

A lot of first-timers assume the flashiest image will age best. I disagree. Small, clear symbols with modest lineweight tend to read longer on the forearm and upper arm, and they cost less time in the chair. I also know people worry about generic compasses, fading fine-line scripts, and whether a piece will be easy to hide for work. Below I start with forearm-friendly, readable designs and move into more private placements and wardrobe pairings you can actually wear every day.
1. Fine Line Compass on Inner Forearm
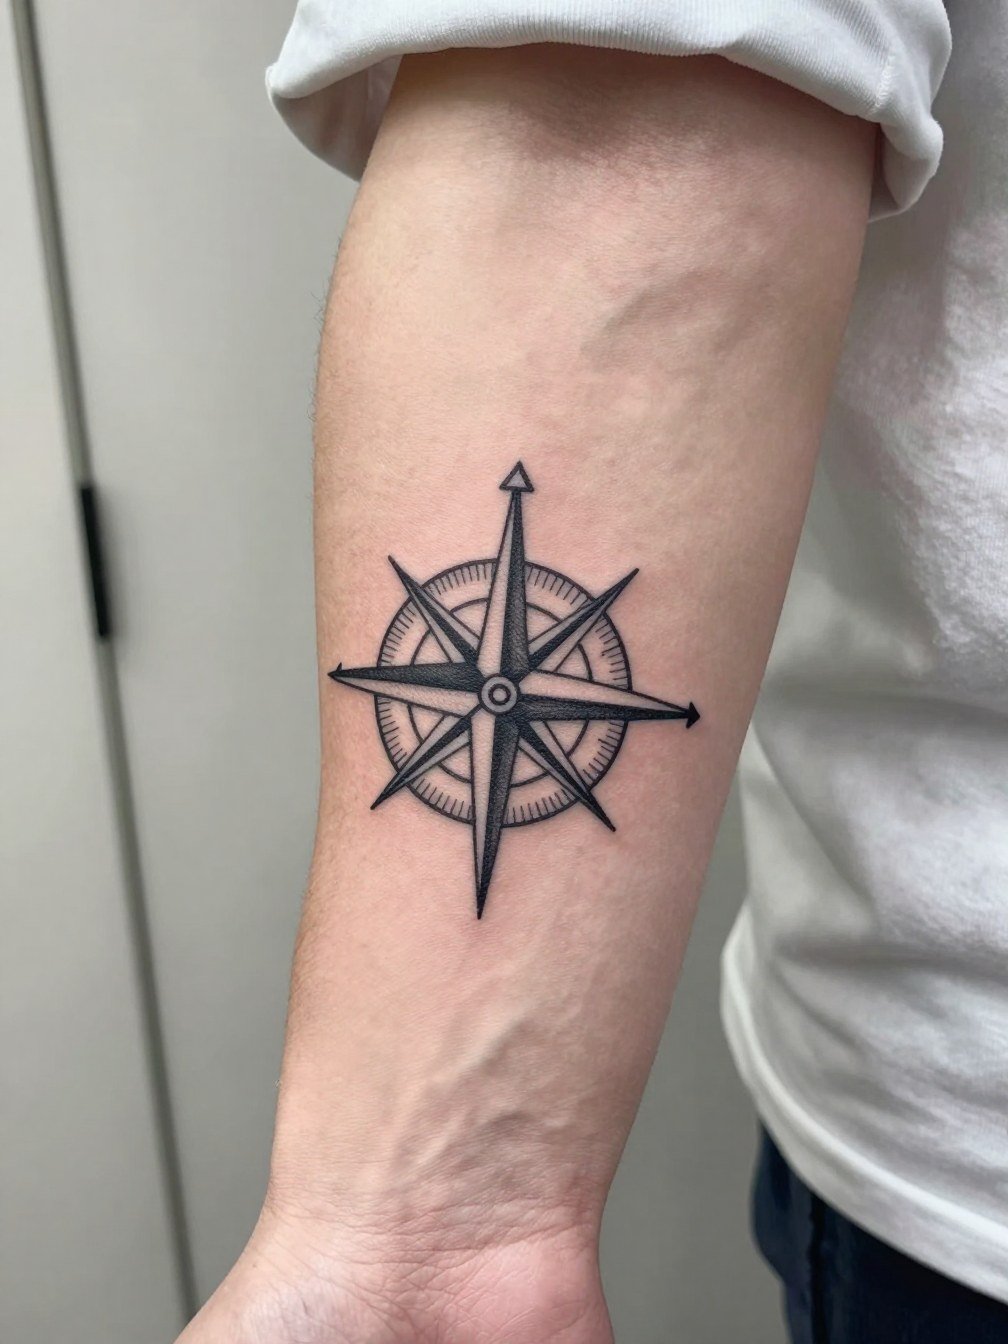
A compact compass reads clearly and occupies a predictable canvas. I recommend a two to three inch size with slightly heavier primary points so the needle holds through touch-ups. Tell the artist you want the primary cardinal points two hair widths thicker than the inner spokes so the symbol resists softening. Common mistake is asking for single-needle filigree across the whole face, which can blur at year two on an inner forearm. The session is short, usually under an hour for a solid stencil and one pass. For showing it off wear a rolled sleeve shirt that frames the palm-up surface.
2. Roman Numeral Date on the Collarbone

A roman numeral date keeps a milestone discreet while reading like a design element. Ask for a tight but legible serif so characters do not compress over time. The usual mistake is placing the date too small under the collarbone where movement and sweat thin the numerals. Expect a medium pain level because the clavicle area lies over bone, and plan a 30 to 45 minute session. For outfits, a wide V-neck or open button-down shows the piece without shouting. Include a layered necklace to visually anchor the clavicle ink.
3. Single-Letter Monogram on the Wrist
A single-letter monogram reads personal while staying subtle. Specify exact capital letter style and ask the artist to space the counterforms slightly wider than your reference so the letter survives expansion over years. A common aging issue is choosing ultra-thin serif strokes that vanish into a blur by year three. The wrist is a high-motion area that sees friction from watches. Session time is brief, often under 30 minutes. For showing off, pair with a minimalist watch on the opposite wrist to balance visual weight.
4. Family Crest on Outer Upper Arm
A crest works well as a medium-size first piece because it allows simplified symbolism without tiny detail. Bring family motifs and discuss which elements to stylize for bold silhouettes rather than intricate linework. A typical mistake is packing the shield with six tiny elements that flatten with time. Outer upper arm tolerates saturation and touch-ups easily. Expect one to two sessions depending on size. For warm-weather display try a muscle tank that leaves the piece visible while keeping it office-friendly under sleeves.
5. Short Quote in Handwriting on Inner Forearm
Handwriting preserves a unique voice, but it must be scaled for reading. Bring the actual handwriting sample and ask the artist to thicken baseline strokes by one step so the loops do not fuse. The biggest mistake is tattooing tiny script without spacing, which blurs into a dark mark after two years. Inner forearm sessions are comfortable and quick, often under 45 minutes. For everyday outfits, rolled-up oxford sleeves frame the script well. Consider pairing with a linen button down for casual workdays.
6. Micro-Realism Wolf Head on Upper Arm
A wolf portrait gives a classic masculine motif while staying mentor-friendly as a first larger piece. Tell the artist you want simplified contrast and a minimum of fine stipple in the darkest zones so saturation reads on darker skin. A common mistake is asking for photo-level fur detail at small scale, which becomes muddled. Sessions run one to two hours for a solid micro-realism piece. For summer display lift sleeves with an open overshirt that frames the shoulder without rubbing the healing ink.
Pre-Session Essentials
The wrist and forearm pieces above heal differently from chest and ribs, so a few small items smooth the session and the first week.
-
Second-skin bandage roll. Useful if your artist supports adhesive barrier methods and you want protection from friction during the initial weeping phase.
-
Pack of disposable paper towels. Handy for blotting after gentle cleansing if you prefer dry-healing techniques and want a clean option.
-
Gentle antibacterial body wash. A mild wash keeps the area clean without stripping ink or causing excess irritation during routine showers.
-
Unscented moisturizing lotion. Apply sparingly only when the tattoo begins to flake and feel tight to avoid over-saturation.
-
Saniderm second-skin bandage. A commonly used brand for short-term barrier protection, but follow your artist's timing precisely to avoid trapped fluid.
7. Raven in Flight on Outer Forearm
Birds read well in motion and the outer forearm gives room for wing span. Ask for strong silhouettes and ask how the wing tips will align when your arm is relaxed. A frequent mistake is over-filling feather detail in tight spaces that later looks like an ink block. Outer forearm tolerates bold blackwork with a low blowout risk compared with fingers and knuckles. Session time is generally under an hour and a half. Pair this look with a fitted tee or a chore jacket that frames the arm without rubbing during healing.
8. Anchor with Subtle Line Detail on Ankle
An ankle anchor is small and symbolic but takes friction from shoes and socks. Choose bold outer lines and simplified rope texture so the piece survives repeated rubbing. The common mistake is requesting ultra-fine rope knots that disappear. Pain is moderate near the ankle bone. Session time is brief. For display wear cropped pants or low-cut sneakers. A cropped pant will put the tattoo in view without constant abrasion from high socks.
9. Tree with Roots on Upper Arm
Trees translate family and growth without text. I suggest a silhouette approach with negative-space root lines that age better than tiny veins. A mistake is cramming too much stipple in the roots at small scale. Upper arm is forgiving for saturation and touch-ups. Session time is typically one hour. This placement looks great with sleeveless layers or a relaxed tee so the piece can peek out casually during summer.
10. Mountain Outline or Hiking Route on Inner Forearm
Mountain outlines are great for etching a specific trip or challenge. If you want a route line, bring GPS coordinates or a rough sketch so the artist can translate it into a readable path that avoids tiny switchbacks. The usual error is compressing the route so it looks like noise when healed. Inner forearm sessions feel mild and are quick. Style this with rolled Henley sleeves for contrast and a men's henley shirt to keep the forearm visible without overexposure.
11. Small Cross on Chest
Religious symbols are straightforward but require placement thought. If placed over the sternum, expect more pain and potential movement from breathing. A common mistake is sizing the cross so small that it softens into a dot with time. Sessions are short but can feel intense near bone. For wardrobe pairing, open-collar shirts keep the area visible without constant friction. Be mindful of cultural origins and treat the symbol respectfully.
12. Arrow or Single-Line Symbol on Wrist
Arrows are clean and read well at small scale. Ask for a slightly heavier shaft than your inspiration so the line does not thin into a fine hairline over time. A common mistake is insisting on a single-needle stroke across a high-friction site, which loses edge. The wrist is sensitive but sessions are very short. Pair with thin chain bracelets on the opposite wrist and avoid anything that will press on the tattoo while it heals. A minimalist watch on the other wrist balances the look.
13. Pet Tribute Portrait on Forearm
Pet portraits carry obvious emotional value, but they must be scaled and simplified to age well. Provide two clear photos from different angles and request an artist mockup that preserves defining shapes rather than hair-by-hair detail. Mistakes happen when people ask for tiny, photo-real fur at three inches. Forearm placement reads well and touch-ups are predictable. Sessions vary by detail. For session comfort wear a loose short sleeve so the artist can access the area without fabric rubbing.
14. Coordinates or Route Band on Inner Wrist
Coordinates encode a memory without words. Give the exact digits you want so the artist can set kerning for long-term legibility. A common error is placing tiny coordinates too close together. The inner wrist has high movement and friction from daily washing, so choose bolder type and expect a touch-up in a year if you want crisp numerals. Sessions are quick. Wear sleeves you can roll easily and consider a thin chain bracelet on the opposite wrist for balance.
15. Botanical Sprig on Inner Bicep
The inner bicep is a good private spot, but it is not the armpit. Ask the artist to keep the stem bolder than the leaf veins to prevent blurring. The mistake is choosing ultra-fine leaf veins without margin. Pain is moderate and sessions are brief. For the appointment wear a tank top so the artist has clear access. Once healed the sprig pairs well with short sleeves and stacked bracelets on the other arm. Consider a muscle tank for display.
16. Geometric Mandala Petal on Shoulder
Geometric work demands spacing. Ask the artist to demonstrate how negative space will look at three and five years. Artists divide on fine-line mandalas here. One camp says tight, single-needle geometry loses crispness in two years. The other camp argues that with slightly wider spacing and measured dot work the pattern holds. If you prefer a safer bet, expand the petal to give the geometry room. Shoulder sessions are comfortable and the area hides under sleeves easily. Try a wide armhole tank when you want to show the piece.
17. Soundwave or Waveform on the Ribcage
Ribcage placements are intimate and high on the pain chart. If you want a waveform, bring the exact audio to ensure the peaks align and the line weight reads at small scale. Fine-line work on ribs is controversial among artists. One camp warns that the skin stretch and movement blur ultra-fine strokes within two years. The other camp says with proper needle depth and slightly wider spacing it settles well, and they will show healed photos. Plan for a longer session and expect a stronger pain experience. Book an experienced artist who shares healed ribcage photos.
18. Minimal Ship Outline on Calf
Calf pieces make great second-first tattoos if you want a larger silhouette. For an outline ship, specify the hull thickness and mast spacing so the thin mast lines do not disappear with time. A mistake is squeezing an intricate rigging design into a small patch. Calf sessions are low-to-moderate pain and allow comfortable positioning. For showing it off in summer, wear cropped shorts so the piece is visible while healed.
19. Dagger with Subtle Color on Outer Forearm
Daggers age well when lines are bold and color is used sparingly. Tell the artist you want muted saturation rather than neon so the color sits with the blackwork as it heals. The usual error is overdoing small color accents that slough off or appear patchy. Outer forearm is forgiving and sessions are typically under ninety minutes. This design pairs cleanly with a fitted tee or a short sleeve overshirt to frame the piece without rubbing.
20. Fingerprint Heart Near the Chest
A fingerprint heart is intimate and distinct. Provide a clear print or ask to stylize it into a heart silhouette so the ridges do not blur into a smudge. The chest area varies in pain and movement. People often request a tiny print that ends up indistinct; ask for modest scale so ridges stay visible. Sessions are short. For visibility wear an open-collar shirt or a button-down shirt with the top buttons undone.
21. Stacked Roman Numerals on the Nape
Nape tattoos are a quiet, easily hidden option. Tell the artist the exact vertical spacing you want and ask to see how it sits with hair down and hair up. A common mistake is underestimating how much the nape moves with neck flexion, which can thin tiny strokes. Expect moderate session comfort and brief duration. For display short hair or hair tied up will reveal the piece. Consider a hair clip for appointment day.
22. Tiny Route Map on Ankle
A map line can reference a hike or route without text. Give the artist the route shape so it is stylized for clarity at a small scale. The ankle receives friction from footwear so choose thicker path weight. People often pick hairline route lines that fade fast. Session time is short. For showing the tattoo in warm months choose rolled cuffs or low sneakers. A low cut sneaker keeps the ankle visible while avoiding excessive rubbing.
23. Celtic Knot Variant on Upper Arm
Heritage knots can be meaningful if handled respectfully. Ask the artist how they adapt traditional patterns into a design that avoids misappropriation and keeps lines bold enough to read over time. The common error is insisting on micro-detail interlace at small scale. Upper arm is accommodating and touch-ups are straightforward. For showing it off wear rolled sleeves or an open overshirt. Note the cultural origins when specifying motifs.
24. Minimal Portrait Silhouette for a Mentor on Upper Chest
A silhouette captures someone without overcommitting to likeness. Bring precise references and ask the artist to reduce detail to strong contours. A mistake is demanding photo realism at small chest scale, which loses definition. Chest sessions can be more sensitive and may require breaks. For wearing after healing open-collar shirts or layered necklaces pair well. Try an open collar shirt for a low-key reveal.
25. Small Wave Line on Wrist or Ankle
A small wave line is a discreet symbol for travel, calm, or a coastal memory. Keep the stroke weight slightly bolder than a hairline and avoid tiny peaks that can merge. Wrist placement means frequent movement and washing, so expect touch-ups sooner than on the ankle. If you plan ankle placement, check footwear friction. Sessions are short and low pain. Wear rolled hems or low-cut sneakers to show the ankle or keep a wrist cuff loose for comfort during the appointment.
Frequently Asked Questions
Q: How should I think about placement if I want visibility but also a professional cover option?
A: Forearm and outer upper arm are the usual compromise because they show naturally with short sleeves and hide under long sleeves when needed. If you need stricter concealment pick the chest or upper thigh. Think about your wardrobe and pick a placement that matches how often you want to see the piece versus how often you need to hide it.
Q: What is a realistic timeline for touch-ups on small first tattoos?
A: Most small black linework looks fine at six months, but expect some softening at two to five years depending on placement and sun exposure. High-motion spots like wrists and ankles often need touch-ups within one to three years. Build touch-up expectations into the design plan so the artist can space linework and saturation accordingly.
Q: How do I find local artists who show healed photos and the exact style I want?
A: Search Instagram and TikTok with style and placement hashtags like #finelinetattoo, #blackworktattoo, #firsttattoo, or #forearmtattoo plus your city name. Use location filters and look specifically for healed photos in portfolios. Reddit threads in r/tattooadvice can point you to artists who post healed results. Prefer portfolios that show the same idea healed on different skin tones.
Q: Saniderm or dry healing which should I choose for a first tattoo?
A: One camp prefers second-skin as an initial barrier since it protects the fresh ink from friction and bacteria in the first days. They point out it can reduce scabbing and handling. The other camp favors dry healing because an occlusive wrap can trap fluid and irritate some people if left on too long. Both approaches are used widely. Follow your artist's specific timing and instructions because mixing methods often causes confusion.
Q: Will fine-line work last on my skin or should I pick bolder outlines?
A: Artists are split on this. One group argues fine-line is more likely to blur because it leaves less margin for error, especially on high-movement skin. The other group says fine-line holds if the design keeps space between strokes and the artist spaces the lines intentionally. If longevity is your primary worry choose slightly stronger lineweight and simple shapes to reduce the risk of early softening.
