
Fine line bee tattoos look crisp in studio photos, but the reality is they often soften with time, tiny pieces can cost more than you expect because of studio minimums, and healed photos rarely match the fresh shot. I wrote this list to favor designs and placements that keep their shape longer, with practical notes on spacing, touch-up timing, and what to wear the day of your session.
1. Single-line Honeybee on the Inner Wrist
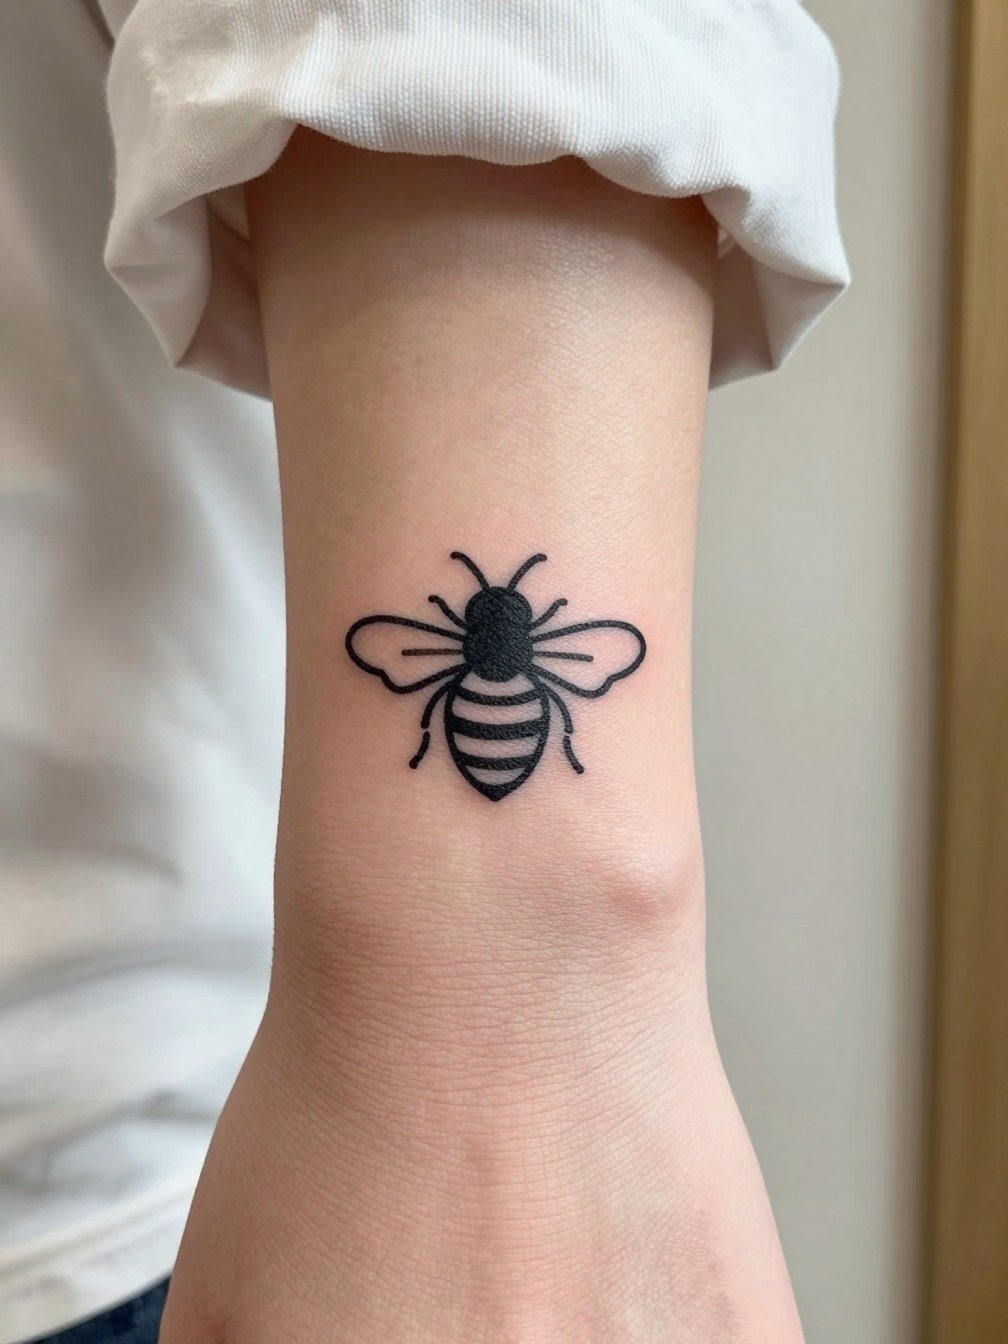
A single continuous-line bee reads clearly at a small scale because there are fewer internal details to blur. Inner wrist sessions tend to be quick, often 20 to 40 minutes, but expect the area to be sensitive during the needle work. The common mistake is packing in stripes or tiny legs that eat space, so ask for fewer internal lines and slightly thicker contour so the shape survives a couple of healing cycles. For the session wear a short sleeve top with the cuff rolled up, and consider styling with a thin chain bracelet on the opposite wrist to frame the piece.
2. Fine Line Bee with Dotted Flight Path on the Outer Wrist
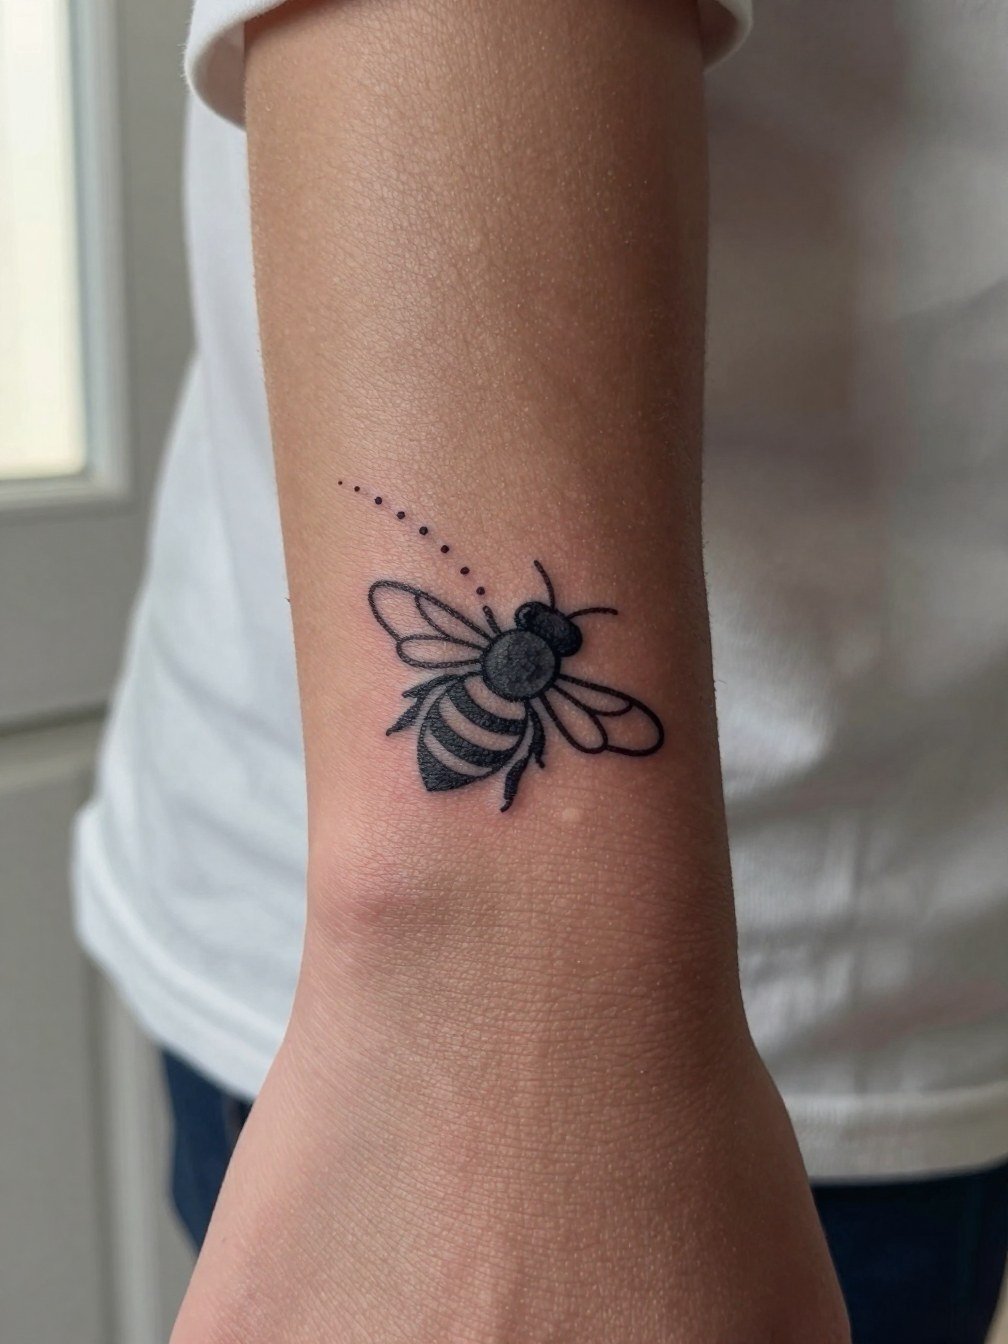
The dotted flight path adds motion while keeping the composition airy, which helps readability as lines soften over the first two years. Outer wrist pieces are slightly less prone to direct sun than the top of the hand, but expect regular washing and light abrasion from watches. A common version that ages poorly overloads the trail with dots. Specify the dot spacing you want and ask how it will read at six months and two years. For showing it off pair this with a minimalist watch on the opposite wrist during outings.
3. Tiny Bee Below the Ear (Mastoid Area)
This spot gives a discreet editorial look but it is micro scale and breathes differently than the wrist. The biggest mistake is trying to cram too many details into the mastoid spot. Expect session time under 30 minutes, and plan for a touch-up window at the one-year mark if you want crisp legs and antennae. For session comfort tie your hair up and wear a top with a normal crew neckline. The show-off pairing is small stud earrings and hair tucked up to reveal the area when you want it visible.
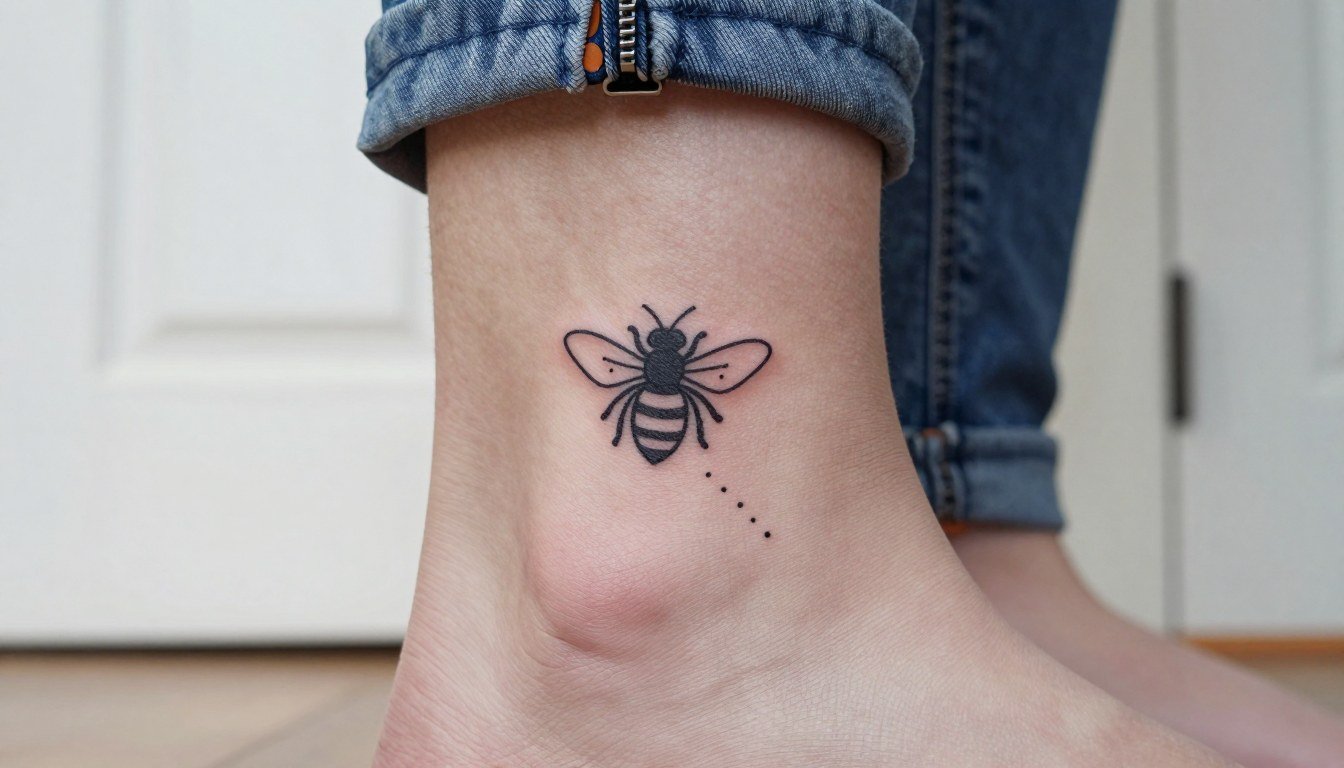
4. Fine Line Bee on the Ankle
Ankle placements hide well but face constant friction from socks and shoes. That friction speeds softening of ultra-fine details, so this placement favors a clean silhouette or slightly heavier contour. The session typically runs 30 to 45 minutes with medium pain reported because of thin skin over bone. For showing it off wear cropped straight-leg jeans or low-top sneakers and try ankle length jeans that expose the area.
5. Fine Line Floral Bee Cluster on Ankle and Foot
Combining bees with flowers softens the design, but more elements mean more risk of internal lines blurring. I recommend a small-to-medium scale where the flowers act as negative-space anchors rather than tight clusters. Foot skin heals differently and will likely need a touch-up as early as 12 months. During the session wear shorts or pants that can be rolled up easily and bring low-profile shoes so the artist can access the top of the foot. To style the final look, cropped pants and low top sneakers work well.
6. Honeybee with Tiny Honeycomb Accent on the Inner Forearm
The inner forearm provides more room, which lets artists use a simple geometric anchor like a honeycomb cell to balance the insect. This layout ages better than dense micro detail because the negative space preserves separation. Expect 30 to 60 minutes of chair time depending on the honeycomb detail. During the session wear a loose button-down with easy sleeve access. For show-off style, roll the cuff and wear a linen button down in cream or olive to frame the piece.
Session Day Picks
The designs above show how wrist, ankle, and inner forearm pieces vary in healing needs, so a few practical items make the appointment and first week easier.
-
Stencil transfer paper kit. Lets you preview placement on skin before the needle hits, which matters for those inner wrist and collarbone stencils discussed above.
-
Topical numbing cream. Applied as directed ahead of a sensitive wrist or sternum session it reduces flinching and keeps the lines steadier.
-
Thin protective film roll. Useful for the first 24 hours on ankle and foot pieces where shoe friction is a worry.
-
Fragrance free gentle body wash. A low-irritant cleanser for daily showers that helps protect fine line work during healing.
-
Aquaphor healing ointment. A mainstream option many people use for the initial thin layer in the first few days to keep micro linework hydrated.
7. Micro Bee with Generous Negative Space
Tiny bees look charming at first but they are where the fine line longevity debate gets heated. One camp argues that ultra-thin micro work blurs and spreads within a few years, especially when legs and stripes are included. The other camp counters that if the artist simplifies the composition and gives more negative space, the micro piece will hold its shape much longer. For this design specify how many internal strokes you want and request a healed photo from the artist of a same-scale piece to compare the real-world wear.
8. Fine Line Bee with Small Flower Companion
A companion flower provides context and helps the bee design feel custom. The common error is over-detailing the petals at micro scale. For a more durable result pick one simplified bloom and limit petal veins to two or three. Session time is usually 30 to 60 minutes depending on flower size. For outfits that highlight the arm, try rolled-up linen shirts in neutral tones and add a gold bangle set to emphasize the wrist-to-forearm flow.
9. Geometric Bee on the Forearm
Geometric approaches trade organic filigree for cleaner shapes that often age better because lines are deliberate and spacing is precise. The forearm gives room for a medium-small composition so the triangles and honeycomb retain separation. A common mistake is scaling the geometry too small. During consultation bring scaled sketches and ask how the pattern reads at a three-inch width. For a casual look push your sleeve up and pair with a boxy tee.
10. Fine Line Bee on the Collarbone
Collarbone skin moves and sees sun, so tiny lines can soften faster here. I recommend a slightly bolder contour with minimal interior detail. Expect moderate pain and shorter session time under 45 minutes for a small bee. For your appointment wear a scoop or square neckline top that exposes the area naturally. For styling pair the placement with a delicate layered necklace and try a scoop neck top to frame the piece.
11. Forearm Bee with Botanical Framing
This composition uses the forearm length to balance the bee and plant elements so the design breathes. When done correctly the botanical framing gives the bee room to read even as stipple softens. The aging timeline often shows stipple fading by year three while linework remains, so plan for a possible touch-up for stipple if color balance matters to you. Session time is typically 45 to 90 minutes depending on botanical detail. A rolled-up linen shirt in neutral tones complements the look for daytime wear.
12. Single Bee with Restrained Watercolor Accent
Color accents can make a bee feel livelier, but color washes fade faster than black linework. One camp says watercolor adds personality and is worth the maintenance. The other camp cautions that color will need more touch-ups and may shift in tone over time. If you prefer the color route request a small, restrained wash rather than saturated fills. For session wear a short sleeve top to expose the outer arm and consider a boxy tee for a relaxed showing-off look.
13. Bold-Outline Bee as a Longevity Alternative
Thicker outlines are often recommended for people who want less blur over time because they hold contrast longer. One camp argues that ultra-fine single-needle bees are too fragile and will look smudged in a few years. The other camp maintains that fine line can settle fine if spacing and line weight are handled carefully. If longevity is a priority choose a cleaner, bolder contour and say precisely how much interior detail you want removed. For a simple outfit pairing, push your sleeve up and wear a slouchy tee.
14. Tiny Bee Behind the Ear
Behind-the-ear bees are very discreet and often chosen for editorial impact when hair is up. They are low-friction but micro scale means fine antennae may disappear over time. The session is short and pain is generally low. A practical consultation point is to request a slightly heavier antenna line and to see healed examples on similar skin tones. For appointment prep use a hair tie and wear a top that will not rub the neck.
15. Geometric Honeycomb Accent on the Upper Arm
Upper arm skin is forgiving and gives artists room to keep lines a bit finer while maintaining readability. Honeycomb geometry pairs well with this area because the cells keep the composition orderly. The mistake is shrinking geometric elements too small. For a clear result ask the artist to map the pattern at the scale you want and to mark the flow with your arm relaxed. During warm-weather outings a tank top and a loose drawstring linen pant complete the casual look.
16. Mini Realism Bee on the Side Ribcage
Ribcage placements take longer and are more painful, but they also offer space for subtle realism that stays recognizable if scaled correctly. The big pitfall on the ribs is making the bee too small or too detailed. Plan for a 60 to 120 minute session depending on shading. For the appointment wear a fitted cropped top that lifts easily and consider a loose sports bra in normal position for access. Remember ribs may require a touch-up once healed due to movement in that area.
17. Medial Inner Thigh Bee with Floral Accent
Inner thigh placements are intimate and tend to stay protected from sun, which benefits line longevity, but they can also see friction from tight clothing. For this spot avoid ultra-fine detail and choose broader negative space around the bee. Session comfort is a priority, so wear shorts that can be moved without tugging. Because the tattoo is mostly private, think about jewelry choices like an anklet for style points rather than daily display.
18. Tiny Bee on the Back of the Neck (Nape)
The nape is a sweet spot for small bees that you can hide with hair or reveal at will. Extra-fine detail can disappear as the hairline moves with age and skin tension. A single clean contour with a tiny interior stripe often lasts better. For the session tie hair up and wear a top with a normal neckline for easy access. If you show it off, a hair claw clip and crew neck tee keep the look editorial.
19. Fine Line Bee on the Thumb Side of the Hand
Hand and finger tattoos face constant washing and sun exposure, so fine lines here are prone to fading or blur. If you want a hand bee expect to plan for touch-ups every one to three years. The pain is moderate and the session short. For the day of the appointment keep the hand clean and avoid rings that might bump the area. Minimal jewelry like a simple ring on the opposite hand helps keep attention balanced.
20. Stippling Bee over the Sternum
Sternum work can be high on the pain chart and requires careful staking of negative space to keep fine lines legible. Stipple shading adds depth without heavy saturation, but stipple fades faster than solid linework. Bring a numbing strategy if needed and plan for a longer session. A fitted sports bra worn normally helps the artist access the area comfortably.
21. Small Bee in Geometric Circle on the Upper Thigh
Upper thigh gives privacy and room, so you can afford fine detail that would not survive on the wrist. The circle provides a clean boundary that helps the bee remain readable as lines soften. Session time is usually under an hour for a small circular piece. For the appointment wear high-rise bottoms that can be lowered slightly without tugging and finish the look with soft loungewear.
22. Tiny Bee with Minimalist Script Date on the Inner Forearm
Adding a short date or single word next to a bee requires precise scale control. Text at small sizes can blur into an indistinct mark, so ask the artist to show you the exact font size on paper and on skin stencils. The inner forearm is a forgiving canvas and lets you compare the word at three inches versus five inches. For session wear a loose button-down that rolls easily and consider a rolled cuff shirt to style the forearm.
23. Fine Line Bee with Honey Drip Accent on the Calf
Calf pieces see less daily abrasion than ankles and hands, so fine detail has a better chance to last. A drip accent adds a decorative anchor and keeps the composition from feeling like a floating sticker. Plan for a session of 30 to 60 minutes depending on shading. For showing the piece wear cropped skirts or high socks and consider cropped straight pants to reveal the area.
24. Minimalist Bee over the Heart
A small bee over the heart is an emotional placement for many, but from a longevity standpoint the chest sees movement and sun, which can soften micro lines. Ask for the design to have a sturdy outer contour and minimal interior crosshatching. Session time is usually under an hour. For the appointment wear a tank or bra that does not rub the sternum and style with delicate layered necklaces for a refined look.
25. Botanic Wreath with Central Bee on the Shoulder Blade
The shoulder blade is a forgiving canvas that handles stipple and tiny leaves well when scaled properly. Wreath compositions age well if the wreath is open rather than tightly packed. The most common mistake is cramming in too many tiny leaves. Session time varies from 60 to 120 minutes based on wreath complexity. For showing it off try open-back tops and layered necklaces to keep the area elegant.
26. Tiny Bee with Concentric Rings on the Upper Chest
Concentric rings can create a custom badge around the bee, which helps readability as the center softens. Keep the rings thin but not hairline so they maintain contrast after a few years. This area is visible and photographs well, so consider the necklace choices you usually wear. For the session a square-neck top keeps access simple and a layered necklace pairs nicely with the placement.
27. Tiny Bee with Whip-Shaded Wing Details on the Upper Arm
Whip shading adds motion and a light texture that can age more subtly than heavy gray fills. The upper arm tolerates light shading well and the wings can keep their shape if the artist spaces strokes properly. A common mistake is overworking the wings with tiny hatch marks. For the appointment wear a loose tank and style with an overshirt pushed up the sleeve for a relaxed look.
28. Small Bee with Honeycomb Band on the Wrist
A honeycomb band anchors a bee and acts like a tiny bracelet that photographs nicely. Wrist bands must be wide enough for the cells to breathe or they will blur together. Specify the cell size you want and ask to see a healed example at similar scale. For daily wear pair with a slim watch on the opposite wrist and choose a minimalist watch for balance.
29. Micro Bee with Generous Line Weight on the Inner Wrist
This final micro idea opts for a slightly heavier single-needle contour to preserve the bee shape longer while keeping a minimalist look. Inner wrist sensitivity is real, and the session is usually short. The common mistake is asking for hairline detail that disappears. Specify the minimum line width you want and ask for a healed example at that width to reduce surprises. For a refined outfit finish consider thin chain bracelets on the opposite wrist to frame your piece.
Frequently Asked Questions
Q: How should I brief an artist so a fine line bee reads well in five years?
A: Bring two reference images showing the design at different scales, and ask the artist to map line weight and negative space on your skin with a stencil so you can see how it reads. Specify which interior details you want removed or thickened, and request healed photos of same-scale work on similar skin tone to set expectations.
Q: Are watercolor accents a bad idea for a bee if I want low maintenance?
A: Watercolor accents look soft and decorative but they require more maintenance because the color can fade faster than black. If longevity matters choose restrained washes, not saturated fills, and plan for touch-ups in a few years. If you prefer minimal upkeep stick to black-and-gray linework with careful spacing.
Q: Where can I find healed-photo portfolios and local fine line artists?
A: Search Instagram and TikTok hashtags like #finelinetattoo and #beetattoo with your city name to narrow results, and check Reddit communities for healed-photo threads where users post multi-year shots. Studio websites often show fresh portfolios, so prioritize posts labeled "healed" or "after" to compare real-world wear.
Q: Will a tiny bee cost less than a medium one?
A: Tiny pieces can still hit shop minimums and sometimes cost the same as a small medium piece because of setup and sterilization. Expect pricing to depend more on the studio schedule and minimum than strictly size, so budget for at least a studio minimum even for micro work.
Q: What should I wear to my appointment for a collarbone or sternum bee?
A: For collarbone and upper chest spots wear a scoop or square neckline in its normal worn state so the artist can access the area without tugging. For sternum work a fitted sports bra that stays in place works well for access and comfort. If you want a styling piece to layer later try a delicate layered necklace.
