
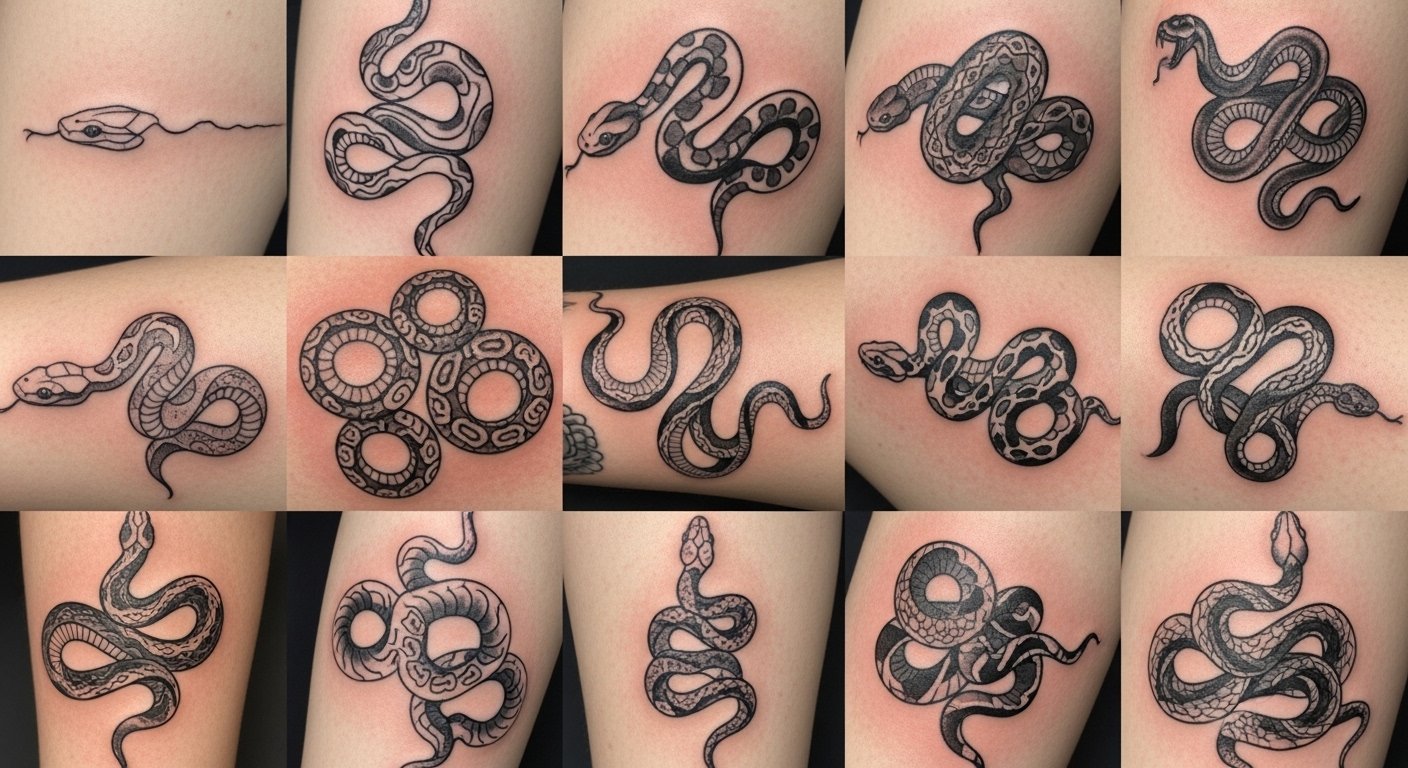
I spent months bookmarking snake tattoos and sitting with flash sheets before I realized my problem. It was not picking a cool snake. It was choosing a style that reads dangerous after healing, not just in that first week. These 20 snake tattoos are the ones I keep seeing on artists' portfolios in 2026, the ones that still look sharp months later.
This list leans into bold, dark snakes and the thinner risky styles that still hold up. I focus on placements that show off motion, like forearms, ribs, and the neck. From what I’ve gathered, artists are favoring strong silhouettes and negative space over tiny, fussy detail that blurs. If you want danger that still looks intentional after two years, these ideas will help you pick the right visual and placement.
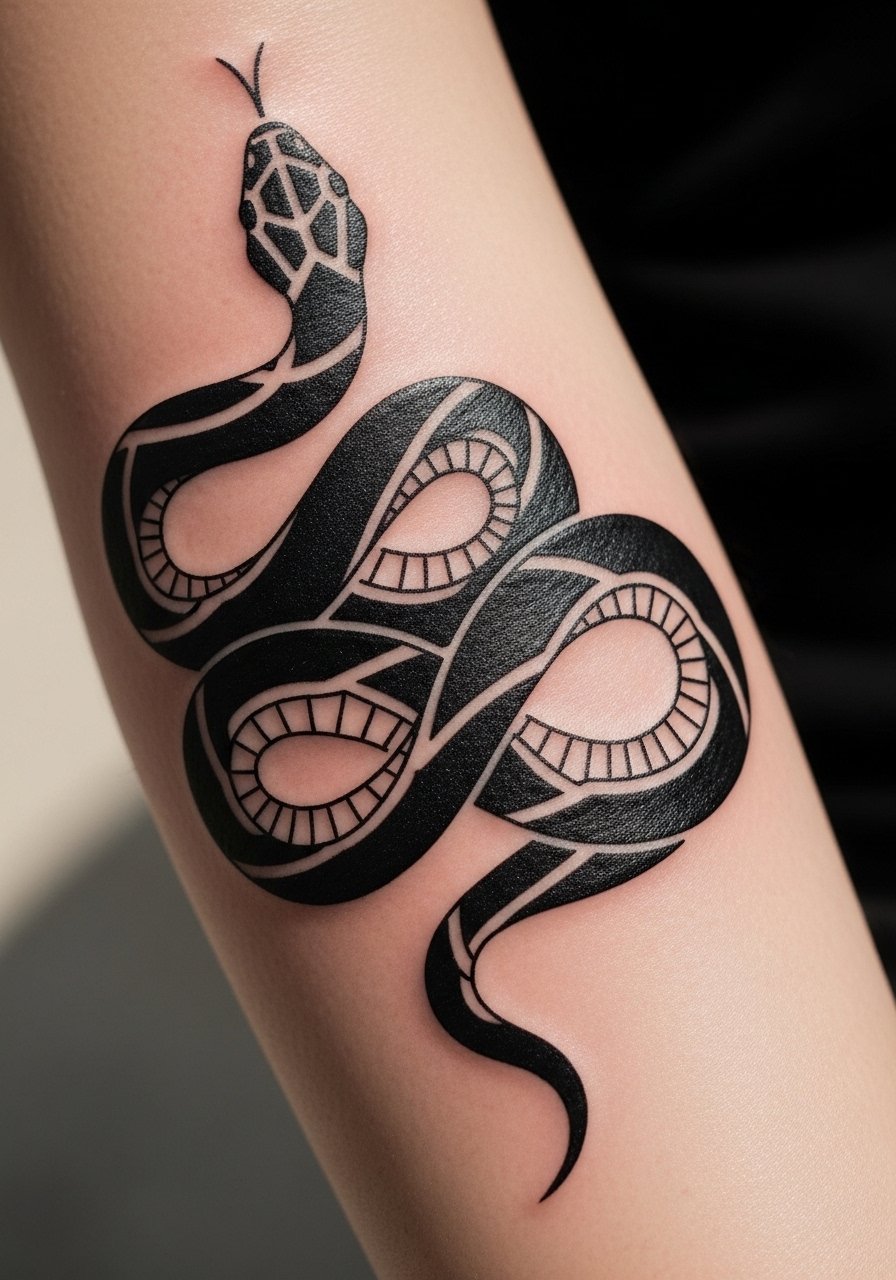
1. Fine Line Snake Wrap on Inner Forearm
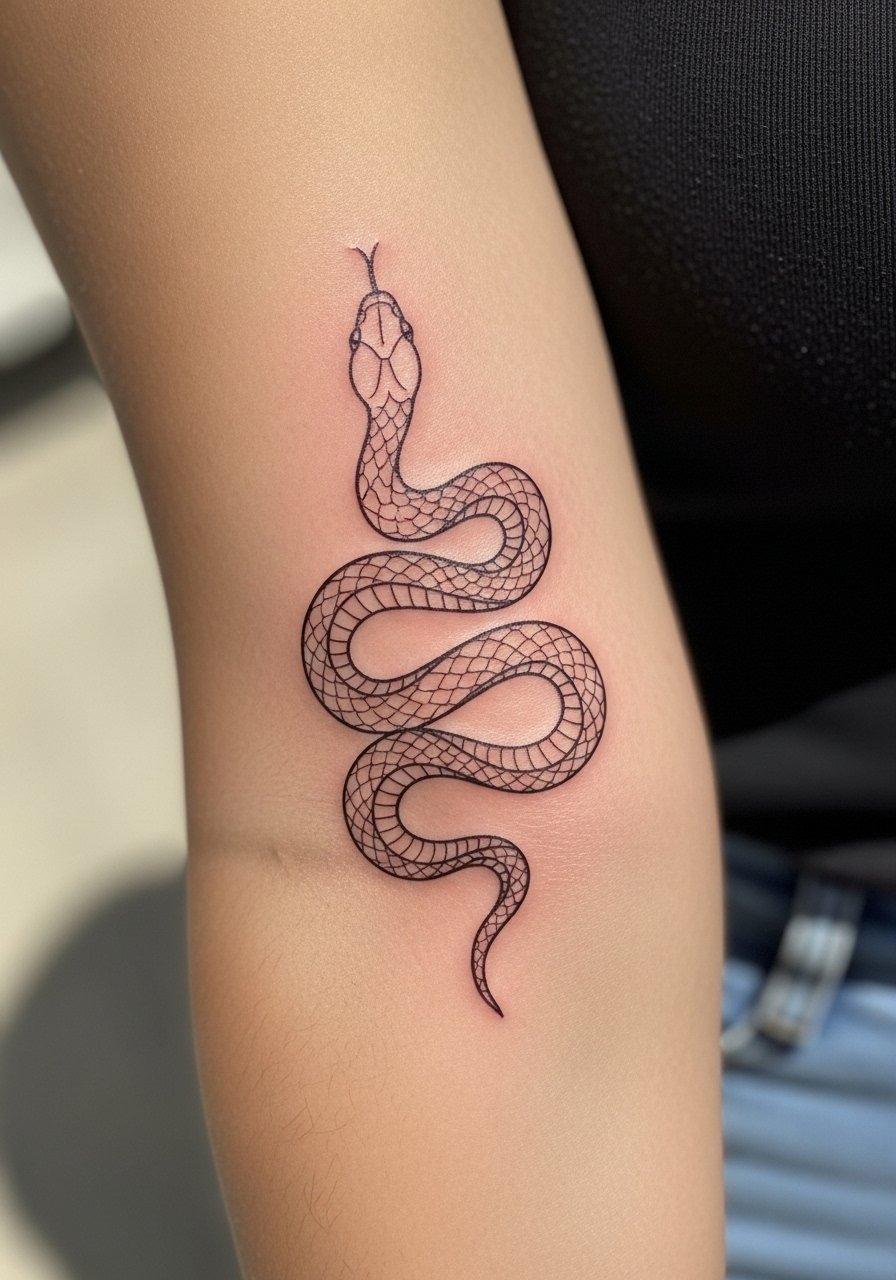
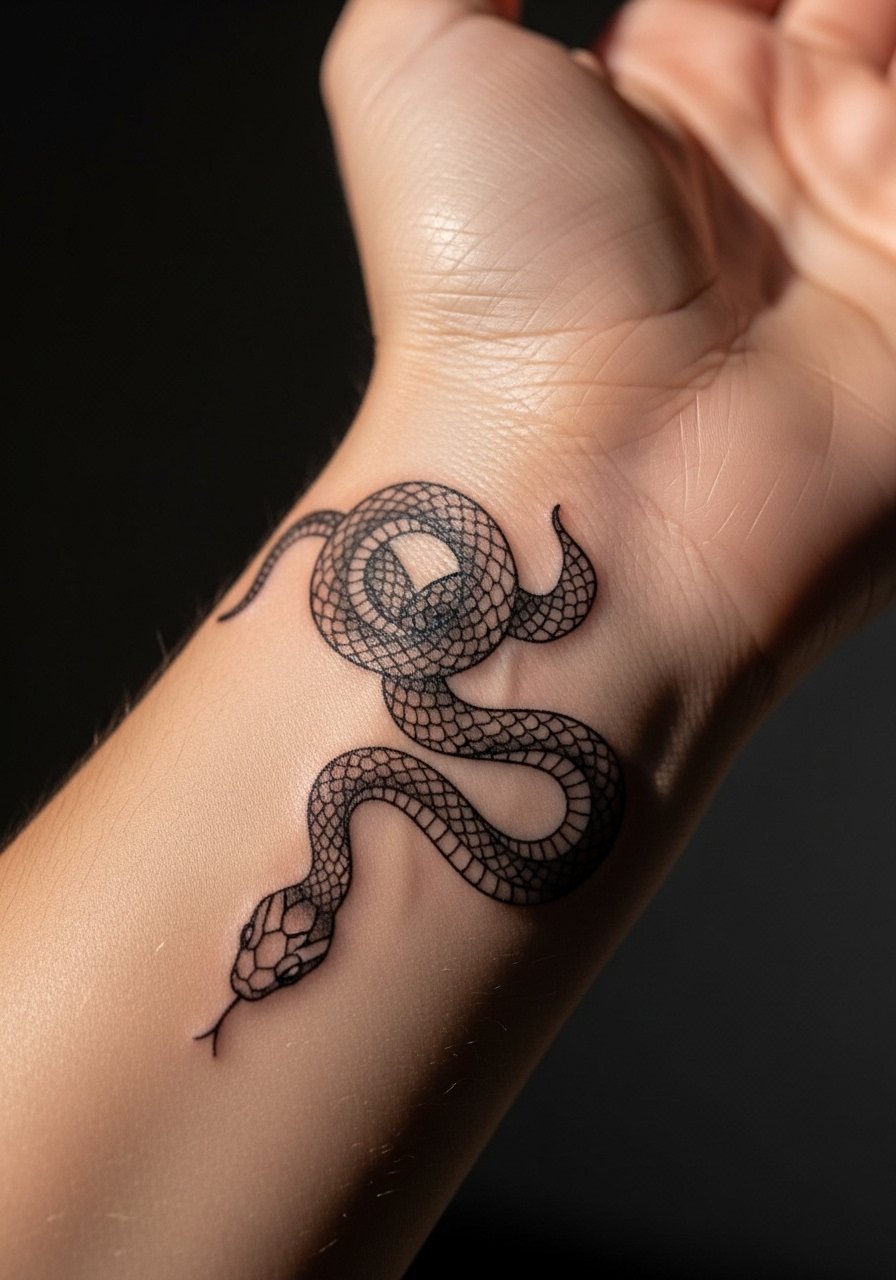
I first saw this on a friend and it read like a whisper of danger. Fine line style makes the snake feel elegant, but expect higher blur risk over time. Ask your artist to use slightly bolder primary lines around the head. That gives the design a readable silhouette as it settles. Pain on the inner forearm is mild to moderate. Sessions are short, often one hour. For healing, I used a thin coat of Aquaphor at night. A common mistake is asking for too many tiny scales. They merge after a year. If you want a version that lasts, request sparse scales and defined negative space between coils. It reads different if placed on the outer forearm. Outer placement lives longer and tolerates denser detail.
2. Traditional Snake And Dagger On Upper Arm
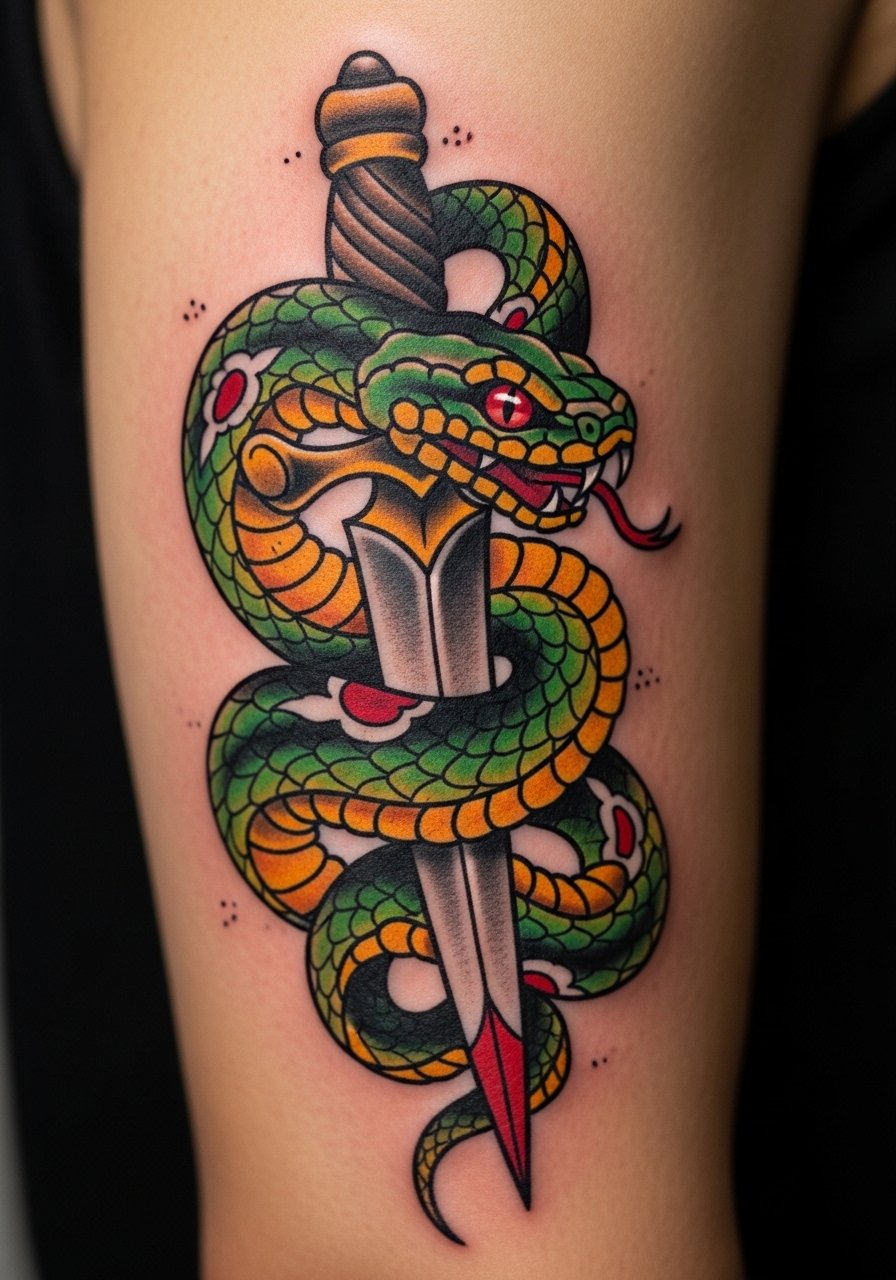
Bold black outlines make traditional work from across a room. I saw this design in classic flash books and on motorcycle jackets. Expect moderate pain on the upper arm. The session usually takes two to three hours depending on color. Tell your artist you want heavy black outlines and solid color fills. That keeps the dagger and snake readable as pigments fade. A mistake I see is using too many small color gradients that look muddy after two years. For a timeless feel, keep the palette limited and the line weight consistent. If you imagine sleeve continuity, ask how this piece will sit with future work.
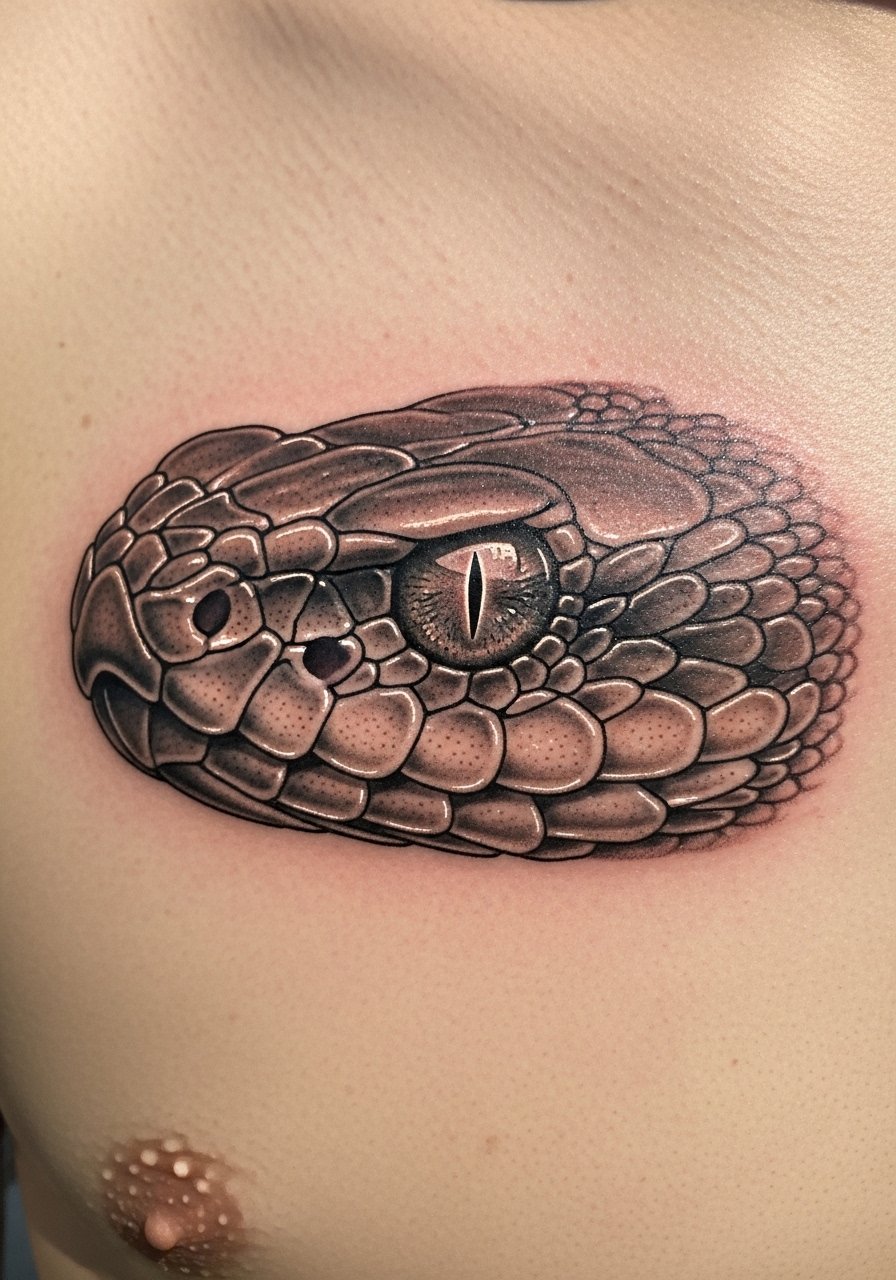
3. Micro-Realism Ouroboros On Sternum
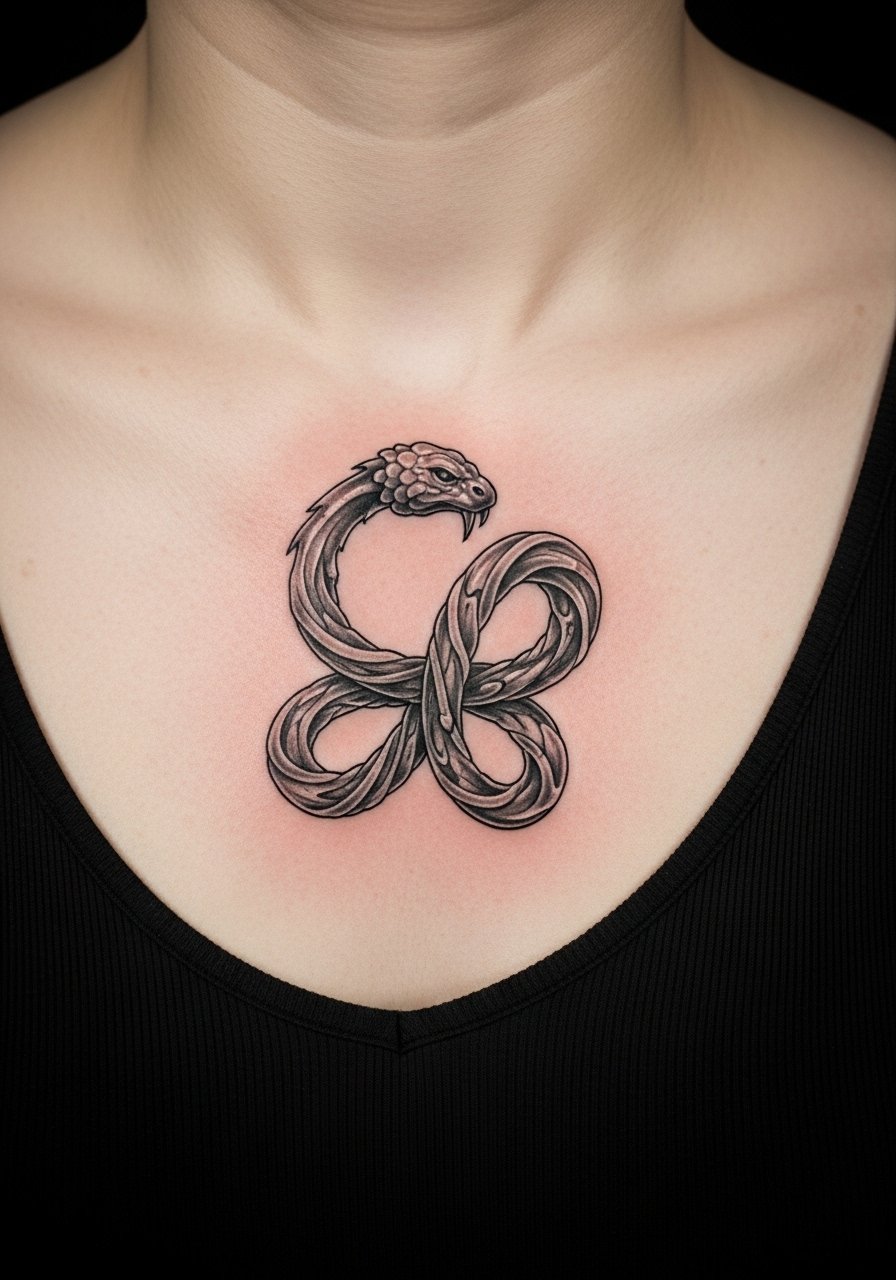
Fair warning, sternum work is painful. I have sat through one and can attest to that. Micro-realism gives the ouroboros a hypnotic, dangerous feeling. Plan for a longer session or two short ones. Tell your artist you want high contrast between the head and tail. That ensures the circular shape reads after six months. Many people make the mistake of asking for ultra-fine highlights that vanish. A better call is to preserve small dark anchor points. Healing tends to take two to three weeks for surface scabbing and six months for full settling. For placement, the sternum lets you center the piece under clothing for dramatic reveal.
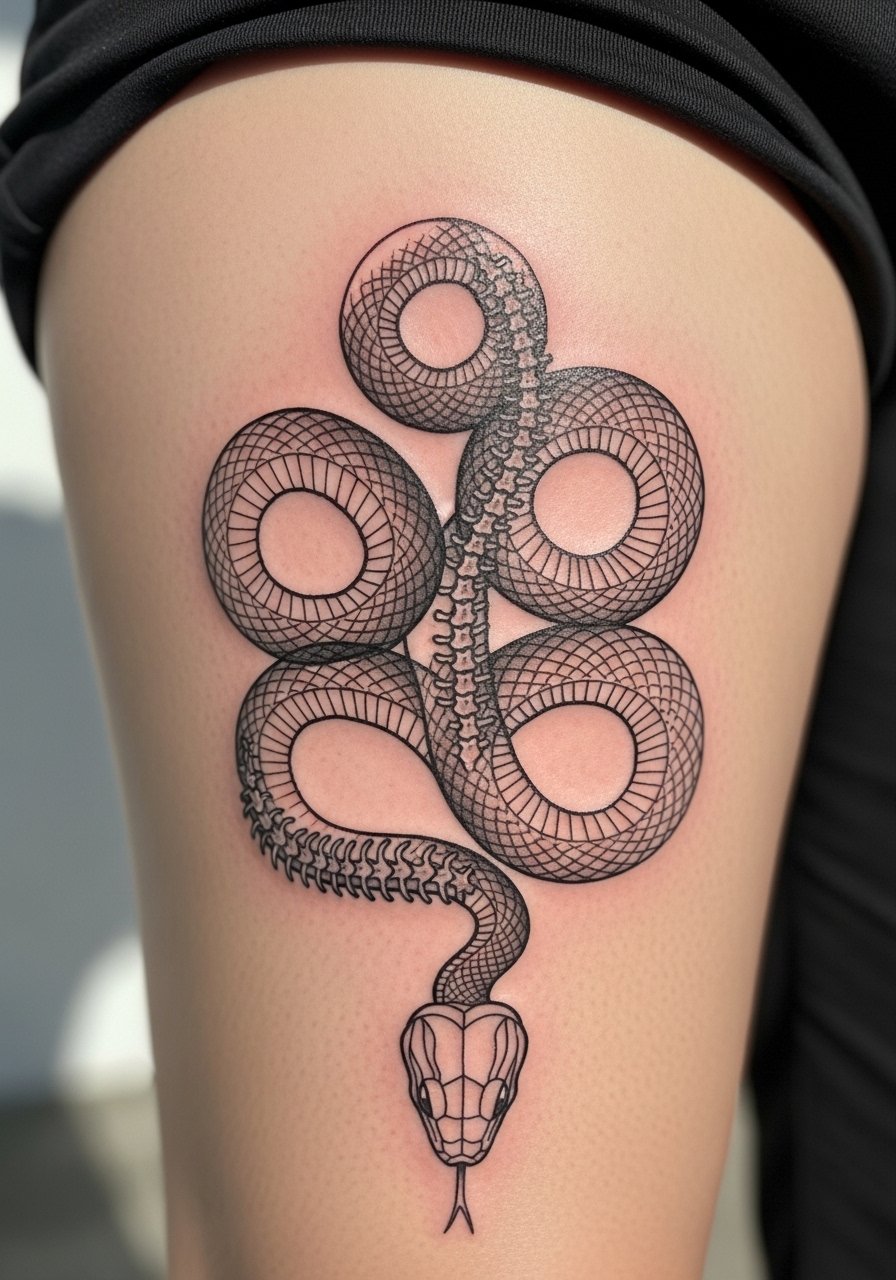
4. Blackwork Coiling Spine Snake on Back
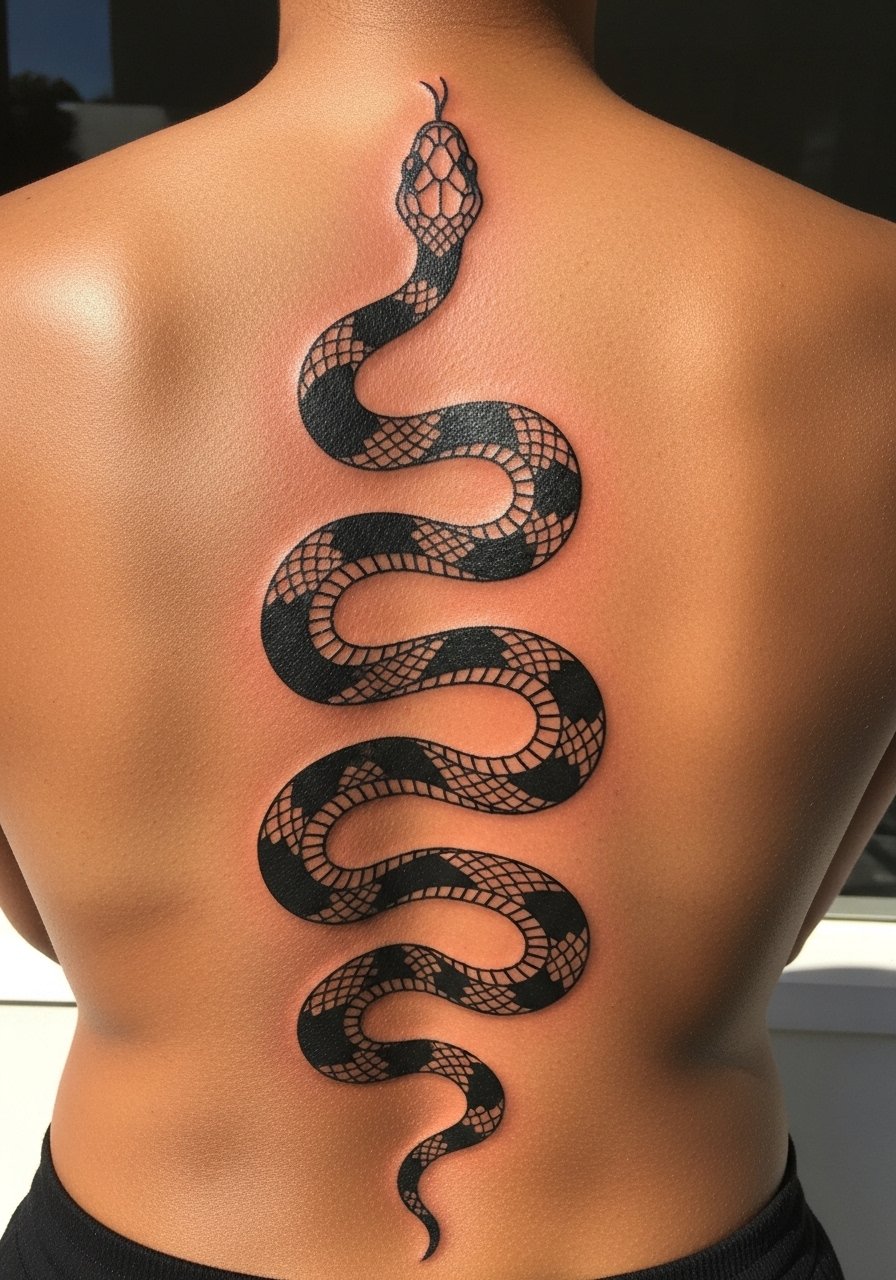
There is a brutal elegance to a vertical blackwork snake down the spine. I noticed artists using thicker fill around the vertebrae to emphasize movement. Pain on the spine is high, expect a few sessions. Ask your artist to plan negative space between coils so the body does not become a single black block as it ages. A common error is overfilling the gaps. That causes the whole piece to read flat after two years. In my experience, blackwork needs touch-ups less often if the initial fill is dense and consistent. The spine placement creates a posture-dependent motion in photos that feels threatening.
5. Watercolor Snake With Flowers on Thigh
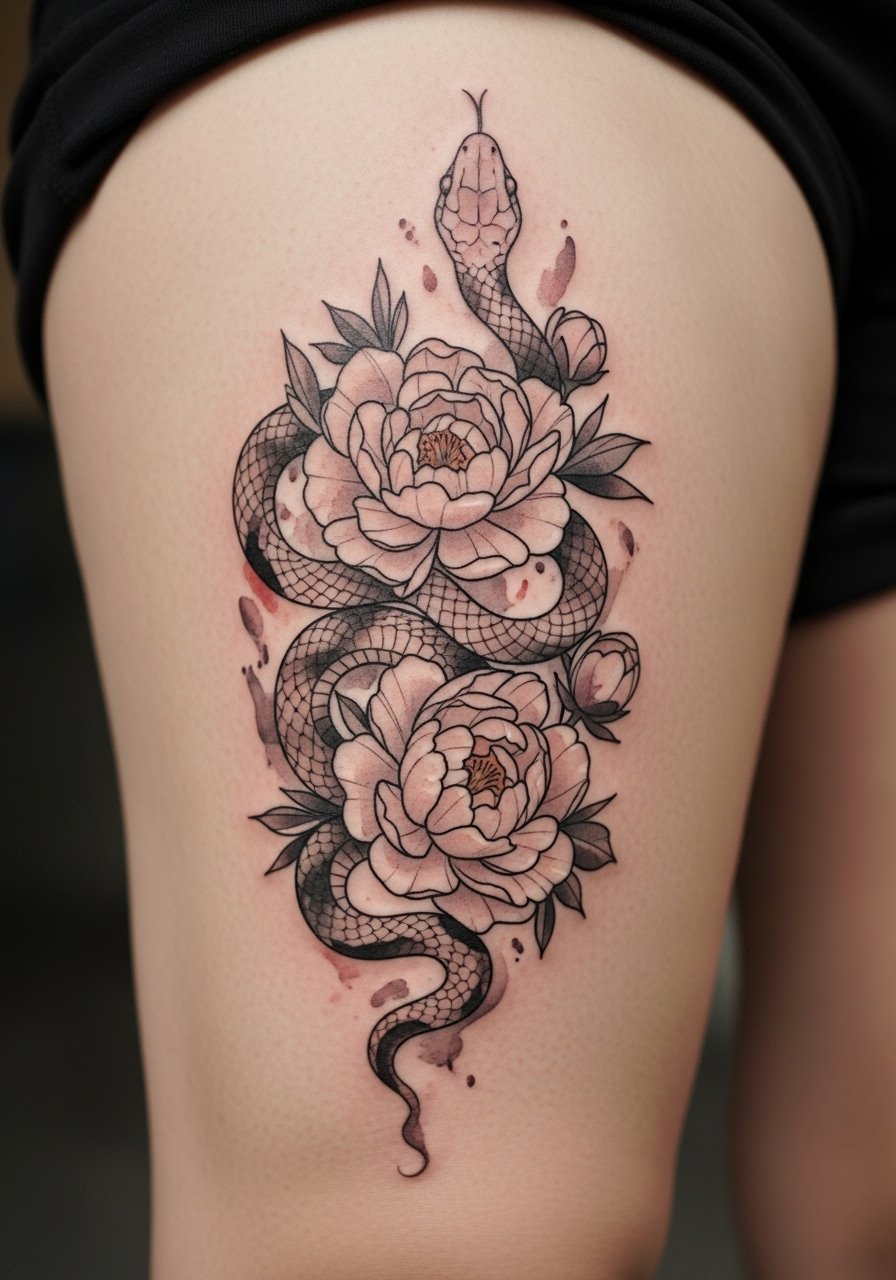
Watercolor techniques look volatile and dangerous because colors bleed into one another. I like this on the thigh because the surface gives room for splashy color and softer edges. Pain there is moderate. Tell the artist you want anchored linework around the head and tail. That keeps the composition legible after pigments spread. The trade-off is that watercolor areas will soften by year two. A version I recommend uses a combo of watercolor fills with crisp ink outlines. That approach ages better. People often ask for entirely watercolor snakes with no anchors. Expect them to blur into color washes after a few years. Thigh placement allows easier touch-ups if you plan for that.
6. Minimal Single-Line Snake Behind Ear
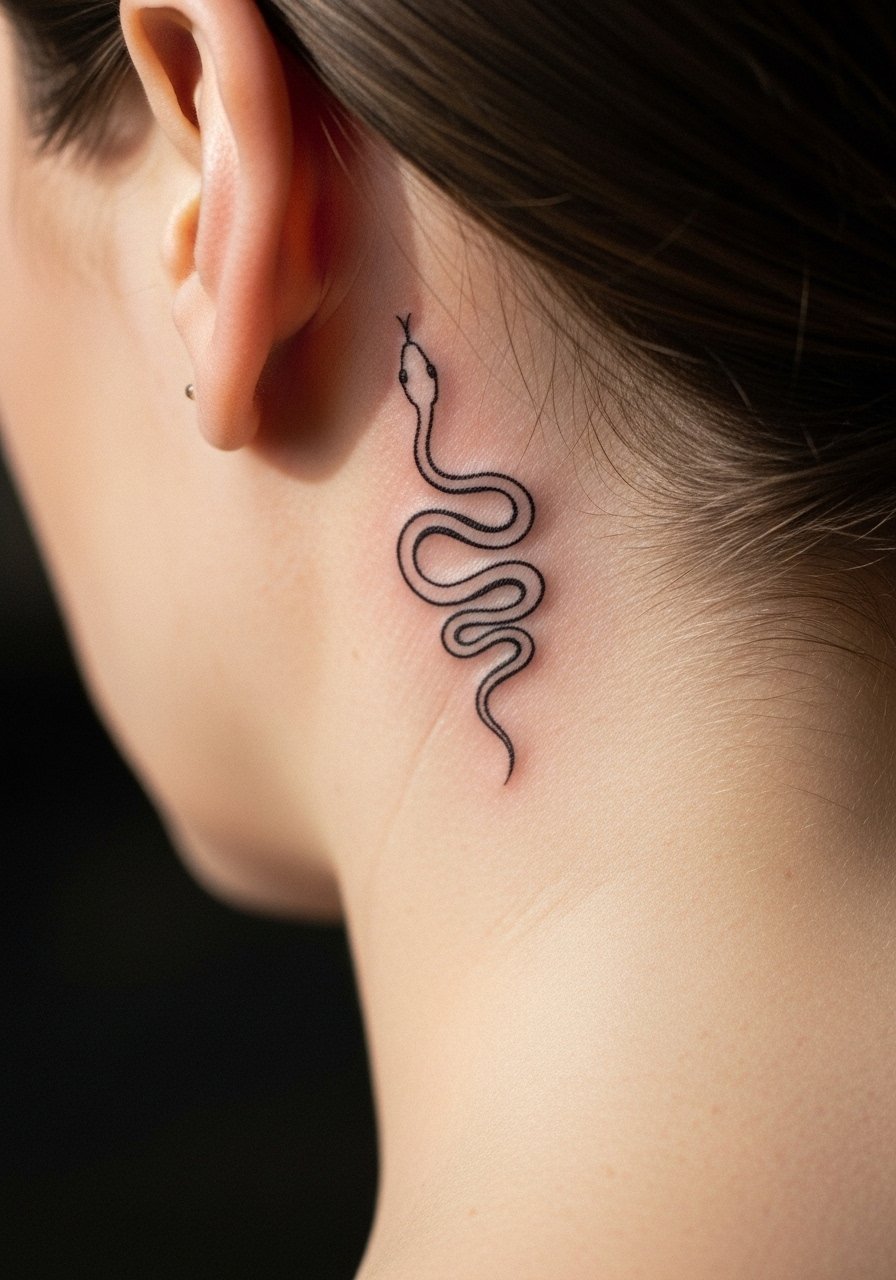
I spotted this at a barbershop and it read like a secret bite. The behind-ear spot is discreet and quick, but pain is sharp and local. Sessions are under 30 minutes. Ask your artist for a slightly heavier primary line than on paper. Fine single lines can vanish in this area after a year. The common mistake is asking for a perfectly hairline stroke. Get a small boldness and keep the curve simple. Healed, it keeps its minimal menace. If you later want expansion, the behind-ear piece connects well with nape work.
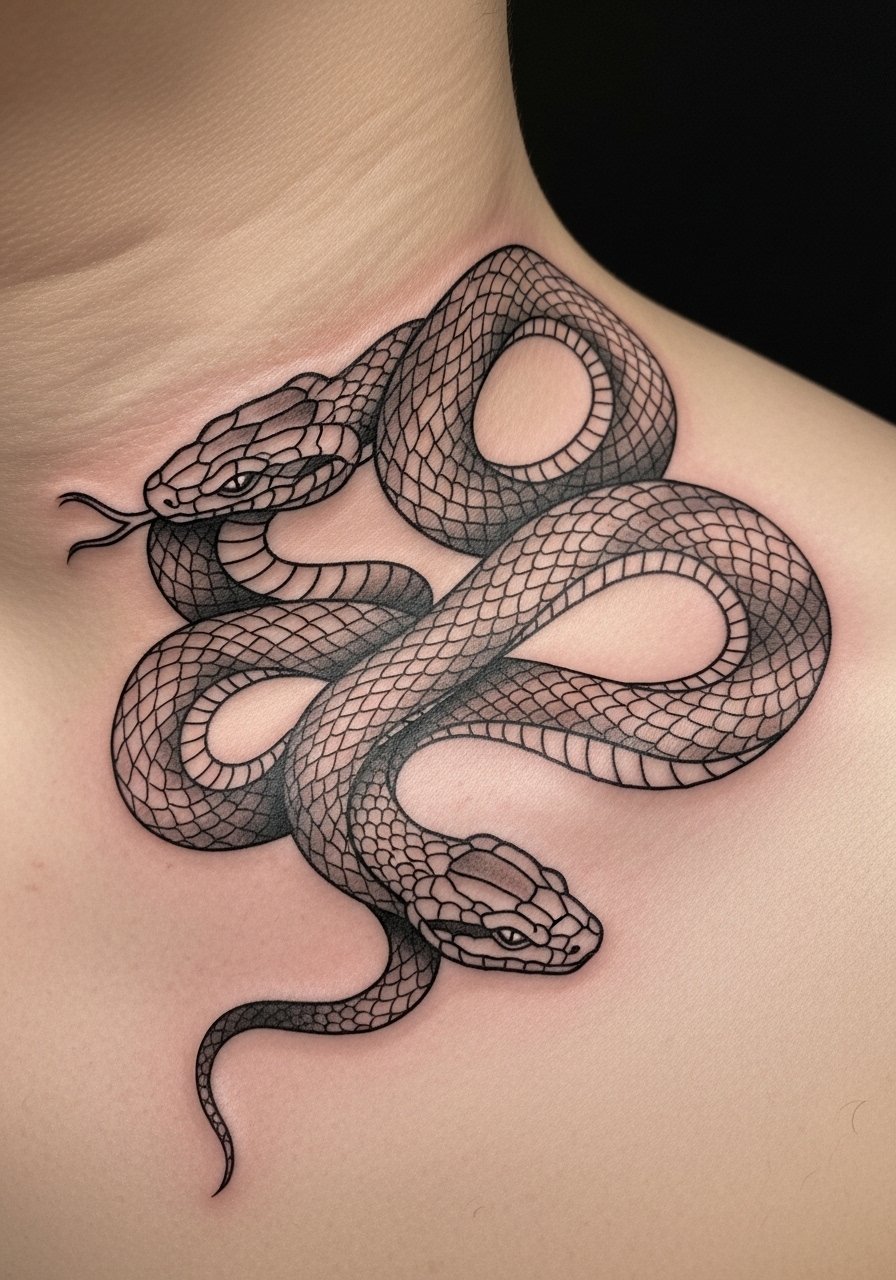
7. Japanese Irezumi Snake Panel on Back
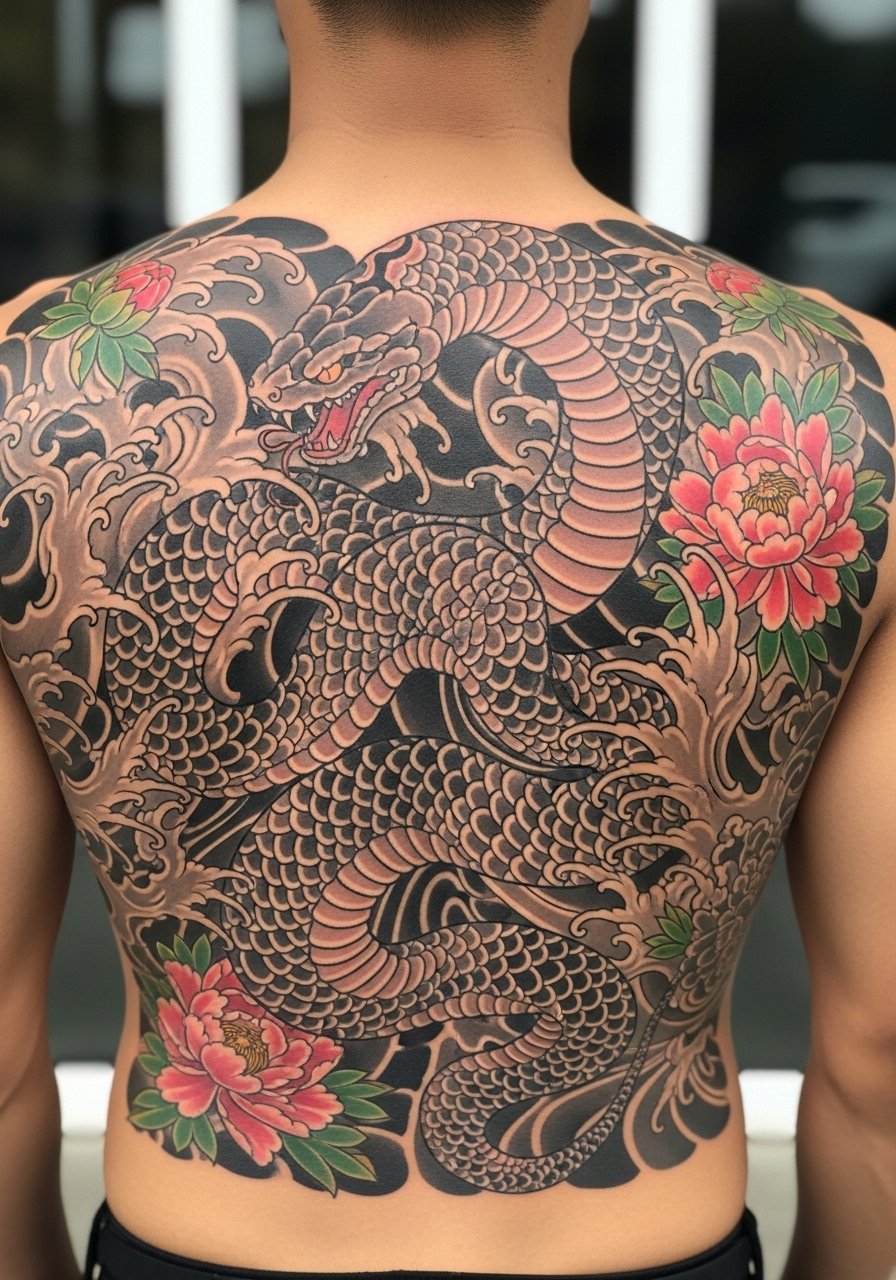
Traditional Japanese snakes read mythic and dangerous. I saw a full-panel version at a convention and it dominated the room. Expect multiple long sessions and moderate to high pain across the back. When you consult, bring reference of scale pattern and background waves. I advise asking for bolder outlines on the snake and softer backgrounds. That prevents the snake from getting lost as background pigment fades differently. A frequent mistake is over-detailing scales without contrast. That blurs into visual noise after a few years. Back panels heal unevenly, so planning placement relative to spine and shoulder blades matters for longevity.
8. Geometric Snake Forearm Band
Seeing a snake built from geometry changed my approach to snake tattoos. The forearm band reads like armor. Pain here is moderate. Sessions vary from one to two hours depending on symmetry. Tell your artist you want consistent spacing so the band reads continuous when the arm moves. Many clients ask for ultra-fine triangles and dots. Those elements can soften and muddy. The fix is to make the primary shapes bold and the micro-patterns secondary. I have seen band pieces age well when the negative space stays clear. Forearm bands are great if you want a repeatable look across multiple sessions.
9. Neo-Traditional Snake And Skull on Calf
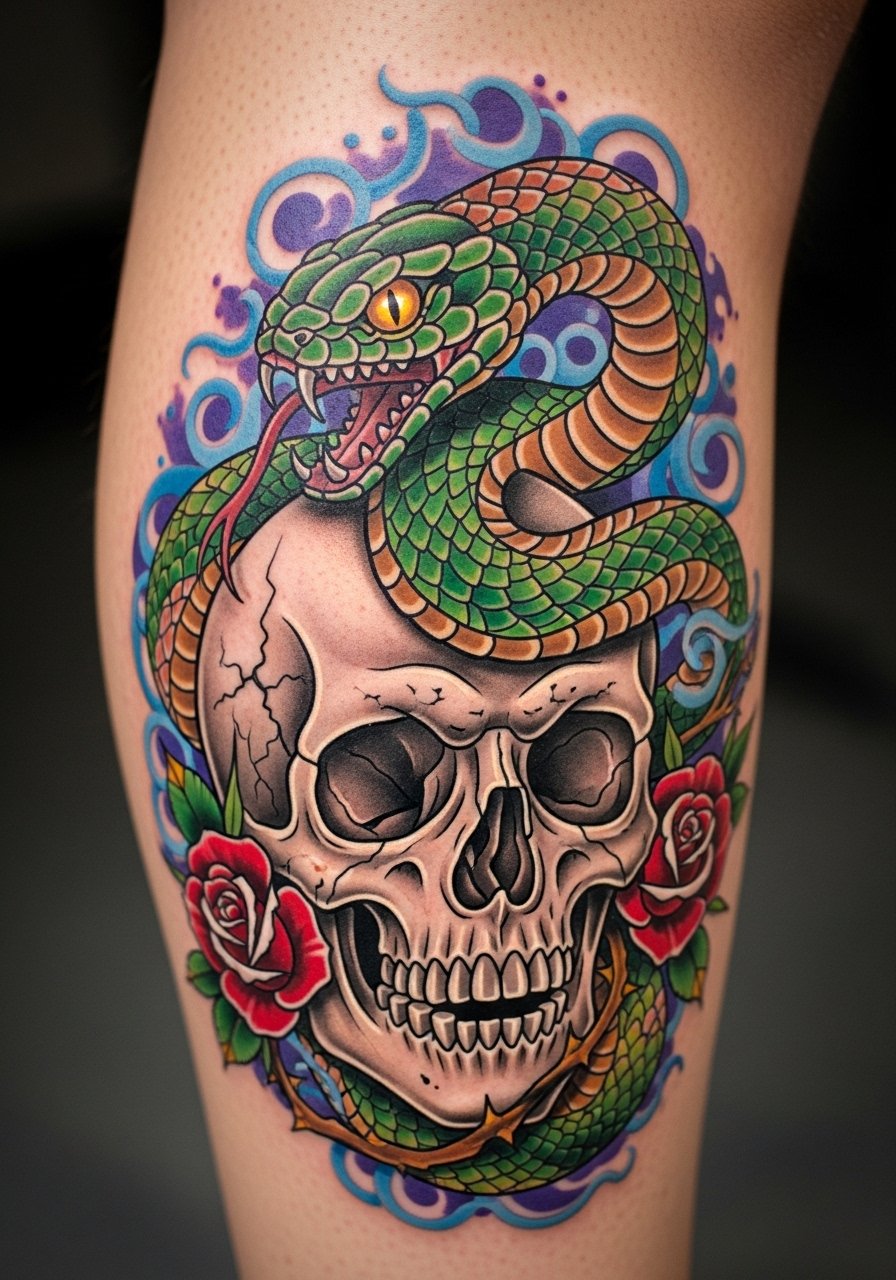
I first bookmarked a neo-traditional calf piece because of its theatrical vibe. The calf tolerates bold shading and larger scale. Pain is moderate. The session runs two to three hours. Ask for saturated mid-tones that read longer than delicate pastels. A common mistake is piling on tiny textures in the skull that go mushy later. Keep the skull shapes simple and rely on contrast to sell the danger. Calf placement looks different when seated versus standing. That shifting perspective adds an unsettling energy that suits a snake motif.
10. Negative Space Snake Ribcage Piece
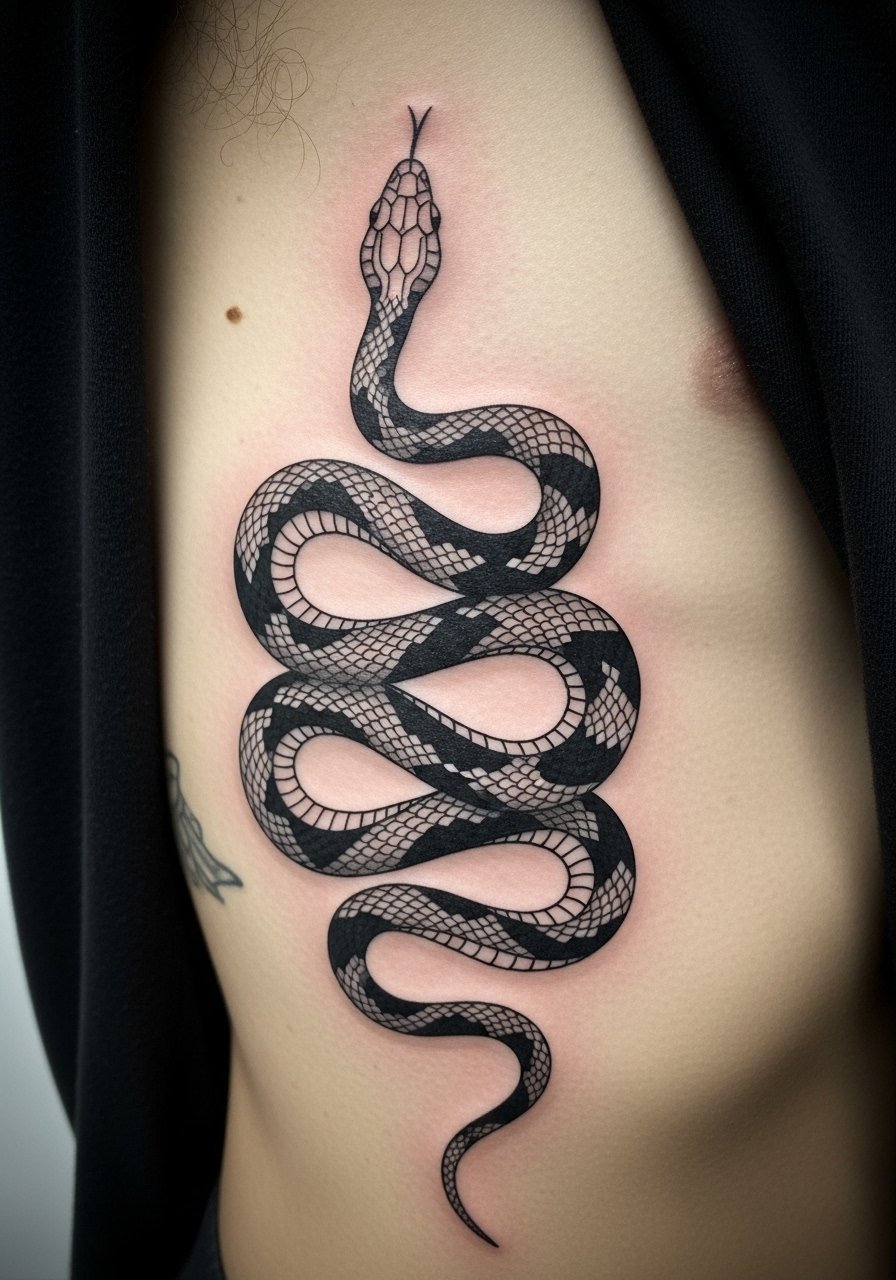
Most artists I follow use negative space to create dramatic snakes on ribs. I prefer this for a fierce, almost carved look. Ribcage pain is high. Expect shorter sessions because of the sensitivity. For this to last, the black fields must be dense and the negative space clean. A frequent error is using thin black fills that fade patchy. Ask your artist for long, consistent fill strokes. Over time, healed ribs can show stretching with weight changes. Keep the negative space large enough so it does not collapse into speckling. Rib placements also photograph with skin contours that enhance menace.
11. Dotwork Scale Sleeve on Full Arm
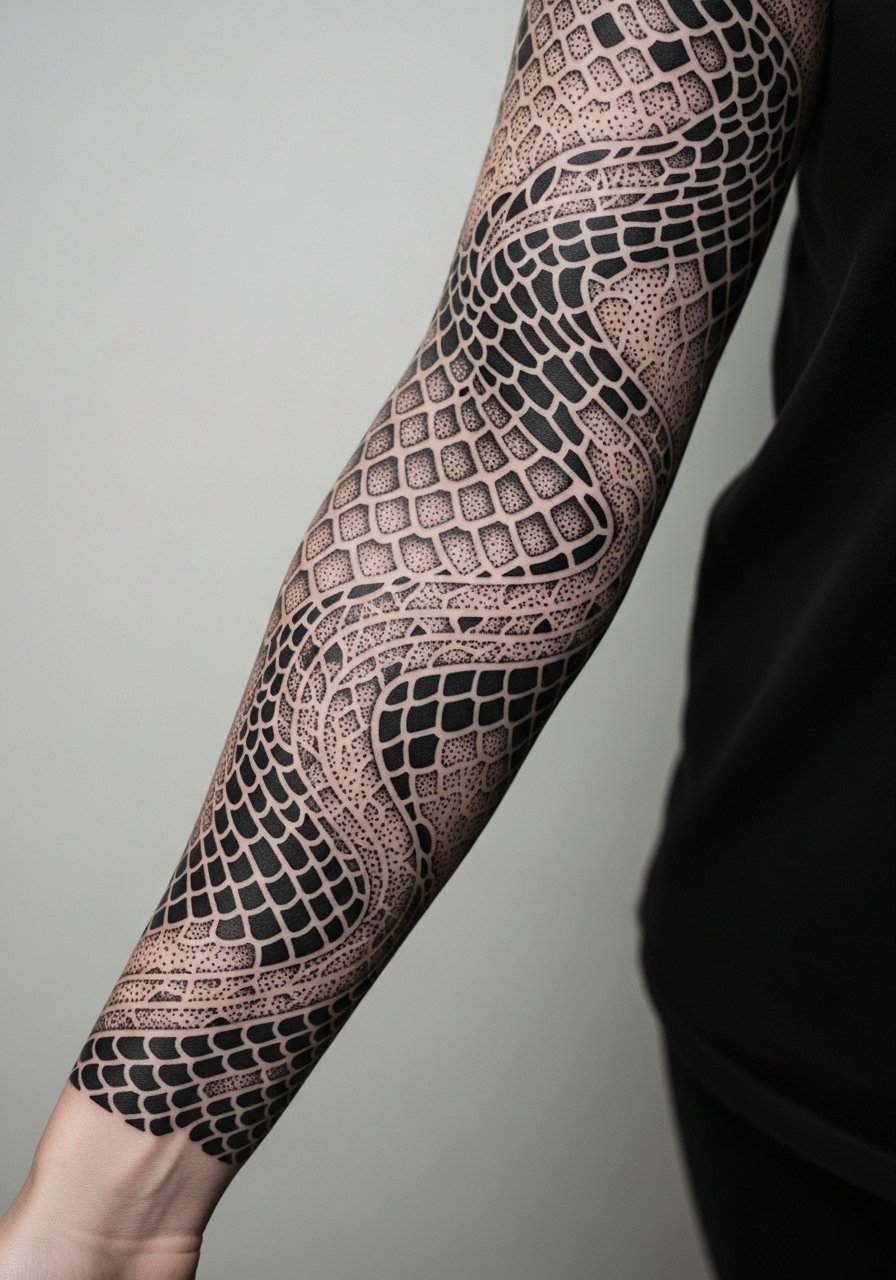
Dotwork creates texture that can look venomous up close. I have seen entire sleeves built from scale patterns that read like armor. Sessions are many and patience is needed. Dotwork ages well when the artist spaces dots intentionally. I tell people to avoid over-reliance on ultra-fine dot shading near joints. Those areas blur first. When consulting, request anchor lines or bands at intervals. That keeps the sleeve readable after years. A mistake I see is continuous micro-dots without larger shapes. Those pieces flatten as ink migrates. If you want a bold read from a distance, mix dotwork with black bands.
12. Micro-Realism Eye-Contact Snake on Chest
I remember feeling unnerved when a micro head stared back at me in a shop. Chest tattoos sit with movement and breath, which adds life. Pain is moderate to high depending on proximity to sternum. Micro-realism looks incredible fresh, but tiny highlights and lashes can soften quickly. Tell your artist to prioritize stronger dark contrast in the eye and jaw. That keeps the stare believable as highlights fade. Common mistakes include asking for tiny individual fang highlights. They often disappear. For longevity, opt for stronger foundational contrast and plan a touch-up six to twelve months out.
13. Snake And Moon Phases On Ribcage
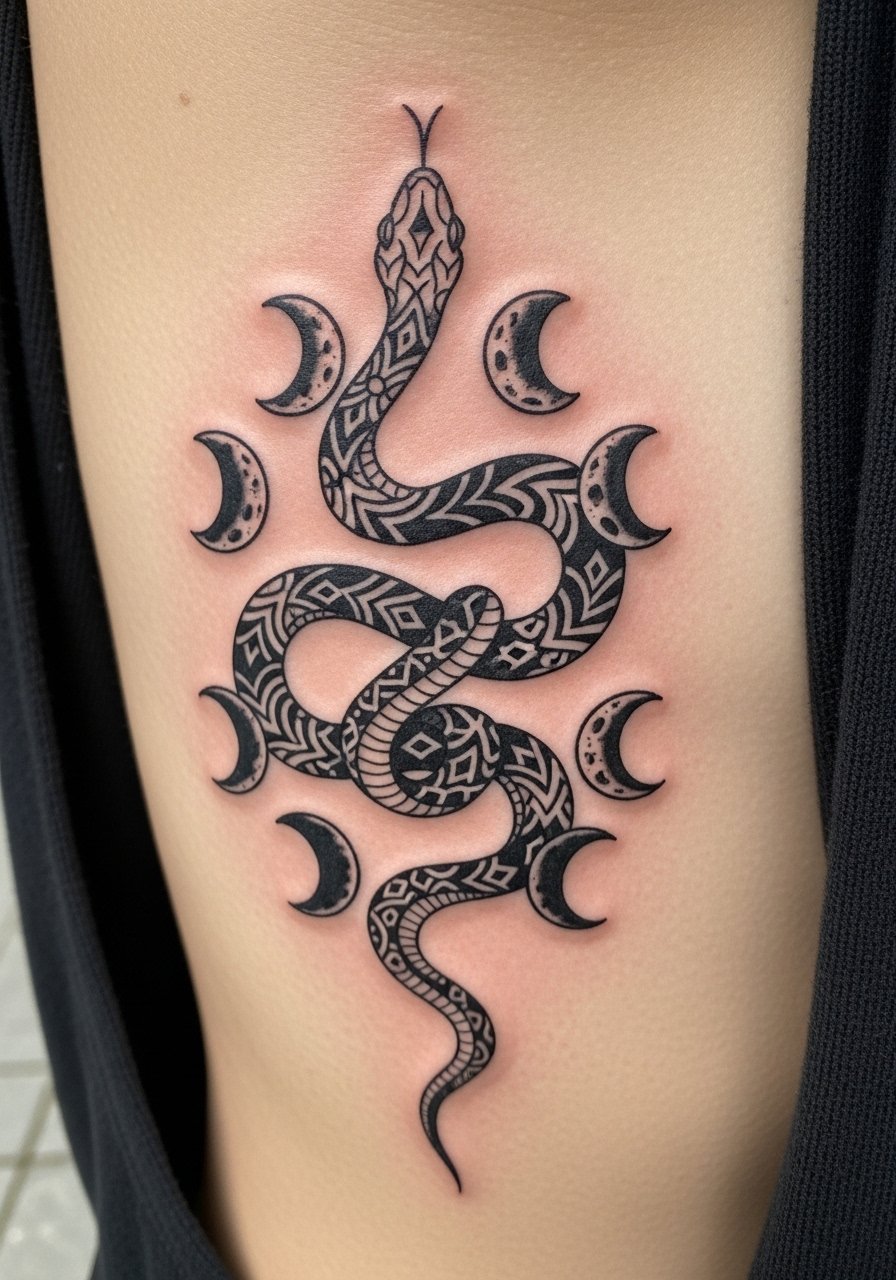
I have seen moon phase pairings make a snake feel mystical and dangerous. The ribcage gives room for a vertical sequence. Pain is intense. Session time is split for comfort. Suggest to your artist that the moon icons be bold and slightly separated. If moons are tiny, they lose clarity. A mistake I see is crowding the moons close to detailed scales. That makes the composition visually noisy once it settles. After six months, the moons should still read as distinct shapes if spaced well. This placement is excellent for pieces you want to hide or reveal.
14. Small Finger Snake Wrap
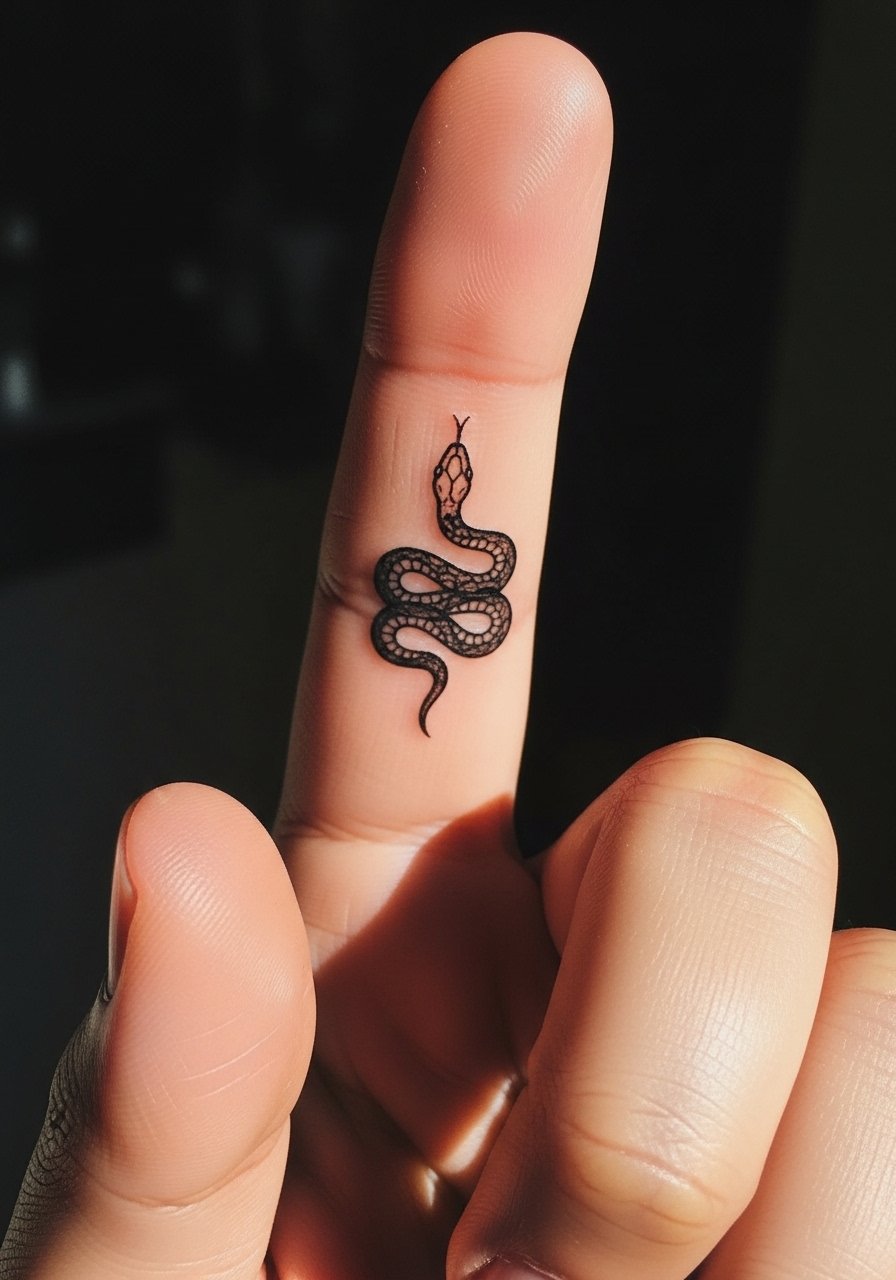
I regret how many tiny finger tattoos I once misjudged. Fingers move constantly and linework blurs faster. A finger snake is bold despite its size, but expect regular touch-ups. Pain is sharp. Sessions are short. Tell your artist you want thicker primary lines and minimal interior scales. Thin details vanish in months. A common error is asking for continuous tiny scales that become indistinct. If you want longevity, accept a simplified silhouette. Also consider an alternative placement like the ankle if you want less upkeep.
15. Double-Headed Snake Collarbone
A double-head creates a confrontational energy I saw at several studio windows. Collarbone locations have sharp bony texture. Pain is high. The session typically lasts one to two hours. Ask your artist to map the heads so they avoid landing on the most protruding bone. That prevents disproportionate fading. A mistake is placing too much delicate shading over bone. That area heals unevenly and can spotty out. For durability, choose bold head outlines and limit fine gradient shading. Visually, collarbone snakes read as a challenge.
16. Snake Wrapped Around Wrist Bracelet Tattoo
Wrist bracelet snakes look like living jewelry. I’ve recommended this to people who want visible menace without a sleeve. Pain is moderate. Sessions can be quick. During consultation, test the wrap on your wrist so the coil falls naturally across veins. A common mistake is sizing the snake too narrow. Thin bands fade faster. Ask for a slightly heavier weight so the bracelet reads from afar after healing. This placement needs SPF protection when exposed to sun. I often suggest using a sunscreen stick after the first month.
17. Anatomical Snake With Exposed Spine on Thigh
I loved this design because it reads like biological horror. Thigh panels tolerate detail and large composition. Pain is moderate. Sessions vary in length. Tell your artist to anchor the spine elements with darker nodes so they contrast as the surrounding shading fades. A mistake I see is too many micro bones that blend together after a year. For a version that ages well, combine crisp dark anchors with softer surrounding texture. Thigh pieces heal slower on account of clothing friction. Plan loose clothing for the first two weeks.
18. Snake And Moth Micro-Realism On Shoulder Blade
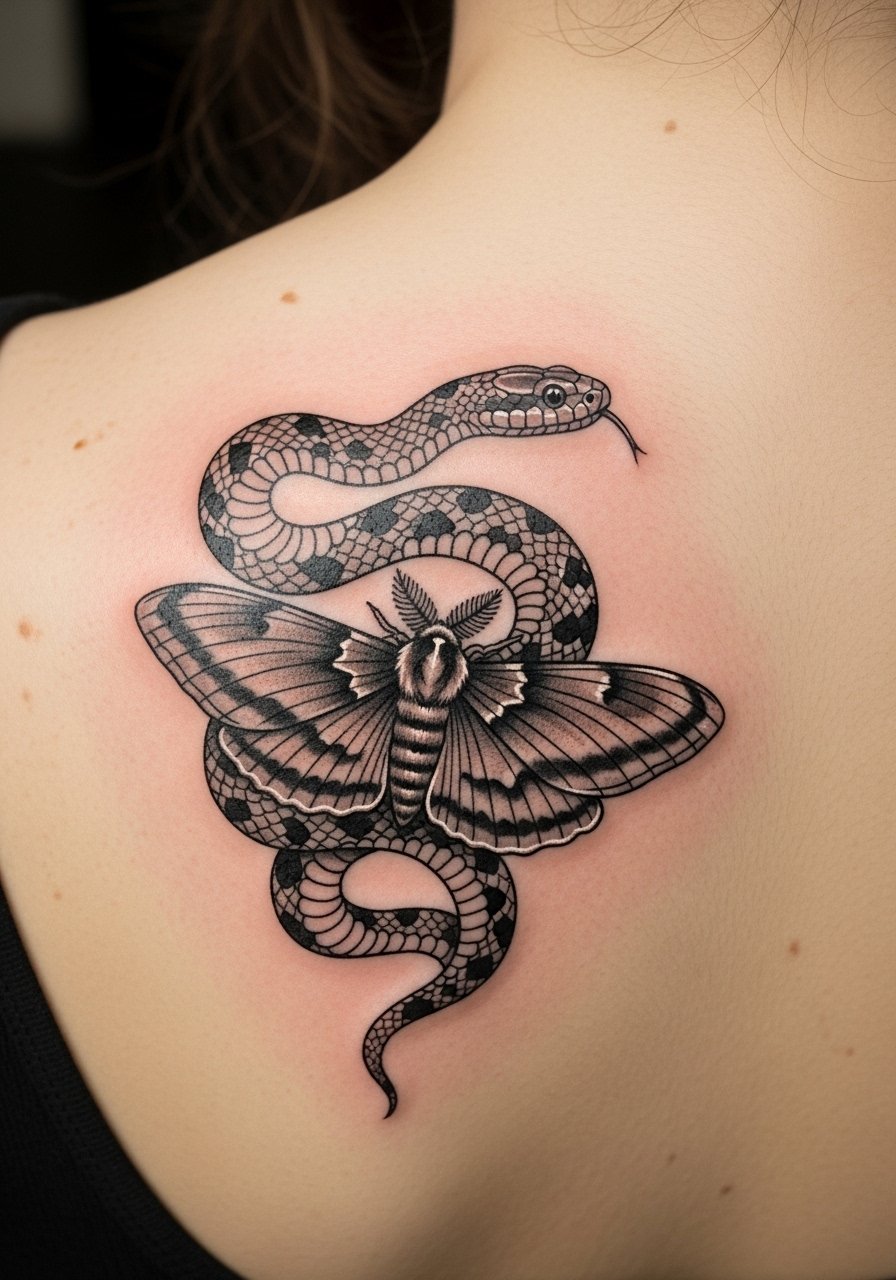
The juxtaposition of moth vulnerability and predatory snake felt poetic when I first noticed it. Shoulder blades take ink nicely and photograph well. Pain is moderate. Sessions usually fall under two hours. I recommend asking for a clear focal point, usually the snake’s eye or the moth’s thorax. That focal contrast helps the piece age with intention. People sometimes request extreme micro-texture on both elements. That can blur into a muddled patch. If you want longevity, make one element tighter and the other more atmospheric. Shoulder movement gives life to the scene.
19. Blackwork Snake Throat Piece
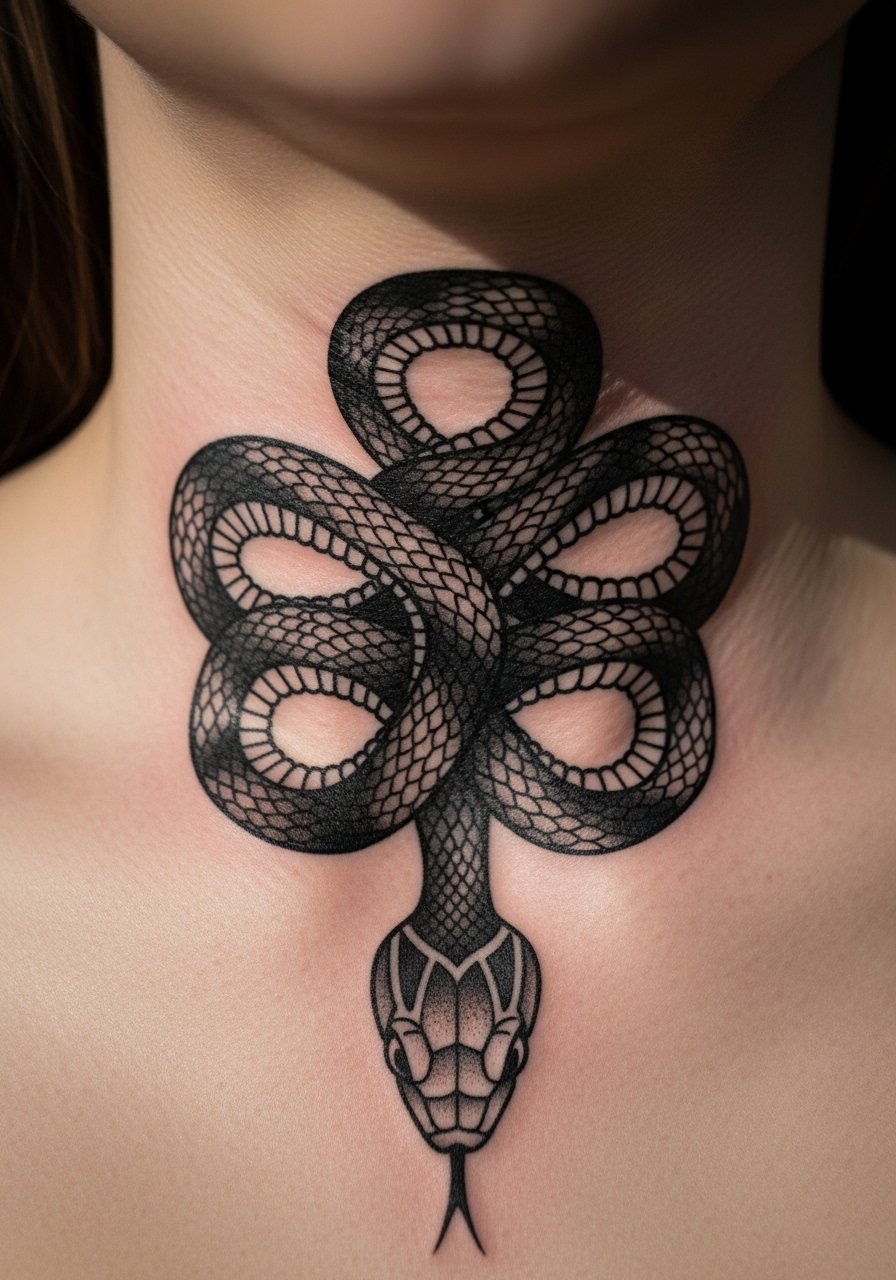
I have seen throat snakes and they announce danger without a word. This is high-visibility and high-impact. Pain is high. Expect multiple short sessions. Ask your artist for a design that flows with the neck muscles so it does not distort with motion. Dense blackwork ages well here if applied uniformly. A frequent error is using patchy fills that show inconsistent fading. Also consider how collarlines cover or reveal the work. Throat pieces read as commitment. Be ready for social visibility.
20. Mechanical Snake Cyberpunk Calf Piece
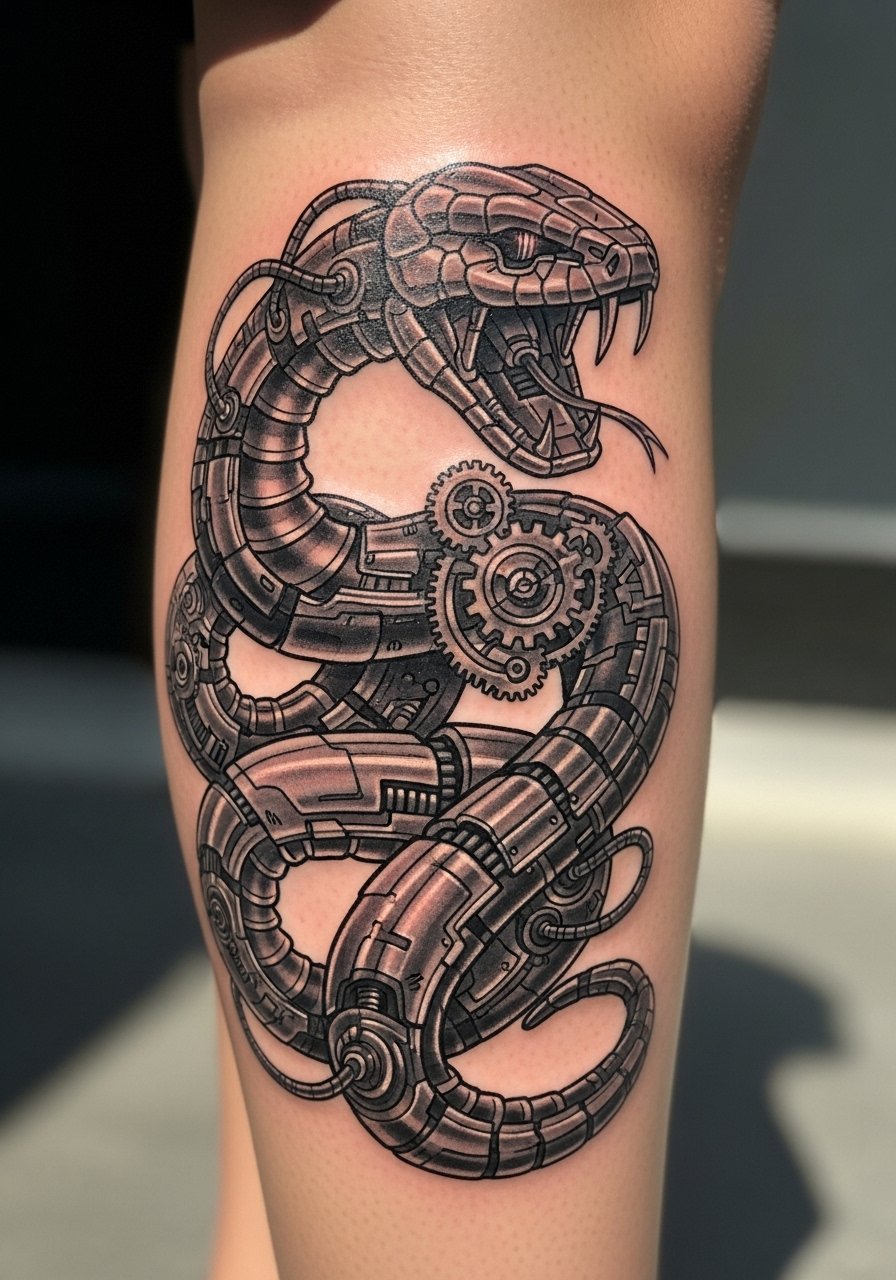
I picked this because it is an under-covered angle. A mechanical snake combines danger with cold precision. Calf placement allows long elongated designs. Pain is moderate. Sessions are multi-hour. For this to read as mechanical and not like random detail, ask for clear edges separating metal panels from organic segments. That contrast holds up better than all-over micro-shading. People sometimes request tiny circuit-like texture that blurs. Make circuits bold or reduce their density. The mechanical aesthetic also looks great with small touches of color. For maintenance, I recommend occasional touch-ups to keep metallic highlights crisp.
Tattoo Prep and Aftercare Essentials
Healing Ointment: Aquaphor Healing Ointment, 14oz tube. Industry standard for the first 3 to 5 days. I use a thin layer at night.
Second Skin: Saniderm Transparent Adhesive Bandage, 6-inch roll. Every artist I know recommends it for the first 24 to 72 hours.
Daily Moisturizer: CeraVe Fragrance-Free Moisturizing Lotion, 12 oz pump. Use from days 4 to 14. Pump bottle is more hygienic.
Gentle Cleanser: Dr. Bronner's Unscented Castile Soap, 32 oz. Dilute a small drop with water to clean twice daily the first week.
Numbing Cream: Cream With 5% Lidocaine, 30g. Apply 30 to 45 minutes before your session only if your artist approves.
Stencil Paper: Tattoo Stencil Transfer Paper, A4 Pack. Useful to test placement at home before your appointment.
Sunscreen Stick: SPF 50 Sunscreen Stick, Travel Size. Use on healed tattoos whenever they see sun. I carry one for beach days.
Long-Term Balm: Mad Rabbit Tattoo Balm, 2 oz. Good for maintaining vibrancy after healing. Artists I know recommend it for healed pieces.
Vegan Care: Hustle Butter Deluxe, 5 oz. A vegan option that works during healing and after.
Numbing Spray: Tattoo Numbing Spray, 4 oz. Handy for touch-ups or sensitive areas mid-session.
Hydrocolloid Bandages: Large Size Pack. A good alternative to Saniderm for small to medium tattoos.
Aftercare Travel Kit: Basic Tattoo Aftercare Kit. Handy for trips and touch-ups.
When I prep, I avoid tight clothing the day after a new piece. Most artists I've talked to say hydration and sleep speed healing. From what I've seen, UV protection is the single biggest long-term ink saver. I bring a small pack with Aquaphor and a gentle cleanser to every appointment.
Frequently Asked Questions
Q: Will fine line snake wraps blur if I get a full sleeve later?
A: Yes, I've seen wraps lose micro-details when integrated into a sleeve with dense shading. Tell your artist you plan a sleeve. Ask for stronger primary lines around the snake and less tiny scale work. Use heavier anchors so the snake remains readable once surrounding shading is added. For daily maintenance, a product like CeraVe Fragrance-Free Moisturizing Lotion, 12 oz pump helps keep the skin supple during the first two weeks.
Q: Do watercolor snake tattoos need different aftercare than traditional ones?
A: From what I've gathered, watercolor sections behave similarly during initial healing. The difference is long term. Watercolor pigments tend to soften and spread. During healing I still follow the same regimen, gentle soap and thin ointment. After healed, I recommend using a sunscreen stick like SPF 50 Sunscreen Stick, Travel Size whenever the piece sees direct sun.
Q: Is ribcage placement too risky for a negative space snake?
A: Ribcage work is painful but visually rewarding. I have watched negative space rings survive well on ribs when the black fills are dense and the gaps are large. The risk is uneven healing near bone. Ask for slightly larger negative areas in the consultation. If you want lower upkeep, plan for a touch-up session at six to nine months.
Q: How often will a finger snake need a touch-up?
A: In my experience, fingers require more frequent touch-ups, often within 12 months. Movement and skin renewal wear the lines. Save touch-ups for after the first year unless you notice rapid blurring. You can reduce frequency by requesting bolder lines and limiting interior texture.
Q: Can I wear Saniderm on a throat or neck piece?
A: Some artists use Saniderm on necks for the first 24 to 48 hours. From what I've seen, it helps reduce scabbing and keeps sweat away. Ask your artist first. If approved, use Saniderm Transparent Adhesive Bandage, 6-inch roll and follow the studio's removal timeline precisely.
Q: Should I use numbing cream for sternum micro-realism?
A: I have used numbing cream selectively. Many artists prefer no numbing because it affects skin stretch and detail work. If you and your artist agree, use a product like Cream With 5% Lidocaine, 30g and apply 30 to 45 minutes prior. Always clear it with the artist first.
Q: What aftercare products actually help bring out blackwork longevity?
A: From what artists tell me, keeping healed blackwork out of prolonged sun is the most effective step. For daily maintenance, a balm like Mad Rabbit Tattoo Balm, 2 oz preserves vibrancy. For initial healing use Aquaphor and clean with a gentle castile soap like Dr. Bronner's Unscented Castile Soap, 32 oz.
