
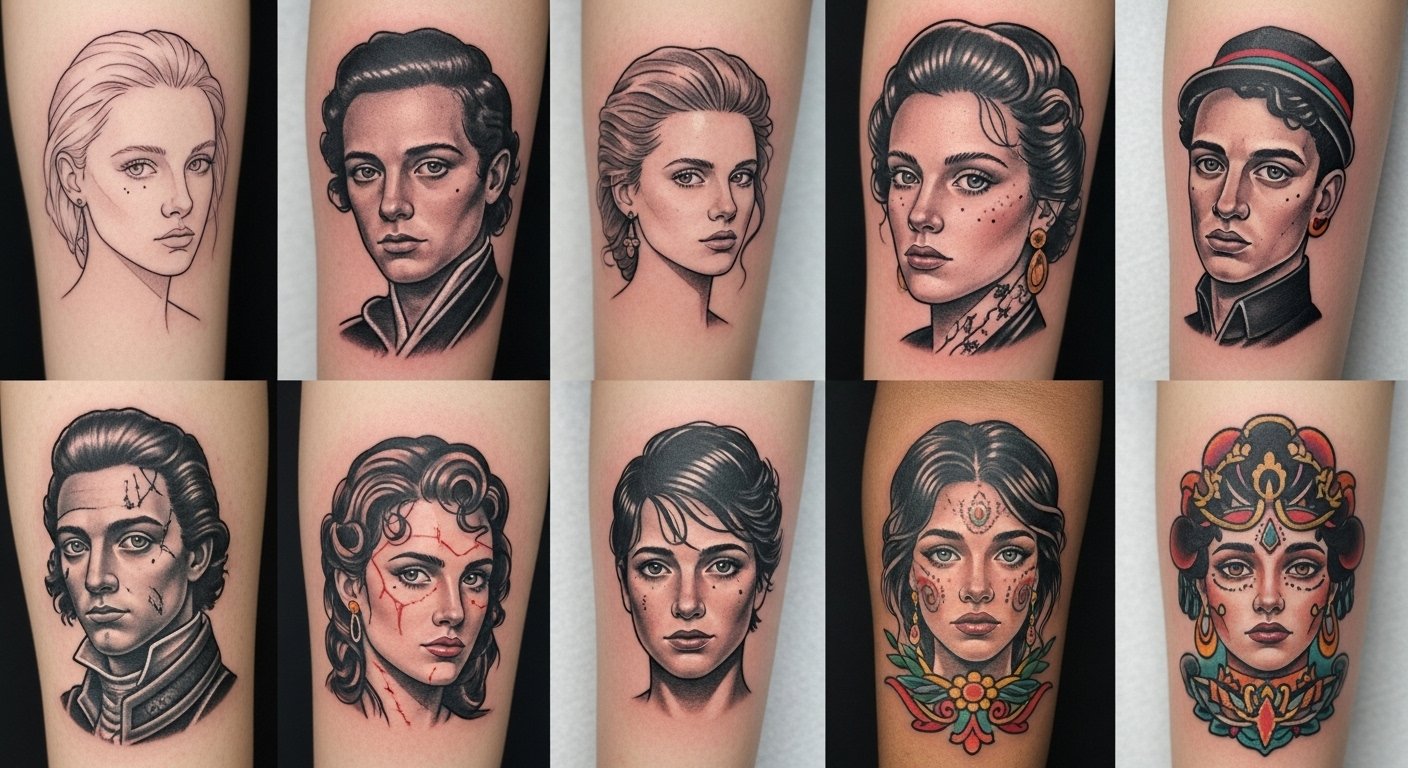
I spent months saving portrait images and comparing healed photos before I got my first realistic portrait. The real issue wasn’t choosing the face—I kept underestimating how style, placement, and aftercare change a portrait as it heals. These 24 portrait tattoo ideas focus on emotion and realism, and which styles actually hold up over time.
Quick context: These ideas center on portrait tattoos—fine line, micro-realism, neo-traditional, and blackwork portraits. They work on forearms, chests, ribs, thighs, and behind the ear. I picked styles trending in 2025 that age well and avoid fads. (Gallup, 2019: ~30% of U.S. adults have tattoos.) (Statista, 2022: acceptance and demand for realistic portraits increased year-over-year.)
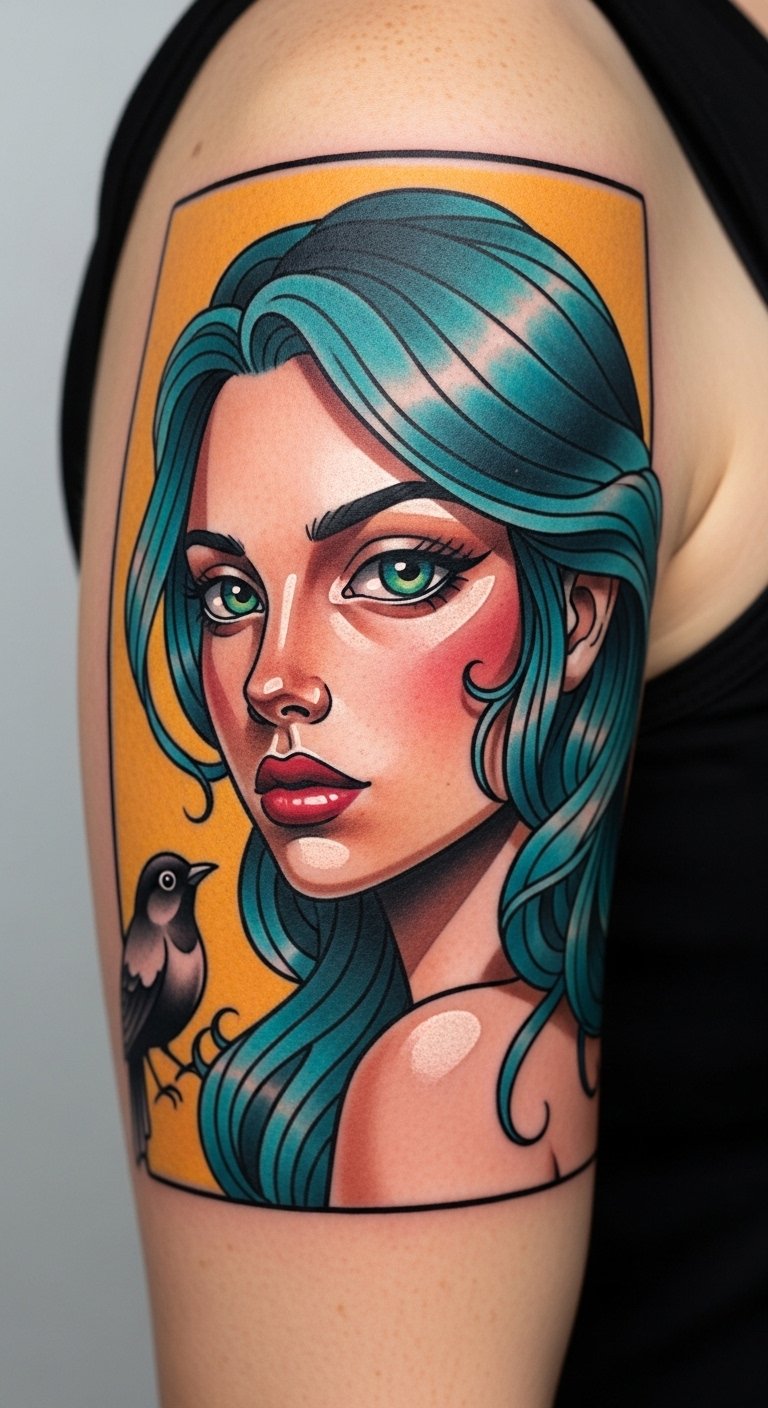
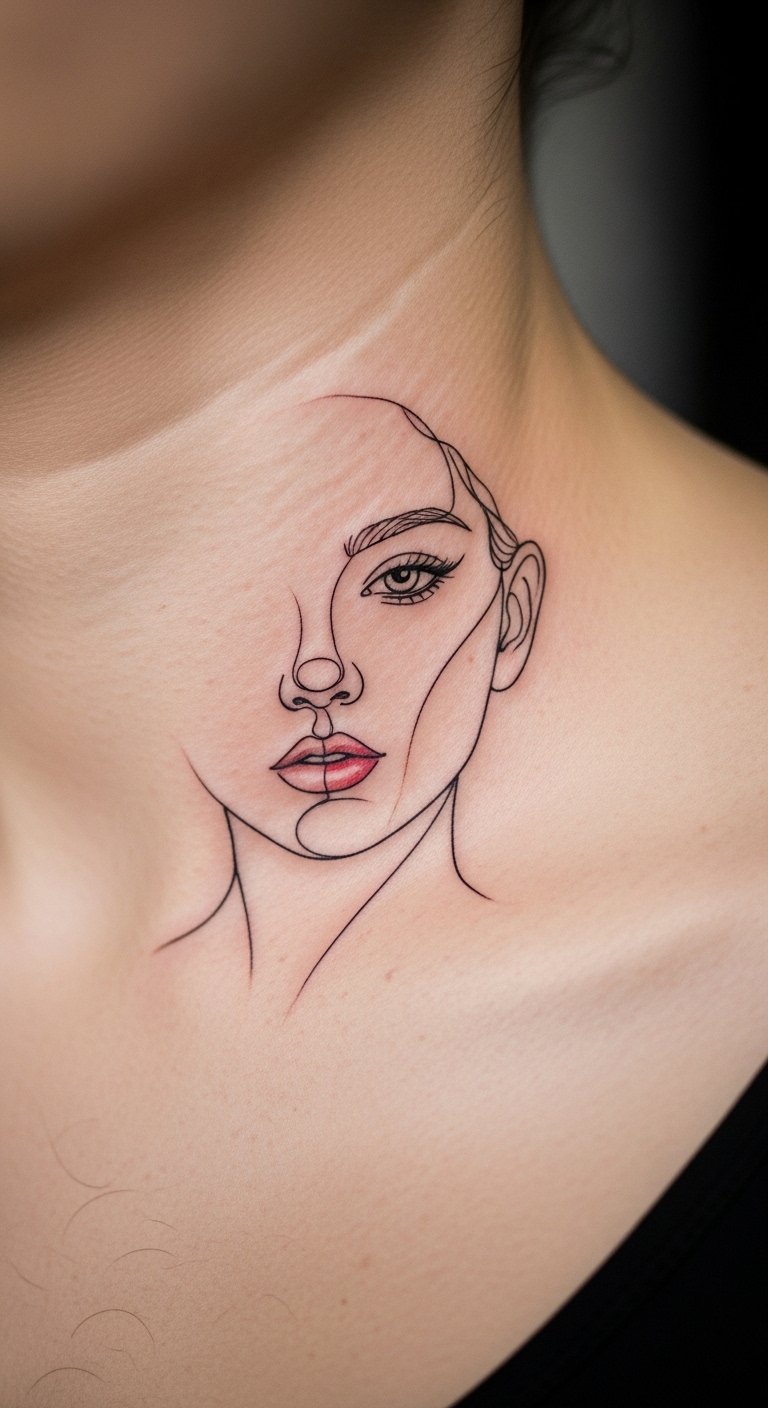
Fine Line Single-Face Portrait on Inner Forearm
Style/Technique: Fine Line / Portrait Realism
Pain Level: Medium (3-4/10)
Session Time: 1-3 hours
Best For: First realistic portrait, easily covered
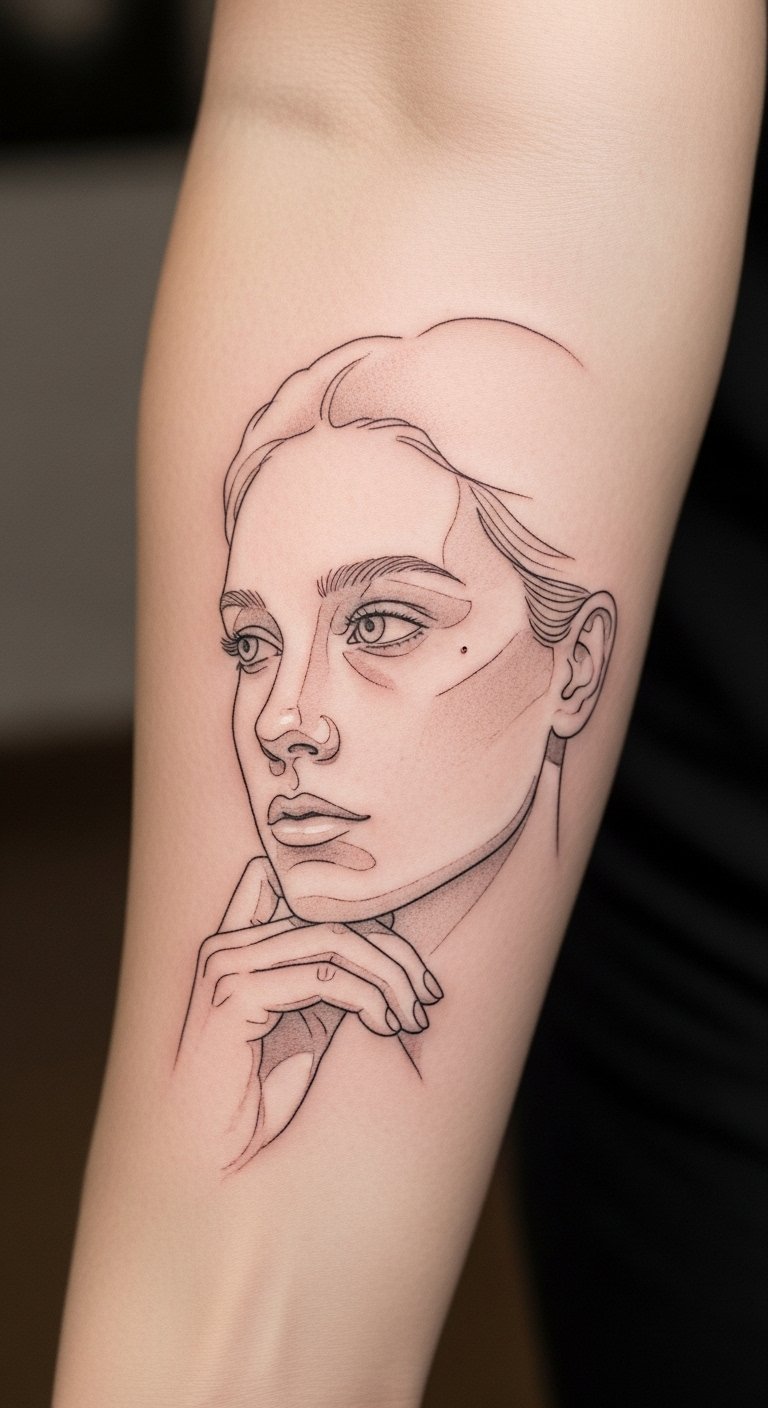
I chose this after seeing healed pieces where tiny lines retained soft detail. Fine line portraits feel intimate and thoughtful. The forearm gives a flat canvas, so expressions read well. Expect medium pain. Healing is usually 2-3 weeks surface; full integration takes months. Fine lines can blur if placed on very oily or stretchy skin—ask for slightly bolder defining lines. This is a meaningful, minimalist option that reads like a photo from a distance.
Micro-Realism Pet Portrait on Thigh
Style/Technique: Micro-Realism / Photorealistic
Pain Level: Low-Medium (3/10)
Session Time: 2-4 hours
Best For: Memorial or pet portrait, larger detail
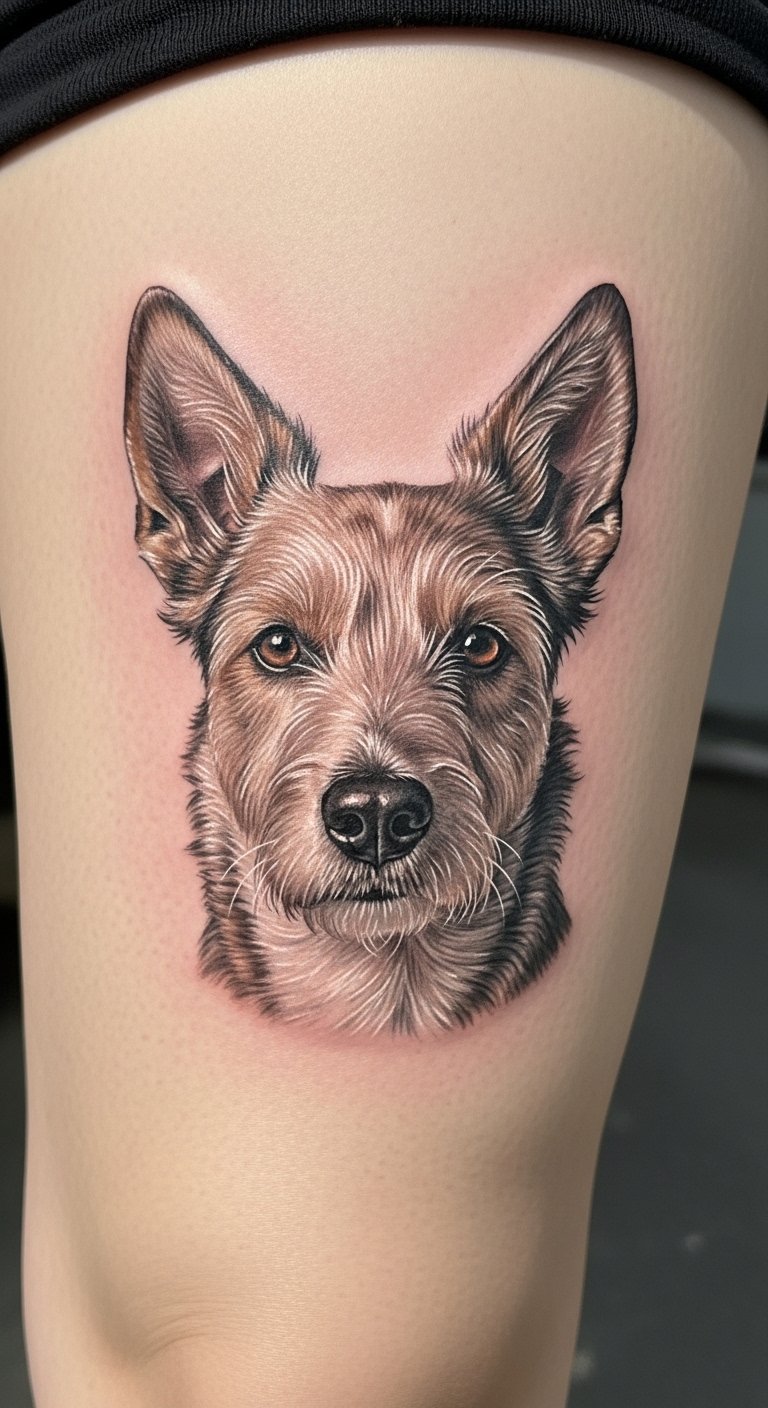
Pet portraits in micro-realism capture expression. The thigh’s thicker skin reduces pain and heals predictably. Expect multiple passes for texture. These age well if artist uses contrast and crisp edges. Common mistake: over-relying on tiny highlights that fade—ask for slightly stronger midtones. I found artists who specialize in pet fur textures make the biggest difference.
Black-and-Gray Elder Portrait on Chest
Style/Technique: Black-and-Gray / Realistic
Pain Level: Medium-High (4-6/10)
Session Time: Multiple sessions
Best For: Emotional, close-to-heart memorials
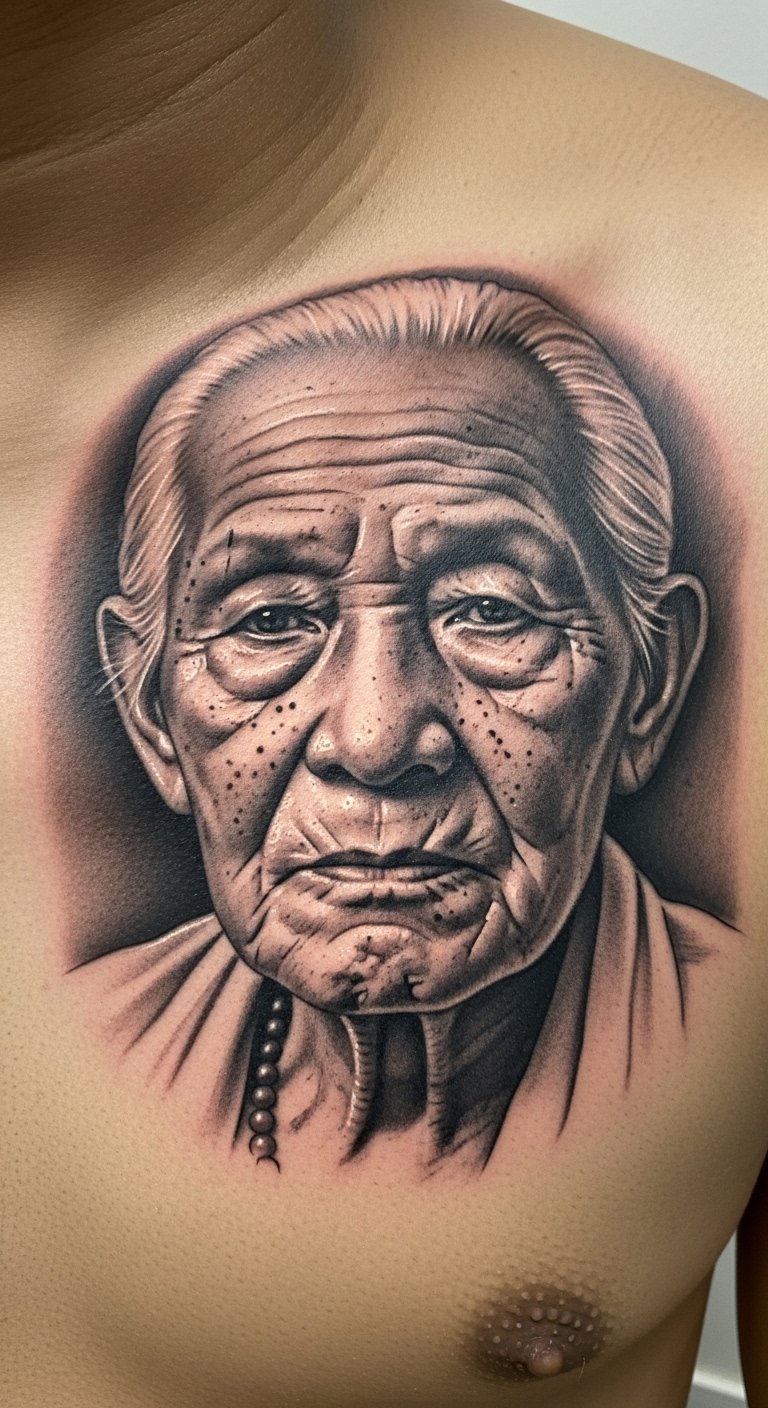
A chest placement reads as intimate and emotional. Black-and-gray portraits are timeless and hold up well against fading—black ink retains contrast longest. Chest tattoos can be sore, and breathing affects the session. Healing needs careful aftercare because chest movement can scab more. Avoid too much tiny dotwork in shadow areas; it can muddle. Ask your artist for reference photos showing healed chest portraits.
Neo-Traditional Color Portrait on Upper Arm
Style/Technique: Neo-Traditional / Color Portrait
Pain Level: Low-Medium (2-4/10)
Session Time: 2-4 hours
Best For: Bold emotional portraits with color accents
Neo-traditional portraits mix realism with graphic color. The upper arm is forgiving for saturation and heals predictably. Colors add mood—reds and muted blues often feel timeless. Bright neons tend to fade fastest. Pain is manageable. A common error is over-detailing the hairline; ask the artist to simplify edges for longevity. I like this when you want emotion plus a stylized look.
Double-Exposure Portrait With Landscape on Ribcage
Style/Technique: Double-Exposure / Micro-Realism + Illustrative
Pain Level: High (7-8/10)
Session Time: Multiple long sessions
Best For: Statement pieces, deeply meaningful combinations
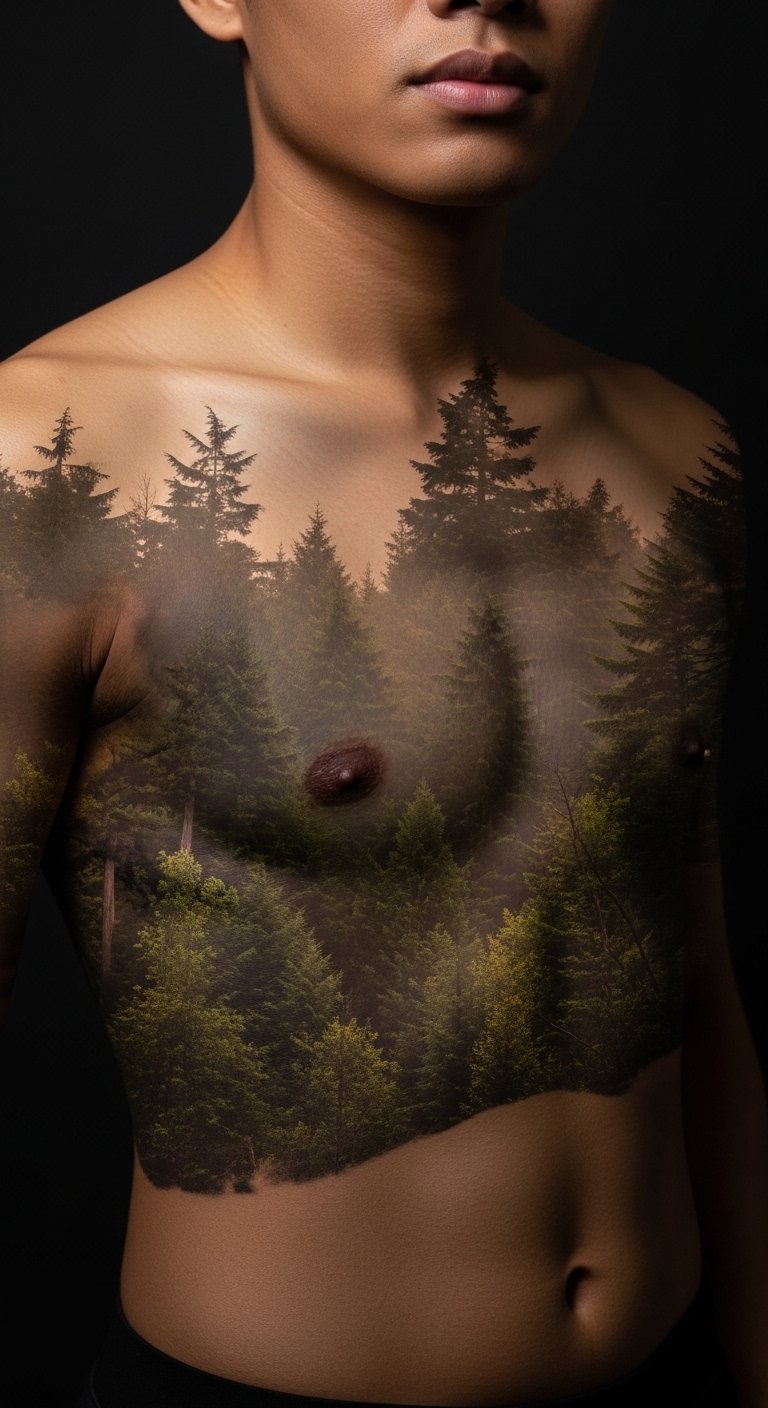
This layered look blends a face with a landscape. It reads cinematic and personal. Ribcage placement gives dramatic canvas but high pain and more risk of movement during sessions. Heals slower due to friction from clothing. Make sure contrasts are strong—the layered parts can blur if values are too similar. This is one of the under-covered ideas I started seeing in tattoo forums; it holds emotional weight when done right.
Stipple Portrait Behind Ear (Small)
Style/Technique: Stipple / Micro-Realism
Pain Level: High (6-7/10)
Session Time: 1-2 hours
Best For: Tiny, secret portraits or test pieces

Tiny stipple portraits look delicate but are technically demanding. Behind the ear is high-pain and heals with extra sensitivity. Stipple ages surprisingly well if dots are spaced for skin movement. The mistake is making it too small for the level of detail—ask for simplified features. I chose this spot to test my tolerance; it felt intense but worth the intimate placement.
Hyperrealistic Eye Portrait on Forearm
Style/Technique: Hyperrealism / Single Feature Portrait
Pain Level: Medium (3-5/10)
Session Time: 2-3 hours
Best For: Focused emotional symbols—eyes convey feeling
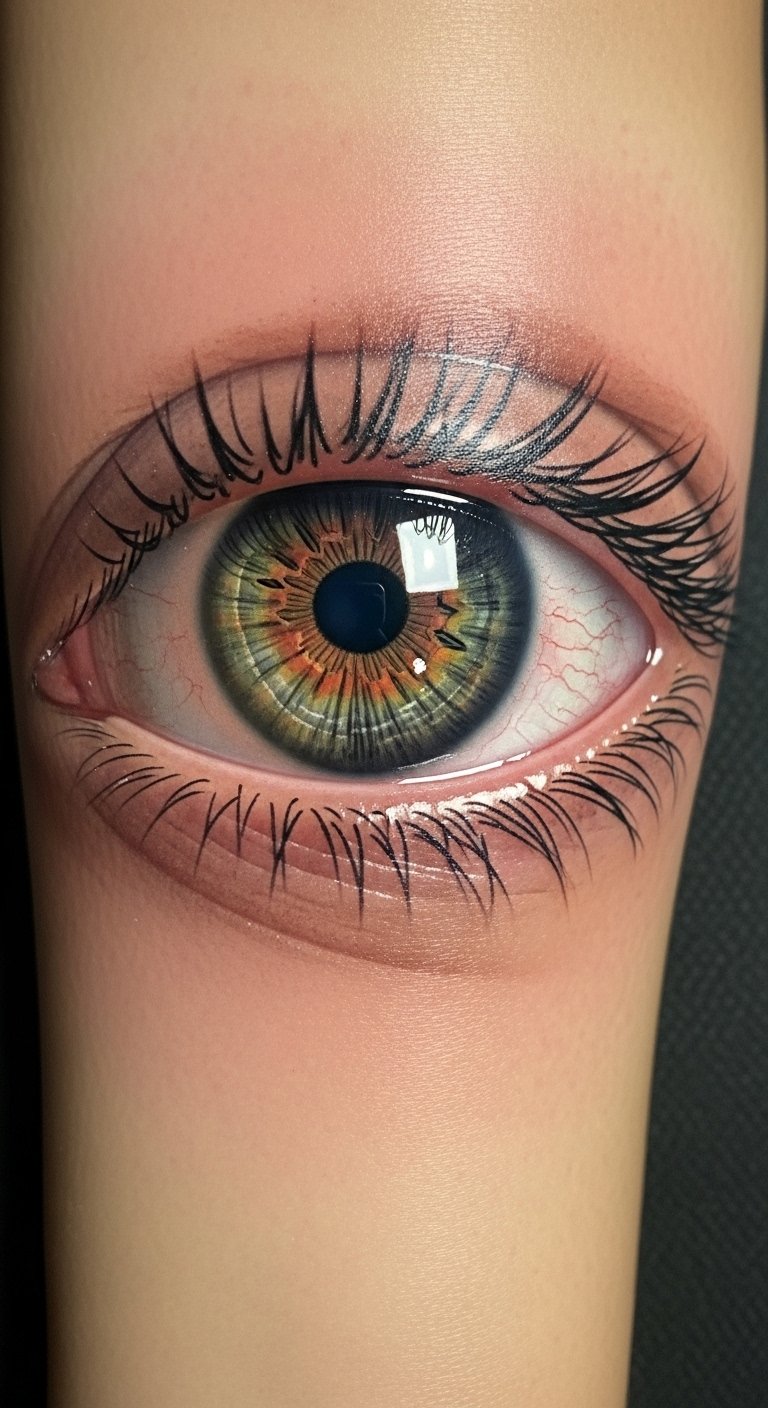
Single-feature portraits—like eyes—are powerful. They capture emotion without needing an entire face. Forearm placement is ideal for viewing. Make sure highlights are replicated for life-like depth. Artists who specialize in photorealistic ocular detail produce the best results. Expect touch-ups to keep whites crisp over time.
Watercolor Portrait Accent on Shoulder Blade
Style/Technique: Watercolor Accent / Realistic Portrait + Painterly Color
Pain Level: Medium (3-5/10)
Session Time: 2-3 hours
Best For: Artistic portraits with soft color moods
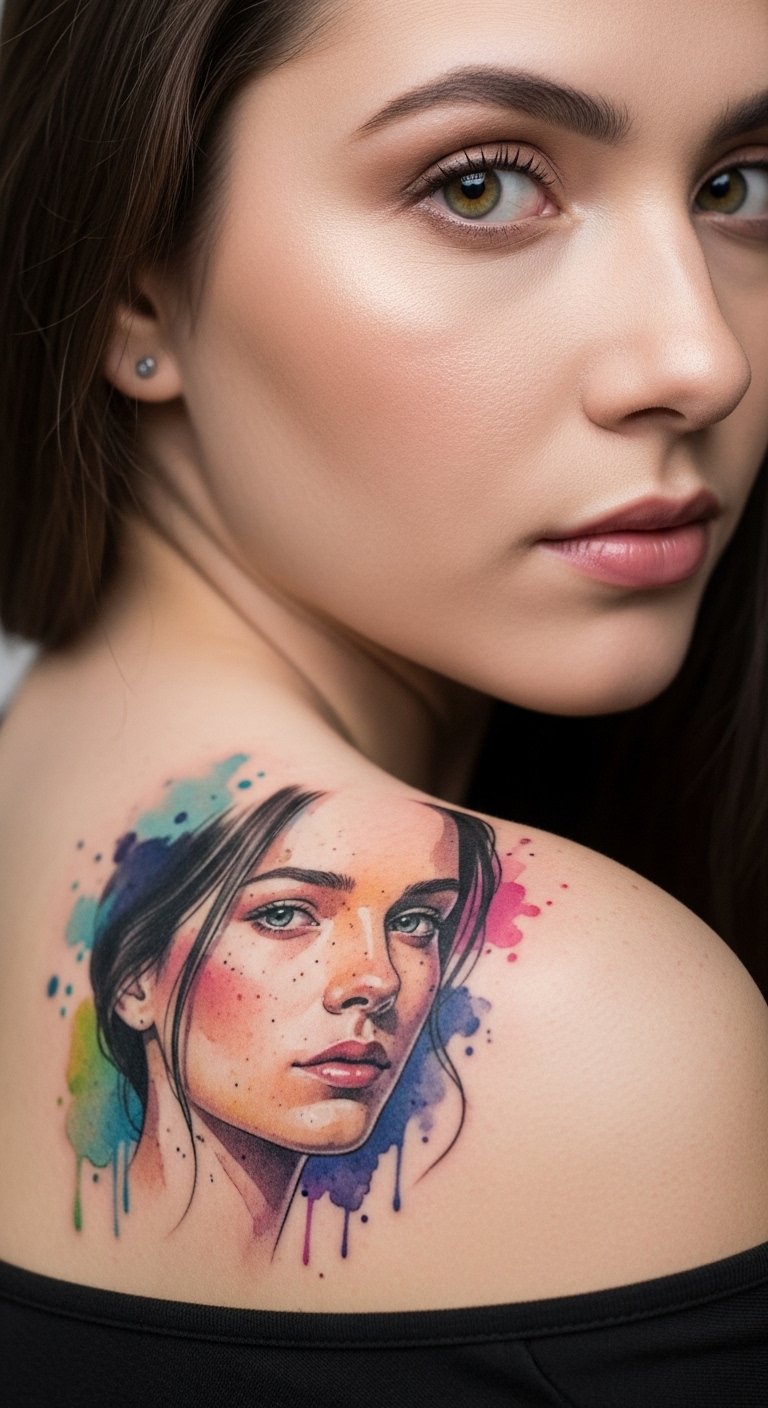
Watercolor accents add mood without full color realism. Shoulder blades are great because of flat surface and lower friction. Pure watercolor-only portraits can fade unevenly; combining realistic shading with color washes keeps the portrait legible as it ages. Avoid super-light pastels as sole color—they can disappear. I recommend asking for stronger color anchors.
Neo-Classic Monochrome Portrait Sleeve Start on Upper Arm
Style/Technique: Neo-Classic / Monochrome Portrait Elements
Pain Level: Medium (3-5/10)
Session Time: Multiple sessions
Best For: Beginning a sleeve with emotional focal points
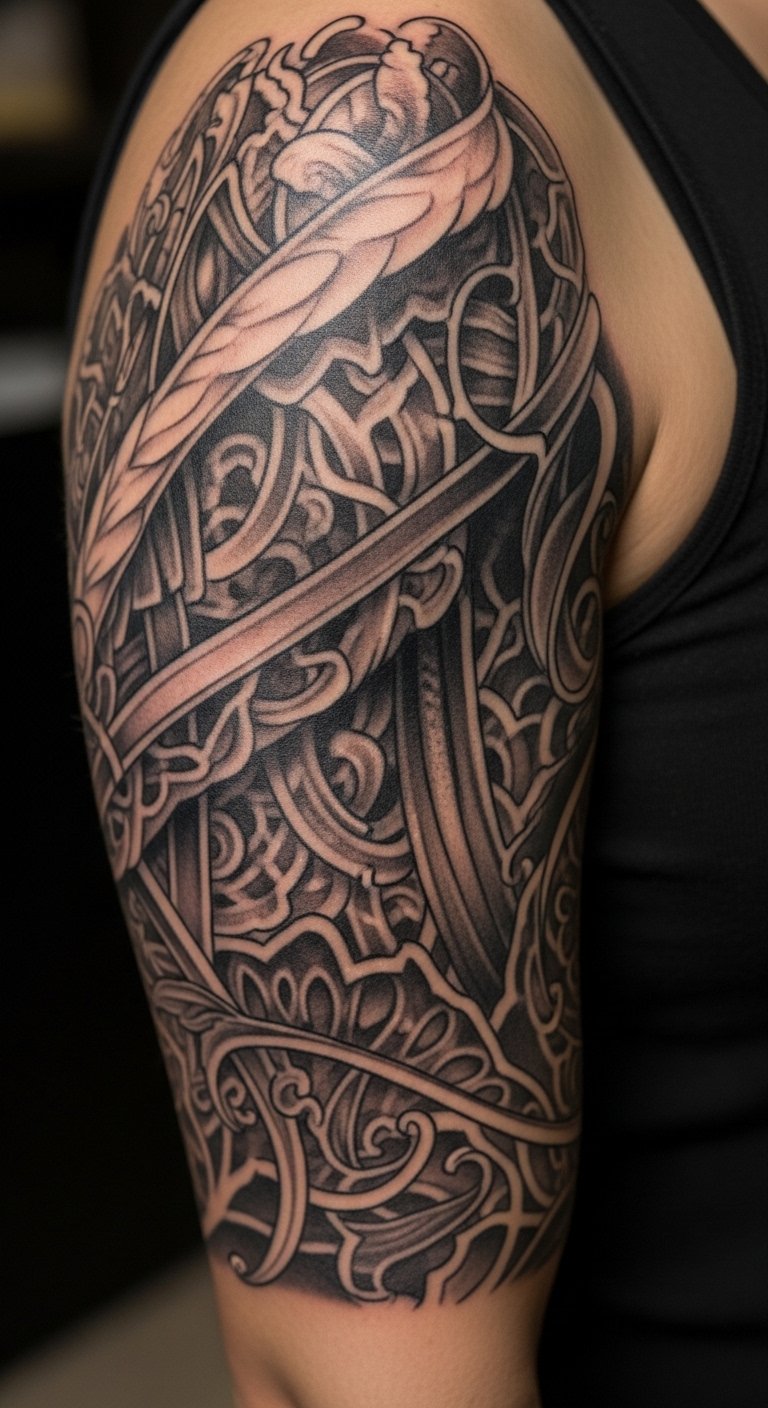
Portraits can anchor a sleeve. Monochrome ties with blackwork or traditional pieces. Upper arm sessions are steady in pain. Plan flow around muscle curves so faces don’t warp with movement. Common mistake: placing a portrait too close to joints where stretching will distort facial lines. I always map the sleeve flow before inking.
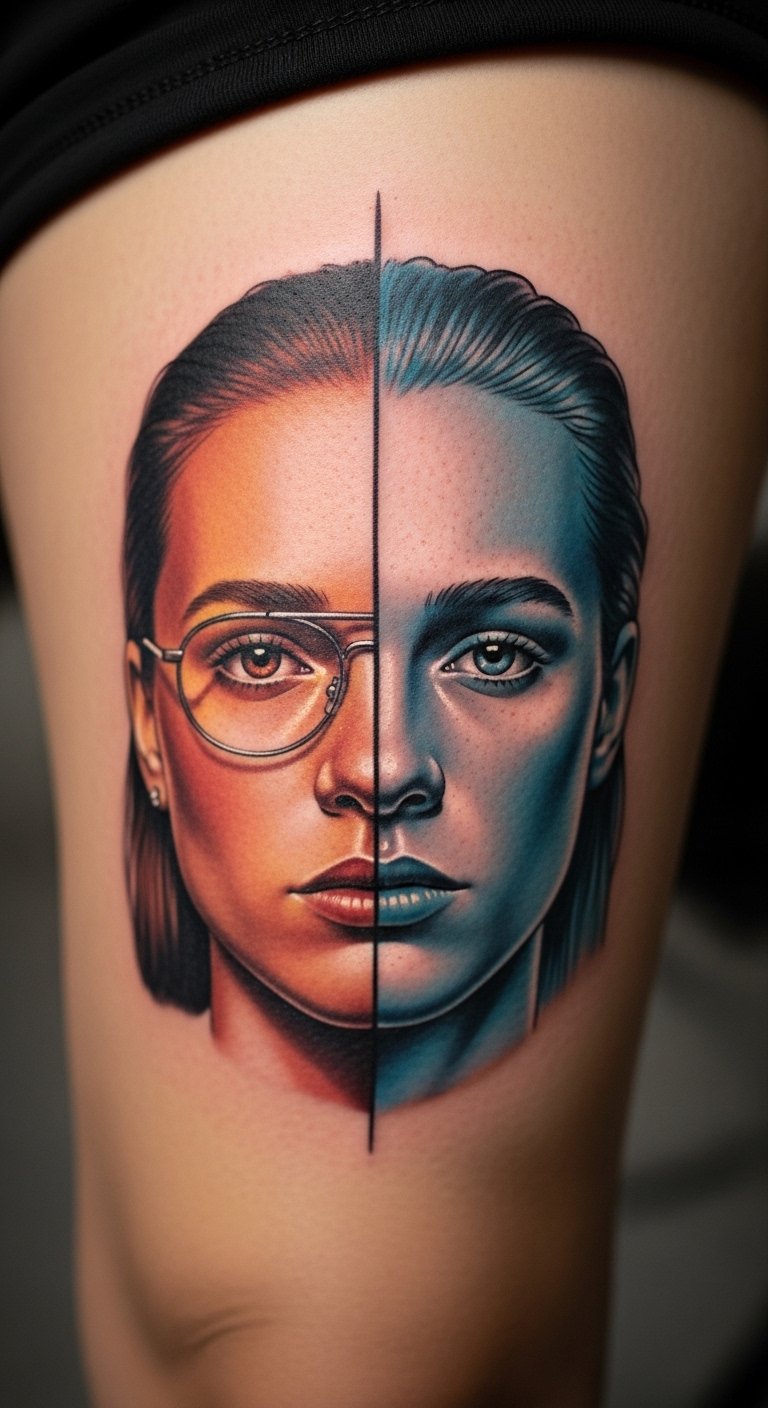
Split-Face Portrait (Real + Abstract) on Calf
Style/Technique: Realism + Abstract / Split Composition
Pain Level: Low-Medium (2-4/10)
Session Time: 2-3 hours
Best For: Modern, emotional statements that pair realism and concept
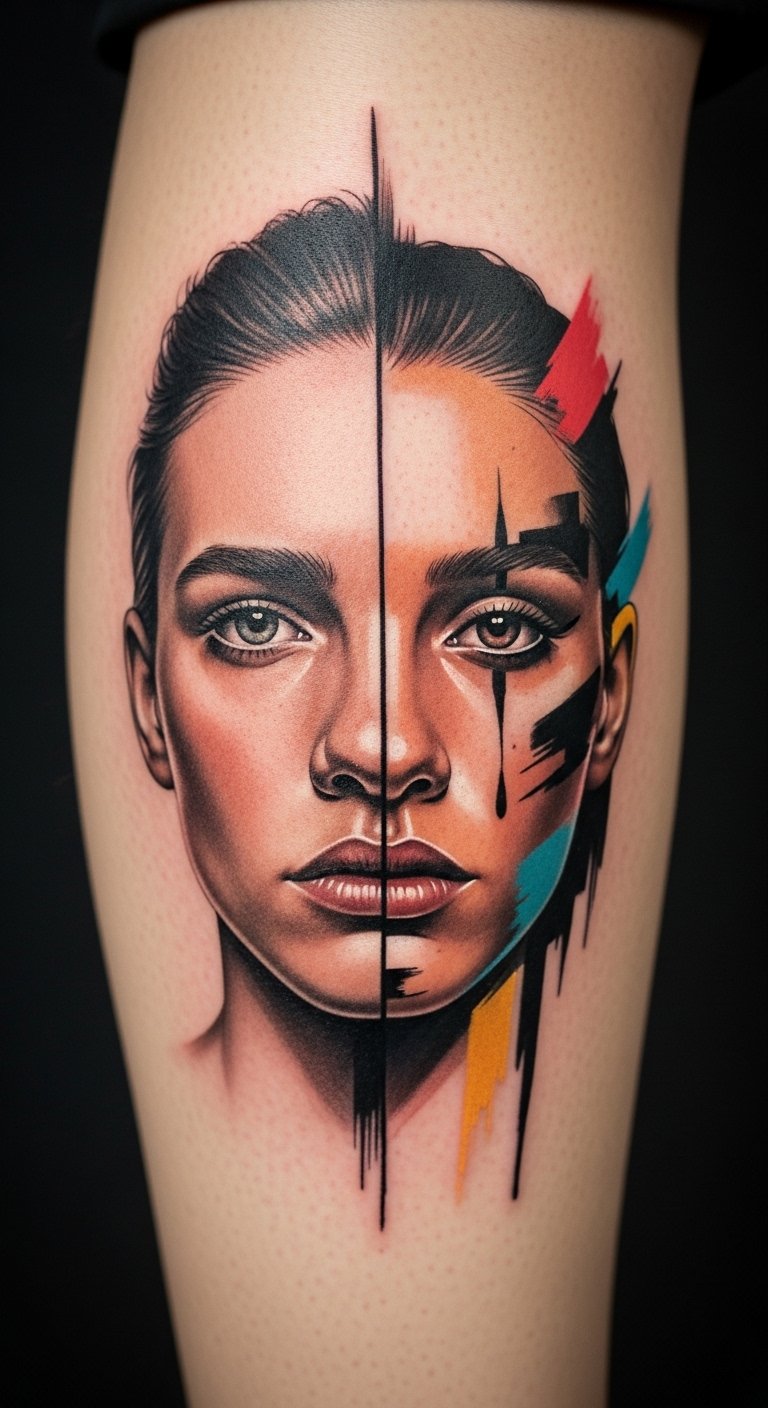
This modern approach pairs a realistic half-face with abstract color or linework. The calf’s stretched skin is forgiving. It creates tension between clear memory and emotional fragment. Fading is manageable if the realist half has strong contrast. I saw this as a fresh angle most portfolios missed; it’s a good conversation piece.
Portrait With Script Banner on Chest (Memorial)
Style/Technique: Realistic Portrait + Script / Classic Composition
Pain Level: Medium-High (4-6/10)
Session Time: Multiple sessions
Best For: Memorial tattoos with a name or date
Combining portrait and script gives clarity to the meaning. Chest placement keeps it close to the heart. Make script bold enough to stay readable as the skin ages. Avoid overly intricate fonts. Artists who do both portrait and lettering regularly give the best layout advice. Healing needs diligent aftercare because chest movement can affect scabbing.
Blackwork Silhouette Portrait on Upper Back
Style/Technique: Blackwork / Silhouette Portrait
Pain Level: Medium (3-5/10)
Session Time: 1-2 hours
Best For: Bold, timeless silhouette portraits
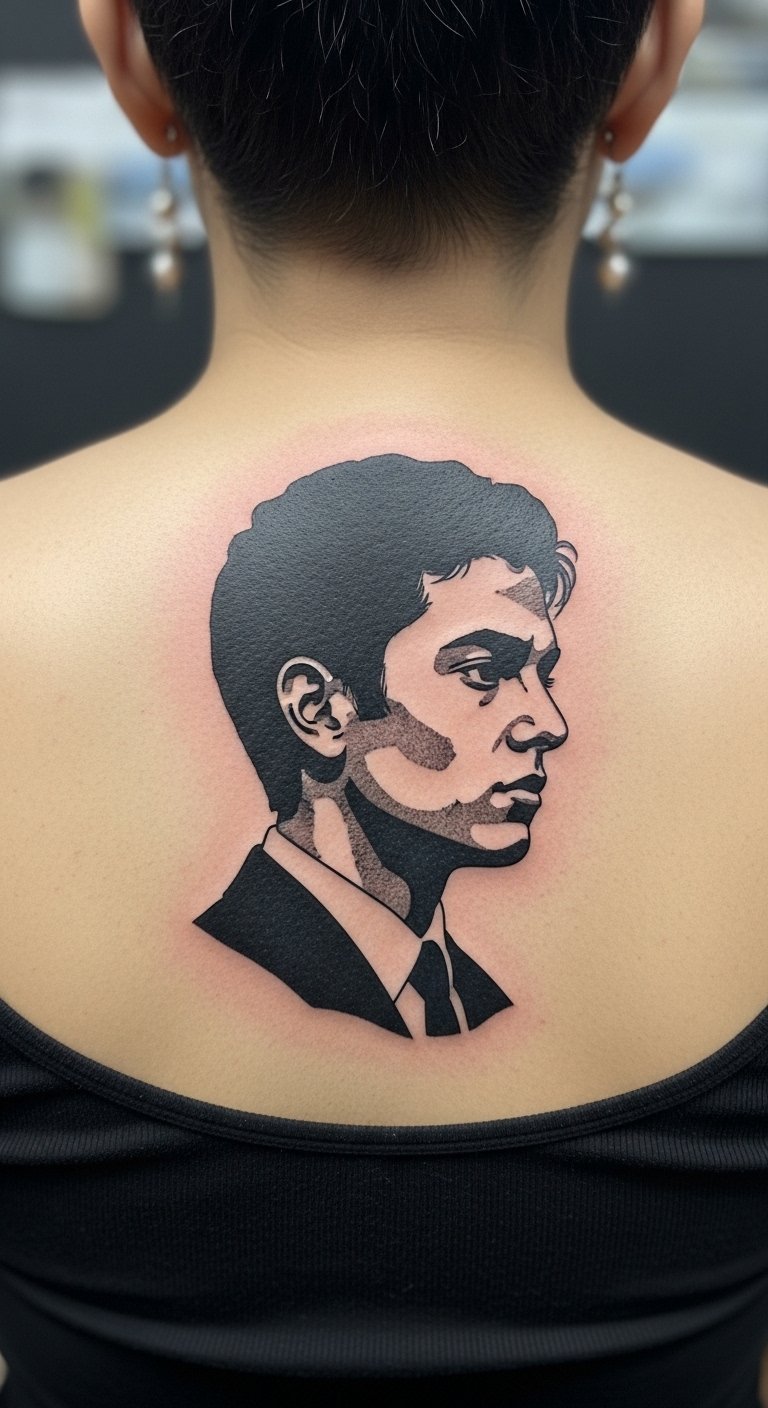
Silhouettes are dramatic and low-maintenance. Filled black ages well compared to small tonal gradients. Upper back provides large, flat area that heals predictably. Keep silhouette edges simple—tiny indentations will grow with time. Artists who excel in solid fills avoid patchy healing.
Split-Tone Portrait (Warm/Cool) on Thigh
Style/Technique: Split-Tone / Color Realism
Pain Level: Medium (3-5/10)
Session Time: 2-4 hours
Best For: Dramatic mood portraits with color contrast
Split-tone portraits create cinematic emotion—warm vs cool changes the feel. Thigh placement reduces movement and clothing friction. Colors can fade unevenly; choose pigments that artists use for longevity. This is a newer trend I’ve noticed that looks striking even as it softens.
Minimalist Line Portrait on Wrist
Style/Technique: Minimalist Line / Single-Continuous Line
Pain Level: Medium (3-5/10)
Session Time: 30-60 minutes
Best For: Subtle, meaningful portraits or abstract faces
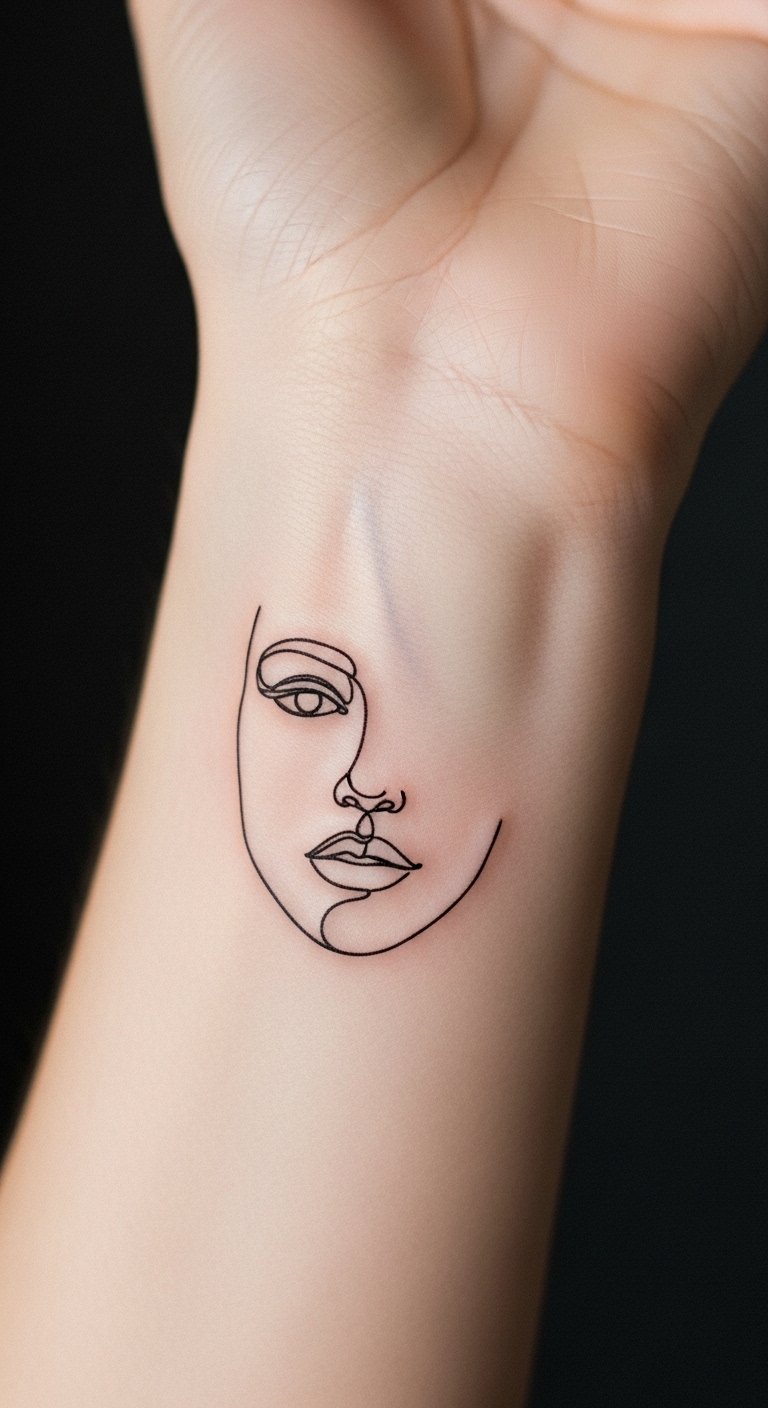
A single continuous line can suggest a face with emotional impact. Wrist placement is visible and sensitive. Lines can thicken slightly as they heal—ask for confident, slightly bolder strokes. This is perfect if you want a portrait feel without full realism.
Micro-Realism Mother-Child Portrait on Ribcage
Style/Technique: Micro-Realism / Intimate Portrait
Pain Level: High (7-8/10)
Session Time: Multiple sessions
Best For: Deeply personal, tender memorial pieces
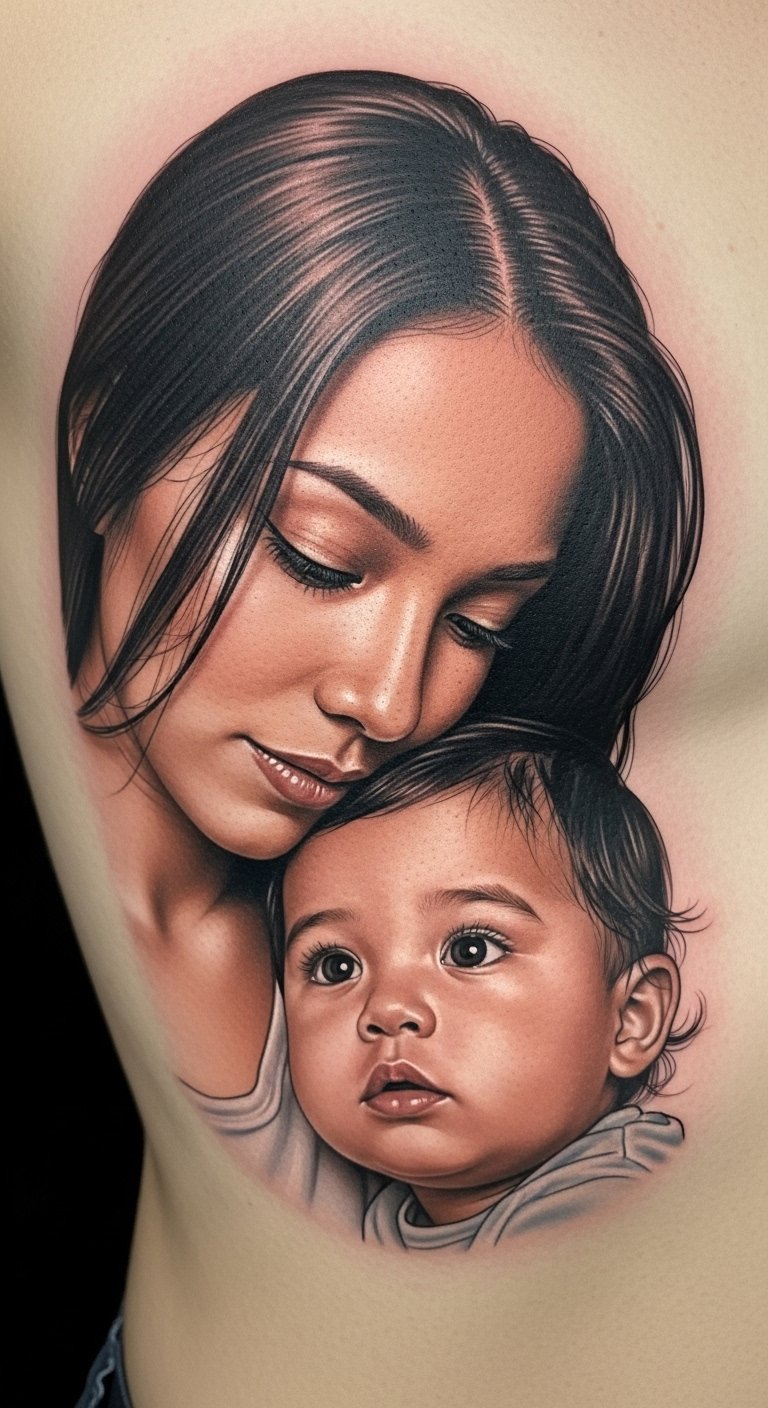
This placement holds meaning but is one of the more painful areas. Micro-realism can capture tiny gestures, like a hand on a cheek. The risk is scabbing and movement-related blurring. Proper aftercare and artist experience in ribcage portraits are essential.
UV/Blacklight Portrait Accent on Shoulder
Style/Technique: UV Accent / Subtle Glow Effects
Pain Level: Medium (3-5/10)
Session Time: 1-2 hours
Best For: Hidden accents that pop under blacklight
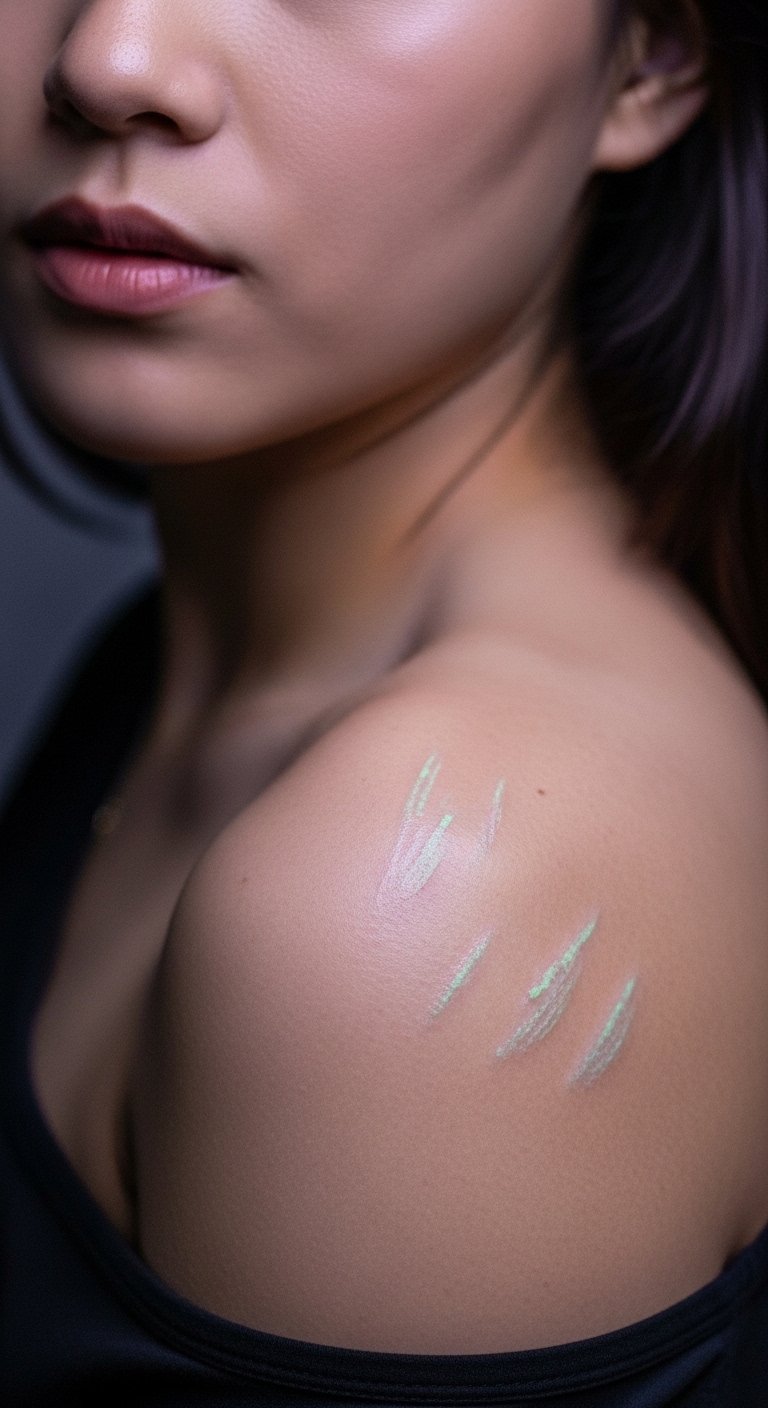
UV accents add a secret dimension. They’re subtle in normal light and glow under blacklight. Not every artist uses UV inks, and healing sensitivity can be higher—ask about ink safety. This is an under-covered angle I found in festival communities.
Two-Tone Line Portrait on Collarbone
Style/Technique: Two-Tone / Fine Line + Color Accent
Pain Level: Medium (3-5/10)
Session Time: 1-2 hours
Best For: Elegant, visible portraits with a pop of color
Collarbones show portrait lines elegantly. Two-tone adds contrast without full color commitment. Beware of bone sensitivity; it can feel sharper in-session. Keep color anchors bold enough to weather time.
Textured Scar-Incorporated Portrait on Forearm
Style/Technique: Realism / Scar Integration
Pain Level: Medium (3-5/10)
Session Time: 1-3 hours
Best For: Working with existing scars, meaningful camouflage
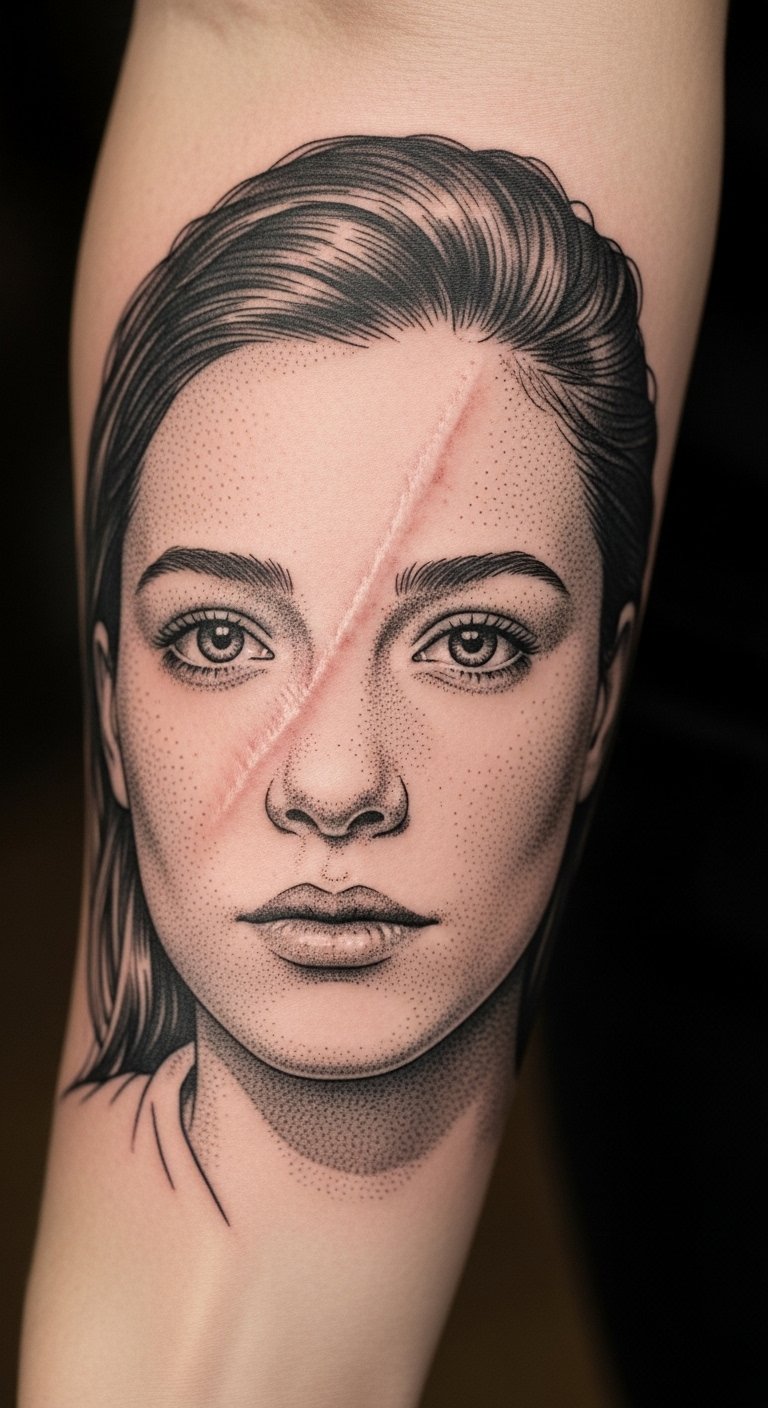
This is a fresh angle: using scars as part of the portrait composition. It can be empowering. Scars behave unpredictably; talk to an artist with experience tattooing scar tissue. Healing may take longer. The result can feel deeply personal and timeless.
Vintage Photo Portrait With Grain on Upper Thigh
Style/Technique: Vintage Realism / Grain Effect
Pain Level: Low-Medium (2-4/10)
Session Time: 2-3 hours
Best For: Nostalgic portraits that mimic old photos
Adding a grain effect gives portraits the look of an old photograph. Thigh placement is discreet. Grain hides small fades later—helpful for long-term appearance. Make sure the artist shows healed examples of grainwork.
Half-Profile Portrait on Sternum
Style/Technique: Realism / Half-Profile
Pain Level: High (7-8/10)
Session Time: Multiple sessions
Best For: Intimate, centered portraits with strong impact
Sternum portraits sit at the body’s center and feel weighty. Expect high pain and longer healing. Symmetry matters here. Avoid tiny facial details that can blur—focus on contrast and clear planes.
Portrait With Geometric Frame on Outer Arm
Style/Technique: Realism + Geometric / Framed Portrait
Pain Level: Low-Medium (2-4/10)
Session Time: 1-3 hours
Best For: Modern portraits with design structure
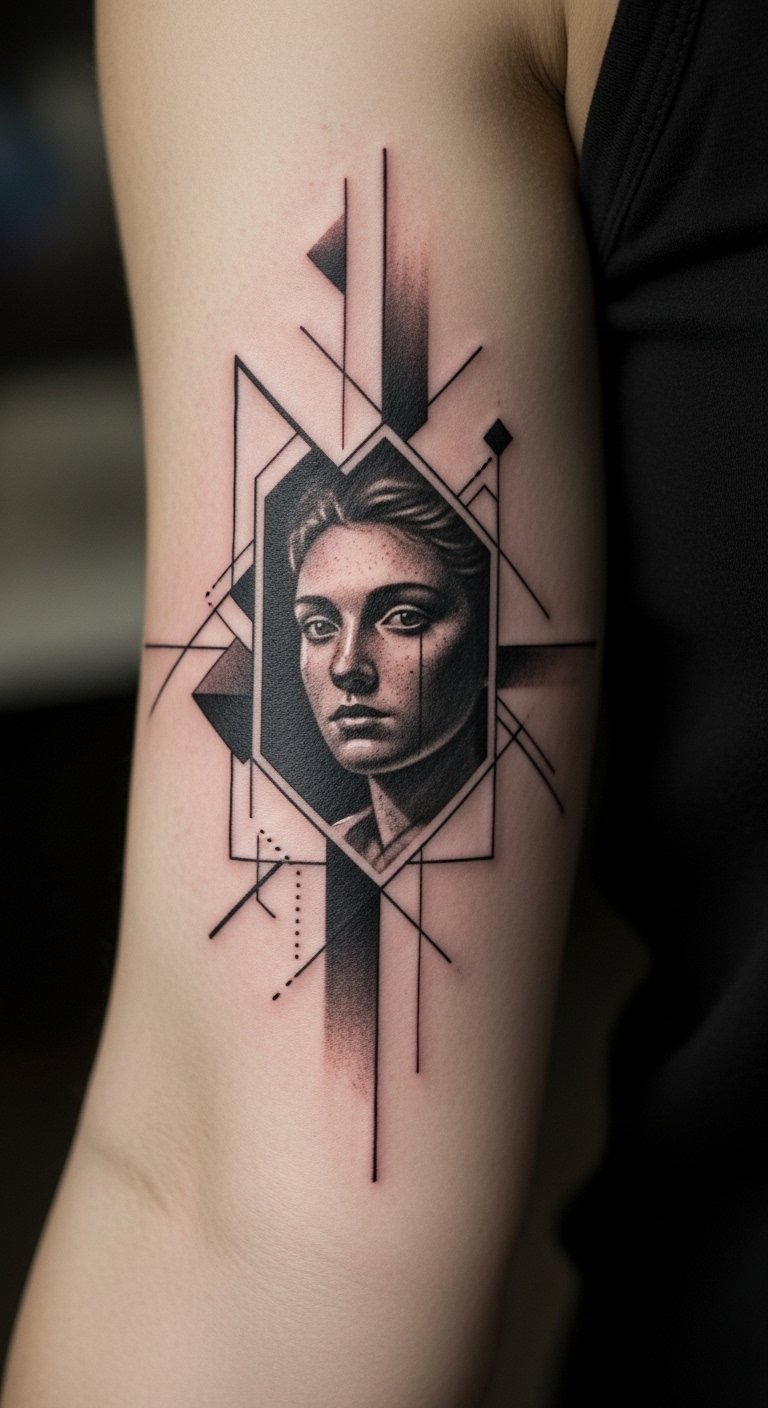
A geometric frame modernizes a portrait and helps with placement. The outer arm heals well. Frames help preserve edges and keep the portrait readable as skin changes. Ask for strong border lines.
Small Pocket Portrait on Upper Thigh
Style/Technique: Mini Realism / Pocket Size
Pain Level: Low (2-3/10)
Session Time: 1 hour
Best For: First-time portrait owners who want something small
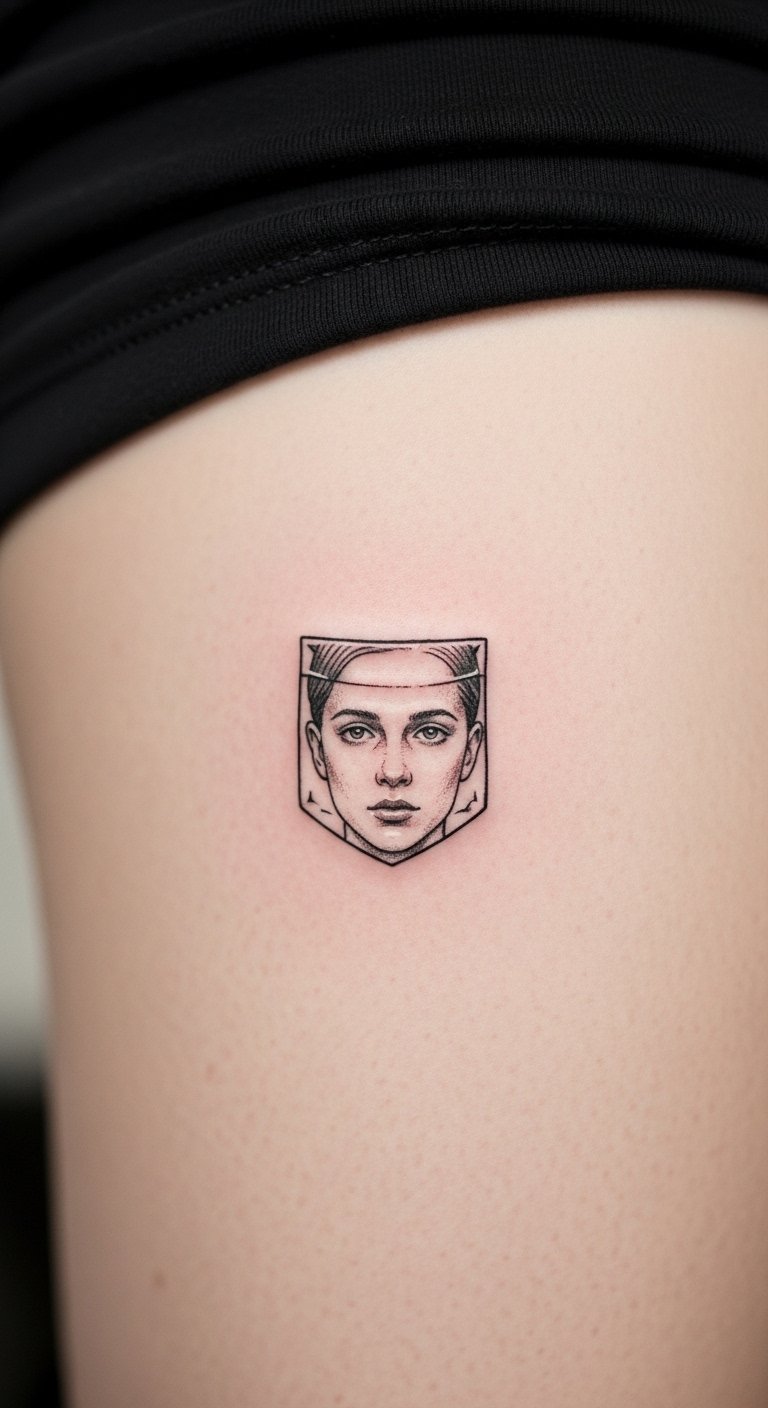
Small portraits can be surprisingly effective. Thigh is forgiving. The main pitfall is trying to cram too many details into a tiny space—keep features simple. I recommend small portraits if you want low visibility and low pain.
Portrait Silhouette With Floral Overlay on Ribcage
Style/Technique: Silhouette + Botanical / Emotional Motif
Pain Level: High (7-8/10)
Session Time: Multiple sessions
Best For: Symbolic portraits with organic overlays
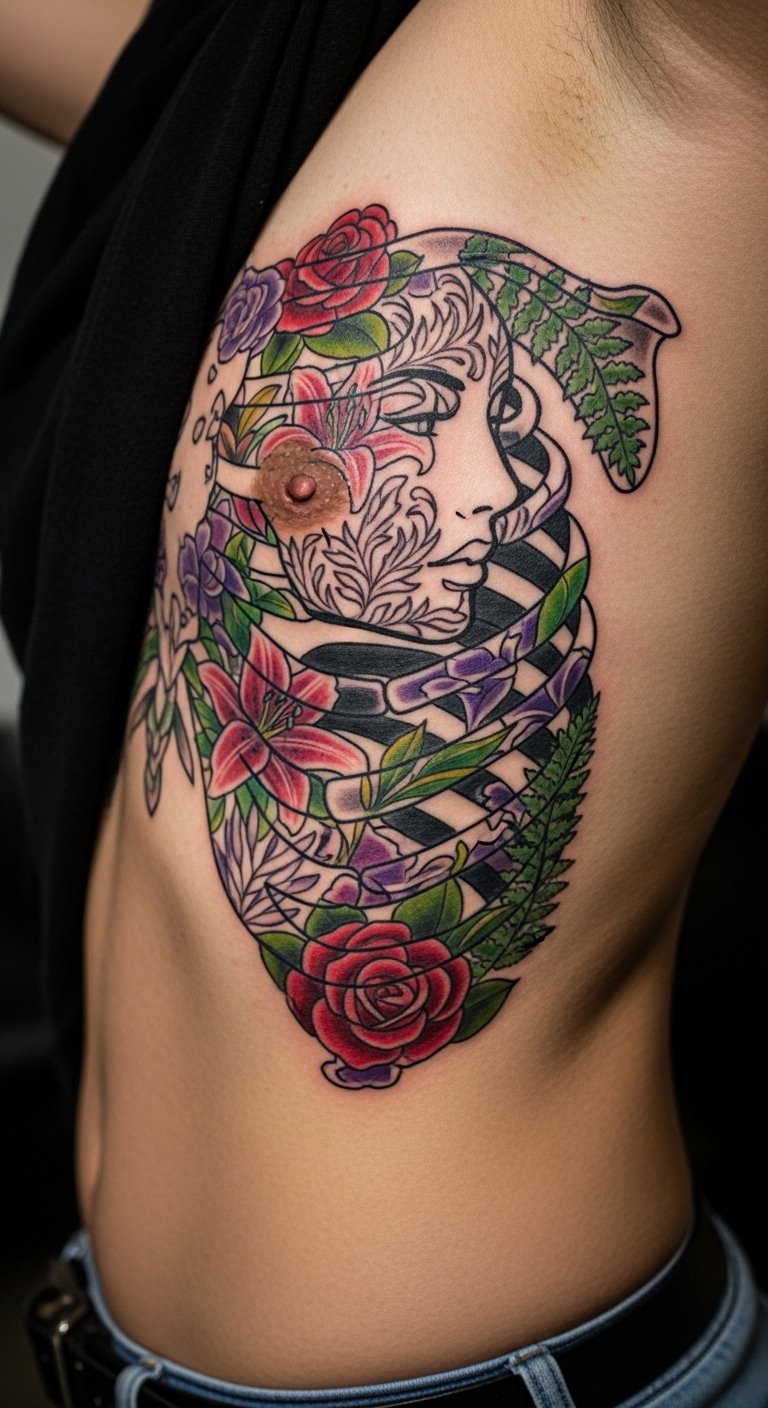
Florals soften silhouette portraits and add symbolism. Ribcage pain is high but the emotional payoff is big. Keep floral lines bold enough to age and avoid tiny florals that can blur into the portrait.
Portrait Sleeve Panel on Full Sleeve Inner Arm
Style/Technique: Realism Panel / Sleeve Integration
Pain Level: Medium-High (4-6/10)
Session Time: Multiple long sessions
Best For: Collectors building cohesive portrait sleeves
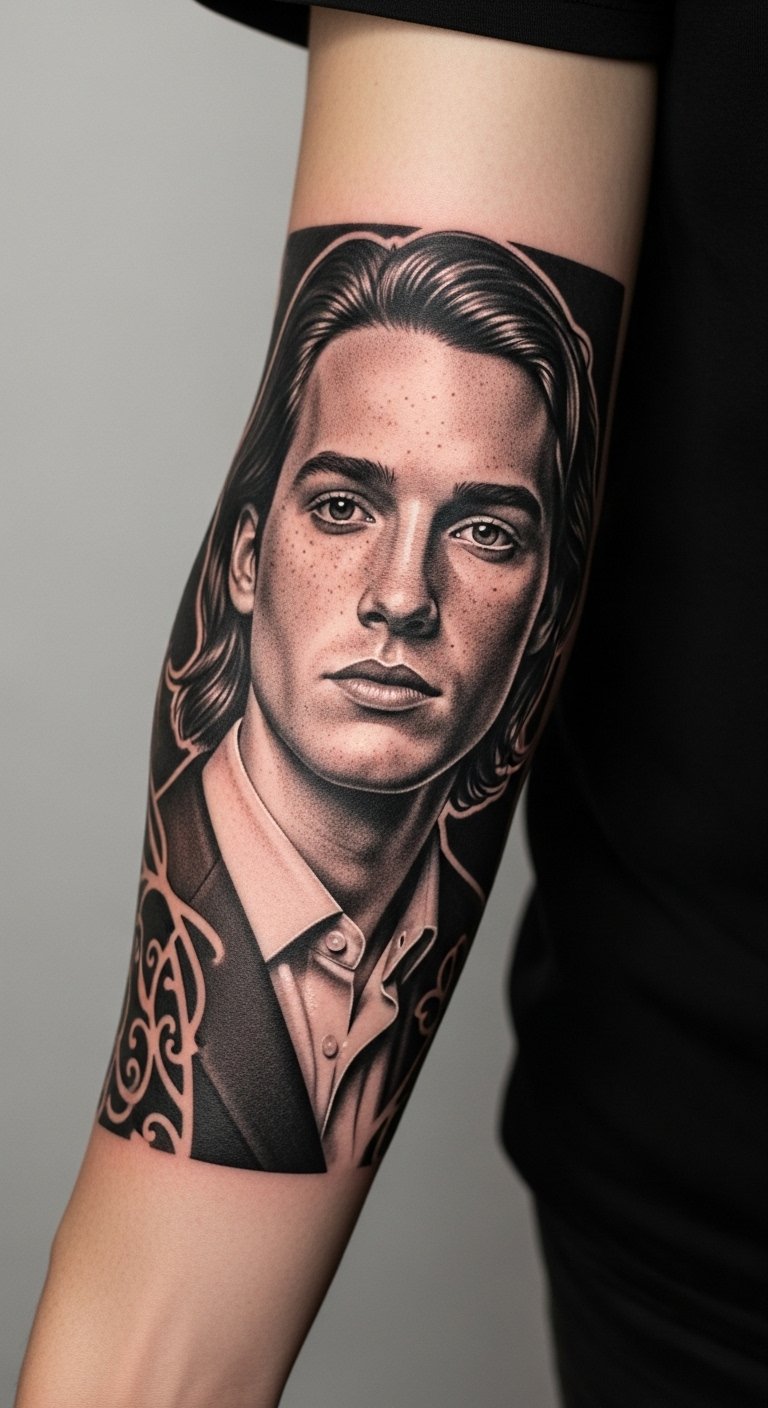
A sleeve panel lets you tell several personal stories across the arm. Inner arm placement can be sensitive near the bicep crease but reads well. Plan for flow so faces don’t crowd. I’ve seen sleeves that keep portraits readable decades later because the artist scaled features correctly.
Portrait With Negative Space Highlights on Calf
Style/Technique: Realism + Negative Space / High-Contrast
Pain Level: Low-Medium (2-4/10)
Session Time: 1-2 hours
Best For: Clean portraits that use skin tone for highlights
Negative space can act as highlight without white ink. Calf placement is low-pain and great for bold contrast. Ensure the artist plans highlights so they remain visible as the skin settles.
Tattoo Prep and Aftercare Essentials
Aftercare essentials:
- Aquaphor Healing Ointment, 14oz tube — Recommended first 3-5 days by many artists
- Saniderm Transparent Adhesive Bandage, 6-inch roll — Second-skin healing method pros use
- CeraVe Fragrance-Free Moisturizing Lotion, 12oz — For days 4-14; gentle and recommended by many artists
- Dr. Bronner's Unscented Castile Soap, 32oz — Gentle cleaning during first week
- Mad Rabbit Tattoo Balm, 2oz — Long-term moisturizing artists recommend for vibrancy
- Hustle Butter Deluxe, 8oz — Vegan balm alternative for healing and maintenance
- Tattoo Numbing Cream 5% Lidocaine — Use only if your artist approves, before sensitive sessions
- Tattoo Stencil Transfer Paper — Handy for designing at home before consultation
- SPF 50 Sunscreen Stick for Tattoos — Daily protection to prevent fading (non-negotiable)
- Saniderm Starter Pack / Tattoo Aftercare Kit — All-in-one for the first two weeks
- Hydrocolloid Bandages (Large) — For small spots or extended protection
- Tattoo Aftercare Balm (Mad Rabbit Travel Size) — For healed-tattoo maintenance
I list products artists actually recommend (Aquaphor, Saniderm, CeraVe) and include alternatives (Hustle Butter, Mad Rabbit) that heal well in my experience.
Frequently Asked Questions
Q: How bad does a portrait tattoo actually hurt?
A: Pain varies by placement. Outer arm/forearm = 3/10. Ribcage/sternum = 7-8/10. Smaller portraits can still hurt if placed over bone. For sensitive areas consider asking about numbing cream with 5% lidocaine but always check with your artist first.
Q: How long before a portrait looks like the healed version?
A: Surface healing is 2-3 weeks. Full settling and color integration take 2-3 months. Portraits often look dull while peeling; they brighten as skin regenerates.
Q: How do I keep my portrait from fading?
A: Sunscreen is essential. Use an SPF 50 sunscreen stick daily and moisturize with a fragrance-free lotion like CeraVe.
Q: Can portraits be touched up later?
A: Yes. Most portraits benefit from a touch-up after healing. High-contrast black-and-gray portraits generally need fewer touch-ups than delicate fine-line pieces.
Q: Will my portrait look different on my skin tone?
A: Yes. Black-and-gray shows well on all tones. Bright colors may read differently on deeper skin. Ask to see healed examples on your skin tone.
Q: Can I work out after getting a portrait?
A: Wait 48-72 hours before light activity. Avoid heavy sweating near the fresh tattoo for at least a week to reduce infection risk. Clean gently with castile soap and follow aftercare.
Q: What if I regret the portrait?
A: Sit with the idea for months before committing. Consider a smaller, hidden placement first. Removal exists but is a long process—better to plan carefully.
Q: Is there a best time of year to get a portrait?
A: Cooler months are easier for healing—less sun exposure and more clothing cover. But with proper aftercare and daily sunscreen, summer tattoos can heal well too.
I linked products where they fit naturally.
I hope these portrait ideas help you picture what will age well and what will feel right on your body. Start with references and a calm consultation. Keep healing top of mind—Aquaphor and daily SPF will keep your portrait looking true for years. Which portrait style are you leaning toward?
