
I spent months hunting illusion tattoos before I understood the trick: great optical illusion ink doesn't just look clever fresh — it needs to read the same way healed and from the angle people actually see it. These 24 designs bend perception, use negative space, and play with anatomy so the effect works in real life, not just on a grid of photos.
This list focuses on optical illusion tattoos across fine line, blackwork, micro-realism, and anamorphic styles. These placements work for arms, ribs, hands, and legs—areas that catch natural sightlines. From my experience following tattoo artists in 2026, artists are pushing anamorphic and negative-space illusions that still hold up healed.
1. Fine Line Floating Script Behind Ear
Style/Technique: Fine Line / Negative Space
Pain Level: Low (2-3/10)
Session Time: 30–60 minutes
Best For: First-timers, easy to conceal
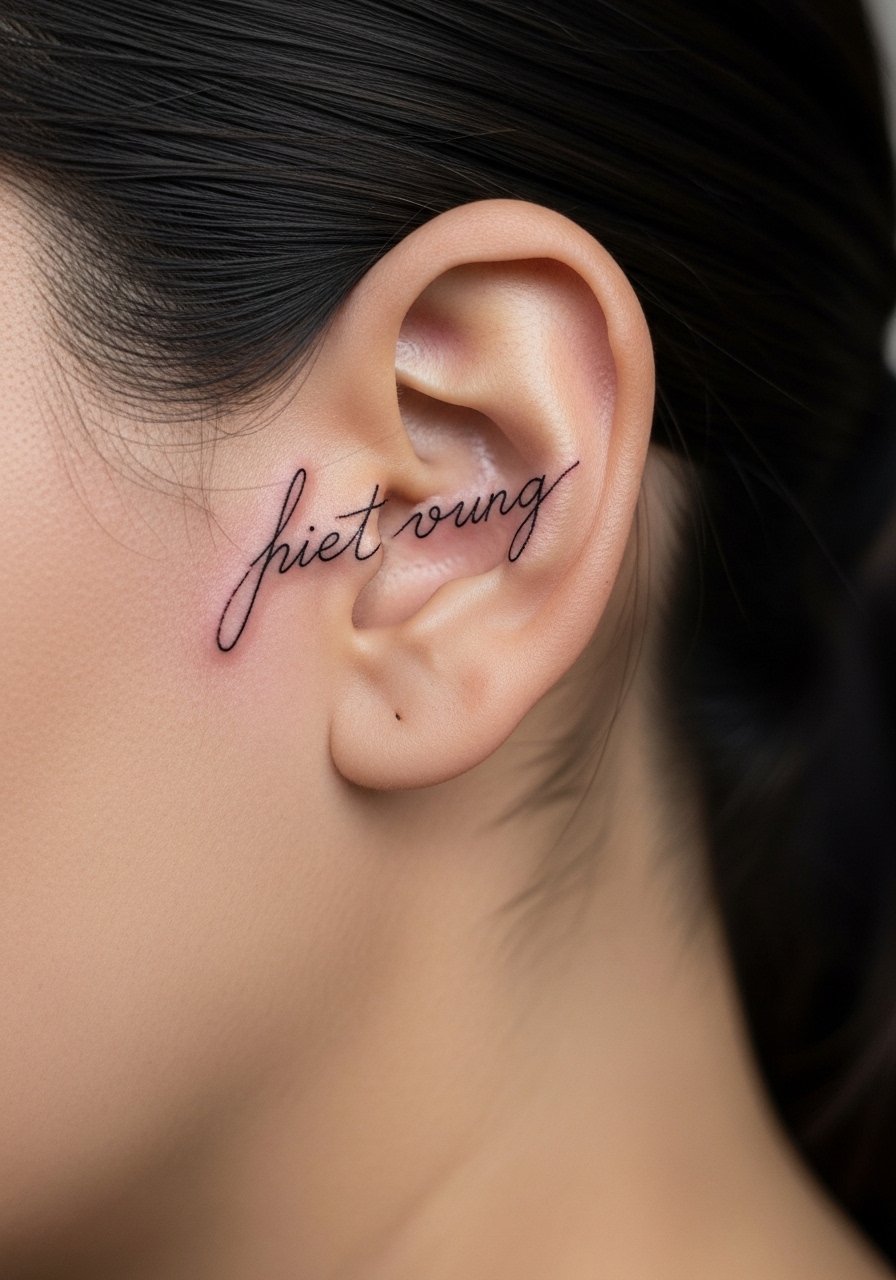
I got hooked on subtle illusions like a floating word that uses gaps to appear suspended. Fine line behind the ear reads intimate and unexpected when you tuck hair. Pain is mild; the skin is thin but quick to tattoo. Healing takes about 2–3 weeks for surface skin, and the lines can blur slightly over a year—so ask your artist for slightly bolder line weight if you want longevity. The visual feels secret and meaningful. Avoid overly tiny lettering; the common mistake is making lines too thin to survive healing. Look for artists who specialize in fine line and negative space. Ask to see healed examples on similar skin tones so you know how the script will settle.
2. Micro-Realism Eye That Follows on Forearm
Style/Technique: Micro-Realism / 3D Shadowing
Pain Level: Medium (4/10)
Session Time: 2–3 hours
Best For: Statement forearm piece, visible illusion
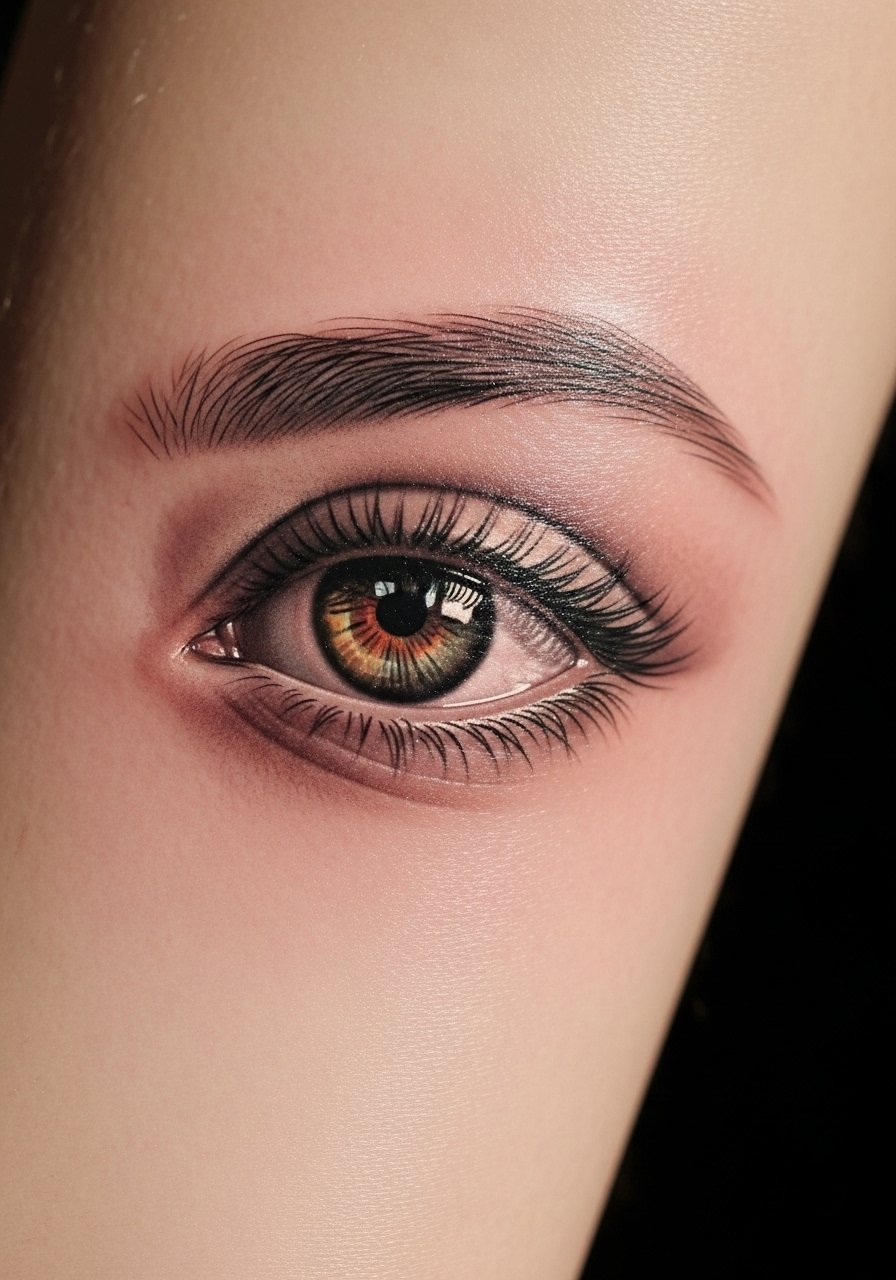
A tiny hyperreal eye uses highlights and shadow to feel like it's watching. On the forearm it meets people's gaze naturally. Expect medium pain because of the thin skin and detail work. Healed, the highlights may soften, so artists often use subtle white ink sparingly—I've seen white fade faster. This style ages well if you maintain moisturized skin and avoid heavy sun. Common mistake: too much contrast that looks fake once healed. Seek an artist experienced in micro-realism and portraiture. Ask for healed photos, not just fresh shots, to judge how contrast mellows.
3. Trompe-L'œil Zipper on Wrist
Style/Technique: Neo-Realism / Trompe-L'œil
Pain Level: Medium (4-5/10)
Session Time: 2–4 hours
Best For: Playful wrist piece, high visibility
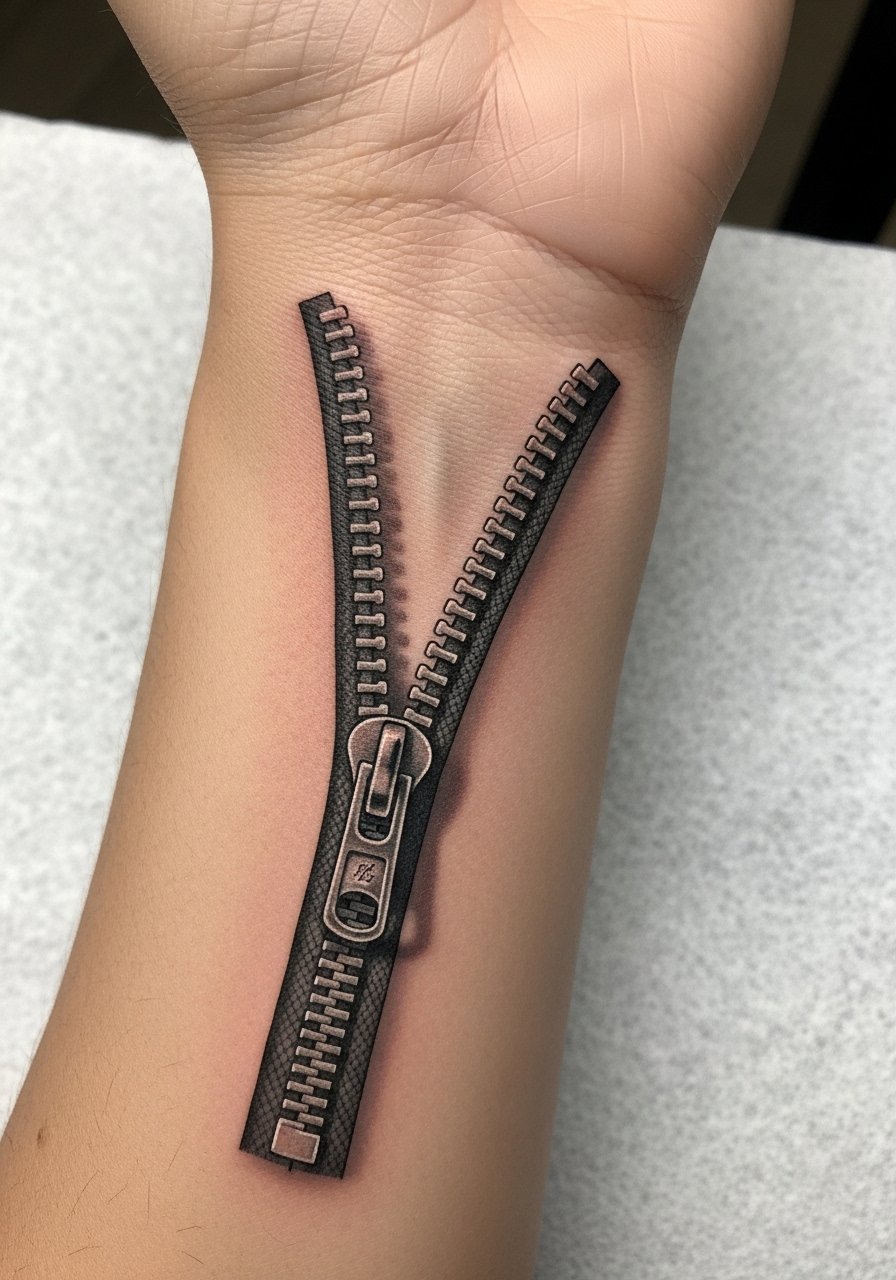
A zipper tattoo blends micro-shading and edge highlights to look like clothing unzipped to reveal skin or imagery underneath. On the inner wrist it constantly surprises. Pain sits in the medium range because the area is bony and has thin skin. Healing shows scabbing around the darkest shadows—don't pick. Over time, tiny highlights can fade, so ask your artist about touch-up plans. Typical mistake: flat shading without layered gradients; that kills the 3D effect when healed. Look for artists who do trompe-l'œil and realistic texture work.
4. Anamorphic Ring That Wraps Finger
Style/Technique: Anamorphic / Geometric
Pain Level: High (6-7/10)
Session Time: 1–2 hours, may need touch-up
Best For: Visible hand jewelry alternative
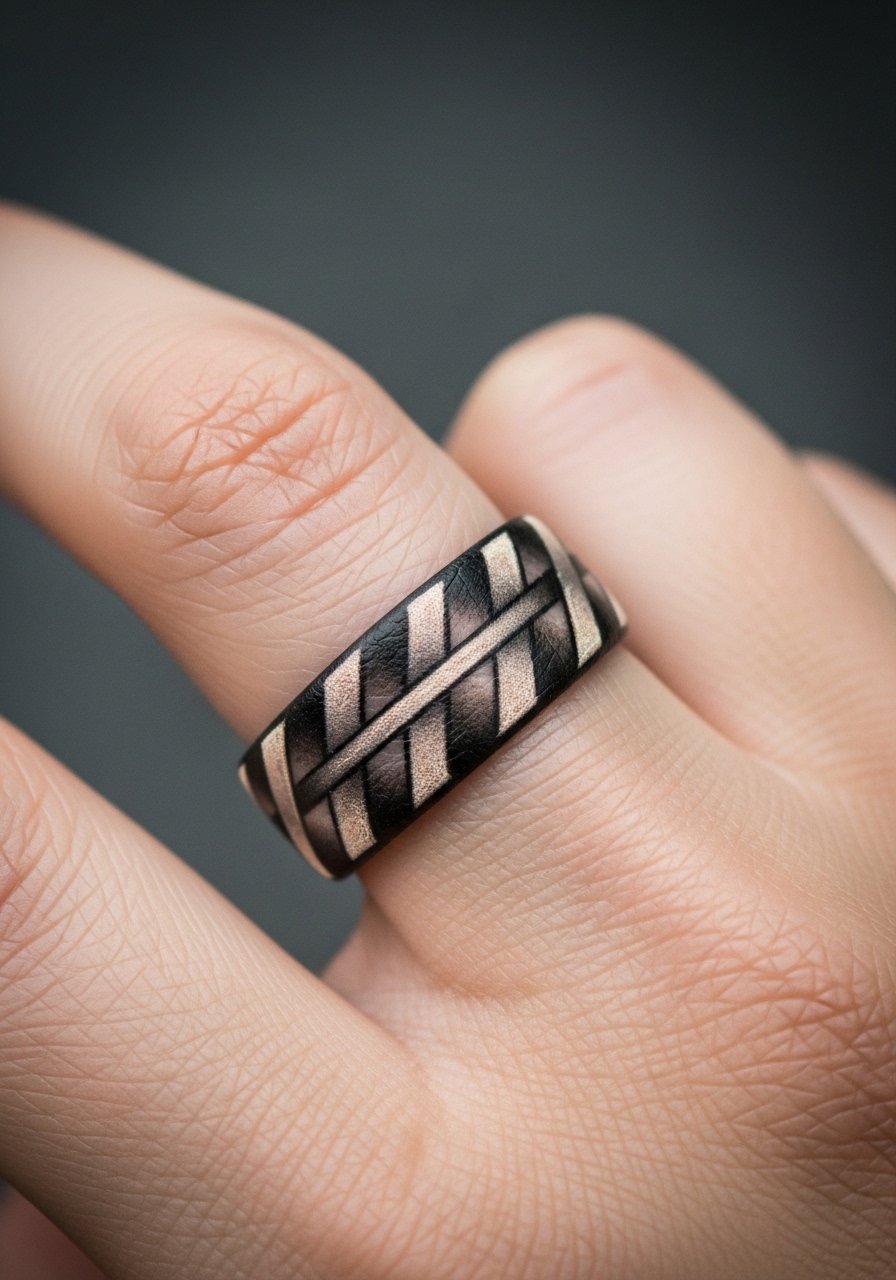
An optical ring uses warped perspective so the band reads three-dimensional from a certain angle. Fingers are painful and prone to fading since skin regenerates fast and is washed often. Expect touch-ups after healing. The result is striking—people often ask if it’s real. Avoid super thin lines; hands need sturdier work to hold. Artists who do fine blackwork and geometric anamorphic pieces are ideal—ask for healed hand examples.
5. Negative-Space Skull on Ribcage
Style/Technique: Blackwork / Negative Space
Pain Level: High (7-8/10)
Session Time: 3–5 hours
Best For: Concealable, dramatic illusion
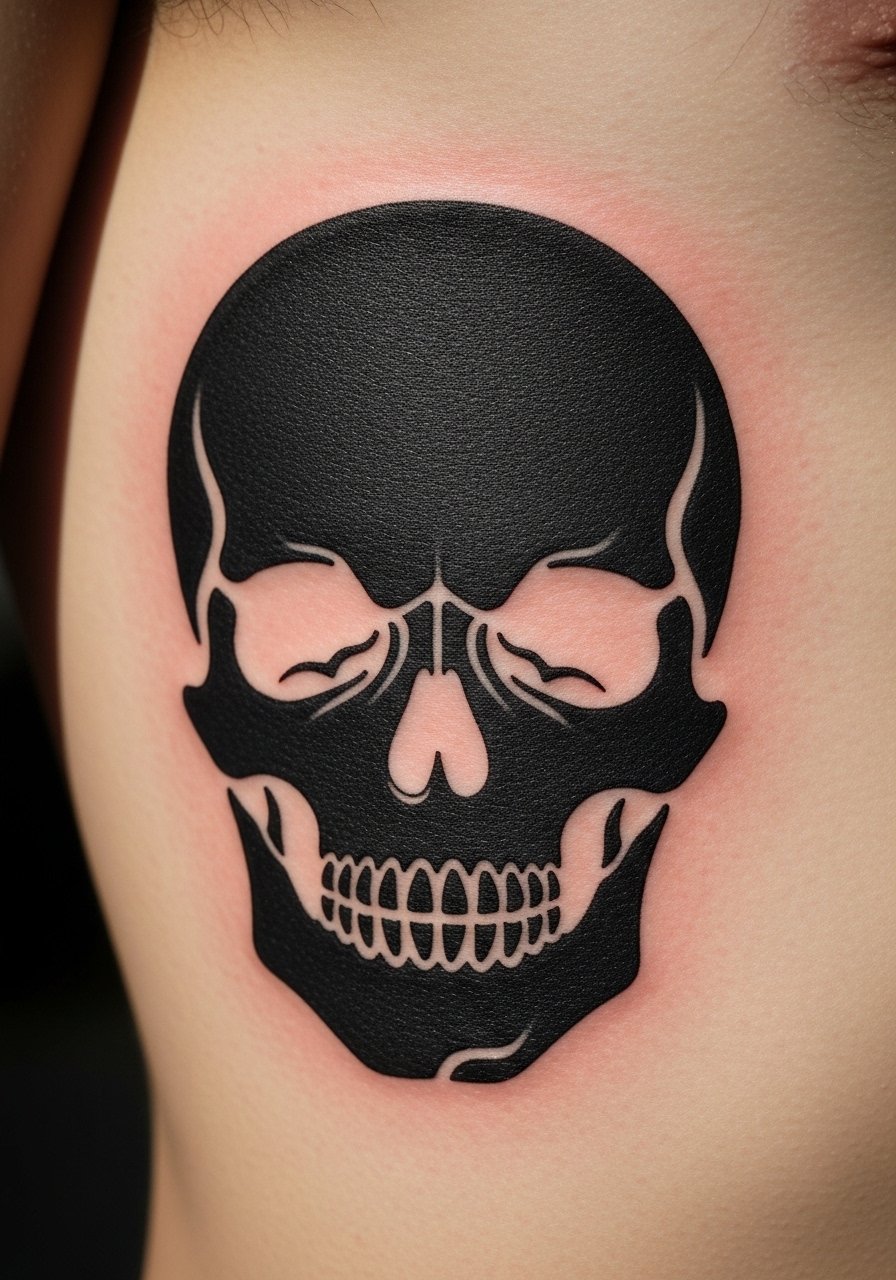
Using blocks of solid black and carved-out skin gives an image that resolves at a distance. Ribs hurt more than other spots, but the placement hides well under clothing. Healed blackwork often keeps shape longer than thin linework, but you may see slight softening at edges—skin shifts matter. Common mistake: letting the negative space be too skinny; it can fill in. Ask for bold negative-space shapes and healed photos to be sure the skull reads after healing.
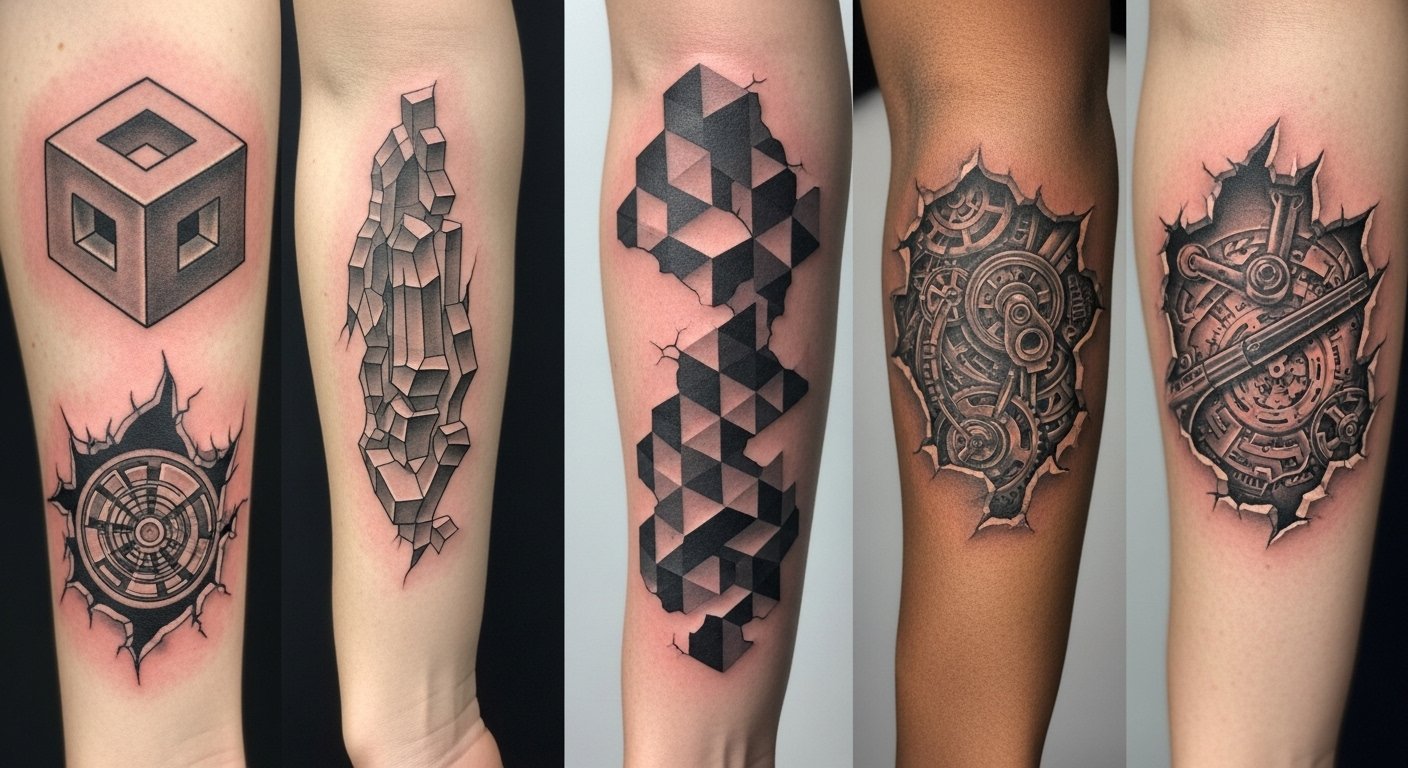
6. Stacked Cubes Sleeve on Outer Arm
Style/Technique: Geometric / Dotwork / 3D
Pain Level: Medium (4-5/10)
Session Time: Multiple sessions (4–8 hours total)
Best For: Sleeve illusion, flow with muscle lines
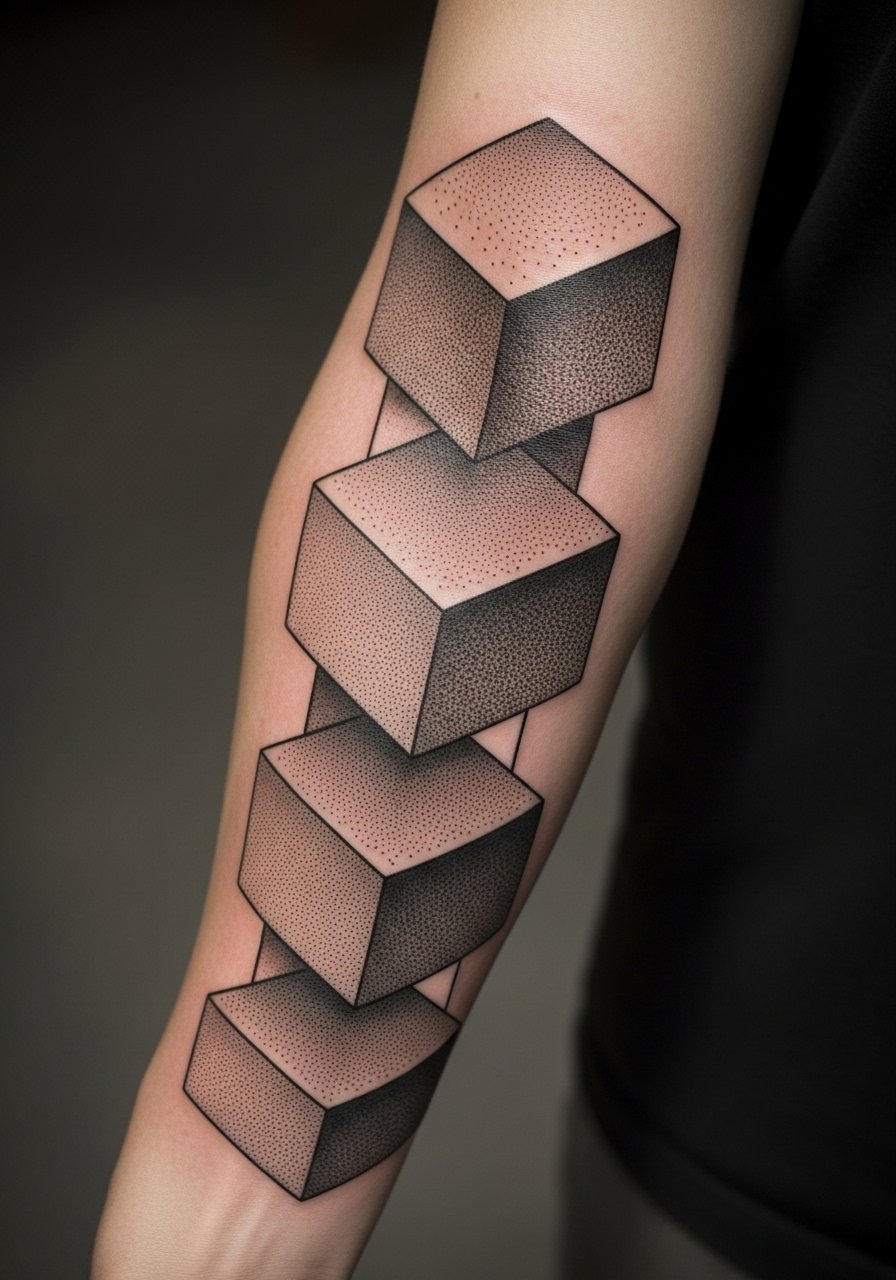
A sleeve of stacked cubes creates an Escher-like depth. Dotwork shading softens transitions and helps the 3D illusion last healed. Outer arm placement is moderate pain and holds detail well. Because sleeves are larger, they heal over multiple sessions and may need touch-ups to unify tones. Avoid overcomplicating the negative space; too many tiny cubes blur with time. Artists who do precise geometric and dotwork are perfect—ask for sleeves they’ve healed for at least a year.
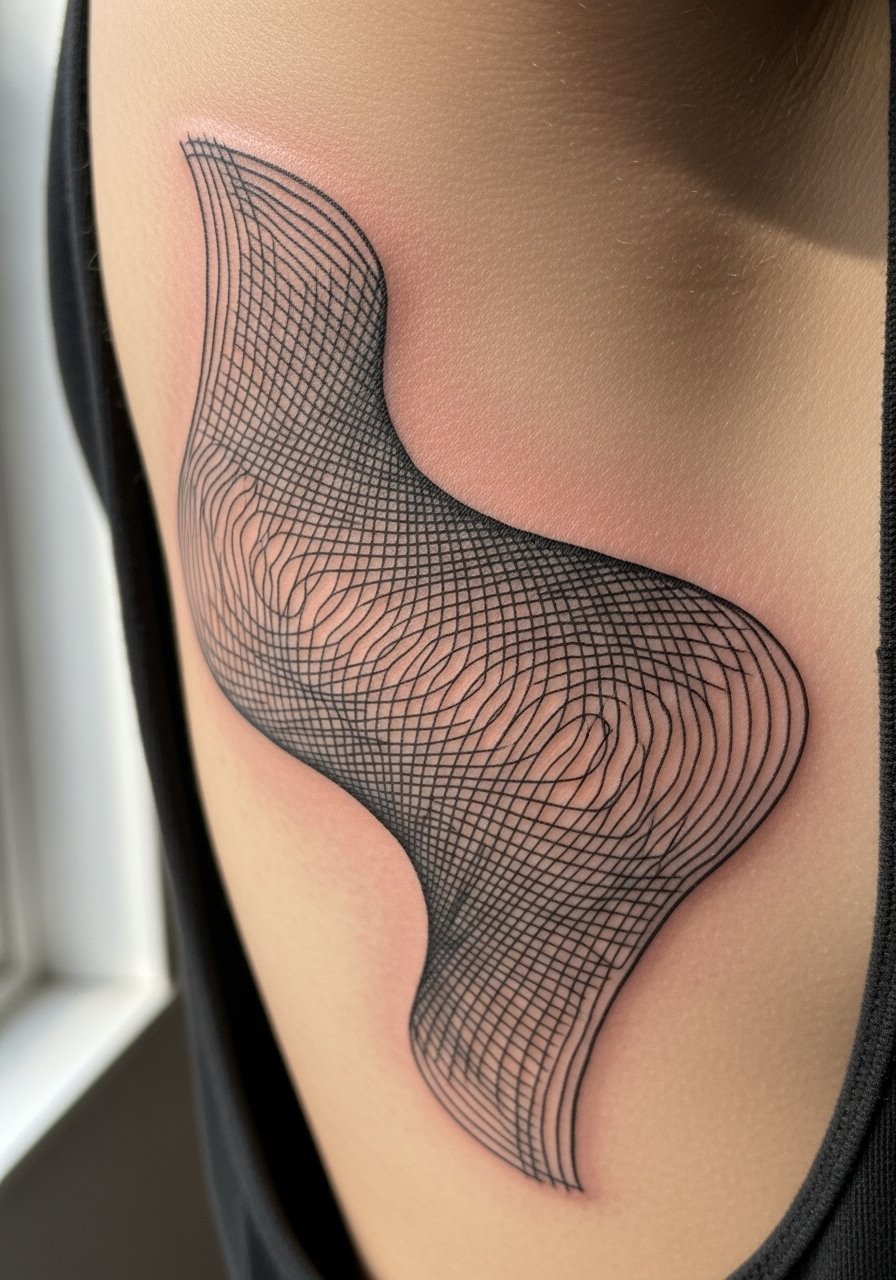
7. Optical Wave Band Around Calf
Style/Technique: Op Art / Blackwork
Pain Level: Medium (4/10)
Session Time: 2–3 hours
Best For: Bold leg statement, easy to show/hide
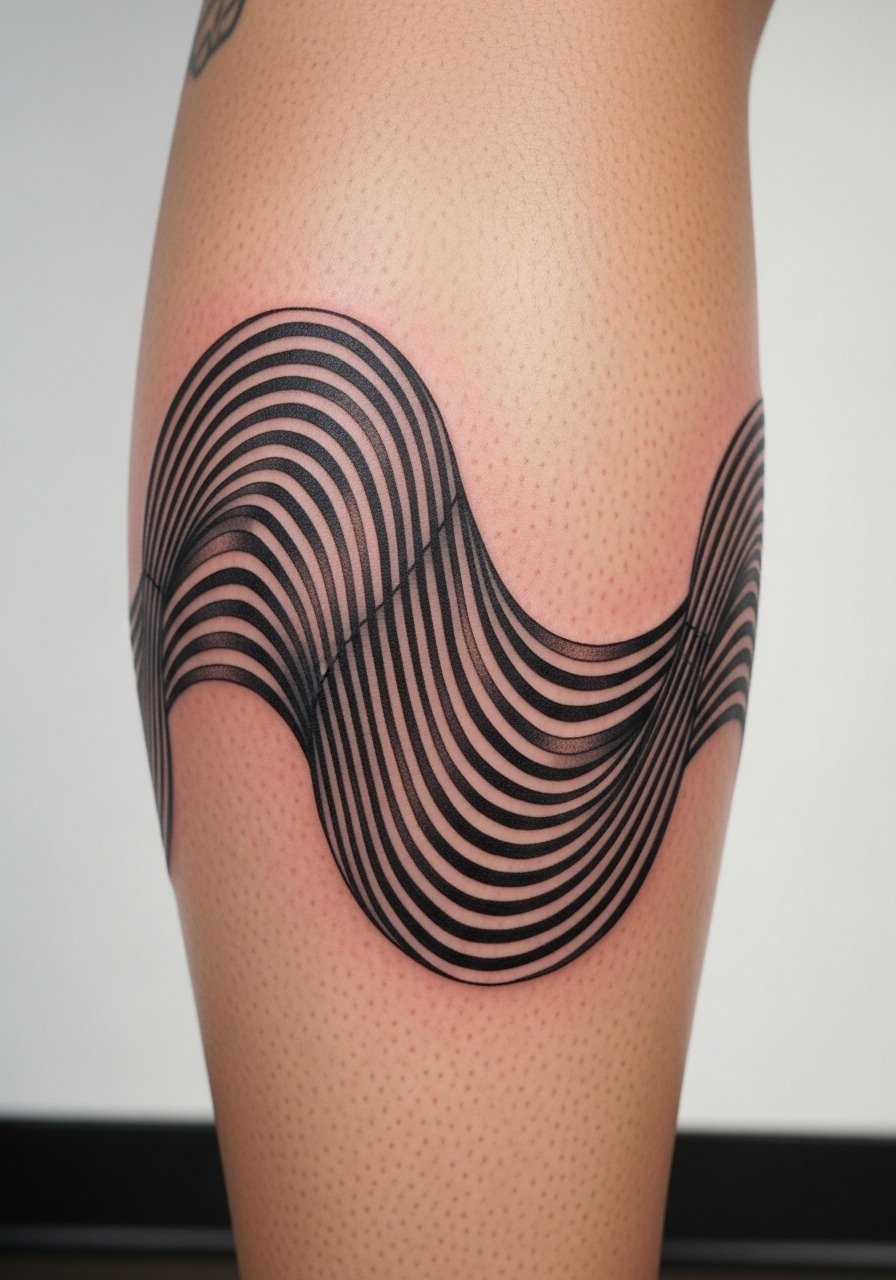
Bands that ripple create motion as you walk. Calf placement is forgiving and relatively low pain, and tattoos here tend to hold shape. Healed lines may soften slightly; choosing solid black with clean spacing prevents bleeding together. A common mistake is packing lines too close—healed skin can blur them. Look for blackwork artists experienced with op art and repetition.
8. Trompe-L'œil Coin Pocket on Hip
Style/Technique: Neo-Realism / Trompe-L'œil
Pain Level: High (7/10)
Session Time: 1–3 hours
Best For: Private spot, playful reveal
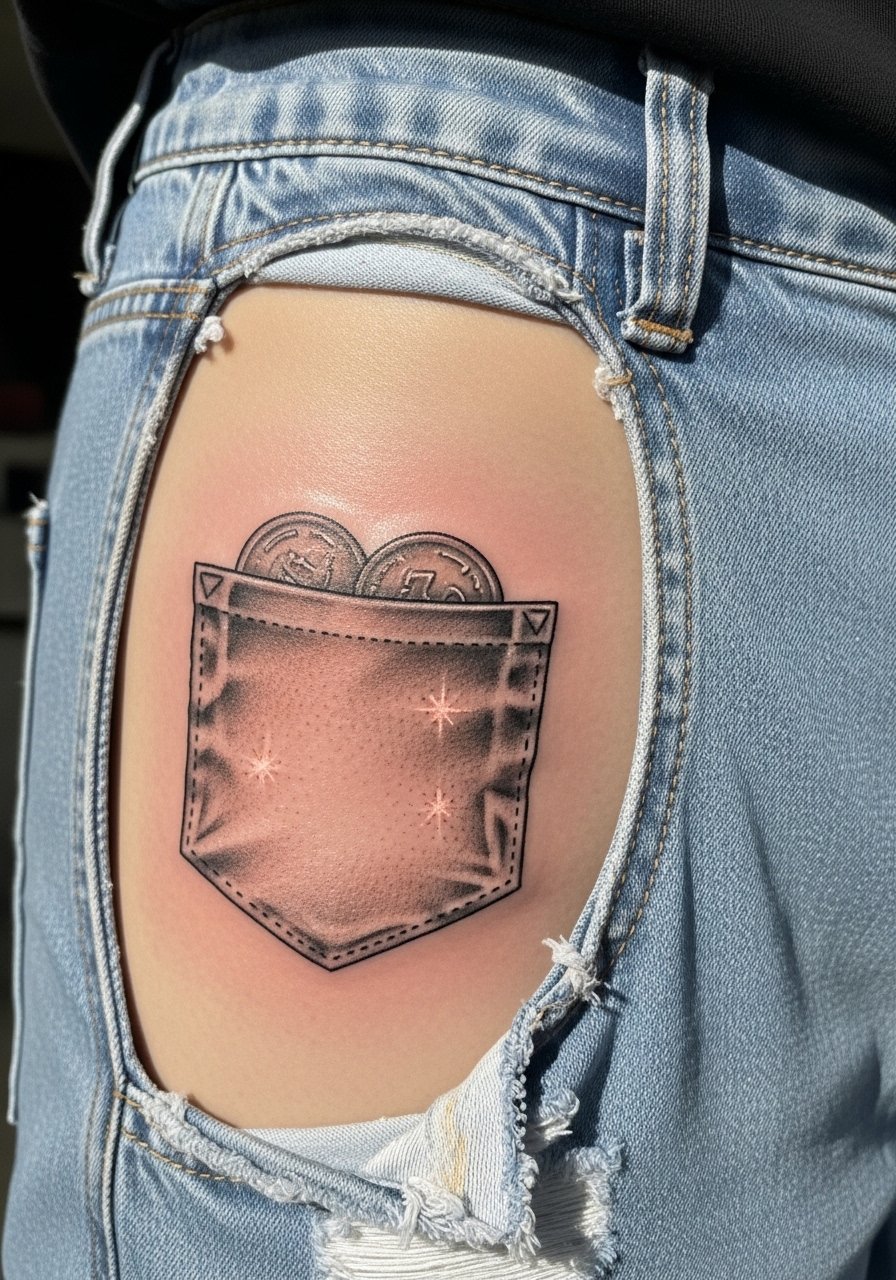
A hip pocket that looks sewn-on uses edge highlights and inner shadows to sit above the skin visually. The hip can be painful, and movement during sessions can be an issue. I’ve seen these hold well if shading is layered. Mistake: too little contrast—then the pocket reads flat. Ask for texture reference work and healed images of similar placements.
9. 3D Torn Skin Revealing Galaxy on Thigh
Style/Technique: Micro-Realism / Color Realism
Pain Level: Medium (4-5/10)
Session Time: Multiple sessions (3–6 hours)
Best For: Large canvas, hiding bright colorwork
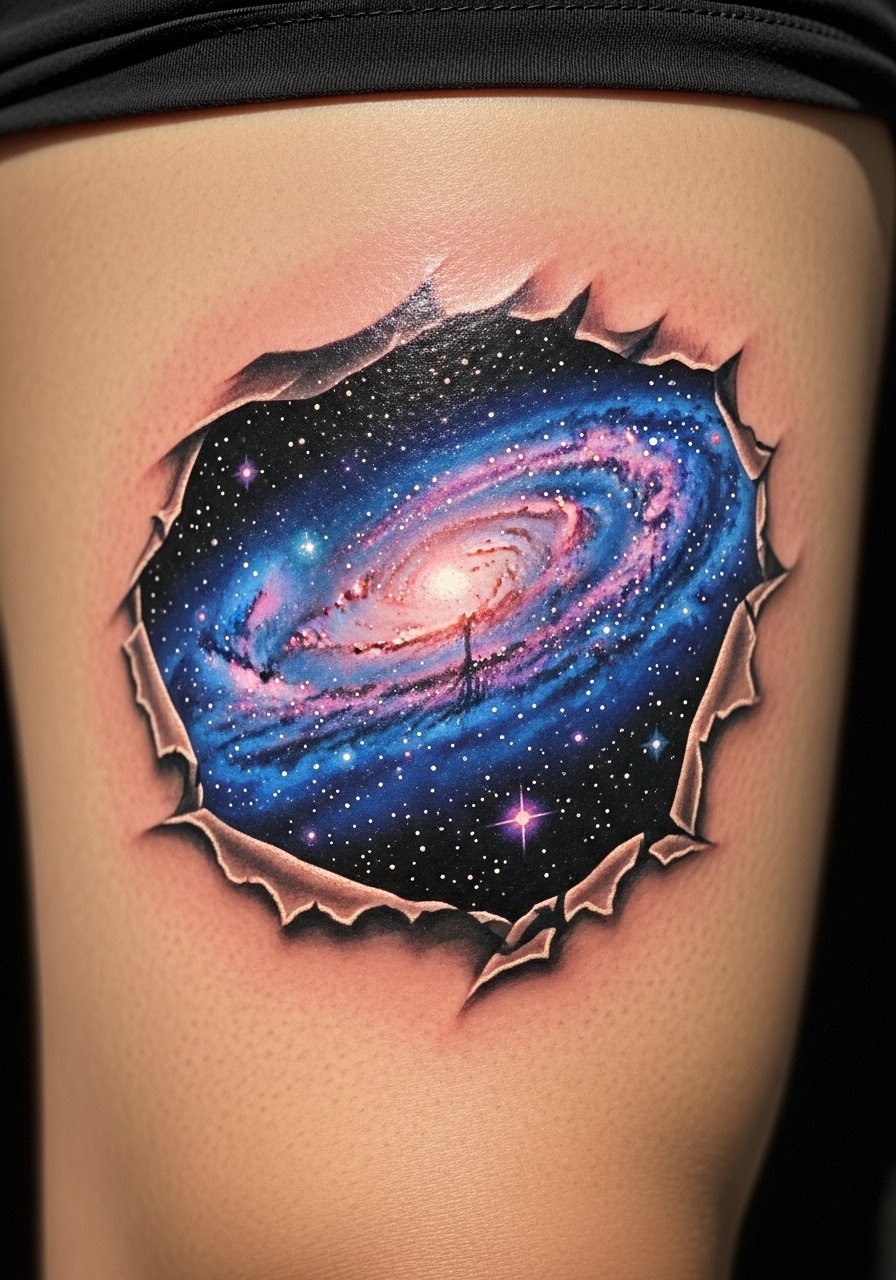
Torn-skin illusions that reveal a galaxy combine crisp edges with color gradients. Thigh flesh tolerates long sessions and allows saturation to heal nicely. Colors often look muted while healing and then pop after months—I've seen purples and blues settle differently by skin tone. Common error: overly sharp white highlights that disappear; request subtle whites and layered color. Work with artists who do color realism and healed color portfolios.
10. Impossible Triangle on Inner Elbow
Style/Technique: Geometric / Minimalist 3D
Pain Level: High (6-7/10)
Session Time: 1–2 hours
Best For: Small but mind-bending elbow piece
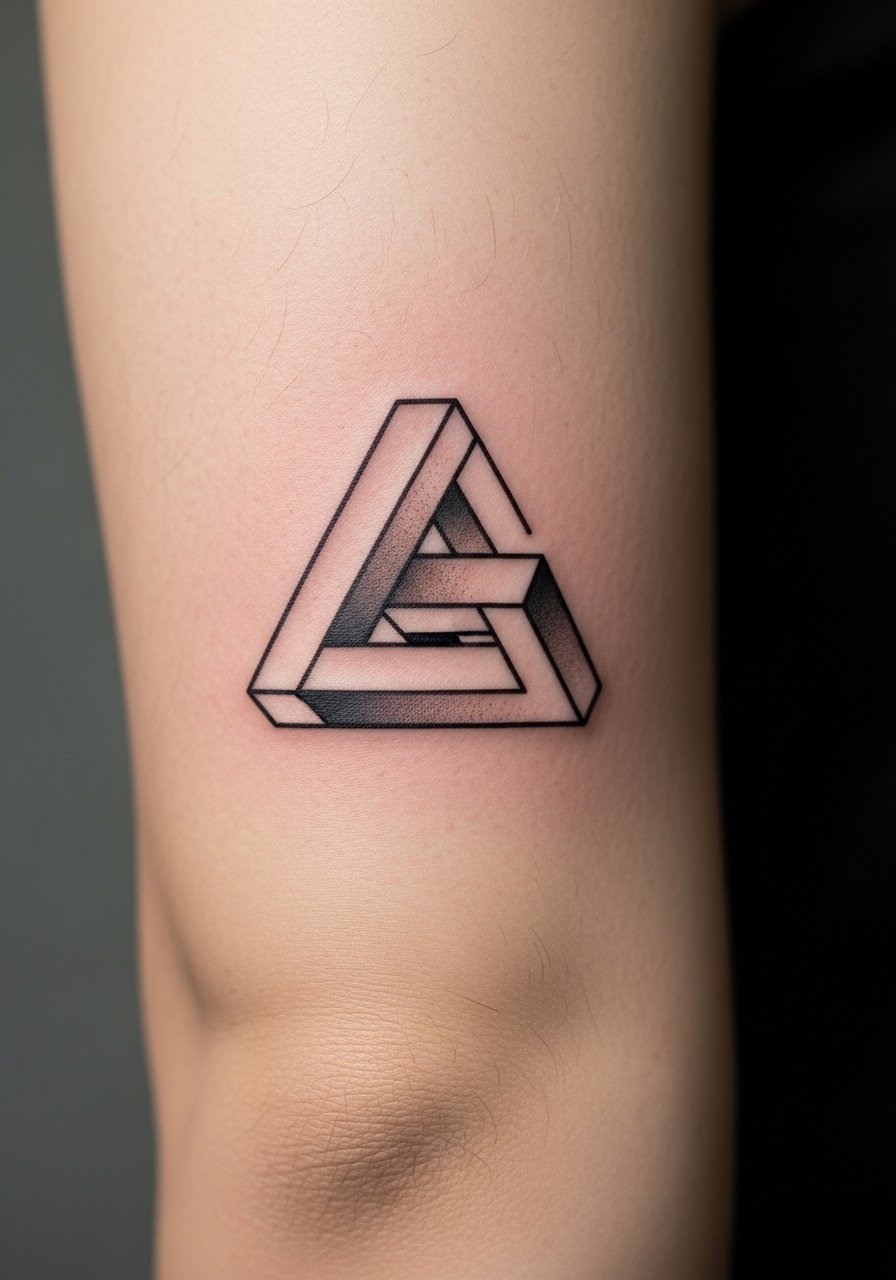
An impossible triangle on a joint reads perfectly when positioned with crease lines. The inner elbow is painful and tricky to heal—frequent bending can cause scabbing. Expect longer surface healing. The trick is to balance line thickness so the illusion survives movement. The common mistake is placing it off-axis; consult with your artist on exact placement relative to motion lines.
11. Hidden-Face Floral On Collarbone
Style/Technique: Fine Line / Negative Space / Botanical
Pain Level: Medium (4/5)
Session Time: 1–3 hours
Best For: Feminine placement, peek-a-boo detail
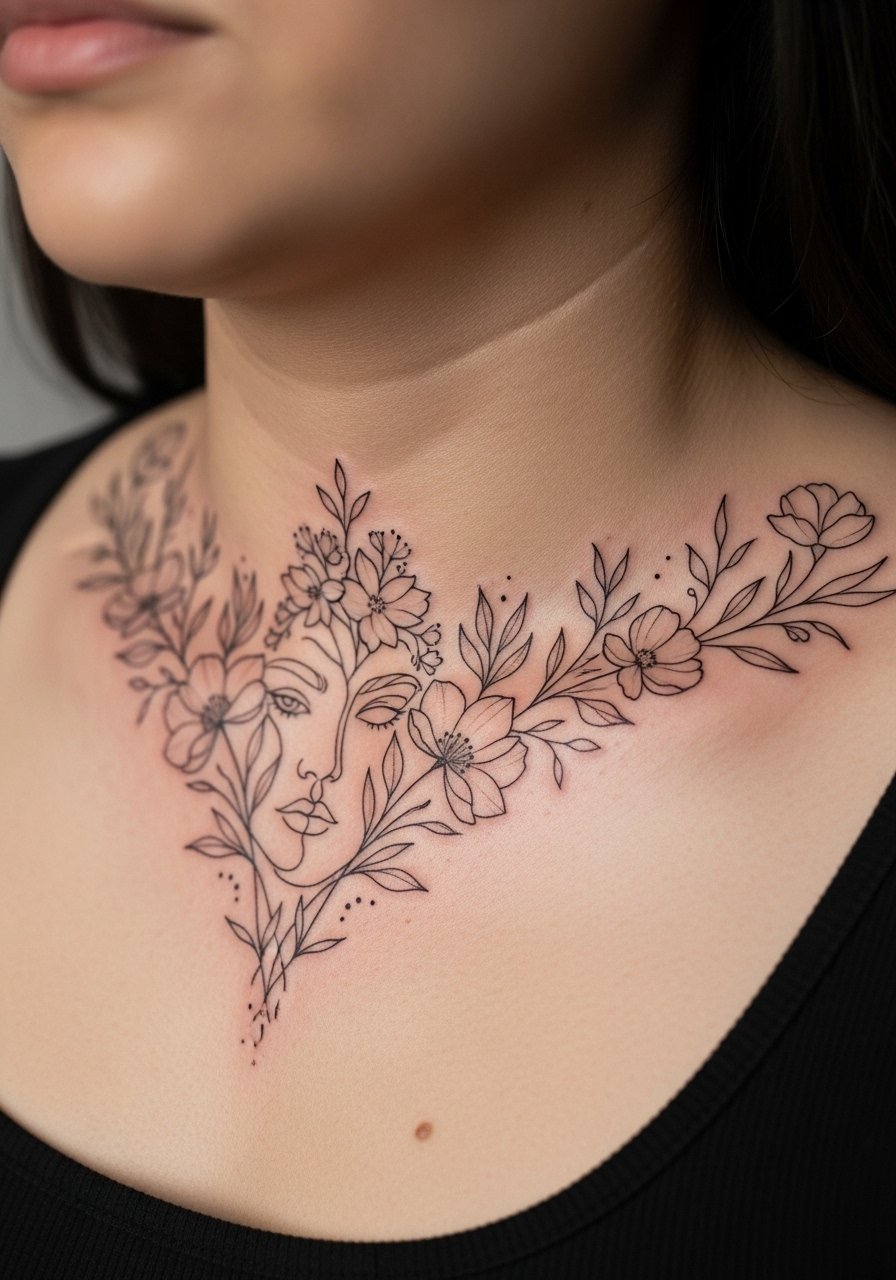
Flowers that hide a face in negative space reward close inspection. The collarbone area has moderate pain and shows movement. Fine line works well but can blur, so artists sometimes thicken key outlines. Healed, the face should still read if negative spaces are broad enough. Newcomers often request too-fine detail—avoid that. Seek artists who blend botanical fine line with optical negative-space composition.
12. Möbius Strip Wrist Band
Style/Technique: Geometric / 3D Minimalist
Pain Level: Medium (4/10)
Session Time: 1–2 hours
Best For: Symbolic wrist piece, subtle math-inspired illusion
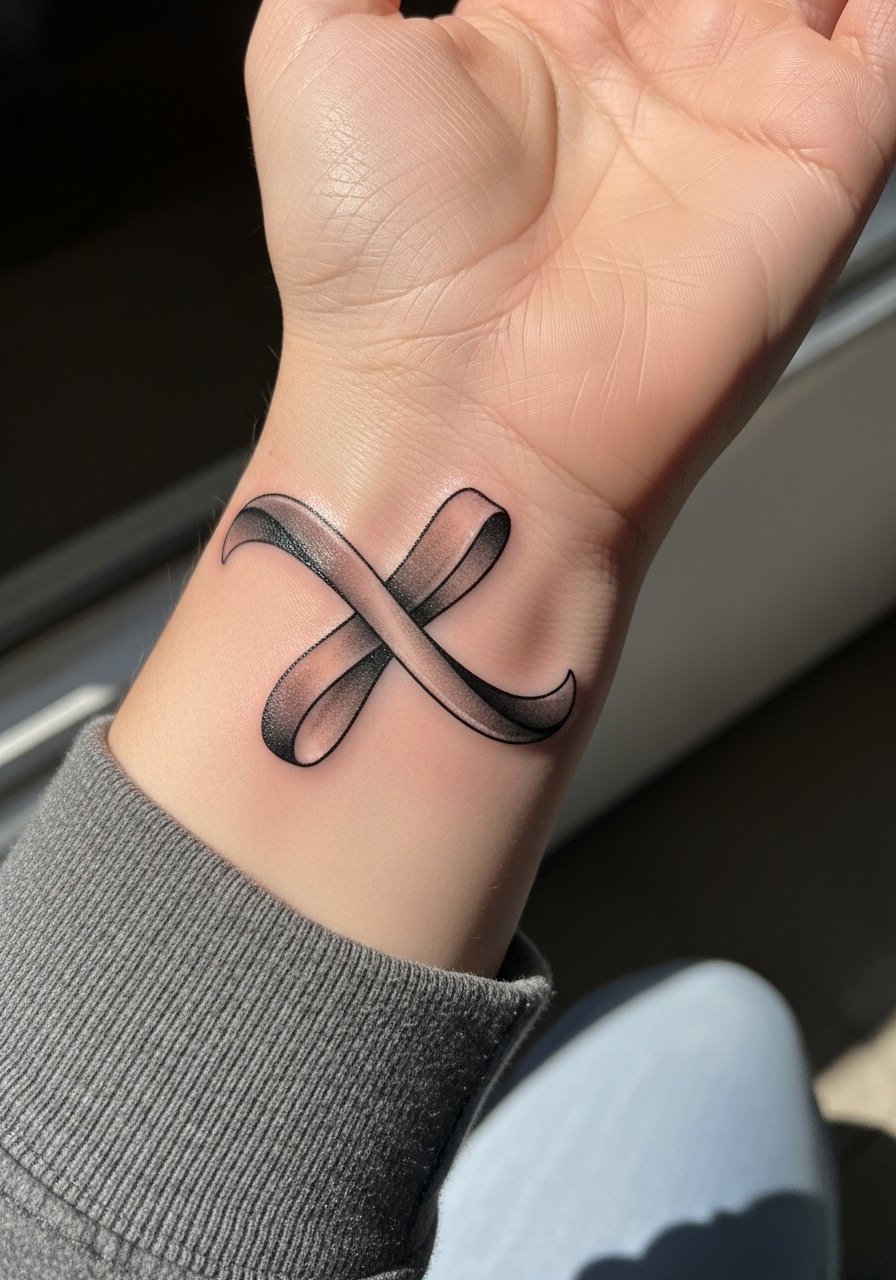
A Möbius strip wraps visually into itself and reads cool on the wrist. Because wrists move and wash frequently, expect some softening at edges—thicker line choices last longer. Healing is straightforward but plan for a potential touch-up. The effect is minimalist yet clever; don't over-detail it. Ask for geometric artists comfortable with symmetric healed work.
13. Escher Staircase Along Spine
Style/Technique: Blackwork / Architectural Illusion
Pain Level: High (7-8/10)
Session Time: Multiple sessions (6+ hours)
Best For: Dramatic back or spine piece
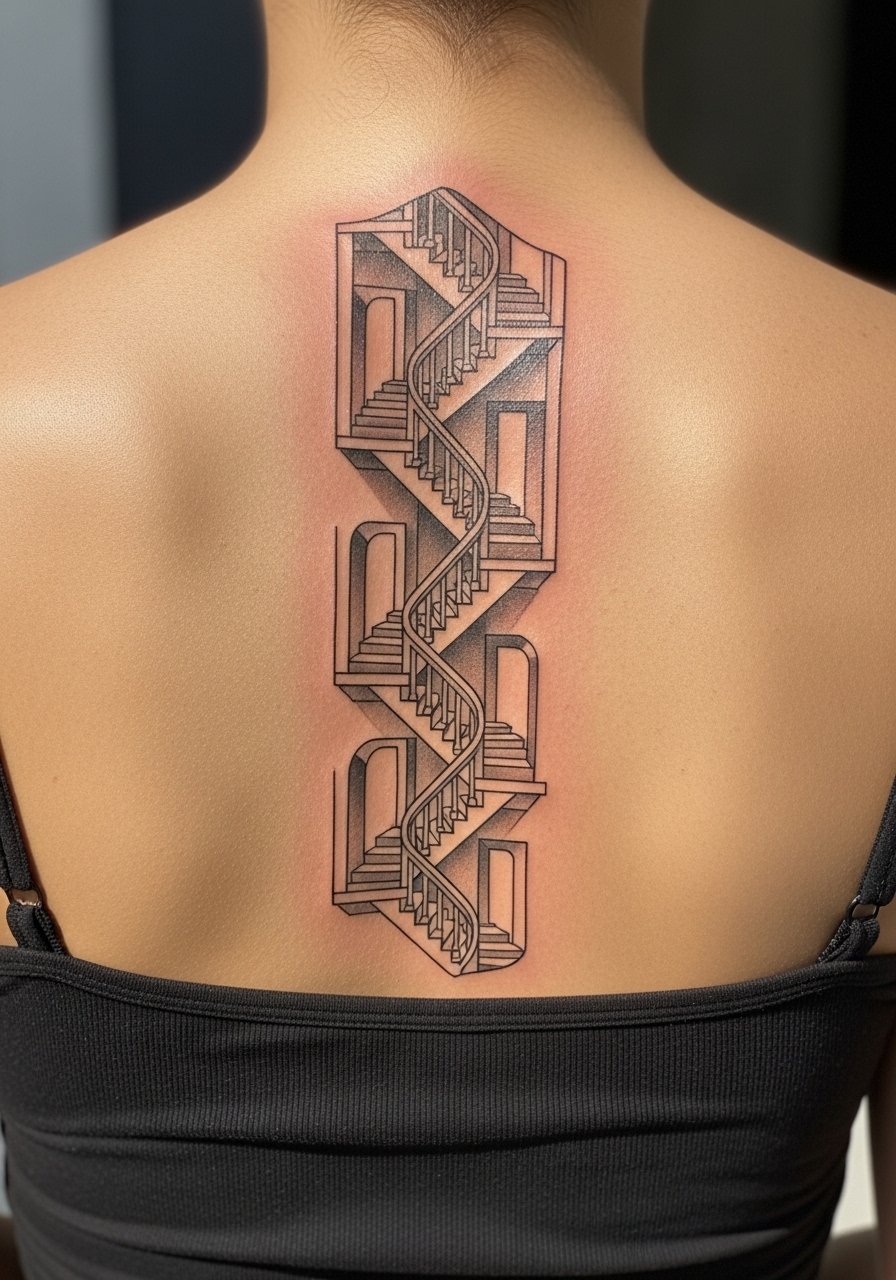
A spine is a natural focal line for impossible structures. Pain is higher on the spine, and sessions are long. Healed blackwork retains structure better than thin lines. The visual reads best from a distance; detail blurs if too intricate. Common error: packing tiny architecture into a small area—scale matters for longevity. Seek artists who specialize in architectural blackwork and healed portfolio images.
14. Shadow Silhouette Matching Arm Muscle
Style/Technique: Shadow Realism / Negative Space
Pain Level: Medium (4/5)
Session Time: 1–3 hours
Best For: Body-contour illusions that move with muscles
I love shadows that play with anatomy—when you flex, the tattoo seems to move. Upper arm has manageable pain and holds shading well. The trick is designing the shadow to align with natural muscle lines so it reads both at rest and in motion. Avoid placing opposing shadows that contradict movement. Look for artists who understand body mapping and healed shading.
15. Pixel Melt On Ankle
Style/Technique: Dotwork / Pixelation / Abstract 3D
Pain Level: Medium-High (5-6/10)
Session Time: 1–2 hours
Best For: Modern low-profile ankle illusion
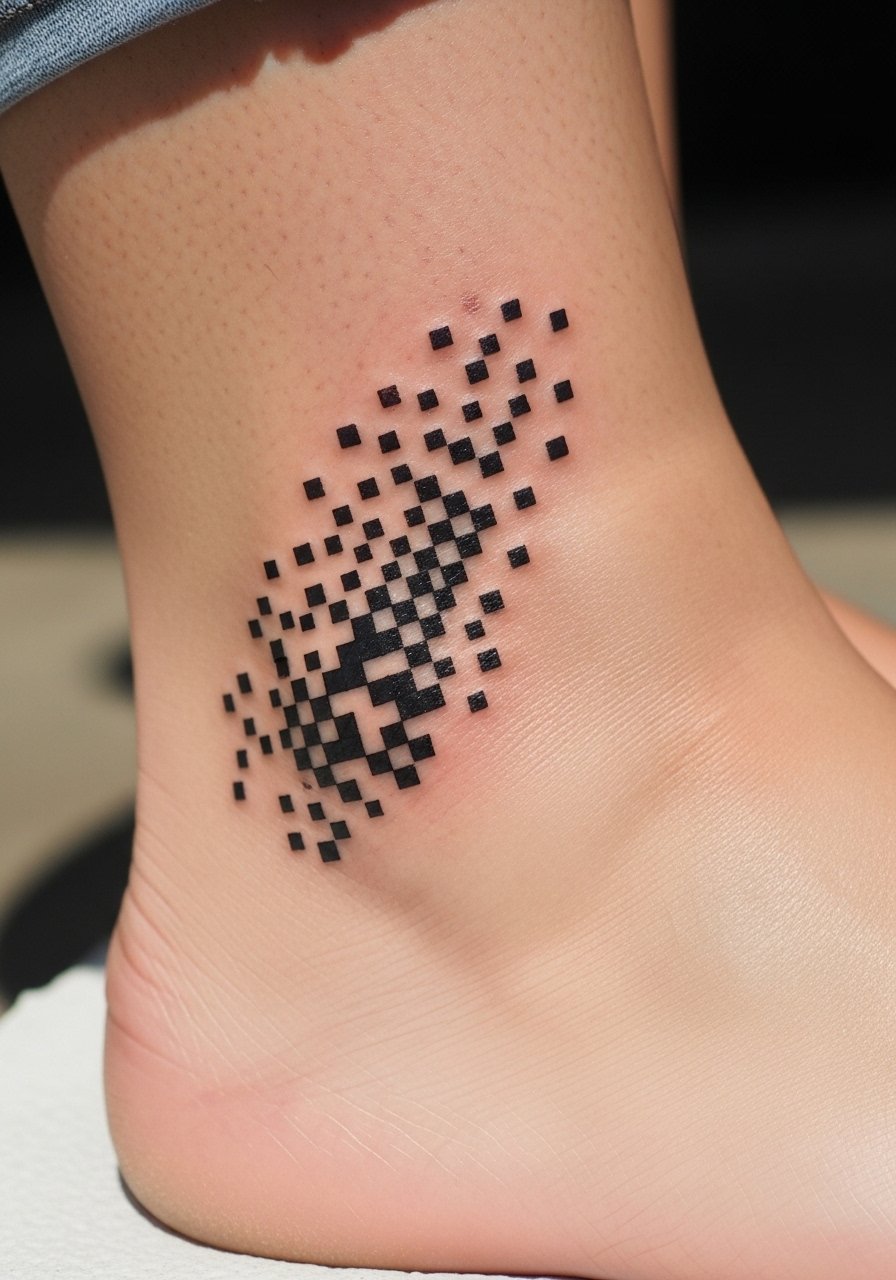
A pixel melt uses tiny squares and stippling to look like the image is dissolving. Ankles are notorious for fading due to friction and socks, so expect touch-ups. Healed results depend on spacing; too-close pixels blend. Artists who do precise stippling and small-scale dotwork are the ones to consult. I’ve seen this approach age well when dots are slightly larger and spaced.
16. Mirrored Symmetry Chest Piece
Style/Technique: Geometric / Mirror-Image Blackwork
Pain Level: Medium (4-5/10)
Session Time: 3–6 hours
Best For: Centered chest statements that shift with breathing
Mirrored designs on the chest use symmetry to trick the eye into depth where none exists. Expect medium pain and longer sessions. Healed symmetry can drift if lines aren’t perfectly executed—alignment is critical. Artists adept at precise blackwork and healed geometric pieces are best. Avoid tiny mirrored details that heal inconsistently.
17. Floating Mechanical Gears on Calf
Style/Technique: Neo-Traditional / Trompe-L'œil
Pain Level: Medium (4/5)
Session Time: 2–4 hours
Best For: Kinetic-looking leg art
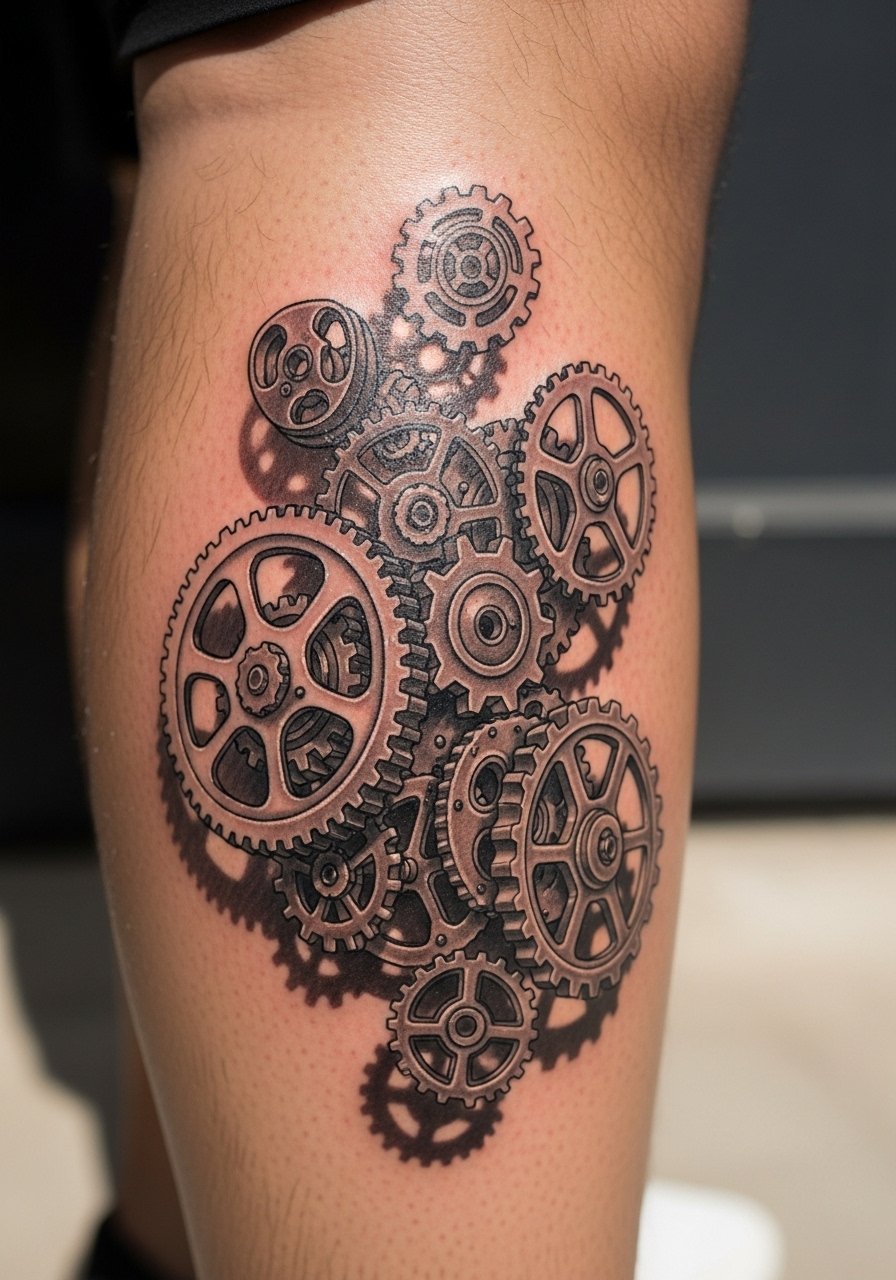
Gears that seem to hover rely on crisp cast shadows and layered highlights. Calf placement tolerates heavy shading well and ages predictably. Common mistake: inconsistent light source; pick one direction for shadows. Ask to see healed pieces with similar shadow approaches.
18. Barcode That Distorts on Wrist
Style/Technique: Minimalist / Linear Distortion
Pain Level: Low-Medium (3-4/10)
Session Time: 30–90 minutes
Best For: Small wrist illusion, conceptual vibe
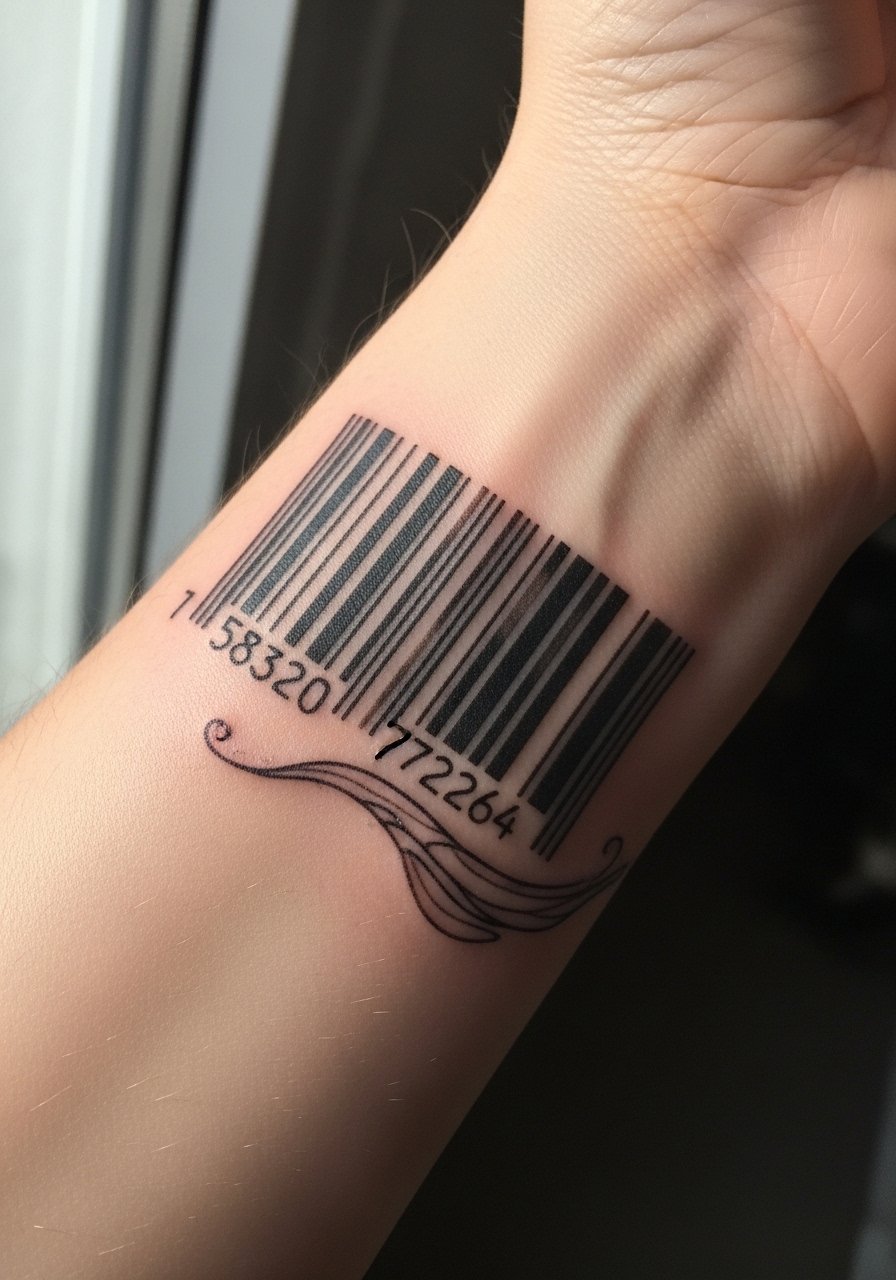
A barcode that warps visually is a simple but effective optical trick. It’s low pain and quick to do. Lines must be spaced carefully since thin bars can bleed. Healed, make sure the artist intentionally thickens lines if needed. This design reads conceptual and modern. Avoid ultra-thin bars that disappear.
19. Peeling Skin Reveal of Wood Grain on Forearm
Style/Technique: Hyperrealism / Trompe-L'œil
Pain Level: Medium (4-6/10)
Session Time: 3–5 hours
Best For: Large forearm illusion, tactile look
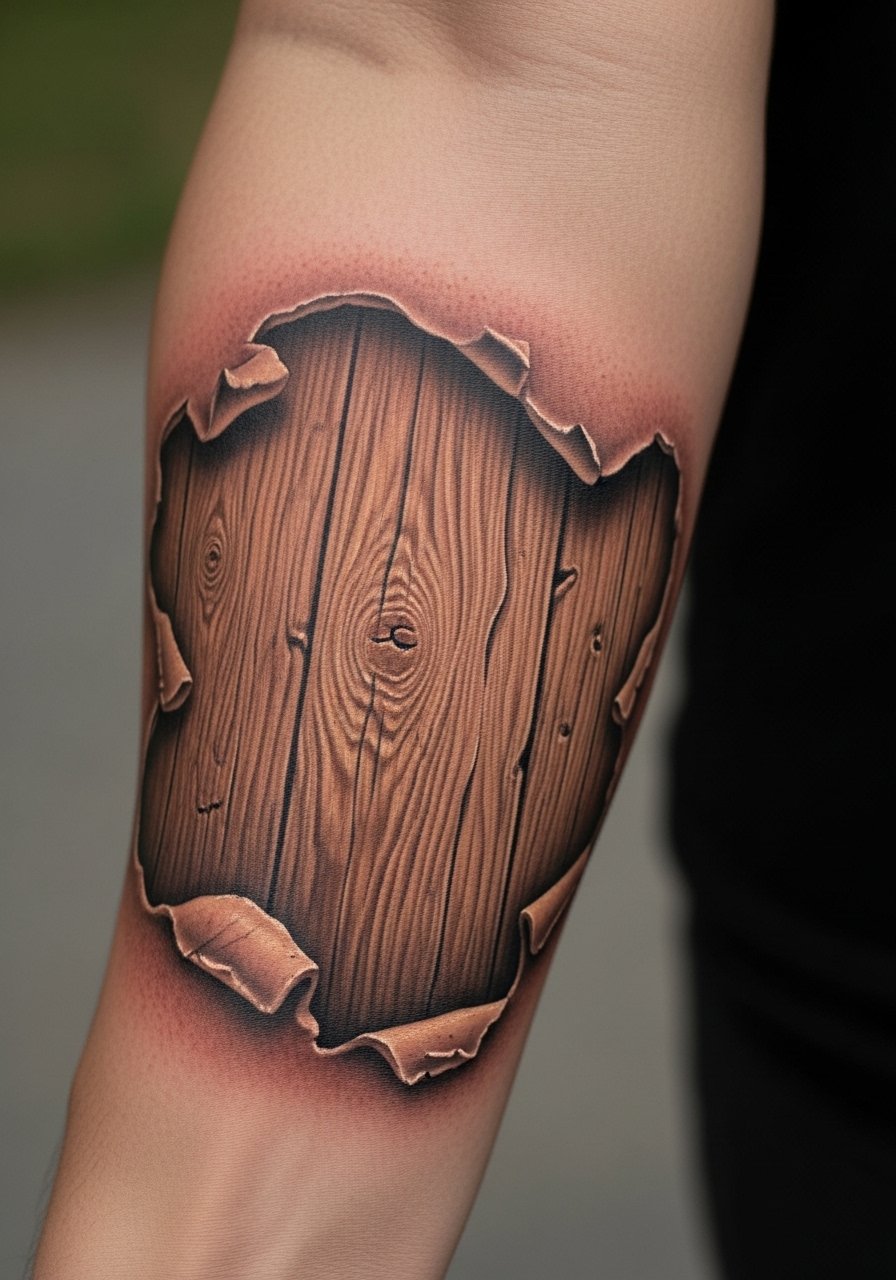
Peeling-skin tattoos are dramatic and use textured shading to sell depth. Forearms tolerate long sessions and show detail well. Healed, textures soften, so artists layer strokes for lasting grain. The biggest mistake is over-etching white highlights that don't last; subtlety wins. Look for artists with hyperreal healed photos.
20. Layered Portrait With Cutaway Skin
Style/Technique: Micro-Realism / Layered Portrait
Pain Level: High (6-8/10)
Session Time: Multiple sessions (4–8 hours)
Best For: Personal portrait illusion on chest or thigh
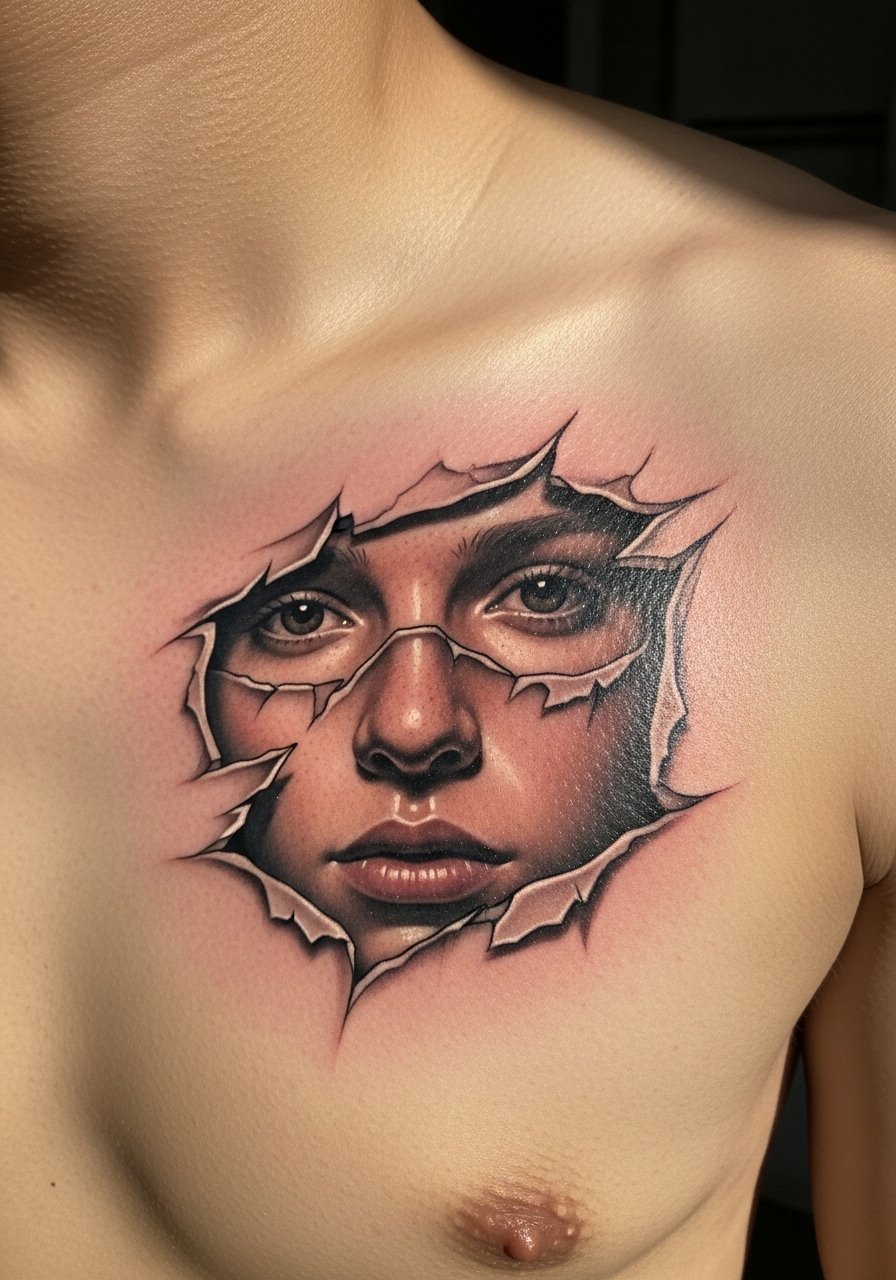
A cutaway portrait combines realism with trompe-l'œil edges. Pain and session time depend on placement. Since portraits need subtle midtones, maintenance is key—healed contrast can mellow. Avoid over-highlighting; ask to see portraits healed at least a year. Choose a portraitist experienced with layered composition.
21. Möbius Flower Ankle Wrap
Style/Technique: Fine Line / Anamorphic Botanicals
Pain Level: Medium (4/10)
Session Time: 1–2 hours
Best For: Artistic ankle wrap with motion
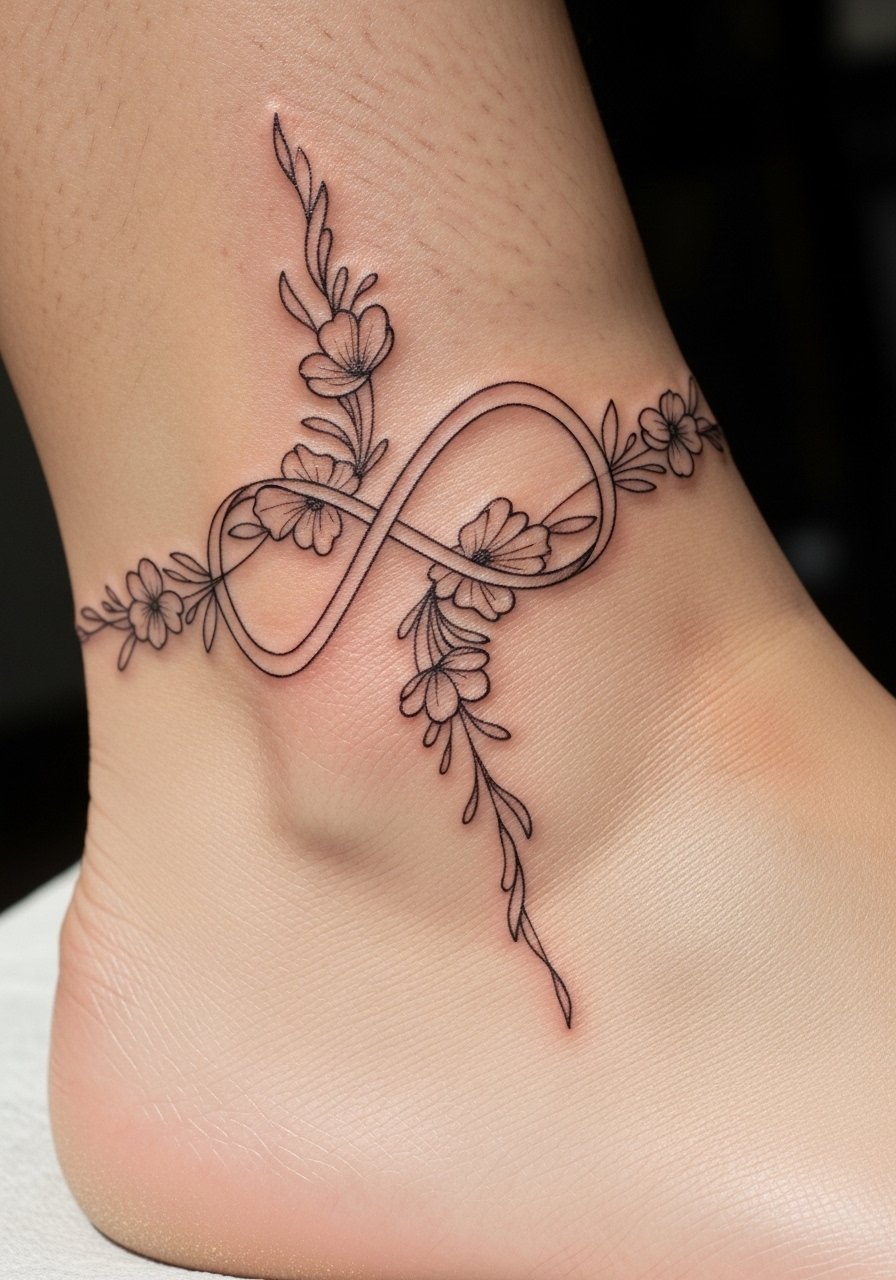
Combining botanical lines with a Möbius twist gives movement. Ankle specifics mean minor fading but good visual payoff. Healed lines must be bold enough to survive friction. Artists who blend fine line with body-wrapping compositions produce the best results. Avoid ultra-fine tendrils that disappear.
22. Mirror Illusion On Back Of Hand (Two Halves)
Style/Technique: Split Realism / Fine Line
Pain Level: High (6-7/10)
Session Time: 1–2 hours, touch-ups likely
Best For: Hand statement, high-visibility illusion
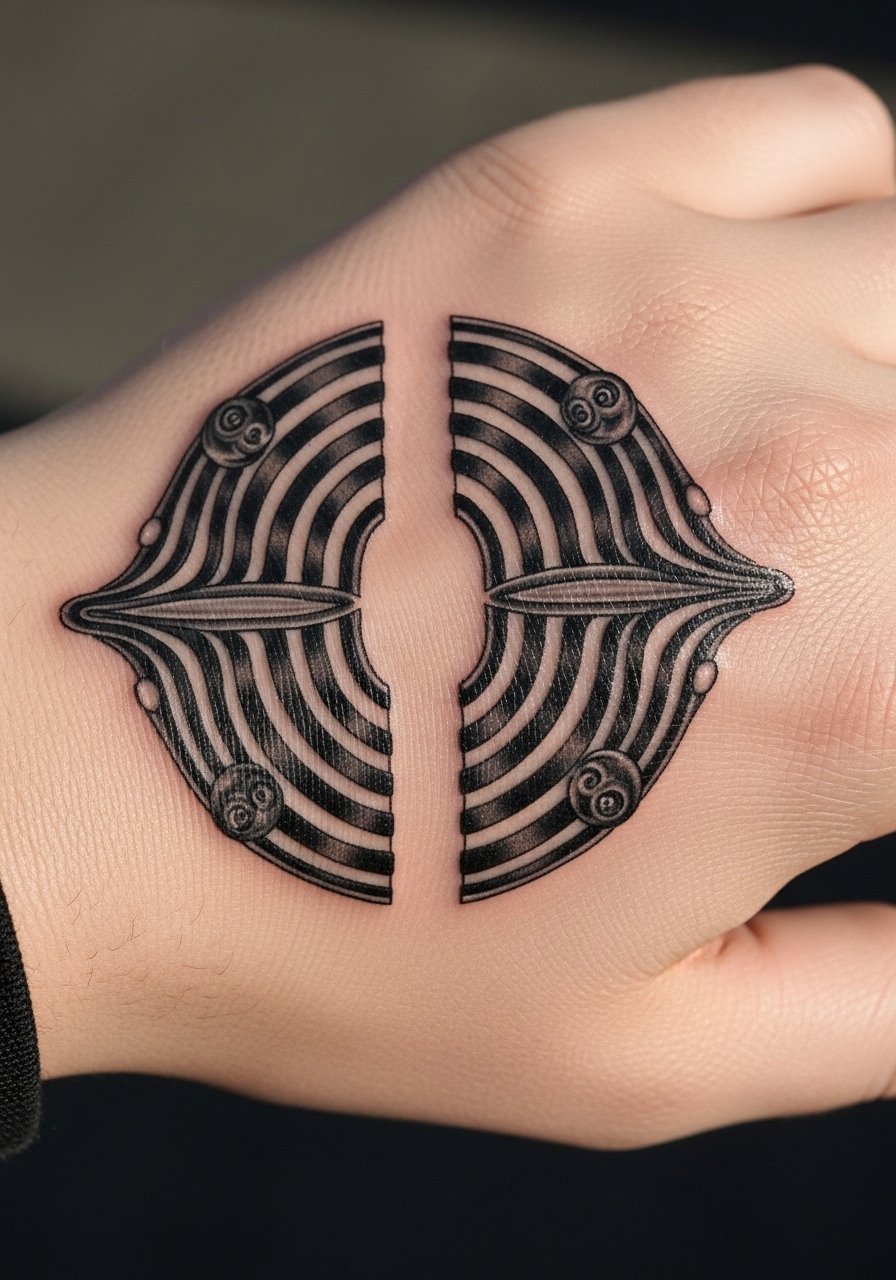
Hands are high-maintenance but rewarding. A split mirror effect plays with symmetry and looks striking. Expect quicker fading and necessary touch-ups. Keep line weight robust to endure washing. Artists with healed hand work will advise on scale and spacing.
23. Kaleidoscope Thigh Panel
Style/Technique: Color Geometric / Mandala 3D
Pain Level: Medium (4-5/10)
Session Time: Multiple sessions (3–6 hours)
Best For: Decorative thigh illusion, colorful statement
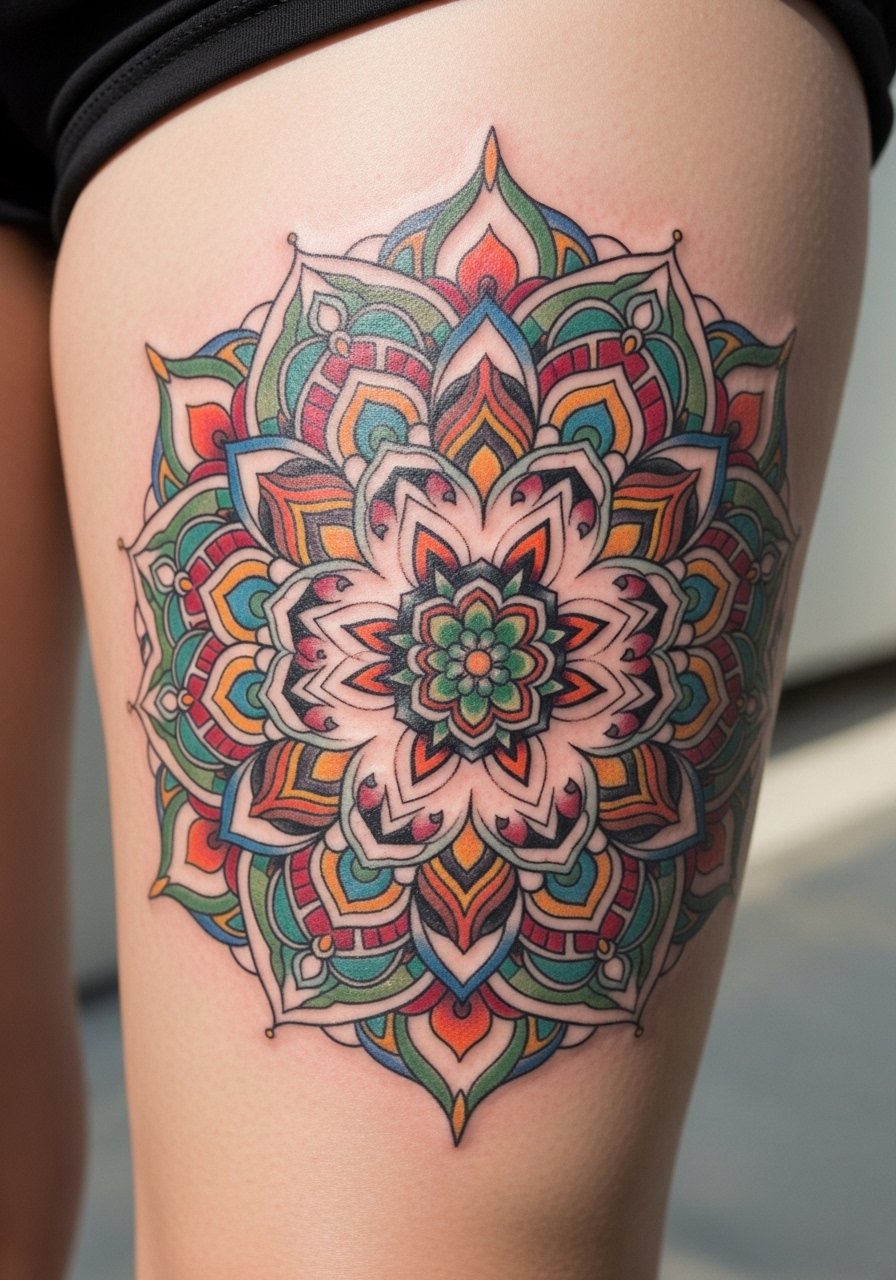
A kaleidoscope panel creates depth through repetitive color and shape. Thighs are excellent for saturation and long sessions. Colors shift during healing; purples and blues often look more muted before fully settled. The common mistake is overcrowding details—give shapes room to breathe to keep the optical effect crisp. Seek colorists with healed leg portfolios.
24. Moiré Pattern Rib Panel
Style/Technique: Op Art / Moiré / Blackwork
Pain Level: High (7-8/10)
Session Time: 2–4 hours
Best For: Bold rib illusion, directional visual motion
Moiré patterns on the ribs create motion that feels almost kinetic. Ribs are painful and require careful placement to ensure the pattern reads correctly when the body moves. Healed results can show slight softening, so line spacing must be intentional. Artists who do op art and large blackwork can show you healed moiré examples. Avoid overly tight line density that blurs during healing.
Tattoo Prep and Aftercare Essentials
Aftercare Essentials:
- Aquaphor Healing Ointment, 14oz tube — For the first 3–5 days to protect scabs
- Saniderm Transparent Adhesive Bandage, 6-inch roll — Second-skin healing method for nights/outings
- CeraVe Fragrance-Free Moisturizing Lotion, 12oz — Daily moisturizing after initial healing
- Dr. Bronner's Unscented Castile Soap, 16oz — Gentle wash for tattoo cleaning
Before Your Appointment:
- Tattoo Numbing Cream with 5% Lidocaine (Topical) — Use only if your artist approves; apply 30–45 minutes before
- Tattoo Stencil Transfer Paper, 10 Pack — For planning placement at home
Long-Term Maintenance:
- SPF 50 Sunscreen Stick for Tattoos — Daily sun protection to prevent fading
- Mad Rabbit Tattoo Balm, 2oz — Keeps healed tattoos vibrant during maintenance
- Hustle Butter Deluxe, 4oz — Vegan alternative for long-term moisturization
Optional Comfort Items:
- Hydrocolloid Bandages, Large Pack — For spot protection on high-friction areas
- Tattoo Aftercare Travel Kit — Handy for weekend trips or touch-ups
Frequently Asked Questions
Q: How bad does a tattoo actually hurt?
A: Pain depends on placement and tolerance. Outer arm/forearm = 2–4/10. Ribcage/ankle/spine = 7–8/10. It’s usually more of an intense scratching or burning. For sensitive spots, I've used and recommended tattoo numbing cream with 5% lidocaine when my artist gave the go-ahead.
Q: How long until my illusion tattoo looks right healed?
A: Surface healing happens in 2–3 weeks, but colors and contrast settle over 2–3 months. Many optical details—highlights, whites, and ultra-fine lines—may soften in that period. From what I’ve seen, waiting at least 8–12 weeks before judging final appearance is smart.
Q: What’s the biggest threat to illusion tattoos fading?
A: UV exposure and neglect. I’ve noticed sun is the fastest way ink loses contrast. Use an SPF 50 sunscreen stick daily on exposed tattoos and moisturize with CeraVe lotion to keep skin healthy.
Q: Can I exercise after getting an illusion tattoo?
A: Wait 48–72 hours minimum and avoid heavy sweating for the first week, longer if the piece is on a joint. Sweat can irritate and affect scab formation. If you need to cover the piece, Saniderm can protect it for short stints, but follow your artist’s advice.
Q: Will optical details blur faster than bold work?
A: Fine optical details can blur faster on active skin (hands, fingers, ribs). From my experience, bold shapes and negative-space illusions in blackwork tend to hold longer. If you want long-term crispness, ask your artist to slightly increase line weight or spacing.
Q: What aftercare products do artists actually recommend?
A: Most artists I’ve talked to suggest a gentle cleanser like Dr. Bronner's Unscented Castile Soap for initial cleaning, then a thin layer of Aquaphor Healing Ointment for the first few days. After that, switch to a fragrance-free lotion like CeraVe. For long-term care, a balm such as Mad Rabbit Tattoo Balm keeps color vibrant.
