
I spent months curating ocean tattoo ideas because I kept seeing two problems: people picked designs that looked great fresh but blurred or faded, and others picked placements that made healing a nightmare. These 30 ocean tattoos are about the way ink actually behaves over time—what looks endless on your skin, how it heals, and where to place it so it still feels serene years later.
This list leans on fine line, watercolor, neo-traditional, and black-and-gray realism. I picked placements that work for first-timers and collectors alike. From what I’ve seen, watercolor ocean waves and minimalist ocean symbols are huge in 2026—just be mindful of aftercare if you choose color.
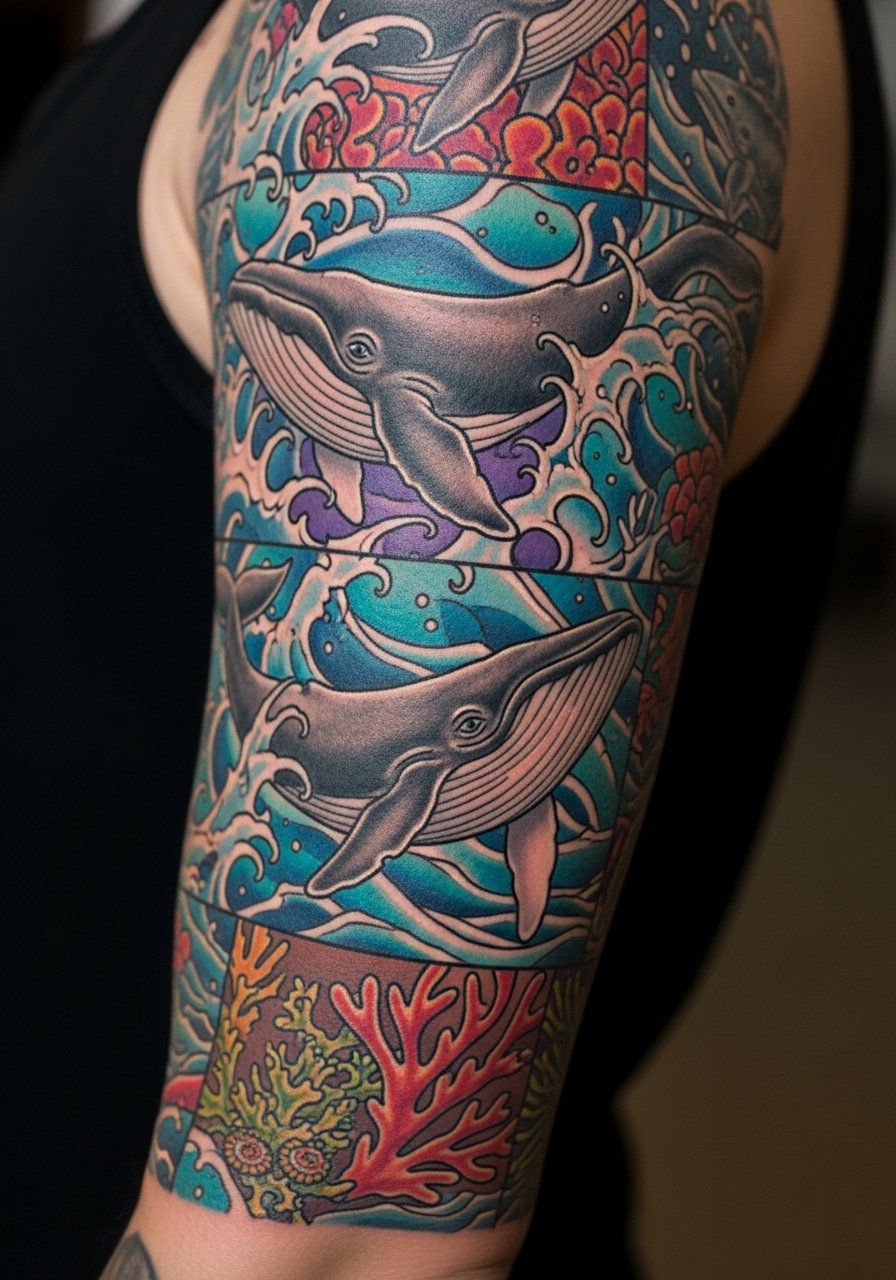
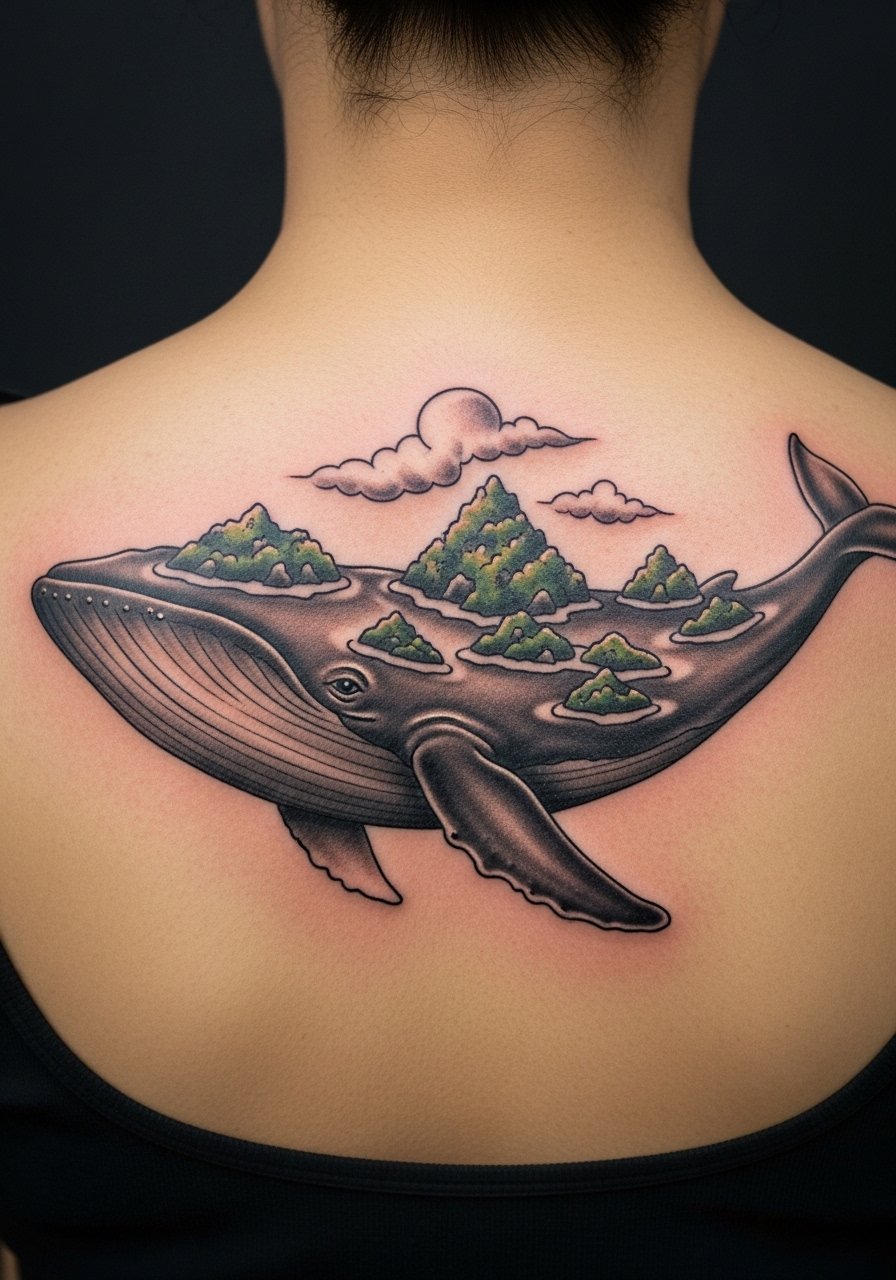
1. Realistic Whale Portrait on Outer Forearm
Style/Technique: Realism / Black & Gray
Pain Level: Low-Medium (3-4/10)
Session Time: Multiple sessions possible (2-4 hours each)
Best For: Forearm visibility, storytelling pieces
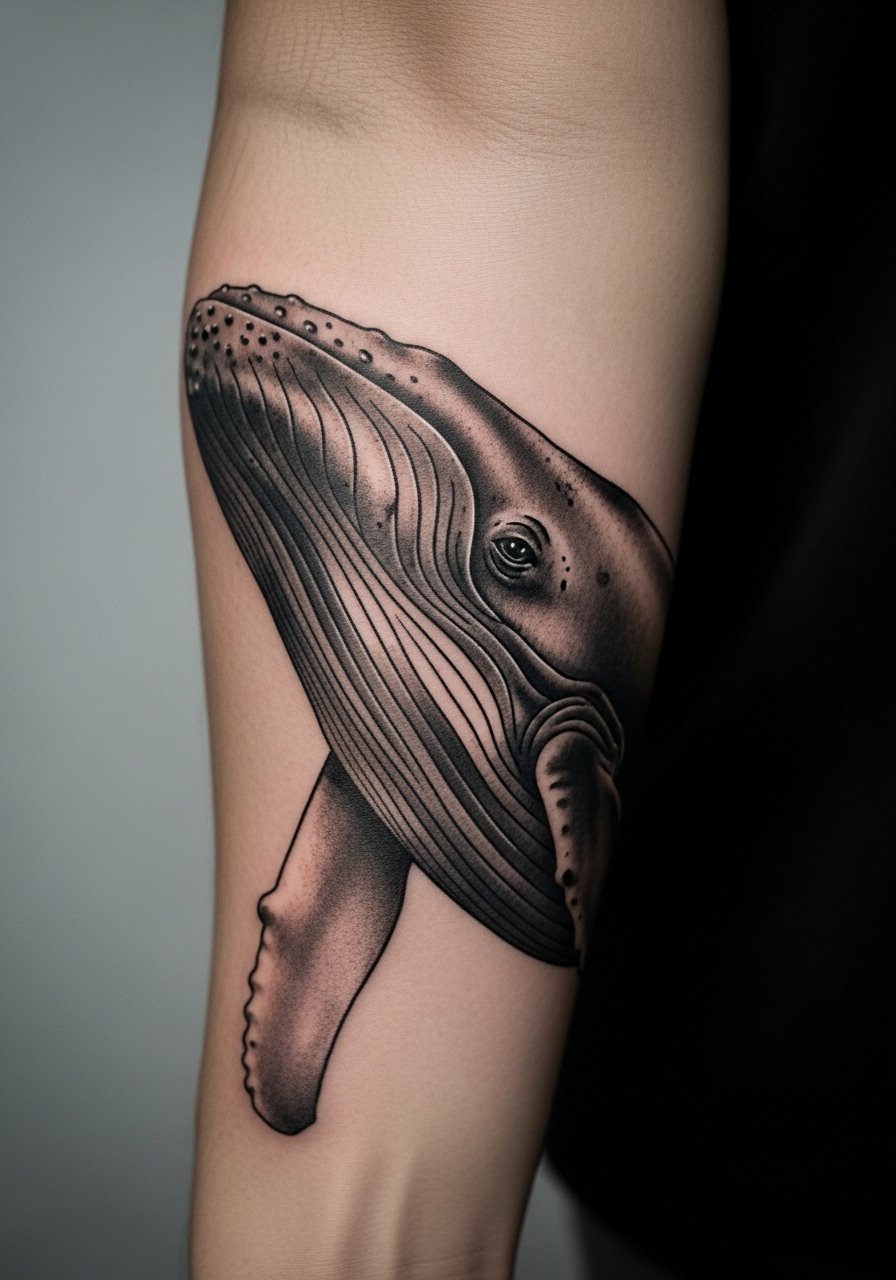
A realistic whale feels quiet and vast. I saw this style pop up when artists leaned into black-and-gray realism for longevity. On the outer forearm the whale reads well in motion and is low-to-moderate in pain. Expect surface healing in 2-3 weeks and full settling by a few months. Blackwork keeps the portrait readable longer than bright watercolor. A common mistake is asking for too-small detail; whales need room to breathe. Ask your artist for healed photos of similar whale portraits and request shading that won’t blob over time. Related terms: realistic whale, marine life, black and gray.
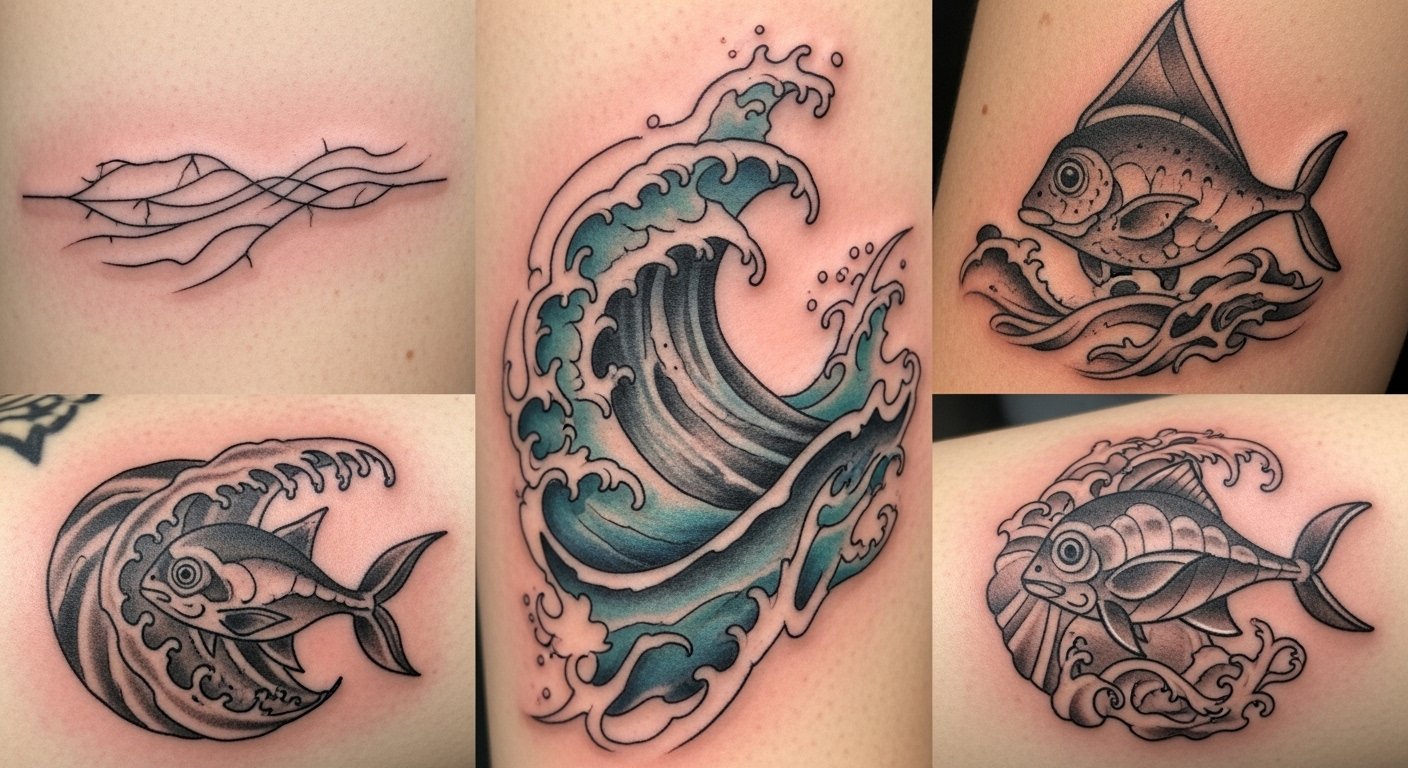
2. Traditional Nautical Octopus on Shoulder
Style/Technique: Traditional / Neo-Traditional
Pain Level: Low (2-3/10)
Session Time: 1-3 hours
Best For: Bold shoulder statement, sleeves later
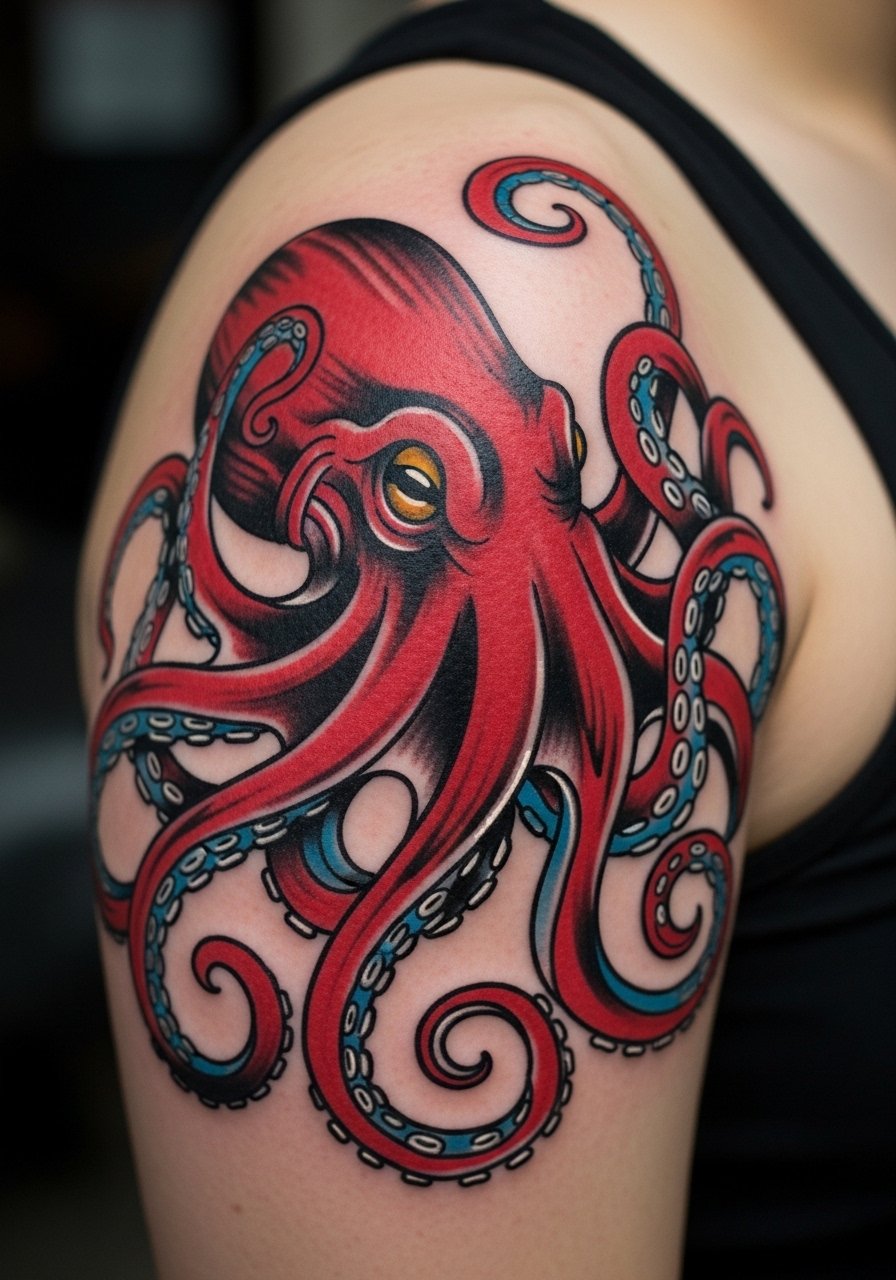
A nautical octopus is a classic for adaptability and mystery. Neo-traditional linework holds up especially well on the shoulder, where skin moves less. Pain is usually mild. This style uses bold outlines and color blocks that age predictably. From what I’ve gathered, avoid tiny tentacle details that turn into a gray mess; keep the suction-cup shapes bold. If you want a sleeve later, design the octopus with negative space in mind. Related terms: bold octopus, nautical, traditional.
3. Watercolor Ocean Waves on Inner Arm
Style/Technique: Watercolor / Painterly
Pain Level: Low-Medium (3-4/10)
Session Time: 1-2 sessions
Best For: Inner arm, thigh, or rib accents
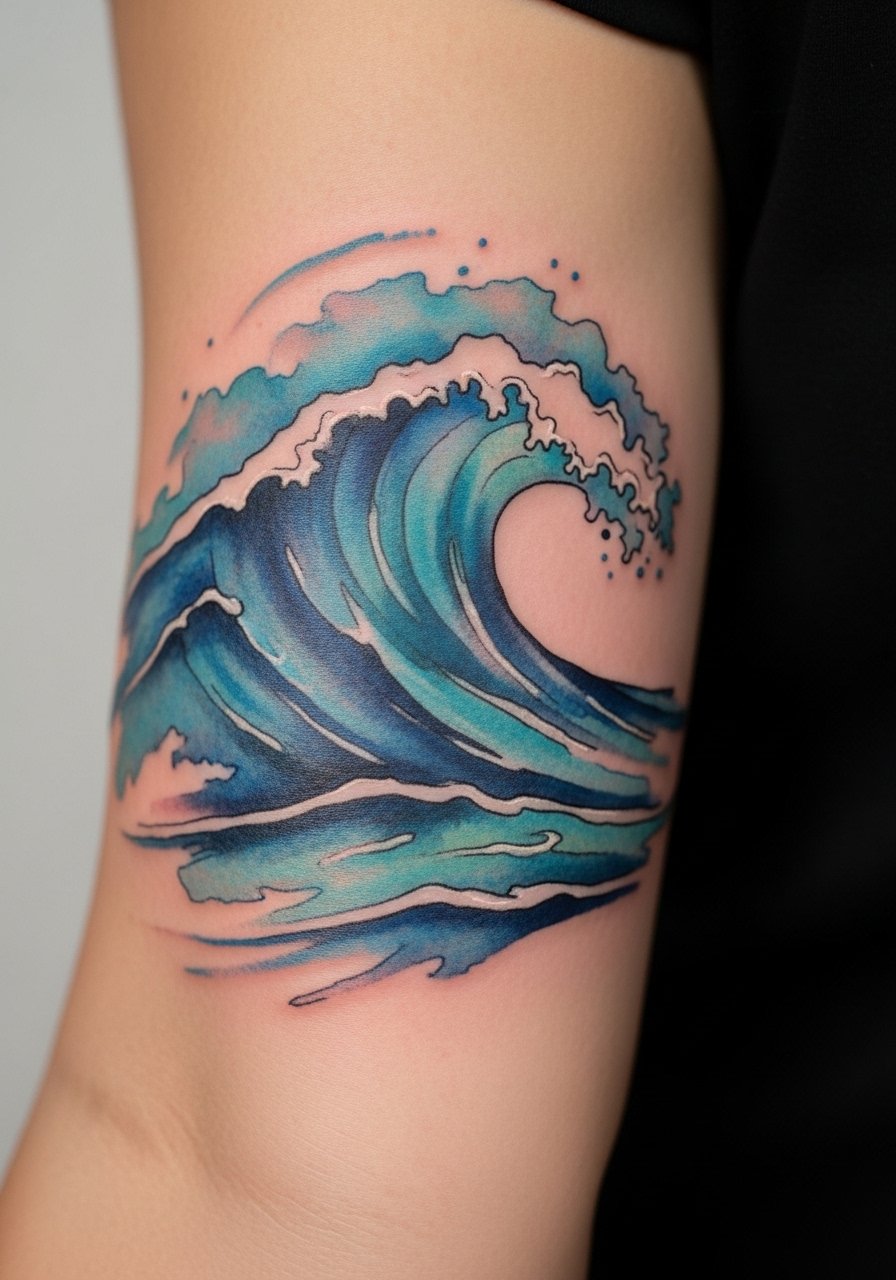
Watercolor ocean waves capture movement and calm. I love this for its beachy vibe, but I’ll warn you: watercolor fades faster than black and gray. Inner arm placement keeps it visible and sheltered from sun. Expect peeling and dulling during healing; daily moisturize and sunscreen later. Artists I follow suggest anchoring watercolor with a fine line wave to preserve form as color fades. Common mistake: asking for extreme splatter effects in tiny sizes—scale matters. Related terms: watercolor sea, ocean waves, small ocean tattoos.
4. Minimalist Wave Heart on Wrist
Style/Technique: Minimalist / Fine Line
Pain Level: Low (2-3/10)
Session Time: Single short session
Best For: First tattoos, wrists, ankles
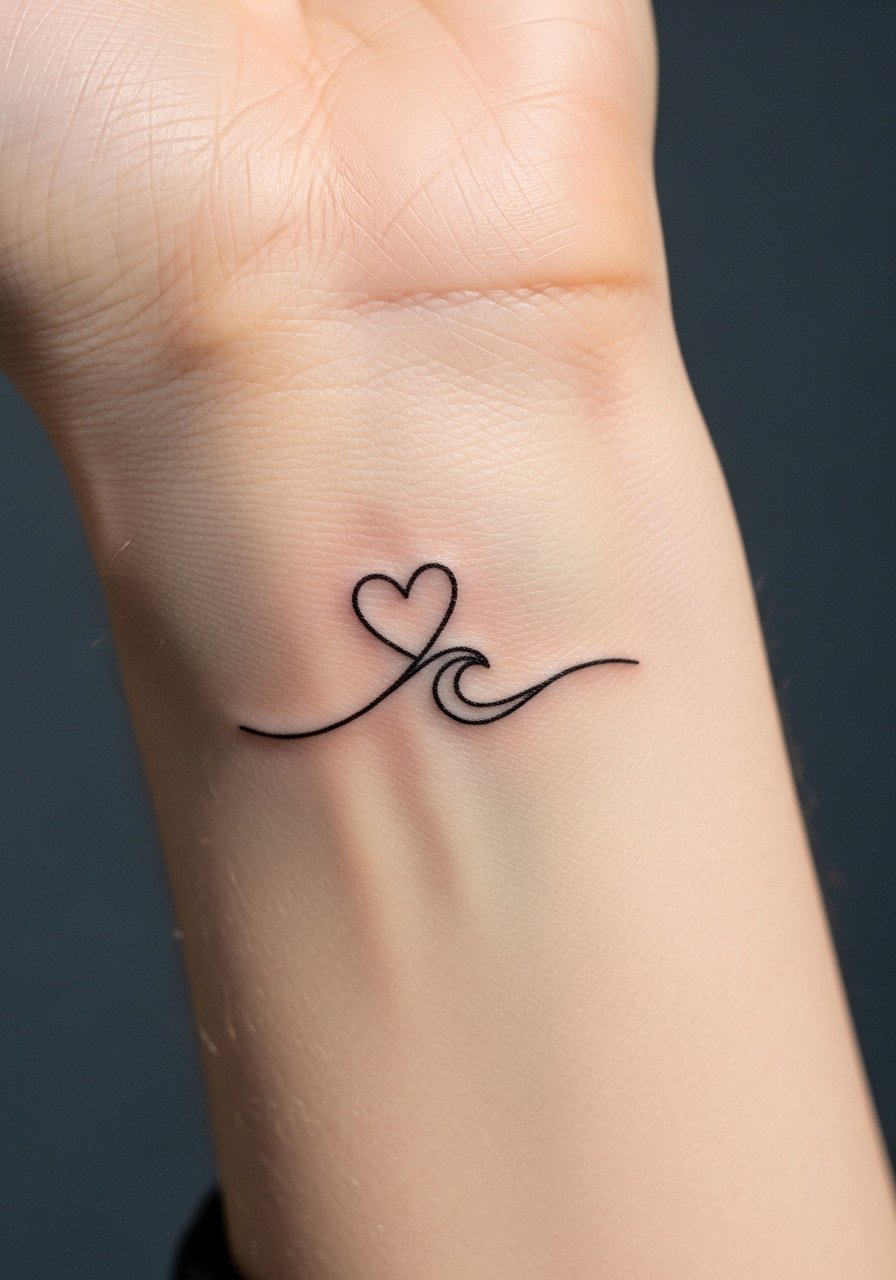
A wave heart is a tiny piece that reads personal. On the wrist it’s visible and low pain, though the skin there can scab quickly. I’ve seen people love this as a first ocean tattoo. The risk is line blowout if the artist uses too heavy a needle; choose a fine-line specialist and keep the size modest. For longevity, avoid constant rubbing from watches or bracelets. Related terms: minimalist ocean, wave tattoo meaning, small ocean tattoos.
5. Neo-Traditional Shark with Waves on Chest
Style/Technique: Neo-Traditional / Color
Pain Level: Medium (4-6/10)
Session Time: Multiple sittings possible
Best For: Chest or upper back, statement pieces
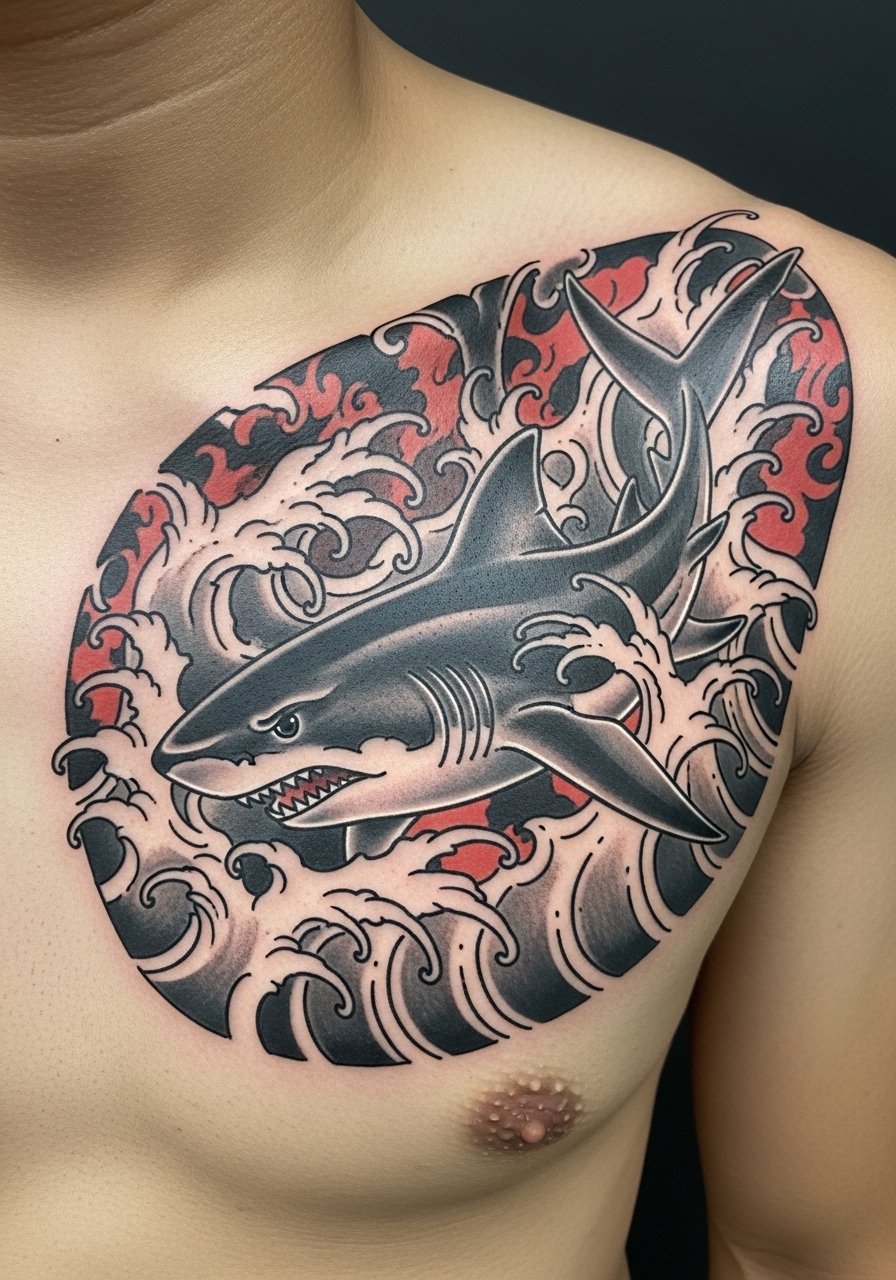
A neo-traditional shark reads as strength and adventure. Chest placement gives a broad canvas. Pain can rise near the sternum and ribs. Color holds differently across skin tones—ask your artist about saturation for your skin. I recommend asking for solid outlines to keep the composition readable as pigments shift. Common mistake: cramming too many elements into a tight chest area; let the shark breathe. Related terms: neo-traditional, shark with waves, marine life.
6. Black and Gray Coral Reef Scene on Ribcage
Style/Technique: Black & Gray Realism
Pain Level: High (7-8/10)
Session Time: Multiple sessions
Best For: Ribcage or thigh for larger scenes
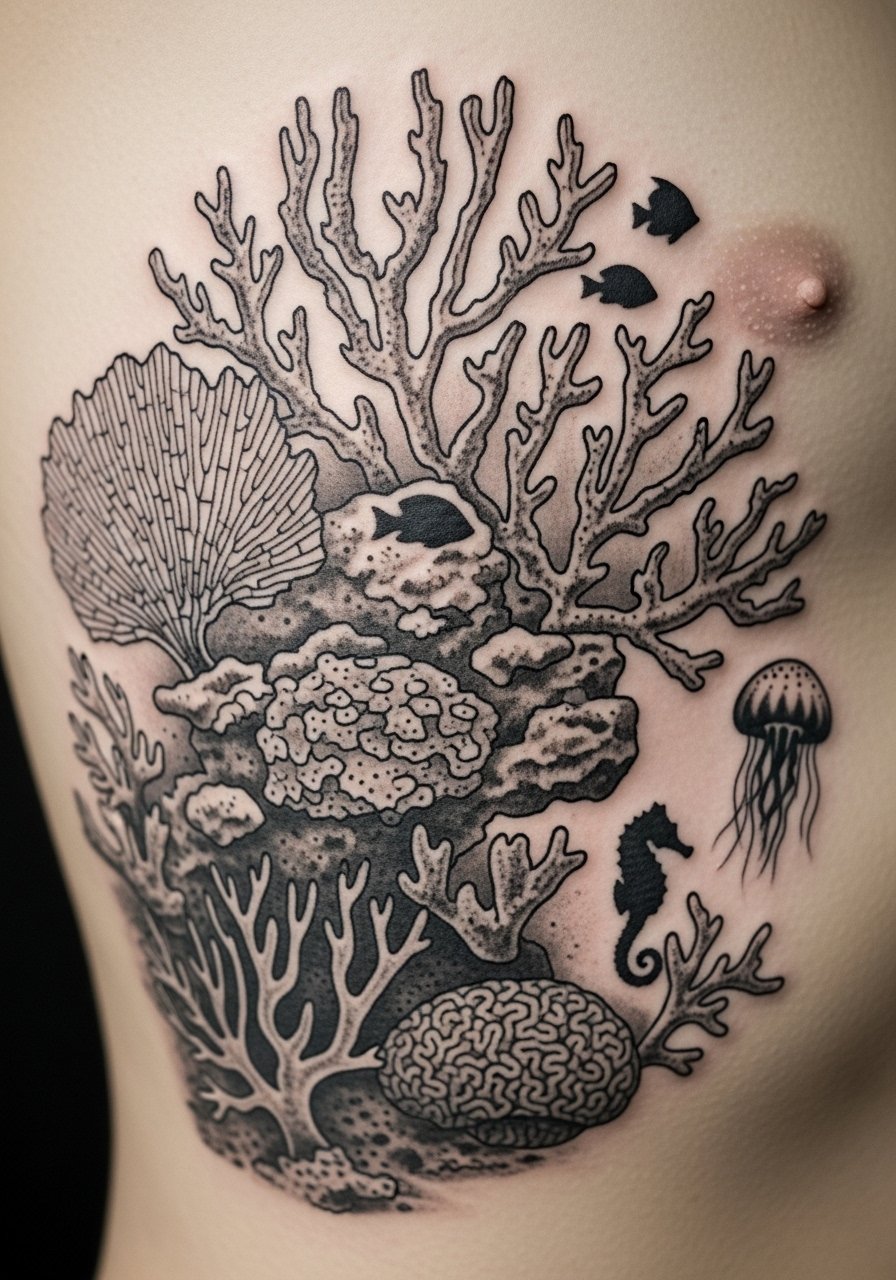
A coral reef scene is intricate and meditative. Ribcage placement looks gorgeous but is painful and needs careful aftercare. Black and gray realism ages favorably for reefs—the shading keeps definition. I’ve seen reef pieces become stunning backdrops for future marine life tattoos. Avoid tiny dotwork reefs that lose contrast; keep medium-to-large scale. Expect longer sessions and staggered healing. Related terms: coral reef scene, black and gray, underwater.
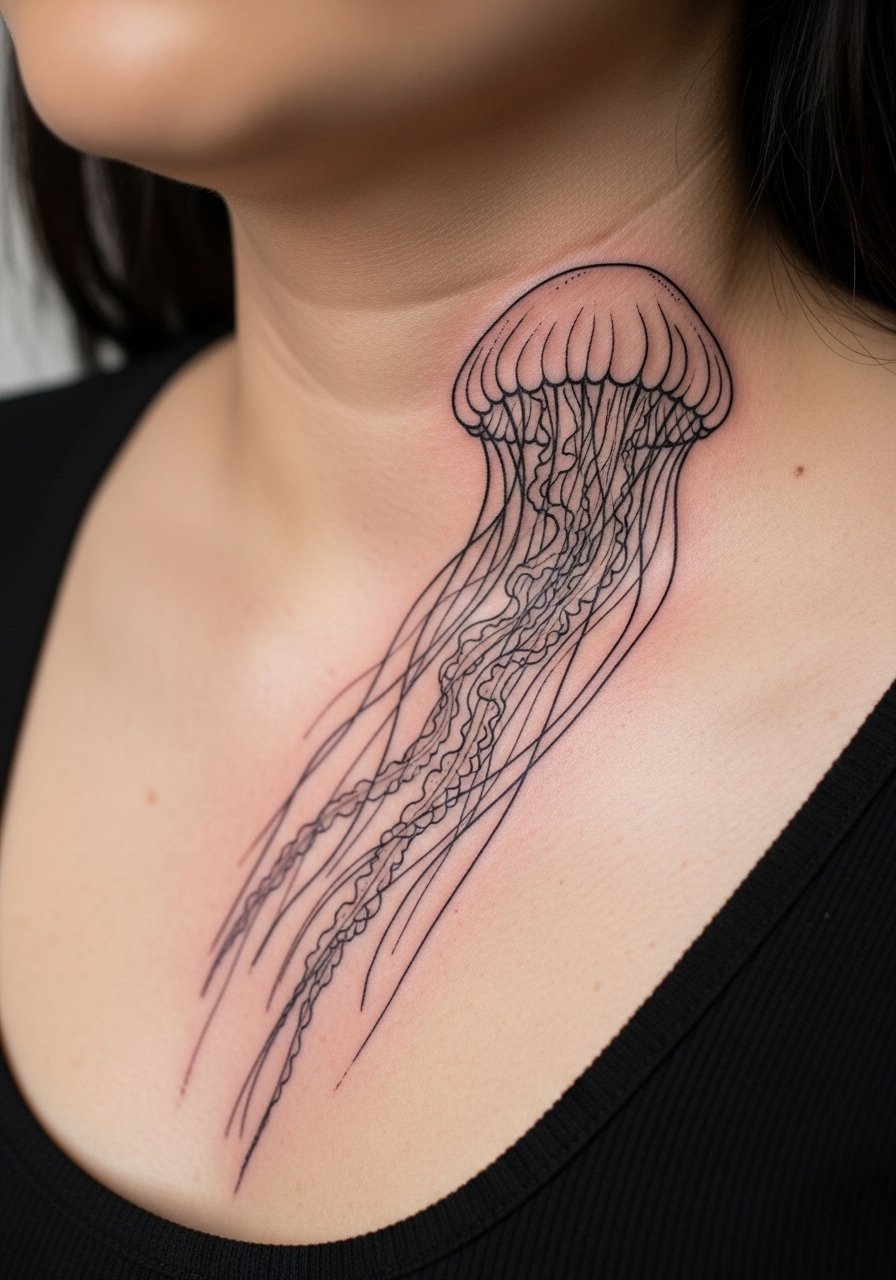
7. Jellyfish Fine Line on Collarbone
Style/Technique: Fine Line / Single Needle
Pain Level: Medium (4-5/10)
Session Time: 1-2 hours
Best For: Collarbone, forearm, sides of ribs
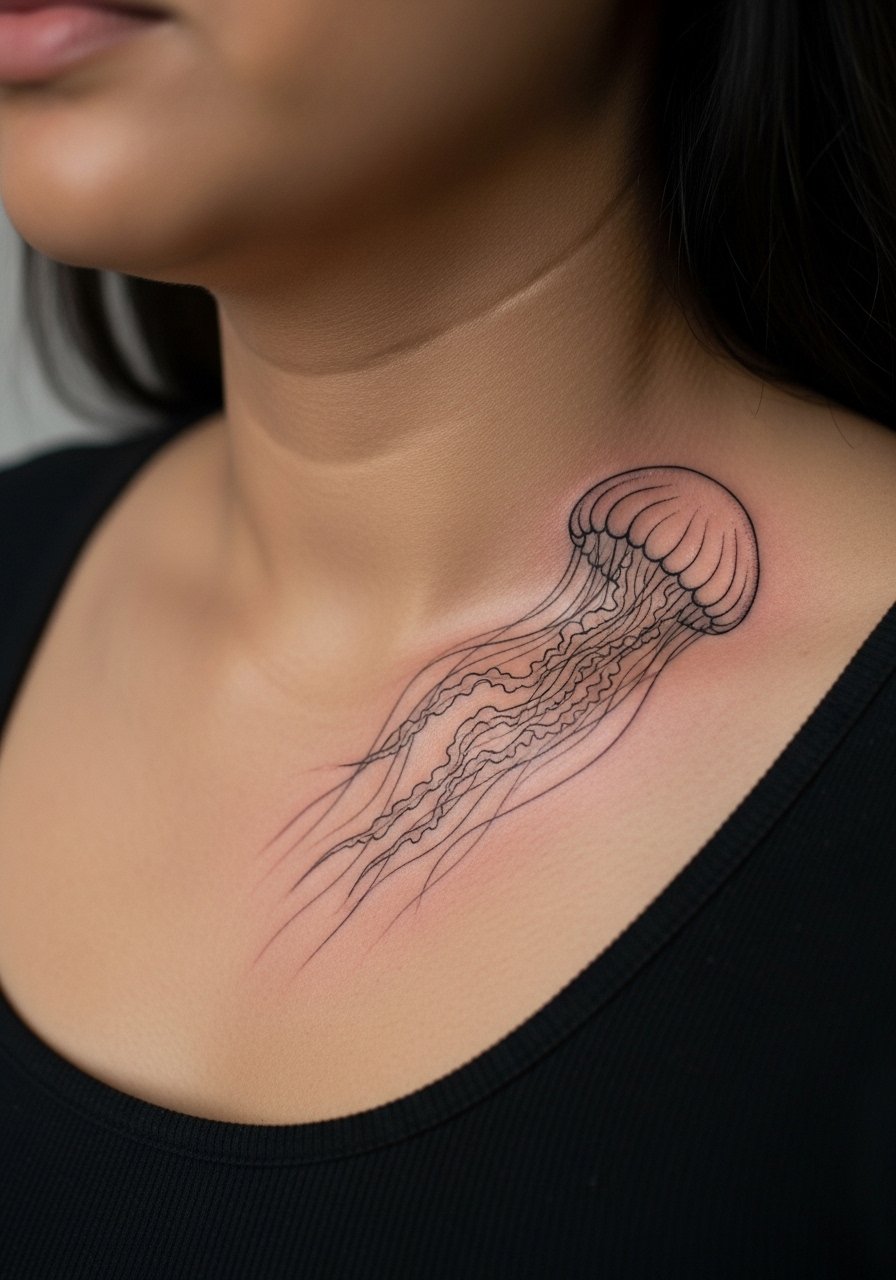
Jellyfish feel ethereal and resilient. Collarbone placement is elegant but can sting more than the outer arm. Fine line suits the jellyfish’s flow, but single-needle work needs a steady, experienced hand. I recommend asking artists for healed examples of fine-line marine life. Common mistake: expecting ultra-thin lines to remain crisp without touch-ups—some blur over time. Related terms: jellyfish fine line, delicate, underwater.
8. Surreal Ocean Turtle with Shells on Calf
Style/Technique: Surrealism / Black & Gray
Pain Level: Low-Medium (3-4/10)
Session Time: 1-3 sessions
Best For: Calf, outer thigh
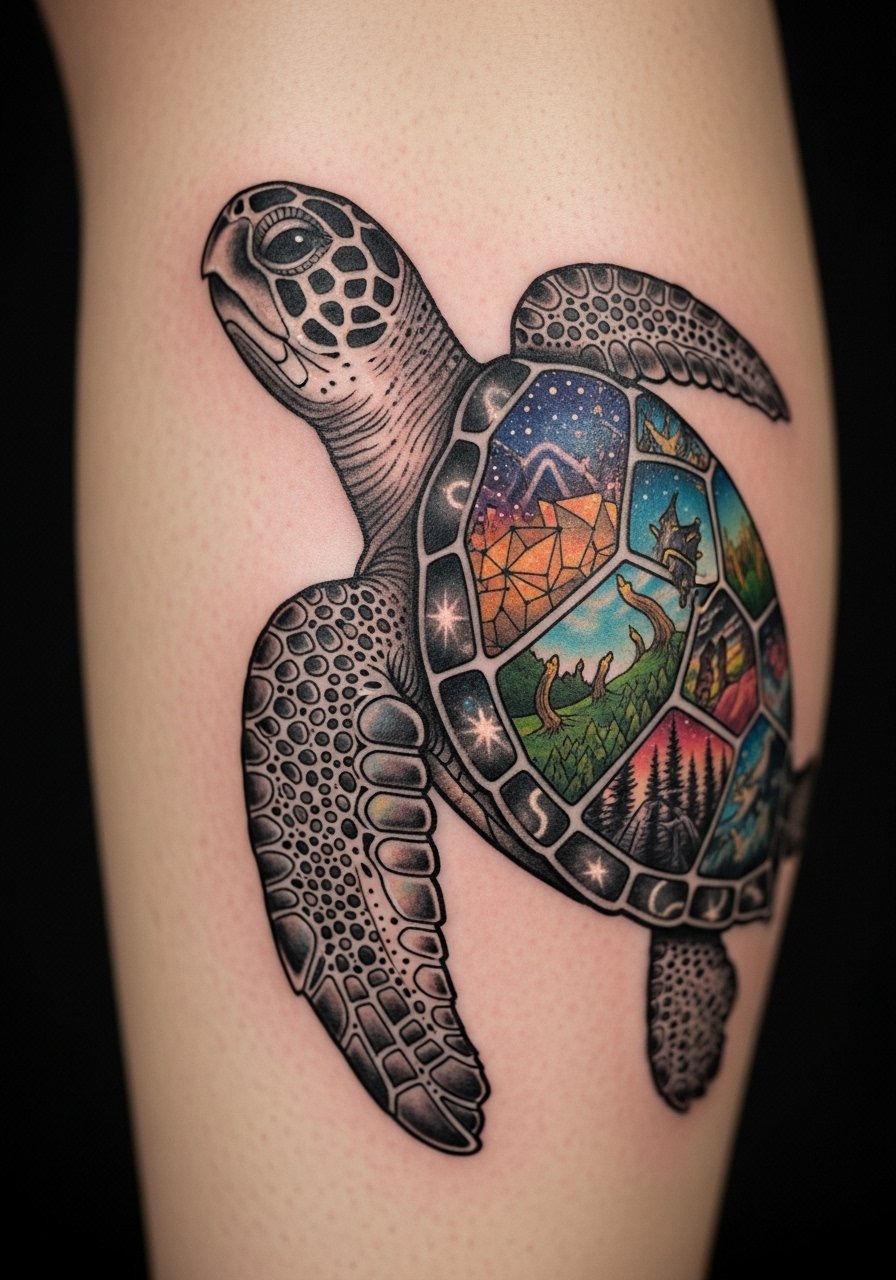
A surreal turtle blends protection symbolism with creative motifs. The calf is a forgiving placement with moderate pain. Surreal details let artists play with shells, islands, or maps inside the shell. From what I’ve seen, black and gray helps surreal elements age consistently. Avoid over-detailing in tiny shell sections—scale up if you want intricate patterns. Related terms: ocean turtle, surreal ocean, protection.
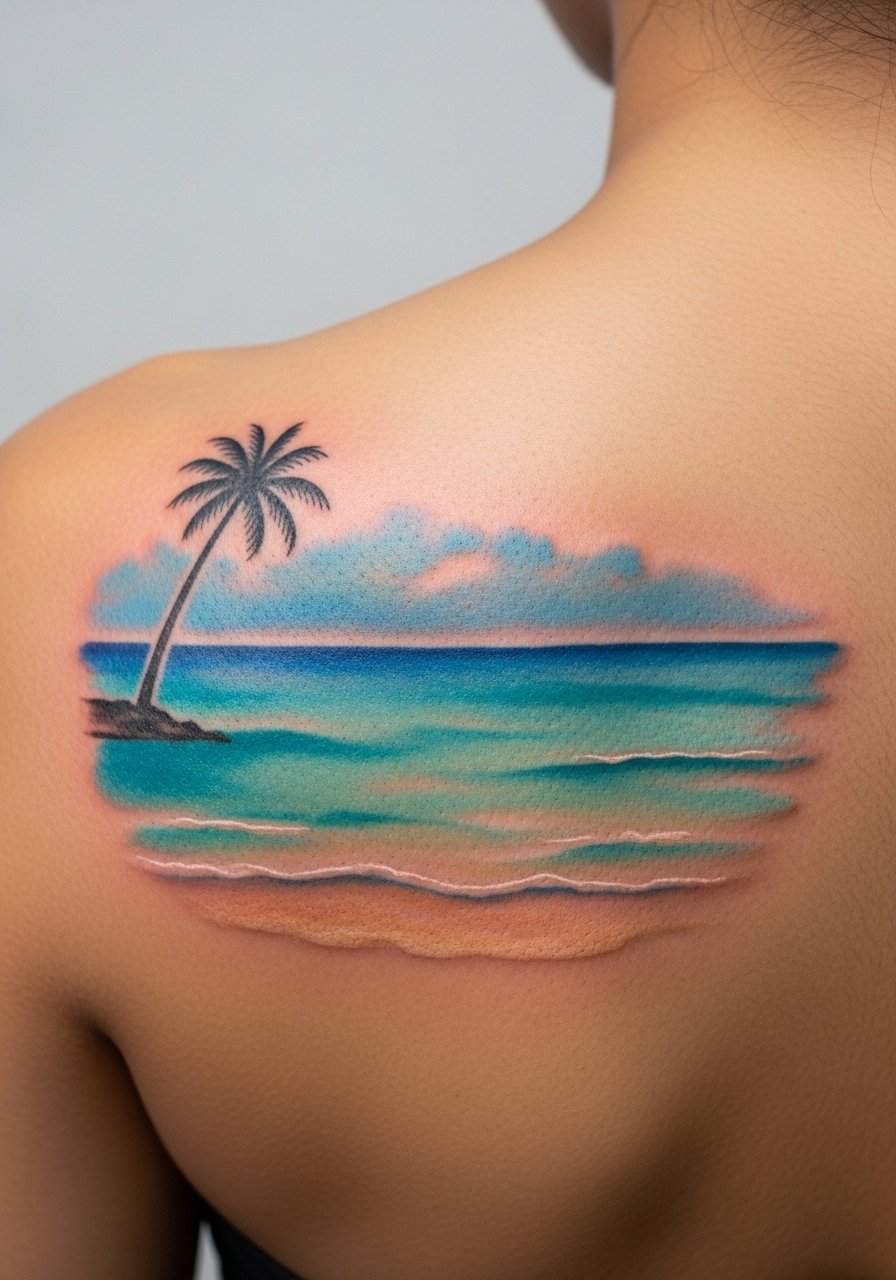
9. Ocean Sunrise Watercolor on Shoulder Blade
Style/Technique: Watercolor / Soft Color
Pain Level: Low-Medium (3-4/10)
Session Time: 1-2 sessions
Best For: Shoulder blade, upper back
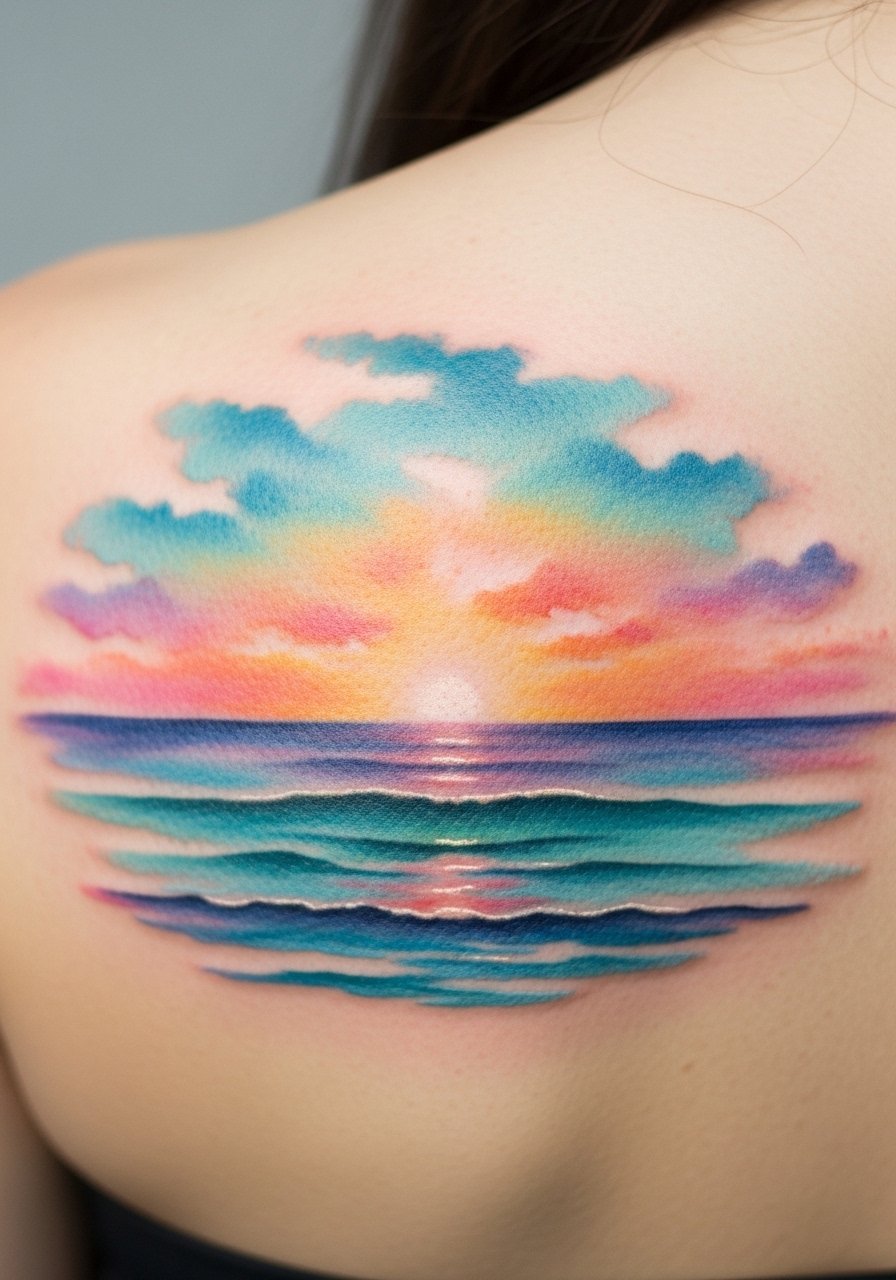
A sunrise over water reads hopeful and calm. Shoulder blade placement hides well under clothing and avoids constant sun exposure if you take care during summer. Watercolor here is beautiful but needs sunscreen long-term. I’ve noticed artists often combine a faint line horizon to prevent the design from dissolving as colors fade. Common mistake: insisting on tiny watercolor suns—scale keeps the blending readable. Related terms: ocean sunrise watercolor, watercolor sea, shoulder blade tattoo.
10. Nautical Compass with Waves on Forearm
Style/Technique: Neo-Traditional / Linework
Pain Level: Low (2-3/10)
Session Time: 1-2 hours
Best For: Forearm, ankle, inner wrist band
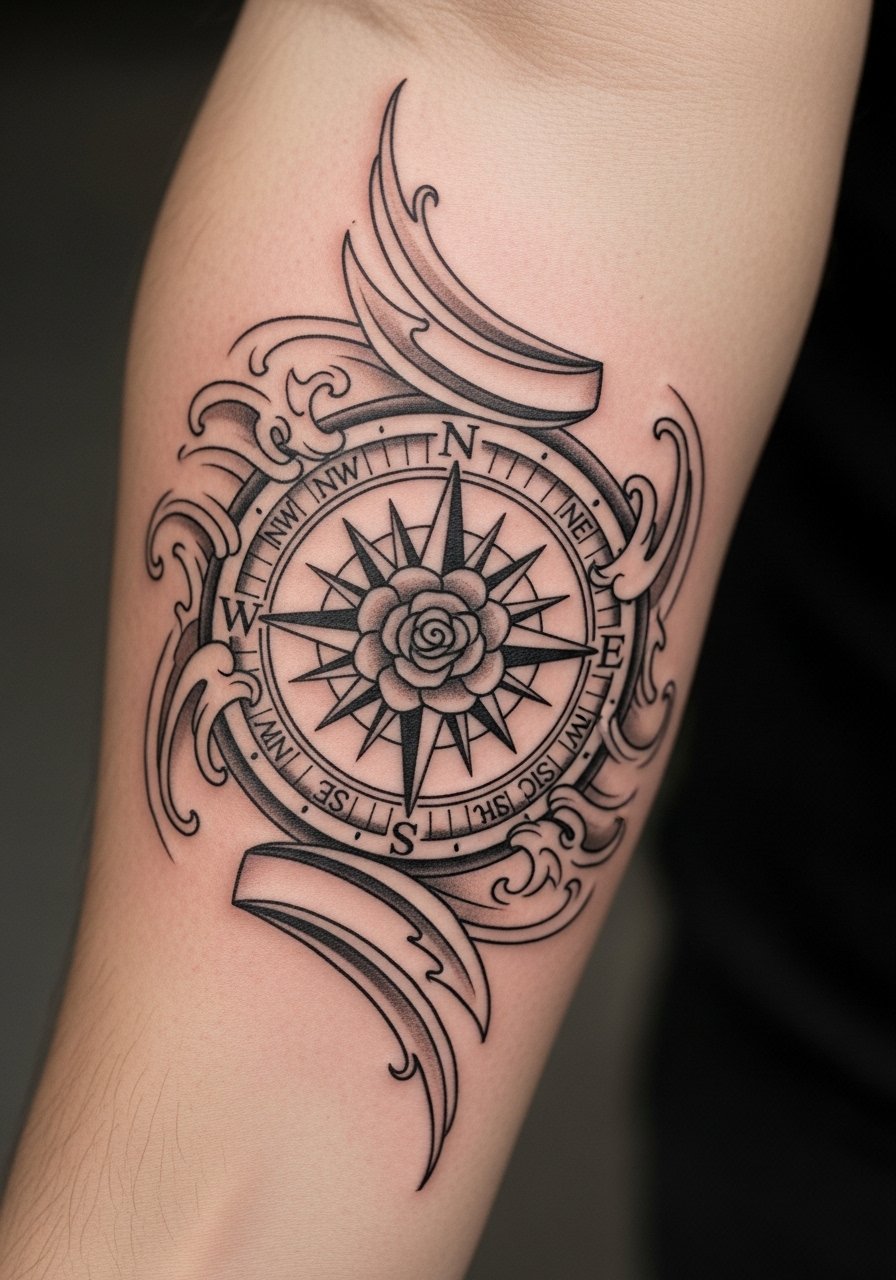
A compass with waves is a timeless navigation symbol. Forearm placement gives daily visibility and low pain. I advocate for clean linework; small, fuzzy compasses lose their purpose. Ask your artist to emphasize contrast so the needle and waves remain distinct as the ink shifts. Related terms: nautical compass, waves, timeless.
11. Realistic Diver Scene Starting a Sleeve
Style/Technique: Realism / Black & Gray
Pain Level: Medium-High (5-7/10)
Session Time: Multiple long sessions
Best For: Full or half sleeve
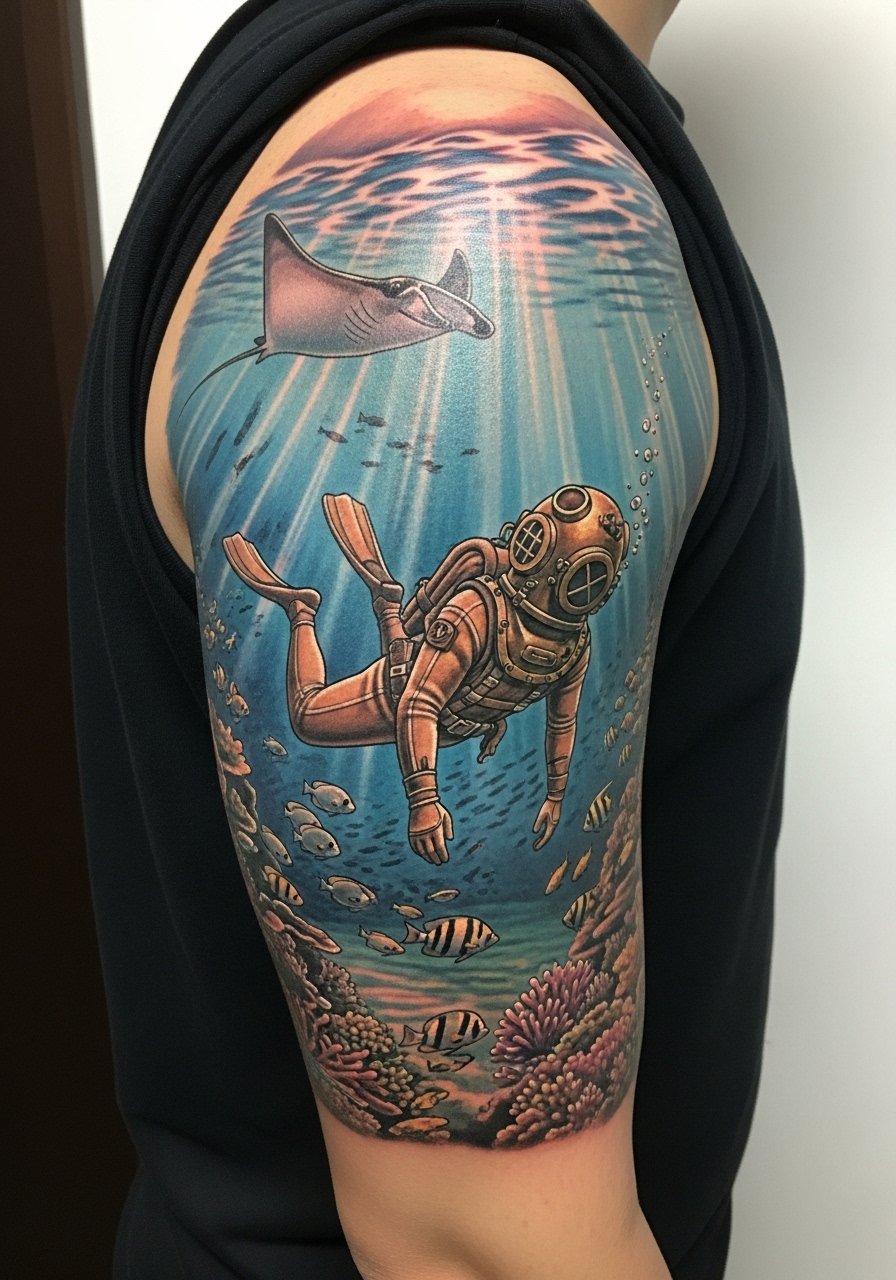
A diver scene builds a story across your arm. This is a commitment and needs an artist skilled in realism. I’ve seen these age beautifully when black and gray shading is used. Pain varies—near elbow and inner arm can be sharper. Avoid too many tiny figures; a few well-composed elements read better. Related terms: realistic diver, underwater, sleeve.
12. Minimalist Ocean Moon Reflection on Inner Wrist
Style/Technique: Minimalist / Black & Gray
Pain Level: Low (2-3/10)
Session Time: Under an hour
Best For: Inner wrist, ankle, behind ear
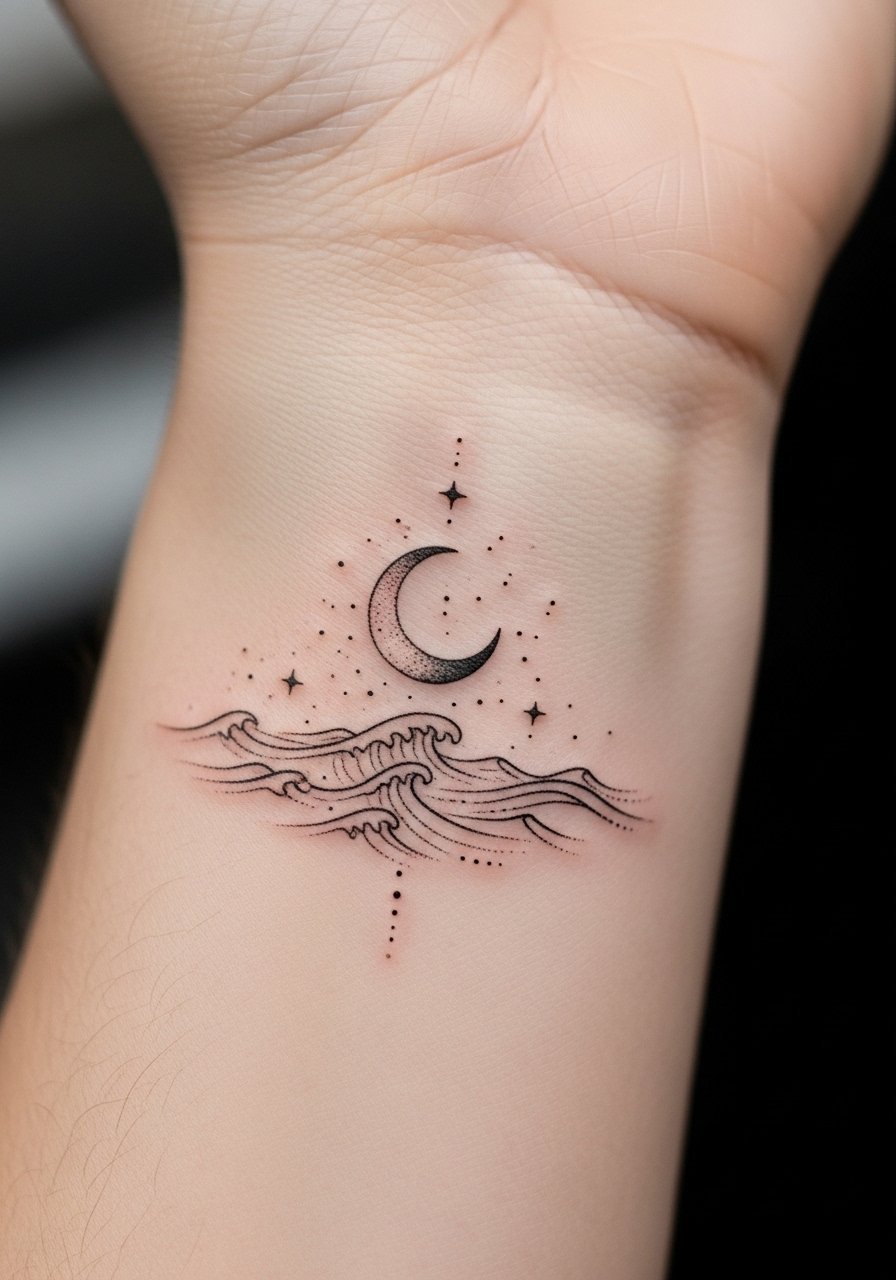
This design is poetic and subtle. Inner wrist placement is personal and low pain but visible. Minimalist moon reflections can blur if lines are too thin; request slightly bolder lines for durability. I often tell newbies to try temporary versions first. Related terms: minimalist ocean, moon reflection, first ocean tattoo ideas.
13. Traditional Anchor with Ocean Foam on Calf
Style/Technique: Traditional / American Traditional
Pain Level: Low (2-3/10)
Session Time: 1-2 hours
Best For: Calf, forearm, hand
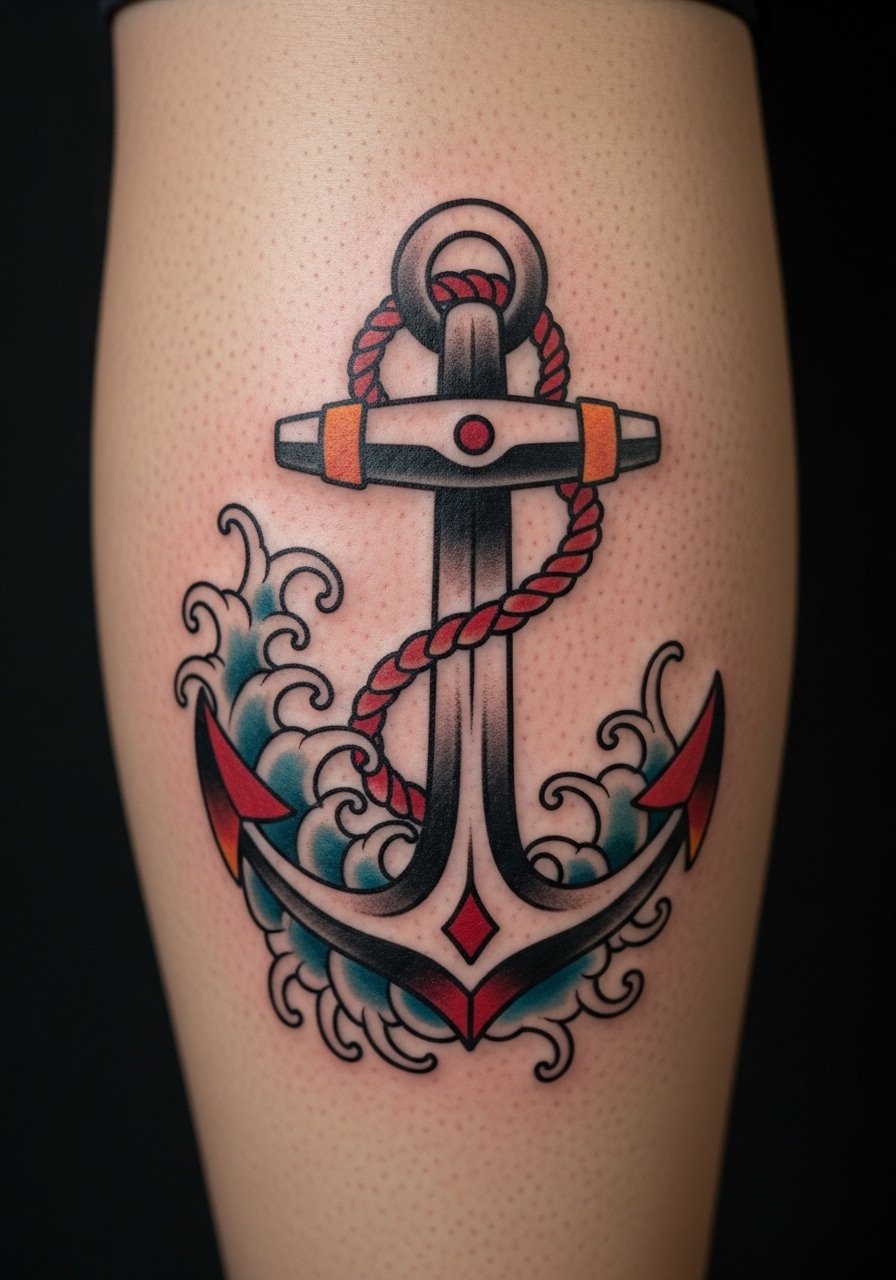
Anchors are classic symbols of stability. The calf is forgiving and keeps the anchor visible when you want it to be. Traditional styles’ bold outlines make them low-maintenance. From what I’ve seen, the biggest mistake is asking for ornate tiny anchors—keep proportions solid. Related terms: anchor with ocean foam, nautical, traditional.
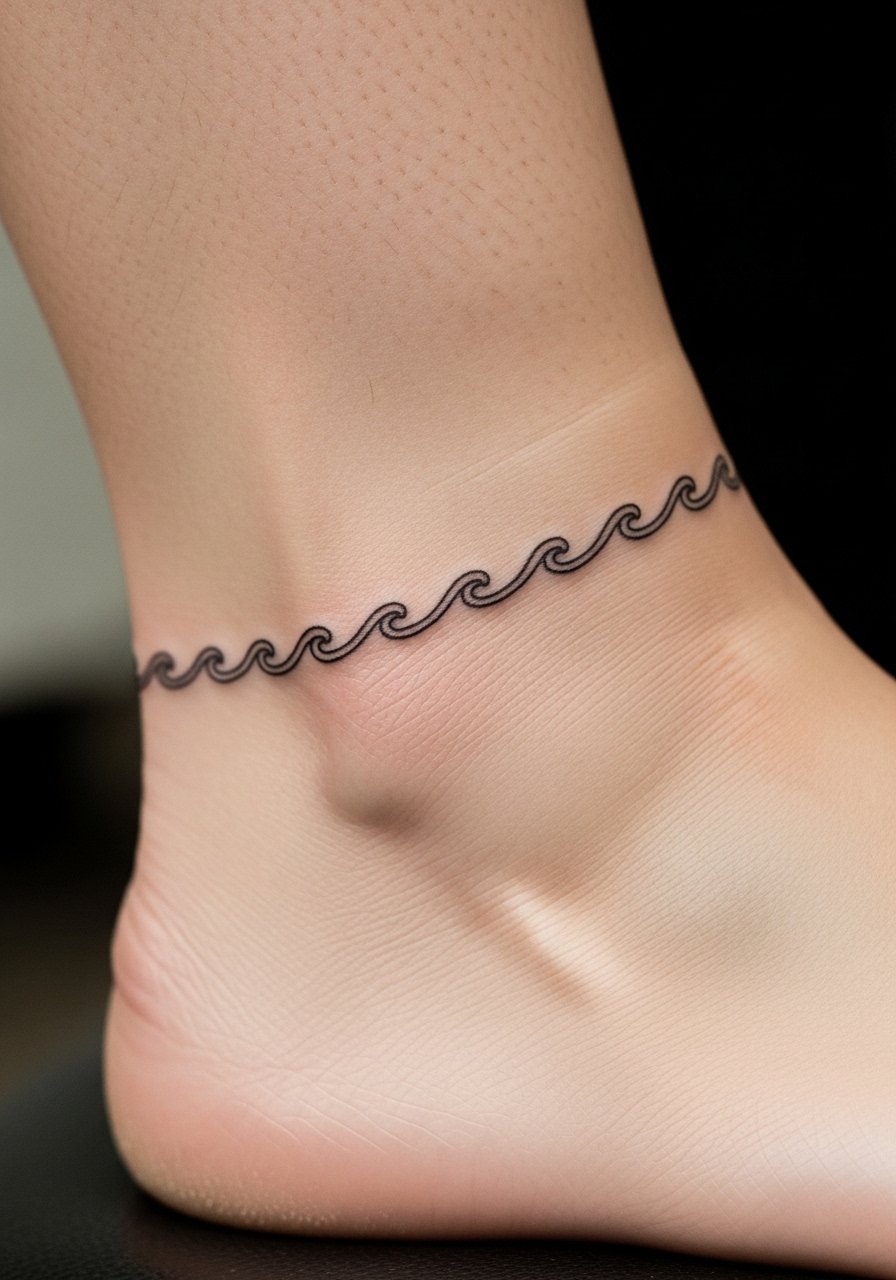
14. Heart-Shaped Wave on Ankle
Style/Technique: Minimalist / Line Art
Pain Level: Low (2-4/10)
Session Time: 30-60 minutes
Best For: Ankle, wrist, collarbone
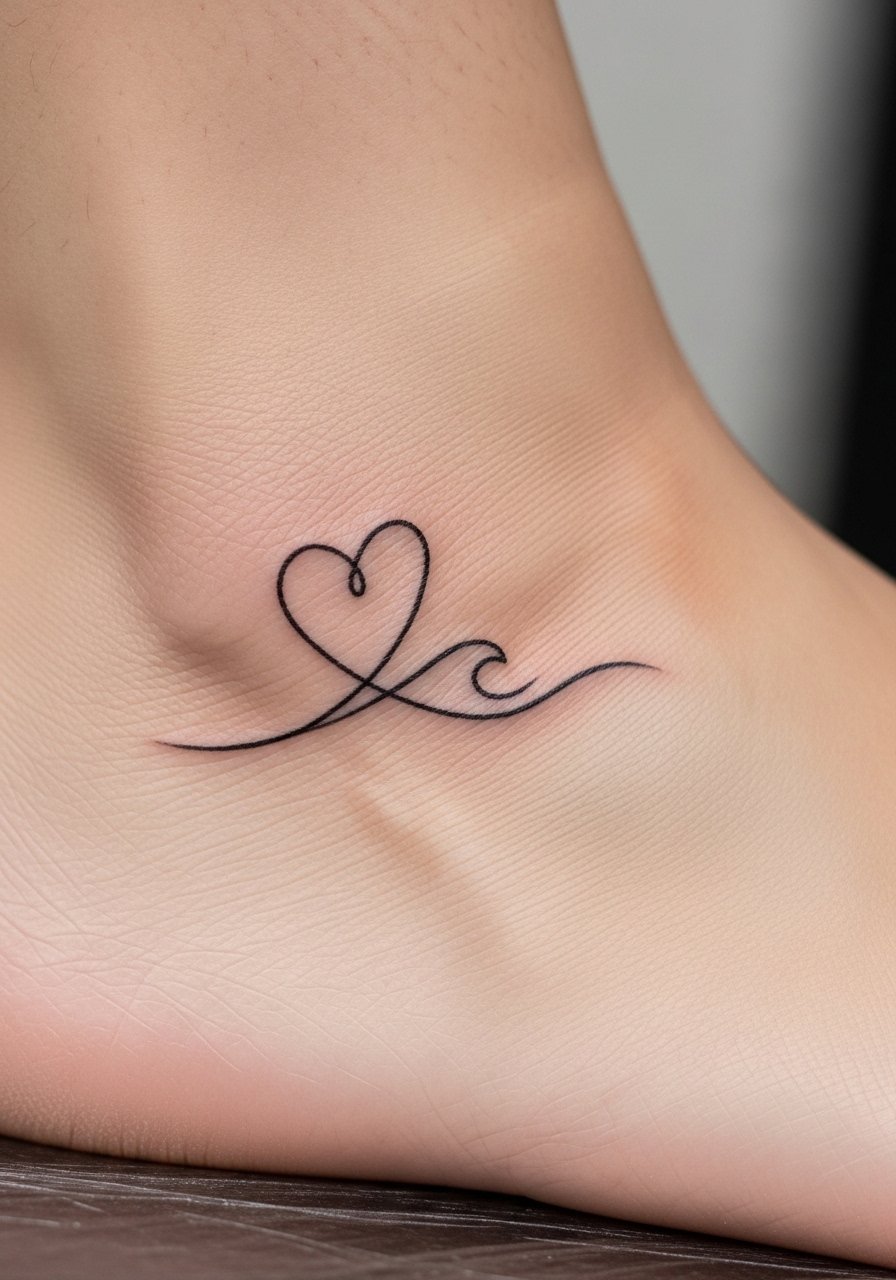
A heart-wave is sweet and symbolic. Ankle placement can sting more than the forearm but heals cleanly with reduced friction if you avoid tight shoes. I recommend slightly thicker linework for small wrist or ankle pieces so the shape stays readable. Related terms: heart waves, small ocean tattoos, minimalist.
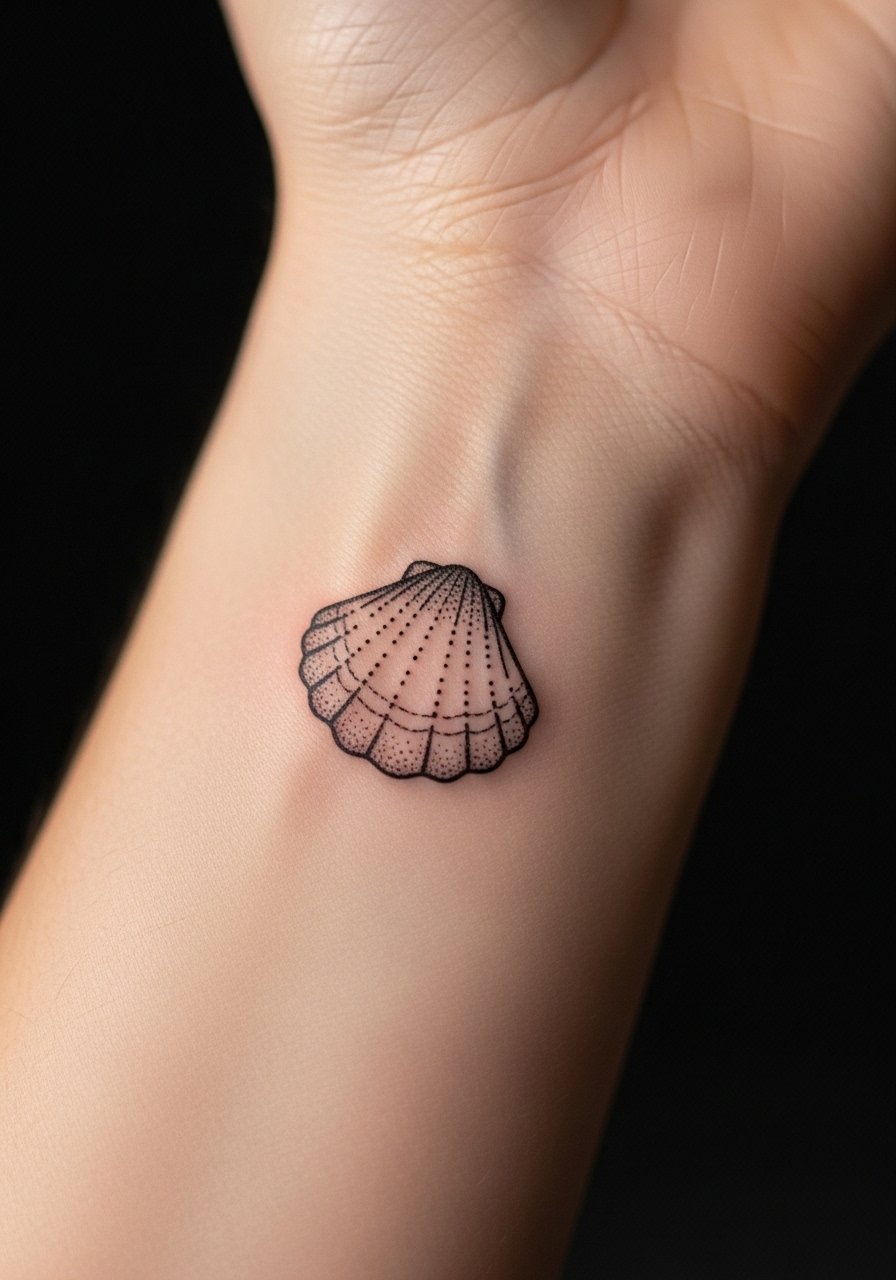
15. Tiny Shell Behind Ear (Handpoke Option)
Style/Technique: Handpoke / Minimalist
Pain Level: Low (2-3/10)
Session Time: 15-30 minutes
Best For: Behind ear, finger, behind neck
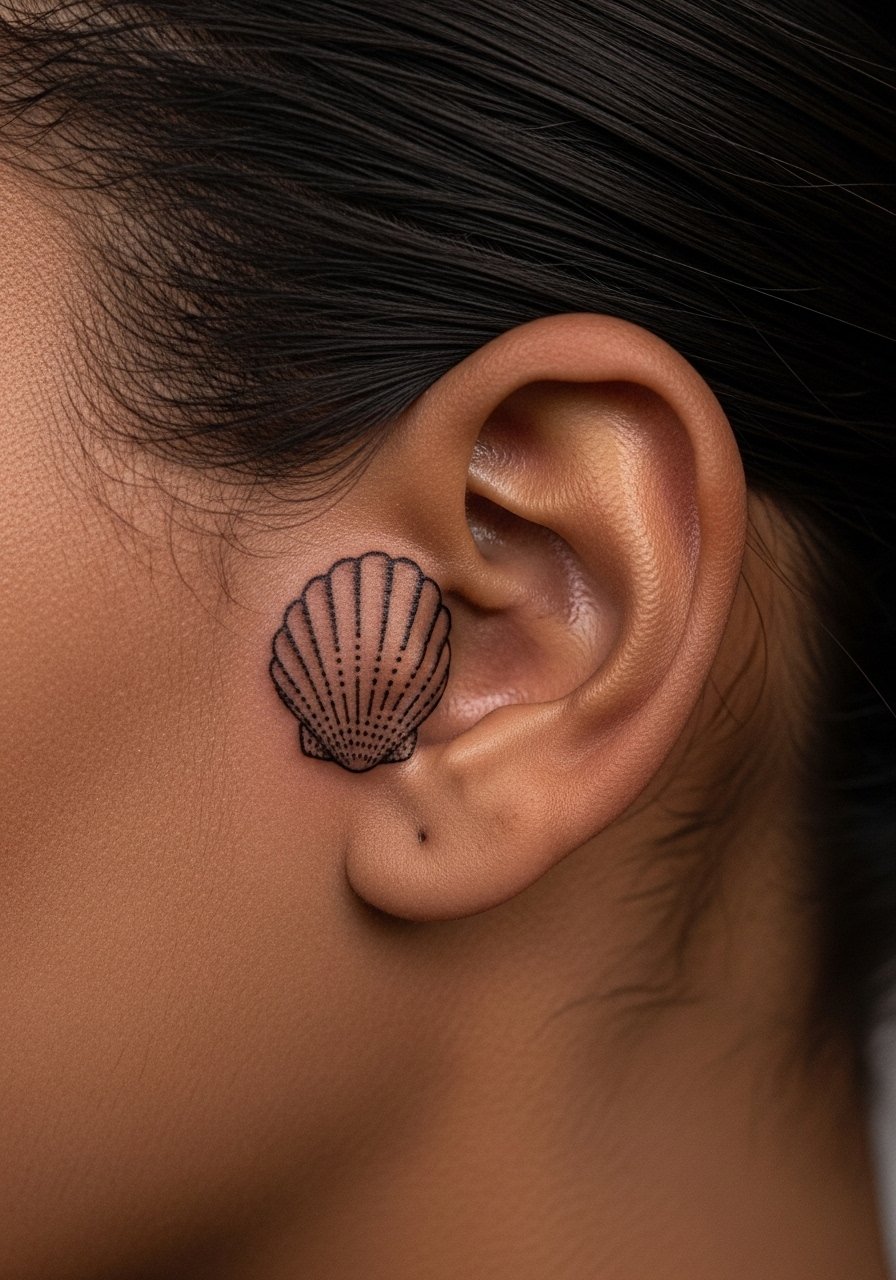
Handpoke shells offer an organic look. Behind the ear is discreet. Handpoke work ages differently; imperfections are part of the charm but choose an artist experienced with handpoke. Common mistake: using handpoke for complex shading—keep it simple. Related terms: tiny shell, handpoke minimalist, first ocean tattoo ideas.
16. Patchwork Ocean Sleeve (Half-Sleeve)
Style/Technique: Mixed Styles / Patchwork
Pain Level: Medium (4-6/10)
Session Time: Multiple sessions over months
Best For: Half-sleeve collectors
Patchwork sleeves let you mix creatures and motifs without a single cohesive scene. I like this if you want variety—add whales, octopus, reefs, and compass pieces over time. Make sure each patch has breathing room so the sleeve doesn’t read cluttered as it ages. Ask your artist about contrast and negative space planning. Related terms: patchwork ocean, marine life, sleeve.
17. UV-Reactive Ocean Waves on Forearm (Subtle Glow)
Style/Technique: Specialty / UV Ink
Pain Level: Low-Medium (3-4/10)
Session Time: 1-2 hours
Best For: Forearm, shoulder, small accents
UV-reactive waves are a niche idea if you want a hidden effect. I’ve seen them used as accents rather than full pieces. Important: ask your artist about healed examples and pigment longevity on your skin tone—UV inks behave differently. Don’t rely solely on UV ink for the main composition; pair it with stable black lines. Related terms: UV-reactive ocean waves, subtle glowing sea.
18. Cybersigilism Ocean Sigils on Inner Arm
Style/Technique: Neo-Mystical / Fine Line
Pain Level: Low (2-4/10)
Session Time: 1-2 hours
Best For: Inner arm, sternum strip, forearm band
Cybersigilism blends digital runes with ocean lines. It’s a fresh angle I don’t see enough of. Inner arm placement keeps it private. The key is crisp, intentional linework so the sigils remain legible as skin shifts. Ask for healed photos of geometric fine line work. Common mistake: mixing too many tiny symbols—simplify. Related terms: ocean sigils, minimalist ocean, fine line.
19. Handpoke Minimalist Shell on Wrist
Style/Technique: Handpoke / Minimalist
Pain Level: Low (2-3/10)
Session Time: Under an hour
Best For: Wrist, finger, behind ear
Handpoke shells are low-key and intimate. The wrist sees movement, so keep the shell simple. I’ve noticed handpoke textures age into a soft, almost pointillist look—some people love that. Ensure pigments used are safe for handpoke techniques. Related terms: handpoke shell, tiny shell, first ocean tattoo ideas.
20. Fine Line Kelp Band Around Upper Arm
Style/Technique: Fine Line / Botanical Marine
Pain Level: Low (2-3/10)
Session Time: 1-2 hours
Best For: Upper arm band, calf band
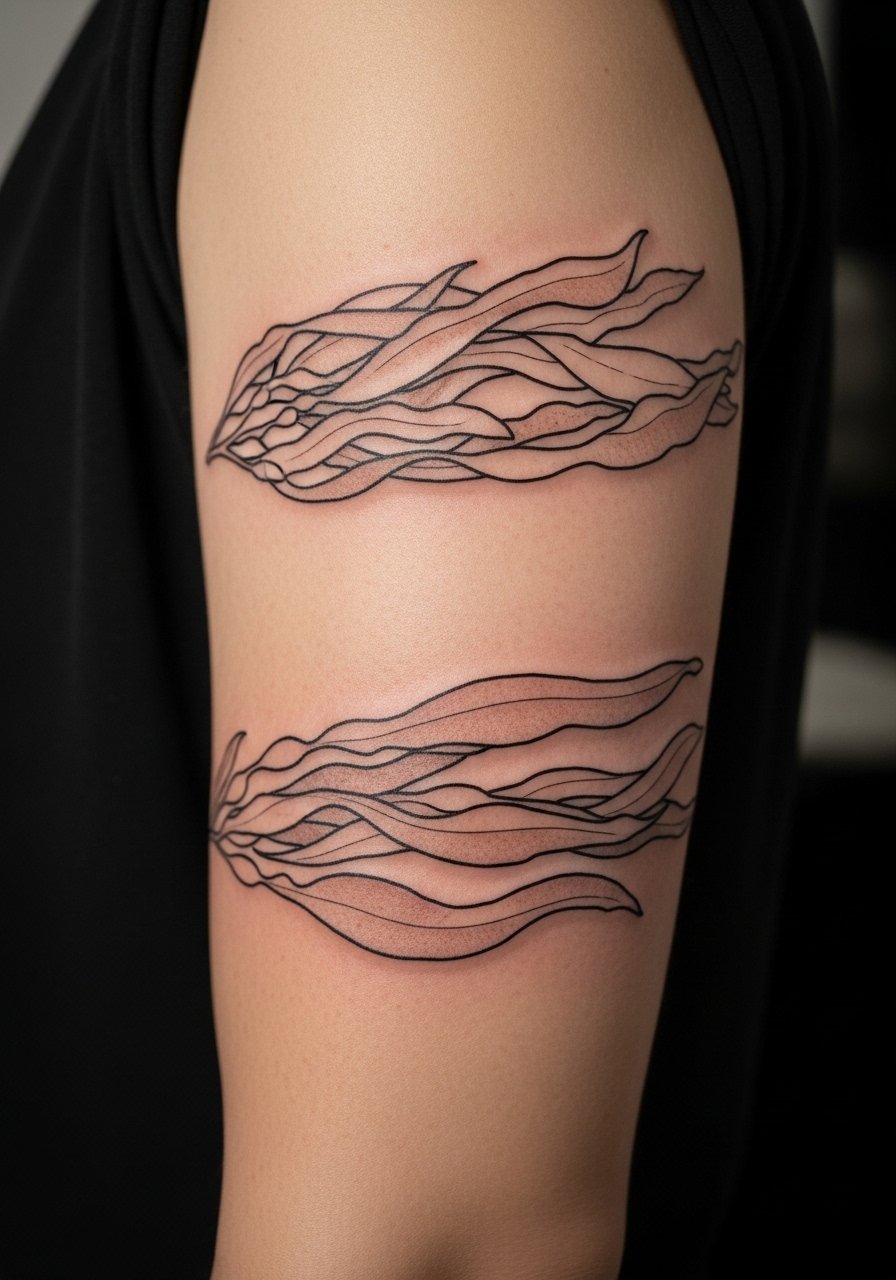
A kelp band is subtle and wearable. Upper arm placement keeps it low pain and easy to hide. Fine line works well here but needs a skilled hand for even spacing. I recommend a slightly stronger anchor line so the pattern keeps its rhythm as it ages. Related terms: kelp band, minimalist ocean, forearm placement.
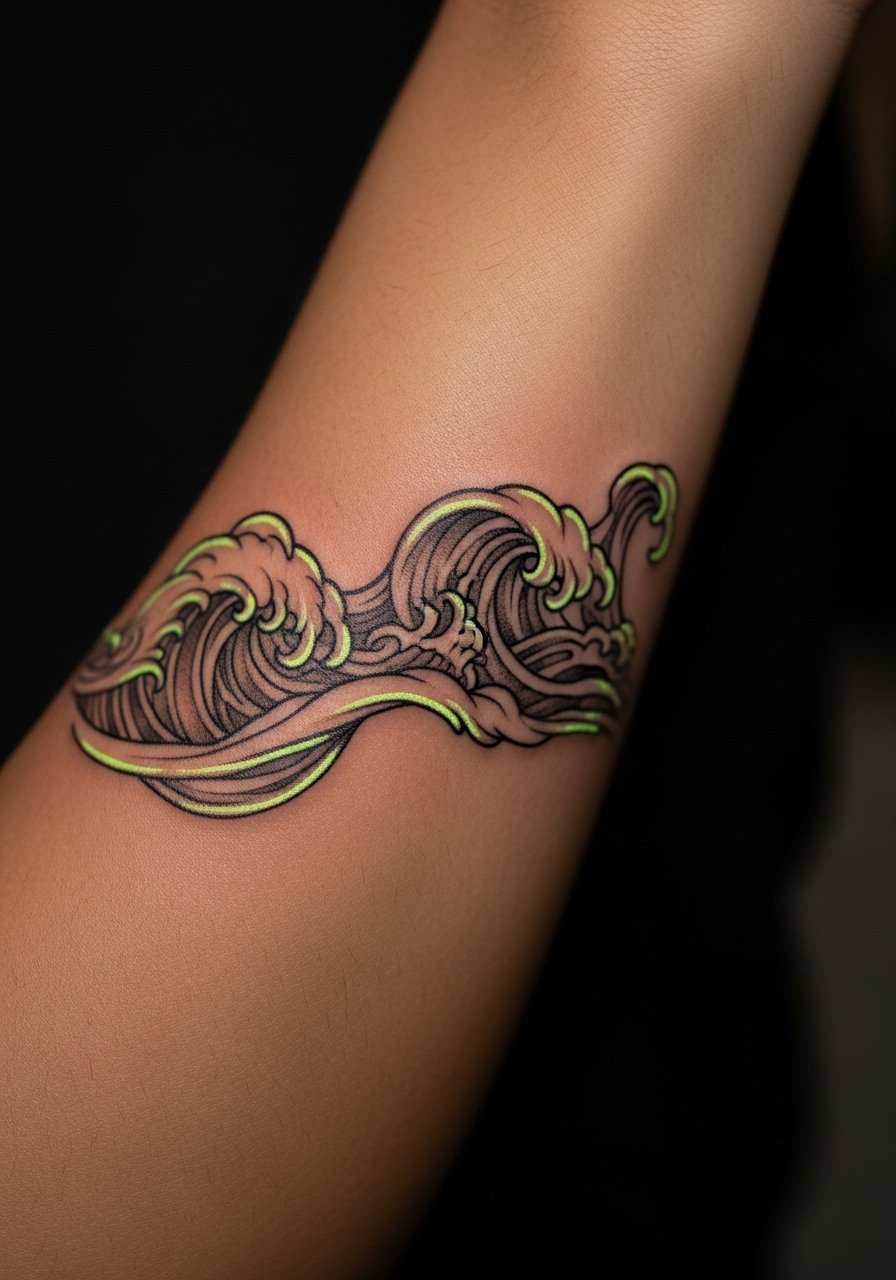
21. Blackwork Wave Band on Forearm
Style/Technique: Blackwork / Bold Line
Pain Level: Low (2-3/10)
Session Time: 1-2 hours
Best For: Forearm, wrist cuff
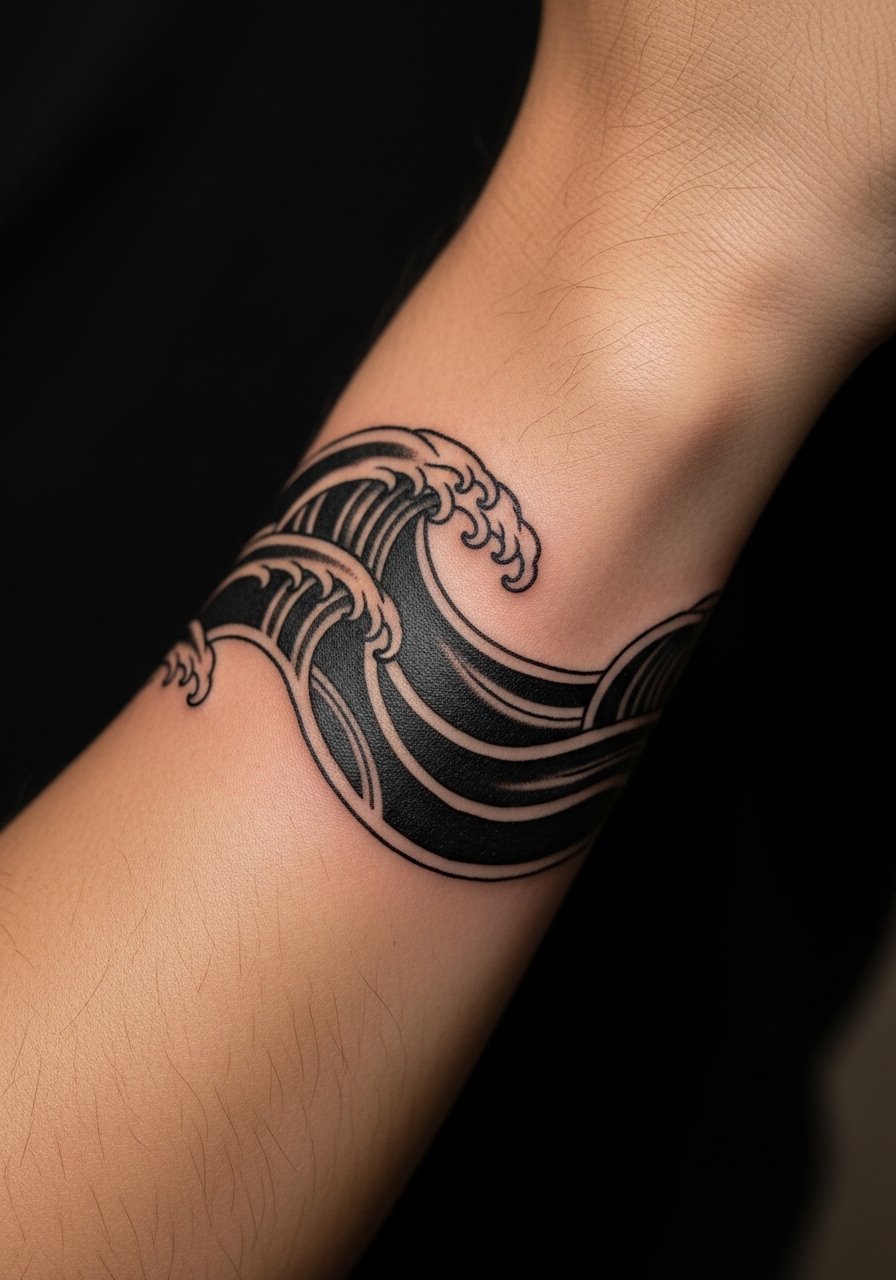
A blackwork wave band reads graphic and timeless. Thick black areas hold up well across skin tones. Forearm placement is visible and lower pain. Avoid tiny negative shapes inside thick fills—keep the pattern readable. From my experience, blackwork is the go-to when you want low-maintenance vibrancy. Related terms: blackwork, wave band, minimalist ocean.
22. Realistic Sea Lion Portrait on Calf
Style/Technique: Realism / Black & Gray
Pain Level: Low-Medium (3-4/10)
Session Time: 1-3 hours
Best For: Calf, thigh
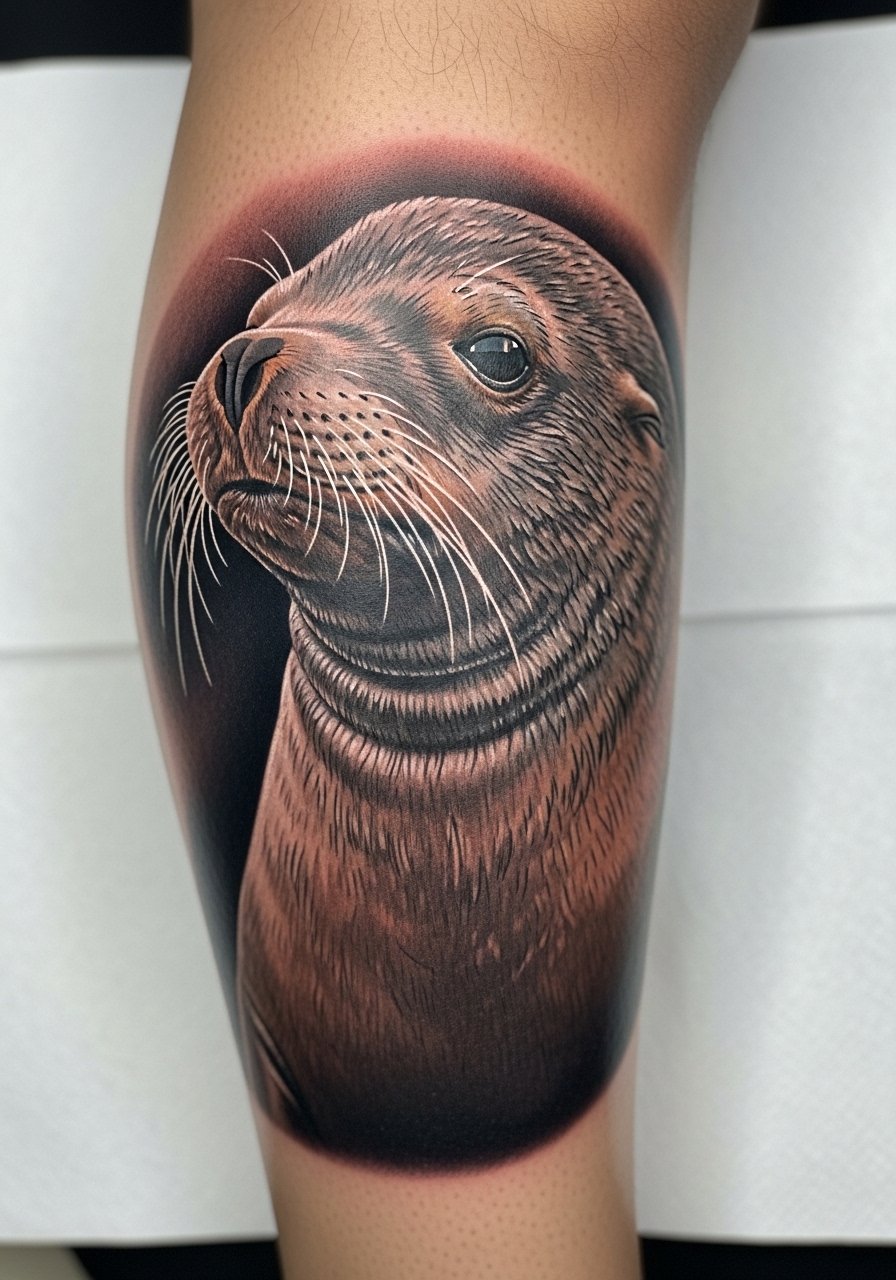
Sea lion portraits are expressive and a little playful. Calf placement gives space for facial detail. I often tell clients to pick subjects with clear contrasts—seals and sea lions work well in black and gray. Common mistake: cramming background reef details that steal focus. Ask to see healed-real examples of animal portrait work. Related terms: marine life, realistic portrait, black and gray.
23. Neo-Traditional Octopus with Ship Elements on Bicep
Style/Technique: Neo-Traditional / Color
Pain Level: Low-Medium (3-5/10)
Session Time: 2-4 hours
Best For: Bicep, shoulder
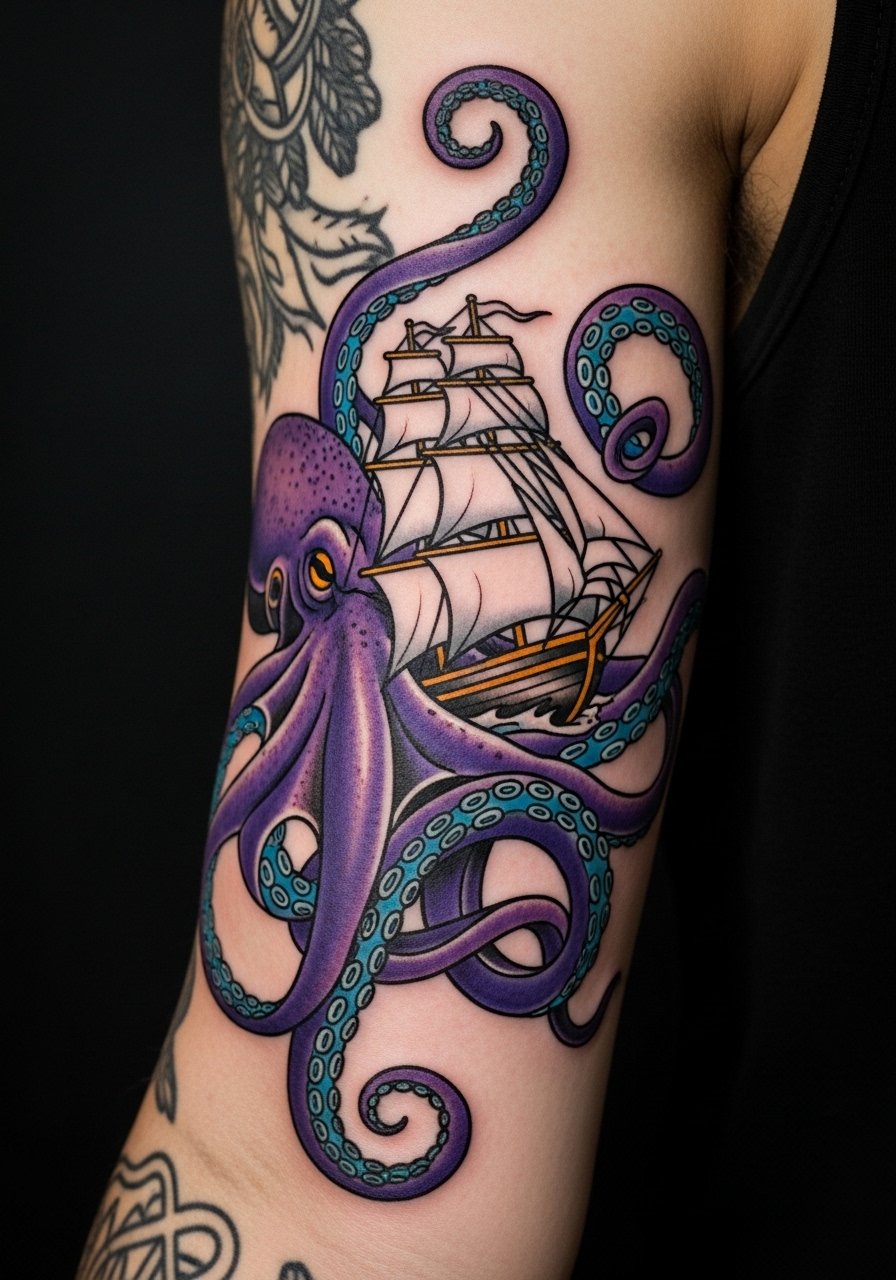
This motif mixes classic sailor imagery with bold neo-traditional color. The bicep is forgiving and low pain. I like the visual drama of tentacles interacting with a ship silhouette. Make sure the ship’s silhouette remains simple so the octopus reads clearly from a distance. Related terms: bold octopus, nautical, neo-traditional.
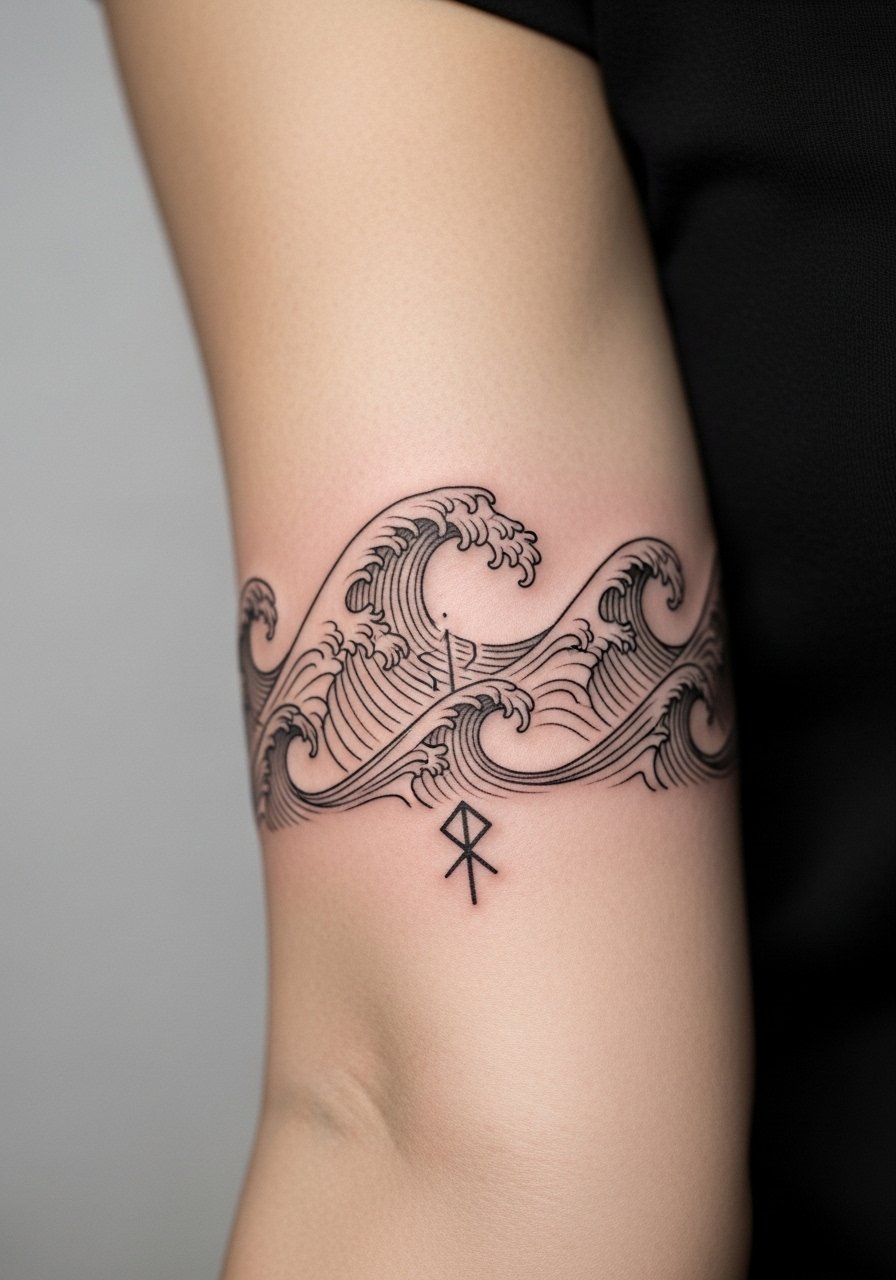
24. Minimalist Wave Ankle Band
Style/Technique: Minimalist / Line Band
Pain Level: Medium (4-5/10)
Session Time: 30-60 minutes
Best For: Ankle, wrist, finger bands
An ankle wave band is subtle and rhythmic. Be aware the ankle can be more painful than forearm due to thin skin. Keep lines bold enough to resist blurring. I advise a touch of negative space between repeats so the pattern stays crisp. Related terms: wave band, minimalist ocean, small ocean tattoos.
25. Watercolor Beach Scene on Shoulder Blade
Style/Technique: Watercolor / Landscape
Pain Level: Low (3-4/10)
Session Time: 1-2 sessions
Best For: Shoulder blade, upper back
A watercolor beach scene reads like a postcard. Shoulder blade placement is forgiving and good for larger watercolor washes. I often see people pair this with a fine-line horizon for structure. The trick is to accept some color softening over time and plan for touch-ups if you want vivid saturation. Related terms: watercolor sea, ocean sunrise, shoulder blade tattoo.
26. Jellyfish Collarbone Cascade (Long Tentacles)
Style/Technique: Fine Line / Flowing Composition
Pain Level: Medium (4-6/10)
Session Time: 1-2 hours
Best For: Collarbone, sternum-side cascades
Long tentacle jellyfish across the collarbone are feminine and dynamic. The area can be sensitive, so expect higher pain than the outer arm. Ask artists for healed shots of long linework on collarbones. Keep tentacles slightly thicker than hairline to avoid premature blur. Related terms: fine line jellyfish, collarbone placement, underwater.
27. Coral Half-Sleeve Accent on Thigh
Style/Technique: Black & Gray with Color Accents
Pain Level: Medium (4-6/10)
Session Time: Multiple sessions
Best For: Thigh, ribcage
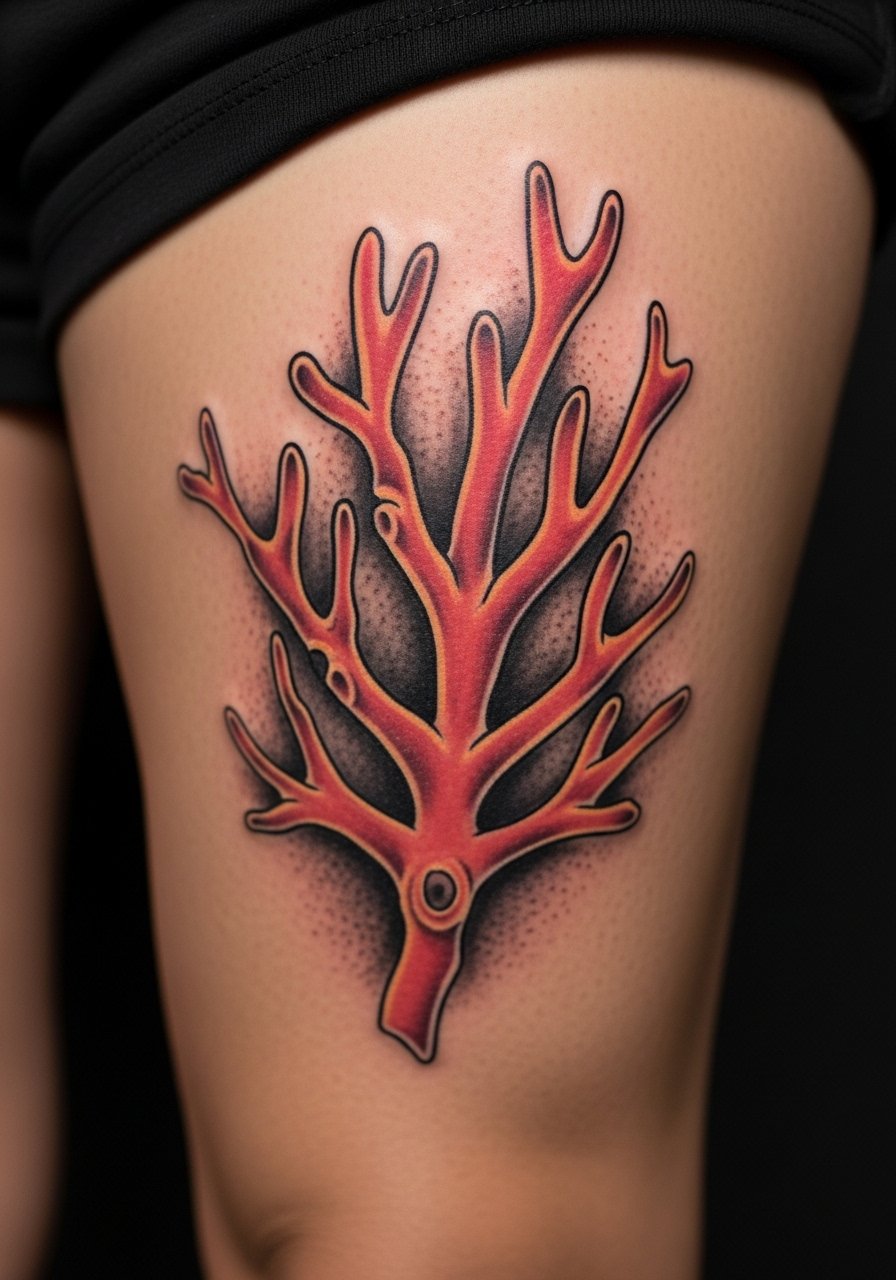
A coral half-sleeve on the thigh is dramatic and allows intricate ecosystems. Thighs are less painful than ribs and hold color well. I recommend black-and-gray base with color accents so the piece remains readable if pigments soften. Avoid tiny polyps; stick to medium forms. Related terms: coral reef scene, marine life, black and gray.
28. Surreal Whale Back Panel (Upper Back)
Style/Technique: Surrealism / Large Black & Gray
Pain Level: Medium (4-6/10)
Session Time: Multiple long sessions
Best For: Upper back, full-back panels
A large surreal whale makes your back feel like a moving ocean. Upper back is a great canvas with moderate pain. Plan sessions for shading and contour. I’ve seen surreal back pieces age well when the artist prioritizes strong contrast. Don’t crowd the whale with too many tiny islands—balance matters. Related terms: surreal ocean, whale portrait, back panel.
29. Nautical Map Ribcage Compass and Waves
Style/Technique: Illustrative / Fine Line
Pain Level: High (7-9/10)
Session Time: Multiple sessions
Best For: Ribcage, side torso
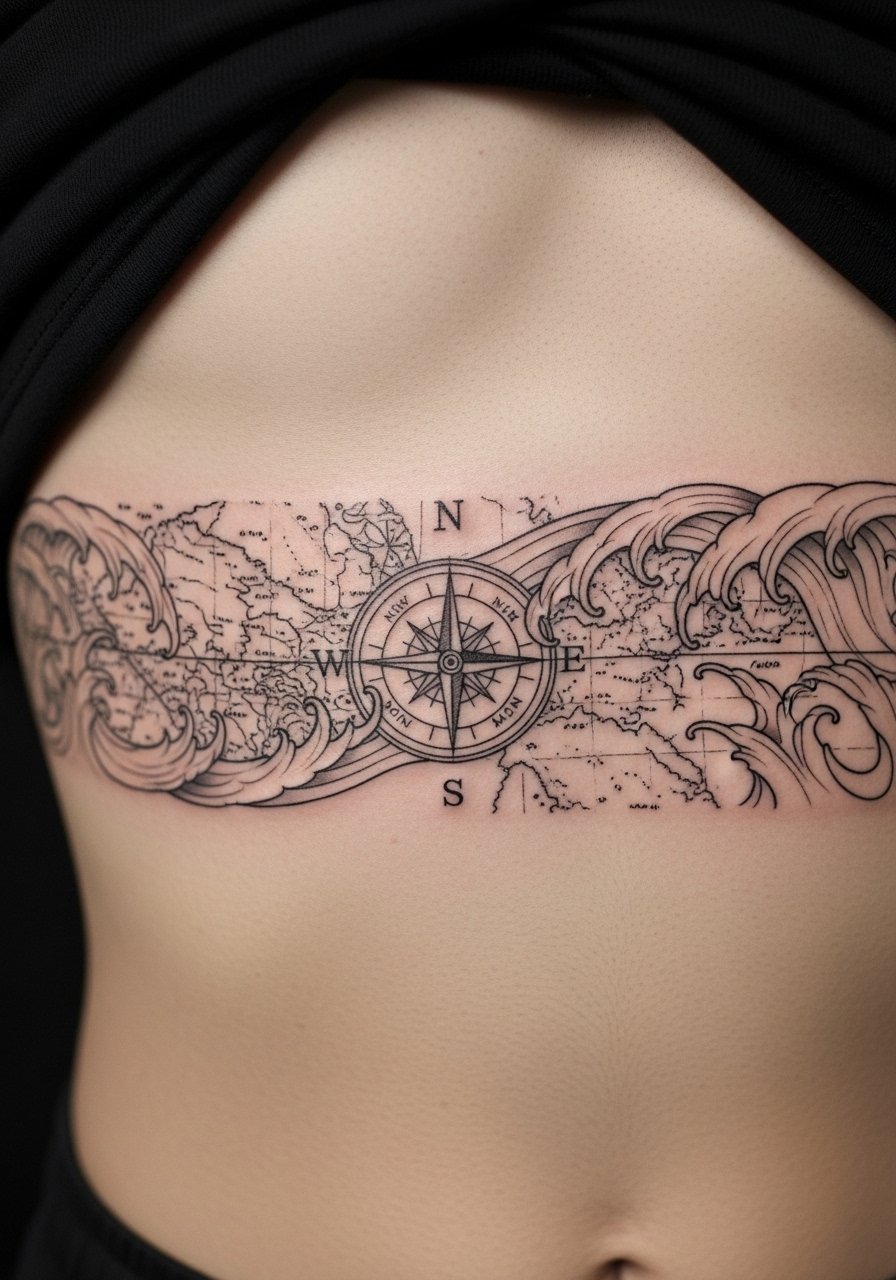
Ribcage maps look epic but hurt. I only recommend this if you’re prepared for sensitivity. Fine-line cartography reads well if given space; the ribs challenge both artist and client. From what I’ve learned, ask for slightly bolder linework for this area to avoid loss of detail. Related terms: nautical map, compass with waves, ribcage placement.
30. Retro Diver Helmet on Chest Center
Style/Technique: Neo-Traditional / Retro Realism
Pain Level: Medium (4-6/10)
Session Time: 1-3 hours
Best For: Center chest, sternum panels
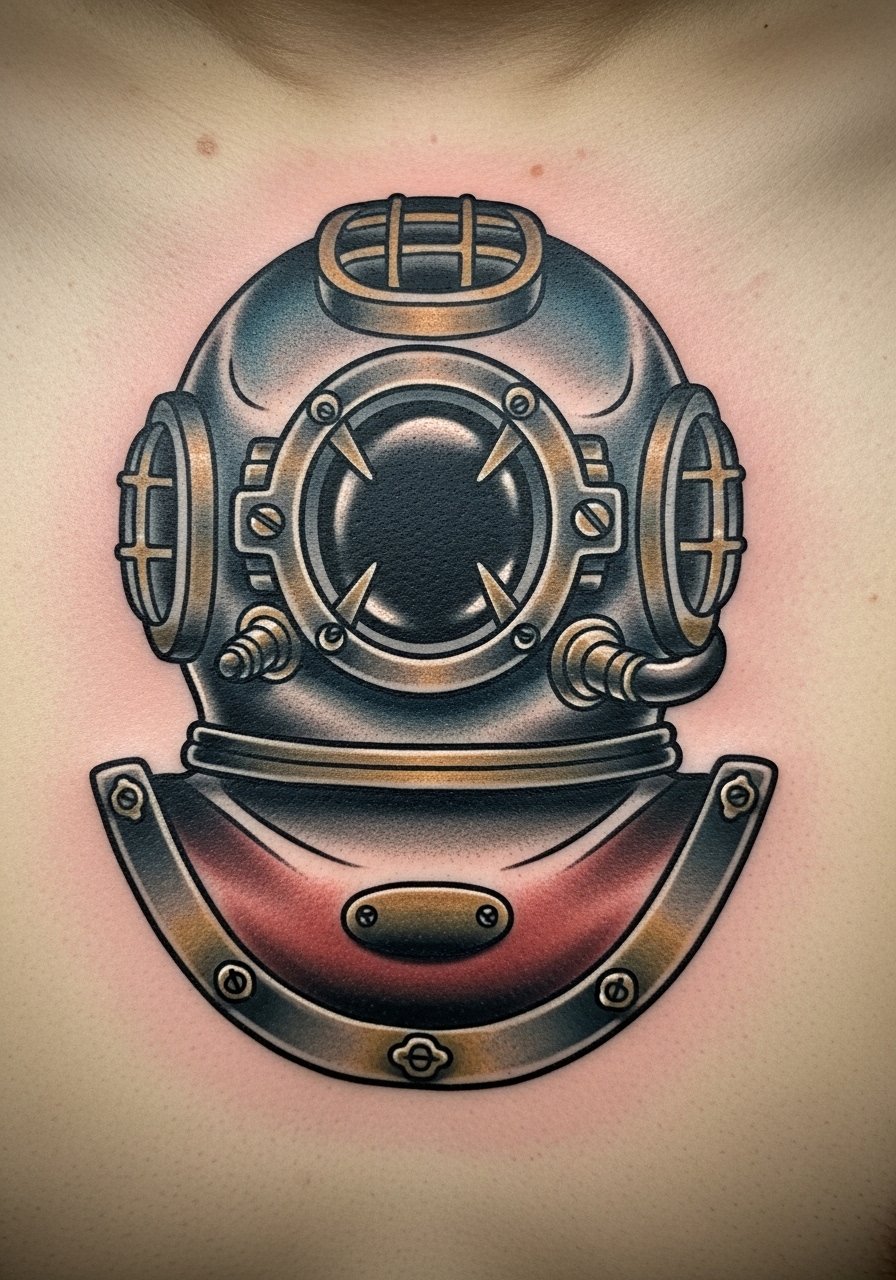
A retro diver helmet is nostalgic and cinematic. Center chest placement can be more painful near the sternum. I like the helmet for storytelling—add tiny ocean creatures inside the glass. Ask your artist about healed examples for chest detail. Keep key elements bold so they remain clear as the skin ages. Related terms: diver helmet, marine life, neo-traditional.
Tattoo Prep and Aftercare Essentials
Aftercare Essentials (first 0–5 days):
- Aquaphor Healing Ointment, 14 oz tube — Recommended by artists for the first few days to prevent cracking
- Saniderm Transparent Adhesive Bandage, 6-inch roll — For second-skin protection during early healing
- Dr. Bronner's Unscented Castile Soap, 32 oz — Gentle cleaning during washes
Before Your Appointment:
- Tattoo Numbing Cream with 5% Lidocaine — Use only if your artist approves, 30–45 minutes before
- Stencil Transfer Paper 8.5×11 — For designers who want to test placement at home
Daily Moisturize & Maintenance (days 4–14):
- CeraVe Fragrance-Free Moisturizing Lotion, 16 oz — Use after ointment phase to keep skin hydrated
- Mad Rabbit Tattoo Balm, 2 oz — Artist-recommended for ongoing moisturizing and color keep
Long-Term Protection:
- SPF 50 Sunscreen Stick for Tattoos — Daily sun protection to slow fading
- Hustle Butter Deluxe, 2 oz — Vegan alternative many artists mention for healed skin
Optional Comfort Items:
- Hydrocolloid Bandages (Large) — For spot protection or blisters during healing
- Tattoo Aftercare Kit (Multi-Item) — Good starter bundle for first-timers
Artists I know usually recommend Aquaphor or Saniderm in the very early phase and a fragrance-free lotion like CeraVe afterward. Hustle Butter and Mad Rabbit are popular for long-term maintenance, though everyone’s skin reacts differently—test a small area if you’re unsure.
Frequently Asked Questions
Q: How bad does a tattoo actually hurt?
A: Pain depends on placement and your tolerance. Outer arm and calf are low (I’d call them 2–4/10). Ribcage, sternum, and ankle can be intense (7–9/10). It’s more of a steady burning or scratching than a sudden shock. For sensitive spots, ask your artist about numbing cream with 5% lidocaine—it helps but won’t erase the feeling.
Q: How do I choose an ocean design I won’t regret?
A: Sit with a design for several months and try a temporary on the same placement. I also ask artists to show healed photos. Timeless motifs—waves, whales, anchors—tend to age better than ultra-trendy flourishes. If you’re unsure about visibility, pick a spot you can easily cover.
Q: What’s the best way to keep ocean tattoos from fading?
A: Sunscreen is non-negotiable. From what I’ve seen, UV exposure is the main fading culprit. Use an SPF 50 sunscreen stick for tattoos on healed work every day and moisturize regularly with a fragrance-free lotion like CeraVe.
Q: Can I swim after getting an ocean tattoo?
A: Not right away. Avoid pools, hot tubs, and open water for at least two weeks or until your artist says the skin is sealed. Chlorine and bacteria can ruin fresh ink and increase infection risk. Keep it clean with a gentle soap like Dr. Bronner’s Unscented Castile Soap.
Q: Should I get a small tattoo first to test pain?
A: Only if you want that specific small design. Pain varies by location more than size. A tiny wrist piece can hurt more than a full forearm scene. If anxiety about needles is high, choose an outer arm or thigh spot for your first piece.
Q: How long does an ocean tattoo take to heal?
A: Surface healing is usually 2–3 weeks; deep skin remodeling can take a few months. The first week is crucial—keep it clean, moisturized, and lightly covered if your artist suggests Saniderm or Aquaphor. Expect peeling around days 3–7; don’t pick at it.
Q: Do colors look different on darker skin tones?
A: Yes. Black and gray tend to show consistently across tones. Bright colors like yellow or light pink can be subtler on deeper skin. I always tell people to ask artists for healed examples on similar skin tones so expectations match reality.
Q: Any aftercare product you’d skip?
A: Heavy scented lotions and petroleum-only products that aren’t formulated for tattoos can irritate. Artists I know prefer simple, proven items like Aquaphor initially and a fragrance-free lotion like CeraVe afterward. If something smells like a perfume, I usually advise skipping it.
