
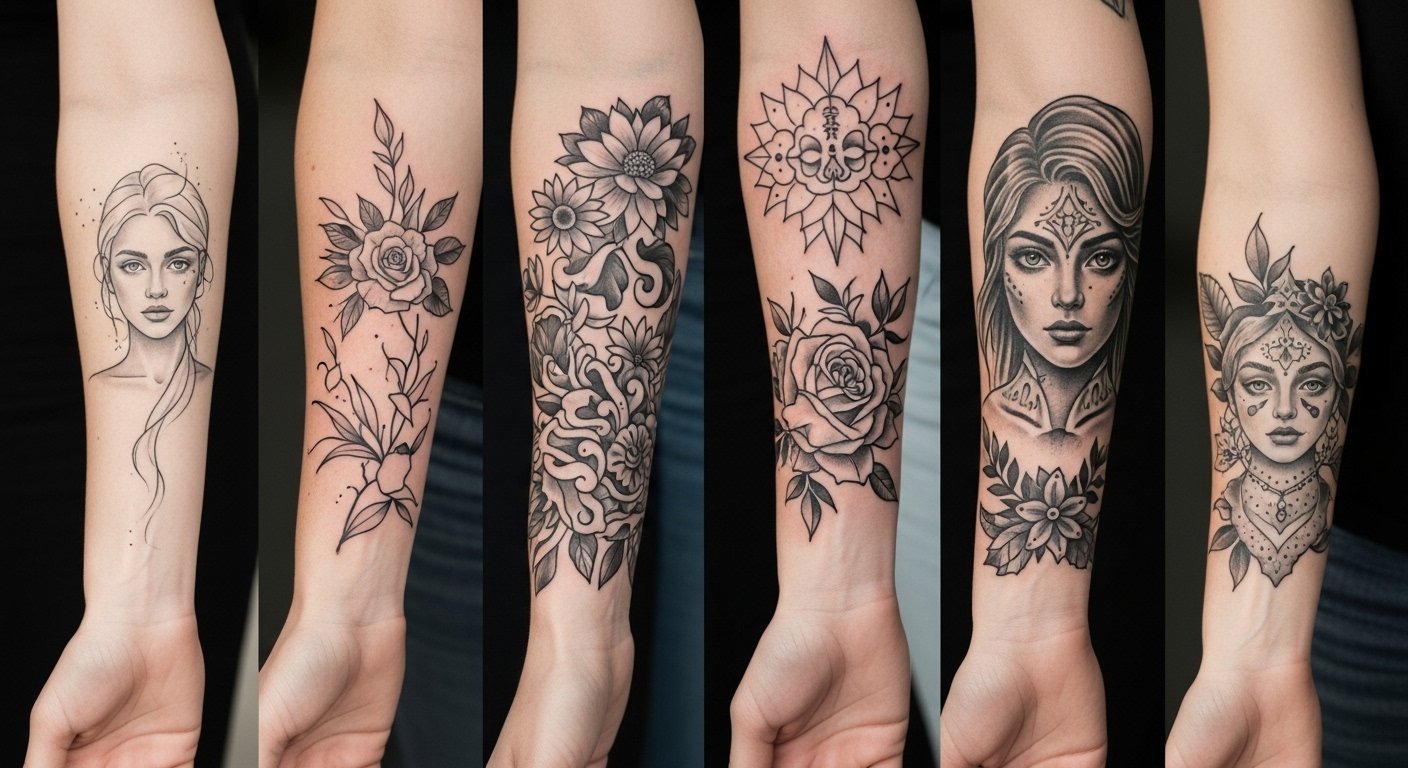
I spent months saving photos, asking artists questions, and watching healed pieces before I realized the real trick: nature tattoo ideas that feel grounded are the ones that match your story, placement, and how your skin ages. These 25 calming designs lean into fine line, geometric, blackwork, and watercolor approaches so you can choose something that actually wears well over time.
This list focuses on nature-inspired, minimalist, and neo-traditional vibes—placements that suit first nature tattoos through full sleeves. From what I’ve seen, hybrids that mix geometric shapes with floral or animal motifs keep designs feeling modern while aging reliably. Expect placement notes, pain reality, healing tips, and an artist-style to look for with each idea.
1. Fine Line Botanical Sleeve on Inner Forearm
Style/Technique: Fine Line / Illustrative
Pain Level: Medium (3-4/10)
Session Time: Multiple short sessions over several visits
Best For: Statement piece that still reads delicate
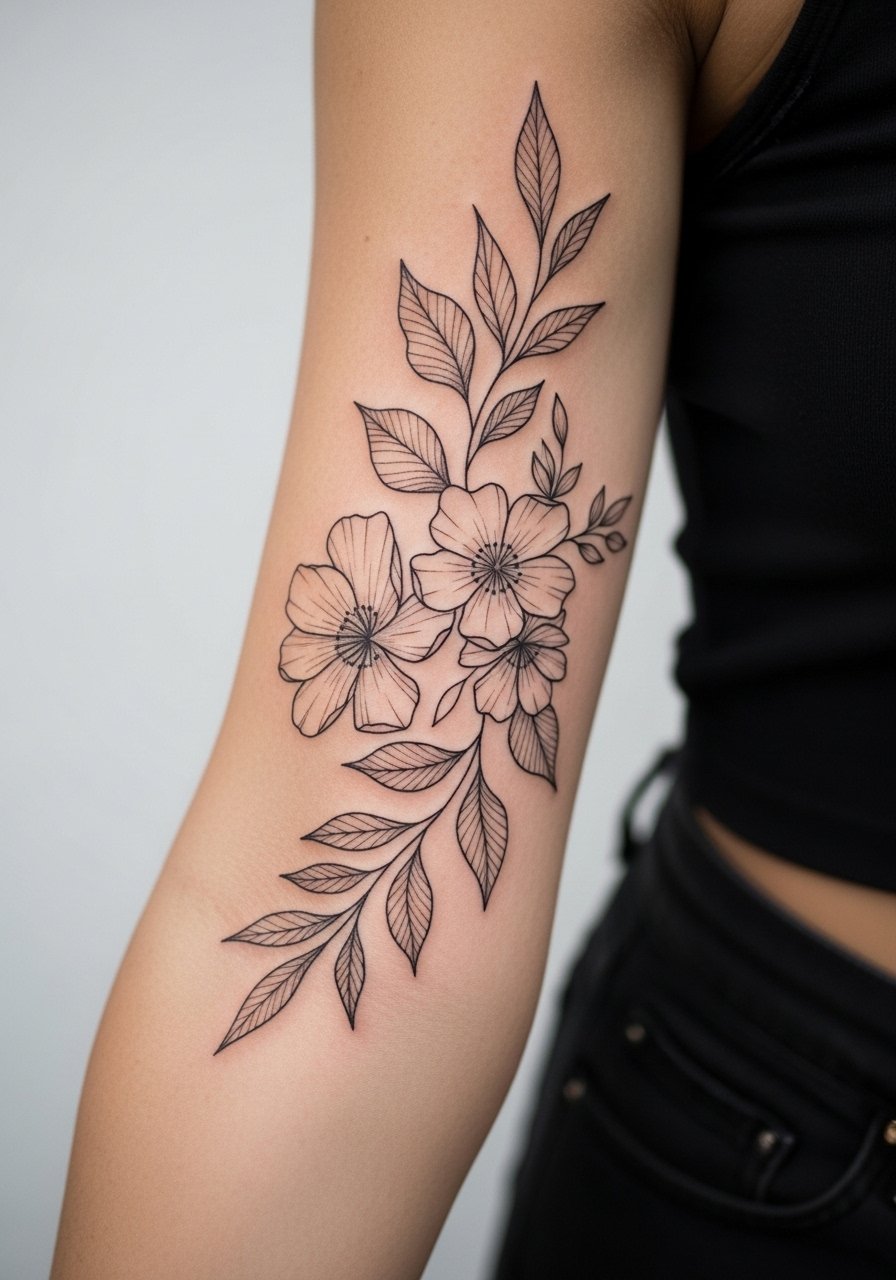
I love how a fine line botanical sleeve reads like a private garden you carry. Fine line nature tattoos let individual stems and peonies tell a story, and inner forearm placement follows the arm’s natural curve so the design breathes with movement. Expect some soreness during 3–4 hour sessions and plan for multiple sittings. Healing is gradual—the first two weeks you’ll see scabbing and then lines soften; after about three months the delicate work really settles. A common mistake is asking for lines too close together; that risks blurring over time. Ask for single-needle expertise and portfolio examples of healed fine line pieces. From my experience, these hold beautifully if you prioritize aftercare and sunscreen and avoid tiny details packed into a small area.
2. Geometric Nature Hybrid on Upper Arm
Style/Technique: Geometric / Minimalist
Pain Level: Low-Medium (2-4/10)
Session Time: 1-3 sessions depending on scale
Best For: Modern statement that photographs well
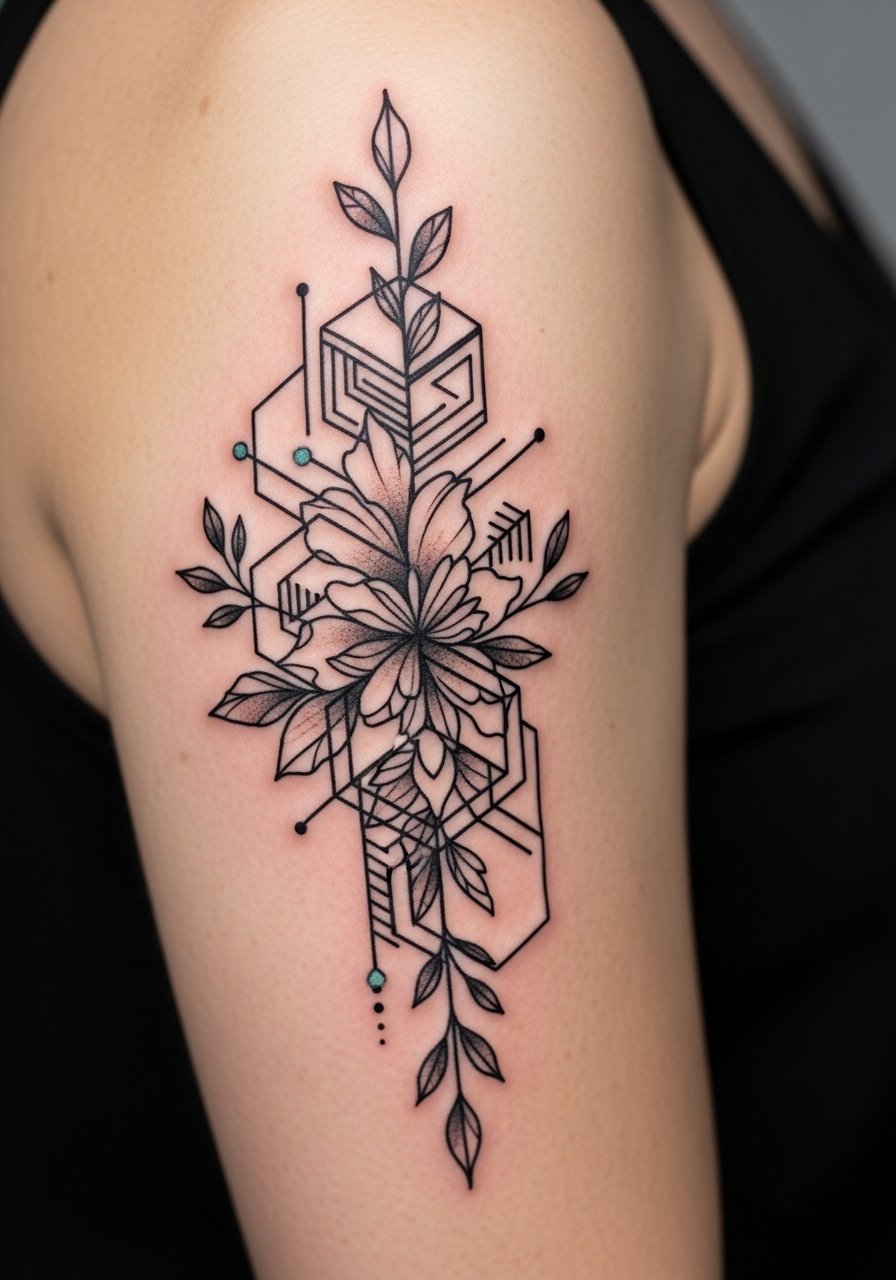
Geometric nature hybrids pair crisp triangles or mandalas with organic leaves or tiny landscapes. The upper arm is forgiving—low pain and excellent for showing off symmetry. Visually, the contrast between rigid geometry and soft botanicals creates a grounded, modern look. Healing goes smoothly if the linework has solid contrast; bold blackwork areas hold up best while thin geometric lines may soften slightly over time. A frequent slip-up is overcomplicating the geometry at small sizes; ask your artist to scale shapes so they age well. If you like the futuristic edge, look for artists who showcase both geometric and botanical pieces in their portfolios.
3. Watercolor Flower Mandala on Shoulder Blade
Style/Technique: Watercolor / Neo-Traditional
Pain Level: Low-Medium (3/4/10)
Session Time: 1-2 sessions, medium-sized piece
Best For: Artistic color work that blends into clothing lines
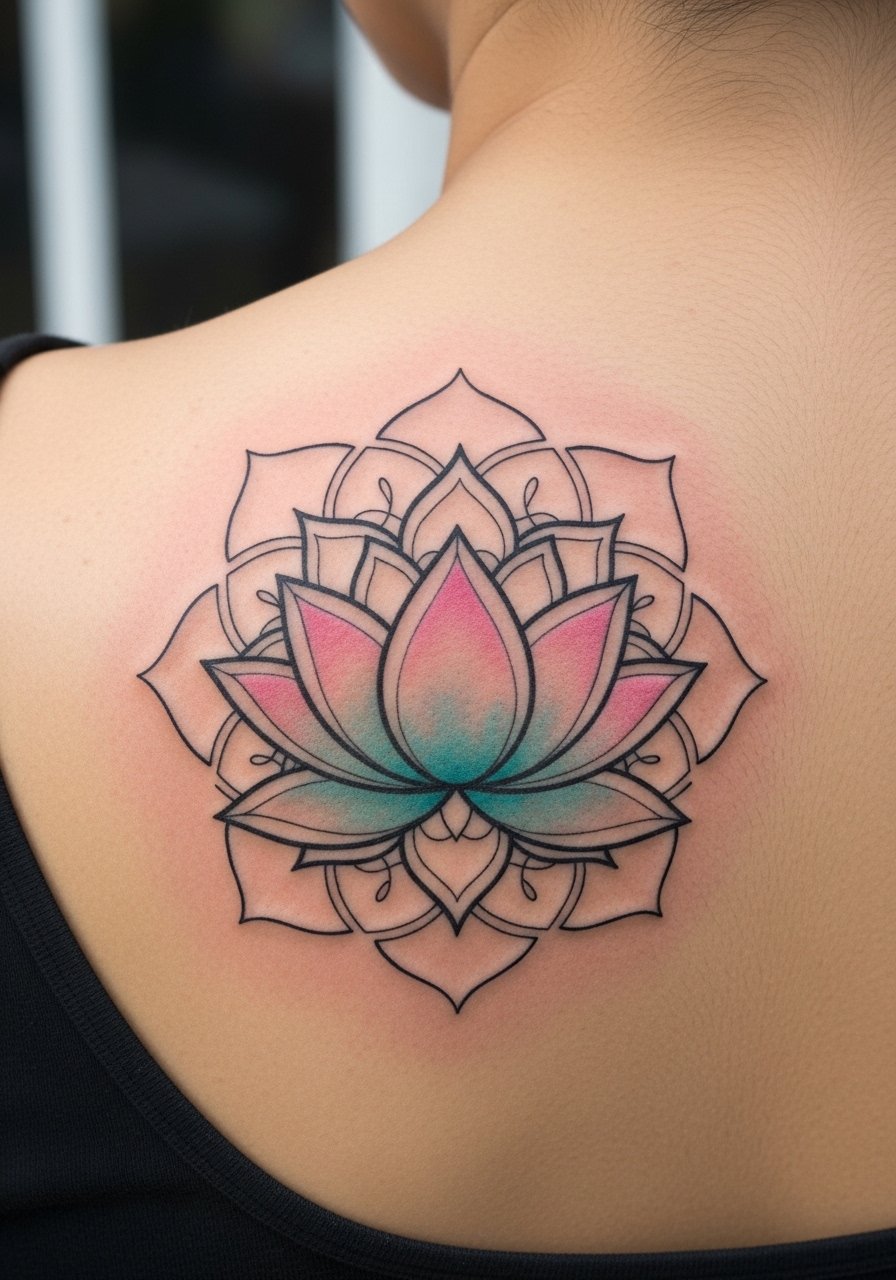
A watercolor flower mandala on the shoulder blade feels like a portable piece of landscape art. The shoulder tolerates color well and allows the painterly gradients to flow without constant rubbing from clothing. Expect a comfortable session and a few weeks of surface healing where colors look muted until the skin regenerates. Watercolor techniques can age differently—soft hues often need touch-ups years later, so focus on saturation in the consult. A common mistake is asking for overly fine watercolor splashes without enough black anchor lines; those pops vanish sooner. Ask for artists who mix watercolor with defined neo-traditional elements so your piece has longevity.
4. Minimalist Tree Silhouette on Ankle
Style/Technique: Minimalist / Fine Line
Pain Level: Medium (4-5/10)
Session Time: 1 session, short
Best For: Small nature tattoos and first nature tattoo
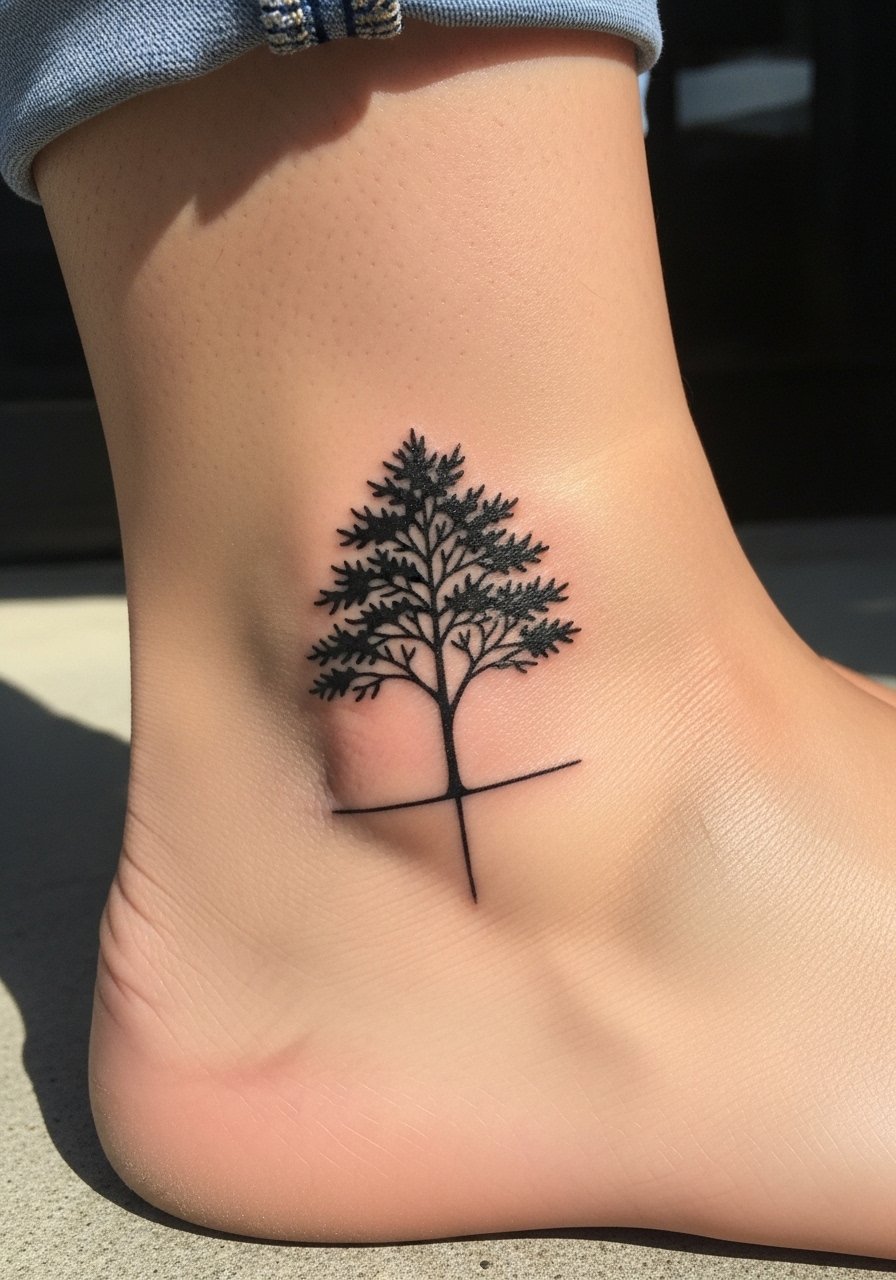
A minimalist tree silhouette on the ankle is a quiet, symbolic choice. It reads as growth and grounding in a compact design that’s easy to conceal. Ankles are sensitive due to bone proximity—expect sharper sensations for a short session and careful aftercare to prevent rubbing with socks. Fine line trees can blur if branches are too intricate, so keep negative space and bold anchors. From what I’ve seen, trees with slightly thicker main stems age better. Ask your artist for healed examples on ankles and to space branches so the silhouette remains legible after years of wear.
5. Botanical Realism Rose on Bicep
Style/Technique: Realism / Black & Gray
Pain Level: Low-Medium (3/10)
Session Time: 2–3 sessions for medium size
Best For: Timeless piece that ages gracefully
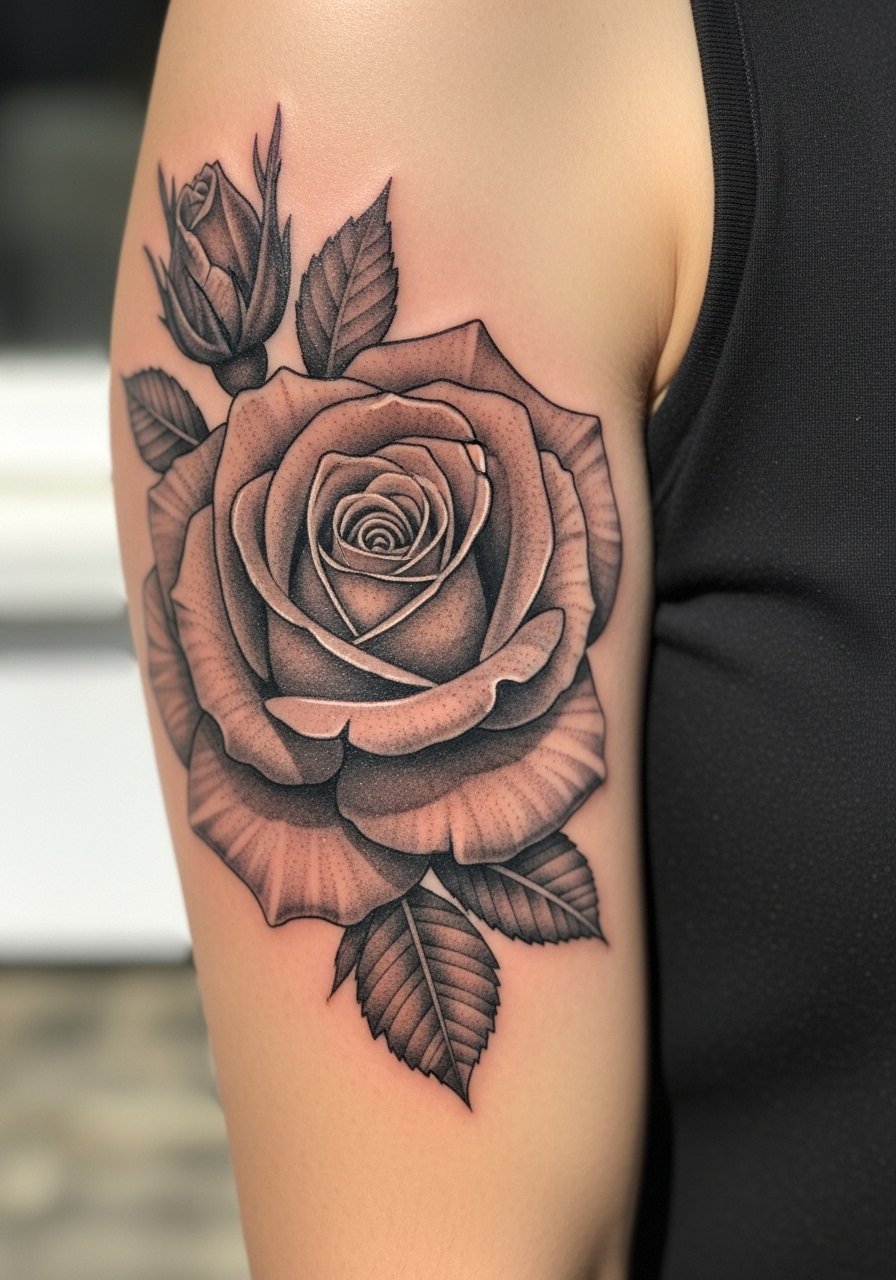
Botanical realism roses are a classic for a reason: they age with dignity. The bicep offers a smooth canvas for shading, and black & gray realism keeps the piece readable long-term. Expect steady tattooing rather than sharp scraping; sessions are comfortable for most people. Healing is straightforward—realism depends on contrast, so emphasize healed photos during your consult. A common error is adding tiny highlights or white ink as the main detail; white fades faster and can vanish on some skin tones. Look for artists experienced in floral realism and who can show healed results on similar skin tones to yours.
6. Neo-Traditional Eagle in Forest on Chest
Style/Technique: Neo-Traditional / Illustrative
Pain Level: Medium-High (5-7/10)
Session Time: Multiple long sessions
Best For: Large, narrative nature tattoos
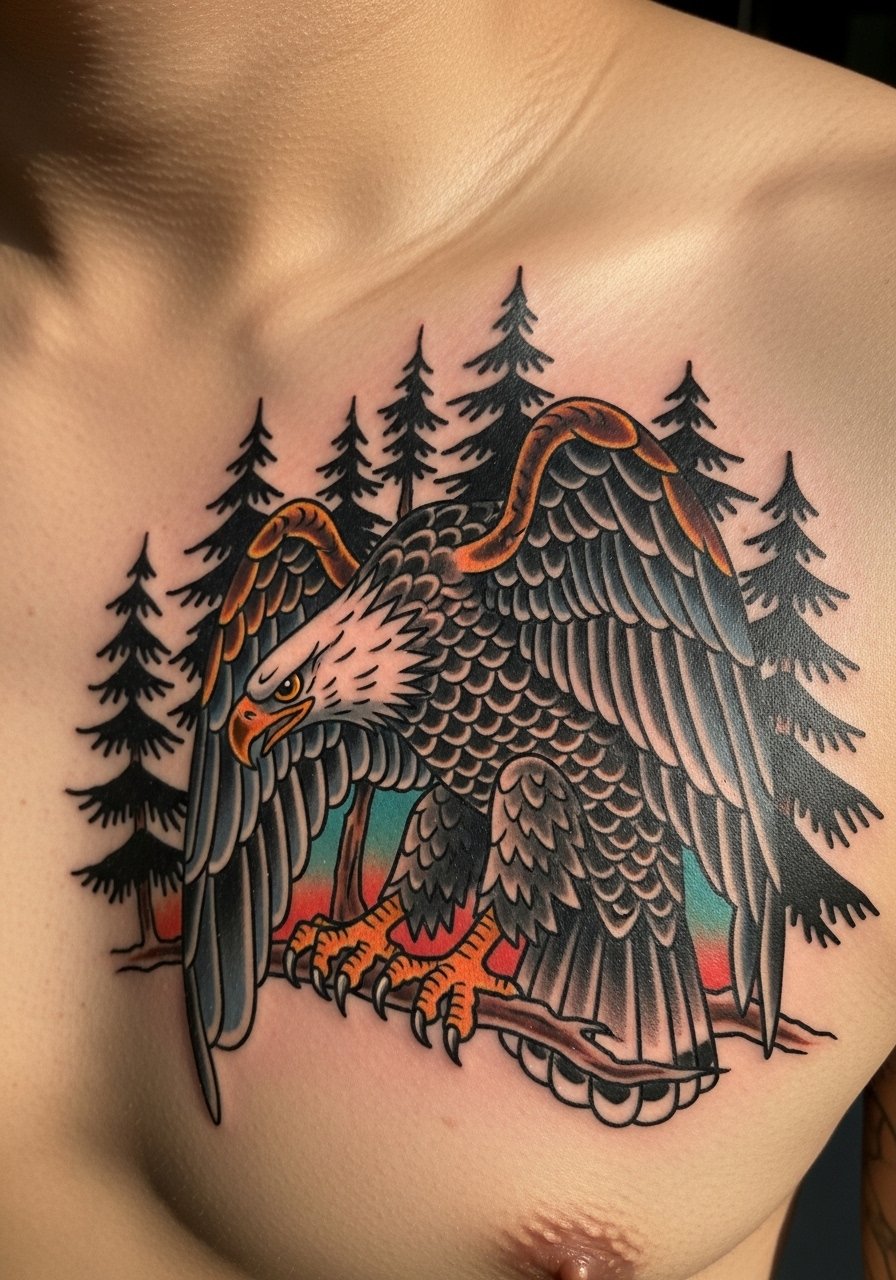
A neo-traditional eagle in a forest blends storytelling with bold linework. Chest placement gives scale and a dramatic canvas for saturated colors and expanded compositions. Expect more sensitivity around the sternum and collarbone, and plan sessions around comfort. Neo-traditional pieces photograph well and keep their graphic impact as they age because of strong outlines. A typical mistake is cramming too many small elements into a chest piece—let focal areas breathe. If you want this vibe, I recommend artists like Valerie Vargas-style colorists who balance illustrative detail with robust line integrity.
7. Abstract Nature Transformation on Ribcage
Style/Technique: Illustrative / Fine Line with Color Pops
Pain Level: High (7-9/10)
Session Time: 2–3 sessions for medium pieces
Best For: Symbolic work showing growth or rebirth
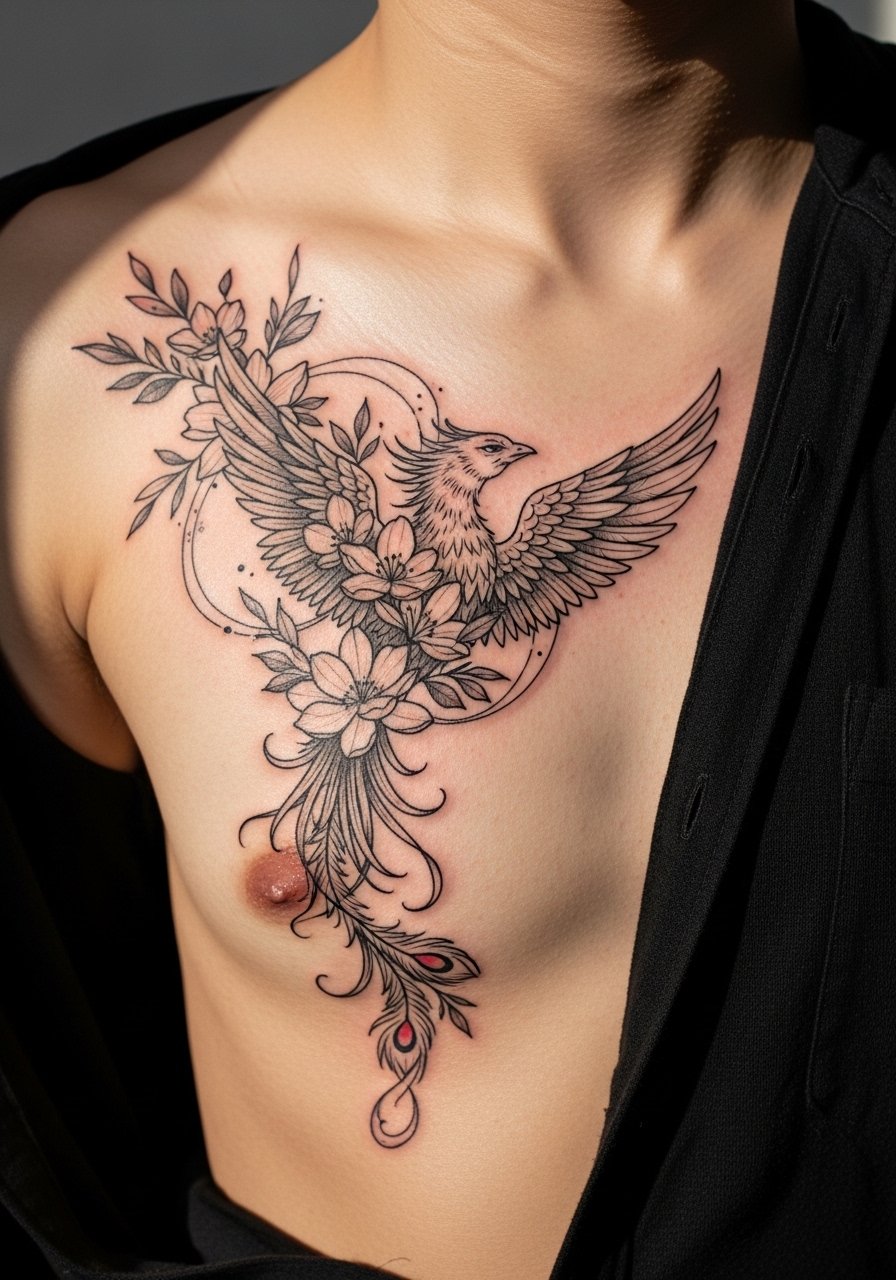
Abstract nature transformations—think surreal florals or phoenix motifs—work beautifully on the ribcage where the body’s curves add drama. The rib area is painful, so expect intensity during longer sessions; split sittings into manageable chunks. Visually, these pieces carry heavy symbolism; they’re great for storytelling. Healing on ribs needs gentle care to avoid friction from clothing, and color pops may need touch-ups as pigments settle. People often request too many tiny details for the rib’s movement; a better move is to simplify focal elements and use negative space for breathability. Ask artists who specialize in illustrative and fine line storytelling.
8. Blackwork Ornamental Leaves as Forearm Band
Style/Technique: Blackwork / Geometric
Pain Level: Medium (4/10)
Session Time: 2–3 hours for a band
Best For: Bold, high-contrast nature tattoos
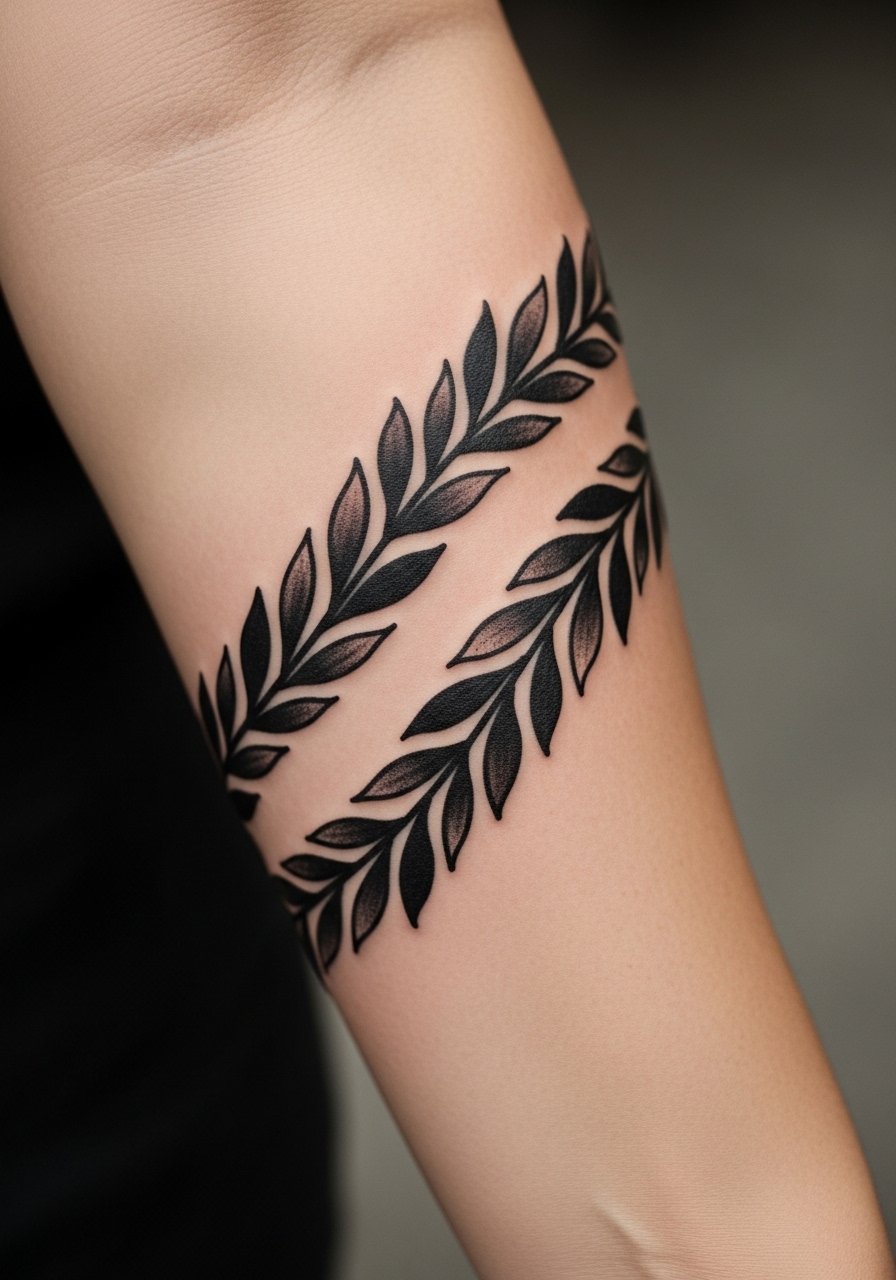
Blackwork leaf bands are striking and low-fuss. The forearm shows off high-contrast patterns and ornamental repetition, and solid black ages predictably on all skin tones. Sessions are tolerable length-wise, and healing is robust if you follow aftercare. The main mistake is using too-thin filler elements that fade into the skin over time; thick fills and clear negative space provide longevity. If you want a modern, graphic look, look for artists like Boris Bianchi or Roxx who do crisp blackwork and can show healed comparisons.
9. Fine Line Animal Portrait on Collarbone
Style/Technique: Fine Line / Minimalist Portrait
Pain Level: Medium (4/10)
Session Time: 1–2 hours
Best For: Subtle wildlife tributes and small nature tattoos
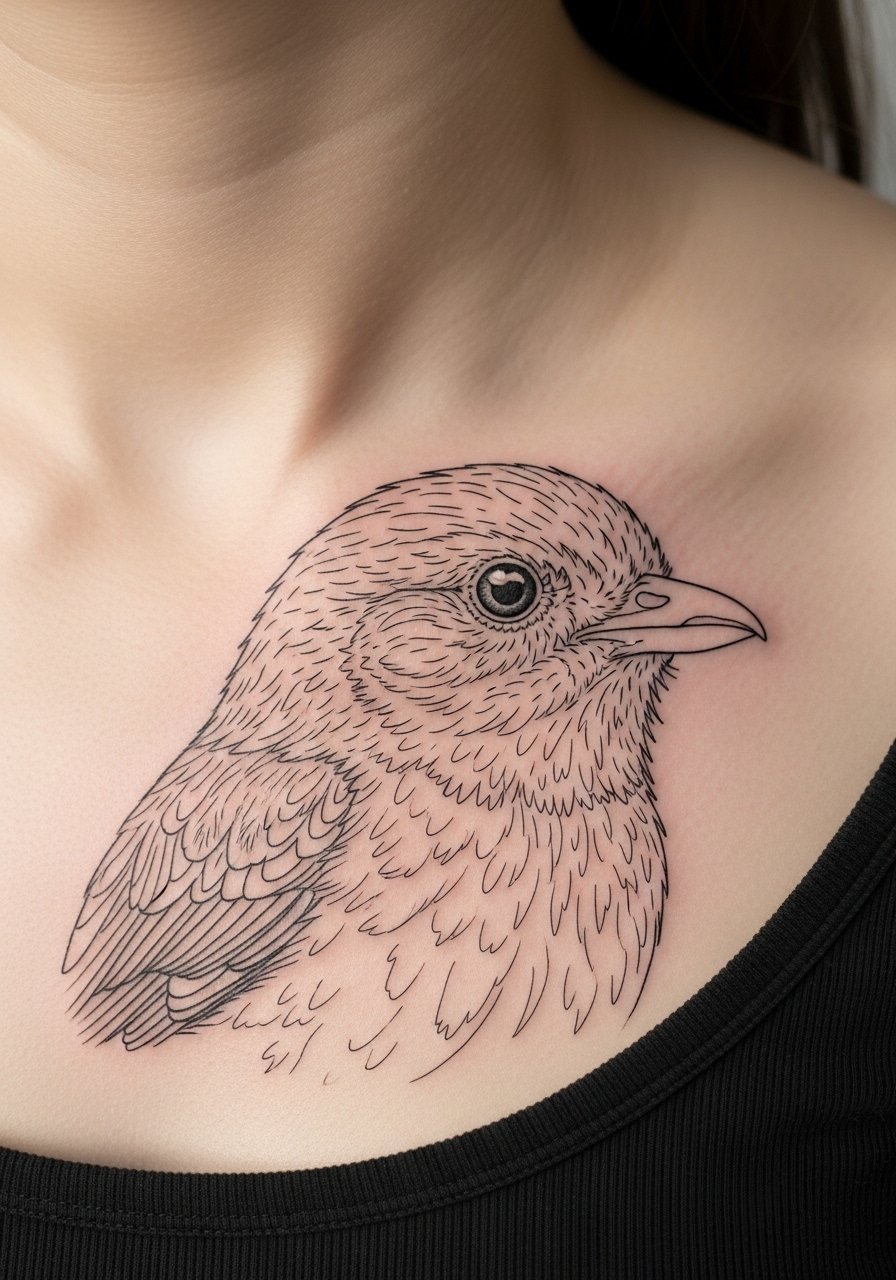
A fine line animal portrait on the collarbone reads intimate and symbolic. Collarbone placement looks elegant in photos and is a gentle way to carry favorite wildlife. Pain is moderate because the bone is near the surface, but sessions are short. Healing requires avoiding tight straps that can rub the area. Many people ask for extreme detail at small sizes—my advice is to keep portraits simplified so the key features remain readable as the piece ages. Ask for healed examples of small animal portraits on collarbones to ensure the artist spaces lines appropriately.
10. Surreal Floral Geometric Thigh Piece
Style/Technique: Geometric / Watercolor Hybrid
Pain Level: Low-Medium (3-5/10)
Session Time: 2 sessions for medium pieces
Best For: Large, creative compositions that hide easily
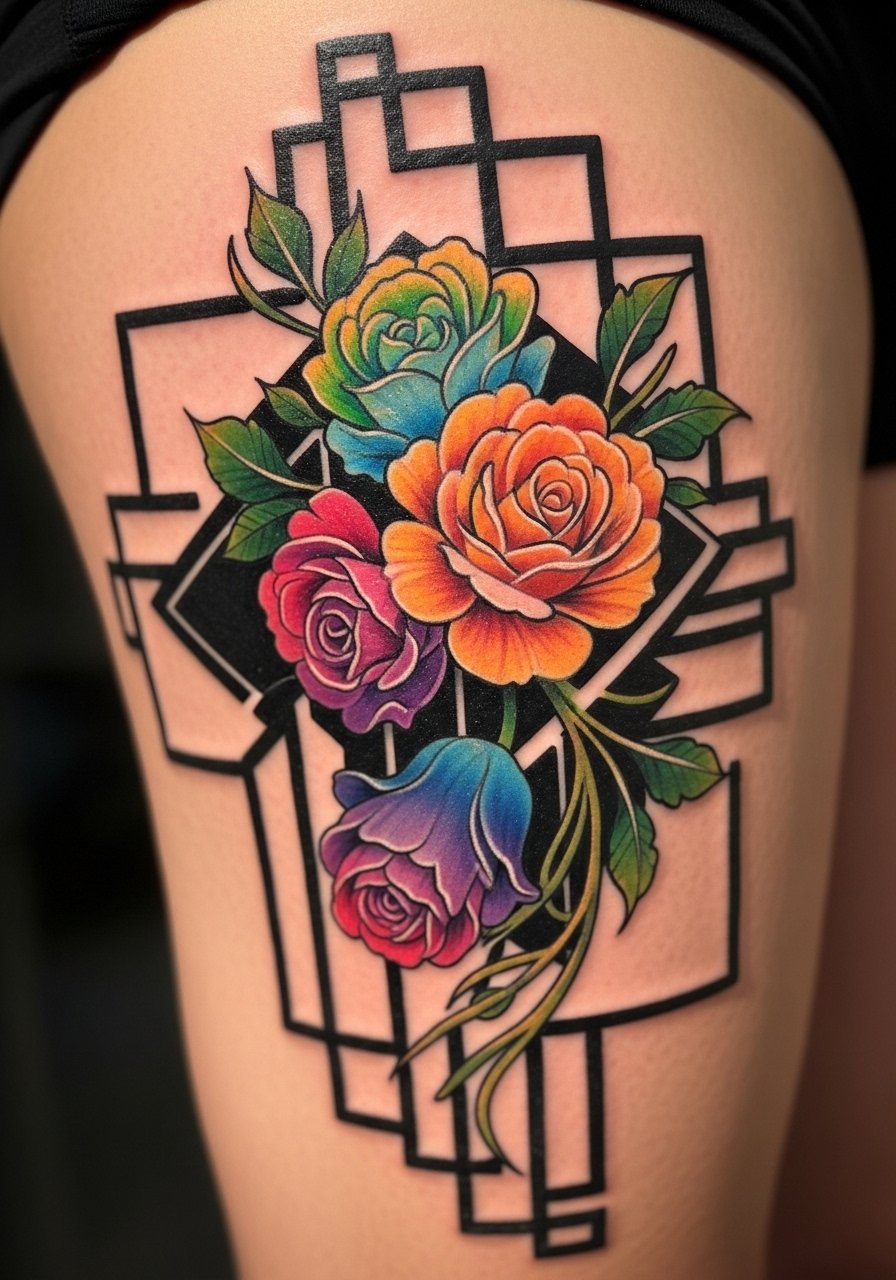
Thigh tattoos are ideal for surreal floral and geometric mashups—there’s space to mix painterly watercolor gradients with crisp shapes. Pain is usually lower on the fleshy thigh and sessions are comfortable. Expect peeling during initial weeks as colors settle; watercolor areas may look muted then brighten once fully healed. A common misstep is overloading the composition with too many color transitions—ask the artist to prioritize a limited palette for longevity. Artists who blend geometric precision with painterly florals will give you that grounded-yet-surreal aesthetic.
11. Traditional Rose Dagger on Outer Bicep
Style/Technique: American Traditional / Bold Lines
Pain Level: Low (2-3/10)
Session Time: 1 session for medium size
Best For: Timeless, photograph-friendly nature motifs
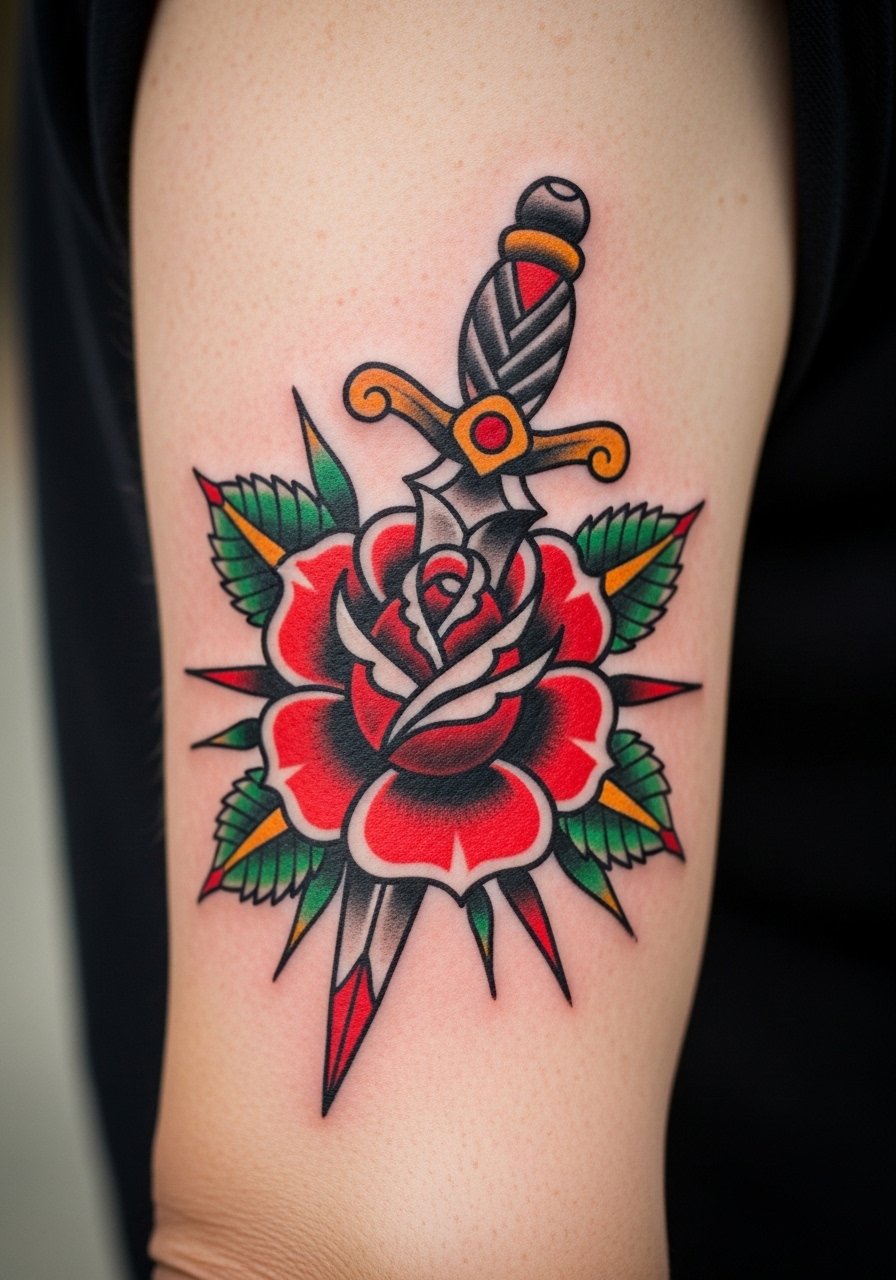
A traditional rose and dagger is a classic that photographs cleanly and ages reliably because of its bold lines and limited palette. The outer bicep is a low-pain, high-visibility spot that resists constant friction. Healed examples show the benefits of strong outlines—tiny details blur less when anchored by thick edges. Don’t ask to cram overly intricate shading into a small traditional piece; simplicity is the strength here. If you like classic motifs, find an artist who shows healed traditional work on similar skin tones.
12. Tree With Mountains Full Back Scene
Style/Technique: Illustrative / Black & Gray Realism
Pain Level: High (5-8/10 across sessions)
Session Time: Multiple long sessions
Best For: Epic, atmospheric nature narratives
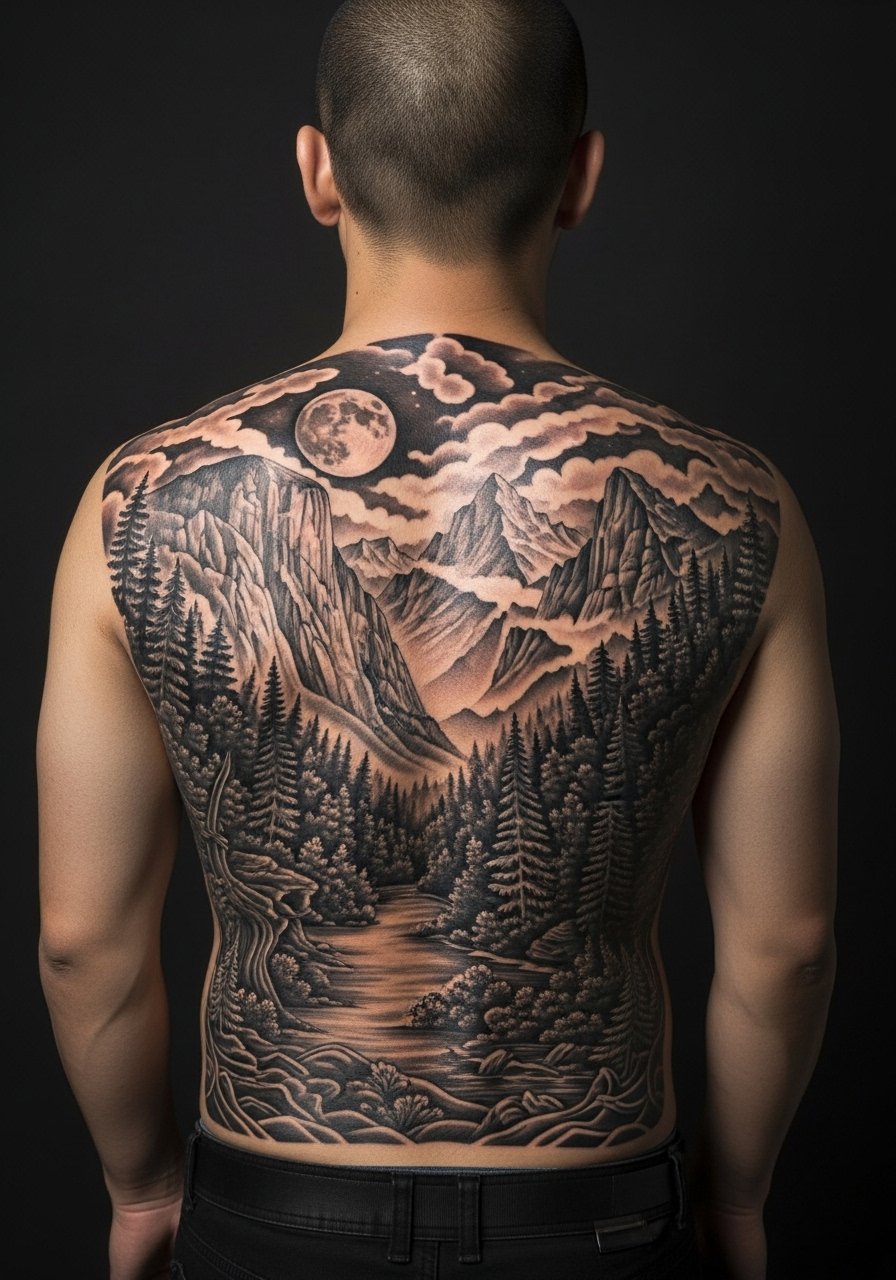
A tree-and-mountain back piece reads like a landscape you can live in. Large black & gray realism holds up well because of layered shading and strong contrasts. Expect multiple sessions with varied pain depending on spine proximity. Healing is lengthy for full-back work—give yourself downtime after long sessions and plan clothing to avoid constant rubbing. A common misstep is trying to force micro-detail across a vast canvas; effective large pieces use strong focal areas and simpler supporting elements. Artists who do illustrative landscapes can show you composition options that remain readable as your skin changes.
13. Y2K Butterfly in Botanicals on Ankle
Style/Technique: Neo-Traditional / Watercolor Accents
Pain Level: Medium (4/5/10)
Session Time: 1–2 sessions
Best For: Nostalgic, small-medium designs with color
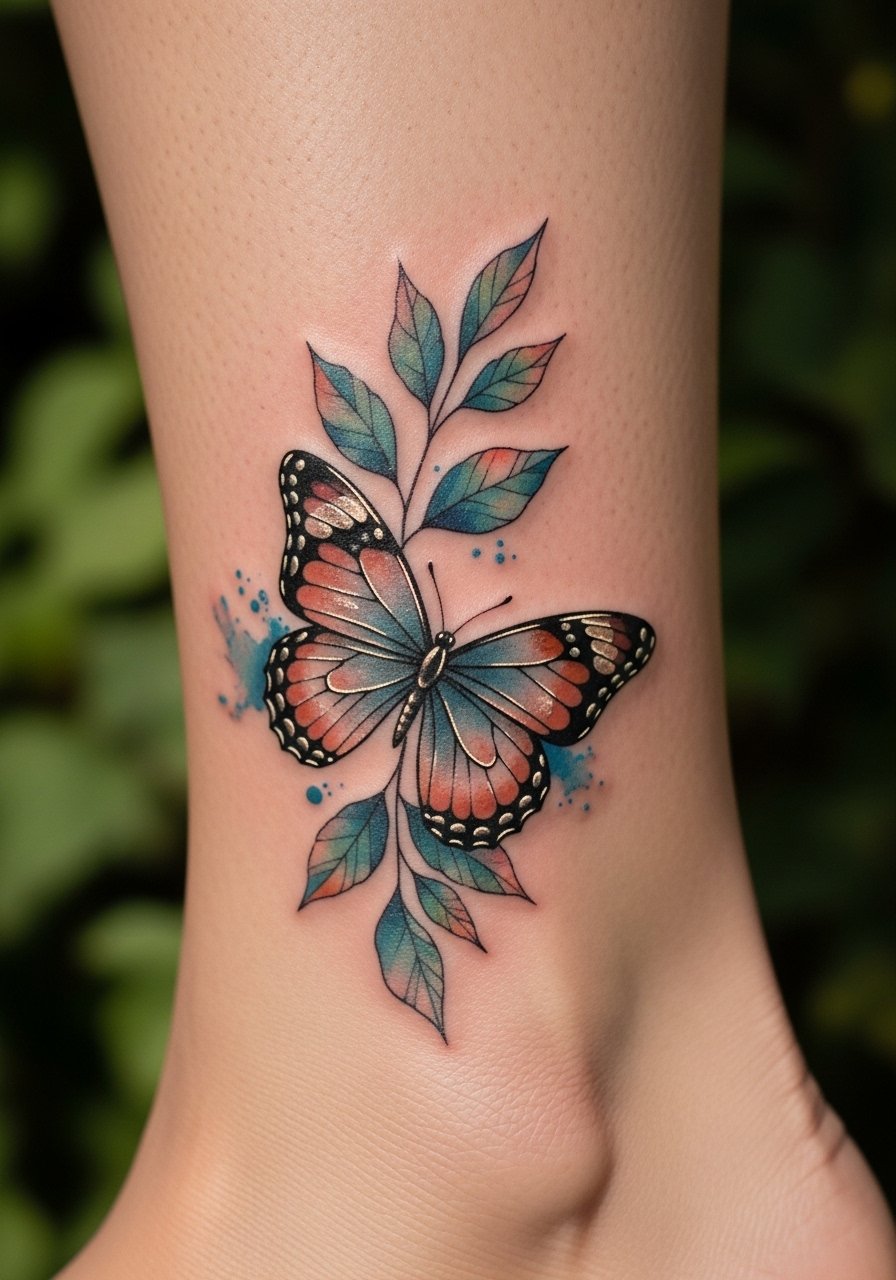
A Y2K butterfly layered in botanicals taps into nostalgia while feeling fresh. Ankles are sensitive but manageable for small to medium designs. Watercolor accents add a soft glow but can fade; pairing them with neo-traditional outlines helps maintain readability. Be careful not to pick colors that disappear on your skin tone—discuss pigment choices with your artist. Artists doing neo-traditional work with clean healed examples are the best match for this fusion.
14. Tiny Fern Behind Ear
Style/Technique: Minimalist / Single-Line
Pain Level: Low-Medium (3-5/10)
Session Time: 30–60 minutes
Best For: Small nature tattoos and discreet symbolism
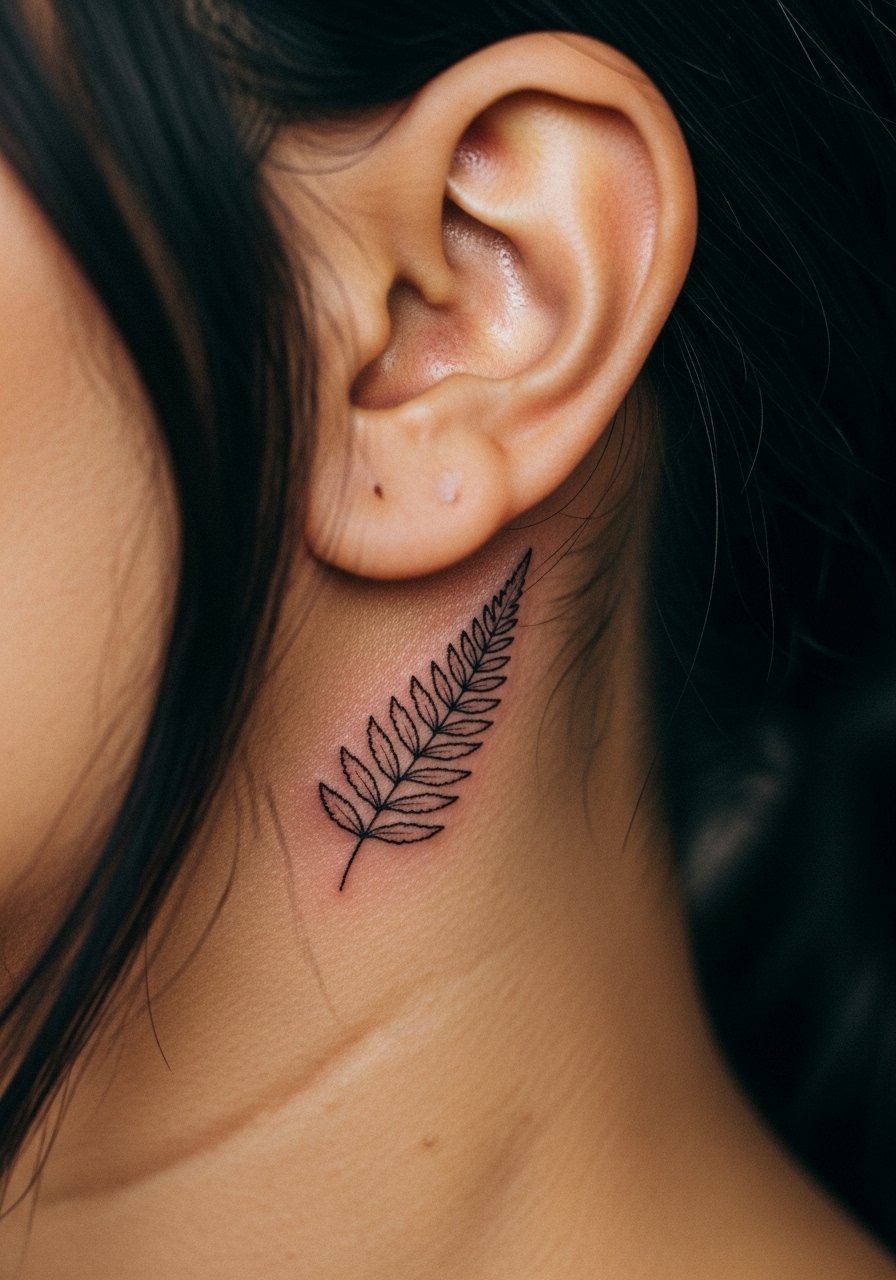
A tiny fern behind the ear is low commitment and highly personal. It’s a subtle nod to nature meaning—growth and calm—and the area heals quickly if you avoid hats and tight collars. Pain can spike due to thin skin but sessions are brief. The biggest error is asking for too-fine detail in a tiny spot; keep the fern silhouette simple. If you’re a first nature tattoo seeker, this is a gentle way to test your tolerance without a large time investment.
15. Moon Phases With Fern Forearm Strip
Style/Technique: Fine Line / Minimalist Symbolism
Pain Level: Low (2-3/10)
Session Time: 1–2 hours
Best For: Symbolic bands and wearable art
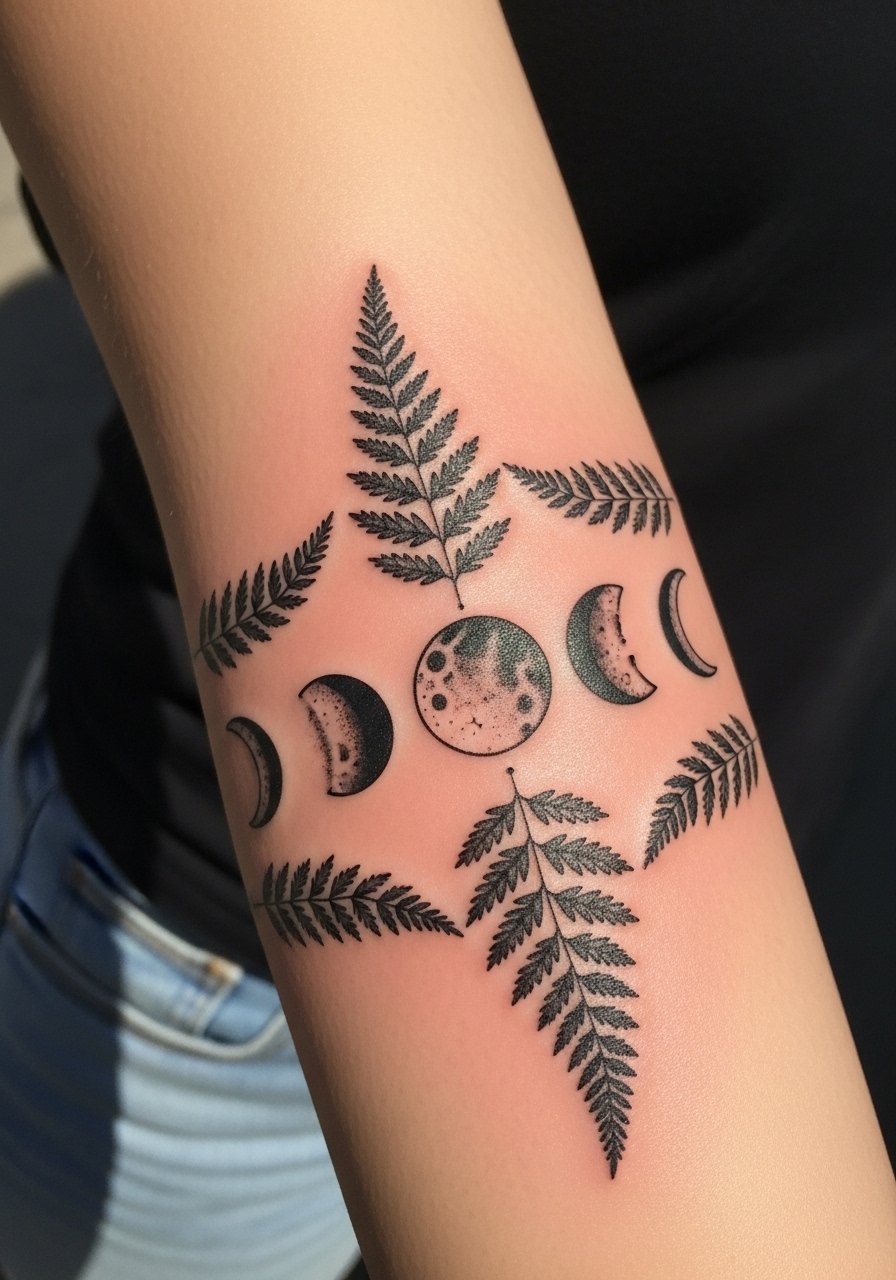
Moon phases paired with a fern create a calm, cyclical symbol of renewal. Forearm placement allows for visible daily reminders and generally mild pain. Fine line moon crescents hold up if sized correctly; avoid tiny crescents that fill in. Healing is straightforward—keep it moisturized and out of direct sun. Ask for healed forearm examples so you can see how thin crescents age and whether slight bolding is recommended.
16. Seaside Pebble Cluster on Wrist
Style/Technique: Micro-Realism / Minimalist
Pain Level: Medium (4/10)
Session Time: 1 hour
Best For: Small nature tattoos that tuck under sleeves
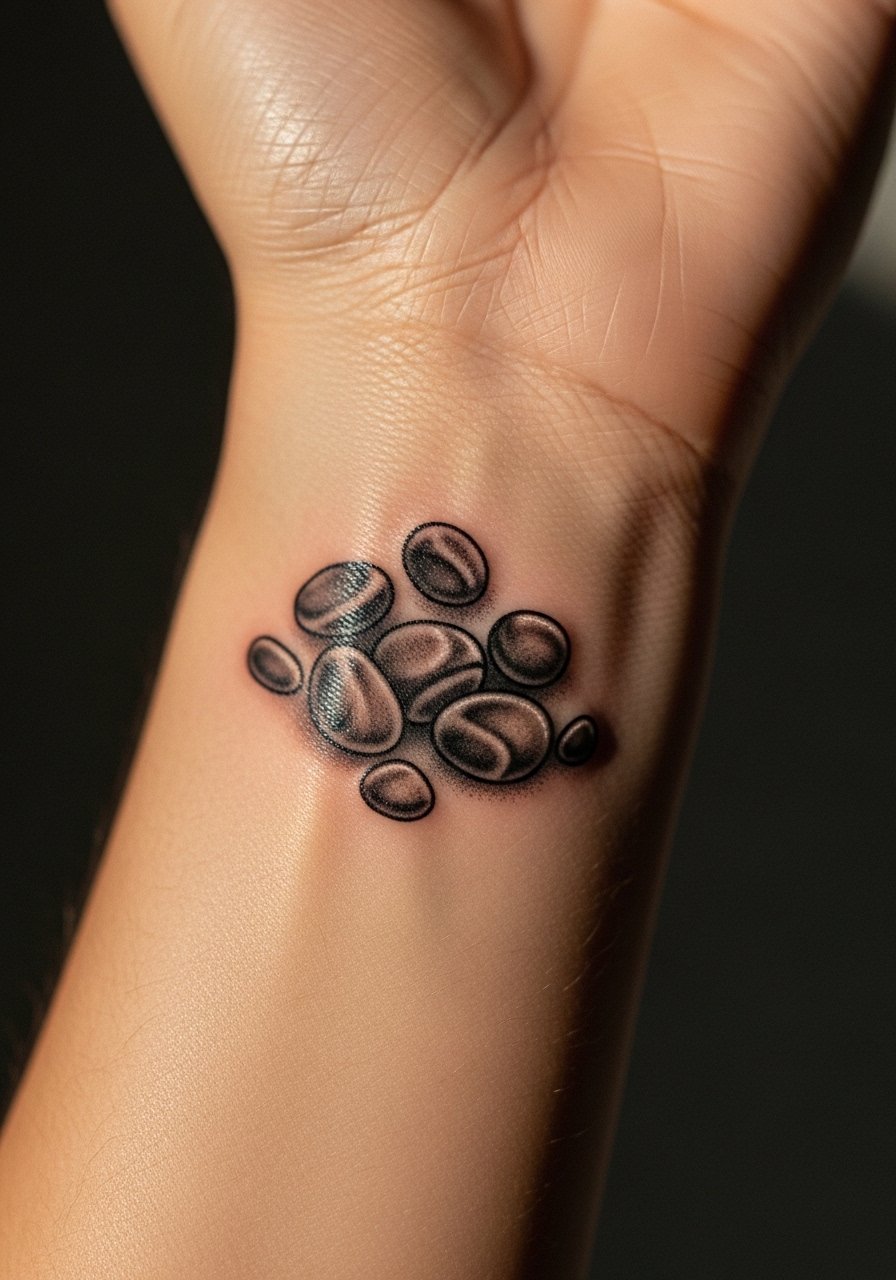
A cluster of seaside pebbles on the wrist feels grounding and tactile. Wrist placement shows easily in photos but gets more sun exposure, so plan for sunscreen once healed. Micro-realism requires careful shading but works well at small sizes when the artist has healed examples. The key mistake is over-detailing tiny pebbles—simpler shading keeps them readable. From what I’ve seen, realistic black and gray pebbles age neatly compared with tiny color gradients.
17. Bonsai Micro-Realism on Inner Wrist
Style/Technique: Micro-Realism / Fine Line
Pain Level: Medium (4-5/10)
Session Time: 1–2 sessions
Best For: Symbolic, small nature tattoos with depth
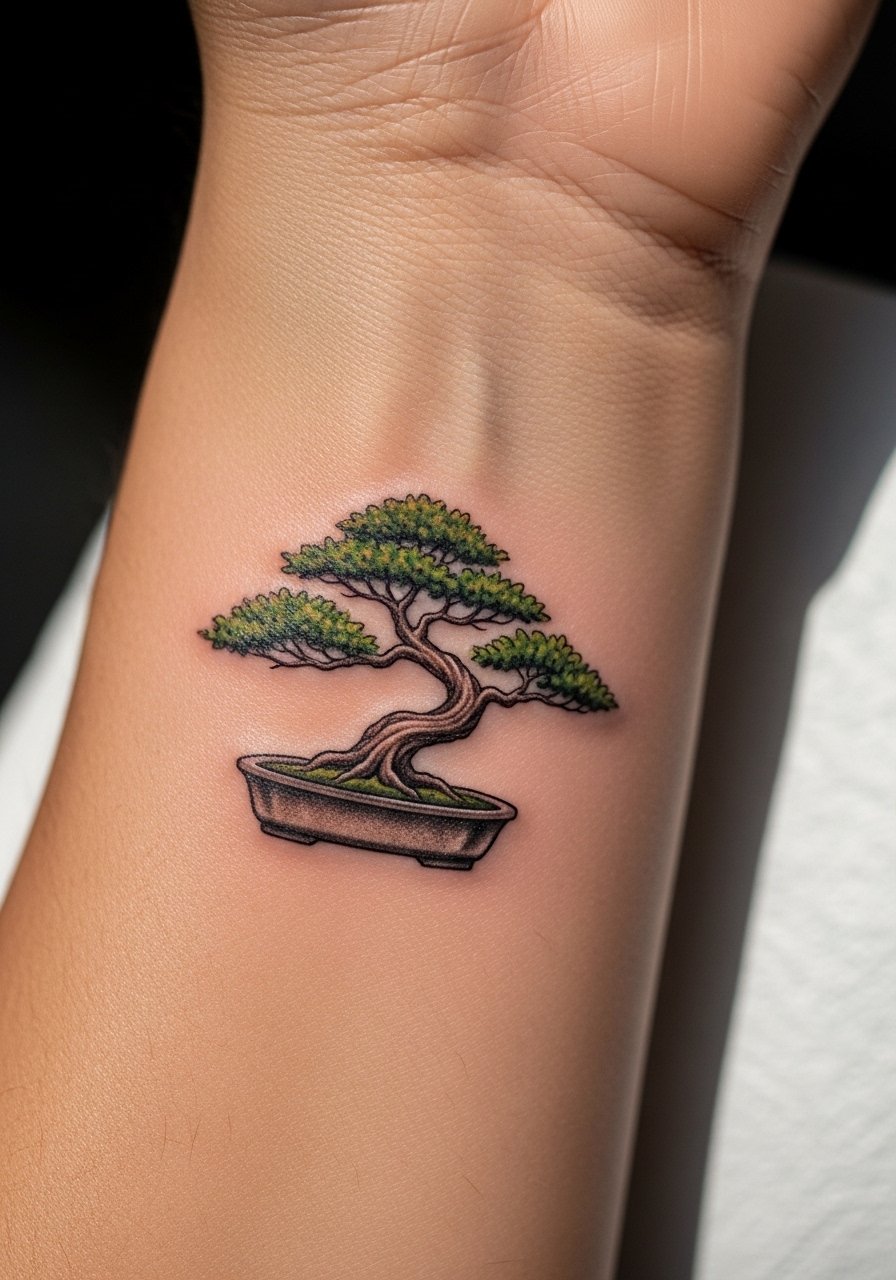
A bonsai on the inner wrist carries meaning about care and patience. Micro-realism excels here but demands an artist skilled in tiny value shifts. The inner wrist is modestly sensitive; expect short sessions. Healing needs protection from frequent movement and friction—avoid tight bracelets for the first few weeks. A common misstep is wanting extreme texture in a tiny space; instead, prioritize silhouette and a few tonal cues. Artists specializing in micro-realism can show how bonsai looks after a year.
18. Meadow Band Around Upper Arm
Style/Technique: Illustrative / Linework with Soft Color
Pain Level: Low (2-4/10)
Session Time: 1–2 sessions
Best For: Wearable nature scenes that wrap the arm
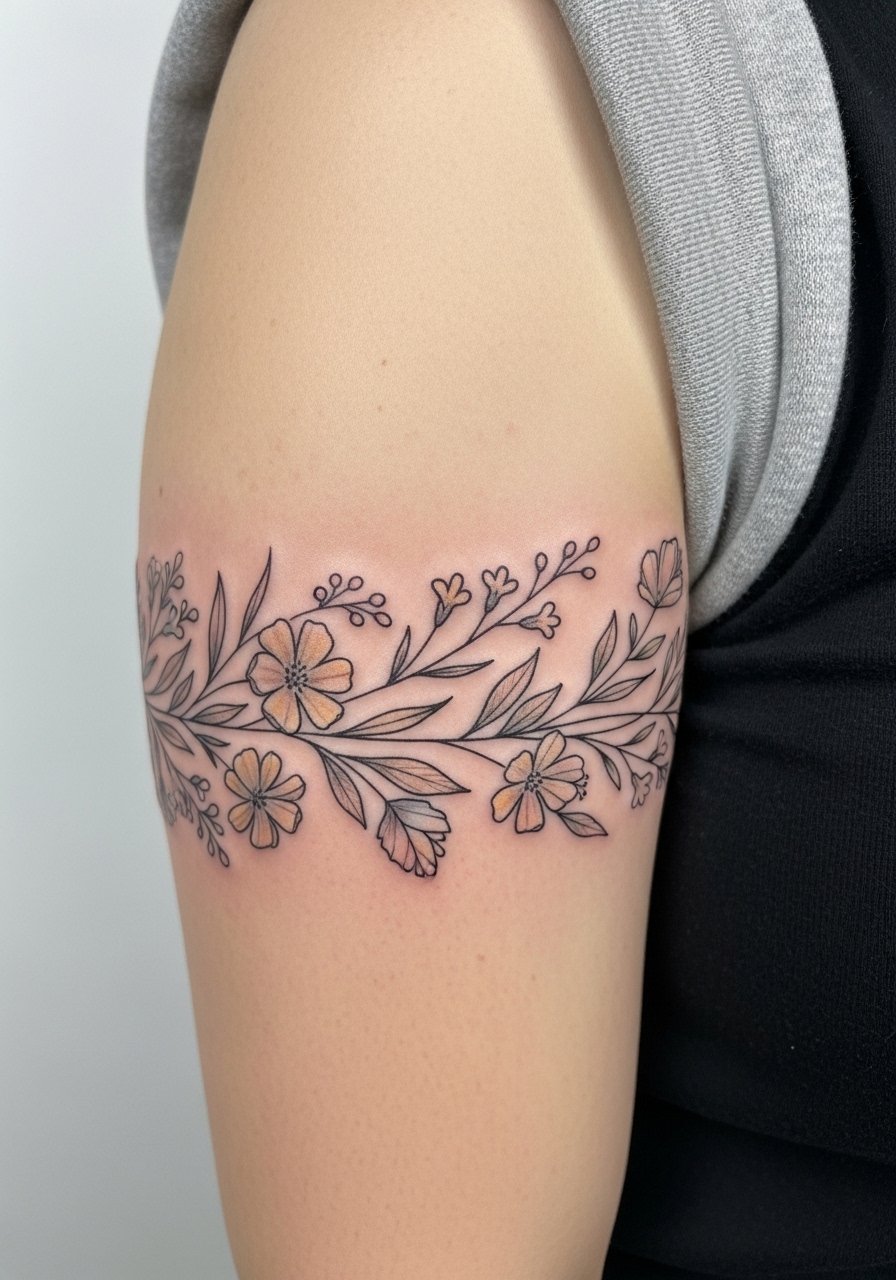
A meadow band circles the upper arm like a private landscape. It’s perfect if you want continuous nature imagery without a full sleeve. Pain is low, and the area heals well. Keep fills soft and avoid too many ultra-fine stems that blur. From experience, artists who balance linework and gentle color are best for this look. Mention that you want healed photos during your consult to judge saturation choices.
19. Lichen & Moss Realism on Calf
Style/Technique: Realism / Textural Black & Gray
Pain Level: Low-Medium (3/5/10)
Session Time: 1–2 sessions for medium patch
Best For: Organic texture lovers and nature detail fans
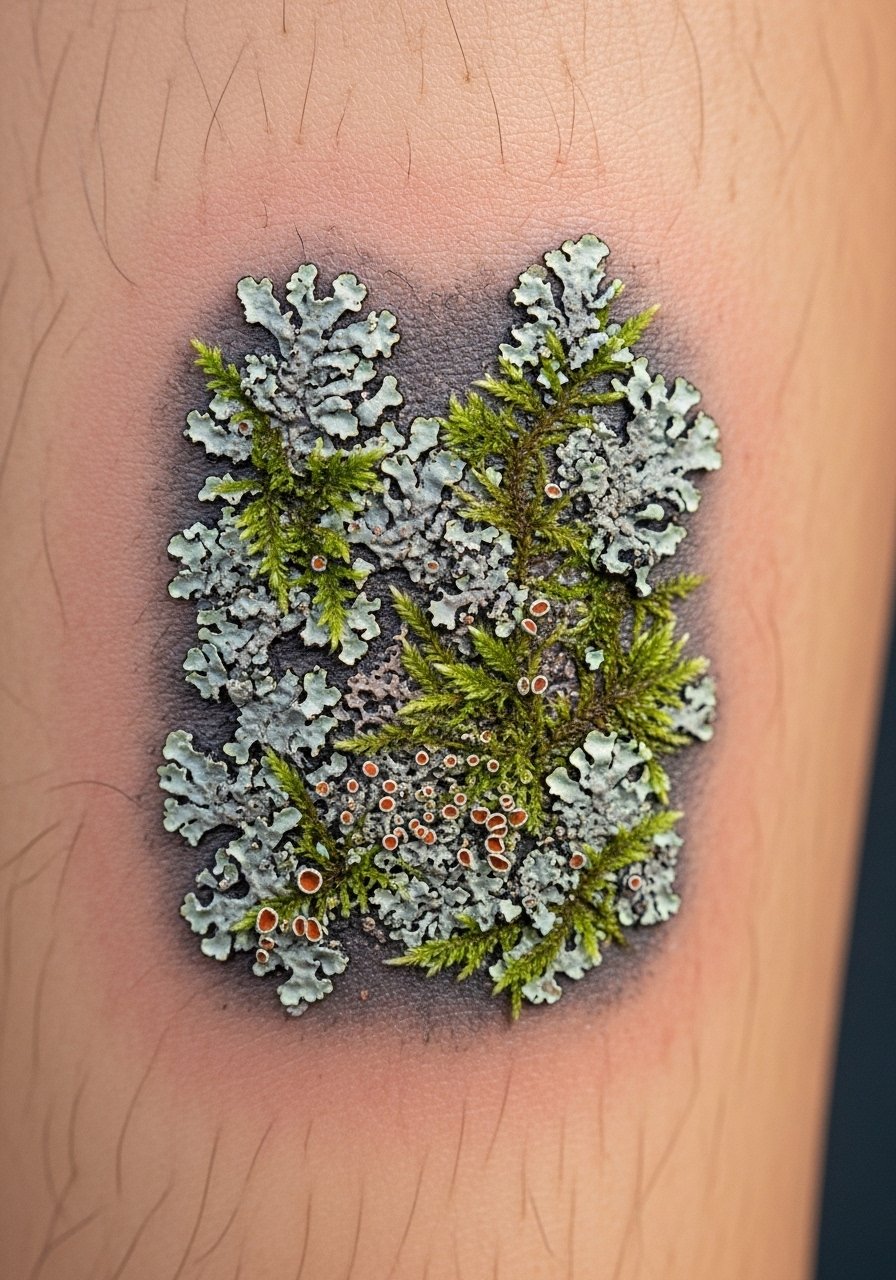
Lichen and moss realism is for people who love texture. The calf’s thicker skin takes shading well and the area is low on friction. Expect sessions focused on tonal layering rather than long linework. Healing is steady; the piece will look slightly muted while skin regrows before it brightens. Avoid asking for tiny stippling everywhere—strategic texture reads better over time. Seek artists who show healed texture work so you can see how grainy elements hold up.
20. Line-Art River On Rib Side
Style/Technique: Minimalist Linework / Flowing Composition
Pain Level: High (7-9/10)
Session Time: 1–2 sessions, depending on length
Best For: Flowing, long designs that contour the body
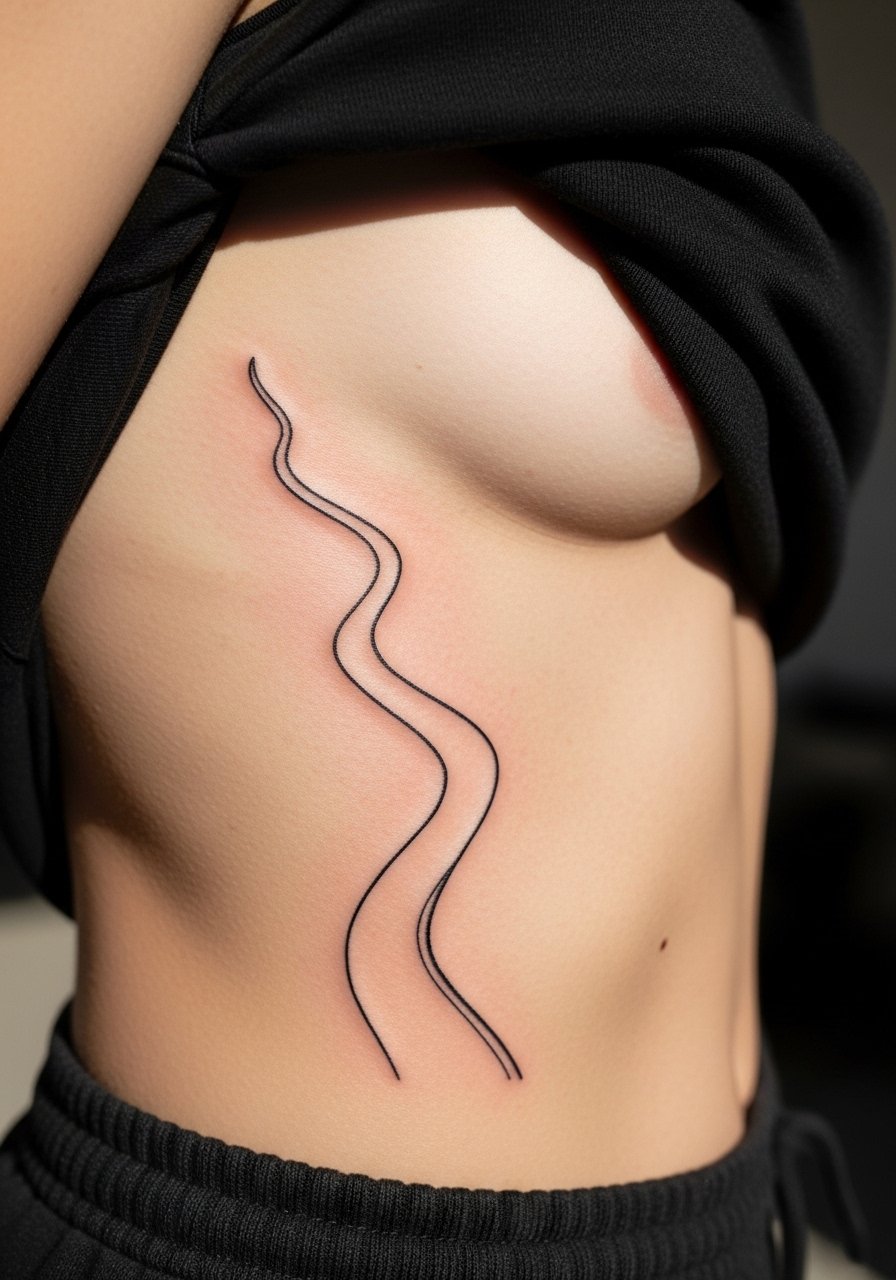
A continuous river line on the rib side follows your body’s curves and reads like motion. Ribs are sensitive, so expect higher pain and split sessions. Minimalist linework can blur if the line is too thin—ask for a slightly stronger weight so the flow remains visible after healing. Keep aftercare strict: no tight clothing rubbing the area. Artists used to long-flowing compositions will advise on line weight for longevity.
21. Seedling Sprout Behind Ankle
Style/Technique: Minimalist / Tiny Realism
Pain Level: Medium (4/10)
Session Time: 30–45 minutes
Best For: Small nature tattoos and first-time seekers

A tiny seedling behind the ankle is a discrete, hopeful symbol. The spot gets sun and friction, so expect the ink to soften over time; thicker outlines help. Sessions are quick and healing is manageable if you watch footwear rubbing. Don’t ask for ultra-fine roots—simplicity ensures the sprout reads well after months. This is a lovely small nature tattoo for someone wanting low commitment with high meaning.
22. Painted Maple Leaf On Shoulder
Style/Technique: Watercolor / Illustrative
Pain Level: Low (3/10)
Session Time: 1–2 hours
Best For: Seasonal nature motifs with painterly flair
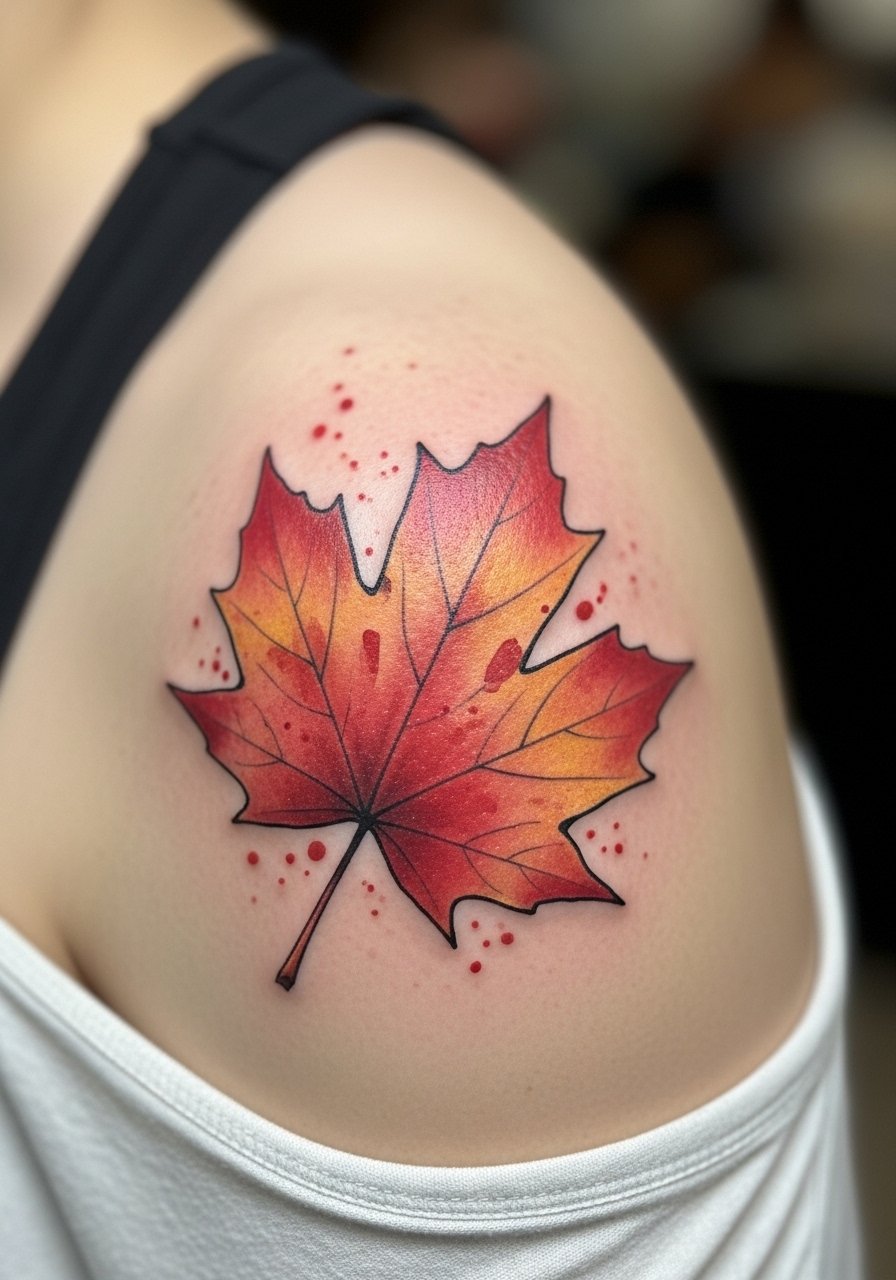
A painted maple leaf on the shoulder channels seasonal calm. Shoulder placement is forgiving and suits flowing color blends. Watercolor edges can fade, so pair them with subtle black anchors if you want long-term definition. Healing is straightforward—keep the area moisturized and shielded from sun. If you want true vibrancy, ask to see healed watercolor examples at similar skin tones so you know how pigments settle.
23. Constellation Florals on Collarbone
Style/Technique: Fine Line / Minimalist with Dotwork
Pain Level: Low-Medium (3-4/10)
Session Time: 1–2 hours
Best For: Delicate, photo-friendly nature tattoo placement
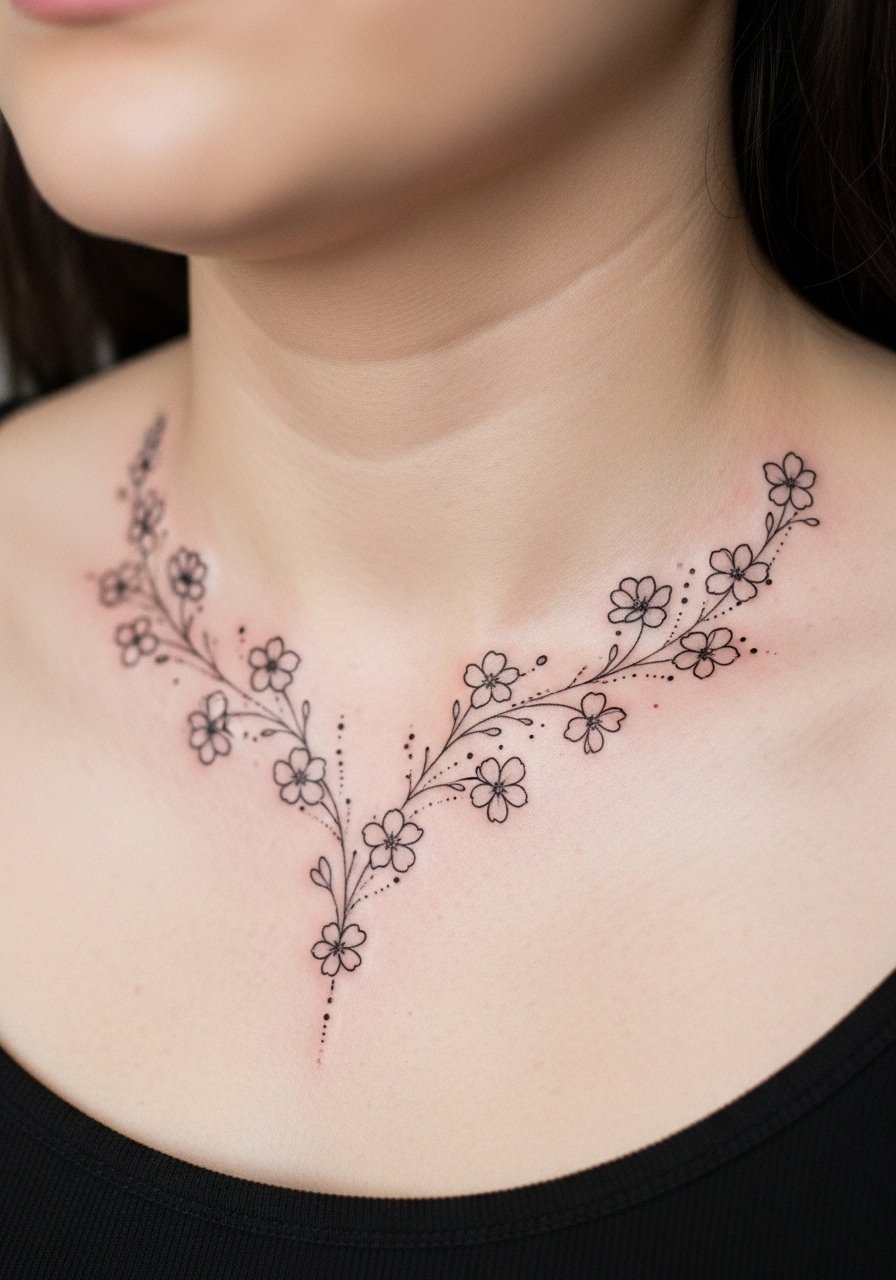
A constellation of florals along the collarbone feels airy and intentional. The collarbone photographs beautifully but needs care with clothing and straps during healing. Dotwork anchors and tiny flowers require precise spacing—too dense and they fuse. From what I’ve gathered, artists who do delicate dotwork and fine line nature tattoos can show healed examples that guide spacing and density decisions.
24. Alpine Linework Ankle Cuff
Style/Technique: Geometric / Linework Landscape
Pain Level: Medium (4/10)
Session Time: 1–2 hours
Best For: Minimal landscape lovers who want a wearable cuff
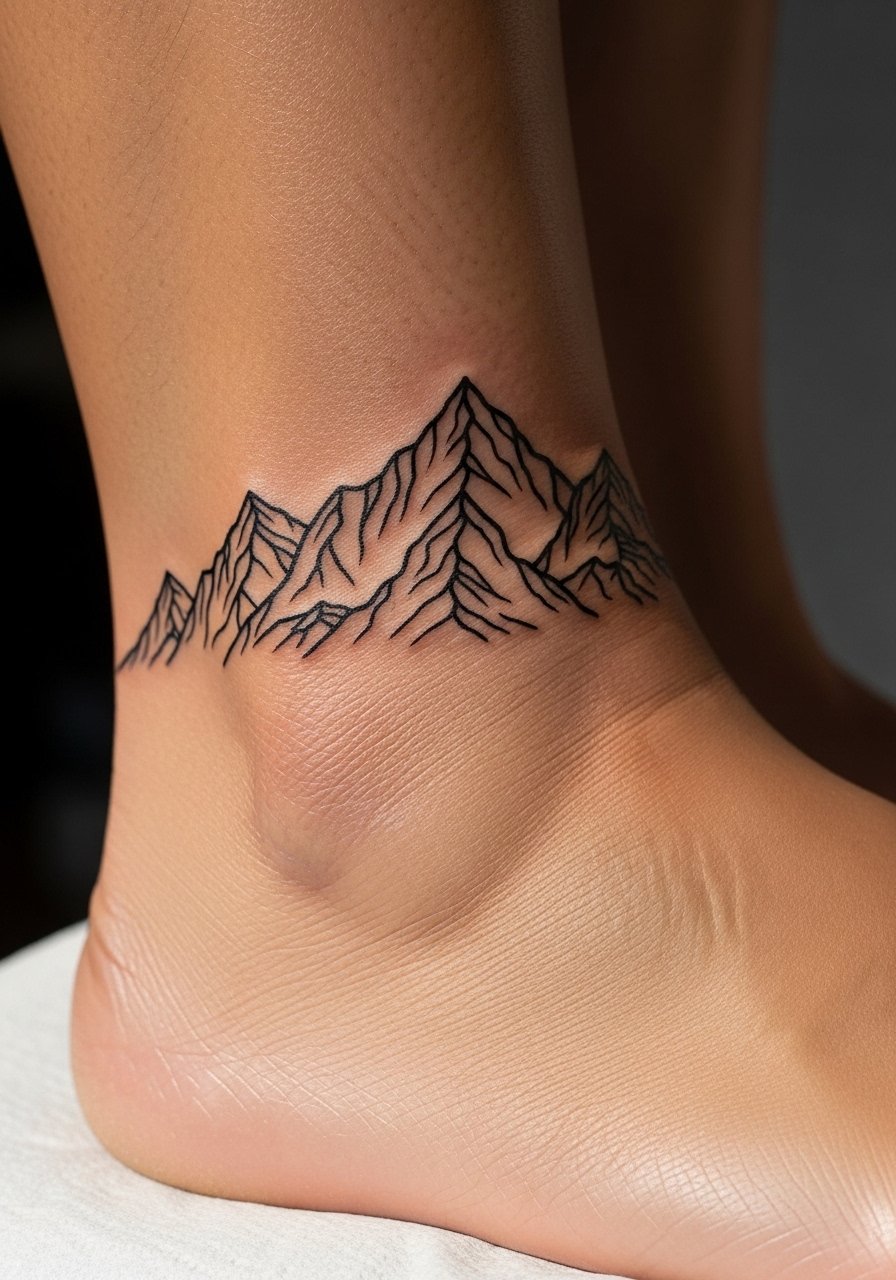
An alpine linework ankle cuff reads like a portable horizon. The cuff format is great for small nature tattoos that still make a statement. Ankle sensitivity is moderate; keep footwear loose during healing. A common error is overcompressing peaks—allow negative space between mountain lines so the silhouette stays crisp. Artists who show healed linework bands will help you select the right line weight.
25. Minimal Seed Pod On Finger
Style/Technique: Minimalist / Micro-Line
Pain Level: High (6-8/10 depending on finger)
Session Time: 15–45 minutes
Best For: Tiny nature tattoos and subtle reminders

A seed pod on the finger is extremely subtle but carries meaning—growth, beginnings. Fingers are high-wear areas; ink fades faster and may need touch-ups down the road. Expect a sharper sting during the quick session and protect it from soak and friction while healing. Many people regret tiny finger tattoos because of maintenance—if you proceed, ask for slightly bolder line weight and realistic expectations about long-term upkeep. Artists who regularly tattoo hands can show you healed finger work and advise on ink choices.
Tattoo Prep and Aftercare Essentials
Aftercare Essentials:
- Aquaphor Healing Ointment, 14oz tube — Great for the first 3–5 days to keep skin from drying
- Saniderm Transparent Adhesive Bandage, 6-inch roll — Second-skin method many artists recommend for initial protection
- CeraVe Fragrance-Free Moisturizing Lotion, 12oz — For days 4–14 when you switch to lighter hydration
Before Your Appointment:
- Tattoo Numbing Cream with 5% Lidocaine — Use only if your artist approves, apply 30–45 minutes prior
- Disposable Razor Pack for Skin Prep — For removing hair shortly before your session if needed
Long-Term Maintenance:
- SPF 50 Sunscreen Stick for Tattoos — Daily sunscreen keeps colors vibrant over years
- Mad Rabbit Tattoo Balm, Travel Size — A popular tattoo-specific moisturizer for healed ink
- Hustle Butter Deluxe, 8oz — Vegan aftercare alternative for keeping healed tattoos supple
Optional Comfort & Small-Needs:
- Tattoo Numbing Spray — Useful for touch-ups or sensitive sessions (ask your artist)
- Hydrocolloid Bandages, Large — For protecting small healed areas during activity
- Dr. Bronner's Unscented Castile Soap, 32oz — Gentle cleanser for the first 2 weeks
From my experience, artists actually recommend Saniderm, a fragrance-free lotion, and a sunscreen stick as staples. Hustle Butter and Mad Rabbit get called out by collectors who favor vegan inks and ethical aftercare choices.
Frequently Asked Questions
Q: How bad does a tattoo actually hurt?
A: Pain depends on placement and personal tolerance. Outer arm and thigh are generally low—think 2–4/10. Ribs, spine, and fingers can hit 7–9/10. It’s more a persistent scratchy/burning feeling than a single sharp shock. If you’re worried, ask about a numbing cream with lidocaine, but run it by your artist first.
Q: What if I regret my nature tattoo later?
A: I always tell friends to sit with an idea for months and focus on timeless symbolism rather than fleeting trends. Start with a placement you can hide if visibility concerns you. Laser removal exists but is a long process—pick something meaningful and collaborate on a custom design instead of copying a viral image.
Q: How do I keep my tattoo from fading?
A: From what I’ve seen, UV exposure is the biggest ink killer. Use an SPF 50 sunscreen stick on healed tattoos every day. Also keep skin moisturized with a fragrance-free lotion and avoid picking scabs while healing. Bold blackwork tends to hold longer; very fine lines and pale watercolors may need touch-ups.
Q: When can I work out after getting inked?
A: Wait at least 48–72 hours before sweating heavily, longer if the tattoo is near areas that flex a lot (elbow, knee). Sweat can irritate fresh ink and raise infection risk. Gentle movement is fine, but skip intense sessions for a week and keep the area clean with a mild soap.
Q: Is a tiny nature tattoo a good first nature tattoo?
A: Only if you actually want it—don’t get something tiny just to “test” tattooing. Tiny pieces on hands or fingers fade faster and need maintenance. If you want a low-commitment start, consider a wrist or ankle design that heals predictably.
Q: How long does a tattoo take to fully heal?
A: Surface healing is usually 2–3 weeks; deeper skin layers keep regenerating for 2–3 months. The first week is the most critical—clean gently, moisturize, and consider using Aquaphor or Saniderm per your artist’s recommendation. Expect flaking around day 3–7; don’t pick.
Q: Do tattoos look different on different skin tones?
A: Yes. Black and gray work shows up well across skin tones. Bright colors may read differently—reds and yellows can look muted on deeper tones. I always ask artists to show healed examples on skin similar to mine. White ink is generally subtle and often disappears on darker skin.
Q: Any ethical or material considerations for nature tattoos?
A: If you care about sustainability, ask about vegan inks and cruelty-free aftercare options. I’ve noticed more studios offering vegan ink alternatives—bring it up in your consult if it matters to you.
