
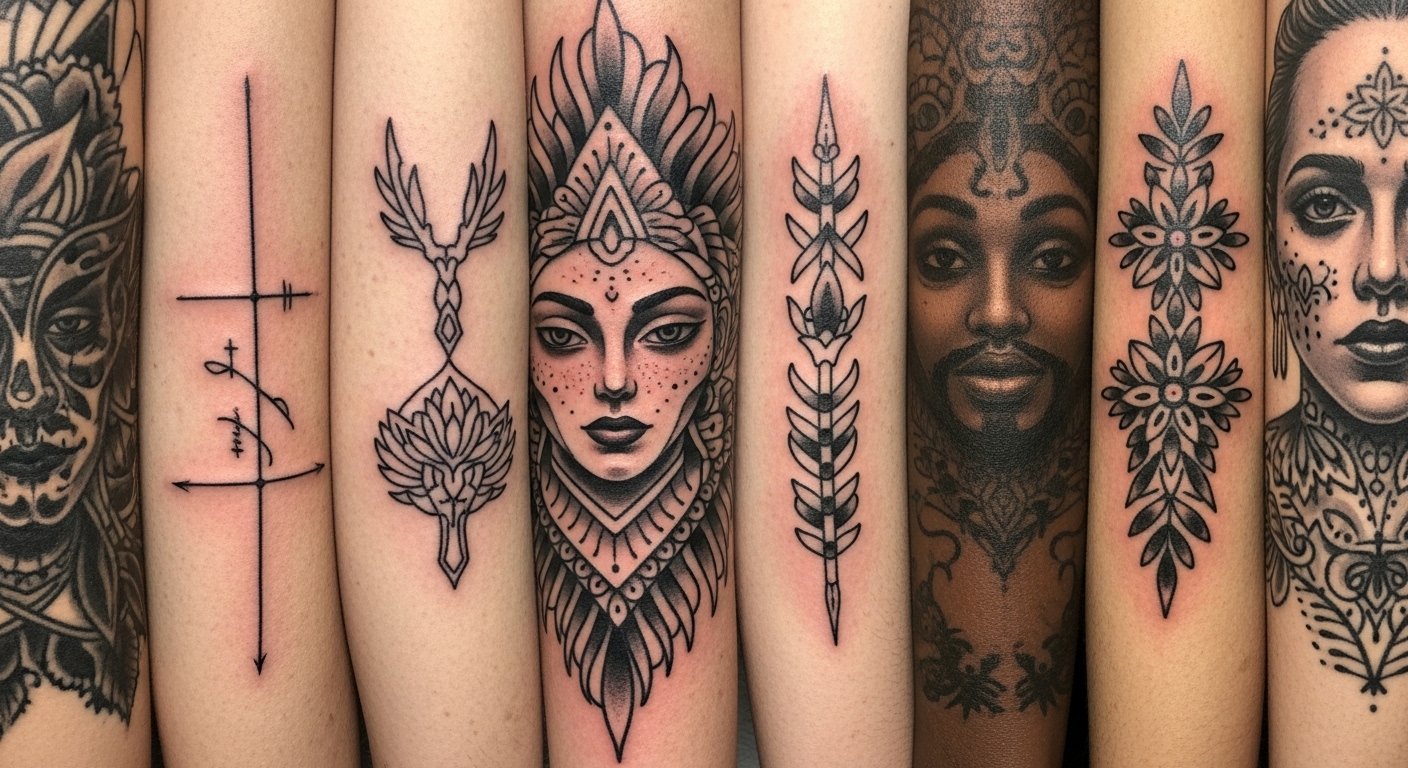
I spent months saving screenshots of music tattoos before I realized the real challenge wasn't choosing a symbol—it was picking a style and placement that would still look soulful years from now. These 25 music tattoos pair mood with practical advice so your ink holds meaning and ages well.
This list leans into fine line, traditional, micro-realism, and blackwork—placements from behind the ear to full sleeves. From what I've seen in 2026, artists favor designs that read well healed, not just fresh.
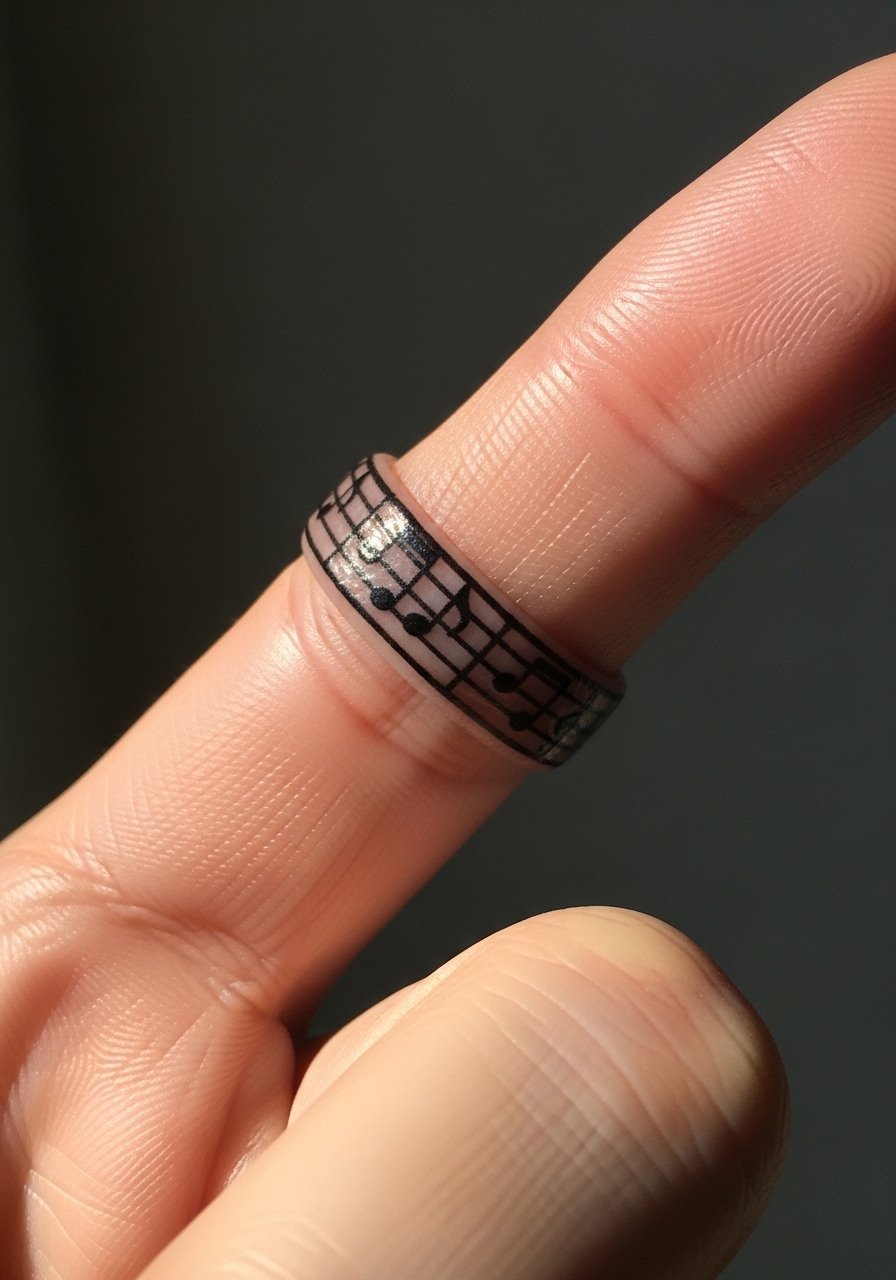
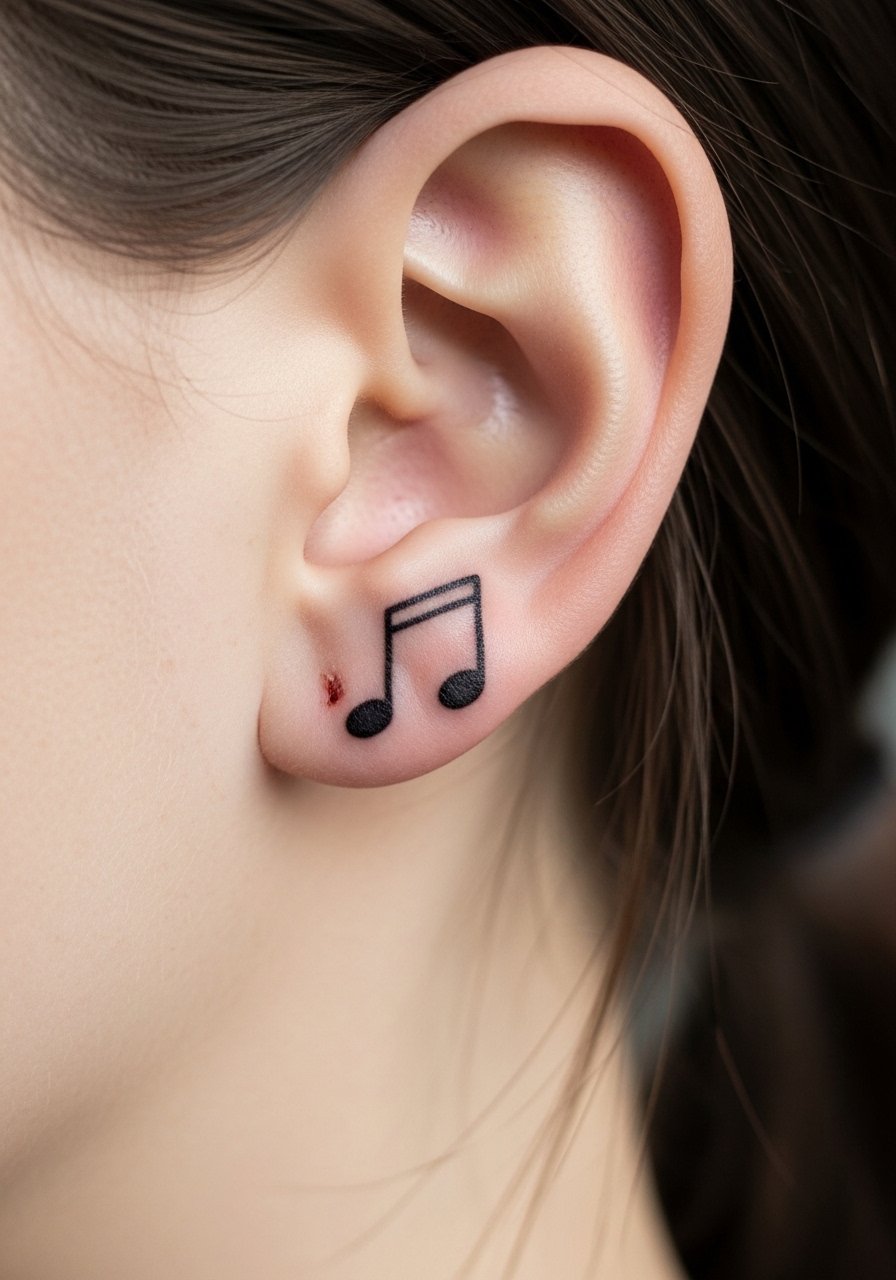
1. Fine Line Treble Clef Behind Ear
Style/Technique: Fine Line / Minimalist
Pain Level: Low (2-3/10)
Session Time: 30–60 minutes
Best For: Subtle, easy-to-hide ink
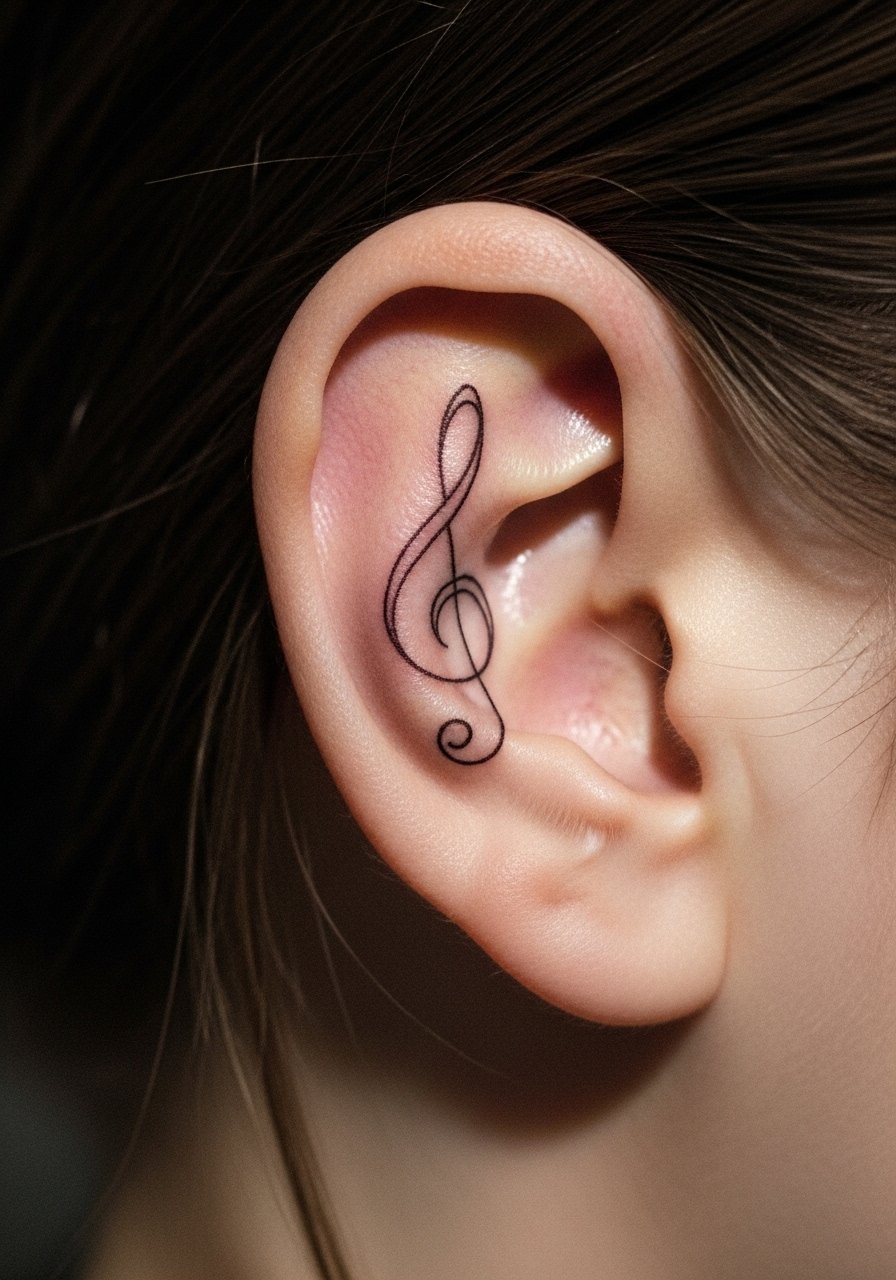
I love this for first-timers who want meaningful music tattoos without commitment. Healed fine lines can blur on very soft skin, so ask for slightly bolder line weight. Behind the ear is quick but packs a sting—short heal, minimal peeling. Common mistake: ultra-thin lines that vanish after a year. Ask an artist who does healed-skin examples for similar placements.
2. Micro-Realism Portrait of a Musician on Upper Arm
Style/Technique: Micro-Realism / Portrait
Pain Level: Low-Medium (3-4/10)
Session Time: 2–4 hours
Best For: Statement piece that ages true

Portraits read best on the upper arm where skin is stable. Micro-realism needs an artist experienced with small tonal transitions—otherwise details blur. Expect mild soreness and two-week surface healing. Healed portraits look softer than fresh; darker contrast up front helps retention. Avoid overly tiny facial details that will smear over time.
3. Bold Traditional Microphone on Forearm
Style/Technique: Traditional / American Traditional
Pain Level: Low (2-3/10)
Session Time: 1–2 hours
Best For: Timeless, visible statement
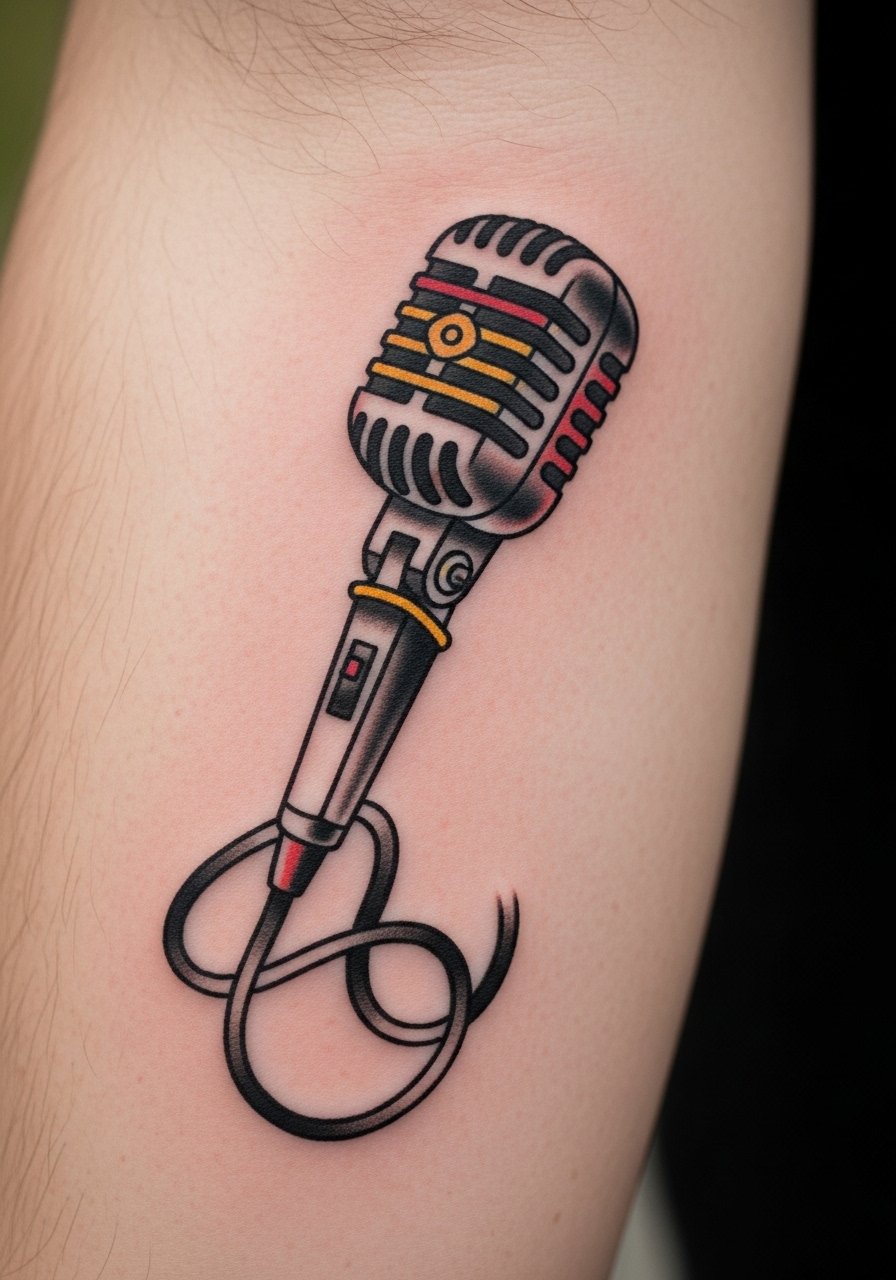
Traditional ink holds up well—heavy lines and solid blacks help music tattoos stay readable for years. Forearm placement heals predictably and is easy to protect from the sun. Pain is mild. Avoid tiny, delicate fills in this style; bold color blocks work better healed. Ask for contrast and thick outlines if you want longevity.
4. Sheet Music Wrap Around Wrist
Style/Technique: Fine Line / Script
Pain Level: Medium (4/5/10)
Session Time: 1–2 hours
Best For: Visible, sentimental pieces
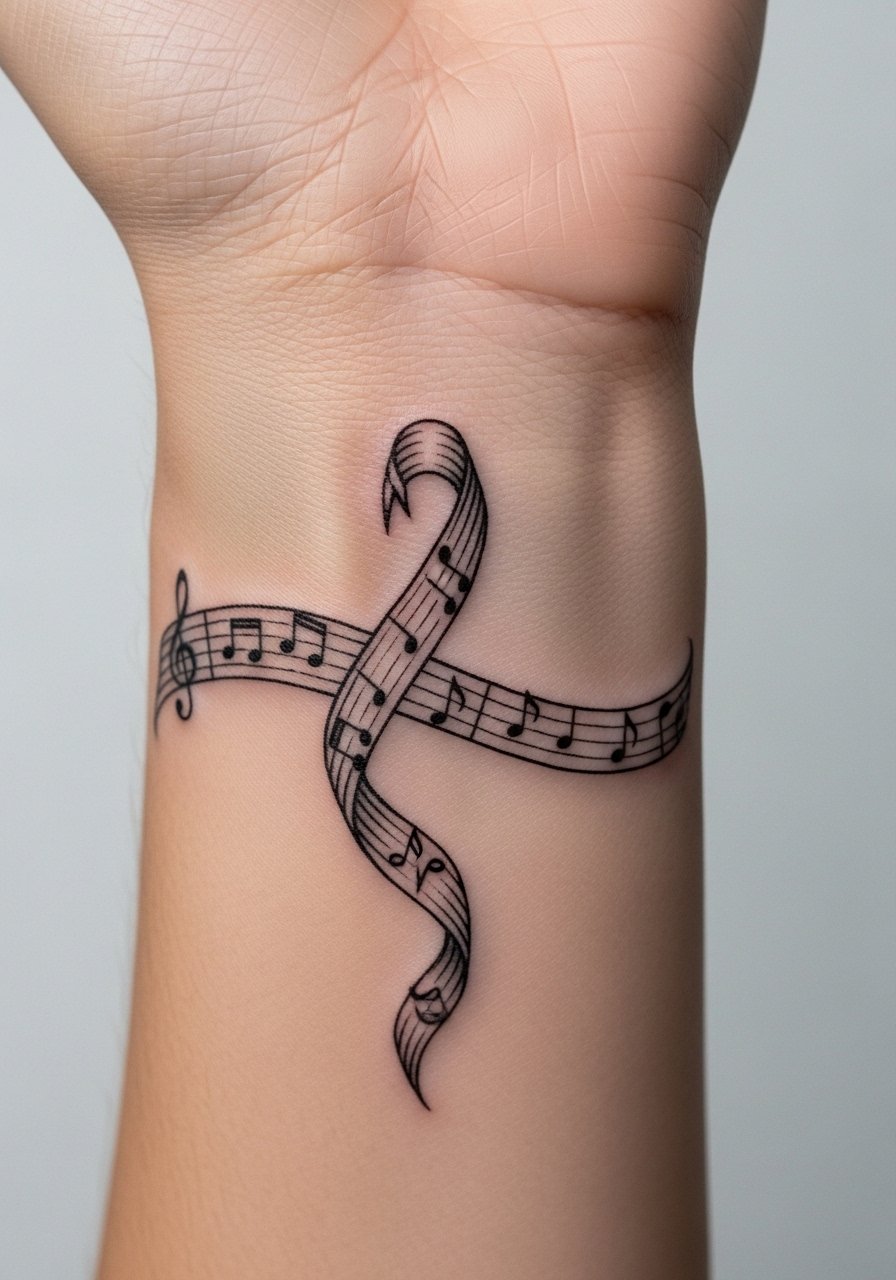
A wraparound wrist score reads like jewelry. The wrist moves and flexes, so lines can thin—expect touch-ups. Pain is sharper near the bone. Healed music notes can soften; ask for slightly heavier key lines. Common mistake: copying tiny printed staff directly—scale up spacing so notes remain crisp when healed.
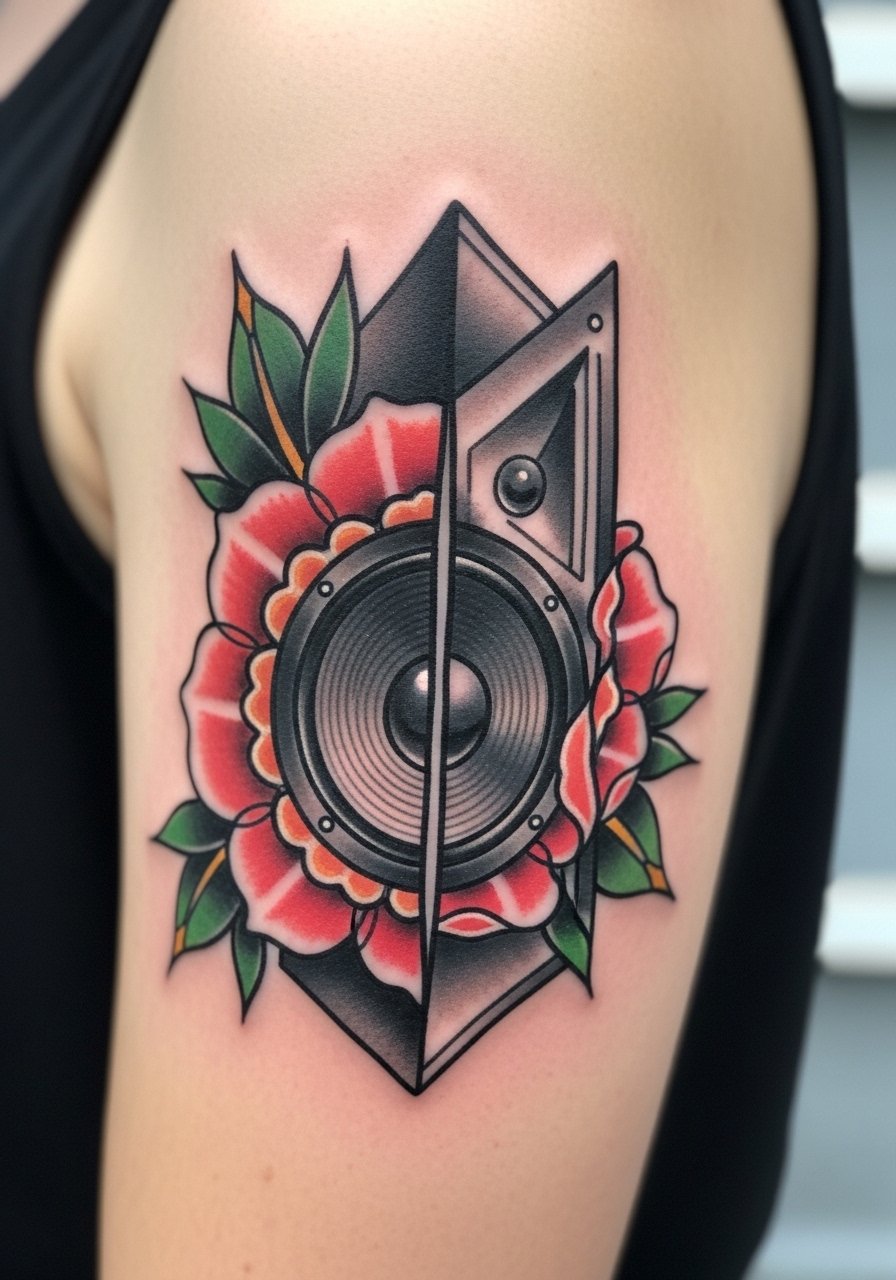
5. Watercolor Soundwave on Ribcage
Style/Technique: Watercolor / Soundwave
Pain Level: High (7-8/10)
Session Time: 2–4 hours, possibly multiple sessions
Best For: Hidden, emotive pieces
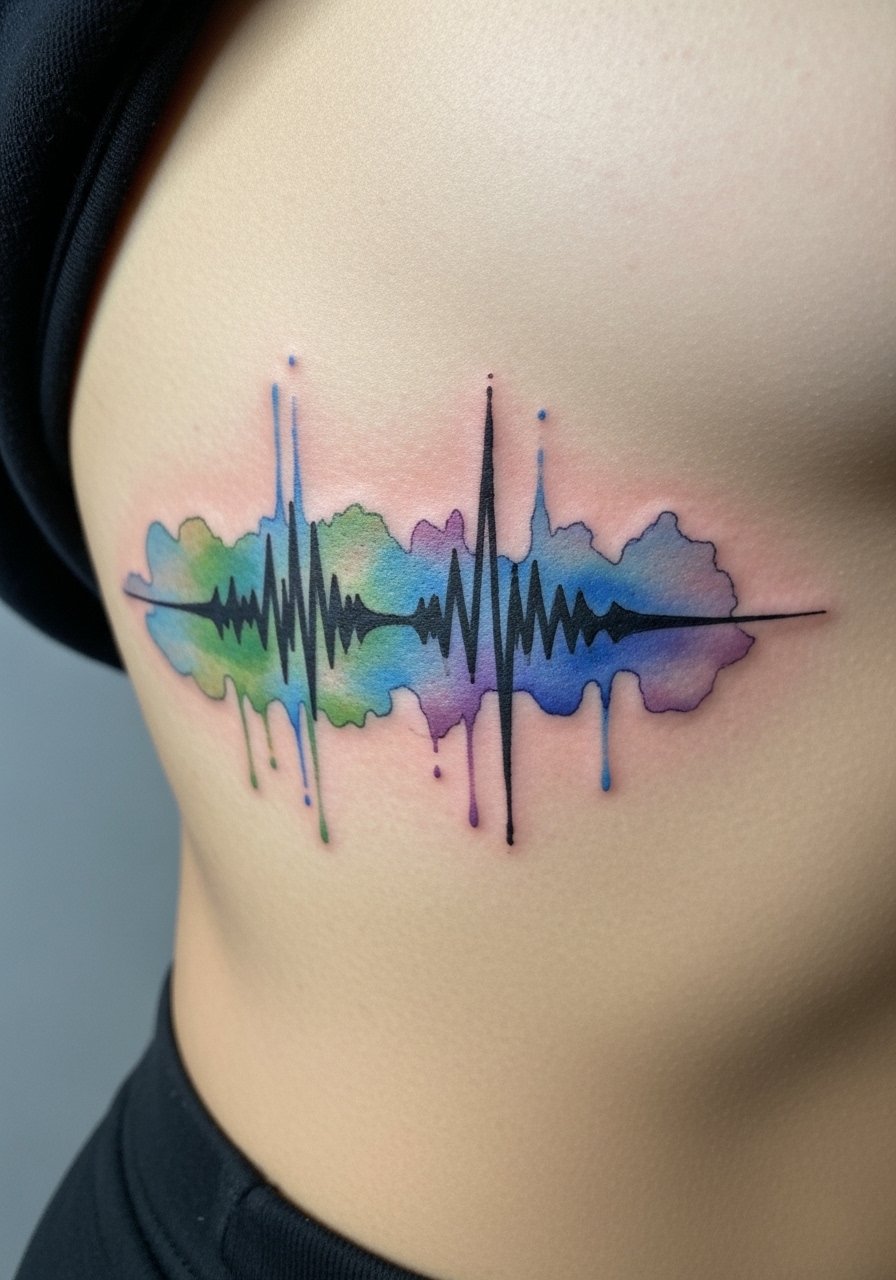
Soundwaves that represent a voice or song look intimate on the ribcage. Ribs hurt more and heal slowly, but the canvas is ideal for long, flowing color. Watercolor fades faster; for longevity, pair the wave with a black anchor line. Avoid overly diffuse color—ask your artist how they keep pigment saturated in the long term.
6. Minimalist Guitar Headstock on Ankle
Style/Technique: Minimalist / Line Art
Pain Level: Medium (5/10)
Session Time: 30–60 minutes
Best For: Small, hideable designs
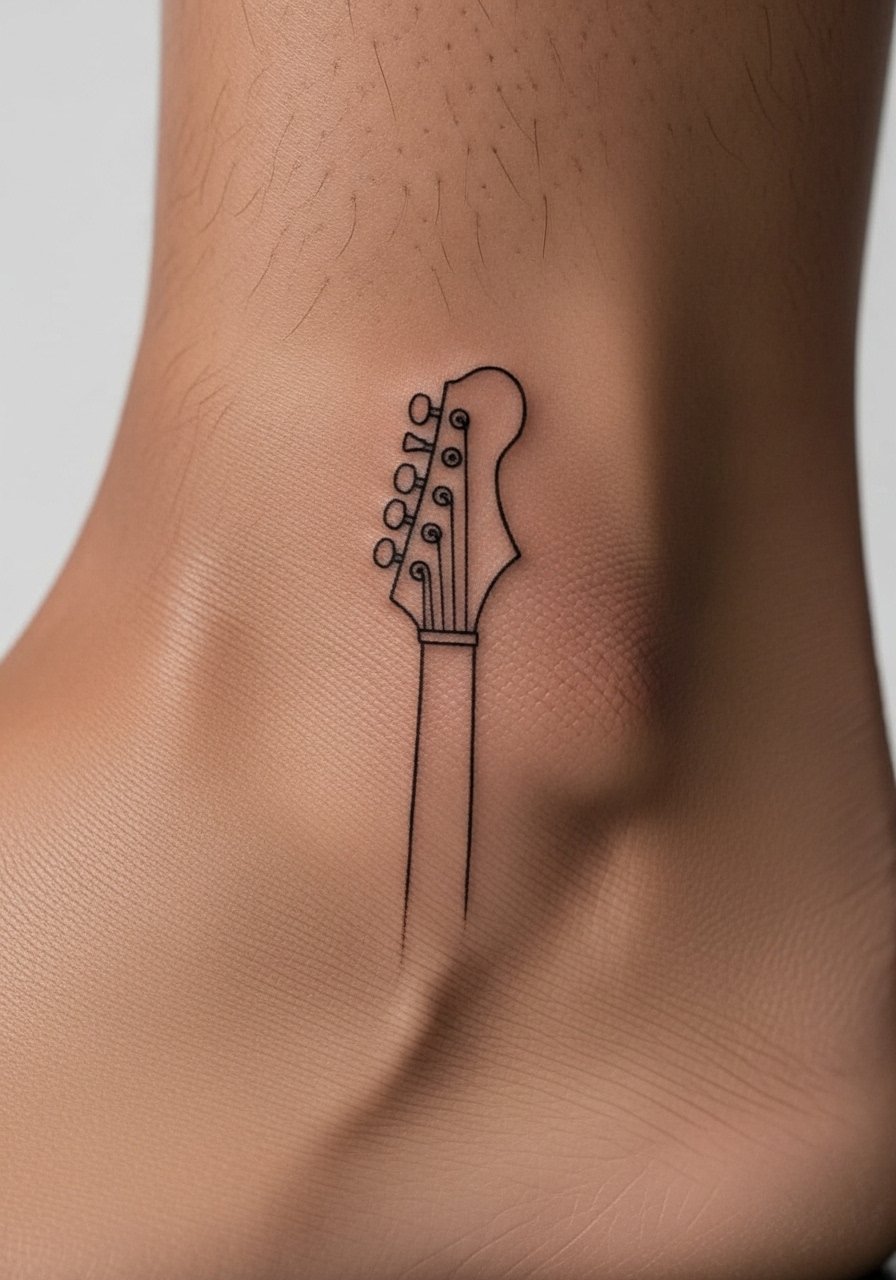
Ankle tattoos can hurt because of thin skin, but small designs heal cleanly if you avoid overly thin lines. Minimalist guitars read best with a tiny bit of line weight. Healed results maintain shape if not placed too close to joint creases. One mistake: putting it right on the inner ankle bone—more pain, more wear.
7. Neo-Traditional Piano Keys on Thigh
Style/Technique: Neo-Traditional / Color
Pain Level: Low (2-3/10)
Session Time: 2–3 hours
Best For: Larger, colorful statements
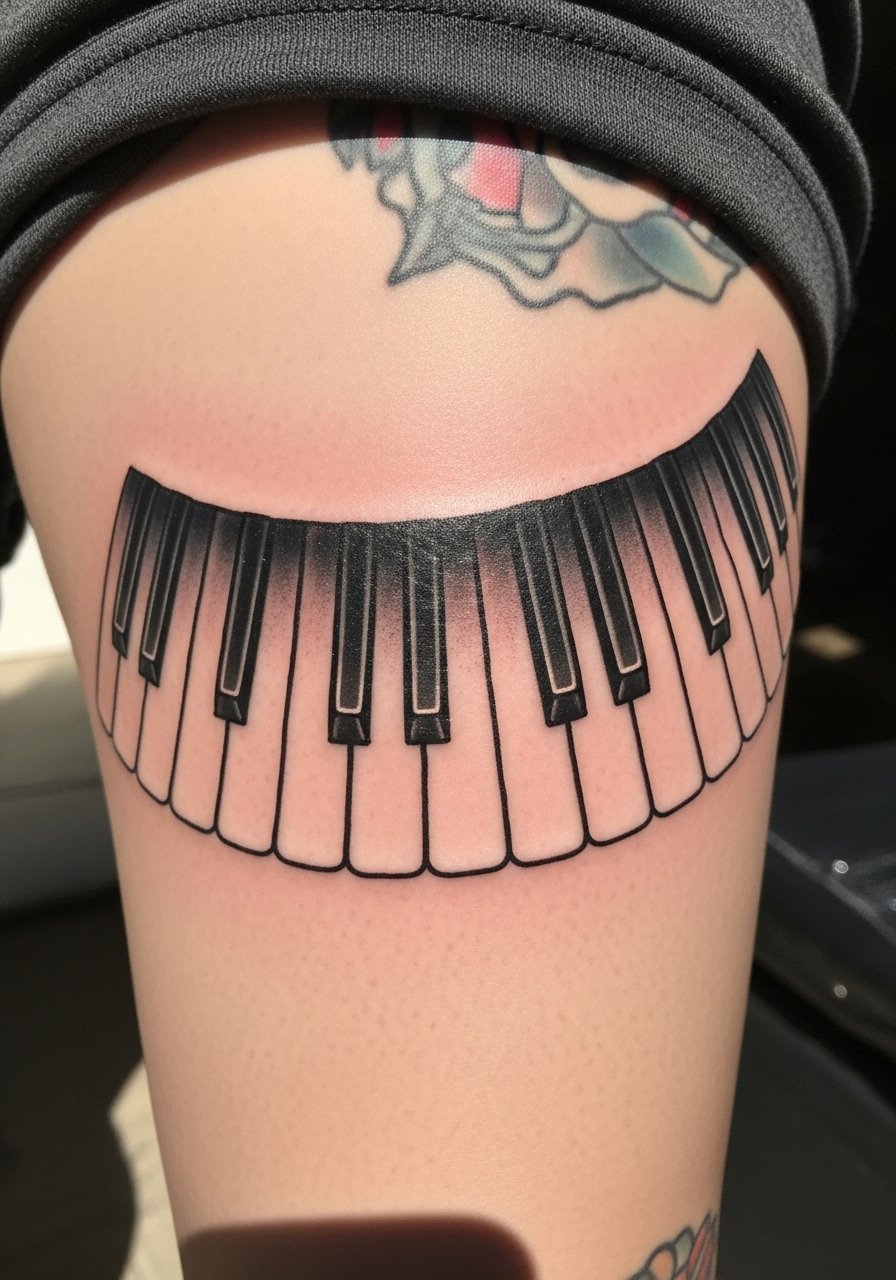
Thighs are forgiving for size and detail. Neo-traditional color works well here and retains vibrancy when moisturized. Thigh placement is lower pain and easy to hide. Watch for sagging on very soft skin; a slightly larger scale avoids muddiness. Ask for healed portfolio examples on similar skin tones.
8. Blackwork Geometric Sound Circle on Sternum
Style/Technique: Blackwork / Geometric
Pain Level: High (7/10)
Session Time: 1–3 hours
Best For: Bold center-chest pieces
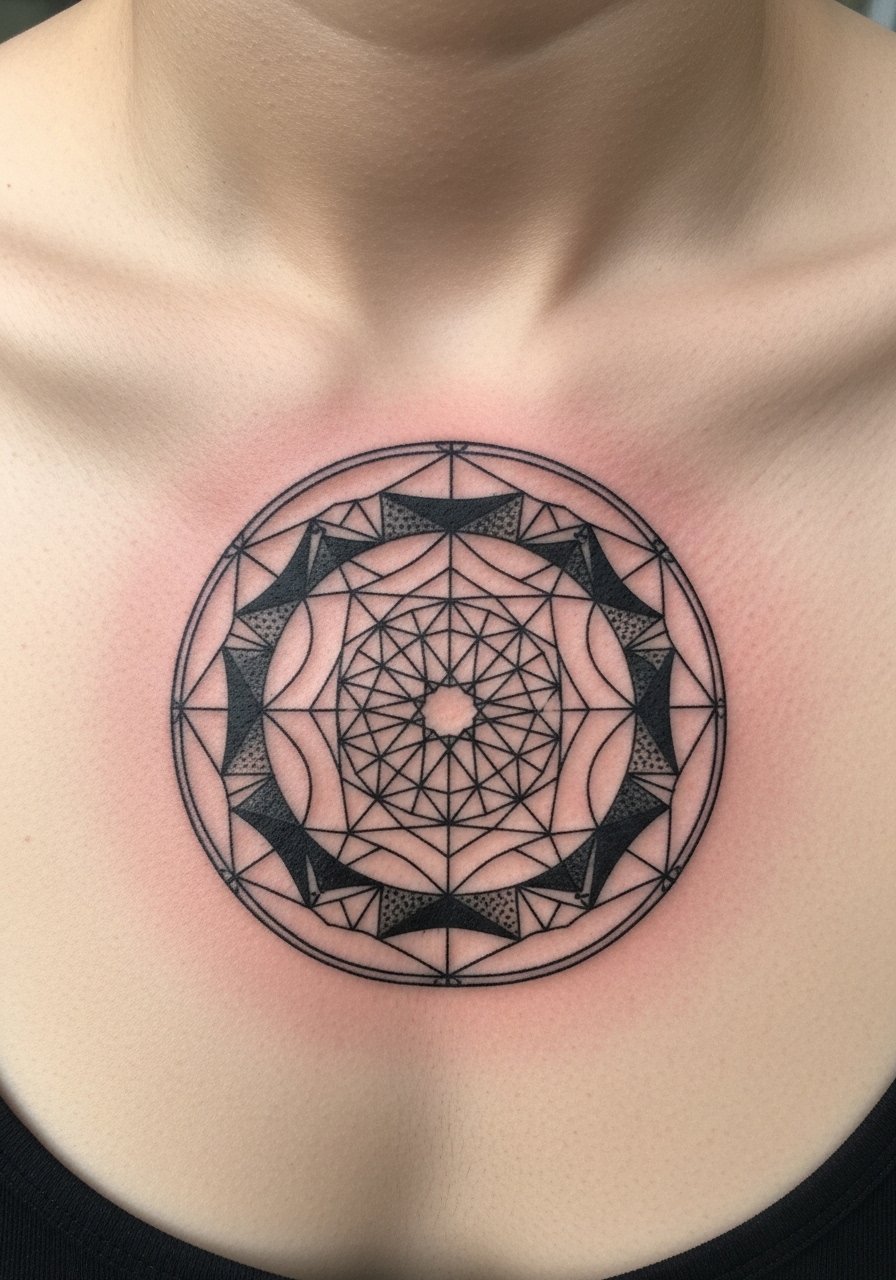
Sternum tattoos look dramatic but hurt and need careful aftercare. Geometry hides small aging issues since strong shapes remain readable. Expect peeling and sensitivity during initial healing. Avoid overly fine dotwork centered on sternum—opt for bold negative space to preserve longevity.
9. Micro Sheet Music Finger Band
Style/Technique: Micro-Realism / Band
Pain Level: High (6-7/10)
Session Time: 1 hour
Best For: Tiny, meaningful accents
Fingers are notorious for fading and spreading. I only recommend bands here if you want a short-term piece or are comfortable with annual touch-ups. Keep lines slightly thicker than you’d imagine. Clean healing and minimal water exposure for first two weeks help; hydrocolloid bandages during sleep reduce scabbing.
10. Micro-Realism Concert Ticket Stub on Rib
Style/Technique: Micro-Realism / Keepsake
Pain Level: High (7/8/10)
Session Time: 1–2 hours
Best For: Personal mementos
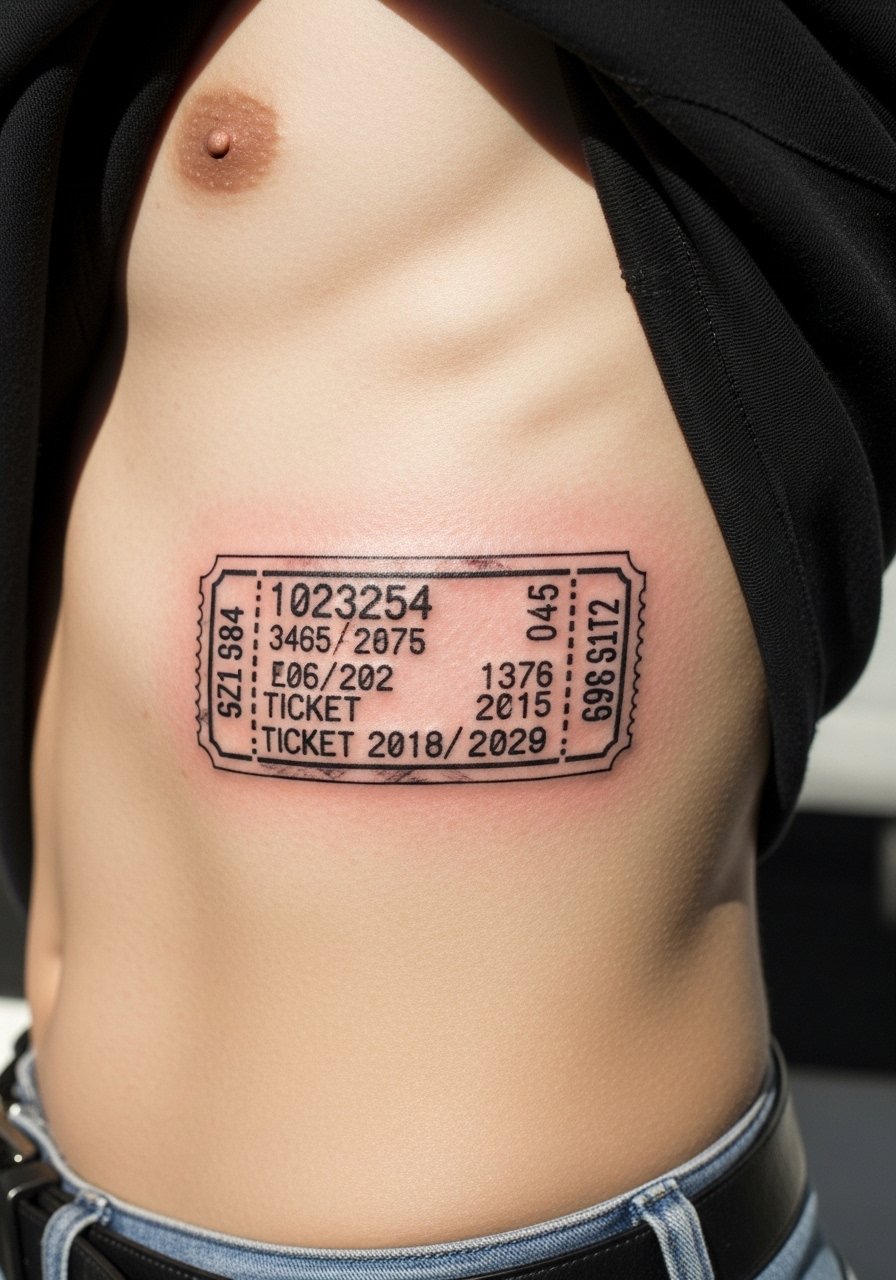
Ticket stubs translate well into music tattoos when scaled correctly. Ribs are expressive but painful. Tiny text blurs—ask your artist to simplify elements so the main details stay legible healed. This feels nostalgic; expect slower color retention if you choose pale ink.
11. Single-Needle Lyric Line on Collarbone
Style/Technique: Fine Line / Script
Pain Level: Medium (4/5/10)
Session Time: 30–60 minutes
Best For: Sentimental, visible quotes

Collarbones show lyrics beautifully but can be picky—skin tension lines can distort script. Single-needle looks delicate but may blur; choose a slightly bolder script. Pain is a sharp burn near the bone. Hydration and gentle cleansing speed surface healing.
12. Blackwork Bass Clef Sternum Cluster
Style/Technique: Blackwork / Symbol Cluster
Pain Level: High (7/10)
Session Time: 1–2 hours
Best For: Bold center pieces that read from distance
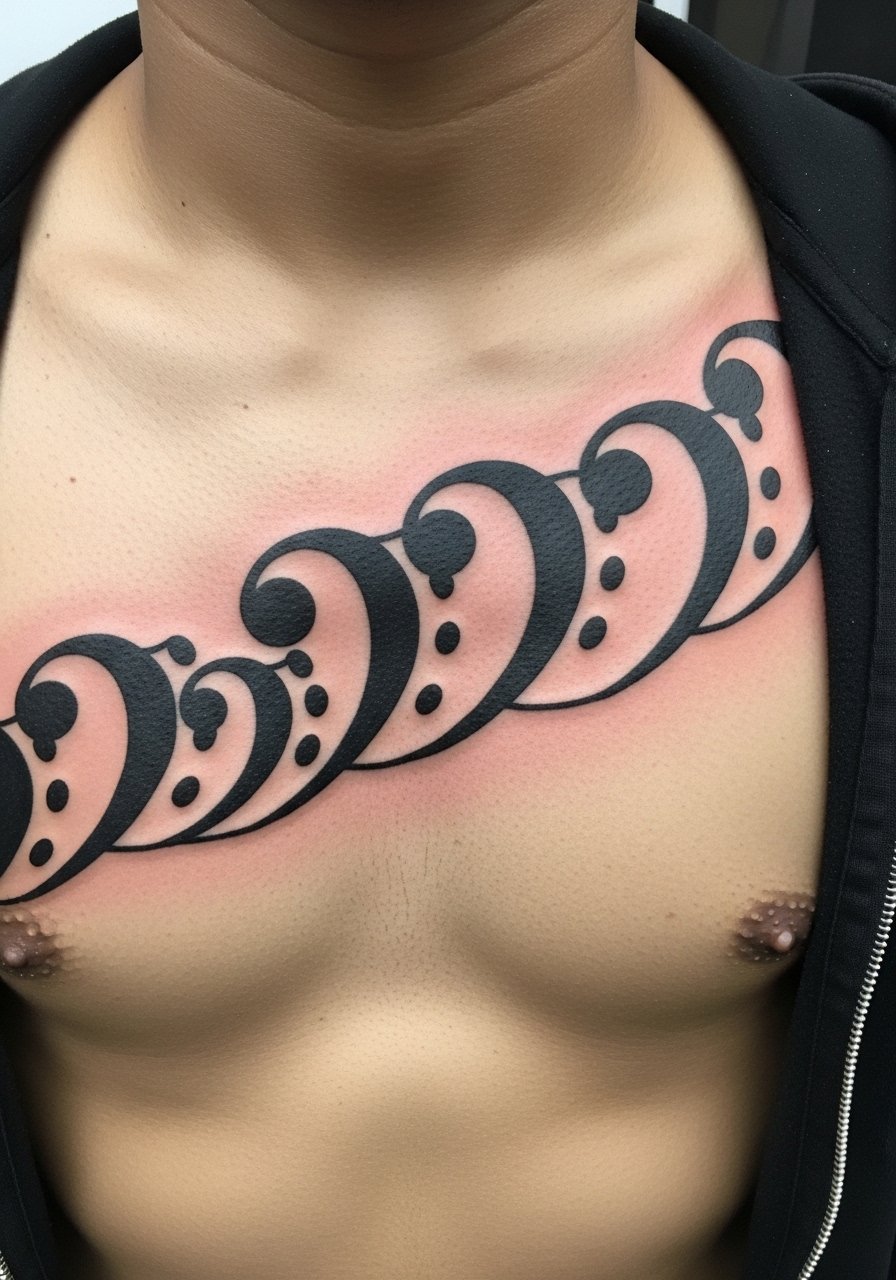
Heavy black keeps symbol clarity. Sternum placement is dramatic but demands strict aftercare to avoid prolonged irritation. Blackwork often ages best across tones; ask for healed images of black-heavy pieces on similar skin.
13. Watercolor Guitar Neck on Side Rib
Style/Technique: Watercolor / Illustrative
Pain Level: High (7-8/10)
Session Time: 2–3 hours
Best For: Artistic, flowing pieces

Flowing watercolor looks great on the ribs but can lose saturation. Pair with black outlines for structure. Expect tenderness and extended aftercare. Avoid very light pastel-only palettes if you want longer-lasting vibrancy.
14. Minimalist Headphone Outline on Nape
Style/Technique: Minimalist / Line Art
Pain Level: Low (2-3/10)
Session Time: 30–45 minutes
Best For: Subtle back-of-neck statements
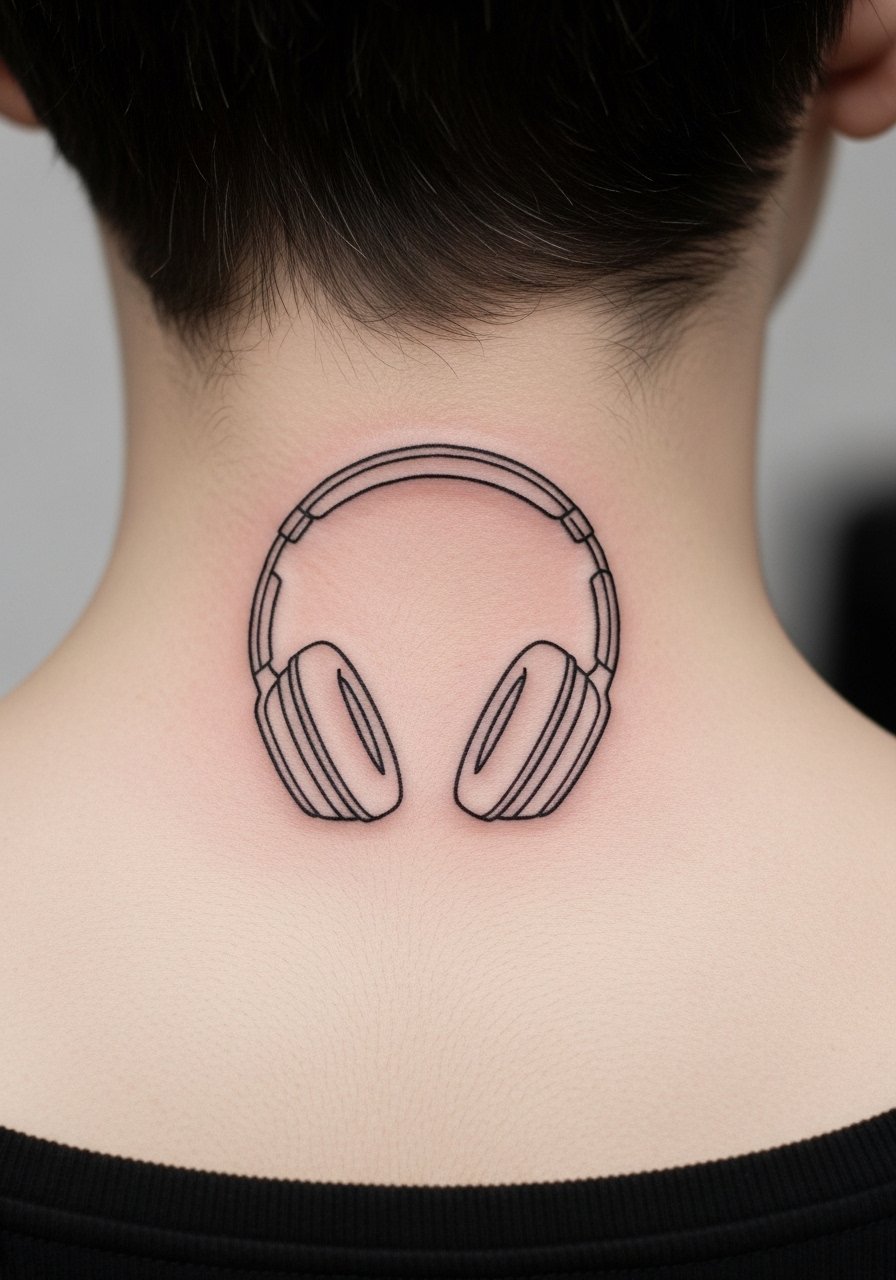
Nape tattoos are subtle and can be covered by hair. Lines settle predictably if not placed over creases. Pain is mild. Ask the artist to check your hairline placement so it peeks through just how you want when healed.
15. Micro-Realism Vinyl Record on Calf
Style/Technique: Micro-Realism / Monochrome
Pain Level: Low (2-3/10)
Session Time: 1–2 hours
Best For: Nostalgic, medium-sized pieces
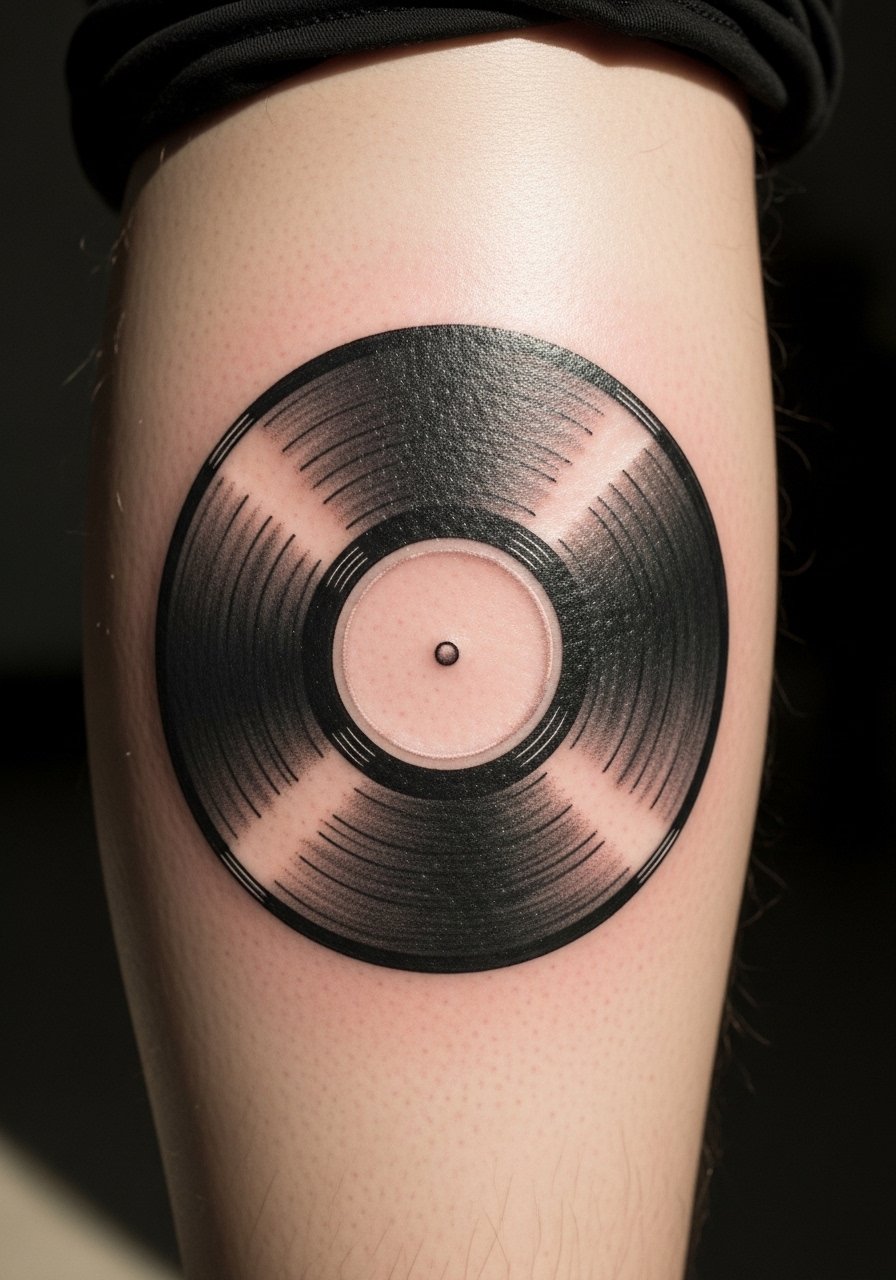
Calf skin holds texture well and heals with minimal movement. Vinyl grooves require subtle shading—avoid over-detailing that blurs into a gray blob. Healed records look softer than fresh, so ask for slightly higher contrast initially.
16. Fine Line Conductor Baton on Inner Forearm
Style/Technique: Fine Line / Illustrative
Pain Level: Medium (3-4/10)
Session Time: 1 hour
Best For: Elegant, readable forearm pieces
Inner forearm is ideal for readable music tattoos. Fine line batons age fine here if lines aren’t wafer-thin. Healing is straightforward; keep sun off during the first month. Avoid tiny cross-hatching that can smudge over time.
17. Soundwave That Turns Into Birds on Shoulder Blade
Style/Technique: Illustrative / Transformative
Pain Level: Low-Medium (3-4/10)
Session Time: 1–2 hours
Best For: Poetic, mid-back placement
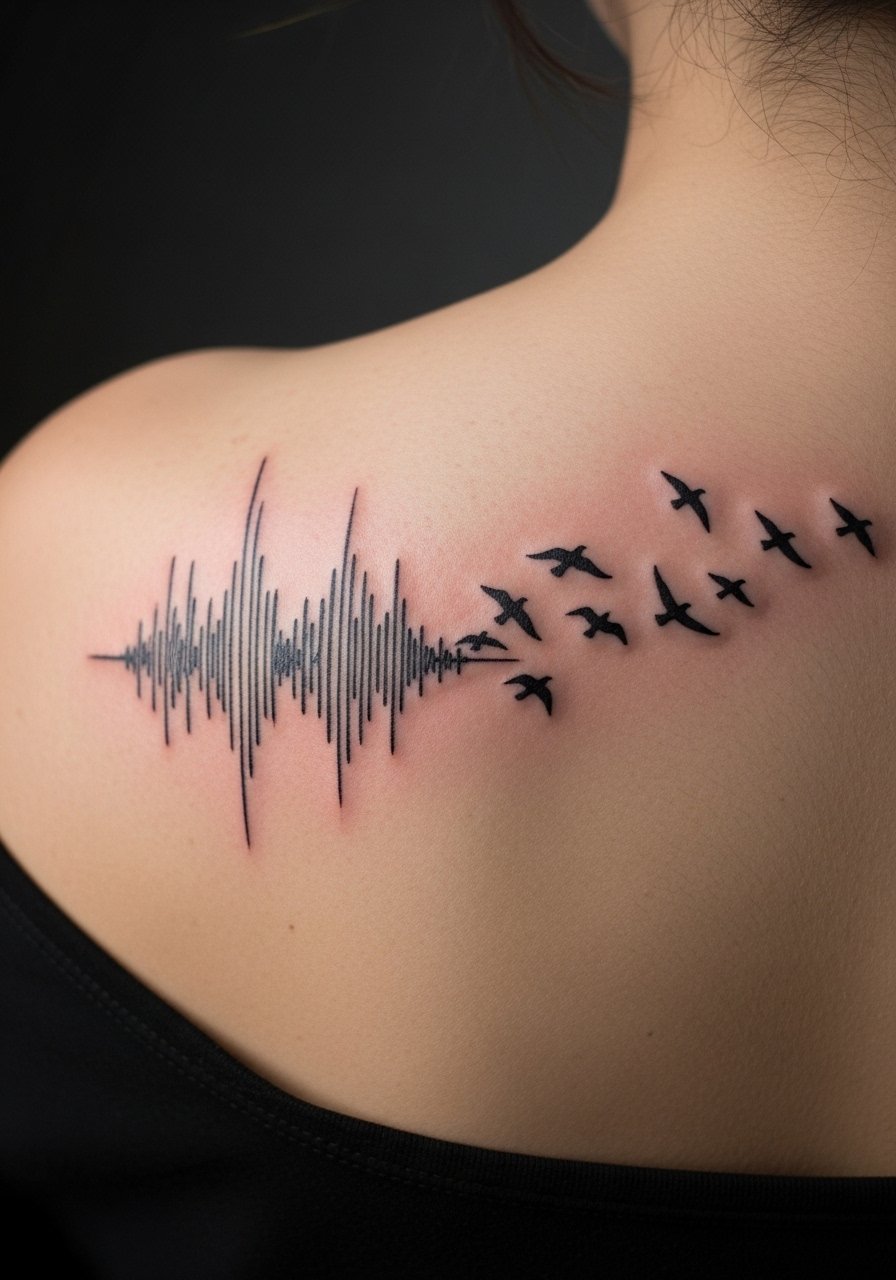
This creative angle feels alive—soundwave imagery transitioning into birds is one of the fresh concepts I keep seeing. Shoulder blade offers a flat canvas with low pain. The design reads well healed if the wave line is bold enough to survive subtle spread.
18. Minimalist Metronome on Wrist
Style/Technique: Minimalist / Iconic
Pain Level: Medium (4/5/10)
Session Time: 30–60 minutes
Best For: Small, daily-visible reminders
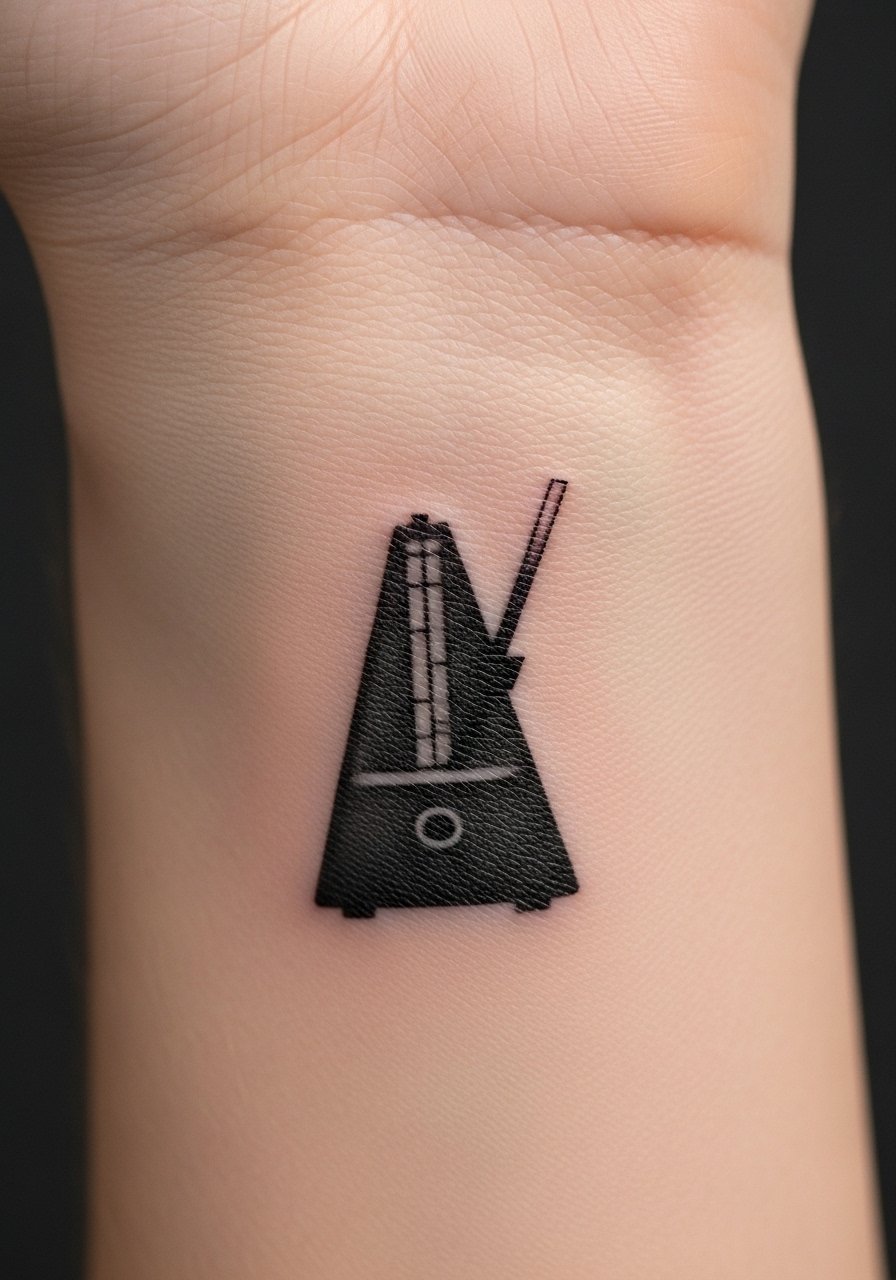
Wrist metronomes are symbolic and easy to show. The wrist moves and gets sun—use stronger lines and protect with sunscreen to retain contrast. Pain is a constant tingle near the tendons.
19. Micro-Realism In-Ear Monitor Earbud on Behind Ear Fold
Style/Technique: Micro-Realism / Tiny Detail
Pain Level: Low (3/4/10)
Session Time: 30–45 minutes
Best For: Music professionals and fans
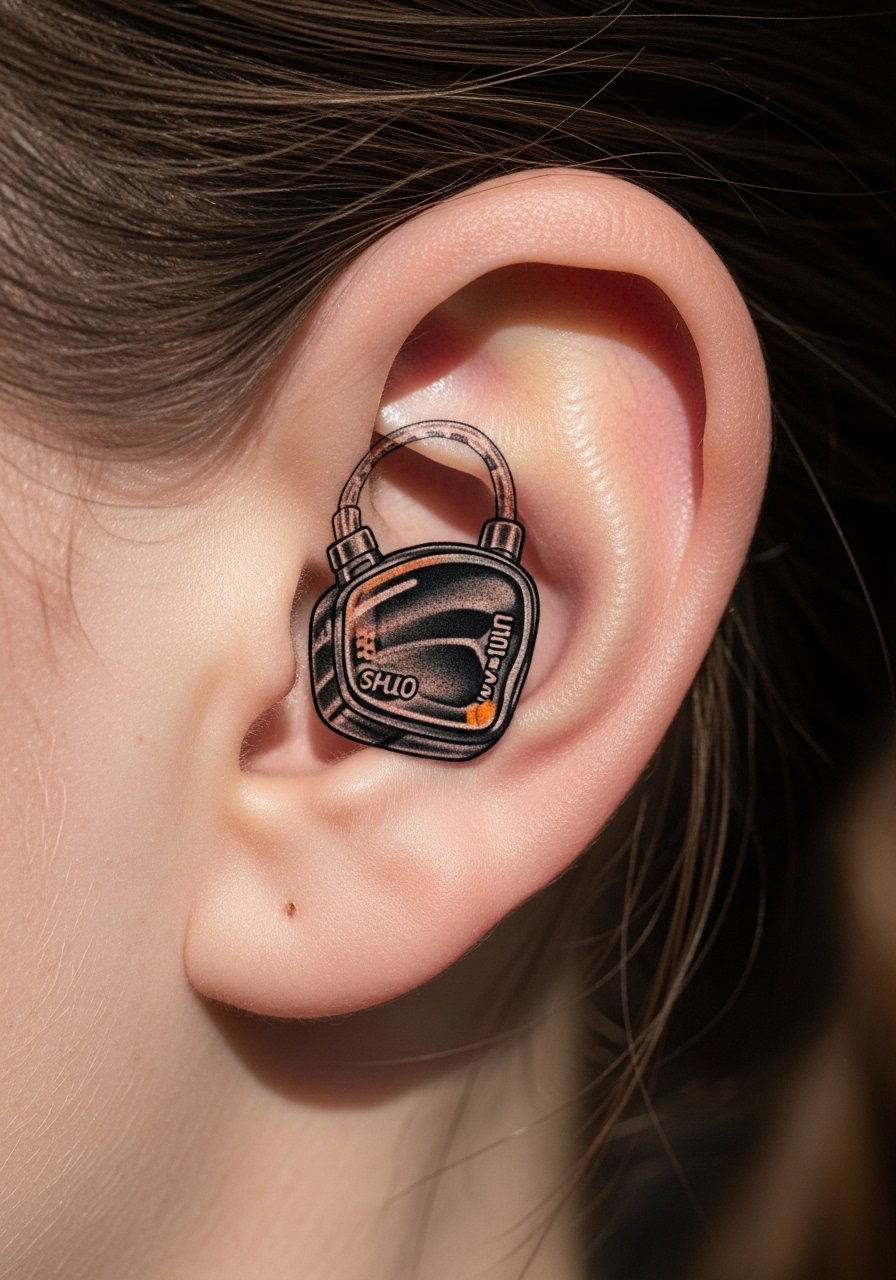
Tucking a tiny earbud behind the ear is a discreet nod to stage life. It heals cleanly if kept dry. Make sure the artist has micro work examples—tiny mechanical shapes need simplified contrast to hold up.
20. Bold Lyric Typography on Ribcage
Style/Technique: Bold Script / Typographic
Pain Level: High (7/8/10)
Session Time: 1–2 hours
Best For: Long-form lyrical lines

Long quotes on ribs look cinematic. Choose bold lettering so letters don’t merge when the skin shifts. Ribs hurt more—plan for recovery and brief slow movement to avoid stretching the scab.
21. Neo-Traditional Soundflower on Upper Arm
Style/Technique: Neo-Traditional / Floral-Integrated
Pain Level: Low (2-3/10)
Session Time: 2–3 hours
Best For: Organic, colorful sleeves
Blending music elements with florals feels fresh—soundflowers are an under-covered angle that reads well as sleeves. Upper arm skin keeps color. Ask for healed examples of color transitions on similar skin tones.
22. Micro-Realism Turntable on Chest Pocket
Style/Technique: Micro-Realism / Tiny Keepsake
Pain Level: Medium (4/5/10)
Session Time: 1 hour
Best For: Nostalgic, intimate designs
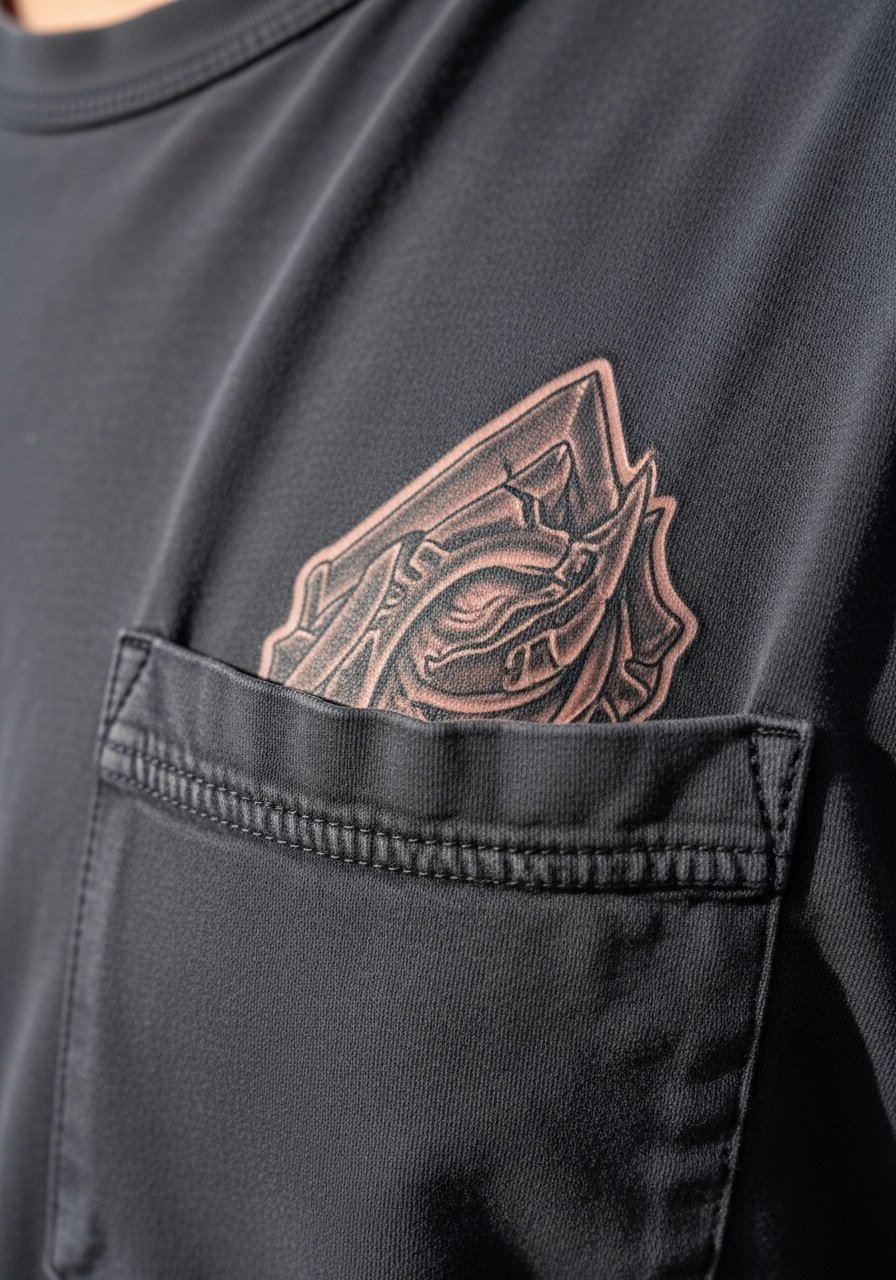
Placed near the heart, small turntables feel sentimental. Keep details bold enough to remain readable. The chest heals predictably; protect from friction with clothing during the first week.
23. Blackwork Guitar Silhouette Along Spine
Style/Technique: Blackwork / Vertical
Pain Level: High (6-7/10)
Session Time: 2–3 hours
Best For: Long, dramatic back pieces
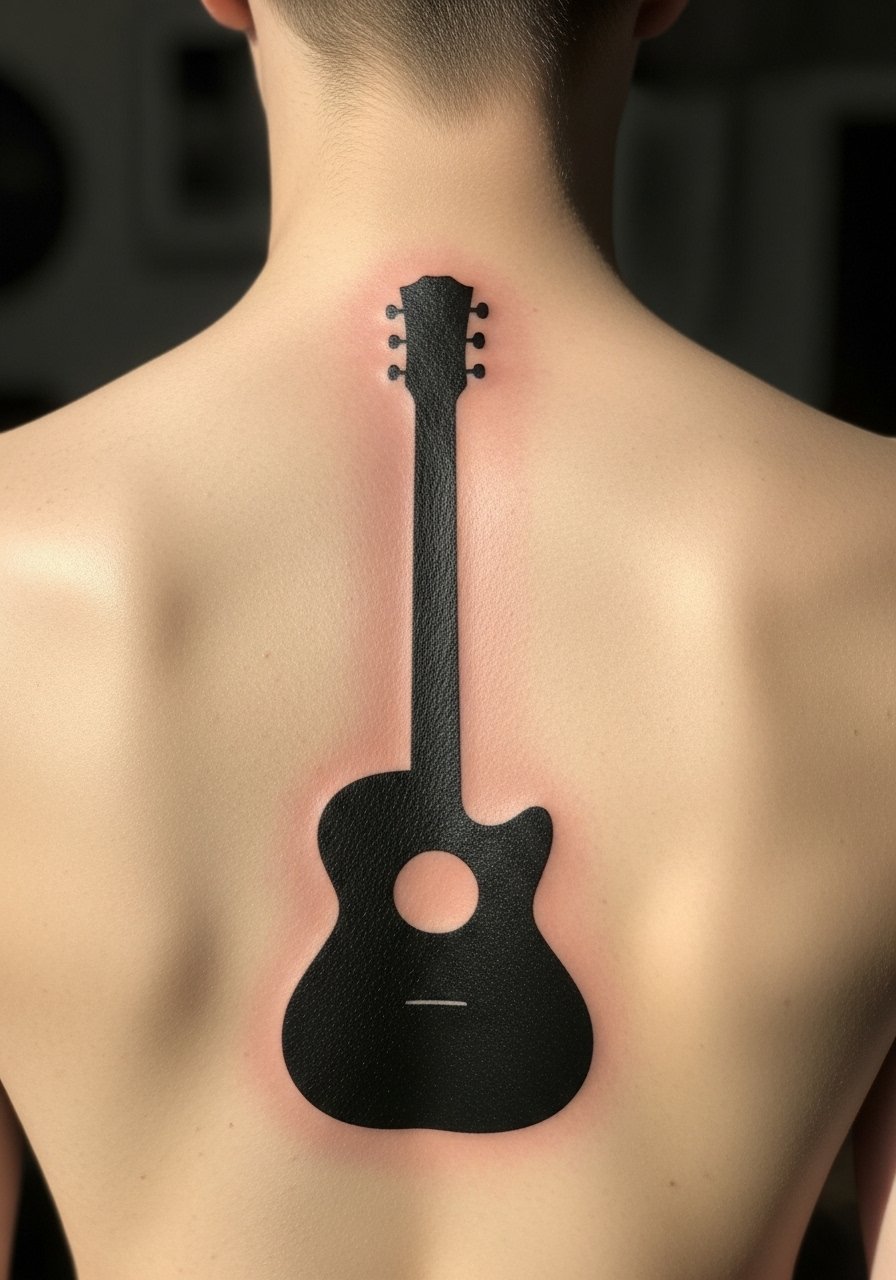
Spine pieces are striking but sensitive. Black silhouettes remain legible as they age. Expect soreness and careful sleeping adjustments during healing. Avoid intricate interior detail that could blur along the spine.
24. Minimalist Musical Notes Behind Ear Lobe
Style/Technique: Minimalist / Tiny Notes
Pain Level: Low (2-3/10)
Session Time: 20–40 minutes
Best For: Tiny tributes and ear-adjacent accents
Small notes behind the lobe are quick and intimate. They heal fast but can fade if frequently exposed to sun and hair products—cover during the first week and keep them moisturized.
25. Unique Live-Set Waveform Sleeve on Forearm
Style/Technique: Illustrative / Sleeve Accent
Pain Level: Medium (4-5/10)
Session Time: Multiple sessions
Best For: Fans who want a story-driven sleeve
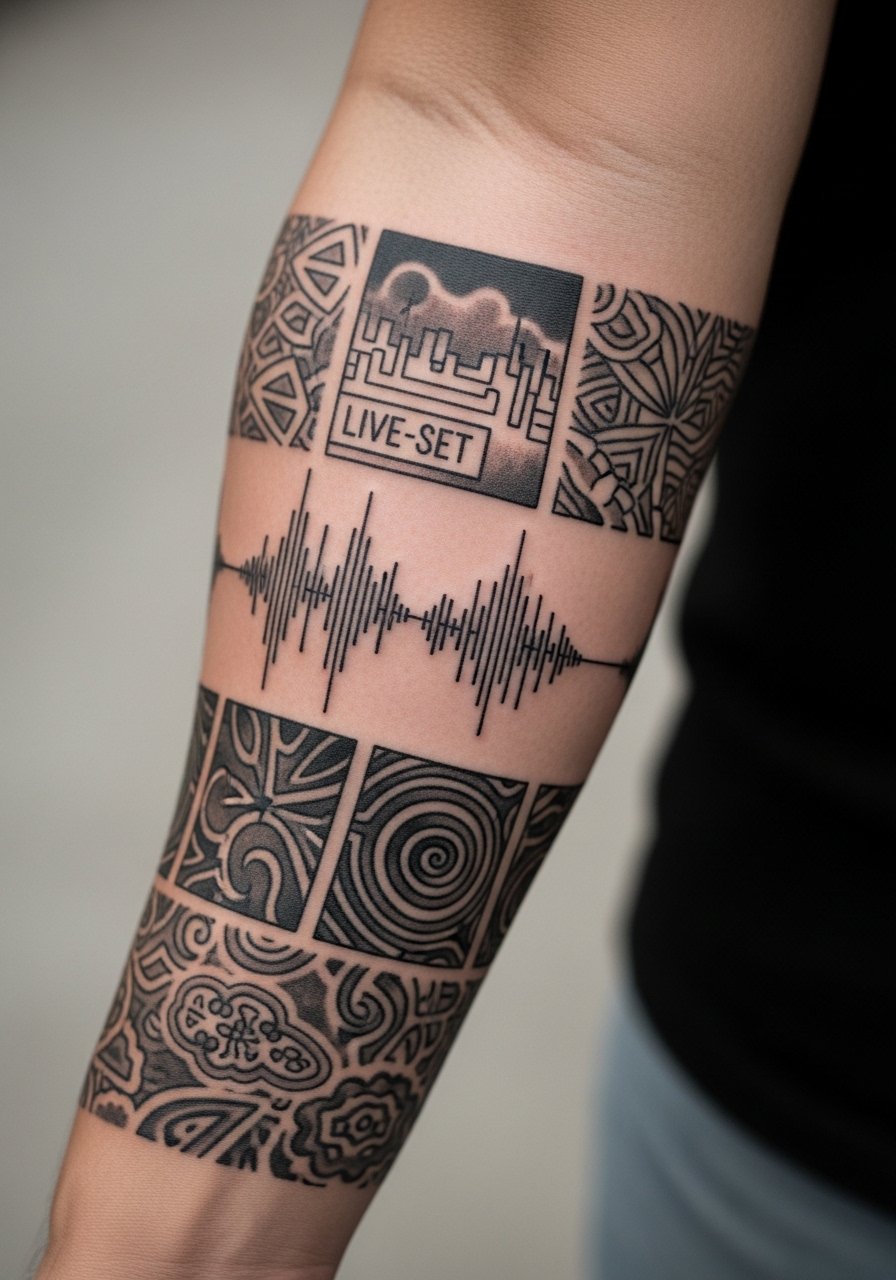
A waveform sleeve that maps a favorite live mix into the sleeve narrative is a fresh idea I haven't seen enough of. It works best when built into larger motifs for scale and reading distance. Forearms take sun—plan long-term maintenance and thicker anchor lines where the waveform should remain crisp.
Tattoo Prep and Aftercare Essentials
Aftercare Essentials:
- Aquaphor Healing Ointment, 14oz tube — Use first 3–5 days for heavy protection
- Saniderm Transparent Adhesive Bandage, 6-inch roll — Second-skin option for initial healing
- CeraVe Fragrance-Free Moisturizing Lotion — Daily moisturizer for weeks 2–6
- Dr. Bronner's Unscented Castile Soap, 32 oz — Gentle cleansing in the first 2 weeks
- Mad Rabbit Tattoo Balm, 2oz — Long-term moisturizer recommended by many artists
- Hustle Butter Deluxe, 4oz — Vegan aftercare alternative for healed skin
- SPF 50 Sunscreen Stick for Tattoos — Daily sun protection for healed ink
- Tattoo Numbing Cream with 5% Lidocaine — Ask your artist before use; for sensitive placements
- Hydrocolloid Bandages, Large — Sleep protection for small touch-ups or blisters
- Tattoo Aftercare Kit (Multi-Item) — Starter kits that include soap, balm, and ointment
- Disposable Gloves, Box — Useful if you need to apply ointment without contaminating fresh ink
- Silicone Scar Sheets, Pack — For raised scars or areas that heal thick, artists sometimes recommend later in healing
Before your appointment: hydrate well, avoid sunburn, and ask the artist about numbing if you’re booking sensitive placements. From what I've learned, Saniderm and gentle, fragrance-free moisturizers get the most real-world nods from artists.
Frequently Asked Questions
Q: How bad does a tattoo actually hurt?
A: Pain depends on placement and your tolerance. Outer forearm/upper arm = lower on my scale (2–4/10). Ribcage/spine/ankle = higher (7–8/10). It’s more a steady burn than sudden agony. For very sensitive areas ask about numbing cream with 5% lidocaine.
Q: How long until a tattoo looks like the healed photos here?
A: Surface healing is usually 2–3 weeks; full settling takes 2–3 months. Colors dull then brighten as the skin regenerates—patience matters. Keep using a fragrance-free lotion like CeraVe during weeks 2–8.
Q: What if I regret the placement or design later?
A: Sit with big decisions for several months. If placement worries you, start with a hidden spot (thigh, upper arm) that you can show off later. Removal exists but is a process—choose thoughtfully.
Q: How do I prevent my tattoo from fading?
A: Sunscreen daily is non-negotiable. From what I've seen, UV exposure is the biggest fade driver. Use an SPF 50 sunscreen stick on exposed ink every day and moisturize regularly.
Q: Can I work out after a tattoo?
A: Wait 48–72 hours at minimum, longer for flex areas. Sweat can irritate fresh ink and introduce bacteria. If you must move, keep the area clean and covered when possible and avoid heavy strain for a week.
Q: Do tattoos look different on darker skin tones?
A: Yes. Black and gray work universally. Bright pastels may read muted on deeper tones—artists often use saturation and contrast differently. I always advise seeing healed examples on similar skin tones and asking the artist for adjustments.
Q: Should I use Saniderm or Aquaphor?
A: Both are commonly recommended. Saniderm is great for a sealed first layer; Aquaphor is useful for the first 3–5 days if you prefer ointment. Many artists I’ve spoken to recommend whichever they use in-studio—follow their guidance.
Q: Will tiny script stay legible?
A: Tiny script can blur. If you want text, scale it slightly larger than you think and choose simple lettering. Ask to see healed text work from your artist before committing.
