
I spent eight months saving designs and asking artists the same question, what actually holds up on skin. I realized the issue was not picking something pretty. It was choosing a minimalist style that still reads as art after healing. These 23 ideas are the ones I kept coming back to, the subtle pieces that still look intentional years later.
This list leans into fine line, micro-realism, blackwork, and minimalist line art. Placements range from inner forearm to ribcage and ankle. From what I've seen, artists in 2026 favor clean negative space and tiny compositions that read at a distance. These picks aim to last and still feel like wearable art.
1. Fine Line Botanical Wrist Band
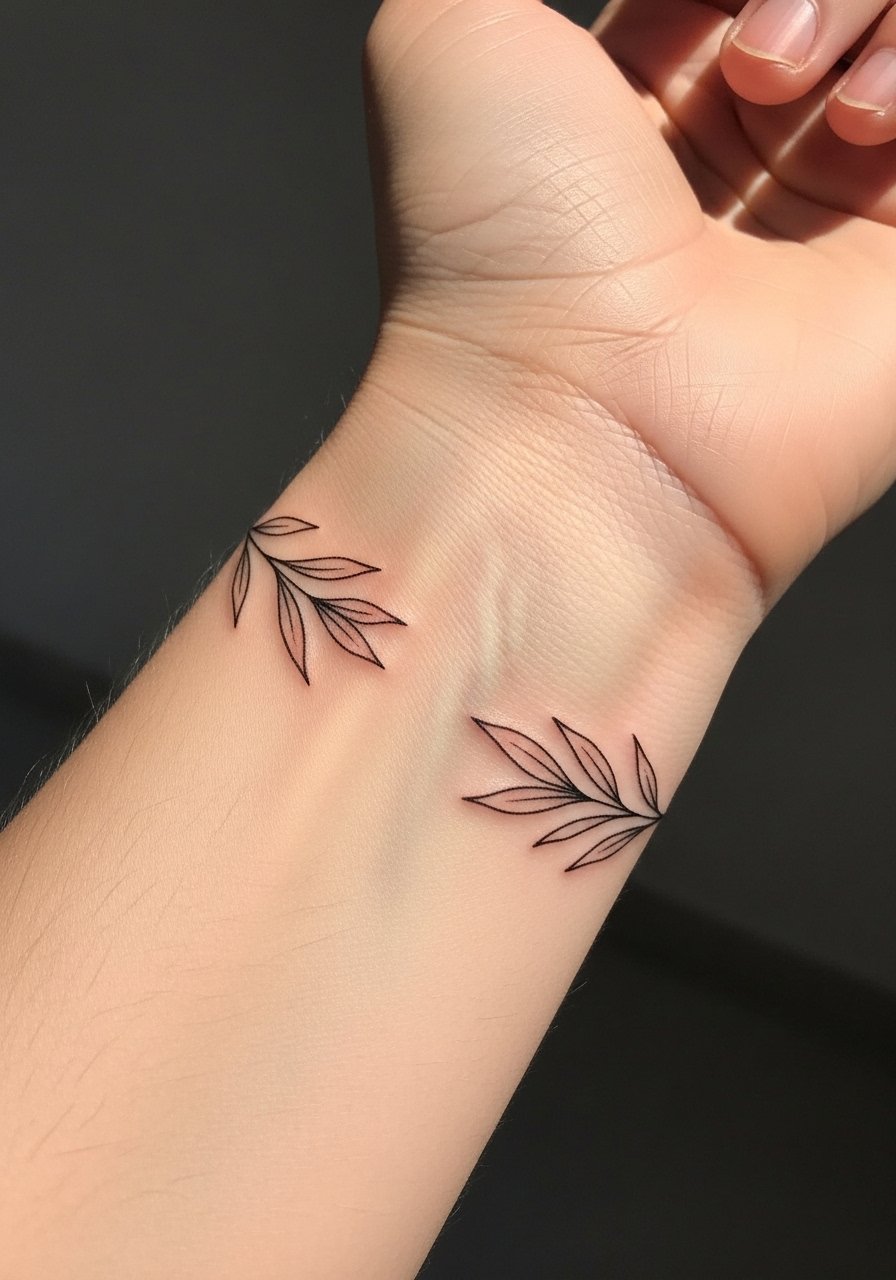
I first saw this on a friend who wanted something subtle but structured. A fine line botanical band works because the wrist gives a natural curve for stems and leaves. Expect mild pain. Sessions are 20 to 40 minutes. I tell my artist to keep leaf tips slightly thicker than the main stem. From what I've seen, the biggest mistake is going too delicate around the wrist joint. Those lines blur faster. At six months the leaves soften. After two years they need touch-ups if the lines were hairline thin to start. Ask for reference photos that show the exact line weight you want. This style suits people who want a visible yet low-key piece.
2. Micro-Realism Moon on Inner Forearm
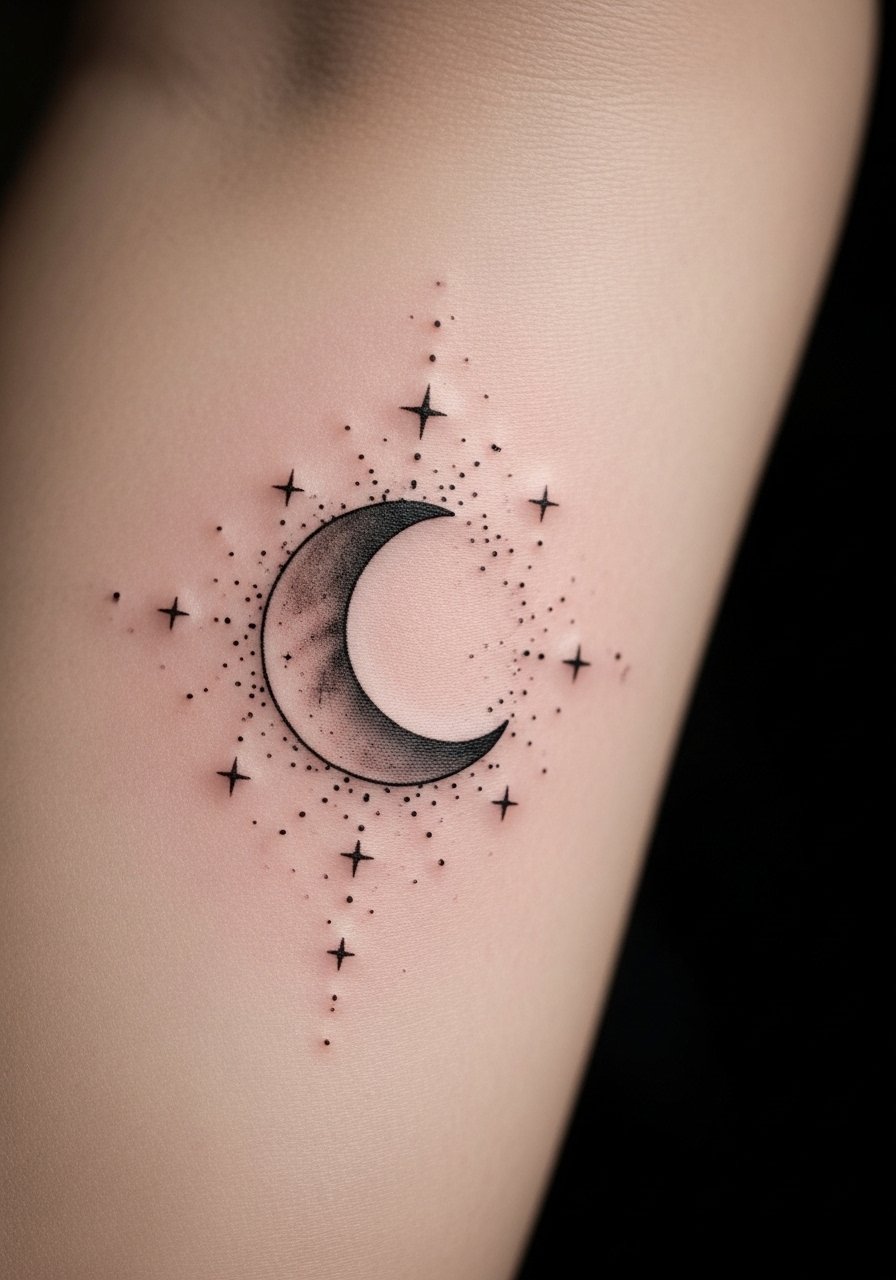
I remember spotting this style on an artist's portfolio and wanting the same on my arm. Micro-realism needs an artist who specializes in tiny gradients. Pain is low to medium on the inner forearm. Plan for a 45 to 90 minute session. Tell your artist you want crisp negative space around the moon so it reads from across a room. A common error is asking for micro shading without enough contrast. At six months the shading settles. At two years the soft halos can blur if the ink was too light. This is great for people who want a celestial symbol that still looks like a miniature painting.
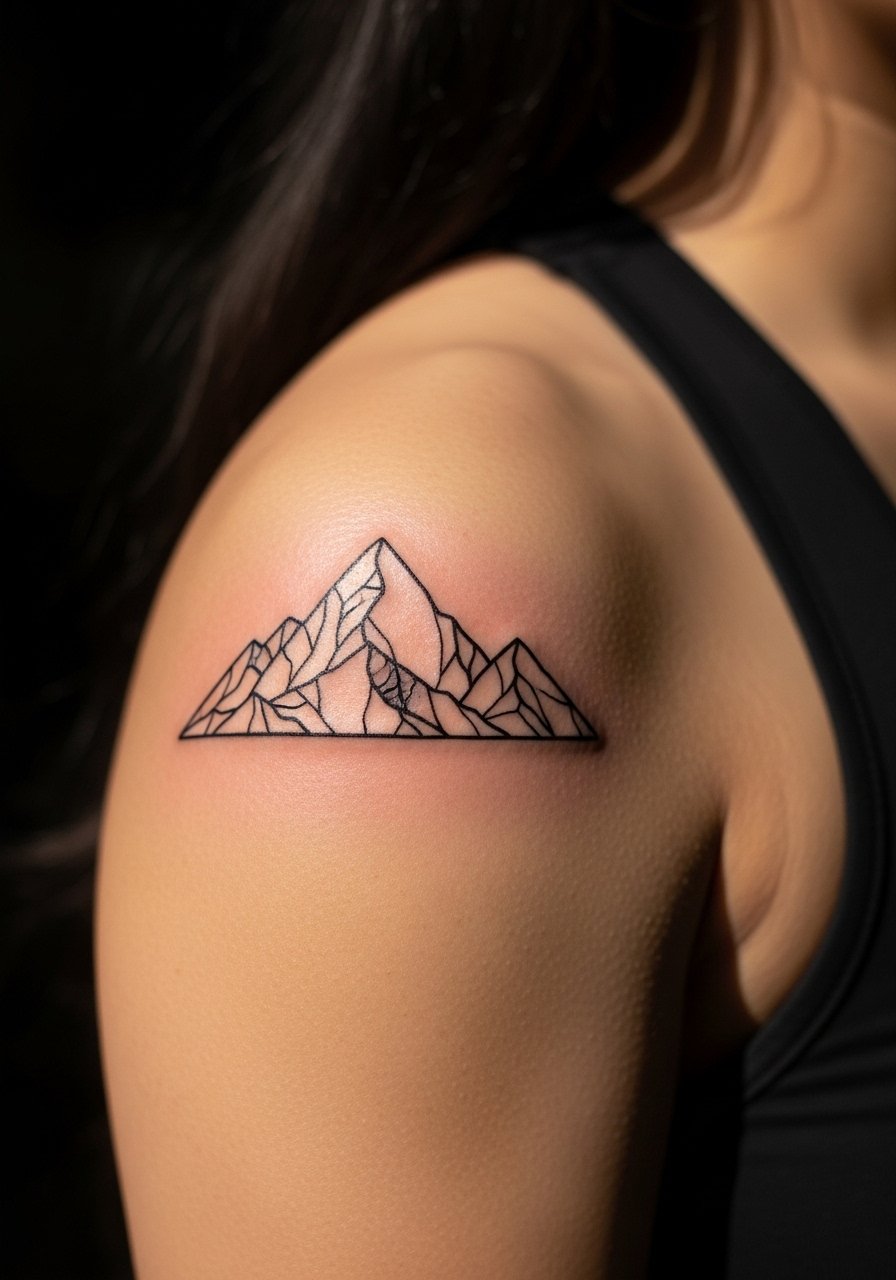
3. Minimalist Line Art Mountains on Ankle

The ankle is a flirtatious placement. Pain can spike over bone. I recommend this style for people who want a travel or nature nod that tucks into footwear. Sessions are usually under 30 minutes. What I see often go wrong is scaling the design too small. Tiny peaks get muddy after a year. Ask the artist to scale the peaks so each line has breathing room. For healing, keep movement low for the first 48 hours. At one year the lines will soften but still read as a landscape if done with honest line weight. This works better on ankles than the top of the foot for durability.
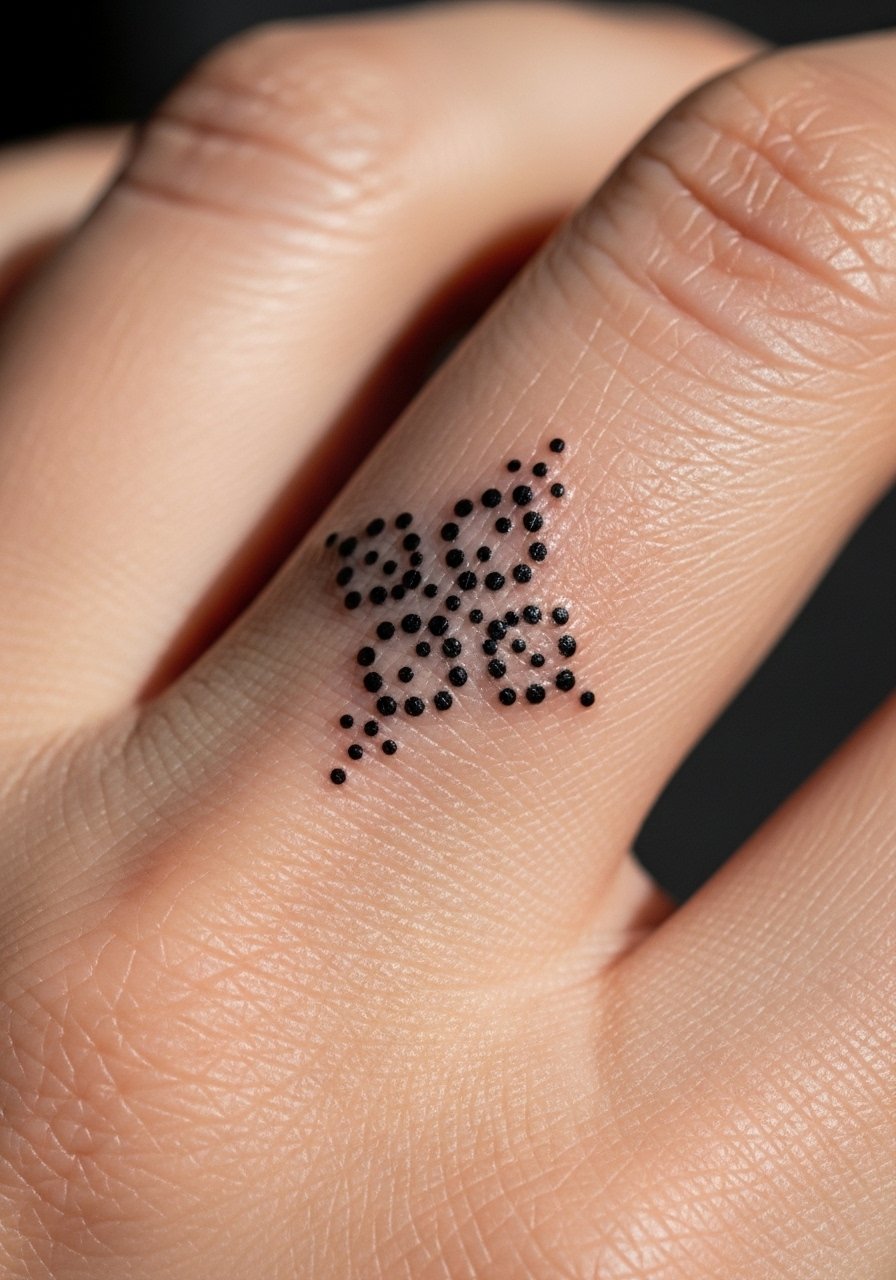
4. Blackwork Geometric Mandala on Spine
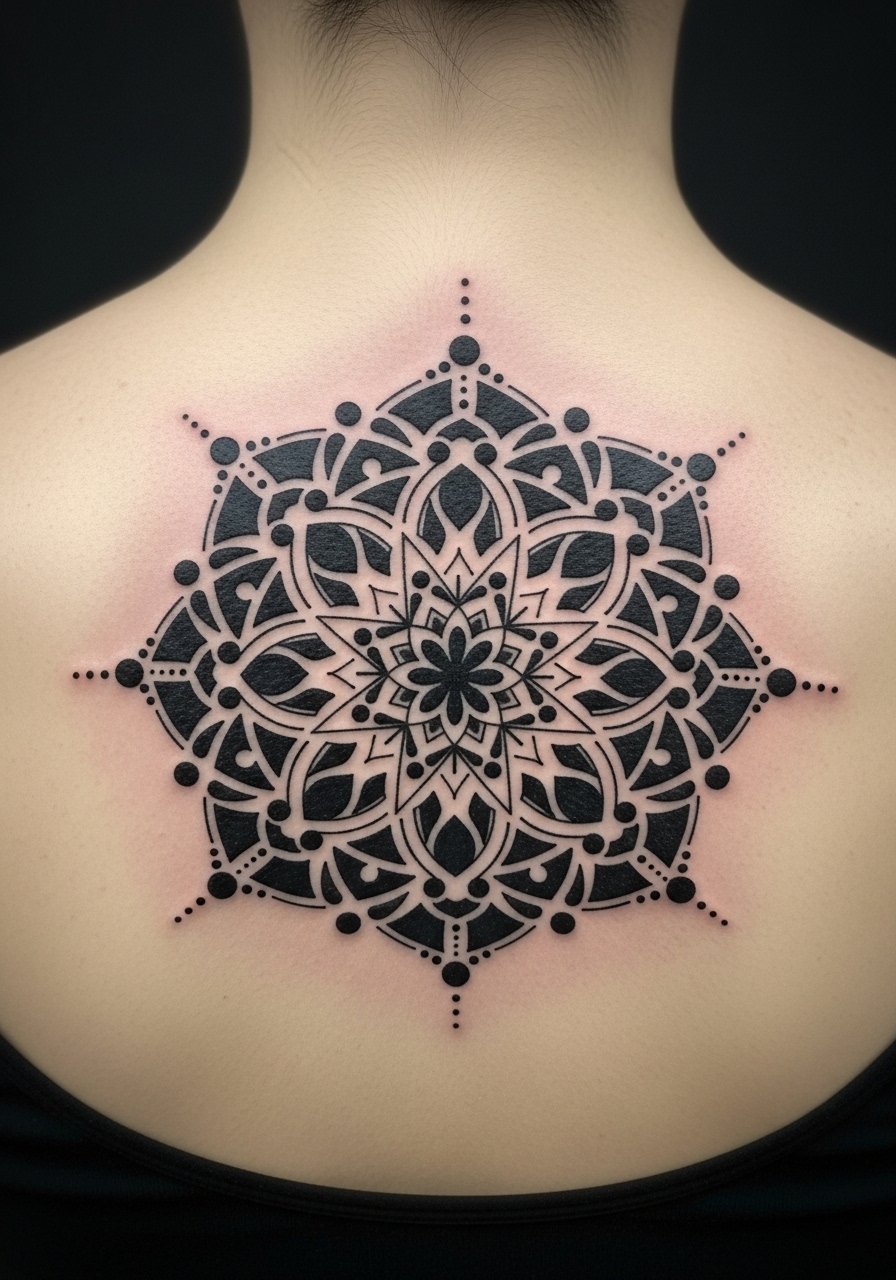
Fair warning, spine tattoos can be painful. That said, a narrow geometric mandala on the upper spine looks architectural and intentional. Sessions vary from 60 to 120 minutes depending on complexity. I tell artists I want crisp dotwork and consistent line weight. The common mistake is crowding the center with too many tiny details. Those elements fade first. After six months, contrast returns as scabbed areas settle. After two years the blackwork holds well if the lines were bold. This is best for collectors who want a vertical statement that pairs well with collars and open-backed tops.
5. Single Needle Script Behind Ear
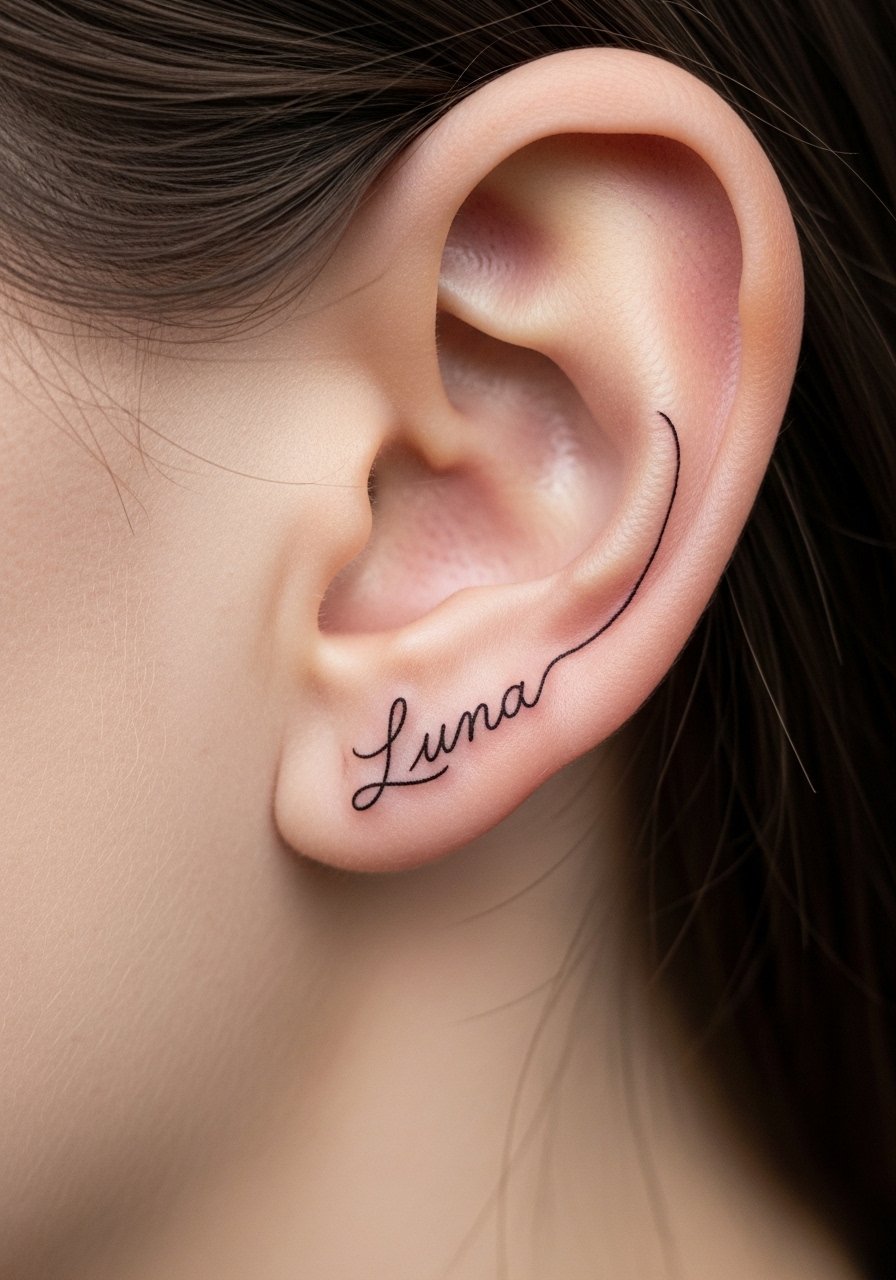
Behind the ear is intimate and frequently chosen for tiny script. Pain is moderate because of thin skin. Sessions are short, often 15 to 30 minutes. I've noticed many people ask for ultra-fine script that disappears after a year. Avoid hairline strokes. Tell your artist the exact word and the letter height you want. I asked for the name "Luna" in a slightly bolder micron than typical. After six months the letters will soften. After two years you may need a refresh, especially if you wear hats or expose the area to sun. This placement reads like a secret if you want something small and personal.
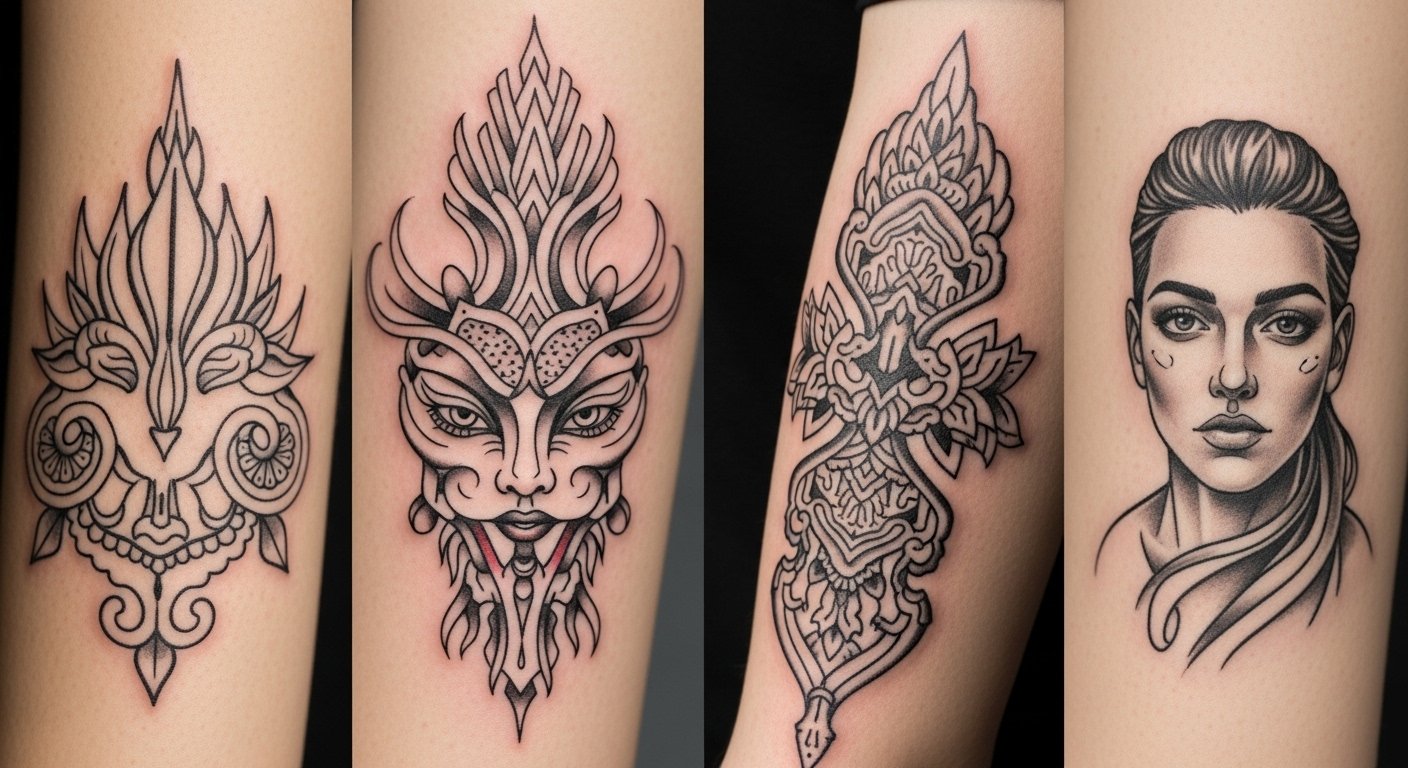
6. Micro Portrait on Inner Bicep

I was skeptical of portraits this small until I saw one nailed by a specialist. Inner bicep is forgiving because it hides and stretches. Expect medium pain and a 60 to 120 minute session. Tell the artist you want recognizable features at 2 to 3 inches across. The mistake I see is compressing too much detail into a tiny space. That causes blending over time. At six months the portrait should still read as a face. At three to five years the fine highlights may disappear without touch-ups. This is ideal if you want someone captured in a subtle, private way.
7. Negative Space Lunar Phase on Collarbone
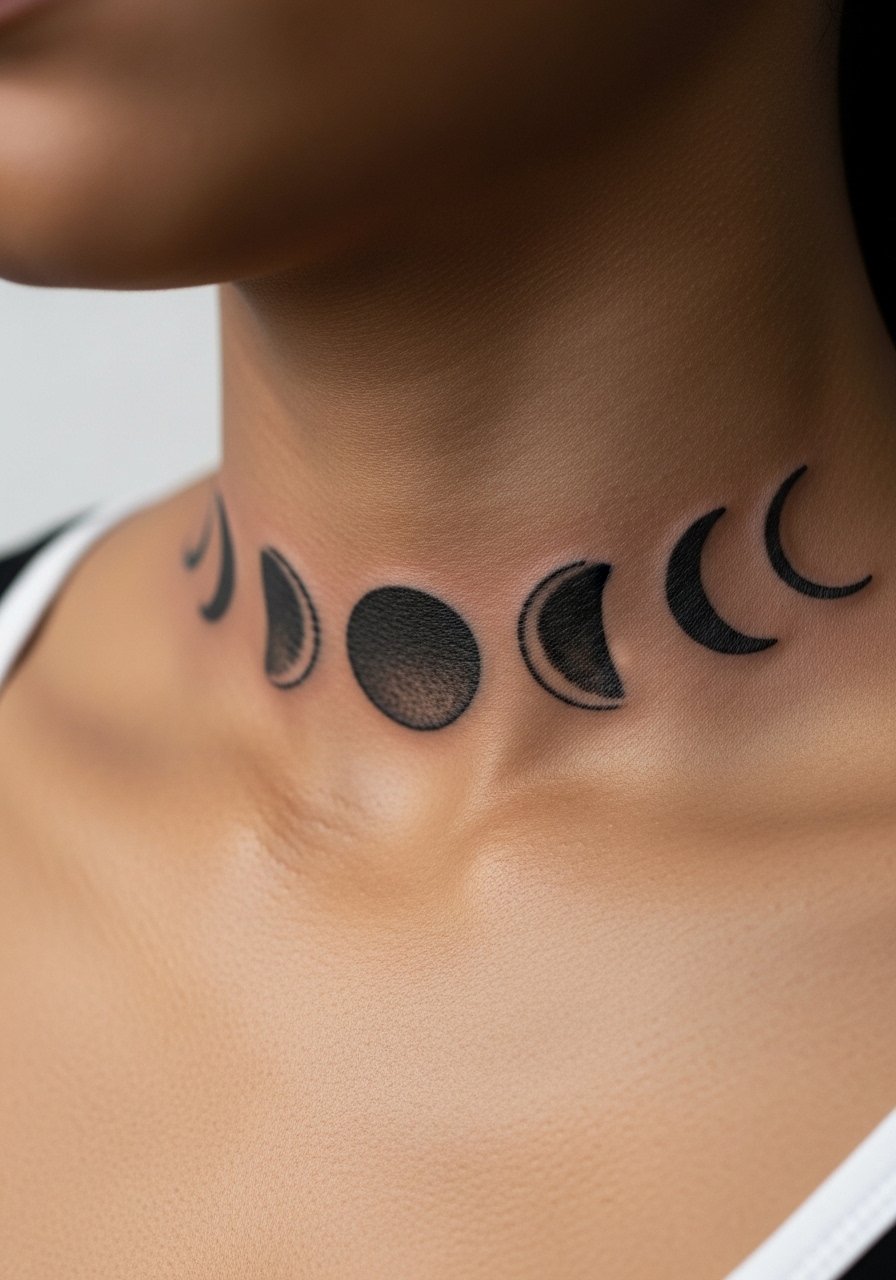
I love collarbone pieces because jewelry and clothing frame them. The collarbone can sting when needle hits bone. Sessions are often 30 to 45 minutes. I tell artists to use negative space for the waxing and waning phases so the skin becomes part of the design. A common mistake is adding too many tiny dots that blur into a line. At six months the negative space holds well if the artist avoided overworking the area. After two years, minor softening is normal. This suits people who want a horizontal visual that moves with necklaces and necklines.
8. Tiny Watercolor Splash on Shoulder Blade

Most watercolor tattoos fade faster than black line work. I like tiny watercolor splashes on the shoulder blade because they can be layered with a black line piece later. Pain at the shoulder blade is low to medium. Sessions take 30 to 60 minutes. Ask your artist to anchor the watercolor with a faint outline. That prevents it from turning into a blotch after healing. From what I've seen, saturated reds and pinks fade unevenly if the ink sits too superficially. At six months the color will mellow. After two years you may need a color refresh. This is great if you want an artistic pop that still reads as painted skin.
9. Continuous Line Face on Forearm
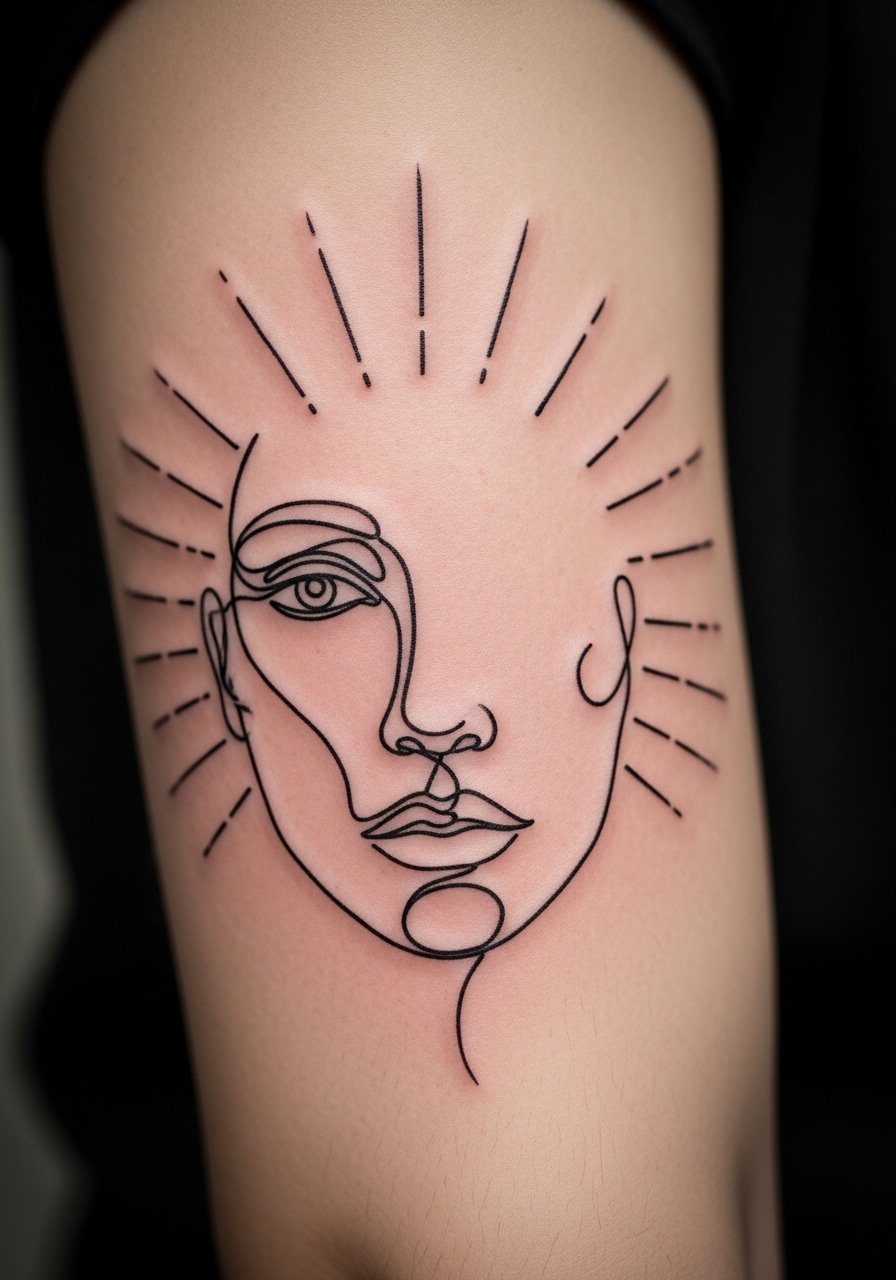
I first fell for continuous line work in galleries. On the forearm it becomes wearable art. Expect low to medium pain. Sessions are quick, usually under 45 minutes. Tell your artist you want a single unbroken trajectory with varying pressure only for emphasis. The common error is too many micro zigzags to disguise shakiness. Those look messy after healing. At six months the line should retain its shape. After a couple of years thin parts can fade more than thicker strokes. This suits people who want an artsy, modern piece that still feels minimalist.
10. Dotwork Crescent on Ribcage
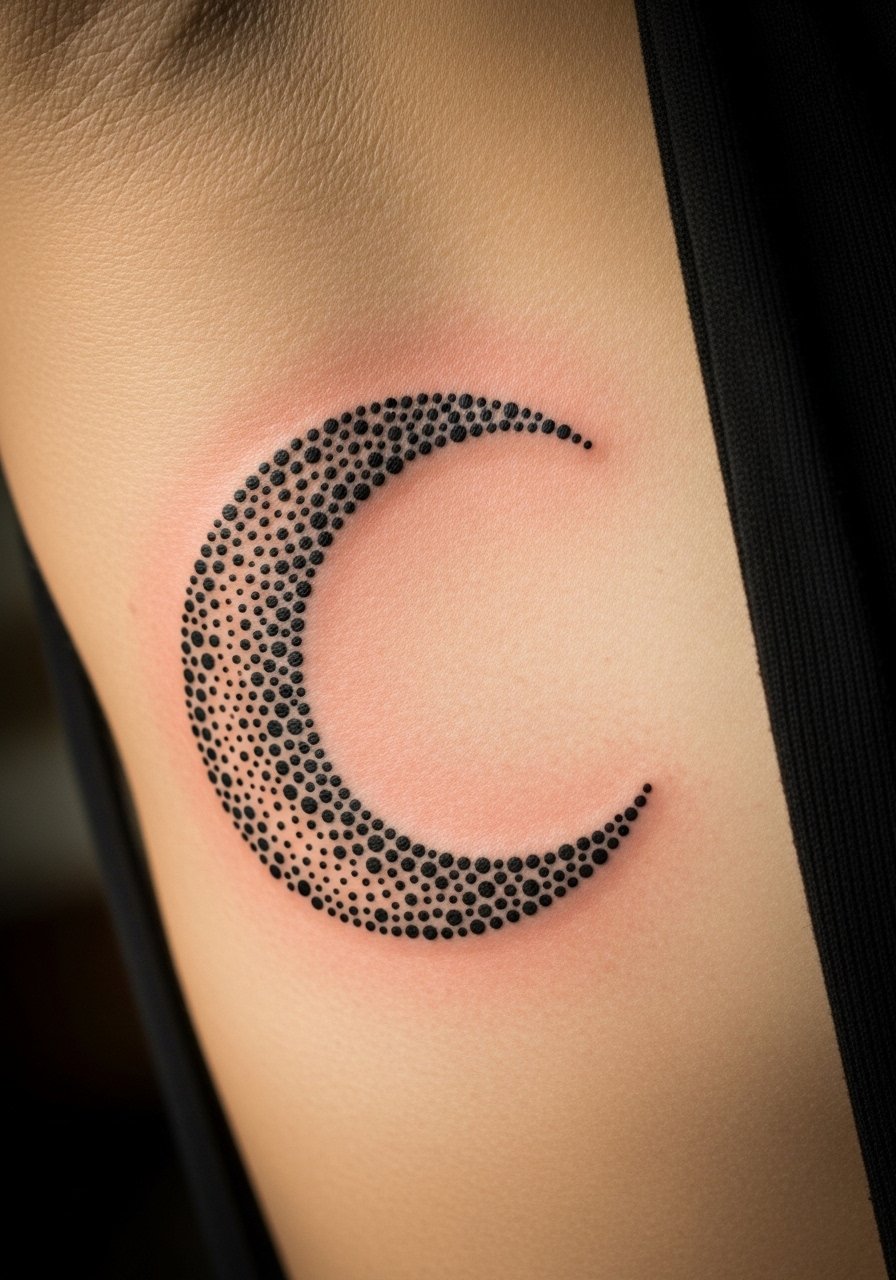
Fair warning, ribcage tattoos hurt. People choose dotwork there for texture and gradual shading. Plan for 60 to 120 minutes. I always tell the artist to build the density in passes so skin recovers between sessions. A frequent mistake is trying to cram heavy dot density into a single pass. That leads to blowouts. At six months the dots settle and look soft. After two years the silhouette holds well if the dots were spaced properly. This is for someone comfortable with higher pain for a detailed, tactile finish.
11. Minimalist Animal Silhouette on Ankle
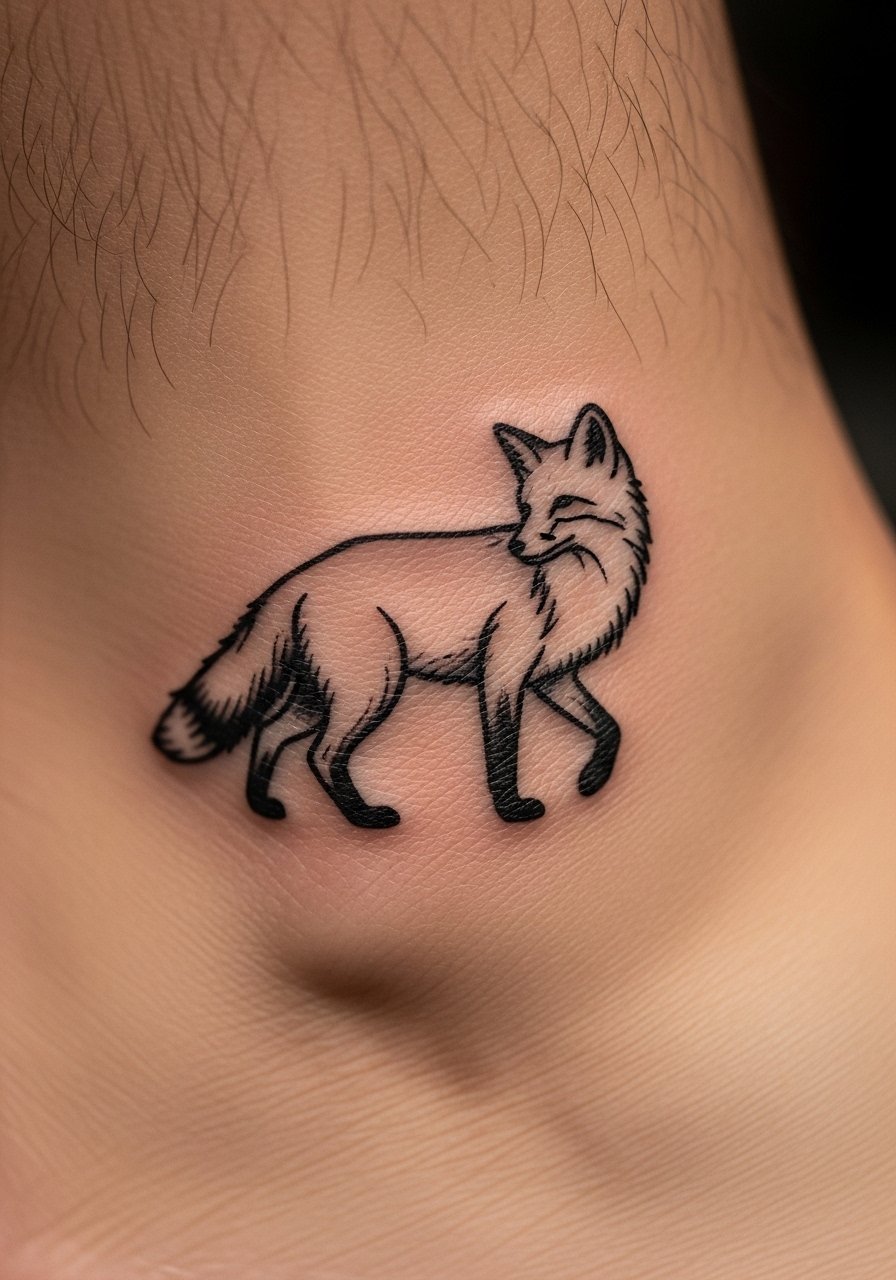
I recommend silhouettes for collectors who want symbolism without detail. The ankle is a good spot if you want something fleeting. Pain over the ankle bone hits harder. Sessions are 20 to 40 minutes. Tell your artist to keep negative space around the silhouette to prevent edge bleeding. The mistake I see is shrinking the silhouette too small. After a year tiny silhouettes can lose crisp edges. At six months a well-executed silhouette still reads bold. This is perfect for people who want a graphic animal mark rather than a realistic depiction.
12. Micro Mandala Behind Knee
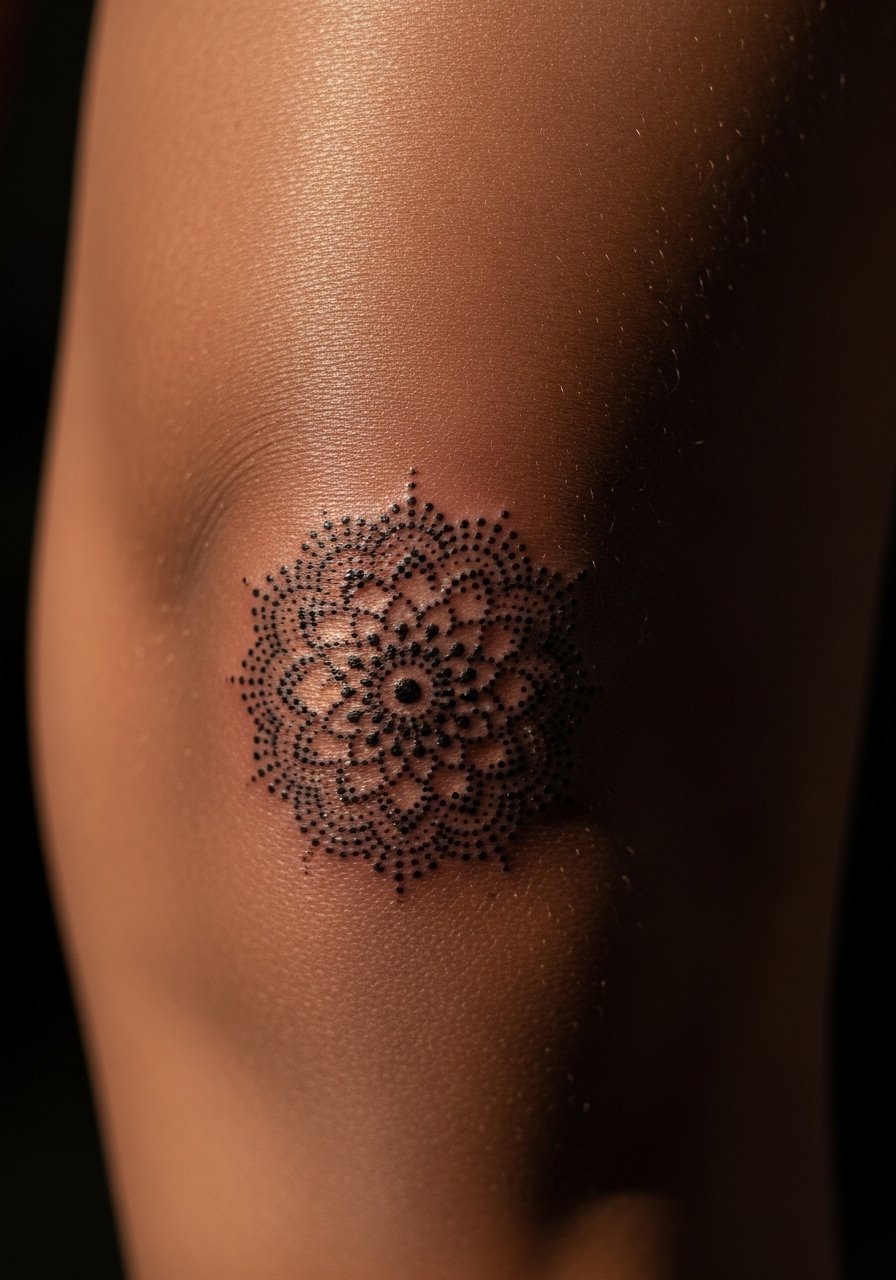
Behind the knee is an unconventional canvas. Pain spikes when the needle hits the joint and the area moves a lot during healing. Expect 45 to 90 minutes. I recommend low-profile mandalas that avoid extremely thin spokes. The biggest mistake is over-detailing. That density falls apart as the skin stretches. At six months the piece will soften but keep its form. After three years fine spokes might blur. This location suits someone who wants an intimate, dynamic tattoo that appears when sitting or bending.
13. Minimalist Constellation on Upper Back
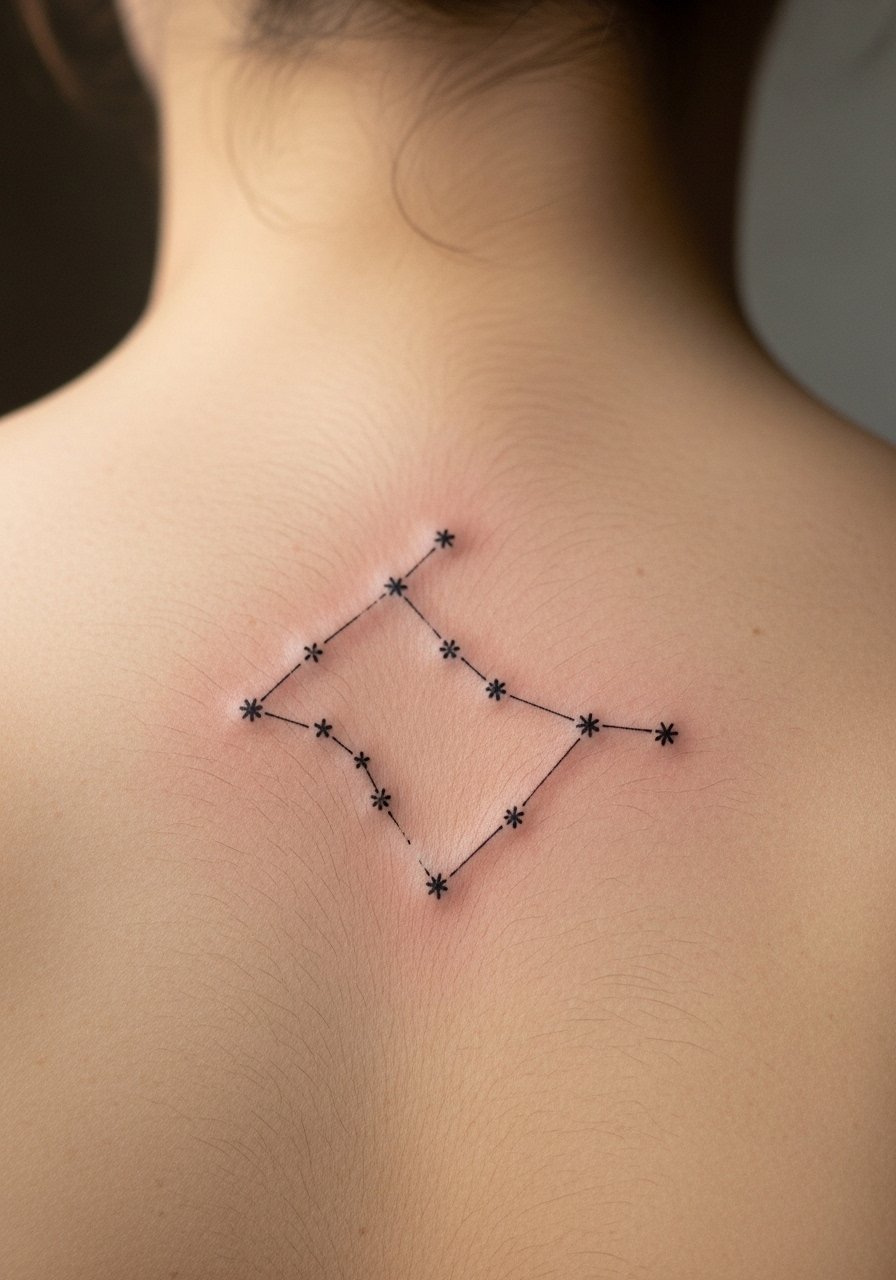
I picked the upper back for constellations after seeing them peek from swimwear. Pain is low to medium. Sessions are 30 to 60 minutes. Ask for slightly larger star dots so they keep contrast over time. A common error is using hairline connectors. Those fade first and leave isolated dots. At six months the pattern should still read as a constellation. After two years line connectors may lose some definition but larger dots hold. This placement works well for people who want something shareable but not constantly visible.
14. Minimalist Eye on Inner Wrist
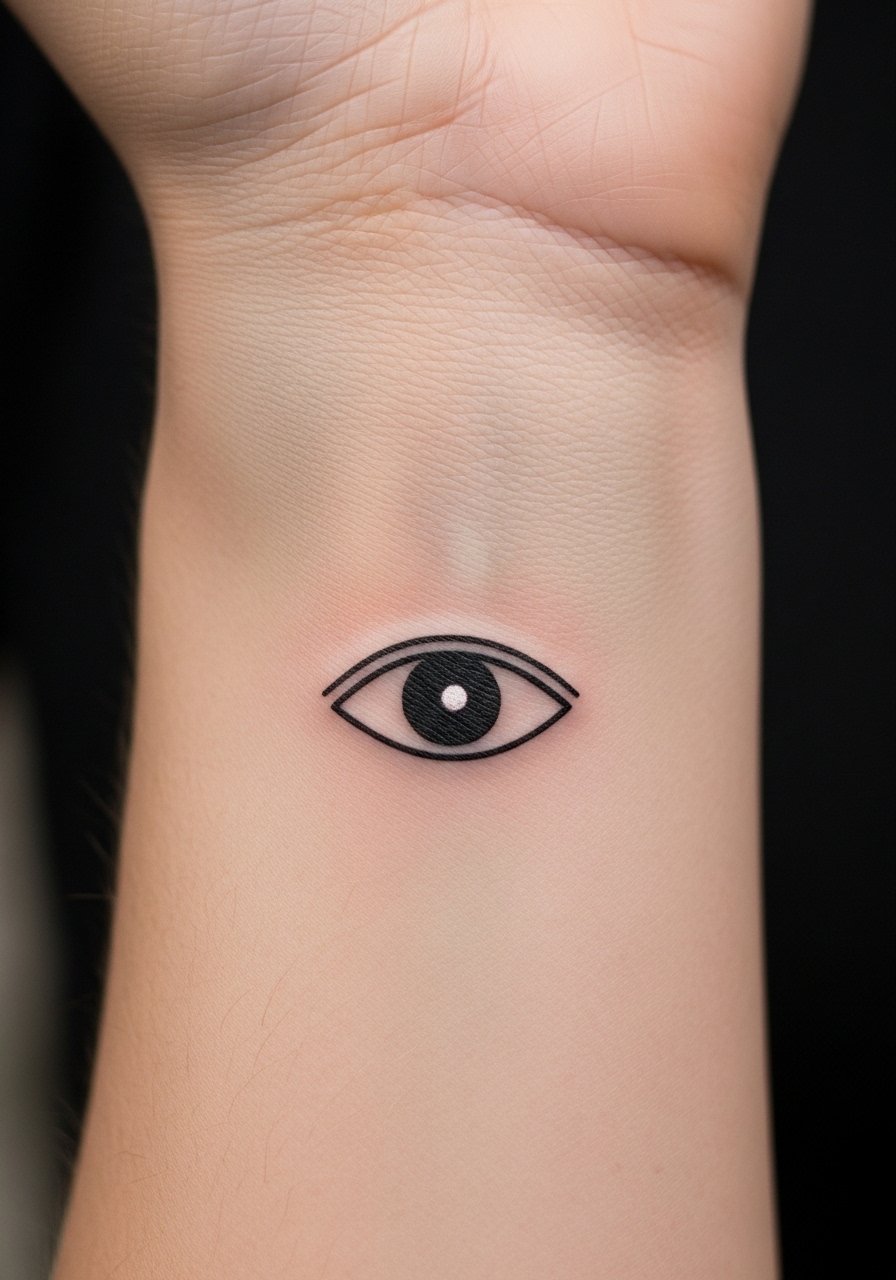
The inner wrist is one of the most visible spots. Pain is low to moderate. Sessions usually last 20 to 40 minutes. I often advise clients to request a reinforced pupil or thicker lower lash. Thin lashes disappear. Many ask for intricate lashes that do not age well in such a mobile area. At six months the eye will keep its shape if the line weights were considered. At two years, expect some softening. This style reads as a symbol on bracelets and watches, so plan scale accordingly.
15. Tiny Abstract Shapes on Fingers
Fingers are notorious for fading. I only recommend small, bold shapes here, not micro-detail. Pain is moderate and sessions are quick. Ask the artist to use bold blocks rather than hairline strokes. The mistake I see is requesting micro scripts on fingers. They blur into illegible smudges within a year. At six months bold shapes still read well. At two years they may need touch-ups annually. This is good for someone who wants a tactile, wearable accent that will require maintenance.
16. Minimalist Arrow on Ribcage

Ribcage is a love-it-or-hate-it placement for pain. Arrows look crisp there when scaled up slightly. Sessions are short, 30 to 45 minutes. I tell artists to leave slight gaps in the shaft to avoid ink pooling. The biggest error is making the shaft too thin. Thin shafts kink and blur as skin moves. At six months the arrow should keep a linear feel. After two years, thin areas fade faster. This work is great for someone who can sit through discomfort for an elegant directional motif.
17. Minimalist Wave on Ankle
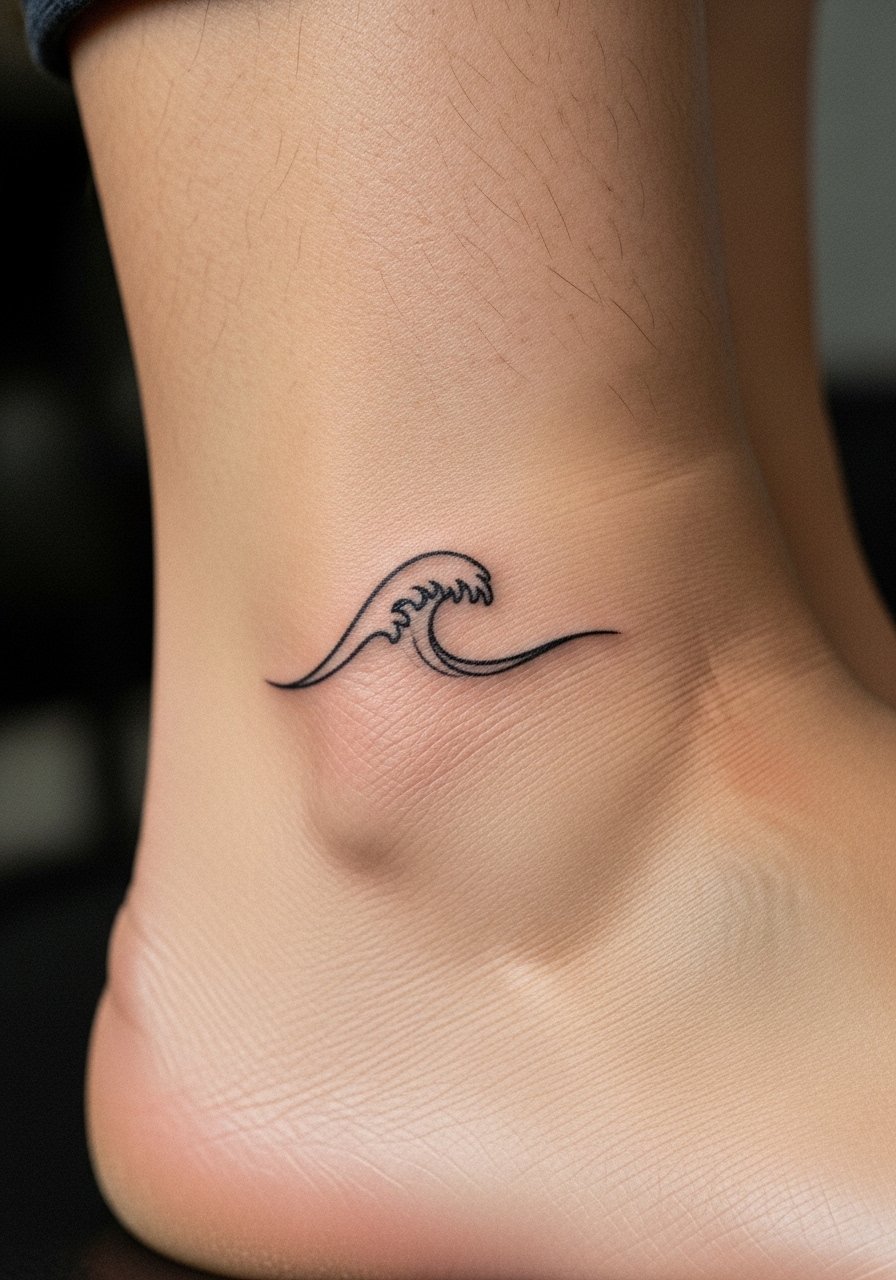
I noticed surfers favor ankle waves because they peek above sandals. The pain is moderate. Sessions are quick. Ask for a bold midline curve so the wave reads from a distance. Too many small curls look soft as they age. At six months the wave keeps its flow. At two years minor softening appears but the shape remains. This is a good pick for people who want a subtle nod to the ocean without a full sleeve or large back piece.
18. Negative Space Heart on Sternum
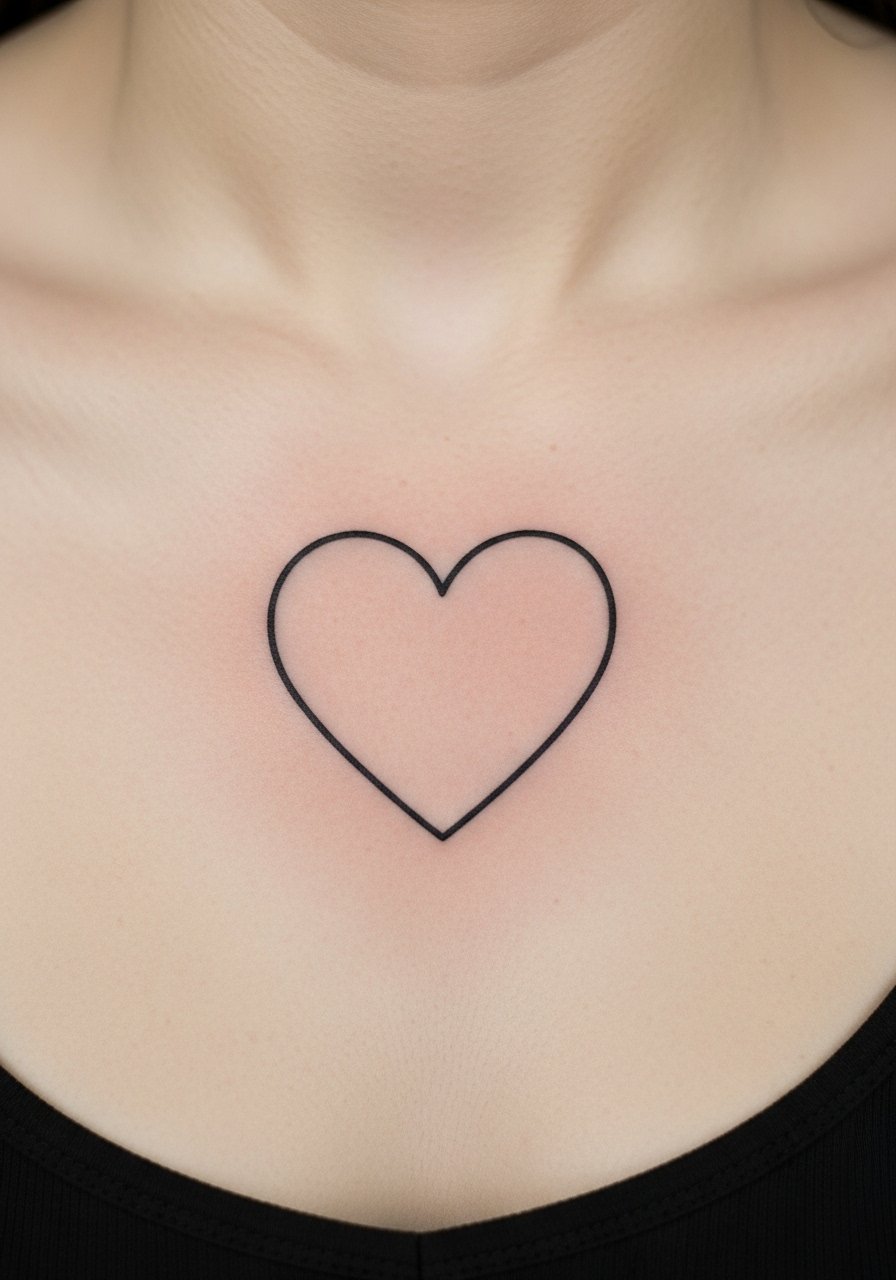
Sternum pieces can hurt because the area is bony and sensitive. Negative space hearts work here because they use the chest's natural plane. Sessions vary from 30 to 60 minutes. Tell the artist you want a comfortable border width. Too thin an outline will blur into a smudge over time. From what I've seen, negative space done right ages better than full fill in this area. At six months the heart reads as crisp. After a couple of years, a touch-up can restore the edge if needed. This choice fits people who want a centered, intimate symbol under clothing.
19. Minimalist Arrow Behind Ear
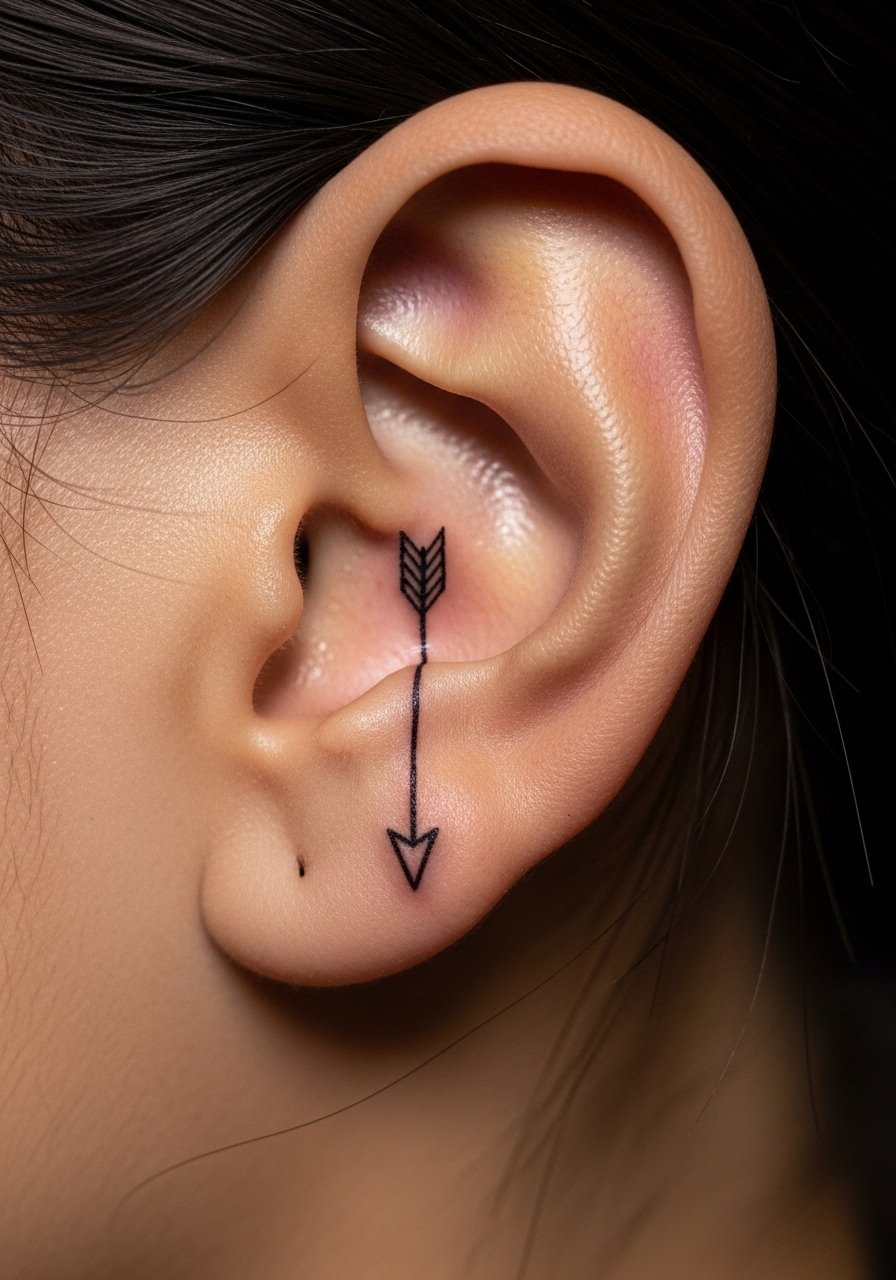
Behind the ear surprises people because it looks delicate yet visible when hair is up. Pain is mild. Sessions last 10 to 20 minutes. I recommend slightly thicker shafts to prevent fading. A common mistake is asking for dotwork or shading in that tiny space. Those details disappear quickly. At six months a simple arrow still reads. At two years, expect some blurring if you expose the area to significant sun. This placement is for people who want a hidden accent that appears when styled right.
20. Minimalist Mountain Range on Shoulder
Shoulder tattoos benefit from muscle tone and movement. Mountains look great there and can extend if you choose. Pain is low to medium. Plan for 30 to 60 minutes. I tell artists to leave space between peaks so each retains definition as skin shifts. The error I see is compacting peaks too tightly. After a year, compressed peaks blend. At six months the range remains legible. This style is ideal for someone who wants a visible landscape that pairs with future sleeve work.
21. Micro Realism Flower on Ring Finger
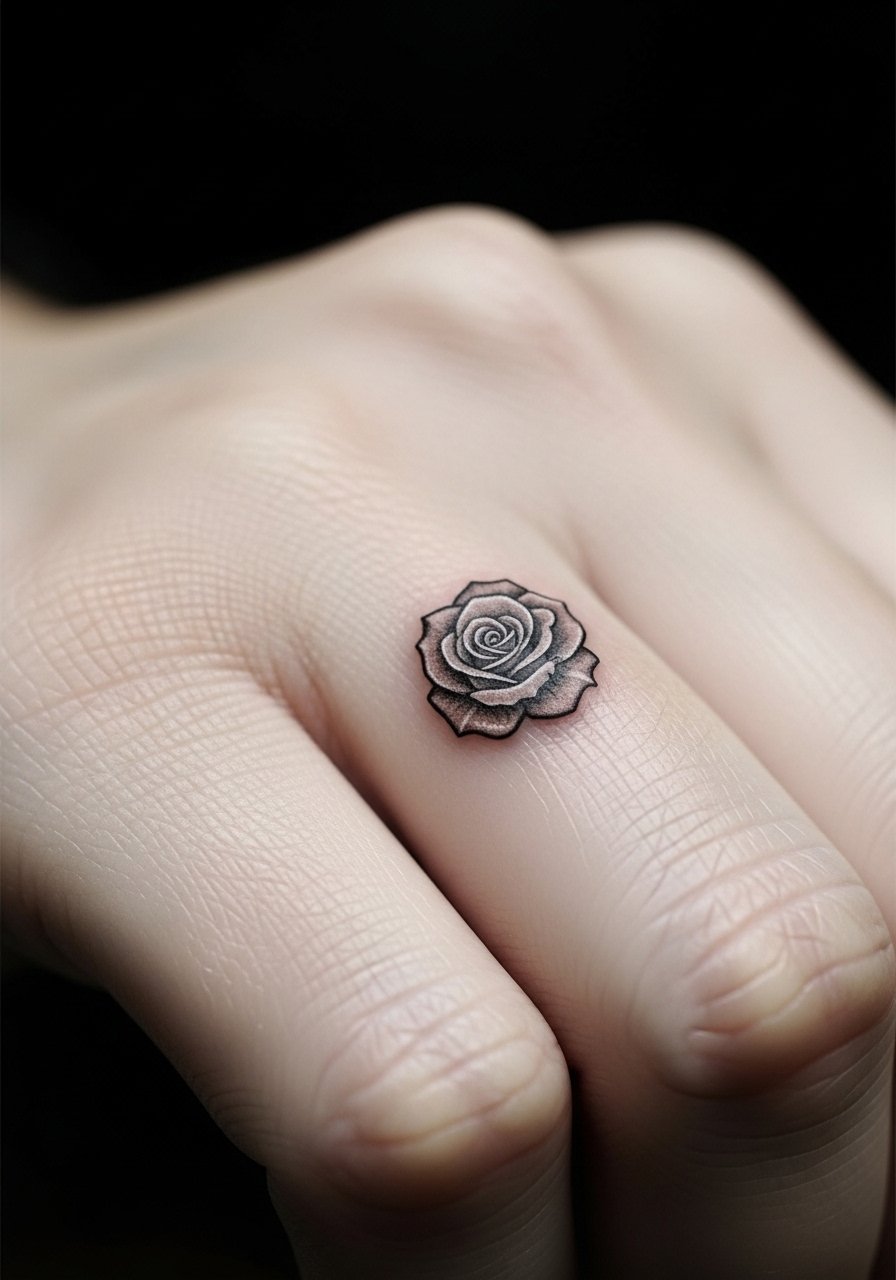
Finger micro-realism requires an expert touch. I advise caution. Pain on fingers is moderate. Sessions are typically 20 to 30 minutes but may need repeats. Ask for simplified shapes rather than full-blown gradation. Too much micro shading on a finger becomes a blurred blob. At six months a simplified flower holds its form. After two years, expect fading and potential spreading. This is for someone prepared for yearly maintenance and who values a delicate, tactile symbol on their hand.
22. Minimalist Compass on Calf
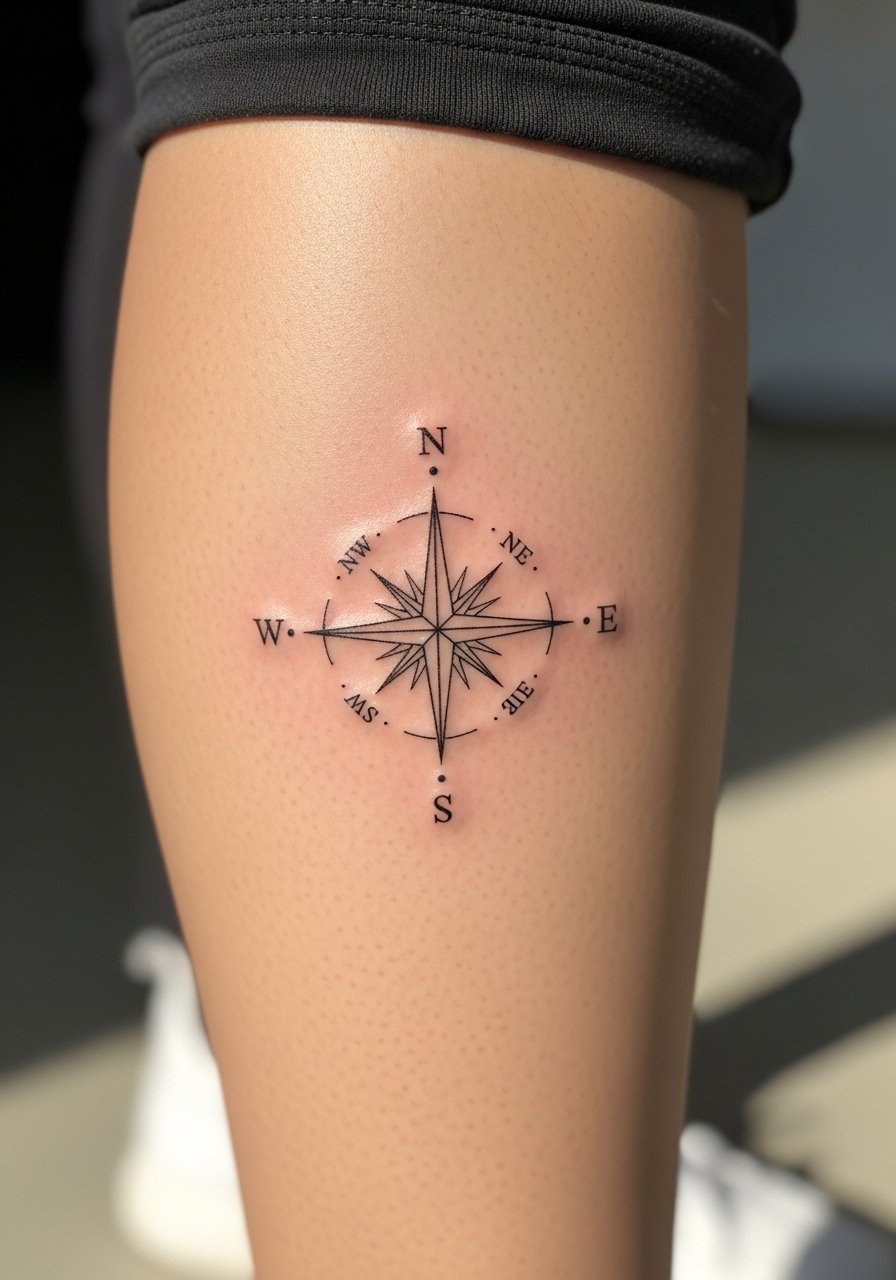
Calf tattoos sit well with clothing and show in shorts. Pain is low. Sessions run 45 to 90 minutes depending on scale. I recommend a medium-sized compass with clear cardinal points. The mistake I often see is shrinking the letters or using tiny directional markers. Those details disappear. At six months the compass center should remain clear. At three years, minor softening happens but the graphic shape stays intact. This placement works for travelers who want a larger minimalist symbol without chest or arm visibility.
23. Minimalist Script on Ribcage
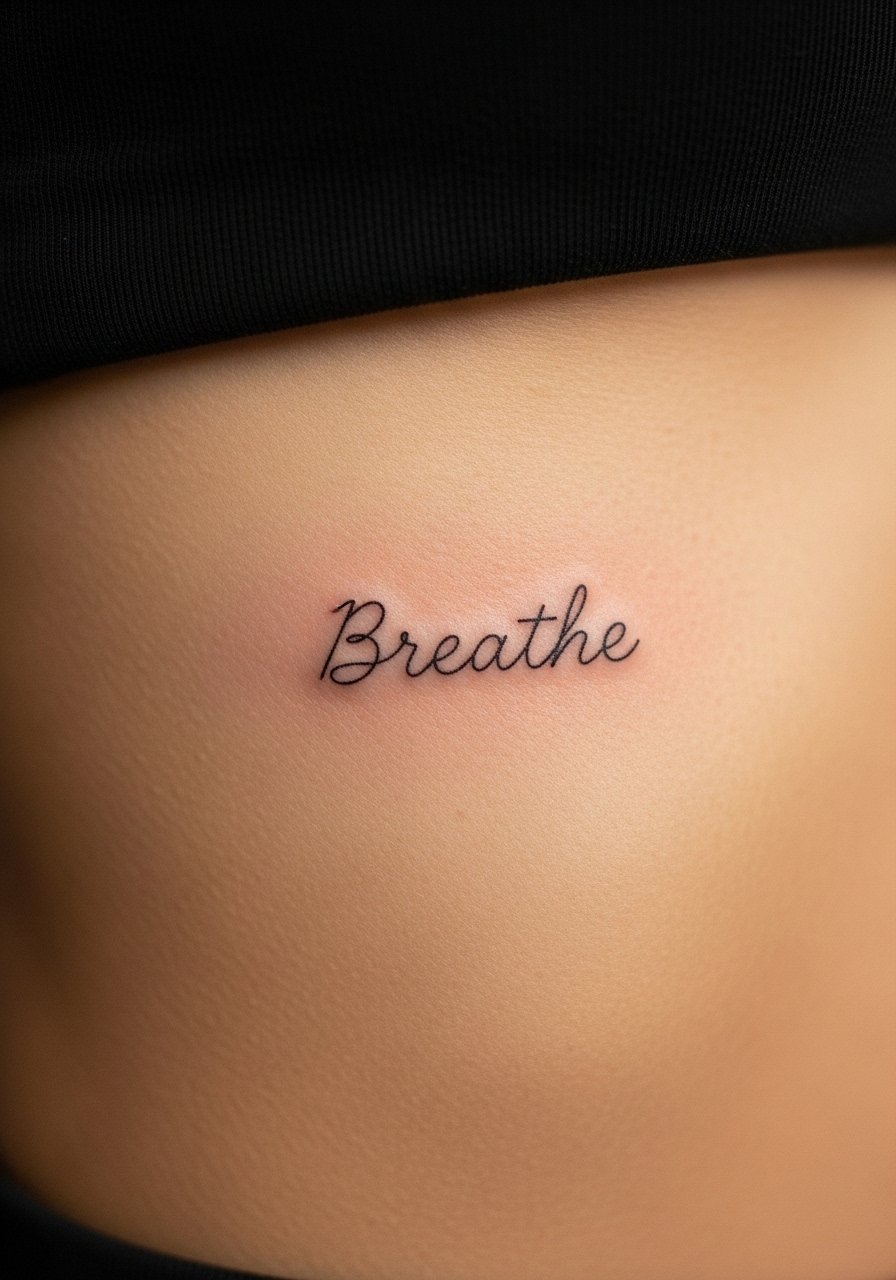
I picked ribcage script because it can be a private motto. Pain is high here. Sessions are short, often 15 to 30 minutes. I always advise clients to choose slightly bolder stroke widths for ribcage scripts. Tiny, hairline letters will blur into a single line over time. Ask your artist to write the script on tracing paper so you can see spacing and height. At six months it should read clearly. After two years, thin areas may require touch-ups. This placement suits someone comfortable with pain for a meaningful, intimate text.
Tattoo Prep and Aftercare Essentials
Healing supplies matter. I have a drawer full of aftercare kits from artists and friends. Below is what I actually use and what most artists I know recommend. Replace YOURTAG with tattooengineer-20 in all links.
Healing Essentials:
- Aquaphor Healing Ointment, 14oz tube. Industry standard for first three to five days. I use a thin layer at night
- Saniderm Transparent Adhesive Bandage, 6-inch roll. Second skin healing method. Every artist I've talked to recommends it for the first 24 to 72 hours
- CeraVe Fragrance-Free Moisturizing Lotion. Daily moisturizer for days four to fourteen. I prefer the pump bottle for hygiene
- Dr. Bronner's Unscented Castile Soap. Gentle cleanser for rinsing twice a day the first week. Dilute a small drop with water
Before Your Appointment:
- Numbing Cream with 5% Lidocaine, 30g. Apply 30 to 45 minutes before your session only if your artist approves. Some artists prefer no numbing
- Tattoo Stencil Transfer Paper, A4 Pack. Useful if you want to test placement at home before your appointment
Long-Term Maintenance:
- SPF 50 Sunscreen Stick for Tattoos, Travel Size. Use on healed tattoos whenever they see sun. I carry one for beach days
- Mad Rabbit Tattoo Balm, 2 oz. Long-term maintenance for vibrancy. Artists I know recommend it for healed pieces
- Hustle Butter Deluxe, 5 oz. Vegan alternative that works during healing and after. Smells better than most aftercare
Optional Comfort Items:
- Tattoo Numbing Spray, 4 oz. Handy for touch-ups or sensitive areas mid-session
- Hydrocolloid Bandages, Large Size. Good alternative to Saniderm for small to medium tattoos
I grouped items by use. Use Aquaphor or a recommended ointment in the first days. Switch to fragrance-free lotion after the initial scab phase. Apply sunscreen to healed pieces always. Artists I follow swear by Saniderm for the first day or two. Try one method then adjust based on how your skin reacts.
Frequently Asked Questions
Q: Will fine line tattoos blur into each other if I get a full sleeve?
A: In my experience, fine line sleeves need breathing room. If you try to pack too many hairline elements into a sleeve it tends to blur into a wash after a few years. Ask your artist to plan negative space between motifs and to use slightly heavier terminal strokes. Consider occasional bolder anchor pieces that keep the composition readable. For post-healing maintenance I use Mad Rabbit Tattoo Balm, 2 oz to keep lines defined.
Q: Do watercolor-style tattoos need different aftercare than traditional ones?
A: From what I've seen, watercolor tattoos fade faster because they rely on subtle color transitions. The aftercare is similar at first, but long-term care matters more. Use SPF regularly on healed watercolor pieces. I also recommend SPF 50 Sunscreen Stick for Tattoos, Travel Size for touch-ups in your bag. If your watercolor includes very light pigments, plan on touch-ups after a couple of years.
Q: Are finger and knuckle tattoos worth it for minimalist art?
A: Finger and knuckle tattoos are striking but high maintenance. I have seen many minimalist designs blur on fingers within a year when artists use hairline strokes. If you want finger art, ask for bold shapes or simple symbols. Expect touch-ups. Hydrocolloid bandages during healing help prevent early scabbing issues. I use Hydrocolloid Bandages, Large Size for small hand pieces when advised.
Q: How should I ask my artist for a micro-realism portrait to ensure it ages well?
A: Tell your artist the final size you want and ask to see previous healed examples at that scale. Request simplified focal points so the portrait keeps identity without unnecessary micro detail. I always ask for slightly stronger midtones so the face reads after six months. For healing, follow standard cleansing and moisturization. A light layer of Aquaphor Healing Ointment, 14oz tube for the first nights works well for me.
Q: Will negative space designs hold up on the collarbone and sternum?
A: Yes, negative space can hold up nicely if the outline around the negative area is planned with adequate width. I have seen negative space fail when the outline was hairline thin. Ask your artist to test the negative area at the stencil stage so you can visualize breathing room. For the sternum, expect more pain and slightly longer initial redness. Aftercare with fragrance-free lotion keeps the edges crisp as they heal.
Q: How long before I can exercise after getting a ribcage or shoulder tattoo?
A: From what I've gathered, most artists I talk to recommend waiting at least 48 to 72 hours before light exercise, and longer for heavy movement that stretches the area. For ribcage tattoos give your body a full week for basic healing before intense core workouts. During the first week use a gentle cleanser like Dr. Bronner's Unscented Castile Soap to rinse and keep friction low.
Q: Which aftercare bandage do artists actually recommend for new tattoos?
A: Many of the artists I know prefer a short Saniderm application for the first 24 to 72 hours, then open air care with gentle soap and a thin layer of ointment. Saniderm helps with fluid control and lowers the chance of picking scabs. If you prefer dressings, I use Saniderm Transparent Adhesive Bandage, 6-inch roll when advised.
