
I spent months collecting guitar tattoo photos and talking to artists before committing to my own instrument ink. The real snag wasn't picking a guitar — it was picking a style that actually looks good healed. These 24 guitar tattoo ideas reflect what I've seen age best and what artists in 2026 are still excited to tattoo.
This list focuses on styles that suit guitar imagery: fine line, neo-traditional, micro-realism, and blackwork. These designs work well on forearms, ribs, chest, and legs. From what I've seen, soundwave and minimal silhouettes are trending, but classic neck-and-body pieces still age the best.
1. Fine Line Classic Acoustic on Inner Forearm
Style/Technique: Fine Line / Illustrative
Pain Level: Low-Medium (3-4/10)
Session Time: 1-2 hours
Best For: First tattoo, visible placement
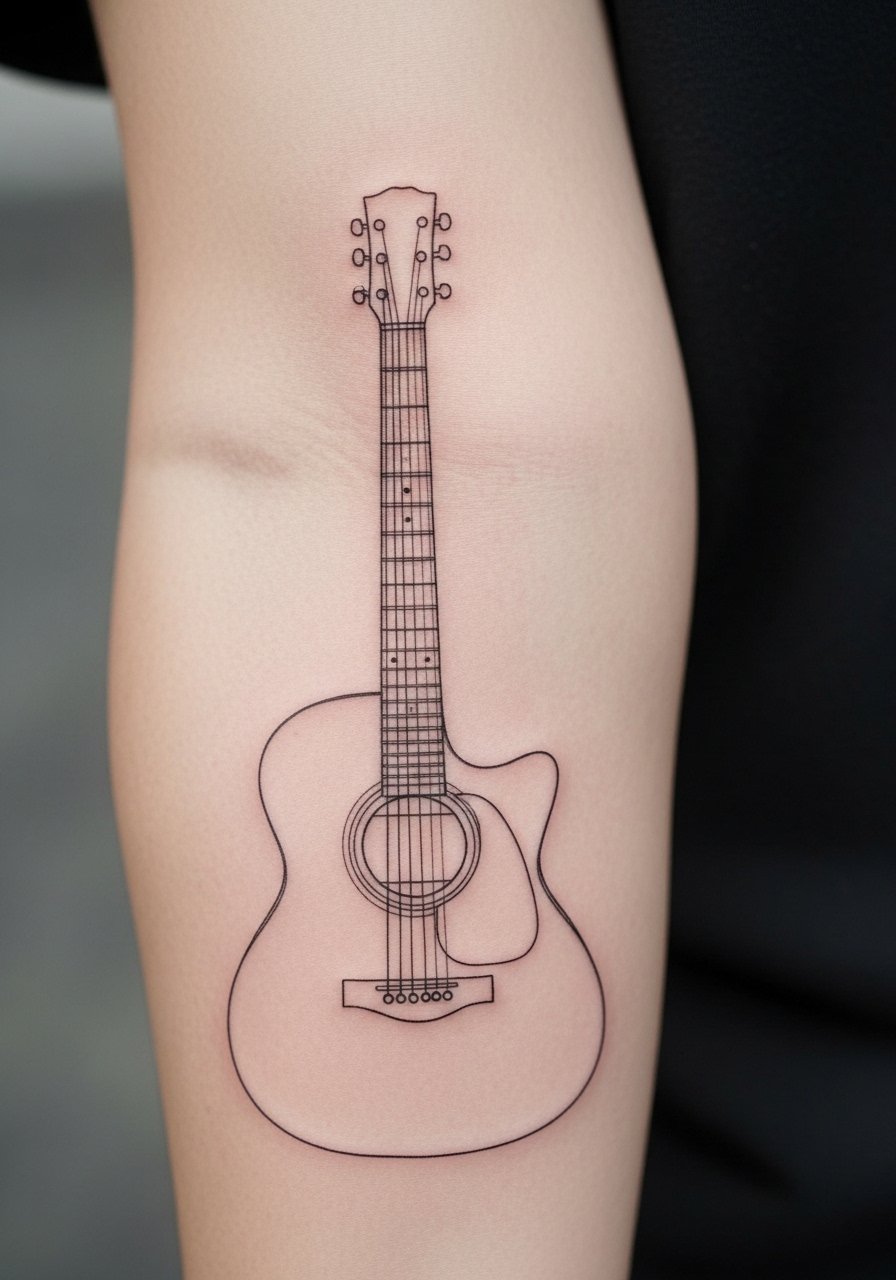
I love how a fine line acoustic reads like a sketch. It feels personal and minimal, great for someone who plays. Inner forearm is forgiving for detail and easy to cover. Expect light soreness for a day or two and surface healing in 2–3 weeks. Fine lines blur faster if too dense; ask your artist for slightly thicker main lines to help longevity. I’ve noticed artists skilled in micro-line or illustrative work make these hold up best.
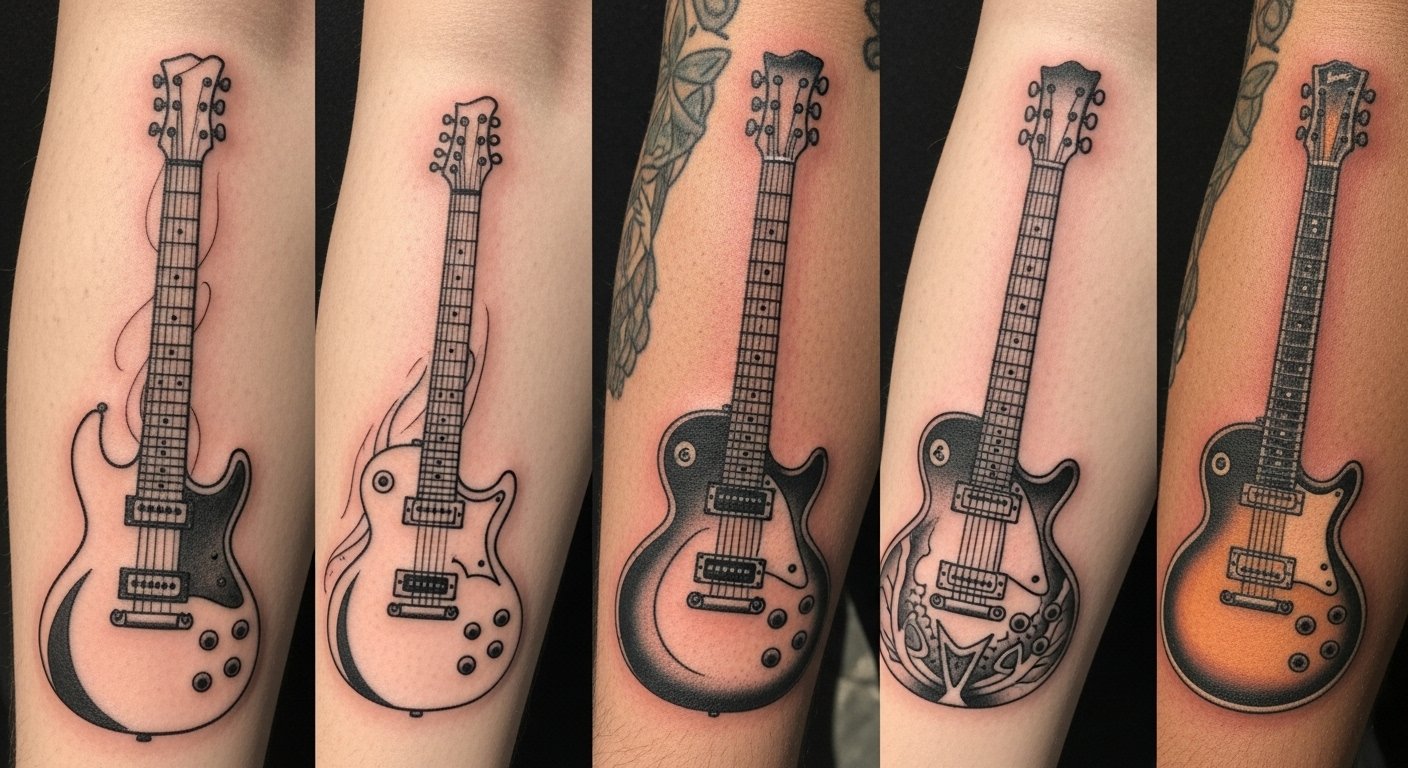
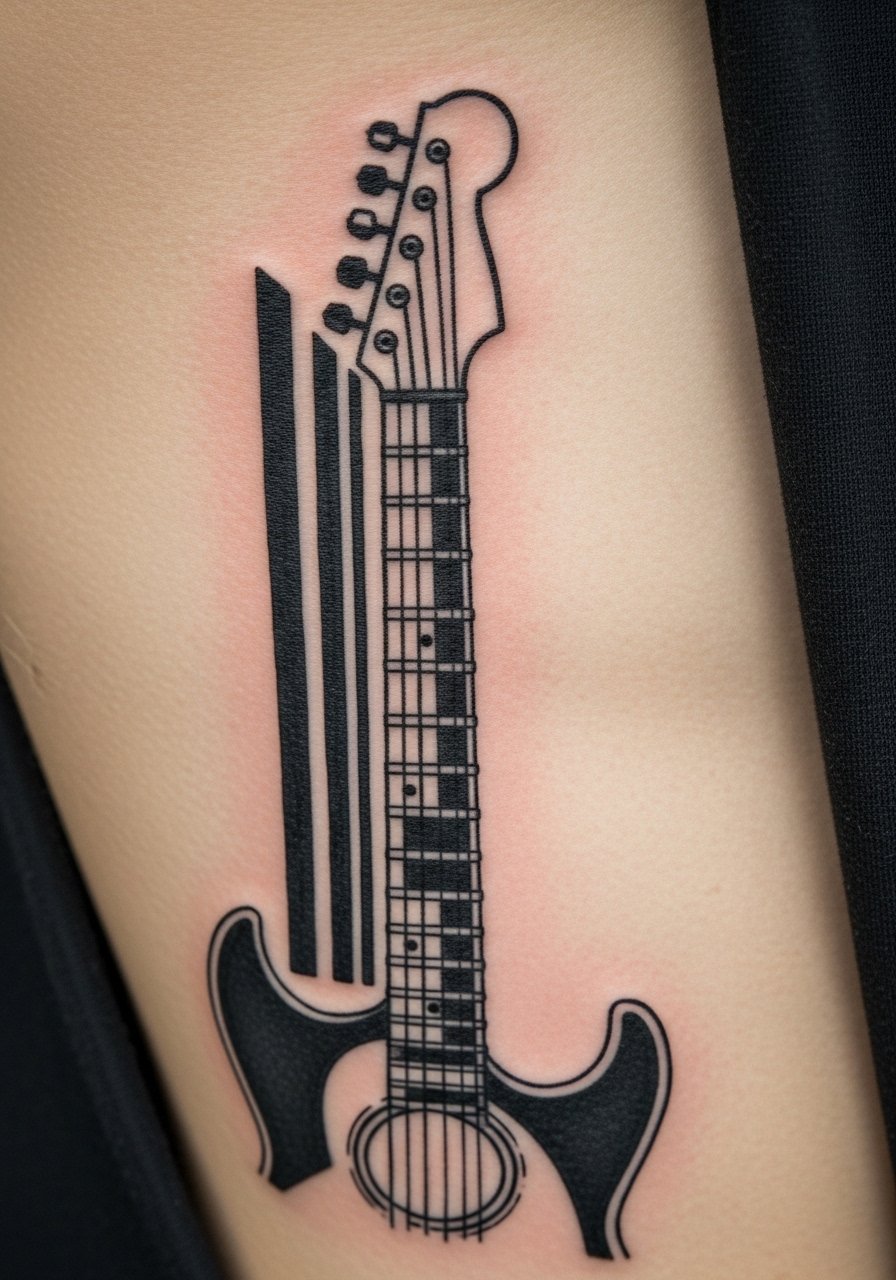
2. Neo-Traditional Electric on Upper Arm
Style/Technique: Neo-Traditional / Color
Pain Level: Low (2-3/10)
Session Time: 2-4 hours
Best For: Statement piece, vibrant color
Neo-traditional guitars mix bold outlines with painterly color. Upper arm gives enough space for the body and headstock while keeping pain low. Colors pop fresh and mellow slightly with time; red and blue hold up well compared to pastel hues. Artists who work in neo-traditional or tattoo realism can balance line and color for long-term vibrancy. Common mistake: oversaturating tiny details—keep shapes stronger than tiny textures.
3. Micro-Realism Iconic Guitar Portrait on Calf
Style/Technique: Micro-Realism / Photorealistic
Pain Level: Medium (4-5/10)
Session Time: 3-6 hours
Best For: Collector, tribute piece
Micro-realism captures wood grain, tarnish, and hardware. The calf is great for larger, detailed portrait-style tattoos that sit flat while you sleep. Expect longer sessions and more scabbing during healing; give it time—colors and depth settle over months. Artists who specialize in instrument portraits and photorealism yield the best results. Avoid picking tiny highlights that will blur; ask for reference photos of the exact instrument.
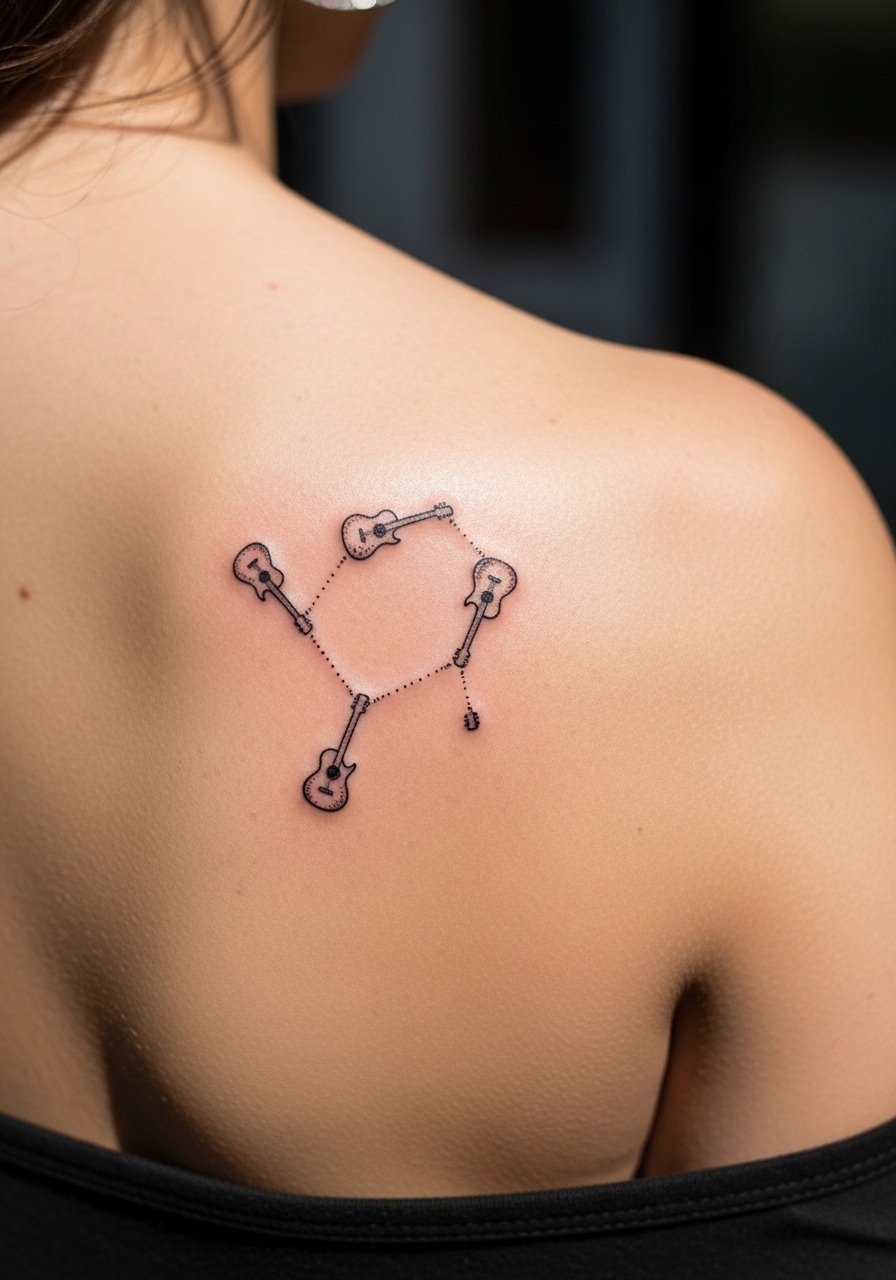
4. Blackwork Guitar Silhouette Behind Ear / Nape
Style/Technique: Blackwork / Silhouette
Pain Level: High (8/10) behind ear; Medium (4-5/10) at nape
Session Time: 30–90 minutes
Best For: Subtle, easy-to-hide
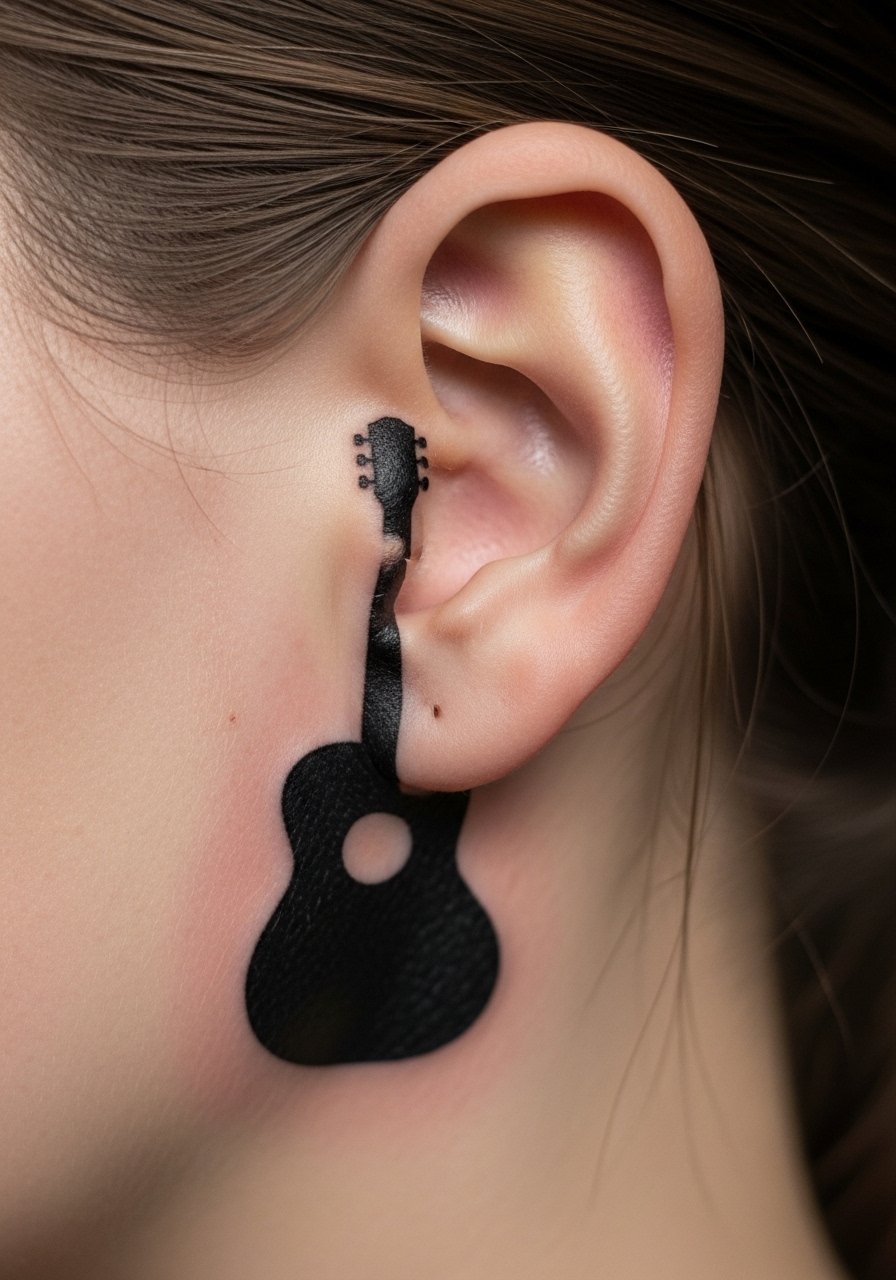
A solid black silhouette is bold and timeless. Small placements like behind the ear or at the nape are discreet but can sting more. Black ink ages best across skin tones and needs minimal touch-ups. Avoid tiny internal details; silhouettes read better healed. From my experience, this style is perfect for people who want a subtle musical nod.
5. Minimalist Line Headstock on Wrist
Style/Technique: Minimalist / Single-Line
Pain Level: High (6-7/10) wrist
Session Time: 30–60 minutes
Best For: First-timers who want small, visible ink
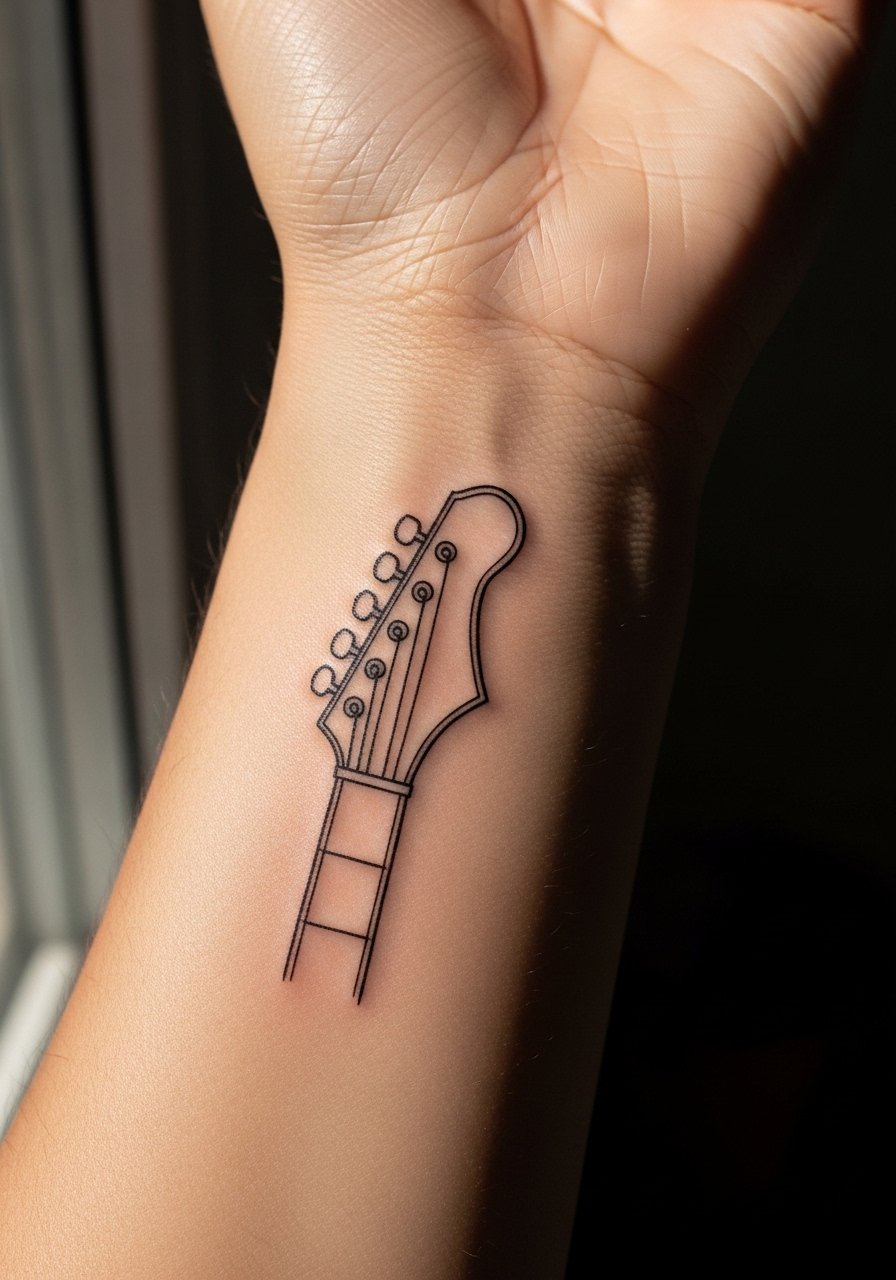
A small headstock in one continuous line looks modern and meaningful. Wrists heal quickly but are sensitive and prone to blur if lines are too close. Expect a sharper pain for placement but fast healing in two weeks. Ask for slightly thicker lines than a single hairline so the piece still reads after a year.
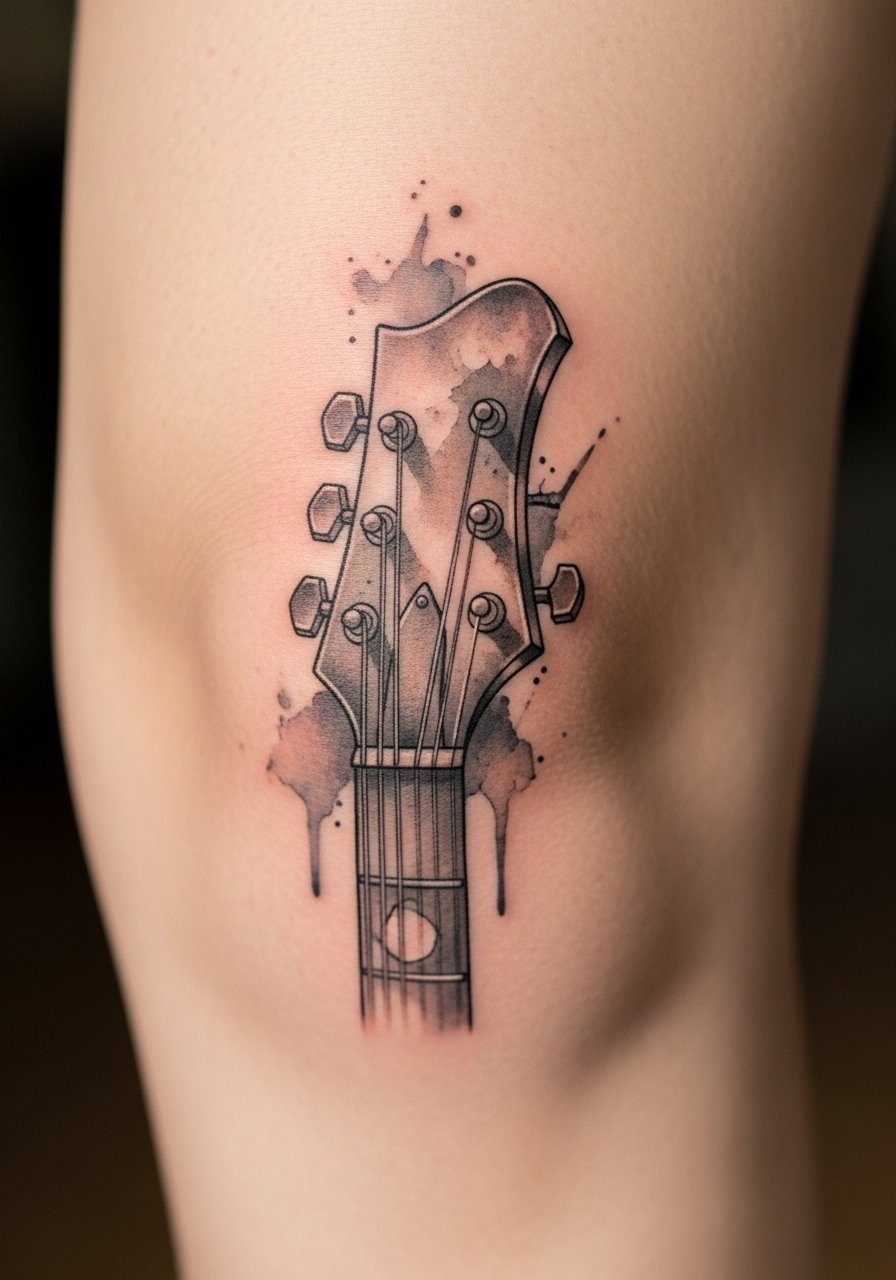
6. Watercolor Guitar Splash on Ribcage
Style/Technique: Watercolor / Painterly
Pain Level: High (7-8/10) ribs
Session Time: 2-4 hours
Best For: Statement, colorful art
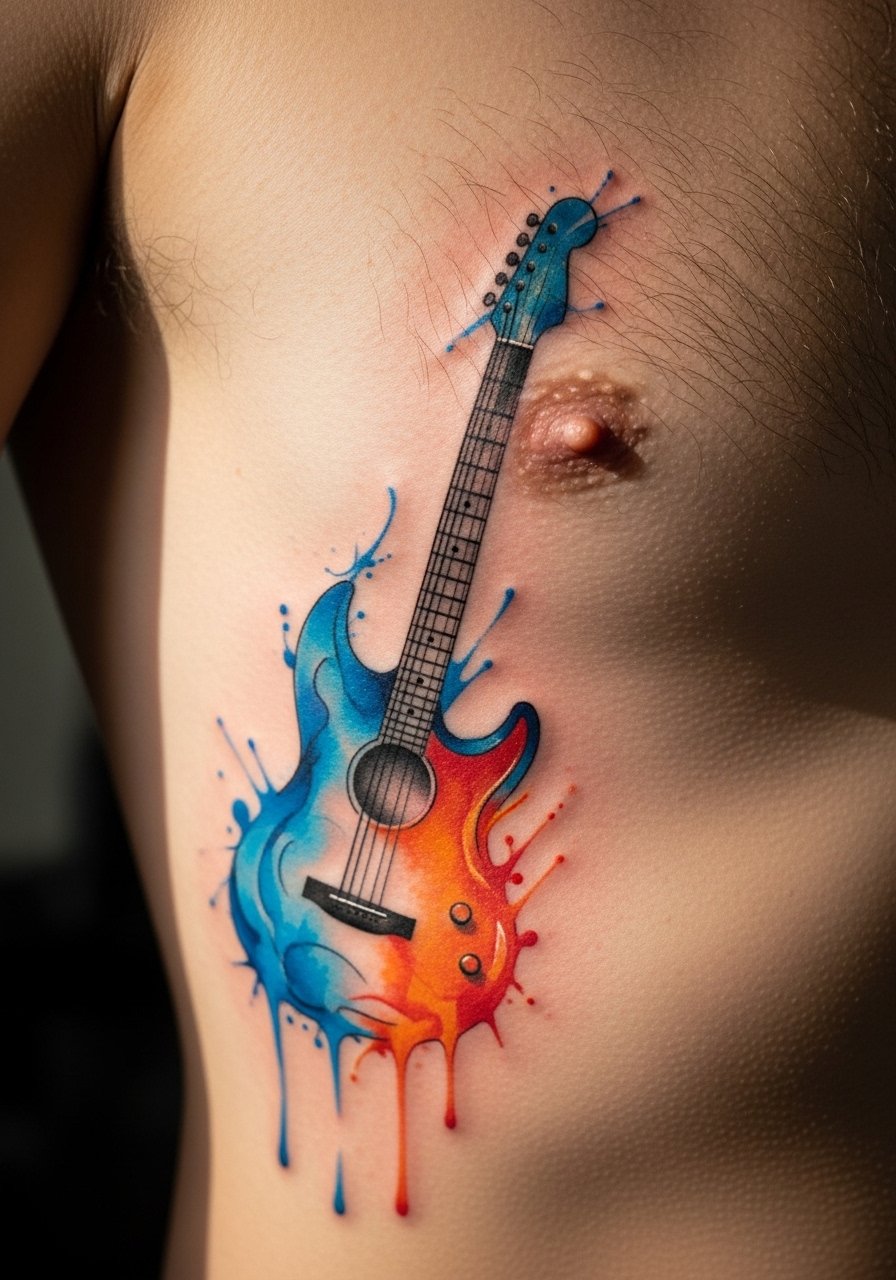
Watercolor gives guitars an expressive, artistic vibe. Ribs are high on pain but excellent for big flowing compositions. Colors look brightest fresh and soften into a muted palette healed, so expect some blending. Artists who blend water-based color and soft shading make these age better. Common mistake: tiny watercolor droplets that fade—stick to larger washes.
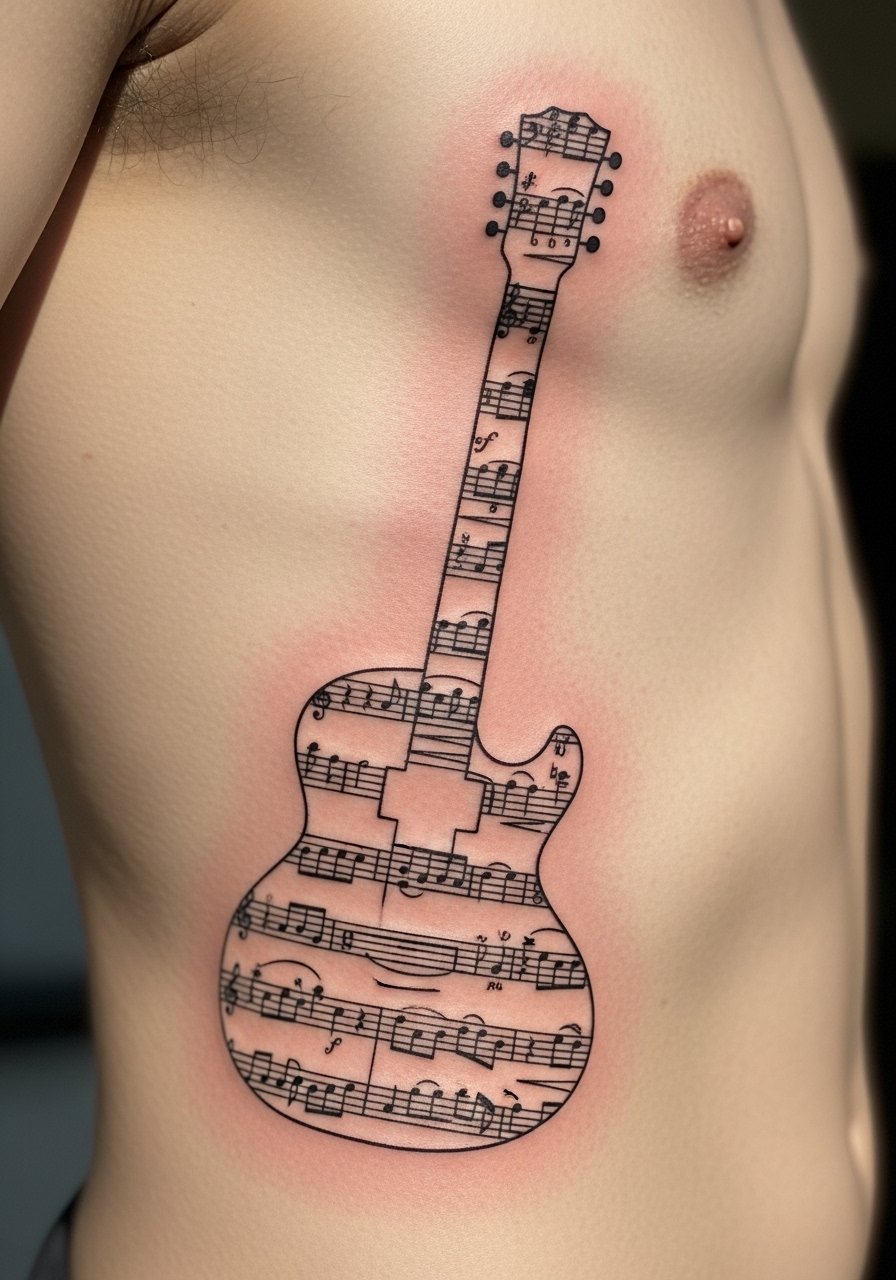
7. Sheet Music Wrap Around Forearm (Acoustic + Notes)
Style/Technique: Illustrative / Script + Music
Pain Level: Medium (4/5)
Session Time: 2-3 hours
Best For: Musicians who want a narrative piece
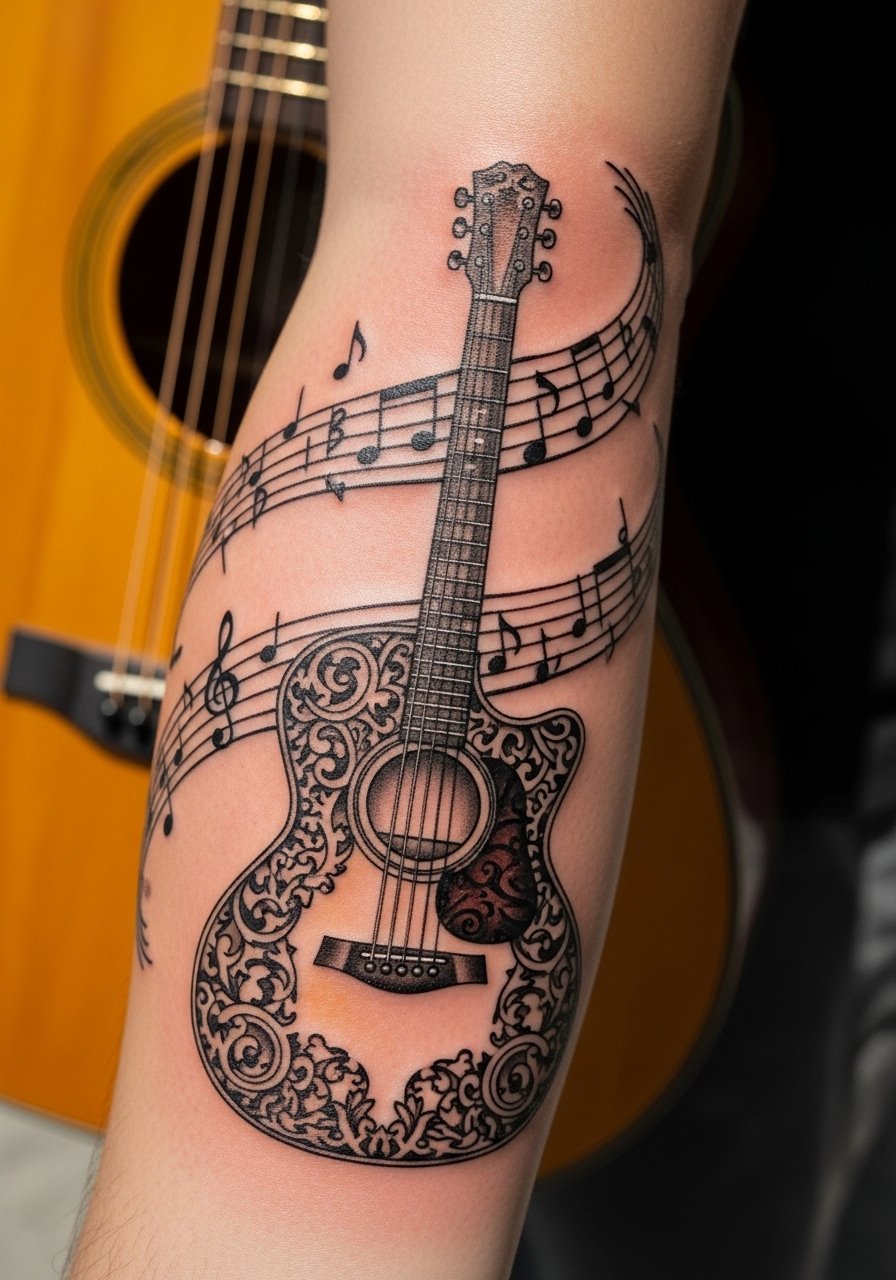
Combining a guitar with sheet music tells a story. A forearm wrap gives movement and visibility without extreme pain. Fine note lines need space to avoid blurring—ask your artist to scale notes slightly larger. Healing is straightforward; keep the area moisturized. From what I've seen, pieces that integrate negative space age cleaner.
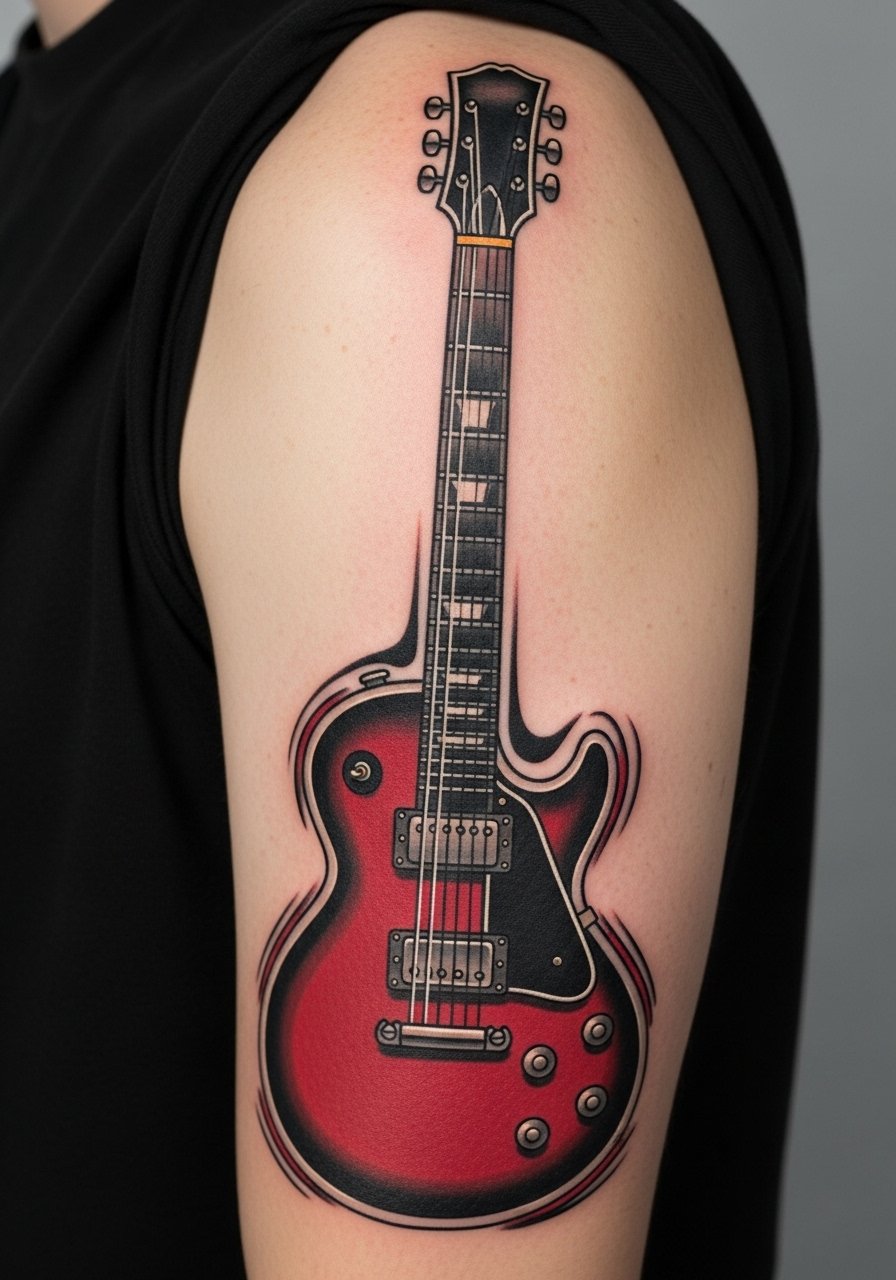
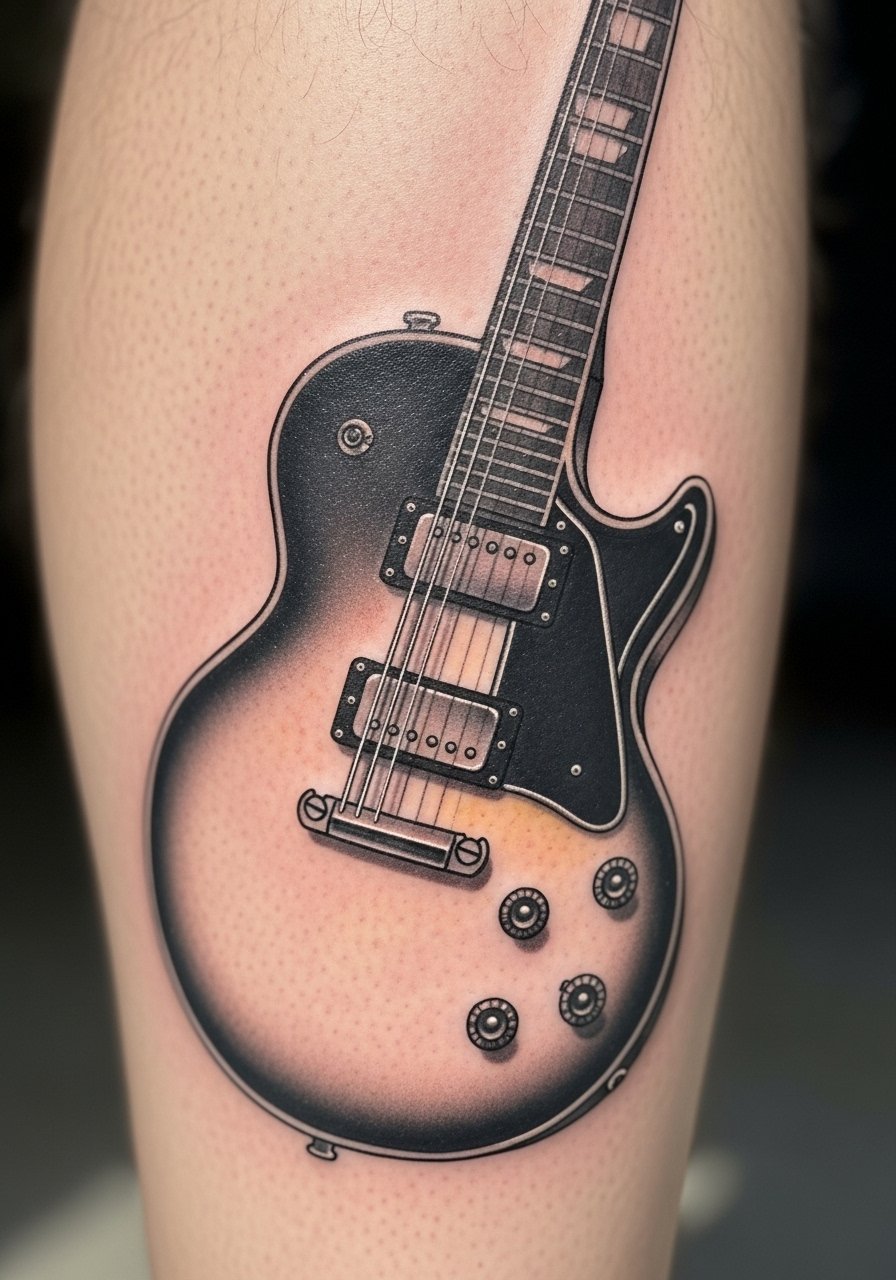
8. Vintage Amplifier Patch on Chest
Style/Technique: Traditional / Neo-Vintage
Pain Level: Medium (4-6/10) chest
Session Time: 1-3 hours
Best For: Rock fans, chest showpiece
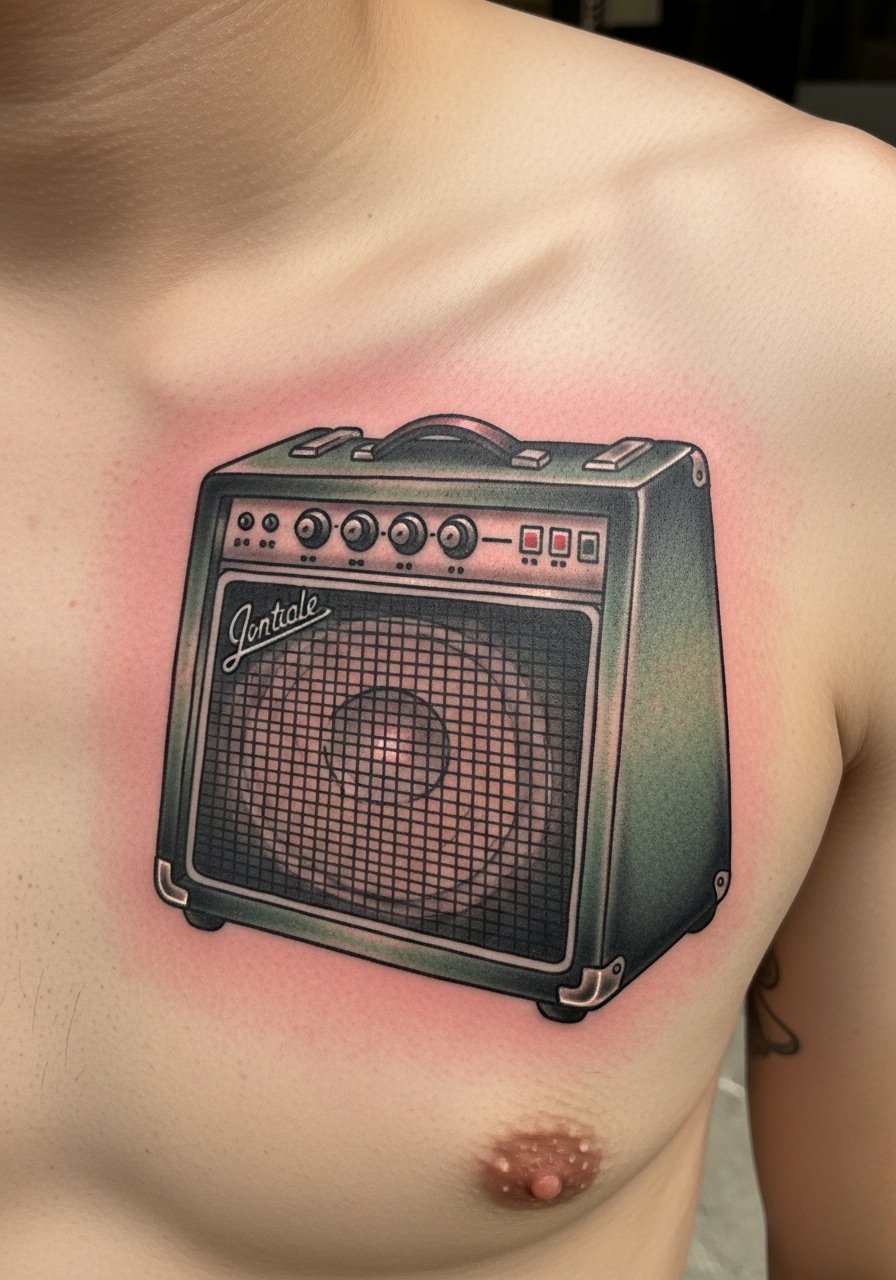
A vintage amp adds personality to guitar ink. Chest placement sits flat for detail but can sting near bone. Traditional bold lines help the design hold up. Expect 2–3 weeks of surface healing; the chest may scab a bit more. I recommend artists familiar with neo-traditional gear work to get hardware details readable.
9. Guitar Pick Mosaic on Ankle
Style/Technique: Geometric / Minimal Color
Pain Level: High (6-7/10) ankle
Session Time: 1 hour
Best For: Small, symbolic ink
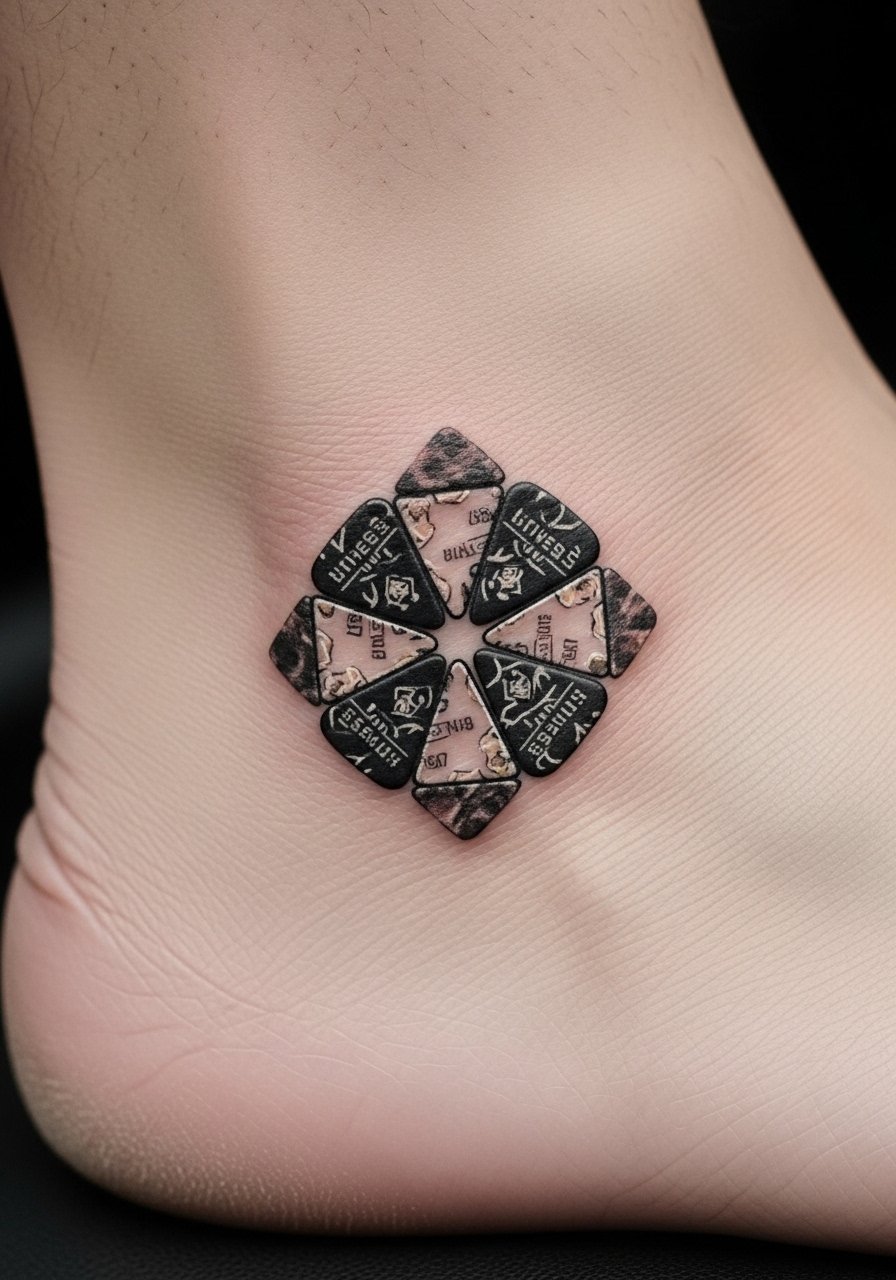
Pick mosaics are playful and symbolic. Ankles are sharp in pain and prone to fading from shoe friction. Keep shapes bold and avoid tiny gradients. In my experience, simple black outlines with a pop of color last longer than tiny colored fills.
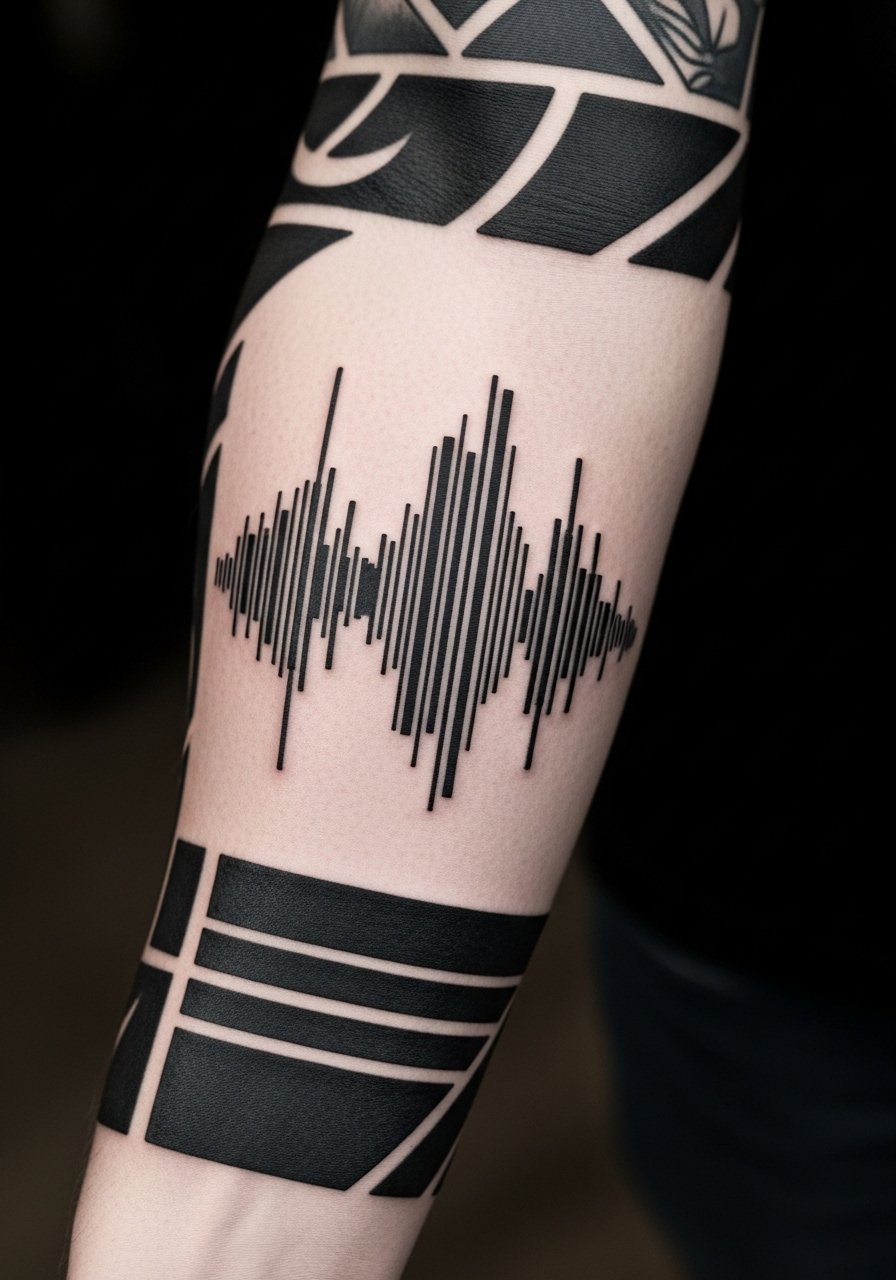
10. Soundwave of Your Favorite Song on Ribcage
Style/Technique: Minimalist / Soundwave Graphic
Pain Level: High (7-8/10) ribs
Session Time: 30–90 minutes
Best For: Personal, sentimental pieces
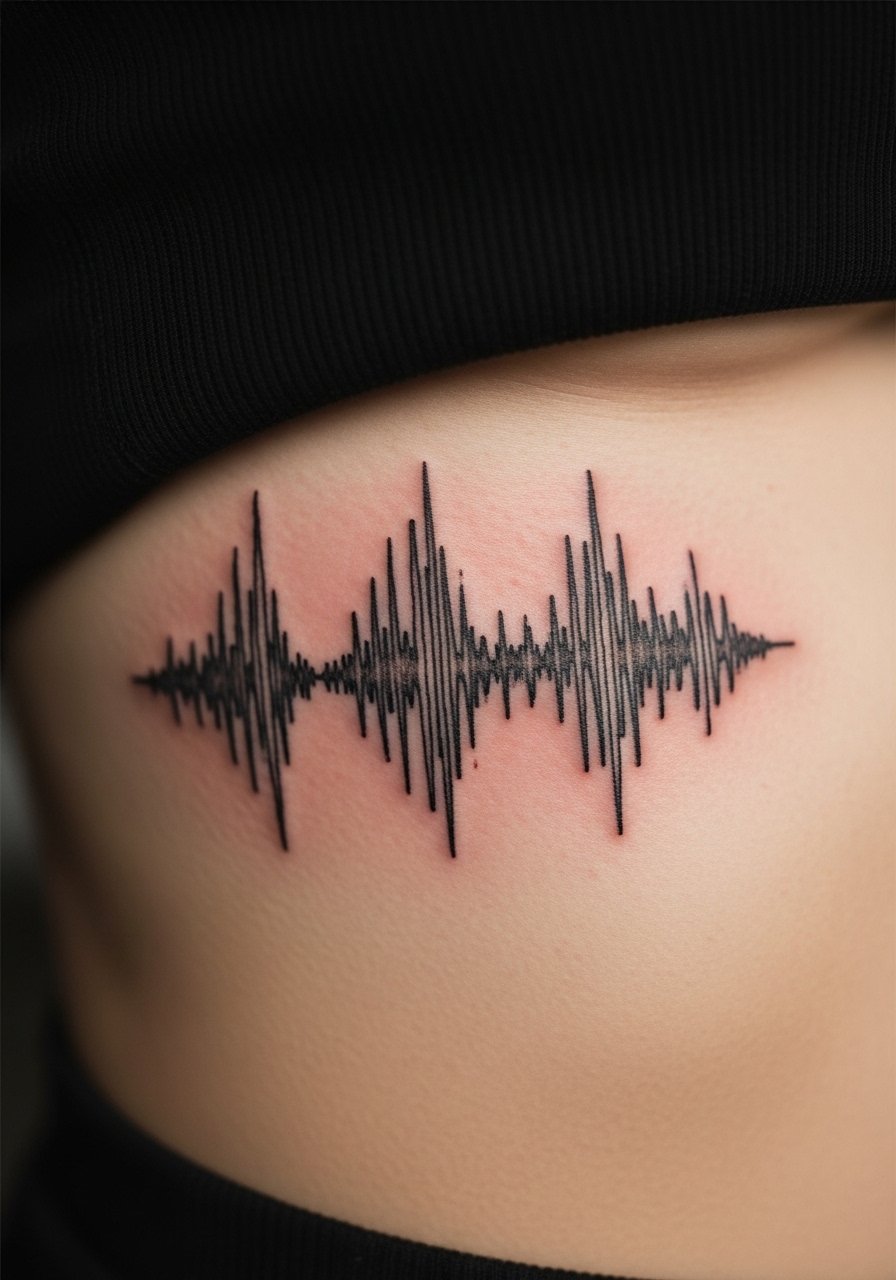
Soundwave tattoos are deeply personal and look modern. The ribcage shows them well but expect pain. Precision is key—ask your artist to use high-contrast line weight so the waveform reads after healing. I’ve seen these become conversation starters; they pair well with a tiny guitar icon.
11. Geometric Fretboard Down the Spine
Style/Technique: Blackwork / Geometric
Pain Level: High (8/10) spine
Session Time: Multiple sessions
Best For: Bold statement, long composition
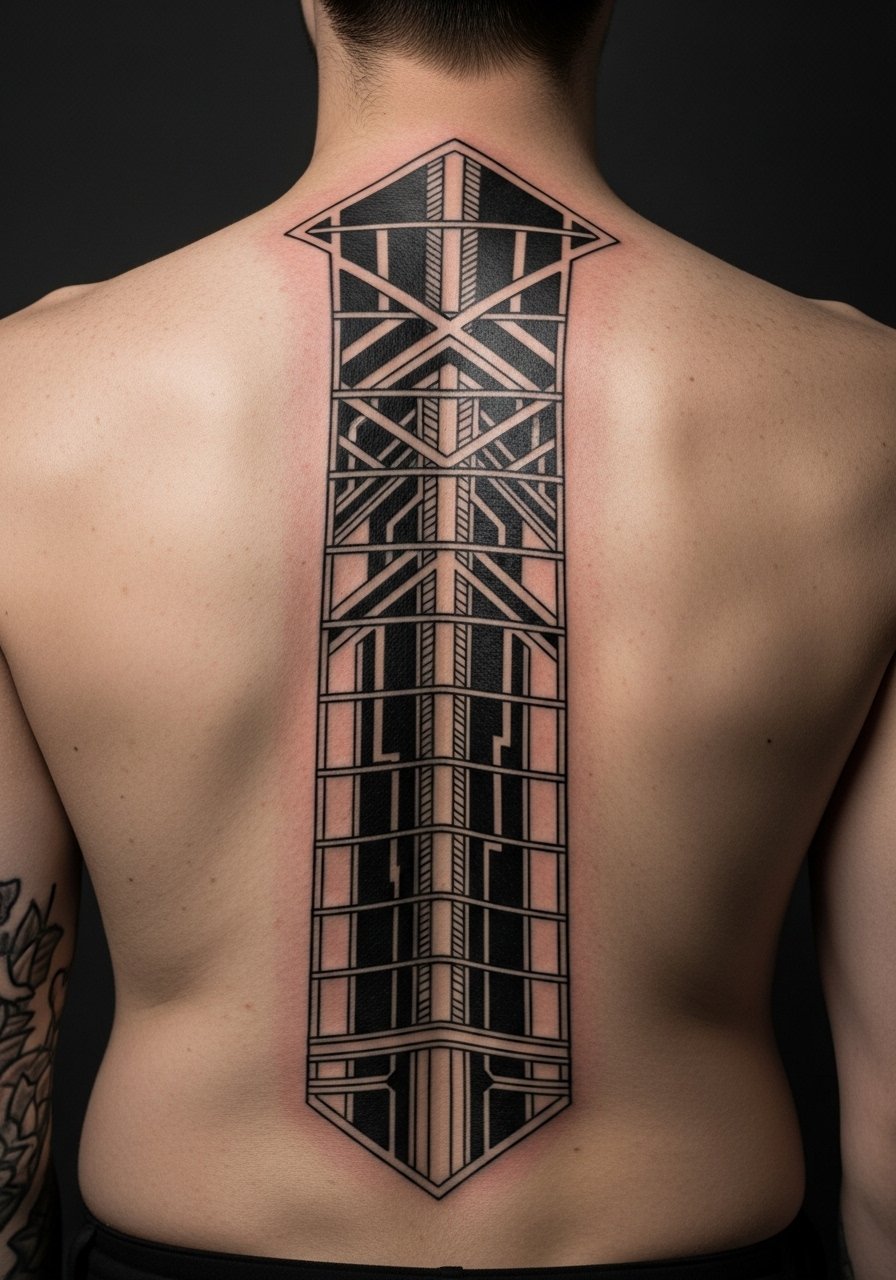
A fretboard along the spine looks dramatic and architectural. Spine tattoos are painful and need an experienced hand for symmetry. Blackwork ages well here, but tight patterns can blur—ask for slightly spaced geometry. Healing is slower over bone; expect sensitivity for a few weeks.
12. Mini Amp + Cable Behind Upper Ear
Style/Technique: Minimalist / Tiny Icon
Pain Level: High (7-8/10) behind ear
Session Time: 20–45 minutes
Best For: Secret nod, subtle
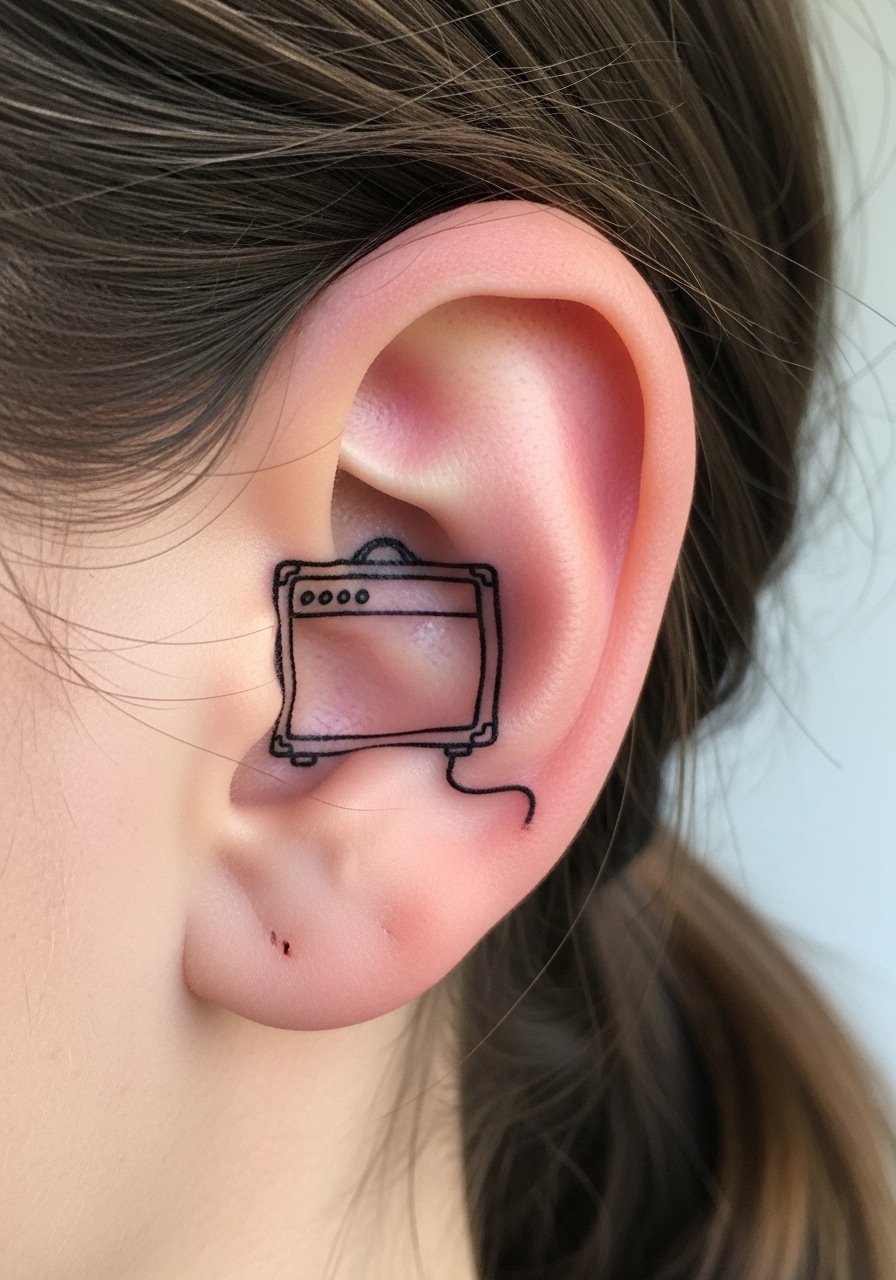
Tiny icons are discreet and cute. Behind-ear spots sting but heal fast. Keep lines bold and avoid tiny text. From what I’ve seen, these are great for someone who wants meaning without constant display.
13. Floral Guitar Hybrid on Thigh
Style/Technique: Fine Line + Botanical
Pain Level: Low-Medium (3-4/10) thigh
Session Time: 2-3 hours
Best For: Feminine, large canvas
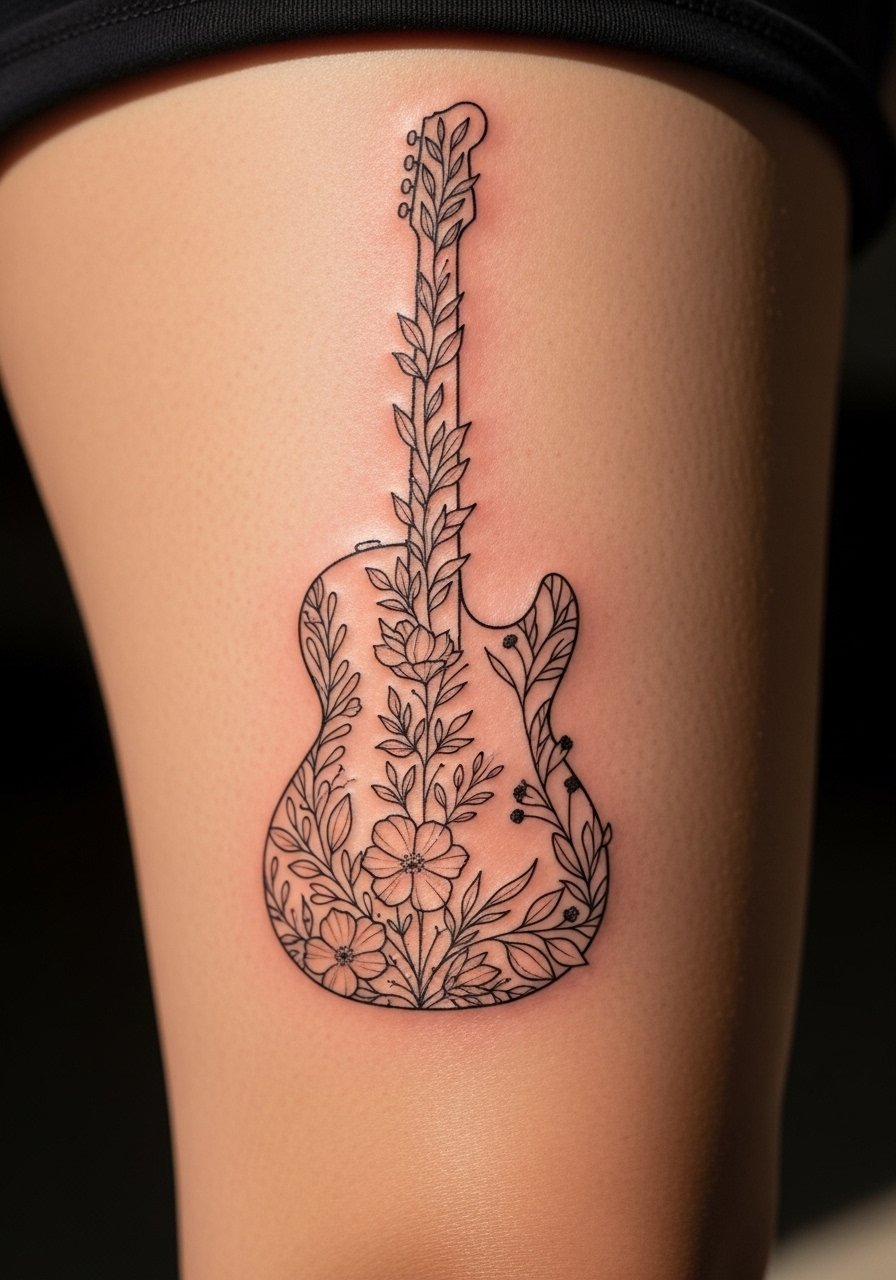
Botanical elements soften guitar imagery. The thigh gives room for composition and is less painful. Fine line florals need breathing room to avoid blurring; larger petal lines help. I’ve noticed these heal beautifully when the artist balances delicate stems with stronger guitar outlines.
14. Guitar Neck Barcode on Side Rib
Style/Technique: Minimalist / Negative Space
Pain Level: High (7-8/10) ribs
Session Time: 45–90 minutes
Best For: Modern, cryptic symbolism
A barcode-style neck is sleek and modern. Sharp black bars age well, but rib pain is real. Artists who work in graphic or blackwork styles execute clean edges. Avoid micro-spacing between bars; keep them bold for longevity.
15. Micro-Realism Pick With Player’s Initials on Inner Wrist
Style/Technique: Micro-Realism / Small Detail
Pain Level: Medium-High (5-7/10) wrist
Session Time: 45–90 minutes
Best For: Personalized, visible
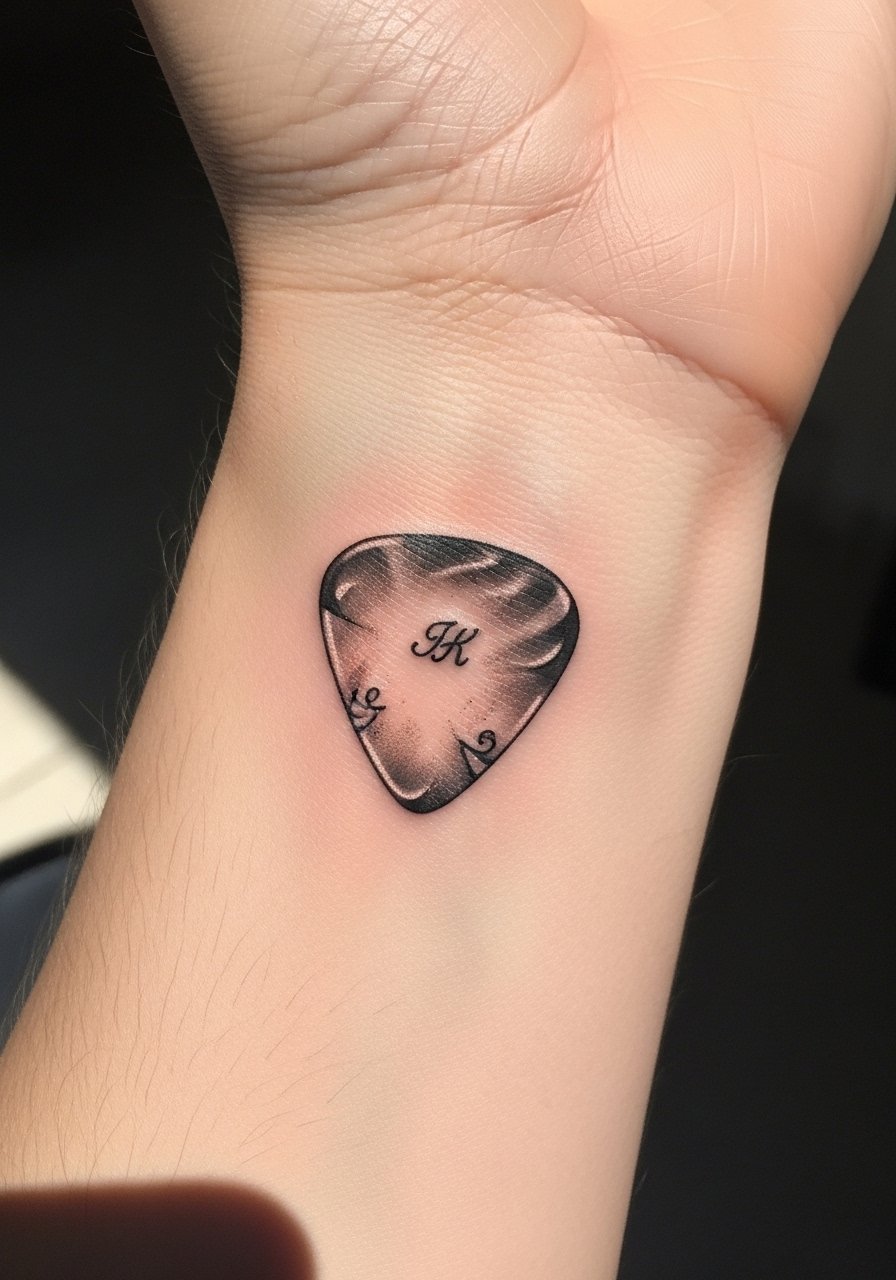
A realistic pick with initials reads like a keepsake. Wrists are sensitive and lines may soften—ask for slightly bolder shading. Healing is quick but avoid wrist flexing for a few days. I’ve seen these remain meaningful without needing touch-ups if done with care.
16. Anatomical Heart Intertwined With Guitar Strings on Sternum
Style/Technique: Neo-Realism / Symbolic
Pain Level: High (8/10) sternum
Session Time: 2-4 hours
Best For: Emotional, center-chest statement
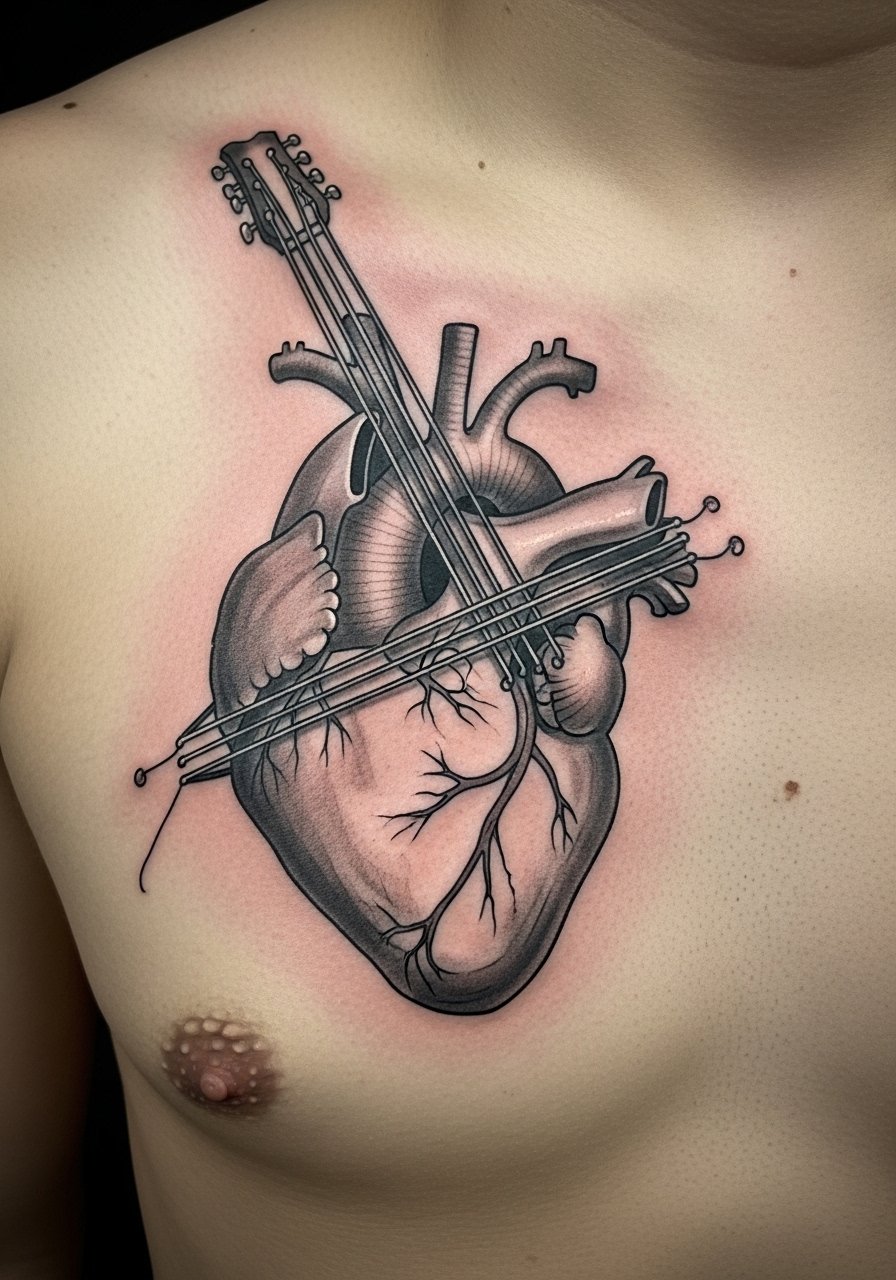
This design marries music and emotion. Sternum work is intense but dramatic. Expect longer healing and sensitivity during sleep. Artists experienced with chest shading and neo-realism can keep the piece legible as it settles.
17. Retro-style Headstock Patch on Bicep
Style/Technique: Traditional / Badge
Pain Level: Low (2-3/10) bicep
Session Time: 1–2 hours
Best For: Bold badge-like tattoo
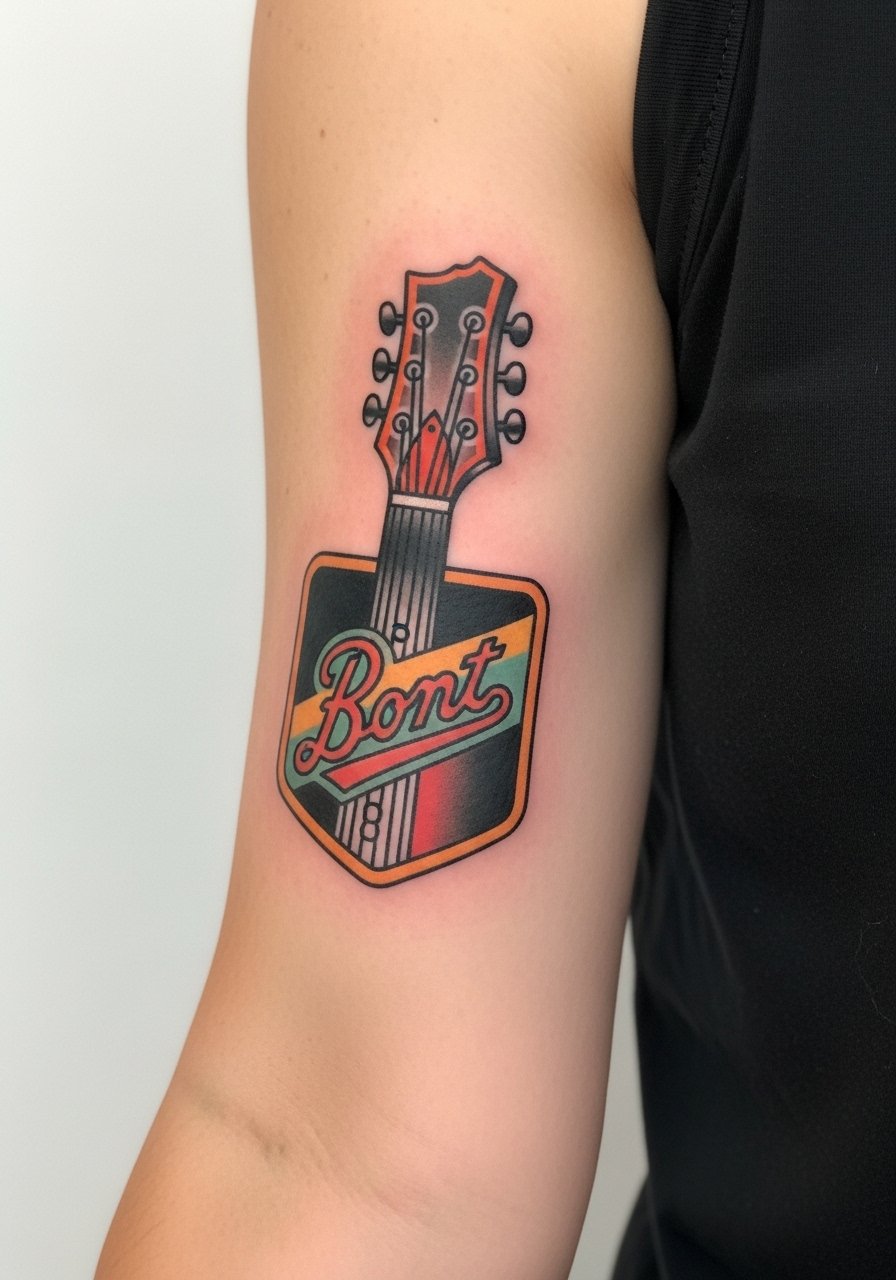
A badge or patch feels like band merch you can wear forever. Biceps are low pain and hold color well. Traditional styling helps the design stay readable years later. Ask for clear negative space near tuners to avoid ink bleed.
18. Double Exposure Guitar + City Skyline on Side Thigh
Style/Technique: Double Exposure / Fine Line + Silhouette
Pain Level: Low-Medium (3-4/10) thigh
Session Time: 2-3 hours
Best For: Travel/music lovers
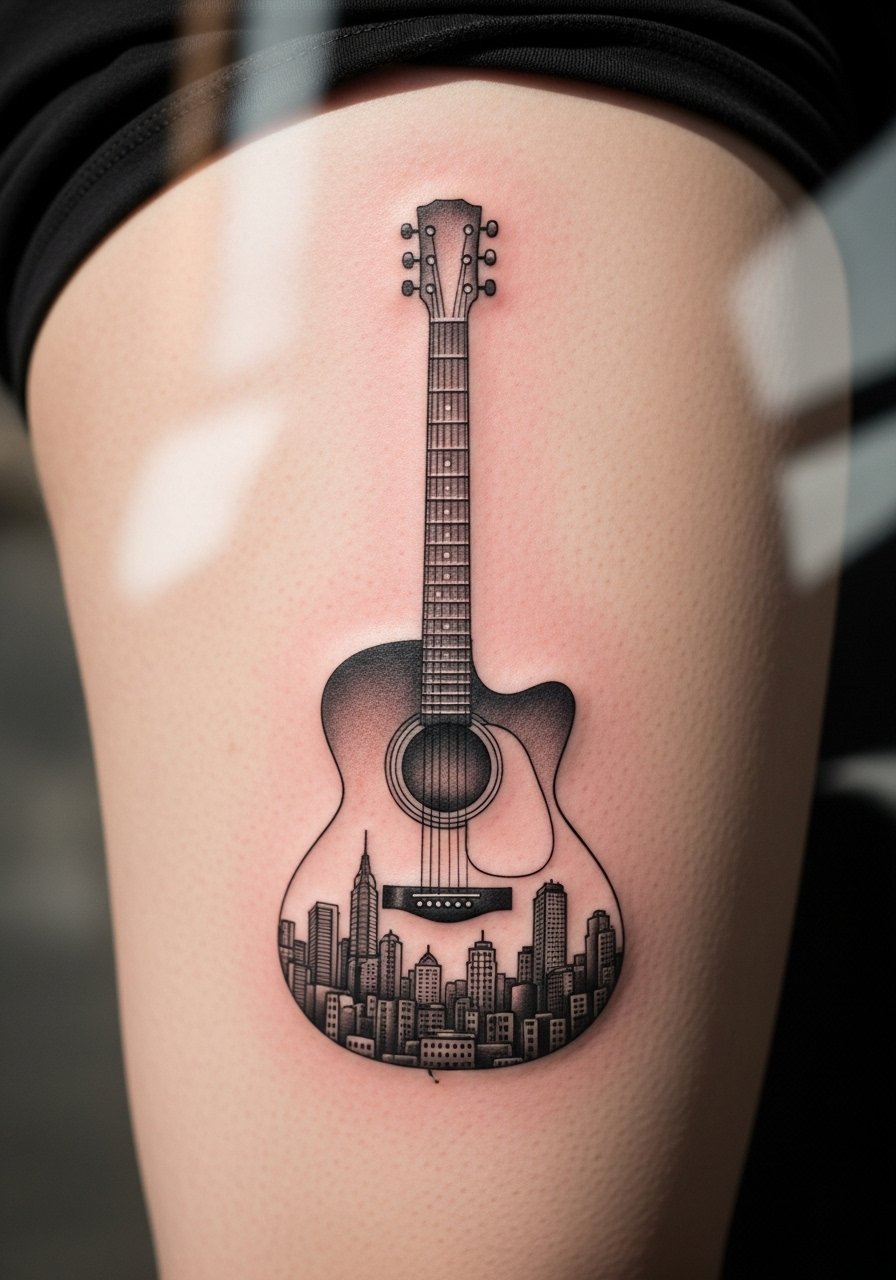
Double exposure tattoos feel cinematic. The thigh accommodates scale and fine shading. These age well if the skyline uses strong silhouette elements rather than tiny windows. Artists who do illustrative blends are ideal.
19. Tribal-Inspired Guitar Band Around Forearm
Style/Technique: Blackwork / Tribal Motif
Pain Level: Medium (4-5/10) forearm
Session Time: 1–2 hours
Best For: Graphic, high-contrast look
A repeating guitar band reads like cuff jewelry. Blackwork is low-maintenance and ages predictably. Keep patterns bold; thin filigree loses crispness over time. From conversations with artists, these are popular for their statement quality.
20. Tiny Guitar Constellation on Shoulder Blade
Style/Technique: Minimalist / Dotwork
Pain Level: Low (2-3/10) shoulder blade
Session Time: 30–60 minutes
Best For: Subtle, spaced design
Dotwork constellations are whimsical without being flashy. Shoulder blade is low pain and great for pieces that might be added to later. Keep dots spaced so the pattern reads as intentional rather than faded.
21. Guitar Headstock Watercolor Behind Knee
Style/Technique: Watercolor / Placement Twist
Pain Level: High (7-8/10) behind knee
Session Time: 1-2 hours
Best For: Unexpected placement, playful color
Behind-knee placements are trendy and unusual. They sting and move with walking, so healing can be tricky. Watercolor here creates a peek-a-boo effect when you sit or bend. Choose larger washes over tiny droplets for longevity.
22. Baroque-Inspired Guitar Frame on Upper Thigh
Style/Technique: Ornamental / Decorative
Pain Level: Low-Medium (3-4/10) upper thigh
Session Time: 2-3 hours
Best For: Elegant, ornate statement
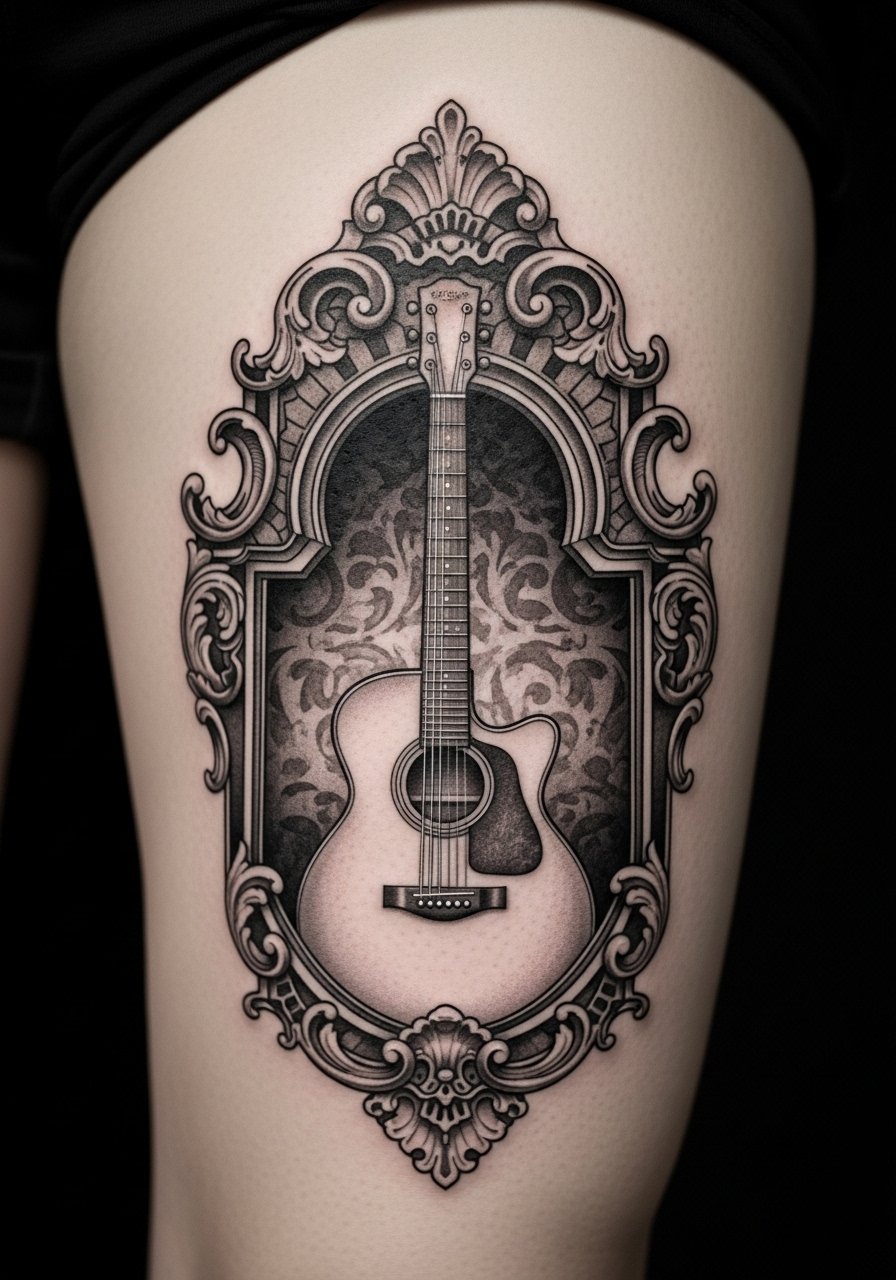
Ornamental frames lend a classical vibe to guitar art. Upper thigh holds detail and is easy to conceal. Keep filigree balanced; too many tiny curls can blur. Artists who work with ornamental realism can keep lines crisp.
23. Negative Space Guitar Made of Sheet Music on Ribcage
Style/Technique: Negative Space / Illustrative
Pain Level: High (7-8/10) ribs
Session Time: 1–2 hours
Best For: Creative, music-first design
Using negative space to form a guitar is clever and subtle. Ribs hurt, but the visual payoff is strong. Ensure the notes are scaled so they remain legible once healed. I prefer this approach for people who want depth without heavy color.
24. Barcode Soundwave Sleeve Accent on Forearm
Style/Technique: Graphic / Sleeve Accent
Pain Level: Medium (4-5/10) forearm
Session Time: 1–3 hours
Best For: Sleeve supplement, modern aesthetic
As an accent within a sleeve, barcode soundwaves add rhythm. Forearm placement balances visibility and pain. For sleeves, ensure the soundwave integrates with surrounding elements to avoid visual clutter. Blackwork here keeps the look lasting.
Tattoo Prep and Aftercare Essentials
Aftercare Essentials:
- Aquaphor Healing Ointment, 14oz tube — Great first 3–5 days, many artists recommend it.
- Saniderm Transparent Adhesive Bandage, 6-inch roll — Second skin method for the first 24–72 hours.
- CeraVe Fragrance-Free Moisturizing Lotion, 12oz — For days 4–14 to keep skin hydrated.
- Dr. Bronner's Unscented Castile Soap, 8oz — Gentle cleanser for daily washes.
Before Your Appointment:
- Tattoo Numbing Cream 5% Lidocaine (single-use packets) — Use only if your artist approves; helps in sensitive spots.
- Stencil Transfer Paper, 100 sheets — Handy if prepping designs at home.
Long-Term Maintenance:
- SPF 50 Sunscreen Stick for Tattoos — Daily sun protection preserves color.
- Mad Rabbit Tattoo Balm, 2oz — Artist-recommended for keeping healed ink vibrant.
- Hustle Butter Deluxe, 4oz — Vegan aftercare option many artists mention.
Optional Comfort Items:
- Tattoo Numbing Spray — For touch-ups or very sensitive zones.
- Hydrocolloid Bandages (large) — Good for small areas and preventing scab picking.
Most artists I’ve talked to prefer Saniderm or Aquaphor for the initial phase and recommend switching to a fragrance-free lotion after the first few days. Numbing products can help but aren’t a cure-all; ask your artist.
Frequently Asked Questions
Q: How bad does a tattoo actually hurt?
A: Pain depends on placement and your tolerance. Outer arm or thigh = low (2–4/10). Ribs, sternum, or behind the ear = high (7–8/10). It’s more an intense scraping or burning than sharp stabbing. For very sensitive spots, consider a 5% lidocaine numbing cream—talk it over with your artist first.
Q: How long does a guitar tattoo take to heal?
A: Surface healing is usually 2–3 weeks. Full settling and color normalization can take 2–3 months. First week is critical—clean gently with unscented soap and follow your artist’s routine. Use something like CeraVe Fragrance-Free Lotion during weeks 2–4.
Q: Will fine-line guitar tattoos blur over time?
A: I’ve noticed fine line work can soften faster than bold blackwork. To reduce blur, ask your artist to use slightly bolder primary outlines or to space tiny details. Proper sunscreen like an SPF 50 stick helps immensely.
Q: Can I exercise after getting a tattoo?
A: Wait at least 48–72 hours for low-sweat activities; longer for heavy sweat or stretches that move the tattoo. Sweating on fresh ink increases infection risk. If you must move, protect with clean dressings and avoid friction.
Q: What if I want a music-accurate detail, like a specific fret or brand logo?
A: Bring clear reference photos. For micro details, choose placements with flatter skin (calf, thigh, forearm) and work with artists who show healed examples of similar work. Tiny logos often need slight enlargement to stay readable.
Q: Do tattoos look different on darker skin tones?
A: Yes. High-contrast black and deep colors read best on deeper tones. Pastel or white ink can be subtle or nearly invisible. I always advise looking at healed portfolios from artists who regularly tattoo your skin tone.
Q: What’s the one aftercare product artists actually recommend?
A: Most of the artists I know suggest starting with Aquaphor Healing Ointment for the first few days, then switching to a fragrance-free lotion like CeraVe. Trust your artist’s specific instructions for your piece.
Q: Can I get a guitar tattoo if I plan to add a sleeve later?
A: Yes. Design with future flow in mind. Place guitars so they integrate with surrounding elements, and choose a style that complements potential sleeve themes—blackwork pairs well with geometric sleeves; neo-traditional blends easily into color work.
