
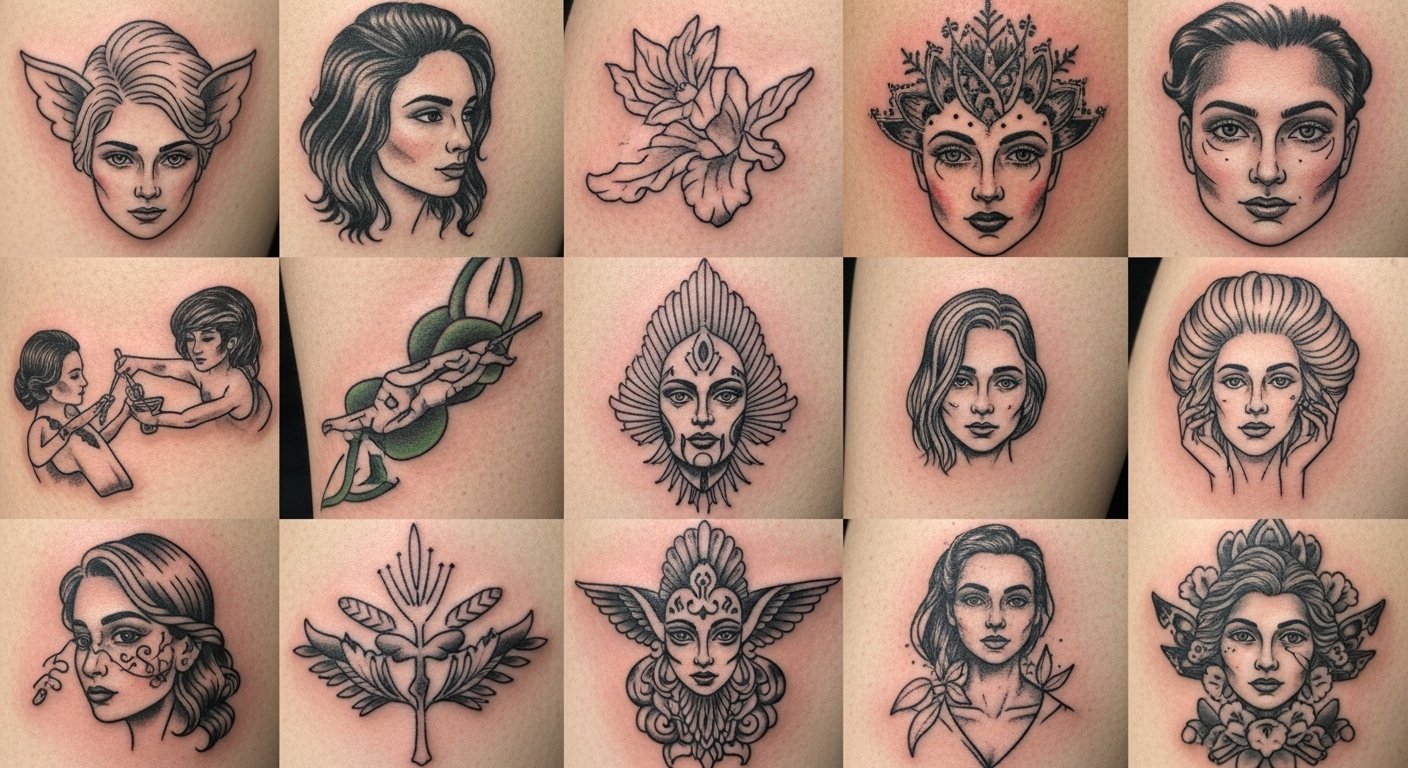
I spent months pinning family tattoo ideas and asking artists what actually looks good healed. The surprise? The design isn't the hard part—it's picking a style and placement that ages well and still feels personal after years. These 24 family tattoo ideas focus on styles artists recommend now and small choices that make tattoos last.
This list leans into fine line, traditional, and micro-realism vibes. Placements range from hidden ribs to visible forearms—great for first-timers or people adding a meaningful piece to a collection. From what I've seen, artists in 2026 push designs that read clearly healed, not just fresh.
1. Fine Line Initials on Inner Wrist
Style/Technique: Fine Line / Minimalist
Pain Level: Low (2-3/10)
Session Time: 30–60 minutes
Best For: First tattoo, discreet placement
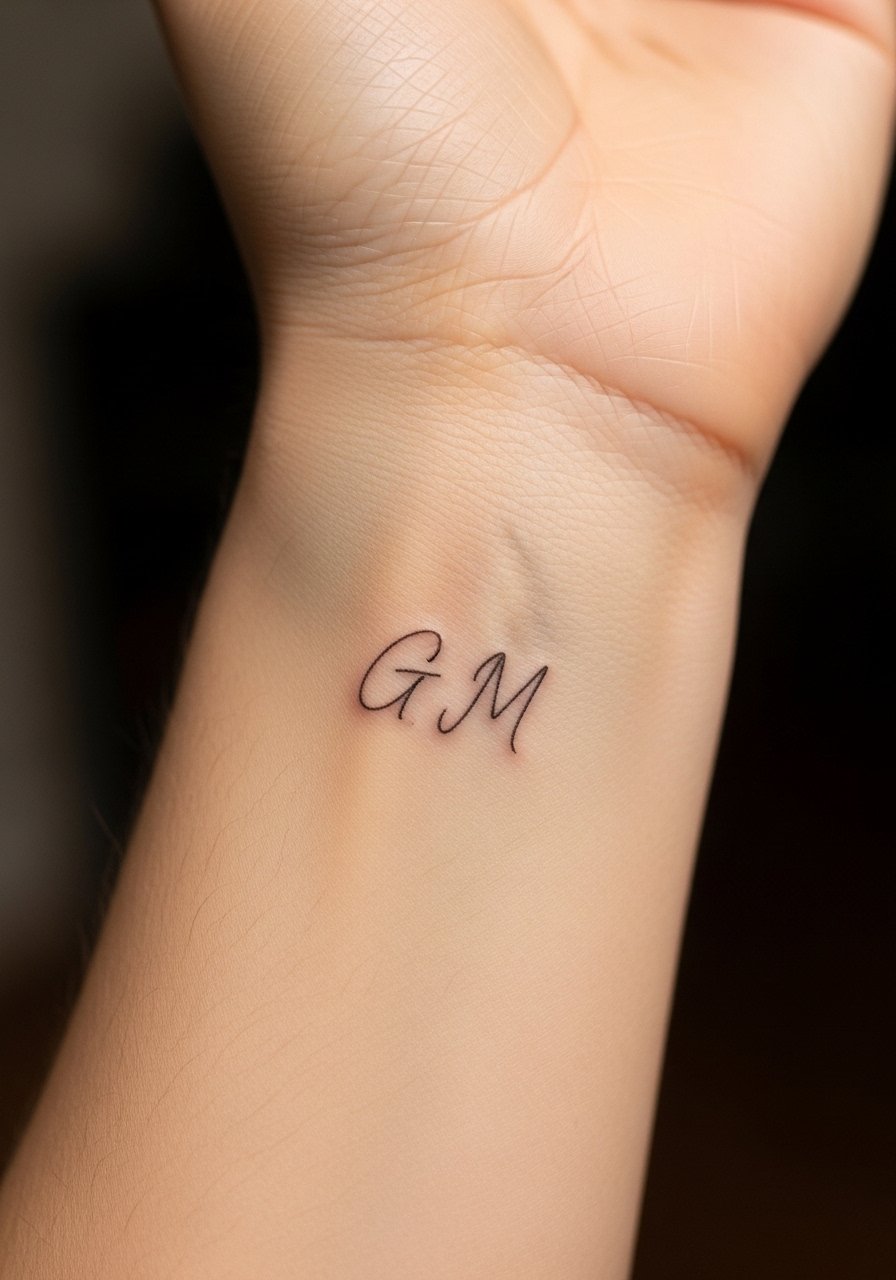
I like initials for their timeless, subtle feel. Fine line makes them feel intimate, but lines can blur if they're too thin. The inner wrist is easy to show or hide. Expect surface healing in 2–3 weeks; keep moisturized and out of heavy sun. Common mistake: asking for hairline strokes—ask your artist for slightly bolder lines so the letters stay legible. Look for an artist experienced in delicate script.
2. Micro-Realism Portrait on Chest
Style/Technique: Micro-Realism / Portrait
Pain Level: Medium-High (5-7/10)
Session Time: Multiple sessions
Best For: Statement piece, close-to-heart placement
Portraits capture a person’s likeness in a way words can't. Chest placement keeps the piece private and meaningful. Portraits demand an experienced artist—small errors show once healed. Expect longer sessions and slower healing around the sternum. Colors and tiny details can soften over time; choose slightly stronger contrast so the face stays readable. Common mistake: low-res reference photos—bring clear, high-quality images.
3. Minimalist Heartbeat With Names on Ribcage
Style/Technique: Minimalist / Script + Linework
Pain Level: High (7-9/10)
Session Time: 1–2 hours
Best For: Hidden, emotional pieces
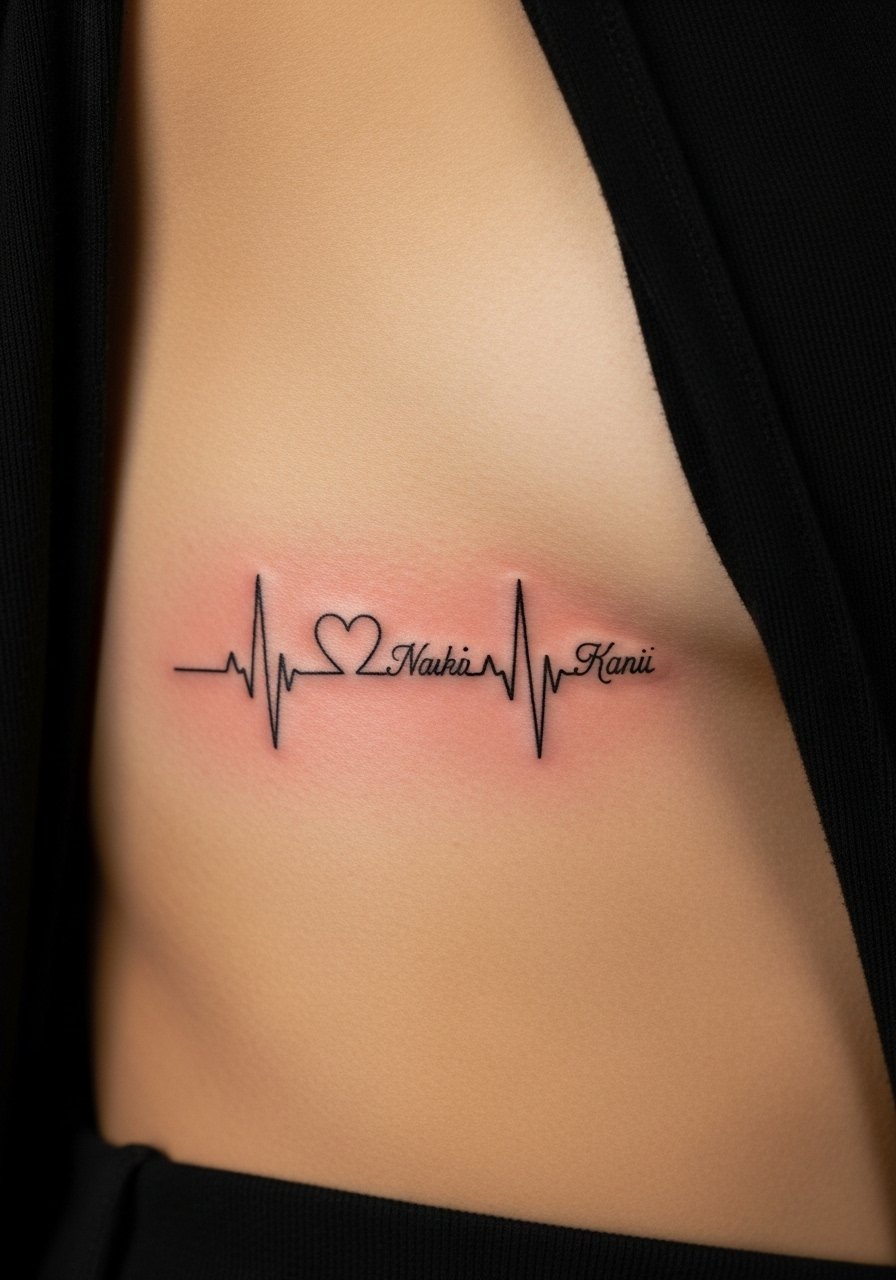
Heartbeat lines with names feel personal and modern. Ribcage placement is intimate but painful and needs good aftercare because the area flexes while healing. I tell friends to expect tenderness for several days and to skip tight clothing. Healing is slower here; avoid heavy activity. Mistake to avoid: cramming long names—keep names short or use initials.
4. Matching Puzzle Pieces Behind Ear
Style/Technique: Minimalist / Single Needle
Pain Level: Medium (4-6/10)
Session Time: 30–90 minutes
Best For: Matching family tattoos, subtle spots
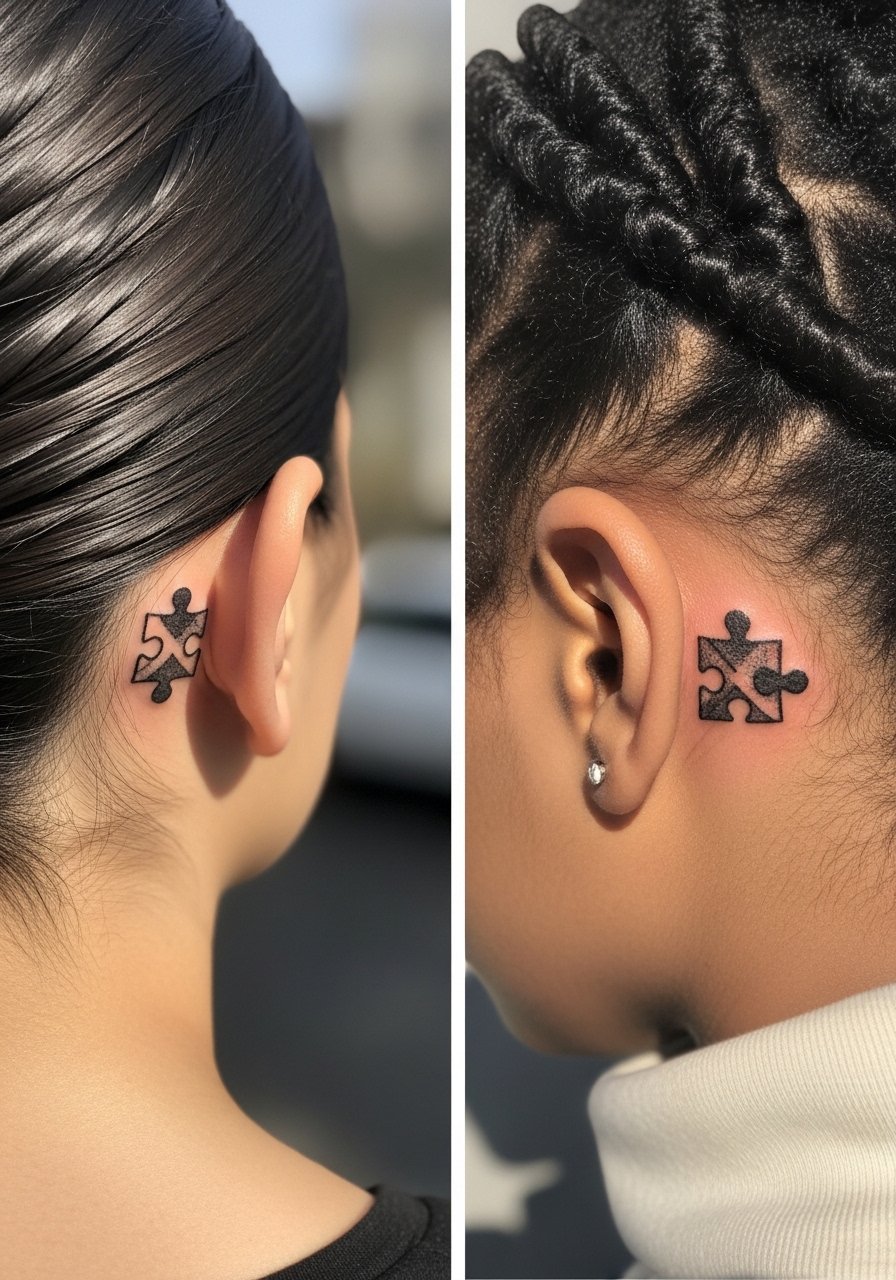
Puzzle pieces are sweet for partners or siblings. Behind the ear hides well and reads as a private symbol. The skin is thin, so lines can sting and may need touch-ups. Small tattoos here can blur—ask for a slightly thicker outline. Healing is quick but keep hair away from the area to avoid irritation.
5. Family Tree Silhouette on Back
Style/Technique: Blackwork / Silhouette
Pain Level: Medium (4-6/10)
Session Time: 2–4 hours
Best For: Statement back piece, symbolic art
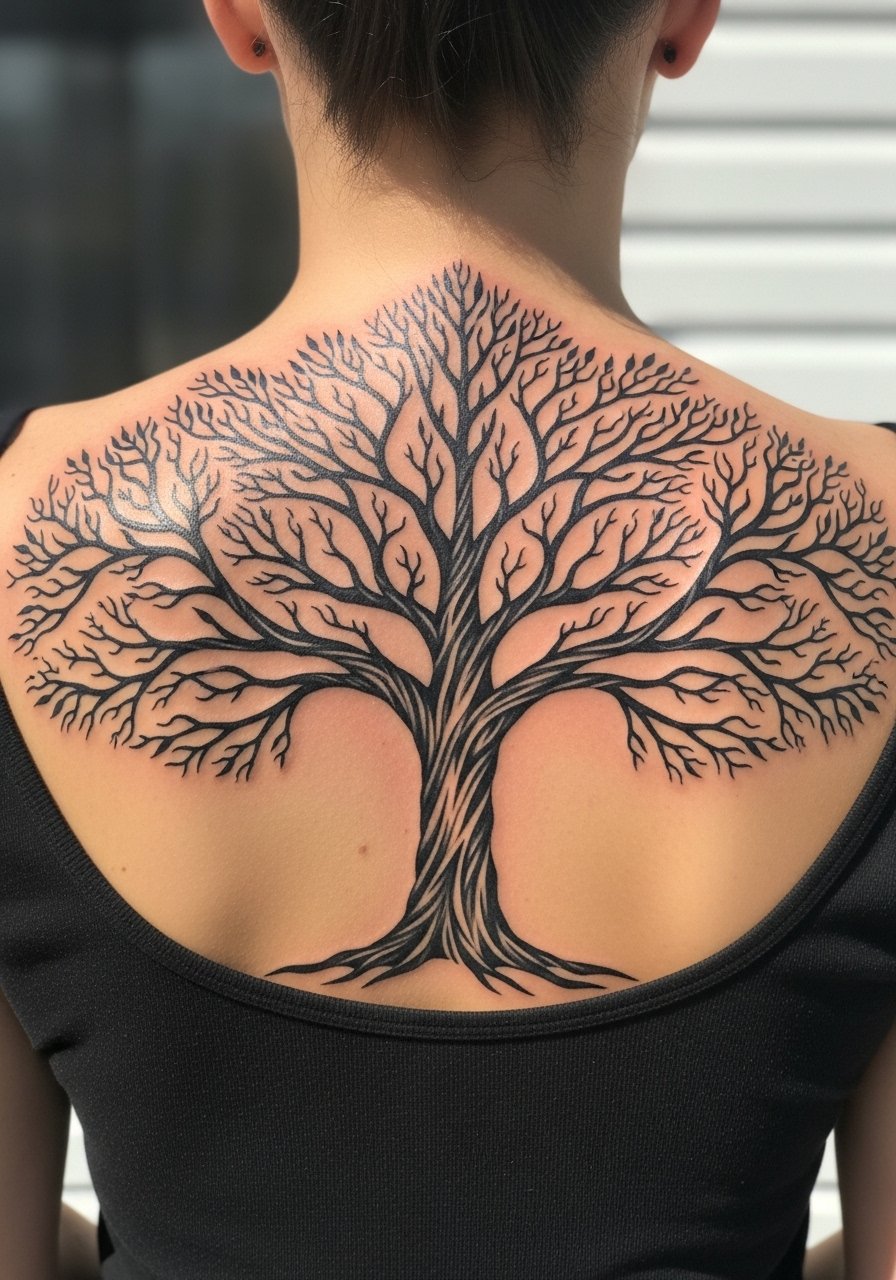
A tree silhouette reads clearly from a distance and ties generations together visually. Back placement gives space for detail and expansion. Blackwork ages well; bold trunks hold up while thin branches may soften. Plan for a shoulder-blade stretch during sessions to manage pain. Avoid over-detailing tiny leaves—simpler shapes heal better.
6. Fingerprint Heart Over Sternum
Style/Technique: Micro-Realism / Micro-Tattoo
Pain Level: High (6-8/10)
Session Time: 1–2 hours
Best For: Close-to-heart, sentimental piece
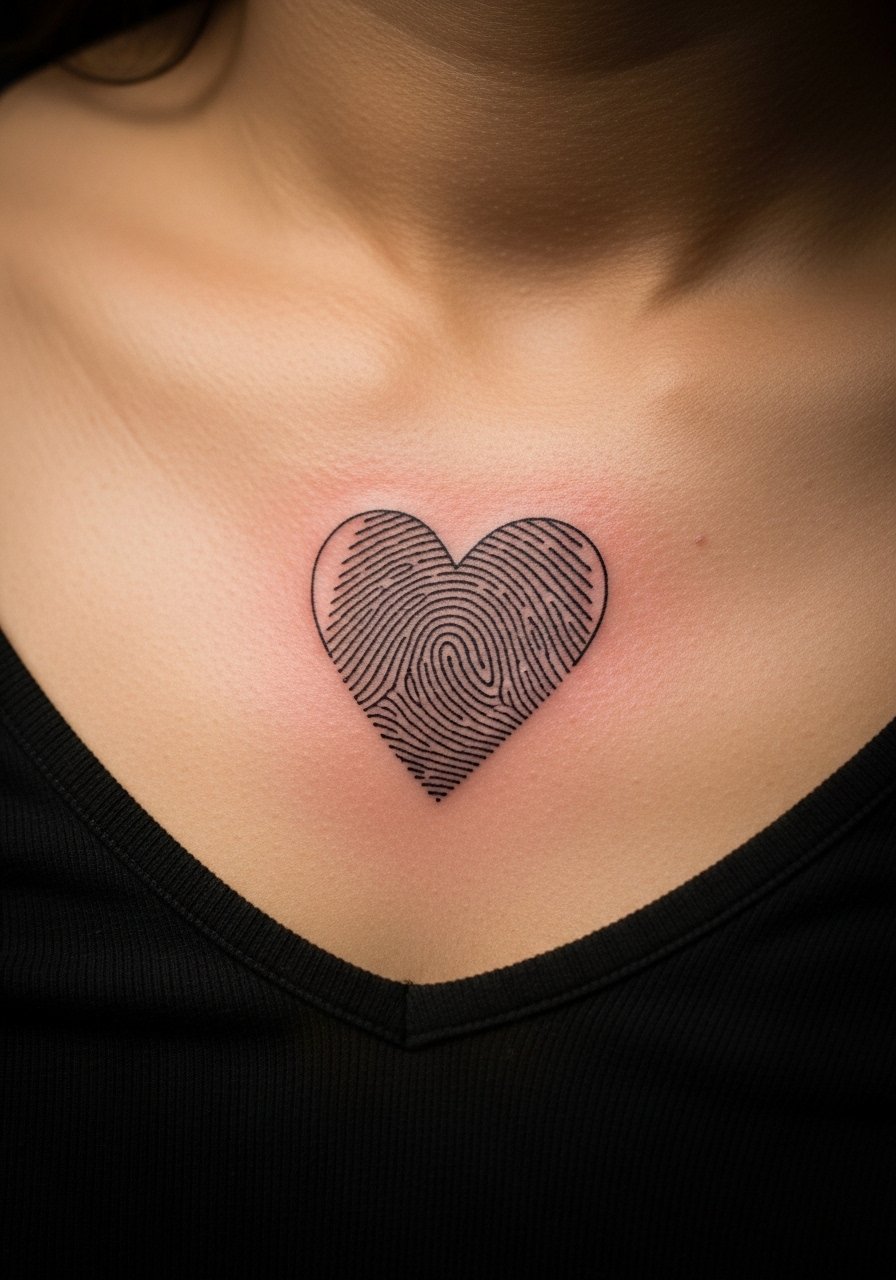
Turning a loved one’s fingerprint into a heart is intimate and unique. The sternum sits close to the heart but can be sensitive. Lines must be slightly exaggerated to stay readable as skin shifts. Expect soreness for a few days and avoid chest-straining workouts. Artists who do micro-realism with healed examples are a must.
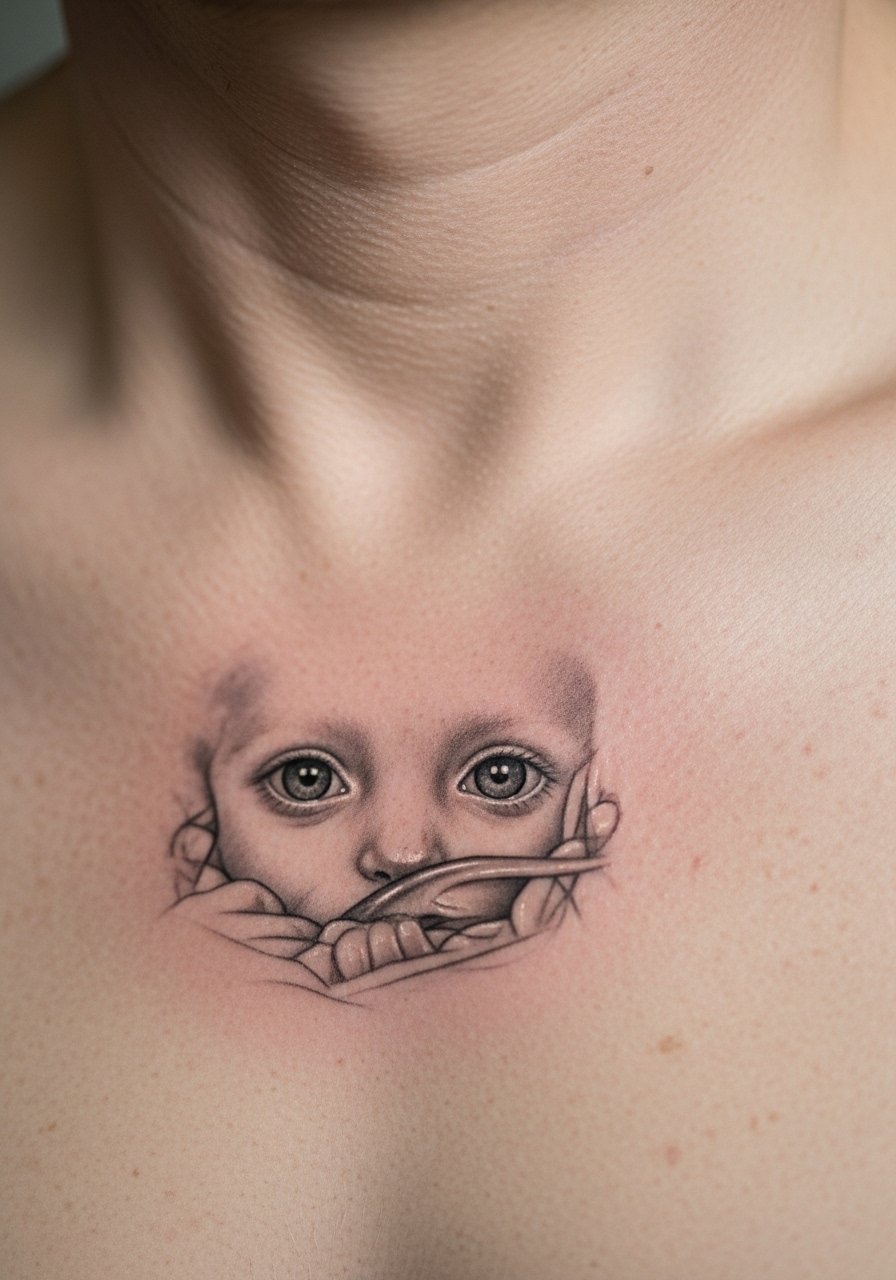
7. Child’s Handprint on Upper Arm
Style/Technique: Micro-Realism / Silhouette
Pain Level: Low-Medium (3-5/10)
Session Time: 1–2 hours
Best For: Parent keepsake, bold silhouette
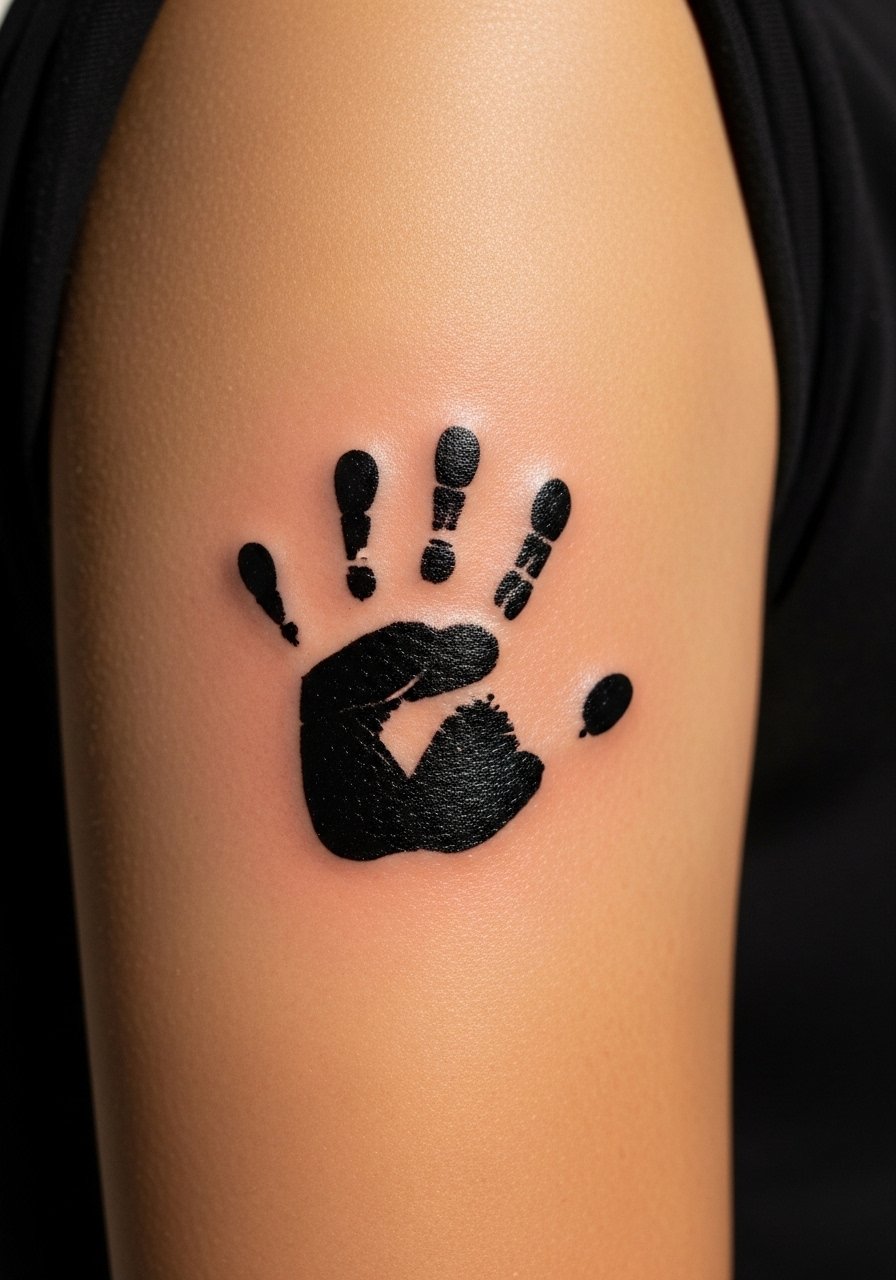
Handprints feel visceral—like holding a moment in ink. Upper arm placement is forgiving and low-pain. Solid silhouettes age predictably; minor fading can be revived with a touch-up. Common mistake: asking for too many tiny gaps inside prints—solid fills read cleaner over time.
8. Watercolor Family Skyline on Ribcage
Style/Technique: Watercolor / Landscape
Pain Level: High (7-8/10)
Session Time: 2–3 hours
Best For: Expressive, colorful pieces
Watercolor style gives a dreamy, emotional vibe. Ribs let you wrap the piece and keep it private. Colors can fade faster, so ask your artist about pigment saturation and touch-up plans. Healing needs careful sun protection; bright hues look best once fully healed. Mistake: expecting watercolor to stay as vivid as fresh—it softens, which can be desirable.
9. Soundwave of Child’s Laugh Behind Ear
Style/Technique: Minimalist / Waveform
Pain Level: Medium (4-6/10)
Session Time: 30–60 minutes
Best For: Tiny, deeply personal marks
Soundwave tattoos are modern and private. Scan a short audio clip into a waveform and your artist can ink it. Behind the ear is a subtle spot; lines need enough weight to stay crisp. Healing is quick but watch hair and product contact. This is a fresh angle many people love for family ink.
10. Scripted Family Motto on Collarbone
Style/Technique: Fine Line / Script
Pain Level: Medium (4/6/10)
Session Time: 1–2 hours
Best For: Visible, readable text
Collarbone text sits in a place that shows meaning outwardly. Fine line script looks elegant but needs a steady hand—ask artists for healed script samples. The area can be tender; expect some soreness. Keep the lettering size moderate so letters remain legible as the skin moves and ages.
11. Micro-Realism Pet + Family Portrait on Thigh
Style/Technique: Micro-Realism / Portrait
Pain Level: Medium (4-6/10)
Session Time: Multiple sessions
Best For: Larger, private family and pet combo
Combining pets with family members in micro-realism creates a complete keepsake. Thighs give space and are less painful than ribs. Detailed shading can blur if done too fine, so ask for slightly stronger contrast. This area heals well with minimal friction if you choose loose clothing.
12. Heirloom Locket Micro-Realism on Sternum
Style/Technique: Micro-Realism / Jewelry
Pain Level: High (6-8/10)
Session Time: 1–3 hours
Best For: Intimate, sentimental jewelry-style tattoos
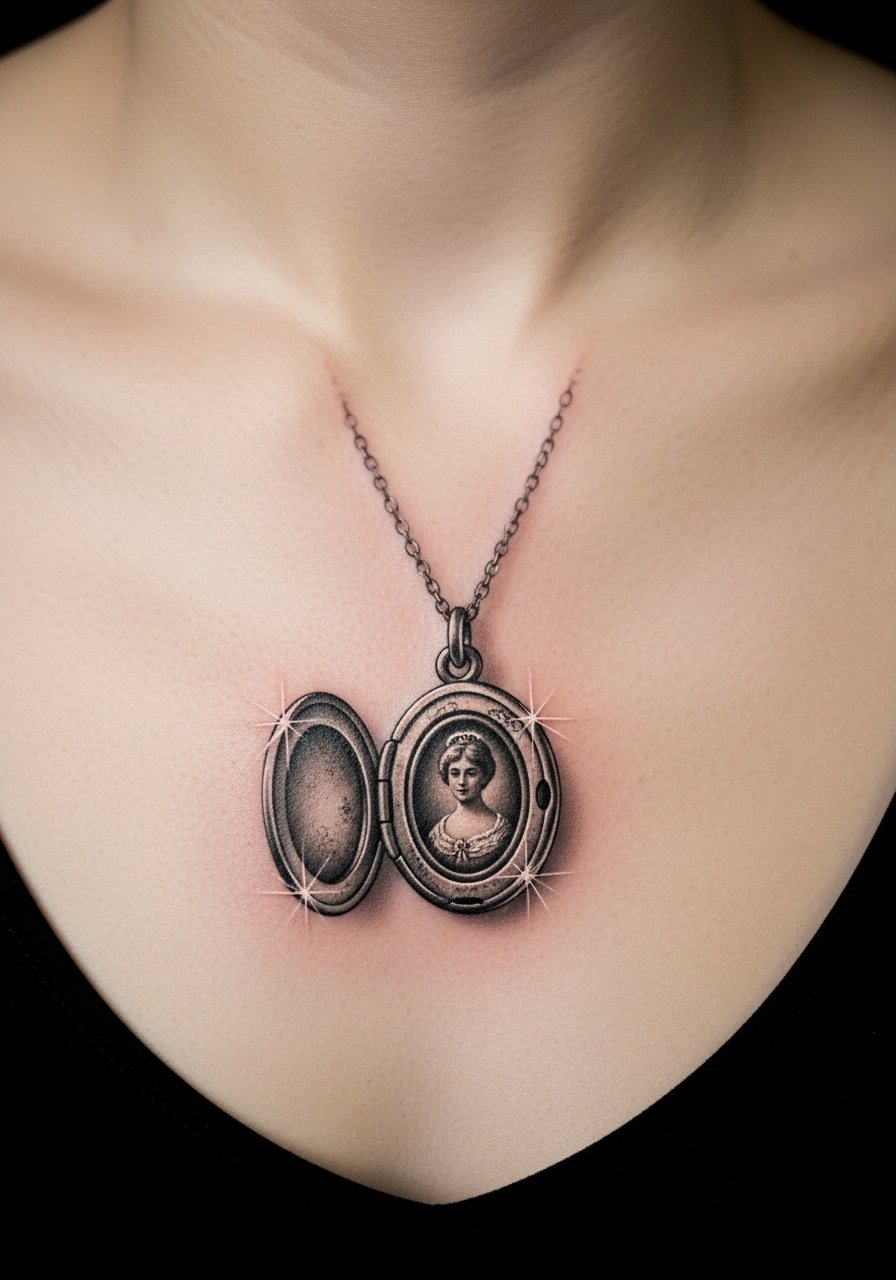
A locket tattoo feels like wearing family keepsakes forever. Sternum placement reads as private and precious. Detail must be balanced so it stays readable; tiny portraits often need touch-ups. Expect tenderness and plan clothing to avoid rubbing while healing.
13. Neo-Traditional Family Crest on Upper Arm
Style/Technique: Neo-Traditional / Bold Color
Pain Level: Low-Medium (3-5/10)
Session Time: 2–4 hours
Best For: Statement, heirloom-style pieces
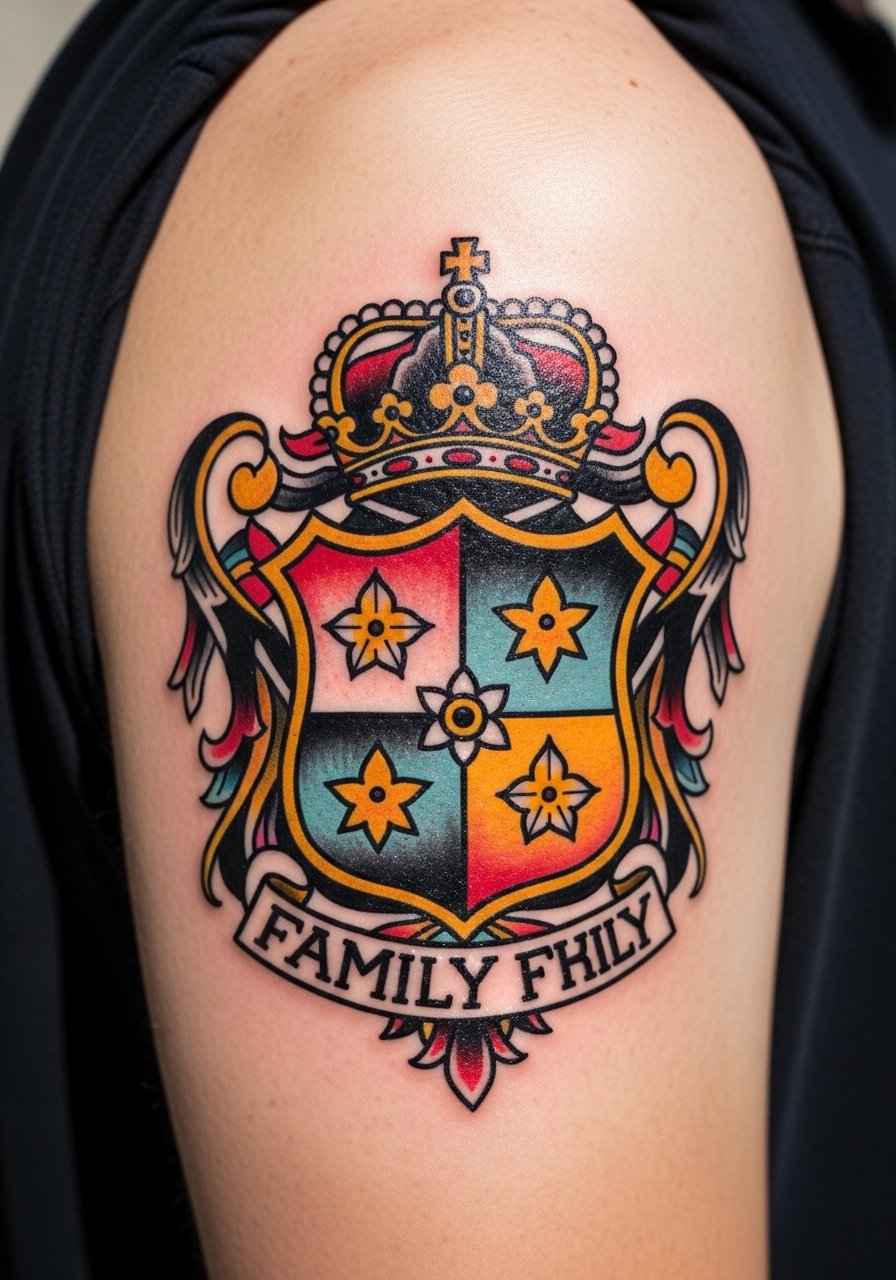
A family crest in neo-traditional style modernizes heritage with bold outlines and color. Upper arms hold saturation well and are low-pain. Color pieces can show slight fading over years; black outlines keep structure. Mistake: overcomplicating the crest—simplify symbols for clearer healing.
14. Coordinates of Family Home on Inner Forearm
Style/Technique: Minimalist / Numeric Linework
Pain Level: Low (2-3/10)
Session Time: 30–60 minutes
Best For: Subtle, travel-root reminder
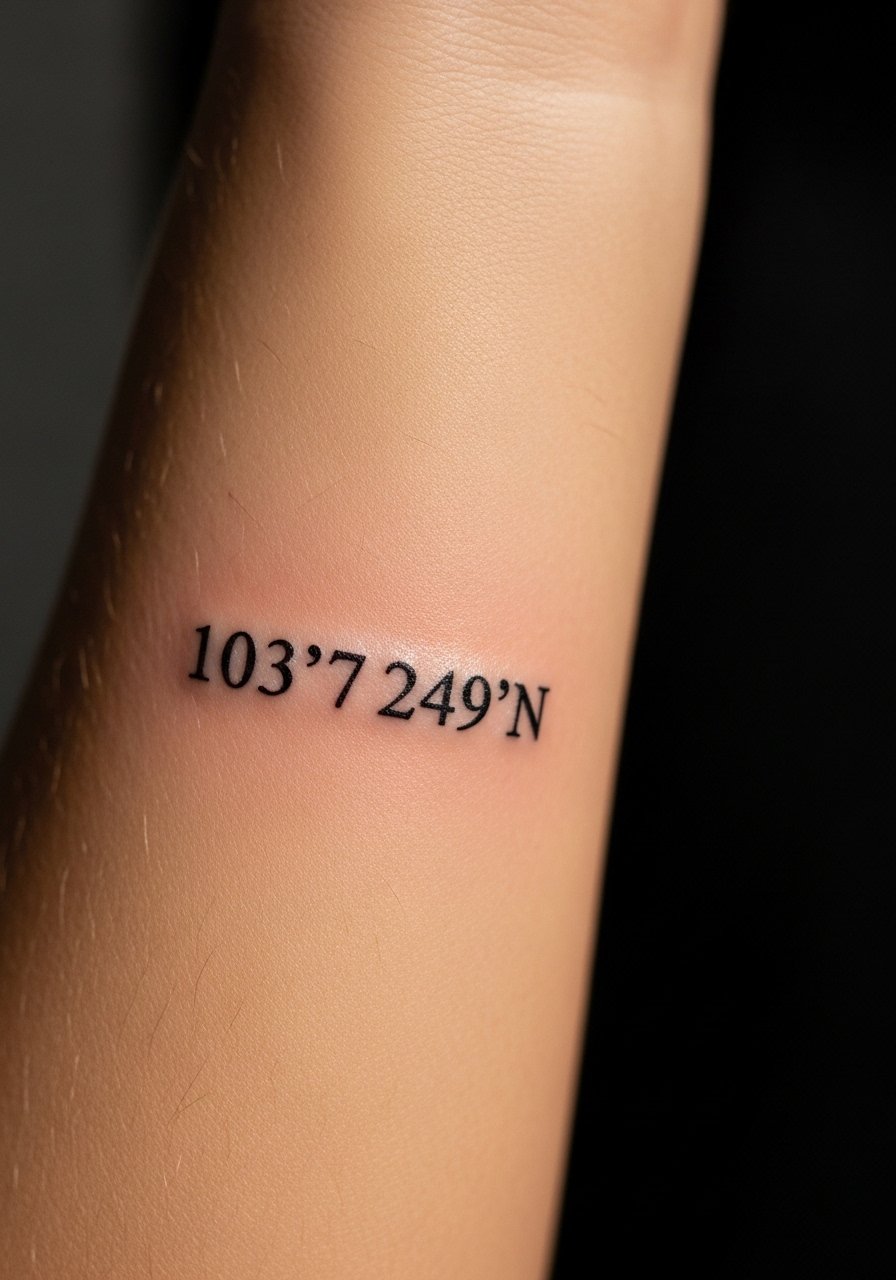
Coordinates read like a private map to what's important. Inner forearm placement is visible and low-pain. Numbers hold up well if spacing is clear. Avoid tiny fonts; legibility is key as lines soften. This is a simple, modern take on family-root tattoos.
15. Continuous Line Family Silhouette on Forearm
Style/Technique: Fine Line / Single-Continuous Line
Pain Level: Low-Medium (3-5/10)
Session Time: 1–2 hours
Best For: Modern, matching pieces for siblings
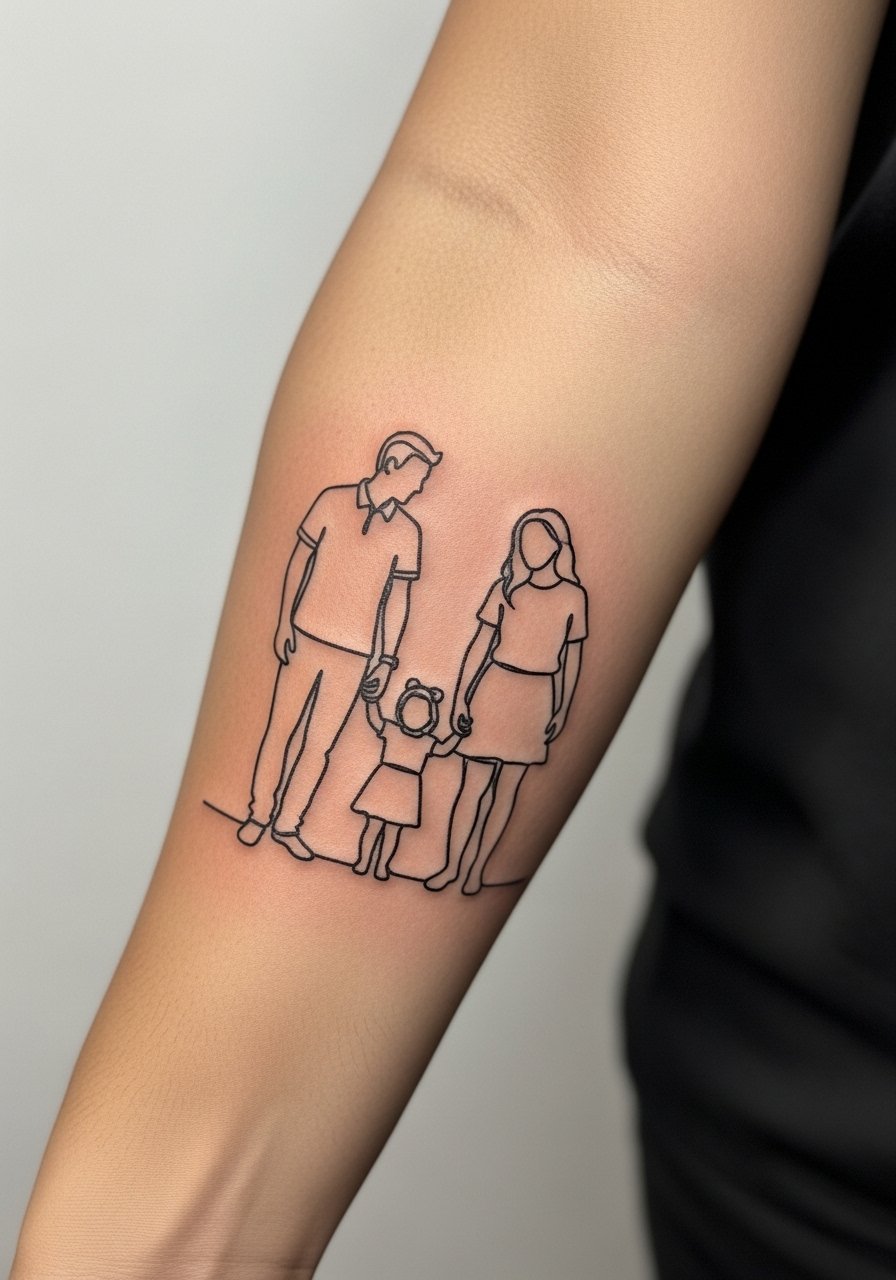
Continuous line art feels modern and cohesive across multiple tattoos. Forearm placement displays the flow. Thin single lines can blur, so ask for slightly heavier gauge so the silhouette remains distinct. Artists who do fine line with healed portfolios are ideal.
16. Watercolor Fingerprint Tree on Calf
Style/Technique: Watercolor / Mixed Technique
Pain Level: Low-Medium (3-5/10)
Session Time: 1–2 hours
Best For: Playful, colorful family symbols
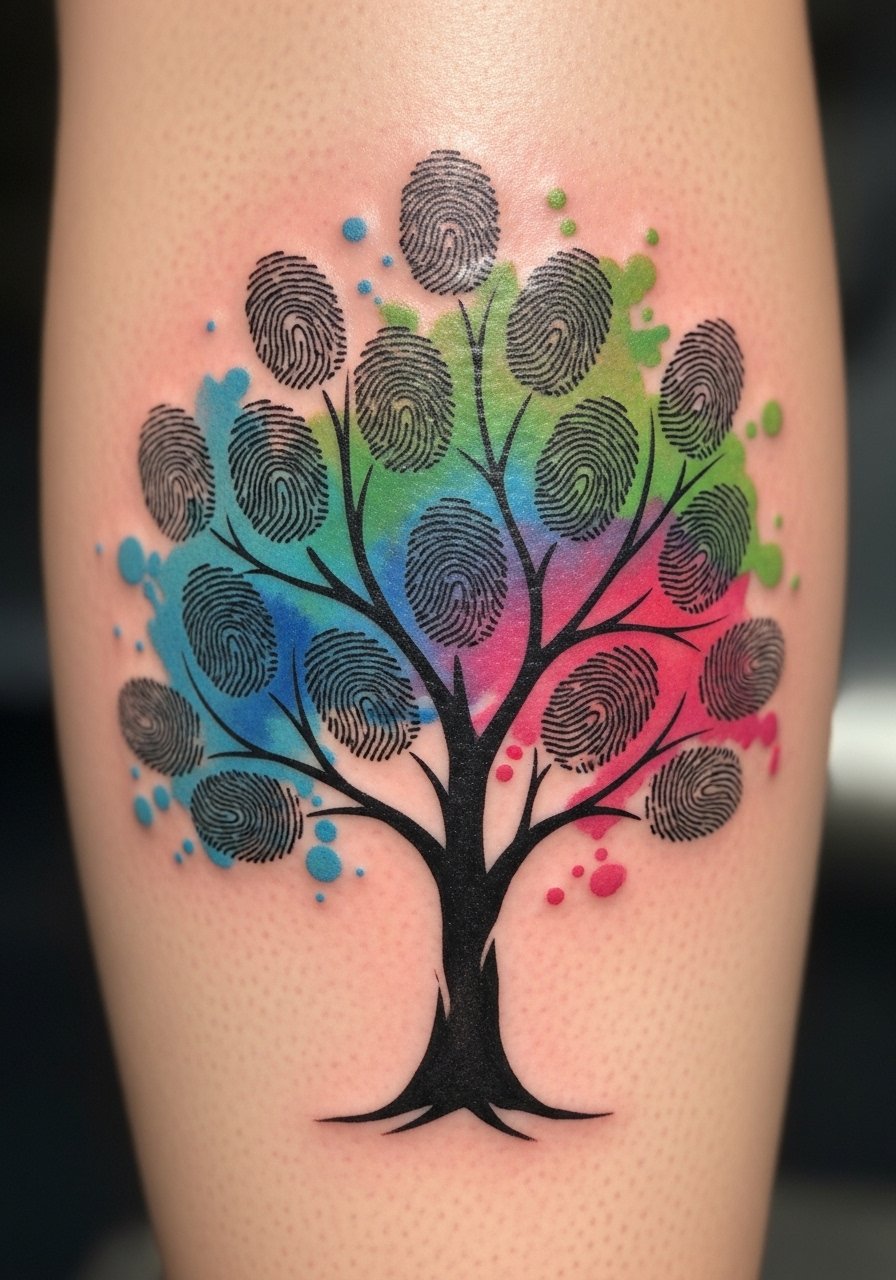
Combining fingerprints as leaves in a watercolor tree adds color and personality. Calf placement is low-pain and easy to hide. Colors need extra sun care; they look best once healed and brightened. Mistake: relying only on pale washes—ask for enough saturation to survive a few years.
17. Interlocking Rings on Ring Finger
Style/Technique: Minimalist / Fine Line Ringwork
Pain Level: Medium (4-6/10)
Session Time: 30–60 minutes
Best For: Symbolic everyday wear
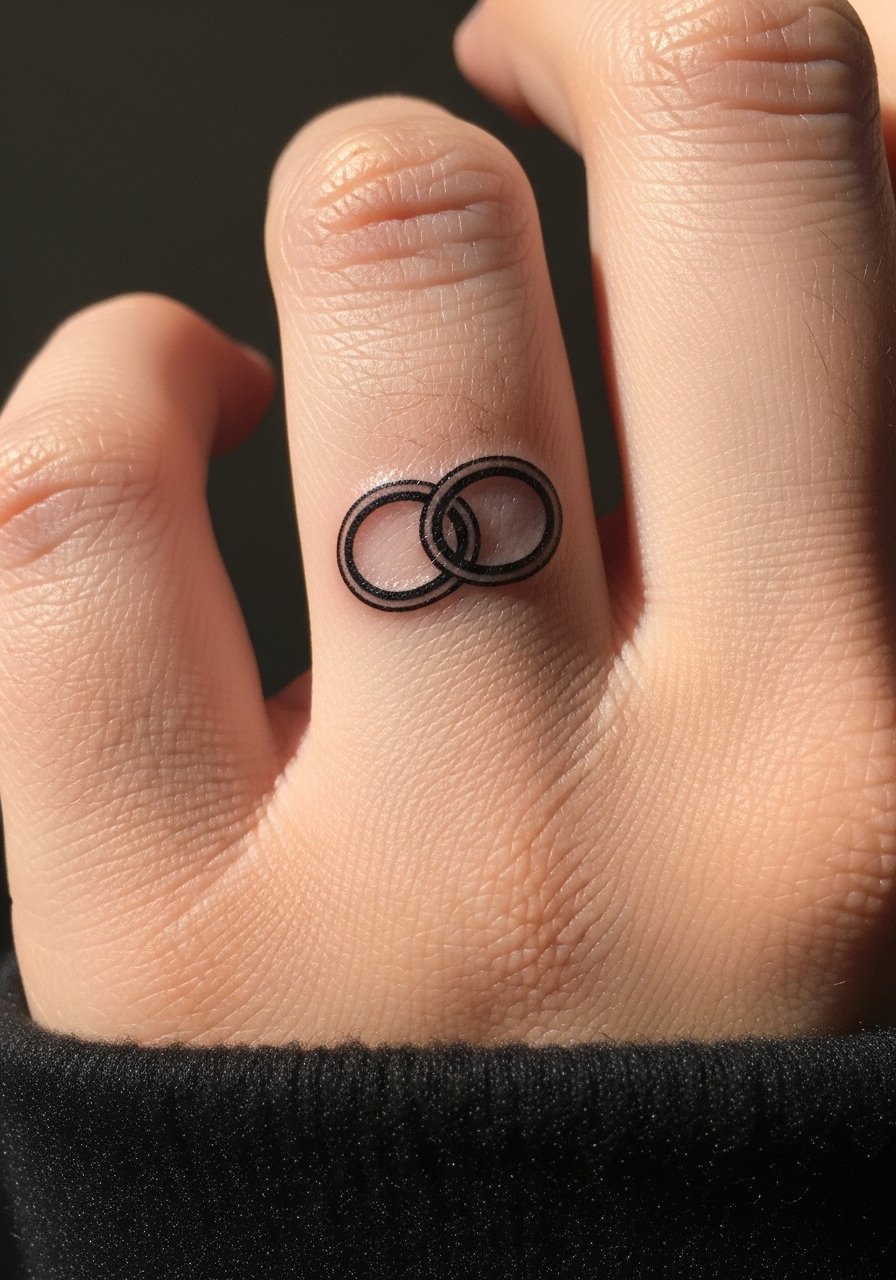
Finger tattoos are visible and symbolic but blur faster due to skin and washing. Interlocking rings read like commitment to family; expect more frequent touch-ups. Choose bolder line weight and consult about placement to keep the rings even. Artists often recommend simple shapes for longevity.
18. Constellation of Birth Stars on Shoulder
Style/Technique: Minimalist / Dotwork
Pain Level: Low (2-4/10)
Session Time: 30–90 minutes
Best For: Subtle matching pieces, expandability
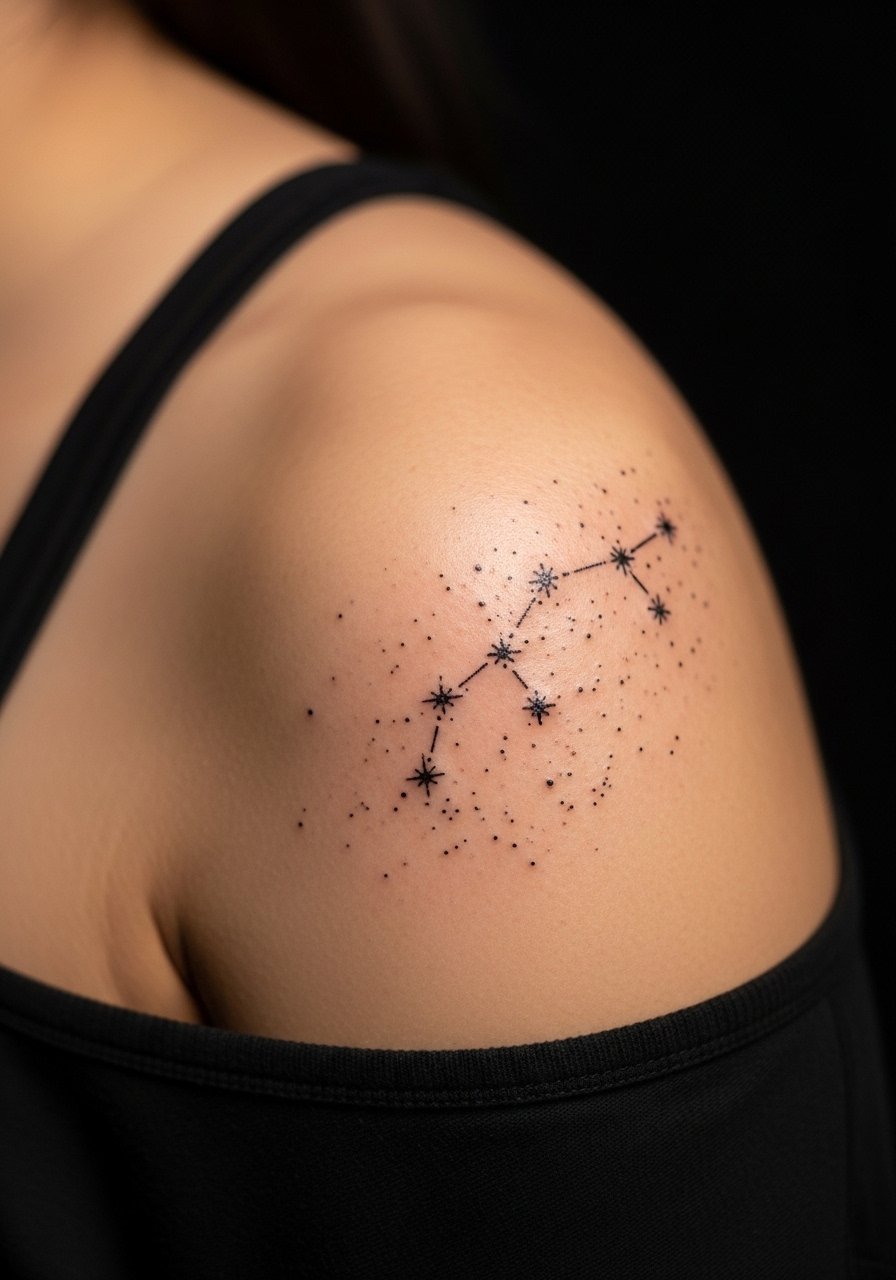
Constellations turn birthdays into a graphic map across skin. Shoulders handle dotwork well and sit nicely under clothing. Small dots can blur if too close together; space them for clarity. This is an under-used way to link multiple family members visually.
19. Handwritten Name Script on Ribcage
Style/Technique: Fine Line / Handwriting Replica
Pain Level: High (7-8/10)
Session Time: 1–2 hours
Best For: Sentimental keepsakes using real handwriting
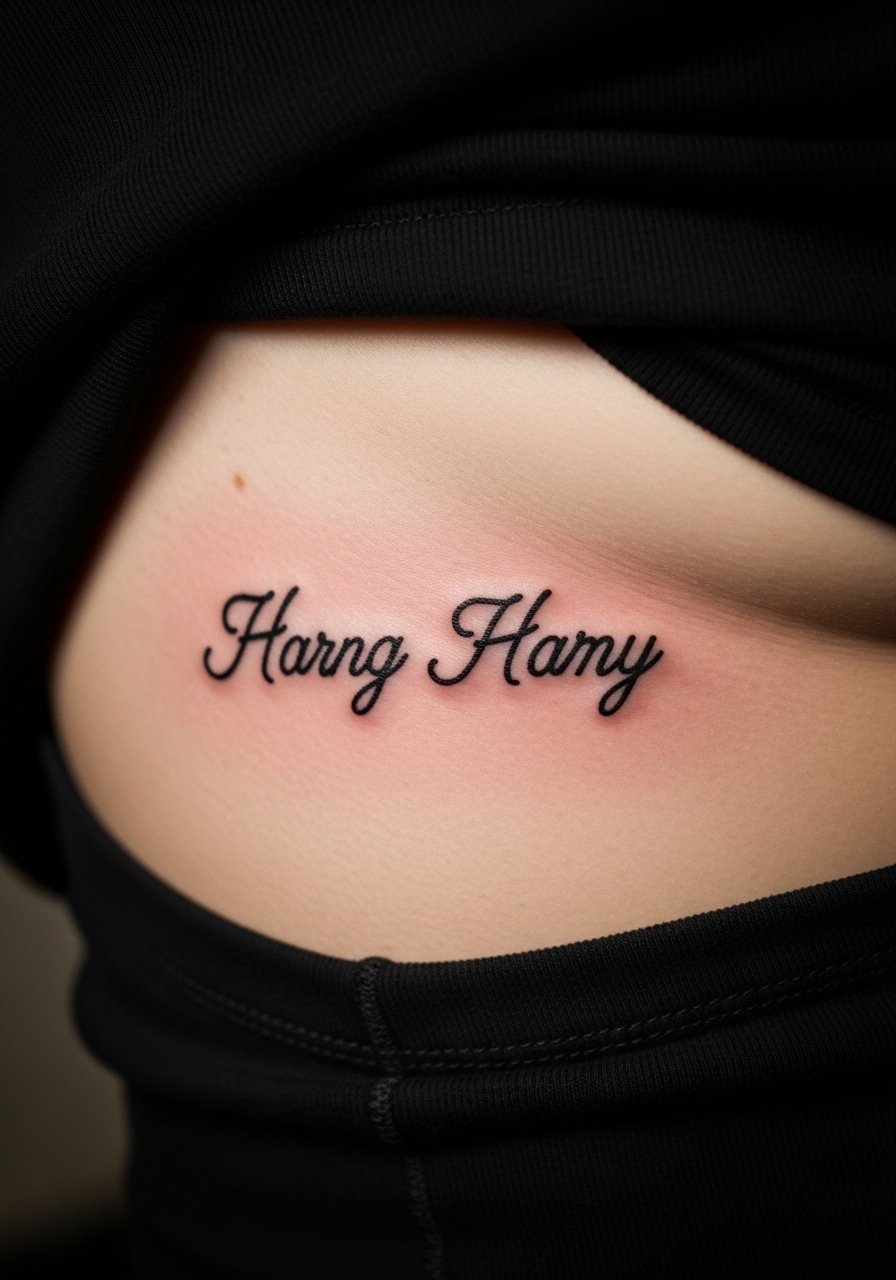
Using a loved one’s handwriting is highly personal. Ribcage placement is intimate but painful. Handwriting reproductions need clear, high-contrast originals so the lines translate well. Healing requires patience due to movement with breathing; expect tenderness early on.
20. Pawprints Across Ankle For Family Pet
Style/Technique: Minimalist / Silhouette
Pain Level: Medium (4-6/10)
Session Time: 30–90 minutes
Best For: Memorial or ongoing pet love
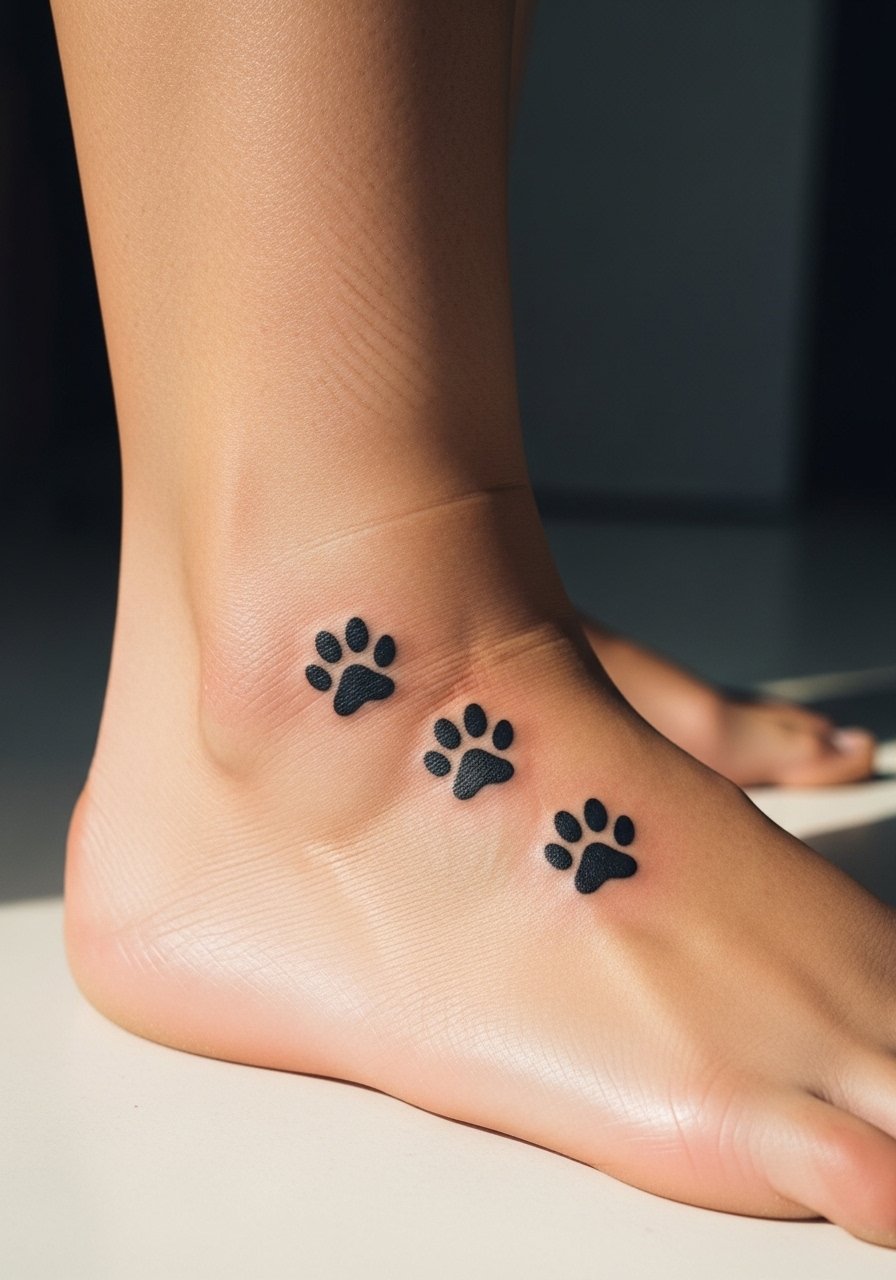
Pawprints are a gentle nod to a family pet and work well on ankles. Small filled prints age predictably. Ankles can sting due to thin skin; expect short, sharp sensations. Keep the prints solid rather than finely detailed so they stay crisp.
21. Family Recipe Script on Inner Arm
Style/Technique: Fine Line / Text Art
Pain Level: Low-Medium (3-5/10)
Session Time: 1–2 hours
Best For: Heirloom text, sentimental culinary family ties
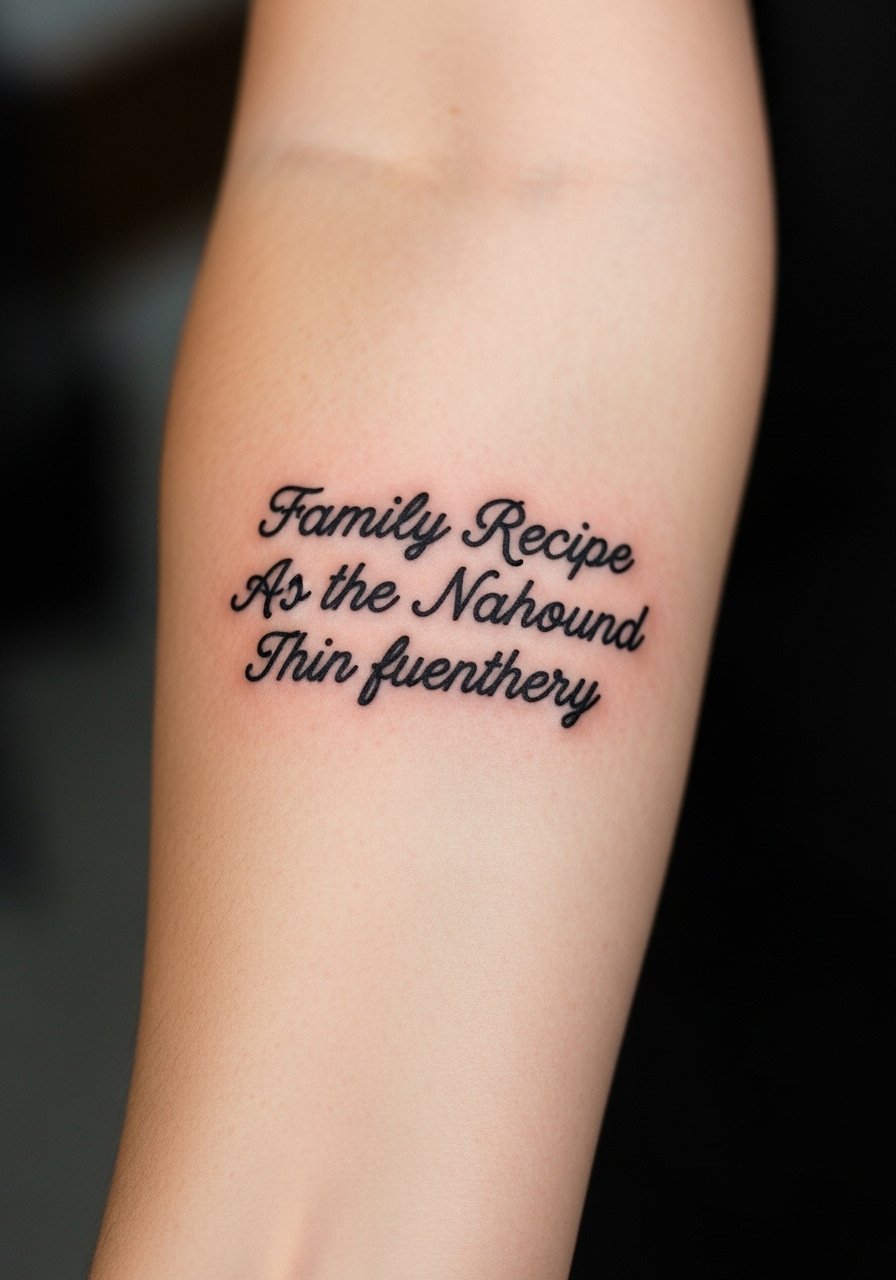
Tattooing a short line from a family recipe feels like carrying tradition. Inner arm placement shows off the text. Keep the text brief—inking long paragraphs makes healing and reading difficult. Ask for larger lettering for clarity long-term.
22. Geometric Family Bond on Shoulder Blade
Style/Technique: Blackwork / Geometric
Pain Level: Low-Medium (3-5/10)
Session Time: 1–2 hours
Best For: Modern, matching sibling pieces
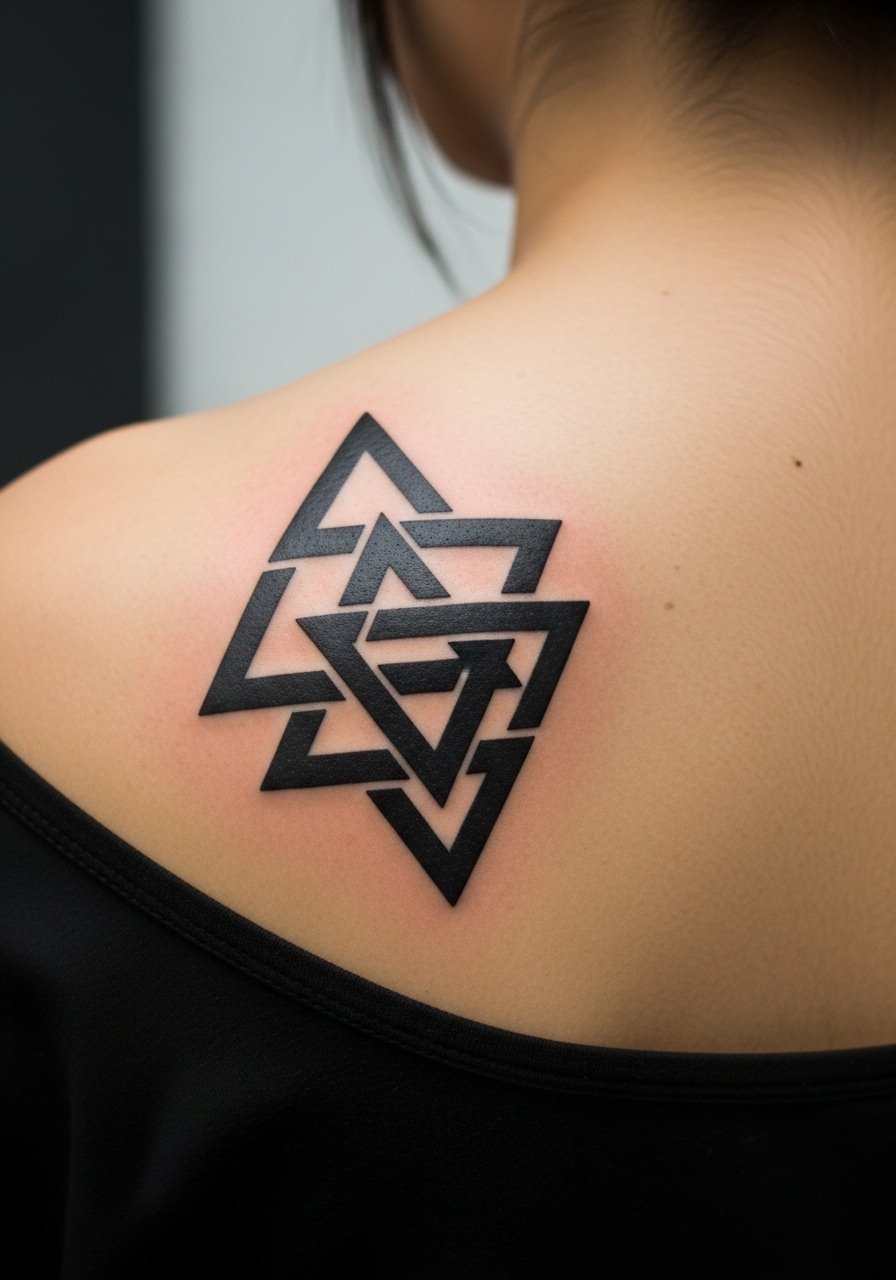
Geometric patterns symbolize structure and connection. Shoulder blades allow symmetry and future expansion. Blackwork holds up well; crisp shapes stay readable over time. Avoid overly intricate dotwork if you want long-term clarity.
23. Roman Numeral Birthdates Along Collarbone
Style/Technique: Minimalist / Numeric Script
Pain Level: Medium (4-6/10)
Session Time: 30–90 minutes
Best For: Classic, readable tributes
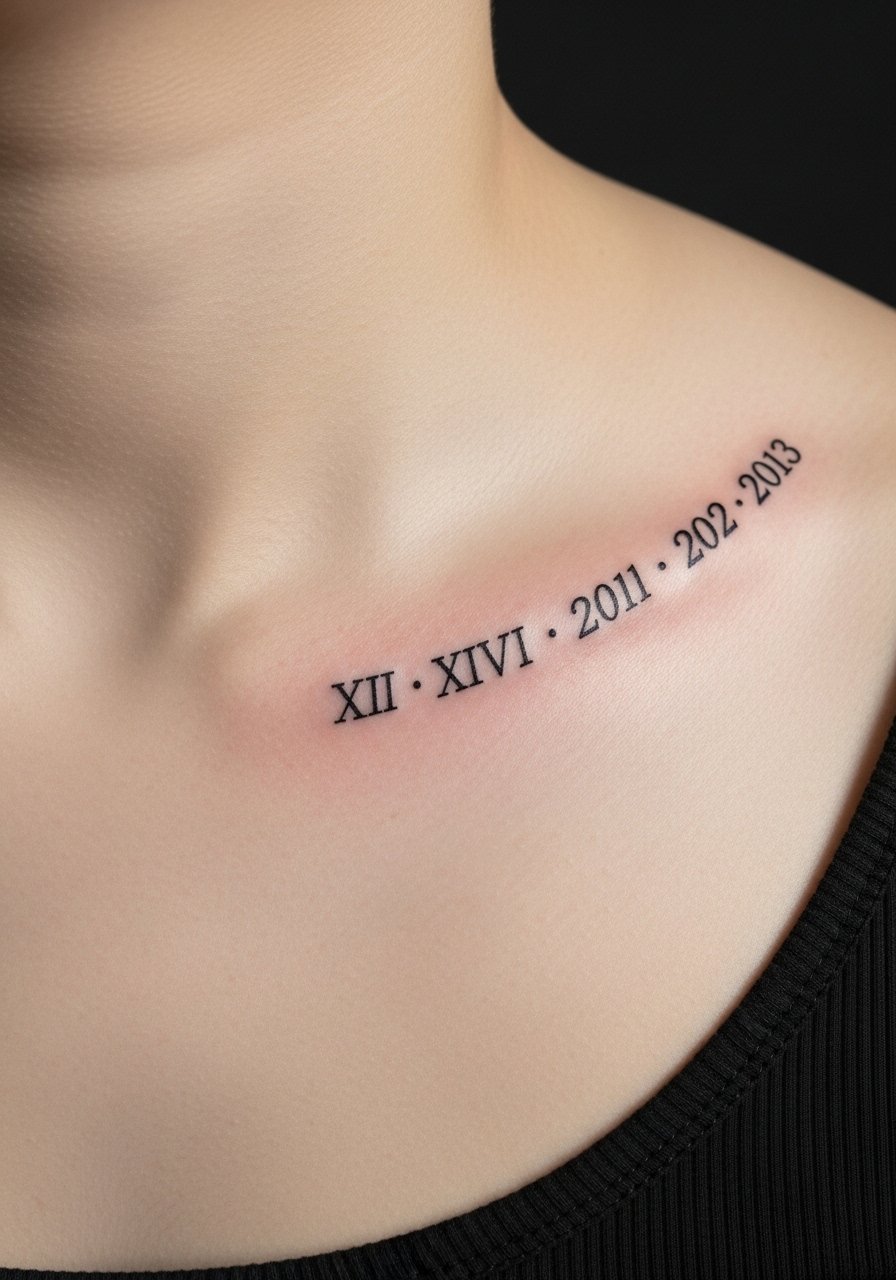
Roman numerals feel classic and discreet. Collarbone placement shows intention without shouting. Keep numeral thickness moderate—thin numerals can merge over years. Artists who tattoo fine script with healed examples are preferred.
24. Map Line Of Ancestral Route On Side Rib
Style/Technique: Minimalist / Fine Line Map
Pain Level: High (7-8/10)
Session Time: 1–3 hours
Best For: Storytelling, historic family routes
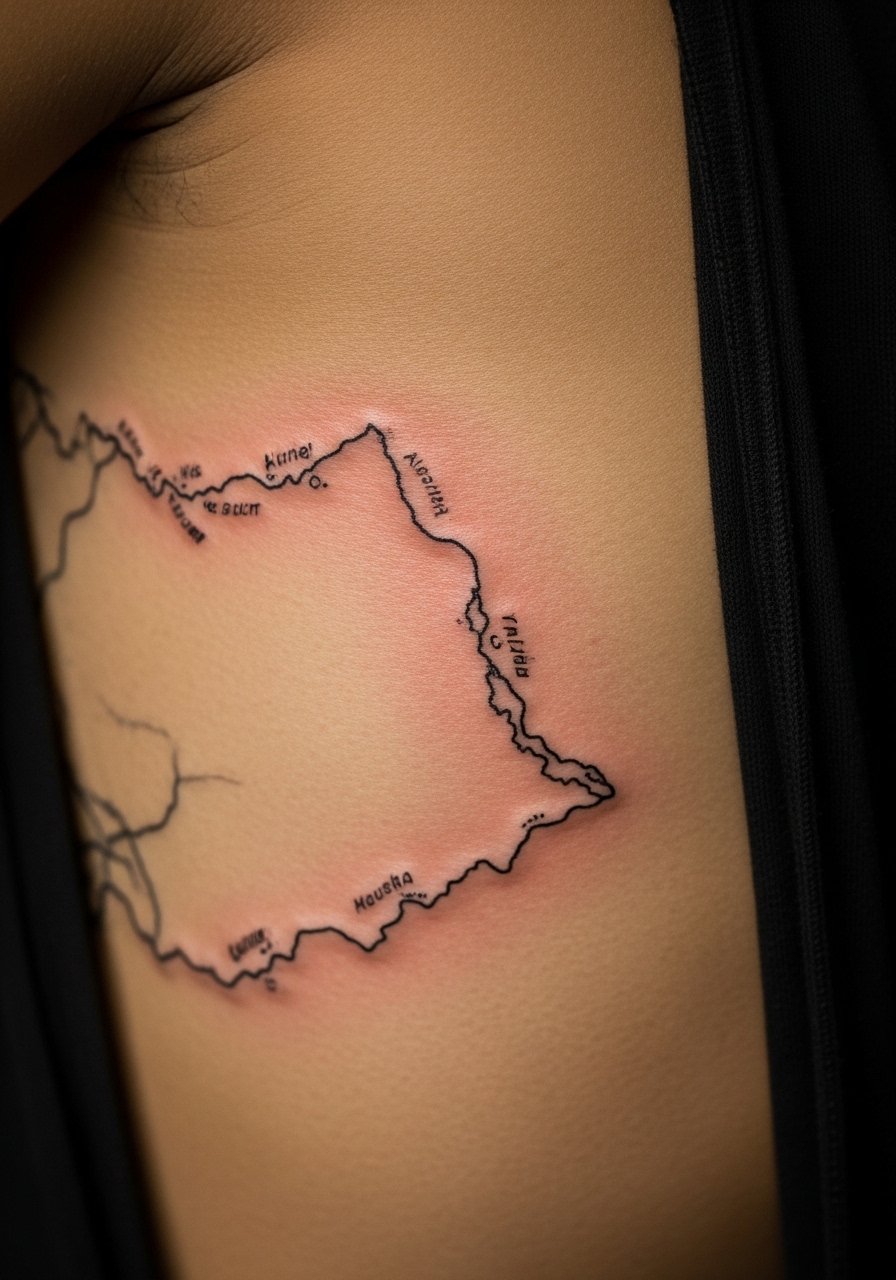
Tracing a map of where family came from is poetic. The rib area gives a long canvas but is sensitive. Lines need enough weight so the route remains visible as skin shifts. Plan for slower healing and protect from the sun to keep the blackwork crisp.
Tattoo Prep and Aftercare Essentials
Aftercare Essentials:
- Aquaphor Healing Ointment, 14oz tube — For first 3–5 days of heavy moisturizing
- Saniderm Transparent Adhesive Bandage, 6-inch roll — Second-skin healing option
- CeraVe Fragrance-Free Moisturizing Lotion — Daily moisturizer for weeks 2–6
- Dr. Bronner's Unscented Castile Soap, 18oz — Gentle cleaning during first week
- After Inked Tattoo Moisturizer, 4oz — Popular healed-skin moisturizer
Before Your Appointment:
- Numbing Cream With 5% Lidocaine — Use only if your artist okays it; apply 30–45 minutes prior
- Tattoo Stencil Transfer Paper — If you’re prepping custom designs at home
Long-Term Maintenance:
- SPF 50 Sunscreen Stick For Tattoos — Daily use to prevent fading
- Mad Rabbit Tattoo Balm 1.76oz — Keeps healed ink vibrant
- Hustle Butter Deluxe Tattoo Butter 4oz — Vegan aftercare option
Optional Comfort Items:
- Hydrocolloid Bandages, Large Pack — For small spot protection
- Tattoo Aftercare Kit — Good starter bundle for first-timers
From what I've gathered, most artists I talk to recommend starting with Aquaphor or Saniderm, switching to fragrance-free lotion after a few days, and committing to sunscreen forever.
Frequently Asked Questions
Q: How bad does a tattoo actually hurt?
A: Pain depends on placement and tolerance. Outer forearm or thigh = 2–4/10. Ribs, sternum, ankle = 7–9/10. It’s more a persistent burning or scratching than sharp agony for most people. For sensitive spots ask about a numbing cream with 5% lidocaine—it helps but won’t erase sensation.
Q: What if I regret the design later?
A: Sit on big, visible ideas for months. If you’re unsure, choose hidden placements so you can live with it privately. Laser removal exists but it's a long process. I’ve seen people cover pieces successfully with neo-traditional or bold blackwork when needed.
Q: How do I keep my tattoo from fading?
A: Sunscreen is essential. From my experience, UV exposure kills ink faster than anything else. Use an SPF 50 sunscreen stick for tattoos daily. Moisturize regularly with a fragrance-free lotion to keep skin healthy.
Q: Can I work out after getting inked?
A: Wait at least 48–72 hours, longer for high-flex areas like ribs. Sweating and friction risk infection and ink loss. I usually tell people to avoid heavy cardio or tight clothing over the piece for a week.
Q: Should I get a tiny tattoo first to test pain?
A: Only if you genuinely want a small piece—don’t pick something trivial just to “test.” Pain varies more by placement than size; a tiny wrist tattoo can hurt more than a larger outer-arm piece. Choose a low-pain area if you want a gentle introduction.
Q: How long does a tattoo take to heal?
A: Surface healing is typically 2–3 weeks; full healing can take 2–3 months. The first week is critical—clean gently with unscented soap, use Aquaphor or Saniderm as your artist recommends, and expect peeling around days 3–7.
Q: Do tattoos look different on darker skin tones?
A: Yes. Black and gray pieces show beautifully across skin tones; some bright colors may appear more muted on deeper skin. White ink often reads differently—discuss healed examples with artists who regularly tattoo people with your skin tone.
Q: What’s a common tattoo mistake to avoid?
A: Choosing hairline-thin lines or tiny text without checking healed samples. Fine work needs a slightly heavier hand to survive years of skin movement. Ask to see healed photos of similar pieces before committing.
