
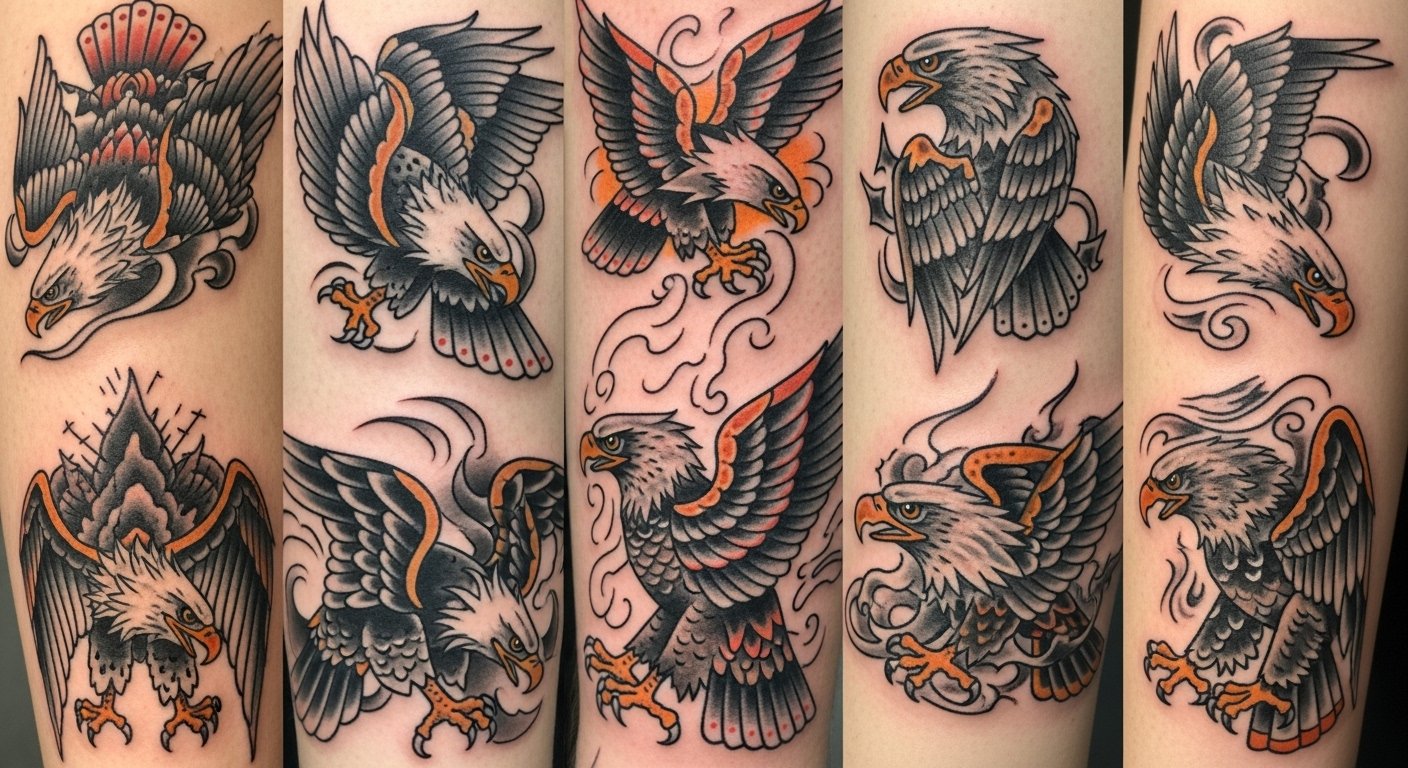
I spent months bookmarking eagle tattoos before I realized the real choice wasn't just style—it was where the design would age and how it would feel on my body. These 24 dominant eagle tattoo ideas focus on power and longevity, the placements that work, and what to ask your artist so the symbol stays strong healed.
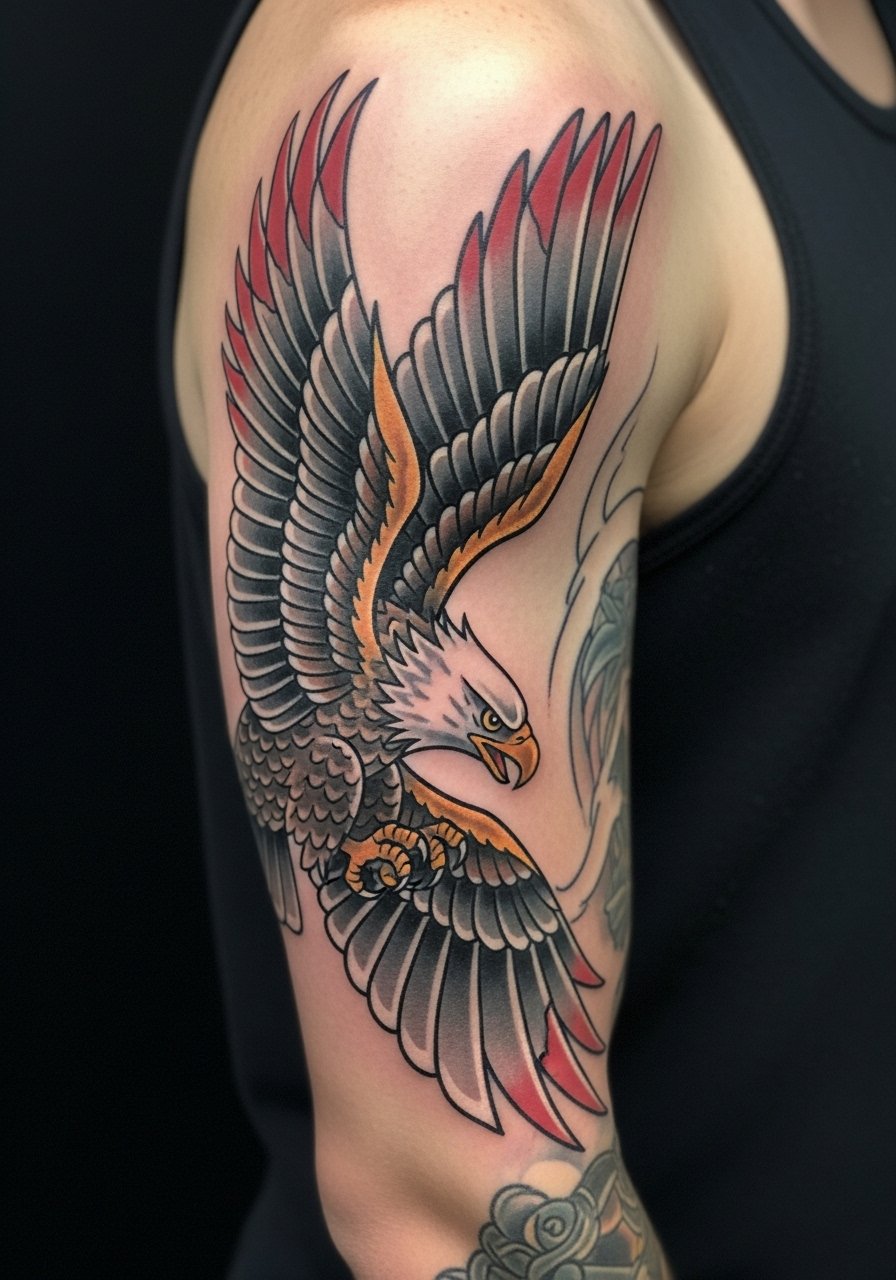
1. Traditional Eagle Head on Outer Bicep
Style/Technique: American Traditional
Pain Level: Low-Medium (3/10)
Session Time: 2–4 hours
Best For: Classic, visible statement
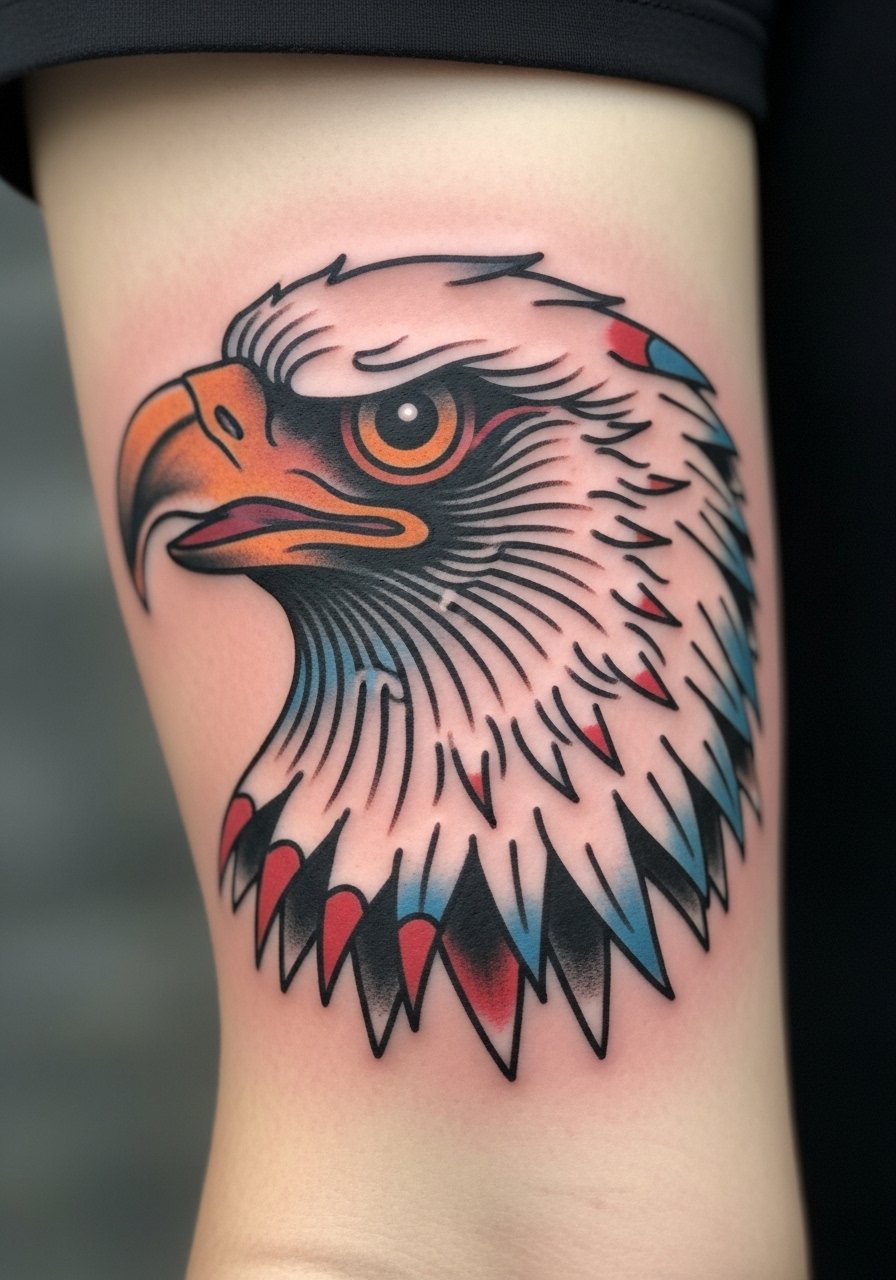
I picked this classic after seeing Sailor Jerry–inspired flash. The bold outlines and limited palette make it read as power and freedom even as it heals. Bicep skin is forgiving for linework, so pain is manageable. I've noticed strong black outlines age best; ask your artist for solid line weight. Avoid tiny feather details that blur into a mess later.
2. Neo-Traditional Eagle in Flight on Upper Back
Style/Technique: Neo-Traditional / Color
Pain Level: Medium (4/10)
Session Time: Multiple sessions
Best For: Large storytelling pieces
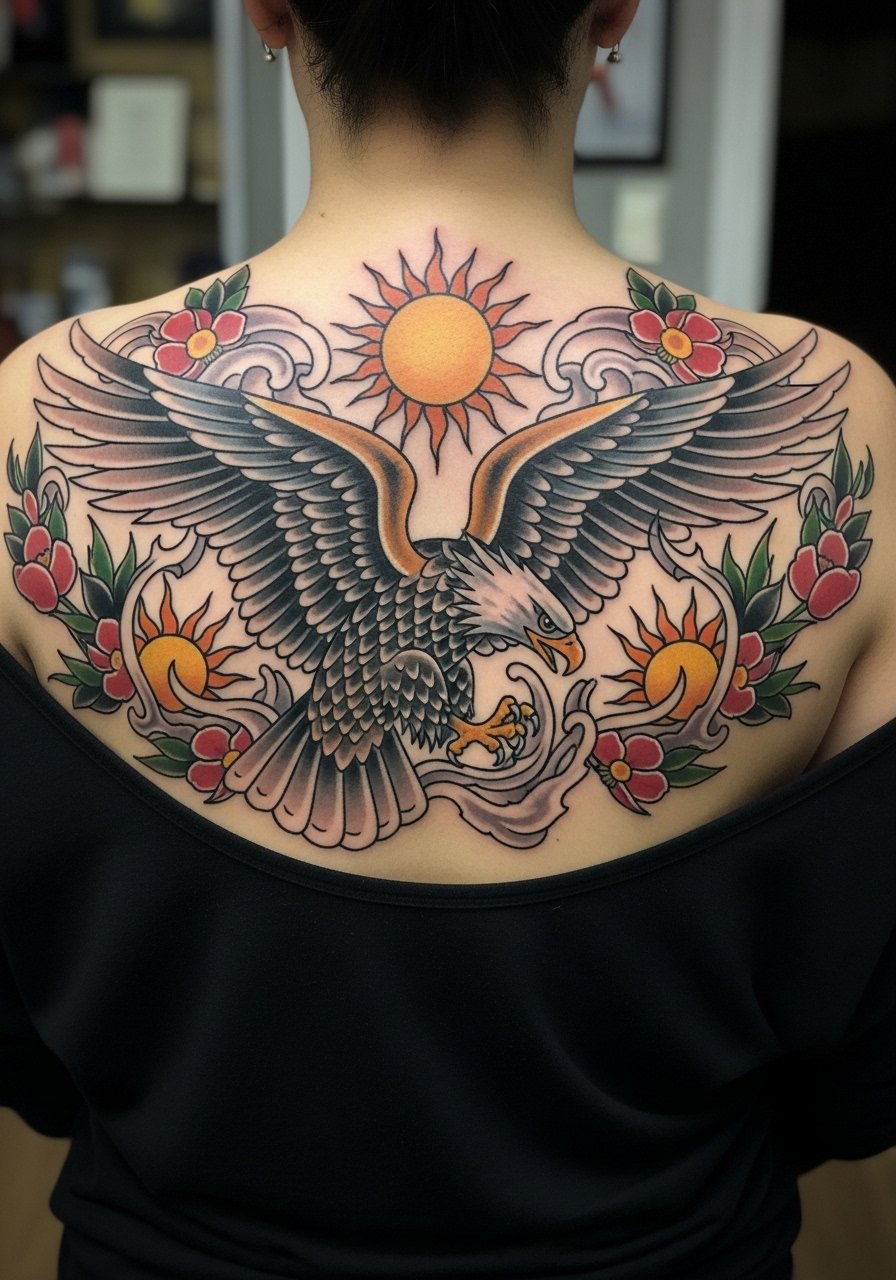
This is where artists get creative—flowers, sunbursts, and layered shading add personal narrative to the freedom symbol. Upper back gives space for wings to flow with the body. Expect multi-session work and soreness between sessions. From what I've seen, neo-traditional color can look rich healed if saturation is right. Don’t cram too many tiny details; they lose clarity on large curved surfaces.
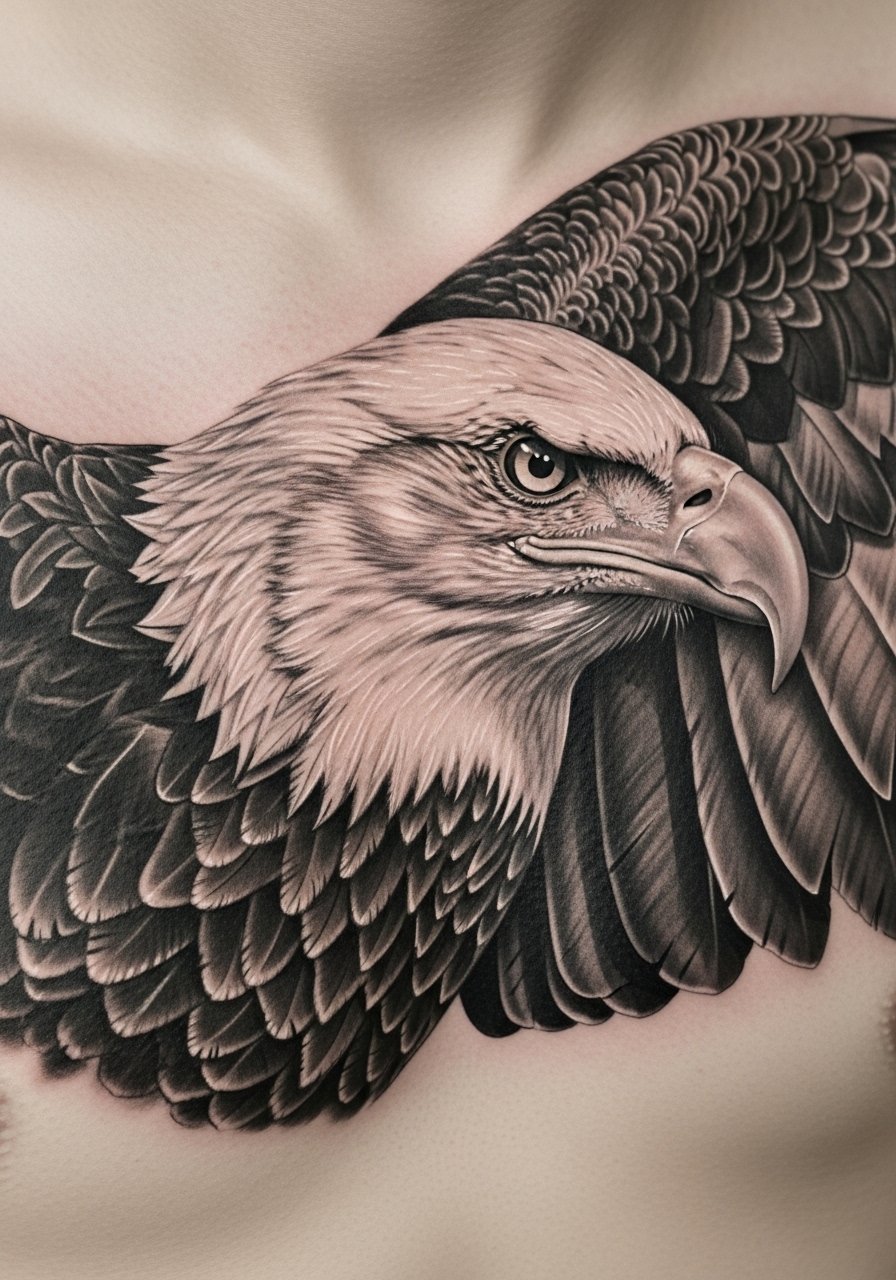
3. Realistic Bald Eagle Portrait on Center Chest
Style/Technique: Realism / Black & Gray with Color Accents
Pain Level: Medium-High (5/10)
Session Time: Multiple sessions
Best For: Bold, meaningful focal piece
A chest portrait reads like authority and connection to nature. Chest can sting more than the arm, but the visual payoff is strong. Realistic feathers need an experienced realism artist. I always ask to see healed portfolios—feather work is the make-or-break. Keep outlines balanced; hyper-fine feather strokes often blur if overused.
4. Tribal Eagle Wings Shoulder Cap
Style/Technique: Tribal / Blackwork
Pain Level: Low-Medium (3-4/10)
Session Time: 2–4 hours
Best For: Heritage-focused, high-contrast looks
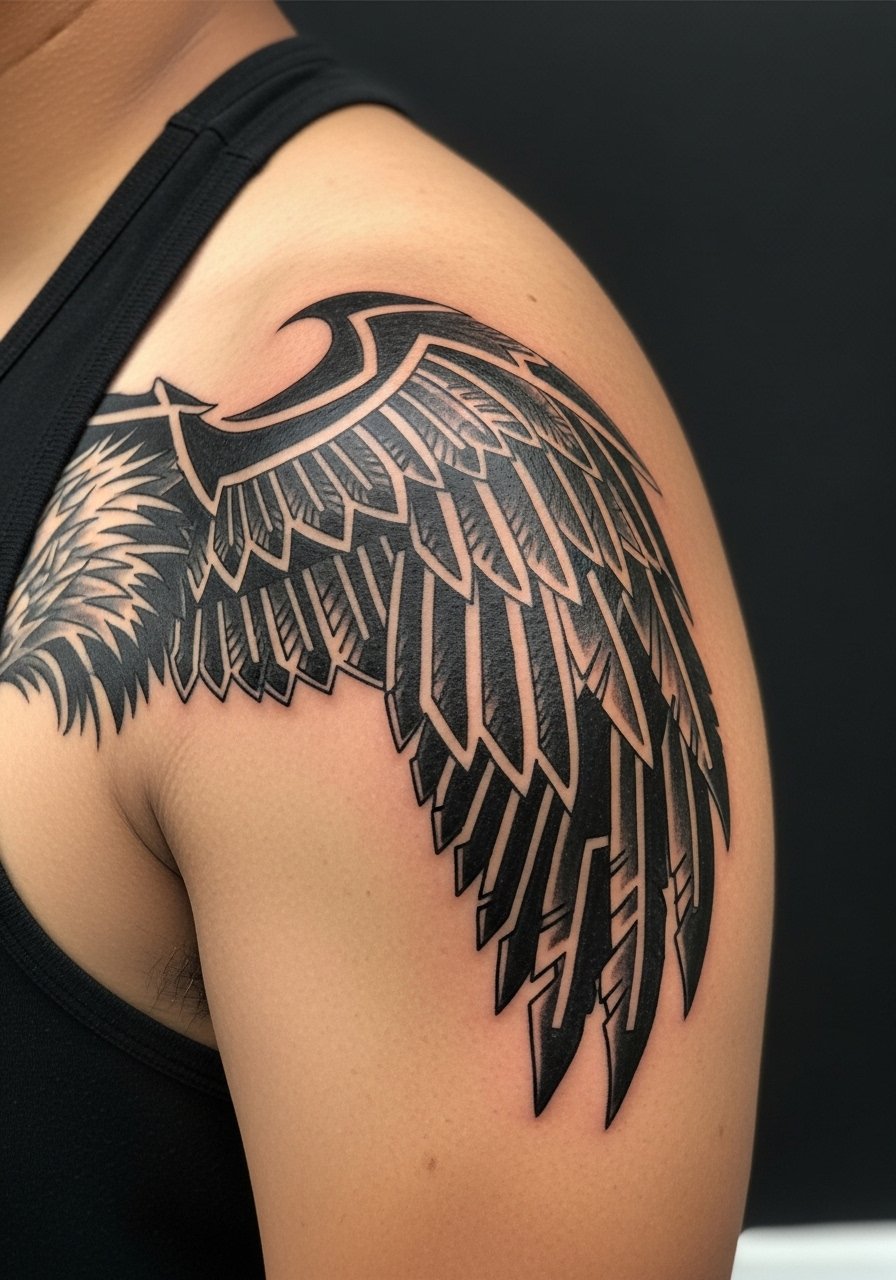
Tribal wings use bold geometry to convey strength. The shoulder cap lets designs wrap naturally. I like this if you want a timeless, masculine feel that ages predictably. Artists who specialize in geometric blackwork produce the clean fills you want. Avoid overly thin lines; tribal needs weight to remain crisp years later.
5. Traditional Eagle with Banner on Inner Forearm
Style/Technique: American Traditional
Pain Level: Low (2-3/10)
Session Time: 1–3 hours
Best For: Readable, personal messaging
A banner lets you add a name or motto to the freedom symbol. Inner forearm placement means good visibility and lower pain. I recommend bold lettering and strong outlines so the banner stays legible healed. Artists often suggest thicker letters over script that can blur. Keep color blocks simple for longevity.
6. Minimalist Eagle Silhouette on Wrist
Style/Technique: Minimalist / Fine Line
Pain Level: Low (2/10)
Session Time: 30–60 minutes
Best For: First eagle tattoo, subtle power
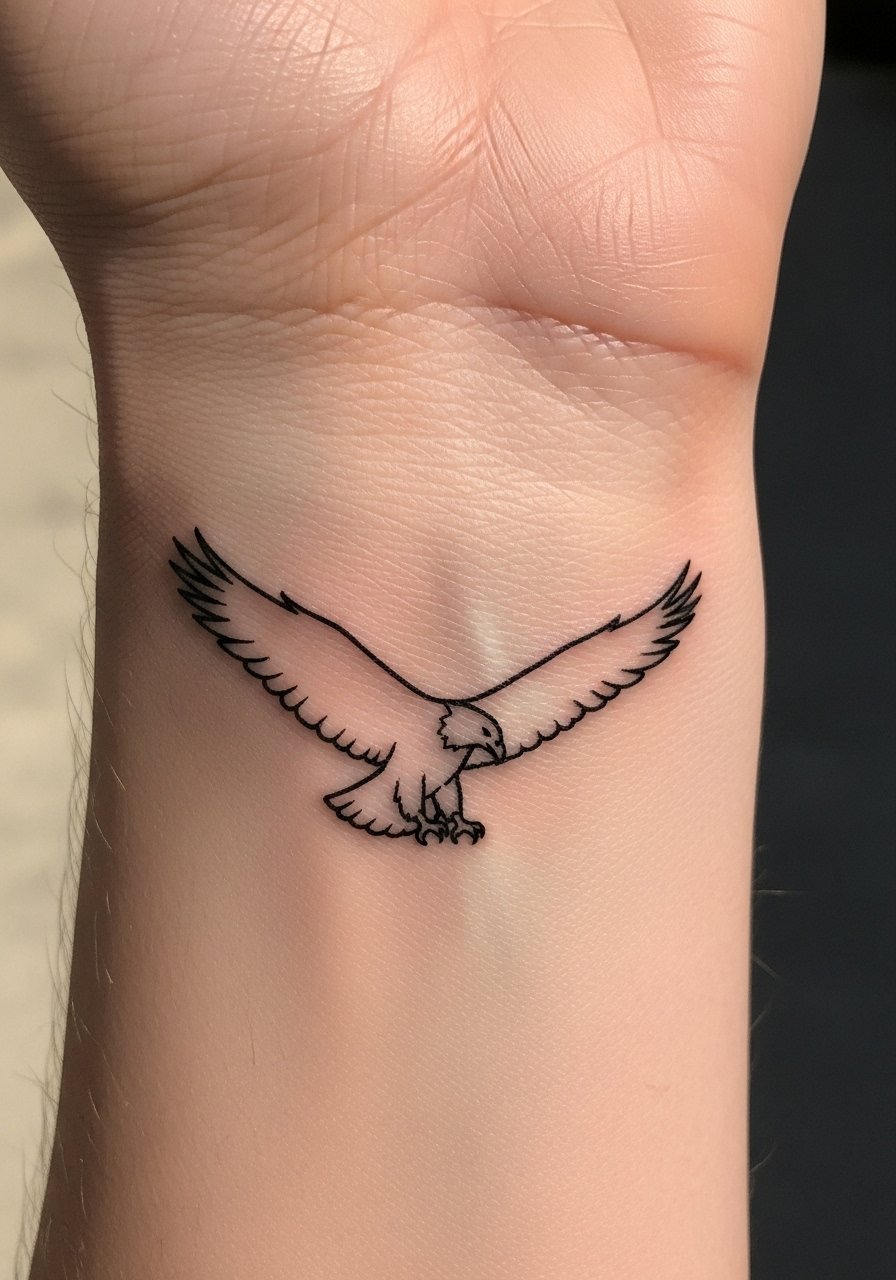
This was my pick when I wanted an understated freedom symbol. Tiny silhouettes read well on wrists but need a steady hand. I've seen fine line wrist tattoos blur faster on very active skin, so ask for slightly bolder lines than you think you need. Keep it simple and avoid thin feather texture.
7. Watercolor Eagle Soaring on Ribcage
Style/Technique: Watercolor / Painterly
Pain Level: High (7/10)
Session Time: Multiple sessions
Best For: Artistic, spiritual vibe
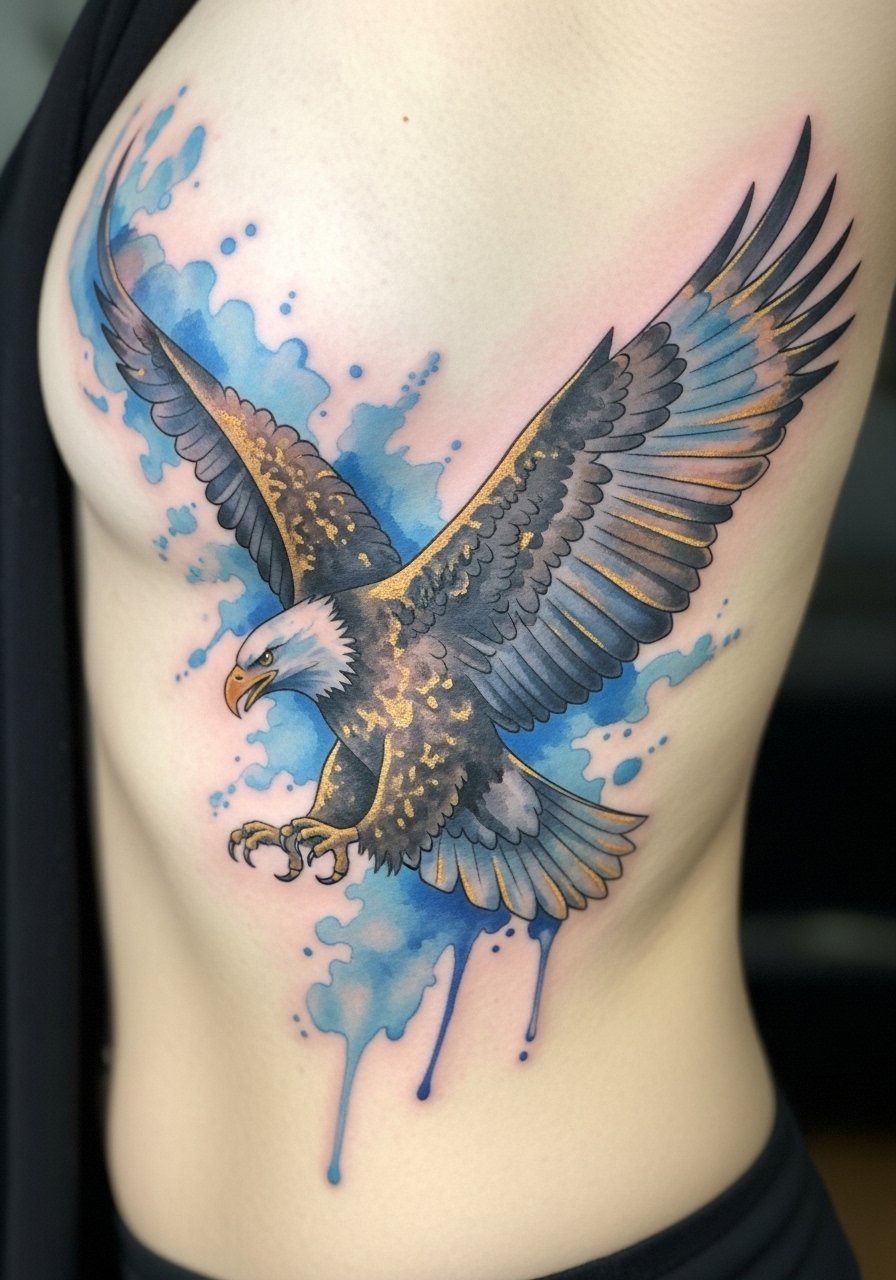
Ribcage placement is dramatic but painful. Watercolor washes create a spiritual, airy feel that pairs with the eagle in flight. From what I've seen, watercolor fades faster, so artists often pair it with a light black outline for structure. Don’t expect razor-sharp edges from watercolor—embrace the blended look and plan touch-ups down the road.
8. Neo-Traditional Eagle with Roses on Upper Arm
Style/Technique: Neo-Traditional / Color
Pain Level: Medium (4/10)
Session Time: 3–5 hours
Best For: Sleeve starts or standalone statement
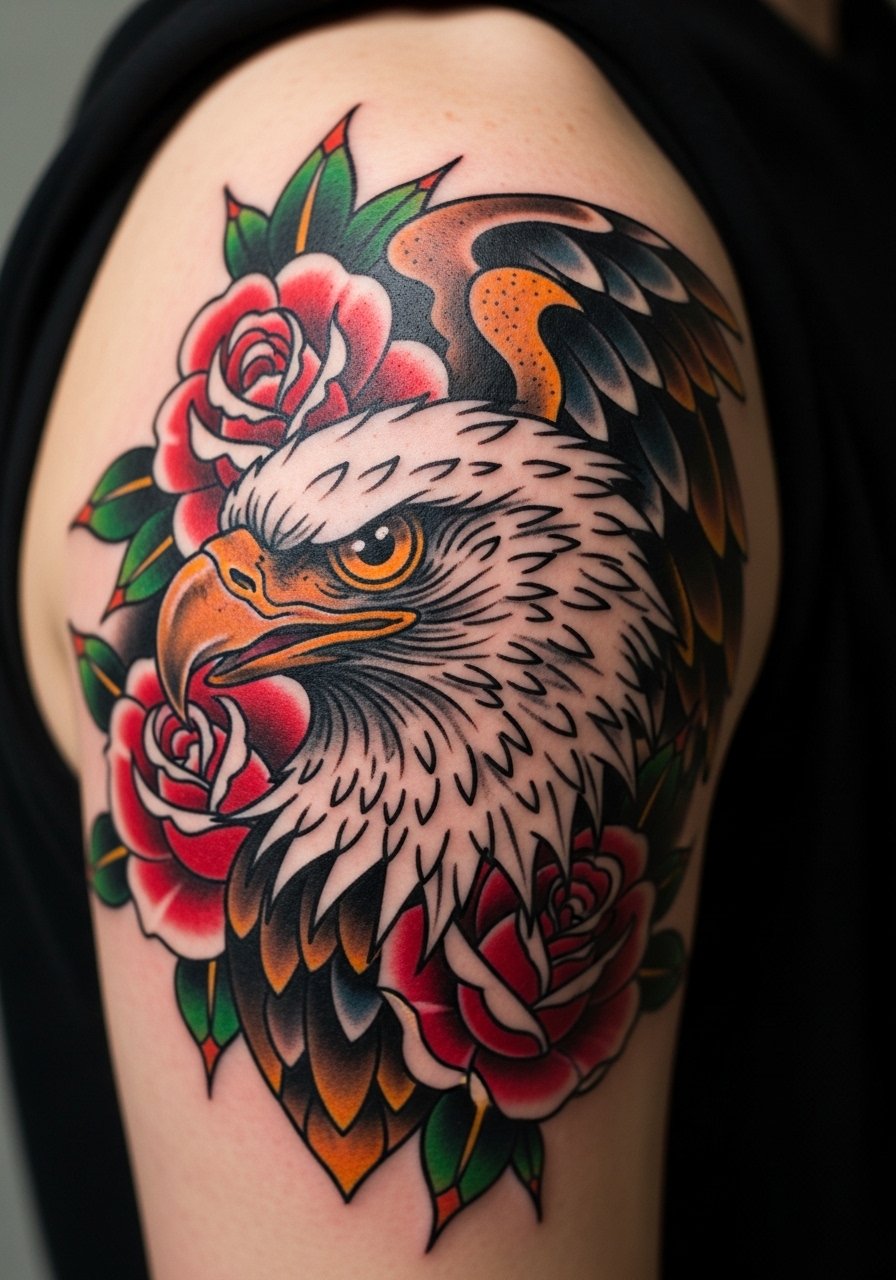
Combining eagles with roses balances strength and resilience. Upper arm contours let the design sit well under clothing. I prefer this style when I want narrative symbolism. Make sure the roses have clear color blocks; tiny petal detail can fade. Ask for strong linework to protect the composition over time.
9. Realistic Eagle Eyes on Side Neck
Style/Technique: Realism / Fine Line
Pain Level: High (6-7/10)
Session Time: 1–2 sessions
Best For: Intense, symbolic focus
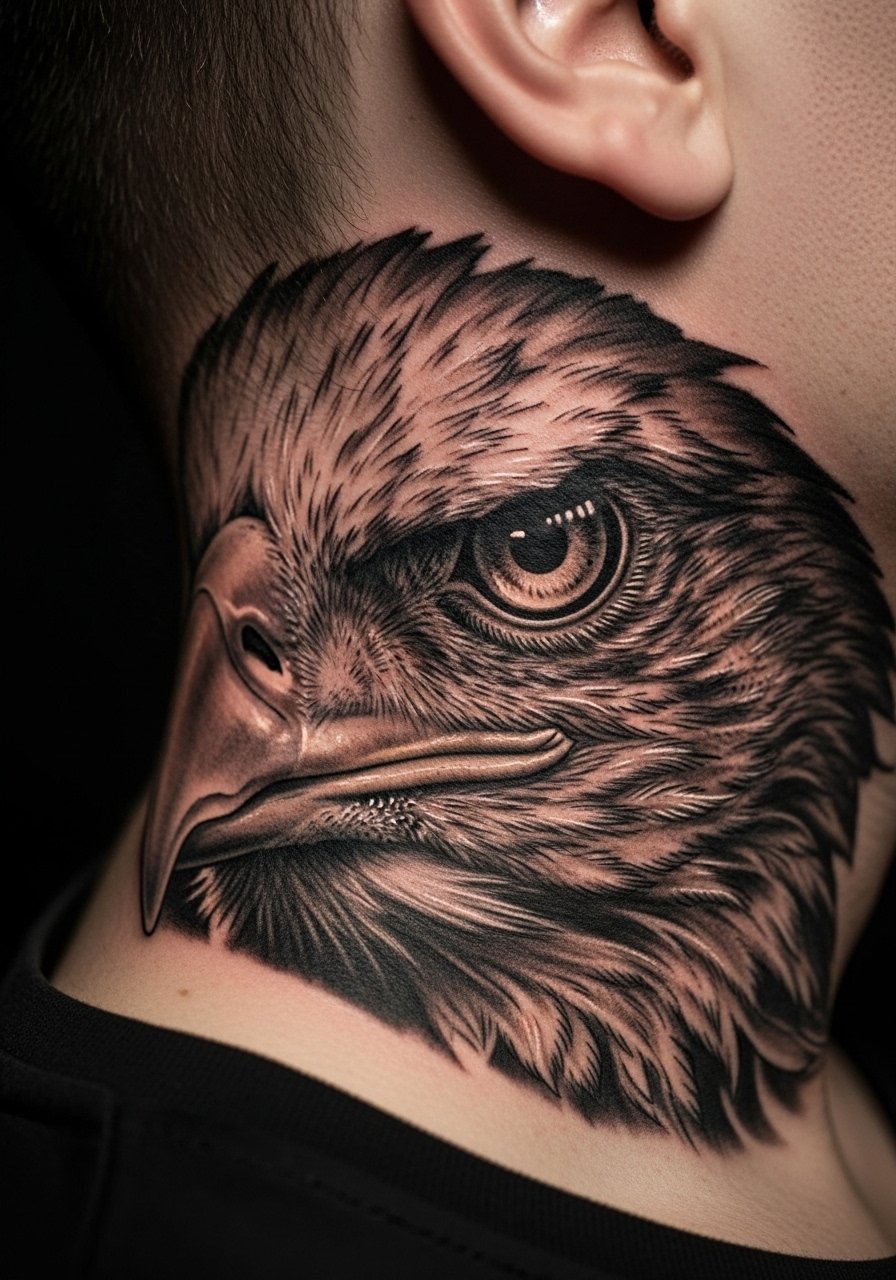
I consider neck pieces intimate and bold. Eagle eyes convey focus and intuition—perfect for a 6th-chakra vibe. Neck skin is sensitive, so expect sharp sensations during the session and careful aftercare. From artists I follow, micro-realism around the neck requires excellent shading control. Avoid tiny strokes that might blur into a smudge.
10. Tribal Eagle Head Profile on Outer Calf
Style/Technique: Tribal / Geometric Blackwork
Pain Level: Low-Medium (3/10)
Session Time: 2–3 hours
Best For: Masculine, leg placements
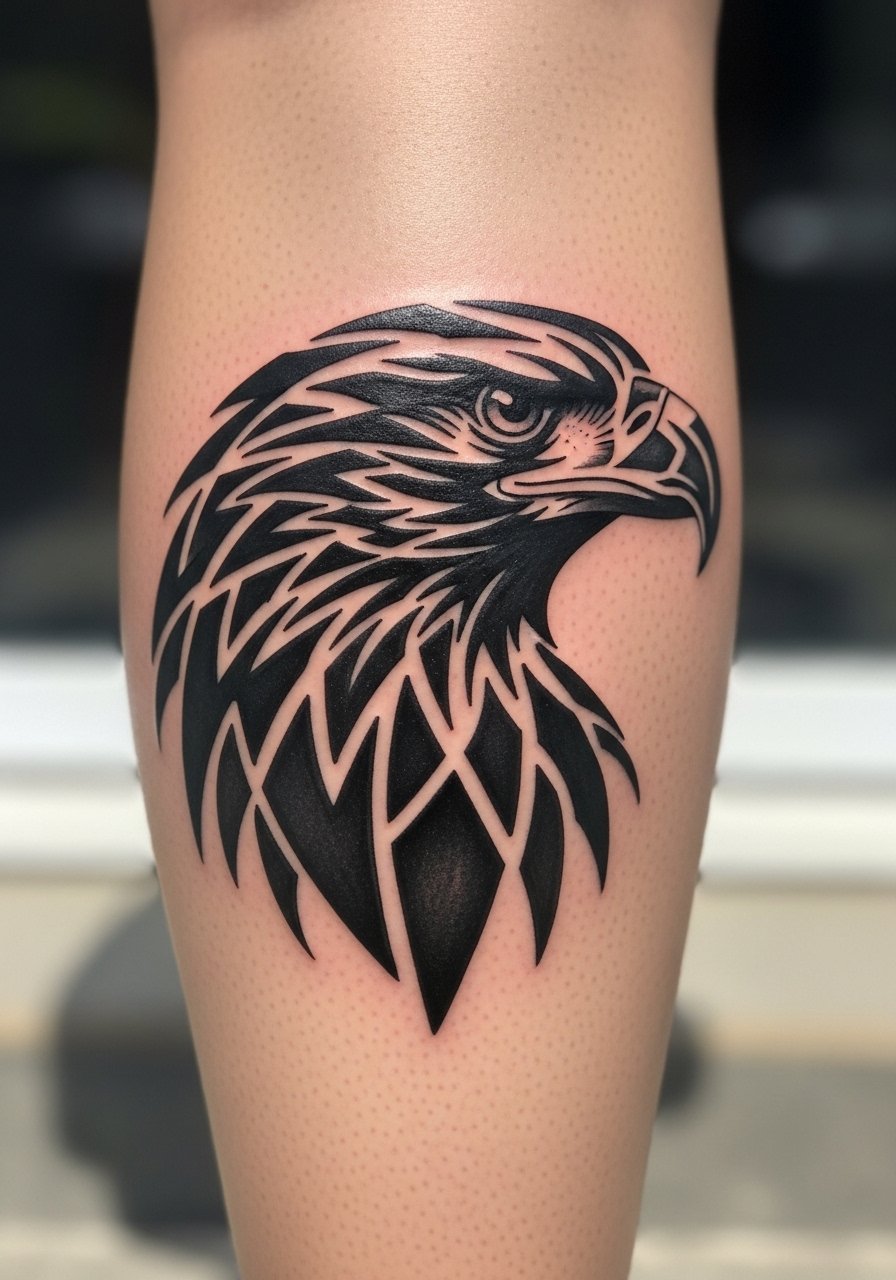
The calf gives a flat canvas that suits tribal profiles. It’s less painful than ribs or neck and shows off bold motifs. I've seen tribal pieces maintain contrast well when the black fill is dense. Ask for crisp edges and matched symmetry; uneven geometry becomes obvious as it ages.
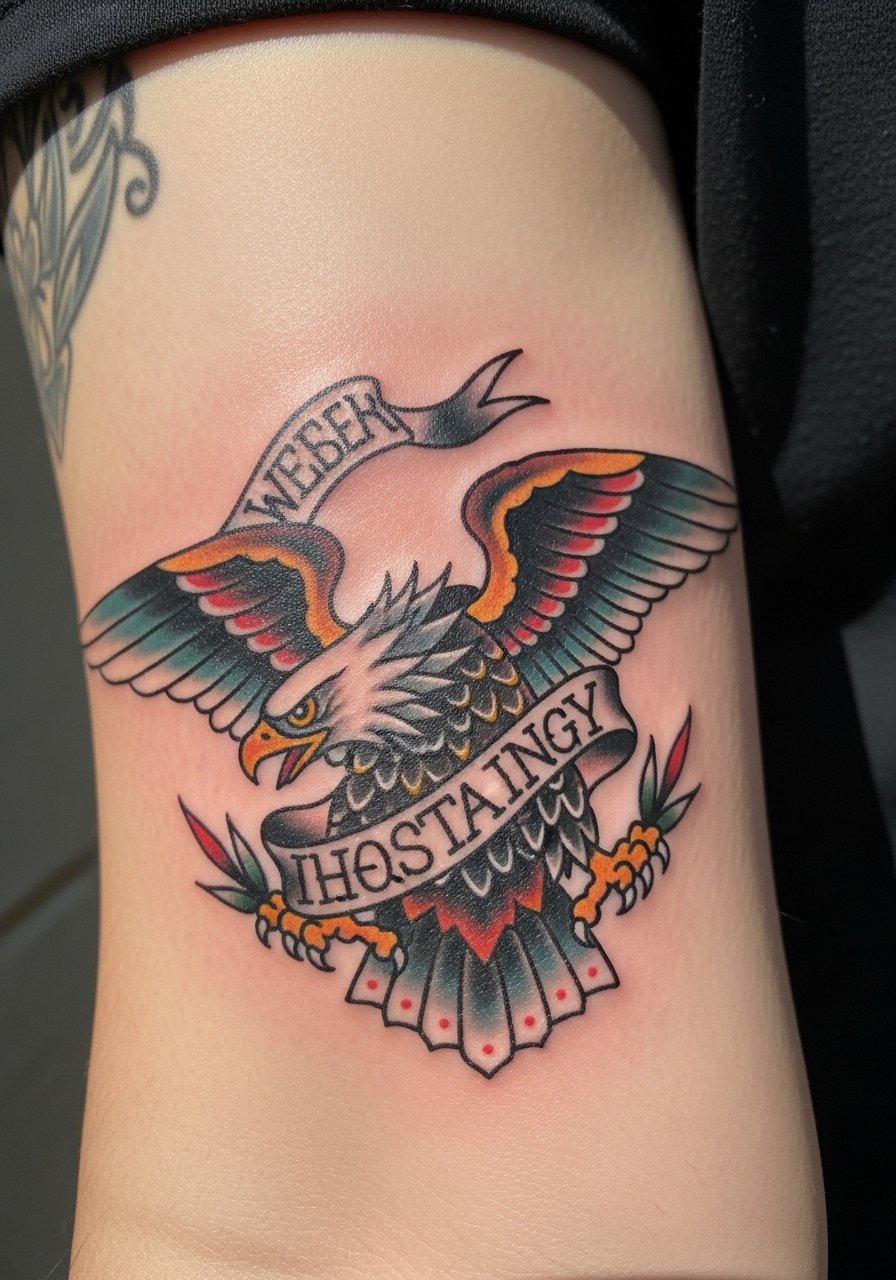
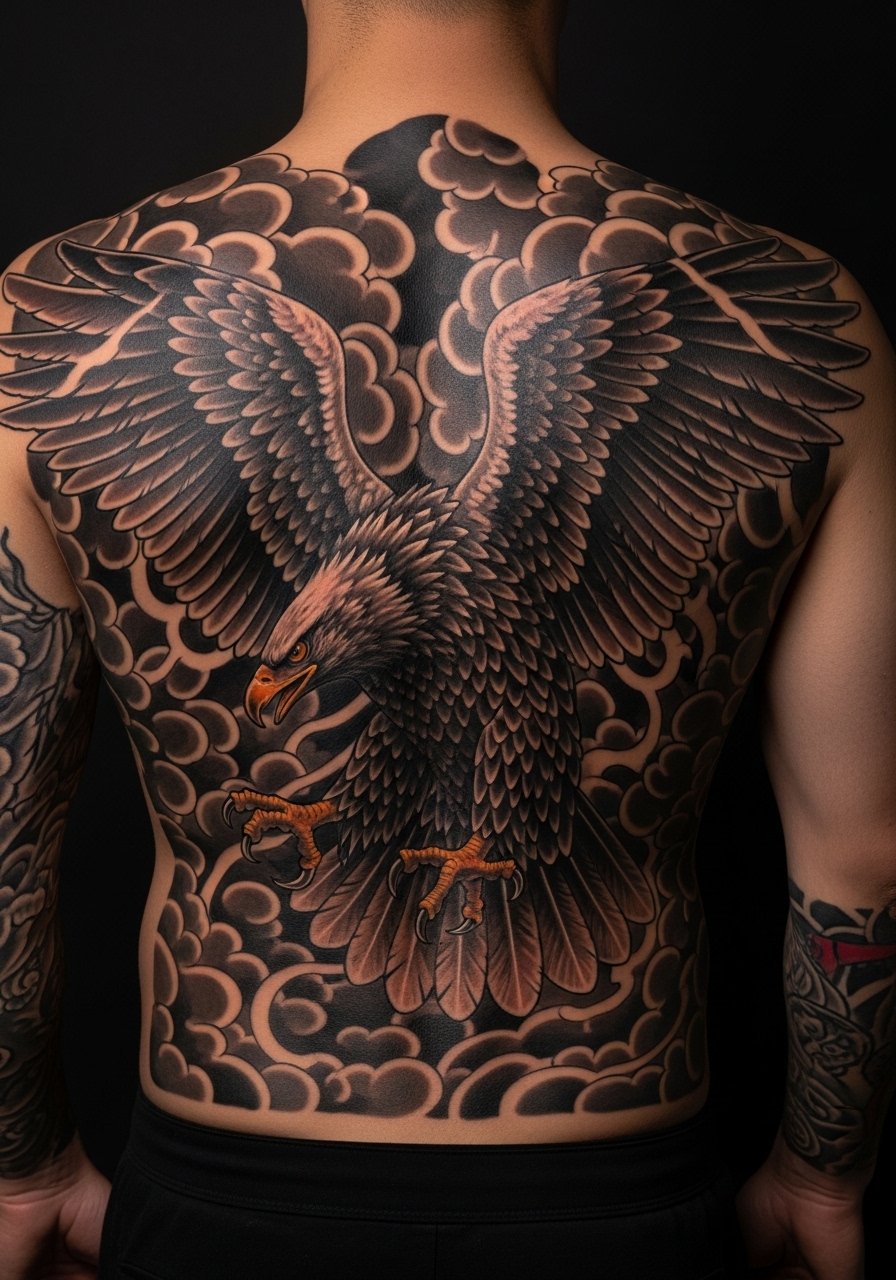
11. American Traditional Eagle Clutching Flag on Shoulder Blade
Style/Technique: American Traditional
Pain Level: Medium (4/10)
Session Time: Multiple hours
Best For: Patriotic, large shoulder pieces
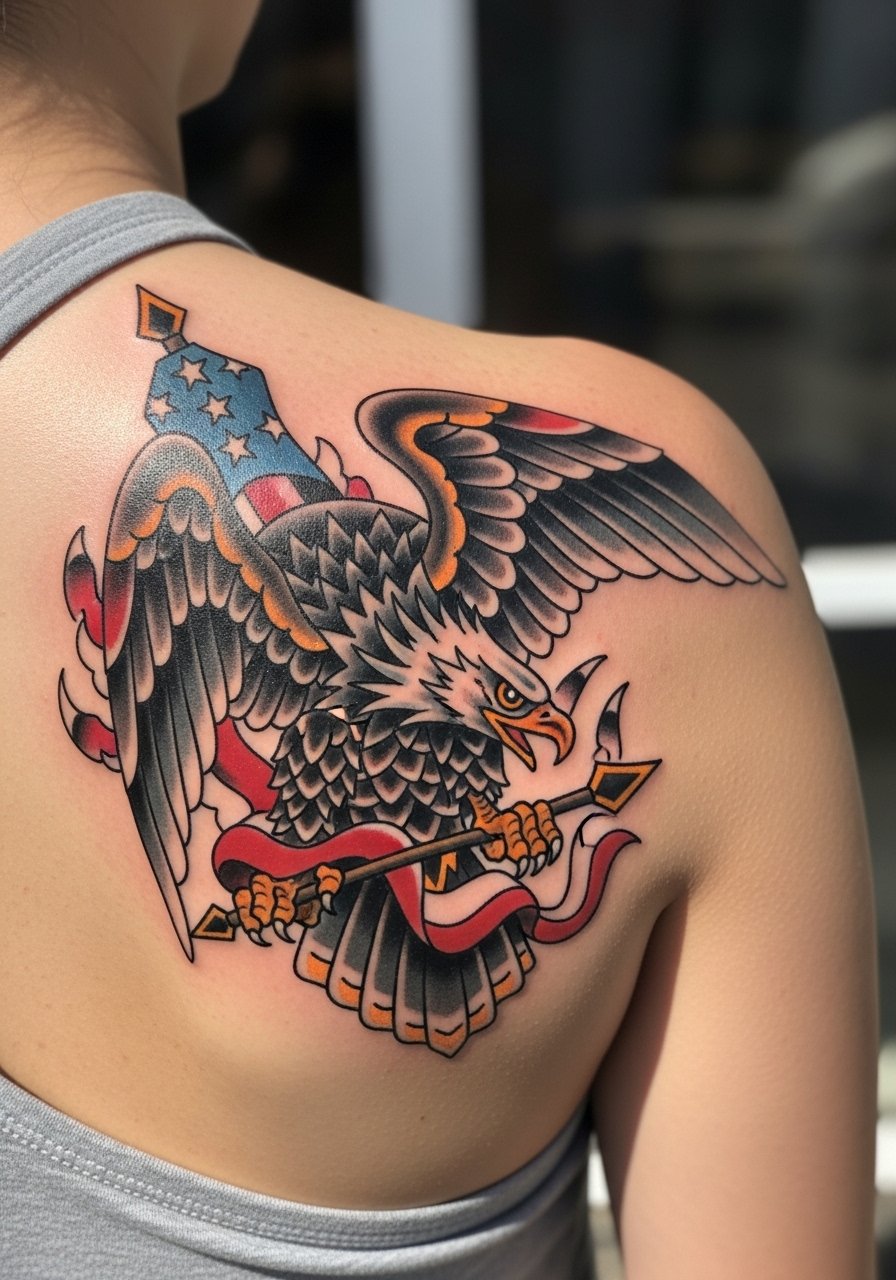
This is a classic patriotic presentation. Shoulder blades let the wings and talons spread wide with body movement. From my experience, traditional color palettes tend to age gracefully when lines are strong. Avoid tiny flag details that become indistinct; keep symbols bold and readable.
12. Mandala Eagle Hybrid on Upper Back
Style/Technique: Mandala / Ornamental Blackwork
Pain Level: Medium-High (5/10)
Session Time: Multiple sessions
Best For: Spiritual balance, large symmetrical pieces
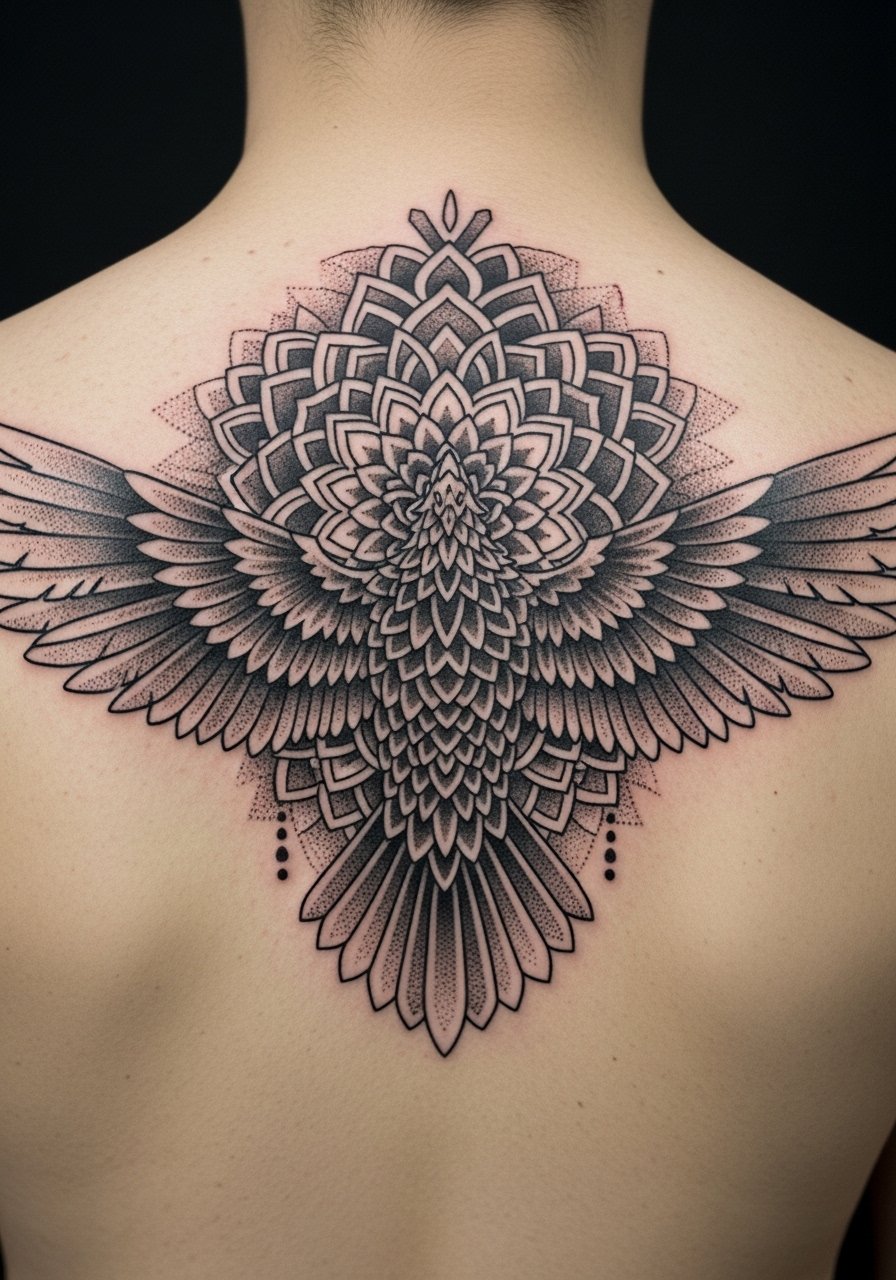
Combining mandala geometry with an eagle creates a guardian, balanced piece. Upper back symmetry allows the mandala to sit perfectly across the spine. Dotwork ages well when applied densely. I always tell people to preview placement mockups—mandalas need perfect alignment to read as intended.
13. Blackwork Eagle Talons on Top of Hand
Style/Technique: Blackwork / High-Contrast
Pain Level: High (6/10)
Session Time: 1–2 sessions
Best For: Edgy, visible power statement
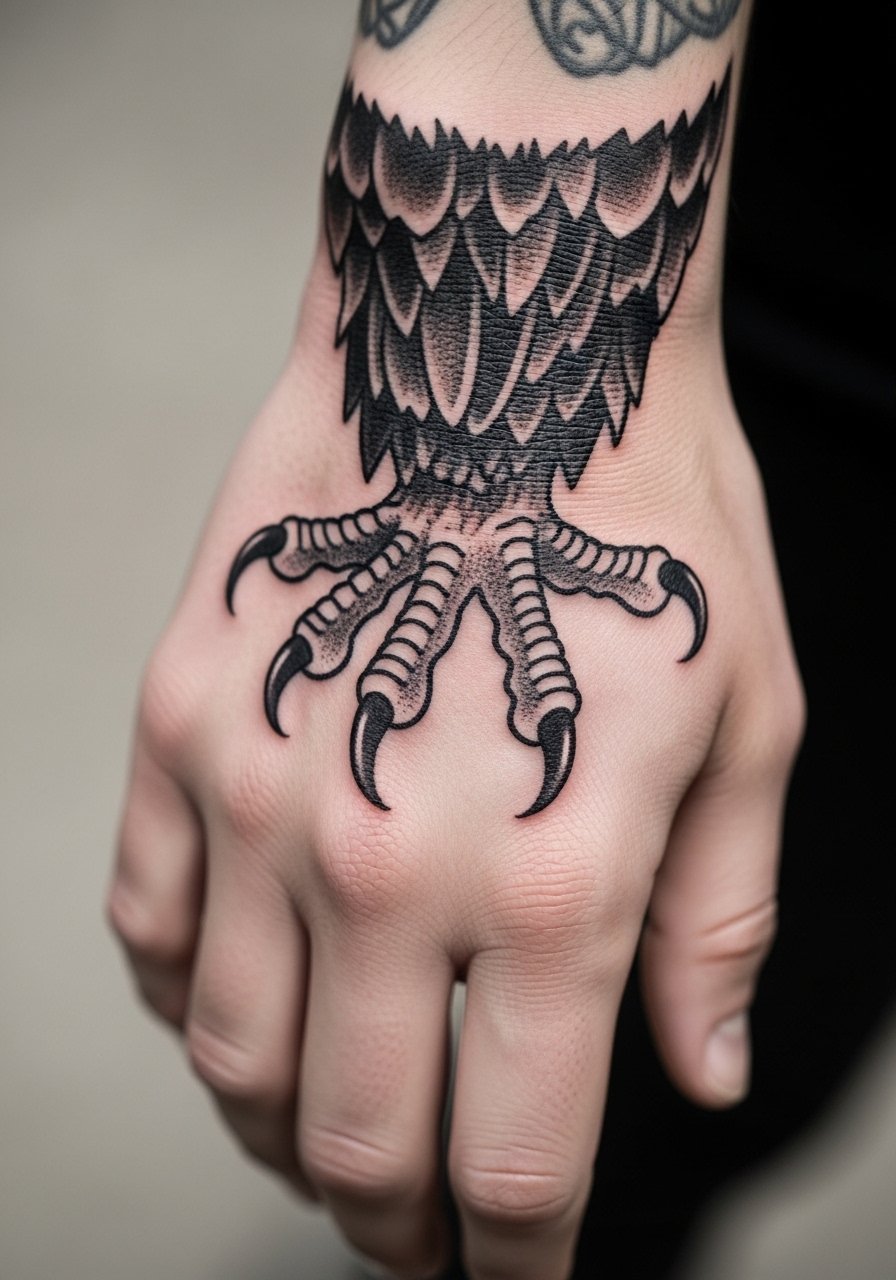
Hands are unforgiving for tattoos, but talon motifs look aggressive and bold. Expect faster fading and touch-ups because of friction. From what I've gathered in tattoo groups, strong black fills and simpler shapes help hands age better. Avoid fine feather detail here; solid shapes maintain the message.
14. Small Eagle Head Behind Ear
Style/Technique: Micro-Realism / Fine Line
Pain Level: Medium (4/10)
Session Time: 30–90 minutes
Best For: Subtle power symbol, hidden placement
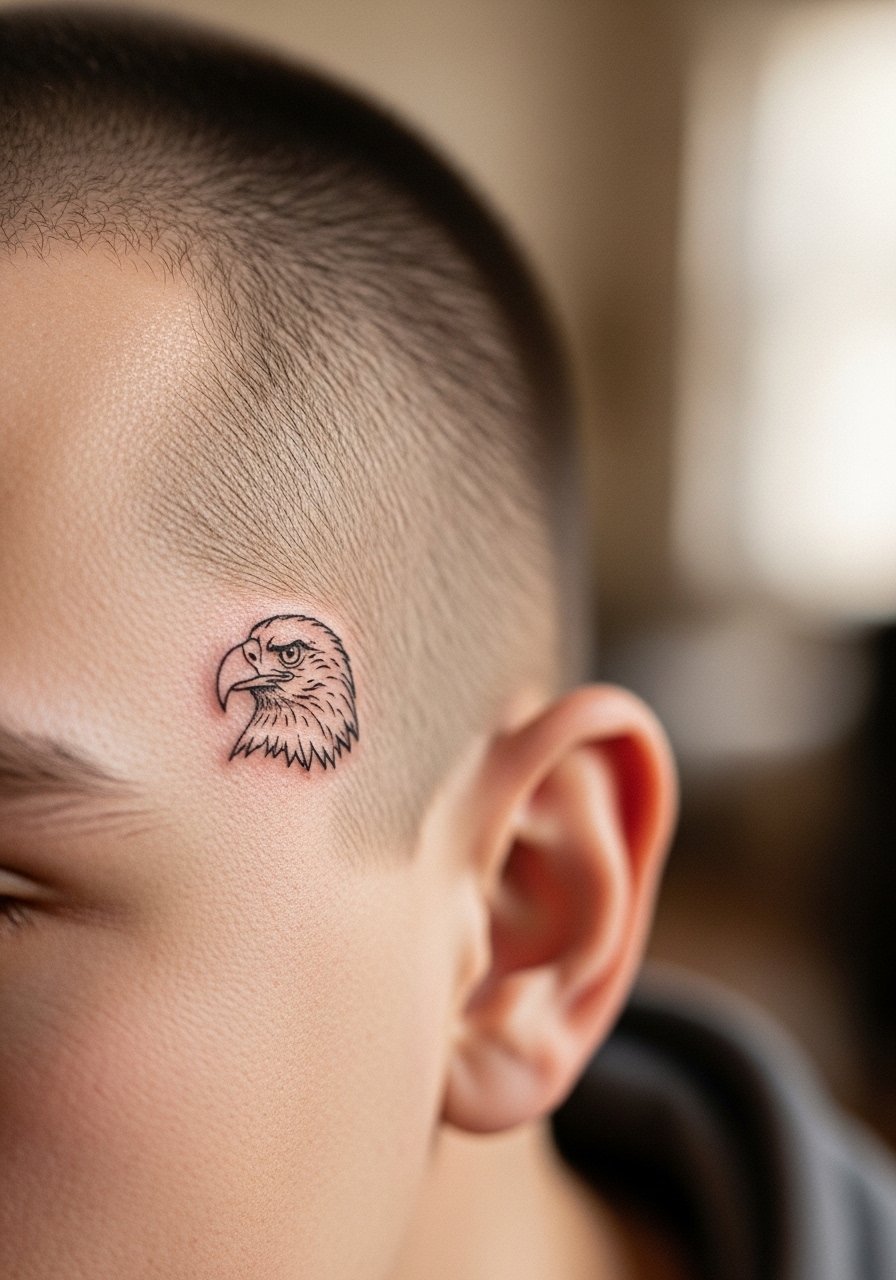
Behind-ear placements are discreet and personal. A small eagle head reads like intent rather than show. I’ve seen micro-realism work well here if the artist knows how to scale feathers down. Be cautious with ultra-fine lines; they can blur and require touch-up.
15. Eagle in Flight Full Sleeve Start on Upper Arm
Style/Technique: Neo-Traditional / Sleeve
Pain Level: Medium (4-5/10)
Session Time: Multiple sessions
Best For: Extended narrative, cover-ups
A sleeve allows storytelling—prey, sky, elements. I like starting on the upper arm where skin is less mobile. Plan sessions and think decades ahead; sleeves evolve. From artists I follow, neo-traditional sleeves benefit from bold anchors so small details don’t get lost. Avoid stuffing too many competing elements near the elbow joint.
16. Handpoke-Style Minimalist Eagle on Ankle
Style/Technique: Handpoke / Minimalist
Pain Level: Low-Medium (3/10)
Session Time: 30–90 minutes
Best For: Organic, first-time minimalist

Handpoke gives an organic, imperfect look that suits a subtle freedom symbol. Ankle placement is easy to hide and less painful than ribs. I’ve noticed handpoke dots can blur into softer-looking marks—if you want that raw feel, go for it. Ask your artist about needle depth and spacing to avoid patchy healing.
17. Cover-Up Eagle Full Back Guardian
Style/Technique: Realism/Blackwork Hybrid
Pain Level: High (6-7/10)
Session Time: Multiple long sessions
Best For: Transforming old ink into protection symbol
A full-back guardian eagle is perfect for cover-ups—its wings can hide old shapes. Expect long sessions and layered shading. From what I've seen, cover-ups need dense darks and strategic highlights to avoid remnants showing through. Work with an artist experienced in cover-up planning and ask for mockups.
18. Small Geometric Eagle on Sternum
Style/Technique: Geometric / Fine Line
Pain Level: High (6/10)
Session Time: 1–2 hours
Best For: Centered, symbolic chest placement
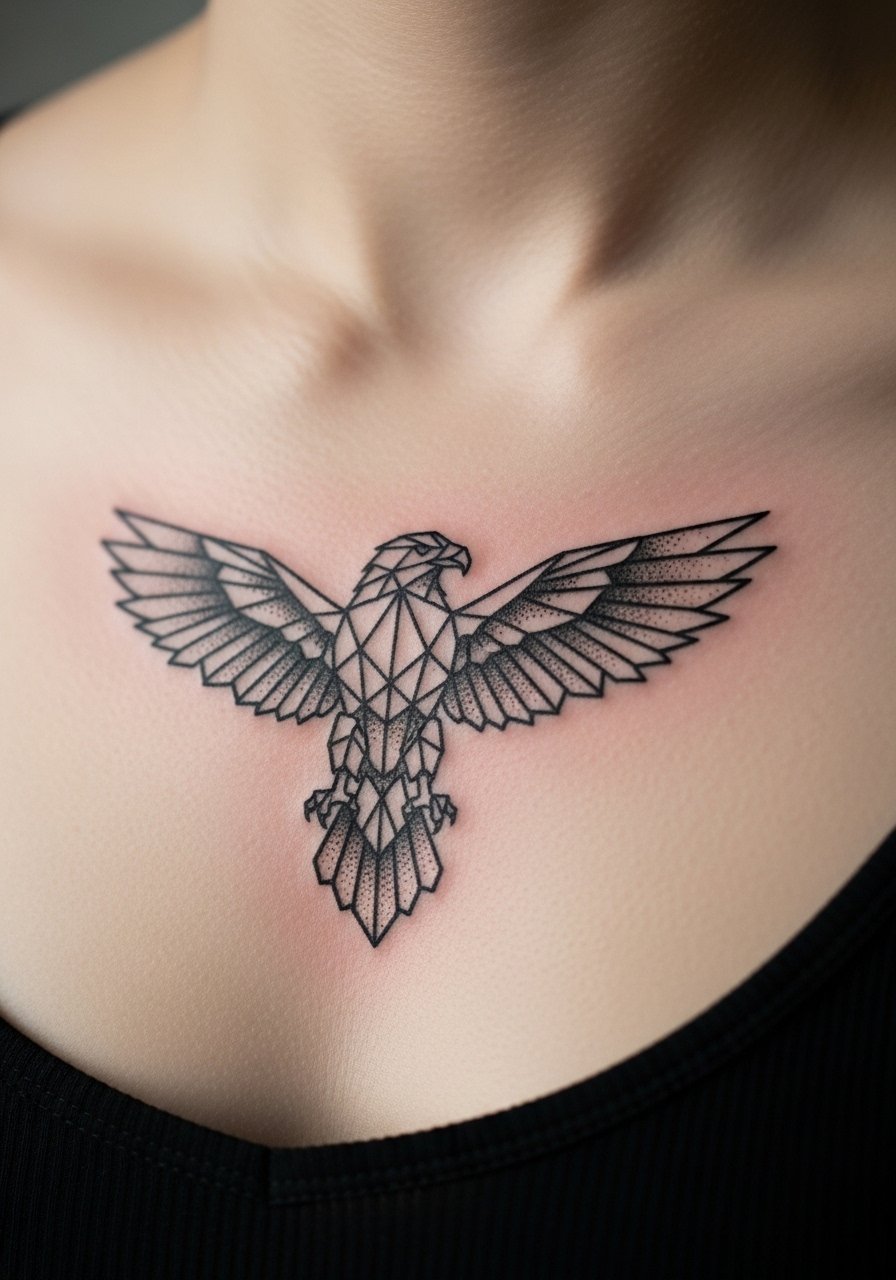
Sternum pieces feel intimate and centered—good for symbolic balance. The area can be painful but rewards with a strong focal point. Geometric approaches age well if lines are bold enough. I recommend discussing symmetry and stencil placement thoroughly.
19. Eagle Clutching Snake Alchemical Hybrid on Thigh
Style/Technique: Neo-Traditional / Mythological Hybrid
Pain Level: Medium (4/10)
Session Time: Multiple sessions
Best For: Story-driven, symbolic contrast
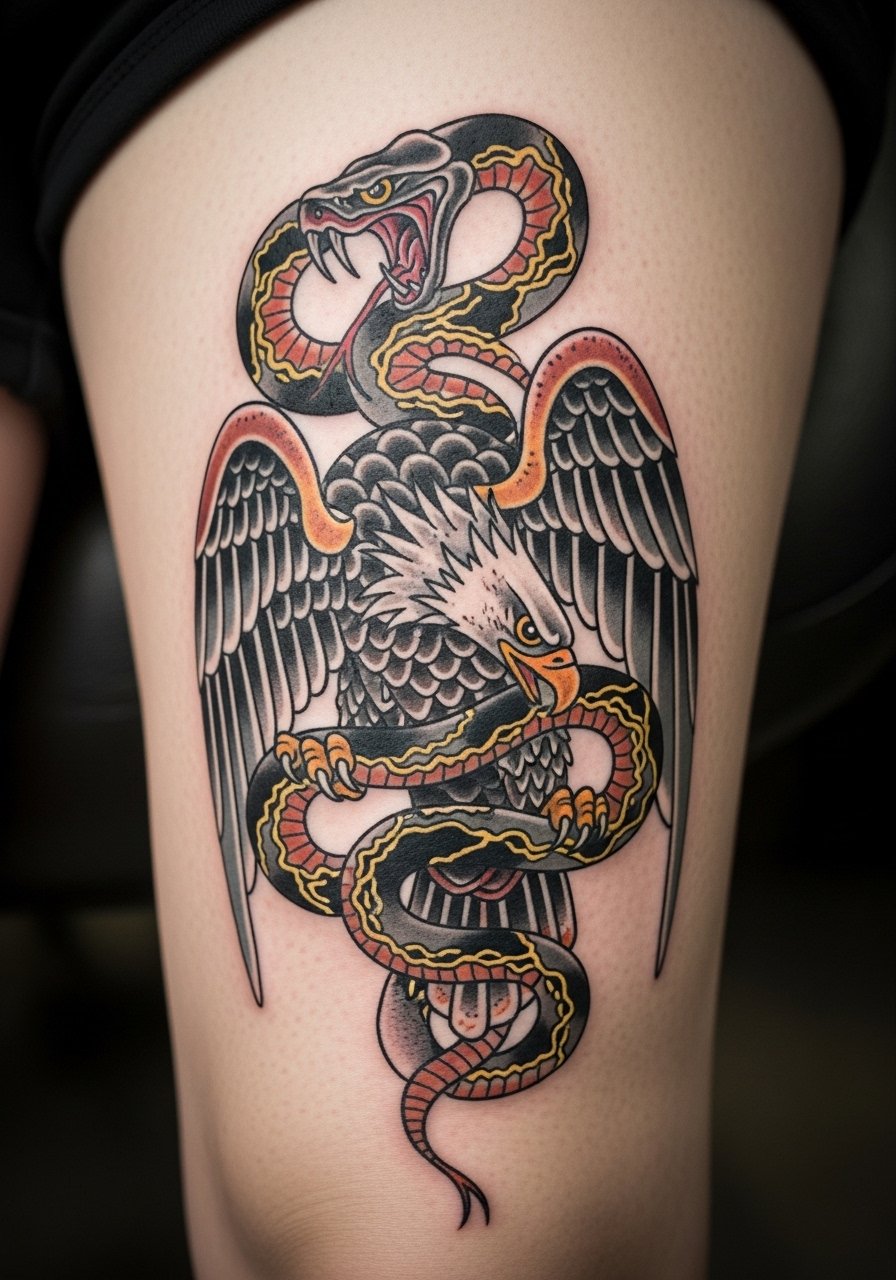
This alchemical pairing reads like transcendence—predator vs. wisdom. Thigh placement gives room for dramatic poses. I find these hybrids stand out when artists balance contrast and negative space. Avoid over-detailing both animals; choose one to dominate visually.
20. Eagle Feather Spine Line Down Back
Style/Technique: Fine Line / Ornamental
Pain Level: Medium-High (5-6/10)
Session Time: Multiple sessions
Best For: Vertical flow, subtle power
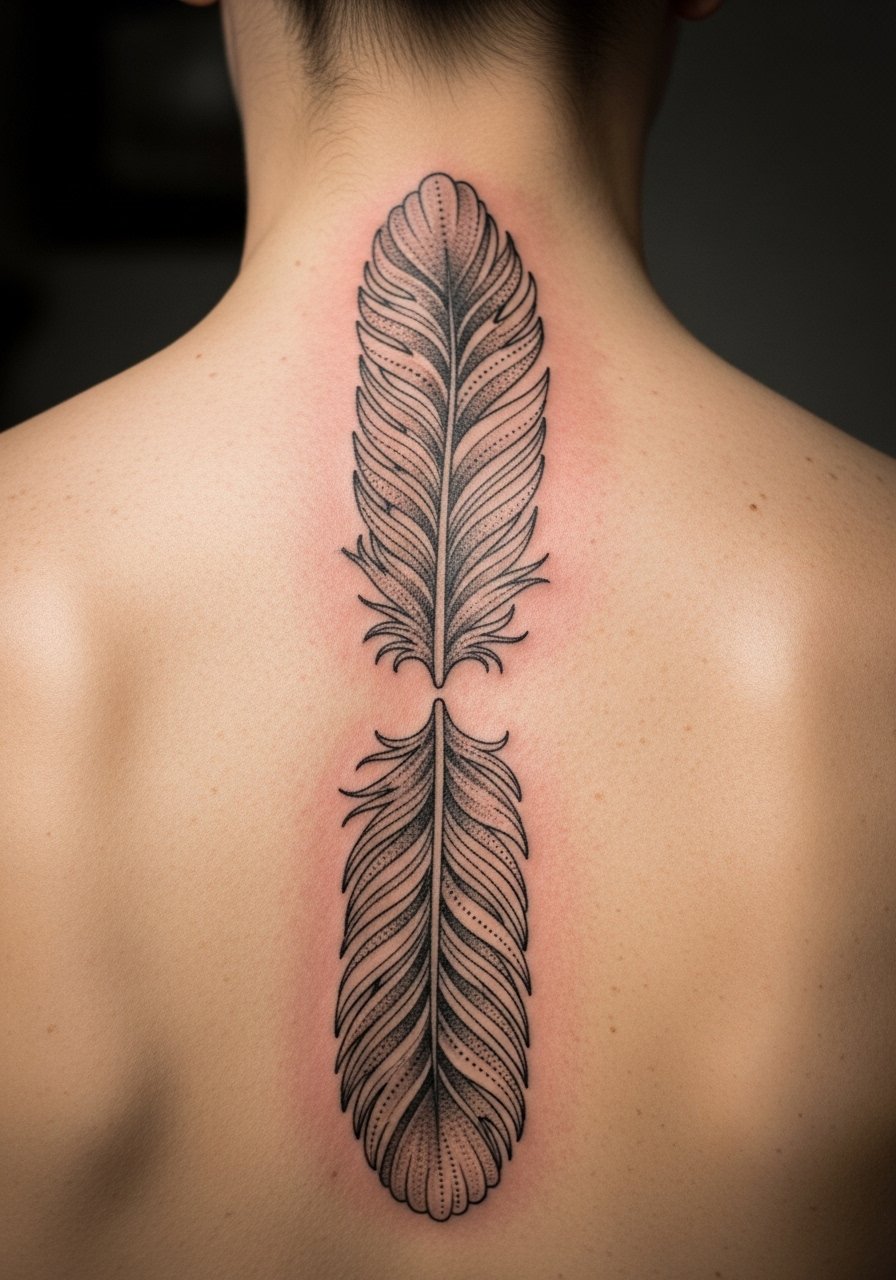
A spine line of feathers reads elegant and strong. It moves with posture and can be shown or hidden easily. Spine work stings more, and healing needs cautious sleeping positions. From my experience, keeping feather stems slightly thicker prevents early blurring.
21. Bald Eagle Winged Chest Panel
Style/Technique: Realism / Black & Gray
Pain Level: High (6/7/10)
Session Time: Multiple sessions
Best For: Broad, symmetrical chest pieces
Full chest wings are dramatic—like armor. I chose this for a strong protector vibe. Chest skin and breathing can make sessions tricky, so expect multiple sittings. Ask to see healed examples of large feather fields; poorly executed shading becomes muddy over time.
22. Eagle Eye Tattooed on Back of Hand
Style/Technique: Micro-Realism / Fine Line
Pain Level: High (6/10)
Session Time: 1–2 hours
Best For: Intense gaze, confrontational placement
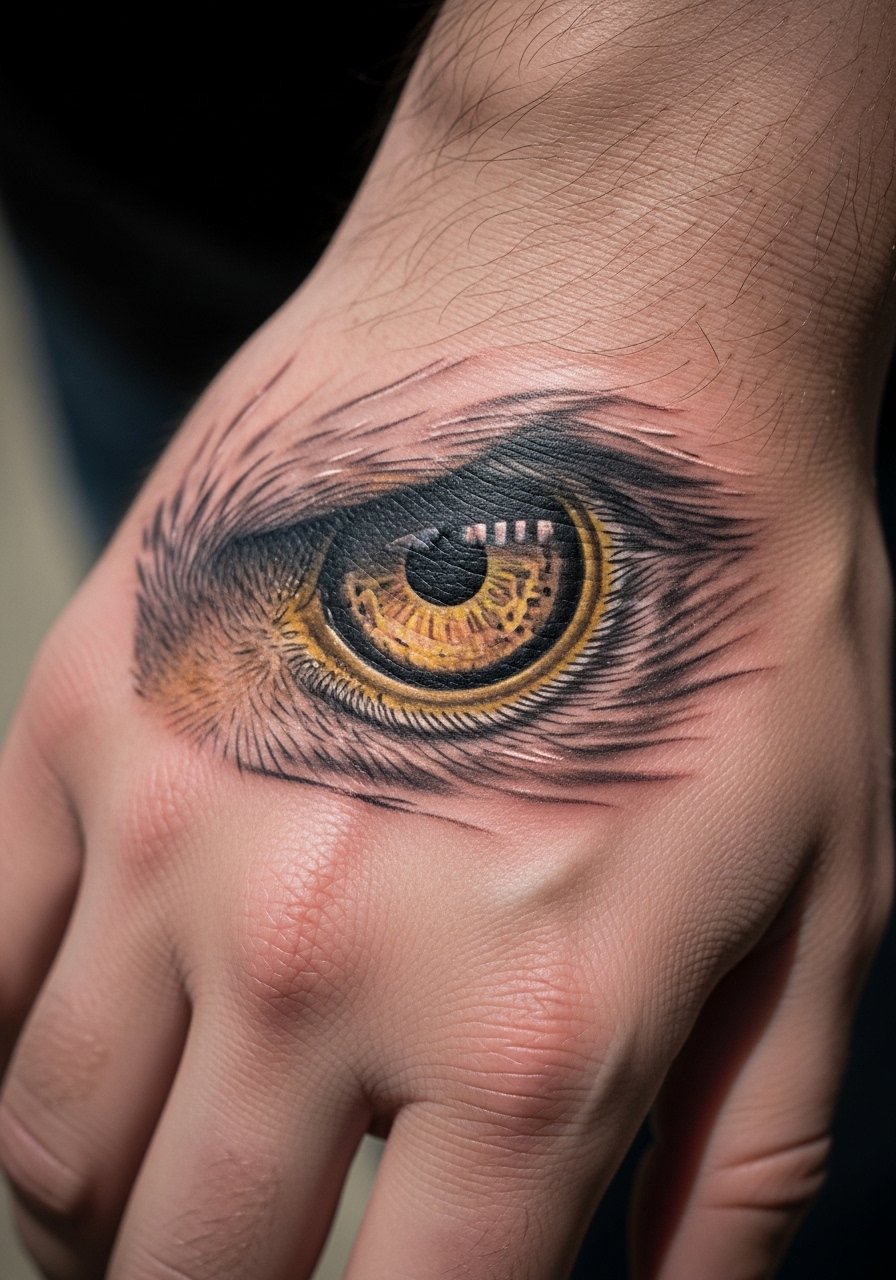
An eye on the hand is confrontational and symbolic of vigilance. As with other hand tattoos, friction accelerates fading. I recommend bold contrast and acceptance of likely touch-ups. Artists who do micro-realism on hands are rare—review healed portfolios closely.
23. Mandala Sun and Eagle Chest Piece
Style/Technique: Mandala + Neo-Traditional
Pain Level: Medium-High (5/10)
Session Time: Multiple sessions
Best For: Spiritual, balanced chest composition
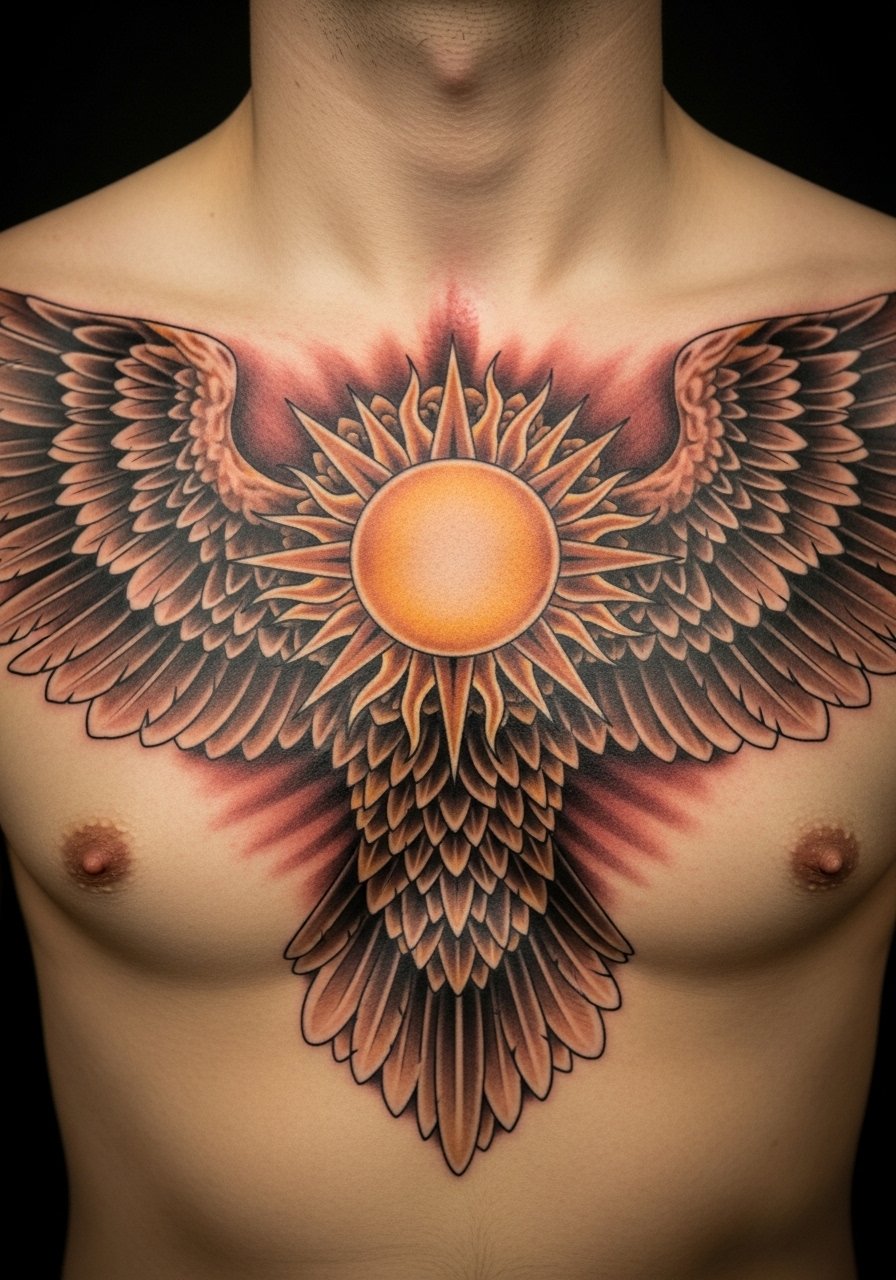
Merging a mandala sun with an eagle blends masculine power and spiritual balance. Center-chest placements benefit from symmetry checks and multiple sittings. I've seen these look cohesive when artists use clear contrast between ornamental lines and the eagle's silhouette. Avoid tiny mandala filigree near high-movement zones.
24. Small Ankle Talon Mark
Style/Technique: Minimalist / Blackwork
Pain Level: Low (2/10)
Session Time: 30–60 minutes
Best For: Tiny statement, easy concealment
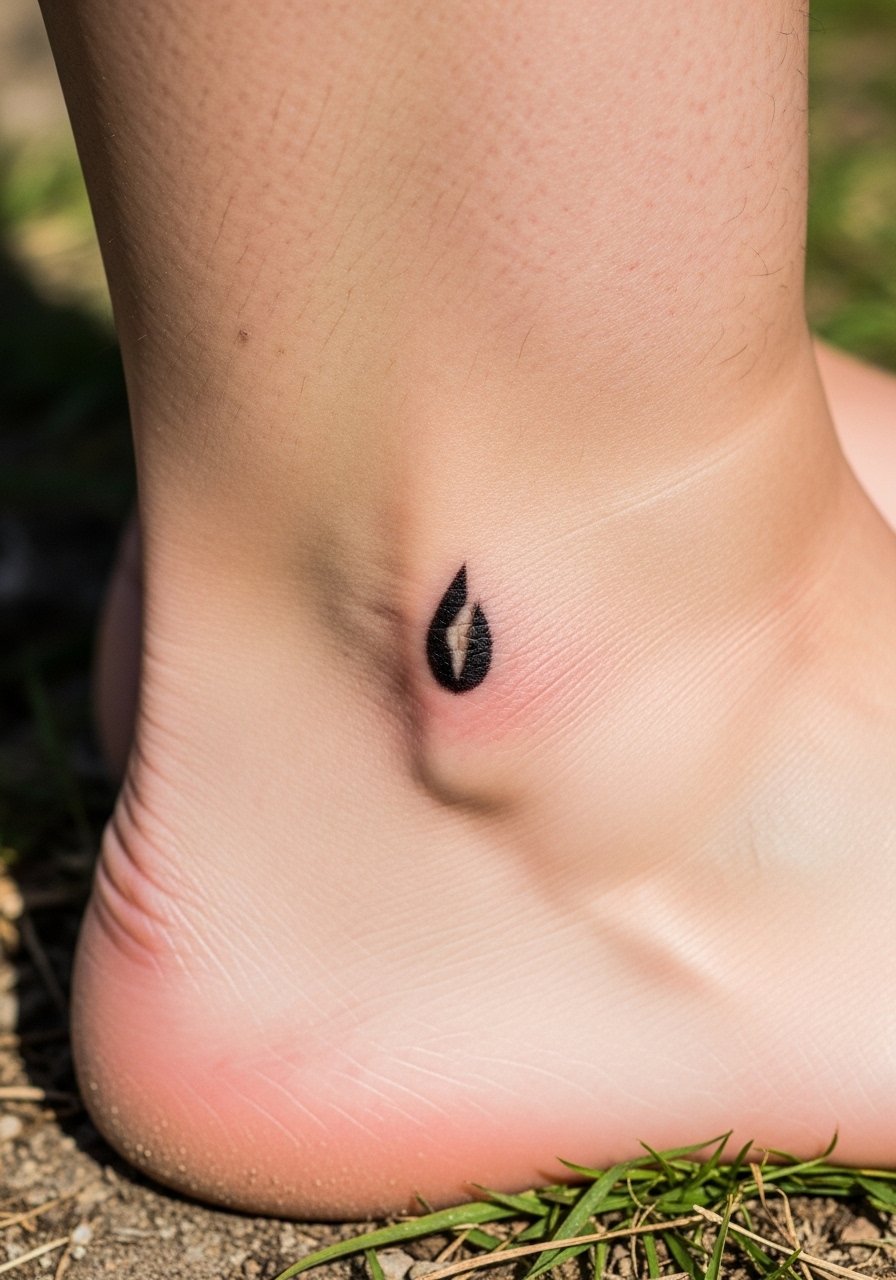
A tiny talon on the ankle is discreet but reads as assertive. It’s a good first eagle tattoo if you want low commitment. Ankle skin moves, so solid shapes hold up better than liney feathers. From my experience, simple silhouettes keep their meaning without needing constant touch-ups.
Tattoo Prep and Aftercare Essentials
Aftercare Essentials:
- Aquaphor Healing Ointment, 14oz tube — Great first 3–5 days; artists recommend it for scabbing control.
- Saniderm Transparent Adhesive Bandage, 6-inch roll — Second-skin healing option for arms and back.
- CeraVe Fragrance-Free Moisturizing Lotion — Daily moisturizer after initial phase.
- Dr. Bronner's Unscented Castile Soap — Gentle cleaning during first week.
Before Your Appointment:
- Numbing Cream with Lidocaine — Use only if your artist approves.
- [Procreate App (iPad) & Stylus for Mockups] (https://www.amazon.com/s?k=procreate+ipad+stylus&tag=tattooengineer-20) — Handy if you mock up custom eagle designs at home.
Long-Term Maintenance:
- SPF 50 Sunscreen Stick for Tattoos — Sunscreen is the #1 fade-preventer I mention to everyone.
- Mad Rabbit Tattoo Balm — Keeps healed color vibrant.
- Hustle Butter Deluxe Tattoo Aftercare — Vegan balm many artists recommend.
Optional Comfort & Tools:
- Tattoo Numbing Spray — For touch-ups or sensitive zones.
- Hydrocolloid Bandages (Large) — Smaller alternative to Saniderm for spot healing.
Frequently Asked Questions
Q: How bad does a tattoo actually hurt?
A: Pain varies by placement and personal tolerance. Outer arm or bicep feels mild; ribs, sternum, and neck are tougher. I've found wrist and hand can surprise first-timers. For sensitive areas, ask about a numbing cream and expect soreness after each session.
Q: What if I regret a visible eagle tattoo?
A: Sit with your design for months. I test visibility with temporary stickers before committing. If you still want change later, cover-ups or laser exist, but they take time. Choosing symbolic elements that matter to you reduces regret.
Q: How do I keep my eagle tattoo from fading?
A: Sunscreen daily and good moisturization are non-negotiable. From what I've gathered, black and gray pieces hold longest; bright yellows and light pastels fade fastest. Use an SPF 50 stick and keep skin healthy with fragrance-free lotion.
Q: Can I work out after getting a tattoo?
A: Wait at least 48–72 hours, longer for flex areas. Sweating risks infection and can lift scabs. I avoid intense gym sessions for a week and follow cleaning advice with gentle soap.
Q: Should I start with a small eagle to test pain?
A: Only if you actually want a small tattoo. Pain depends more on placement than size. A tiny wrist eagle can hurt more than a larger forearm piece. If nervous, pick an outer arm or thigh first.
Q: How long does my eagle tattoo take to heal?
A: Surface healing takes 2–3 weeks; full maturation is 2–3 months. The first week is most critical—clean gently, apply Aquaphor or the product your artist recommends, and avoid picking scabs. Colors look muted during healing and brighten later.
Q: Do tattoos look different on different skin tones?
A: Yes. Black and gray shows well across tones. Bright colors may appear muted on deeper skin, and white ink can be nearly invisible. I always ask artists for healed examples on skin tones like mine before booking.
Q: How do I choose between traditional, neo-traditional, or realism?
A: Think about longevity and personal taste. From what I've seen, traditional holds up decades with bold lines. Realism needs a highly skilled artist to keep feather detail readable healed. Neo-traditional blends both for narrative pieces. Trust portfolios and ask for healed photos.
