

I spent months narrowing down compass tattoo ideas because I wanted something that would still feel true to me years from now. The tricky part wasn’t finding pretty images—it was finding styles and placements that actually heal well, read on different skin tones, and carry the meaning I wanted. These 28 compass designs drove that search—practical, personal, and direction-driven.
This list focuses on compass tattoo designs that lean minimalist, nautical, geometric, and realism—placements that work from wrist to ribcage. From what I’ve seen, artists in 2026 favor clean lines, geometric fills, and travel combos that age well; I call out pain, healing, and common mistakes so you know what to expect.
1. Minimalist Geometric Compass on Inner Wrist
Style/Technique: Minimalist / Geometric
Pain Level: Low-Medium (2-4/10)
Session Time: 1 hour
Best For: First tattoo, daily reminder, small compass tattoo
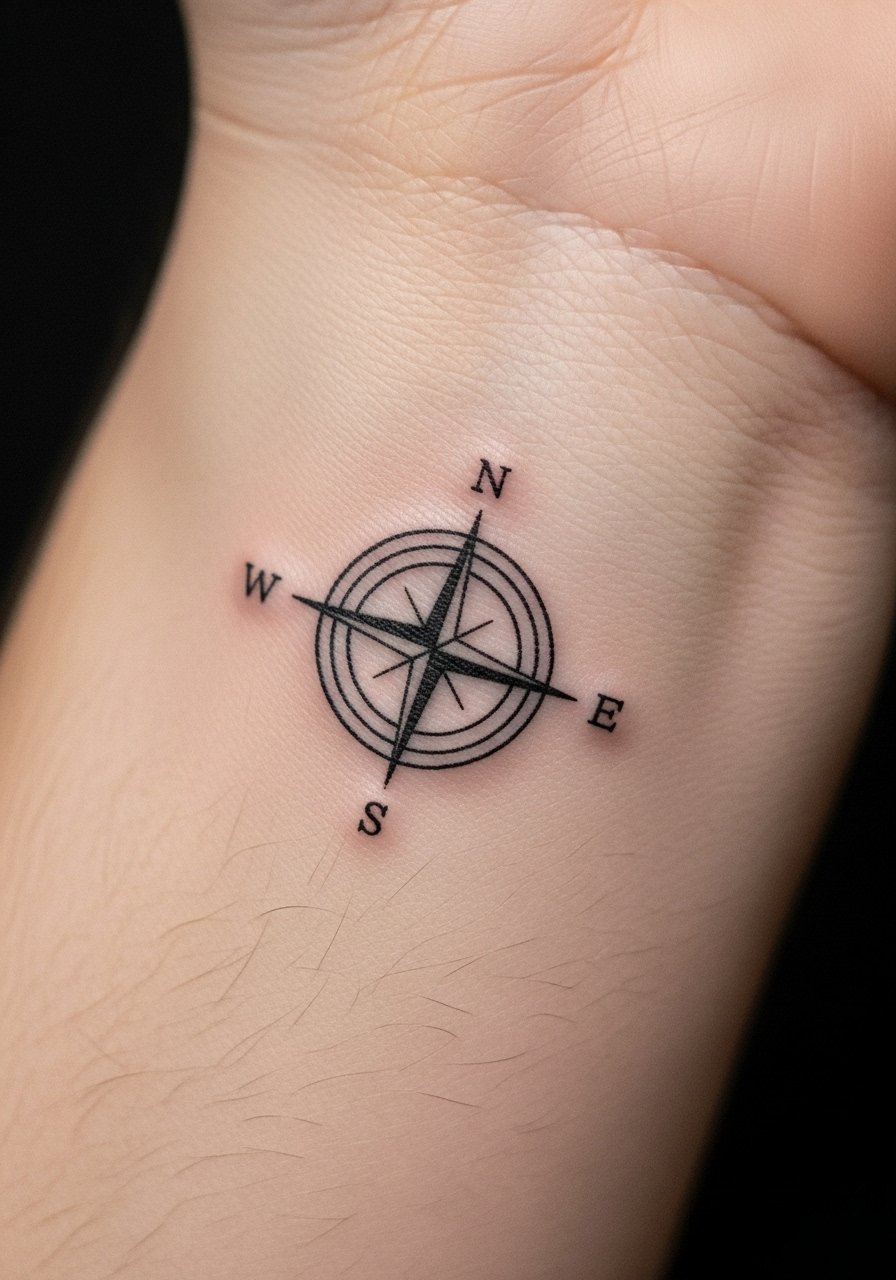
I picked this style when I wanted a quiet symbol of direction. A minimalist compass tattoo reads like a private prompt for decisions. The inner wrist is visible and convenient, but movement and sunlight mean bold single lines hold up better than ultra-fine needlework. Expect quick healing—about two weeks for surface skin—though sunscreen will be your long-term ally. A common mistake: forcing too many tiny details into a micro compass. Ask for clean negative space and a stencil scaled to your wrist.
2. Traditional Nautical Compass Rose on Forearm
Style/Technique: Traditional / Nautical
Pain Level: Low (2-3/10)
Session Time: 2-3 hours
Best For: Timeless look, forearm display
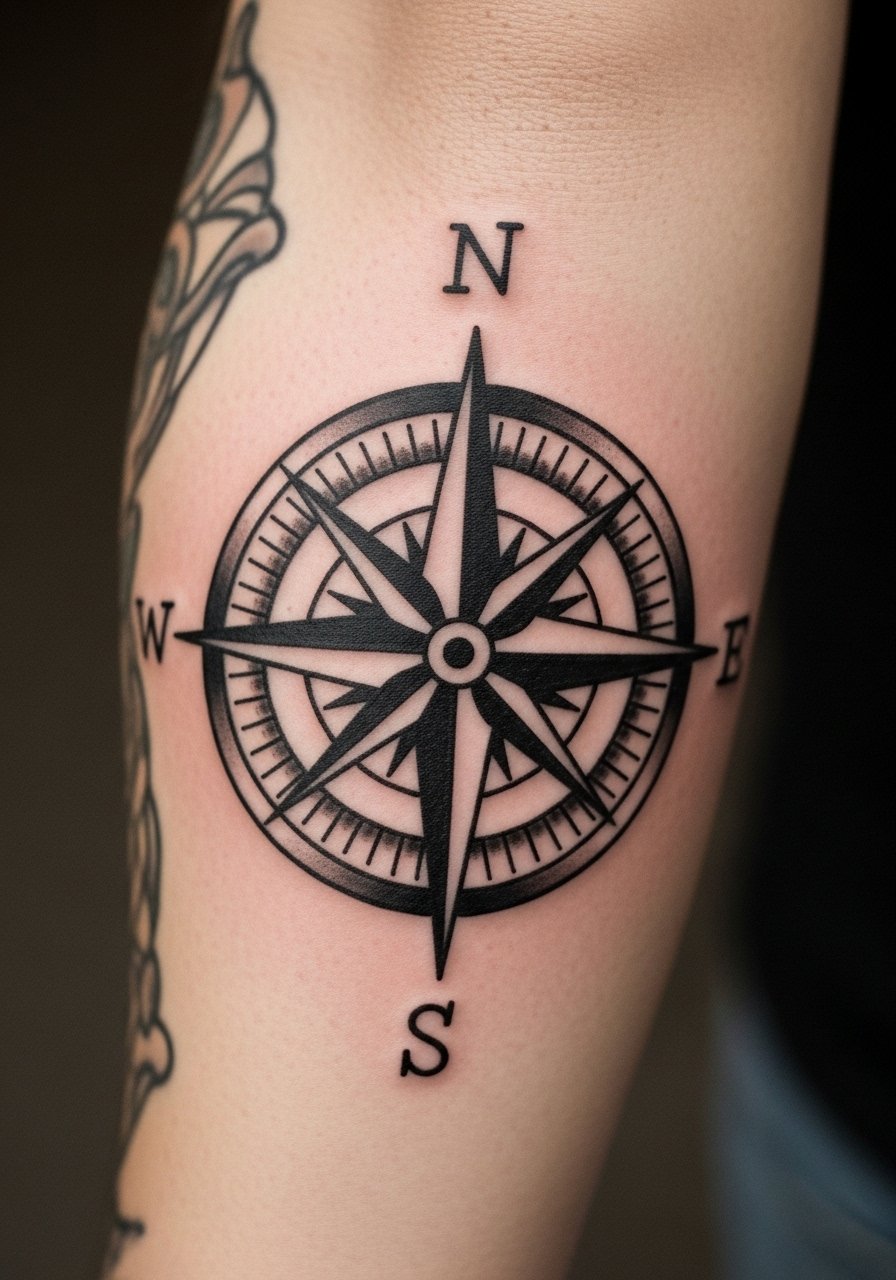
This is the classic nautical compass tattoo—bold lines and clear contrast make it a great long-term option. It reads easily from a distance and pairs well with anchors and roses for that sailor heritage vibe. The forearm is forgiving for shading sessions, and traditional styles age well because they use thicker lines. Avoid over-detailing the rose points; clarity beats tiny flourishes that blur later. Look for artists experienced in American traditional line weight.
3. Fine Line Compass with North Star on Collarbone
Style/Technique: Fine Line / Single Needle
Pain Level: Medium (4-5/10)
Session Time: 2-3 hours
Best For: Delicate placement, symbolic pieces
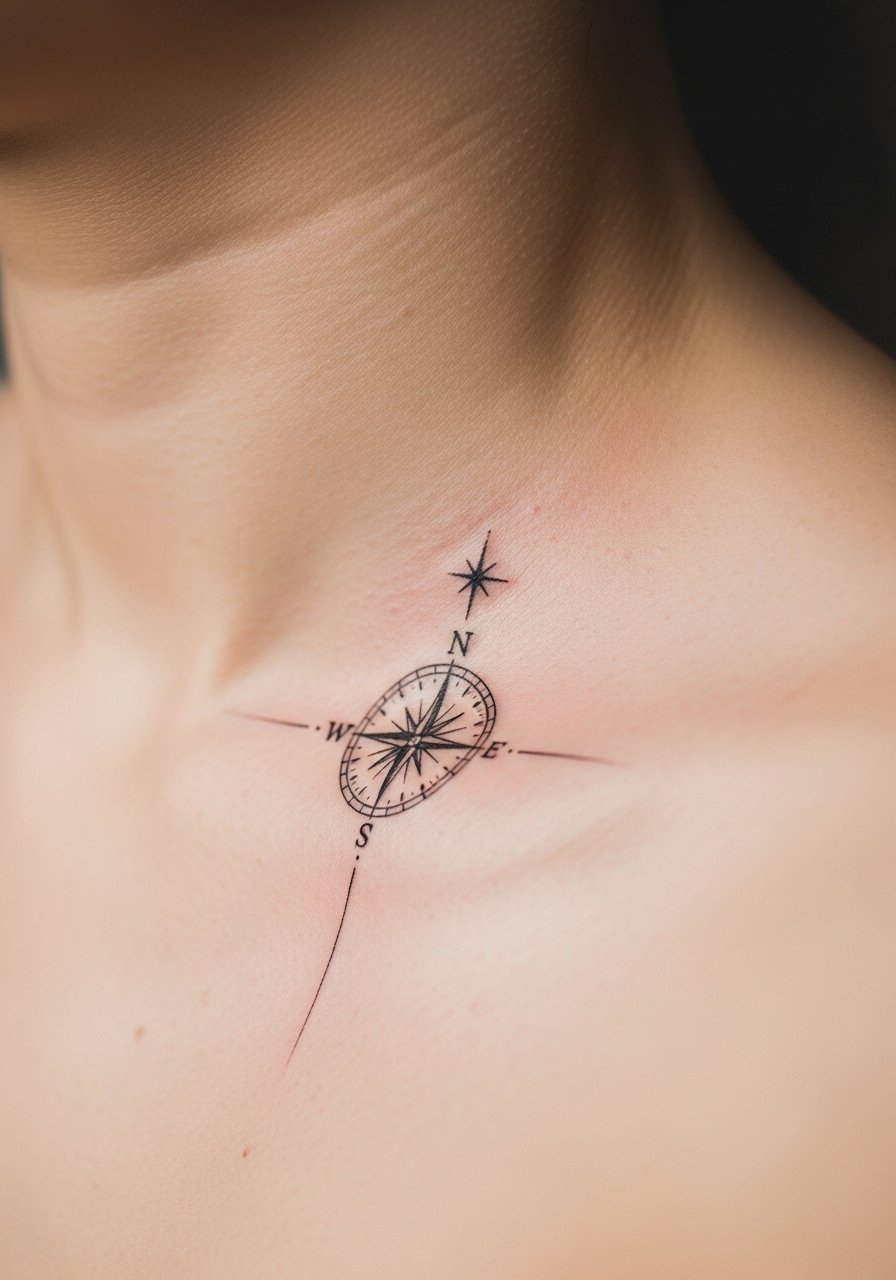
I like the collarbone for its quiet visibility and how a fine line compass with a North Star feels like a guiding light you carry. Fine line work looks elegant but can blur over years if lines are too thin—especially on high-motion areas. Pain is noticeable on the collarbone but tolerable. Healing needs gentle care: keep it moisturized and avoid tight straps that rub. Ask your artist for a slightly bolder single-needle line to preserve crisp edges as it settles.
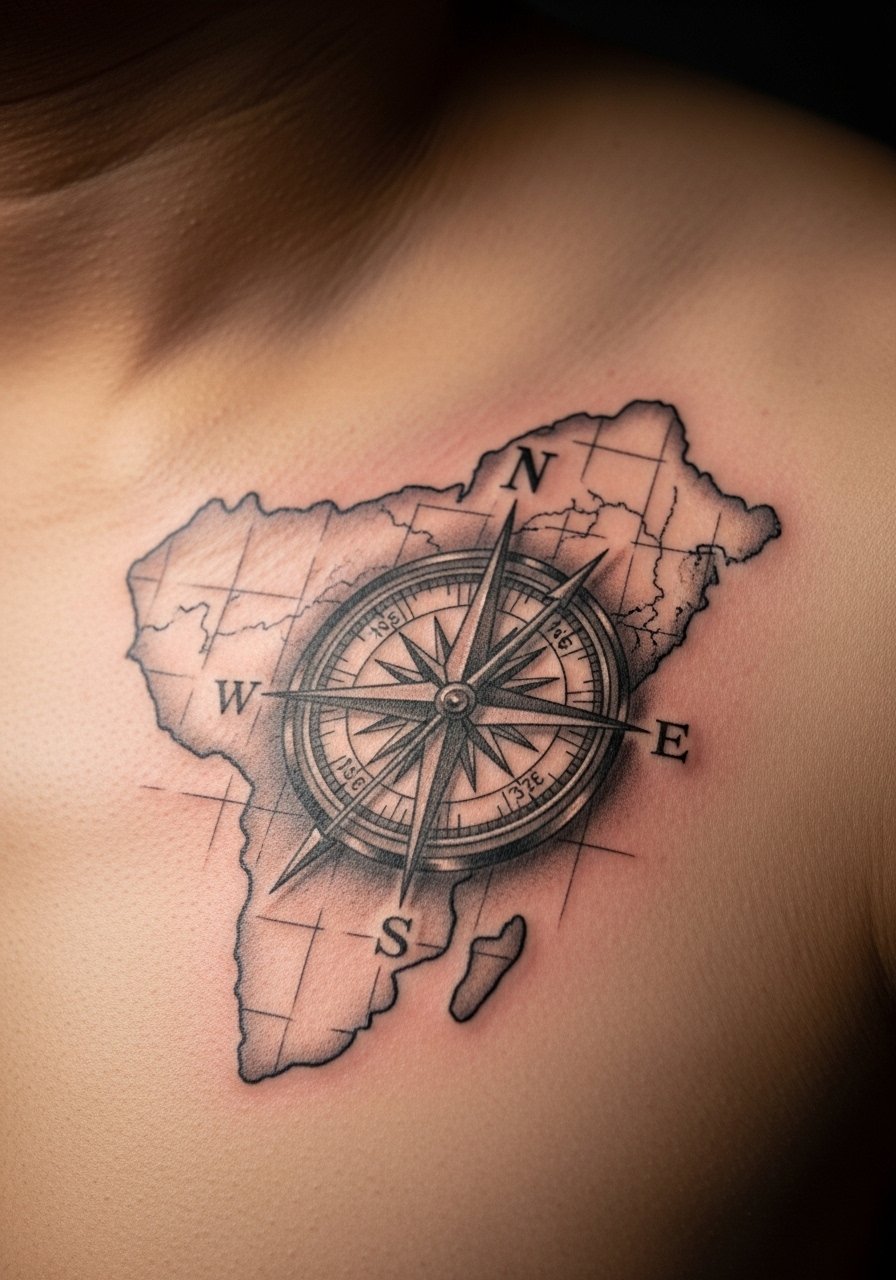
4. Compass With World Map Overlay on Upper Arm
Style/Technique: Illustrative / Realistic
Pain Level: Low-Medium (3-4/10)
Session Time: Multiple sessions, 3-6 hours total
Best For: Travel lovers, medium statement piece
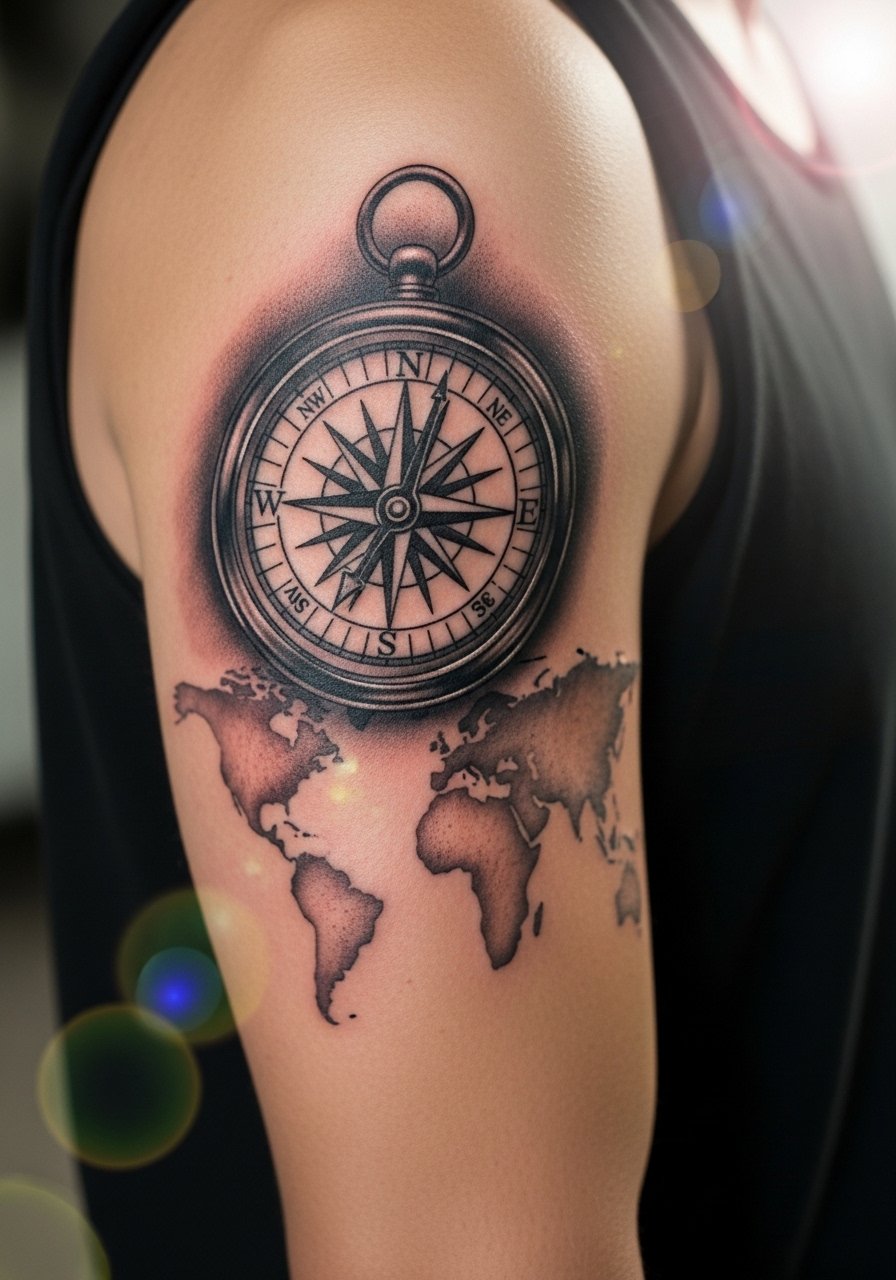
This design layers a realistic compass over a world map for a travel-focused compass tattoo meaning. It feels like a story on your skin—every continent a memory. Upper arm placement gives room for detail and ages well. Expect longer sessions for shading, and plan touch-ups if you want map details crisp. Avoid cramming tiny place names; coordinates are a cleaner personalization option. Look for an artist skilled in black-and-gray realism.
5. Blackwork Compass and Anchor on Chest
Style/Technique: Blackwork / Neo-Traditional
Pain Level: Medium-High (5-6/10)
Session Time: Multiple sessions, 4+ hours
Best For: Bold statement, high-contrast piece
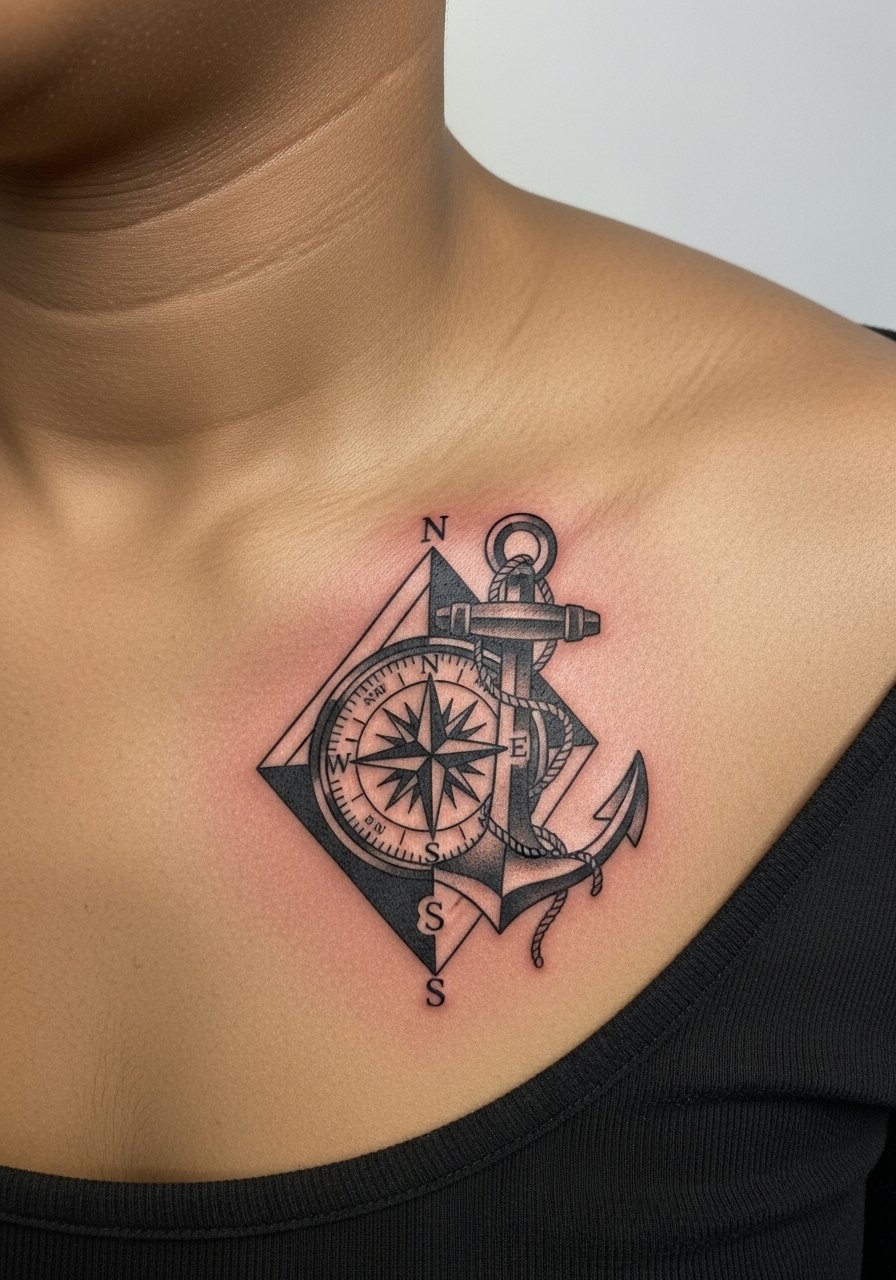
I went with blackwork here because it reads strongly on all skin tones and provides longevity. The chest gives presence and room for thick fills that don’t fade into mush. Pain is higher on the chest, and sessions can be long, so breaking it into visits helps. This combo emphasizes protection and direction—anchor for stability, compass for guidance. Ask for bold fills and clear negative space to avoid patchy healed tones.
6. Watercolor Compass Splash on Shoulder Blade
Style/Technique: Watercolor / Illustrative
Pain Level: Low-Medium (3-4/10)
Session Time: 2-4 hours
Best For: Creative, colorful statement
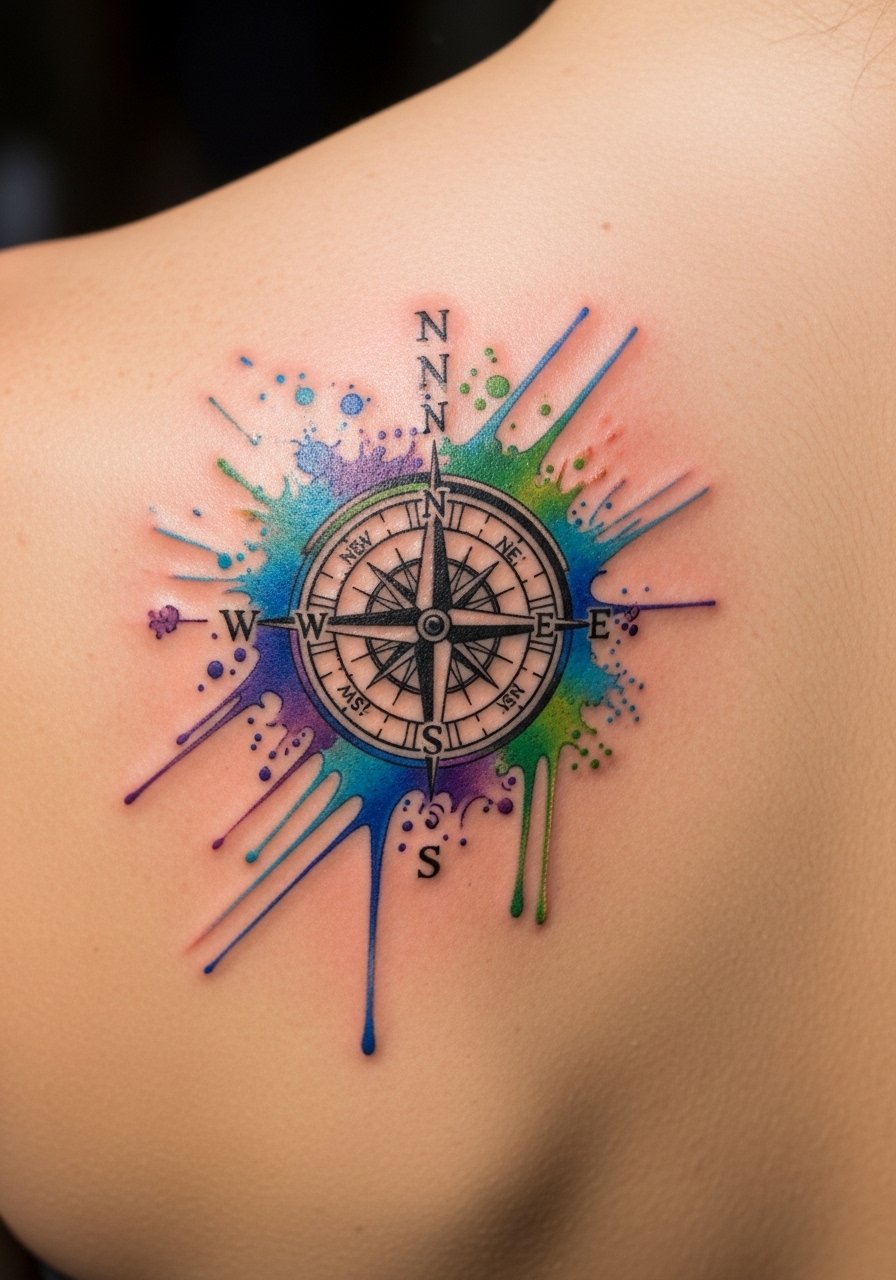
Watercolor compass tattoos feel expressive—colors bleed around a central compass for movement and creative energy. They look fantastic fresh but need more careful aftercare and UV protection because colors fade faster than black and gray. The shoulder blade is a forgiving spot with low friction. Avoid expecting razor-sharp edges in watercolor work; the style is about painterly flow. Ask the artist how they layer pigment for healed vibrancy.
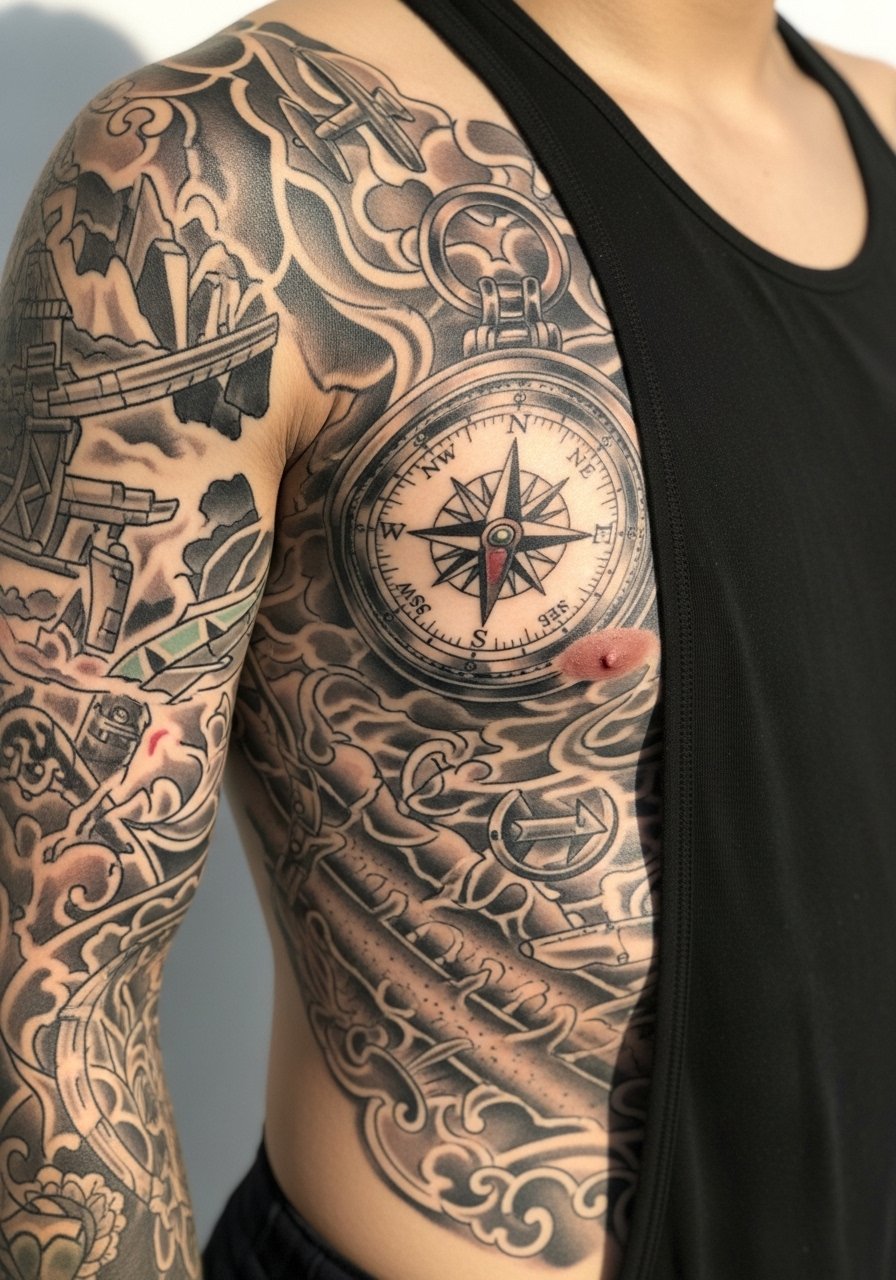
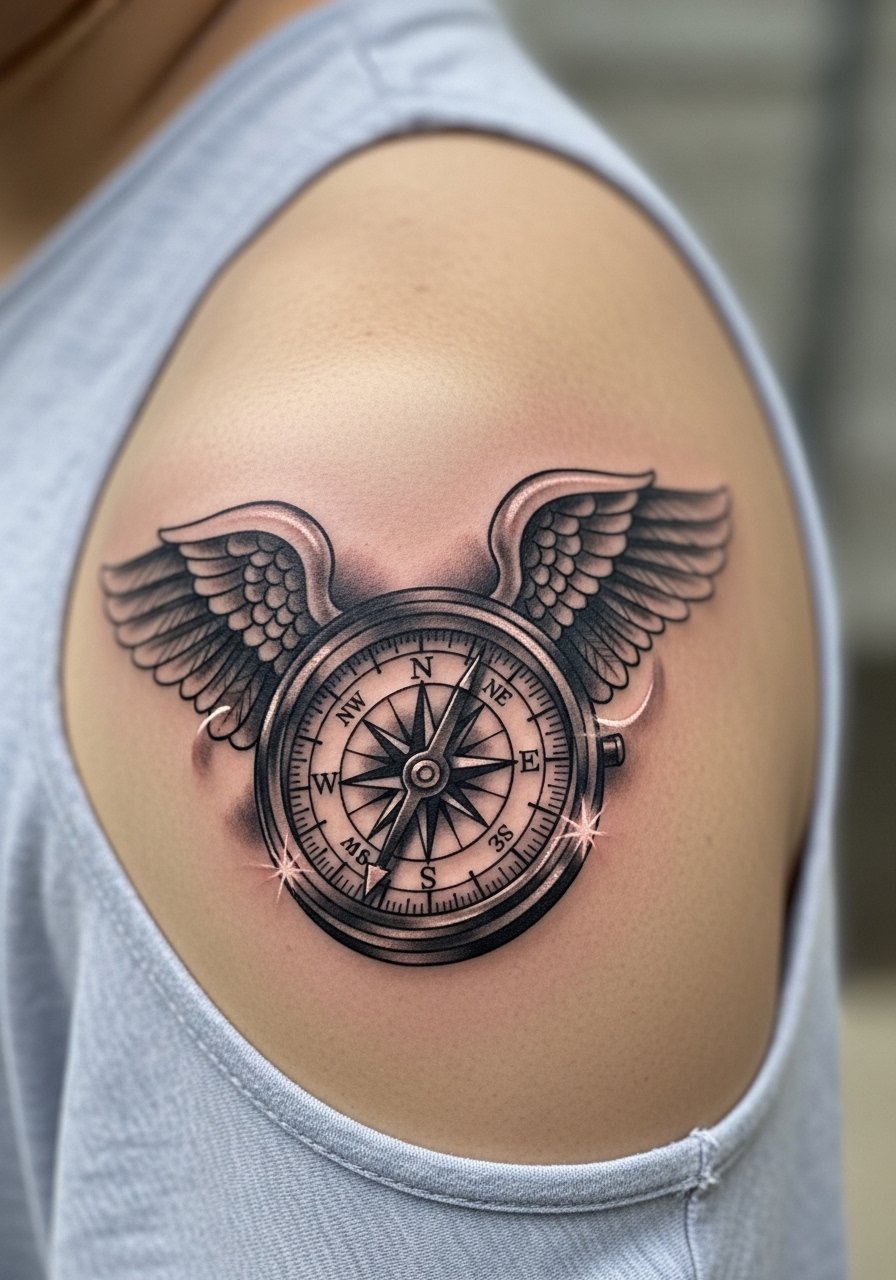
7. 3D Realistic Brass Compass on Forearm Sleeve Start
Style/Technique: Realism / 3D
Pain Level: Medium (4-6/10)
Session Time: Multiple sessions, 6-10 hours total
Best For: Sleeve anchor, hyper-detailed realism
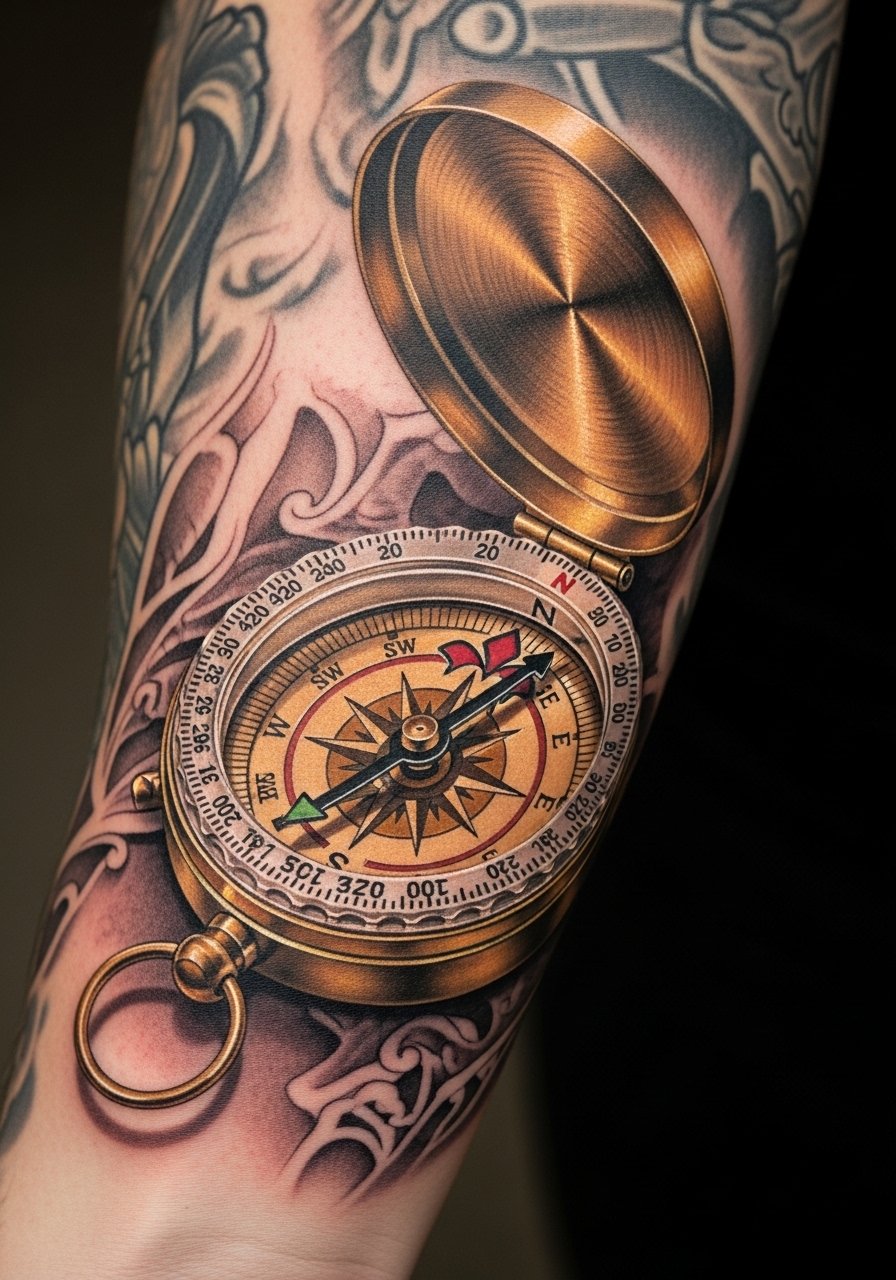
A 3D realistic compass reads like an object sitting on your skin—great for realism fans. I picked forearm sleeves for this because the curvature lets artists show depth. Realism needs an experienced artist; tiny shading mistakes show after healing. Plan several sessions and expect slower healing in dense shaded areas. The key mistake is underestimating how dense black/gray areas feel as they heal—break sessions to manage pain and swelling.
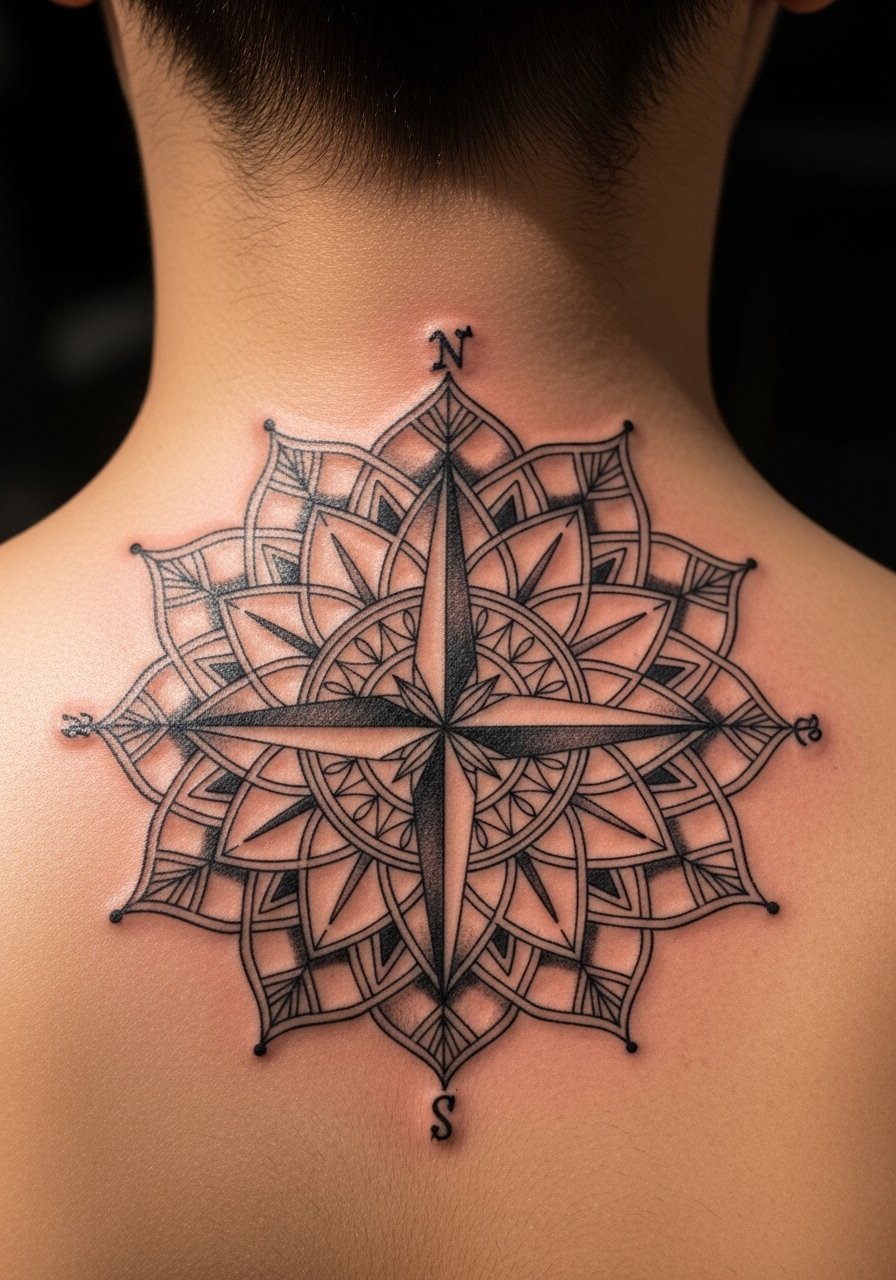
8. Geometric Sacred Compass With Honeycomb on Ribcage
Style/Technique: Geometric / Sacred Geometry
Pain Level: High (7-8/10)
Session Time: 3-5 hours
Best For: Spiritual symbolism, large midriff pieces
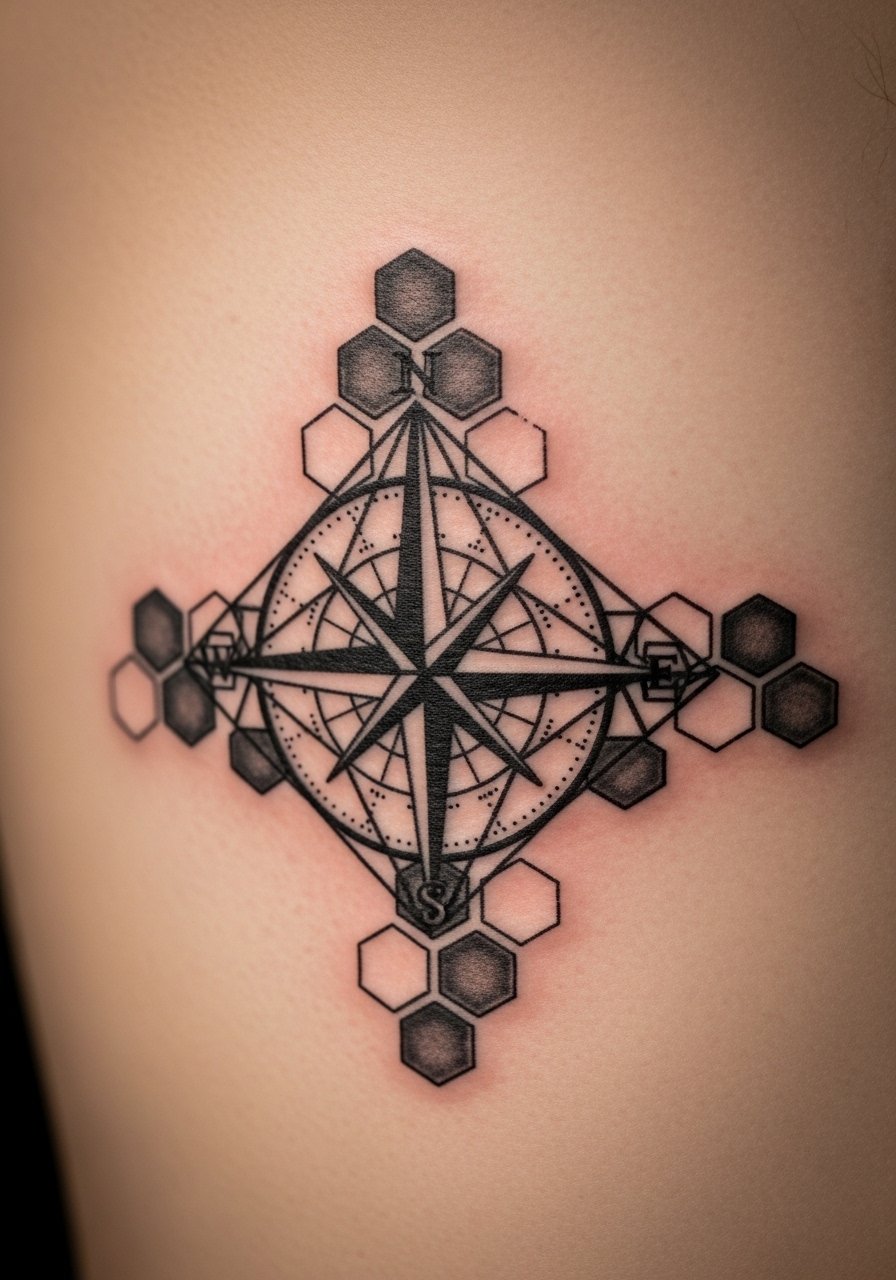
This felt like a modern spiritual piece for me—the compass nested in a honeycomb suggests structure and direction. Ribcage placement gives dramatic flow but is painful and needs careful aftercare due to breathing and movement. Bold geometric lines hold up best; tiny dotwork can blur on the ribs. If you want this, ask the artist about stencil placement so the pattern flows with your body contours.
9. Compass With Roses and Rope on Bicep
Style/Technique: Traditional / Neo-Traditional
Pain Level: Low (2-3/10)
Session Time: 2-4 hours
Best For: Romantic nautical vibe, visible but easy to hide
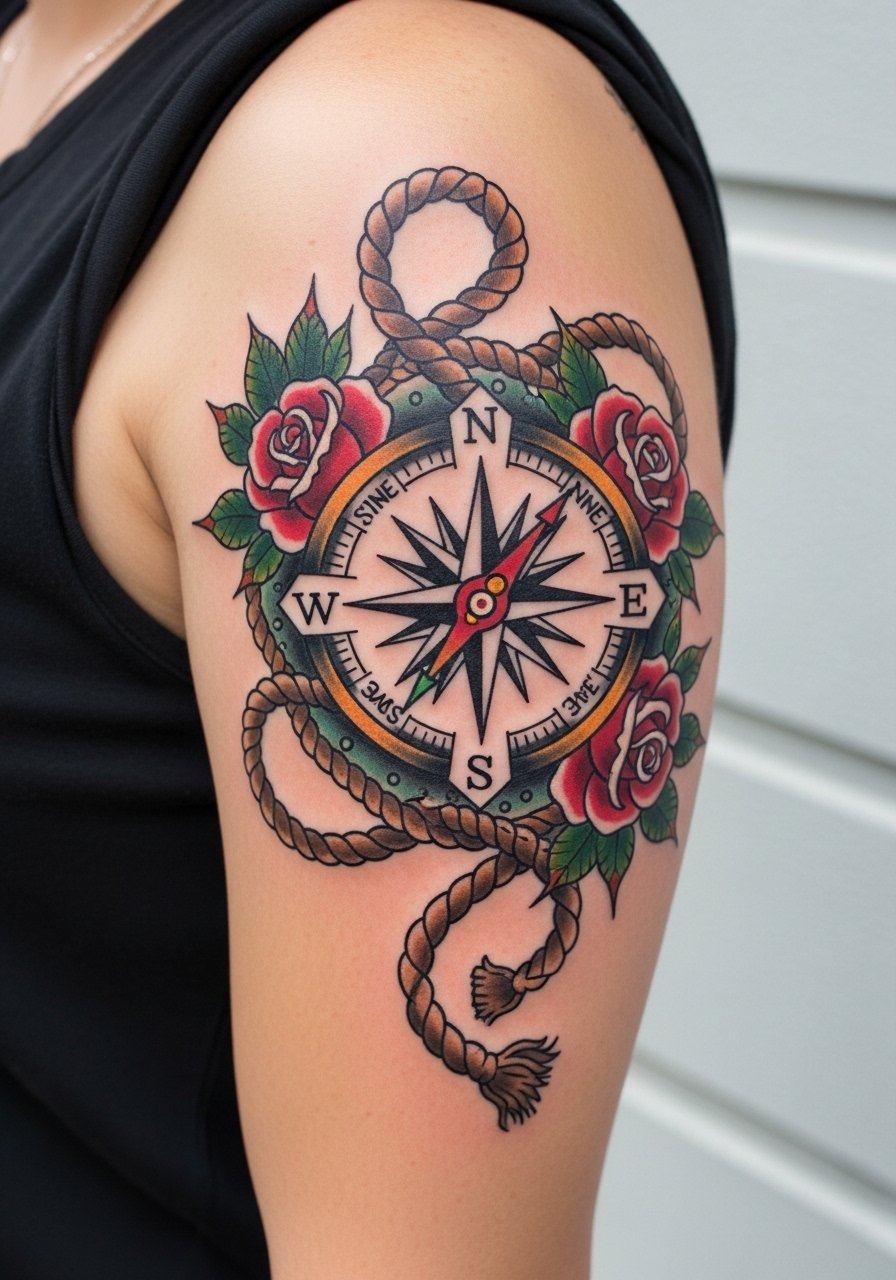
Pairing a compass with roses and rope gives that old-school sailor protection and romantic symbolism. The bicep is a forgiving spot with low pain and good aging. This combo benefits from traditional line weight—colors and shapes remain readable as skin ages. Avoid overly thin rope lines; they can blend into shading over time. Look for artists who excel at old-school palettes.
10. Minimalist Compass With Coordinates Behind Ear
Style/Technique: Minimalist / Fine Line
Pain Level: Low-Medium (3-4/10)
Session Time: 1 hour
Best For: Tiny personal marker, hidden placement
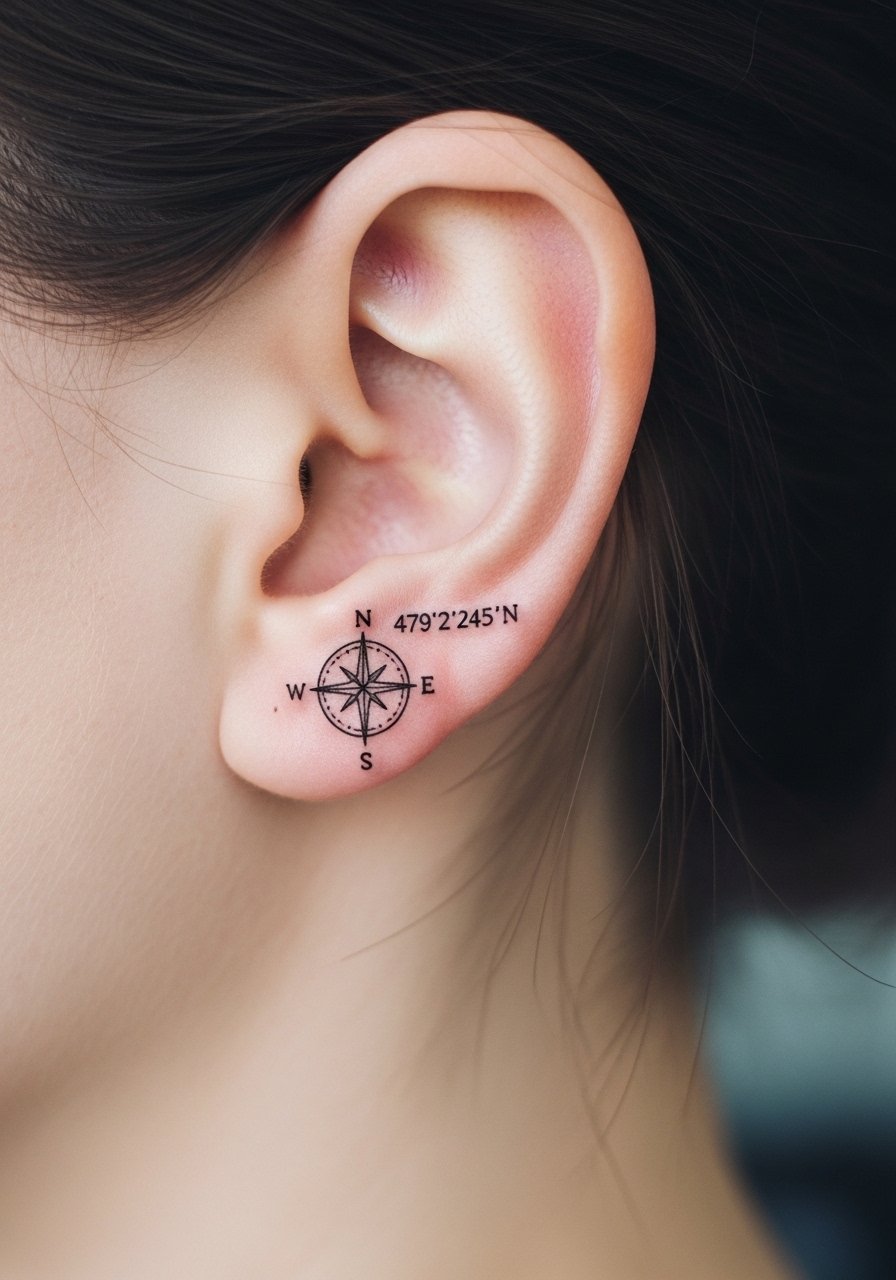
I went with coordinates to mark a location that matters to me—behind the ear felt intimate. Small compass tattoo placements like this require restraint; too much detail becomes a mush of lines when healed. Pain is brief but stinging due to thin skin. Try a temporary to confirm placement. For longevity, ask for slightly heavier single-needle lines rather than hairline strokes.
11. Nautical Compass and Ship on Calf
Style/Technique: Illustrative / Nautical
Pain Level: Low (2-3/10)
Session Time: 3-5 hours
Best For: Story-driven pieces, travelers

Pairing a compass with a ship reads like a journey home. The calf offers a canvas for medium-scale illustrative work and usually heals cleanly. Expect multiple hours for detail. This composition ages nicely because lines can be bolder. Avoid over-cluttering with tiny waves or ship details; silhouette clarity matters more post-heal. Artists who do ship and maritime work are the ones I’d ask to see portfolio samples of.
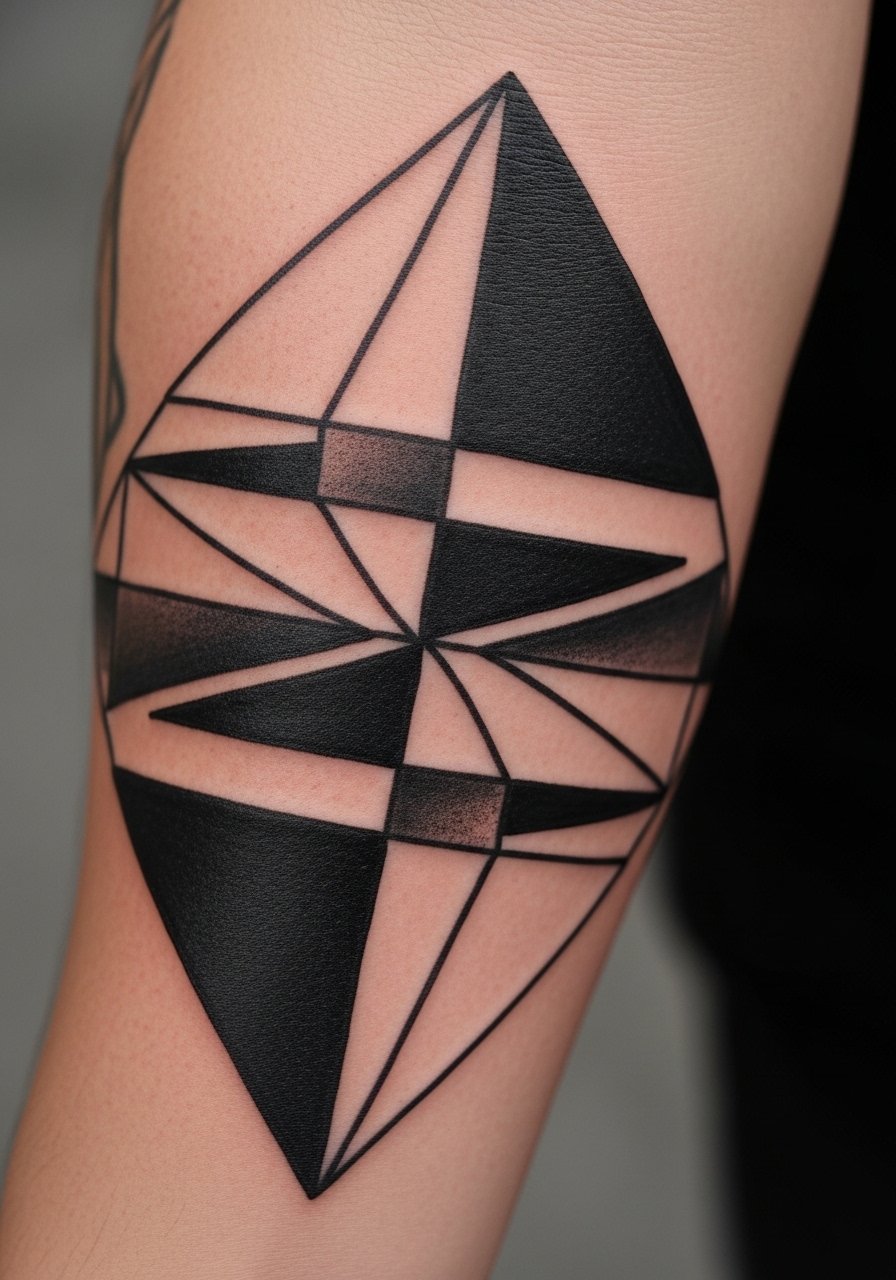
12. Abstract Compass With Arrows on Inner Bicep
Style/Technique: Abstract / Minimalist
Pain Level: Medium (4-5/10)
Session Time: 2-3 hours
Best For: Modern, directional symbolism
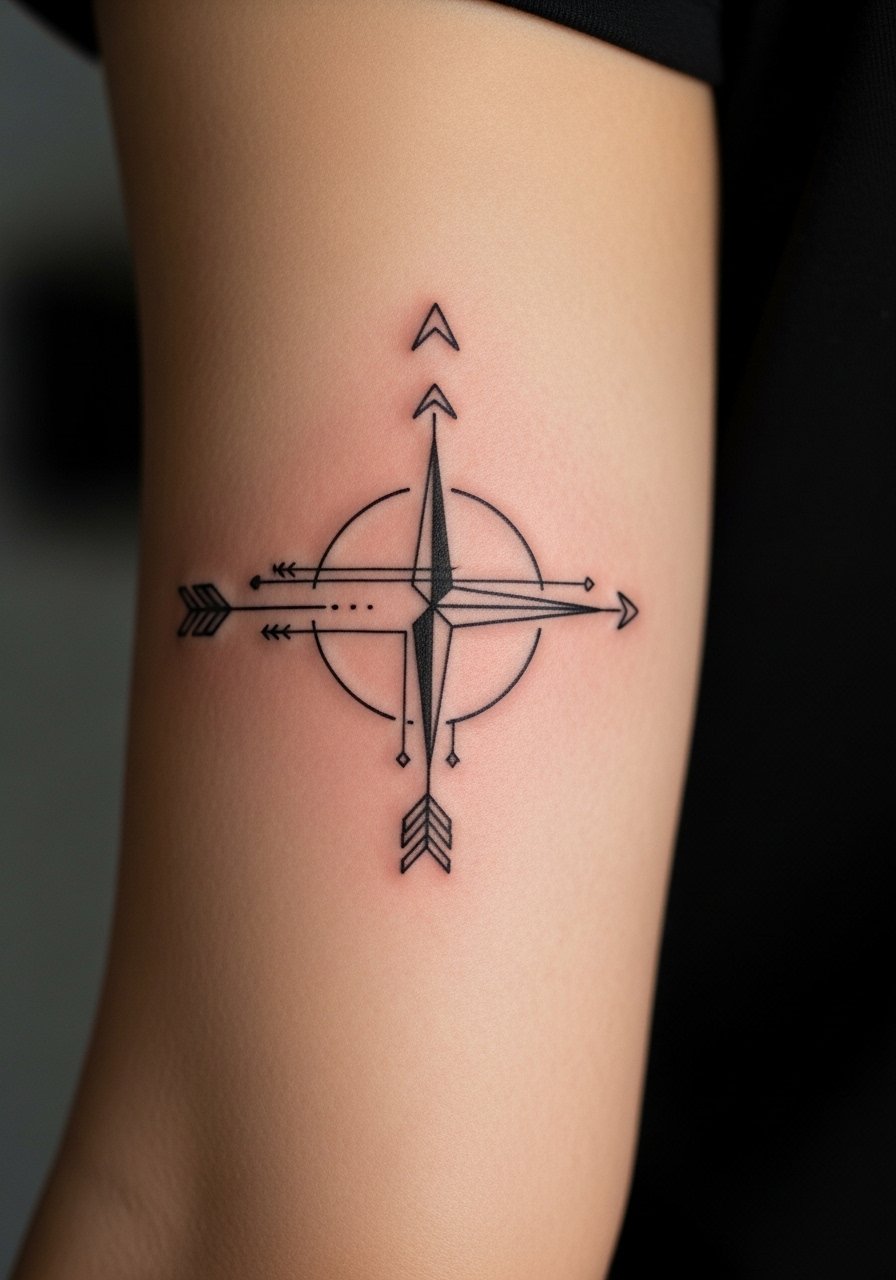
This abstract take uses arrows to suggest forward motion more than literal navigation. The inner bicep is intimate and can hide well. Movement and sweat in this area mean maintain moisture while healing to avoid scabbing that distorts lines. Ask for balanced spacing—abstract designs suffer when elements sit too close together and blur as they settle.
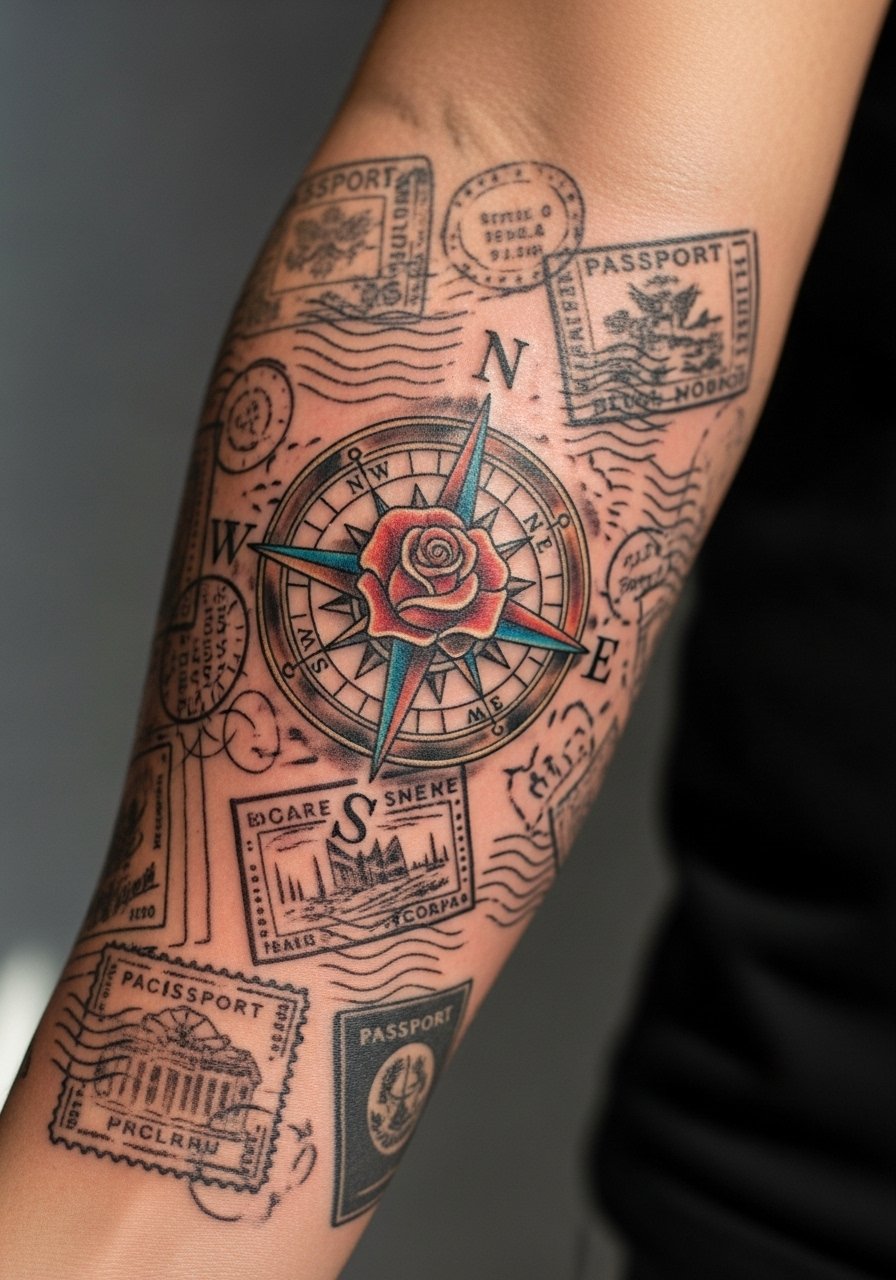
13. Compass With Passport Stamps on Forearm
Style/Technique: Illustrative / Travel Collage
Pain Level: Low-Medium (3-4/10)
Session Time: 3-5 hours
Best For: Memory-driven travel tattoos
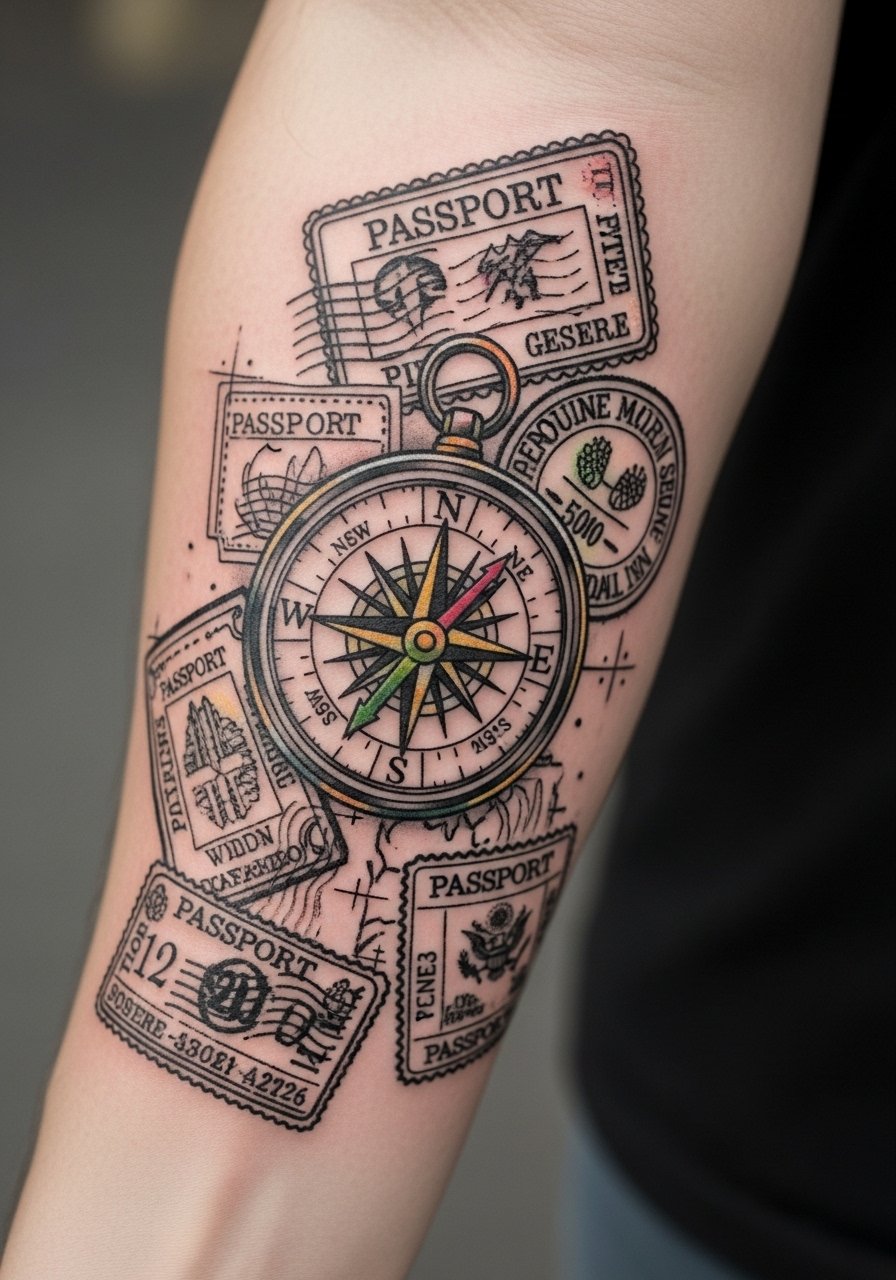
If you want a visual travel diary, stamp motifs around a compass create a personalized sleeve starter. Forearm placement shows off detail and lets you add stamps over time. Avoid tiny text in stamps—legibility fades. Coordinates and a single bold stamp often read better long-term than many small labels. Look for illustrators who can balance small iconography with negative space.
14. Vegvisir Rune Compass on Forearm
Style/Technique: Cultural / Blackwork
Pain Level: Low-Medium (3-4/10)
Session Time: 2-3 hours
Best For: Norse symbolism, protection motifs
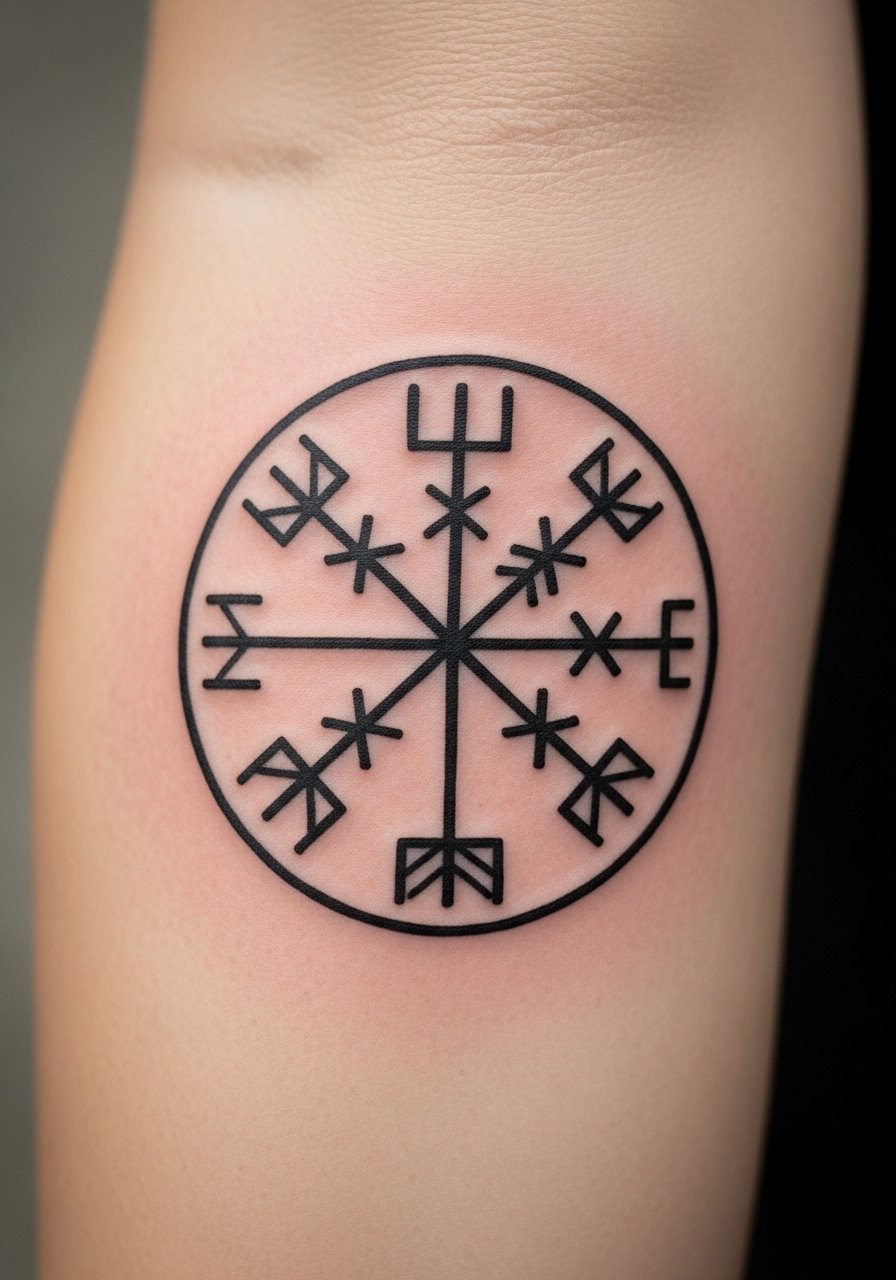
The Vegvisir brings Norse protection into compass tattoo meaning. I saw this often among people wanting cultural depth. Because of its line detail, choose an artist experienced with runic designs to ensure symmetry and clean intersections. It ages well in blackwork; keep it out of direct sun and it will stay crisp longer. Ask to see healed examples on similar skin tones.
15. Topographical Contour Line Compass on Thigh
Style/Technique: Minimalist / Topographic
Pain Level: Low (2-3/10)
Session Time: 2-3 hours
Best For: Hikers and outdoors lovers, medium-hidden piece
This is one of my favorite under-covered ideas—mixing contour lines with a compass feels like mapping both landscape and life. The thigh is forgiving and low-pain. Fine contour lines need careful spacing to avoid merging as they heal. If you hike a lot, place it where shorts or straps won’t rub during healing. Ask your artist for slightly thicker contour lines than a sketch to preserve the pattern.
16. Compass With Ancestral Homeland Map on Chest
Style/Technique: Illustrative / Personalized
Pain Level: Medium (4-5/10)
Session Time: 3-5 hours
Best For: Heritage tattoos, storytelling pieces
For immigrant stories or family roots, a compass with an ancestral homeland map is quietly powerful. Chest placement allows a medium-size, readable map. Keep map detail minimal—shading and silhouette work better than tiny labels. This design solves the “generic symbolism” fear by tying direction to a real place. Artists who do cartographic ink can help stylize borders so they stay clear when healed.
17. Micro Compass on Finger for Daily Reminder
Style/Technique: Micro / Minimalist
Pain Level: Medium-High (5-7/10)
Session Time: 30-60 minutes
Best For: Constant reminder, discrete placement
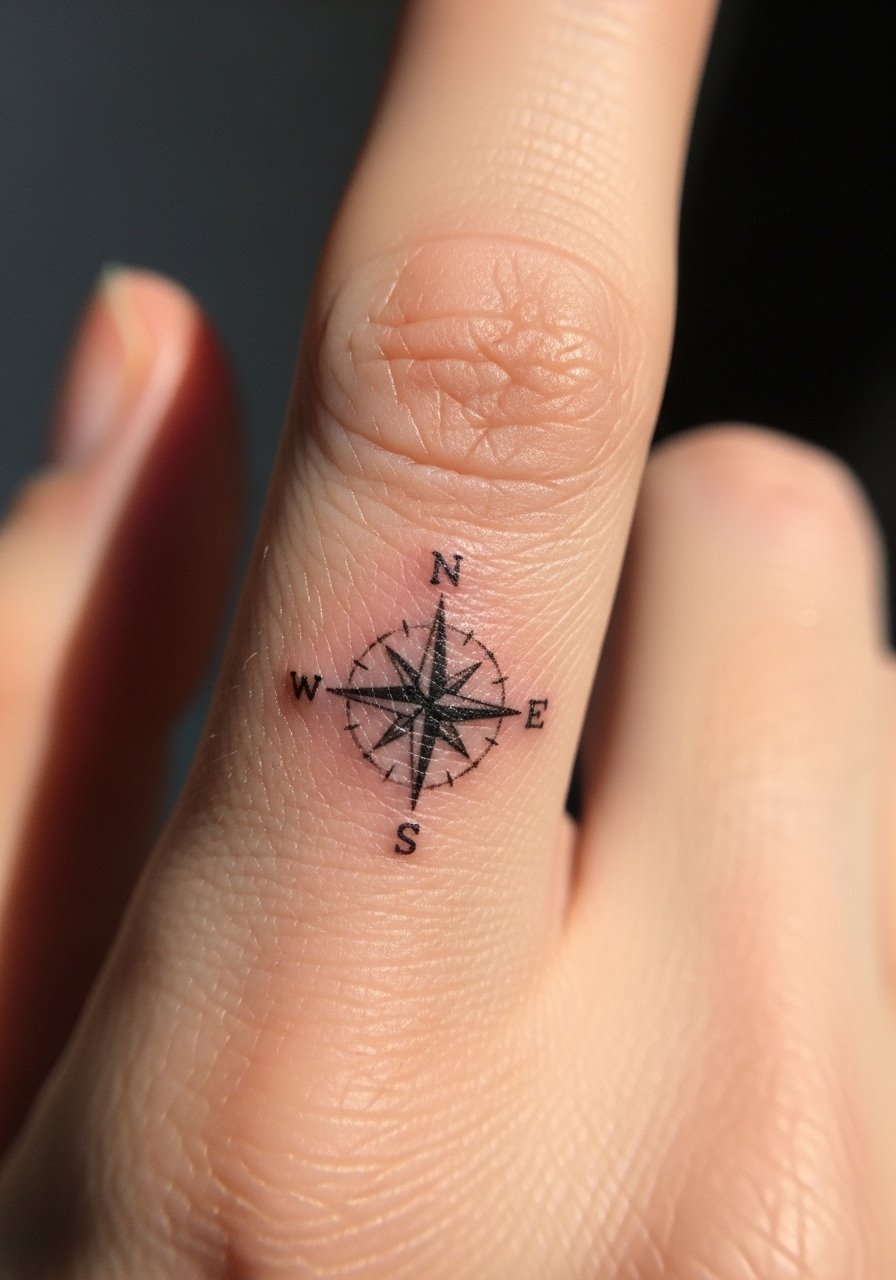
Finger compasses are great for a constant nudge, but they fade faster due to constant washing and skin turnover. I opted for a slightly thicker outline to combat early blurring. Pain is sharp but short. If you choose this, expect touch-ups down the road and ask the artist about ink placement depth for longevity. Small compass tattoo fans should be prepared for periodic refreshes.
18. Compass Mandala on Back of Neck
Style/Technique: Neo-Traditional / Mandala
Pain Level: Medium (4-6/10)
Session Time: 2-3 hours
Best For: Symmetry lovers, visible with hair up
A mandala-centered compass feels meditative—a direction-finding symbol rooted in balance. The back of neck placement is visible when you wear your hair up and heals relatively well. Symmetry is everything here; ask the artist to mirror the stencil precisely. If you sleep on a pillow that rubs the area, plan for gentle care in the first two weeks.
19. Compass and North Star Ankle Tattoo
Style/Technique: Fine Line / Minimalist
Pain Level: Medium (5-6/10)
Session Time: 1-2 hours
Best For: Small but meaningful placement, first-timers who want visibility
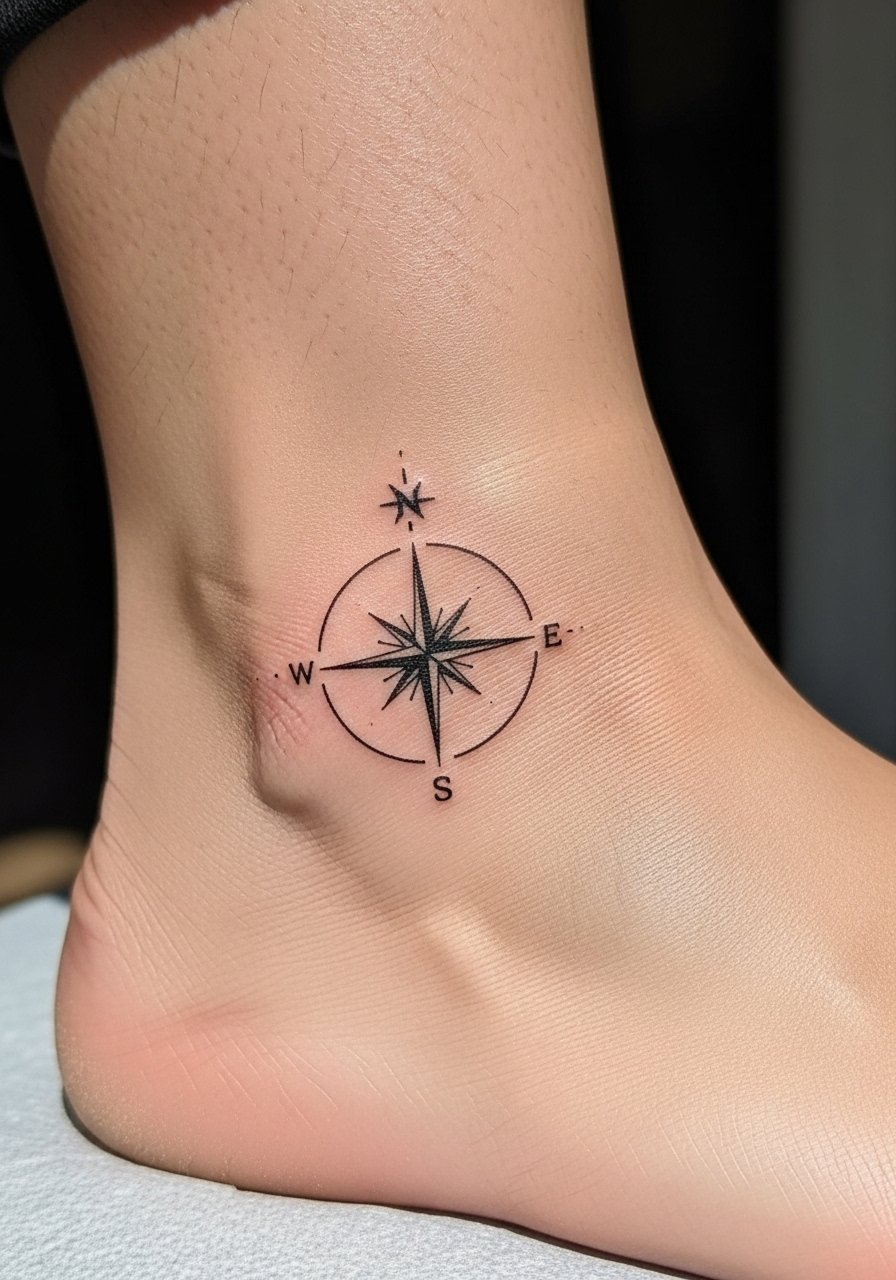
Ankle compasses are visible and elegant. I chose a North Star accent to emphasize guidance. The ankle is higher on the pain scale because of thin skin and bone proximity, but sessions are short. The region flexes—so slightly bolder lines resist early blurring. If you’re worried about placement regret, try a temporary sticker to check daily visibility.
20. Compass With Mythological Creature (Raven) on Shoulder
Style/Technique: Illustrative / Mythological
Pain Level: Low-Medium (3-4/10)
Session Time: 3-5 hours
Best For: Wisdom symbolism, narrative pieces
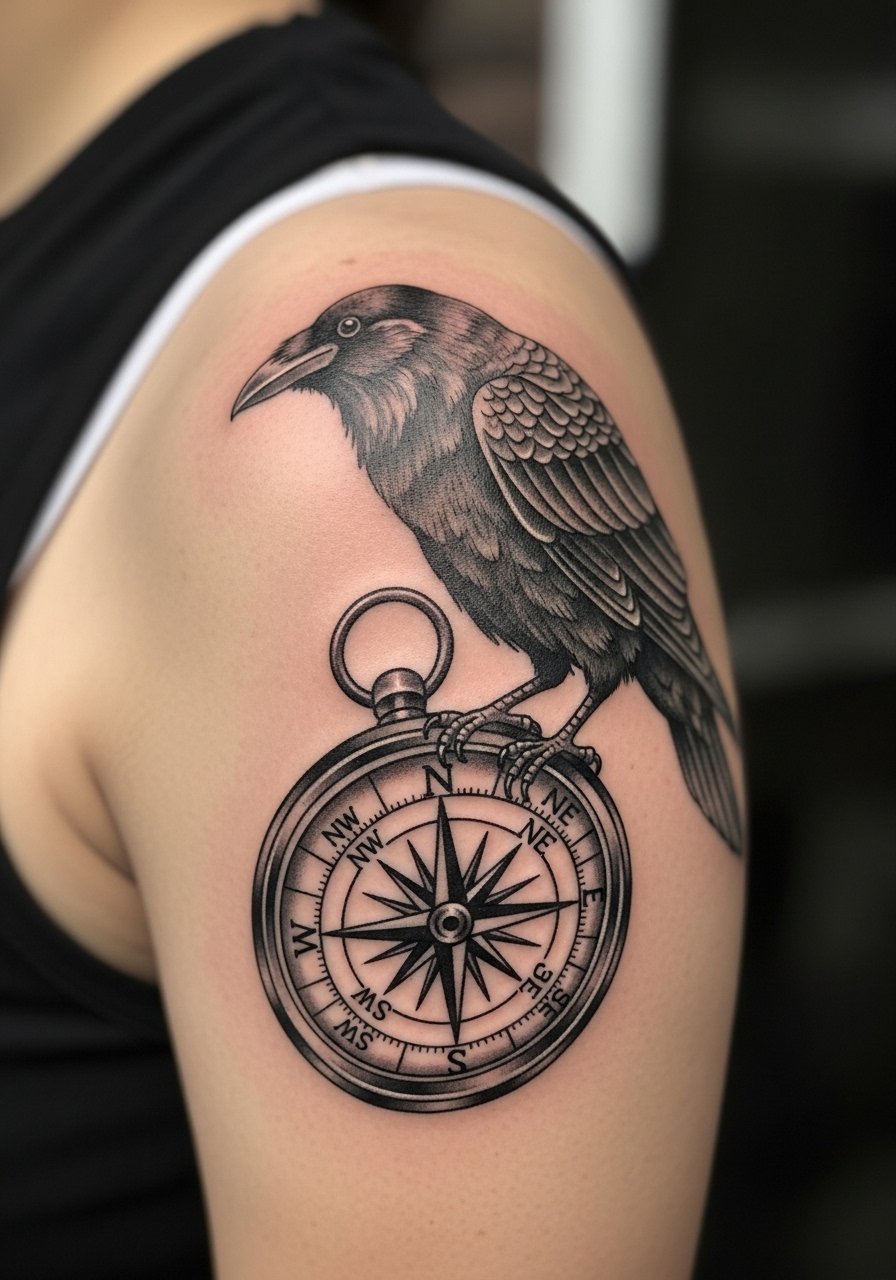
Combining a compass with a mythological creature—like a raven—adds narrative depth and a fresh twist I rarely saw elsewhere. It reads as a wisdom guide and looks great on the shoulder where curves help composition. Ask for clear separation between creature linework and the compass so both elements age distinctly. This helps avoid muddled detail after healing.
21. Geometric Compass Sleeve Panel on Outer Forearm
Style/Technique: Geometric / Blackwork
Pain Level: Medium (4-6/10)
Session Time: Multiple sessions, 6+ hours
Best For: Sleeve starter, modern aesthetic
I like geometric panels for a contemporary feel—compass motifs can anchor a sleeve with repeating geometry. The outer forearm tolerates long sessions, and blackwork geometry keeps a sharp healed look. Mistake to avoid: too many tiny intersecting lines. Ask the artist to test a stencil on your arm to see how the pattern flows with muscles.
22. Compass Rose With Celtic Knot on Upper Arm
Style/Technique: Neo-Traditional / Cultural Fusion
Pain Level: Low-Medium (3-4/10)
Session Time: 2-4 hours
Best For: Cultural symbolism, decorative pieces
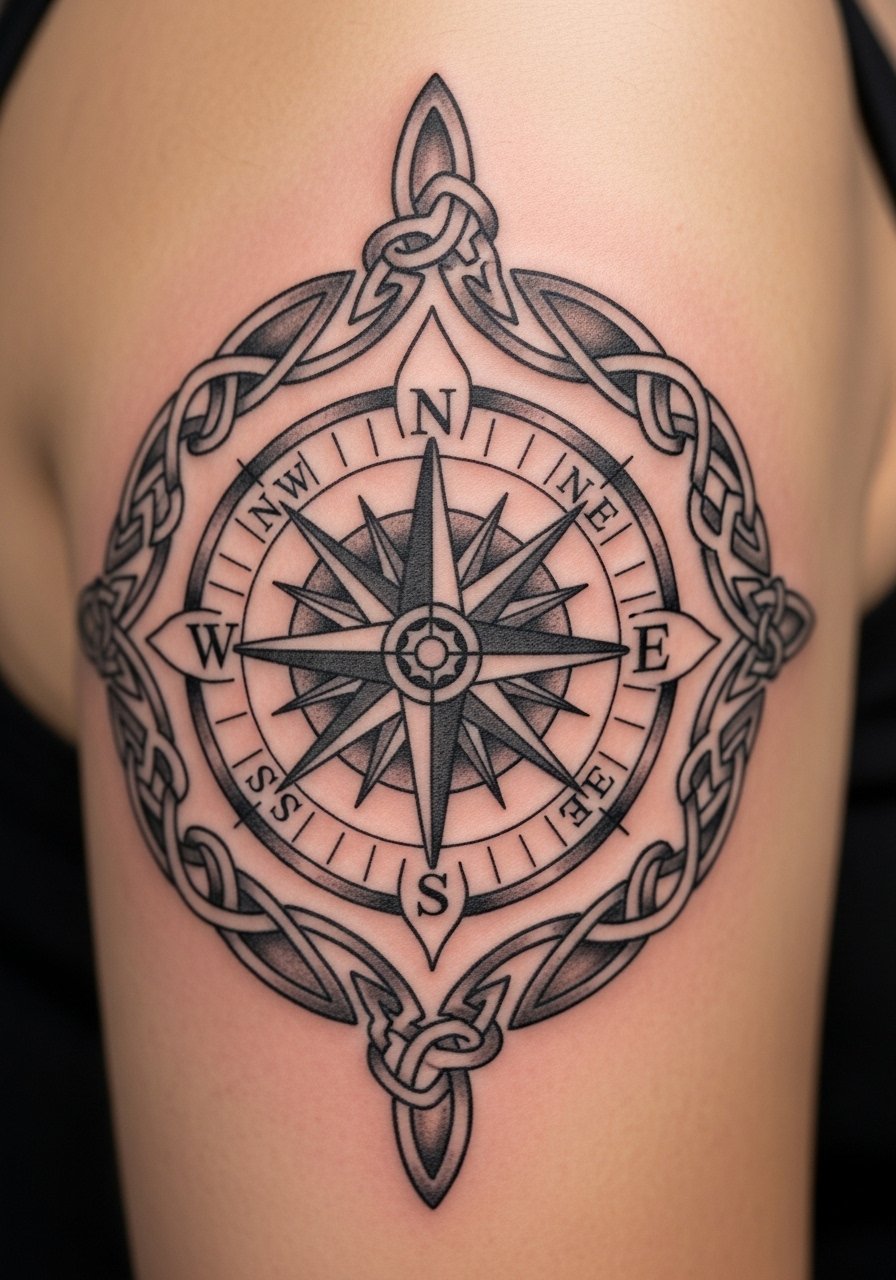
Celtic knotwork around a compass offers continuity and heritage vibes. This fusion works well on the upper arm where curves let knotwork breathe. Knot details must be bold enough to stay separated after healing—thin interlace vanishes over time. Artists experienced in knot patterns will sketch flow lines first; ask to see healed knotwork on similar skin tones.
23. Compass Tattoo As Part Of Travel Sleeve On Ribcage
Style/Technique: Illustrative / Collage
Pain Level: High (7-8/10)
Session Time: Multiple sessions across months
Best For: Big storytelling pieces, highly personalized work
A ribcage-centered compass can be the emotional anchor of a travel sleeve. It’s gorgeous if you want a narrative collection, but rib work is painful and heals slower. I’d plan multiple sittings and prioritize rest between sessions. Avoid packing too much micro-detail into a ribcage map; bold shapes read better when breathing stretches the canvas.
24. Compass With Birth Flowers On Thigh
Style/Technique: Neo-Traditional / Floral Combo
Pain Level: Low (2-3/10)
Session Time: 2-3 hours
Best For: Personalized gifts, memorials
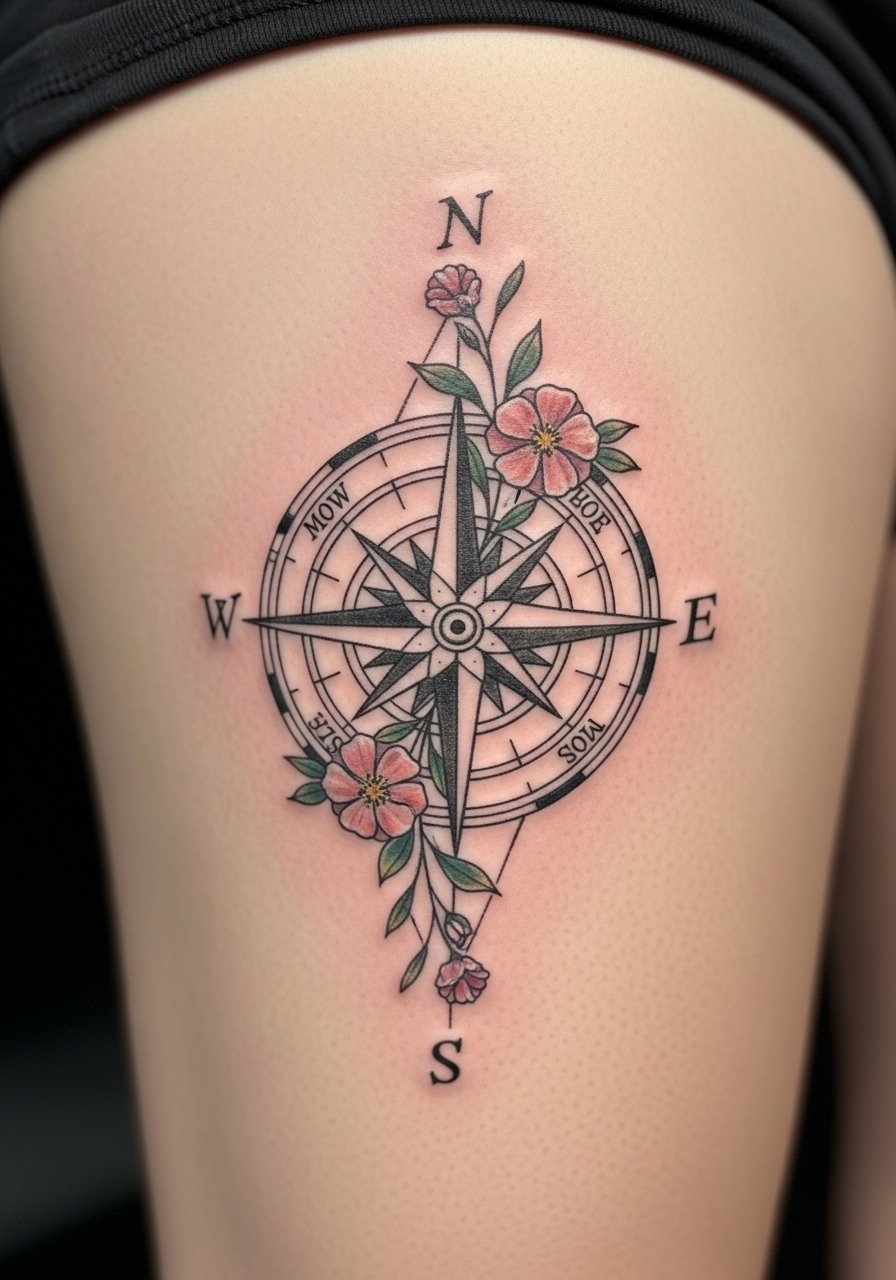
Pairing a compass with birth flowers personalizes the symbolism—direction plus lineage. The thigh is low-pain and hides easily, making it great for intimate tributes. Flowers and compass balance each other visually, but keep petals bold so color holds up after healing. Artists who do floral realism will show you how colors age on different skin tones.
25. Micro-Realism Compass On Inner Wrist
Style/Technique: Micro-Realism / Tiny Realism
Pain Level: Medium (4-5/10)
Session Time: 1-2 hours
Best For: Subtle realism, small realistic objects
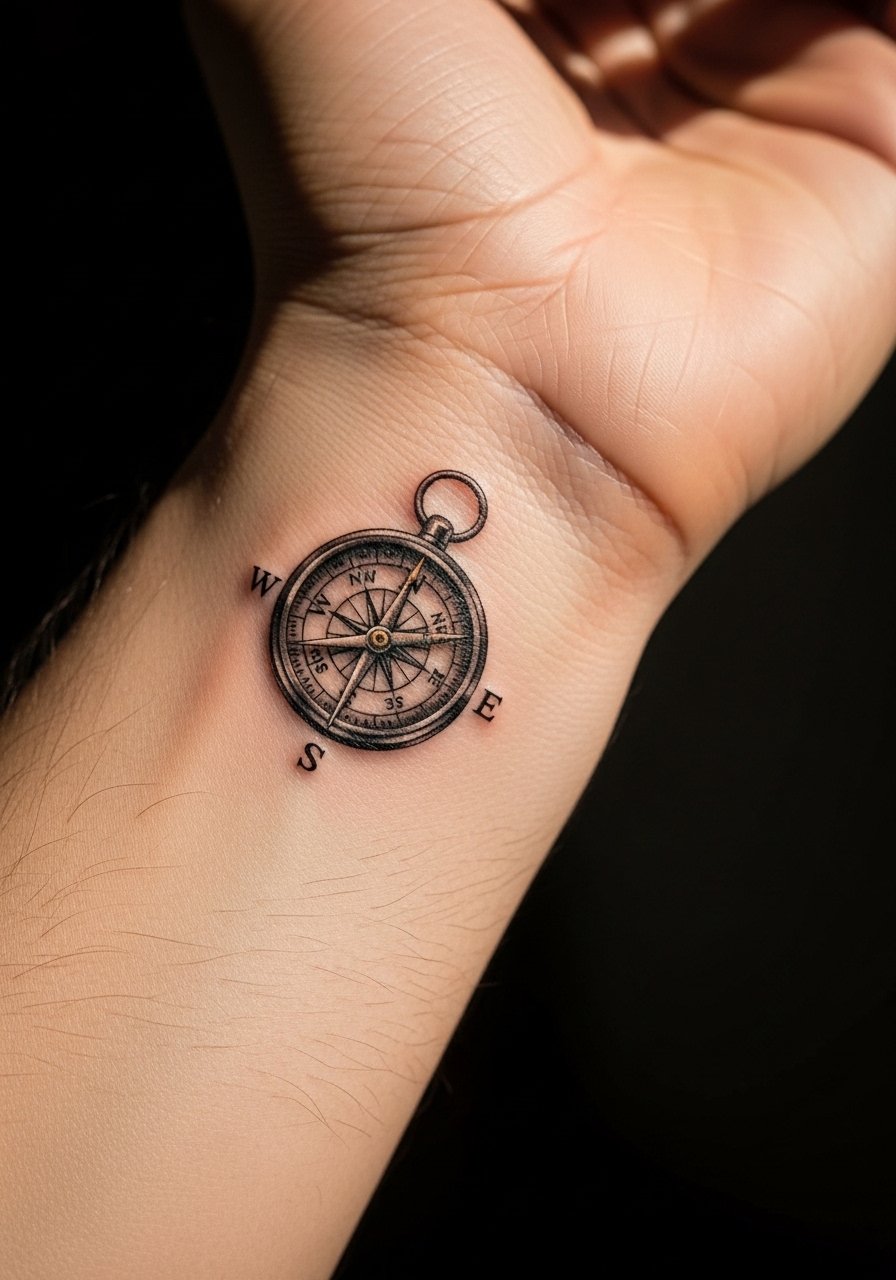
Micro-realism compasses are impressively detailed at a small scale. I recommend choosing an artist who specifically shows micro-realism in their portfolio—tiny shades and highlights determine whether the piece reads as an object or a smudge after healing. Inner wrist is visible, so commit to sun protection to avoid early fading.
26. Compass With Passport Stamp Sleeve Accent on Forearm
Style/Technique: Illustrative / Travel Accent
Pain Level: Low-Medium (3-4/10)
Session Time: Multiple shorter sessions
Best For: Collectors adding travel memories
This idea works if you want to build over time—place a central compass and add passport stamps as you visit places. I love this for its ongoing personal story. Keep stamps larger than you think to remain legible long-term. Ask your artist how pigments will age on your skin tone so color choices last.
27. Compass and North Star Anklet-Style Band
Style/Technique: Minimalist Band / Fine Line
Pain Level: Medium (4-6/10)
Session Time: 1-2 hours
Best For: Ankle visibility, delicate bands
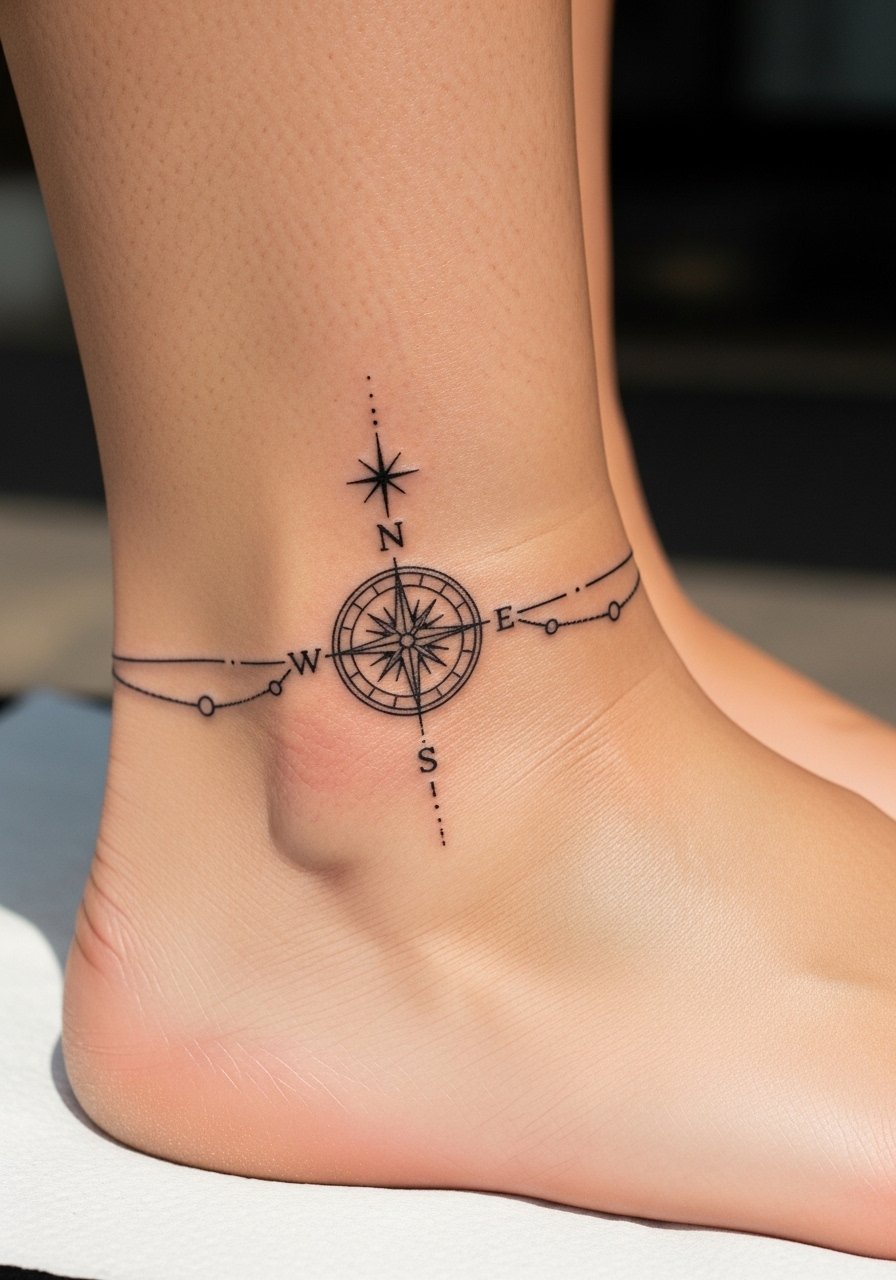
Turning a compass into an anklet band feels like wearing guidance. Bands can be tricky—your artist must consider how the ankle flexes and where socks might rub. I recommend slightly bolder lines and a small gap in the band for breathability. This is a nice balance of subtlety and meaning if you want daily visibility.
28. Compass With Hermes Wing For Messenger Vibe On Shoulder
Style/Technique: Mythological / Illustrative
Pain Level: Low-Medium (3-4/10)
Session Time: 2-4 hours
Best For: Wisdom and travel symbolism, statement shoulder piece
I added a Hermes wing to nod to travel, messages, and movement—a less-common mythological twist. The shoulder gives the motif room to breathe and shows well with shirts. Make sure wing feathers and compass points are separate enough to age distinctly. Artists comfortable with mythic iconography can help balance symbolism and readability.
Tattoo Prep and Aftercare Essentials
Aftercare Essentials:
- Aquaphor Healing Ointment, 14oz tube — Industry standard for initial days
- Saniderm Transparent Adhesive Bandage, 6-inch roll — Second-skin healing method
- CeraVe Fragrance-Free Moisturizing Lotion, 12 oz — For days 4–14
Before Your Appointment:
- Tattoo Numbing Cream 5% Lidocaine — Use only if your artist approves
- Tattoo Stencil Transfer Paper Sheets — Helpful when planning custom placement
Long-Term Maintenance:
- SPF 50 Sunscreen Stick for Tattoos — Daily protection to prevent fading
- Mad Rabbit Tattoo Balm, 1.7 oz — Keeps healed tattoos vibrant
- Hustle Butter Deluxe, 8 oz — Vegan alternative for ongoing care
Optional Comfort Items:
- Dr. Bronner's Unscented Castile Soap, 32 oz — Gentle daily clean
- Hydrocolloid Bandages (Large) — For spot healing or small blisters
- Tattoo Aftercare Travel Kit — Good for trips or touch-ups
Frequently Asked Questions
Q: How bad does a tattoo actually hurt?
A: Pain depends on placement and your tolerance. Outer forearm and thigh are usually lower on the scale, while ribs, spine, and ankles are higher. It’s more a persistent scratch and burning than a sudden sharp shock. For sensitive spots ask about a 5% lidocaine numbing cream—some artists allow it and it eases the first hour.
Q: What if I regret my compass design?
A: I’ve seen people avoid regret by personalizing compasses—add coordinates, a birth flower, or a map outline tied to meaning. If you’re unsure, try a temporary or start with a small compass tattoo in a hidden spot. Laser removal exists but it's a long process; better to plan thoughtfully up front.
Q: How do I keep my compass tattoo from fading?
A: From what I’ve gathered, UV exposure is the biggest ink killer. Use an SPF 50+ stick daily on exposed tattoos and keep freshly healed ink out of direct sunlight. Regular moisturizing with a fragrance-free lotion helps skin health and retention of color.
Q: Can I work out after getting a compass tattoo?
A: Wait at least 48–72 hours before strenuous workouts; if your tattoo is on a flex area (elbow, knee, ribcage), give it a week to reduce swelling risk. Sweat can irritate a fresh tattoo and increase infection risk. Keep it clean and gently moisturized during the first two weeks.
Q: Should I get a small compass first to test my pain tolerance?
A: Only if you genuinely want the small design. Pain varies more by placement than size; a tiny wrist or finger piece can hurt more than a larger outer-arm tattoo. If you’re nervous, pick a low-pain placement like the outer upper arm.
Q: How long does a compass tattoo take to heal and look final?
A: Surface healing is about 2–3 weeks; deeper healing can take 2–3 months. Colors and lines settle gradually—expect dullness while healing, with true tones returning after full skin regeneration. Use recommended aftercare (Saniderm for early days or Aquaphor initially) and avoid picking scabs.
Q: Do compass tattoos look different on different skin tones?
A: Yes—black and gray tend to show best across skin tones. Bright colors can appear more muted on deeper skin tones, so talk to artists who regularly tattoo your skin tone to pick pigments and line weights that heal visibly. White ink usually won’t read well on darker skin, so plan accordingly.
Q: What's the biggest mistake people make with compass tattoos?
A: Packing too much tiny detail into a small design. Micro lines, tiny text, or minuscule map labels often blur with time. I always advise scaling up detail or simplifying designs—clear shapes and balanced negative space age far better.
