
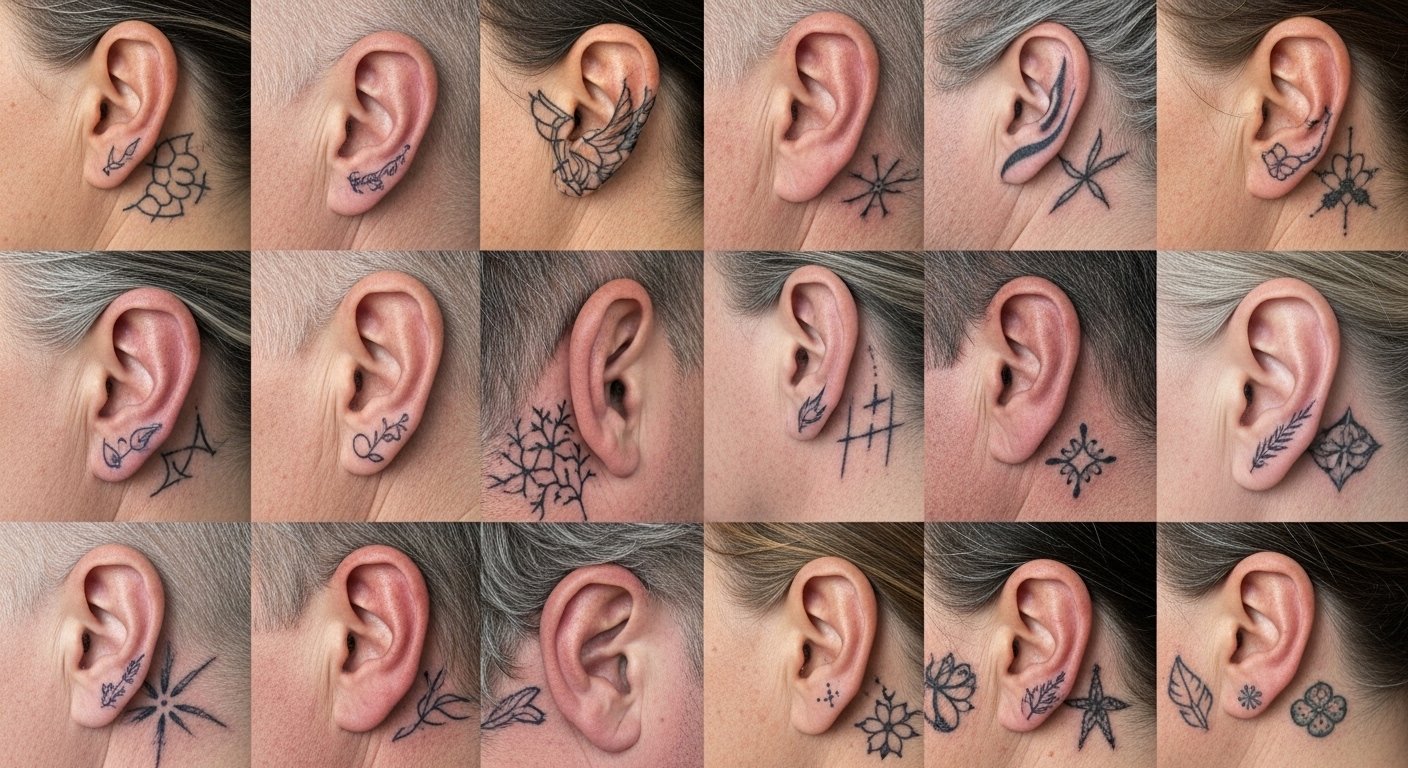
I spent months watching behind-the-ear tattoos go from tiny trend to a staple for people who want something discreet but personal. The trick I learned: the design needs to suit a little, curved canvas and survive shampoo, phone pressure, and earrings. These 24 ideas focus on styles that age well and sit subtly behind the ear.
This list focuses on small-scale fine line, blackwork, neo-traditional, and micro-realism designs placed behind the ear and along the hairline. These placements are popular for first-timers and collectors who want hidden, meaningful marks. From what I've seen in 2026, micro pieces and UV-accent details are especially popular among discreet placements.
1. Fine Line Botanical Sprig Behind Ear
Style/Technique: Fine Line / Illustrative
Pain Level: Medium (5-6/10)
Session Time: 30–60 minutes
Best For: First small visible piece, delicate statement
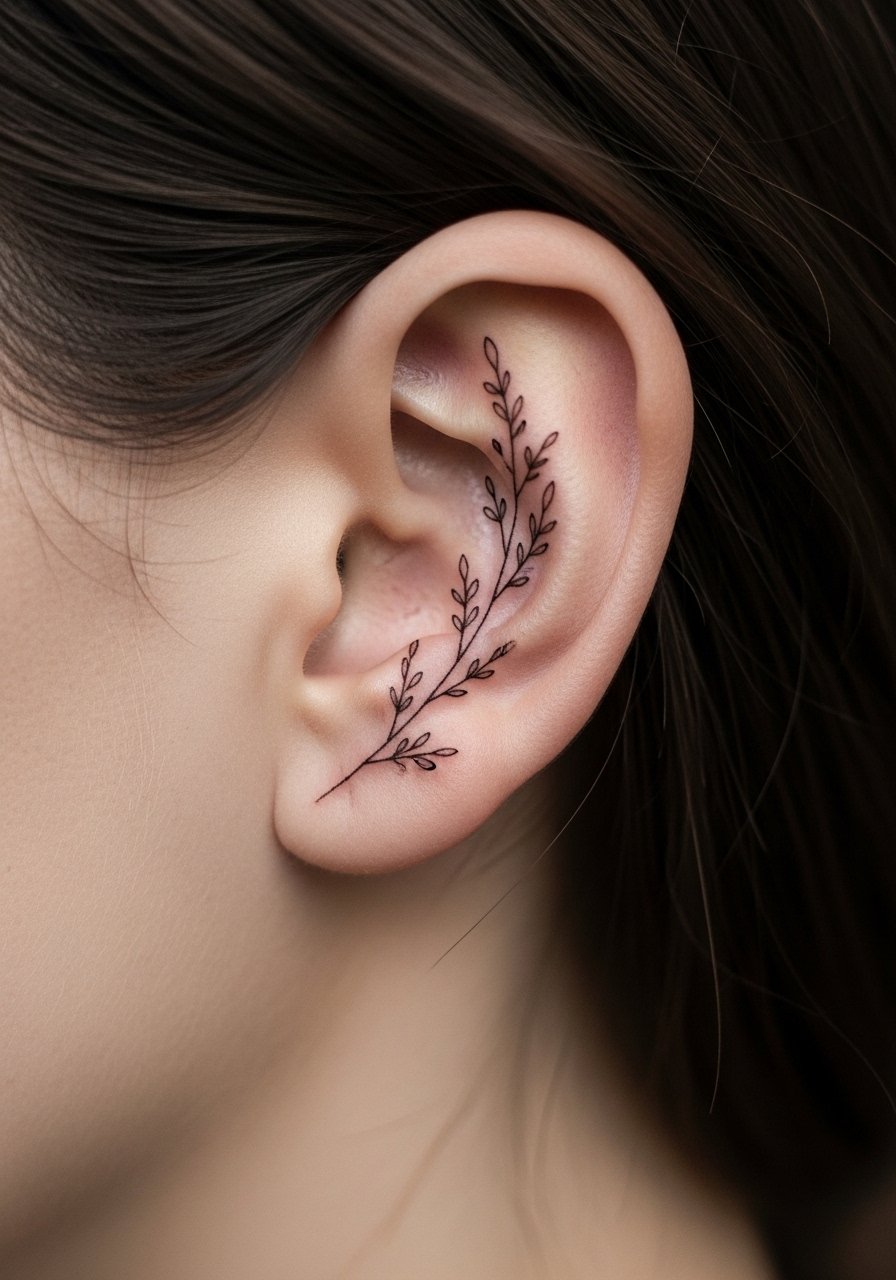
I got one of these years ago and it's a classic. Fine leaves follow the ear curve and read as delicate when tucked by hair. Behind the ear, thin lines can blur if the artist goes too hair-fine; I ask for slightly bolder micro-lines. Expect tenderness for a couple of days—avoid sleeping on that side. Heals in about 2–3 weeks on the surface; full settling takes months. Common mistake: requesting ultra-hairline strokes from an inexperienced fine-line artist.
2. Tiny Crescent Moon Micro-Realism Behind Ear
Style/Technique: Micro-Realism / Minimalist
Pain Level: Medium (5/10)
Session Time: 30–45 minutes
Best For: Meaningful, night-sky lovers, easy hide
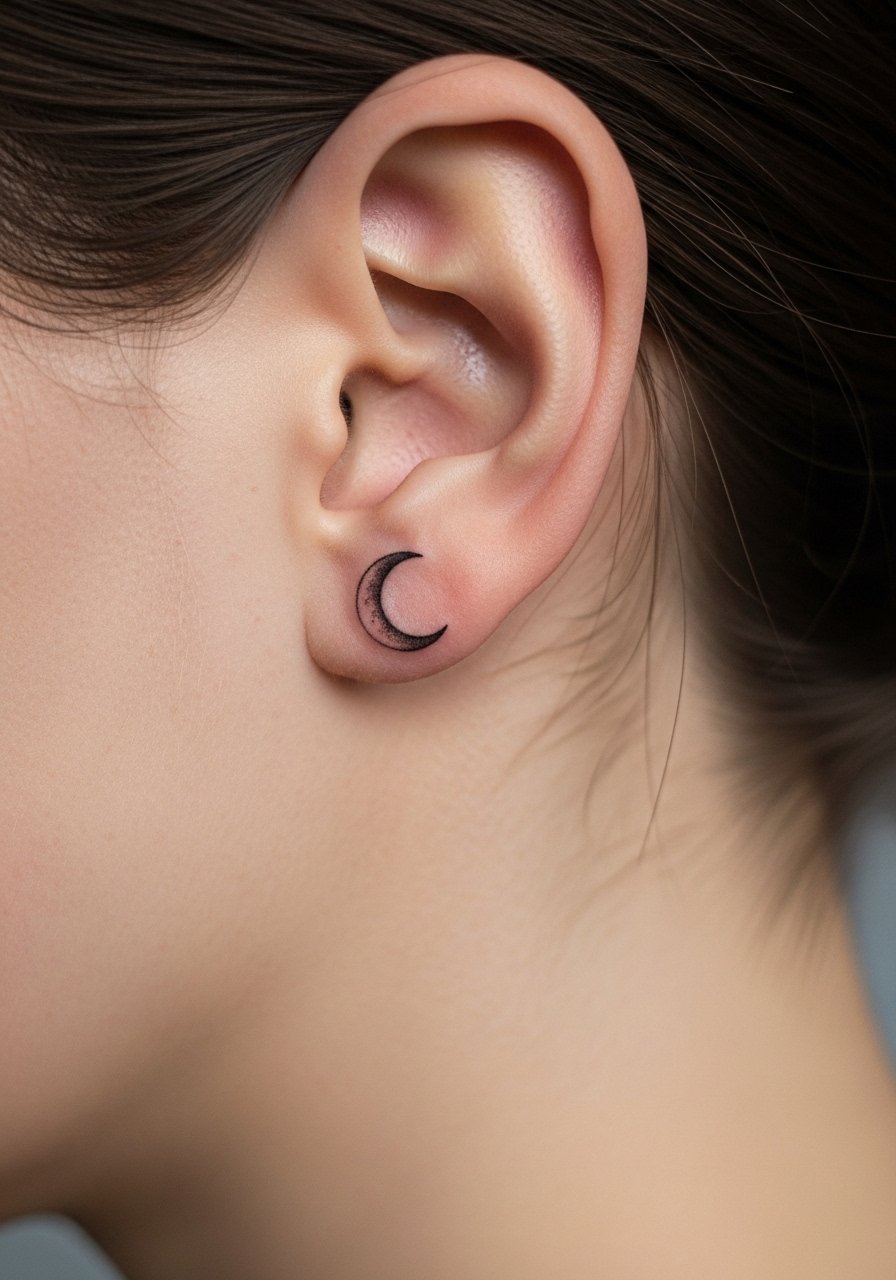
A shaded crescent feels personal and subtle. Micro-realism lets you keep soft shading without heavy color, which is helpful behind the ear where skin is thin. Expect a sharp look fresh that softens into a small gray crescent healed. Protect from sun and friction—phone calls can rub it. Ask for healed examples of micro shading on similar skin tone.
3. Minimalist Single-Word Script Behind Ear
Style/Technique: Fine Line / Script
Pain Level: Medium (5-6/10)
Session Time: 20–40 minutes
Best For: Meaningful single-word ink, discreet reminder
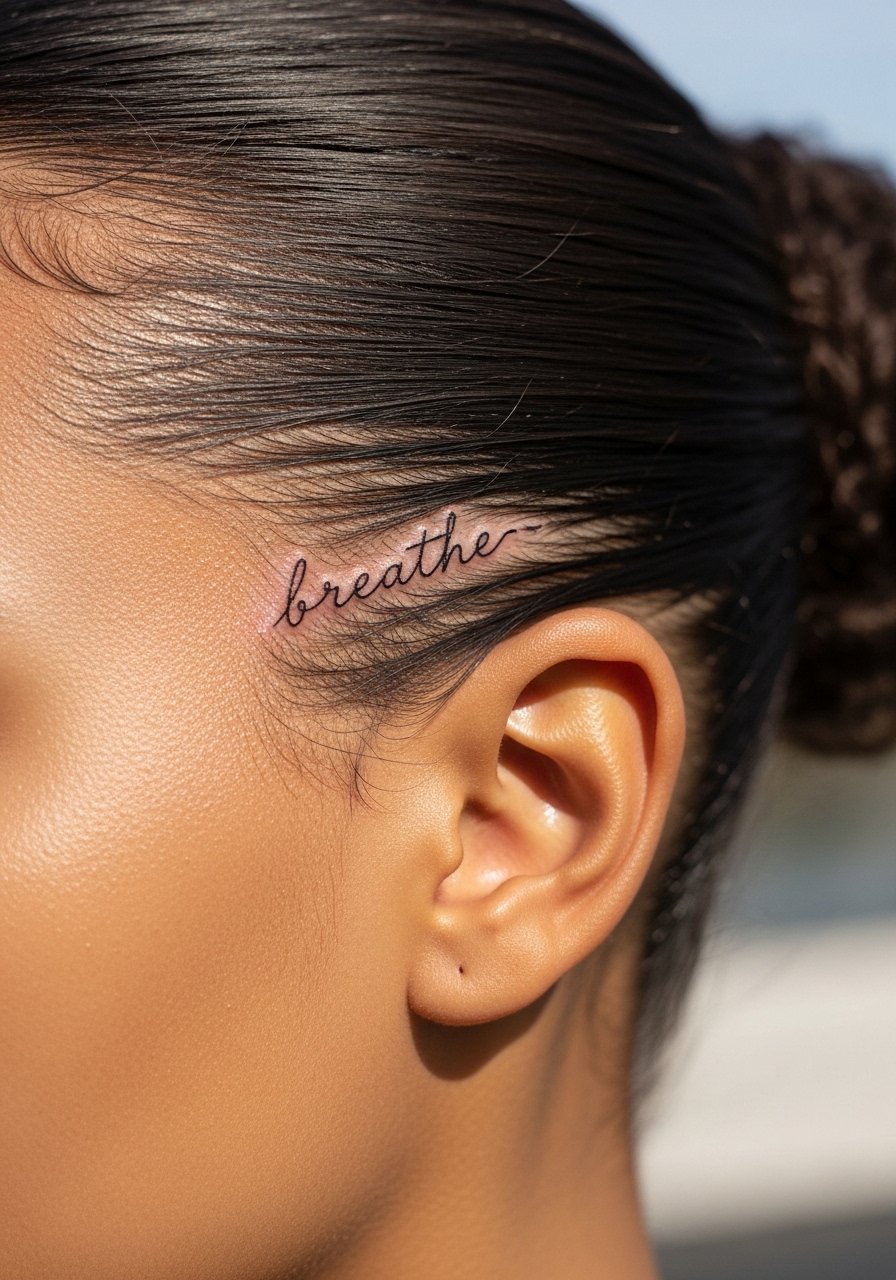
Words here sit tucked and read only up close. Script needs a steady hand; tiny letters often merge if the artist uses too thin a needle. I recommend a slightly condensed lettering style and asking to see healed script photos. Surface heals quickly; full settling makes letters look fuller than fresh. Avoid fancy flourishes that blur—simple, timeless script holds up better.
4. Dotwork Constellation Cluster Behind Ear
Style/Technique: Dotwork / Geometric
Pain Level: Medium (5/10)
Session Time: 30–60 minutes
Best For: Astrology fans, subtle pattern
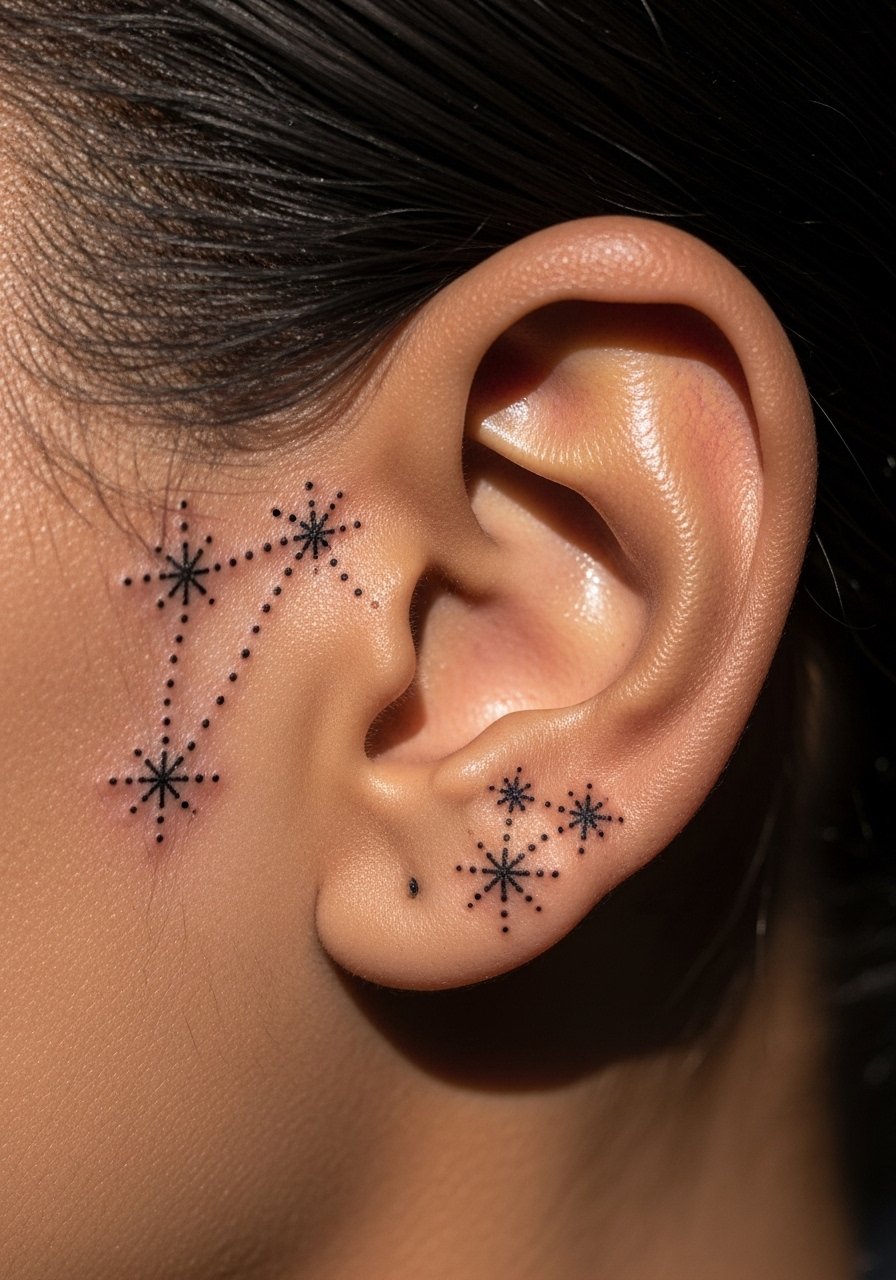
Dotwork reads like texture and stays subtle. Small constellations age well because dots blur into organic texture rather than chunky lines. Pain is manageable, though repetitive tapping can sting. Keep shampoo light and avoid heavy scrubs while healing. A common misstep is asking for too many tiny dots—space them so the piece breathes.
5. Blackwork Crescent With Negative Space Behind Ear
Style/Technique: Blackwork / Negative Space
Pain Level: Medium-High (6/10)
Session Time: 45–75 minutes
Best For: Bold but hidden statement
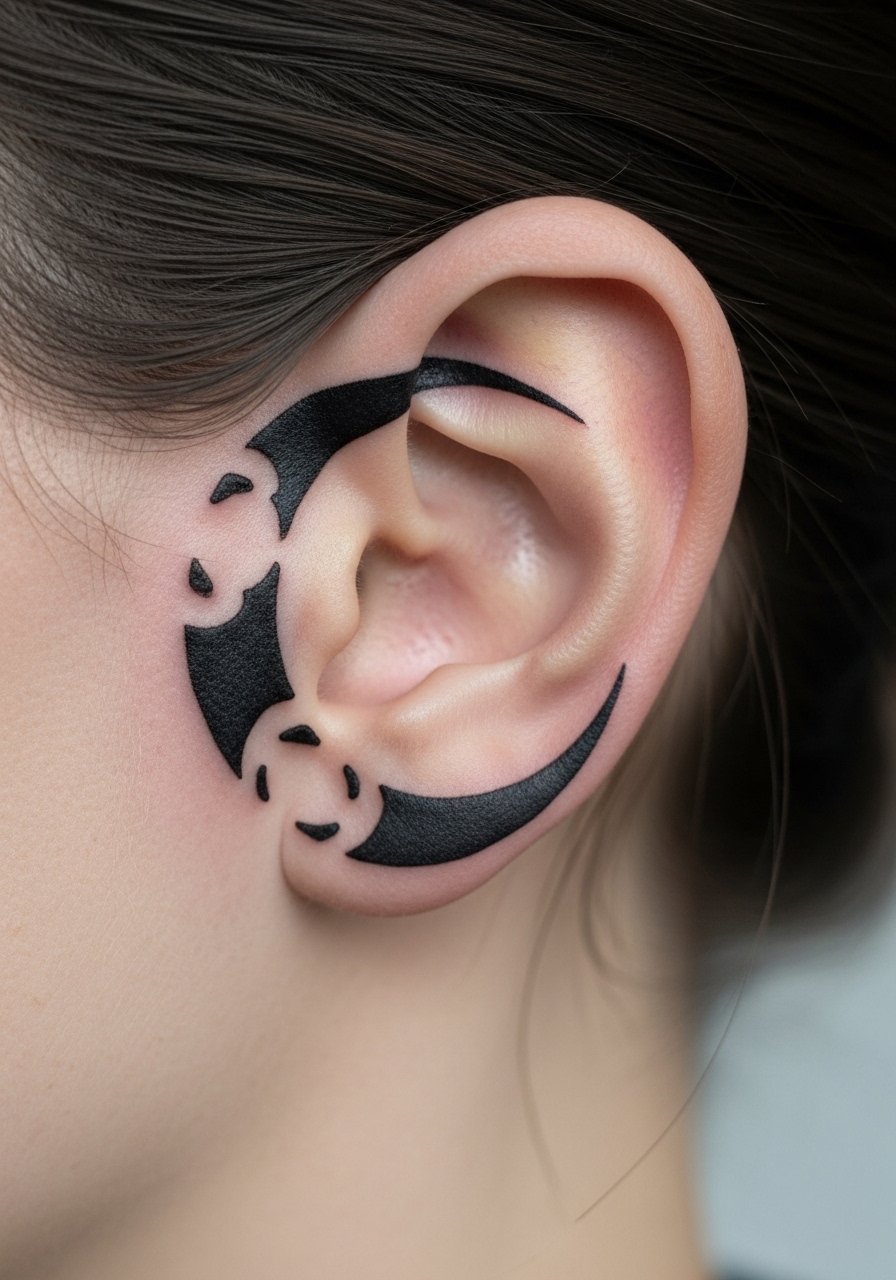
Blackwork reads boldly even small, and negative space keeps it light. Behind the ear, solid black holds up but needs good saturation to avoid patchy healing. Expect soreness for a few days. This style ages predictably—black holds best if you keep it moisturized and out of direct sun. Avoid overly large fills; small, dense shapes are smarter for the curve.
6. Micro Floral Cluster (Tiny Roses) Behind Ear
Style/Technique: Neo-Traditional / Micro
Pain Level: Medium (5-6/10)
Session Time: 30–60 minutes
Best For: Romantic, slightly colorful discreet piece
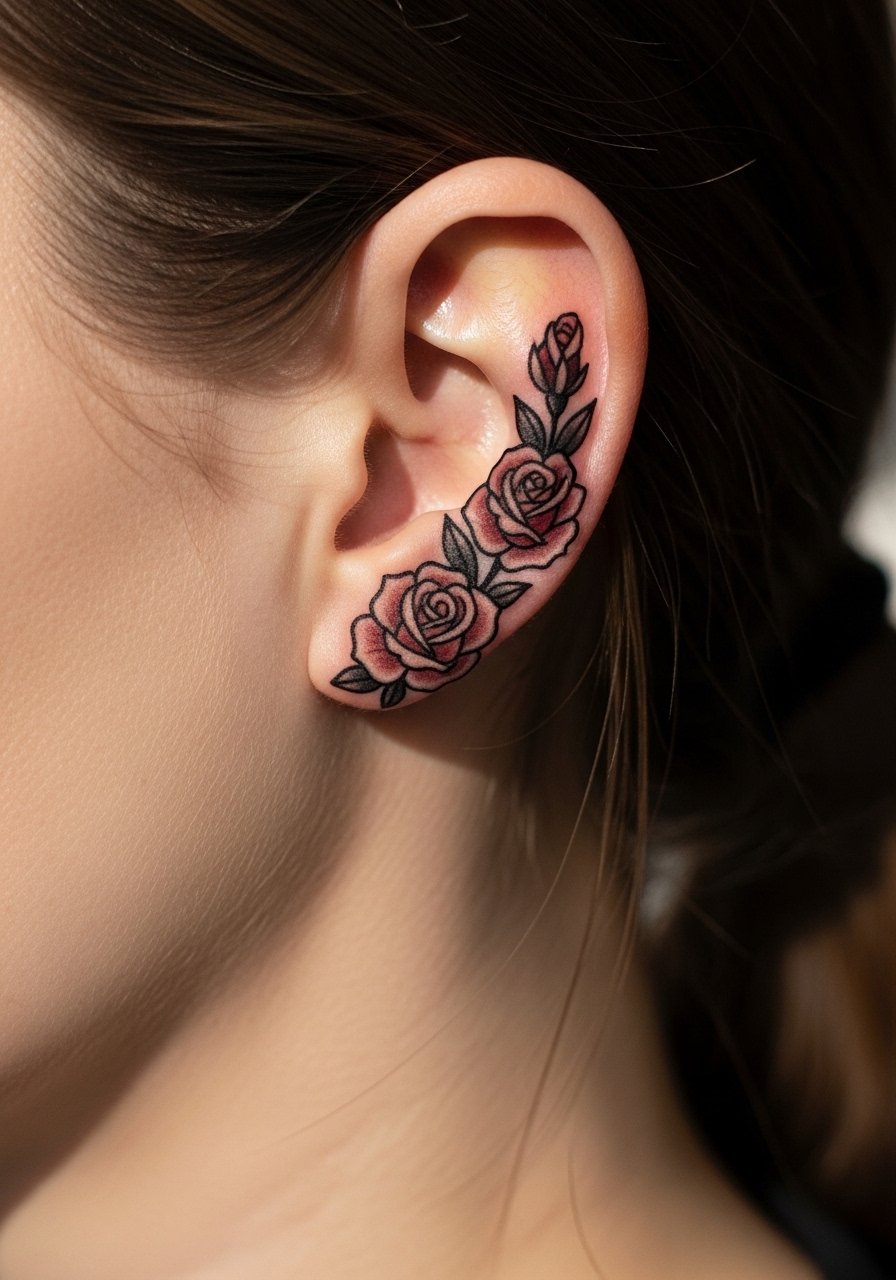
Tiny neo-traditional flowers bring a vintage vibe while staying small. Pigment saturation matters: reds can fade faster but with good packing they look great healed. Watch how colors settle—ask the artist for healed examples on similar skin. Keep side-sleeping light for a few days. A common mistake is too many colors in a tiny area; stick to 1–2 shades.
7. Tiny Musical Note Line Behind Ear
Style/Technique: Minimalist / Symbol
Pain Level: Medium (5/10)
Session Time: 20–30 minutes
Best For: Musicians, music lovers, discreet symbolism
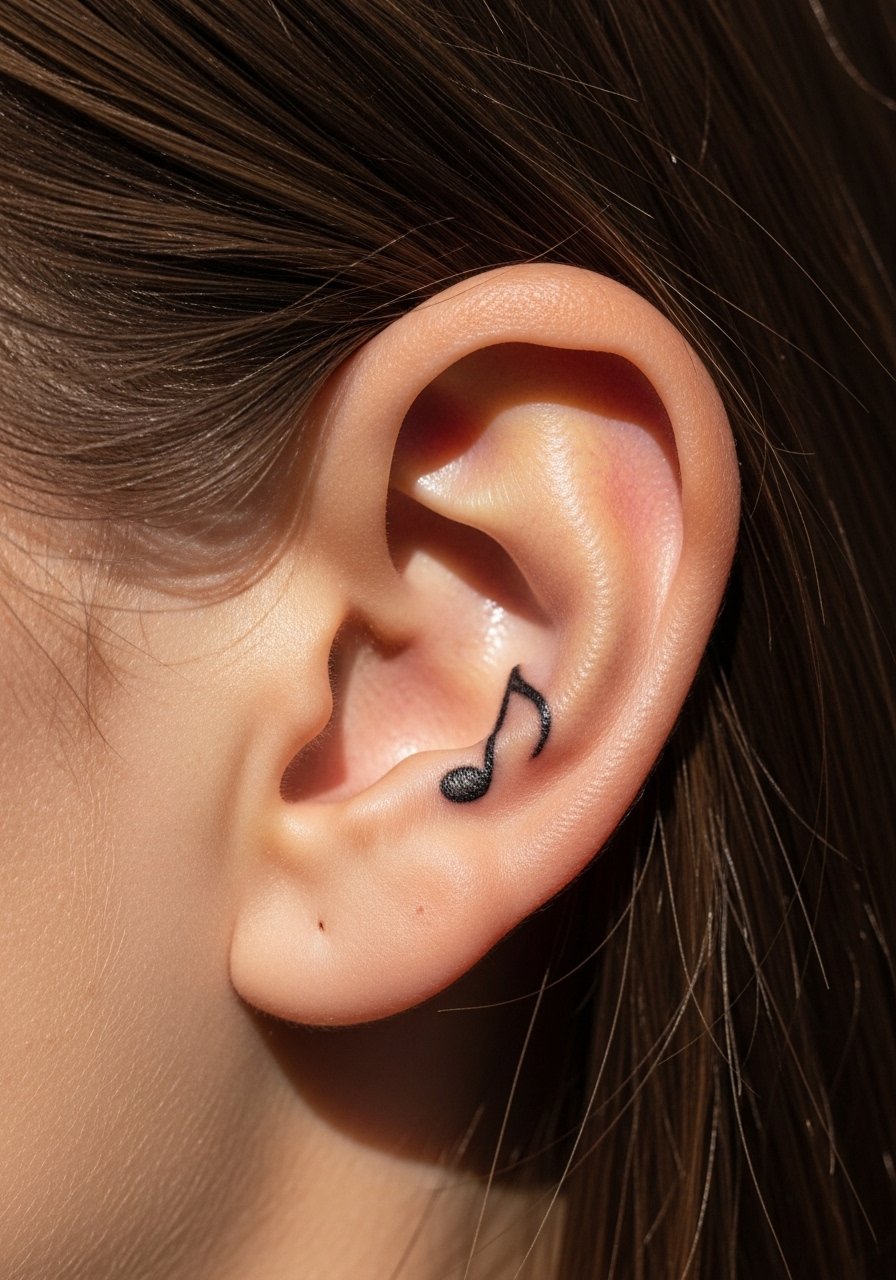
A small music note looks intentional and reads clearly. Simple black inks hold up best here. This placement is prone to phone rubbing, so let it rest and avoid heavy earrings while it heals. Heals fast on the surface; full settling in a few months. Don't overcomplicate the design—single-note clarity is the goal.
8. Tiny Soundwave or Voice Clip Behind Ear
Style/Technique: Minimalist / Micro-Realism
Pain Level: Medium-High (6/10)
Session Time: 30–45 minutes
Best For: Personal audio snippet, sentimental pieces
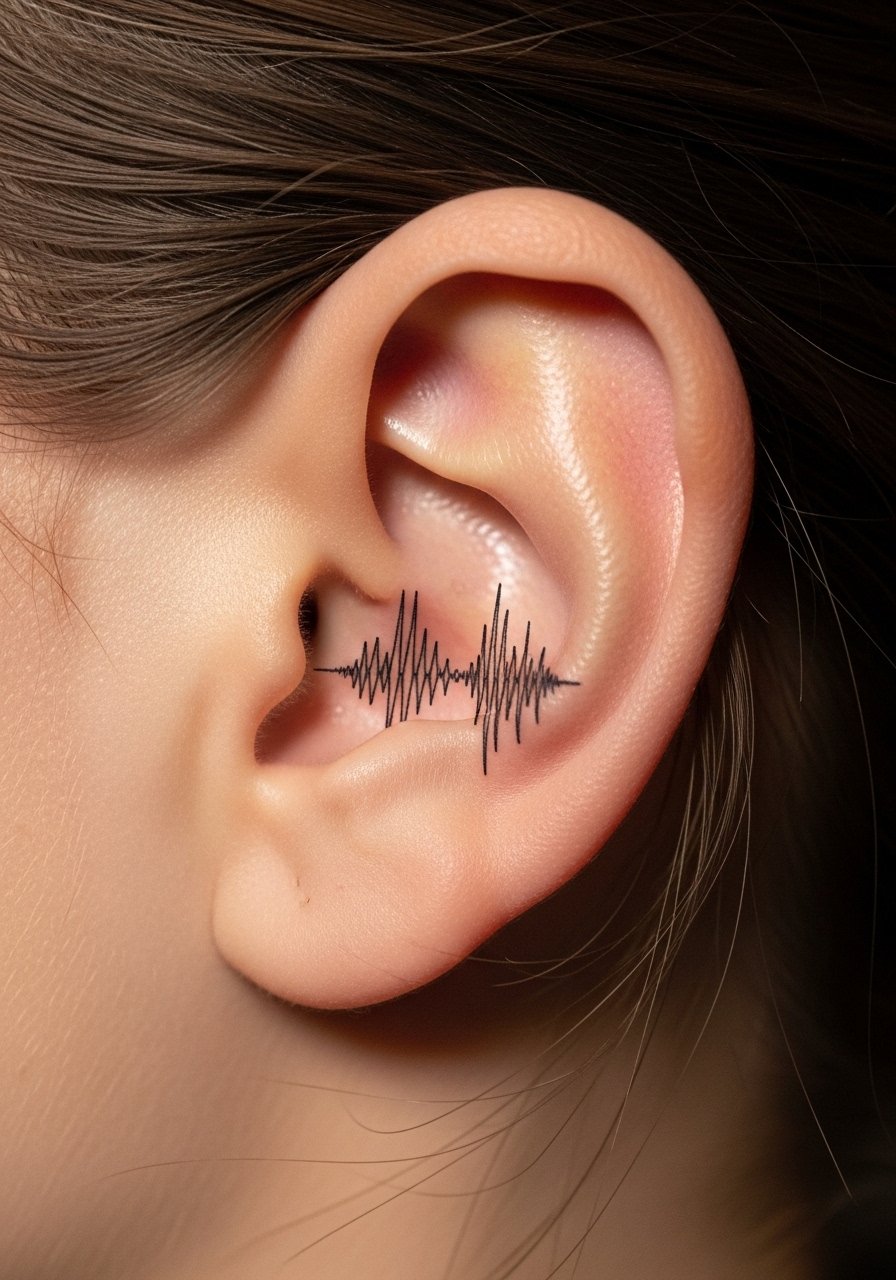
I've seen people record a loved one's voice and turn it into a soundwave. It sits perfectly behind the ear like a secret. Precision is key—get stencil proof before inking. This piece can be very meaningful but needs an artist used to micro-linear work. Protect from rubbing; lines can feather if placed over too-thin skin.
9. Tiny Anchor Blackwork Behind Ear
Style/Technique: Traditional / Blackwork
Pain Level: Medium (5/10)
Session Time: 20–40 minutes
Best For: Classic symbolism, discreet nautical nod
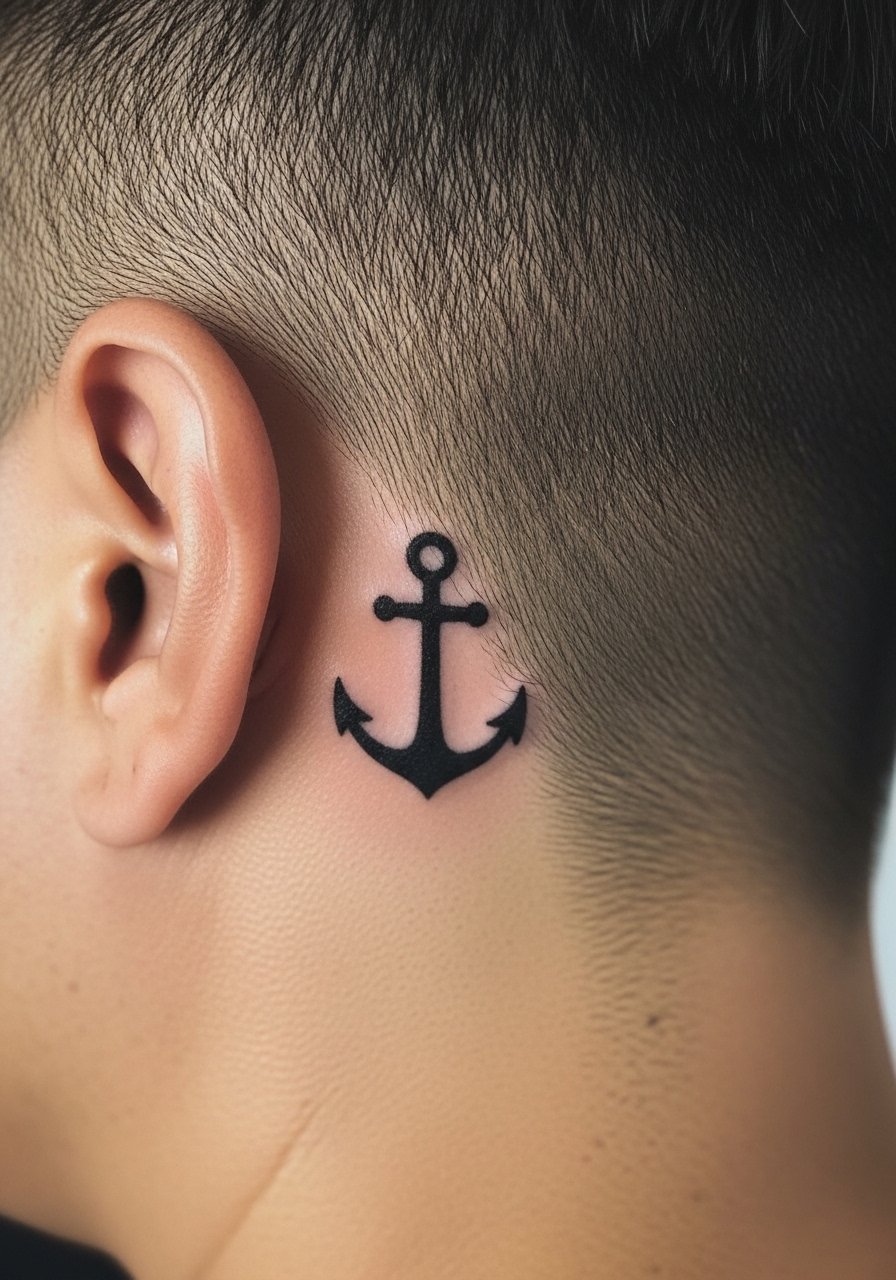
An anchor feels timeless and reads clearly behind the ear. Traditional bold lines mean less worry about blurring. Pain is manageable and healing straightforward. Keep the skin moisturized; traditional solid blacks age reliably. Common mistake: adding tiny details that won't hold in such a small spot—stick to bold, simple forms.
10. Tiny Feather Fine Line Behind Ear
Style/Technique: Fine Line / Illustrative
Pain Level: Medium (5/10)
Session Time: 30–45 minutes
Best For: Light, airy aesthetic, symbolic freedom
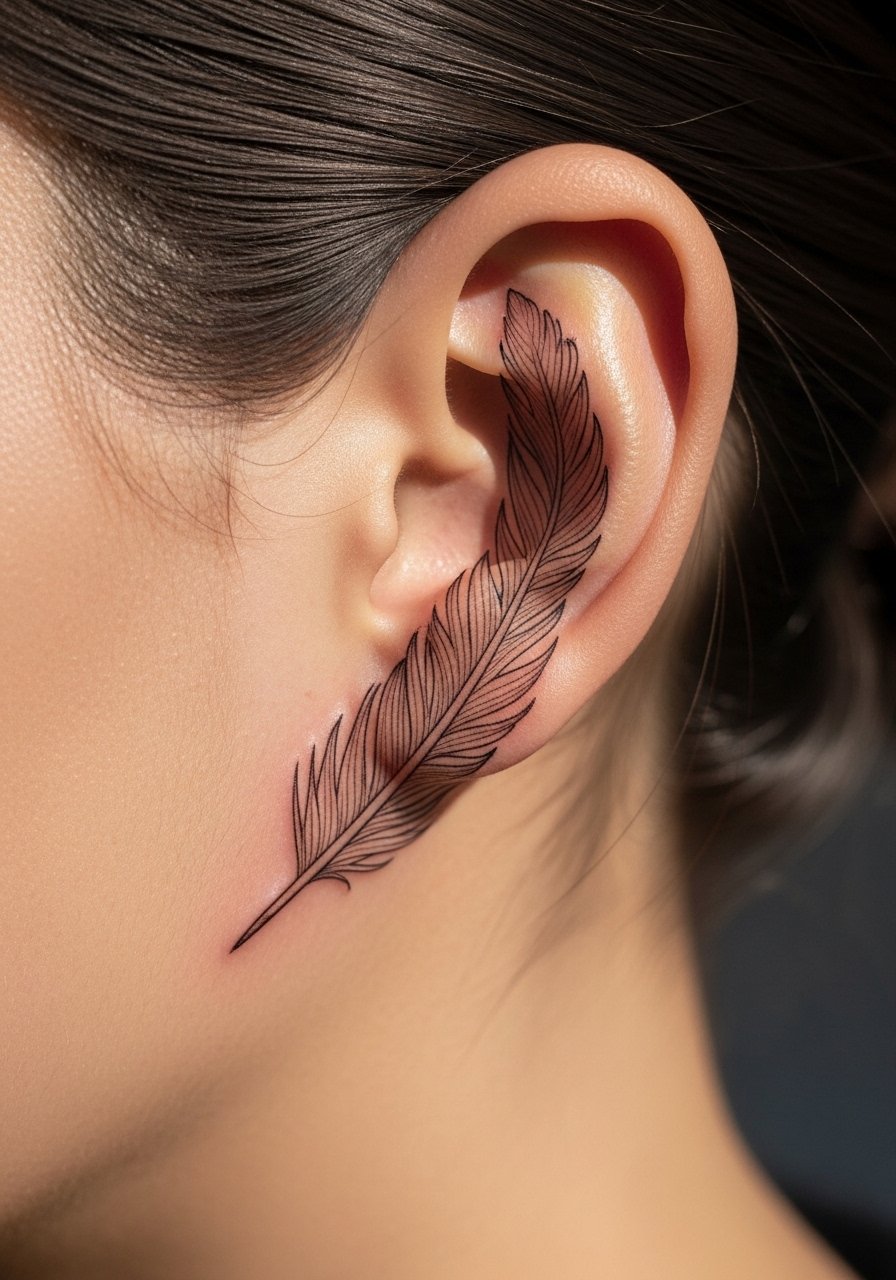
Feathers curve naturally with the ear’s shape. Fine line feathers soften as they heal, so slightly thicker single lines do better long-term. This placement makes the feather almost peek out from hair. Avoid heavy styling products on that area while it heals; oils can disrupt scabbing.
11. Micro Geometric Triangle Stack Behind Ear
Style/Technique: Geometric / Fine Line
Pain Level: Medium (5/10)
Session Time: 20–40 minutes
Best For: Minimal, modern lines, easy to conceal
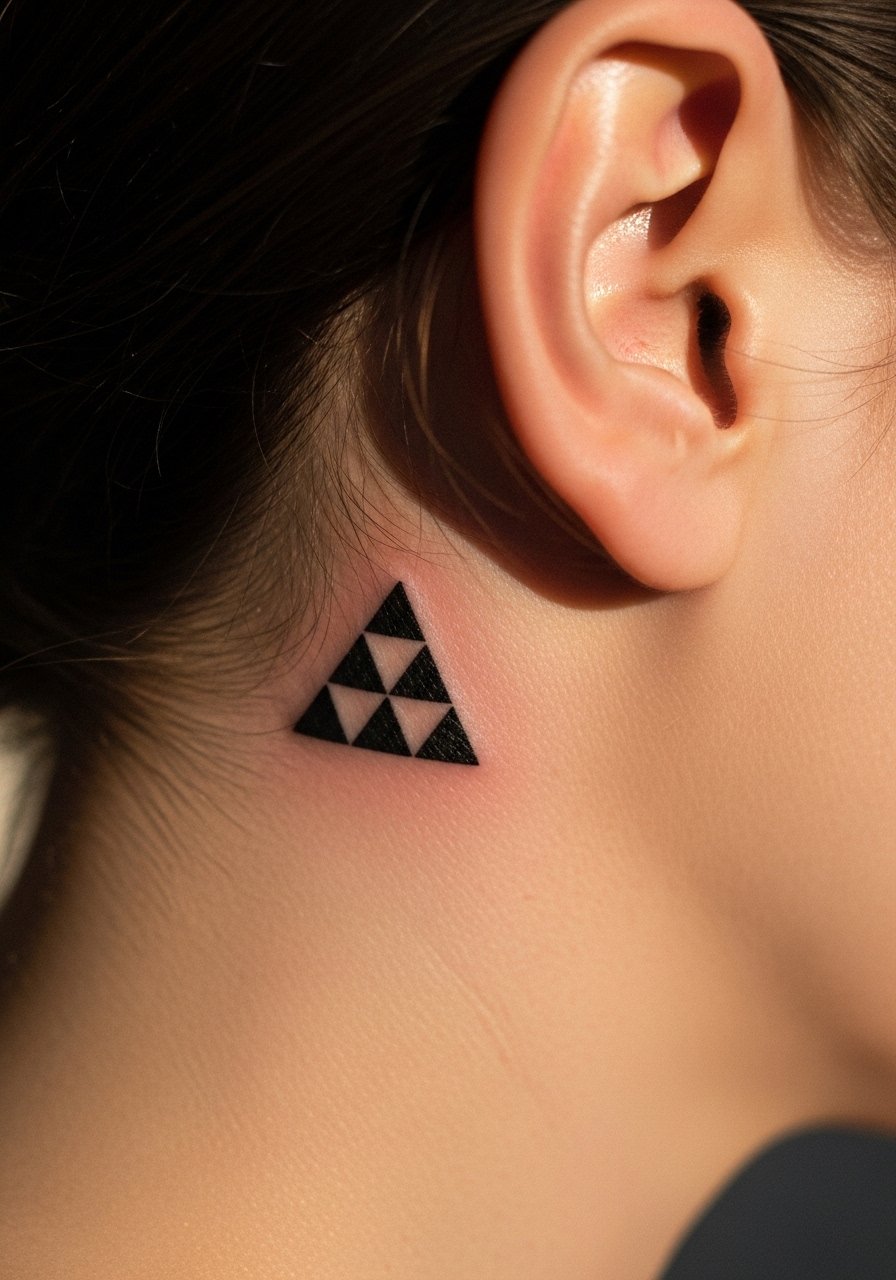
Stacked triangles look modern and suit the small behind-ear canvas. Crisp angles require steady hand and accurate stencil placement. Heals quickly on the surface but check for any corner blowouts after 6–8 weeks. Ask to see healed geometric work in small sizes before booking.
12. Tiny Star Cluster Blackwork Behind Ear
Style/Technique: Minimalist / Blackwork
Pain Level: Medium (5/10)
Session Time: 20–30 minutes
Best For: Subtle sparkle, constellation vibes
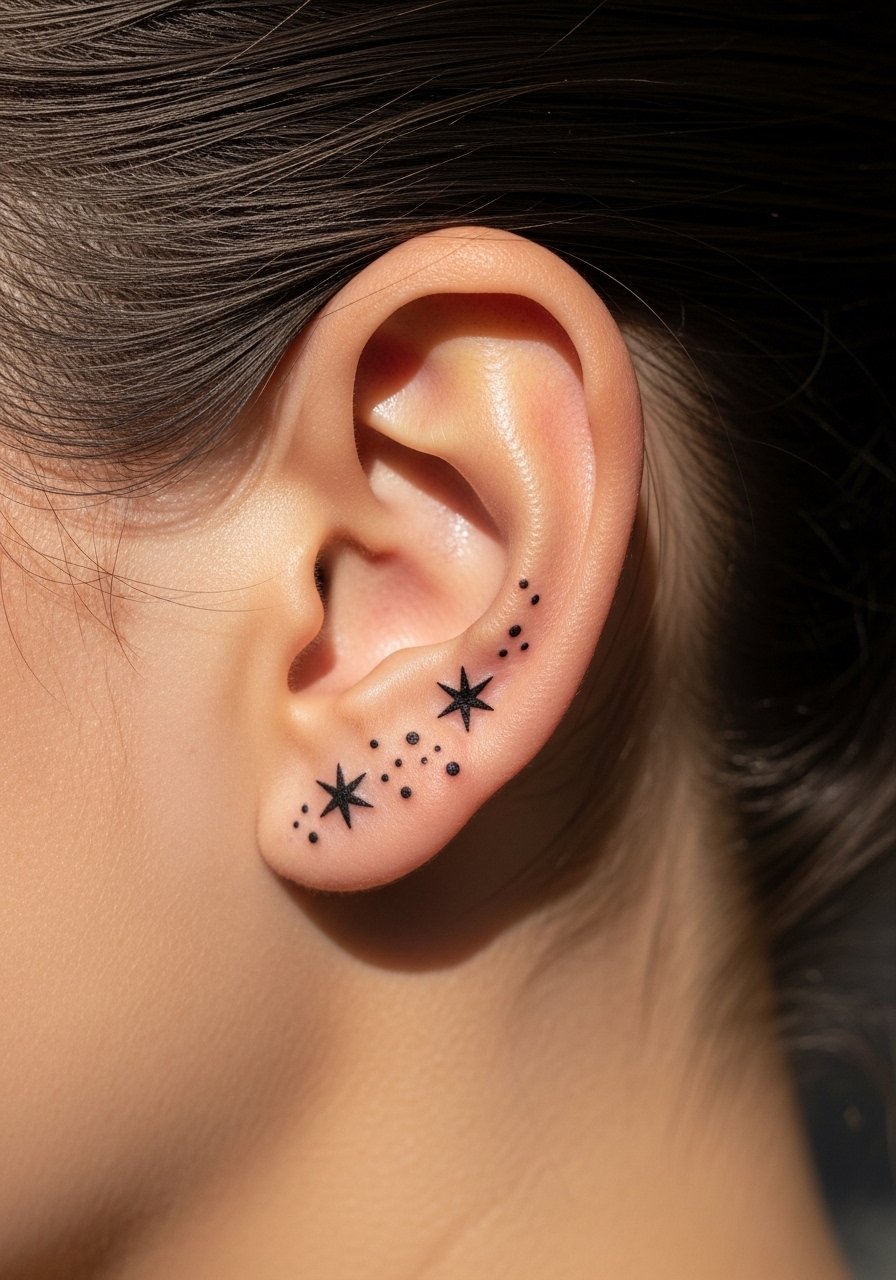
A cluster of stars reads like texture from a distance and reveals detail up close. Small solid stars stay crisp when the artist spaces them properly. Watch for overcrowding—negative space is key. Protect while sleeping and avoid heavy earrings for the first week.
13. Tiny Semicolon Mental Health Symbol Behind Ear
Style/Technique: Minimalist / Symbol
Pain Level: Medium (5/10)
Session Time: 15–25 minutes
Best For: Personal reminder, discreet advocacy
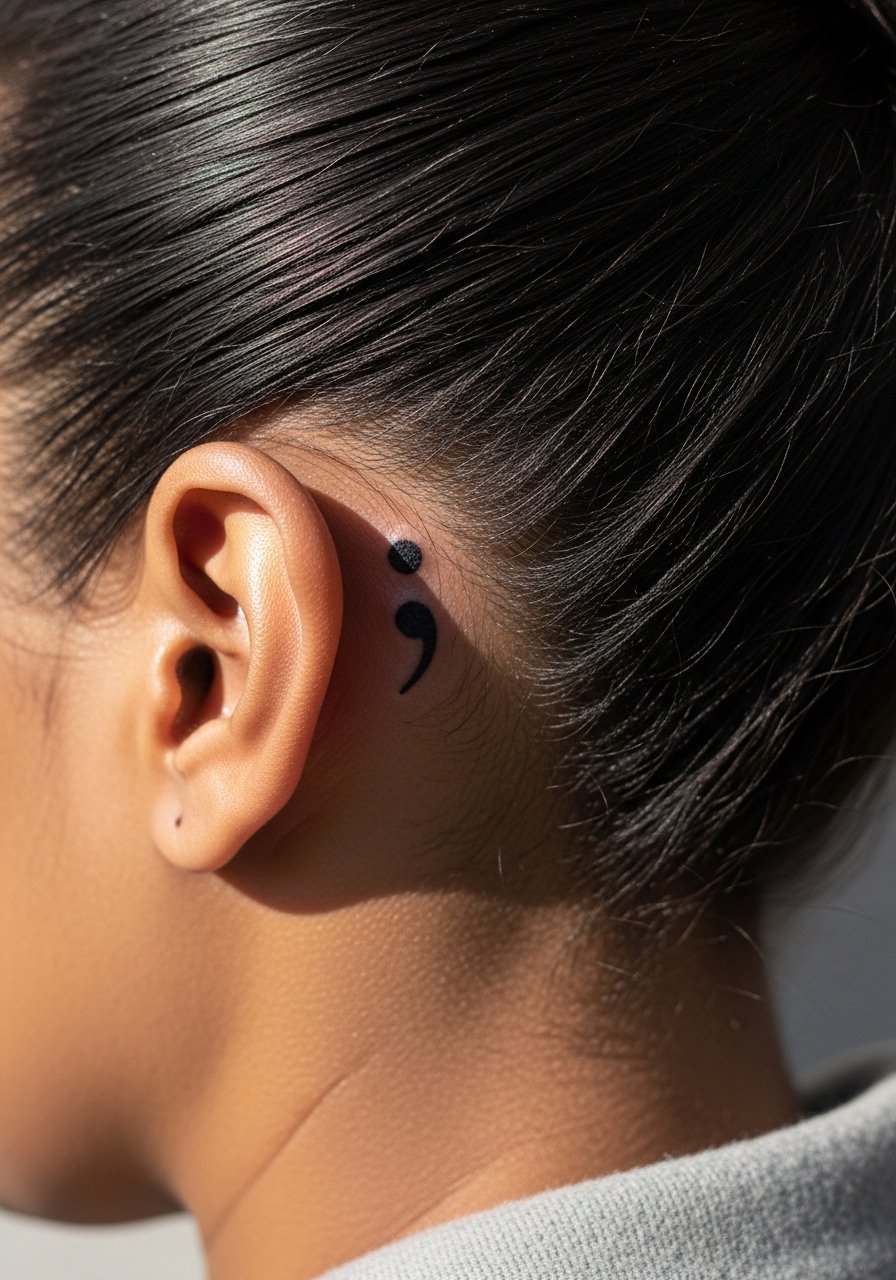
Semicolons are powerful and tiny—perfect for behind the ear. I’ve seen people use this placement for private meaning. Heals fast; the main care is avoiding friction from collars or hair. Request bold enough lines so the dot and stroke don’t merge over time.
14. Tiny Vine Wrap Along Ear Curve
Style/Technique: Fine Line / Illustrative
Pain Level: Medium-High (6/10)
Session Time: 45–60 minutes
Best For: Organic flow, visible when hair is up
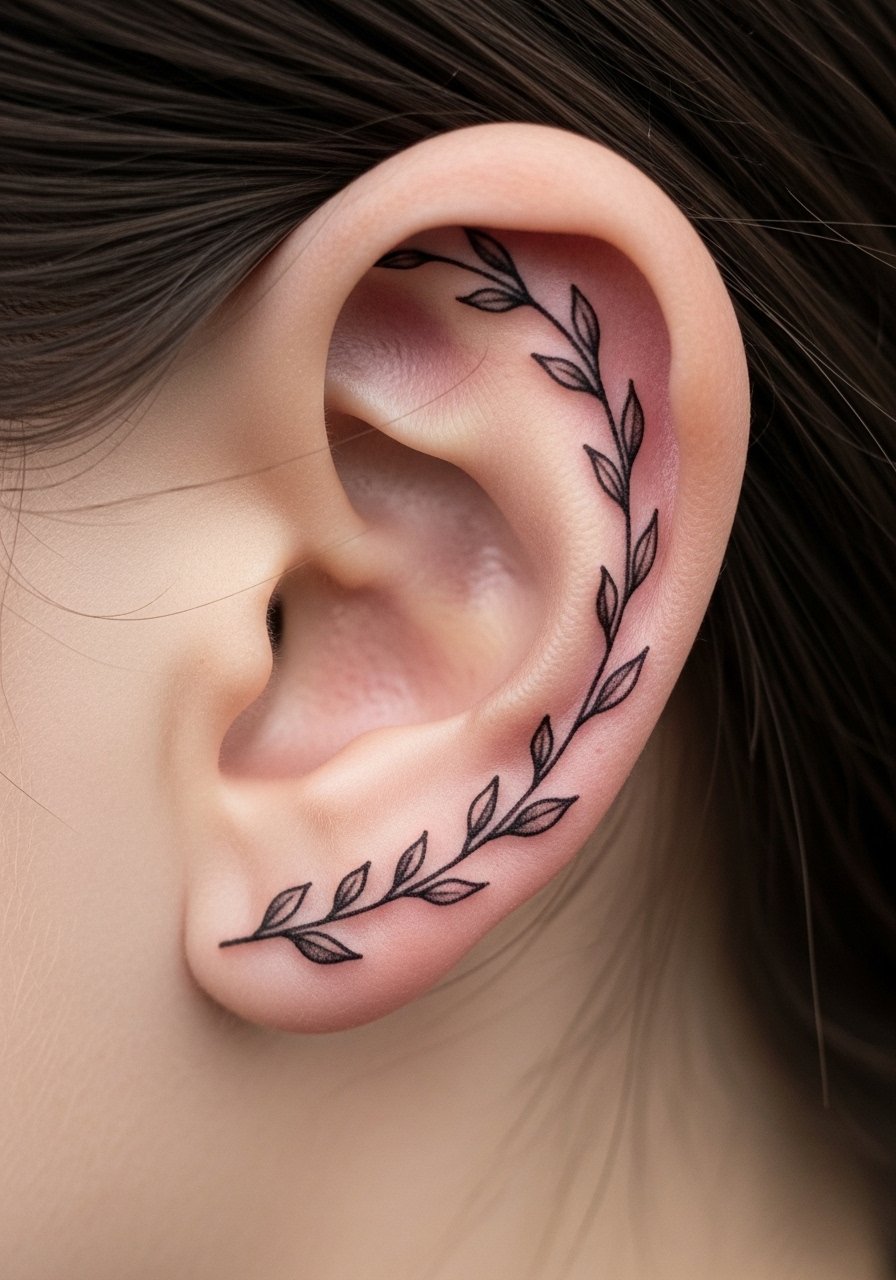
Vines complement the ear’s shape and look intentional when hair is pulled back. Because it stretches along curve, expect more tenderness and a slightly longer session. Ask for a stencil to check flow. Keep it out of hair products while healing to avoid irritation.
15. Micro Portrait Silhouette Behind Ear
Style/Technique: Micro-Realism / Silhouette
Pain Level: Medium-High (6/10)
Session Time: 45–75 minutes
Best For: Tiny loved-one silhouette, subtle tribute
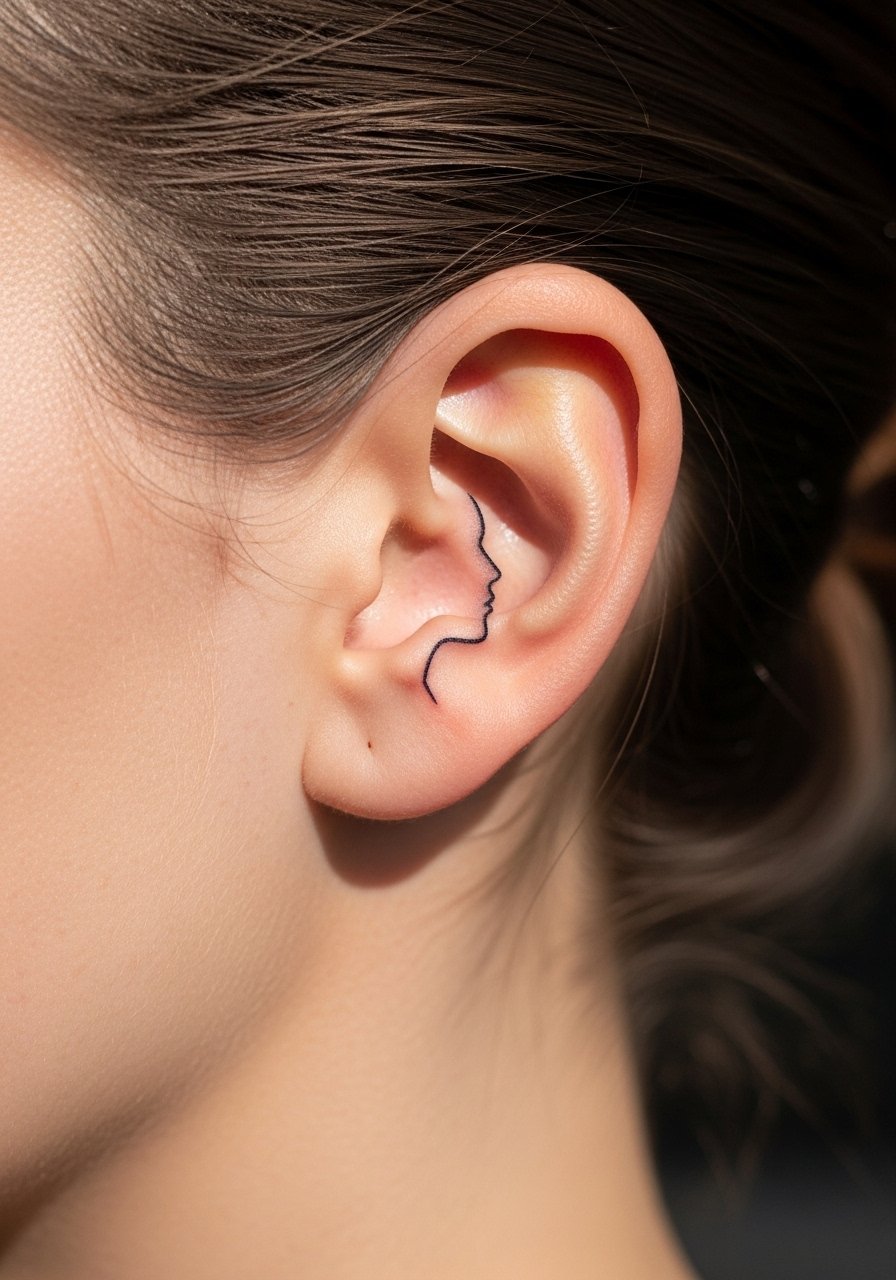
Small silhouettes can hold strong if the artist simplifies the form. Micro portraits need an artist experienced in scale; otherwise, details get muddy. This placement is intimate and often unseen unless you show it. Expect careful aftercare since shading can patch if not saturated well.
16. Tiny Arrow Fine Line Behind Ear
Style/Technique: Minimalist / Fine Line
Pain Level: Medium (5/10)
Session Time: 20–30 minutes
Best For: Directional symbolism, discreet accent
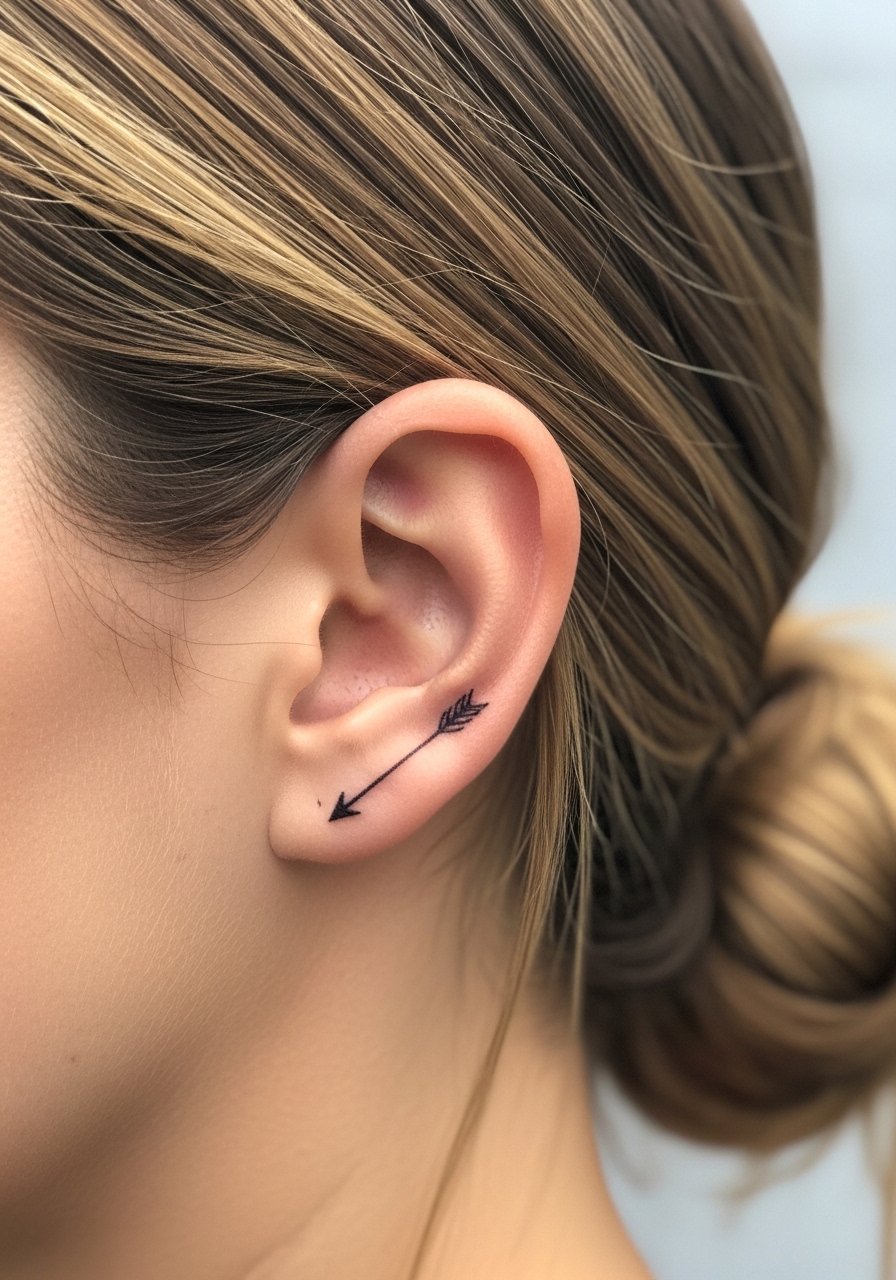
Arrows are clean and purposeful. Single-line arrows need slight thickness so the shaft doesn't disappear as it heals. This is an easy hit-and-go piece with fast surface healing. Keep it dry of heavy conditioners and protect from constant phone contact.
17. Tiny Airplane Travel Icon Behind Ear
Style/Technique: Minimalist / Symbol
Pain Level: Medium (5/10)
Session Time: 15–25 minutes
Best For: Travel lovers, subtle wanderlust symbol
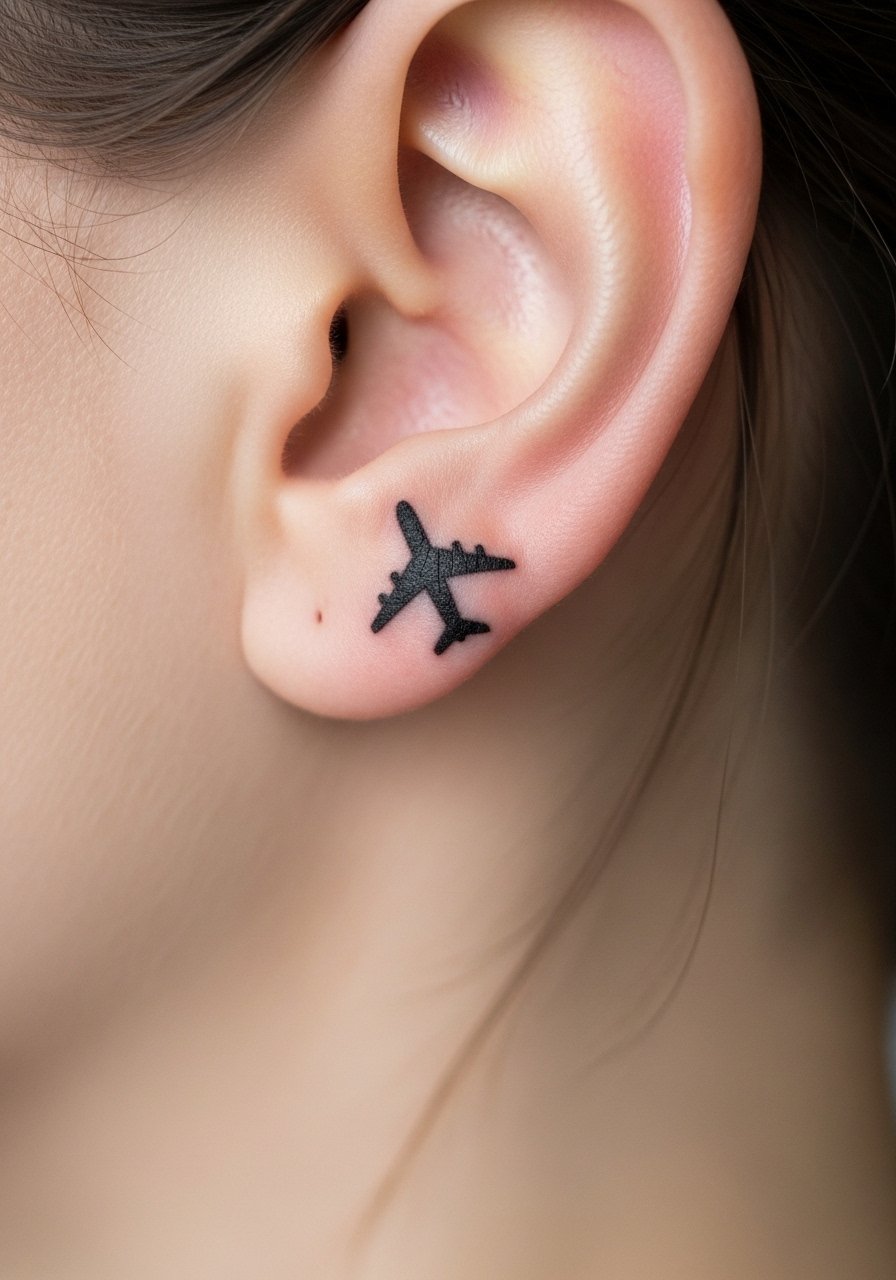
I like this for people who want a private reminder of a life lived moving. Simple black icons hold well. Avoid making it too intricate—tiny windows or lines blur. Heals quickly; watch for friction from glasses or headbands.
18. Tiny Crescent + Star UV-Accent Behind Ear
Style/Technique: Fine Line + UV Accent
Pain Level: Medium-High (6/10)
Session Time: 30–45 minutes
Best For: Hidden daytime subtlety, UV reveal at night
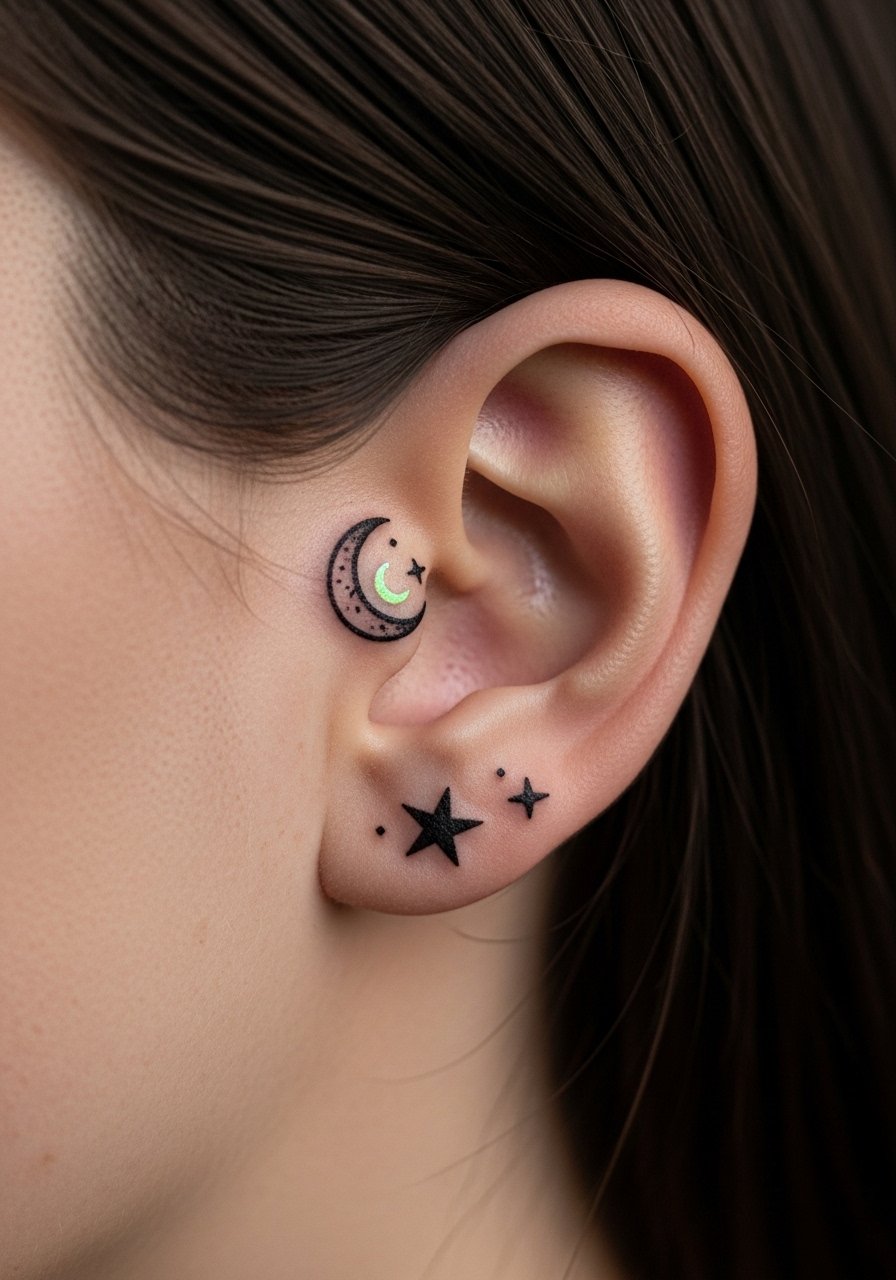
UV accents give a hidden layer—completely subtle in daylight but pops under blacklight. Not every artist uses UV safely; ask about pigments and healed examples. Expect similar pain to small fine-line work. Note UV ink may fade differently, so maintenance can be different than black ink.
19. Tiny Paw Print Micro-Realism Behind Ear
Style/Technique: Micro-Realism / Symbolic
Pain Level: Medium (5/10)
Session Time: 25–40 minutes
Best For: Pet tribute, small memorial

A tiny paw is sentimental and reads clearly if shaded minimally. Micro realism helps it look like an imprint rather than a cartoon. Keep it away from heavy earrings during healing to avoid smudging. Ask the artist for healed tiny pet prints as references.
20. Tiny Leaf Outline With Watercolor Accent Behind Ear
Style/Technique: Fine Line + Watercolor Accent
Pain Level: Medium (5-6/10)
Session Time: 30–50 minutes
Best For: Painterly look, subtle color peek
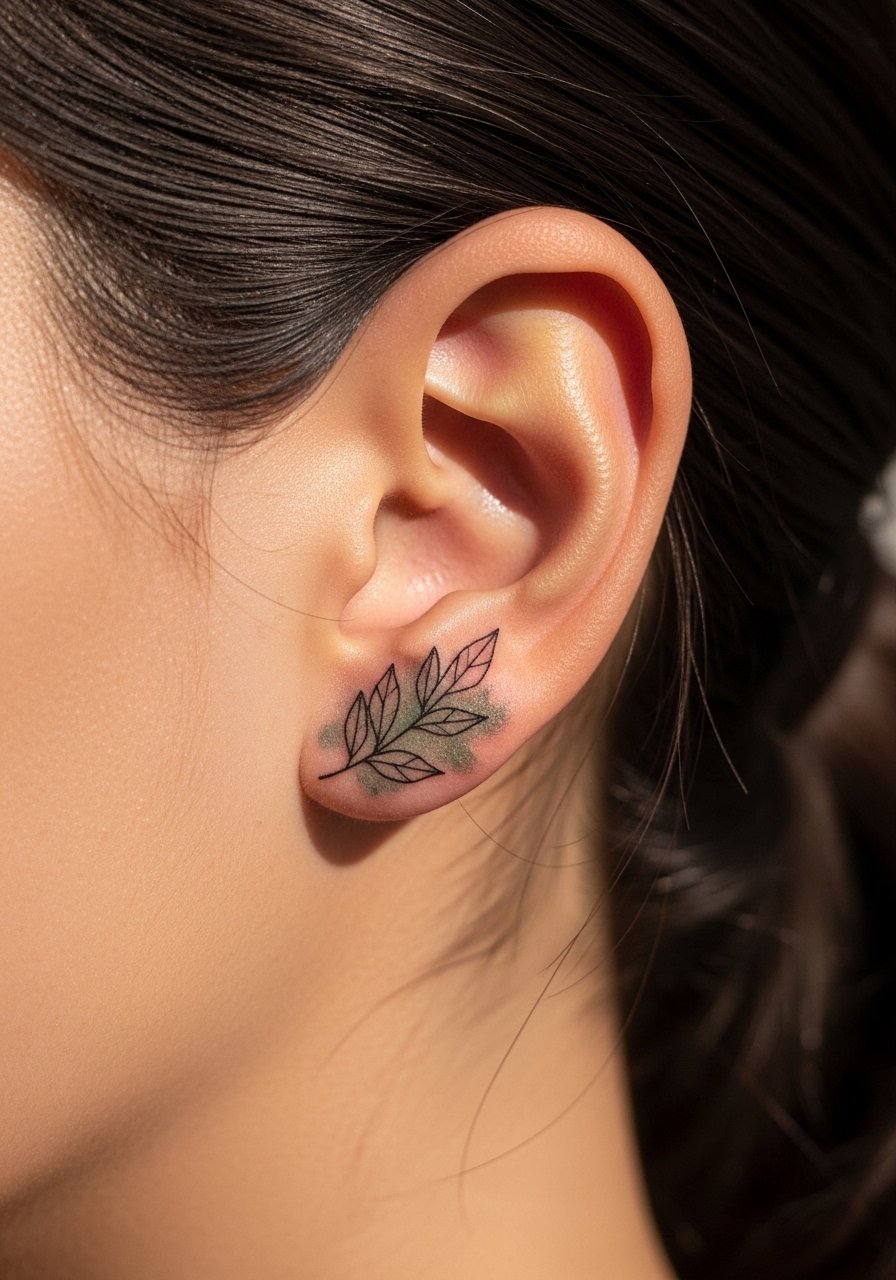
A faint watercolor wash gives personality without being loud. Color behind the ear can fade quicker due to sun and hair products, so pick muted tones and expect softer healed color. Ask the artist for healed watercolor examples in small sizes.
21. Tiny Hebrew/Script Letter Behind Ear
Style/Technique: Fine Line / Script
Pain Level: Medium (5/10)
Session Time: 20–35 minutes
Best For: Cultural or spiritual single-letter meaning
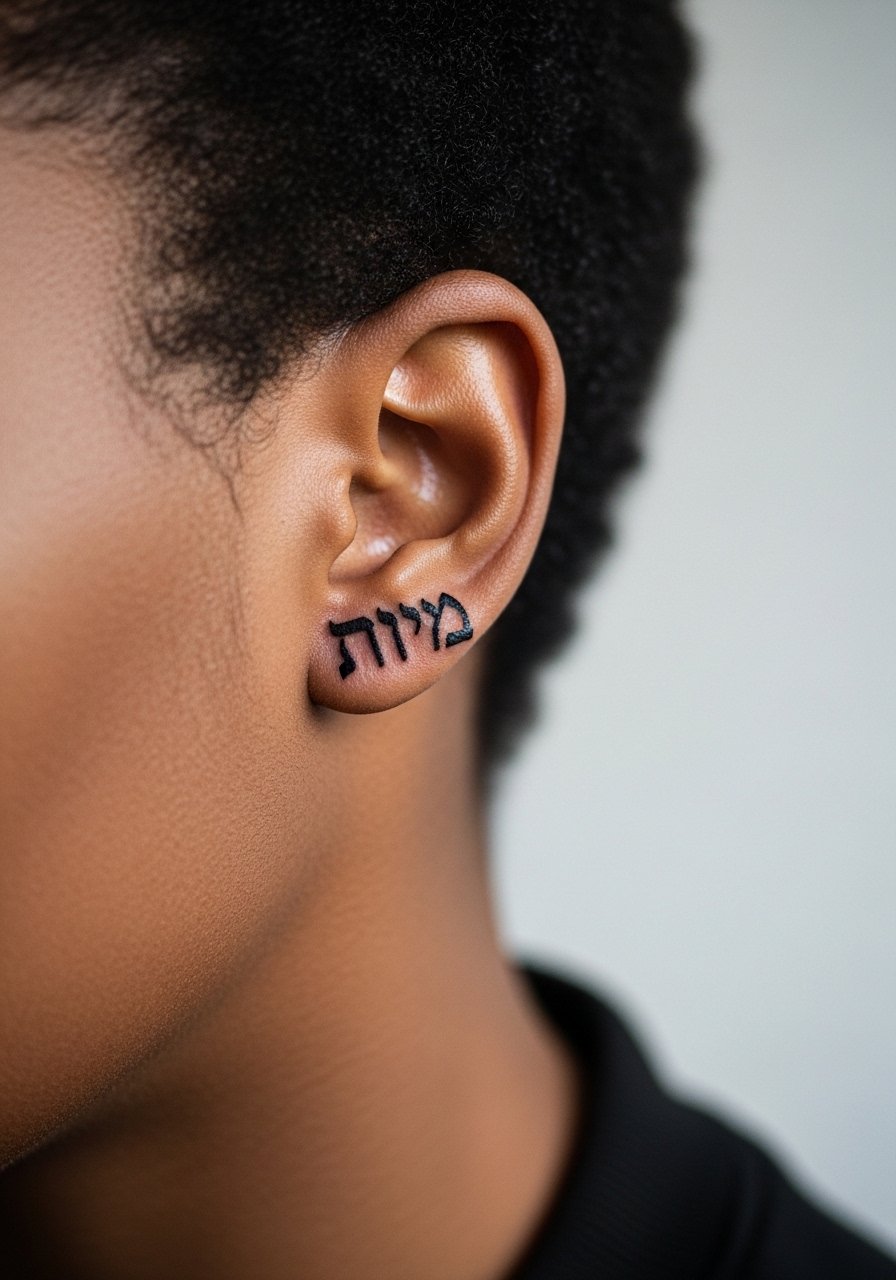
Single-script letters carry weight in a small space. Precision is crucial—letters should be slightly bolder than you think to avoid merging. Check letterform references and healed examples. Heals quickly; protect with gentle washing.
22. Tiny Lightning Bolt Blackwork Behind Ear
Style/Technique: Minimalist / Blackwork
Pain Level: Medium (5/10)
Session Time: 15–25 minutes
Best For: Energetic symbol, bold tiny mark
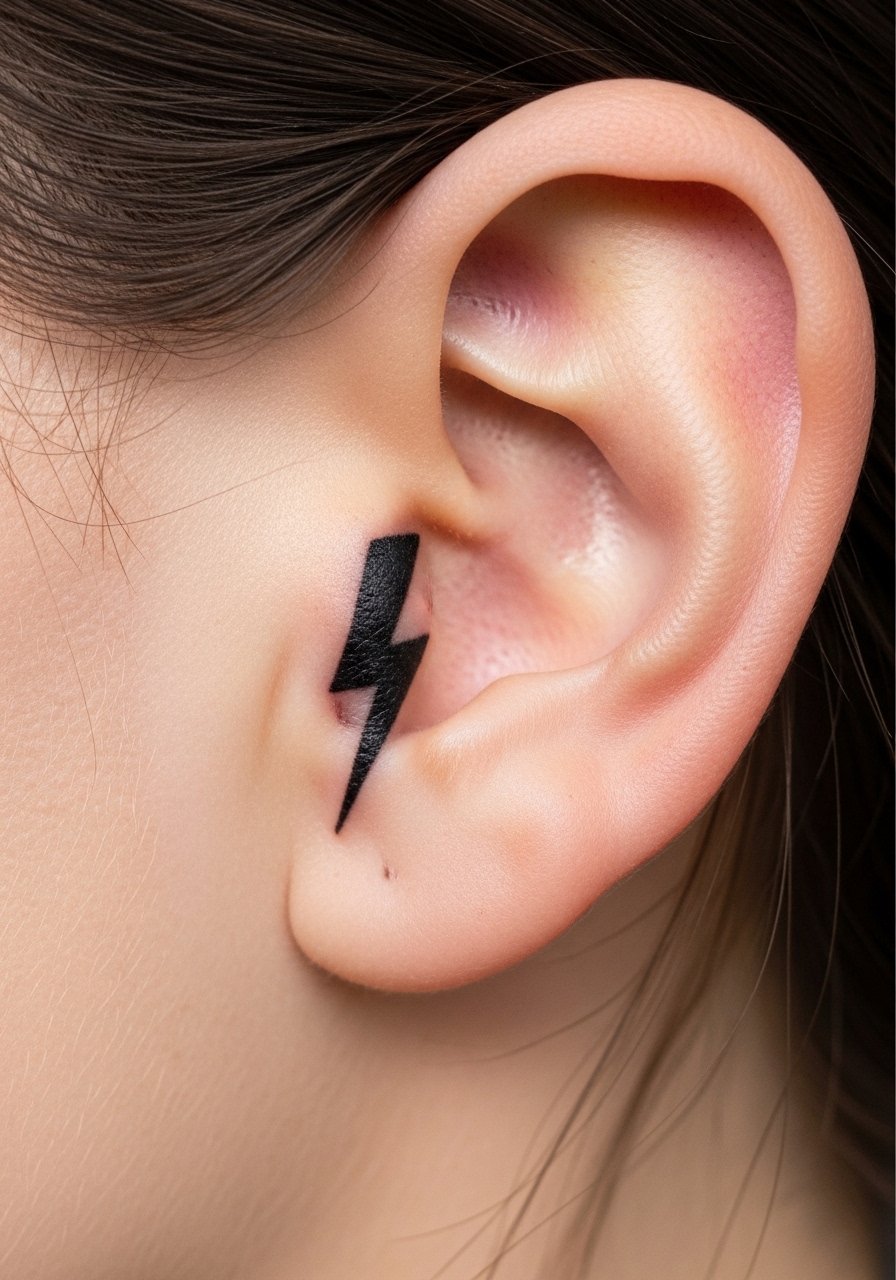
Lightning bolts are simple and striking. Solid black makes them readable long-term. This placement handles sharp angles well if the stencil is spot-on. Keep it dry of products that could clog pores while healing.
23. Tiny Abstract Line Art Behind Ear
Style/Technique: Fine Line / Abstract
Pain Level: Medium (5/10)
Session Time: 25–40 minutes
Best For: Artistic, non-literal expression
Abstract line art feels modern and personal. Single continuous lines need an artist fluent in contour work to avoid shaky marks. These pieces age into soft, graphic motifs—great for people who want art but not a statement piece.
24. Matching Small Symbol (Twin Tattoos) Behind Ear
Style/Technique: Minimalist / Symbol Pairing
Pain Level: Medium (5/10)
Session Time: 20–40 minutes per person
Best For: Couples, friends, sibling symbols
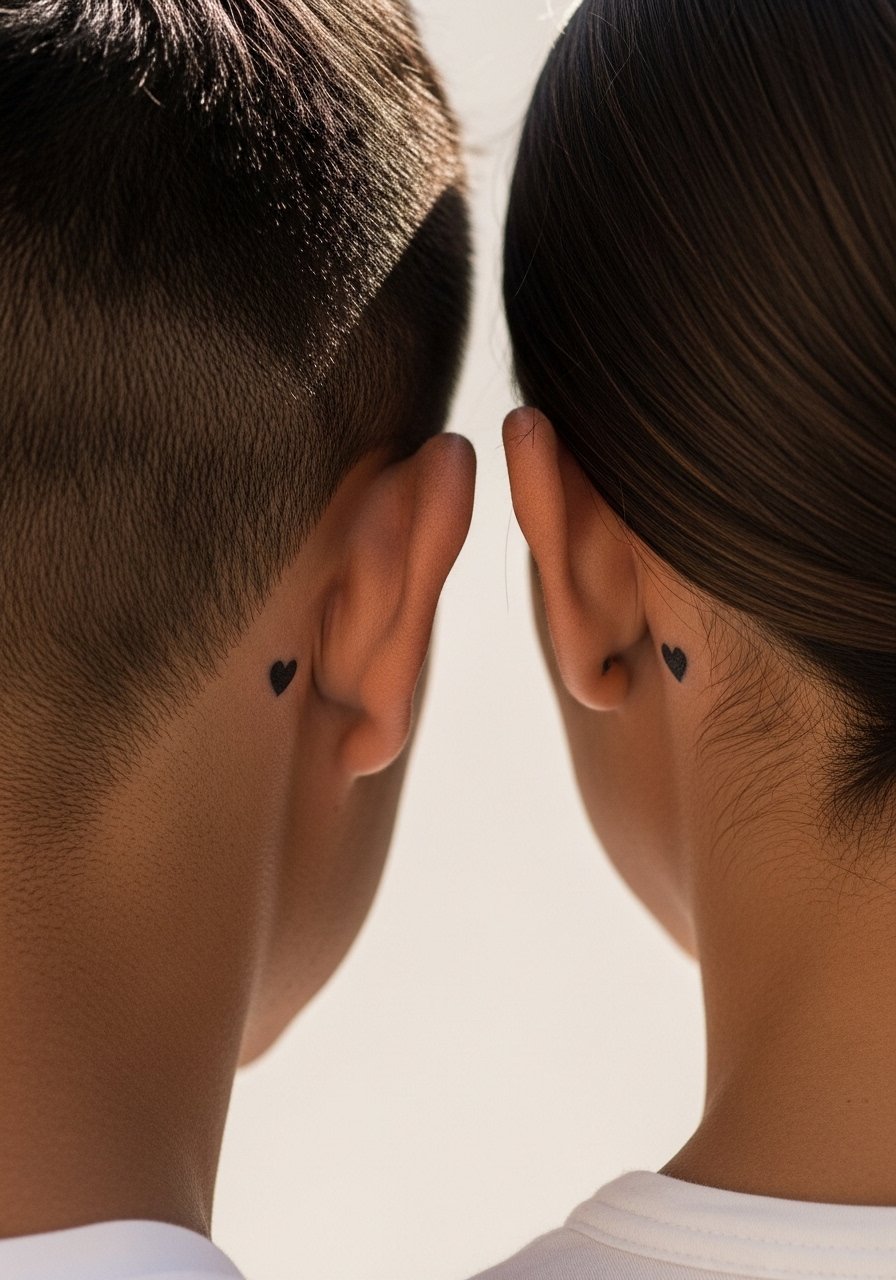
Matching behind-ear symbols are discreet and personal. Size and placement should mirror on both people for balance. Expect quick sessions and an easy healing process if care is followed. Avoid overly intricate designs—simple shared marks keep the focus on meaning.
Tattoo Prep and Aftercare Essentials
Aftercare Essentials:
- Aquaphor Healing Ointment, 14oz tube — Industry standard for first 3–5 days
- Saniderm Transparent Adhesive Bandage, 6-inch roll — Second-skin method many artists use
- CeraVe Fragrance-Free Moisturizing Lotion, 12oz — For days 4–14 and ongoing moisturizing
- Dr. Bronner's Unscented Castile Soap, 16oz — Gentle daily clean
Before Your Appointment:
- Tattoo Numbing Cream with 5% Lidocaine, 30g — Ask your artist before using
- Stencil Transfer Paper, Thermal Tattoo Stencil Paper — Handy if you’re testing placements at home
Long-Term Maintenance:
- SPF 50 Sunscreen Stick for Tattoos — Daily protection prevents fading
- Mad Rabbit Tattoo Balm, 2oz — Keeps healed tattoos vibrant
- Hustle Butter Deluxe, 2oz — Vegan aftercare alternative
Optional Comfort Items:
- Tattoo Numbing Spray — For particularly sensitive areas or touch-ups
- Hydrocolloid Bandages (Large) — For spot protection during healing
I've seen artists recommend Saniderm for the first 24–72 hours, then switching to Aquaphor, and later to a fragrance-free lotion like CeraVe. Sunscreen stick is the simplest long-term defense against fading, especially for behind-the-ear tattoos that catch stray sun.
Frequently Asked Questions
Q: How bad does a behind-the-ear tattoo hurt?
A: Pain is usually medium—thin skin and little fat make it more sensitive than the outer arm but less than ribs. I’d call it a 5–6/10 for most people: sharp and close to bone, then a dull burn. Numbing cream can help; consider tattoo numbing cream with 5% lidocaine if you’re nervous (ask your artist first).
Q: How long before I can sleep on that side?
A: Wait at least 48–72 hours before fully resting on that side; you’ll want minimal pressure for the first few days. If you need to sleep on it, protect the fresh tattoo with a clean pillowcase and avoid heavy contact. Keep healing products like Aquaphor lightly applied as advised.
Q: Will hair and shampoo ruin a behind-the-ear tattoo while healing?
A: Be gentle. Use a mild cleanser like Dr. Bronner's Unscented Castile Soap and rinse shampoo away quickly. Try to keep long hair pinned back and avoid heavy conditioners on the area for the first week.
Q: How do I keep a tiny design from blurring?
A: Ask your artist to slightly thicken the most delicate lines and to space elements with enough negative space. From what I've seen, fine-line work benefits from modest line weight. For touch-ups, keep a maintenance plan with healed photos to show your artist.
Q: Can I use Saniderm on behind-the-ear tattoos?
A: Many artists use Saniderm for small placements. If you do, follow the artist’s timing—often 24–72 hours for face/head areas—then switch to ointment or lotion. I rely on Saniderm Transparent Adhesive Bandage, 6-inch roll when recommended.
Q: How do tattoos look on different skin tones behind the ear?
A: Black and gray hold up well across skin tones and read clearly. Bright pastels can be muted on deeper tones; darker pigments like deep blues, reds, and black work best for longevity. Ask to see healed examples on skin tones similar to yours.
Q: How long does surface healing take and when does color settle?
A: Surface healing is usually 2–3 weeks. The tattoo will look dull while skin regenerates; colors and lines settle over 6–12 weeks. Keep using gentle moisturizers like CeraVe Fragrance-Free Moisturizing Lotion to support skin health.
Q: Should I pick a tiny test tattoo first if I'm nervous about pain?
A: Only if you actually want that small piece. Pain varies more by placement than size—behind the ear can be more sensitive than a small wrist piece. If you want a low-visibility test, consider outer upper arm or shoulder blade instead.
