
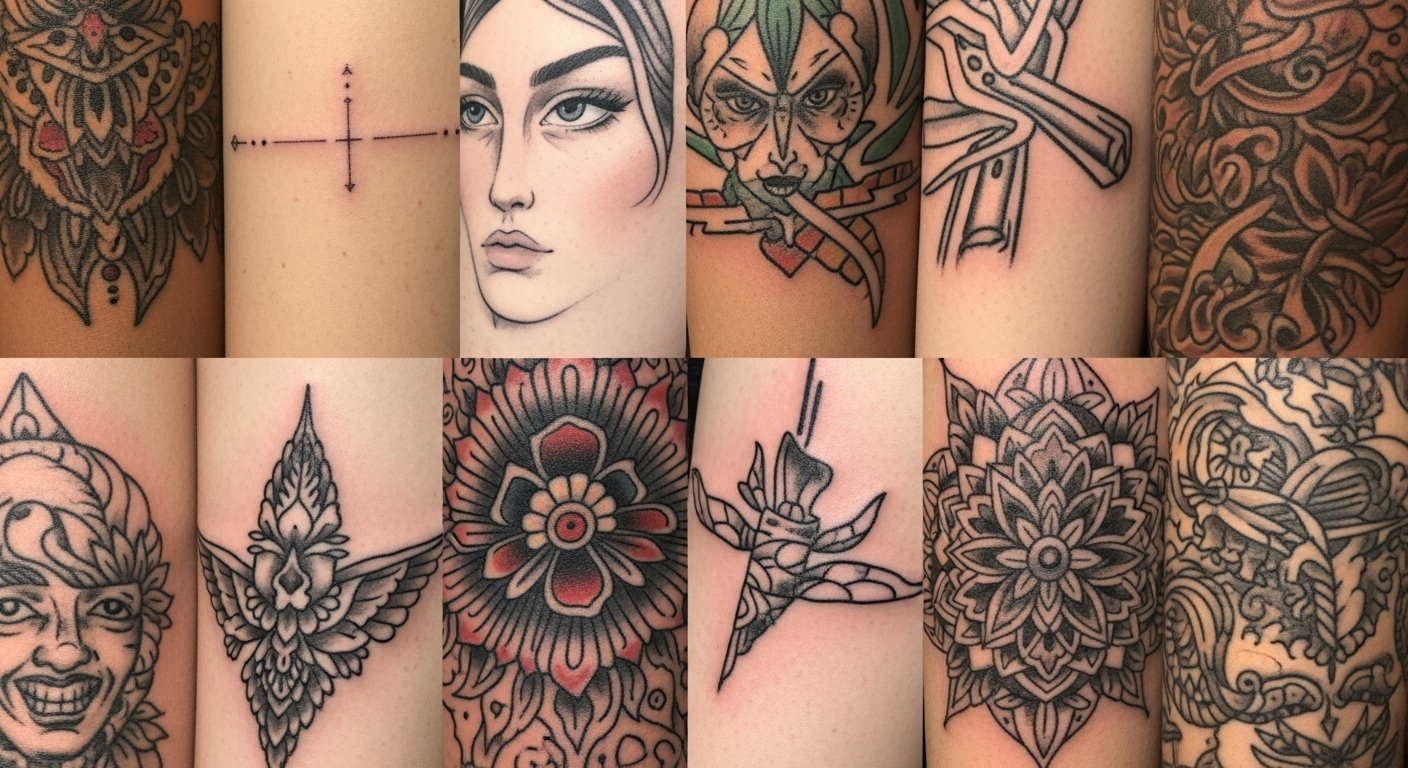
I spent months tracing constellations on scrap paper before I realized the real decision was style, not symbol. I wanted an astrology tattoo that would still read as deliberate ten years from now — not a faded trend. These 30 cosmic designs mix timeless techniques with astrological meaning so you can pick a look that ages well and fits your body.
Quick context: I focus on fine line, traditional, blackwork, micro-realism, and watercolor-inspired astrology tattoos. Placements include inner forearm, ribs, behind ear, and thigh. These picks reflect 2025 trends toward meaningful, minimal, and UV-accented pieces that actually hold up.
Fine Line Constellation Bracelet on Inner Wrist
Style/Technique: Fine Line / Minimalist
Pain Level: Low (2-3/10)
Session Time: 30–90 minutes
Best For: First tattoo, subtle visibility
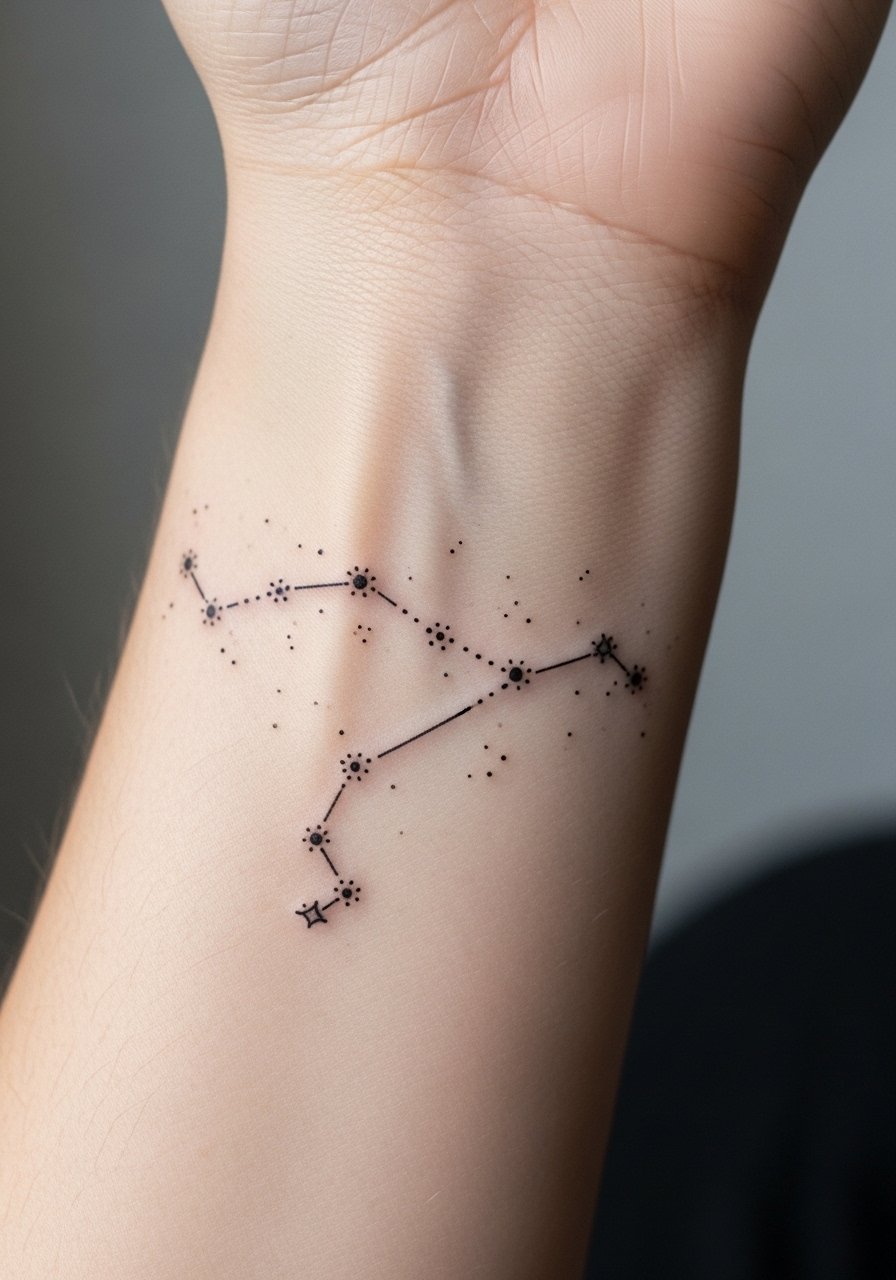
I got a tiny Sagittarius constellation as a bracelet to test fine line on my wrist. Fine line gives a delicate, personal feel and reads like jewelry. The inner wrist is low-pain but sees friction; expect 2–3 weeks of surface healing. Lines can blur over years if they’re too close together, so ask for slightly bolder spacing. This style heals to a soft, skin-integrated look — not the crisp black it is fresh. Common mistake: asking for hairline spacing that the skin can’t hold long-term. Ask your artist for healed examples of fine line on a wrist.
Micro Constellation Behind Ear in Negative Space
Style/Technique: Micro-Realism / Negative Space
Pain Level: Low (3/10)
Session Time: 30–60 minutes
Best For: Hidden, elegant placement
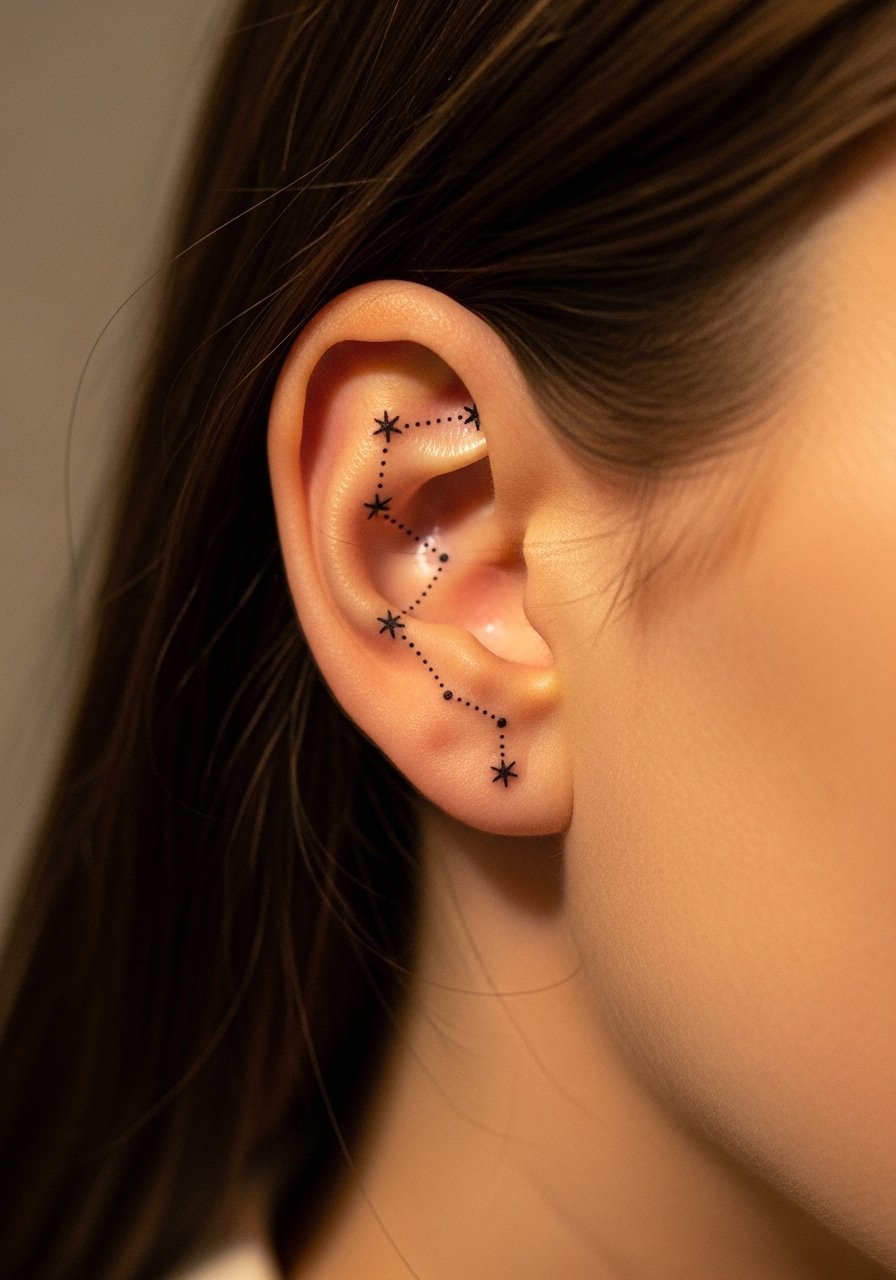
Behind-the-ear micro constellations are intimate and discreet. The area is forgiving for tiny dots and negative-space stars. Pain is low but the area seats on firm cartilage so expect a weird pressure sensation. Heals in 2–3 weeks; keep hair away during healing. This placement ages well if dots are spaced and slightly larger than you think — micro dots can vanish on re-epithelialization. Avoid overly dense patterns; they’re a common regret. Ask for healed photos on similar skin tones during consultation.
Blackwork Celestial Mandala Down Spine
Style/Technique: Blackwork / Geometric
Pain Level: High (7-8/10)
Session Time: Multiple sessions
Best For: Statement piece, long canvas
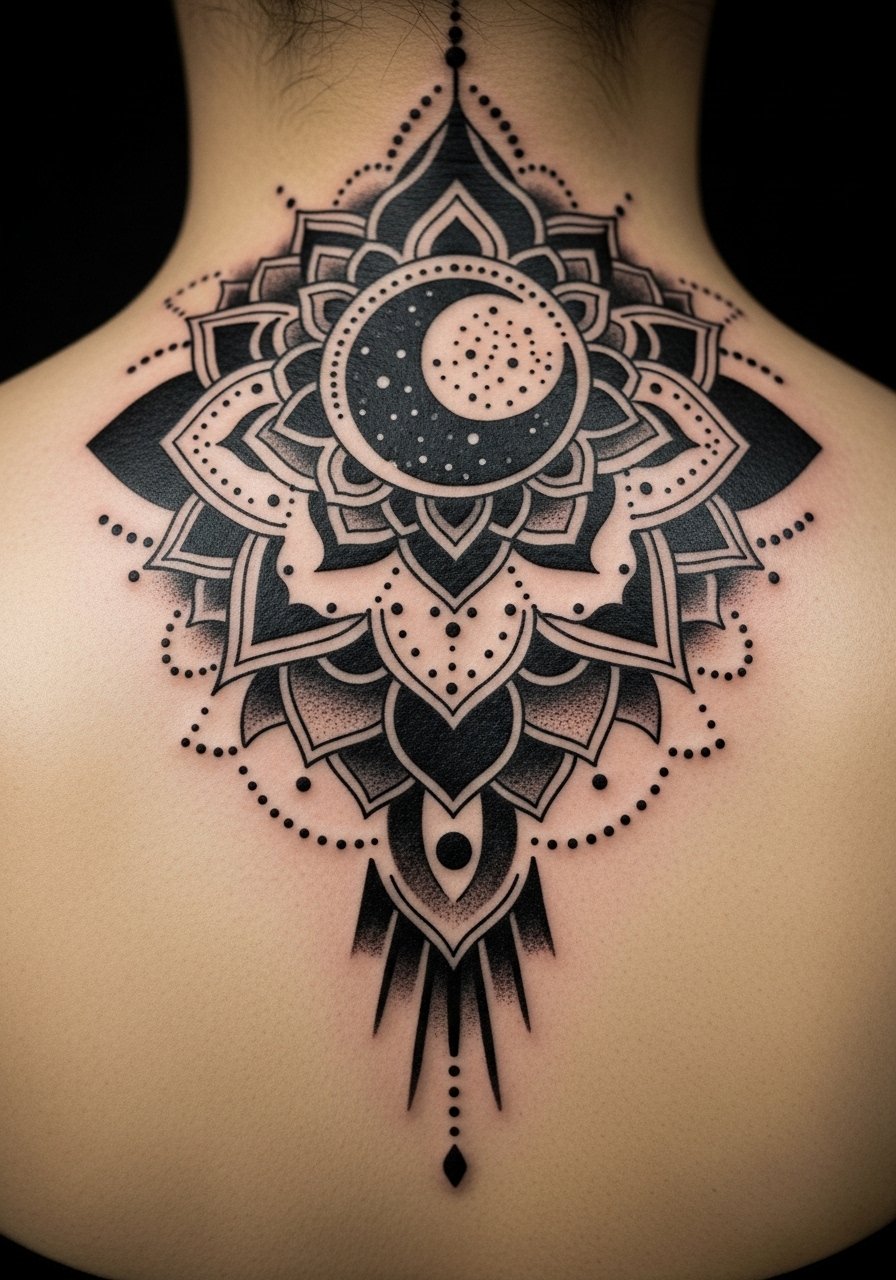
I sketched a mandala with moon phases for my spine piece. Blackwork holds up incredibly well on the spine because bold shapes resist blowout and fading. Pain is intense around the spine and lower back; plan for breaks. Healing is slower due to movement; avoid strenuous bending for a week. The bold contrast stays readable over years. A common error: over-detailing in tiny spine mandalas — large shapes translate better as it settles. Look for artists experienced in geometric symmetry and dotwork.
Watercolor Birth Chart on Ribcage
Style/Technique: Watercolor / Illustrative
Pain Level: High (7/9)
Session Time: 2–4 hours per session
Best For: Personal statement, colorful pieces
I chose a watercolor wash behind planetary glyphs to soften the intensity of a ribcage piece. The ribs are painful and prone to movement; expect high discomfort and slower healing. Watercolor-style pigments can look stunning fresh but often mellow when healed. To keep color longevity, insist on saturation and thicker pigment application where necessary — but avoid tiny watercolor splatters that fade into noise. Artists who do fine color layering and know how pigments sit in skin are key. Aftercare and sun protection are vital for watercolor longevity.
Neo-Traditional Zodiac Animal on Upper Arm
Style/Technique: Neo-Traditional / Bold Color
Pain Level: Low-Medium (3-4/10)
Session Time: 2–5 hours
Best For: Visible statement, easy to hide with sleeves
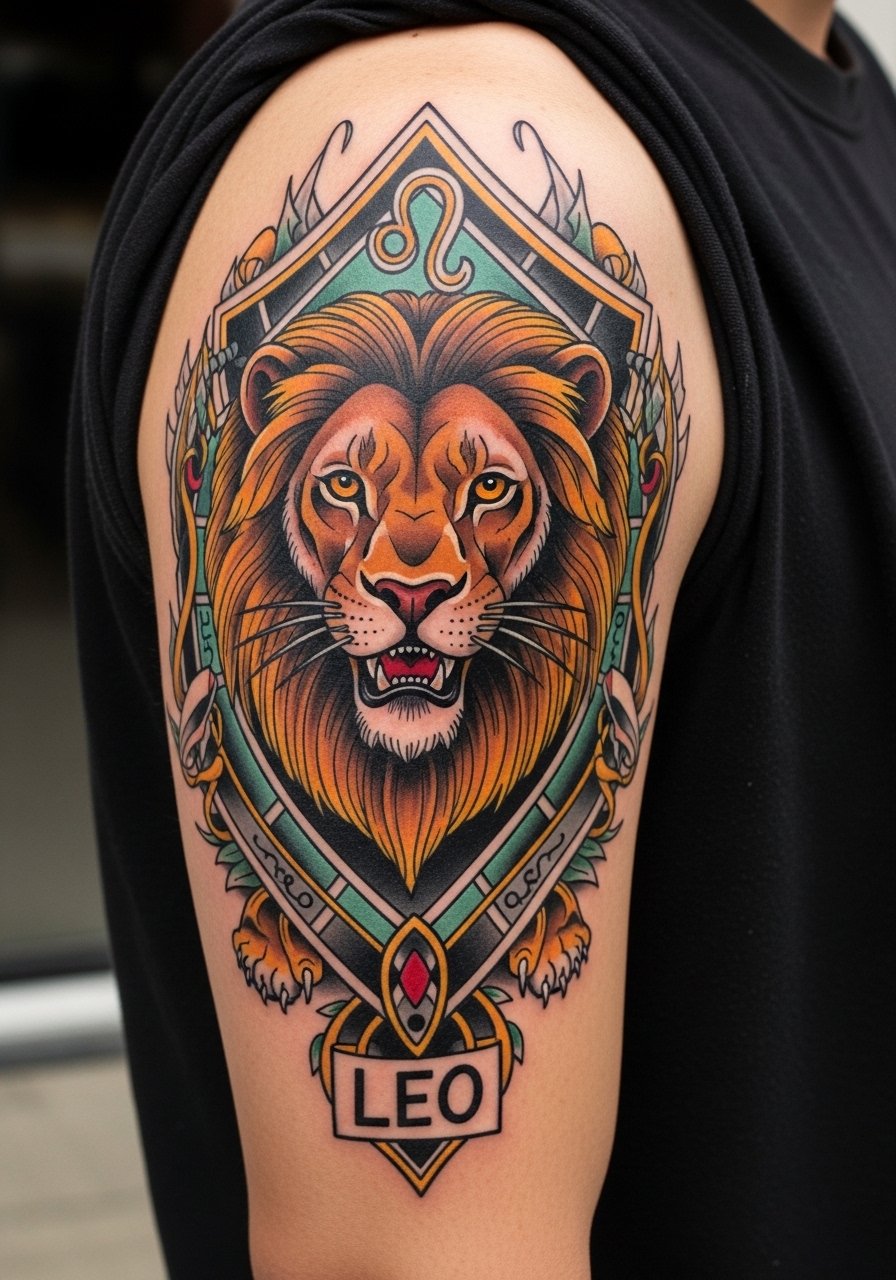
I saw a Leo done in neo-traditional style and loved how it reads from a distance. Neo-traditional’s bold lines and saturated color age predictably; outlines stay sharp and colors mellow. Upper arm is forgiving and heals quickly. Pain is low; sweating and movement are minimal. Common mistake: requesting too many small color gradients — they can muddle over time. If you want a statement zodiac animal, this style gives a classic feel that stays readable.
Minimalist Planetary Stack on Finger Side
Style/Technique: Minimalist / Single Needle
Pain Level: Medium (5-6/10)
Session Time: 30–60 minutes
Best For: Tiny visible astrology, stacking rings alternative
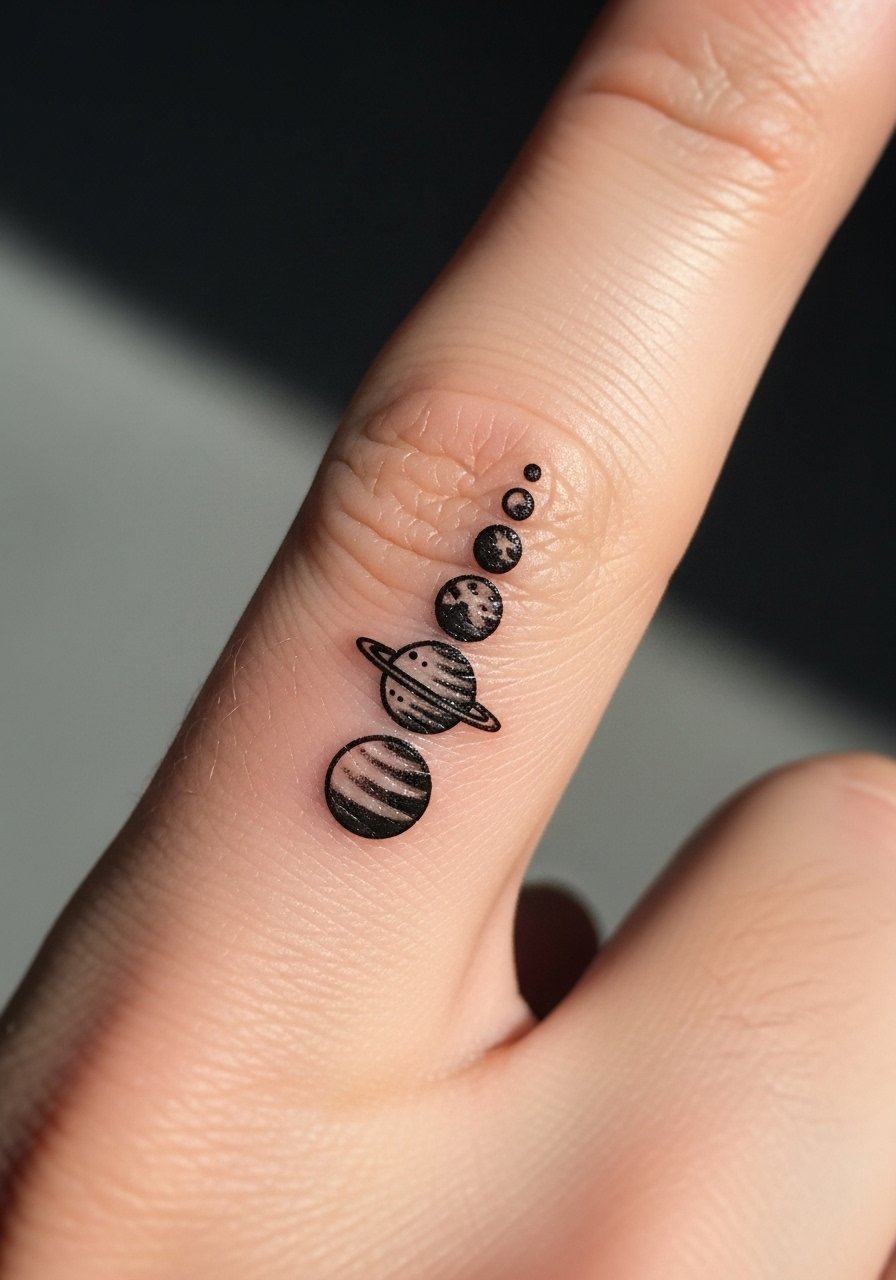
I tested a planetary stack on my finger’s side as a discreet option. Fingers are high-maintenance; expect faster fading and potential touch-ups. Pain is sharper due to thin skin. Heals within 2–3 weeks superficially but may need refreshers. Keep lines slightly bolder than you want so they survive hand washing and friction. Many people regret ultra-fine finger ink because it softens quickly. Ask your artist about retention and plan for a possible touch-up.
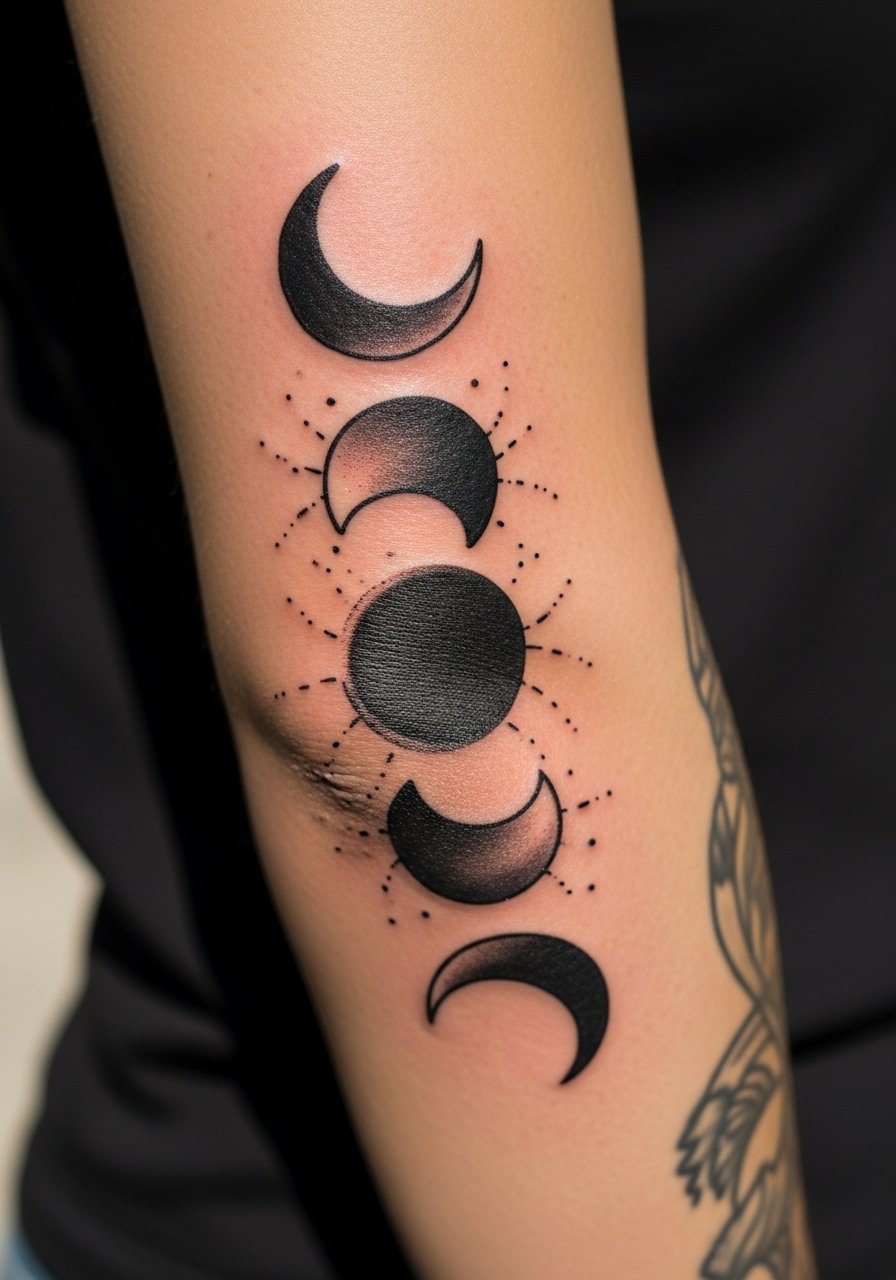
Fine Line Moon Phase on Collarbone
Style/Technique: Fine Line / Minimalist
Pain Level: Medium (4-5/10)
Session Time: 45–90 minutes
Best For: Feminine, visible neckline
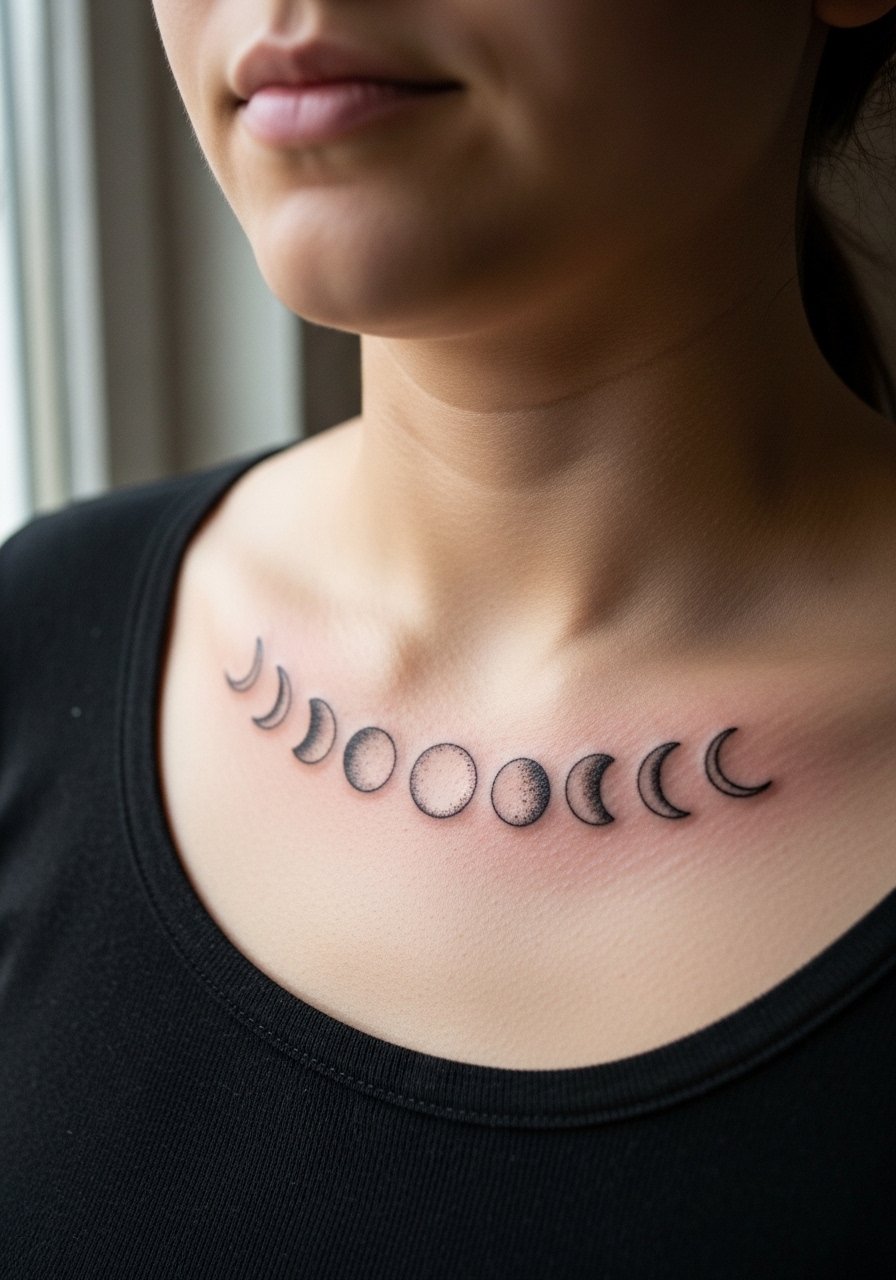
I chose a moon-phase sequence along my collarbone to catch light. Collarbone sits between low and medium pain — bony contact is sensitive. It’s a great placement for visibility and layering with necklaces. Fine line moon phases settle to a soft, worn-in look as they heal. Avoid packing too many tiny crescents; spacing prevents blurring. Healing needs gentle motion control — skip tight straps for a week. Ask to see healed collarbone pieces to match line weight to your skin.
Dotwork Solar System Chest Piece
Style/Technique: Dotwork / Blackwork
Pain Level: Medium-High (6-7/10)
Session Time: Multiple sessions
Best For: Broad statement, symmetrical design
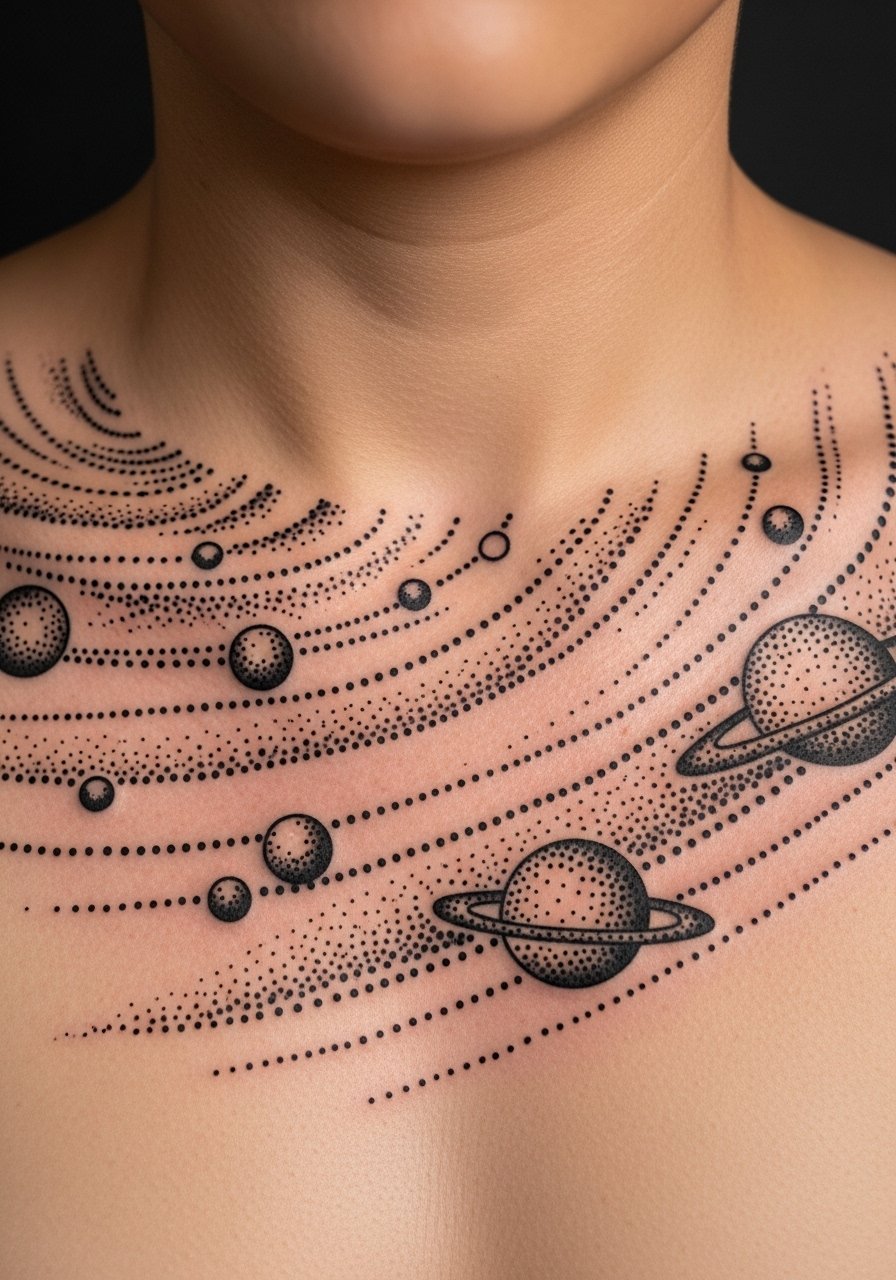
A chest solar system lends scale to astrology symbolism. Dotwork creates texture and depth without heavy color that fades. The chest tolerates larger pieces and holds detail well but can be painful near the sternum. Dotwork ages gently; small dots may soften but overall composition stays readable. Avoid relying solely on micro-dot gradients—combine with bold anchors for longevity. Artists skilled in stippling will make the piece feel dimensional when healed.
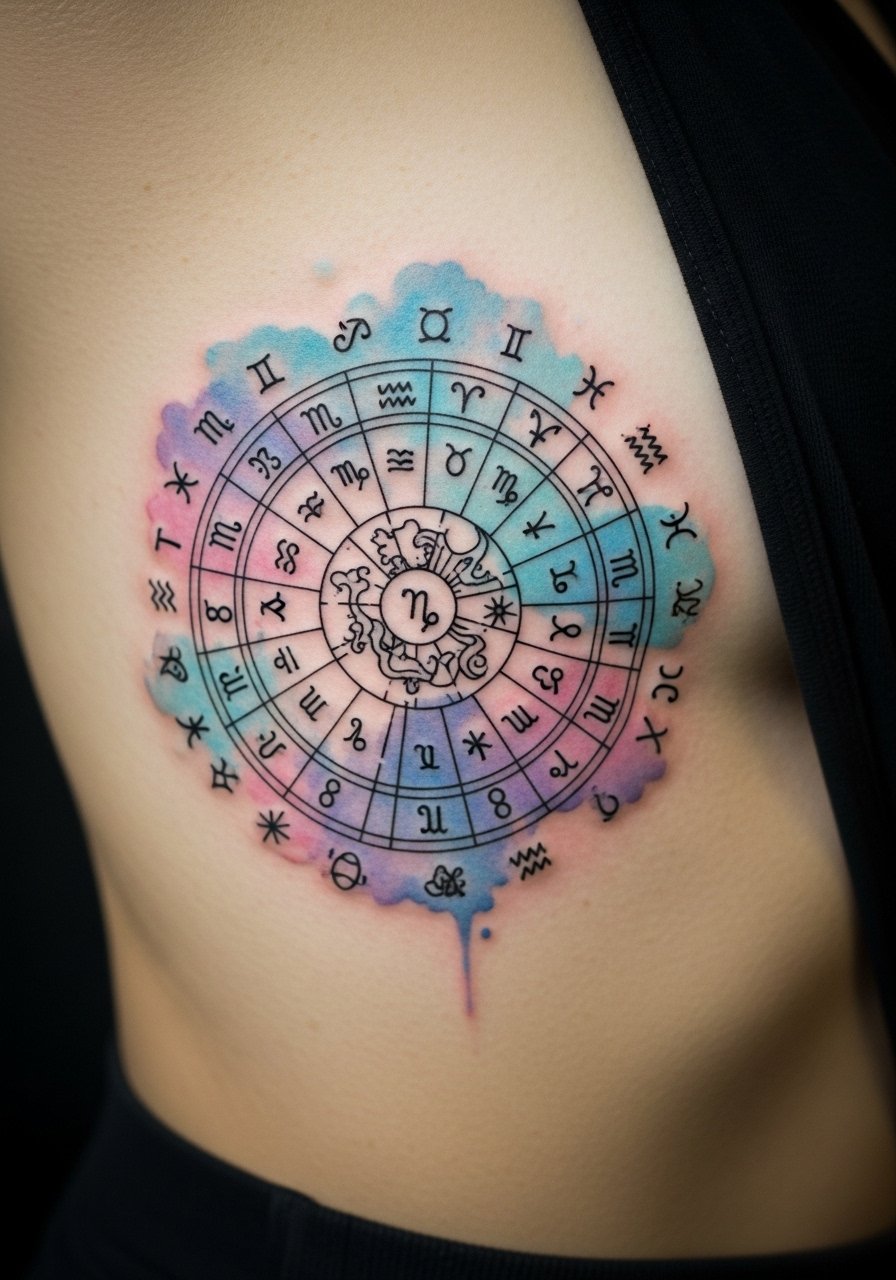
Geometric Zodiac Wheel on Back Shoulder
Style/Technique: Geometric / Blackwork
Pain Level: Medium (4-6/10)
Session Time: 2–4 hours
Best For: Medium statement, covers large flat area
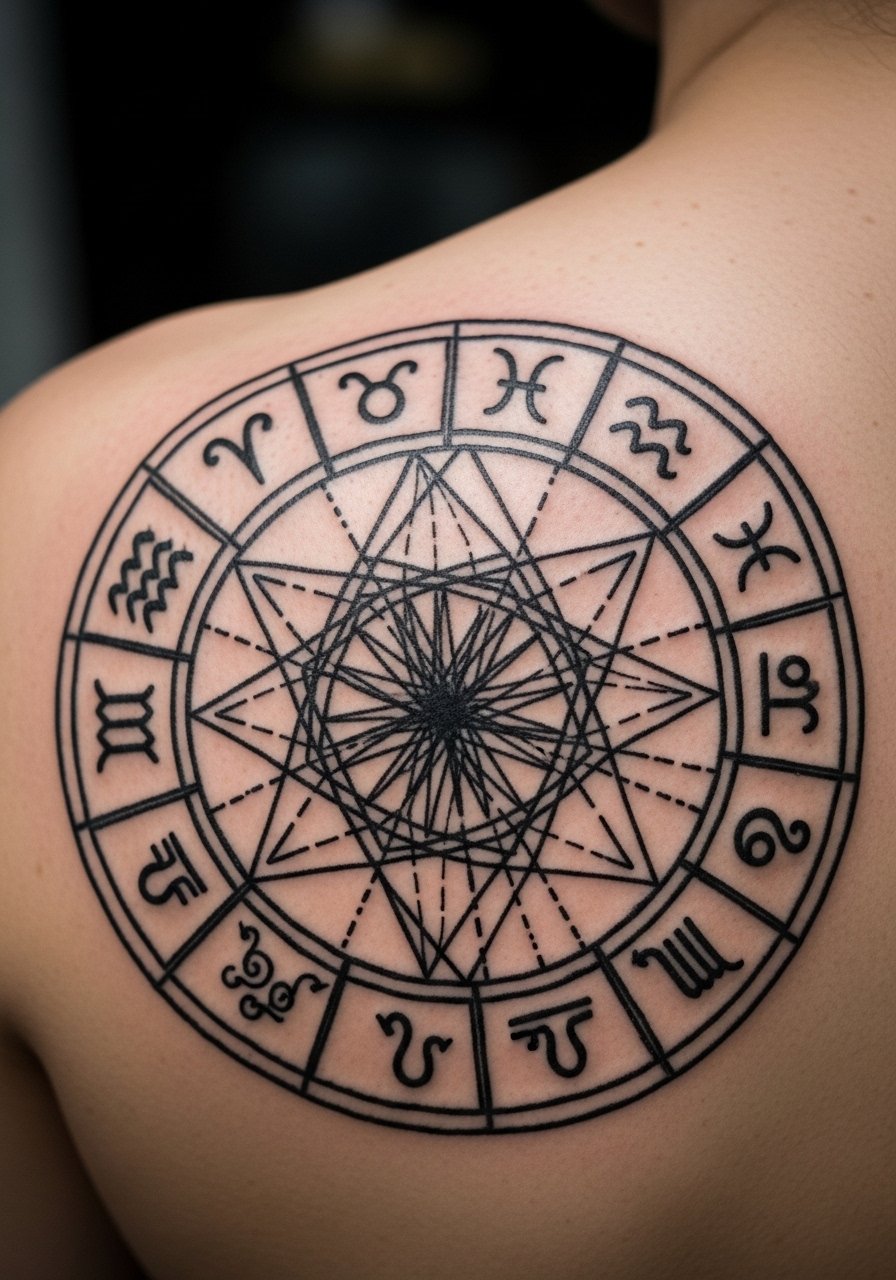
I picked a zodiac wheel over my shoulder to balance symmetry. The upper back is great for geometric layouts — flat space reduces distortion. Pain is moderate. Black geometric pieces tend to stay crisp if lines are punched confidently. Common mistake: requesting micro glyphs spaced too tight around a small wheel; they can blur into a ring. Ask for slightly larger glyphs and clear negative space so the wheel remains readable years later.
Single-Line Astrology Glyph on Inner Finger
Style/Technique: Single-Line / Minimalist
Pain Level: High (6-7/10)
Session Time: 20–40 minutes
Best For: Discreet, symbolic ink
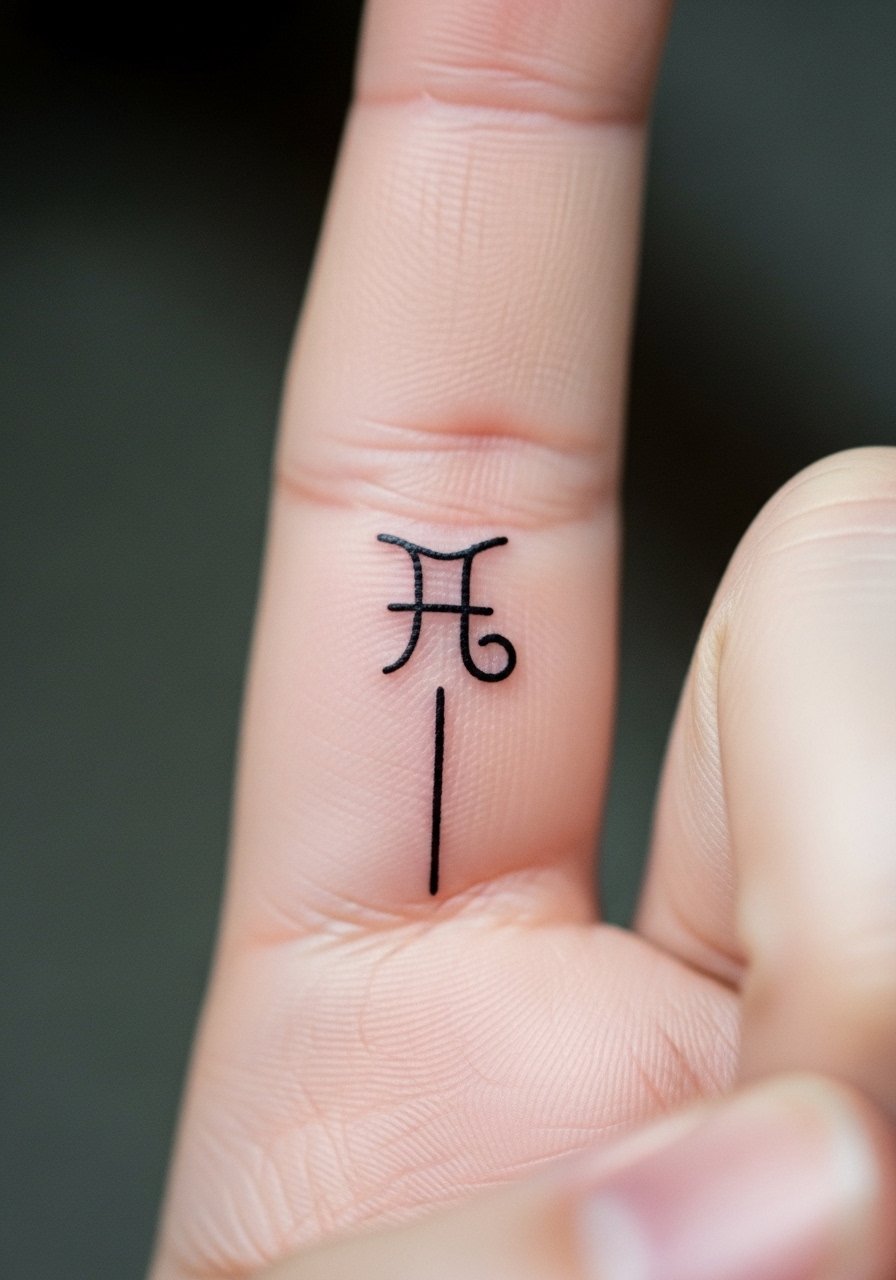
A tiny glyph on my inner finger is a secret nod to my chart. Fingers are tricky — skin moves and ink migrates. Pain can be sharp. Expect more frequent touch-ups and possible fading. To avoid disappointment, make the glyph slightly bolder than your ideal. Aftercare is crucial because the hands get wet a lot; protect the area during the first two weeks. This placement is meaningful but high-maintenance.
Micro-Realism Birth Star on Ankle
Style/Technique: Micro-Realism / Fine Detail
Pain Level: Medium (4-5/10)
Session Time: 1–2 hours
Best For: Subtle, elegant spots
I had a small birth star near my ankle to keep things discreet. The ankle’s skin is thin and movement heavy; expect medium pain. Micro-realism can look delicate and crisp once healed if the artist places slightly heavier contrast. Avoid ultra-fine grays that vanish into the skin. This area can fade faster due to socks and shoes rubbing; plan for placement on the lateral ankle where abrasion is lower.
Blacklight UV Constellation on Upper Chest
Style/Technique: UV Ink Accent / Fine Line
Pain Level: Medium (5/6)
Session Time: 1–2 hours
Best For: Hidden glow, party-friendly reveal
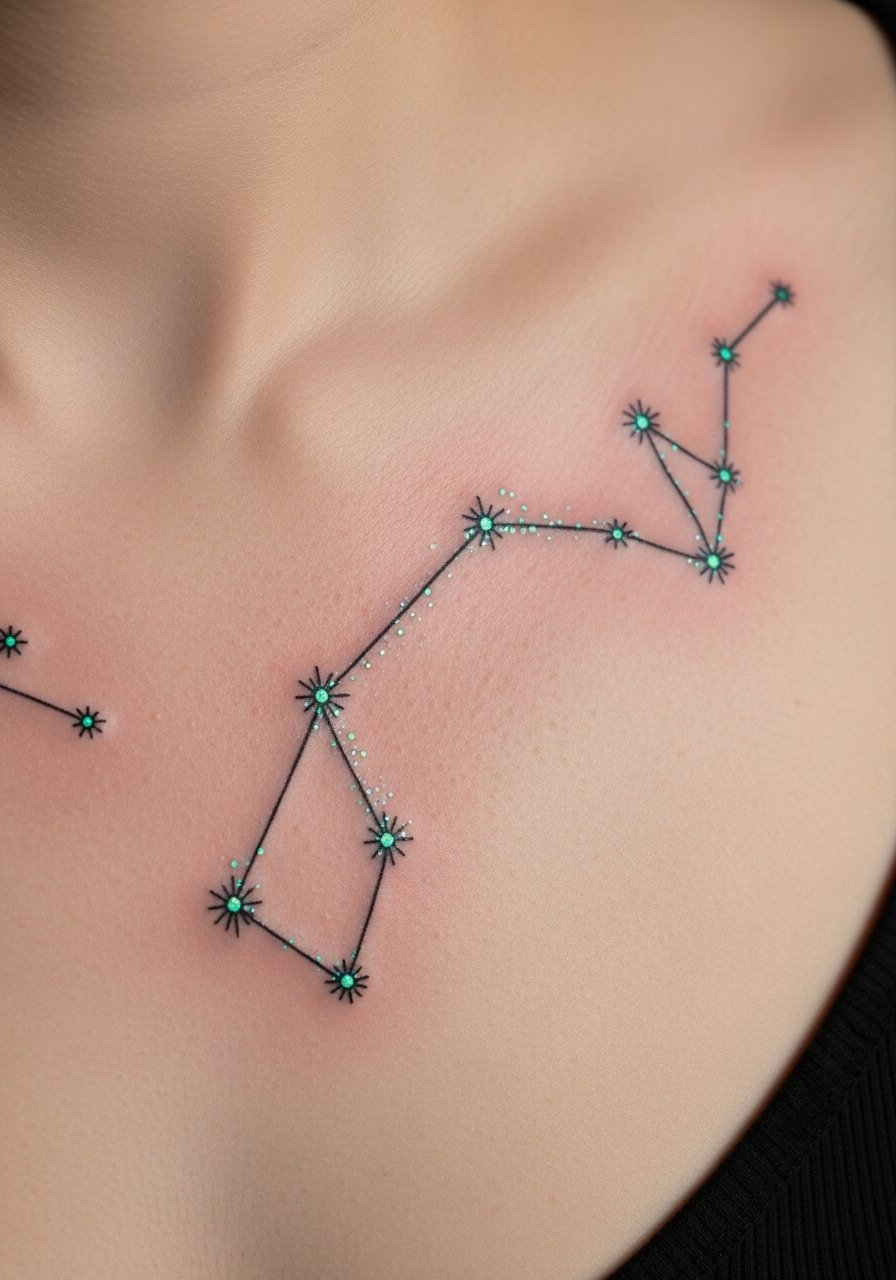
I experimented with UV accents across a chest constellation. UV ink is subtle in daylight and glows under blacklight — a fun, modern twist. Pain is typical for chest placements. UV pigments can be more prone to fading than standard inks, so combine them with solid black anchors. Ensure your artist has experience with UV formulas. Note: healed look is understated; the glow is for occasional reveals, not constant brightness.
Traditional Sun and Moon on Forearm
Style/Technique: Traditional / Bold Outline
Pain Level: Low-Medium (3/4)
Session Time: 1–3 hours
Best For: Timeless symbolism, visible arm piece
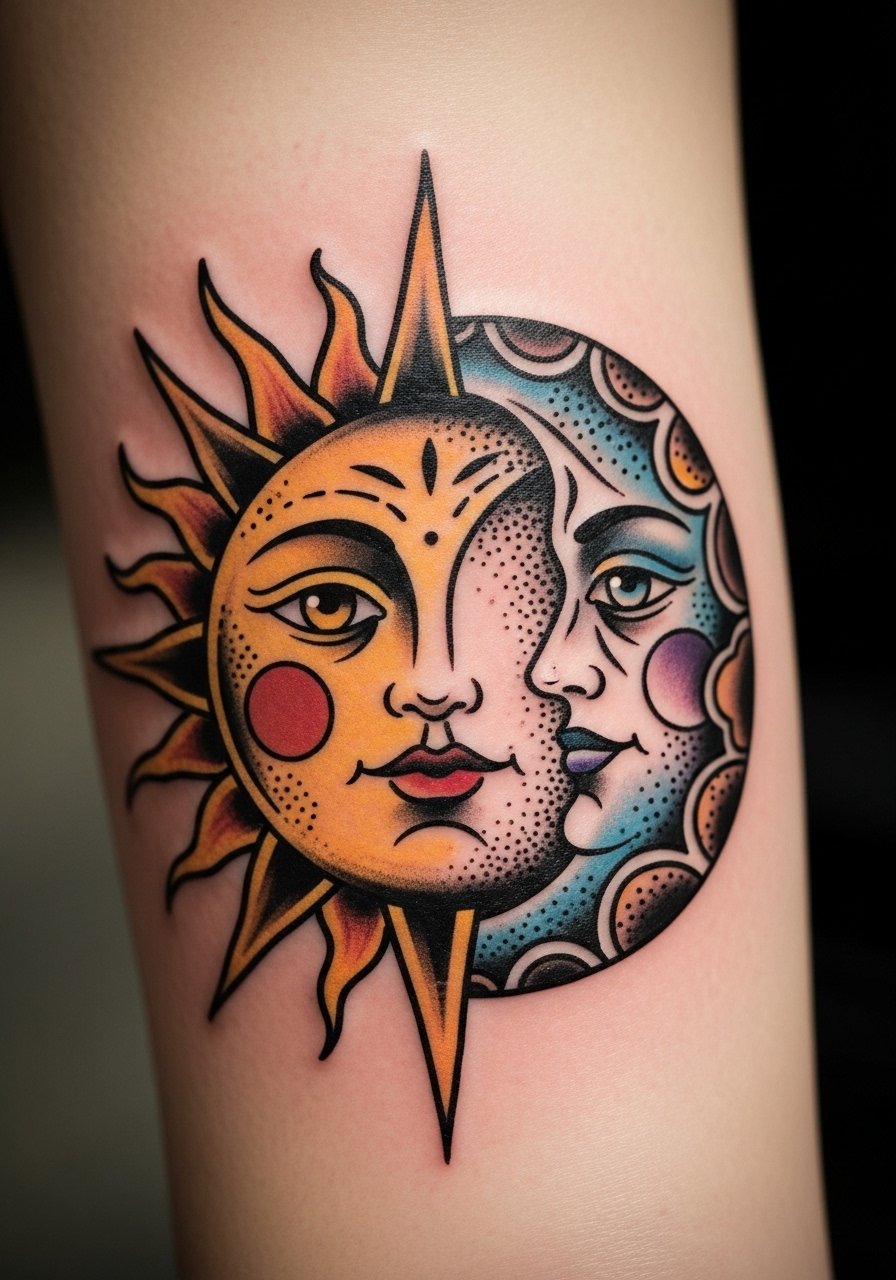
A traditional sun and moon reads like a classic talisman on the forearm. Bold lines and saturated fills hold up over time and across skin tones. Forearm placement is low-pain and great for first-timers. The look matures into a strong silhouette as it heals. Avoid tiny interior shading that can blur; traditional blocks of color last longer. If you want something timeless and readable from a distance, this is a reliable choice.
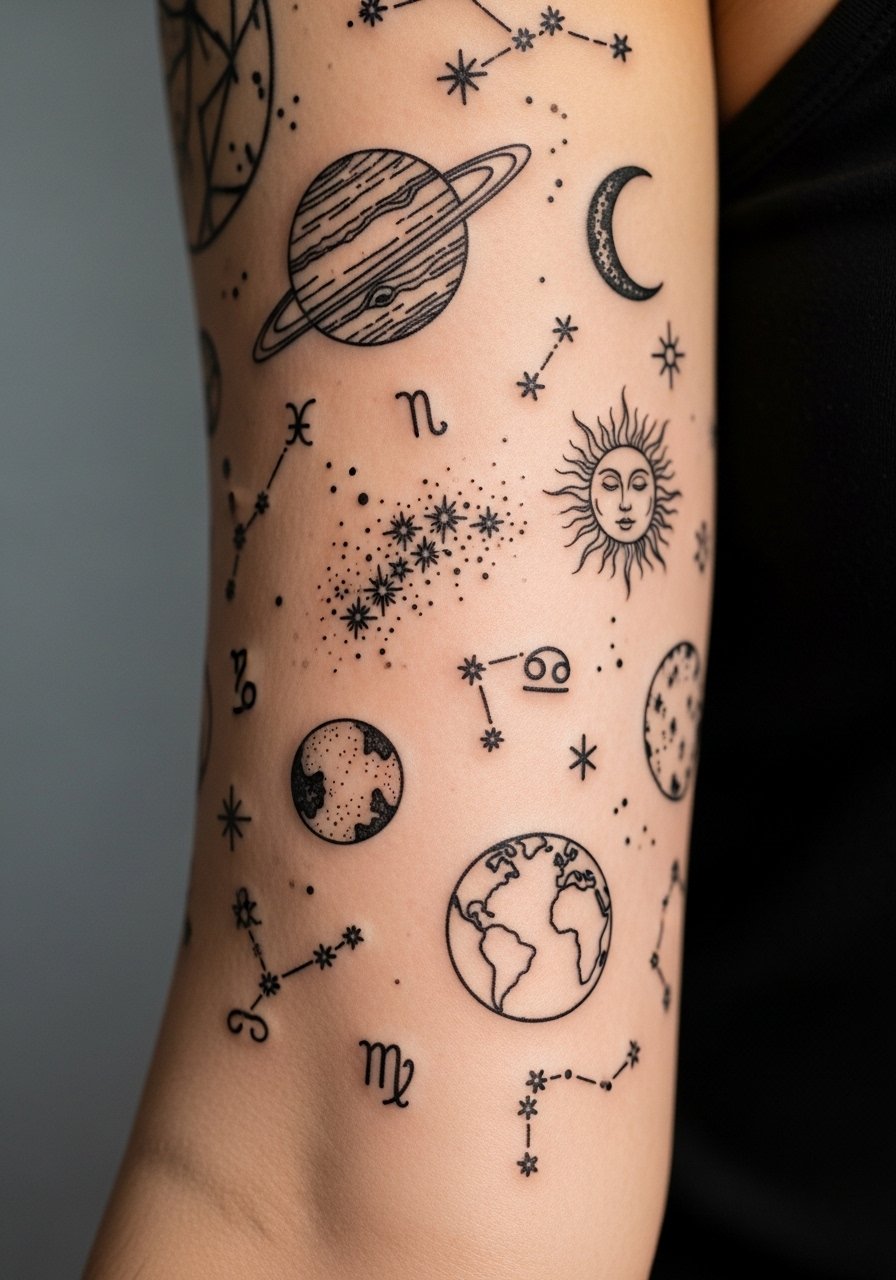
Minimalist Astrology Line Sleeve on Inner Forearm
Style/Technique: Minimalist / Linear Composition
Pain Level: Medium (4/5)
Session Time: 2–4 sessions
Best For: Curated sleeve, modern aesthetic
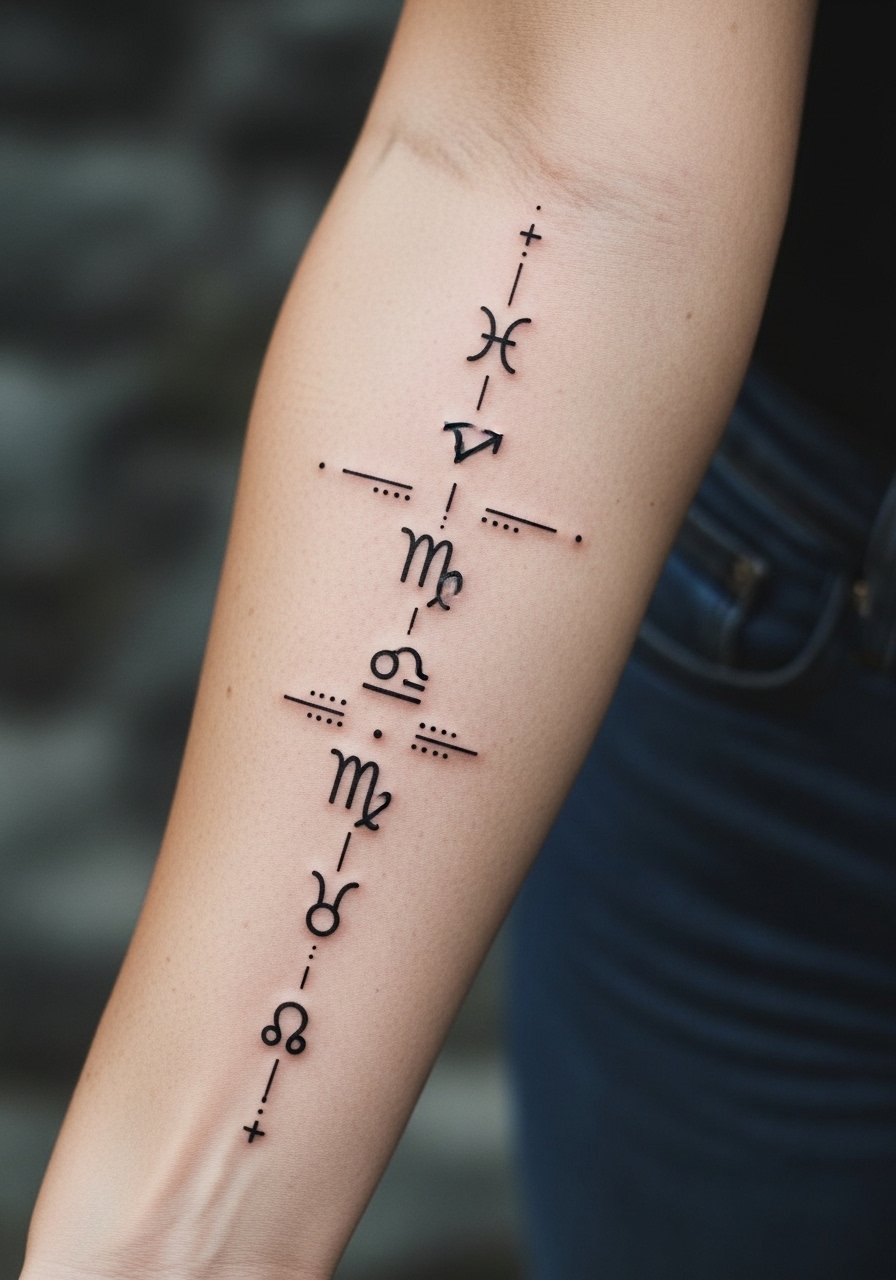
I designed a vertical line of glyphs and planets down my inner forearm for a curated sleeve feel without heavy coverage. Inner forearm allows for longer compositions and moderate pain. Minimalist lines settle to a soft patina; spacing is vital. A common error is lining symbols too close — give breathing room. This approach ages into a wearable piece that still reads as intentional.
Ribcage Astrology Map in Script and Symbols
Style/Technique: Illustrative / Script + Symbols
Pain Level: High (7-9/10)
Session Time: Multiple sessions
Best For: Deeply personal, hidden canvas

I committed a birth map with house placements to my ribs. Ribs are painful and require pause; expect intense sessions. This placement is intimate and easy to hide. Script combined with glyphs creates a diary-like feel. Healed script may soften, so ask for slightly thicker strokes. Avoid tiny annotations that become unreadable. Aftercare should minimize stretching and heavy breathing motion for a few days.
Zodiac Constellation Calf Sleeve in Blackwork
Style/Technique: Blackwork / Cohesive Sleeve
Pain Level: Medium (4-6/10)
Session Time: Several sessions
Best For: Large, bold display
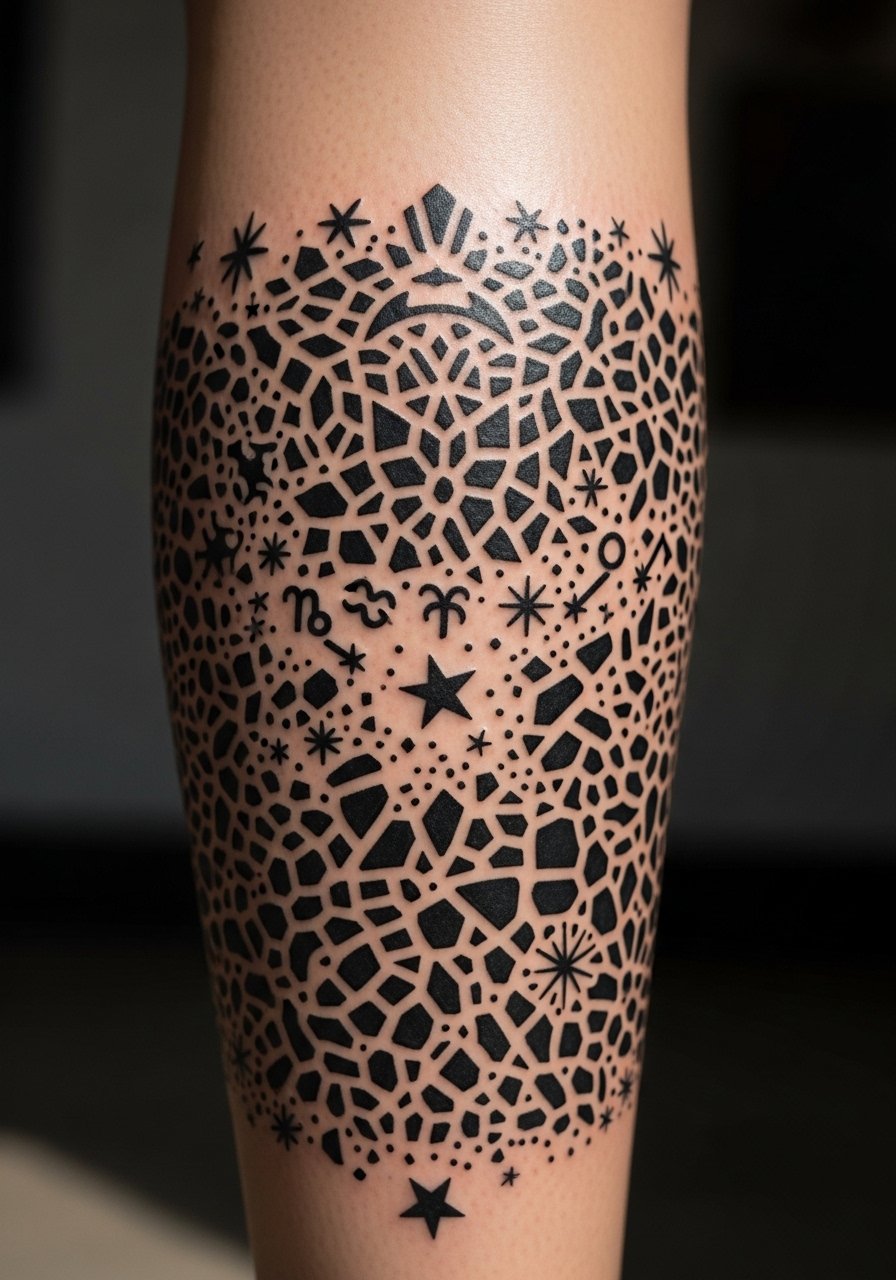
A calf sleeve lets you tell a story with the full zodiac. Blackwork stands up to abrasion from socks and shoes if placed thoughtfully. Calf pain is moderate; muscles help dull sensations. This style retains contrast for years. Make sure the artist balances negative space so constellations remain distinct when the skin settles. A common error is overfilling the calf with tiny stars — focus on composition and large anchors.
Watercolor Nebula on Thigh
Style/Technique: Watercolor / Large Color Field
Pain Level: Medium (5/6)
Session Time: Multiple sessions
Best For: Large colorful statement, private placement
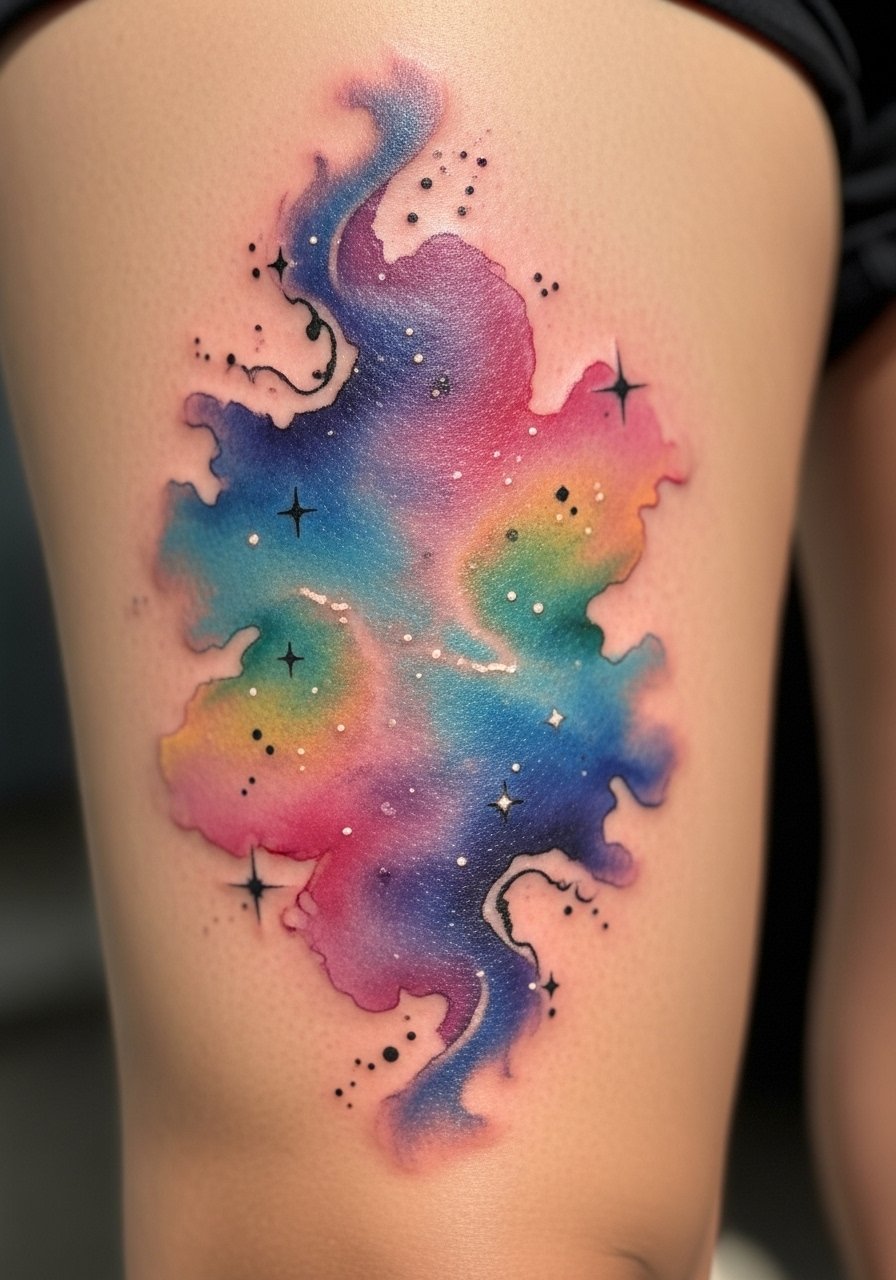
I picked a nebula wash on my thigh for sheer color. Thighs tolerate big color fields and have lower pain in many spots. Watercolor hues look dreamy fresh but can soften; ask for stronger saturation if you want longer-lasting vibrancy. Heals over weeks; avoid tight clothing that rubs. Artists who layer pigments will get a more enduring result. Keep some black anchors so the piece retains structure over time.
Minimal Line Horoscope Symbols on Collarbone
Style/Technique: Minimalist / Micro Symbols
Pain Level: Medium (4/5)
Session Time: 45–90 minutes
Best For: Symmetric neckline, subtle meanings
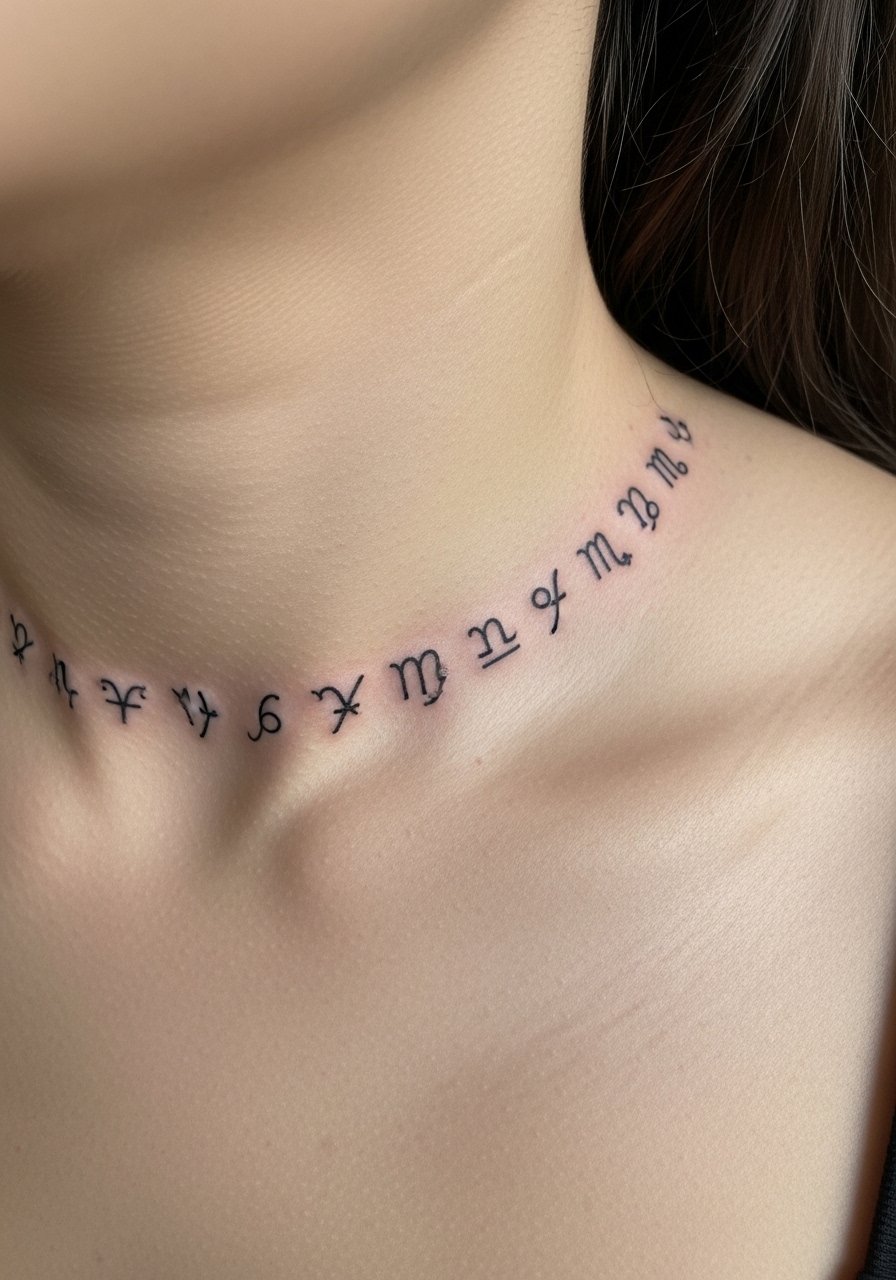
A row of horoscope symbols along my collarbone felt like wearable jewelry. Collarbone is medium pain because of bone proximity. Micro symbols require careful spacing; healed examples help set expectations. This placement looks elegant and pairs well with necklaces. Common mistake: picking ultra-tiny symbols — make them legible at arm’s length. Protect from sun exposure while healing.
Abstract Cosmic Sleeve With Negative Space Planets
Style/Technique: Abstract / Blackwork + Negative Space
Pain Level: Medium-High (5-7/10)
Session Time: Multiple sessions
Best For: Artistic statement, full-arm coverage
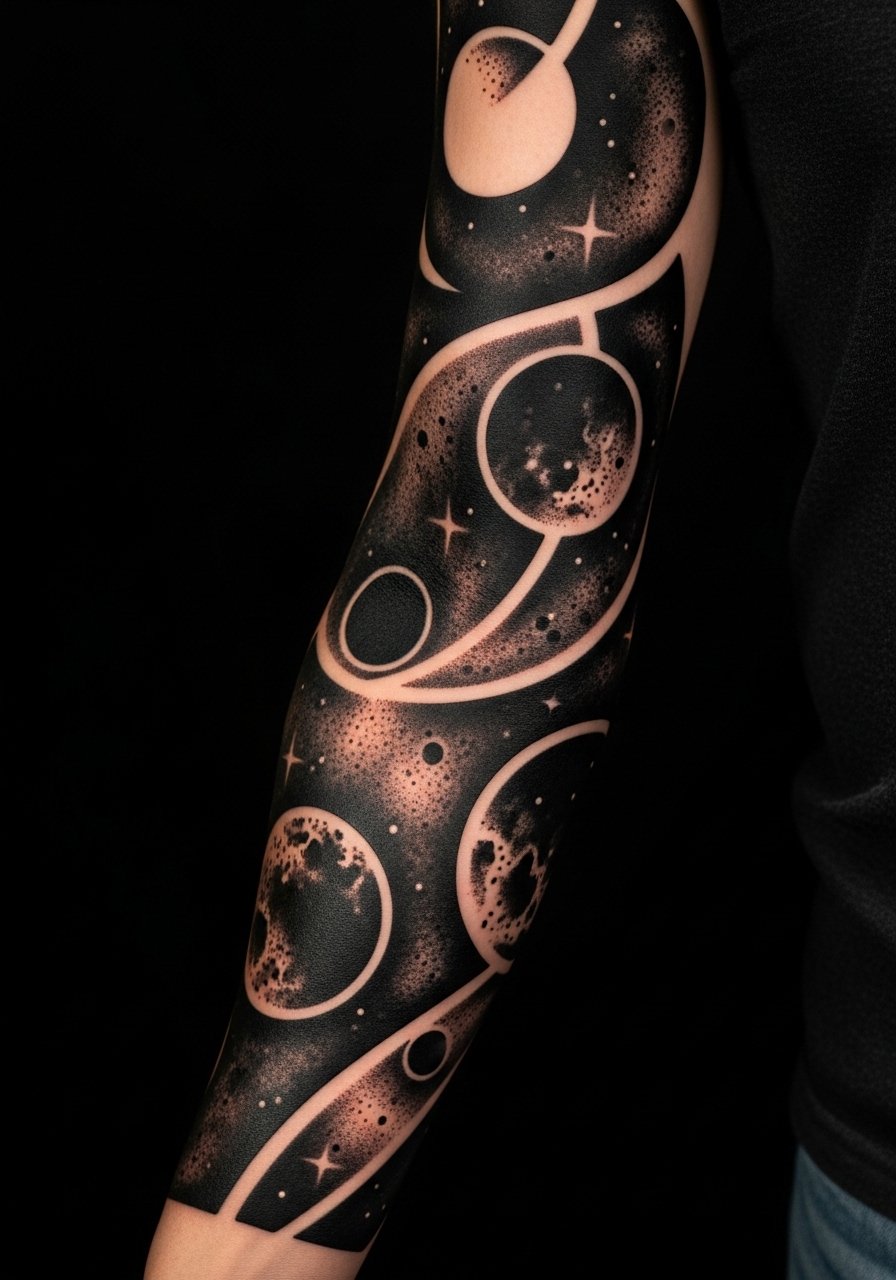
I wanted an abstract sleeve that implied planets without literal rendering. Negative space planets pop against black blocks and age consistently. Arms tolerate large blackwork well, but coverage sessions are longer. Heals into dramatic contrast. Don’t over-detail the negative spaces; they should read as shapes from a distance. Artists who do solid fills and crisp edges are necessary for this look.
Micro Dot Planet on Ear Helix
Style/Technique: Micro / Dot Work
Pain Level: Medium (4-6/10)
Session Time: 20–40 minutes
Best For: Tiny visible accent, ear jewelry alternative
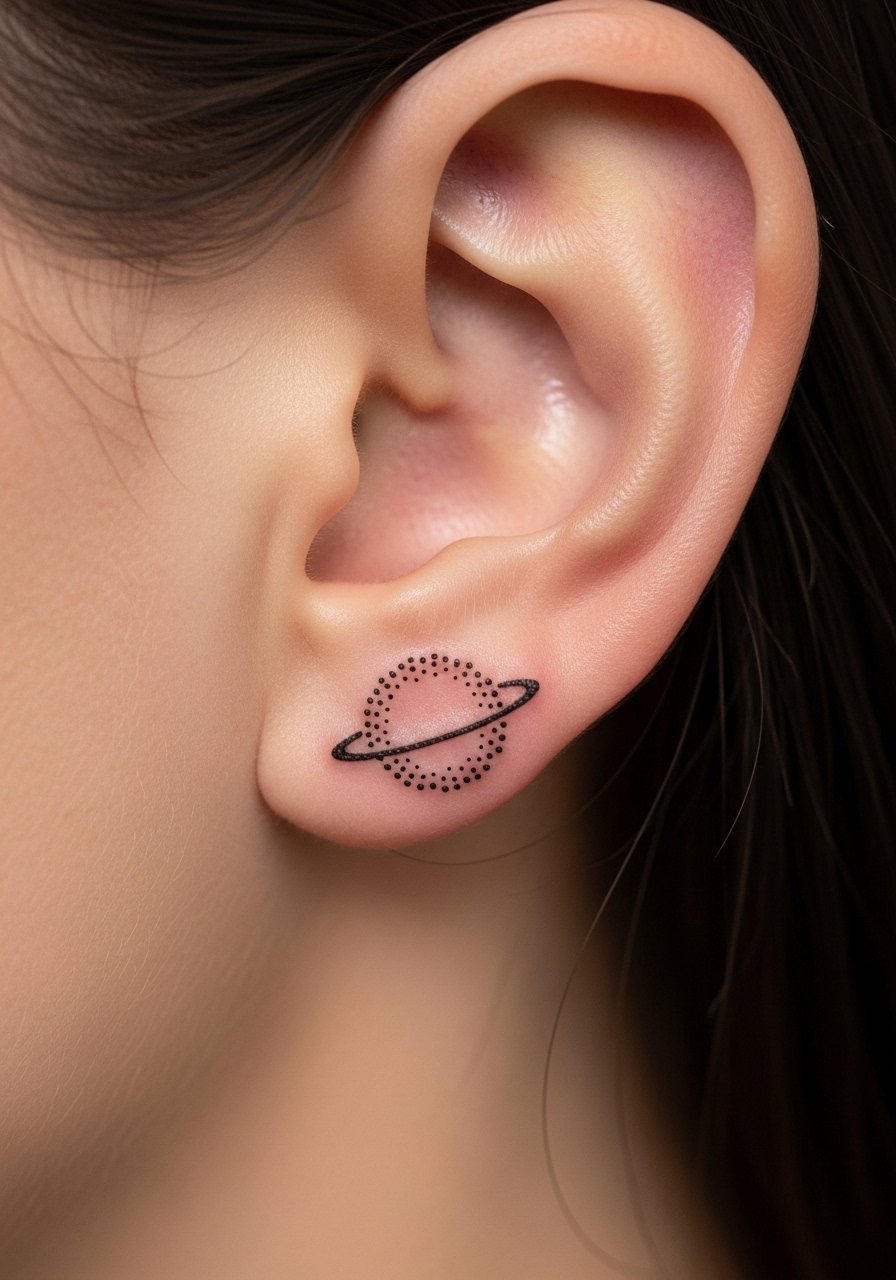
I got a tiny dotted planet in my helix as a subtle accent. The helix can be oddly sensitive, but micro work is short. Expect higher chance of ink spread if dots are too close—ask for crisp spacing. Heals quickly but keep hair and earrings away. This spot is a fresh way to wear astrology without a big commitment.
Astro Compass on Forefoot
Style/Technique: Illustrative / Linework
Pain Level: High (7-8/10)
Session Time: 1–2 hours
Best For: Grounded symbolism, foot placement
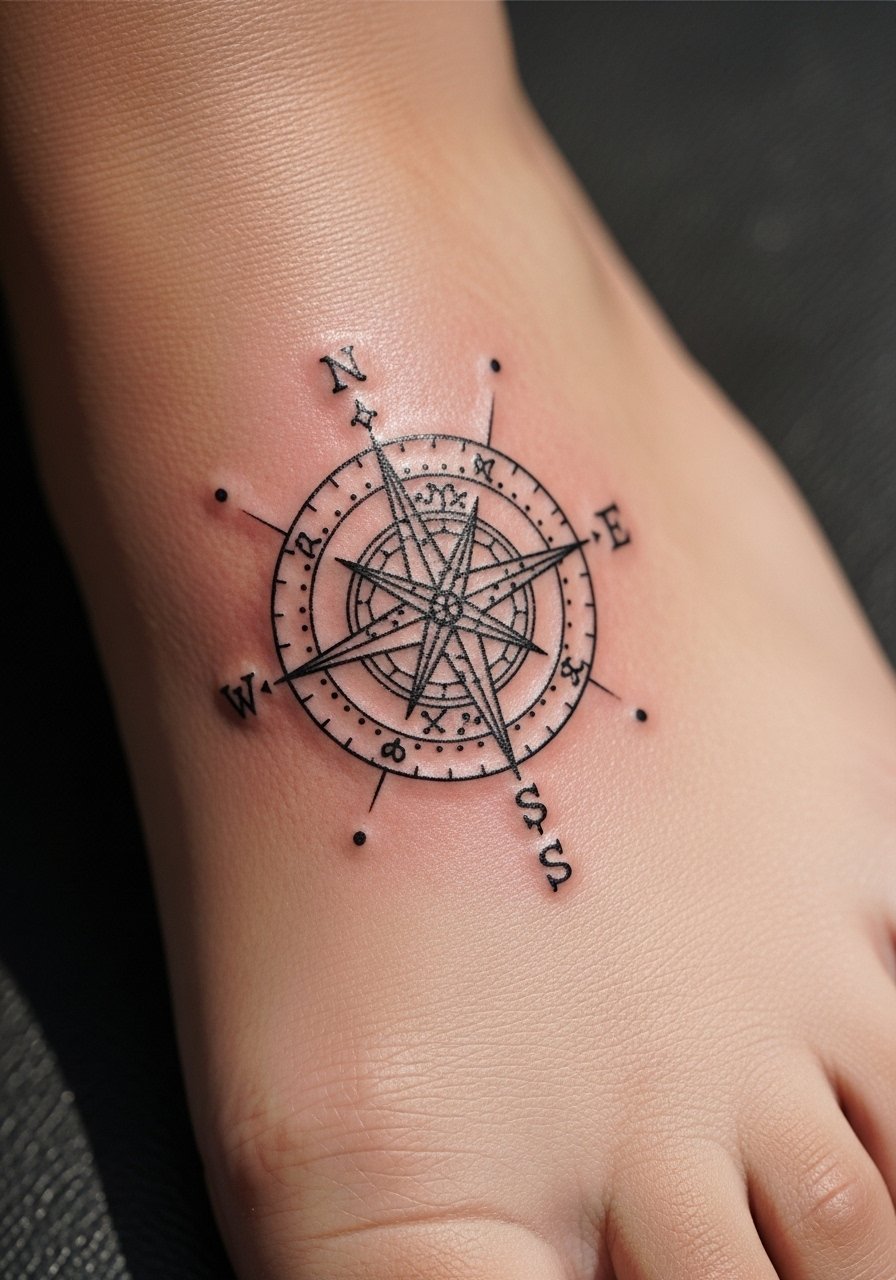
A compass with astrological markers felt literal to me — a map for choices. Feet are painful and subject to heavy friction; expect faster fading and potential touch-ups. Pain is sharp, especially near toes. Heals in a few weeks superficially but may need refresh in a year. Choose bold lines rather than micro detail to retain definition as the foot skin endures constant wear.
Celestial Linework Sleeve on Outer Arm
Style/Technique: Linework / Illustrative
Pain Level: Medium (4-5/10)
Session Time: Multiple sessions
Best For: Readable, wearable sleeve
I curated an outer-arm sleeve of planets connected by fine lines. Outer arm is low-pain and great for longevity. Linework ages into a soft but readable set of illustrations. Keep line spacing generous to avoid blending. This style is modern, minimal, and ages predictably if lines aren’t hairline thin.
Birth Chart Coordinates on Inner Biceps
Style/Technique: Script + Symbols / Minimalist
Pain Level: Medium (4-5/10)
Session Time: 1–2 hours
Best For: Private, personal placement
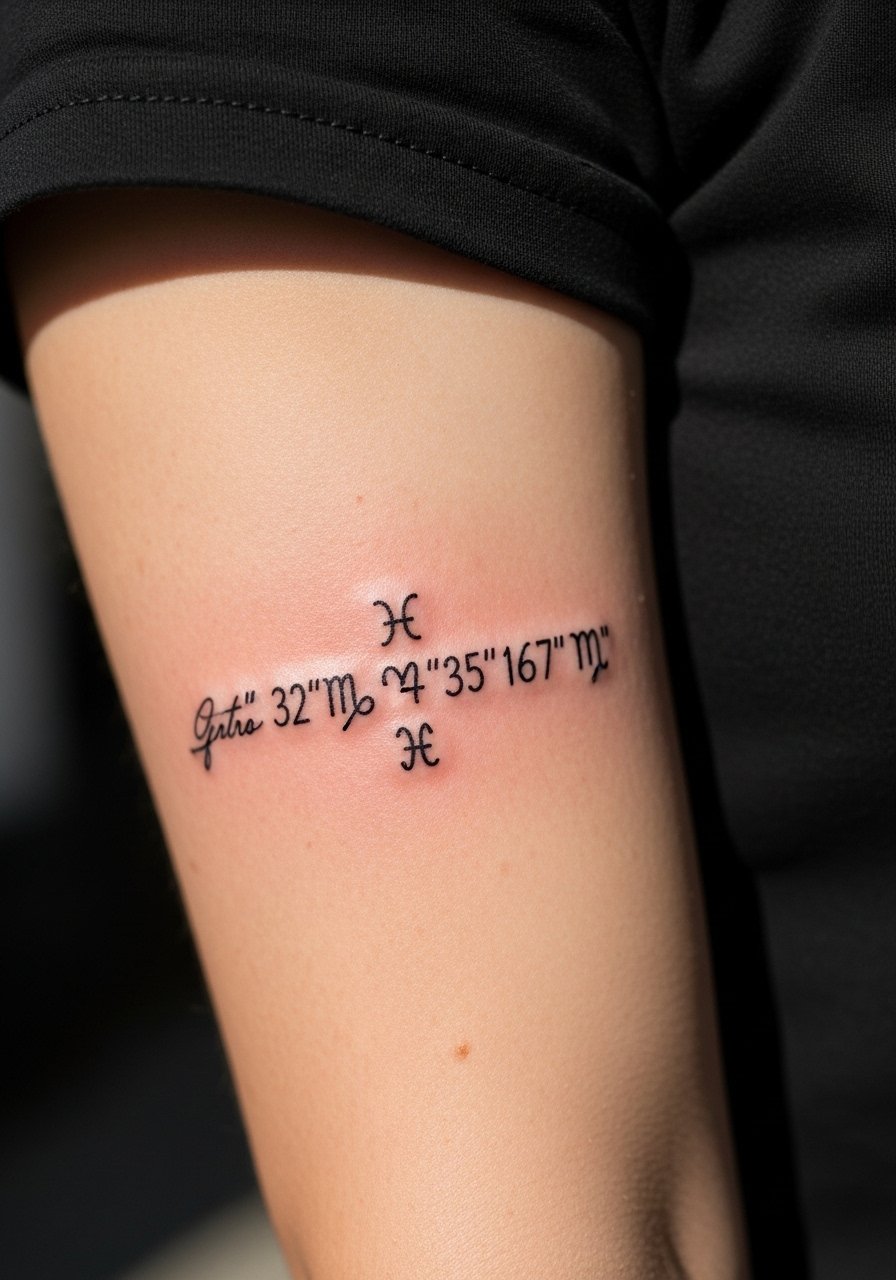
I had my birth coordinates tattooed with glyph accents on my inner biceps. It’s a private placement that’s easy to cover. Pain is moderate and healing straightforward. Script may soften; choose slightly thicker lettering. This is a quiet way to anchor astrology in your body. Avoid micro-annotations that blur; keep text simple and spaced.
Lunar Eclipse Sleeve Accent on Elbow Area
Style/Technique: Neo-Traditional / Bold Outline
Pain Level: High (6-8/10)
Session Time: Multiple sessions
Best For: Accent around joint, dramatic effect
I wrapped a lunar eclipse motif around my elbow for motion-based drama. Elbows are painful and challenging for shading due to movement. Bold neo-traditional shapes handle joint movement better than tiny details. Healing is longer and requires careful motion control early on. Common mistake: over-detailing inside the joint — keep forms strong.
Celestial Neck Nape Glyph Cluster
Style/Technique: Fine Line / Tiny Cluster
Pain Level: Medium (4/6/10)
Session Time: 30–60 minutes
Best For: Hidden but revealable, hair-friendly
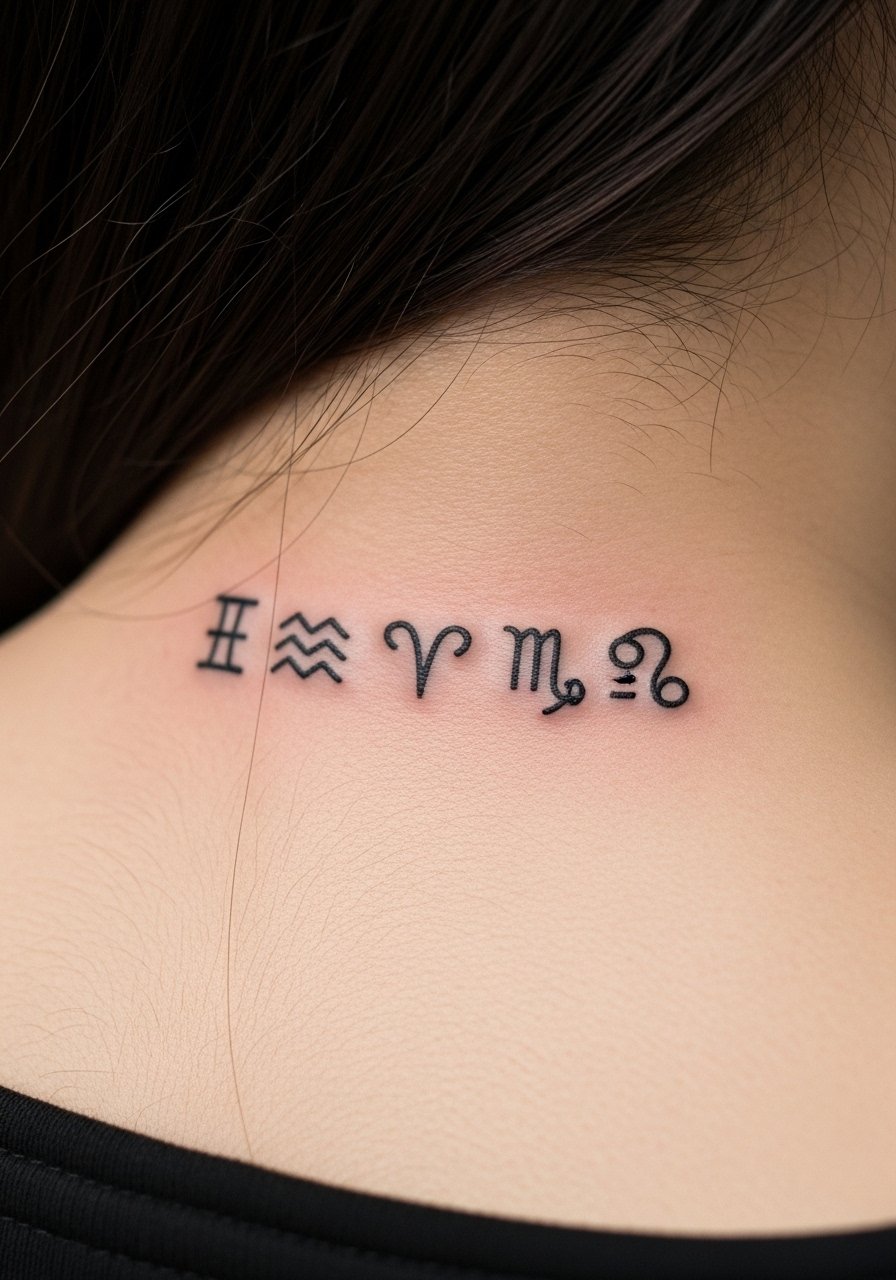
A nape cluster feels private yet easy to show. Nape pain varies with proximity to bone and nerve endings. Hair can irritate the area during healing, so pin it up. Fine-line glyphs here age similar to collarbone detail; ask for slightly heavier lines to hold. This spot reads as a secret signature and keeps meaning close.
Solar Flare Burst on Shoulder Blade
Style/Technique: Illustrative / Burst Lines
Pain Level: Medium (4-5/10)
Session Time: 1–2 hours
Best For: Back detail, shoulder accent
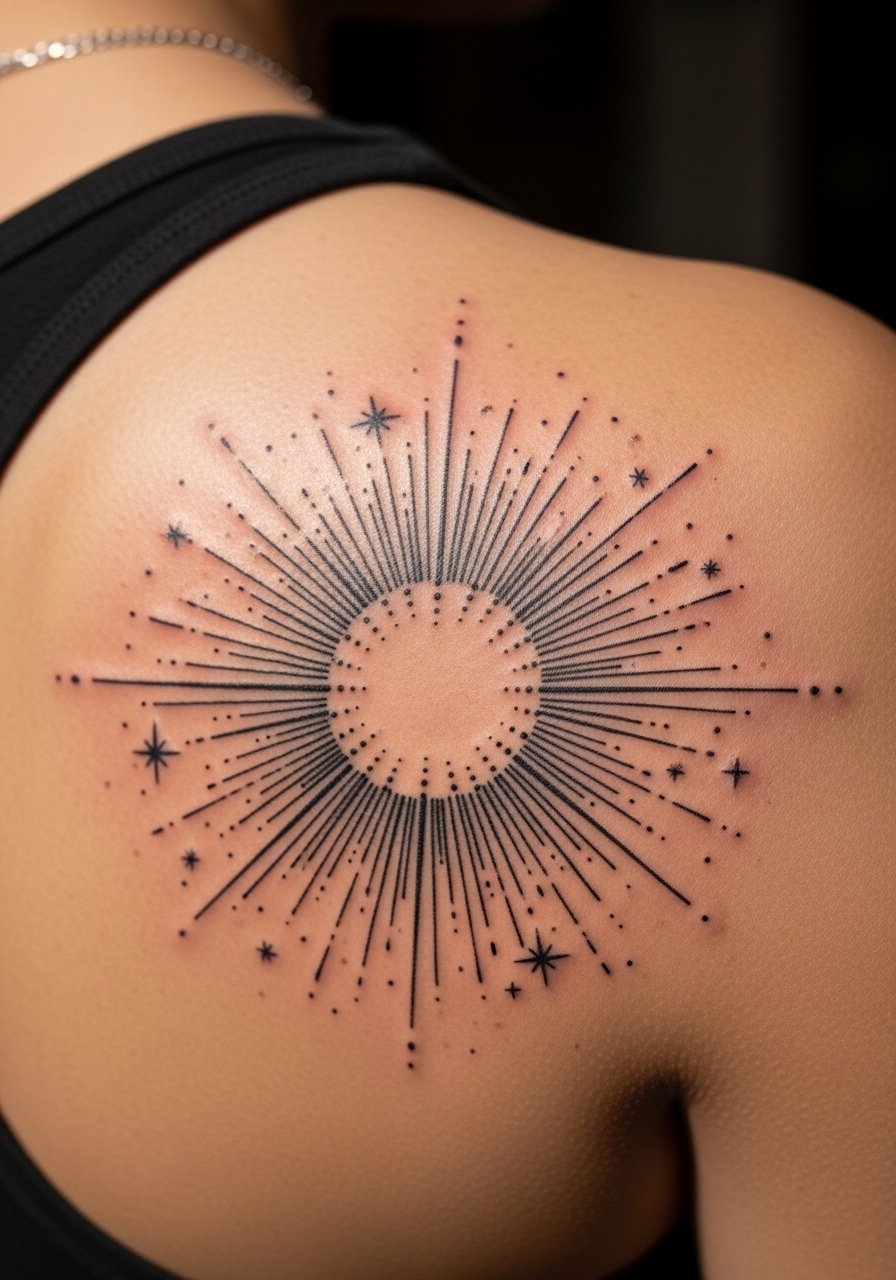
A solar flare on my shoulder blade felt dynamic and directional. This area is moderate pain and benefits from motion-free healing. Radiating lines should be bold enough to survive skin settling. Avoid too many micro-lines that merge. Shoulder blades are great for occasional reveals with tanks and strapless tops.
Zodiac Mandala Throat Accent (Upper Chest)
Style/Technique: Mandala / Blackwork + Glyphs
Pain Level: High (6-8/10)
Session Time: Multiple sessions
Best For: Bold neckline, statement piece
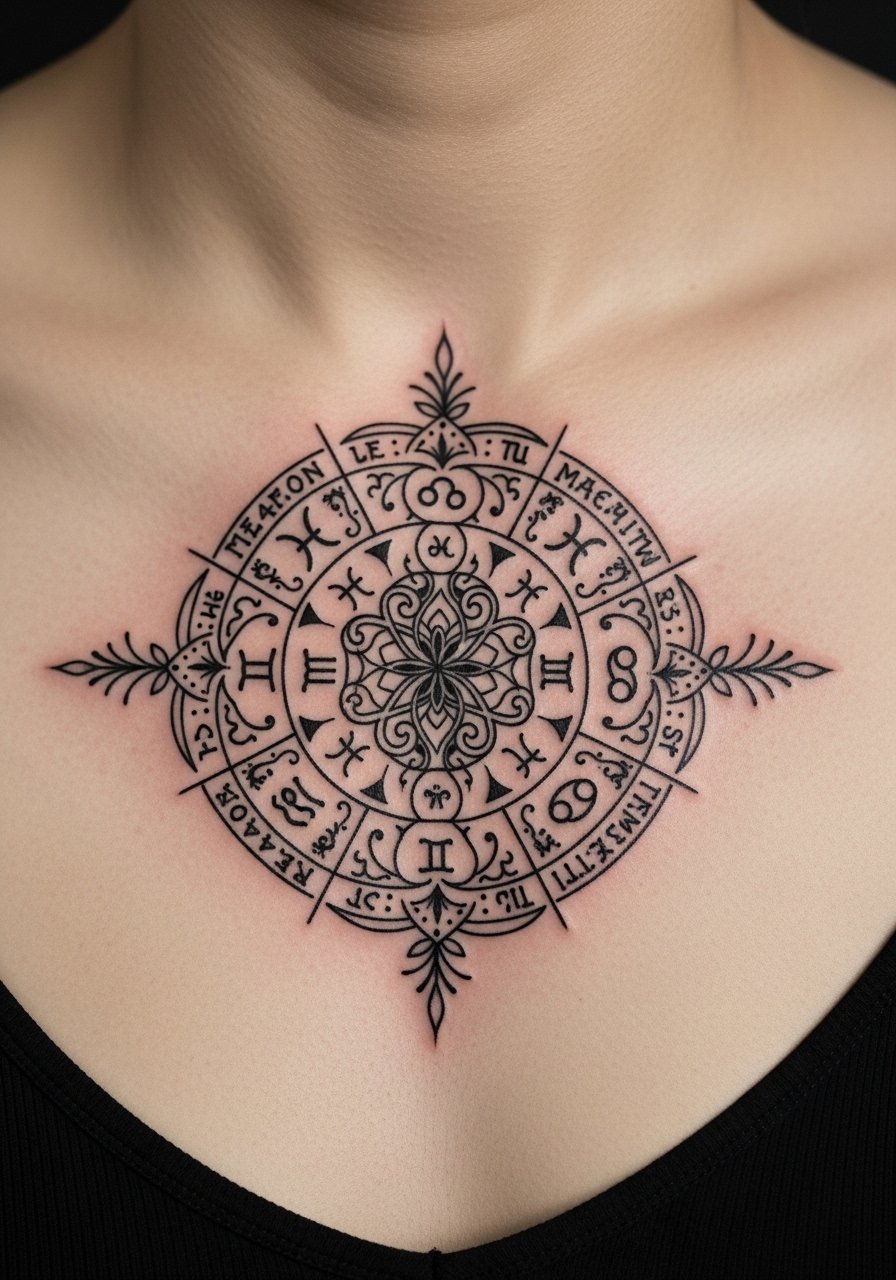
I sat with a sternum-centered mandala combining zodiac signs. The upper chest is sensitive with deep breaths affecting comfort. Bold mandala structure holds up best. Heals into a unified shape; tiny inner details can fade if too fine. Expect post-session tenderness; take it easy. This is a committed statement that ages into a wearable symbol.
Cosmic Arrow Through Wrist Extensor
Style/Technique: Illustrative / Minimalist Arrow
Pain Level: Medium (4-6/10)
Session Time: 30–60 minutes
Best For: Linear placement, directional design
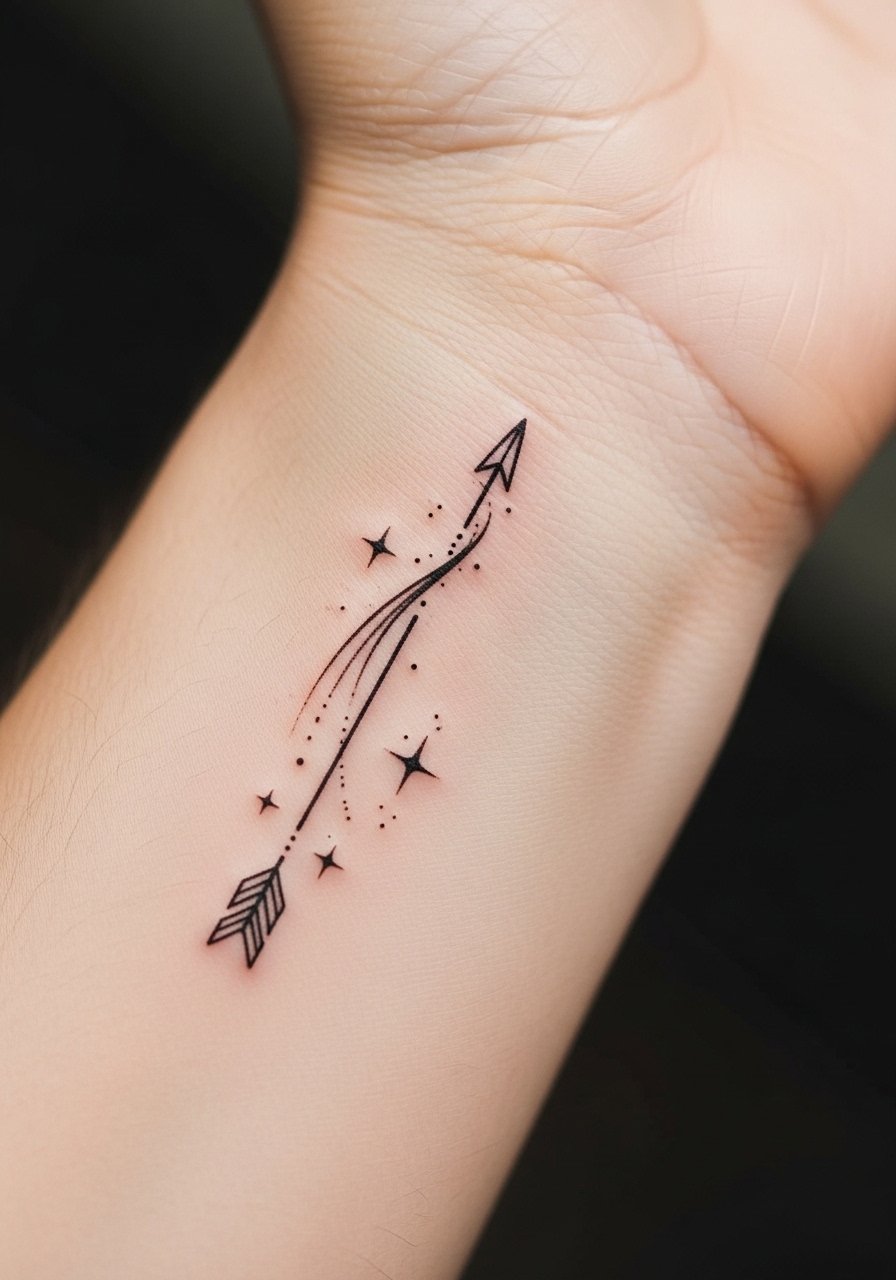
A thin arrow with tiny stars across my wrist felt purposeful. The extensor side is moderate in pain and visible. Lines should be slightly heavier than hairline to account for daily abrasion. Heals fast but needs protection from bracelets. This placement is modern and reads like intent when visible.
Solar Glyph Ring Around Upper Arm
Style/Technique: Blackwork / Band Tattoo
Pain Level: Low-Medium (3-5/10)
Session Time: 1–2 hours
Best For: Subtle band, wraparound symbolism
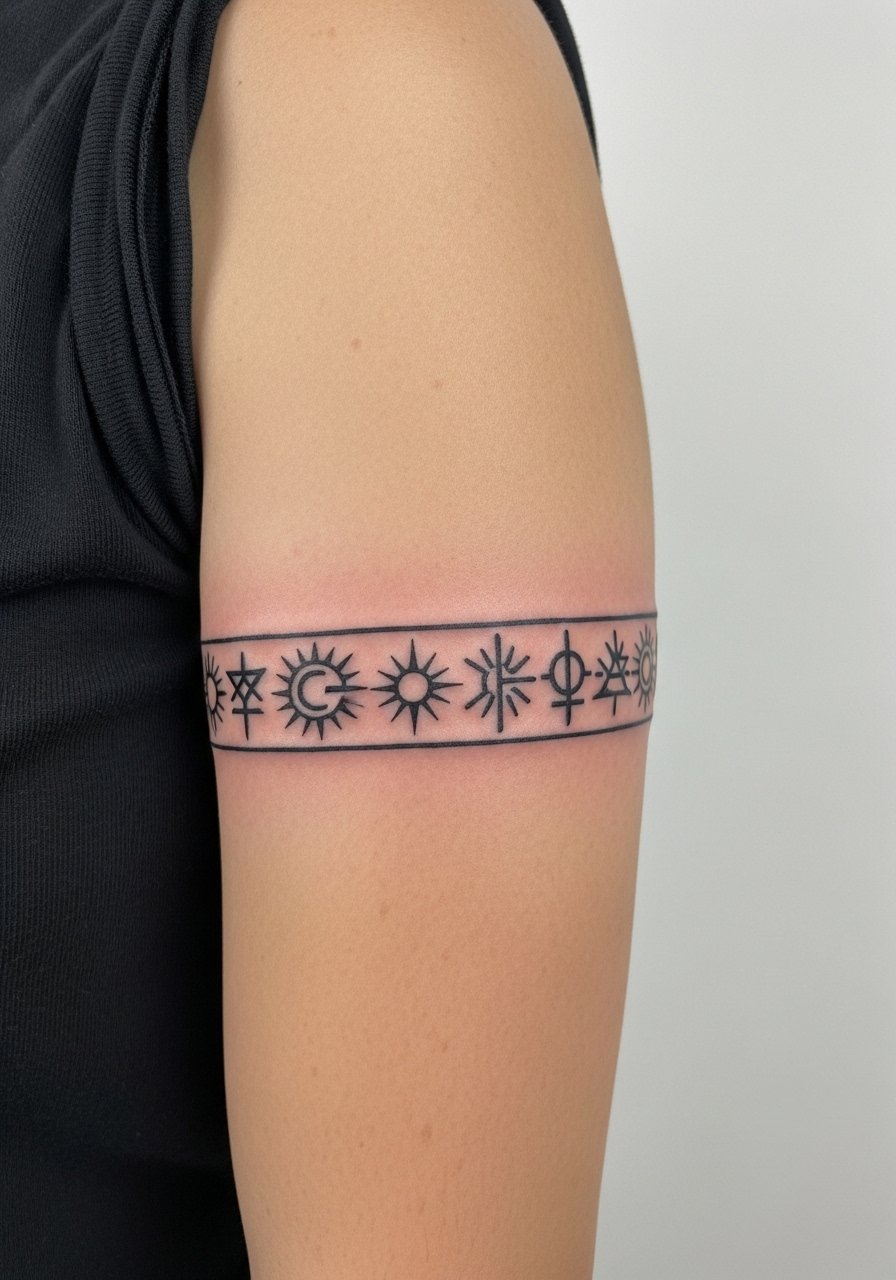
I added a glyph band for a wearable astrology motif. Upper arm bands are low pain and easy to hide. Bands age well if not overly detailed; dense tiny marks can blur into texture. Keep the band width consistent and avoid micro-ornamentation that won’t hold. This is a tidy, intentional look.
Cosmic Knot Behind Knee (Popliteal Area)
Style/Technique: Small Illustrative / Knot Motif
Pain Level: High (7-8/10)
Session Time: 30–60 minutes
Best For: Hidden, surprising placement
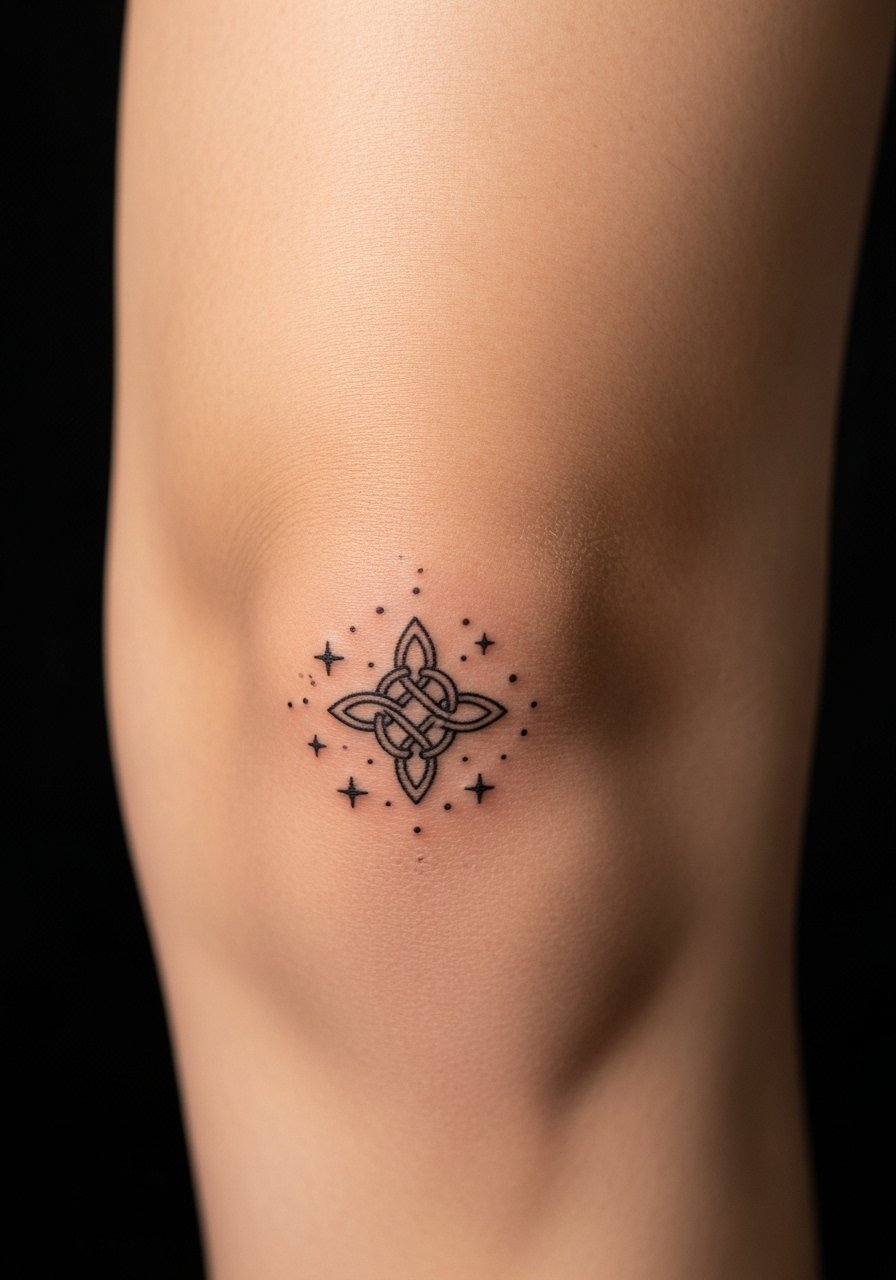
A tiny knot behind my knee was a secretive, playful choice. Behind the knee is one of the more painful and tricky spots due to movement. Healing requires avoiding deep flexion and long walks at first. Keep the design simple—fine detail struggles here. It’s a surprising placement with personal flair if you’re ready for the care.
Astrology Sleeve Accent Around Wrist Cuff
Style/Technique: Illustrative / Cuff Design
Pain Level: Medium (4-5/10)
Session Time: 1–2 sessions
Best For: Wearable cuff, layering with jewelry

I wrapped a cuff of tiny glyphs and stars for a jewelry-like effect. Wrists are visible and moderate in pain. The cuff should be bold enough to survive daily use. Too many micro details will muddy over time. This approach balances visibility with subtlety and pairs well with bracelets.
Tattoo Prep and Aftercare Essentials
Aftercare Essentials:
- Aquaphor Healing Ointment, 14oz tube — Industry standard for first 3–5 days
- Saniderm Transparent Adhesive Bandage, 6-inch roll — Second skin healing method
- CeraVe Fragrance-Free Moisturizing Lotion, 12oz — For days 4–14 healing
- Dr. Bronner's Unscented Castile Soap, 16oz — Gentle tattoo cleaning
- Numbing Cream With 5% Lidocaine — Apply 30–45 min before (ask artist)
- Tattoo Stencil Transfer Paper, 10 Pack — For at-home layout prep
- SPF 50 Sunscreen Stick For Tattoos — Daily protection to prevent fading
- Mad Rabbit Tattoo Balm, 2oz — Long-term moisturize to keep healed color vibrant
- Hustle Butter Deluxe, 8oz — Vegan aftercare alternative recommended by many artists
- Tattoo Numbing Spray — For touch-ups or sensitive sessions
- Hydrocolloid Bandages, Large — For spot protection and blister care
- Tattoo Aftercare Kit (Multi-Item) — Good starter pack with ointment and gentle soap
Before your appointment, prioritize hydration, sleep, and a snack. Ask about numbing if you’re anxious. Artists often recommend Saniderm or Aquaphor early, then switching to a fragrance-free lotion (CeraVe) after the first few days. For long-term color retention, use a daily SPF stick on exposed tattoos.
Frequently Asked Questions
Q: How bad does a tattoo actually hurt?
A: Pain depends on placement and tolerance. Outer arm/forearm = around 3–4/10. Ribs/ankle/behind knee = 7–9/10. It’s more a persistent scratching or burning than sharp agony. For sensitive areas, ask about numbing cream with 5% lidocaine — it helps but doesn’t eliminate feeling.
Q: What if I regret my tattoo?
A: Sit with designs for months and pick placements you can hide (upper thigh, ribs, upper arm). Laser removal exists but is a long process. Consider micro tattoos first only if you genuinely want them — don’t get something you’d regret just to “test.”
Q: How do I keep my tattoo from fading?
A: Sun protection is the single biggest factor. Use SPF 50 sunscreen stick daily on exposed tattoos. Moisturize with CeraVe lotion to keep skin healthy. Black ink fades slowest; bright colors require more maintenance.
Q: Can I work out after getting a tattoo?
A: Wait 48–72 hours minimum; longer if it’s on a flex area like knees or elbows. Sweat can irritate fresh ink and increase infection risk. Keep the area clean and dry initially, and follow your artist’s aftercare.
Q: Should I get a small tattoo first to test pain tolerance?
A: Only if it’s something you actually want. Pain varies by placement, not strictly by size. A tiny wrist tattoo can hurt more than a larger forearm piece. Choose a less painful area if you’re nervous.
Q: How long does a tattoo take to heal?
A: Surface healing: 2–3 weeks. Full healing: up to 2–3 months. The first week is most critical — keep it clean, moisturized, and protected with Saniderm or Aquaphor.
Q: Do tattoos look different on different skin tones?
A: Yes. Black and gray show strongly across tones. Bright colors (yellow/orange) may look muted on deeper skin — talk to artists who tattoo similar skin tones and can show healed examples.
Q: What aftercare products do artists actually recommend?
A: Many artists recommend Saniderm for initial protection and then switching to a fragrance-free lotion (like CeraVe) and a healing ointment (Aquaphor or Hustle Butter) in the first two weeks. For long-term vibrancy, a daily SPF stick is recommended.
Stats & Sources:
- About three in ten U.S. adults have a tattoo (Pew Research Center, 2019): https://www.pewresearch.org/fact-tank/2019/10/31/about-three-in-ten-americans-have-a-tattoo/
- Younger adults more likely to have tattoos: 47% of adults ages 18–29 report at least one tattoo (Pew Research Center, 2019): same source above.
Start with research and a consultation. A good artist will show healed examples and suggest tweaks that help longevity. Invest in proper aftercare — Aquaphor and daily SPF are the basics I still swear by. Which cosmic style are you leaning toward?
