
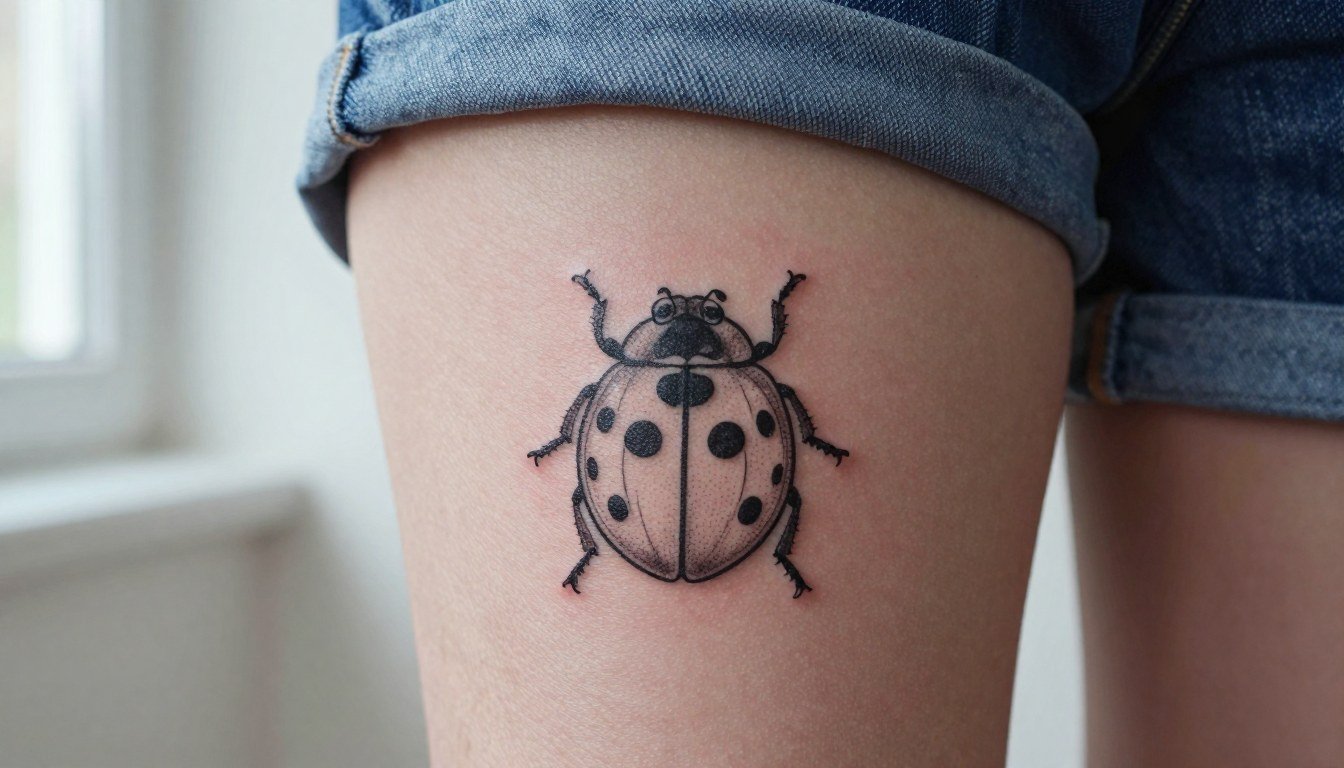
Tiny ladybug tattoos are trending because they can be quietly sweet or boldly graphic, but the trick is balancing scale with clarity so the bug reads as a bug, not a smudge. Some people love the ultra-small look and say enlarging it ruins the tiny-charm. Other people insist a little extra size or contrast prevents the design from reading like a mole from a distance. Below I show small ladybug designs that keep their charm and stay legible over time.
1. Tiny Realistic Ladybug on a Leaf

This composition works when you want a tiny motif that still reads from a short distance. I recommend a slightly larger silhouette than a one-centimeter dot so the spots remain distinct after healing. During the consultation, show a healed micro-realism reference and ask for a slightly heavier outline around the wing margins so the piece survives settling. Expect a short session, usually under an hour, with low pain on the forearm. Common mistake is packing interior wing detail too tight. Over time the leaf helps separate the bug from skin texture, which reduces mole-like misreads and lowers blowout risk.
2. Small Red-and-Black Flash Ladybug

This compact flash is the easiest way to keep the motif instantly readable. For a visible wrist piece, plan for quick saturation and bold linework so the red holds without muddying. Session time is short, under an hour, but wrists can sting more than the forearm. Dress for the appointment in a short-sleeve tee or a rolled sleeve shirt so the artist has clear access. A common error is asking for very fine interior dots; choose fewer spots and stronger outer linework to avoid blurring by year two. Touch-ups are often needed once in the first two years for color refresh.
3. Fine-Line Black-and-Grey Ladybug
Black-and-grey shrinks the cutesy read and makes the insect feel more neutral. On the thigh the skin is flatter so single-needle work can show delicate stipple shading without excessive distortion. Tell your artist to use a slightly heavier line weight than their thinnest single-needle for the outer contour so the silhouette stays crisp over years. Session time is modest, often one to two hours with low-to-moderate pain. This version ages into a refined, subtle mark instead of a soft red smudge, but expect a touch-up window at the two-year mark to restore contrast.
4. Ornamental Ladybug Motif
This decorative take turns the insect into ornament, which is useful if you want something artistic rather than literal. It demands more session time because of dot work and stipple shading, so expect two to four hours depending on size. The usual mistake is compressing too many tiny elements into a micro footprint. In consultation, bring examples that show healed stipple density and ask for wider spacing between motifs. Upper-arm placement means lower blowout risk than fingers, and the ornamental pattern keeps the design readable even as saturation softens.
5. Ladybug with Script or Tiny Lettering
Pairing a tiny ladybug with a short word gives the piece emotional grounding without adding bulk. For leg placements, wear loose shorts on session day so the artist can access the area comfortably, and consider a flowy short to show it off afterward. During the consultation, request that the lettering be spaced slightly wider than you think, because small cursive can blur inward over time. Typical session time is under two hours. A common error is tucking script too close to the bug; a hair of separation keeps both elements legible for years.
6. Tiny Ladybug as a Memorial Dot
A tiny silhouette can serve as a quiet tribute when you want something discreet. Behind-ear placements need a specialist who has experience with small single-needle work in that zone. Expect a short but sensitive session and plan for a touch-up at the one- to two-year mark because the area sees sun and hair friction. A frequent mistake is shrinking the motif until it reads like a freckle. If you want it to stay readable, keep the outline slightly thicker and allow the artist to place it where hairline friction is minimal.
Session Essentials
These small placements have shorter sessions but specific needs, so a few items smooth the day and the first week.
-
Stencil transfer paper kit. Helps you and the artist preview exact placement on skin, which is useful for tiny wrist and behind-ear pieces in the ideas above.
-
Topical numbing cream. Applied to thicker-skinned spots about 40 to 50 minutes before the appointment it can reduce chair-time discomfort for sensitive zones listed earlier.
-
Thin protective film roll. Useful for small pieces on hands and ankles where daily friction from socks or washing threatens early scabbing.
-
Fragrance-free body wash. Gentle cleansing supports early healing without irritating tiny linework on delicate placements.
-
Aquaphor healing ointment. A widely used ointment for the initial days that helps keep micro-line tattoos moisturized without heavy buildup.
7. Ladybug as a Scar Cover-Up
Using a ladybug to mask or work around a scar requires custom composition based on the scar's texture and direction. The biggest mistake is treating the scar like flat canvas; scars can reject ink or sit unevenly, so ask the artist to map the design around the raised or indented areas. Expect slightly longer session time and a possible second sitting for saturation. For showing it off, cropped sleeves and relaxed outerwear frame the elbow without constant rubbing, and a cropped sleeve tee makes the placement easy to reveal. Specialized artists who post healed scar work are best for this job.
8. Unusual Stylized Ladybug with Altered Anatomy
If you like oddball tattoos, an anatomically altered insect becomes a conversation piece rather than a literal ladybug. The risk is turning the design into clutter if you cram in too many legs or tiny textures. Tell the artist you want clear negative space around the body so the altered anatomy reads. Session time varies with line complexity. This style ages well if the outer contours are kept bold and the interior ornamentation uses stipple rather than micro cross-hatching to avoid early merging.
9. Very Tiny 1 cm Ladybug
This is the camp that loves super-small charm and the camp that worries about readability. One group argues that the tiny scale is the whole point and that enlarging loses personality. The other group insists a one-centimeter bug will easily read as a freckle or mole unless you add contrast or a tiny botanical anchor. If you pick this size, request proof of healed micro work from the artist and accept that a yearly touch-up may be needed to maintain spot clarity.
10. Ladybug as a Tiny Spot Tattoo
A spot tattoo reads as intentional when positioned on compact visible zones like the wrist or ankle. The common error is going too small for the anatomical canvas. On ankle placements expect moderate pain and higher friction from socks and shoes, so keep the outline sturdy. For easy reveals, pair it with slim accessories or a minimalist watch and roll jeans up during warm weather. Touch-ups might be needed sooner than forearm work because of footwear friction.
11. Whimsical Cute Ladybug Flash
If you want traditional good-luck energy, this cartoon-leaning version is the easiest to read and maintain. Bold outlines and saturated red prevent early dulling. Session time is short and the pain is mild on the upper arm. For show-off outfits choose sleeveless tanks or muscle tees and consider a ribbed tank top to frame the area. Avoid requesting ultra-thin interior details that compete with the saturated fills. Expect color refresh within two to three years depending on sun exposure.
12. Geometric Ladybug with Negative Space
Geometric reduction keeps the motif modern while preserving silhouette. Inner bicep is flatter and often better for single-needle geometry, but warn the artist about softer tissue and ask for slightly bolder spacing between lines. Session time can be an hour or more. The main mistake is over-detailing inside the negative spaces. This approach ages predictably because the bold negative shapes remain readable as lines soften.
13. Black-and-Grey Ladybug for a Less Feminine Read
This version directly addresses concerns about gendered read. One camp prefers bright red and black because it keeps the image playful and obvious. Another camp chooses monochrome for neutrality and durability. If you want a less cutesy read, pick black-and-grey with a bold silhouette and ask for slightly reduced spot count. Collarbone placement can be moderately painful and needs a short session. For outfits that show it off, try a scoop-neck top that frames the area without rubbing the fresh ink.
14. Ladybug with Botanical Anchor
Adding a leaf or stem gives the bug a home and prevents it from blending into skin texture. This is the single best visual trick to avoid the mole problem while keeping the piece small. For forearm sessions wear a short-sleeve tee or a neutral t shirt that can roll up easily. The leaf also helps if you want a memorial anchor because the natural element reads clearly even as color softens. Expect a short session and a likely touch-up window at two years.
15. Tiny Dotwork Ladybug in Stippling Style
Stipple shading gives a delicate texture and avoids blocky fills that age into blobs. The trade-off is longer session time if the dot density is high. Ankles encounter more friction so ask for conservative dot density near the edge and a stronger outer contour. For sessions wear pants you can roll up and a loose linen pant that lets the artist access the ankle without rubbing. Plan for a touch-up within the first year if activity and footwear are heavy.
16. Minimal Ladybug Finger Accent
Finger tattoos age differently because the skin regenerates rapidly and sees constant washing. If you choose a finger accent, accept that touch-ups are likely within a year. Keep the design as a clear silhouette and avoid interior micro detail. Session time is short but can sting more than other spots. The common mistake is asking for tiny color fills that fade fast. For daily care in the first week, avoid ring wear and heavy hand work to protect saturation.
17. Tiny Whip-Shaded Ladybug on the Upper Arm
Whip shading softens the wings while keeping the outline strong, which reads modern without leaning too cute. Outer arm placement is forgiving and usually low pain. During consultation, specify that you want the shading to read soft rather than stippled and ask for one or two healed photos of the artist's whip-shaded micro work. For show-off outfits pick a muscle tee or sleeveless top to frame the area. Touch-ups are typically minimal if the outer contour stays bold.
Frequently Asked Questions
Q: How small is too small for a ladybug so it does not read like a mole?
A: If a tiny ladybug is under about one centimeter and has interior spots or fine interior lines, it risks reading as a freckle. A better approach is to slightly increase the outer contour thickness or add a tiny leaf anchor so the silhouette reads clearly. If you want absolute micro size, accept that annual touch-ups may be needed to maintain spot contrast.
Q: Where can I find healed examples and artists who specialize in micro work?
A: Search Instagram and TikTok with hashtags like #ladybugtattoo, #microtattoo, and #finelinetattoo plus your city name. On Reddit, r/tattoos and r/tattooadvice show many healed photos and candid feedback. Look for portfolios that include healed shots rather than only fresh-stencil images.
Q: I want the motif but not a feminine read. What style and placement work best?
A: Black-and-grey fine line or simplified flash with fewer interior dots gives a more neutral read. Upper arm, chest, or thigh placements also read less performative than wrist or ankle. Ask the artist to reduce red saturation and focus on strong outer linework and simplified spots.
Q: Will a ladybug tattoo on a scar hold up?
A: Scars behave differently depending on their age and texture. The design should be planned around the scar rather than directly over uneven tissue. Expect a custom layout and possibly more sessions for saturation. Seek artists who post healed scar cover-ups so you can see results on similar skin types.
Q: What should I wear to my appointment for different placements?
A: For forearm pieces wear a short sleeve tee you can roll up. For thigh work pick loose shorts or bike shorts. For shoulder or upper arm choose a tank top for easy access. Comfortable, easily removable clothing that does not press on fresh ink is the pragmatic choice.
