

A lot of bonsai tattoos that look great fresh fail to read after a few years because artists pack foliage too tightly or pick the wrong placement. If you want a tree that still reads as a bonsai when it heals, choose trunk and negative space over literal leaf count, size the piece for the body area, and plan touch-ups for any fine shading. The first example below shows how a ceramic pot anchors a detailed ribcage piece.
1. Intricate black-and-gray bonsai in a ceramic pot
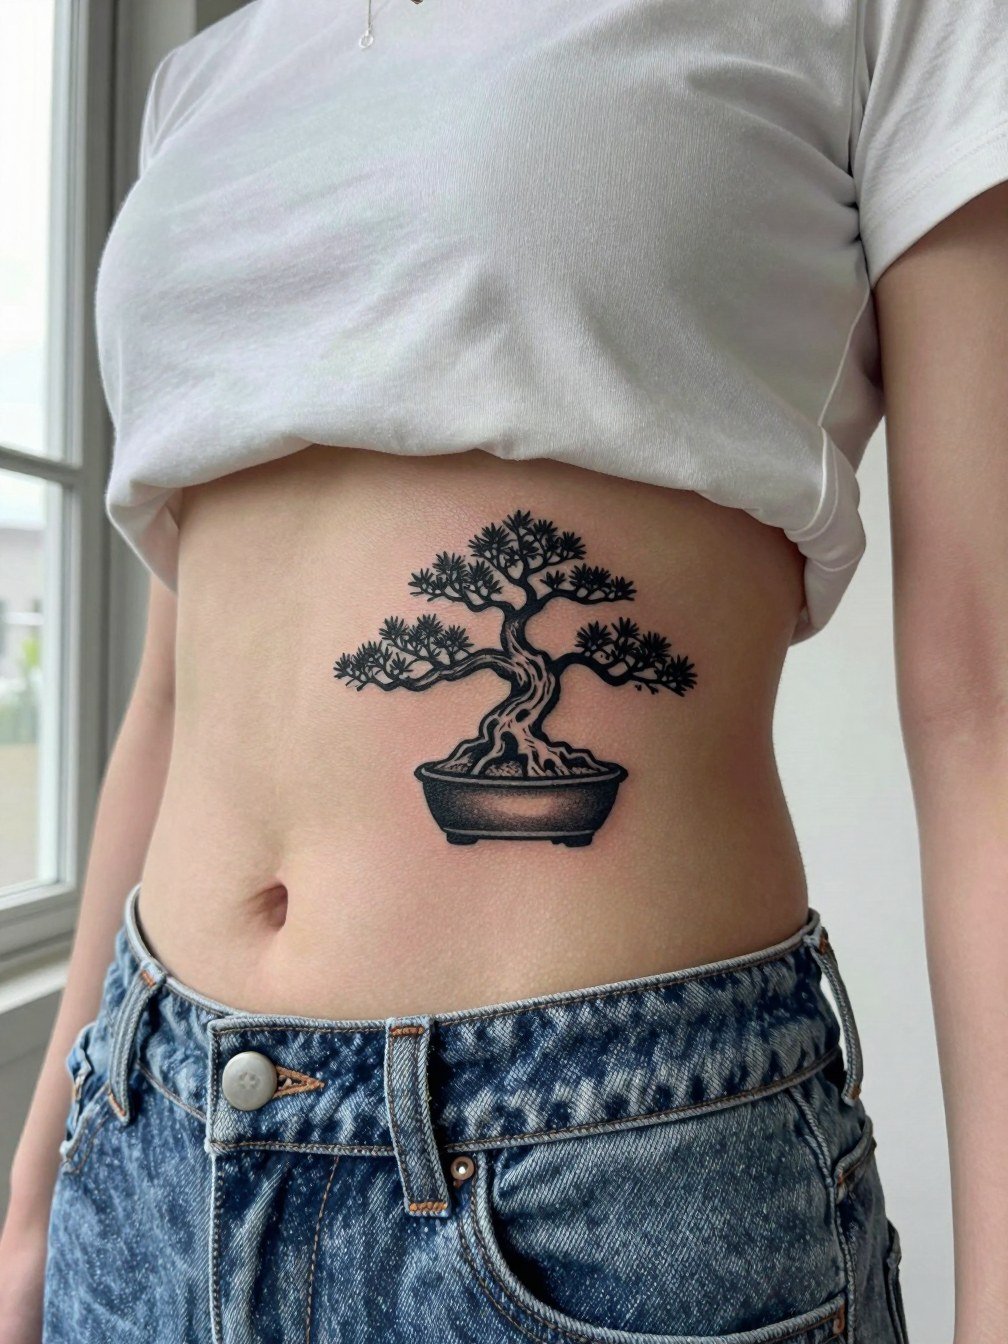
This one works when you want a statement piece that reads like a mature plant rather than a fern blob. On ribs the pain level is higher than an arm piece and sessions often run longer, so plan for 1 to 4 sessions and realistic breaks. A common mistake is packing tiny leaves too close to the trunk, which blurs into a green-looking mass as the skin heals. For longevity, push trunk texture and minimal canopy contrast, and expect a touch-up around year two if you want crisp micro shading to stay defined.
2. Fine line bonsai with airy negative space
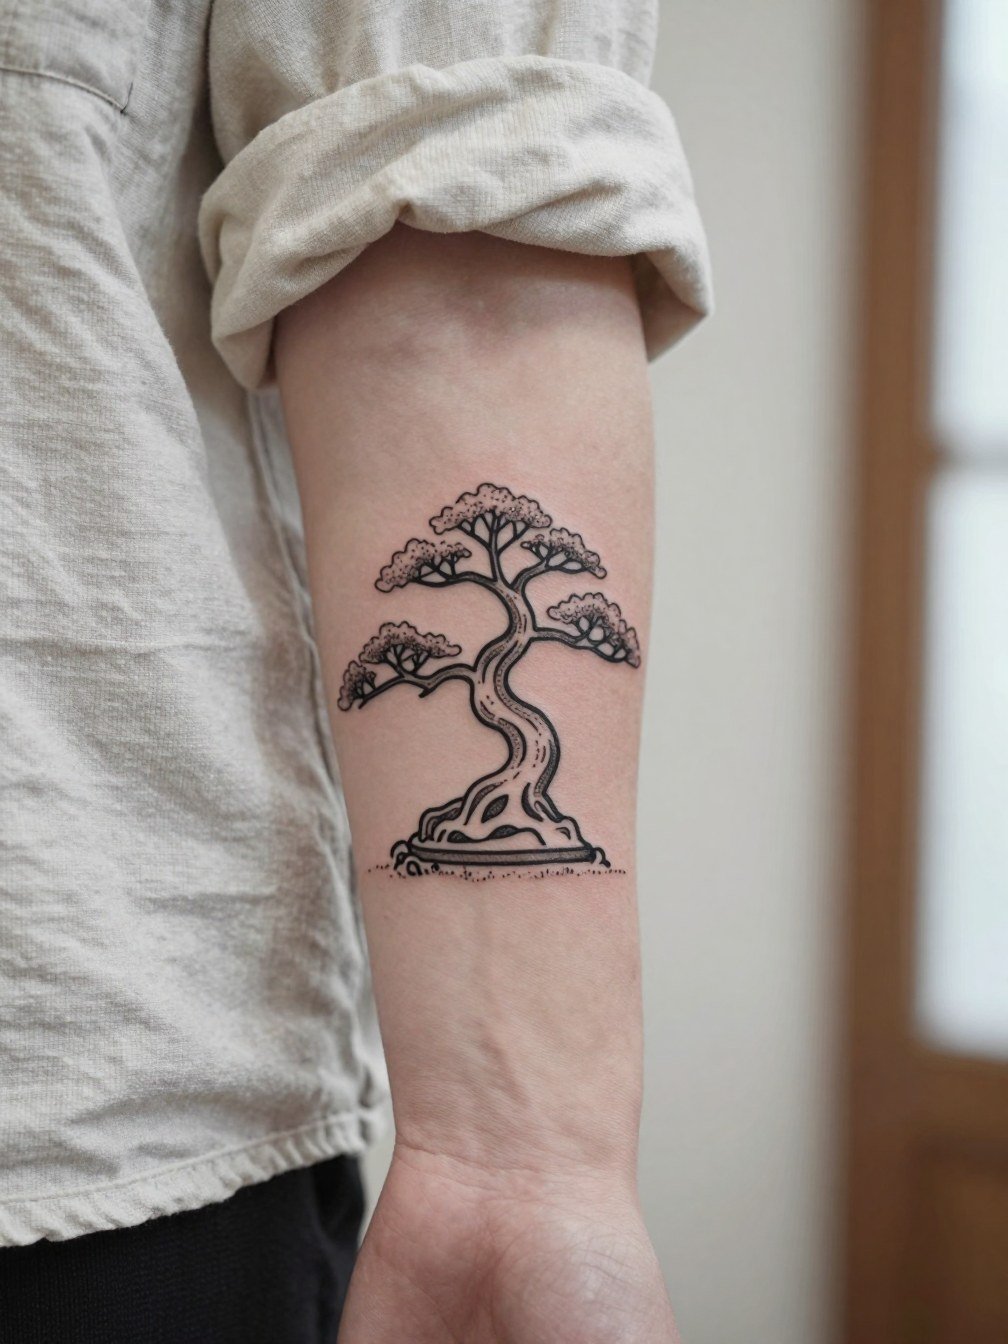
Choose this for a wrist-to-elbow piece that stays elegant and breathable. Fine single-needle linework looks crisp at six months but may soften by year two on thin skin. The practical approach is to use slightly bolder lineweight than a social-image reference so the canopy keeps defined negative space. Wear a linen button down or roll sleeves to show the forearm. For the session, short sleeves or a loose button-down make access simple and comfortable.
3. Traditional bonsai with bold outlines and packed blacks
This version prioritizes longevity through heavy outlines and saturation. It feels like classic flash and ages by thickening lines rather than disappearing into blotchiness. The outer upper arm is a forgiving placement for this style; session time is usually 1 to 2 hours for medium work and discomfort is low. A common error is making the pot too small, which throws off composition on the arm. When showing the piece, sleeveless tees or a cropped utility jacket frame the shoulder line, try a sleeveless tank top on the day.
4. Geometric split bonsai design for the top arm
This hybrid is for someone who wants structure and nature together. The visual risk is overcomplicating the geometry so the tree reads like a pattern rather than a plant. Session time may extend if the geometric shapes require sharp edges, and blowout risk increases if lines are too fine and too close. Wear a relaxed short sleeve shirt for the appointment so the artist has easy access to the outer arm.
5. Bonsai with moon cycle accents on the forearm
Adding moon phases gives symbolic layers without overcrowding the tree. One error is placing crescents so close that they merge with foliage at six months. Space the moons and use small dot work to separate them. Outer forearm comfort is high and a single session will often cover medium pieces. For showing it off, pair with a plain oversized tee or a denim overshirt with sleeves rolled.
6. Bonsai with a perched raven, side torso option
If you want narrative, the raven adds contrast and a focal point. On ribs this often becomes a multi-session commitment, and pain is higher than arm placements. A common aesthetic mistake is crowding the bird into the canopy so it loses silhouette when healed. Make the bird slightly larger and keep crisp negative space around it for longevity. For the session, wear a loose sports bra or button-front top so the artist can access the side torso without fuss.
Pre-Session Essentials
These picks smooth the appointment and early healing for the rib and forearm pieces above.
-
Stencil transfer paper kit. Lets you preview linework on skin before committing, especially helpful for the detailed pot and trunk work in ideas one and six.
-
Topical numbing cream. Applied 40 to 60 minutes before shortens discomfort on sensitive ribs and keeps you in the chair for longer sessions.
-
Thin protective film roll. Useful for protecting small forearm and wrist tattoos during the first week of daily activity.
-
Fragrance-free gentle body wash. Cleans the healing area without irritating linework or stipple shading.
-
Aquaphor healing ointment. A mainstream option for the initial few days that keeps fine linework moisturized without clogging superficial channels.
7. Yin-yang bonsai concept for inner forearm balance
This compact symbol works well when you want balance without script. Small blackwork reads well on forearm skin, but tiny halves can merge over time if the circle gets too small. Push the design to a slightly larger scale than a reference image so negative space remains visible at two and five years. For the session, wear a short sleeve tee so the artist can access the palm-up surface easily. Expect a single session for a well-sized symbol.
8. Hidden initials in the root base, inner forearm subtlety
Embedding initials in roots keeps personalization discreet and protects the aesthetic. The practical mistake is making letters too ornate so they vanish into bark texture. Keep initials as simple negative-space shapes and have the artist show a stencil on your skin at scale. For session wear, a rolled sleeve shirt or loose button-down is ideal. A single short session typically does the trick for small to medium sizes.
9. Loose organic bonsai that avoids "broccoli" foliage
People often complain bonsai tattoos look like broccoli when artists over-detail the canopy. This approach uses implied texture and strategic negative space so the silhouette reads at a distance and up close. Outer forearm holds detail well but avoid tiny branchlets that sit too close. For showing the piece, layer with a denim overshirt or plain tee so the tree pops against neutral fabric. Expect a 1 to 2 hour session for medium pieces.
10. Bonsai paired with mountains or sun for place memory
Landscape add-ons extend a bonsai into place-based memory. The mistake is scaling landscape elements too large so they compete with the tree. Keep mountains simple, use a small sun or horizon line, and let the bonsai remain dominant. Upper-arm placement suits layered composition and session time is typically one to three hours. Wear a loose sleeveless top for easy access on the day.
11. Small wrist bonsai for a first tattoo
A tiny bonsai can be a calm first tattoo, but the wrist eats fine detail if the design is too small. Aim for slightly larger scale then your initial idea and place the trunk so it has room to breathe. Session time is short and pain is moderate. Pair with thin bracelets on the opposite wrist and a minimal watch to keep the area visually open. Expect possible touch-up after healing if linework softens.
12. Strong bark texture with minimal foliage for ribs or arm
If you want realism without leaf clutter, focus on bark and trunk contrast and keep foliage sparse. On ribs this requires careful spacing because skin stretch can blur tiny textures, so artists often recommend wider linework. The wrong call is putting micro dot leaves into tight clusters on the ribs. For session wear on ribs, choose a loose sports bra or button-front top so the artist can access the side torso cleanly.
13. Placement-led bonsai that fits the elbow web
Designs that ignore anatomy often look awkward once the arm moves. When an artist composes the tree to curve with the elbow web, the piece reads as part of the body. The elbow web flexes and may distort ultra-fine branches, so pick slightly bolder linework and plan for a mid-year touch-up. Wear a relaxed short sleeve shirt to the session so the area is accessible and comfortable.
14. Geometric bonsai cuff for the upper arm
A cuff-style composition reads like a band and suits sleeves or stacked jewelry. Mistakes include putting too many ultra-thin dots so stippling becomes muddy on darker skin tones. For clarity, increase dot size slightly and test a stencil on your arm. Session time depends on wrap length, and wearing a tank top makes access easy.
15. Bonsai with seasonal color accents on upper arm
Color accents can add warmth, but on darker skin tones color saturation may not hold as predictably as black-and-gray. One camp prefers monochrome for longevity, and another sees color as an important accent. One group says black-and-gray ages better and keeps the bonsai readable. The other group argues that careful, healed color placement brings life to a pot or seasonal motif. To manage risk, limit color to one or two small areas and ask to see healed examples on similar skin tone. Wear a cropped utility jacket to show the shoulder line.
16. Micro-realism bonsai for a vertical sternum accent
Sternum work is intimate and requires careful spacing because the area moves with breathing. Micro-realism here needs slightly more negative space than a flat reference because the skin stretches. A common error is mapping a page-sized image directly onto the sternum without scaling, which crushes detail. Wear a fitted bandeau or sports bra for sessions, and expect longer sittings for a vertical micro-realism piece.
17. Bonsai with root map and coordinates for memorials
Embedding place or date details inside roots preserves the composition and keeps symbolism compact. The practical mistake is using ornate numerals that merge into texture. Keep the coordinates or Roman numerals simple and have the artist show a stencil at scale. For appointments, a plain tee with rolled sleeves makes access easy. Expect a single session for small to medium placements.
18. Stylized species-specific bonsai, pine or cypress
Tying a bonsai to a species adds nuance but requires the artist to know branch structure. If accuracy matters, bring clear botanical references and request healed examples of similar silhouette work. A mistake is expecting a generic tree to pass for a species-specific form. Upper arm is forgiving and session times vary. Wear a loose sleeveless top so the artist can work the bicep and shoulder transition.
19. Negative-space canopy with dot work highlights
This approach reads airy and textured without tiny repetitive leaves. Dot work can soften transitions but too many small dots can look muddy on certain skin tones. The right balance preserves canopy shape and gives the piece tactile shading. Outer forearm sessions are comfortable, and show-off pairing with a plain oversized tee keeps the art visible.
20. Asymmetrical bonsai silhouette for the shoulder cap
An asymmetrical silhouette takes advantage of shoulder contours. The common error is forcing symmetry where the body bends, which makes the tree look flattened in motion. Match branch flow to the shoulder muscle and keep canopy off the joint. Wear a sleeveless shirt for the session to ease access.
21. Minimal dot-bonsai for the ankle
Ankle tattoos face rubbing from socks and shoes, so minimal, clean silhouettes perform best. Avoid tiny stipple inside leaves that will disappear through friction. For the session, roll your jeans cuff or wear a skirt; a pair of rolled jeans keeps the area exposed without fuss. Healing can be bumpier because of movement, so plan gentle footwear in the first week.
22. Chest-to-sternum bonsai vertical composition
Vertical chest pieces look elegant when the trunk aligns with sternum flow. The aging risk is placing too many ultra-fine branches near the chest crease where movement flattens detail. Prioritize trunk contrast and let foliage be implied. Session times vary and discomfort tends to be moderate to high depending on proximity to bone. Choose a scoop-neck tank top for session comfort.
23. Bonsai sleeve starter for the outer arm
If you plan a sleeve, start with a composition that leaves breathing room for future pieces. The common mistake is filling every gap early. Outer arm is a forgiving canvas so begin with 2 to 3 trees of varying scale and let the artist plan connective negative space. Wear a cropped utility jacket or tank on the day for easy access.
24. Bonsai as a memorial with subtle iconography
Memorial tattoos benefit from restraint. The worst version looks cluttered and unreadable because it tries to include too many symbols. Pick one succinct icon and tuck it into roots or pot negative space. For a forearm piece, a plain tee with rolled sleeves reveals the art while keeping the vibe low-key. Artists may recommend a slightly larger scale for longevity.
25. Bonsai with a small animal companion on the upper arm
Adding an animal gives narrative but risks stealing focus. Make the animal silhouette simple and balanced so it reads with the tree. The outer upper arm supports a medium composition and session time will reflect the animal detail. To show it off, go sleeveless and pair with a muscle tee.
26. Negative-space pot design for the wrist or ankle
This minimal pot trick gives the impression of containment without heavy black fills that age unevenly on small placements. The error is shrinking the pot so the tree looks top-heavy. Keep proportional balance and allow the negative-space pot to breathe. For the session wear a short sleeve tee for wrist work or roll jeans for ankle access.
27. Split composition bonsai and geometric skyline
Split concepts like this are visually satisfying but require clear separation so the eye reads two parts. Avoid blending the skyline into canopy edges; give negative space as a separator. Outer forearm accommodates the horizontal split well. For the session, a plain oversized tee keeps the art visible and comfortable.
28. Whip-shaded bonsai for soft depth on the upper arm
Whip shading gives motion without heavy stippling and suits larger arm pieces. The risk is over-softening detail so the trunk loses structure at two years. To prevent this, keep trunk linework firmer and limit whip runs in canopy edges. Session length varies with shading area. A tank top on the day makes access seamless.
29. Bonsai designed for darker skin tones, contrast-first approach
Color choices shift when skin tone varies, and many people prefer black-and-gray for predictability. One group argues black-and-gray ages better and keeps the tree readable. Another group supports small color accents if the artist has healed color examples on similar skin. If you have darker skin, push contrast with stronger linework and solid blacks rather than tiny single-needle leaves. For the appointment wear a denim overshirt or sleeveless top so the artist can check saturation on your skin.
Frequently Asked Questions
Q: How much detail is too much for a ribs bonsai?
A: Ribs tolerate medium detail but not micro-precision packed into a tiny area. Two clear sentences: One camp prefers dense micro-realism because it looks like a miniature tree. Another camp urges simplification because fine foliage blurs on moving skin. Aim for strong trunk detail, spaced canopy, and plan for a touch-up in the first year.
Q: Should I pick black-and-gray or add color accents?
A: Black-and-gray is the safer choice for long-term readability, especially on darker skin tones. Color accents can be lovely but pick only one small area, and request healed examples on similar skin before committing. If you do add color, expect it to be an accent rather than the dominant element.
Q: Where can I find artists and healed examples without following specific handles?
A: Search Instagram and TikTok with tags like #bonsaitattoo, #blackandgreytattoo, and #finelinetattoo paired with your city name to narrow local portfolios. On Reddit check bonsai and tattoo communities for healed shots and placement feedback. Prioritize portfolios showing healed work, branch spacing, and trunk structure over fresh-only images.
Q: How should I dress for a ribcage or side torso session?
A: Wear a loose sports bra or button-front top so the artist can access the side torso without you needing to undress. For forearm or upper-arm appointments, short sleeves or a tank top work best. Bring a light, comfortable layer for after the session since your skin will be sensitive.
Q: How often do bonsai tattoos need touch-ups?
A: It depends on line weight, placement, and skin type. Fine line forearm pieces might need a touch-up around year two, while bold traditional work can stay crisp longer. Expect at least one touch-up within three years for small intricate work if you want the highest fidelity.
Q: Are there special considerations for darker skin tones and bonsai design?
A: Yes. Stronger contrast, heavier line weight, and more negative space usually preserve readability on darker skin. If color matters, look for healed examples on similar tones and ask for saturation strategies. Artists experienced with diverse skin tones can show you how a design will translate over time.
Q: What are the biggest beginner mistakes with bonsai tattoos?
A: The most common errors are making the canopy too dense, scaling the design too small for the placement, and copying a fresh photo without asking to see healed work. Instead, prioritize trunk silhouette, negative space, and healed examples to guide size and spacing.
