

Fine-line matching tattoos can read like a private language between sisters, small marks that map shared jokes, fragments of family lore, or a mutual joke only you two remember. Pick designs that survive daily life and still mean something when the lines soften. These ideas favor clarity, wearability, and ways to show off the work without shouting, so you and your sibling both feel the choice in ten years as well as today.
1. Minimal Matching Arrow on Inner Forearm
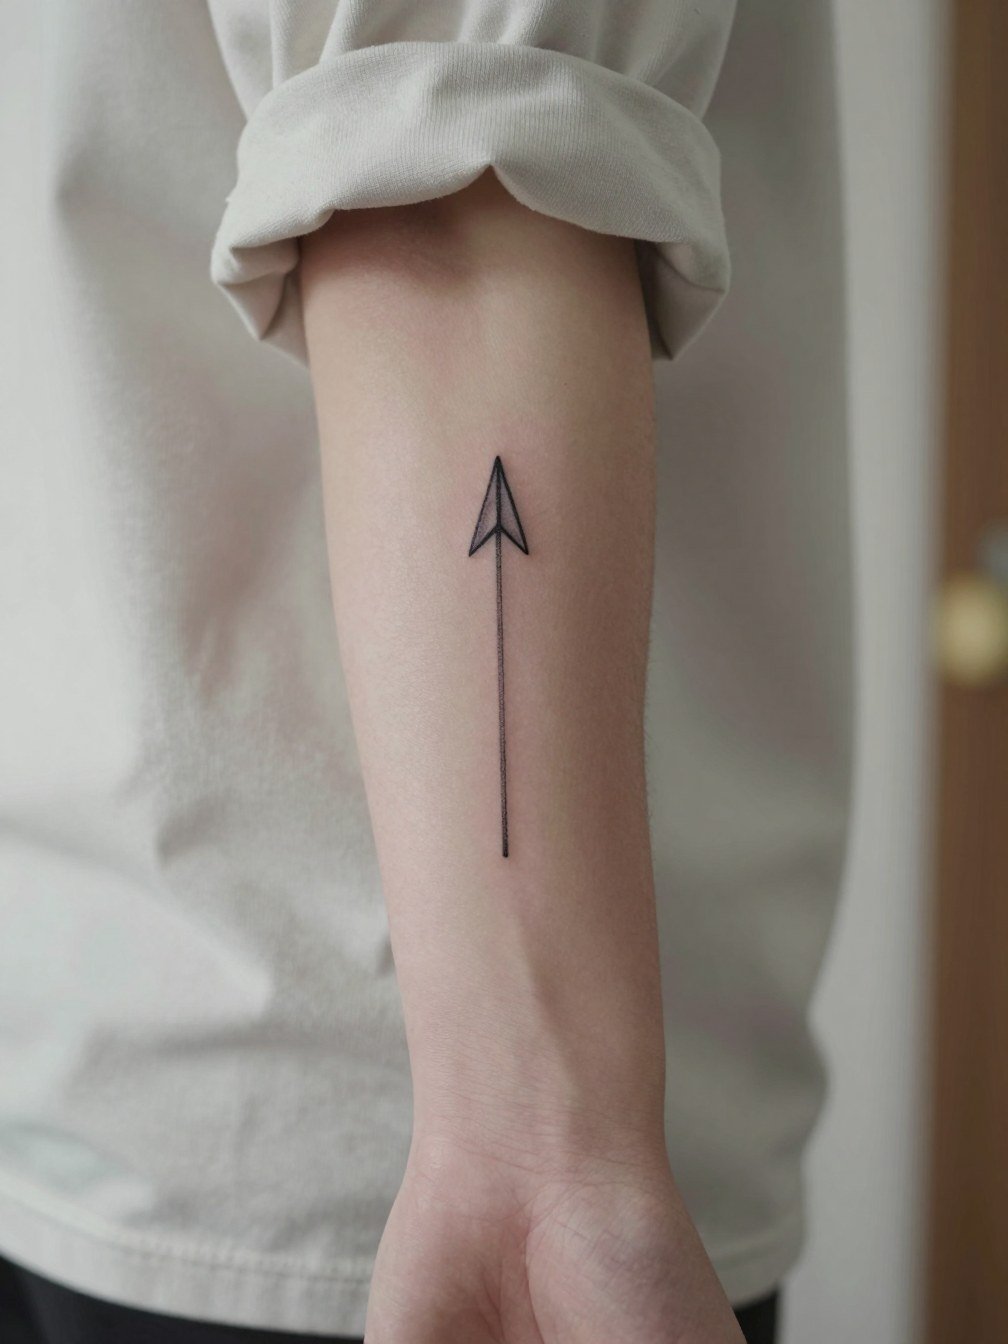
Small arrows pair well when you want a subtle twin mark that reads personal but not matchy-matchy. I recommend sizing the shaft to at least three inches if you want the single-needle detail to last beyond year two. Bring two reference images at different scales so the artist can show how the linework reads at three inches versus five. Inner forearm sessions are two discrete passes and feel like steady buzzing with some soreness at the end. Common mistake is asking for an inch-long arrow; it often loses definition and needs an early touch-up.
2. Tiny Constellation Dots on the Wrist

Wrist constellations read like secret coordinates for sisters who want something tiny and symbolic. The biggest aging issue is overcrowding the dots too close together; spacing preserves the shape as skin settles. For the consultation, ask the artist to mock up the constellation at the exact scale you plan to wear so you can test bracelet overlap. The wrist is high-motion and prone to slight blowout over time, so expect a touch-up around the two-year mark for crisp dot work. Pair with a delicate gold chain necklace to keep attention on the area.
3. Matching Single-Word Script on the Collarbone
A single-word on the collarbone looks intimate and deliberate. For longevity, request slightly heavier line terminals than the reference photo so the letters retain form as the ink spreads a little. Discuss exact letter spacing with the artist and have them draw the script at the size you will wear it so the word sits flat and readable. Collarbone sessions feel shallow and sometimes sharp because the bone is close to the skin. Expect a one-hour session and possibly a small touch-up after a year if any thin strokes soften. Pair with open-back tops that frame the collarbone.
4. Paired Crescent Moon and Sun on Inner Bicep
Paired celestial motifs let you coordinate without copying exactly; one sister gets the moon and one the sun, and they sit harmoniously when arms rest side by side. Inner bicep skin is softer and can hold single-needle detail well, but avoid ultra-thin script in this area; slightly bolder strokes keep contrast over time. For the appointment, wear a sleeveless top so the artist can work unimpeded. Sessions are relaxed with moderate discomfort near the armpit edge. Avoid placing the design too close to the crease, as friction and sweat can fade stipple faster.
5. Mirror-Image Wildflower Sprig on the Ribcage
Ribcage sprigs make for a private, elegant match that shows off when you want it to. Ribs move with breathing and skin stretch, so the fine-line camp warns that tiny stems can blur; the other camp insists careful needle depth and slightly increased spacing keep it crisp. One group says fine line on ribs blurs within two years because of constant skin movement. The opposing group says with proper depth and spacing, fine line settles fine on ribs and points to healed photos to show it. Sessions here are longer and more painful than forearms, so plan breaks and bring a supportive top for aftercare. Wear a fitted crop top for the session.
6. Matching Tiny Butterfly on the Ankle
Ankle butterflies are small show-off pieces that pair well with sandals or cropped pants. The ankle experiences friction from socks and shoes, so a solid silhouette outperforms delicate filigree for staying crisp. For the session, wear low-rise jeans or rolled cuffs so the artist can reach the area without pressure on the ankle. Typical session time is 30 to 45 minutes with a small stinging that eases quickly. Expect light touch-ups at year two if you wear boots a lot. Style with ankle boots that end just above the design.
Pre-Session Essentials
A few small items smooth the wrist, ankle, and ribcage sessions above and make the first week less fussy.
- Stencil transfer paper kit. Lets you preview stencil placement on skin for the constellation and arrow pieces before the needle hits.
- Topical numbing cream. Use per instructions about 45 minutes before a sensitive rib or inner bicep session to reduce pain without affecting linework.
- Thin protective film roll. Keeps ankle and wrist tattoos clean during the first few days of activity and frequent hand washing.
- Fragrance-free body wash. Gentle cleansing for the first week that avoids irritating delicate linework on the torso and collarbone.
- Aquaphor healing ointment. Thin layer for the initial healing window supports fine line work without clogging channels.
7. Half-Matching Geometric Triangle Pair on the Wrist Knot
Triangle sets read modern and allow sisters to split a concept without mirroring exactly. For durability, ask the artist to slightly thicken the outline if you plan to wear bracelets on that wrist regularly. The wrist sees frequent washing and friction, so outline weight preserves geometry. Session time is short but can be sensitive near the radial bone. A common mistake is matching triangles under 0.75 inches, which rarely keep crisp angles. Style with a delicate chain bracelet worn on the opposite wrist so the tattoo remains visible.
8. Coordinated Roman Numeral Dates on the Side Rib
Sisters sometimes match milestone dates in Roman numerals for a discreet and classic look. Ask the artist to space numerals wider than you expect, because tight numerals can run together as the skin ages. Rib placement makes the session longer and more painful than forearm work, so plan for breaks and a comfortable top that exposes the area without shifting. A common mistake is choosing a dense serif at a very small scale. Expect the faintest softening by year three and factor a touch-up into long-term plans.
9. Complementary Outline Dog and Paw on the Ankle
Pairing an outline animal with a tiny paw keeps the connection clear while giving each sister a distinct piece. For the outline dog, request a single pass of a slightly heavier contour so the silhouette stays defined. The ankle tolerates small motifs well but watch for scabbing from shoes. Sessions are quick and mildly painful. A common mistake is placing the paw too close to shoe seams; move it an inch inward to avoid friction. Show-off pairing works with cropped pants or sandals for a casual reveal.
10. Split Floral Chain That Aligns When Arms Touch
A split floral chain is ideal if you want a matching effect only when you're together. During the consultation, have the artist position stencils on both arms and test how the motifs align in different arm positions to ensure the match reads when relaxed. Inner forearm linework heals predictably, though tiny internal details can blur if too close. Expect moderate discomfort and about an hour per arm for a simple chain. Avoid asking for ultra-fine petals under 0.5 millimeters; they rarely last without a touch-up.
11. Small Matching Wave Line Behind the Ear
Tiny motifs behind the ear are playful and private. The mastoid area handles single-needle lines well but requires an artist comfortable with small curves in tight spaces. Sessions are quick and the pain is sharp but brief. A common mistake is asking for identical mirrored placement without accounting for hairline differences; have the artist match by sight rather than exact measurement. For after-show-off looks, tuck hair or wear small hoop earrings to highlight the spot. Consider a simple earring set like small hoop earrings when you want the tattoos visible.
12. Matching Minimalist Mountain Range on the Back of the Arm
A small mountain range on the back of the arm works for active sisters who want something outdoorsy. Outer arm skin is less prone to blowout than the inner forearm, so you can keep slightly thinner strokes. For placement, have the artist lay the stencil while your arm is relaxed and slightly bent to see how the peaks read in motion. Sessions are tolerable, usually under an hour. A common misstep is using too much negative space in a tiny composition; it can look lost from a few feet away. Pair with a longline cardigan that frames the arm.
13. Matching Tiny Heart Outline on the Finger
Finger tattoos are notorious for fading and requiring touch-ups. If you want a finger heart, pick a slightly thicker outline and plan for annual refreshes. Discuss exactly how the heart will sit relative to knuckle movement so bending does not distort the shape. Sessions are short but can sting and scab heavily. Avoid ultra-fine fills or tiny scripts; small fills often spotty. For showing off, stack with stackable rings worn on adjacent fingers.
14. Coordinated Botanical Wrist Band
A wrist band reads like jewelry without the maintenance of metal. Because the wrist washes and rubs daily, ask for slightly more saturation in the linework than a delicate bracelet mimic so the band does not blur into a gray line. The session is quick but expect some tenderness. Common mistake is wrapping the band completely without clear negative space at seams, which can create a continuous scar-like look as it heals. Style with an open cuff bracelet on the opposite wrist to balance the look.
15. Pair of Matching Tiny Anchor Buttons on the Calf
Calf placements suit sisters who want larger pieces that stay private or visible depending on footwear. Anchors are durable here because the skin is thicker and less mobile. For consultation, decide on exact height on the calf to ensure symmetry when you stand side by side. Sessions are mildly uncomfortable over muscle and can take 30 to 60 minutes. A frequent mistake is placing designs too low where jeans rub them; move the anchor an inch higher for less friction. Pair with ankle boots or sandals depending on season.
16. Small Matching Lock and Key on Opposite Wrists
Lock-and-key pairs feel playful and intimate. On the wrists, ensure the lock and key are sized so both read at arm-resting distance and that fine notches on the key are slightly exaggerated for longevity. Wrist sessions are sensitive but done in under an hour. A mistake is making the key too small to show its teeth; that detail blurs sooner than expected. Wear a delicate chain bracelet on the opposite wrist to frame the piece.
17. Coordinated Crescent Watercolor Accent Behind the Ear
Delicate color behind the ear can look like a small secret splash. Watercolor techniques can fade unevenly on very dark or very light skin, so ask the artist for healed photos on a range of tones and for slightly denser edges if you want color longevity. Sessions are quick but the area is sensitive due to thin skin. A common error is requesting multiple pastel tones in a very small space, which can muddy when healed. Simple palettes hold better, and a small earring frames the area nicely.
18. Matching Botanical Thigh Sprigs
Inner thigh sprigs feel intimate and romantic when you want a matching secret. The inner thigh sees friction from clothing, so keep stems slightly bolder than you think. For the consultation, test stencil placement while seated so the sprig sits naturally with leg posture. Sessions can be more sensitive and take longer than ankle work. A frequent mistake is placing the design too close to the underwear line; move it slightly downward to avoid rubbing. Style with a slip dress for evenings when you want to show the piece without full exposure.
19. Matching Minimalist Compass Points on the Back of the Neck
Nape placements show when you want them to and hide under a ponytail otherwise. The nape can handle fine line but hairline movement can blur edges if placed too low. During the consultation, have the artist mark the piece with you standing and then with your head tilted so placement works in both positions. Sessions here are brief with a ticklish feeling rather than sharp pain. A common mistake is choosing complex detail in a tiny nape tattoo; keep it simple for longevity.
20. Twin Minimal Script for a Shared Phrase on the Rib Side
Matching script on the ribs carries emotional weight. For durability, ask the artist to thicken hairline strokes slightly and to space letters a touch wider so the word remains legible as the skin settles. Rib sessions are longer and painful, so plan breaks and bring a fitted top that allows easy access while keeping you covered. One camp worries fine script on ribs will blur fast; the other says spacing and depth prevent that. Expect a touch-up after the initial healing cycle if any strokes soften.
21. Shared Line-Work Crescent in the Palm
Hand tattoos face high wear and often need multiple touch-ups. If you want a matching crescent in the palm area, pick a slightly thicker outline and plan for at least one refresh within the first year. For the appointment, expect a shorter but intense session as skin there is thin and nerve-rich. A common error is expecting hand ink to age like forearm work; it generally fades faster due to frequent washing and friction. Keep the design bold and minimal to maximize lifespan.
22. Complementary Morse Code Lines on the Side of the Finger
Morse code lets you encode a word only you both know. For finger placement, keep dots and dashes slightly larger than pictured so they remain readable after a year of hand use. Talk to the artist about spacing so that knuckle folds do not run through a dash. Session time is short but can be irritating. Finger pieces often require touch-ups within 12 months. For discreet show-off looks, wear thin stackable rings or slide them off to expose the code.
23. Matching Tiny Anchor Under the Collarbone
Under-collarbone anchors are subtle and visible with certain necklines. The area sits on thin skin, so request slightly bolder terminals so the anchor reads after healing. Sessions are shallow and can feel sharp over the bone. A common mistake is placing the anchor too close to the clavicle edge where jewelry rubs; move it slightly below the bone margin. Style with open-back tops to frame the area when you want to show the tattoos.
24. Matching Tiny Pine Tree on the Wrist Inner Edge
Small nature motifs work well on the inner wrist when sized for clarity. Position the tree away from the wrist crease so movement does not break the silhouette as you bend your hand. Inner wrist detail can soften faster, so ask for slightly denser trunk lines. Sessions are short with an unpleasant but manageable sting. A common error is placing the piece too close to where bracelets sit. Wear a thin leather cuff on the opposite wrist to keep the tree visible.
25. Matching Tiny Paper Plane on the Foot Side
Top-of-foot tattoos show easily in summer but face wear from shoes. If you want a paper plane here, place it slightly toward the instep to avoid direct shoe seams. Sessions are short but the foot can be toothy in pain due to thin skin over bone. A frequent mistake is choosing a fragile outline that scabs unevenly. Keep the plane bold and minimal so it heals into a solid shape. Pair with sandals or low-profile sneakers to show it off.
26. Complementary Seedling Pair on the Wrist
Seedling pairs are symbolic without being literal. For wrists, slightly bold stems help the sprout stay legible through frequent handwashing. Discuss how much negative space you want between the leaves so the shapes do not merge. Sessions are brief and uncomfortable near the bone. Avoid tiny leaf veins that can blur; simple silhouettes last longer. Style with a delicate chain bracelet on the opposite wrist for balance.
27. Matching Simple Arrowhead Behind the Ear
Behind-the-ear arrowheads are quiet and modern. Because the skin is thin there, choose slightly fuller shapes and ask the artist to show healed examples on a similar tone. The session is quick with a sharp sensation. A common error is requesting complex shading in such a small area; it usually fades into a smear. Keep the arrowhead clean and bold for best retention. Small studs or hoops draw attention to the spot when you want to highlight the match.
28. Coordinated Crescent and Star on the Shoulder Blade
Shoulder blade placements allow slightly larger detail with less daily abrasion. For matching crescents and stars, decide on exact distances between motifs while bending forward so the design sits centered on the muscle. Sessions are comfortable and often quick. A mistake is placing the star too close to the spine where clothing rubs; center it more laterally. Show-off outfits like open-back dresses highlight the pair beautifully.
29. Matching Small Family Symbol on the Inner Wrist
A custom family symbol feels like a private crest. For the inner wrist, keep linework slightly bolder and test how it reads when you make a fist and when the hand is relaxed. Expect the highest visibility but also the earliest softening of detail on this surface, so design for clarity over ornamentation. Sessions are short but can sting. A typical mistake is packing in too many tiny elements that blur together in months. Style with rolled-up sleeves to show the symbol without bracelets obscuring it.
Frequently Asked Questions
Q: How do I find healed examples and portfolios for matching sister designs without naming specific artists?
A: Search platform tags and location filters. Try hashtags like #matchingtattoosisters, #sisterink, and #twinskinink on social platforms, and use city or state filters on portfolio sites to find healed photos near you. Reddit tattoo threads often include photo-heavy posts showing different skin tones. Look for the term "healed" in captions to see long-term results.
Q: Will a fine-line wrist or rib tattoo last, or will it blur quickly?
A: It depends on spacing and placement. One group of artists argues that very thin single-needle lines on high-motion areas like ribs and wrists blur within two years. Another group says slightly heavier terminals and more spacing keep fine-line work readable for much longer. If you want fine detail, ask the artist to show healed examples at similar sizes and on similar placements.
Q: What should I wear to the session for a collarbone, rib, or shoulder tattoo?
A: Pick clothing that gives the artist unobstructed access without you disrobing. For collarbone or shoulder, a wide V-neck shirt or tank top works. For ribs, a fitted cropped top or sports bra keeps the area exposed while staying comfortable. For shoulder blade work, choose a loose scoop-neck top that sits naturally when you lean forward.
Q: How often should matching small tattoos be expected to need touch-ups?
A: Small designs on high-friction or high-motion zones like fingers, palms, and hands usually need touch-ups within 12 to 24 months. Pieces on shoulders, outer arms, and calves often hold longer and may only need occasional refreshes every few years. Planning for at least one touch-up in the first two years is realistic for very small work.
Q: Are there cultural considerations for mandala or tribal-inspired matching tattoos?
A: Yes. If a motif has a clear cultural origin, acknowledge it and consider whether the symbol is appropriate for your relationship to that culture. Ask the artist to explain the origins of the pattern and, if possible, consult someone from the culture or choose a motif inspired by rather than directly copied from sacred or community-specific symbols.
Q: Can sisters get the same design on different placements so the tattoos "match" visually?
A: Absolutely. Complementary placements like one sister on the inner forearm and one on the outer forearm, or one on the ankle and one on the foot, create a visual relationship without duplication. During the consult, have both stencils applied and photographed to confirm how the designs read together at rest and in movement.
