
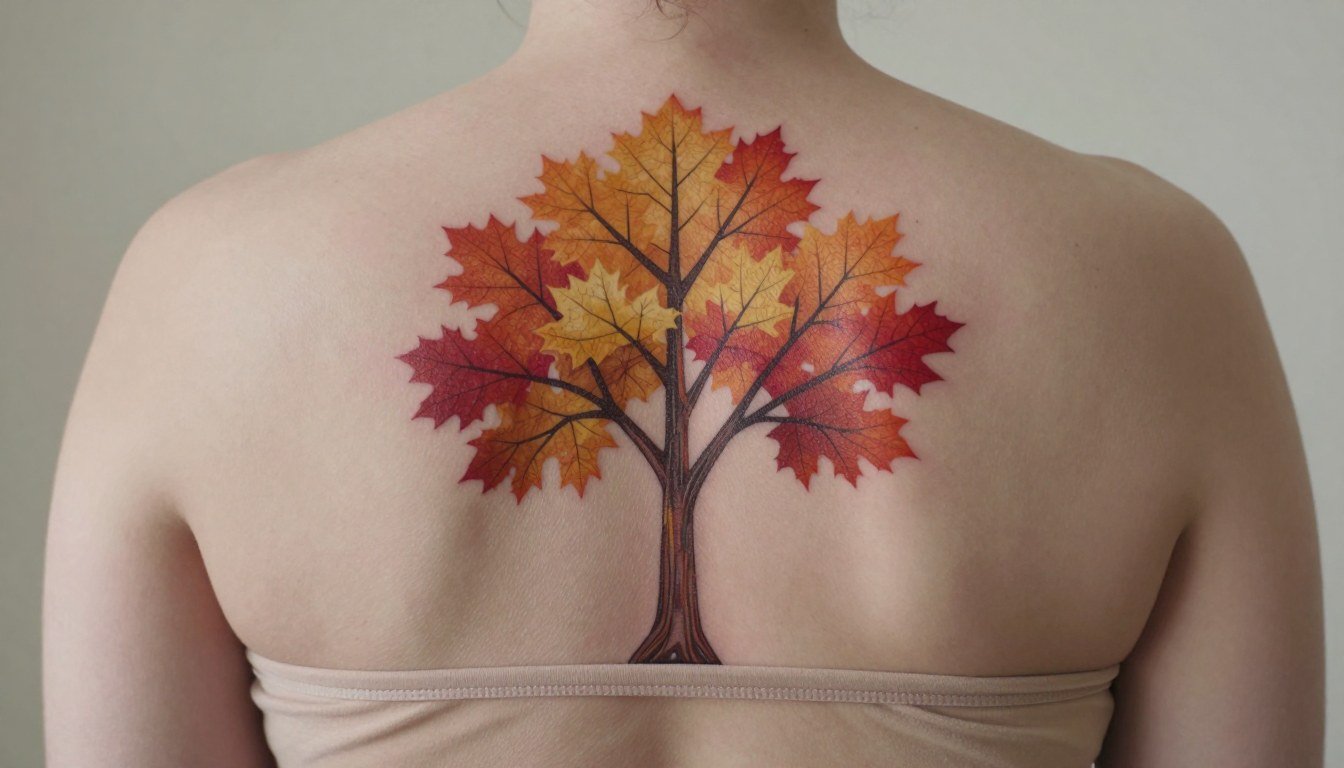
Autumn favors designs that read like a season rather than a costume. A maple-silhouette in saturated orange reads as fall from across the room, while a pumpkin or scarecrow can age into cliché. If you want autumn that still reads at year three, pick compositions with clear silhouettes, planned spacing, and at least a little structure under the color. That approach protects painterly work without killing the softness.
1. Watercolor Autumn Tree Silhouette on Forearm
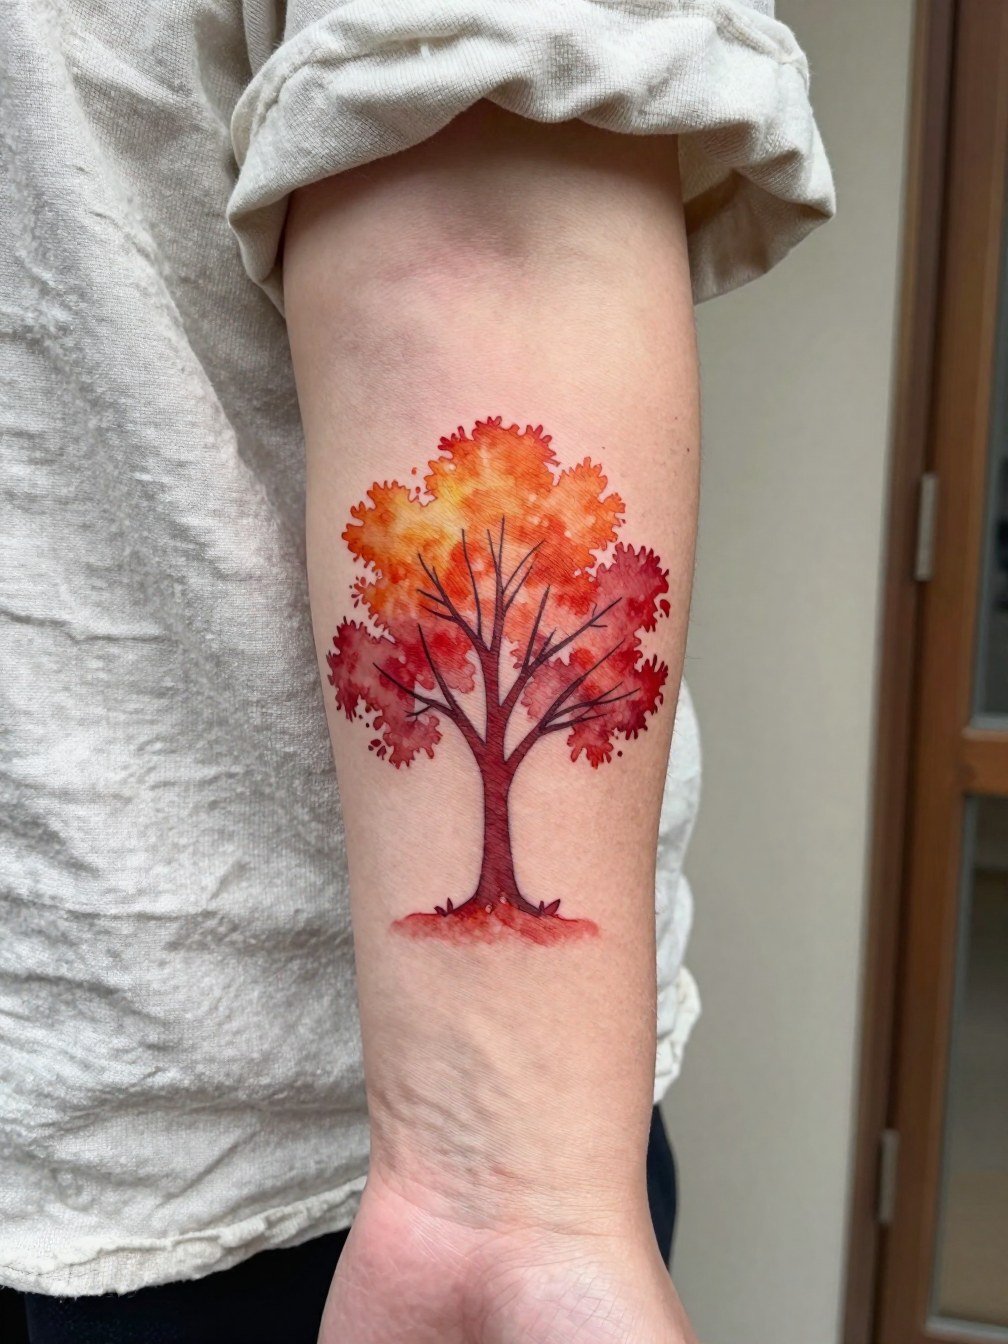
A forearm watercolor tree gives the fall palette without heavy detail. For this placement, request a slightly stronger contour on the trunk and main branches so the silhouette keeps its shape as the watercolor fades. Many watercolor-only forearm pieces blur into soft patches by year three if the artist uses only feathered color and no anchor lines. To avoid that, bring two references: one showing the exact watercolor blend and another showing the desired trunk outline thickness. Expect one session around one to two hours and mild soreness with light swelling. Pair it with rolled sleeves and a linen button-down to show the inner forearm without covering the piece.
2. Japanese Maple Branch with Bird on Outer Forearm
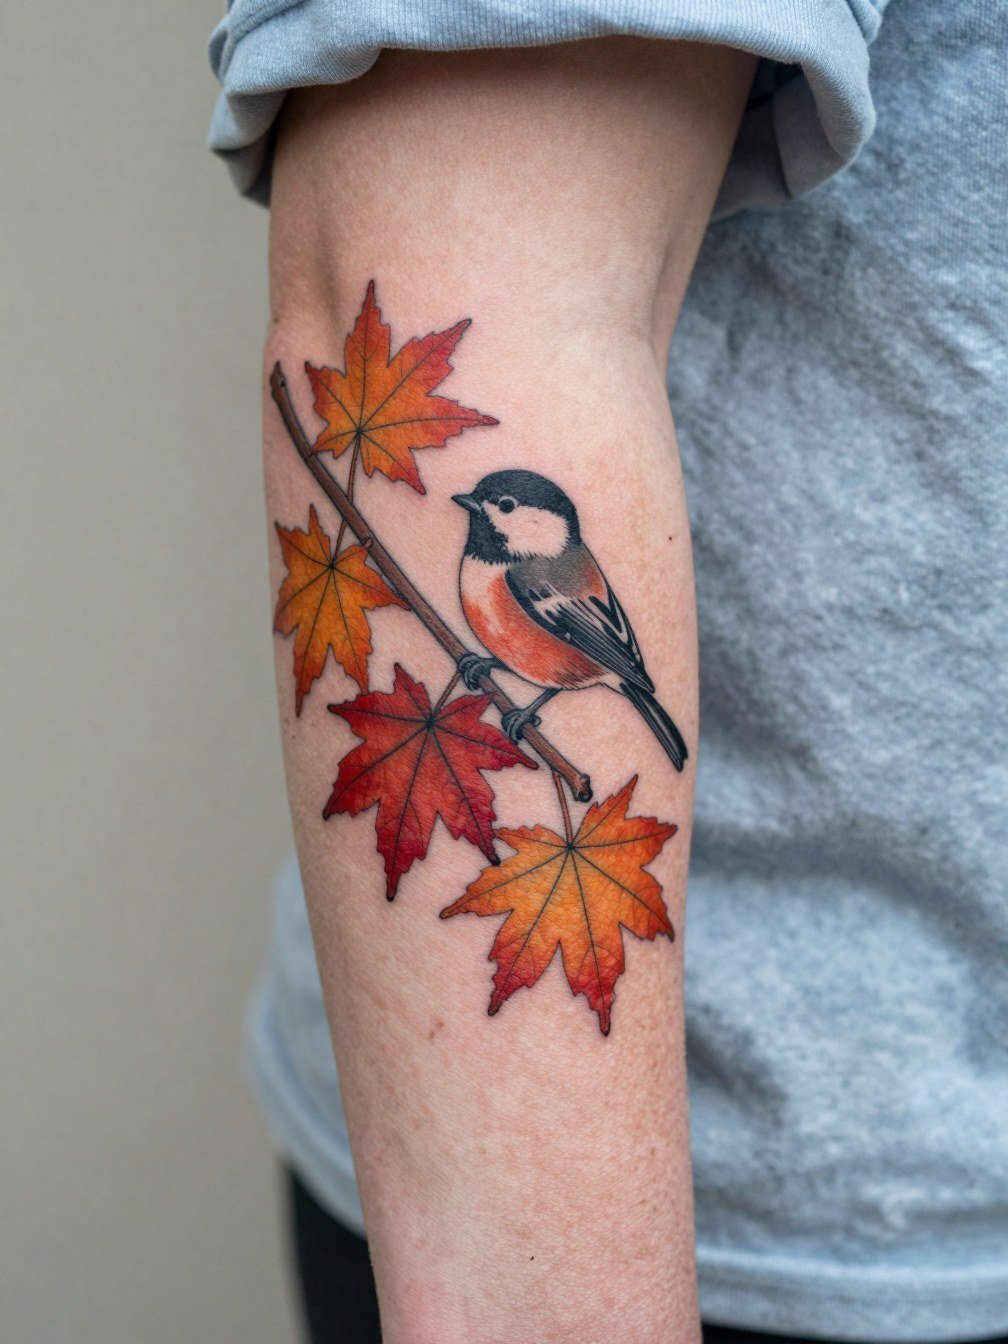
A Japanese maple branch reads instantly as autumn and still reads on darker skin when the artist plans saturation carefully. Tell the artist you want mid-level saturation on the red leaves and stronger black linework around the bird for clarity. A common mistake is asking for hyper-real color washes without enough contrast, which hides detail in monthly sunlight. Expect a two-hour session and a moderate pain level on the outer forearm. Style it with a rolled sleeve shirt in cream or rust to complement the leaf colors when you want to show it off.
3. Tree Through the Seasons Down the Spine
The spine gives room for a literal seasons concept and it suits a vertical tree composition. Ask the artist to map the trunk spacing first so each seasonal band has breathing room and the leaves do not crowd into one another as the skin moves. One misstep is cramming too many tiny leaves into each band, which looks busy at six months and turns muddy by year five. Expect multi-session work if you want full color across bands, and fair warning that ribs and spine are higher on pain charts. Show it under an open-back dress or a tie-back top for occasions when you want the whole vertical piece visible.
4. Bare Branch with Falling Leaves on Calf
A calf placement supports vertical movement like falling leaves and keeps the design out of constant friction. When consulting, ask the artist to preview the leaf spacing at both three-inch and five-inch scales so you see how motion reads at different sizes. A typical error is dropping the branch too close to the ankle where socks rub and cause extra fading. Session time is usually one long sitting for a medium piece and the area bruises less than rib placements. To show it off, pair with midi skirts or cropped trousers that reveal the calf.
5. Small Autumn Leaf Cluster Behind the Ankle
A tiny leaf cluster is a classic low-commitment way to carry autumn. For this placement, specify slightly bolder vein lines so the leaves keep structure under daily sock friction. People often pick ultra-fine detail for the ankle and then need touch-ups because of constant rubbing. The session is short and tolerable, but expect extra care in the first week to avoid scabbing from shoe contact. Wear cropped pants or ankle-baring shoes to show it off with ankle length jeans when you want the detail visible.
6. Memorial Maple on the Upper Arm
Using autumn as memorial imagery can be very specific. One camp says seasonal images give grief a gentle frame and last because they are layered with memory. The other camp argues a decorative tree may feel hollow if the symbol is generic and not tied to a date, name, or small personal motif. If you want the piece to read as memorial, integrate a subtle identifier such as a ribbon shape, initials in the root negative space, or a specific leaf count that references a date. Plan for moderate session time depending on color, and keep in mind the upper arm heals well with low blowout risk. For show-off outfits, a loose tank top or sleeveless knit pairs well and a cropped knit sweater works when the weather cools.
Pre-Session Essentials
A few small items smooth out sessions for wrist, calf, and upper-arm work and help the first week of healing after the pieces above.
-
Stencil transfer paper kit. Lets you and the artist preview linework placement on skin before needles touch ink, which matters for forearm and spine trees.
-
Topical numbing cream. Applied about 45 minutes before can reduce discomfort on ribs and sternum sessions without affecting linework when used properly.
-
Thin protective film roll. Useful for ankle and hand placements that face extra rubbing during the first 48 hours.
-
Fragrance-free gentle body wash. Cleans the area during showers without irritating fresh ink.
-
Aquaphor healing ointment. A mainstream option for the initial protective layer during the first few days to lock moisture without clogging needle channels.
7. Half-Autumn, Half-Winter Back Panel
A split-season back piece reads as storytelling and gives the artist room for color gradients. Big compositions require a staged plan. Ask how many sessions the artist expects and ask to see healed multi-session examples with similar saturation. A mistake people make is assuming one marathon session produces the same saturation as staged work. This is a costly long-term commitment, so start with the autumn half and expand later if budget or tolerance dictates. Wear a front-button shirt the day of a back session for easy removal and limited fabric drag.
8. Minimalist Bare-Tree Outline on Ribs
Rib tattoos split artists into two camps on fine line. One group says the rib skin stretches and distorts thin single-needle lines within two years so lines blur. The other group argues that with slightly wider spacing and controlled needle depth, fine line on ribs can settle well and look clean at three years. If you want a rib tree, have the artist show healed three-year photos of actual ribs and agree on line spacing and depth before starting. Expect a higher pain rating and possible staged touch-ups after year one.
9. Autumn Tree Backlit Silhouette on Shoulder Blade
A shoulder-blade silhouette reads from a distance and ages gracefully because the design relies on negative space. Tell the artist you want the negative spaces mapped at both three and five inches so the silhouette holds as the skin moves. A common mistake is requesting tiny negative leaf cuts that disappear once the area heals. Session time is short for a silhouette but the artist will still mark stencil placement carefully. Show it off with a backless or thin-strapped top and a open-back dress for evenings out.
10. Stipple-Shaded Tree on the Inner Upper Arm
Stipple or dot shading gives texture without heavy color and suits the inner upper arm if the stippling is spaced to avoid tone fill. Tell the artist to demonstrate dot density at close range so you can see how shadow reads at normal viewing distance. People sometimes ask for ultra-tight dot fills that later read as a gray patch rather than textured shading. Expect a medium session and moderate soreness; inner arm skin can bruise. For everyday looks, wear ribbed tanks or a ribbed tank top to frame the inner arm.
11. Leafless Tree Transitioning Into Autumn Foliage on the Side Torso
A transitioning tree communicates seasonal change and can be highly symbolic. When planning, ask for reference shots that show how a two-color gradient will heal in the rib area. The typical error is compressing too many leaf colors into a tight space so the gradient looks patchy after healing. This placement is sensitive so plan for breaks and possible touch-ups. Style it with side-slit tops or high-waisted bottoms that leave a peek of the side torso visible.
12. Watercolor Sponge-Paint Tree on the Calf
Sponge-paint watercolor softens edges and can look painterly on the calf because the shape supports tall trees. Ask the artist to show healed sponge-style work on darker skin so you know how the colors read. One mistake is using pastel pigments that fade into a bruise-like wash after six months. Calf pieces typically take a single long session for medium scale work and are low-risk for blowout. Pair with cropped trousers or tall socks pulled low to reveal the work and consider wide leg cropped pants for everyday wear.
13. Folk-Inspired Harvest Scene with Tree on Thigh
A thigh harvest scene expands autumn beyond leaves and gives a narrative feel while staying seasonal but not holiday-specific. When booking, specify how much negative space you want around the scene so the composition breathes and does not press against the underwear line. A common error is overpowering the thigh with too many small props that blur together. Thigh sessions are fairly comfortable with options to sit or lie down, and they heal well if you avoid tight waistbands. Show it with midi skirts or bike shorts and try midi skirt casual pairings for summer reveal.
14. Tiny Branch and Leaf on the Collarbone
Collarbones highlight slender fine-line pieces but you must size the script or leaf for visibility. Request the line weight be slightly heavier than your smallest reference so the leaf reads after healing. A regular mistake is choosing hairline single-needle lines that vanish in a year on the collarbone. Sessions are short but the area can sting because of proximity to bone. Pair it with wide V-neck or scoop-neck tops and consider an open-front cardigan for layered looks.
15. Black-and-Grey Silhouette Tree on the Lower Back
Lower-back silhouettes survive well because they rely on shape and contrast rather than detail. Ask for a stencil check while standing and seated so placement sits above the waistband as you expect. One frequent error is placing focal elements too low where waistbands or belts abrade the area and accelerate fading. Expect moderate session time and low blowout risk when the artist uses bold linework. Pair with low-rise jeans or a cropped tank to reveal the placement when you want.
16. Geometric Tree with Negative Space on the Wrist
Wrist trees are visible and intimate. For longevity, ask the artist to avoid single-needle lines hugging the wrist crease and instead place the main geometry slightly above the crease where the skin moves less. People often request very thin geometry that blurs from daily washing and rubbing. Sessions are short but wrists need careful first-week protection. Style the wrist with rolled sleeves or minimal bracelets and consider a linen button down with sleeves pushed up to frame the work.
17. Leaf-Filled Tree Wrapped Around the Bicep
A bicep wrap reads well in motion and gives room for denser leaf work. During consultation, specify how the wrap aligns with muscle flex; ask to preview how the band looks when your arm is relaxed and when flexed. A mistake is wrapping too tightly so seams and leaves distort when muscles move. Expect a medium session and typical bicep soreness. Show it with sleeveless layers or a relaxed short sleeve that frames the wrap.
18. Minimal Black Tree on the Hand Edge
Hand-edge tattoos are high-maintenance because of washing and friction. Ask the artist for expectations about touch-ups and plan to avoid heavy scrubbing early on. A common mistake is picking extremely fine detail that disappears under frequent washing and sun exposure. Sessions are quick but the area heals with more scabbing risk, and touch-ups within the first year are common. Keep the area protected and consider minimal rings rather than bracelets to avoid extra contact when showing off a small hand-edge piece.
19. Large Autumn Landscape Tree on Full Back Panel
A full-back autumn landscape lets the artist build color depth and branching detail. Before booking, ask for a multi-session plan and healed photo examples of large color work that used the same palette. The main mistake is asking for every small motif at once, which makes scheduling and healing harder. Large back projects require staged sessions and realistic budgeting, and they can take multiple touch-ups to get saturation even across the canvas. For reveal outfits, oversized open cardigans or backless dresses work best when you want to show sections of the piece.
Frequently Asked Questions
Q: How much should I expect to budget for a watercolor autumn tree versus a small leaf cluster?
A: Prices vary by artist and region, but think in ranges rather than exact numbers. A small leaf cluster typically fits a single short session and falls into the lower range for local studio minimums. Watercolor medium pieces or custom back panels commonly require longer sessions and multiple visits, so plan for a noticeably higher range and factor in typical tipping of 15 to 25 percent.
Q: Will watercolor autumn colors hold up on darker skin tones?
A: Watercolor can work on darker skin if the artist plans for extra saturation and contrast and layers color differently than they would on lighter skin. Ask the artist to show healed photos on similar skin tones when you book and agree on a slightly bolder outline or anchor to preserve shape.
Q: Where can I find real healed examples and local artists who do seasonal tree work?
A: Search Instagram and TikTok hashtags such as #autumntattoo, #mapletattoo, and #watercolortattoo plus your city name to find portfolios that post healed shots. Reddit tattoo threads and tattoo-specific galleries are useful for seeing how pieces age, while location-tagged posts on Instagram help identify nearby studios. Bring saved healed examples to a consultation so you and the artist share the same visual language.
Q: What should I wear to a session for a ribs, calf, or forearm tree tattoo?
A: For ribs, a button-front dress or loose shirt lets the artist access the area without fabric rubbing the fresh ink. For calf work, wear wide leg cropped pants or loose shorts so the leg can be rolled up without pressure. For forearm sessions, choose short sleeves or a cropped knit sweater with sleeves you can push above the elbow. Comfortable, normal-fit clothing that exposes the area without being pulled is ideal.
Q: How often do autumn tree tattoos need touch-ups?
A: Expect small pieces with dense fine detail to need touch-ups within two to five years, especially on high-friction areas like the wrist or hand edge. Larger, well-spaced designs with anchor lines and good saturation can hold longer with minimal touch-up. Plan a check-in with your artist around year one to assess any needed tweaks.
Q: Are there any placements I should avoid if I want a tree that ages cleanly?
A: Areas with frequent friction and thin skin such as the side of the hand, fingertips, and near waistband lines tend to fade or blur faster and often need more touch-ups. Vertical placements like forearm, spine, and calf normally give trees room to breathe and are more forgiving for larger compositions.
Q: How do I make a seasonal tree feel personally specific without obvious dates or names?
A: Integrate subtle identifiers into the composition such as a specific leaf count, a tiny bird that had meaning, or a root shape inspired by a place you love. These small choices anchor the piece in your story without relying on explicit text. Use those details in the stencil preview so the placement and scale read correctly before inking.
