
Artists and clients often get hung up on the pretty surface of Art Nouveau without planning for how the lines will settle. Fine filigree looks amazing fresh, but on wrist and rib skin it can thin into fuzz if spacing and line weight are ignored. Which placements keep the movement crisp, and which versions need a touch more scale to last? The first idea shows a classic way to keep a Mucha-inspired portrait readable on skin.
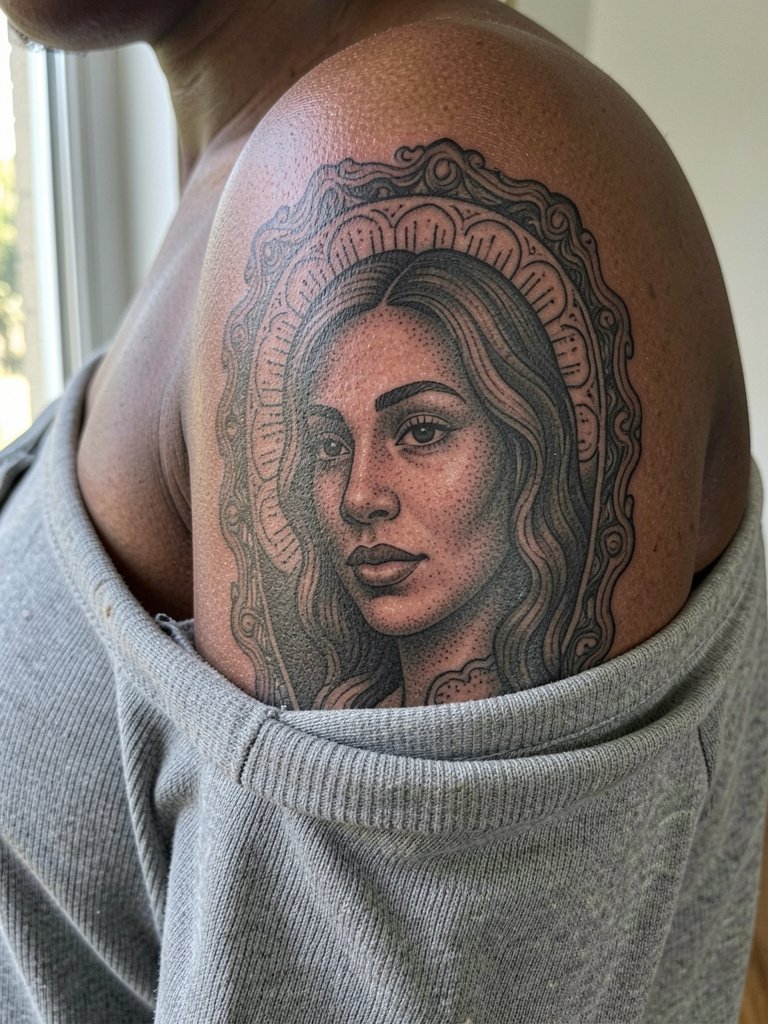
1. Side-Facing Portrait in Oval Frame

A side-facing woman in an oval frame reads as unmistakably Art Nouveau while staying compact. Recommend this when you want the poster composition without a full sleeve. Tell the artist you want slightly heavier contour lines around the oval so the frame keeps its shape with age, and bring a three-inch printed mockup so scale is clear. A common mistake is asking for ultra-fine hairline curves everywhere, which crowds the face and blurs into shading at year two. For showing the piece, sleeveless knit tops or a cropped blazer work nicely. Wear a loose tank on appointment day for easy shoulder access. Pain on the outer upper arm is low and a single two-hour session usually covers a medium portrait.
2. Floral Portrait with Flowing Hair and Vine Borders
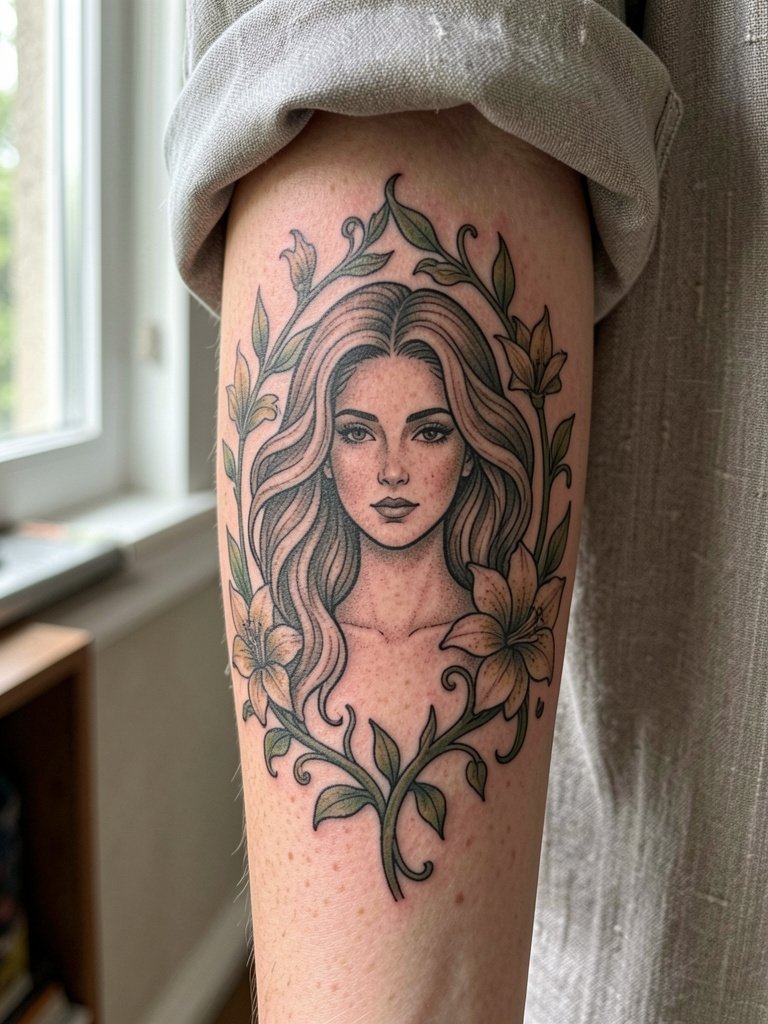
Color versus black and grey sparks strong opinions in Art Nouveau work. One camp says muted color palettes best recreate the original poster-era look and give floral elements more visual depth. The opposing camp argues black and grey with stronger contrast keeps ornament readable as the skin ages. If you prefer color, ask for muted, low-saturation tones and wider spacing between filigree lines so the pigments do not merge. Outer forearm placement benefits from rolled-up linen shirts for show-off wear and a loose short-sleeve during the session. Expect two sessions for a medium portrait with modest color saturation.
3. Full Botanical Sleeve with Lilies and Iris Motifs
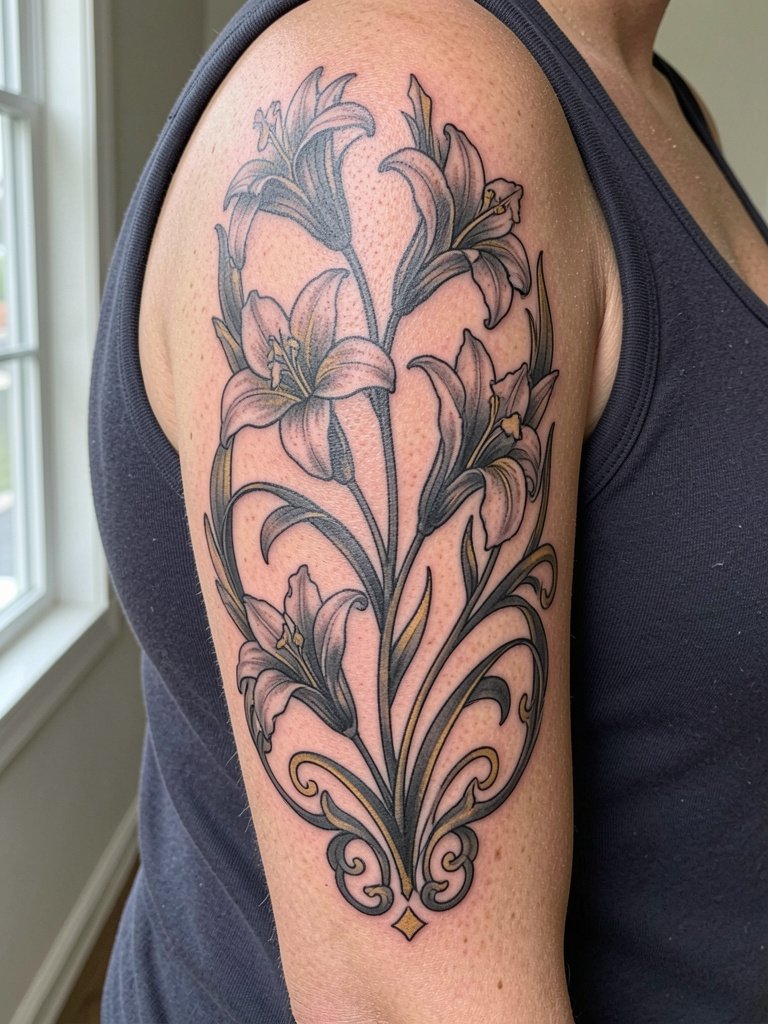
Fine line versus bolder outlines divides artists and clients when sleeves are discussed. One group prefers fine, hairline contours because the flow and curvature are essential to the Art Nouveau look. The other group recommends heavier outlines at key structural points so the composition holds up across the whole arm. For a sleeve, plan the heavier anchor lines on the outside stems and keep detail within larger petals. This placement reads well when paired with sleeveless knit tops and cuff bracelets, and for the session wear a loose tank top so the artist can access shoulder through forearm. Expect multiple sessions and periodic touch-up over several years for saturation maintenance.
4. Collarbone Flowing Linework

The collarbone is ideal for long, elegant curves because the bone highlights line flow. Recommend this design for someone who wants a subtle decorative piece that frames necklaces. For the session wear a strapless or open-collar blouse so the artist can stencil precisely. A common mistake is placing too many micro-details near the clavicle where movement and friction from straps can blur small dots. Expect moderate pain around the bone and a one to two hour session for a slender ornamental piece. For showing off, try square neck tops or layered fine necklaces that sit just above the ink.
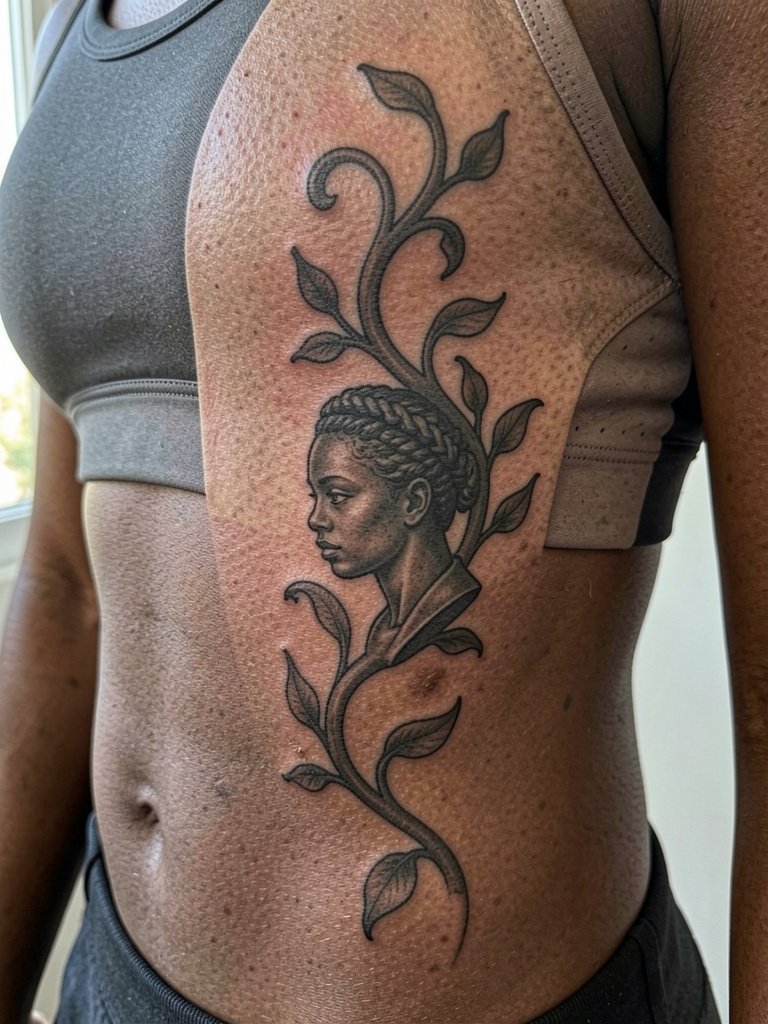
5. Side Torso Elongated Composition
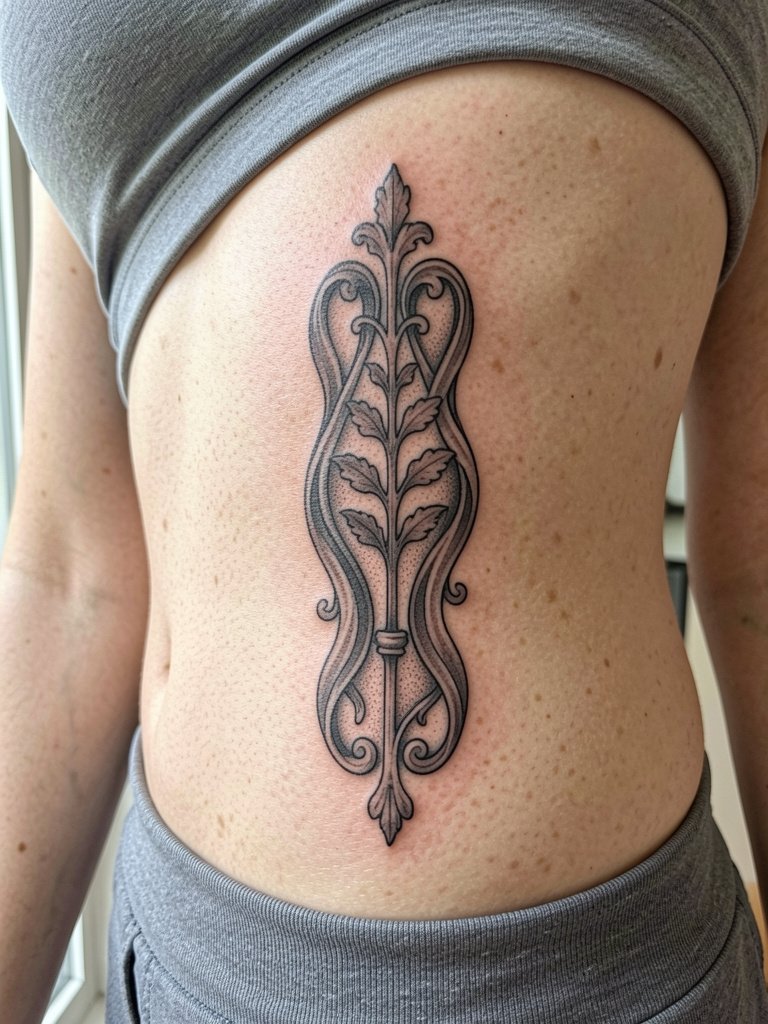
The ribcage offers vertical space for long flowing Art Nouveau lines but it is a higher pain zone. Plan the composition to follow the torso curve so stems and hair-like lines emphasize length. Specify slightly thicker primary lines to resist blowout, and ask for wider spacing in the filigree to maintain legibility at five years. The rib area tends to blur more if details sit too close together. For session wear a soft sports bra that can be moved aside to give the artist clean access. Expect a single longer session or two shorter sessions depending on detail and your pain tolerance.
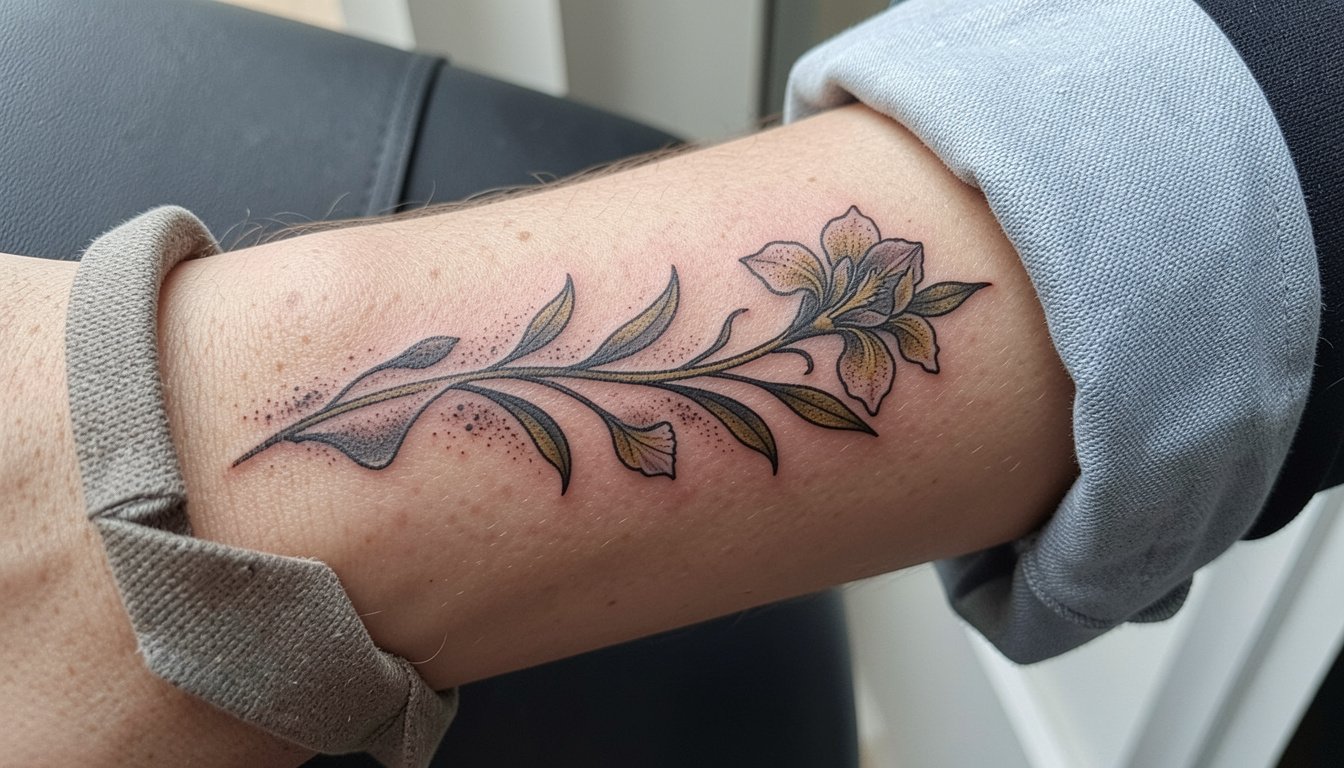
6. Small Floral Cluster for the Wrist

A small floral cluster gives the Art Nouveau language in a low-commitment size. Recommend this for first-timers who want ornamental flow without a portrait. The main risk is asking for microfiligree that the inner wrist cannot hold; request slightly heavier linework for outlines while keeping inner details light. If you want to wear the piece, pair it with a thin chain bracelet on the opposite wrist or a minimalist watch on the other hand. For your session remove any watch and bracelets from the tattooed side and wear short sleeves. Healing looks sharp at three months if spacing and line depth were correct, and tiny touch-ups may be needed by year three on the thinnest interior lines.
Studio Day Picks
The first six designs include wrist, forearm, shoulder, and rib placements that heal differently. These five items smooth the session and the first week across those specific areas.
-
Stencil transfer paper kit. Helpful for previewing exact placement on skin before the needle goes down, especially for the oval portrait and sternum templates above.
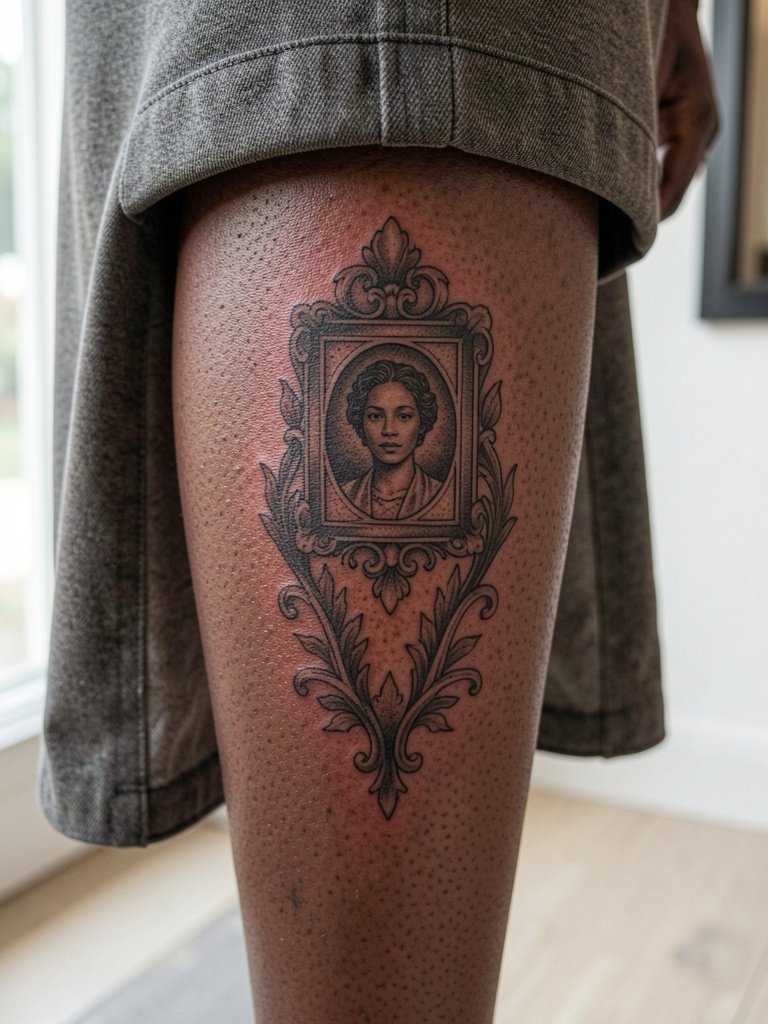
-
Topical numbing cream. Applied about 45 minutes before the appointment it reduces rib and sternum discomfort without changing how the artist works.
-
Thin protective film roll. Useful for ankle and wrist pieces where friction from socks or watches can irritate the fresh ink.
-
Fragrance-free gentle body wash. Keeps newly tattooed skin clean without stripping color during the first week of showers.
-
Healing ointment balm. A thin layer for the first couple of days locks in moisture for fine ornamental linework while avoiding heavy occlusion.
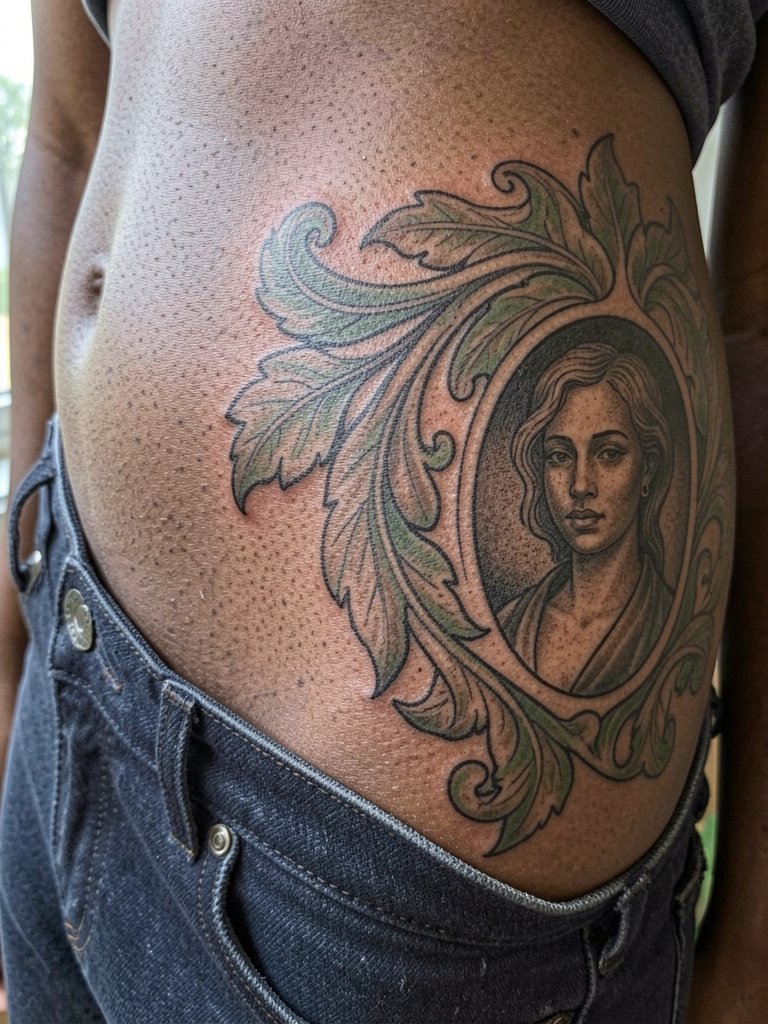
7. Black-and-Grey Woman with Decorative Halo
A haloed portrait reads like a poster and benefits from slightly bolder frame lines so the silhouette remains clear at a distance. Use black-and-grey when you want low-maintenance aging and high contrast. During consultation request staged mockups at three and five inches so you see how the halo scales with arm circumference. Off-shoulder tops and halter necklines complement the framing in everyday wear. Session time varies from two to four hours for a medium portrait and touch-up may be needed after a year depending on your skin's reaction to stipple shading.
8. Botanical Ankle Piece with Trailing Vines

Ankle botanical pieces suit trailing stems and small blooms because the vertical flow follows the leg. Warn clients that ankle skin gets friction from socks and shoes, so solid silhouette beats micro-detail there. Pair this look with ankle-strap sandals or cropped trousers to show the vine movement. For the session wear shorts or pants that can be rolled up without tugging. Expect a single session under an hour for a small-to-medium ankle motif. If you want to preserve fine tendrils, ask for slightly thicker stem lines near the joint.
9. Decorative Shoulder Panel
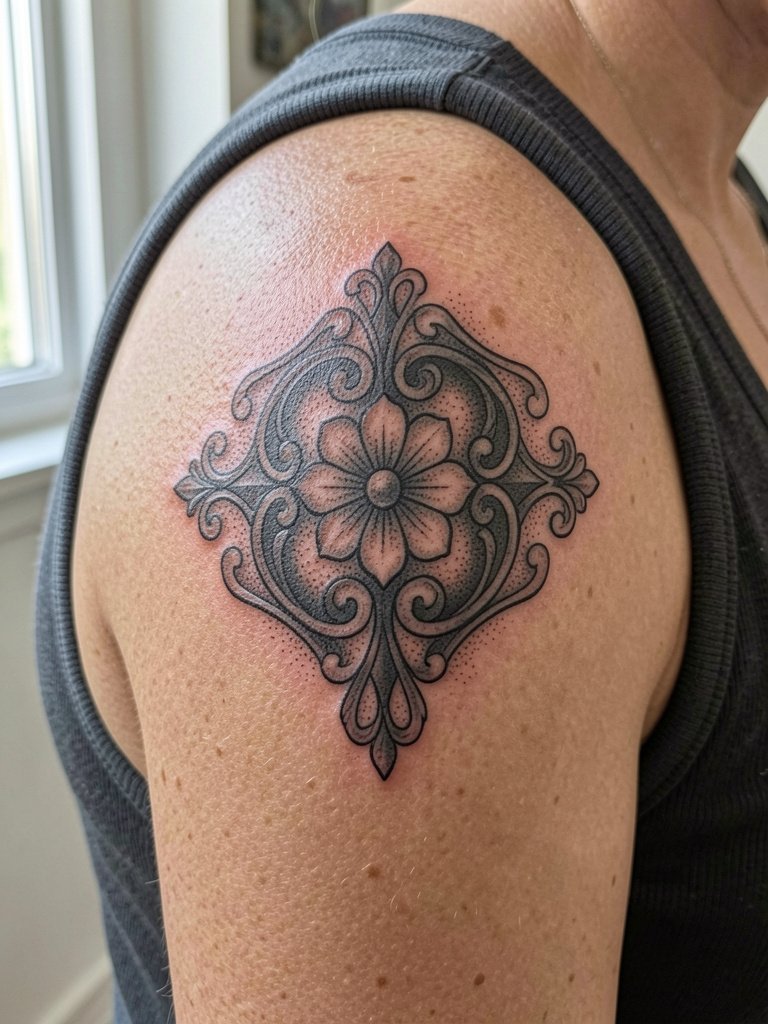
The shoulder gives a rounded canvas for symmetrical ornament. Advise the artist to design the medallion to sit on the cap so movement does not distort the central motif. Tank tops and off-shoulder blouses pair well for showing off the panel. For the session wear a loose tank so the artist can easily stencil and ink the area. Shot spacing should account for the roundness to avoid one side compressing more than the other. Typical session time for a medium shoulder panel is one to two hours with a touch-up possible after six to twelve months.
10. Calf Trailing Vine Composition
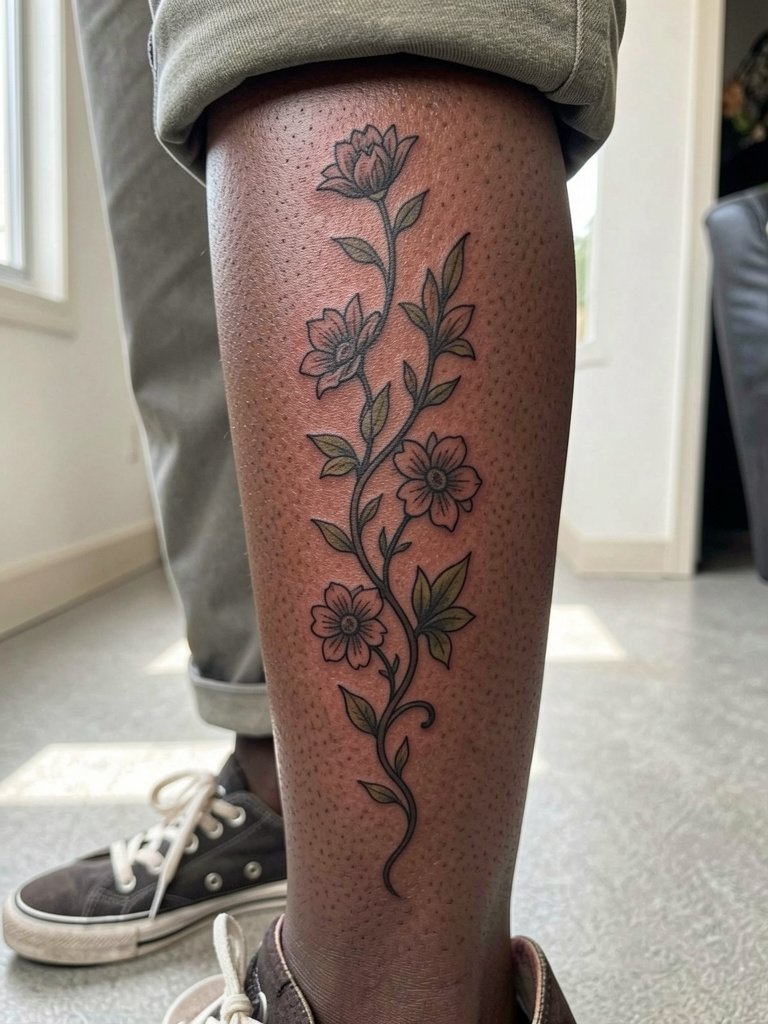
Calf pieces read well from a distance and are lower in social intensity than hands or neck, which makes them good for lovers of vertical Art Nouveau language. Ask the artist to anchor the main stem with a bolder outline where the calf muscle shows curvature so the vine keeps its shape when you move. Pair the calf motif with low-profile sneakers or midi skirts to show motion. Wear shorts or rolled pants on the appointment day. A single long session can complete a medium calf piece but expect to schedule touch-up if shading needs more saturation.
11. Minimal Ornamental Forearm Band
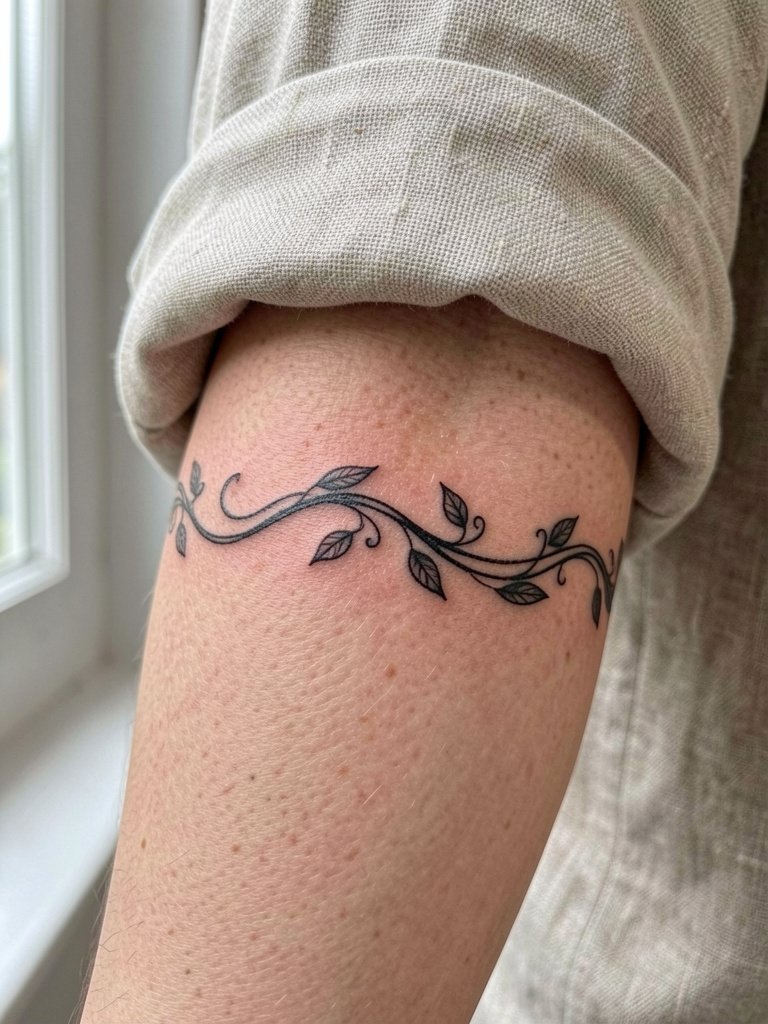
A forearm band can be decorative without being busy. Recommend a single-weight outline with negative space inside the cuff to keep breathability in the design. The most common error is squeezing too many tiny leaves into a narrow band, which reduces contrast after healing. This style looks best with rolled sleeves and gold cuff bracelets. For the appointment wear a button-down you can roll up above the elbow for easy access. Expect around an hour for a neat band and a small touch-up after initial healing if any thin areas need darkening.
12. Sternum Symmetrical Ornament
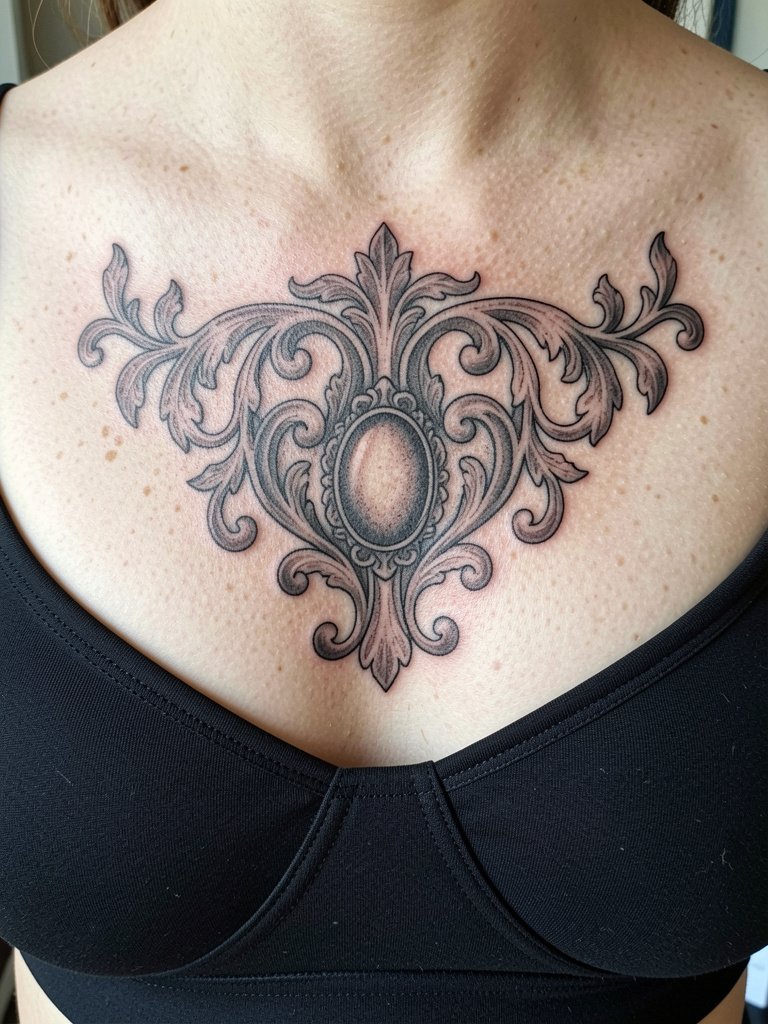
Sternum pieces are naturally symmetrical and suit ornamental framing. This area can be sensitive, so plan for slightly thicker anchor lines on the central medallion. One common mistake is cramming narrow filigree too close to the breast crease where movement and pressure cause early blur. For showing the design consider deep V tops or structured bralettes that reveal the center chest. During the session wear a strapless or soft bralette for clean access. Expect moderate to high pain and one to two sessions depending on scale.
13. Nape Filigree Flourish
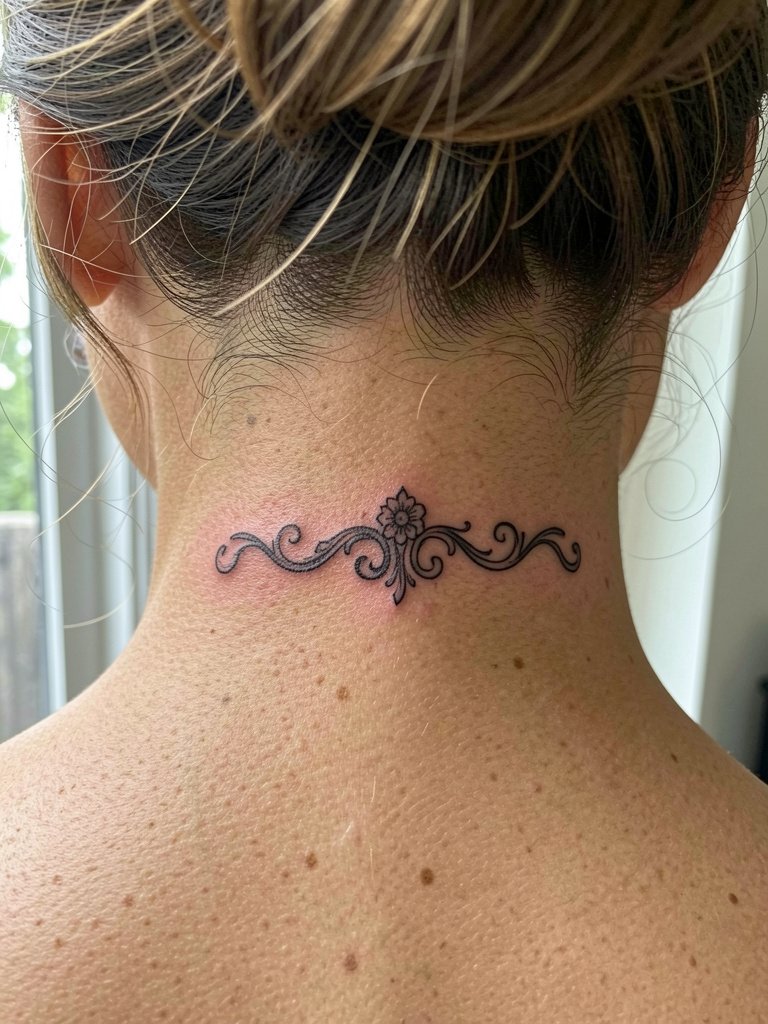
Back-of-neck flourishes are low-profile but decorative. They favor graceful curves and small medallions, and they work well when you want a peek of ornament with your hair up. Ask the artist to leave breathing room around each curl so the design keeps a crisp silhouette when the hair grows. If you wear necklaces, choose ones that sit above the nape piece rather than over it. The session is brief and pain is usually low, but healing depends on hair growth and shampooing practices, so plan touch-up timing accordingly.
14. Hip Elongated Botanical Motif
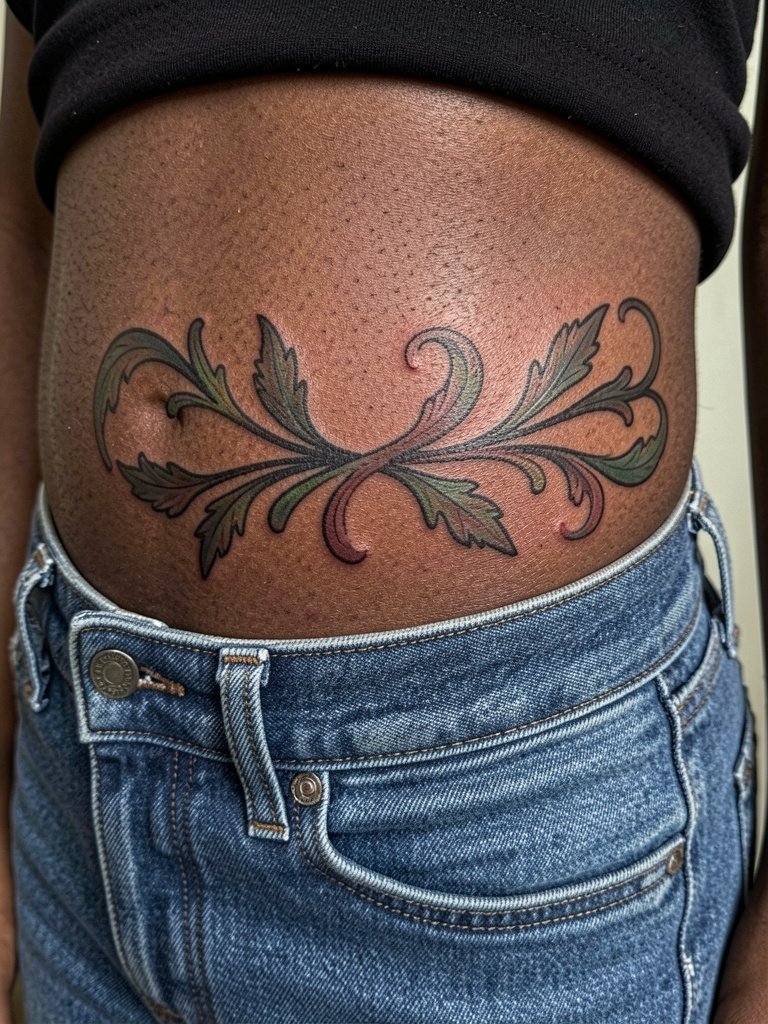
Hip motifs benefit from a curve that hugs the waistline. Ask for a vertical composition that tapers as it reaches the upper thigh to read well in swimwear. A common mistake is too much micro-detail toward the waistband where friction can dull fine dots. Pair this with high-waisted swimwear or side-slit dresses to show the sweep. For the appointment wear loose shorts or low-rise jeans that can be moved without tugging. Pain is moderate and a single session usually suffices for medium scale work.
15. Inner Bicep Botanical Bust

Inner bicep canvas reads intimately and holds detail if executed properly. Clarify with the artist that the stencil sits on the medial side of the bicep and not in the axilla. The arm should be relaxed during placement so the composition matches how the skin sits at rest. The inner bicep can blur faster than the outer arm if the lines are too fine, so specify slightly heavier internal contours while keeping hairline accents where required. Wear a sleeveless top during the session for clear access. Pain is moderate and the session time varies with portrait complexity.
16. Calmed Minimalist Medallion on the Thigh
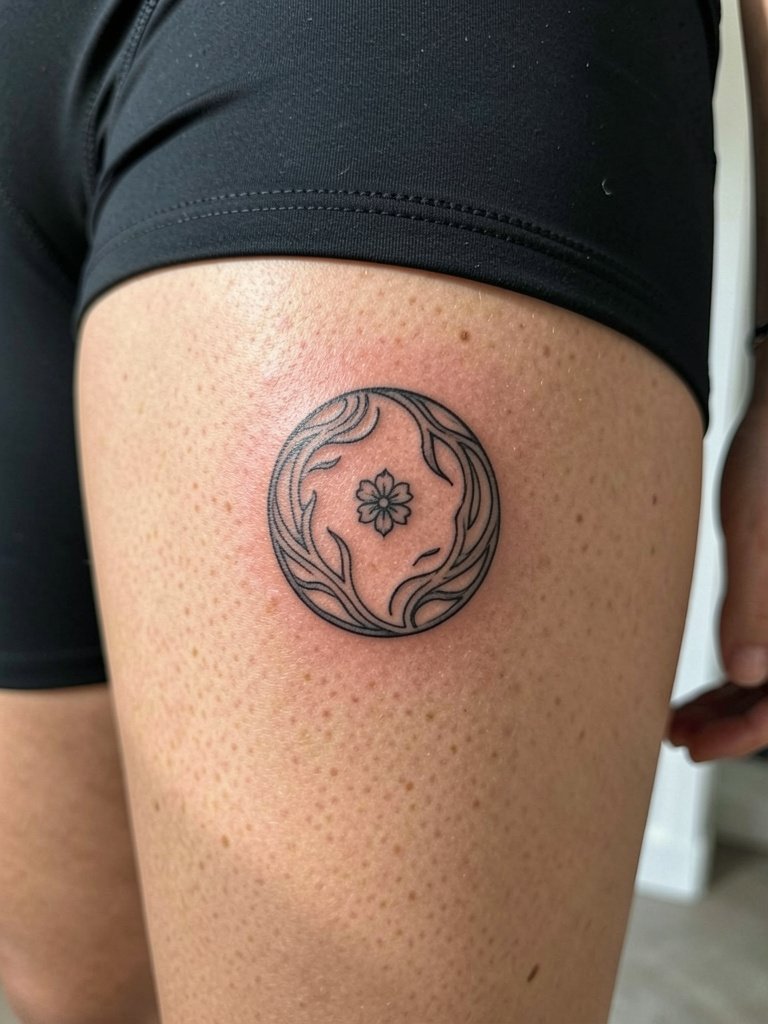
Thigh medallions give space for ornate curves while remaining private. Request a simple central medallion with surrounding negative space so the piece breathes on the skin. One frequent mistake is overfilling the circle with tiny filigree that gets lost when the thigh compresses in movement. For show-off wear choose high-waisted swimwear or side-slit dresses. On session day wear shorts or bike shorts that allow the artist to work the upper thigh comfortably. Pain is generally low to moderate for the outer thigh and the result ages slowly with normal body changes.
17. Elongated Rib Vine with Single Portrait Accent
Combining a small portrait with an elongated vine uses scale to your advantage. The vine gives movement and the portrait supplies the Art Nouveau signature. Because ribs are a high-motion and high-pain area, plan for heavier outline anchors and wider spacing in the filigree. During consultation bring references showing both portrait scale and stem thickness so the artist can balance detail versus longevity. Wear a soft sports bra for easy access on session day. Expect one long session and the likelihood of a touch-up if shading needs darkening after healing.
18. Ankle Chain of Small Medallions
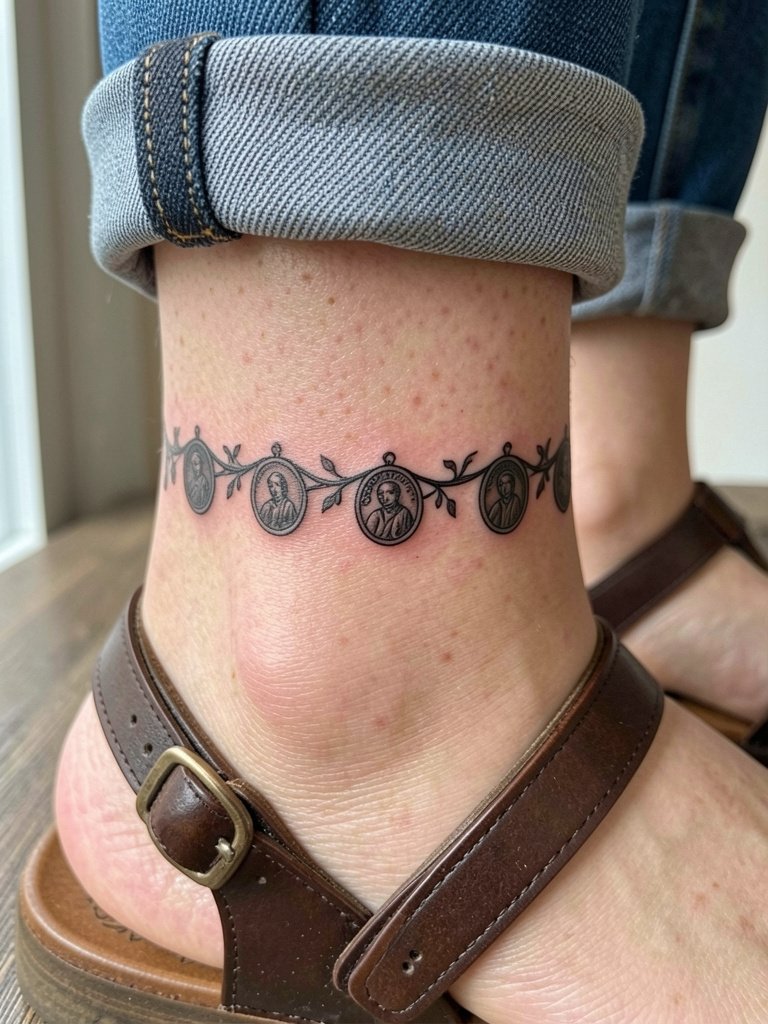
A medallion chain around the ankle reads like jewelry and can be scaled for subtlety. The ankle experiences a lot of friction, so avoid ultra-thin connecting lines. Pair with ankle-strap sandals or low sneakers for a composed look. For the appointment wear shorts or rolled jeans so the area is cleanly accessible. Expect a short session and possible touch-up if any tiny connecting lines fade after the first heal.
19. Decorative Back Panel Along the Spine
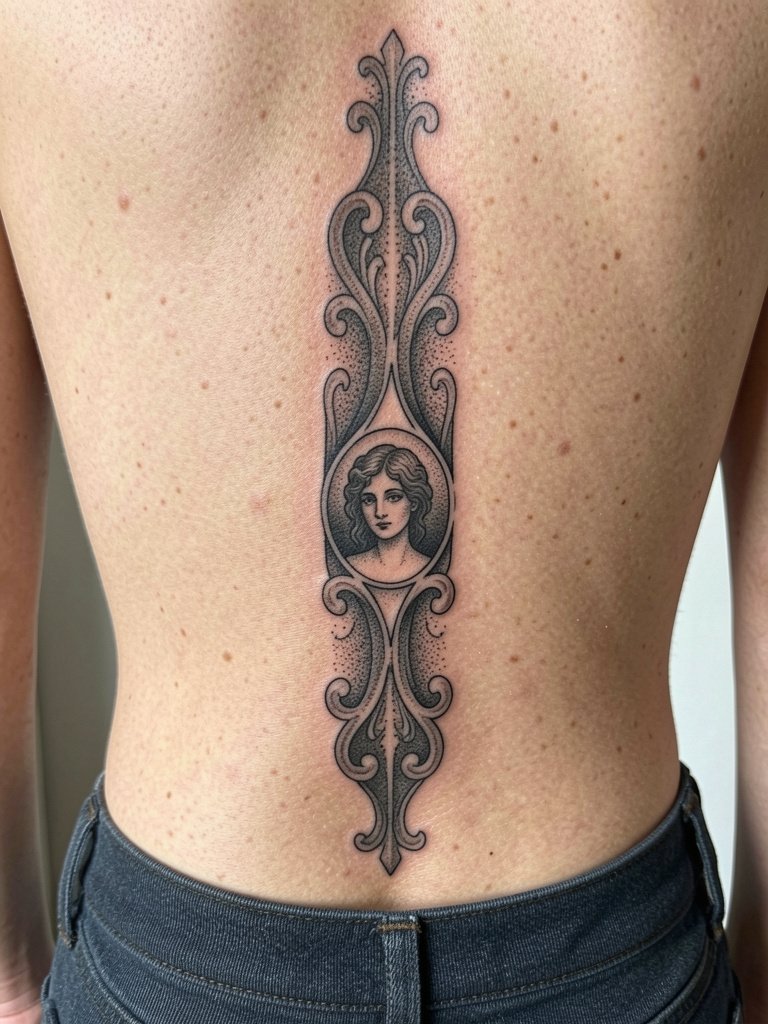
A spine-aligned panel emphasizes verticality and symmetry. Request that the central spine line be slightly bolder to avoid migration into the surrounding stipple. Many clients try to compress too much detail into the central axis, which risks early blurring. For showing the panel wear low-waisted jeans and cropped tops. During the session wear a top that can be moved up without adjusting the waistband. Expect multiple hours depending on scale and a likely touch-up window after initial healing.
20. Micro Ornamental Piece Behind the Ear
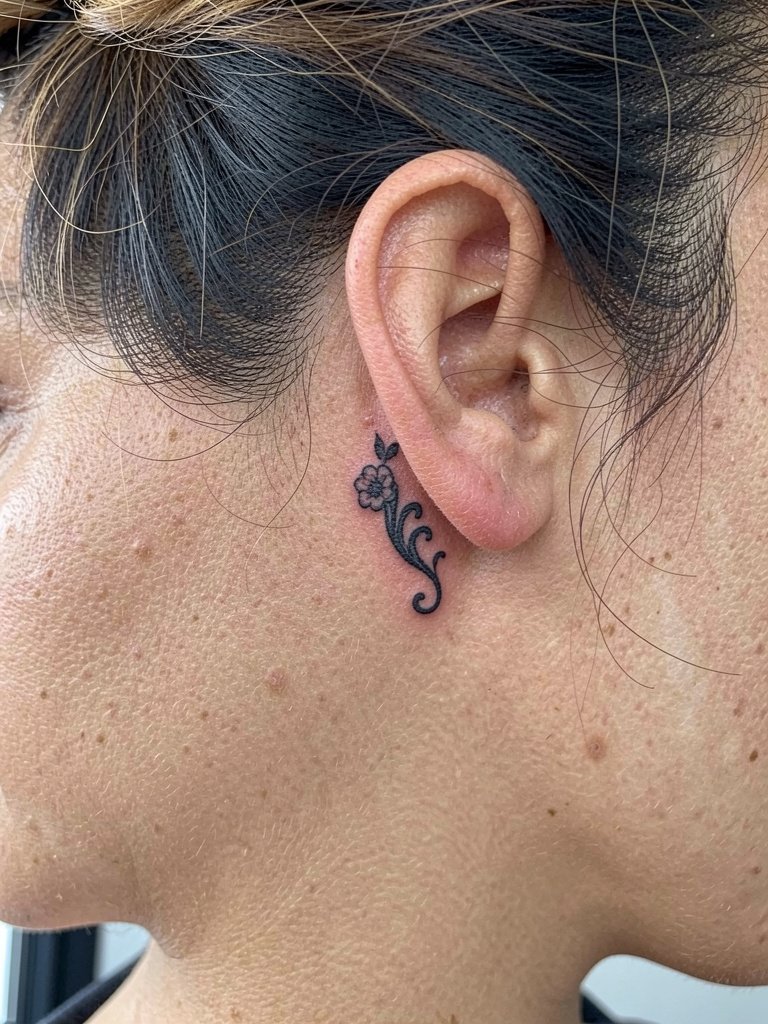
Behind-the-ear tattoos are intimate accents that demand crisp silhouettes. Ask the artist to use single clear arcs and avoid tiny internal dotwork that can be lost when hair rubs the spot. This placement works with short hair or styles that expose the nape. For the appointment have hair tied back in a simple updo. Sessions are short and pain is low to moderate. Expect minor touch-up needs if shampooing habits cause friction during early healing.
21. Calf Panel with Portrait Medallion
A framed medallion on the calf balances portrait detail with trailing ornament. Specify margins around the portrait face inside the medallion so facial features remain readable as the calf moves. This design looks great with midi skirts and mid-calf boots. On session day wear clothing that can be rolled or removed without compressing the area. One to two sessions are typical and a touch-up may be needed if stipple fades in spots after healing.
22. Wrist-to-Hand Decorative Connector
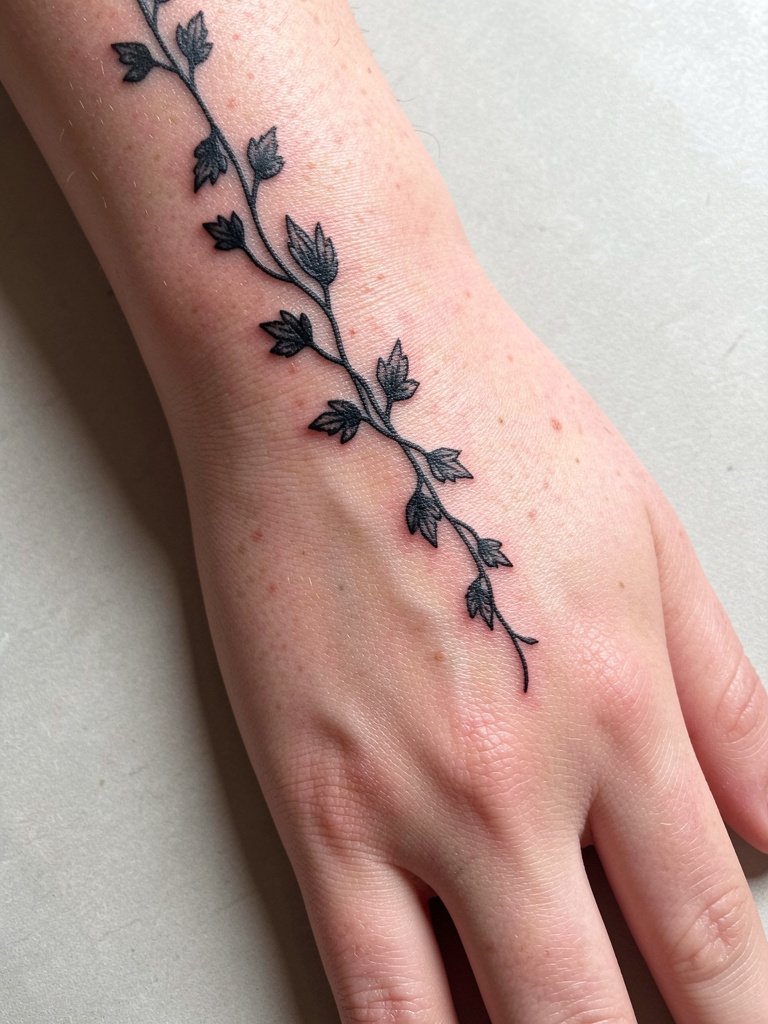
Hand and wrist connectors are high-visibility and high-wear. Ask the artist to outline the main shapes with a sturdier line so the design remains legible despite washing and sun exposure. Pair this with thin chain bracelets on the opposite wrist when showing the piece. For the session remove all rings and bracelets and wear short sleeves. Expect faster fading than on protected skin, so budget for a touch-up at 12 to 18 months if you want the connector to remain crisp.
23. Hip-to-Thigh Flowing Panel
A hip-to-thigh panel gives the most dramatic body flow and suits clients who want a statement that still hides under everyday clothes. Make sure the portrait inset is proportionally scaled so it does not lose facial definition with skin movement. High-waisted swimwear and side-slit dresses are natural show-off pairings. Wear low-rise jeans or loose shorts to the appointment so the artist can stencil the hip line cleanly. Expect multiple hours across one or two sessions and a likely touch-up during the first year as pigments settle in the curved area.
Frequently Asked Questions
Q: How do I decide between black-and-grey and muted color for an Art Nouveau piece?
A: Both options work but they emphasize different outcomes. If longevity and contrast matter most, black-and-grey with stronger anchor lines will usually read well longer. If you want period-accurate mood and softer highlights, request muted, low-saturation color and wider spacing between decorative elements so pigments do not muddy over time.
Q: What placements age best for flowing Art Nouveau lines, and which should I avoid if I want minimal touch-ups?
A: Areas with lower friction and less daily stretch keep fine ornamental detail longest, so the outer upper arm, calf, and shoulder are good bets. High-motion spots like the inner wrist, hand, and ribcage often need touch-ups sooner. Plan slightly bolder main lines for wrists and hands and ask for wider negative spaces in small motifs.
Q: Where can I find artists who post healed Art Nouveau portfolios without naming artists directly?
A: Search visual platforms with style-specific tags and location filters. Try hashtags like #artnouveautattoo, #artnouveauink, and #muchaInspired on Instagram and TikTok and set your location to nearby cities. Browse studio portfolio pages that include healed shots rather than just fresh photos. Reddit tattoo communities also surface honest healed examples and troubleshooting advice, which helps you compare how similar designs aged on different skin tones.
Q: How should I dress for my session depending on placement?
A: Pick clothing that gives the artist full, comfortable access to the area without you having to undress. For shoulder and upper arm, wear a loose tank or off-shoulder top that can be moved easily. For ribcage and hip work, a soft sports bra and low-rise pants are practical. For ankle and calf pieces, wear shorts or rolled cuffs so the artist can position the limb without fabric tugging.
Q: How realistic is it to do a small Art Nouveau portrait and keep facial detail?
A: Small portraits need space to breathe, so scale matters. If you want a face under two inches across, accept simplified features and stronger contour lines. For finer facial realism keep the portrait at least three to four inches tall and ask the artist for staged mockups at the intended dimensions so you can evaluate legibility before committing.
