
I spent months bookmarking Gothic pieces before I realized the real challenge: picking a design that keeps its drama after it heals. Gothic tattoos read strong from a distance but live in the details up close. These 24 ideas focus on heavy contrast, dark motifs, and placements that make them feel theatrical without becoming unreadable over time.
This list zeroes in on blackwork, neo-traditional, fine line, and micro-realism with Gothic motifs. I picked placements that suit statement pieces and hidden keepsakes. From what I’ve seen in 2026 trends, dark botanical and architectural details are getting a lot of attention—and they age better than tiny, intricate scripts.
1. Fine Line Victorian Lace Choker on Neck
Style/Technique: Fine Line / Ornamental
Pain Level: High (7/10)
Session Time: 1–2 hours
Best For: Visible accent, delicate statement
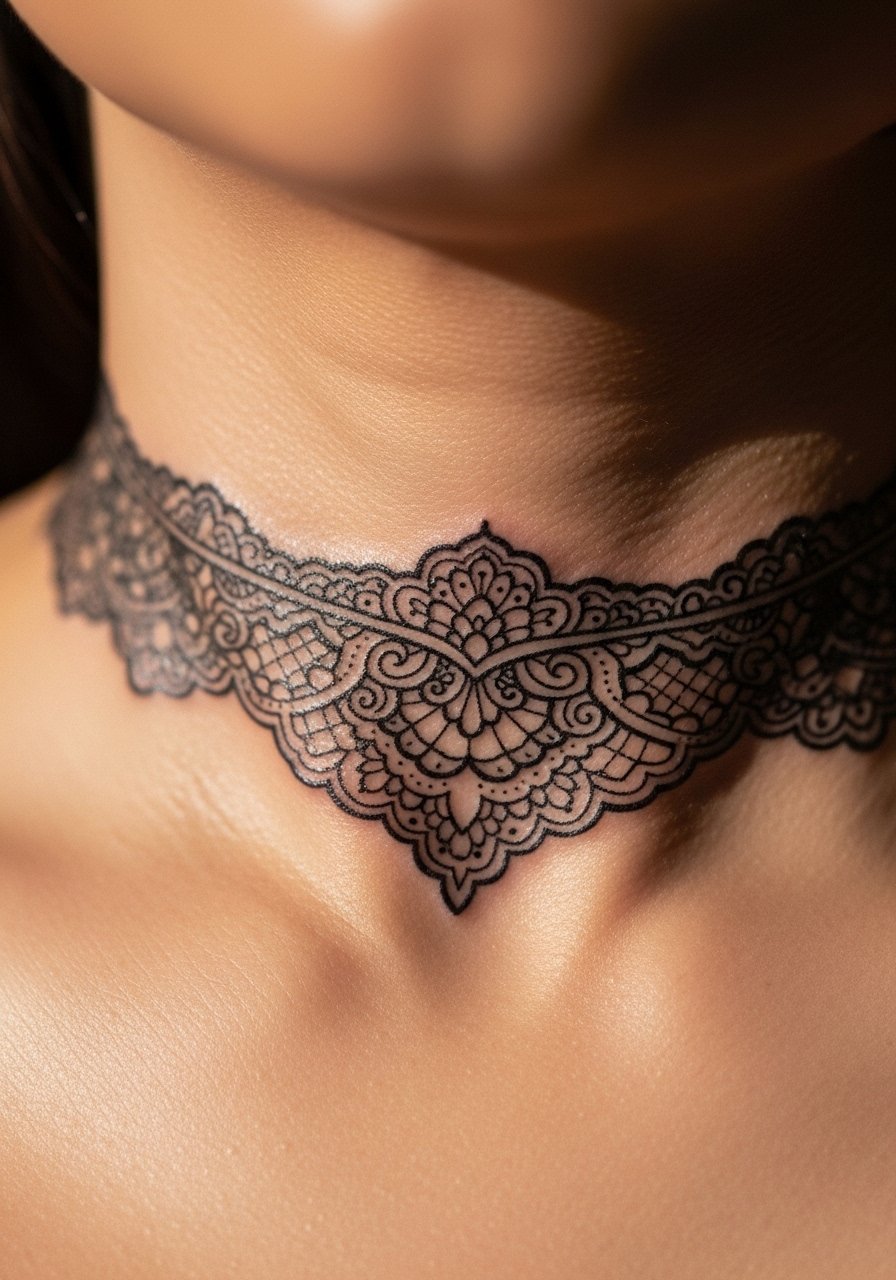
I love how a lace choker reads like jewelry and like a story. Fine line makes this feel feminine and Gothic at once. The neck keeps the piece visible, but expect higher pain and a slower initial healing due to constant movement. I’d plan for careful aftercare; Saniderm or a thin occlusive helps the first 3–5 days. Lines settle and soften with time. From what I’ve noticed, too many hairline details can blur; ask for slightly bolder secondary lines. This is a look that needs an artist comfortable with delicate negative space and consistent line weight. Healed, it reads refined—fresh it’s razor-sharp.
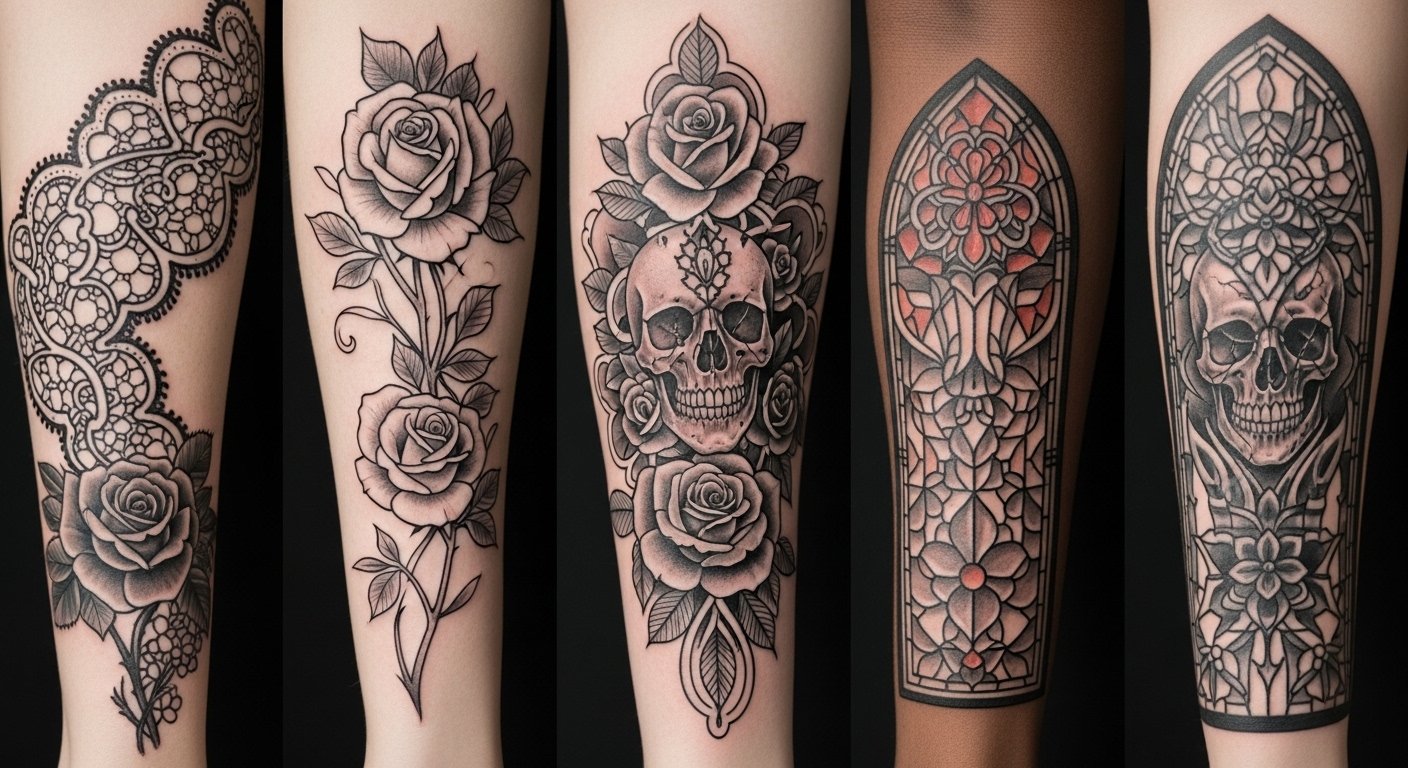
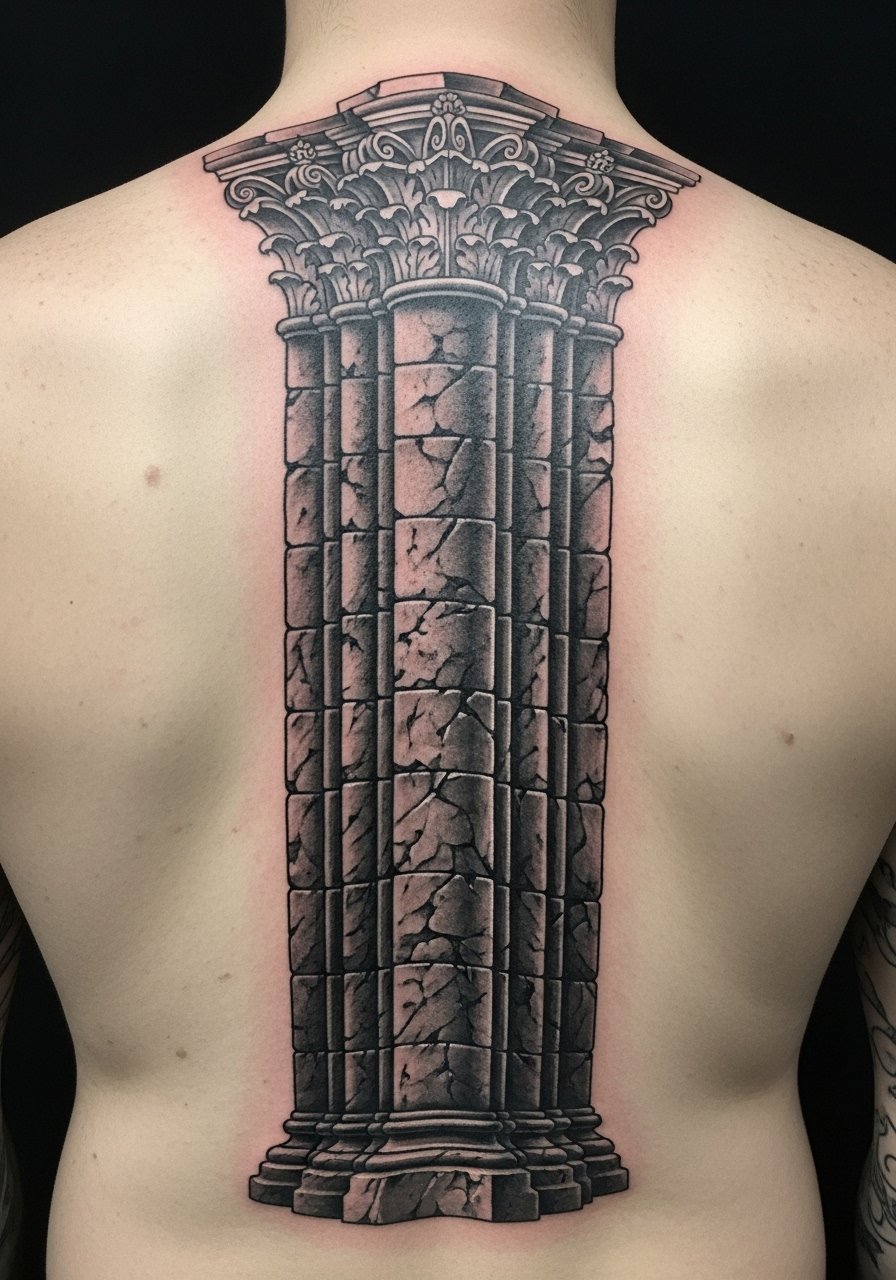
2. Blackwork Cathedral Sleeve on Full Arm
Style/Technique: Blackwork / Architectural
Pain Level: Medium-High (6/10)
Session Time: Multiple sessions
Best For: Bold statement, sleeve continuity
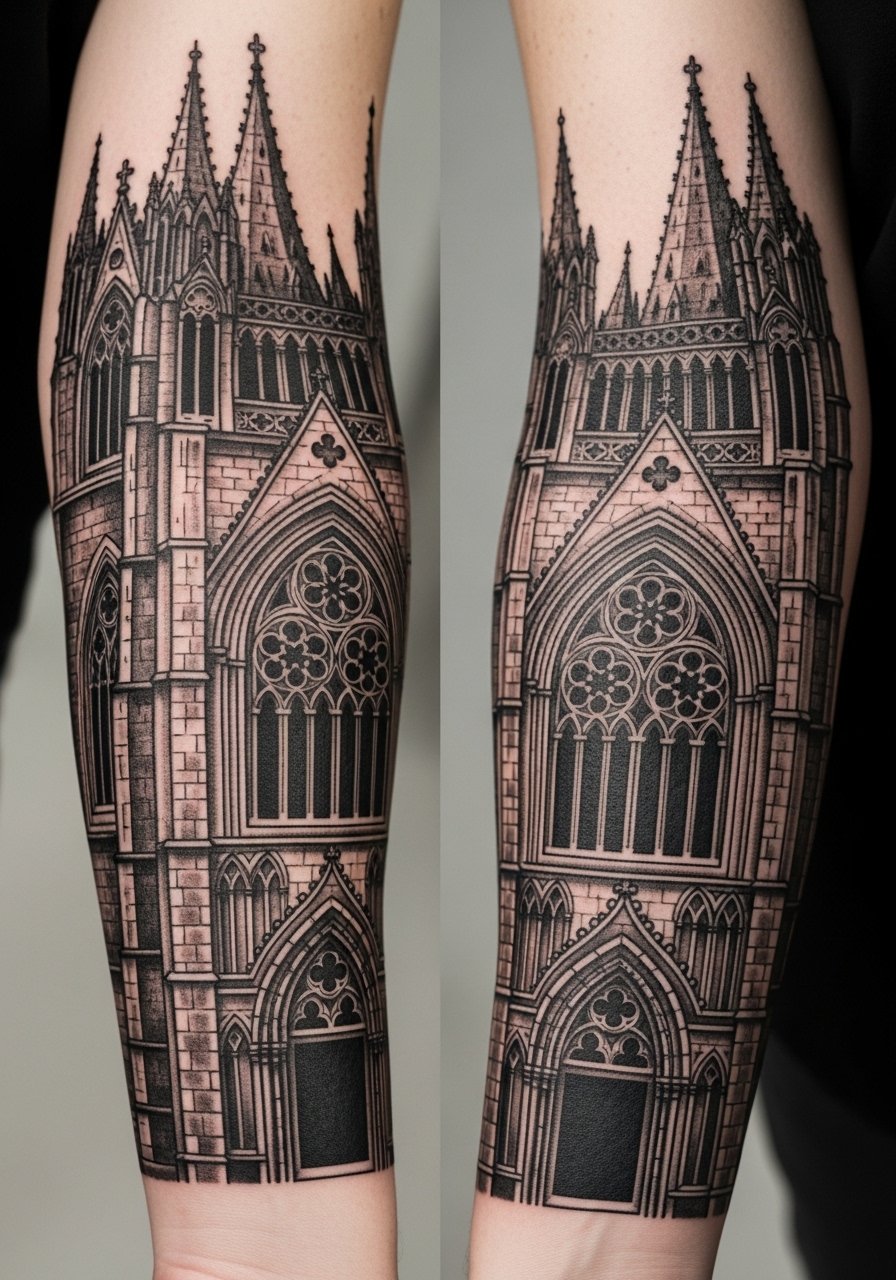
Solid blackwork brings Gothic architecture to skin. Columns, arches, and stained-glass silhouettes feel dramatic in negative space. Sleeves hide touch-ups well and the bold fills age predictably. Expect multiple sessions and long block-filling time. Pain varies across the arm—inner bicep and elbow hurt more. Healing benefits from heavy moisturization after the first week. From my experience, strong black fills resist fading best, while tiny architectural dots can wash out. Ask your artist about balancing negative space and solid areas so the piece keeps contrast as it ages.
3. Micro-Realism Victorian Portrait on Upper Arm
Style/Technique: Micro-Realism / Portrait
Pain Level: Medium (5/10)
Session Time: 2–4 hours
Best For: Meaningful piece, visible but easy to cover
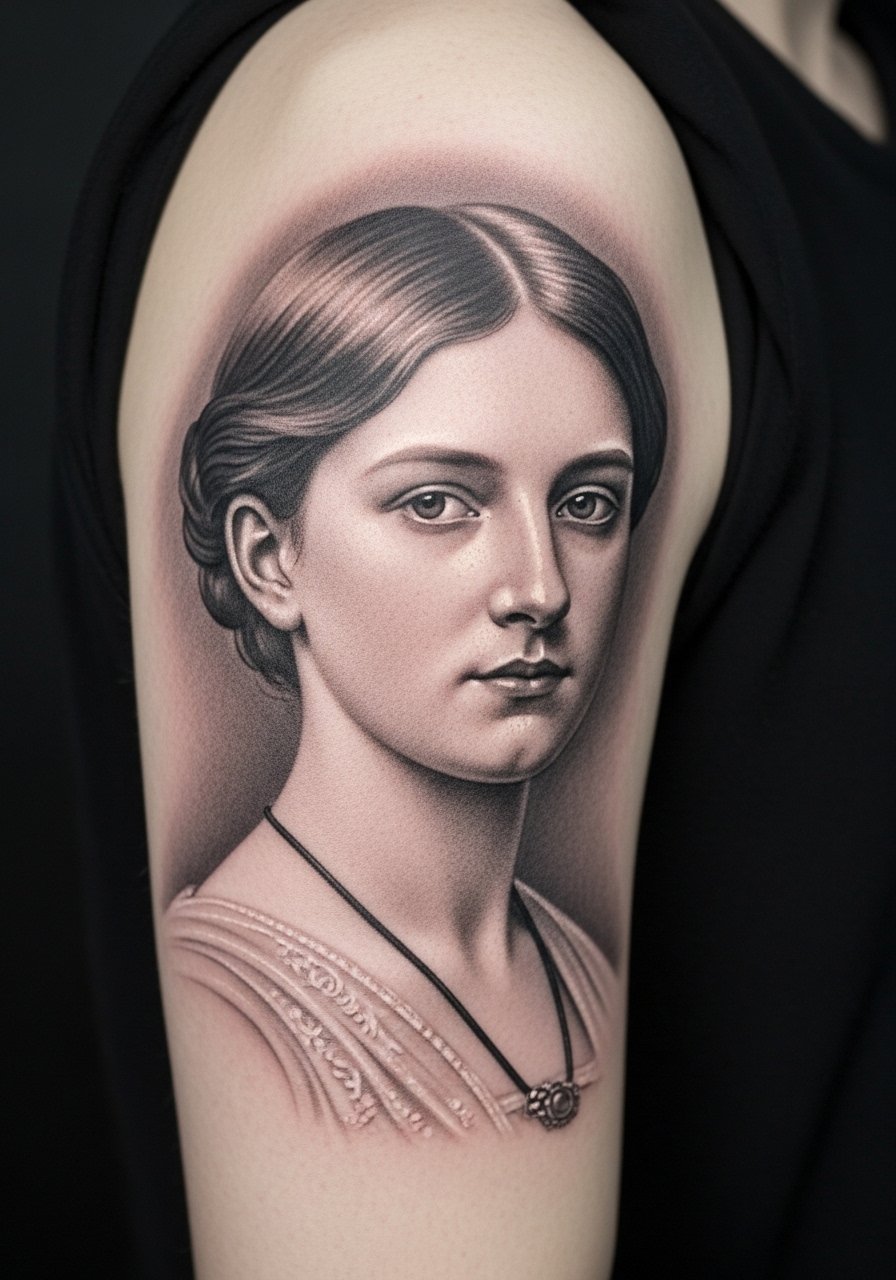
A micro-realism portrait in a Gothic vein—think high-collared figure or mourning sitter—has moody presence. Upper arm placement is forgiving for longer sessions and usually less painful than ribs or sternum. Grayscale holds up well on most skin tones. In my experience, portraits need clear reference photos and an artist who’s dialed in to subtle shading. Overworking contrast early can scar and flatten tones, so expect modest sessions and touch-up plans. Healed, portraits gain softness; they rarely look the same as fresh ink, so plan for that muted, haunted look.
4. Stained-Glass Window Panel on Upper Back
Style/Technique: Neo-Traditional / Color Block
Pain Level: Medium (5/10)
Session Time: 2–5 hours
Best For: Back statement, centerpiece
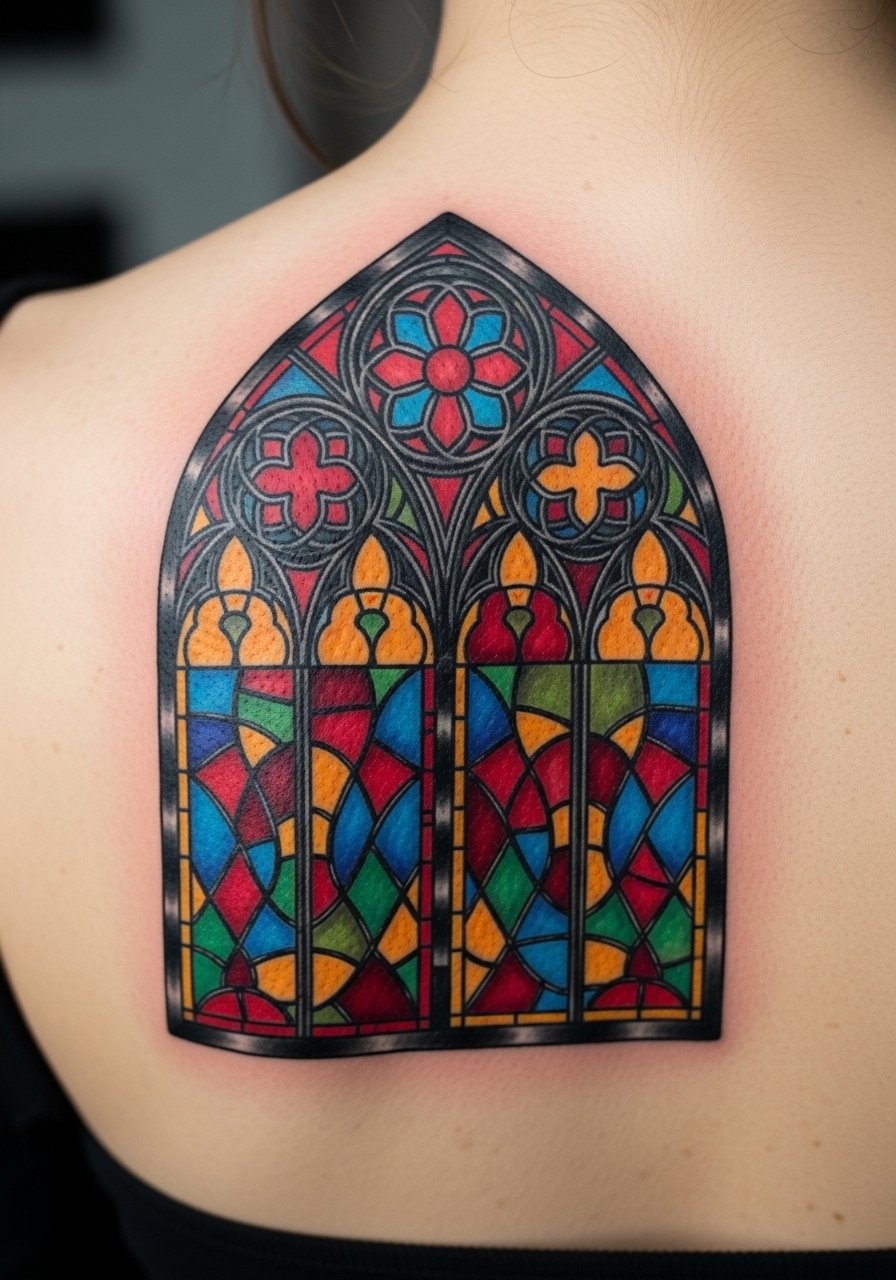
Stained-glass takes Gothic motifs into saturated color without losing drama. Bold black lead lines keep the design legible as colors fade. Upper back gives room for a rectangular panel and is easier to hide for work or formal events. Color heals differently—reds and yellows fade faster—so long-term maintenance matters. From what I’ve seen, artists who work with color gradients and clear separations between hues do this best. Avoid overly tiny color fragments; larger panes of color last longer and age cleaner.
5. Ornamental Ribcage Filigree With Script
Style/Technique: Blackwork / Ornamental Script
Pain Level: High (8/10)
Session Time: 1–3 hours
Best For: Intimate statement, coverable
Ribcage filigree looks like a vintage locket spread across the ribs. Placement is intimate and easily covered, but it’s a painful area. I found that smaller filigree elements read best when paired with a bold anchor point so nothing gets lost in healing. Expect surface peeling and tender movement for the first week. Artists often recommend spacing script slightly from filigree lines; otherwise both can blur together as you heal. If you want readable lettering, use a heavier script weight than you might think.
6. Black Rose Cluster on Upper Chest
Style/Technique: Neo-Traditional / Blackwork
Pain Level: Medium (5/10)
Session Time: 2–3 hours
Best For: Centerpiece, chest statement
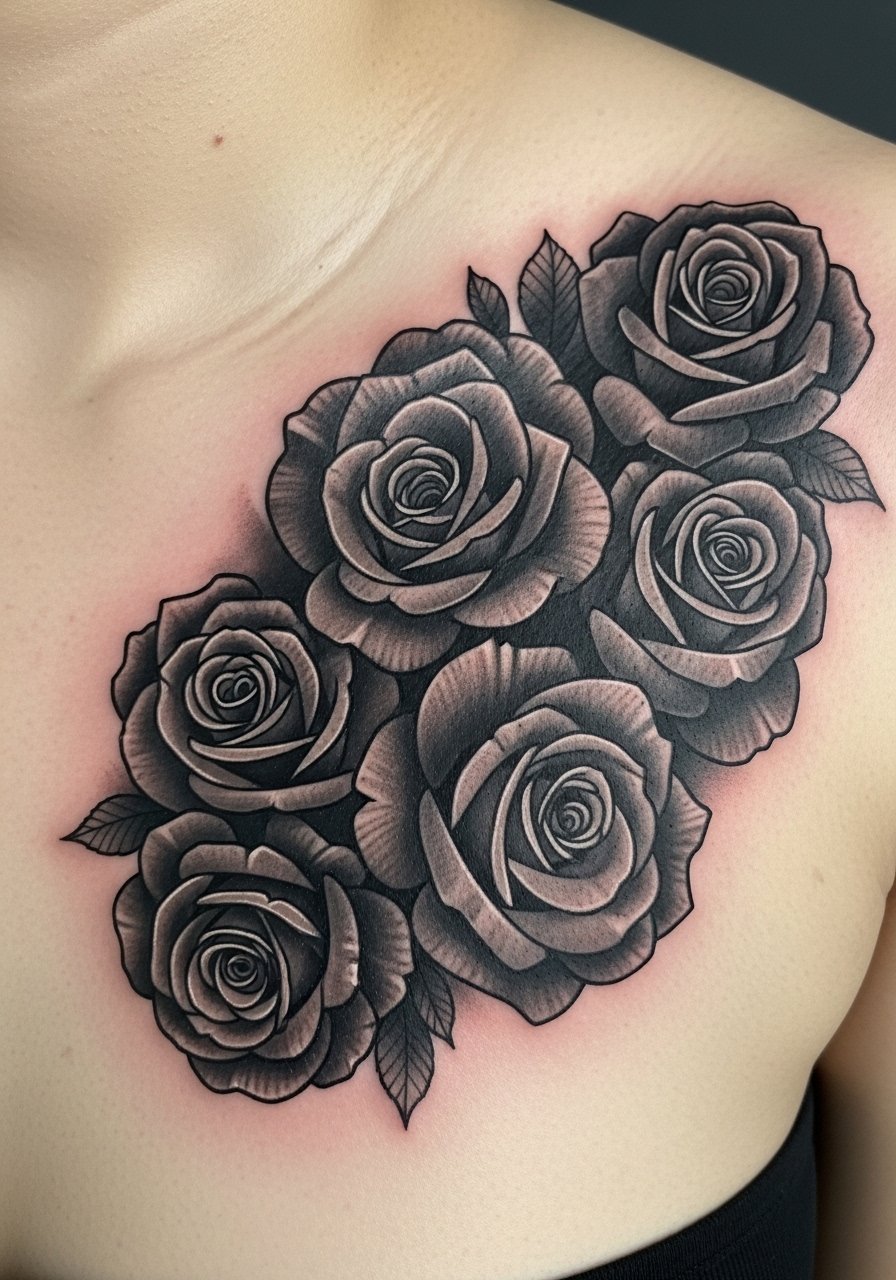
Black roses feel Gothic without cliché. On the chest they frame the sternum and collarbone, making a strong, moody focal point. Expect moderate pain over the sternum and more comfort around the pectoral. Large contrast and heavy black petals age well; small, detailed petal veins can blur. From what I’ve noticed, pairing solid black areas with soft gray gradients keeps the piece readable for years. Keep the area well-moisturized during healing. Avoid picking scabs—black inks can scab darker and leave patchy healed areas if disturbed.
7. Skull and Ivy Half-Sleeve on Forearm
Style/Technique: Blackwork / Neo-Traditional
Pain Level: Medium (4–6/10)
Session Time: 2–3 sessions
Best For: Visible sleeve, easy touch-ups
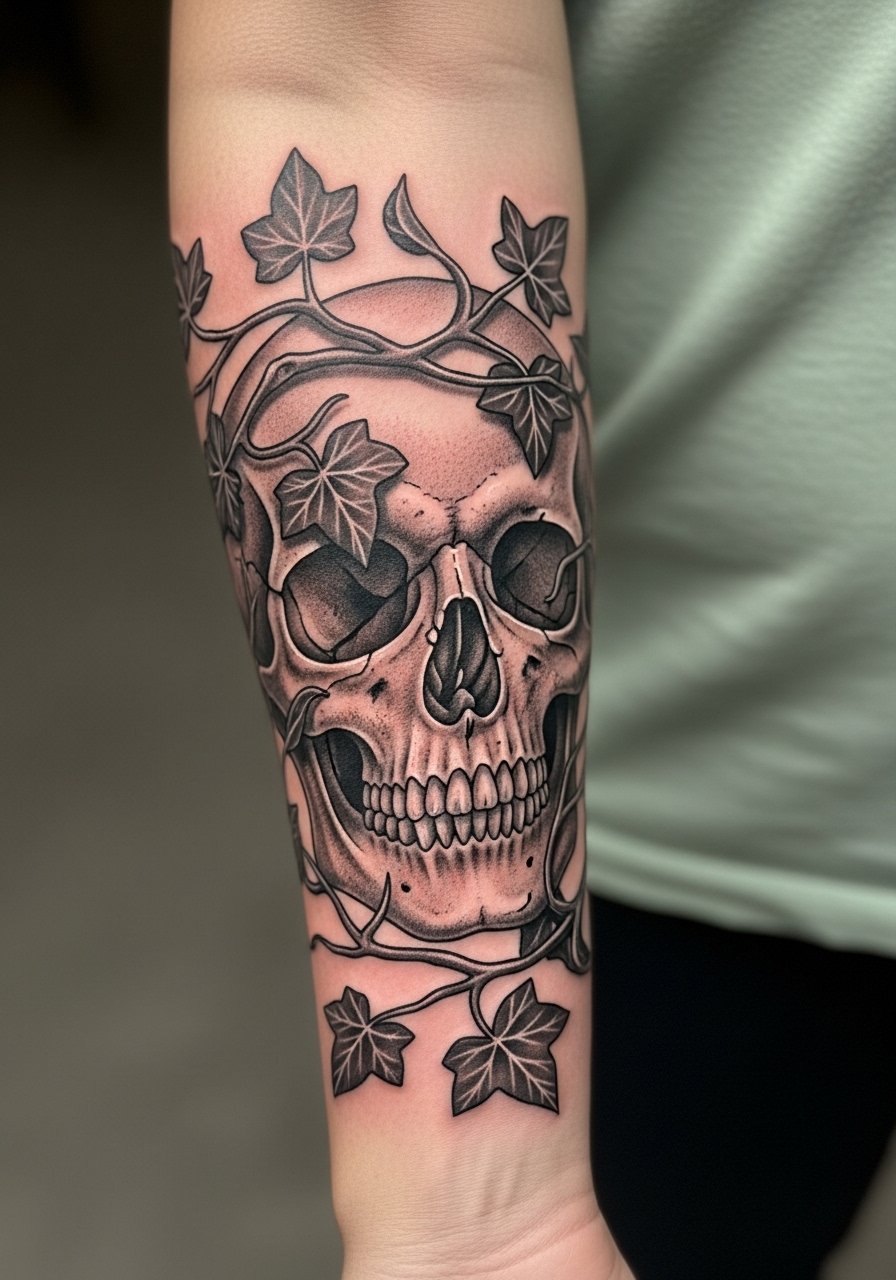
Skulls paired with dark botanical elements read Gothic and organic. The forearm is a forgiving place for touch-ups and sunlight exposure is controllable. Ivy winding around a skull creates motion and frames the arm. Pain is manageable, though near the wrist and inner forearm can sting more. I’ve seen this style age nicely when artists use strong blacks for the skull silhouette and softer gray for foliage. A common mistake is too many tiny leaf details; scale up leaves so they hold through healing.
8. Mini Occult Sigil Behind Ear
Style/Technique: Fine Line / Micro-Blackwork
Pain Level: Low-Medium (3–5/10)
Session Time: 30–60 minutes
Best For: Subtle symbol, hidden meaning
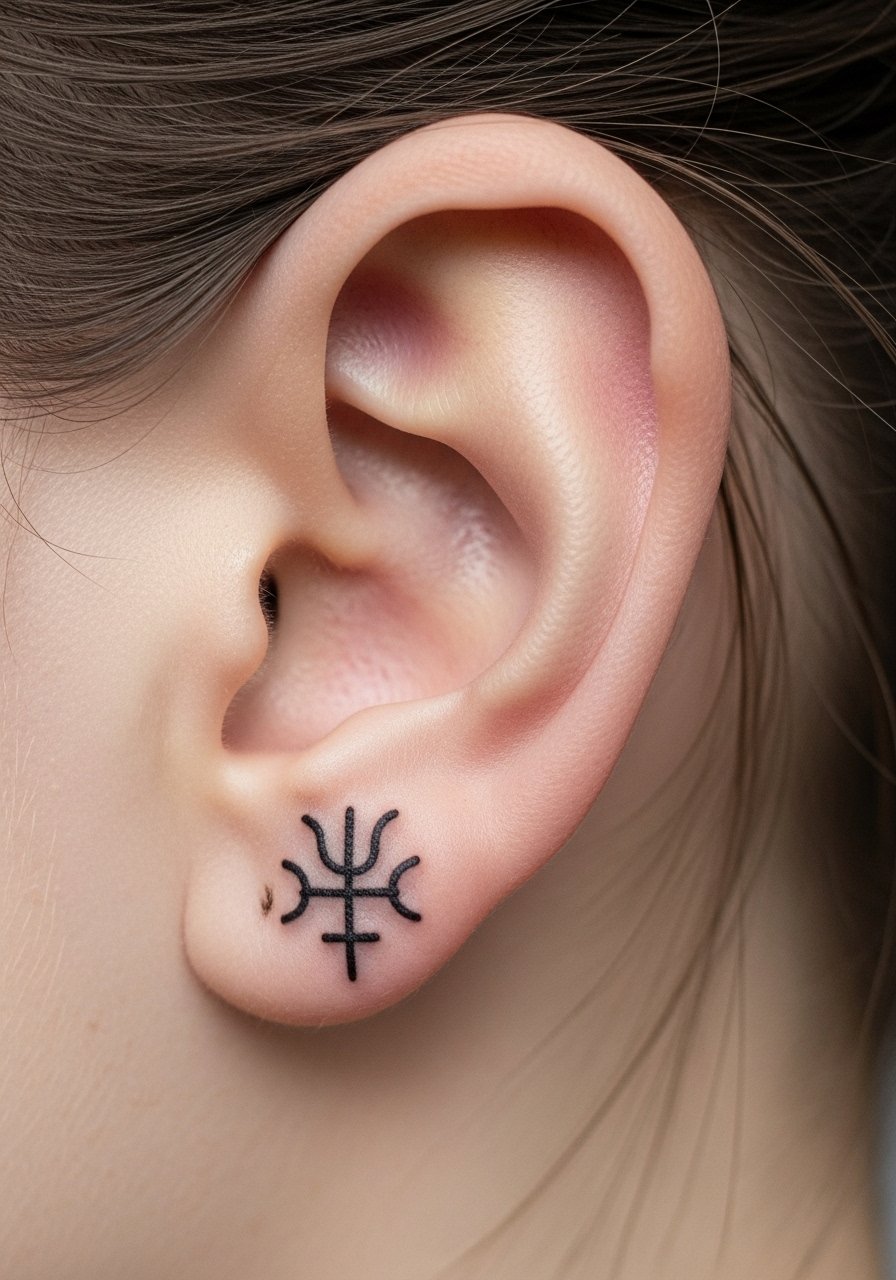
A tiny sigil behind the ear reads private and Gothic. Placement is low-pain for many, but the skin is thin so lines can crisp or feather. I’ve used this placement for secret symbols and recommend asking the artist to bolden critical nodes so the sigil remains legible as it heals. Healing is quick but keep hair and shampoo away from the area for the first week. This is a great way to get Gothic energy in a subtle spot.
9. Stacked Memento Mori Pocket Watch on Sternum
Style/Technique: Micro-Realism / Black & Gray
Pain Level: High (7–8/10)
Session Time: 2–3 hours
Best For: Central chest focal, symbolic piece
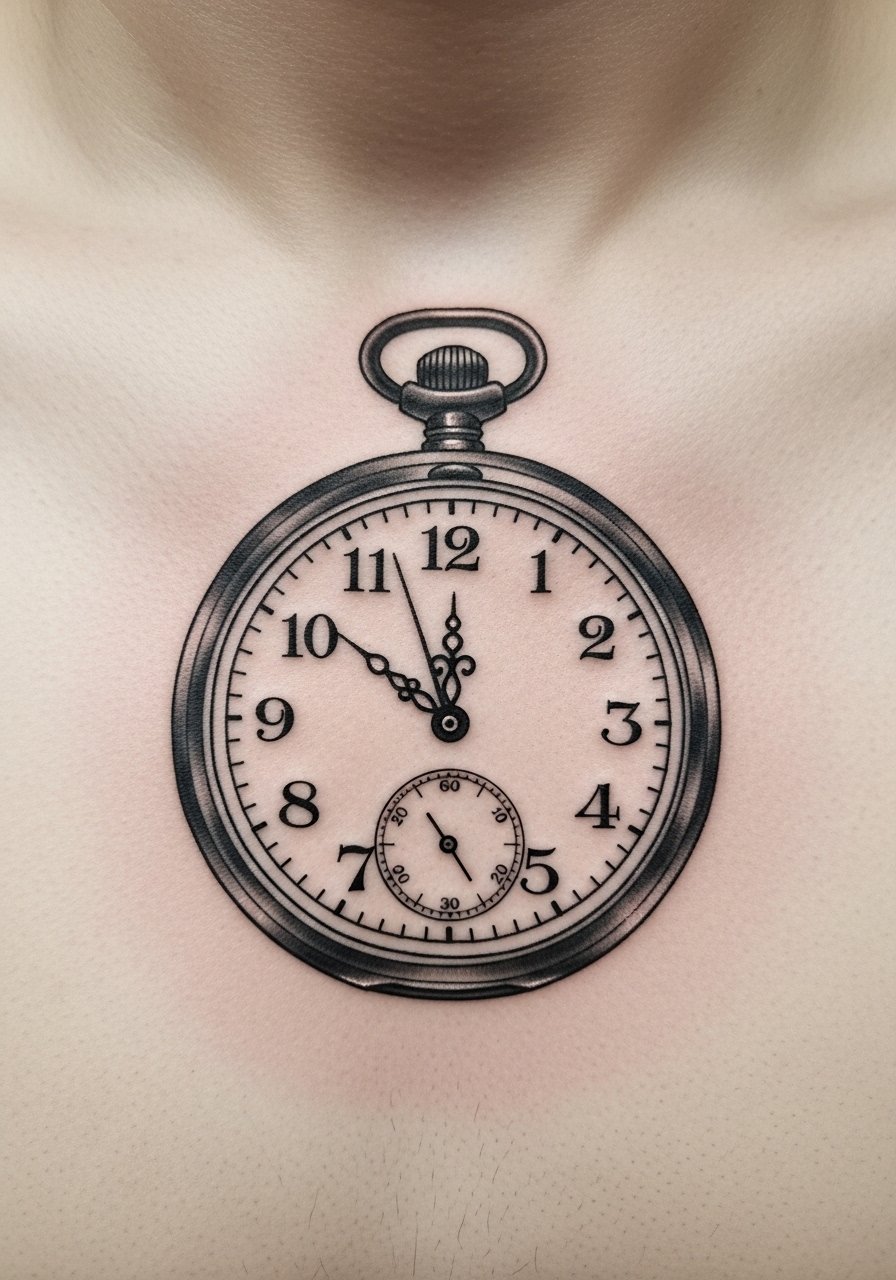
A pocket watch with skull motifs on the sternum feels like a Gothic timekeeper. The sternum is painful but powerful visually. Micro-realism needs crisp contrast so the watch face stays readable as skin softens. Expect longer healing and tender movement for the first 1–2 weeks. From my experience, artists who slightly over-ink shadow areas produce better long-term reading; under-inked grays can fade into a blur. Keep sunscreen on this area once healed to preserve tonal definition.
10. Baroque Mirror Frame on Thigh
Style/Technique: Ornamental / Neo-Baroque
Pain Level: Low-Medium (3–5/10)
Session Time: 2–4 hours
Best For: Large statement, easy cover
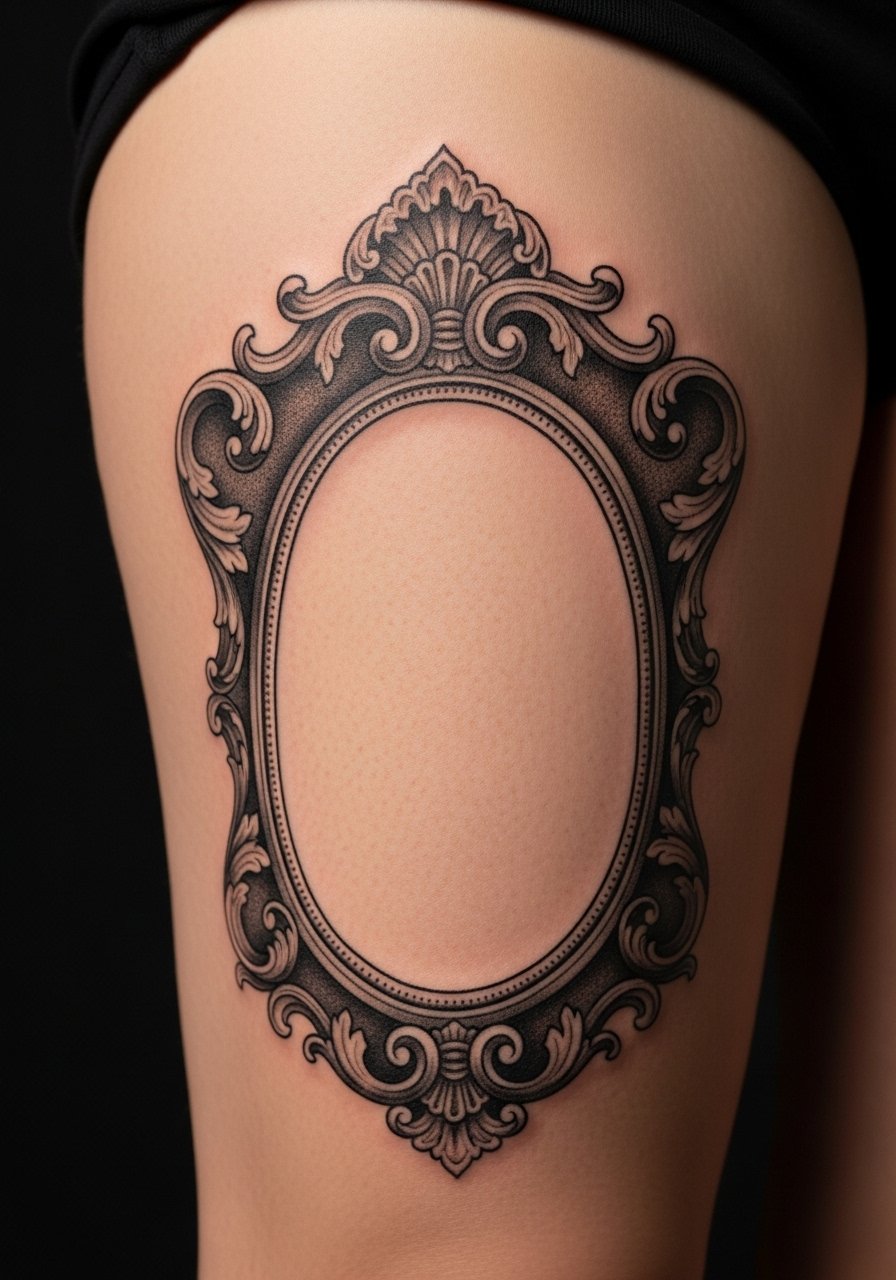
A baroque mirror frame makes for a decorative Gothic piece on the thigh. It’s an adaptable canvas—use it as a frame for another image later, like a portrait or scene. Thigh placement is lower pain and easy to hide. Ornamental curls read best with clear negative space and thicker outer lines. I’ve seen overly intricate scrollwork blur; opting for fewer, bolder flourishes keeps the design legible through healing and weight changes.
11. Gothic Cross Over Spine
Style/Technique: Blackwork / Linear
Pain Level: High (7–9/10)
Session Time: 1–2 hours
Best For: Central vertical statement
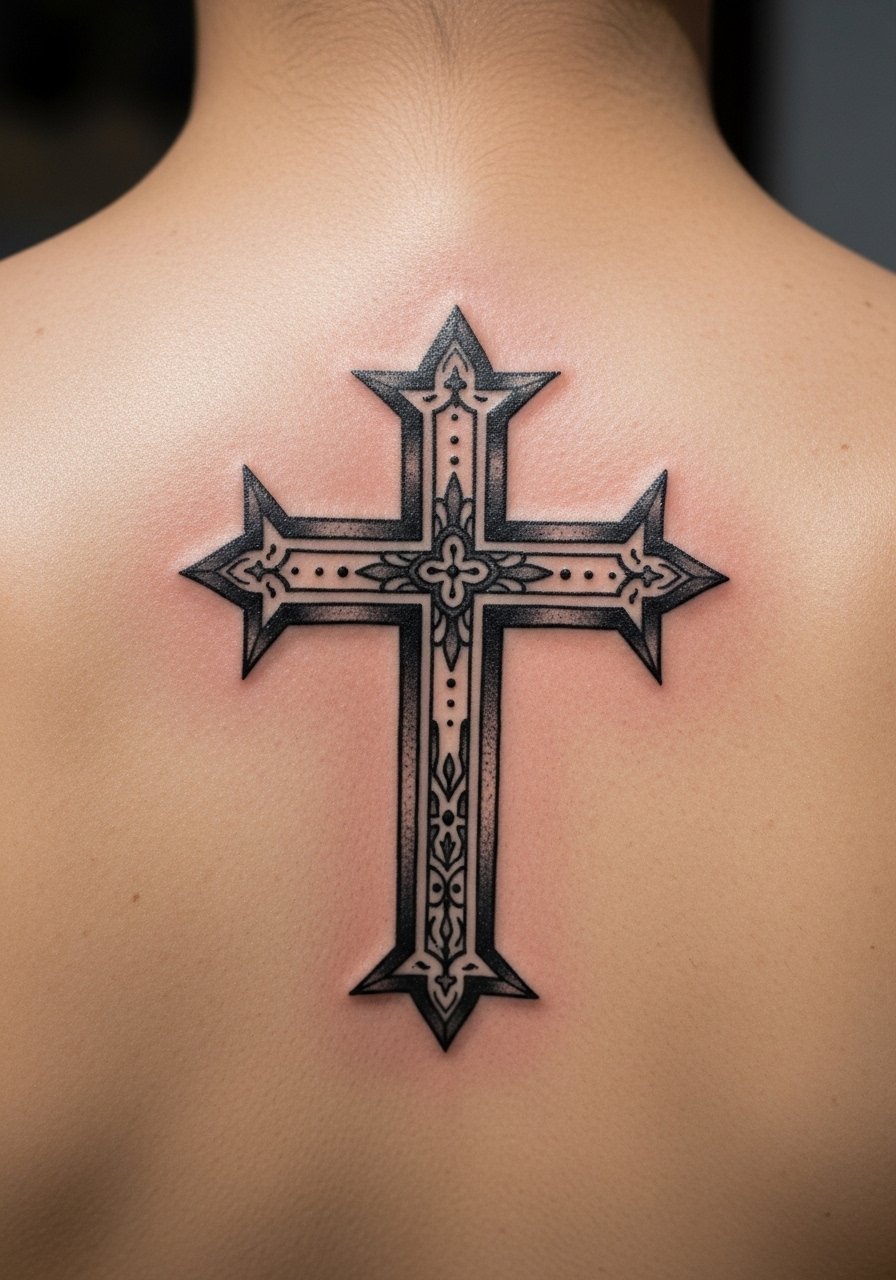
A spine-cross uses the body's vertical axis for dramatic effect. Spine tattoos are painful and demand short, focused sessions. Lines should be slightly thicker than you'd get on a forearm so the central column keeps crispness as skin moves. From what I’ve gathered, artists recommend planning for touch-ups on spinal work because movement and clothing rub can wear edges. Healed, the piece reads solemn and architectural.
12. Dark Botanical Thigh Panel With Anemones
Style/Technique: Blackwork / Fine Line
Pain Level: Low-Medium (3–5/10)
Session Time: 2–3 hours
Best For: Large floral panel, coverable
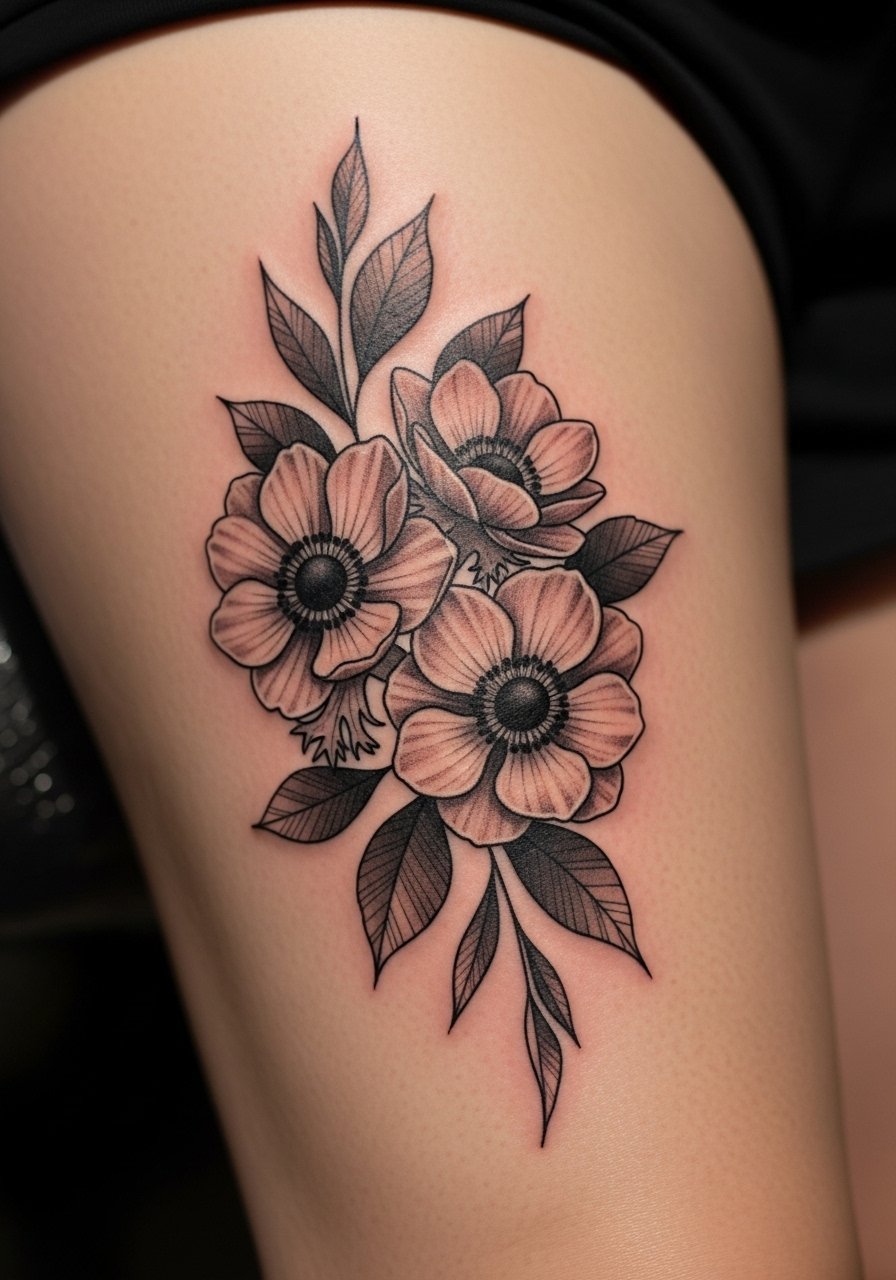
Dark botanicals are Gothic without literal skulls. Anemones, poppies, and black roses feel moody when rendered in dense blacks and negative space. Thigh panels take larger scale well and age gracefully. Expect modest discomfort and a smooth healing period. In my experience, keeping petal edges bold improves longevity. Ask for layered shading rather than many tiny stippled dots—those can blur over time.
13. Neo-Traditional Gargoyle on Shoulder Blade
Style/Technique: Neo-Traditional / Figurative
Pain Level: Medium (5/10)
Session Time: 2–3 hours
Best For: Shoulder statement, visible with certain clothing
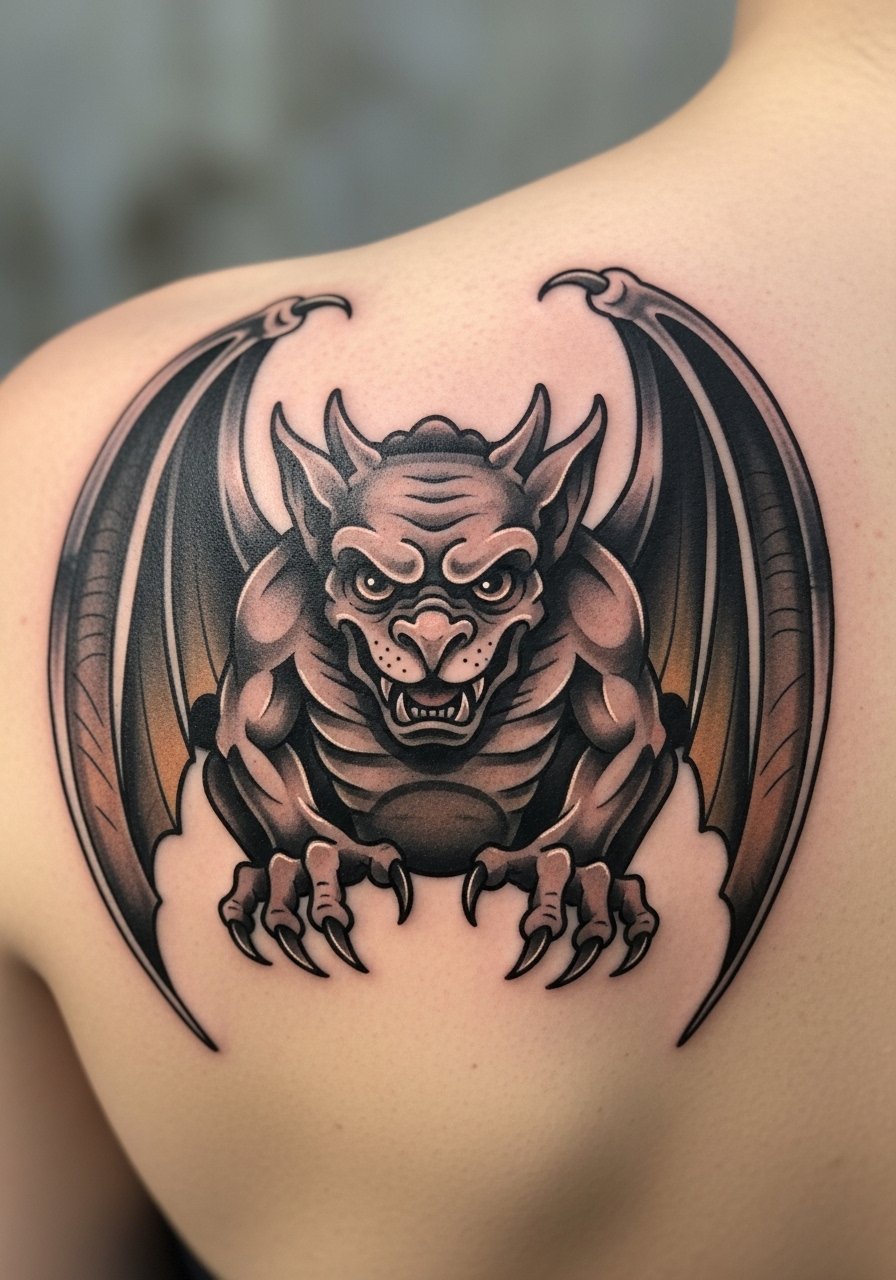
Gargoyles are gothic icons with personality. Shoulder blade placement is great for mid-sized figures and tolerable in pain. Neo-traditional linework gives expression without tiny micro-detail that can fail. I’ve noticed pieces with balanced color and strong outlines keep their attitude as they age. Watch for too many fine texture lines—simpler shadow shapes usually look better long-term.
14. Cameo Silhouette Wrist Band
Style/Technique: Micro-Blackwork / Silhouette
Pain Level: Medium (4/6/10)
Session Time: 1 hour
Best For: Wrist accent, vintage vibe
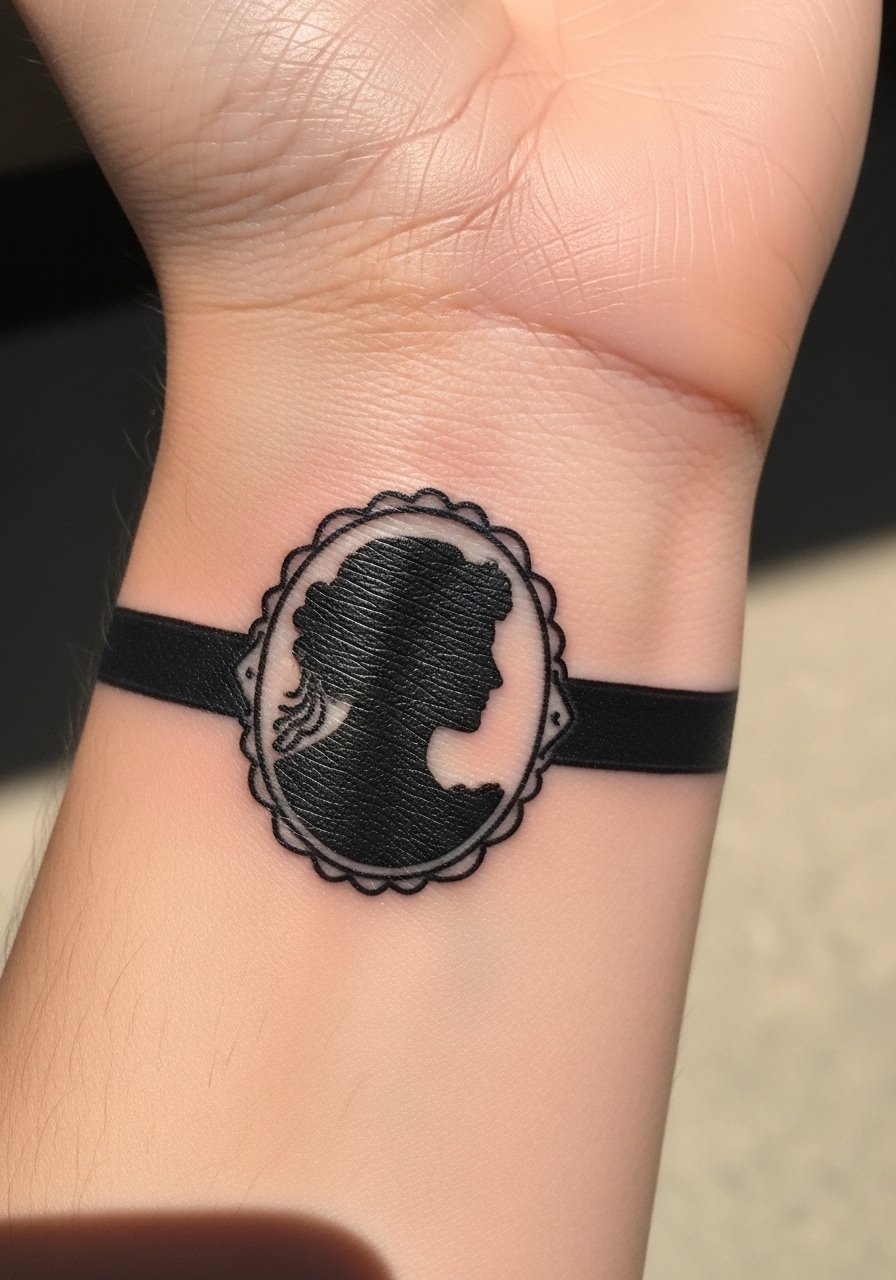
A cameo wrist band reads vintage and Gothic in a small package. Wrists move a lot, so simple silhouettes hold better than fine filigree. I’ve seen cameo silhouettes last years when artists used solid black fill and avoided ultra-thin frame lines. Keep sunscreen on this area once healed—it's exposed and prone to fading. For clarity, pick a silhouette with strong negative space.
15. Candle and Dripping Wax Rib Tattoo
Style/Technique: Blackwork / Minimal Realism
Pain Level: High (8/10)
Session Time: 1–2 hours
Best For: Vertical rib art, symbolic piece
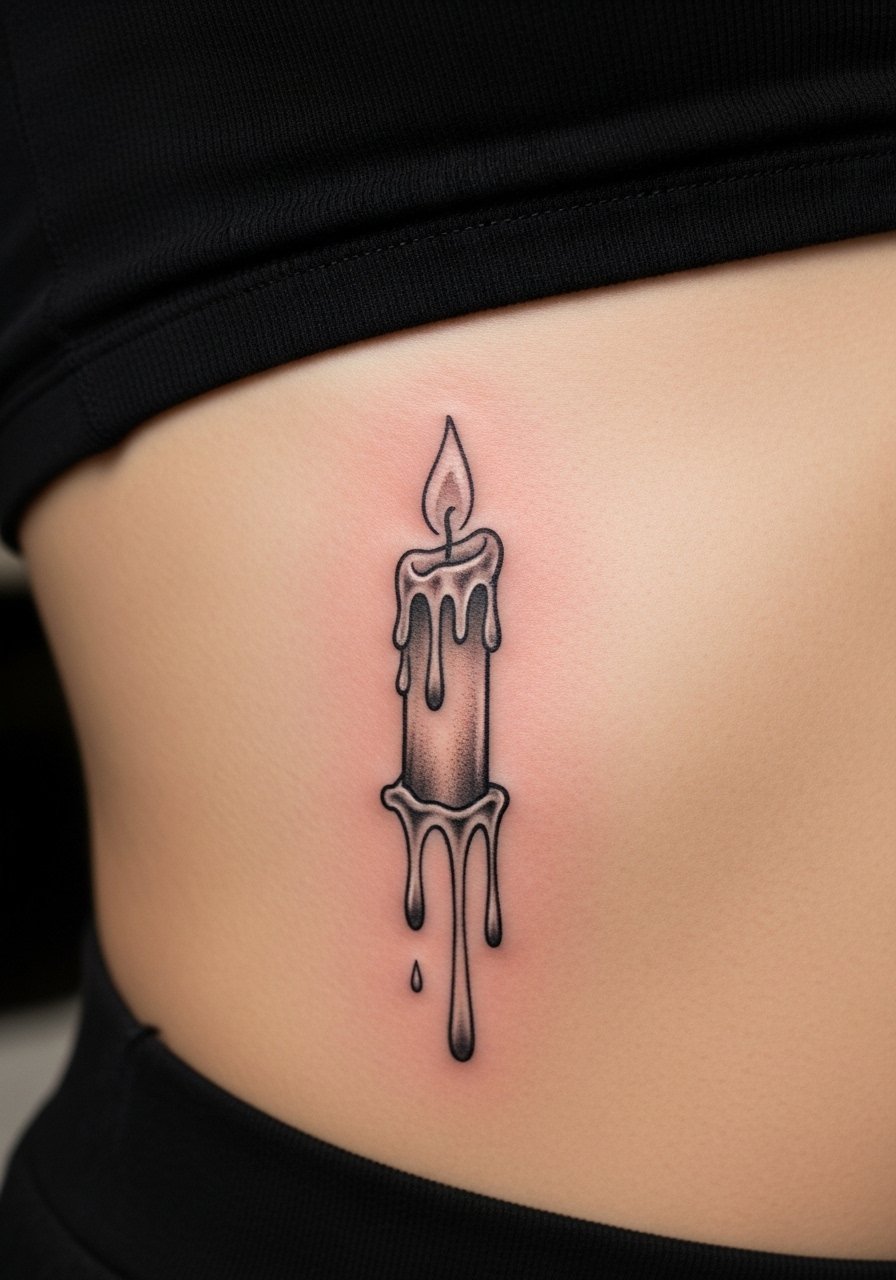
A candle melting into wax lines reads like a small Gothic narrative. Ribs are painful but great for tall, narrow imagery. Minimal realism works here—solid blacks for the candle base and softer gray for melted wax. I’ve noticed that outlining drips a touch bolder prevents them from disappearing in a year. Keep movement minimal while it scabs; turning can tug at the scabs and distort lines.
16. Ornate Gothic Key on Inner Arm
Style/Technique: Fine Line / Ornamental
Pain Level: Medium (4/10)
Session Time: 1–1.5 hours
Best For: Symbolic, easy to conceal
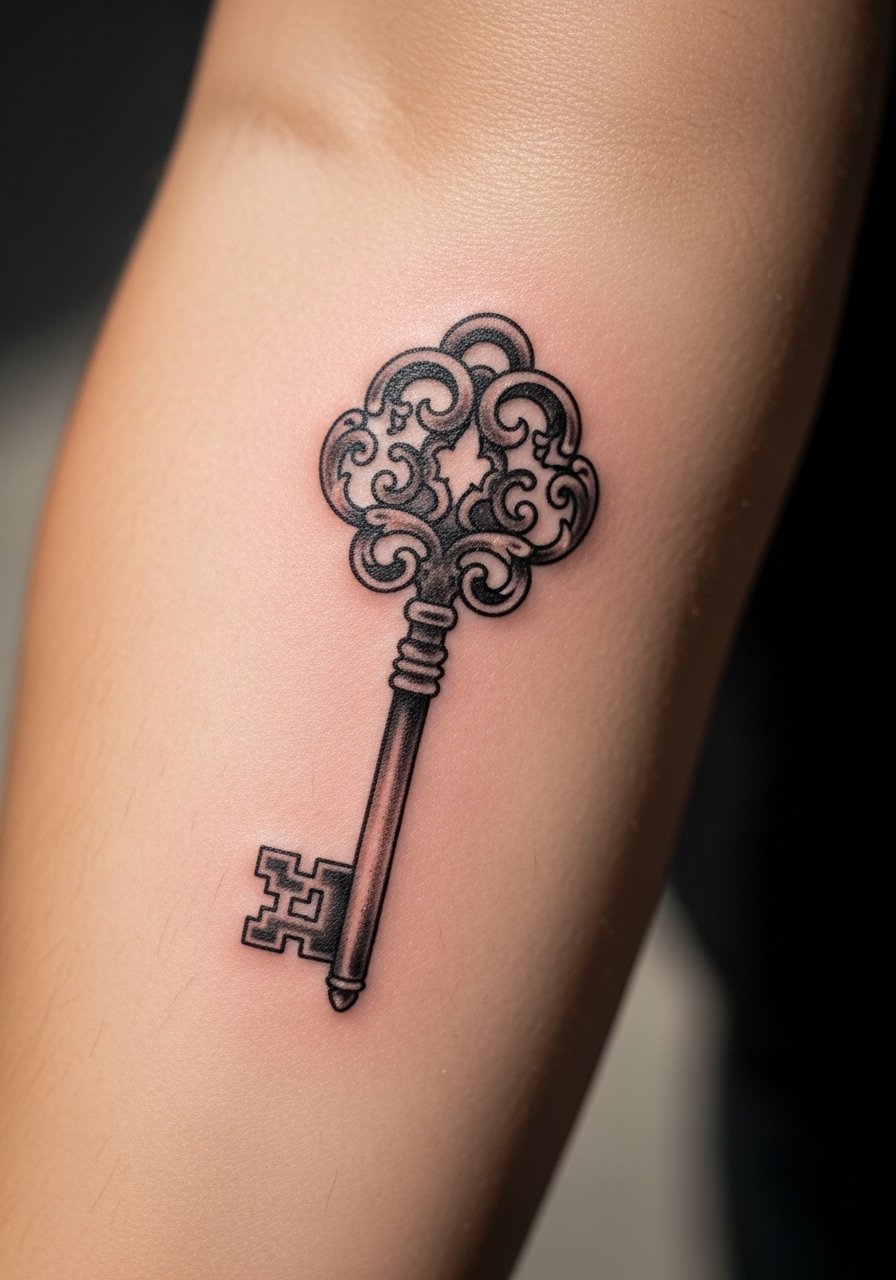
Keys feel like private Gothic tokens. The inner arm is a comfortable location and shows off vertical keys beautifully. Fine lines work if the head of the key is bold enough; I’ve seen overly filigreed keys merge as they heal. Choose a design with negative space and a few thicker anchor lines. Heals cleanly with basic aftercare and is a low-maintenance Gothic choice.
17. Ouroboros on Nape of Neck
Style/Technique: Micro-Realism / Blackwork
Pain Level: Medium (5/10)
Session Time: 45–90 minutes
Best For: Neck accent, hidden easily by hair
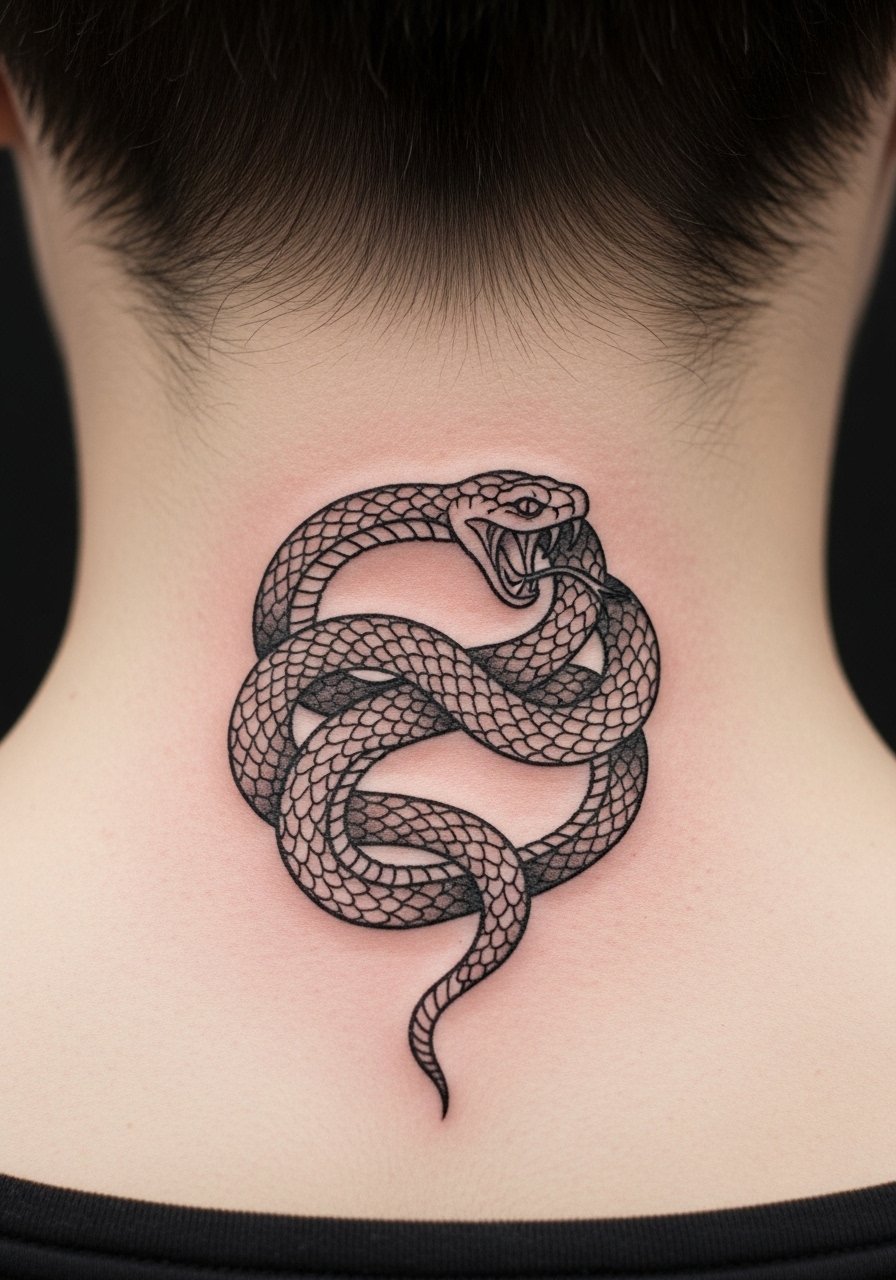
An ouroboros feels ancient and Gothic in a tiny package. Nape placement is subtle and can be hidden by hair. Expect medium pain and quick healing. From what I’ve seen, circular designs do well here because movement doesn’t distort them as much as elongated designs. Ask for slightly bolder outlines so the ring stays crisp long-term.
18. Blackwork Bat Swarm on Shoulder and Chest
Style/Technique: Blackwork / Silhouette
Pain Level: Medium (5/10)
Session Time: 1–2 sessions
Best For: Dramatic spread, nocturnal motif
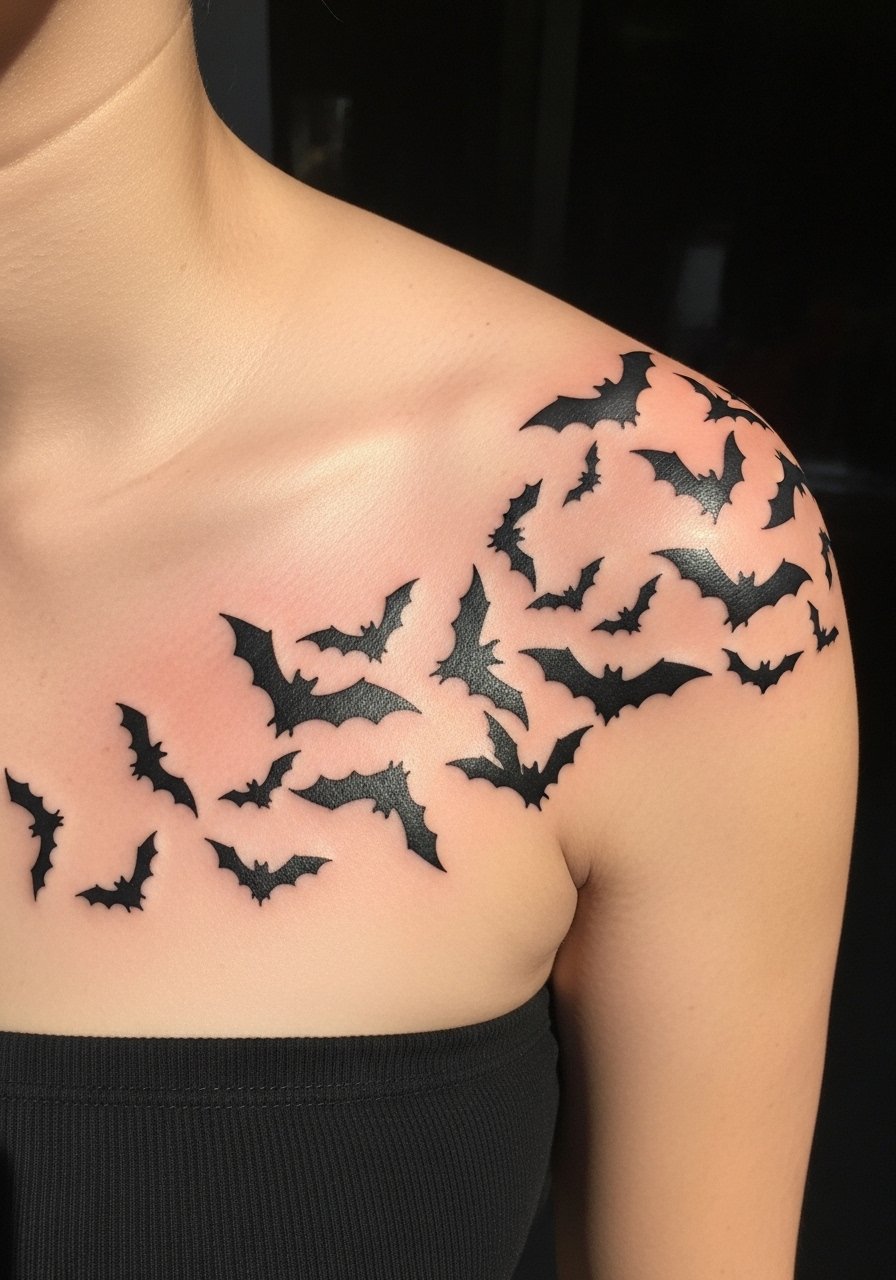
A bat swarm reads cinematic and Gothic. Using silhouettes makes the piece bold and resilient to fading. Shoulder-to-chest placement follows natural contours and gives motion. I’ve seen this work best when bats scale up as they approach the shoulder, keeping small silhouettes farther from high-friction areas like under the arm. Solid black silhouettes age more gracefully than detailed wings.
19. Gothic Scripted Latin Phrase Across Collarbone
Style/Technique: Script / Ornamental
Pain Level: Medium (4–6/10)
Session Time: 30–90 minutes
Best For: Readable quote, shallow curvature

A Latin phrase in Gothic script feels like an heirloom. Collarbone placement is striking but moves with breath and posture. I’ve found that having letters slightly bolder than you think keeps the phrase legible. Avoid tiny flourishes that might blur together. Discuss kerning with the artist so spacing feels intentional and readable once healed.
20. Black Rose Behind Ear Cluster
Style/Technique: Micro-Blackwork / Neo-Traditional
Pain Level: Low (3–4/10)
Session Time: 30–60 minutes
Best For: Small accent, feminine Gothic touch
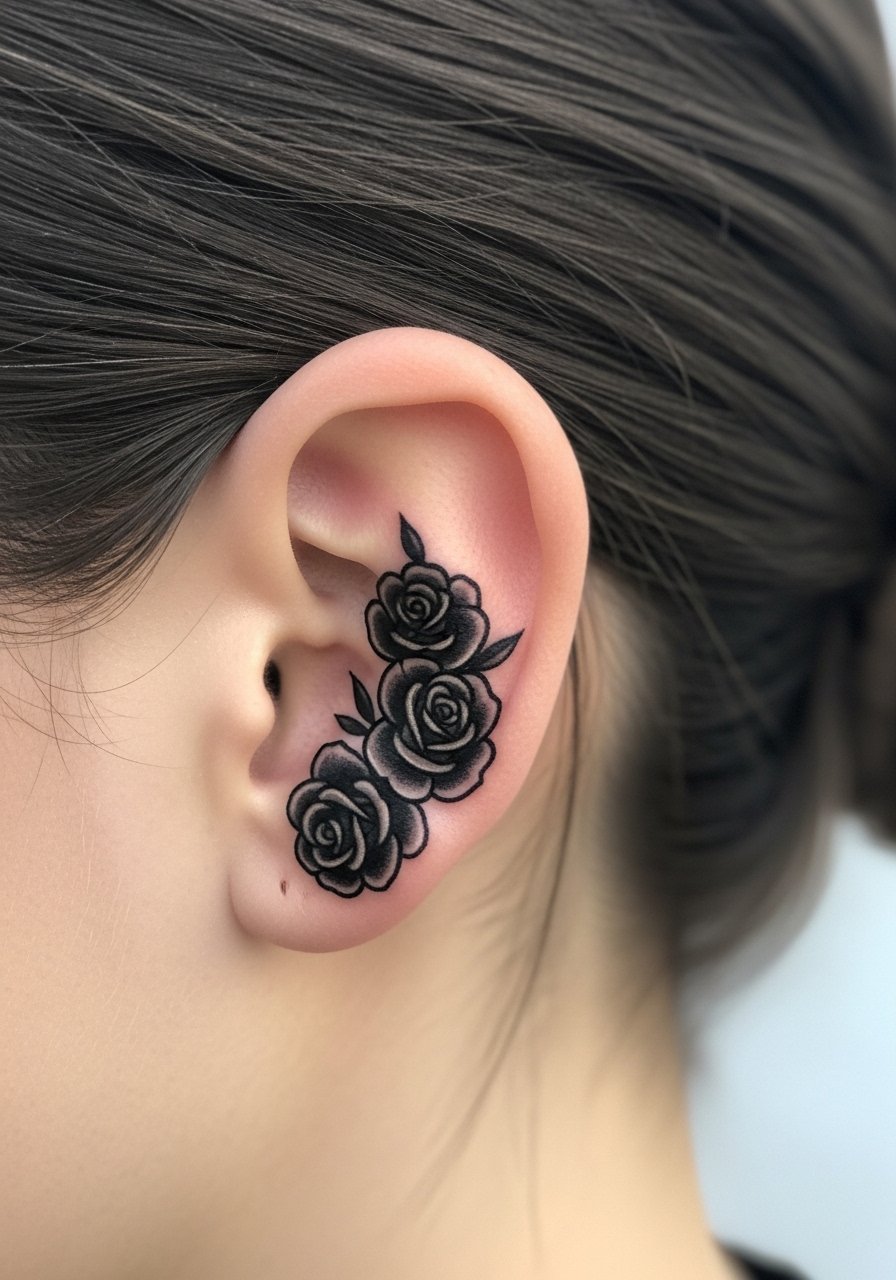
Behind-ear roses are low-key but carry Gothic weight. Pain is low; healing is quick. Solid shapes work better here than delicate petals. From what I’ve observed, a single bold bloom reads longer-term than many tiny petals. Keep your hair clean and avoid heavy shampooing the first few days.
21. Architectural Column Spine Panel
Style/Technique: Blackwork / Architectural
Pain Level: High (7–9/10)
Session Time: Multiple short sessions
Best For: Vertical back art, dramatic silhouette
A column panel turns the spine into a Gothic facade. Pain is significant, so split into short sessions. Texture and shadow are key—too many tiny stippled details can fill in. I’ve noticed larger shadow blocks and clean negative spaces create a carved stone look that ages well. Expect initial tenderness and plan for touch-ups where clothing rubs frequently.
22. Stained-Glass Calf Medallion
Style/Technique: Neo-Traditional / Color Block
Pain Level: Medium (4–5/10)
Session Time: 1–2 hours
Best For: Calf focal, high-visibility when wearing shorts

A round stained-glass medallion on the calf reads like a Gothic jewel. Calves tolerate longer sessions and are easy to protect during healing. I recommend distinct black lead lines to keep color panes from bleeding together. From what I’ve seen, color saturation initially looks intense and then calms during healing—plan for that visual shift.
23. Grim Reaper Thigh Portrait
Style/Technique: Micro-Realism / Neo-Traditional
Pain Level: Medium (5/6/10)
Session Time: 2–4 hours
Best For: Large symbolic piece, coverable
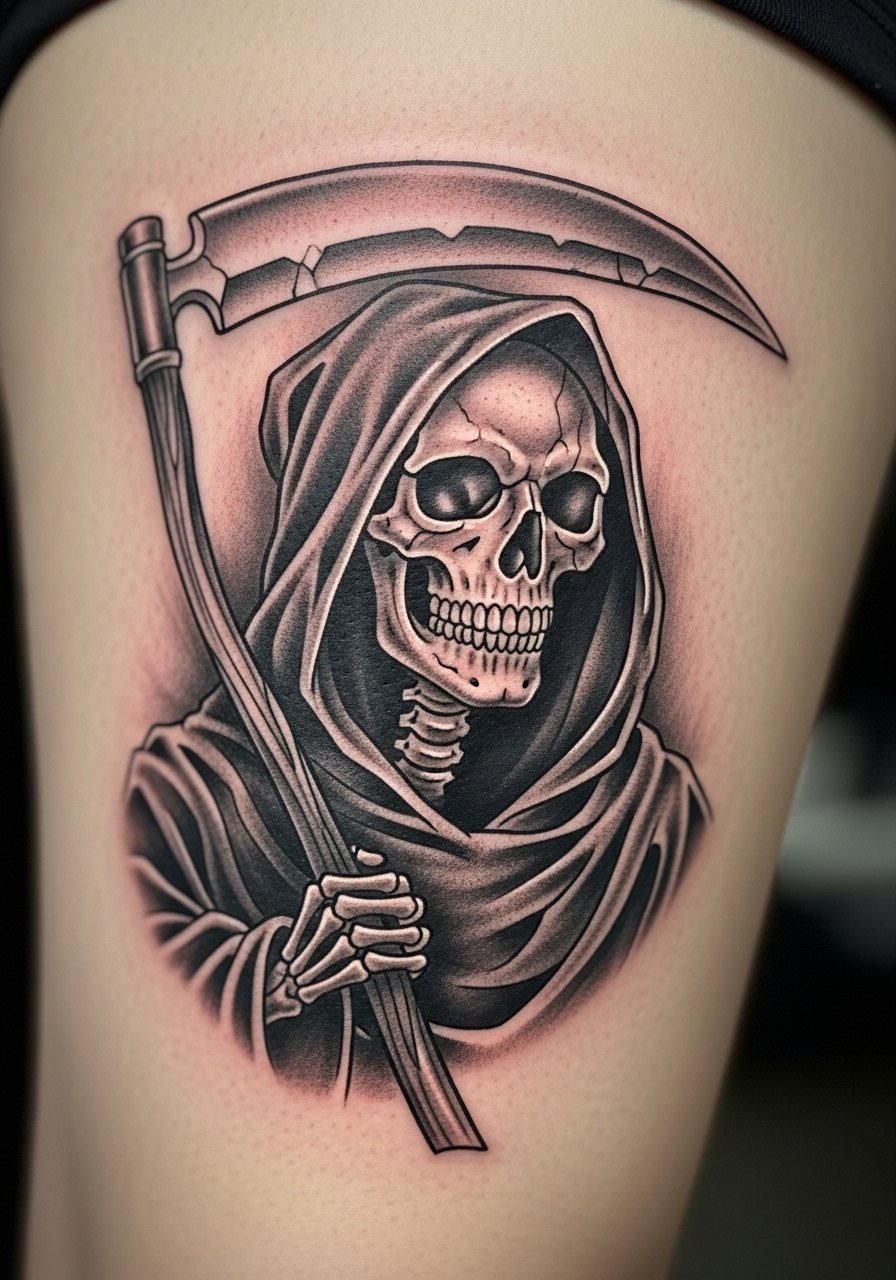
A Grim Reaper portrait on the thigh is a classic Gothic statement. Thigh canvas allows for mood and detail without extreme pain. Realistic shading gives it weight; bold cloak edges help the figure stay readable as skin settles. Avoid trying to cram too many tiny facial details—faces soften. In my experience, planning a secondary highlight layer at a touch-up session preserves depth.
24. Baroque Choker Band on Upper Arm
Style/Technique: Ornamental / Blackwork Band
Pain Level: Low-Medium (3–4/10)
Session Time: 1–1.5 hours
Best For: Arm accent, decorative wrap
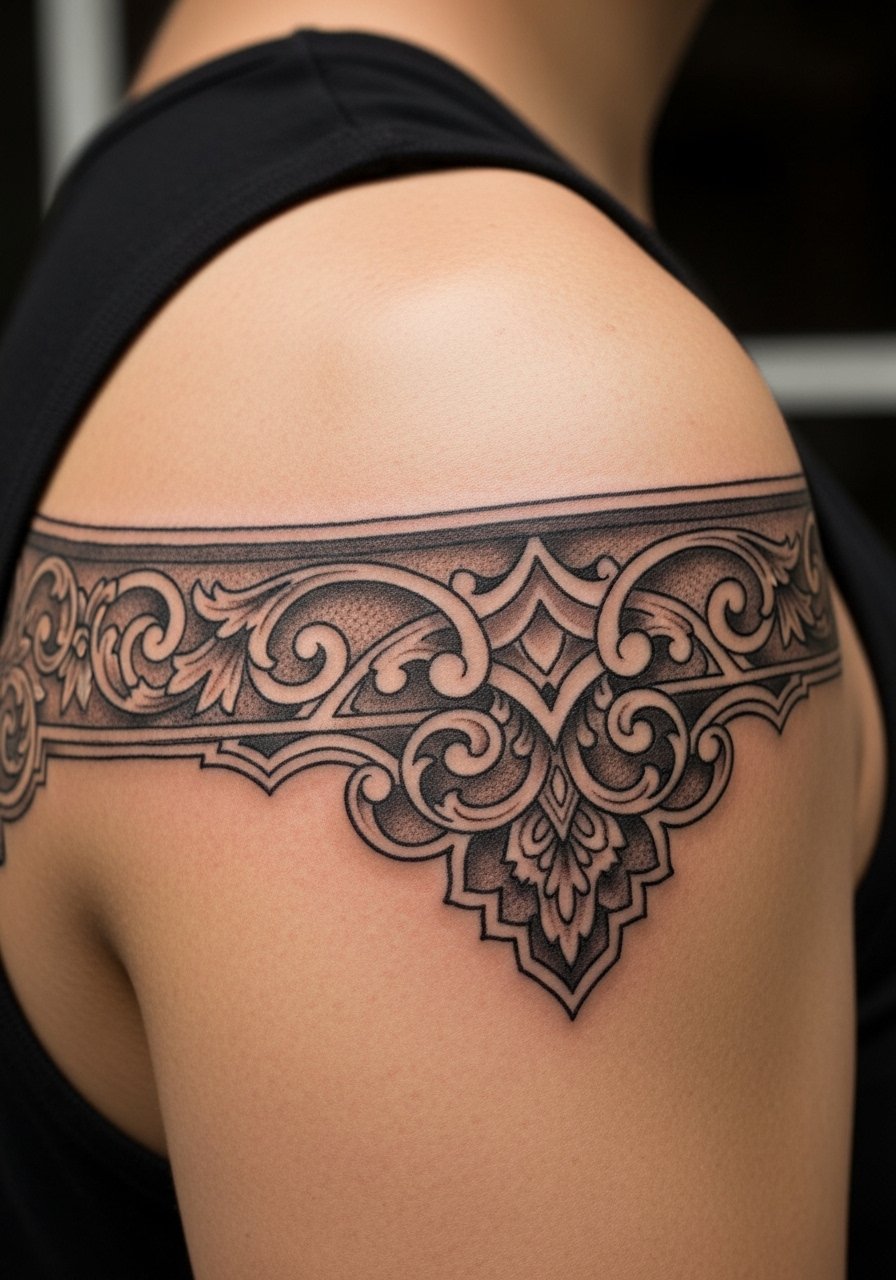
A baroque arm band reads like vintage jewelry with Gothic flair. Upper arm placement is mild in pain and easy to hide. I prefer band designs with repetition and clear negative space so the pattern doesn’t merge after healing. From what I’ve noticed, slightly thicker outlines in repeating motifs maintain crispness longer. This is a low-effort way to add Gothic detail that works with other pieces later.
Tattoo Prep and Aftercare Essentials
Aftercare Essentials:
- Aquaphor Healing Ointment, 14oz tube — Great first-boot occlusive for the first 3–5 days
- Saniderm Transparent Adhesive Bandage, 6-inch roll — Second-skin option artists often recommend
- CeraVe Fragrance-Free Moisturizing Lotion, 12oz — Daily moisturizer for weeks 2–8
- Dr. Bronner's Unscented Castile Soap, 32oz — Gentle cleanser for the first week
Before Your Appointment:
- Tattoo Numbing Cream 5% Lidocaine — Use only if your artist approves, apply 30–45 min before
- Stencil Transfer Paper Pack — Handy if you work on a custom design at home
Long-Term Maintenance:
- SPF 50 Sunscreen Stick for Tattoos — Daily protection to prevent fading
- Mad Rabbit Tattoo Balm, 2oz — Moisturizer made specifically for healed tattoos
- Hustle Butter Deluxe, 2oz — Vegan alternative for long-term hydration
Optional Comfort Items:
- Tattoo Numbing Spray — For touch-ups or very sensitive spots
- Hydrocolloid Bandages Large Pack — For spot coverage and blister-prone areas
Most artists I’ve talked to stress sunscreen and gentle moisturizing above all. Saniderm and Aquaphor come up repeatedly in community threads. I’ve noticed the best-healed pieces were kept out of the sun and moisturized consistently for months.
Frequently Asked Questions
Q: How bad does a tattoo actually hurt?
A: Pain depends on placement and personal tolerance. Outer forearm and thigh are usually a 3–4/10 for most people. Ribs, sternum, and spine can reach 8–9/10. It’s more a persistent burning or scratching than a single sharp jab. For sensitive spots, ask about tattoo numbing cream 5% lidocaine—it helps but doesn’t remove everything.
Q: What if I regret the design later?
A: Sit with ideas for months and choose placements you can conceal if you change your mind. Cover-ups and removals are possible, but they take time. I’ve seen people preserve options by starting with smaller, coverable pieces (upper thigh, upper arm). If you’re unsure, go slightly larger and simpler so future changes are possible.
Q: How do I keep a Gothic tattoo looking dramatic over time?
A: Sunscreen is essential. From what I’ve gathered, UV exposure does most of the fading. Use an SPF 50 sunscreen stick for tattoos daily and moisturize with a fragrance-free lotion like CeraVe. Blackwork and bold contrasts generally last longer than extremely fine details.
Q: Can I work out after getting inked?
A: Wait at least 48–72 hours for low-intensity workouts. If the tattoo is on a flex point—elbow, knee, ribcage—wait closer to a week. Sweat and friction can irritate fresh ink and increase infection risk. Keep the area clean with a gentle soap like Dr. Bronner's Unscented during early healing.
Q: Should I test with a small tattoo first to see how I handle pain?
A: Only if you want a small tattoo long-term. Pain varies by placement more than size. A tiny wrist piece could hurt more than a broad thigh patch. If you’re nervous, pick a less painful area and a design you actually want.
Q: How long does a tattoo take to fully heal?
A: Surface healing is 2–3 weeks. Full skin regeneration can take 2–3 months. The first week is the most critical—clean gently, avoid picking, and use recommended aftercare. Expect peeling around days 3–7; colors and contrast will look muted until the skin fully settles.
Q: Do tattoos look different on different skin tones?
A: Yes. Black and gray work shows beautifully across tones. Bright colors can appear muted on deeper skin tones and white ink often disappears on darker skin. From my experience, artists who regularly tattoo your skin tone can show healed photos so you know the realistic expectations.
Q: Which aftercare products should I have on hand right after my appointment?
A: I keep Aquaphor for the first few days, Saniderm for those who prefer a second-skin method, and a gentle soap like Dr. Bronner’s. For weeks 2–8, a fragrance-free lotion like CeraVe is useful. All of these are linked above in the aftercare list.
