
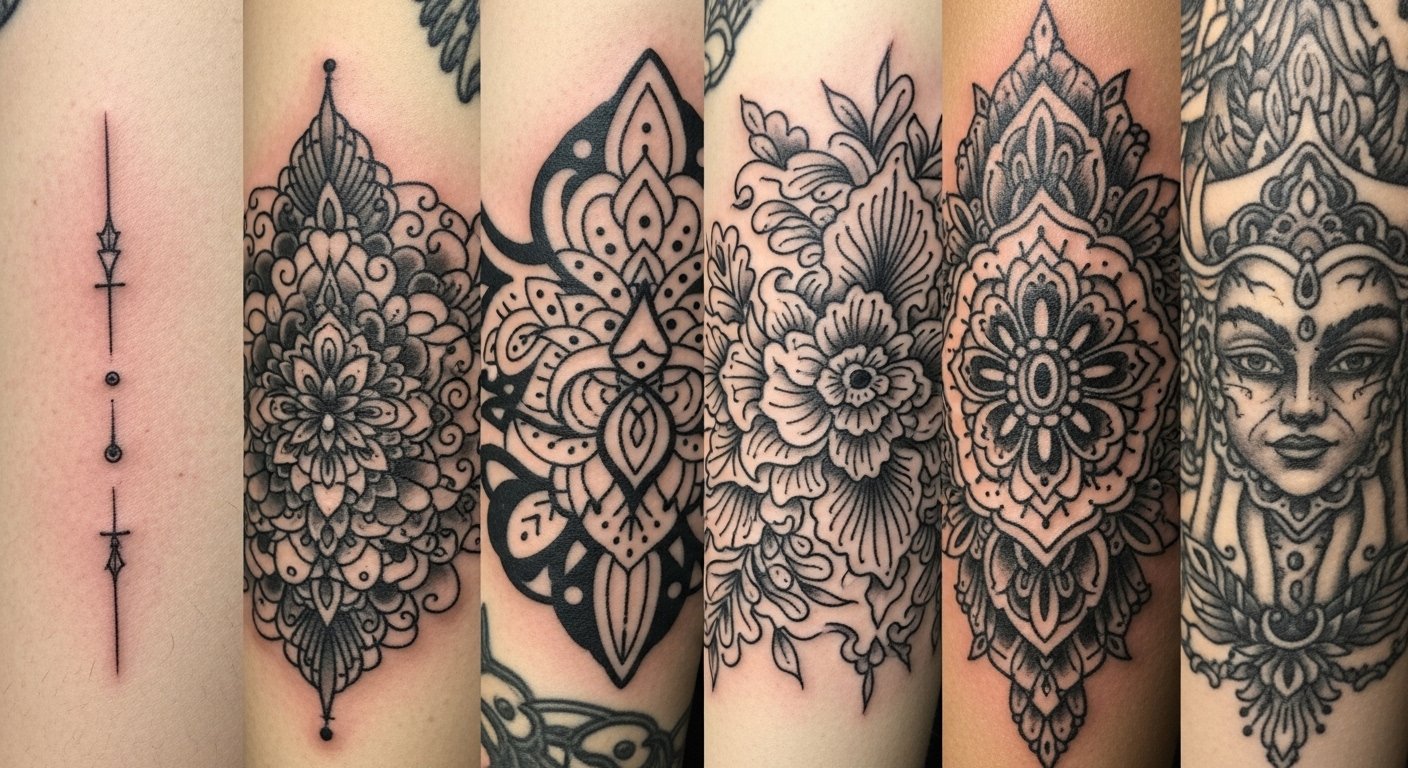
I spent months narrowing down foot tattoos after getting my own first piece there. The hard part wasn't finding pretty designs. It was knowing which styles actually heal well on skin that rubs, sweats, and gets sun. These 25 foot tattoos are styles I kept seeing held up best over time, plus a few under-the-radar ideas artists started showing me in 2026.
This list focuses on fine line, blackwork, traditional, and micro-realism styles aimed at the top, side, and arch of the foot. These placements suit small to medium pieces. From what I've gathered, artists now prefer slightly bolder line weights on feet so designs last longer. Expect tips for placement, pain, and aging with each idea.
1. Fine Line Floral on Top of Foot
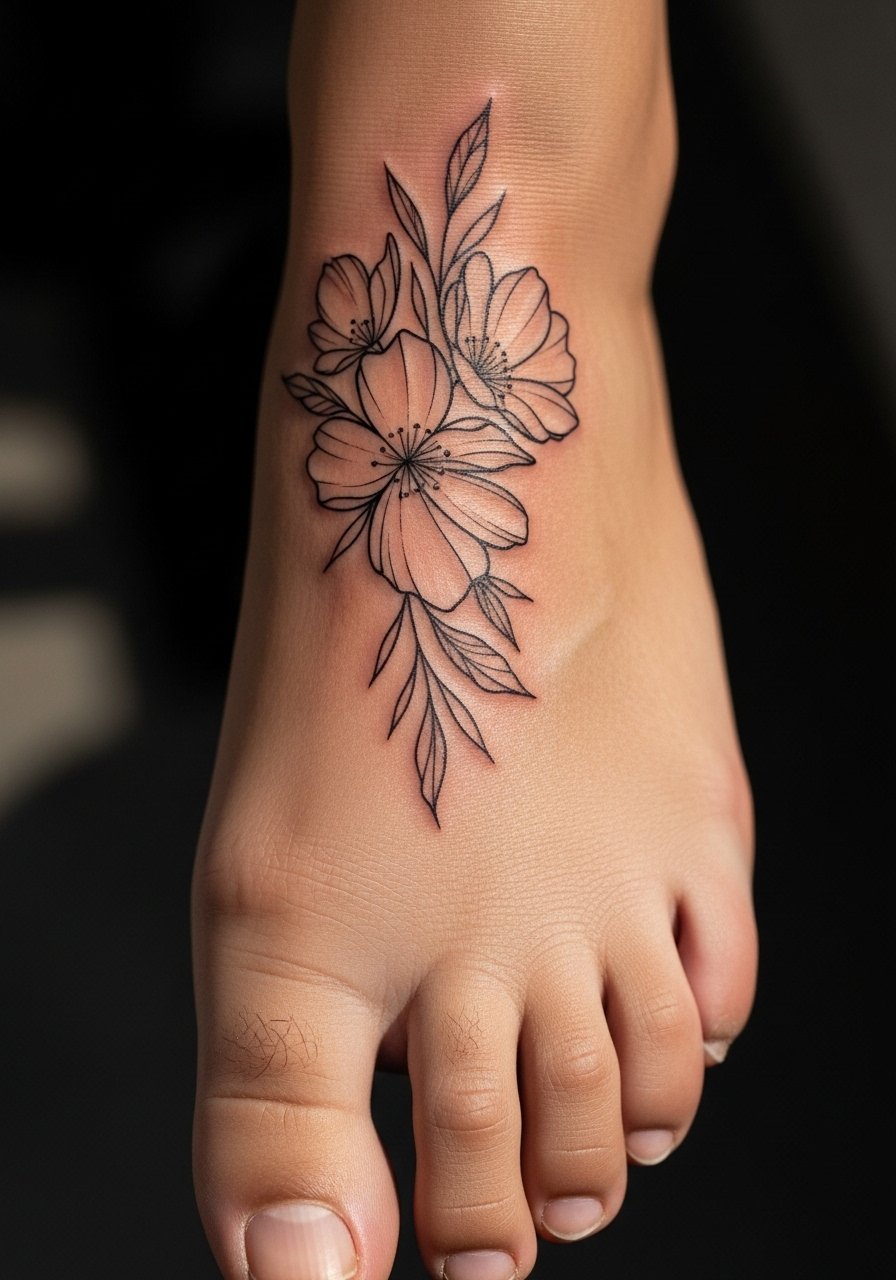
I first noticed this kind of floral on a friend's foot at a music festival. It reads delicate up close, but I recommend asking your artist for slightly heavier line weight than a wrist piece. Foot skin moves and bleeds ink more, so pain is medium to high when working near the toes. Sessions are short, often 30 to 60 minutes for a small bouquet. Tell your artist you want the stems to keep negative space between them, so lines do not merge as it heals. A common mistake is asking for ultra-fine hairlines. Those blur into smudges after a year on feet. Healed at six months it looks soft and feminine. At two years you may need a touch-up to restore edge definition.
2. Minimalist Line Art Wave on Outer Foot
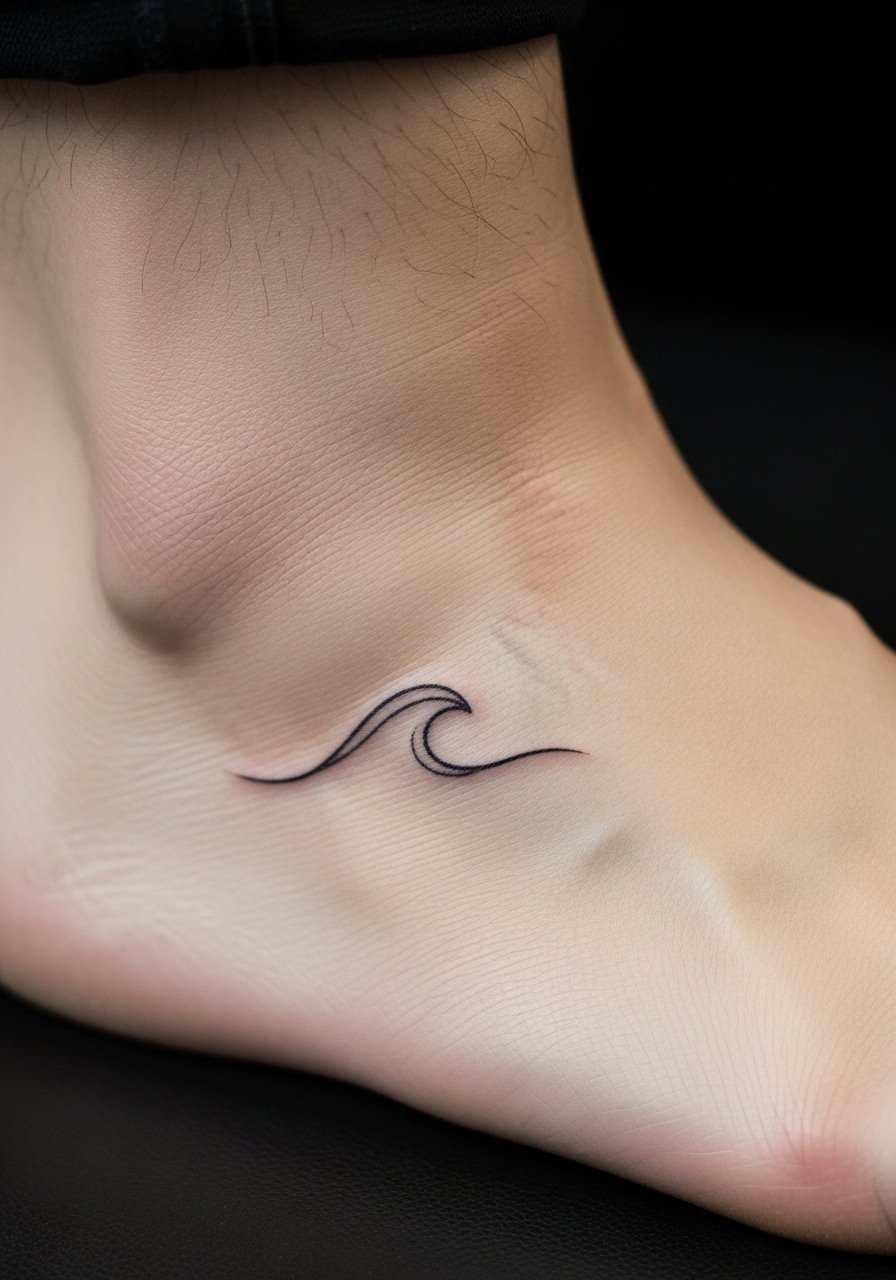
Fair warning, the outer foot can be bony and sharp during the session. That thin continuous wave looks modern and reads well from a distance. I advise a minimal line, but not needle-fine. Session time is short, under 45 minutes for small designs. During consult say, "Keep the line weight uniform but visible after six months." I often see people request lines so thin they disappear on the foot. If you want subtlety, plan for a small touch-up at one year. Healed it has a relaxed look. After two years it will soften and may need re-inking to stay crisp.
3. Micro-Realism Seashell Near Ankle Bone
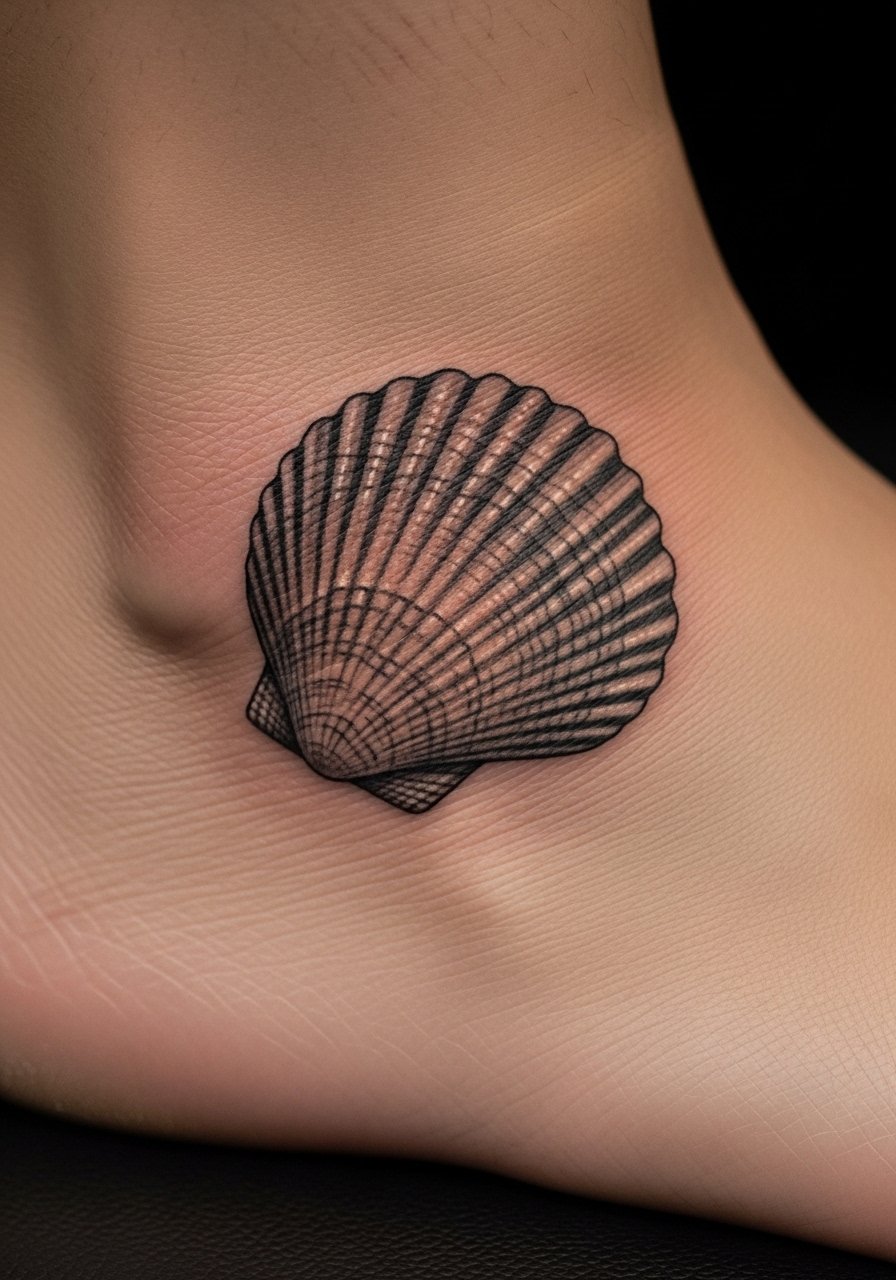
I love this when the ankle bone frames the design. Micro-realism needs an artist experienced with tiny gradients on thin skin. Pain is moderate around the ankle bone. Expect a 60 to 90 minute session for a detailed shell about two inches wide. Tell your artist you want more contrast and slightly bolder shadows so the shell reads once healed. A common failing I see is asking for extreme soft shading that becomes a gray patch. At six months the texture is still visible. At two years that fine shading will blur, but bold contrast holds better. Avoid placing heavy detail over creases where it will warp as the foot moves.
4. Traditional Sailor Star on Instep
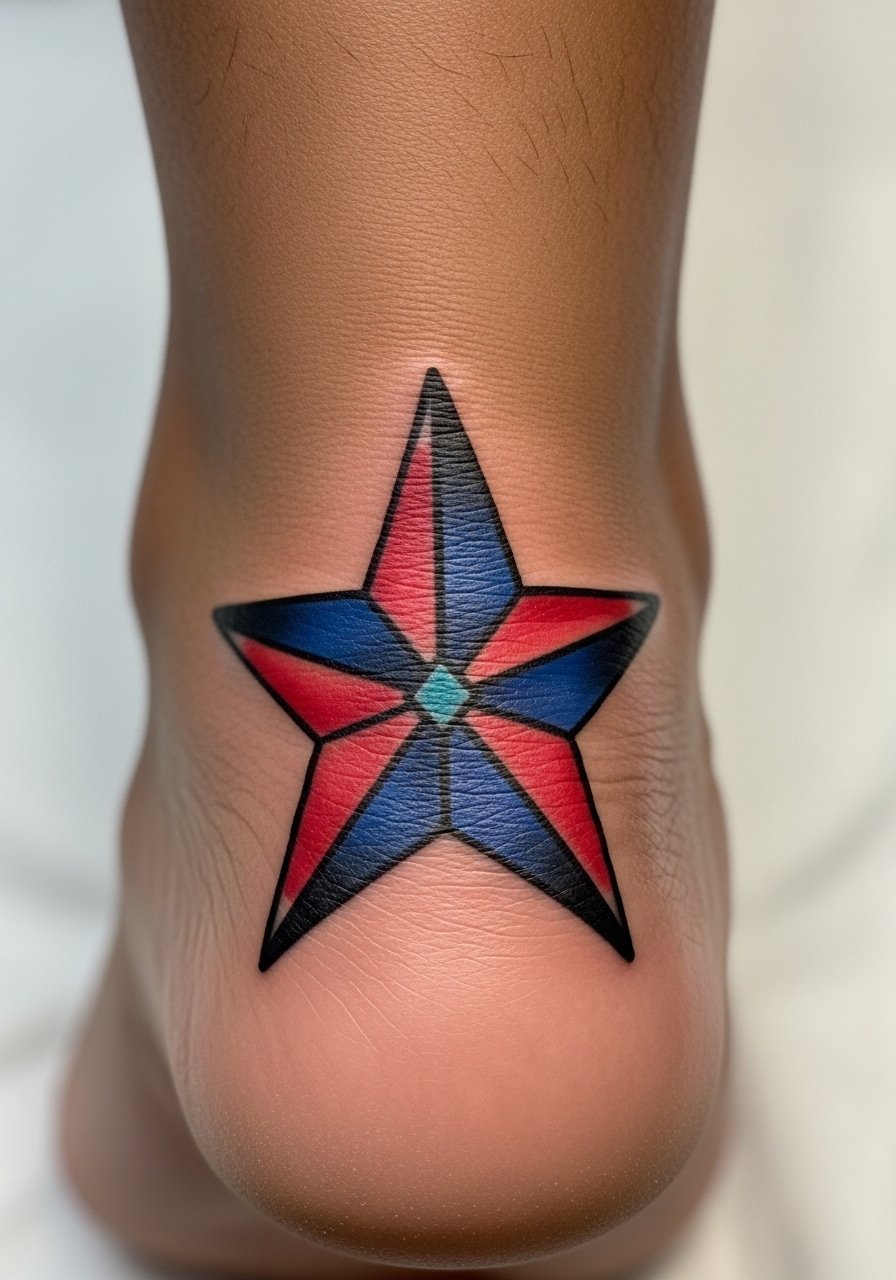
There is a visual punch to bold traditional work that fares well on feet. The thick outlines preserve shape as the ink settles. Pain is moderate on the instep. This style usually takes 30 to 60 minutes. Ask your artist for strong black outlines and solid color fills. I tell clients to skip tiny details and focus on flat color blocks for longevity. A mistake I keep seeing is requesting intricate shading in that small space. Healed after six months the star holds shape. At two years the color may fade but outlines stay defined, which makes touch-ups simple.
5. Blackwork Mandala Around Ankle
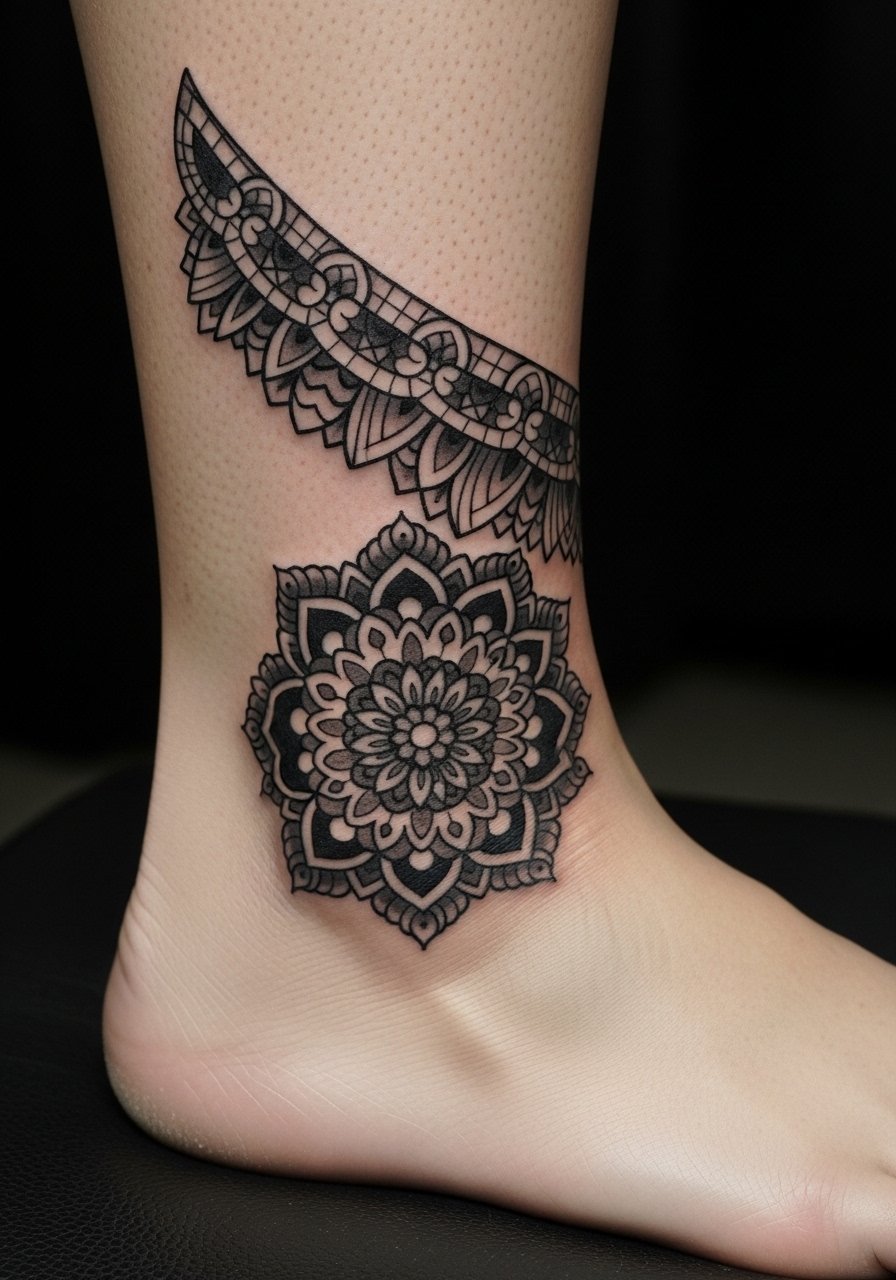
When I saw a mandala wrapping an ankle I noticed it read like jewelry. The ankle gives a circular canvas that suits radial symmetry. Sessions vary, but expect 90 minutes for a medium mandala. Pain is higher on the ankle side. Tell your artist you want consistent dot spacing and room between bold fills so the pattern does not clog. A frequent mistake is shrinking the mandala to fit a tiny spot. That causes dots and lines to merge. At six months the geometry looks tight. Over years it will soften but stays readable if lines are bold from the start.
6. Watercolor Koi Along Side Foot
I noticed watercolor pieces on feet often lose vibrancy fast. This koi avoids that by pairing soft washes with stable black outlines. Placement on the side of the foot flows with the foot's curve. Expect moderate pain and a 90-minute session for color layers. During consultation ask for stronger outlines around color fields so pigments do not bleed together as they settle. A common aging problem is asking for pure watercolor with no anchors. That fades into blotches by two years. This version keeps the watercolor feel while aging more gracefully.
7. Geometric Negative Space on Arch
There is a quiet sophistication to negative space geometry on the arch. Arch skin is softer, so lines need room. Pain is low to moderate there. Sessions are usually 45 to 75 minutes depending on size. Tell your artist to plan negative space as deliberate blank skin rather than tiny thin lines that may close up. I see clients ask for too many thin parallel lines and then return because shapes blurred. At six months the design reads like crisp shapes. After a few years small elements might merge, but large negative spaces keep the pattern readable.
8. Single Needle Script Along Foot Spine
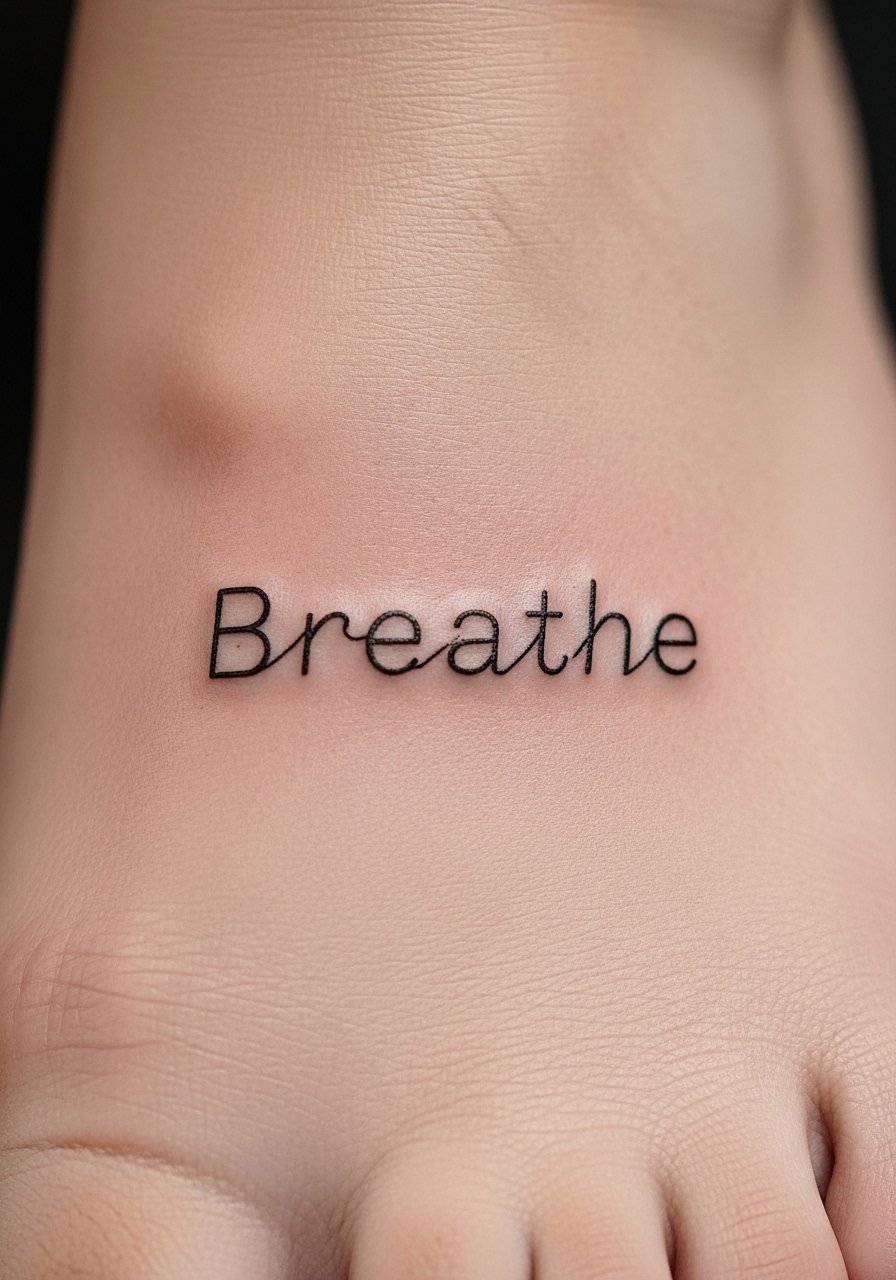
I first got a tiny script on my own foot and learned that foot script needs extra care. The top-of-foot spine is tender while tattooing. Pain is medium to high in that thin area. Keep the word short. Ask your artist for slightly heavier single-needle stroke so letters stay legible after a year. A common error is choosing long quotes that the foot cannot hold. At six months spacing may narrow. At two years those thin strokes often need a refresh. Tell your artist the exact font size you want and ask for a practice stencil to see placement while standing.
9. Dotwork Constellation Across Toes
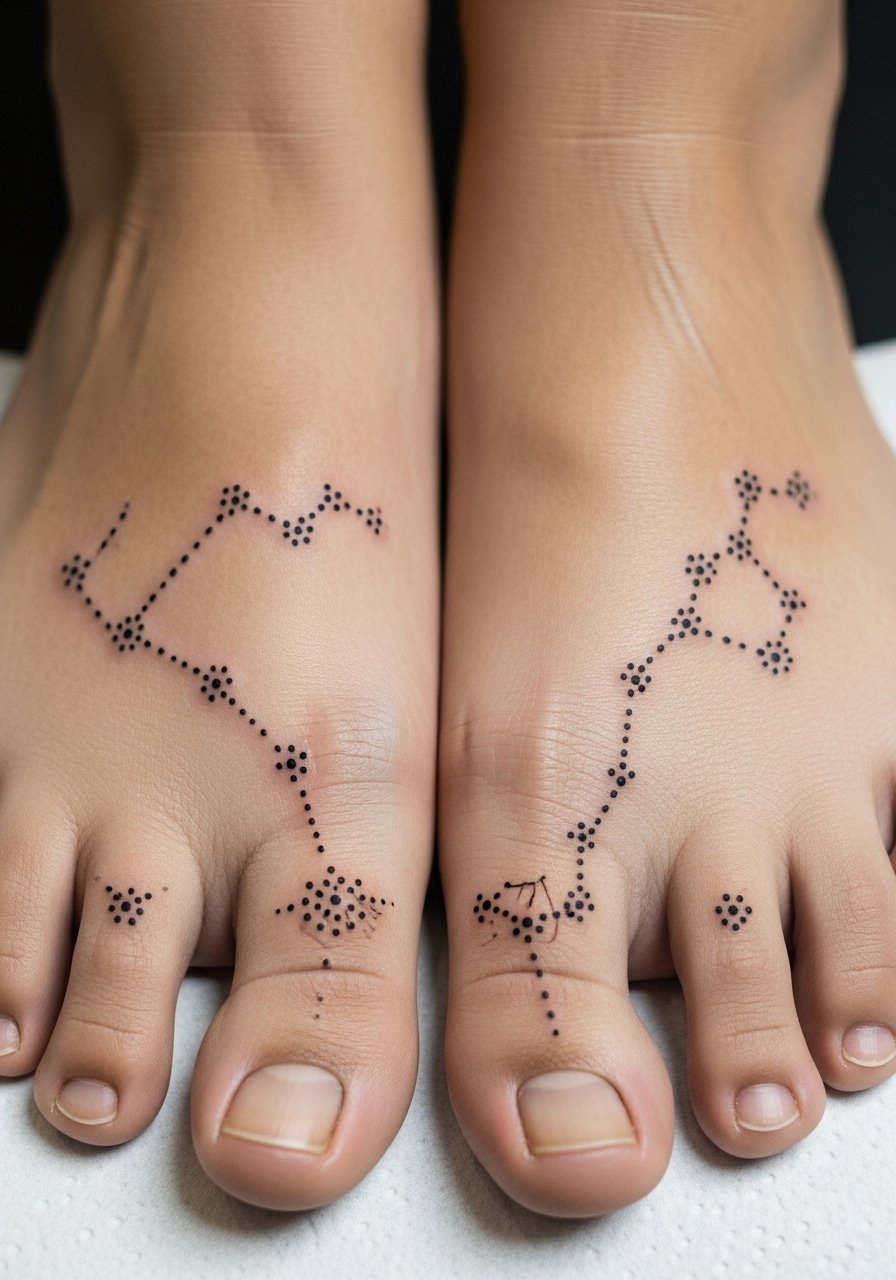
Toes are a tricky place. I saw a neat constellation that still read after months because the dots were larger than typical. Pain is high on toes. Sessions are short, done one section at a time. Request slightly enlarged dots and fewer connecting lines during your consult. Many people ask for ultra-fine dots that vanish or become smudges. At six months the design looks like scattered stars. At two years expect some loss of dot definition, especially on toes that rub in shoes.
10. Micro-Realism Feather on Side of Foot
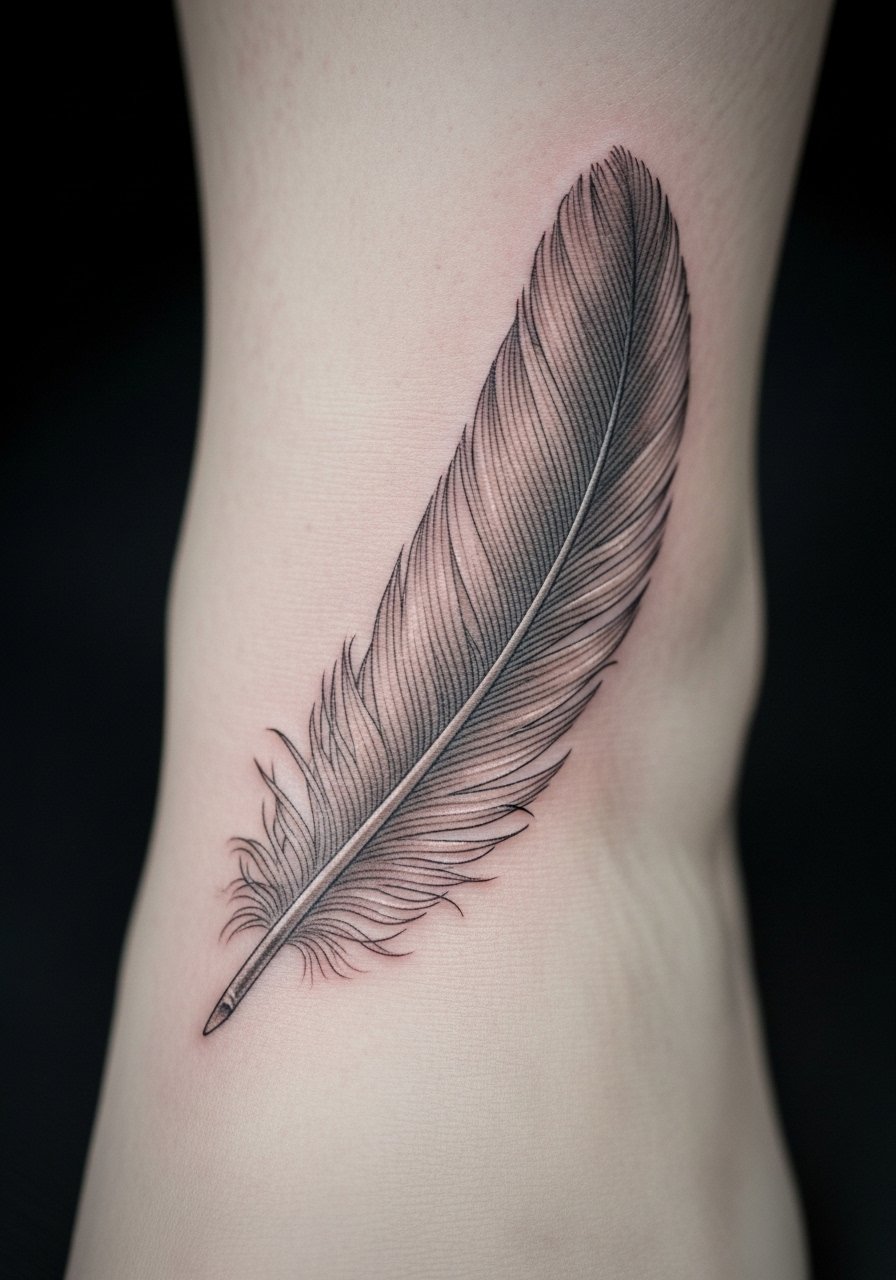
What grabbed me about the feather was how it followed the foot's curve. Micro-realism works if the artist adapts shading to the skin there. Pain is moderate. Sessions are usually 45 to 75 minutes. Tell the artist you want visible barbs and a slightly darker shaft so the feather retains structure. A common mistake is over-blending the barbs into a gray area. At six months the feather looks airy. Two years in the tiny details will fade, but the darker central line keeps the shape intact.
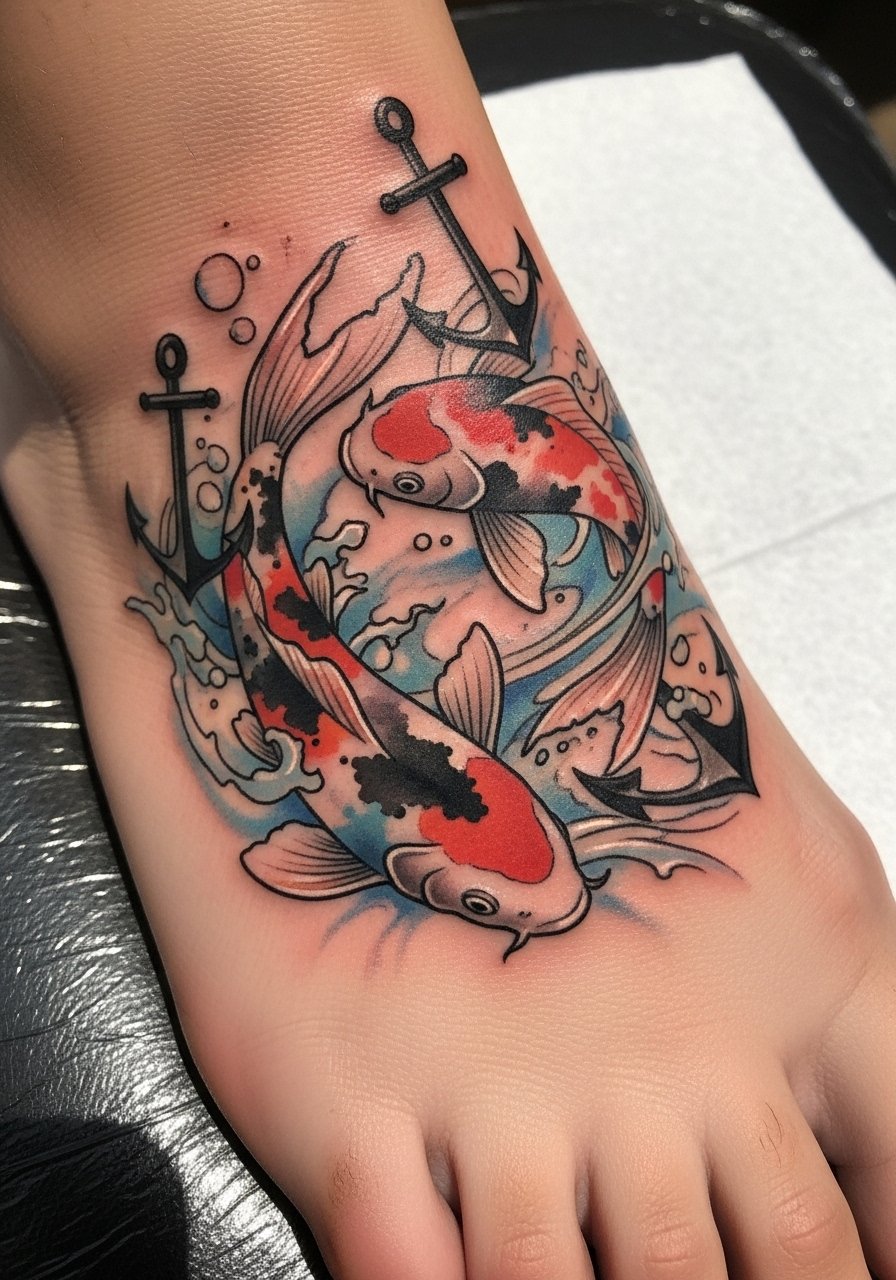
11. Traditional Anchor Behind Heel
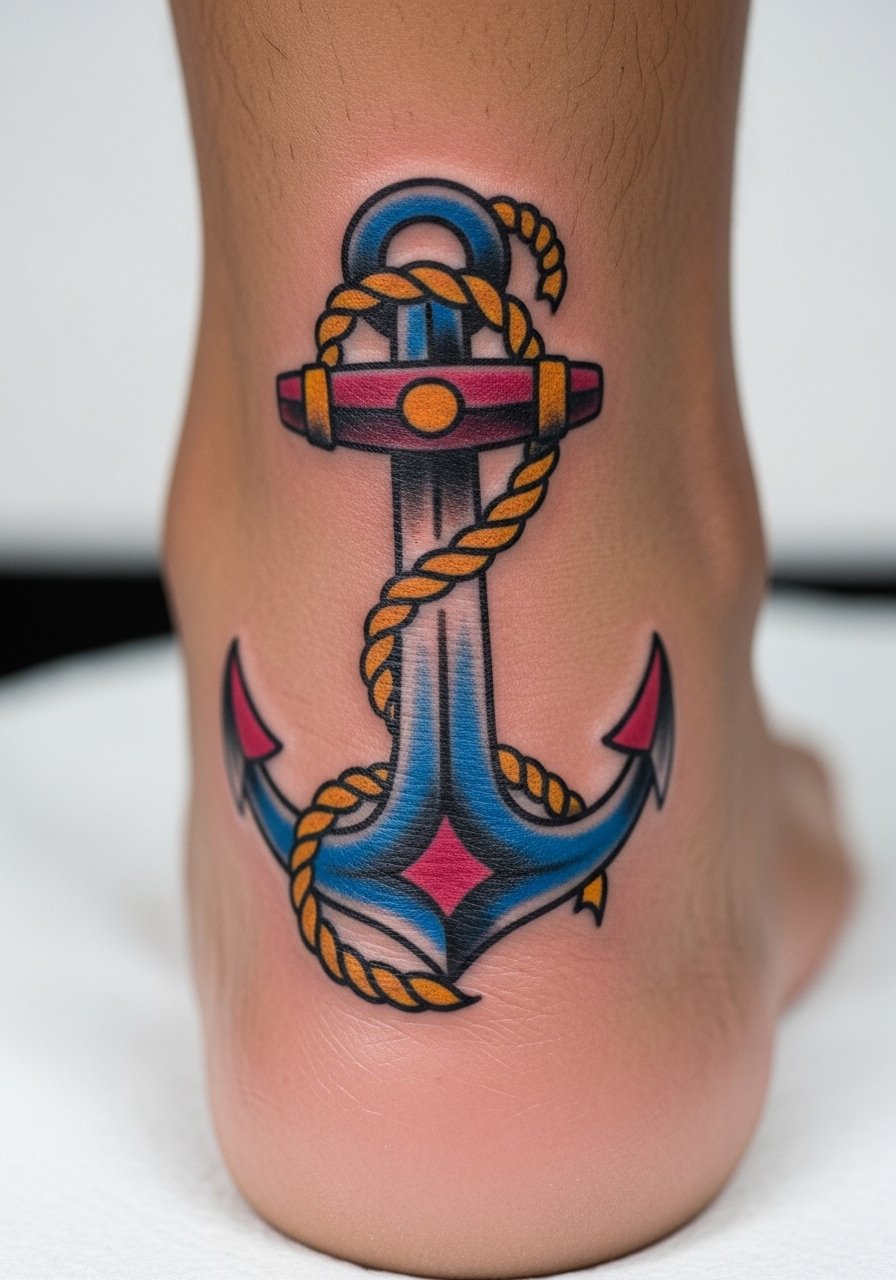
I noticed anchors behind the heel are an old-school placement that reads like a stamp. That area takes a lot of friction from shoes. Pain is moderate. Expect a 30 to 60 minute session. Ask for dense black inking and solid fills so the design tolerates rubbing. People sometimes pick thin-line anchors there and then wonder why they blurred. After six months the anchor still looks solid. Over time the paint will thin but the bold composition stays identifiable.
12. Minimalist Coordinate Tattoo on Inner Foot
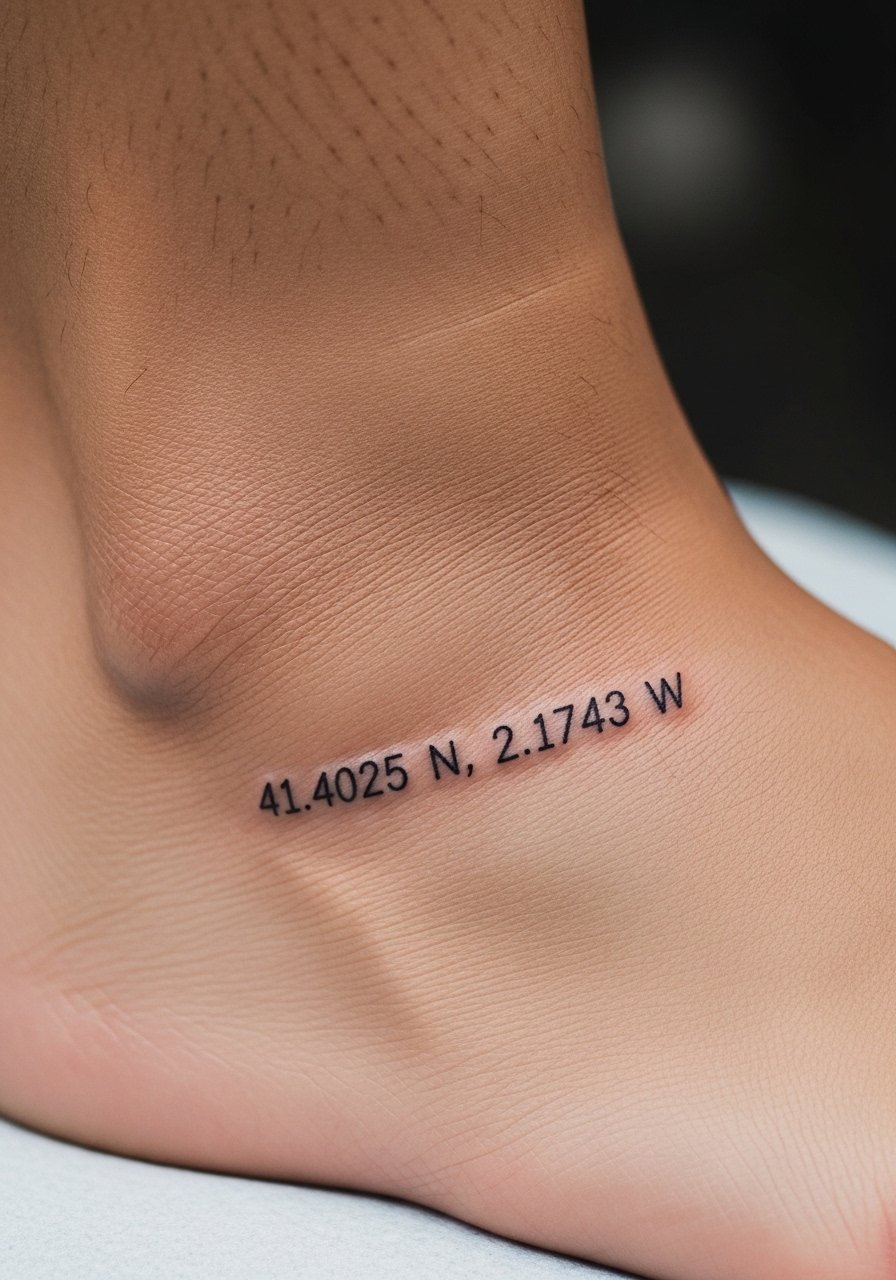
I recommend coordinates when you want a personal marker that can be discreet. The inner foot gives a flat canvas. Pain is low to moderate. Small text needs readable kerning. Tell your artist the exact numerals and font size. A common issue is requesting tiny digits that become unreadable. At six months the numbers look crisp if spacing was correct. After a couple of years the digits may soften and require a retouch. If readability matters, choose a slightly bolder type.
13. Blackwork Floral Ankle Band
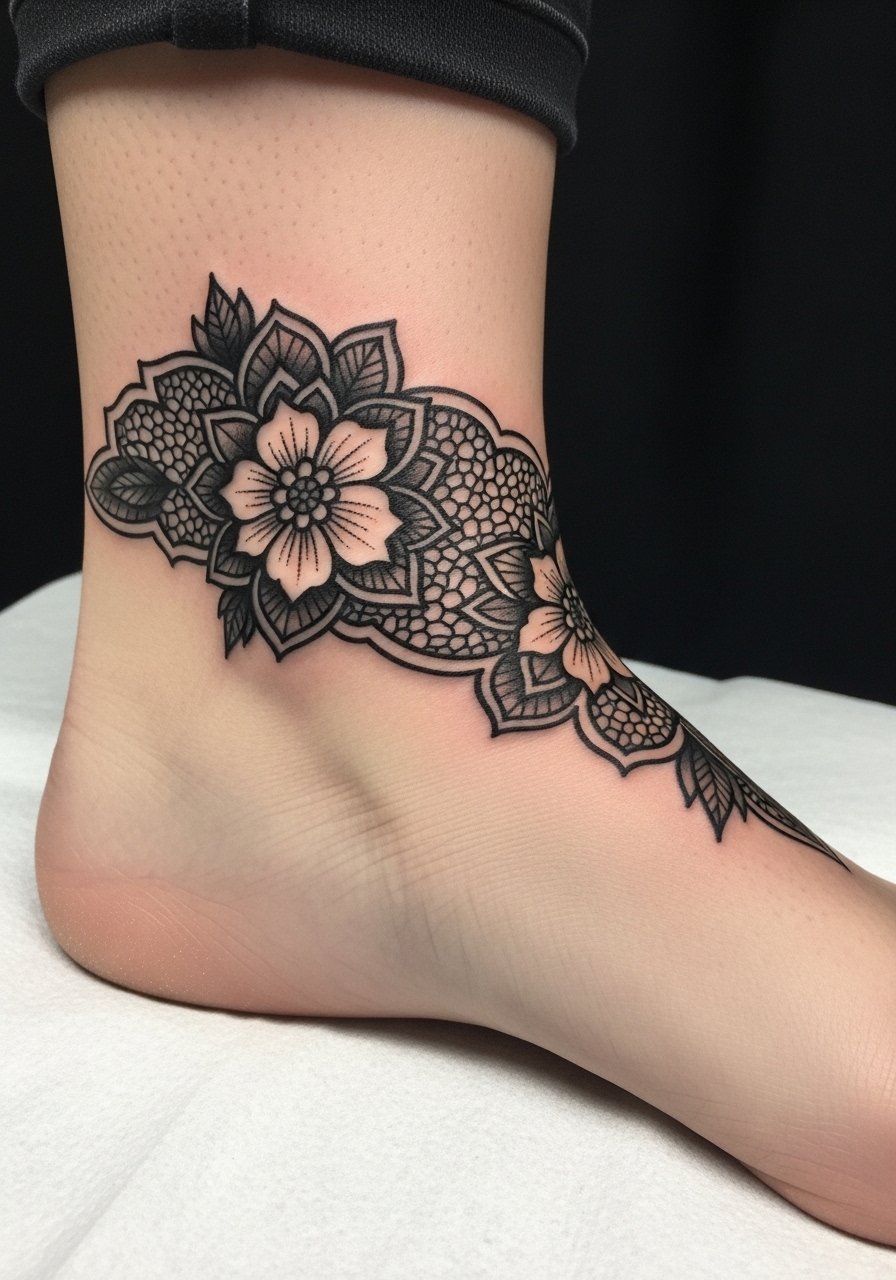
When an artist wrapped bold black florals around an ankle I noticed it held like a cuff. Bands need symmetry and bold fills to survive foot movement. Pain is medium to high on the bone. Sessions run 60 to 120 minutes depending on wrap complexity. Tell your artist to leave intentional gaps so the design breathes and does not become a solid black line. People often request very fine petal lines that later look like a dark blur. At one year it reads like a lace cuff. At three years bold black still answers visually even if edges soften.
14. Watercolor Sunset on Top of Foot
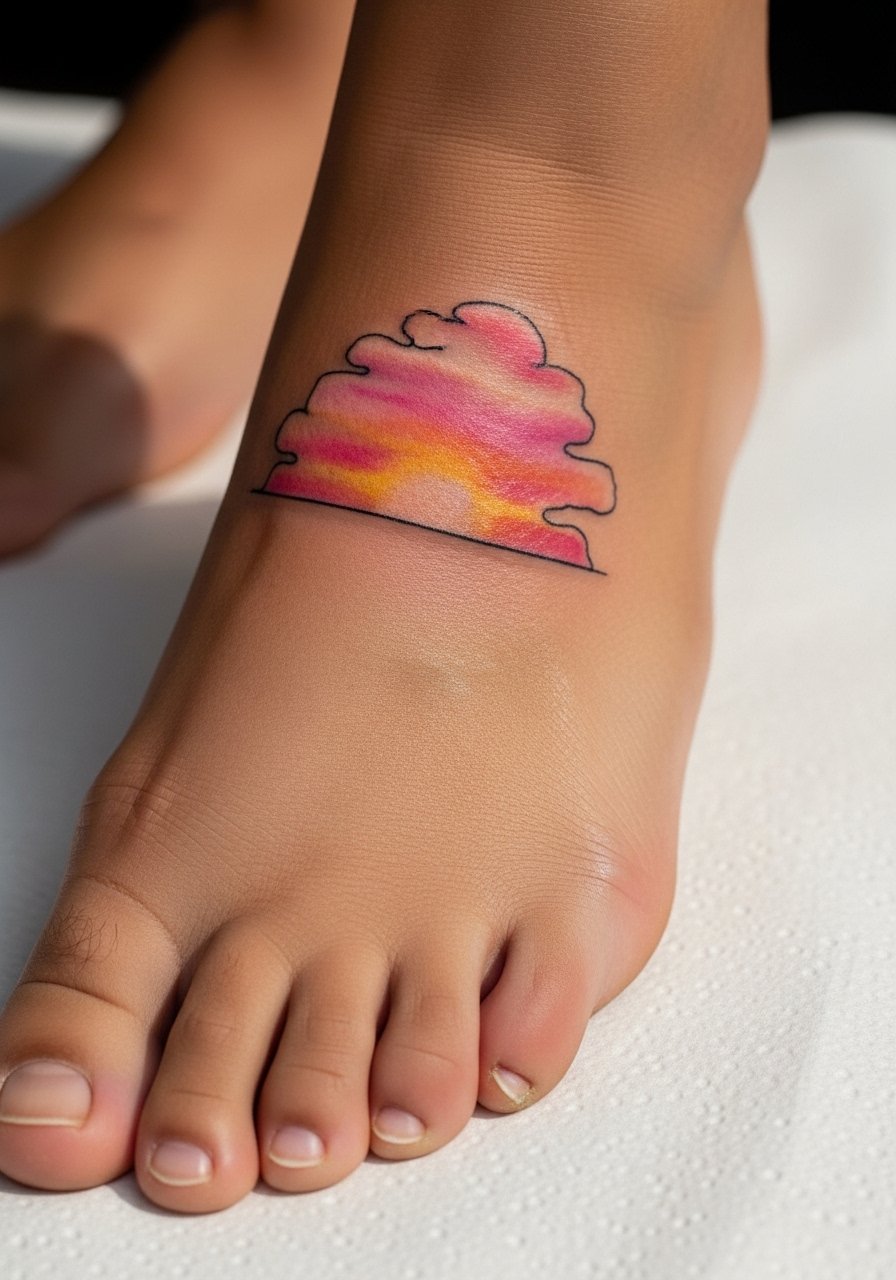
I saw a watercolor sunset that survived better because the artist used light black anchors around large color fields. The top of the foot shows color well, but it fades faster than line work. Pain is medium. Sessions may take 90 minutes to layer washes. Ask your artist to keep color patches large and avoid tiny blended strokes. The common mistake is asking for painterly detail that soon looks patchy. At six months the gradients are still visible. Two years in, colors will need refreshes to regain vibrancy.
15. Geometric Honeycomb on Side Toe Area
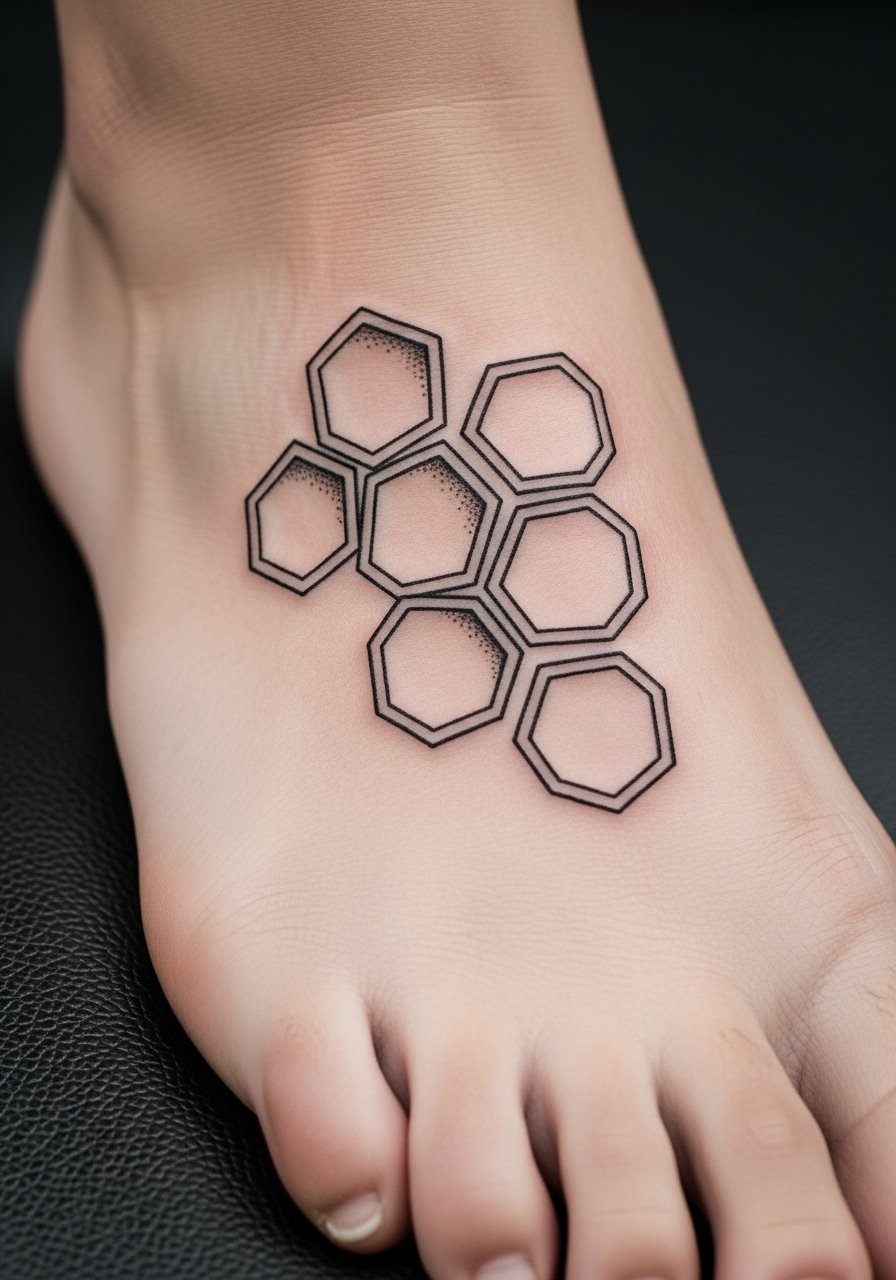
I love the way hexagons mimic natural texture on the foot. Toe-adjacent geometry needs scale. Pain is high near toes. Sessions are short but precise. Tell your artist you want each cell large enough to avoid merging. Small honeycombs are a mistake I see often. At six months the cells look crisp. Over years fine joins might blur, but the structure holds if scale is generous.
16. Micro-Realism Paw Print on Heel
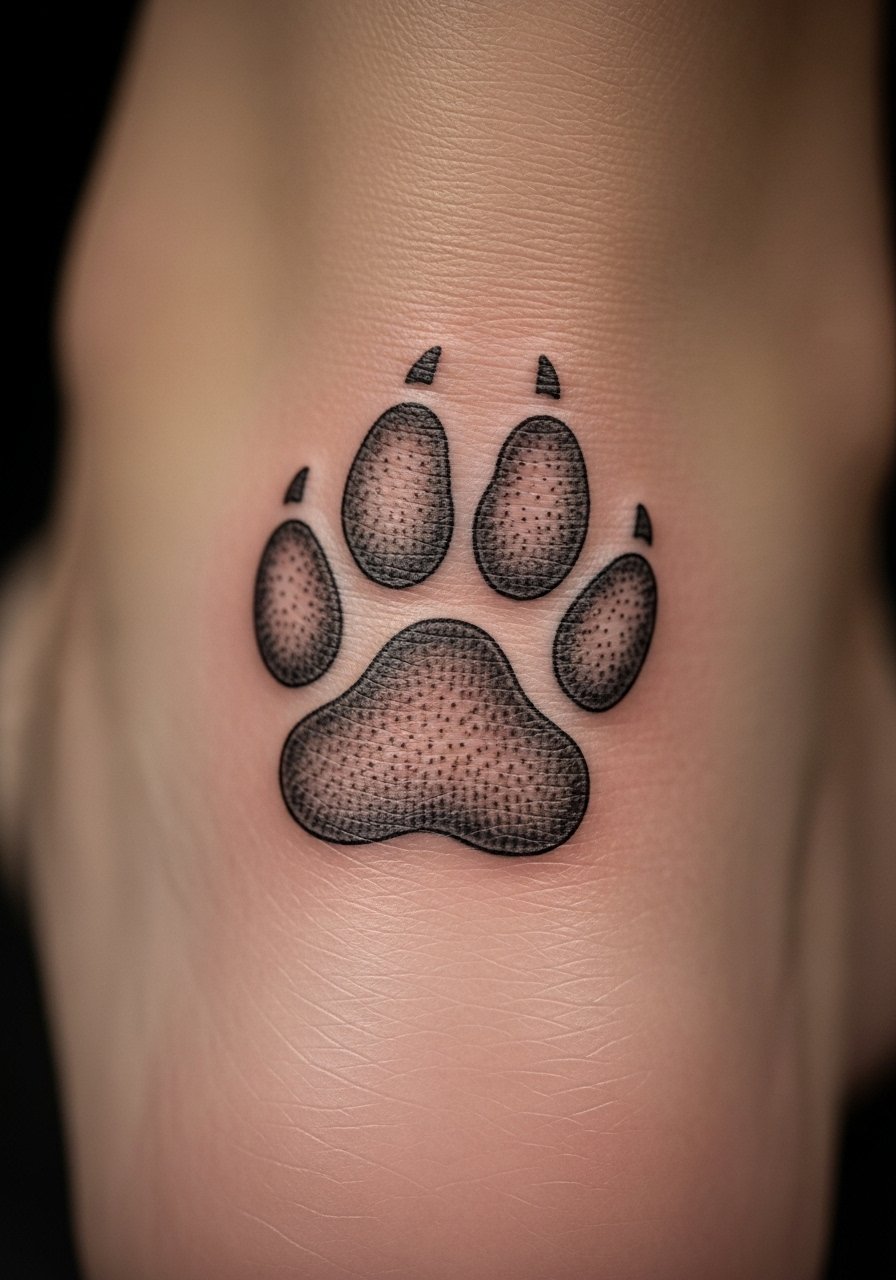
I got a paw print on my heel and learned that heels shift differently. Micro detail needs to be simplified slightly. Pain is moderate. Expect a 30 to 60 minute sitting. Tell your artist you want texture implied, not tiny dots that will become a smudge. A typical mistake is over-detailing the pads. After six months the print looks realistic. Over longer time it will flatten but still read as a paw, especially with a bold outline or shadow.
17. Blackwork Crescent Moon Along Instep
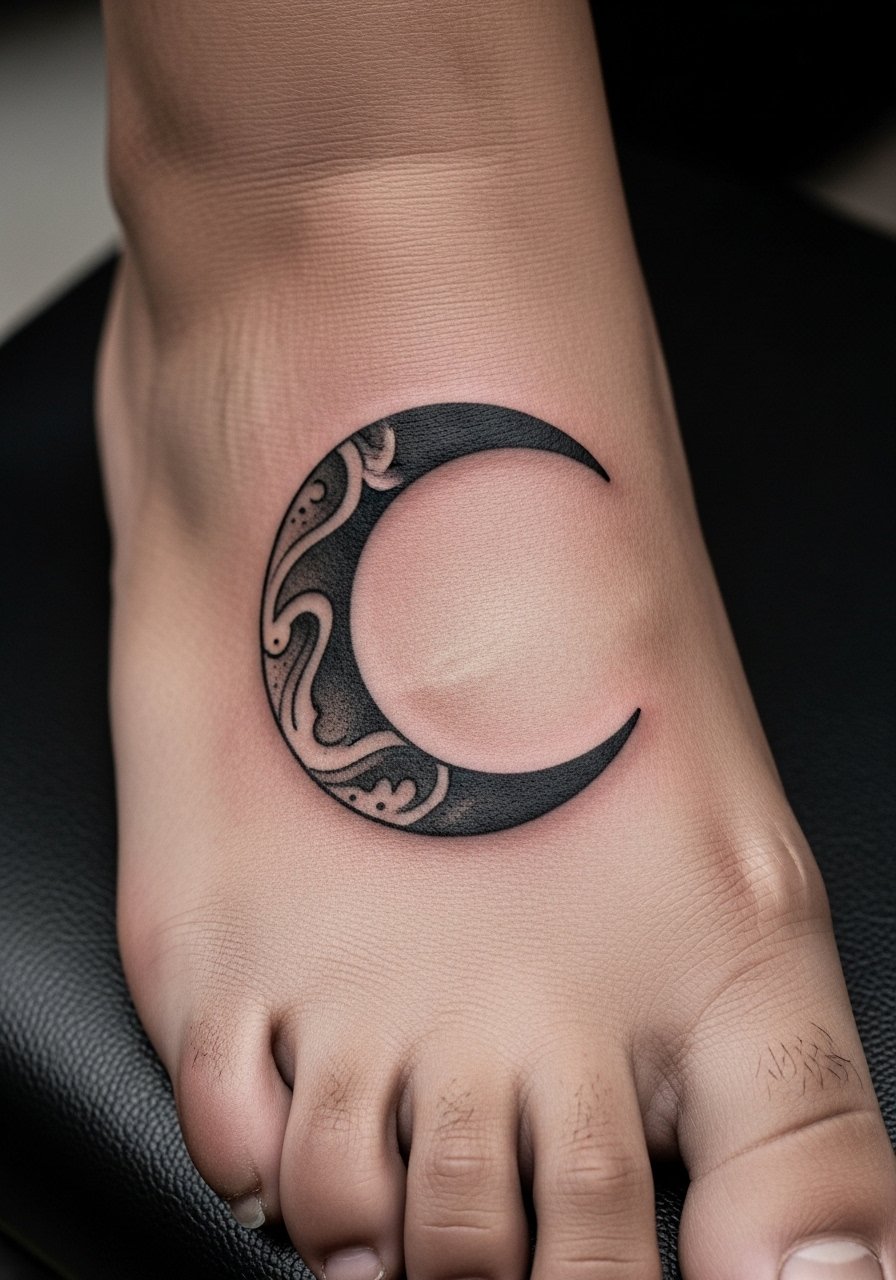
A crescent moon on the instep acts like a little emblem. I found that heavy black fills age best here. Pain is moderate. Sessions are fast, under an hour for a clean moon. Ask your artist to enforce a smooth curve and solid fill. People sometimes request thin crescent lines that later look uneven. At six months the silhouette is perfect. Years later it still reads because solid black resists blur.
18. Fine Line Botanical Toe Ring
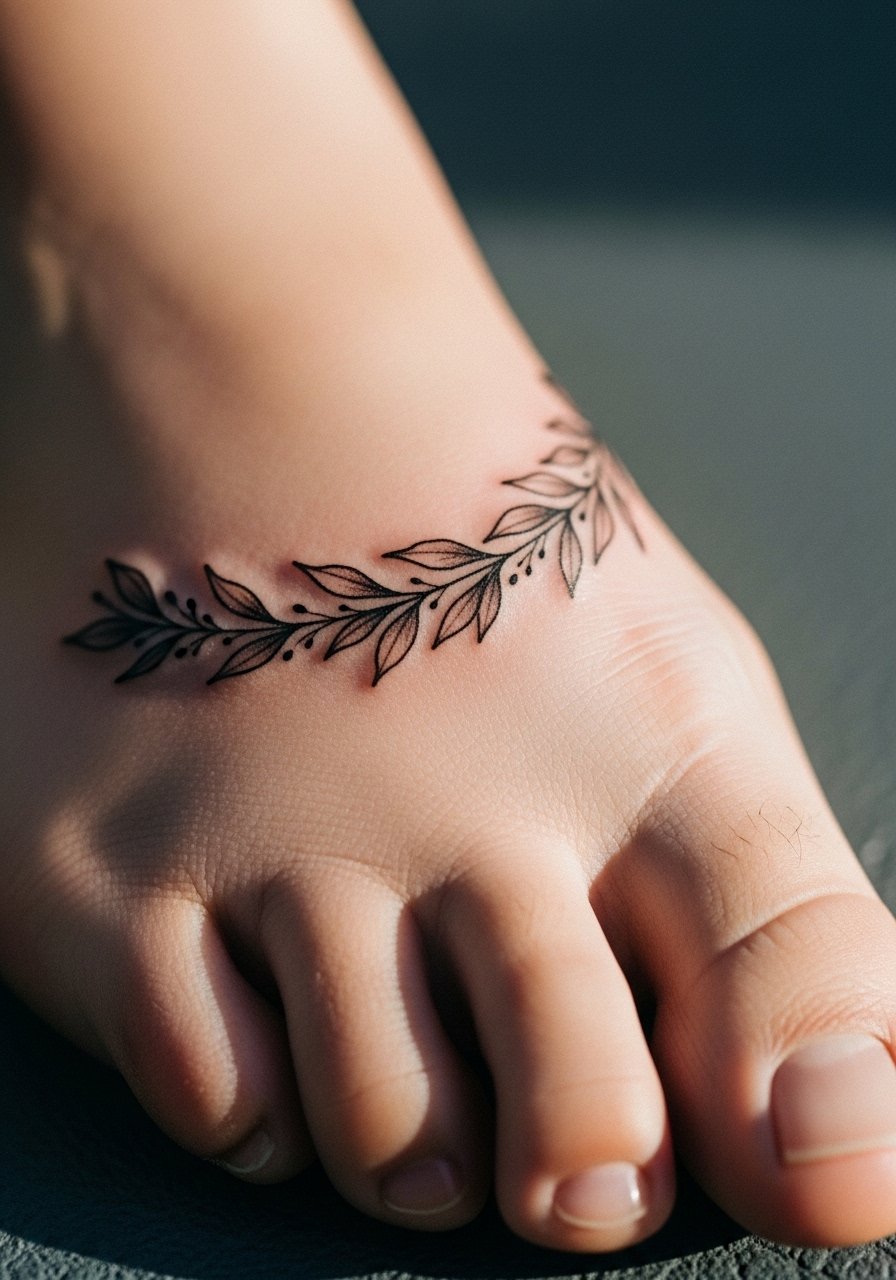
I love the idea of a toe ring tattoo that mimics jewelry. Toe base skin is fragile and rubs against footwear. Pain is high. Sessions are short. Request a simple repeat leaf pattern with some gaps to avoid merging. The most common mistake is overloading the ring with tiny leaves. At six months it looks dainty. At two years small segments may blur and require touch-ups or thicker lines to keep the ring effect.
19. Geometric Seed of Life on Top of Foot
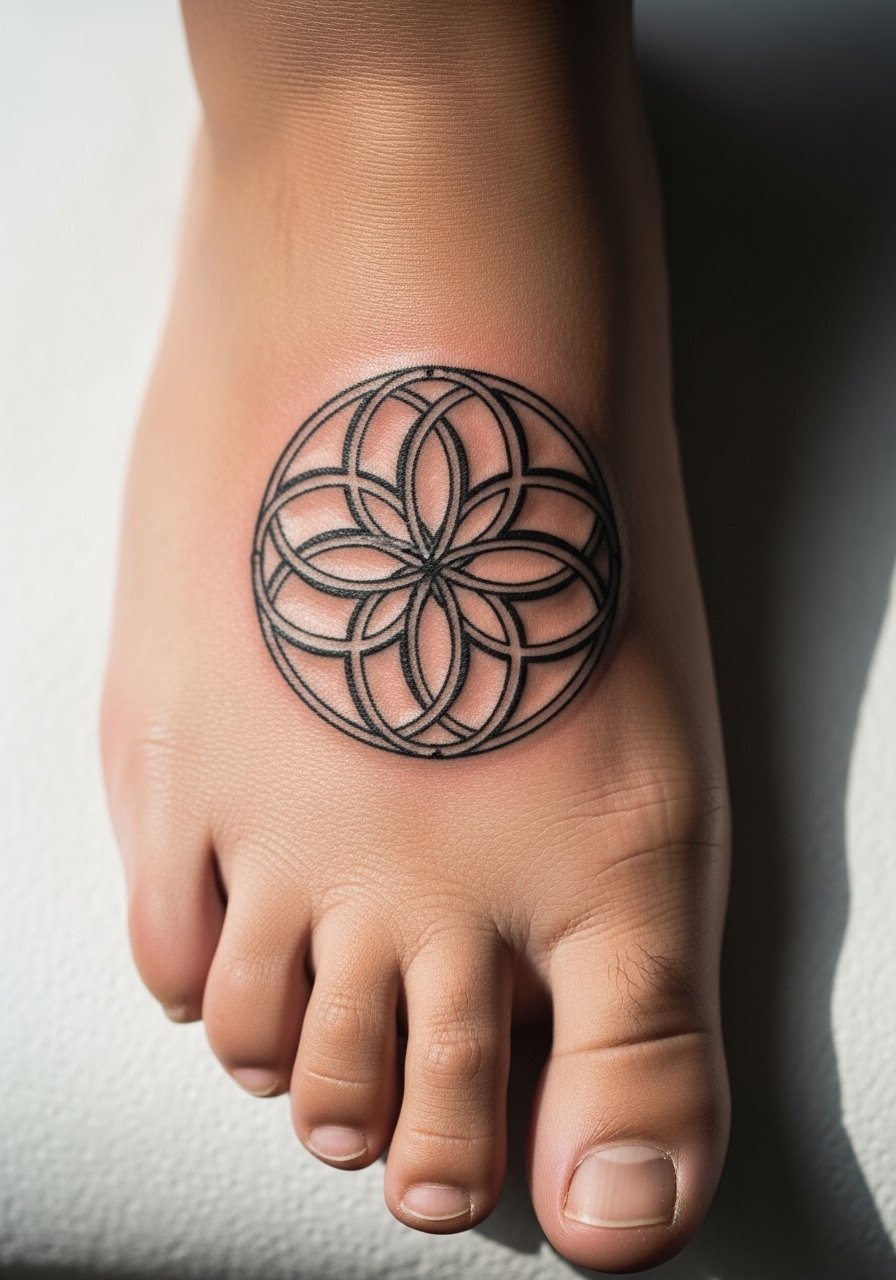
I noticed sacred geometry feels grounded on the top of the foot. The Seed of Life needs accurate spacing. Pain is medium. Sessions are often 60 to 90 minutes. Tell your artist to prioritize circle spacing over fine line detail. A common error is shrinking the motif so circles overlap too tightly, which leads to visual muddiness. At one year the pattern looks precise. Over time the intersections may soften, but the overall geometry remains legible if lines started bold enough.
20. Minimalist Arrow Along Foot Side
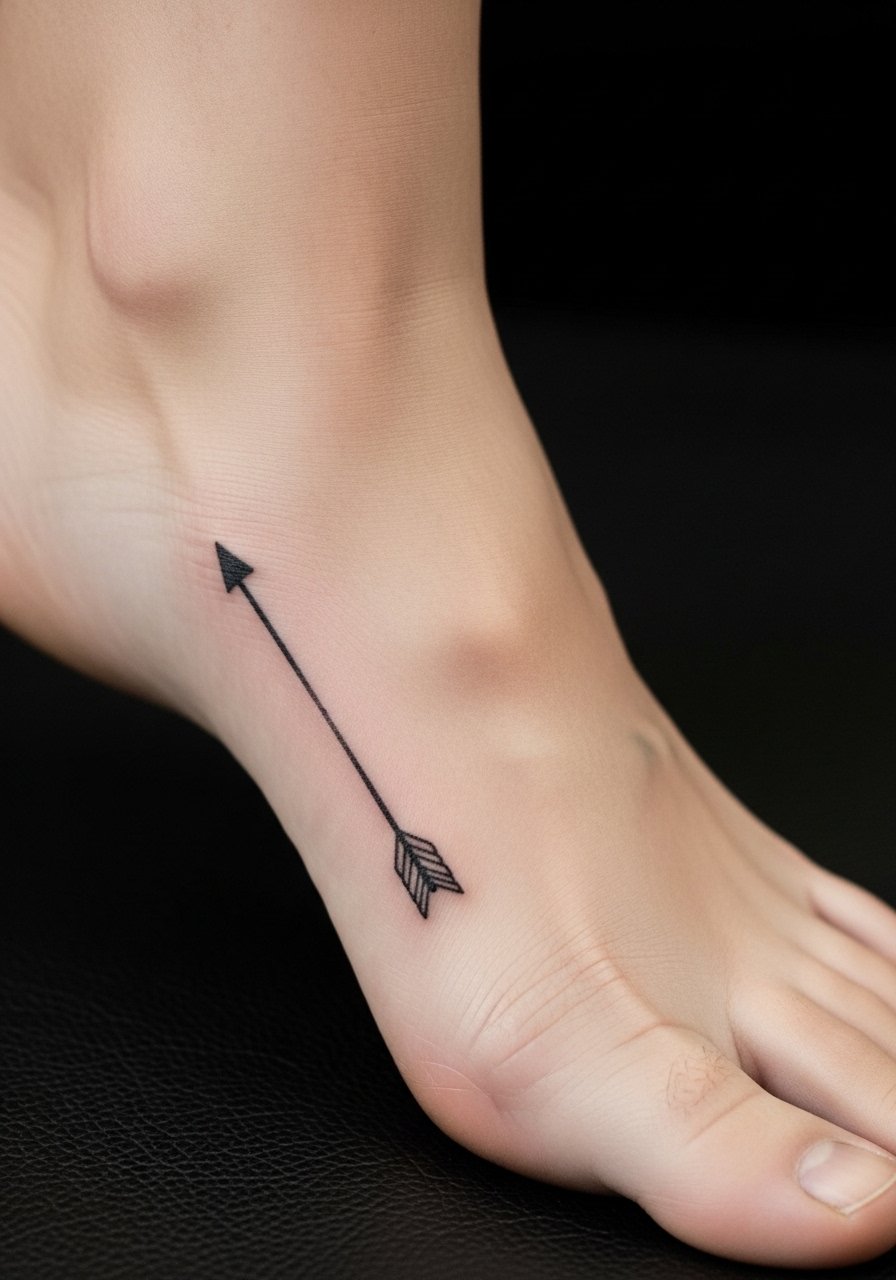
I saw an arrow that tracked with foot movement and it felt purposeful. The side of the foot handles a single linear motif well. Pain is low to moderate. Session time is brief. Ask your artist to thicken the arrow shaft slightly to preserve directionality as it heals. Many clients request needle-thin arrows that disappear. At six months the arrow points clearly. Two years on, edges soften but the symbol keeps its intent.
21. Dotwork Sunburst Near Ankle Bone
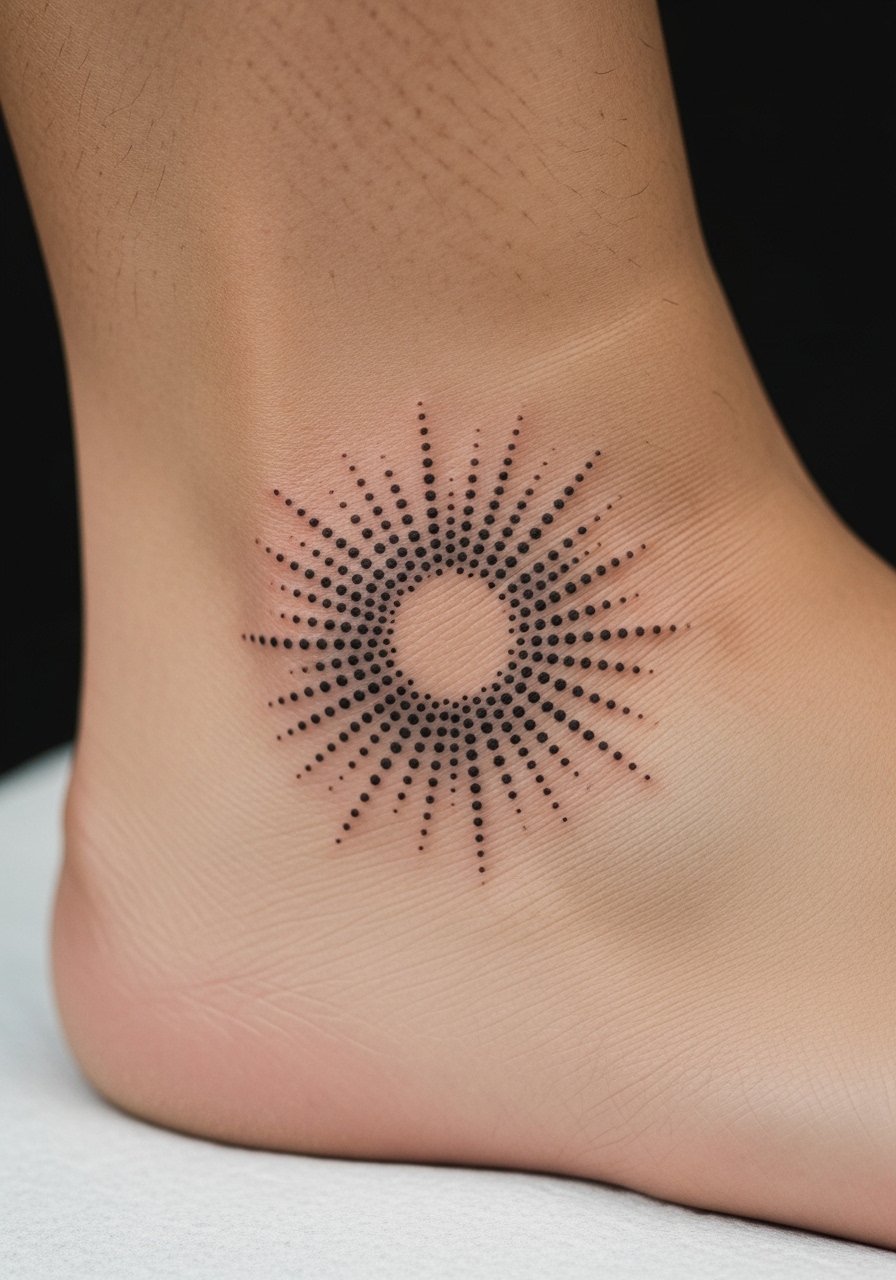
I used to avoid heavy dotwork on ankles until I saw one that kept its gradient. Dot size and spacing matter. Pain is moderate to high near the bone. Sessions can be long for dense dot fields. Tell your artist you want larger dots toward the center and spaced outward, so the gradient survives. A common mistake is compacting dots too tightly. At six months the sunburst reads with depth. Years later the center may fill in slightly, but the radiance stays because of planned spacing.
22. Micro-Realism Butterfly Landing on Toe
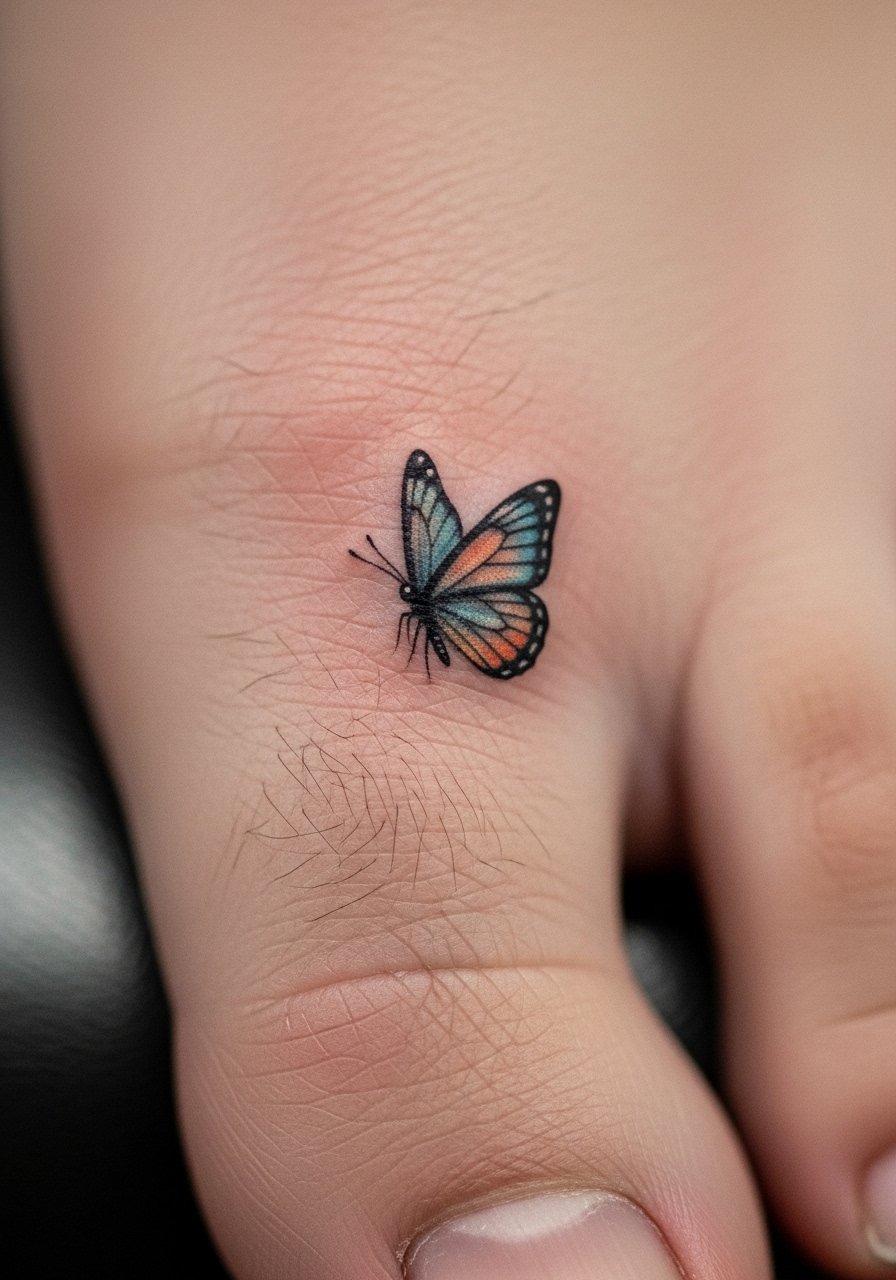
I watched an artist place a tiny butterfly on a toe joint and learned to scale up slightly for durability. Toe joints move, which tests pigment. Pain is high. Sessions are brief. Ask for a clear outline and larger wing cells so color does not pool. People often choose hyper-detailed miniatures that blur. At six months the butterfly looks delicate. At two years it may flatten, but a crisp outline retains the silhouette.
23. Blackwork Tribal Band Under Arch
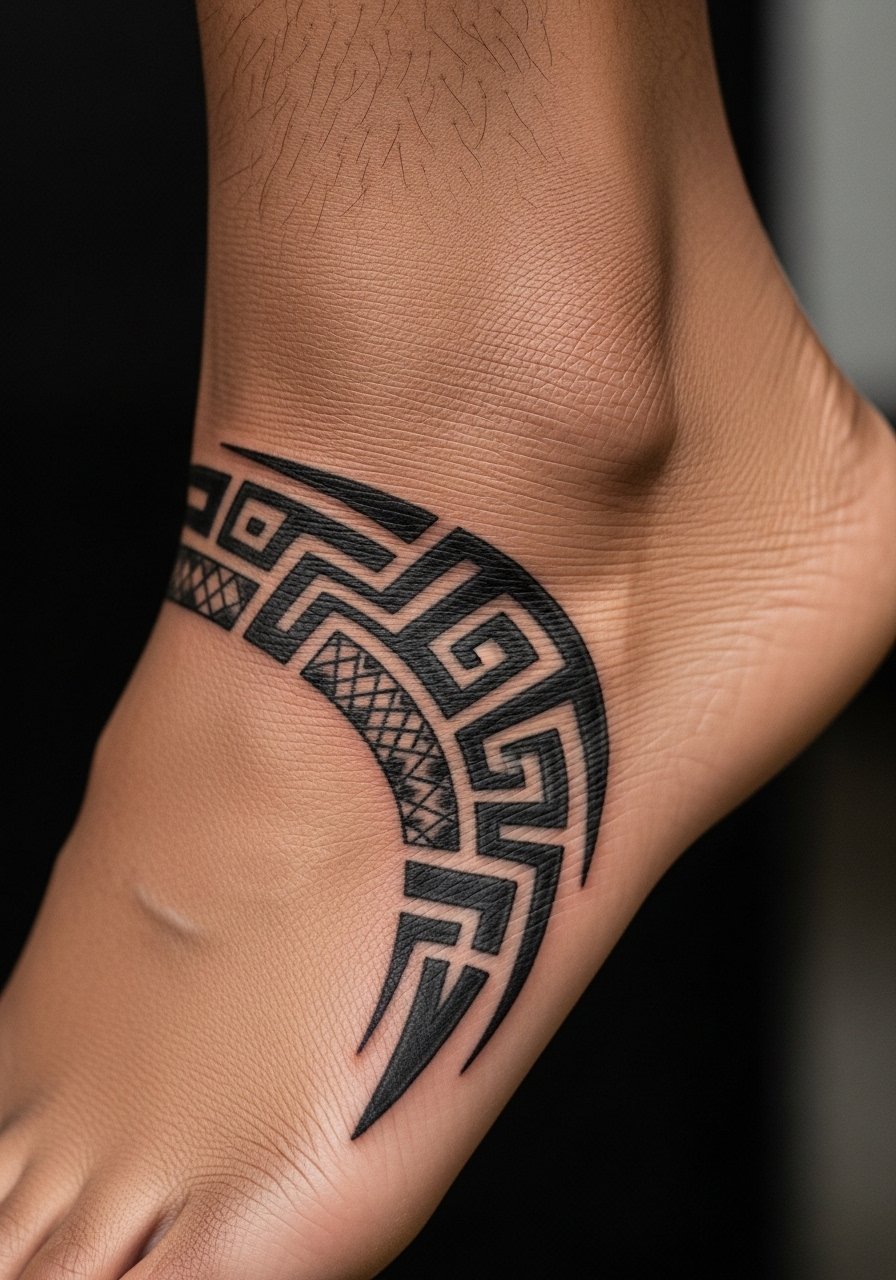
I find tribal bands under arches act like a secret statement. The arch is sheltered from sun but stretches with motion. Pain is low to moderate. Sessions require careful wrapping of the foot. Tell your artist to work with the natural arch and not force straight lines across a curved surface. Many request complex interlocks too small for the area. At one year the band reads solid. Over time the pattern keeps contrast because negative space was maintained.
24. Fine Line Mandrake Root on Side Foot
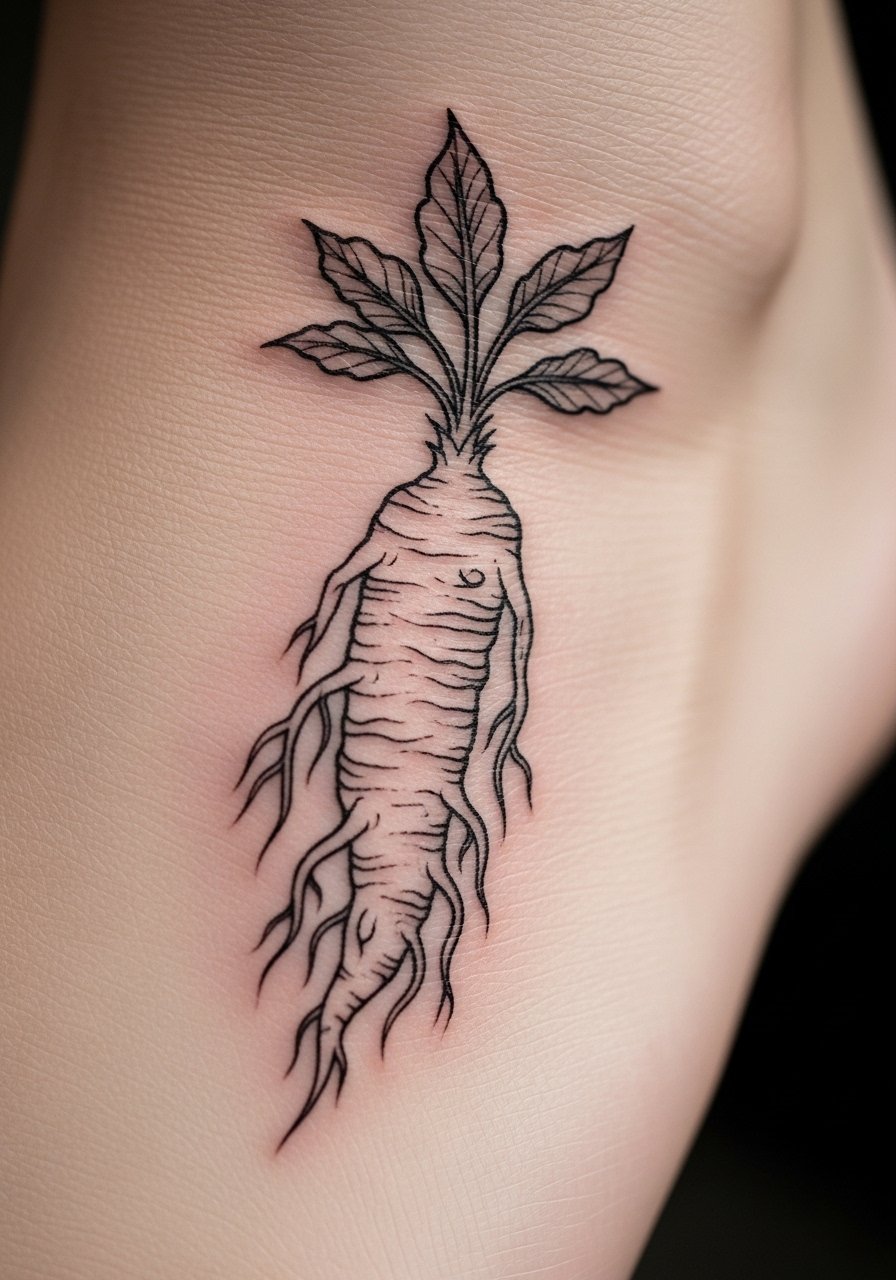
I first saw a mandrake root motif in a botanical catalog and adapted it to the foot. Side-of-foot placement makes the tendrils look like they grow with your stride. Pain is moderate. Expect a 45 to 75 minute session. Ask your artist to emphasize the main root line with slightly heavier strokes so tendrils remain supportive but not dominant. A mistake I spot often is over-detailing the root hairs. At six months the design reads organic. Two years later the main line keeps the silhouette while tiny hairs may fade.
25. Micro-Realism Tiny Portrait Near Ankle
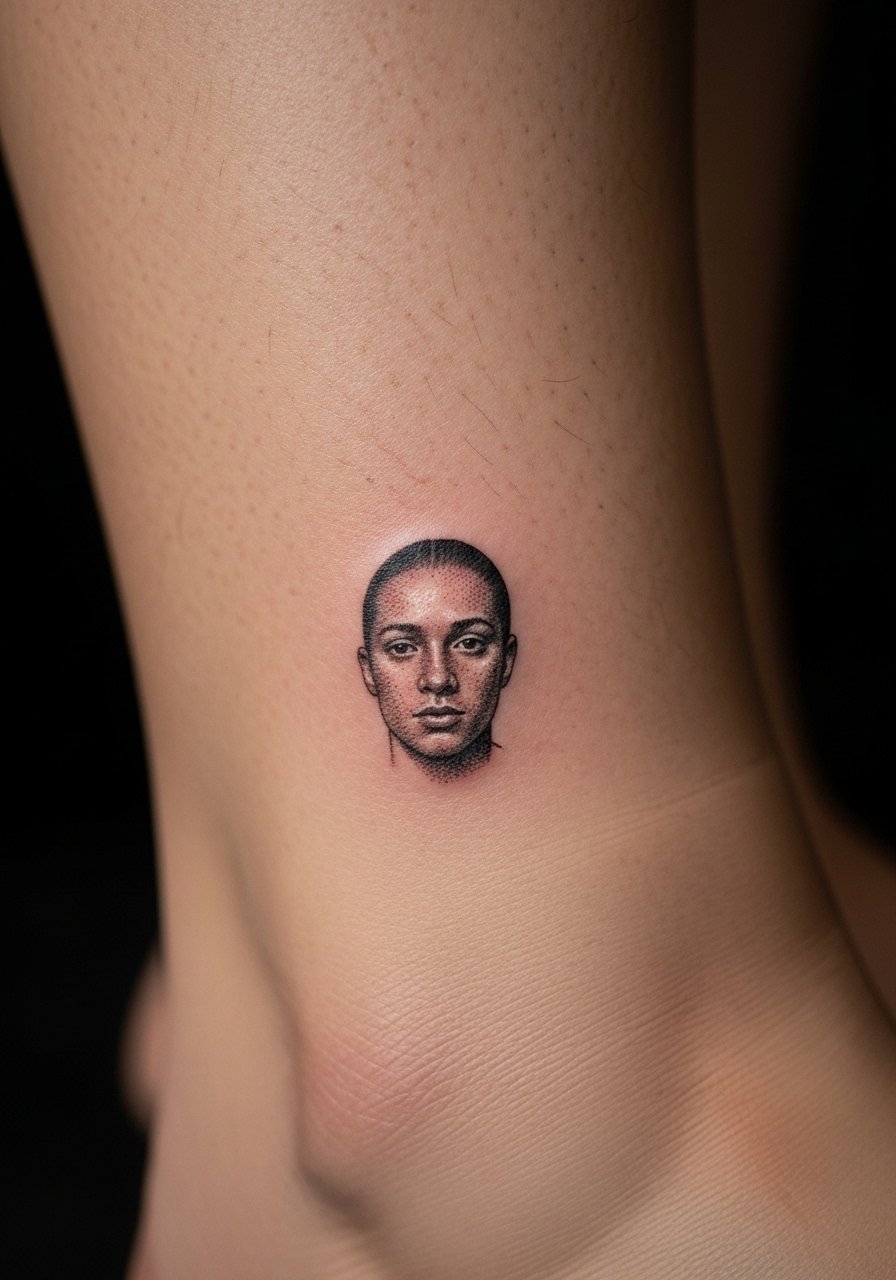
I was surprised how intimate a tiny portrait looks on the ankle. Micro-portraiture needs an artist experienced at small scales on mobile skin. Pain is moderate. Sessions range 60 to 120 minutes depending on reference. During the consult give a high-contrast photo and say, "Preserve main features, simplify tiny textures." A common error is asking for hyper-real detail that becomes a gray smudge. At six months the likeness can be clear. If you want it to stay recognizable long-term, plan for periodic touch-ups every few years.
Tattoo Prep and Aftercare Essentials
Aftercare. Prep. Long-term maintenance. These are the items I reach for and the ones artists I know actually recommend.
Aftercare Essentials:
- Aquaphor Healing Ointment, 14oz tube. Industry standard for first 3 to 5 days. I use a thin layer at night
- Saniderm Transparent Adhesive Bandage, 6-inch roll. Second skin healing method. Every artist I've talked to recommends it for the first 24 to 72 hours
- CeraVe Fragrance-Free Moisturizing Lotion, 12 oz pump. Daily moisturizer for days 4 to 14. I prefer the pump bottle for hygiene
- Dr. Bronner's Unscented Castile Soap, 32 oz. Gentle cleanser for rinsing twice a day the first week. Dilute a small drop with water
Before Your Appointment:
- Numbing Cream with 5% Lidocaine, 30g. Apply 30 to 45 minutes before your session only if your artist approves. Some artists prefer no numbing
- Tattoo Stencil Transfer Paper, A4 Pack. Useful if you want to test placement at home before your appointment
Long-Term Maintenance:
- SPF 50 Sunscreen Stick for Tattoos, Travel Size. Use on healed tattoos whenever they see sun. I carry one for beach days
- Mad Rabbit Tattoo Balm, 2 oz. Long-term maintenance for vibrancy. Artists I know recommend it for healed pieces
- Hustle Butter Deluxe, 5 oz. Vegan alternative that works during healing and after. Smells better than most aftercare
Optional Comfort Items:
- Tattoo Numbing Spray, 4 oz. Handy for touch-ups or sensitive areas mid-session
- Hydrocolloid Bandages, Large Size. Good alternative to Saniderm for small to medium tattoos
Frequently Asked Questions
Q: Will fine line tattoos on the top of the foot blur faster than blackwork?
A: From what I've seen, fine line pieces on the foot blur quicker because the skin there moves and rubs. If you want lines to stay readable, tell your artist to use a slightly bolder single-needle or thin two-needle approach. I recommend stronger outlines and larger negative spaces. For maintenance, use Mad Rabbit Tattoo Balm, 2 oz on healed ink to keep contrast.
Q: Do watercolor-style foot tattoos need special aftercare compared to traditional ones?
A: In my experience, watercolor pieces demand larger color fields and anchor lines to avoid becoming blotchy. During healing, be diligent about gentle cleansing and avoiding direct sun. I use Saniderm Transparent Adhesive Bandage, 6-inch roll for the first day on color work when the artist approves. Long term, sunscreen sticks help preserve washes.
Q: Can tiny scripts or dates remain legible on toes or ankle?
A: Short words or numbers can work if you size them up and choose a clean typeface. When I got a one-word script on my foot, the artist suggested thicker strokes and extra spacing. If you want numbers, tell your artist the exact numerals and font weight. Use CeraVe Fragrance-Free Moisturizing Lotion, 12 oz pump while healing to reduce scabbing and preserve edges.
Q: Are Saniderm or hydrocolloid bandages safe for foot tattoos?
A: Yes, many artists I know recommend Saniderm for the first 24 to 72 hours, especially for areas that rub. Hydrocolloid bandages are a good alternative for smaller spots. If you plan to use them on the foot, make sure the area is clean and dry before application. Remove and reapply only as instructed by your artist.
Q: How painful is tattooing the toes versus the arch or instep?
A: From my sessions and what I've heard, toes are among the most painful spots due to thin skin and proximity to bone. The arch is milder and often the most comfortable. Instep and ankle bone areas sit in the middle. If you have a low pain tolerance talk to your artist about splitting sessions and possibly using a Numbing Cream with 5% Lidocaine, 30g only if they approve.
Q: If I want a geometric design to last on the foot, what should I emphasize in the consult?
A: Ask your artist to scale shapes so lines and dots have room to breathe. From what I've gathered, spacing decisions made in the stencil stage determine longevity. Say, "Enlarge key elements by 10 to 20 percent so they don't merge." Also request a bold starting line weight for critical edges.
Q: How often will I need touch-ups for a micro-realism portrait on the ankle?
A: In my experience small portraits need touch-ups more than larger ones. Plan for a check-in at six months and then expect a light refresh every two to four years depending on sun exposure and skin type. Use a dedicated tattoo balm like Mad Rabbit Tattoo Balm, 2 oz for maintenance to help retain contrast and saturation.
