
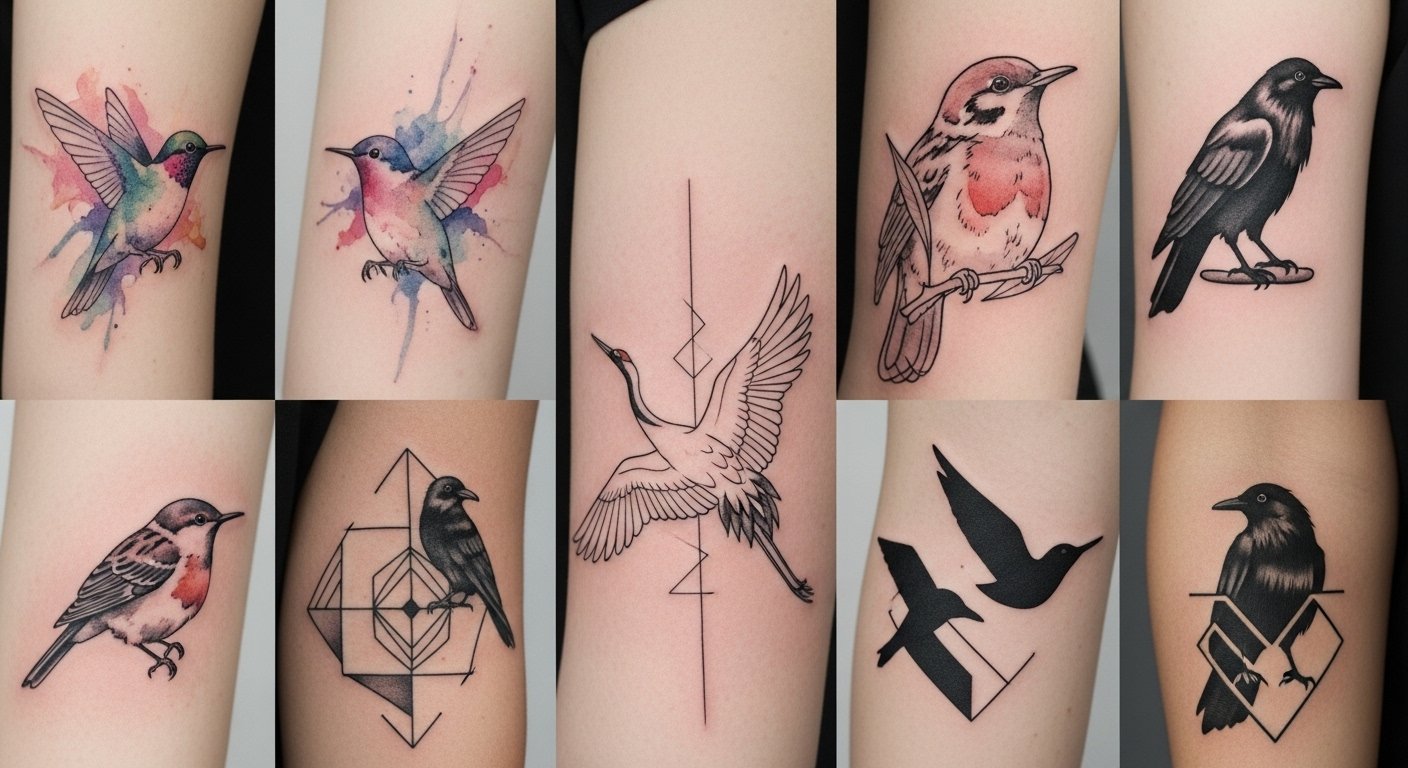
I spent months scrolling bird tattoo feeds before I realized the trick: the designs I loved online didn't always age or feel light on my skin. These 29 bird tattoo ideas lean into airy movement, delicate linework, and modern trends I kept seeing in artist portfolios. They focus on placements that feel effortless and heal reliably—so your tattoo can actually feel light, not just look it.
This list is about bird tattoo ideas that read as free-spirited and wearable. I’m writing from what I’ve seen in studios and my own tattoos: fine line, micro-realism, watercolor accents, geometric hybrids, and blackwork all make the list. These designs work on forearms, collarbones, ankles, ribs, and behind the ear—the low-pain and visible spots that still feel easy. I’ve noticed micro-realism and handpoke fine line birds are trending hard right now.
1. Fine Line Hummingbird on Collarbone
Style/Technique: Fine Line / Micro Watercolor Accent
Pain Level: Low-Medium (3-4/10)
Session Time: 1–2 hours
Best For: Dainty statement, first bird tattoo ideas
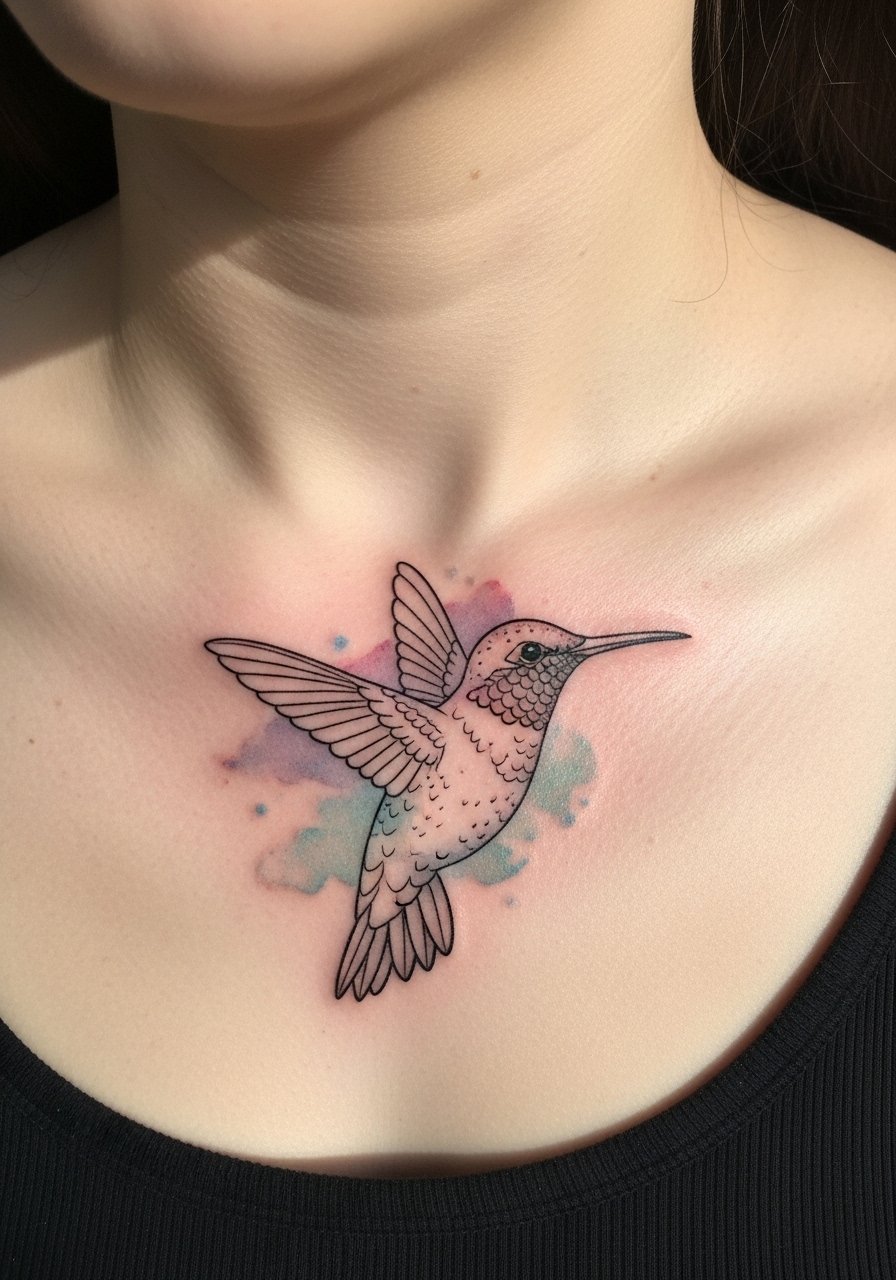
A tiny hummingbird on the collarbone reads airy because the area moves with breath and the skin is relatively flat. I’ve seen artists use a single-needle to keep feathers delicate, then add a pastel watercolor splash for motion. Expect mild soreness because the collarbone can sting, but the visual payoff is lightness that looks like it floats on the skin. Healing is straightforward—keep it moisturized and out of direct sun. Fine line work can blur if over-scrubbed; ask your artist about slightly thicker anchor points so lines settle cleanly. For this look, seek someone who shares healed micro photos and can show how watercolor holds up after a year.
2. Watercolor Swallow in Flight on Wrist
Style/Technique: Watercolor / Illustrative
Pain Level: Medium (4/10)
Session Time: 1–2 hours
Best For: Visible small bird tattoo ideas
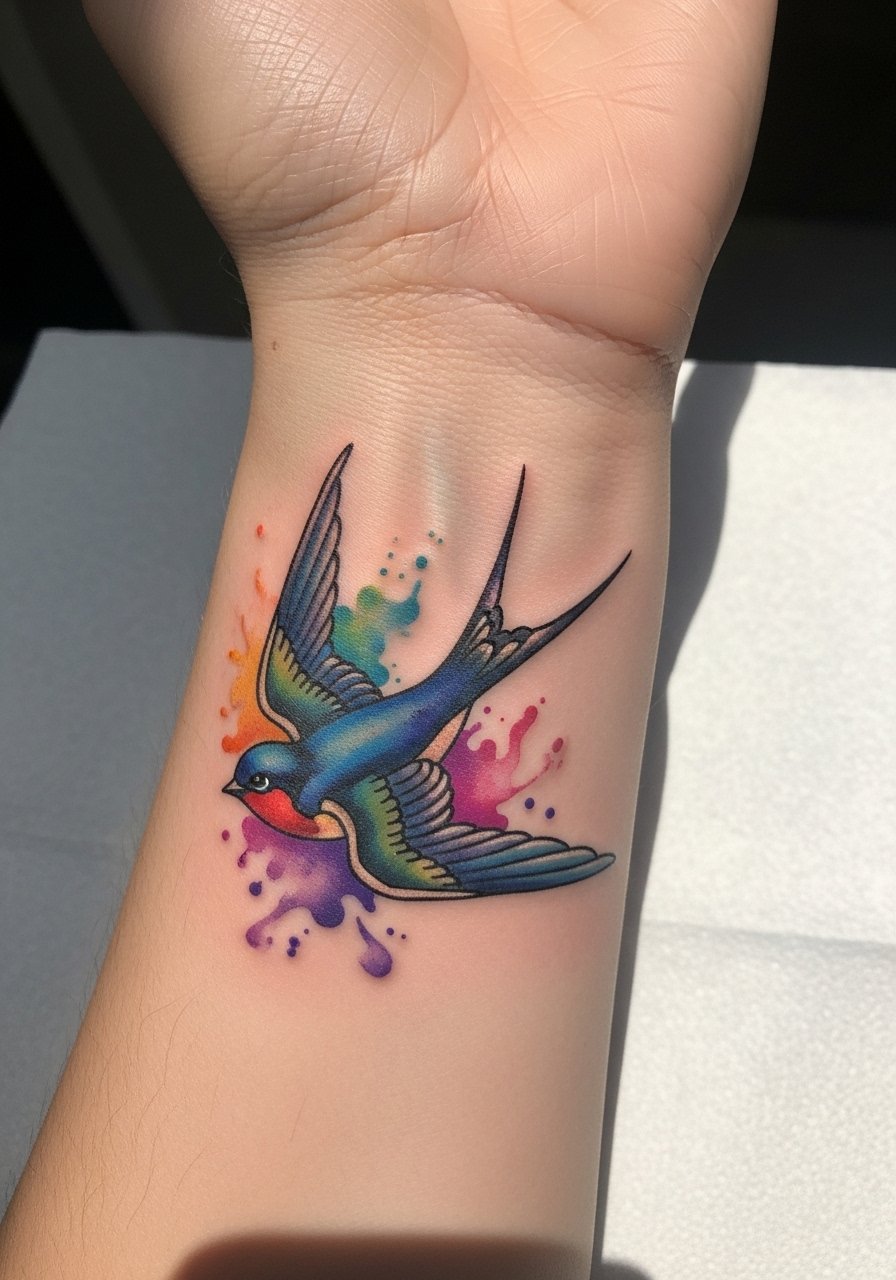
A small swallow painted with watercolor-style drips gives a free-spirited feel on the wrist. I love this placement because the wing motion follows your arm when you move. Watercolor requires gentle aftercare—no scrubbing and strict sunscreen later—since pigment can fade faster than bold black. Pain is manageable on the forearm/wrist area but expect extra sensitivity near the bone. One common mistake is choosing too many pastel tones; stick to 2–3 complementary hues and ask your artist how they plan to saturate color for longevity. Check portfolios for healed watercolor birds so you know how the pigments settle on real skin.
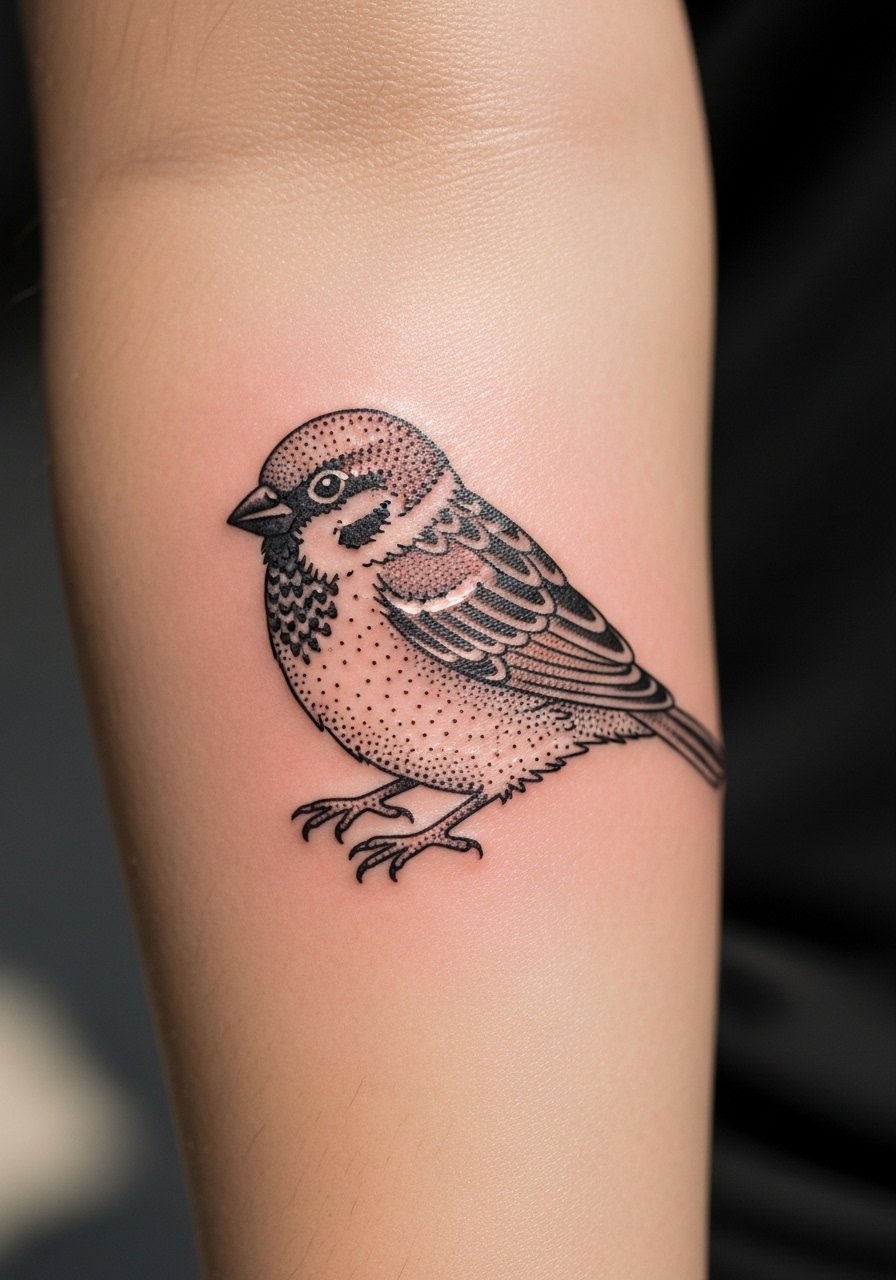
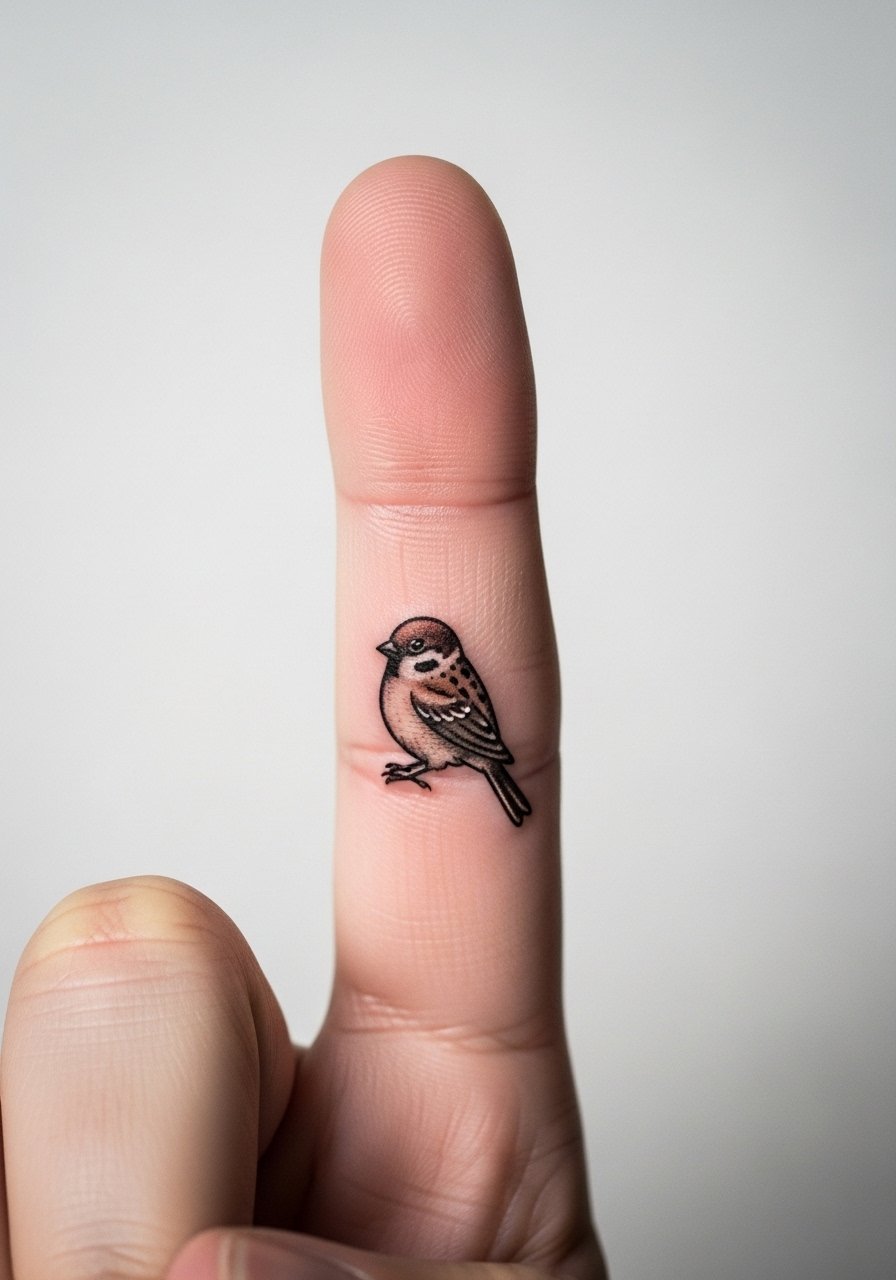
3. Micro-Realism Robin Behind Ear
Style/Technique: Micro-Realism / Color
Pain Level: Low (2–3/10)
Session Time: 30–90 minutes
Best For: First bird tattoo, subtle placement
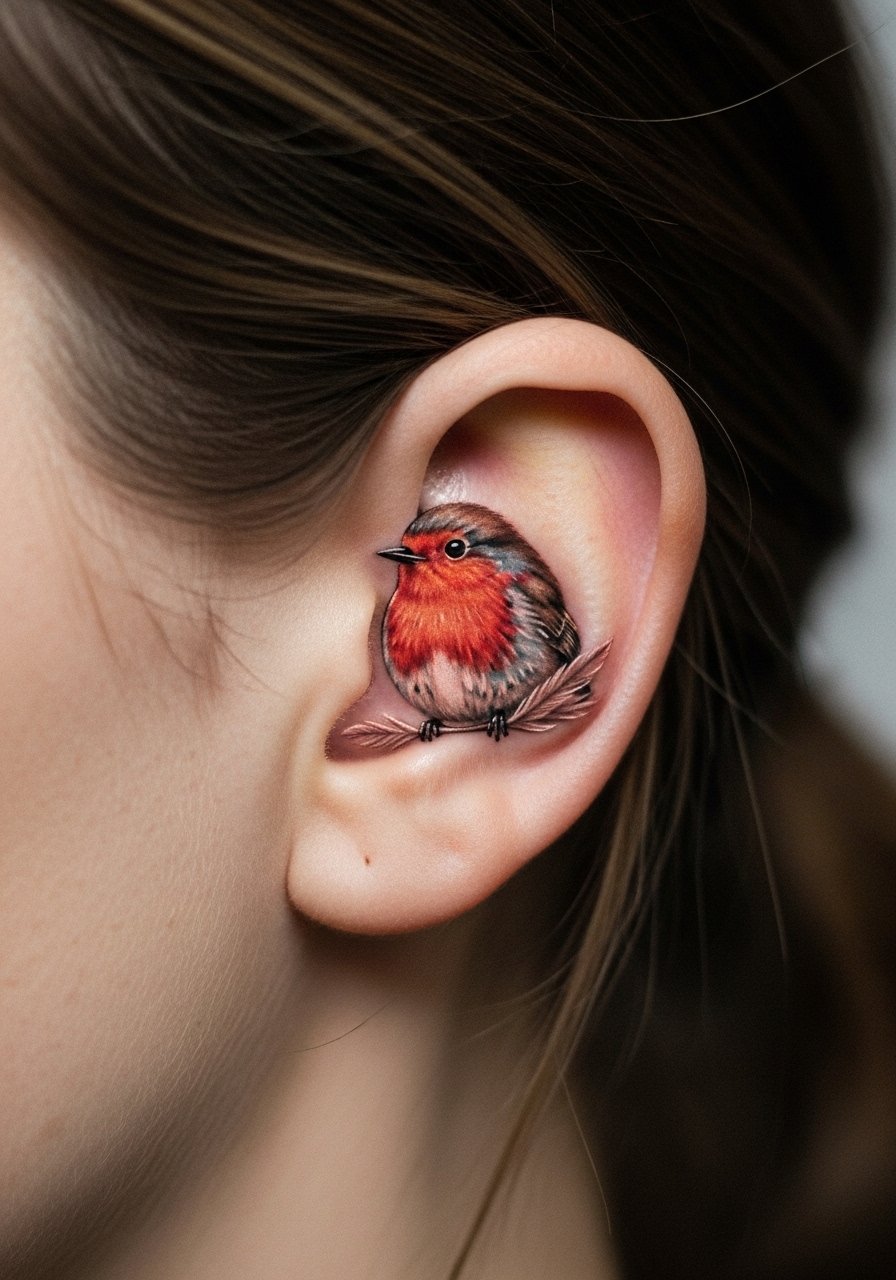
Micro-realism birds behind the ear are tiny but expressive—the robin’s chest color brings life without heaviness. I chose a similar spot for a small bird once and found it great for testing pain tolerance: quick, low-impact sessions. Healing is usually fast, but keep hair and shampoo away from the area for the first week. Micro-detail requires an artist experienced in small-scale realism—ask to see healed close-ups. This placement hides easily under hair and ages well if the linework is precise; blurry micro-realism is usually from inexperienced needle depth, so bring references and ask your artist about needle choices.
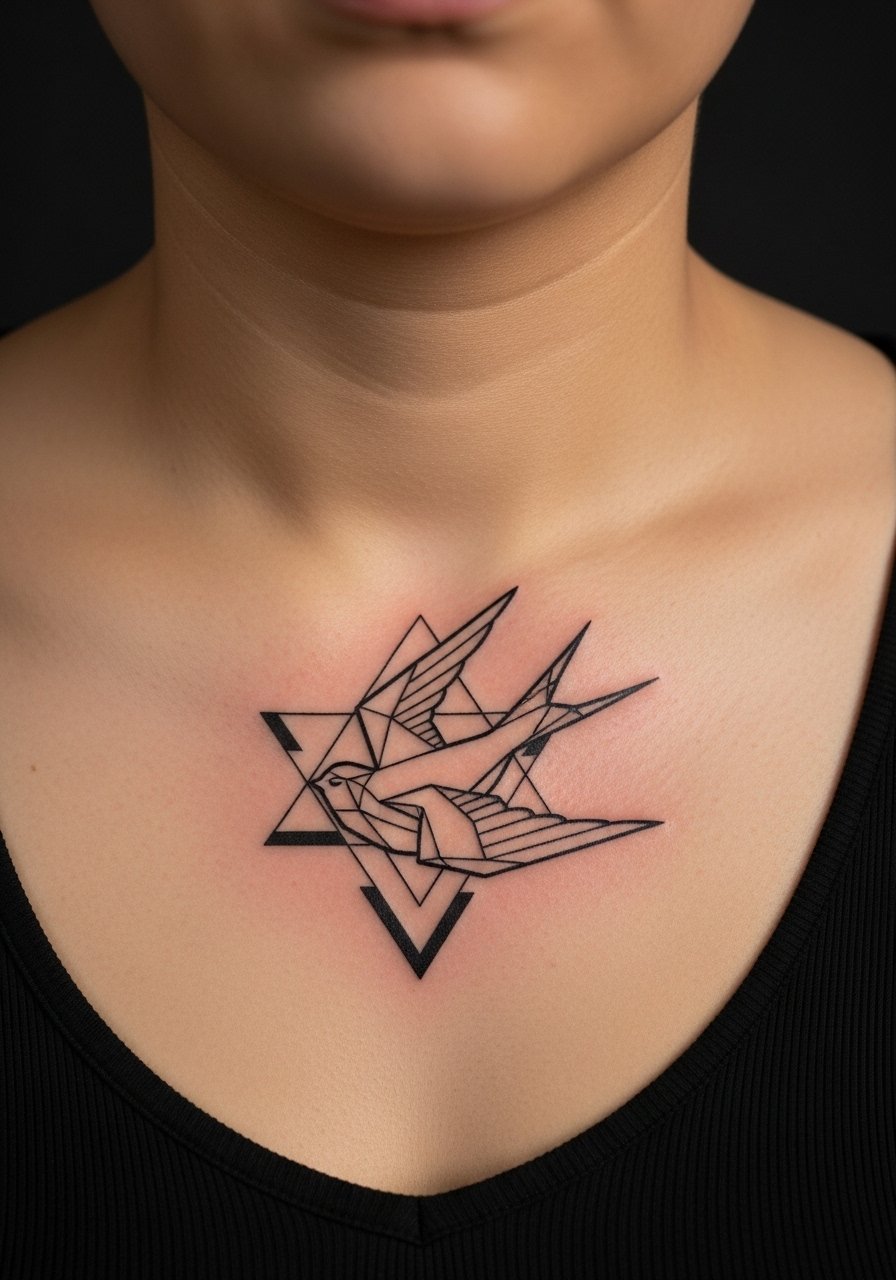
4. Geometric Owl Silhouette on Shoulder Blade
Style/Technique: Geometric / Blackwork
Pain Level: Low (3/10)
Session Time: 1–2 hours
Best For: Modern, professional-friendly pieces
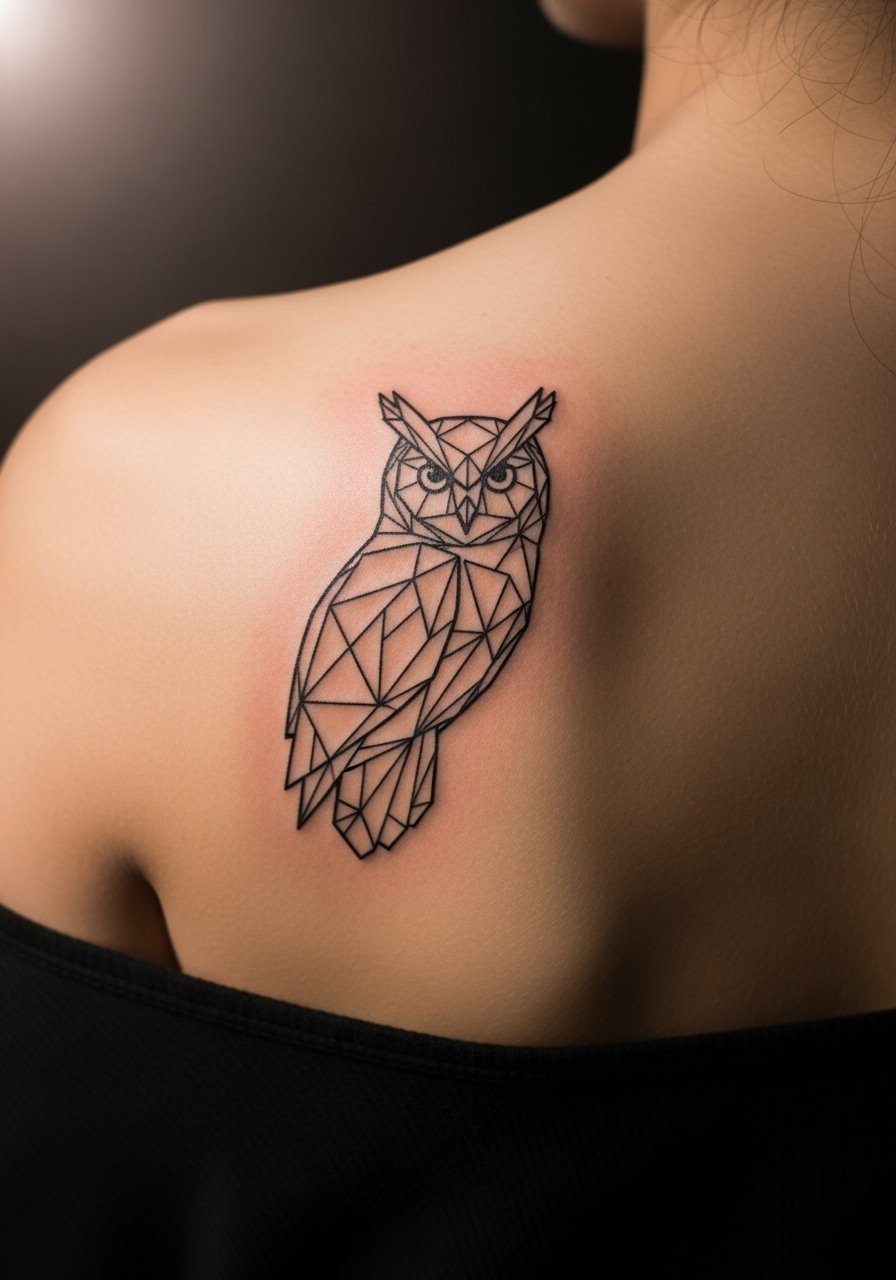
An owl rendered with geometric shapes keeps the design modern and light visually—heavy fill is balanced with negative space so it doesn't read dense. Shoulder blades are forgiving for pain and great for hiding under clothing. From what I've gathered, geometric birds age cleanly because bold lines hold up; dotwork and stippling within shapes add texture without weight. A common misstep is overcomplicating the geometry—simplicity reads lighter. Ask your artist how the design will flow with shoulder movement and request healed examples on similar skin tones.
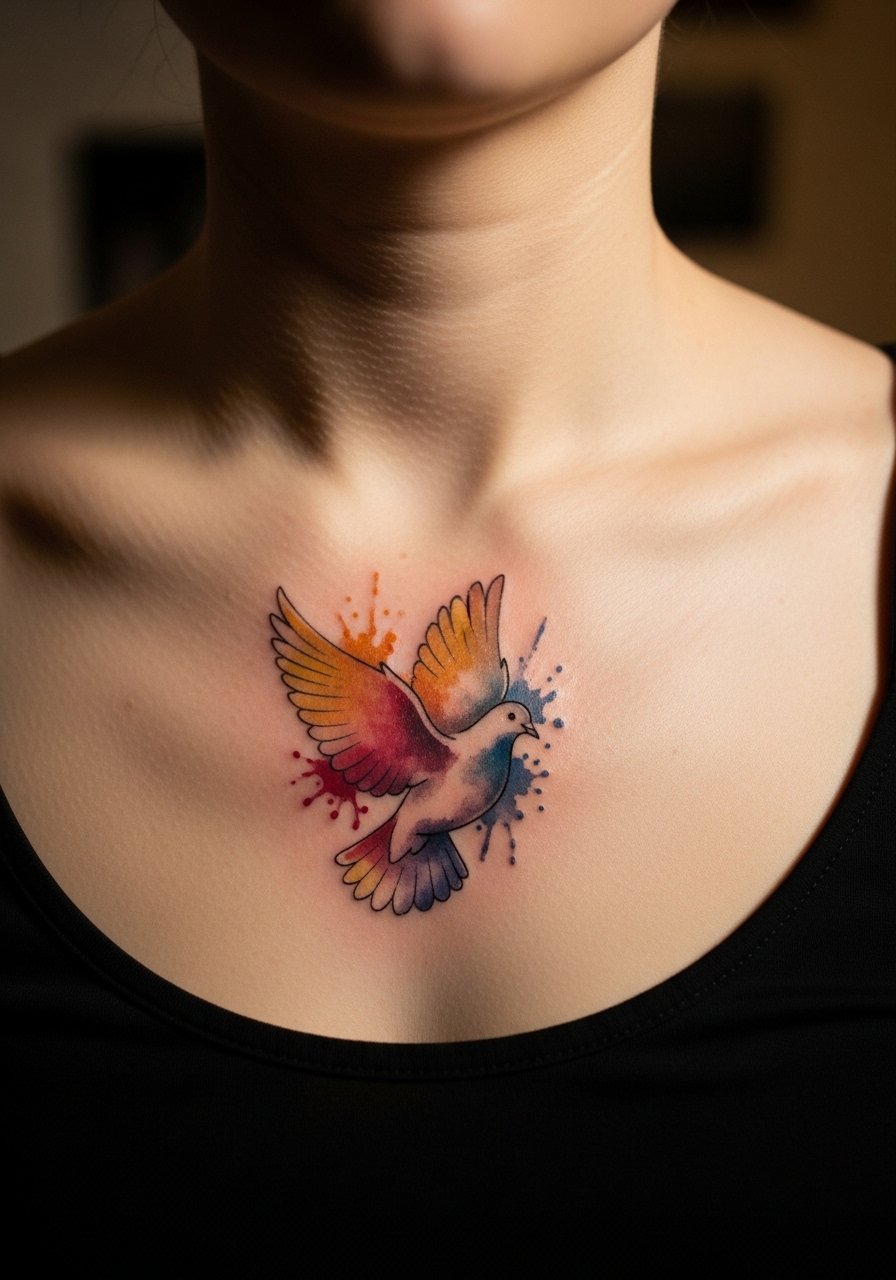
5. Minimalist Dove Outline on Inner Wrist
Style/Technique: Minimalist / Fine Line
Pain Level: Low (2–3/10)
Session Time: 30–60 minutes
Best For: First bird tattoo ideas, symbolic pieces
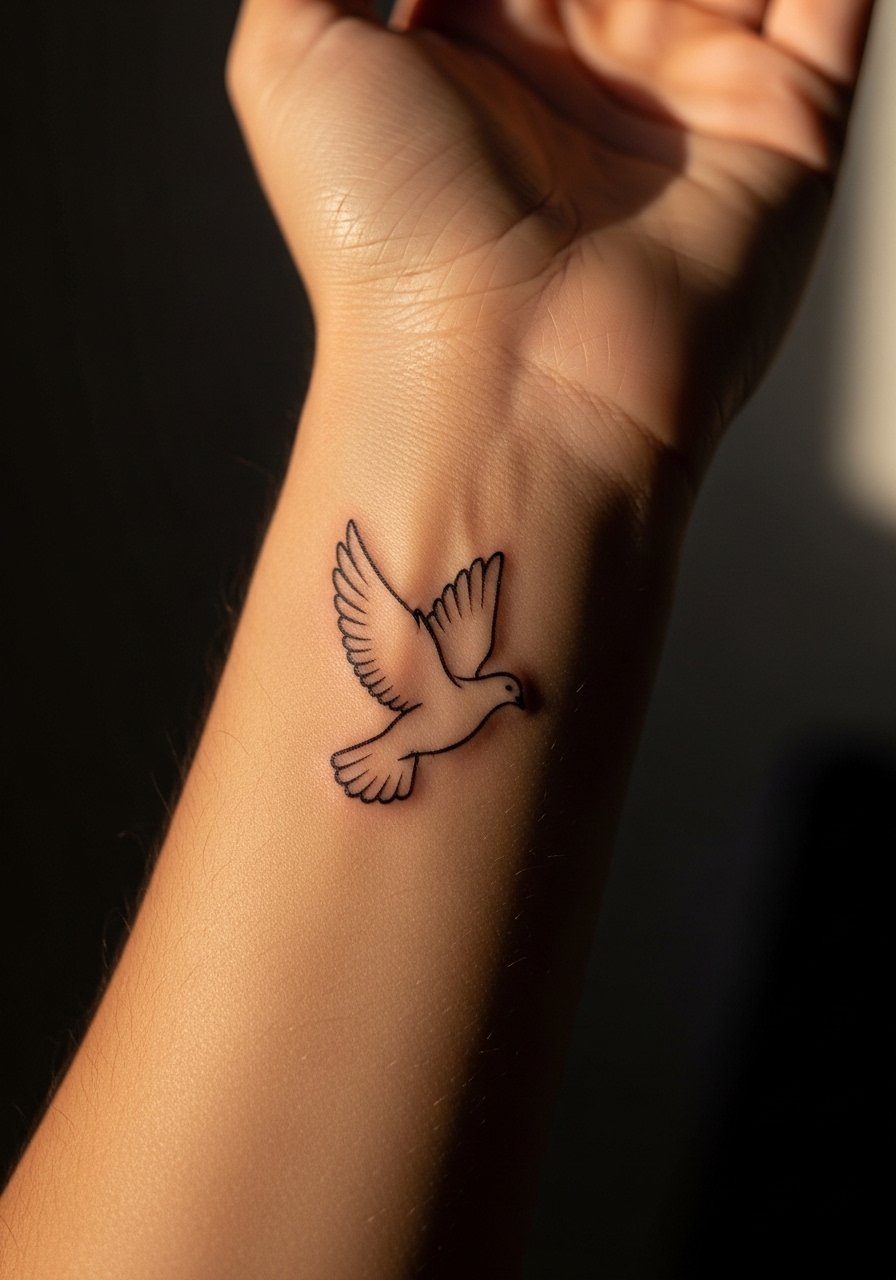
A single-line dove on the inner wrist feels quiet and symbolic—peace and freedom without visual weight. I’ve recommended this to friends nervous about pain; the wrist is quick and tames first-timer anxiety. Healing requires sun avoidance to prevent the thin line from blurring—use SPF diligently. The usual mistake is choosing lines too thin; ask for slightly reinforced starting and end points so the form holds. This is a perfect example of small bird tattoo ideas that stay meaningful and easy to cover with a watch or bracelet when needed.
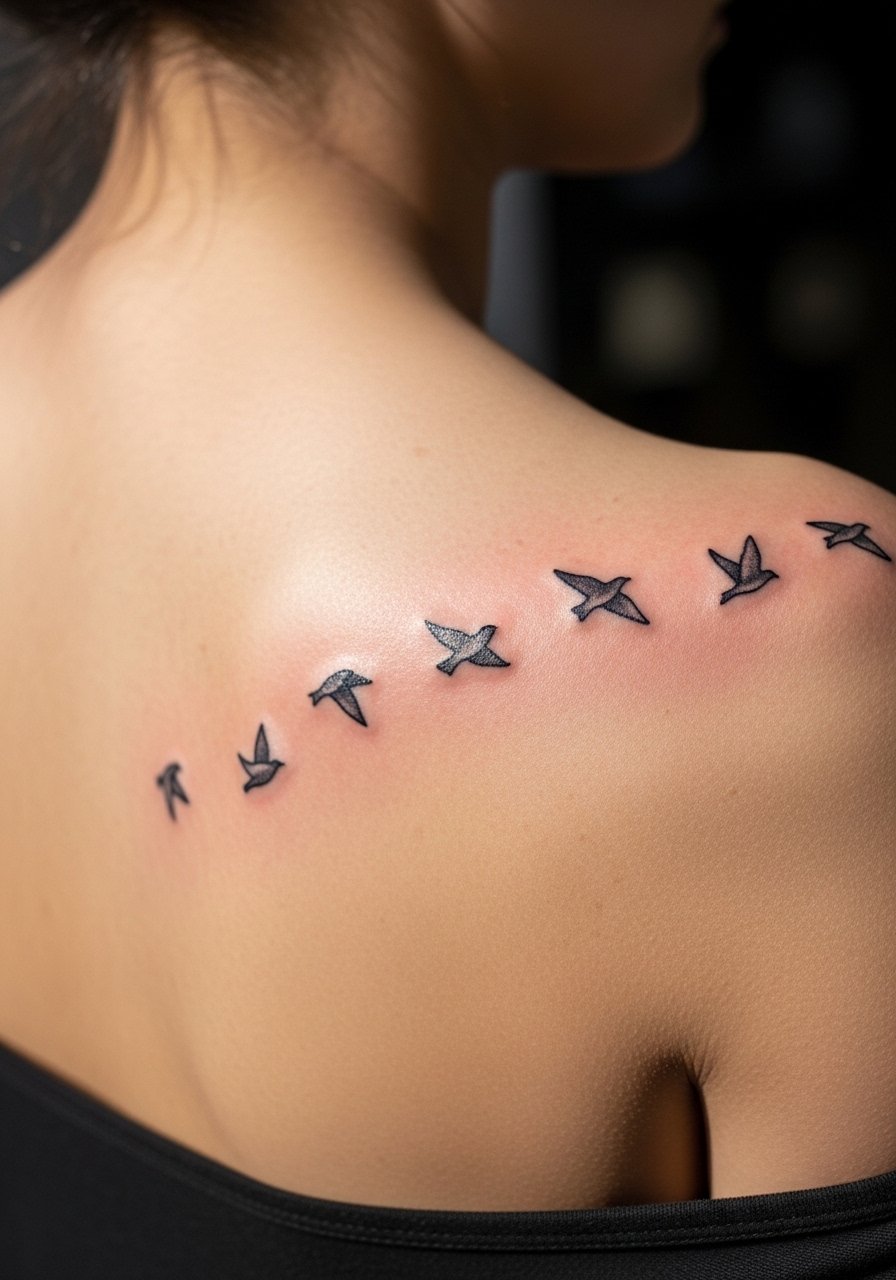
6. Fine Line Sparrow Flock Along Ribcage
Style/Technique: Fine Line / Illustrative
Pain Level: High (7–8/10)
Session Time: 1–3 hours (might be multiple sessions)
Best For: Personal storytelling, flexible expansion

A flock of sparrows along the ribs reads like motion across the body—perfect for migration or growth symbolism. I’ll be honest: ribs hurt more than most places, but the payoff is a graceful flow that can be built over sessions. Fine line flocks need an artist who understands body curvature so birds don't warp when you move. Healing on the ribs means avoiding tight clothing and heavy exercise for longer. A common error is placing too many tiny birds too close together; give each bird breathing room so healed lines don’t merge. If you want to expand into a sleeve later, this area integrates well.
7. Blackwork Raven Mandala on Upper Arm
Style/Technique: Blackwork / Mandala Dotwork
Pain Level: Medium (4–5/10)
Session Time: 2–4 hours, maybe split
Best For: Bold, symbolic statement
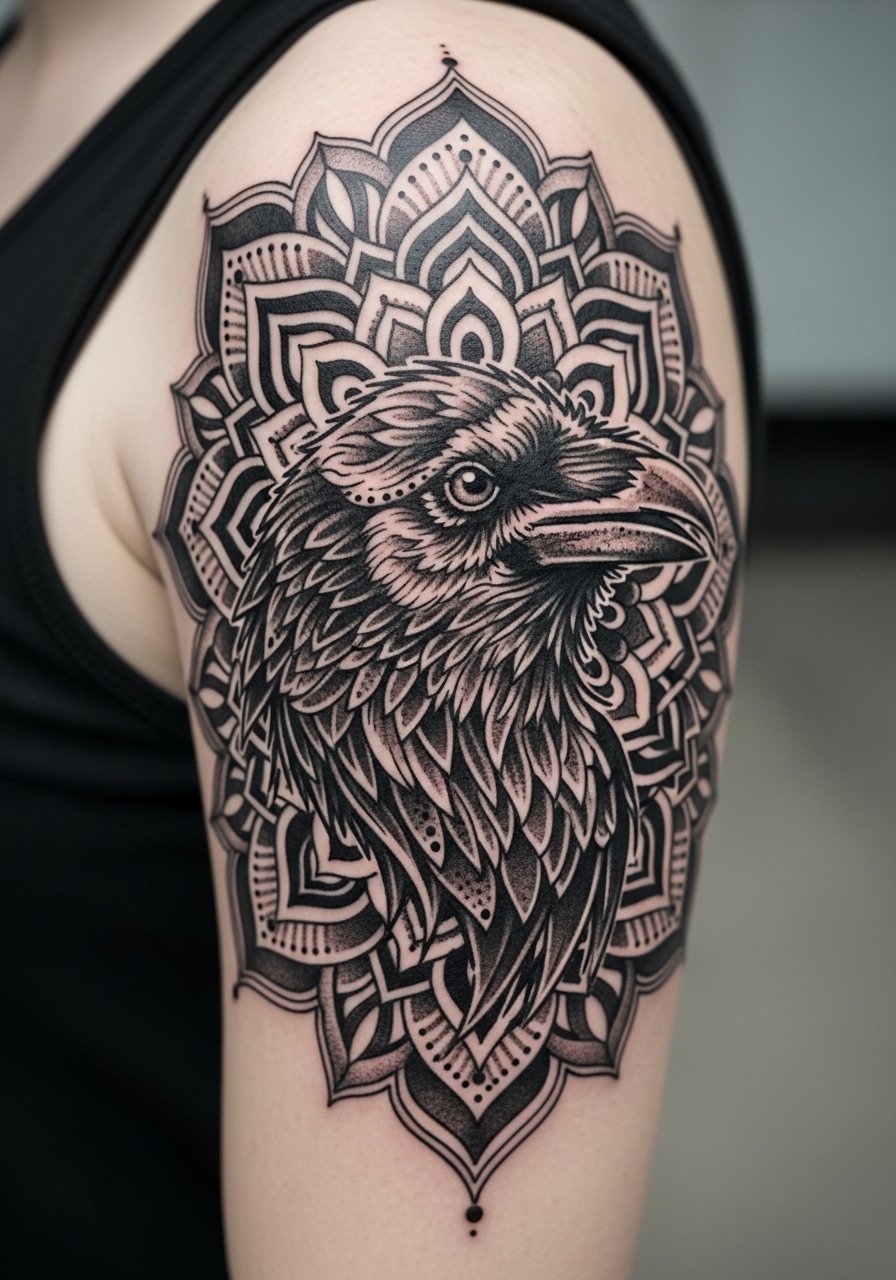
A raven with mandala elements reads heavy in symbolism but can still feel light if the negative space is used. Blackwork holds up excellently on darker skin tones—I've seen artists add white highlights for contrast. Upper arm placement is forgiving; sessions are often comfortable for most people. Dotwork creates texture that appears soft from a distance, so the piece doesn't feel visually heavy despite solid black. Watch out for over-filling small mandala areas—too much saturation can trap ink in ways that make touch-ups harder. Ask to see healed blackwork mandalas on similar skin tones before booking.
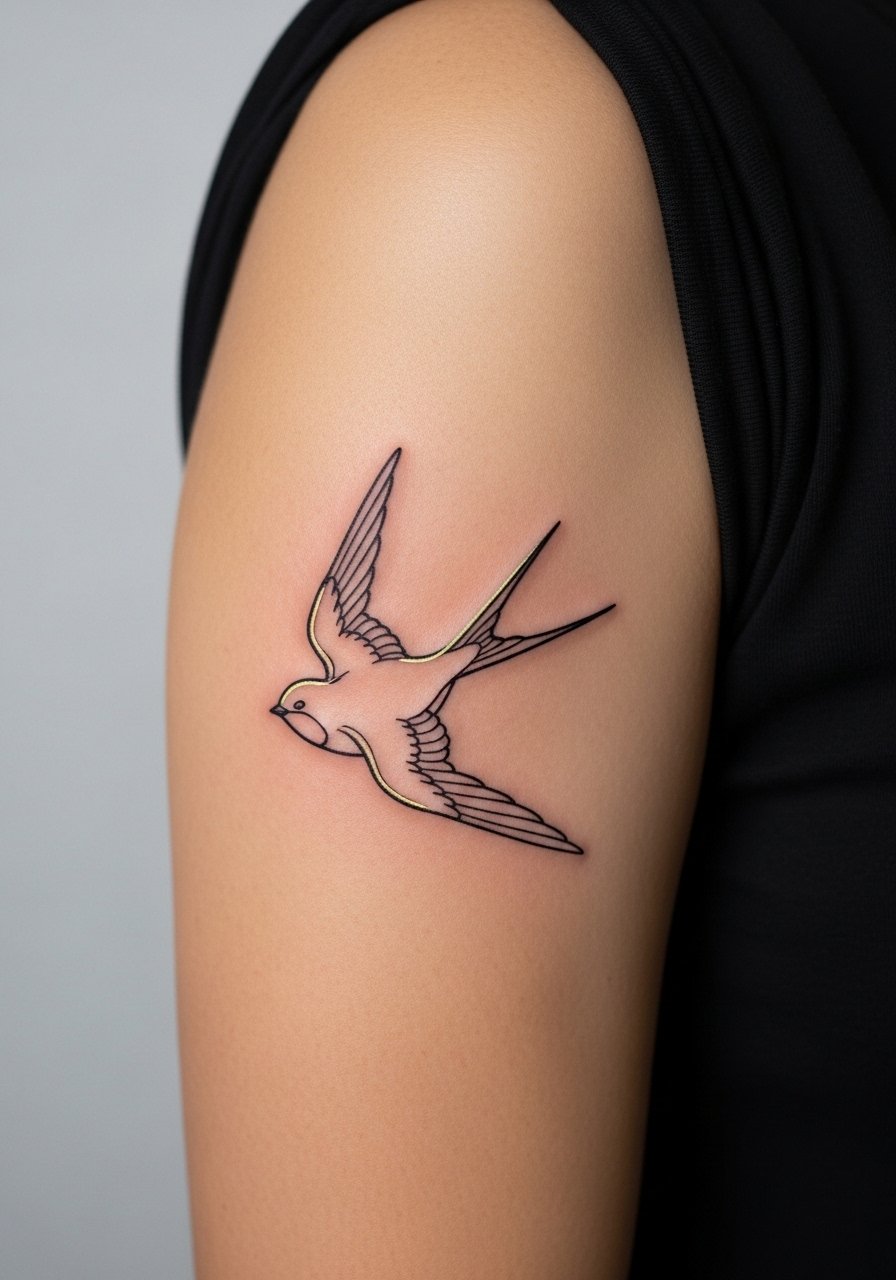
8. Traditional Anchor Swallow on Forearm
Style/Technique: Traditional / American Traditional
Pain Level: Low-Medium (3/10)
Session Time: 1–2 hours
Best For: Timeless pieces, visible forearm placement
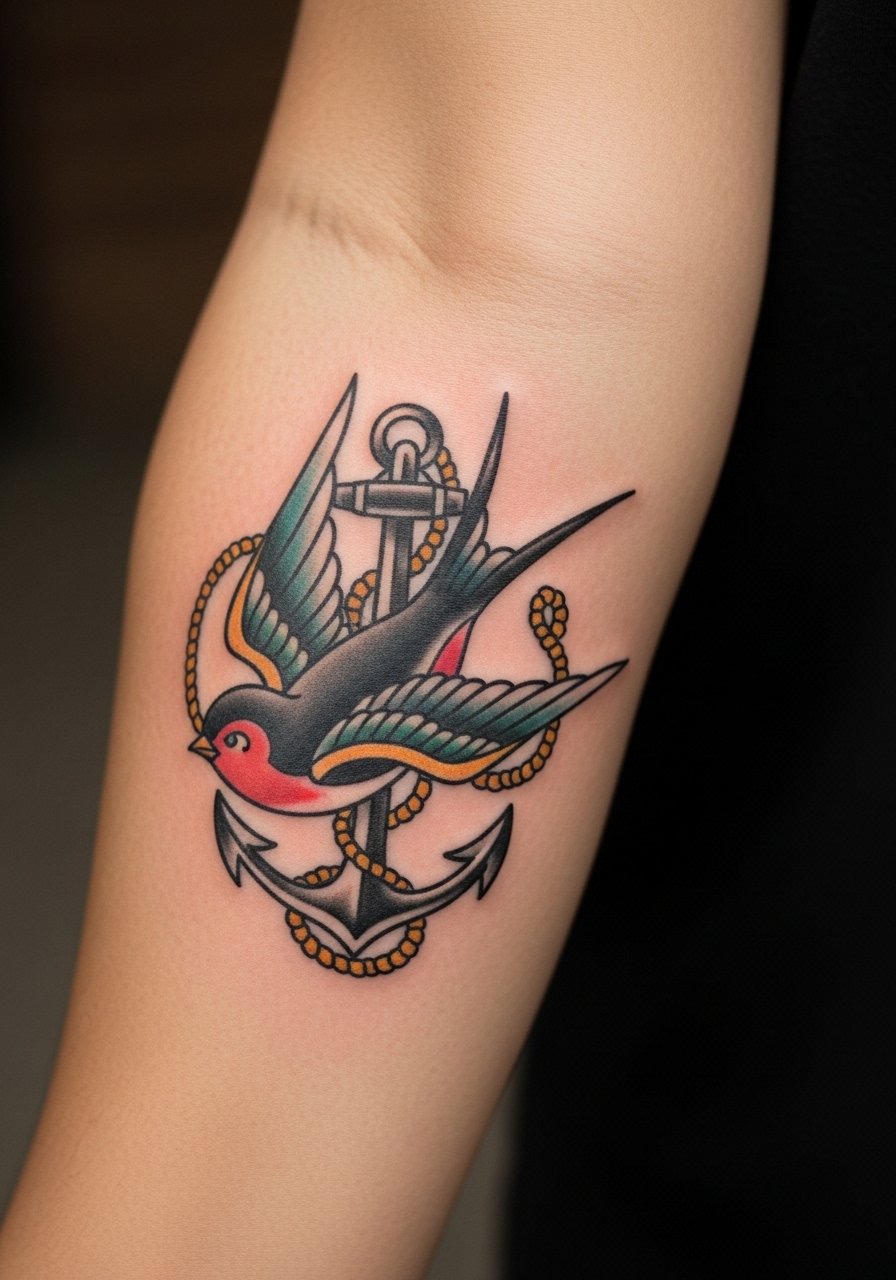
The swallow is a classic that reads light because of open wing shapes and bold outlines. Forearm placement lets the bird be seen easily and it ages predictably—traditional lines tend to hold up best. I’ve noticed sailors' and travel symbolism tied to swallows still resonates; choose limited colors that age well. Common mistakes include tiny details inside the swallow that blur—stick to bold, clean shapes. Ask your artist to place the swallow so wings follow arm contours; that movement keeps the design feeling airy.
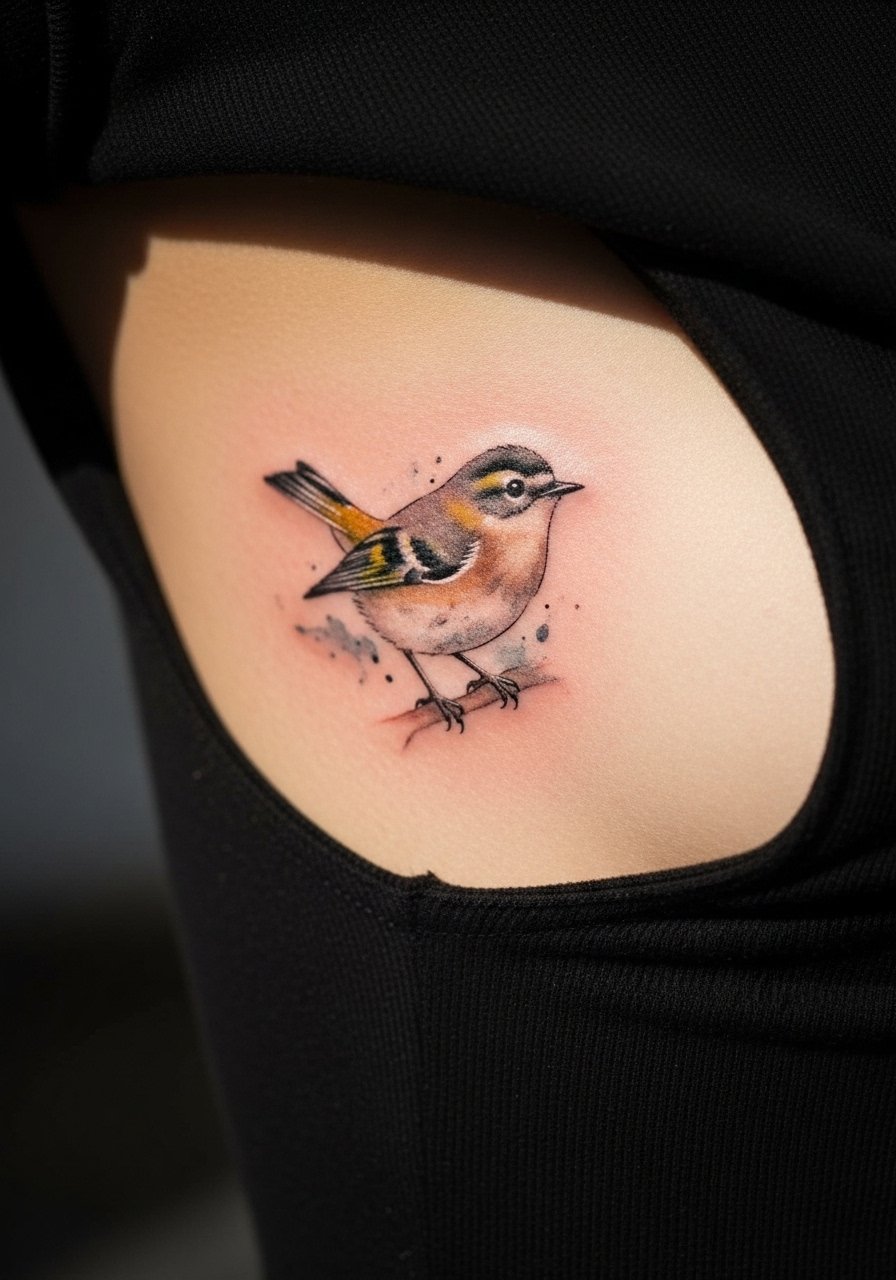
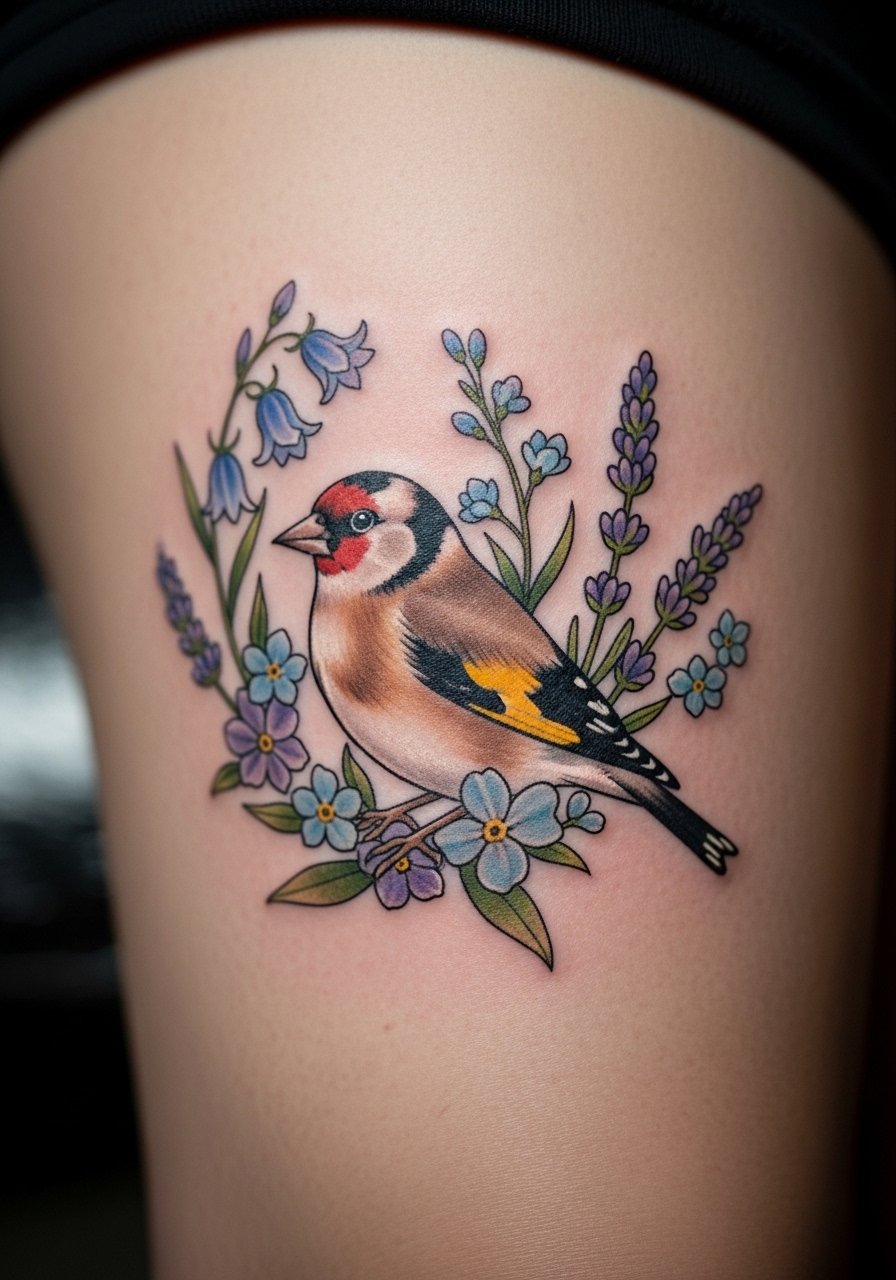
9. Illustrative Finch with Florals on Ankle
Style/Technique: Illustrative / Soft Color
Pain Level: Medium (4–5/10)
Session Time: 1–2 hours
Best For: Charming ankle pieces, customizable florals
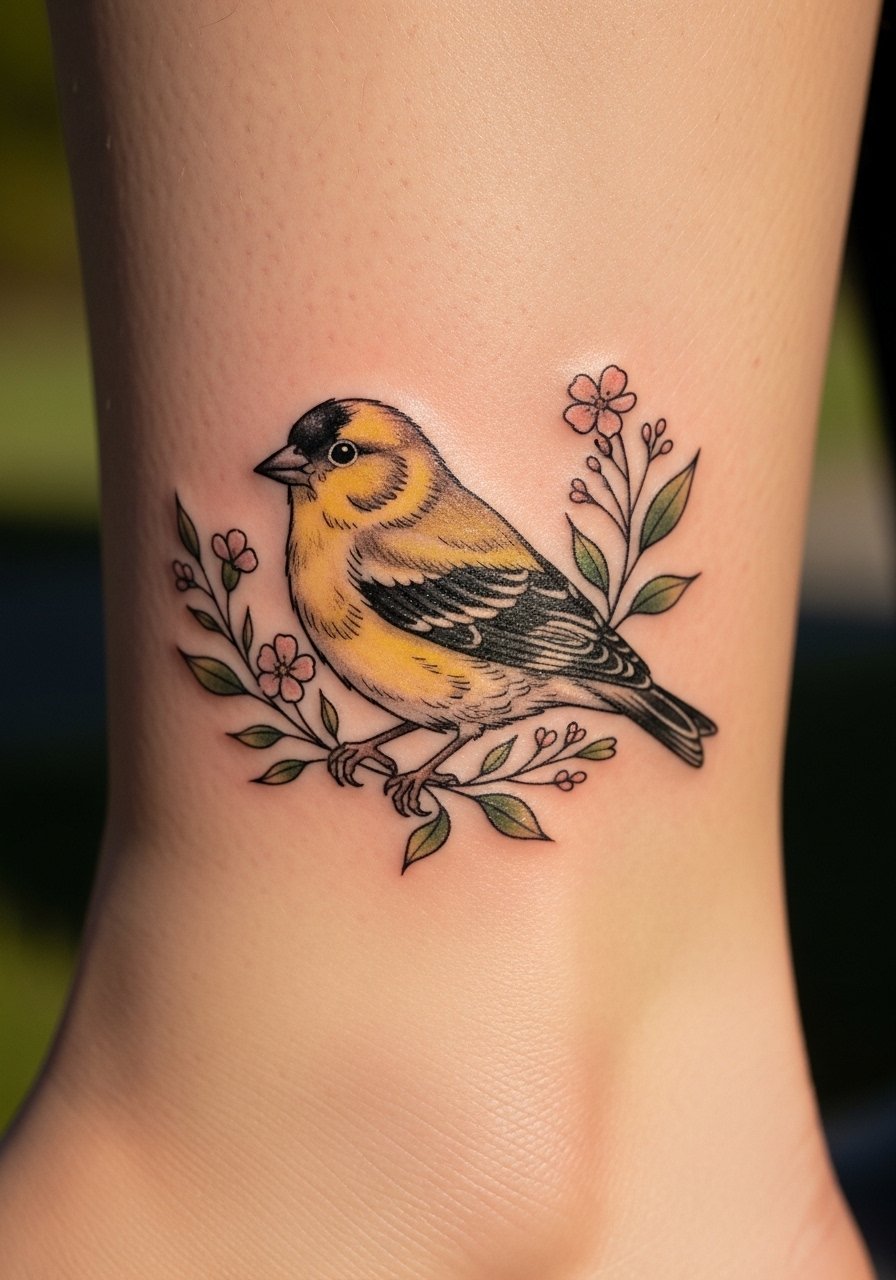
A finch paired with small florals at the ankle reads delicate and light. The ankle is bony, so expect sharper pain during tattooing, but it’s a compact session. I find florals personalize bird tattoos—pick blooms tied to memory or season. Healing requires keeping shoes from rubbing and avoiding long walks with tight footwear. Fine color fades faster here, so ask your artist about saturation and healed photos. Avoid overcrowding the composition; tiny petals and feathers should have breathing room to avoid blurring into a blob over time.
10. Neo-Traditional Eagle on Bicep
Style/Technique: Neo-Traditional / Bold Outline with Gradients
Pain Level: Low-Medium (3–4/10)
Session Time: Multiple sessions for size/detail
Best For: Statement upper-arm pieces
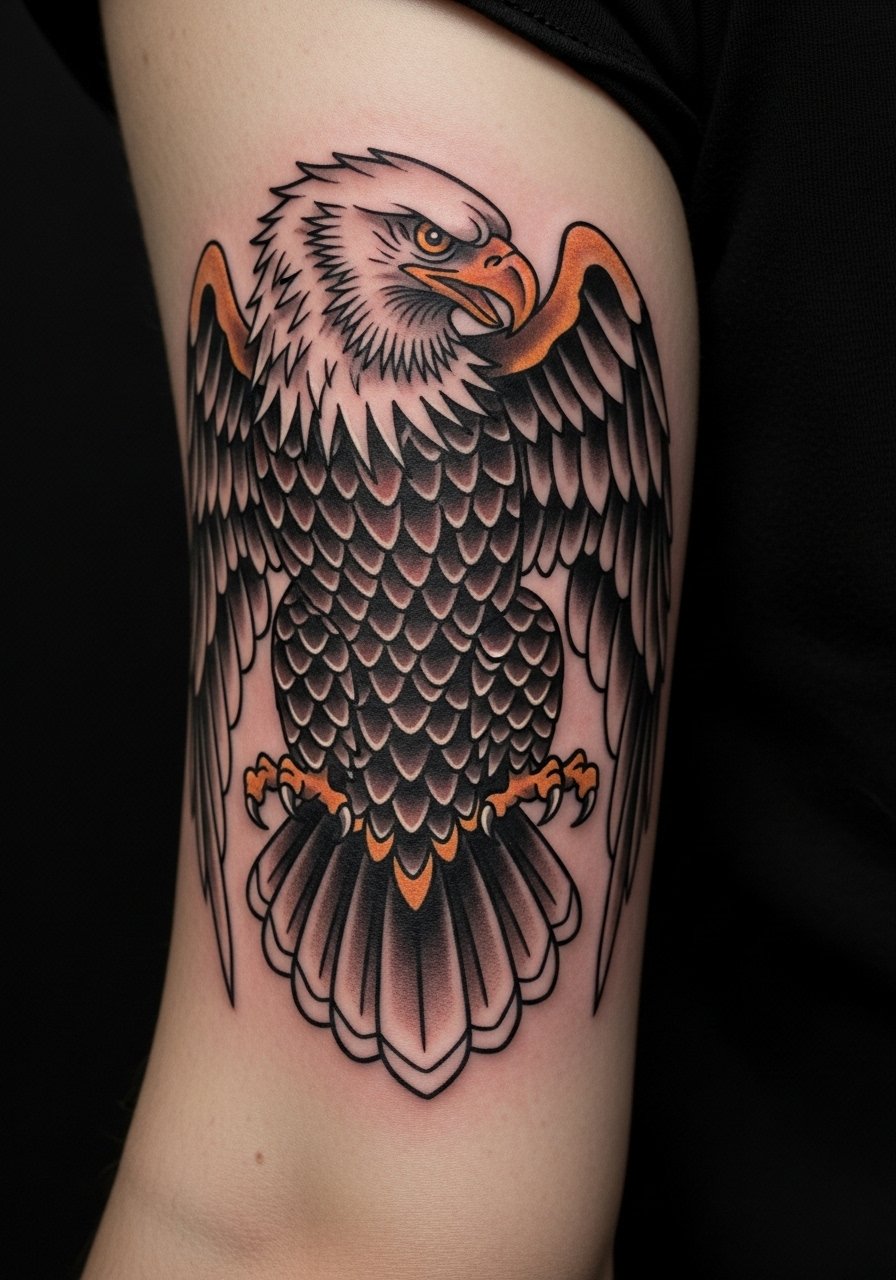
A neo-traditional eagle uses bold outlines and modern gradient shading to balance power with wearability. On the bicep, the piece moves with flex and feels wearable rather than heavy. I’ve seen artists blend old-school clarity with softer shading to keep the design from looking dense. Biceps are forgiving for healing and offer space for medium-large compositions. A common error is using too many tiny color transitions—ask for focused palette choices so the eagle reads clean when healed. If you want longevity, emphasize line integrity in the consult.
11. Dotwork Phoenix Rising on Back
Style/Technique: Dotwork / Blackwork Gradient
Pain Level: Medium (5–6/10)
Session Time: Multiple long sessions
Best For: Large symbolic pieces, back canvases
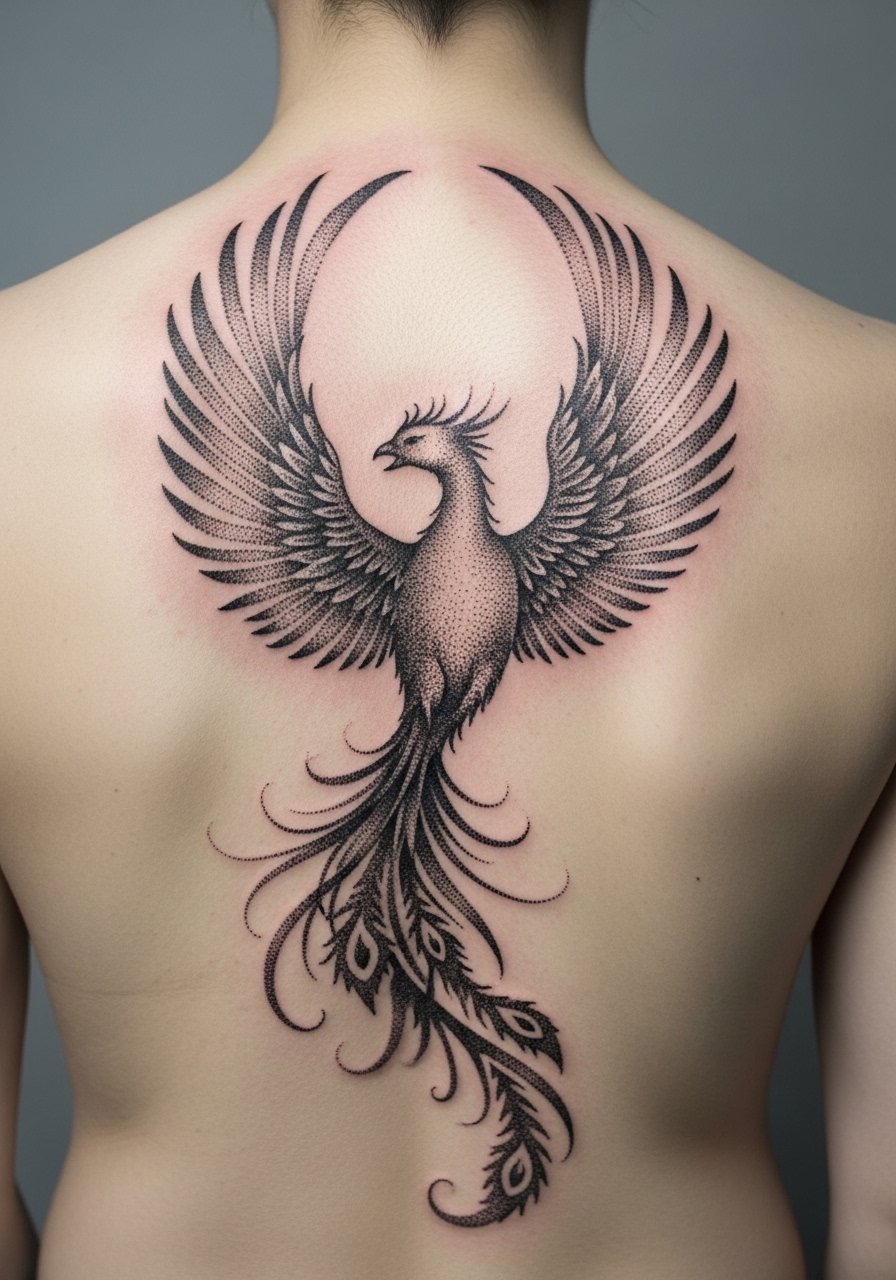
A dotwork phoenix on the back is dramatic but can still feel light because stippling creates airy texture. Large dot gradients give a sense of upward motion without heavy blocks of fill. I’ve seen people build this over multiple sessions, which helps with tolerance and composition tweaks. Back pieces need patience during healing—avoid sleeping directly on the area at first and follow aftercare to protect stippling detail. Artists who specialize in stippling can show healed gaps versus crisp gradients; that’s the difference between a cloud-like phoenix and a muddy patch.
12. Micro-Realism Kingfisher on Thigh
Style/Technique: Micro-Realism / Color Accent
Pain Level: Low (3/10)
Session Time: 1–2 hours
Best For: Hidden, personal pieces
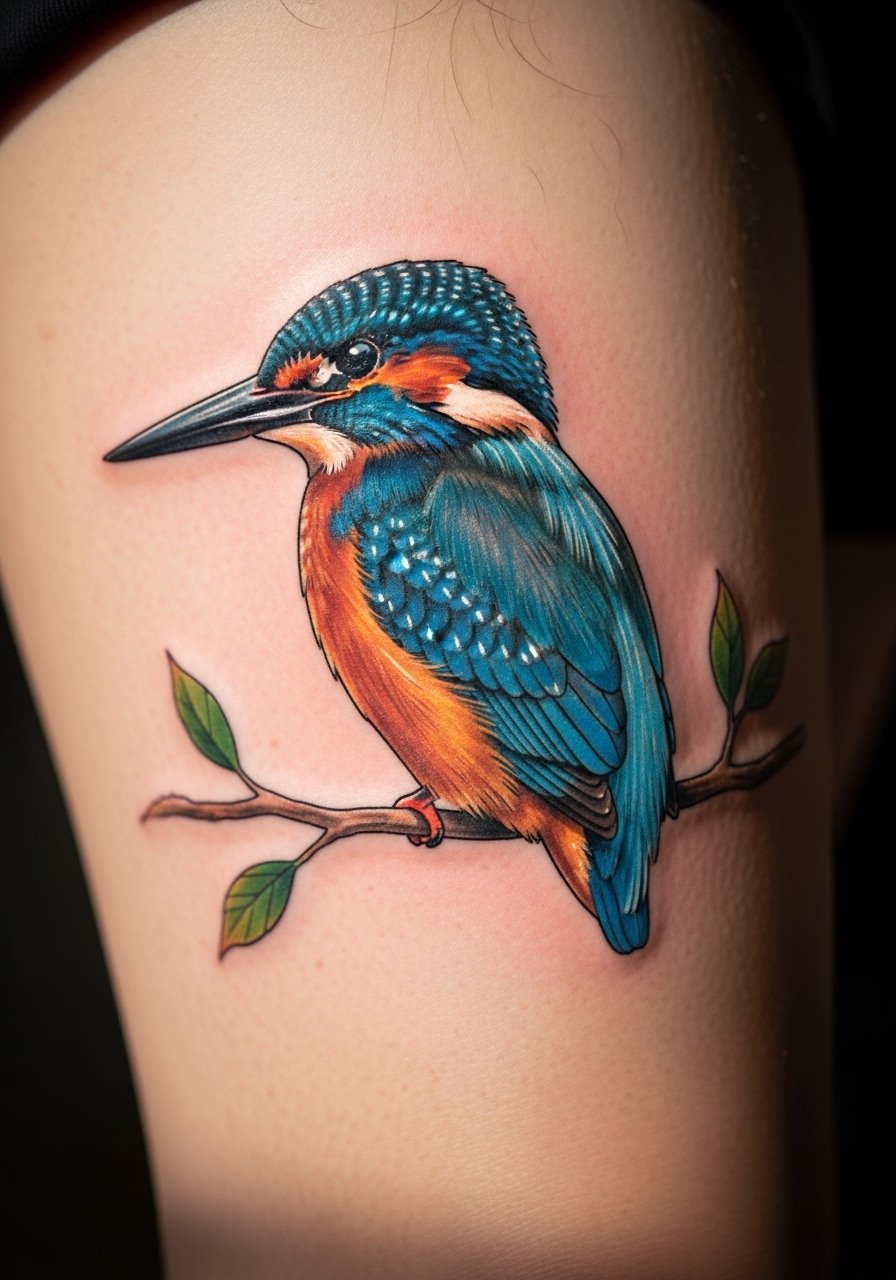
A tiny kingfisher on the thigh carries bright color without feeling heavy—thigh flesh tolerates ink well and heals smoothly. I like thigh placements for personal pieces you can choose to show or hide. Micro-realism looks best with crisp reference photos and an artist who shares healed close-ups. Pain is generally manageable, but watch for inward contours where sitting/stretching may feel odd during healing. The error I see most is over-detail for a size—keep the bird small but focused on key color patches so it remains legible after healing.
13. Watercolor Hummingbird Splash on Collarbone
Style/Technique: Watercolor / Fine Line Hybrid
Pain Level: Low-Medium (3–4/10)
Session Time: 1–2 hours
Best For: Dainty, motion-focused collarbone pieces
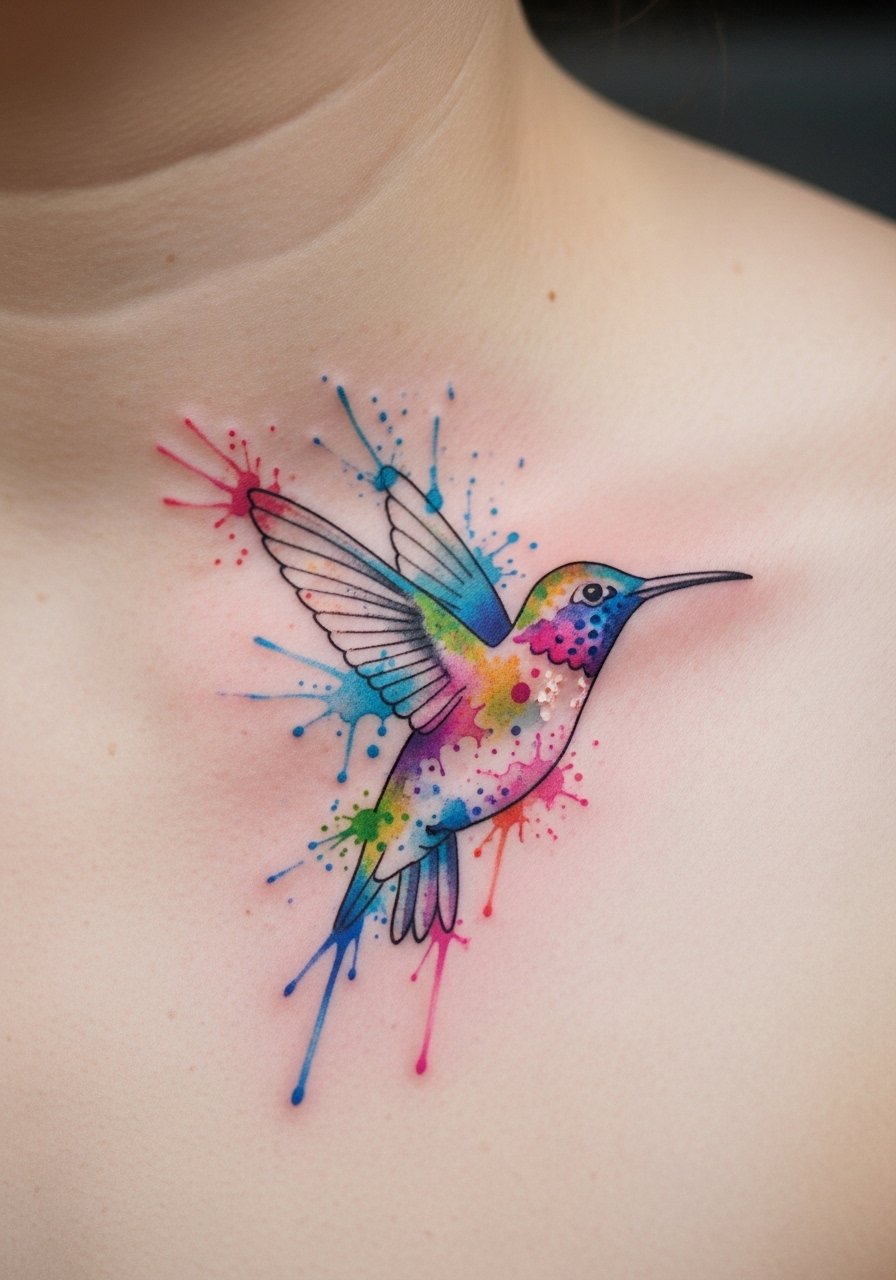
This is a variation on the hummingbird that favors brush-like color splotches behind a delicate outline. I picked this after seeing several artist feeds—watercolor conveys fleeting motion that suits hummingbirds. Collarbone placement highlights that motion as the chest expands. Pain is present but brief. Watercolor requires a long-term commitment to sunscreen and occasional touch-ups; ask your artist how they plan to anchor pigment for longevity. Avoid stacking too many pastel tones; two hues plus black outline often read lightest when healed.
14. Geometric Swallow Over Sternum
Style/Technique: Geometric / Minimalist
Pain Level: High (7–8/10)
Session Time: 1–2 hours
Best For: Center-chest focal pieces
Geometric swallows over the sternum feel modern and airy despite the bold placement. Sternum tattoos are intense—expect higher pain—but the visual symmetry can be worth it. Keep the geometry simple so the chest movement doesn’t warp shapes. I’ve seen a few clients regret overly complex fills here; negative space helps the swallow breathe. Healing on the sternum needs gentle clothing choices and patience. If you’re worried about pain, consider splitting the session or starting with a single, central swallow and expanding later.
15. Handpoke Sparrow on Inner Arm
Style/Technique: Handpoke / Fine Line
Pain Level: Low-Medium (3–4/10)
Session Time: 1–2 hours (handpoke is slower but gentler)
Best For: Organic texture, artisanal results
Handpoke bird tattoos have an organic texture that feels light and intimate. I’ve gotten a handpoke dotbird and can attest to the different sensation—less buzzing, more tapping, and a softer healed texture. Inner arm is a chill spot for this technique. The downside is longer session time for the same coverage, but many prefer the look. Common mistakes are picking an artist without handpoke portfolio—always ask to see healed handpoke examples. This is one of those unique ideas competitors overlook but that I keep seeing in niche feeds.
16. Minimalist Flying Line Bird on Ankle
Style/Technique: Minimalist / Single Line
Pain Level: Medium (4/10)
Session Time: 30–60 minutes
Best For: Small bird tattoo ideas, subtle motion
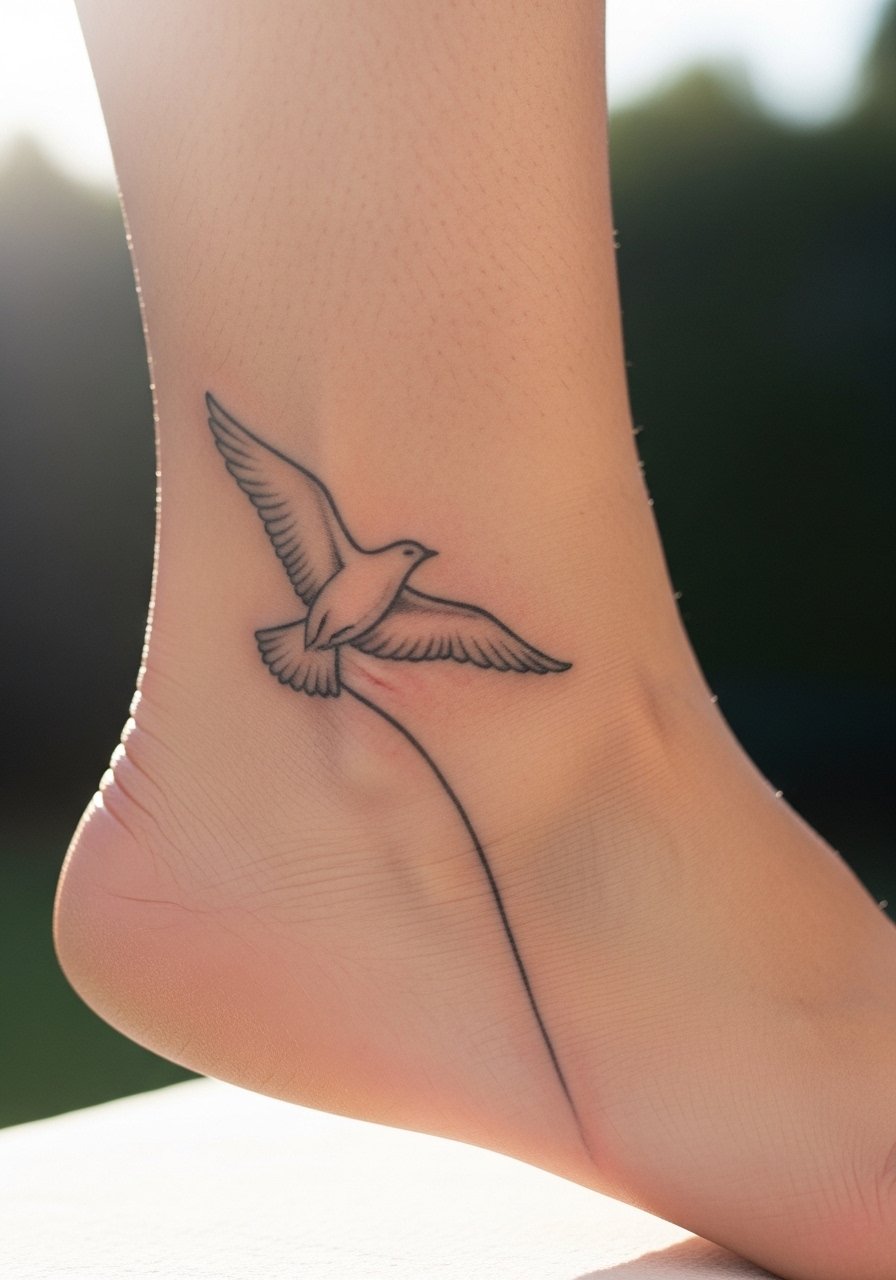
A single continuous line forming a flying bird is minimal and airy—perfect for ankles. The bony ankle can sting during tattooing, but these quick pieces heal fast. I recommend asking your artist to thicken key segments slightly so the line doesn’t vanish over time. Minimalist single-line birds are great first tattoo ideas if you want something symbolic without heavy commitment. Keep moisturized and protected from shoes that might rub the area during healing.
17. Neo-Traditional Parrot Perch on Thigh
Style/Technique: Neo-Traditional / Bold Color
Pain Level: Low-Medium (3–4/10)
Session Time: Multiple short sessions
Best For: Colorful thigh pieces, tropical vibes
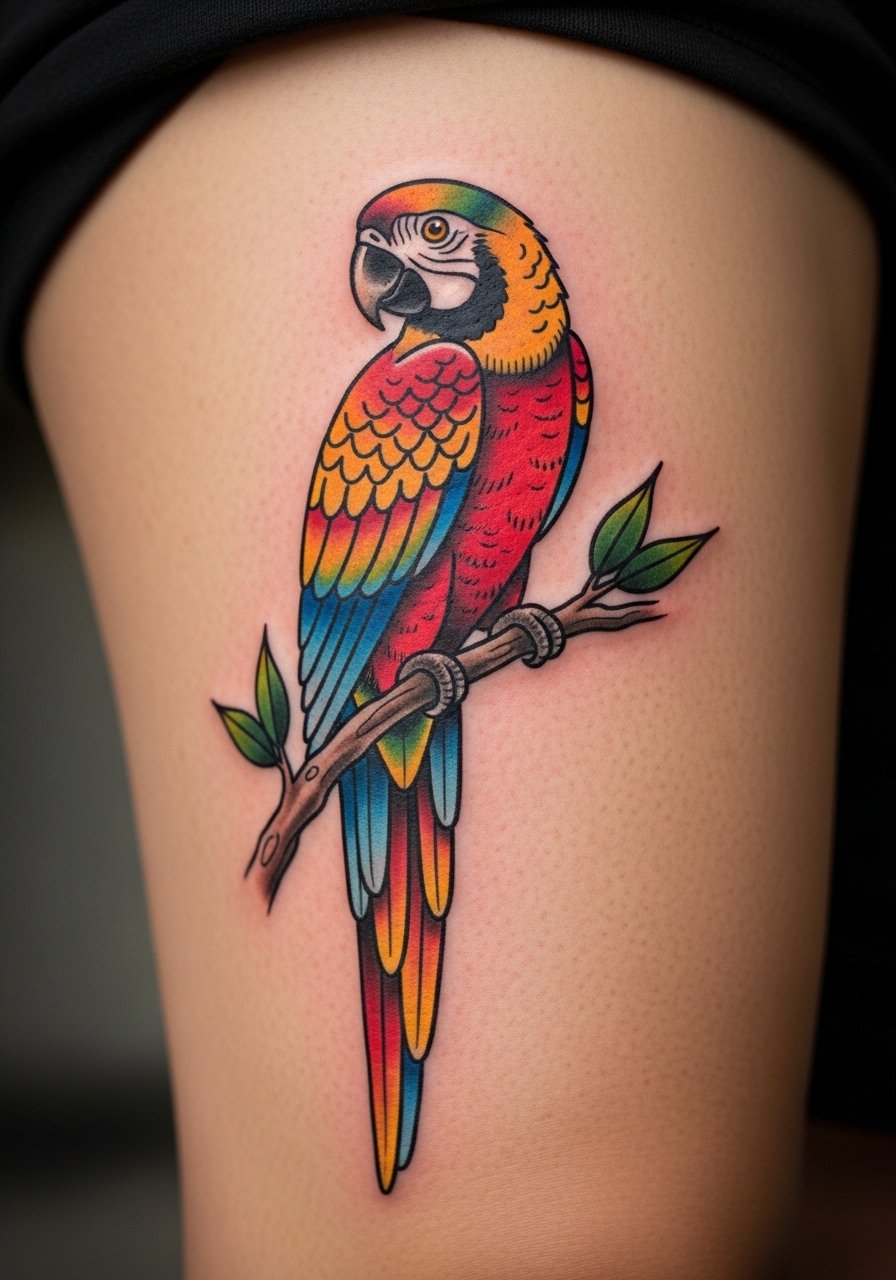
A parrot in neo-traditional style reads playful and light if composed with open negative space. Thighs accommodate medium to large color work and heal well. I’ve seen artists use a limited palette to keep brightness without overwhelming the composition. Watch for tiny feather details that can blur; neo-traditional thrives on strong shapes and selective texture. Thigh placements are ideal if you want a colorful bird that’s easy to hide for work or travel.
18. Illustrative Kinglet on Ribcage
Style/Technique: Illustrative / Fine Line with Soft Color
Pain Level: High (7–8/10)
Session Time: 1–2 hours
Best For: Personal, narrative pieces
A small kinglet on the ribs is delicate in design but intense during the session. People pick ribs for personal meaning since it’s easy to conceal. I recommend testing a small stencil first to check how the piece moves with breathing. Illustrative birds on the rib age predictably if linework has slight boldness; ultra-thin lines here can soften quickly. Plan for extra healing care—rib tattoos can take a bit longer to stop itching and peeling.
19. Blackwork Swallow on Hand Side
Style/Technique: Blackwork / Bold Outline
Pain Level: High (6–7/10)
Session Time: 1 hour
Best For: Small bold visible pieces
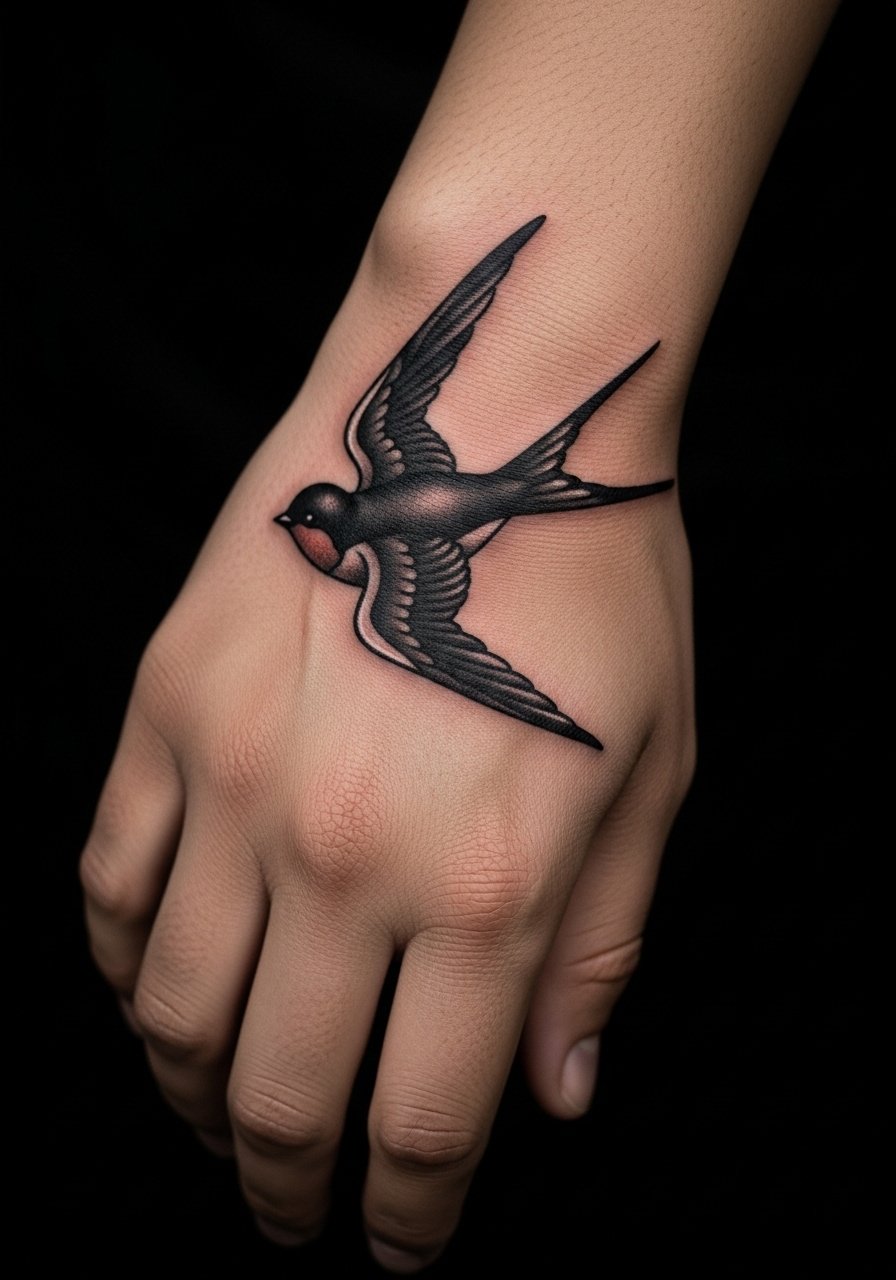
Hand tattoos are very visible and can feel heavy if over-detailed, but a simple blackwork swallow stays readable and light. Hands heal differently and often require touch-ups, so pick bold lines and embrace that maintenance. I’ve seen artists recommend a single-session bold line for hand birds to avoid overworking the tissue. Expect some pain, and be ready for extra care during the initial healing week since hands see a lot of washing and movement.
20. Geometric Wing Fragment on Collarbone
Style/Technique: Geometric / Minimal
Pain Level: Low-Medium (3–4/10)
Session Time: 1 hour
Best For: Subtle neck/collarbone accents

A wing fragment uses geometry to imply flight without a full bird, keeping the look airy. Collarbone placement emphasizes that lifting feel as the skin moves. I like this for people who want the idea of a bird without a literal rendering. Keep shapes simple—too many tiny triangles look busy when healed. Ask to see healed geometric fragments so you can judge line thickness choices for longevity.
21. Seasonally Colored Dove on Sternum Ridge
Style/Technique: Watercolor / Fine Line
Pain Level: High (7–8/10)
Session Time: 1–2 hours
Best For: Memorial or seasonal symbolism
A dove with seasonal color accents—like autumn ochres or spring greens—reads personal and light if colors are sparing. Sternum placement is intense for pain but central on the chest; design breathes there. I’ve seen people choose subtle palette shifts to mark seasons or memories. Watercolor here needs artist care to anchor pigment near thin skin; discuss how much color saturation is realistic for long-term appearance.
22. Tiny Micro Sparrow on Finger
Style/Technique: Micro-Realism / Fine Line
Pain Level: High (6–7/10)
Session Time: 30–60 minutes
Best For: Tiny, visible reminders
Finger tattoos are quick and meaningful but prone to fading and wear. A micro sparrow works if you accept likely touch-ups down the road. I’ve recommended simple lines and small silhouettes rather than color on fingers. The pain can be sharp because of bone proximity. Keep expectations realistic: finger skin regenerates quickly and blurs fine detail. If you want a lightweight, daily-visible bird, fingers do the job with maintenance.
23. UV-Reactive Swallow Outline on Outer Arm
Style/Technique: UV Ink Accent / Minimalist Outline
Pain Level: Low-Medium (3–4/10)
Session Time: 1–2 hours
Best For: Nightlife visibility, subtle daylight look
UV-reactive ink can be used sparingly to keep a bird light by day and subtly glow under blacklight. I’ve seen artists use UV lines behind a standard outline so the piece is discreet in normal lighting. Be sure to ask about ink safety and longevity—UV can fade differently, so plan for touch-ups. This is one of those unique ideas that reads fresh but stays low-profile in daylight.
24. Handpoke Phoenix Feather on Calf
Style/Technique: Handpoke / Dotwork Feather
Pain Level: Low-Medium (3–4/10)
Session Time: 1–2 hours (longer for handpoke)
Best For: Textured, tactile pieces
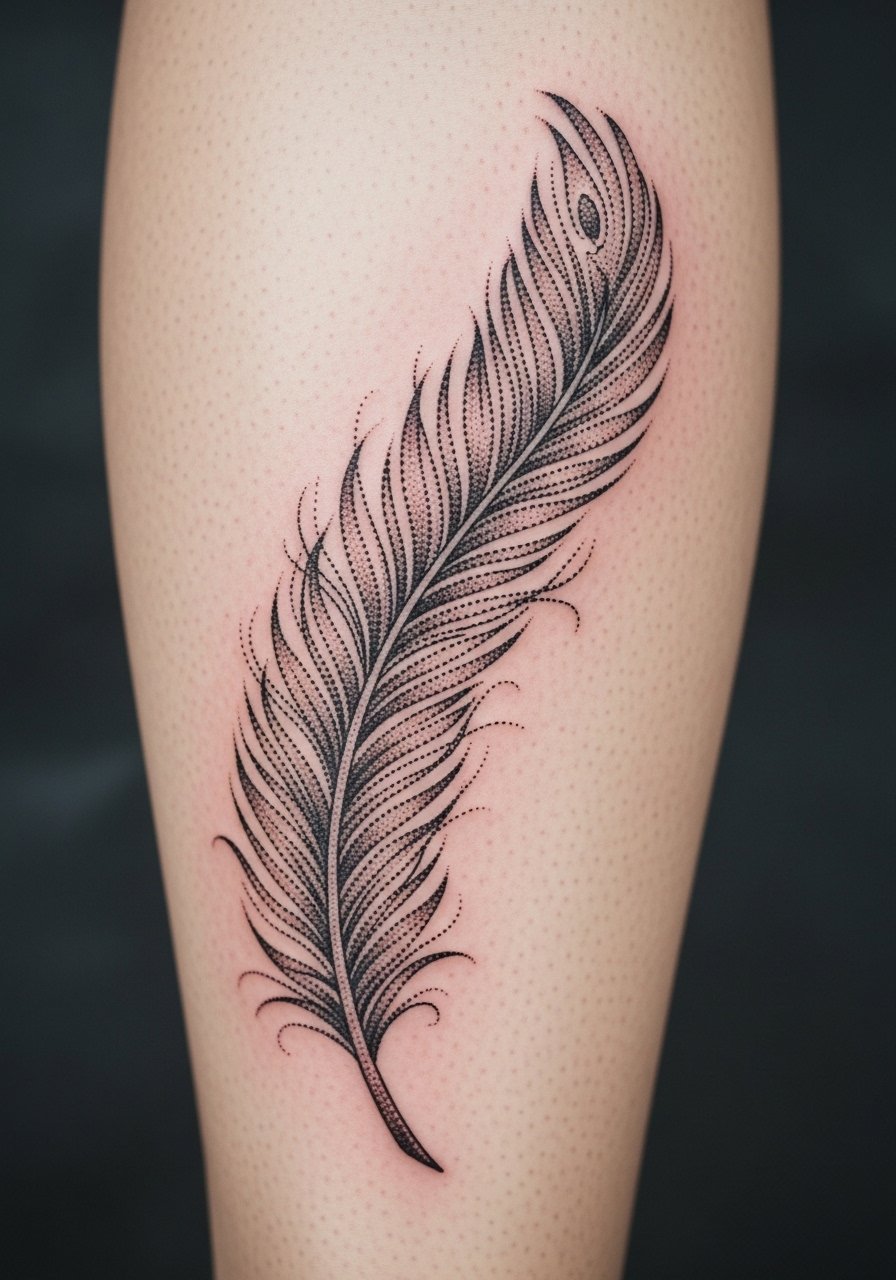
A single feather done by handpoke looks organic and light—stippling creates an airy feel. Calf placement heals well and handles dotwork beautifully. I like the slow process of handpoke for feather texture; it reads softer than machine shading. Expect longer sessions but gentler overall sensation. Ask to see healed handpoke feathers; they age differently than machine stippling and can look wonderfully textured if done right.
25. Flock Timeline Across Back Shoulder
Style/Technique: Illustrative / Fine Line Flock
Pain Level: Medium (4–5/10)
Session Time: Multiple short sessions
Best For: Narrative pieces showing growth
A flock timeline—adding birds over time across the shoulder—lets you tell a growth story without committing all at once. I’ve seen people add birds at key life moments. Shoulder and upper back placements are flexible for expansion. The trick is spacing each bird so when healed they don’t merge. Artists who offer multi-session planning can map growth so the flock looks intentional rather than crowded.
26. Blackwork Pelican Silhouette on Rib Side
Style/Technique: Blackwork / Silhouette
Pain Level: High (7–8/10)
Session Time: 1–2 hours
Best For: Bold, symbolic coastal pieces
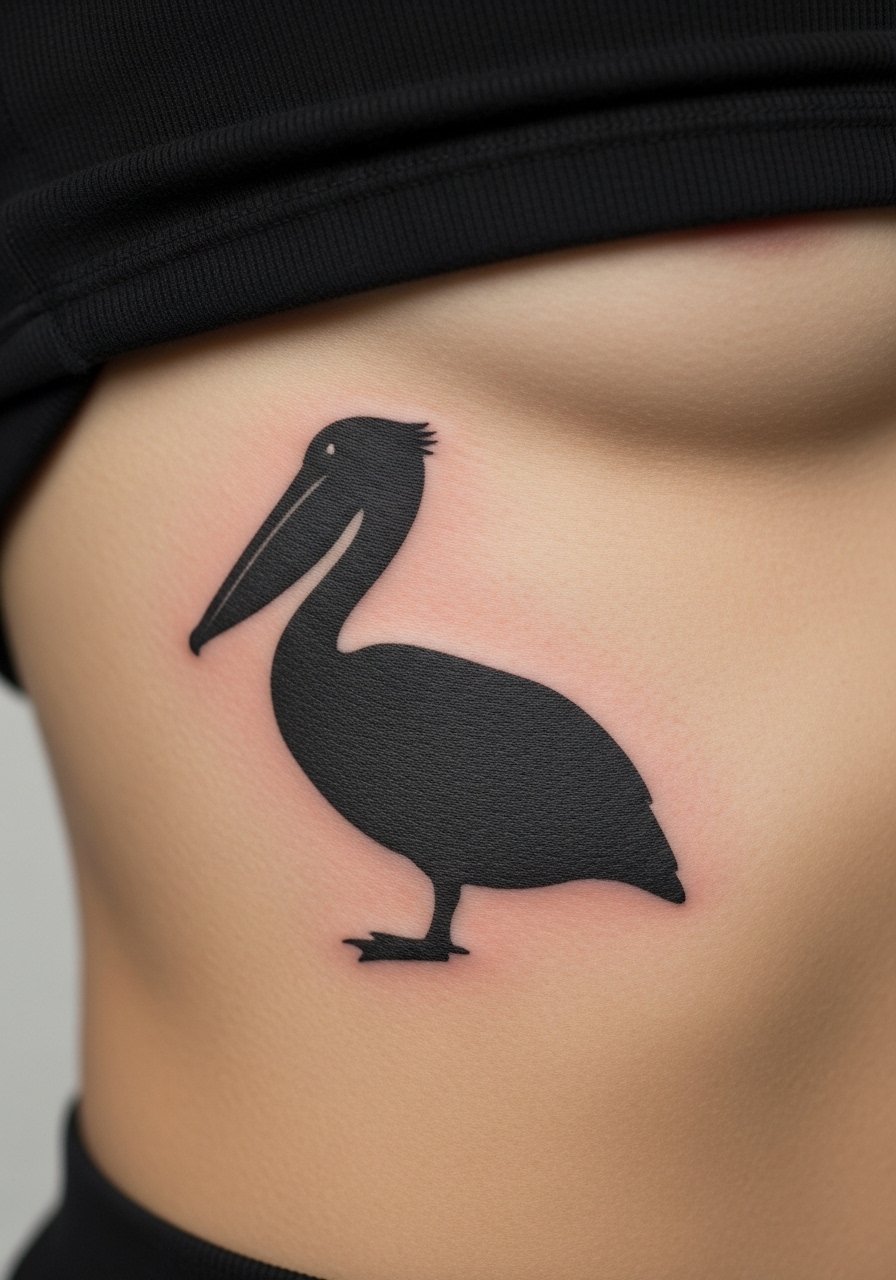
A pelican silhouette can read bold while still feeling light if placed along the rib side where shape follows the body. Solid black silhouettes age predictably, even on deeper skin tones. Rib pain is real, but the result is a graphic statement that balances weight through negative space. Avoid tiny internal details; a silhouette works best as a clean form.
27. Illustrative Swallow with Script on Collarbone
Style/Technique: Illustrative / Fine Line + Script
Pain Level: Low-Medium (3–4/10)
Session Time: 1–2 hours
Best For: Personal phrase + bird pairings
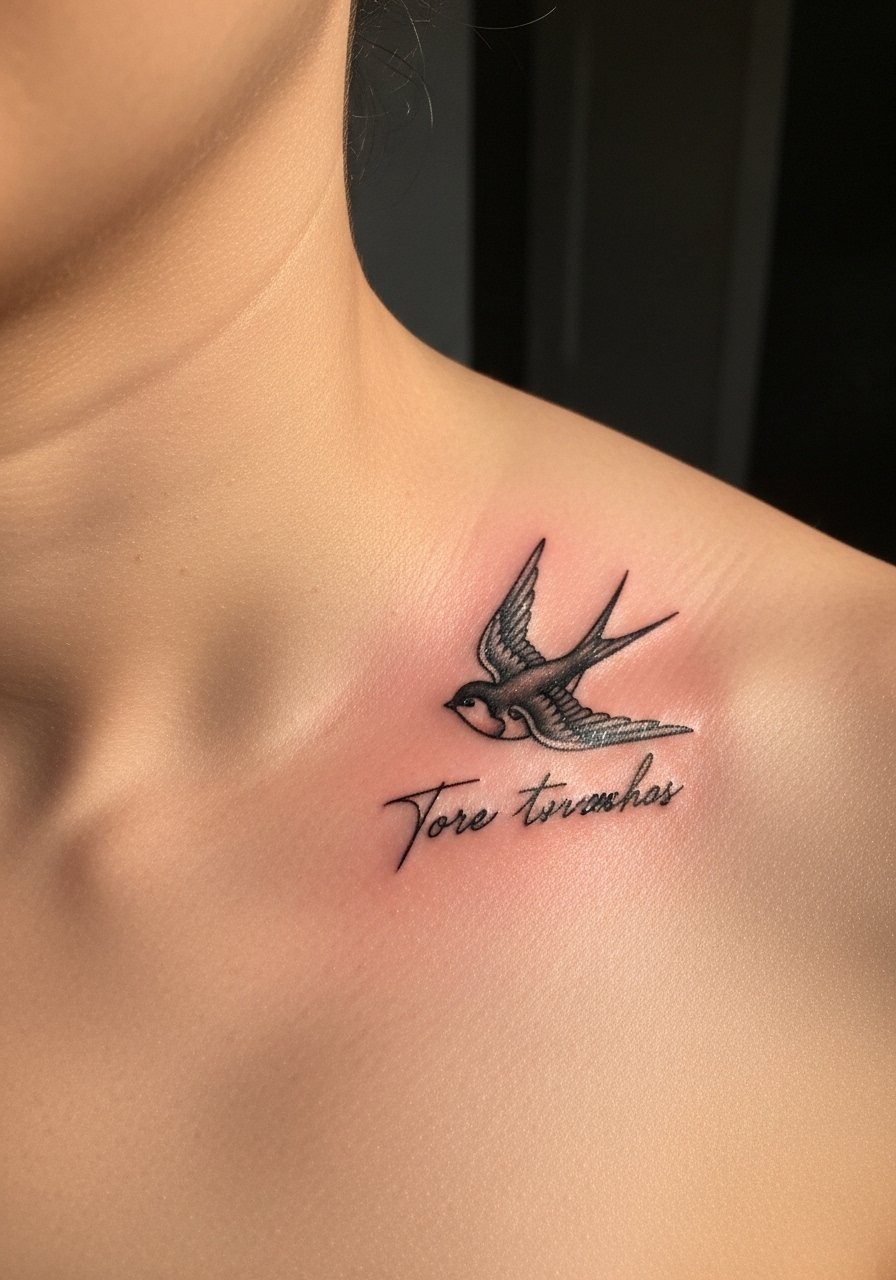
Pairing a small swallow with a short phrase keeps the design light but meaningful. Collarbone lettering must be spaced thoughtfully—letters can blur if too tiny. I advise picking a short line and asking for slightly bolder lettering so it remains readable after healing. Script plus bird can be a great first-bird tattoo idea because it’s personal and easy to conceal.
28. Finch on Inner Thigh with Florals
Style/Technique: Illustrative / Soft Color
Pain Level: Low (3/10)
Session Time: 1–2 hours
Best For: Intimate placements that age well
Inner thigh placements are underrated for bird tattoos—the skin tends to stay protected and color holds up well. A finch with small florals reads tender and light, and it’s easy to hide for work or swim season. I’ve noticed finches age nicely here because friction is minimal if you avoid tight clothing during healing. Ask your artist for healed thigh examples if you have darker skin; coloration can look different and good artists will show it.
29. Minimalist Flight Line Along Spine
Style/Technique: Minimalist / Linework Flock
Pain Level: High (7–8/10)
Session Time: 1–2 hours
Best For: Vertical movement pieces, spine accents
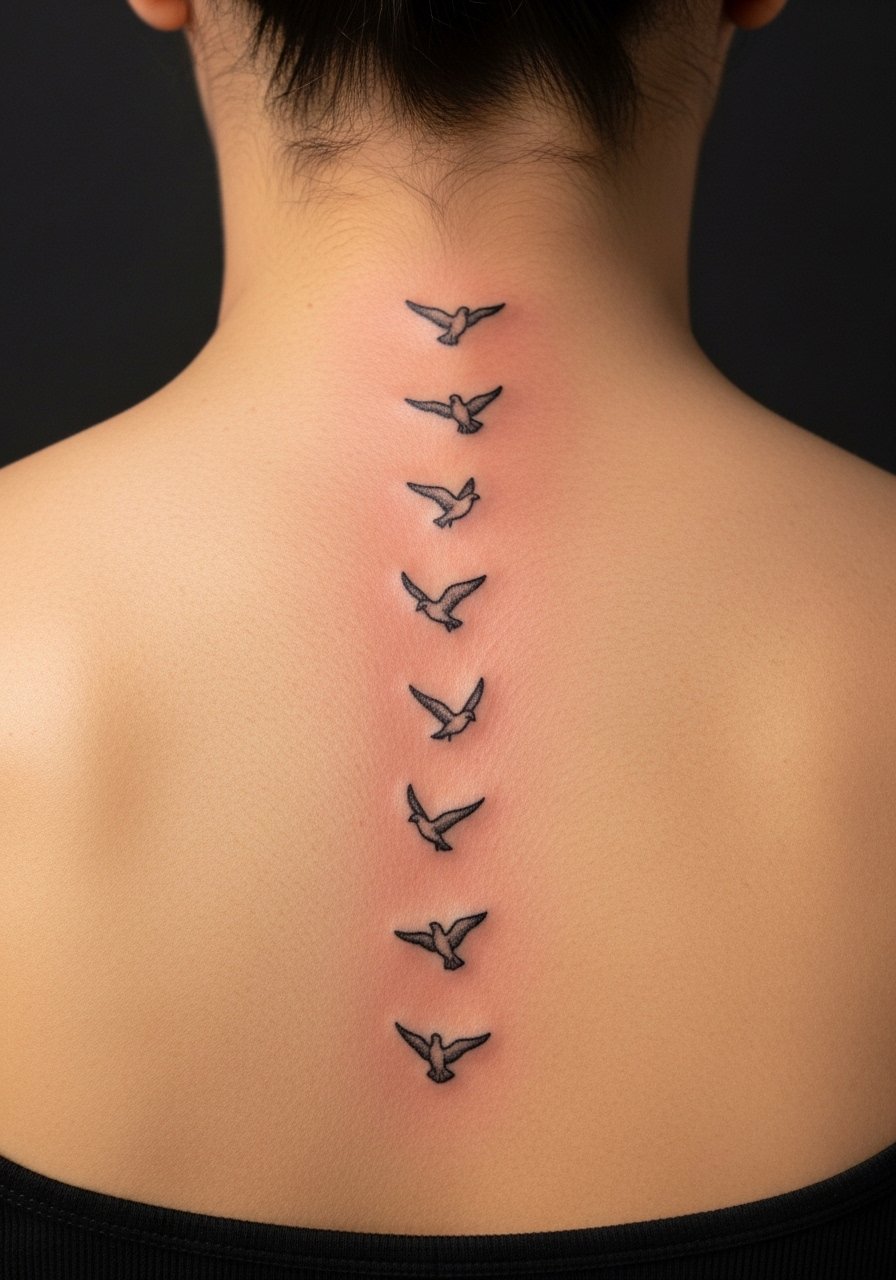
A vertical line of small birds down the spine creates an elegant lift that reads light visually. The spine is sensitive, so expect higher pain, but sessions go quickly for tiny birds. Make sure the artist checks alignment with your posture—spine tattoos can skew if not centered. Minimalist birds here should be spaced so healed lines don’t merge into a single dark streak. From what I’ve seen, this placement is a favorite for people who want visible motion without bulk.
Tattoo Prep and Aftercare Essentials
Aftercare Essentials:
- Aquaphor Healing Ointment, 14oz Tube — For first 3–5 days to keep the area moist
- Saniderm Transparent Adhesive Bandage, 6-Inch Roll — Second-skin option for initial protection
- Dr. Bronner's Unscented Castile Soap, 8oz — Gentle cleaning during first week
- CeraVe Fragrance-Free Moisturizing Lotion, 12oz — Daily moisturizer after the ointment phase
Before Your Appointment:
- Numbing Cream With 5% Lidocaine, Topical — Ask your artist before use
- Tattoo Stencil Transfer Paper, 8.5x11in Pack — For at-home mockups or artist prep
Long-Term Maintenance:
- SPF 50 Sunscreen Stick For Tattoos — Daily protection to prevent fading
- Mad Rabbit Tattoo Balm, 2oz — Keeps healed tattoos vibrant
- Hustle Butter Deluxe, 3oz — Vegan moisturizing option artists recommend
- Hydrocolloid Bandages (Large) — For spot protection during healing
Optional Comfort Items:
- Tattoo Numbing Spray — For touch-ups or sensitive spots
- Aftercare Travel Kit (Wipes + Ointment) — Handy for on-the-go care
From my experience, artists consistently recommend Saniderm or Aquaphor in the first days, then switching to a fragrance-free lotion like CeraVe. I’ve found Hustle Butter and Mad Rabbit useful for long-term moisturization. Sunscreen is non-negotiable—use the SPF stick on healed ink daily.
Frequently Asked Questions
Q: How bad does a tattoo actually hurt?
A: Pain is placement-dependent and personal. Outer arm/forearm = lower, ribs/spine/ankle = higher. The sensation is more like sustained scratching or burning than sudden sharp pain. If you’re worried, consider a smaller piece in a forgiving spot or ask about numbing cream with 5% lidocaine (check with your artist first).
Q: What if I regret my tattoo?
A: Take time to sit with ideas for several months and pick placements you can hide if needed (thigh, upper arm). Start small if you’re unsure. Laser removal exists but takes multiple sessions. I’ve seen the best long-term results come from pieces chosen slowly and with meaning.
Q: How do I keep my bird tattoo from fading?
A: From what I’ve gathered, UV exposure is the top fading culprit. Use an SPF 50+ sunscreen stick regularly and moisturize to keep skin healthy. Bold lines and blackwork tend to age best; watercolor needs more maintenance.
Q: Can I work out after getting a tattoo?
A: Wait at least 48–72 hours before heavy sweating, longer for areas that flex. Sweat and friction risk infection and ink loss. Gentle movement is fine, but avoid swimming for two weeks.
Q: Should I get a small tattoo first to test pain tolerance?
A: Only if you genuinely want a small piece. Pain varies by placement, not just size. A tiny ear/behind-ear or inner arm piece is a good test without being permanent visibility-wise.
Q: How long does a tattoo take to heal?
A: Surface healing is typically 2–3 weeks; full healing can be a couple of months. The first week is the most critical—cleaning with gentle soap and using Aquaphor or Saniderm per your artist's advice prevents common issues.
Q: Do tattoos look different on different skin tones?
A: Yes. Black and gray work shows up strongly across tones. Bright colors may read more muted on deeper skin, so discuss saturation with your artist and ask to see healed examples on similar skin tones.
Q: Are handpoke tattoos different to care for?
A: They feel slightly different during application and can heal with a softer texture. Aftercare is the same—keep them clean and moisturized. If you’re drawn to handpoke texture, ask to see healed handpoke portfolios first.
