
Someone I know spent months saving references, then realized the real problem was picking a style that ages well on forearm skin. I visit five shops across Brooklyn and chat with artists who specialize in fine line and blackwork, and the same handful of ideas keep coming up this year. Below are 20 small forearm tattoos that work for men now, why they hold up, what to tell your artist, and the realistic tradeoffs to expect.
1. Fine Line Arrow on Inner Forearm

Someone I know first saw this on a friend and booked it because it reads simple but precise. Fine line works here at a 2 to 3 inch scale, and the inner forearm helps keep the arrow aligned with muscle for a clean look. Controversy matters here. One camp says fine line fades faster on forearms and needs touch-ups by year two. The other camp says proper spacing and slightly thicker line weight make fine line last. Tell your artist you want true hairline work but with a little breathing room between strokes. Pain is moderate near the wrist. Expect a single short session and a likely touch-up at year two if you want crisp lines.
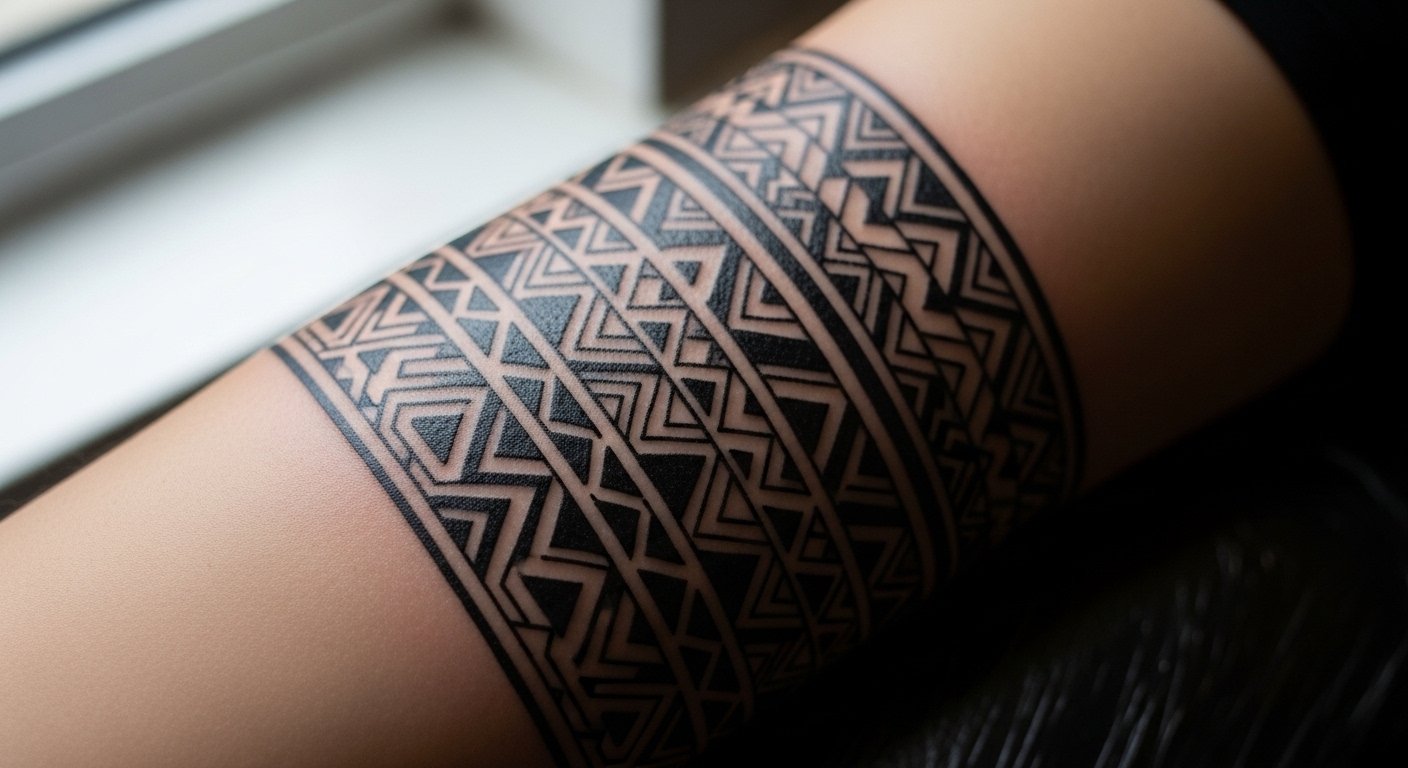
2. Geometric Band Wrap on Outer Forearm
When you want structure that ties into a sleeve later, a narrow geometric band is practical. The outer forearm gives room for straight linework and stipple shading that ages well because the shapes have some negative space. A common mistake is asking for lines too close together. That invites blowout as the skin moves. For consultation, bring photos that show exactly how thick you want the band and where it should sit when your arm is relaxed. Session time is usually under two hours. Pain is lower on the outer forearm. Expect subtle softening of edges at year two and possible touch-ups at year three.
3. Tiny Tree Silhouette, Vertical Inner Forearm
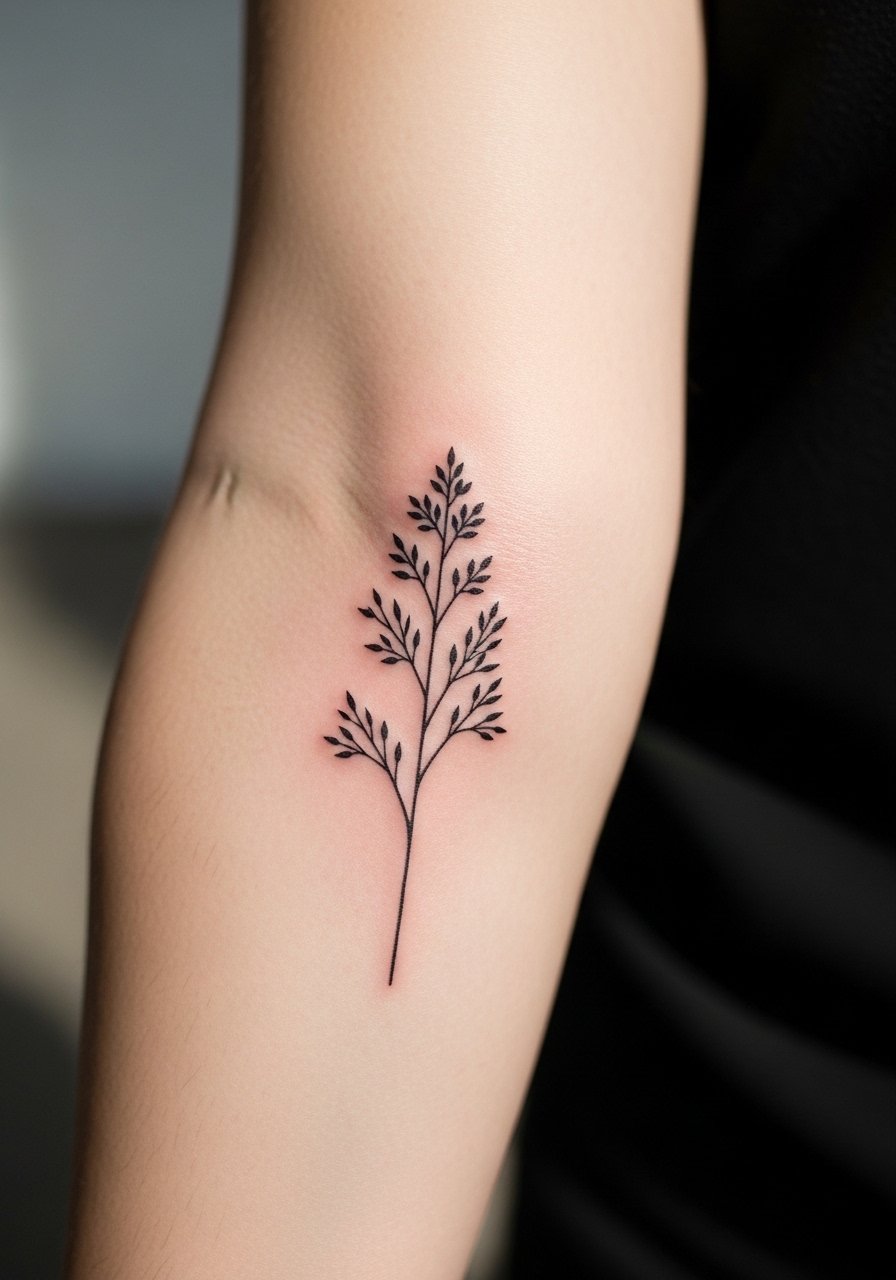
I recommend this when someone wants symbolism without a sleeve commitment. Vertical placement follows muscle fibers so the trunks and branches sit flatter and keep detail. The aging issue: filled micro-details near branches can blur if placed too close to flex points. Tell your artist you want simplified branches and a strong trunk line to protect against early blurring. The session feels stingy near the wrist but manageable. Plan one session and a touch-up if you add color or more branches later. This version reads at arm distance and still ages gracefully if kept simple.
4. Micro-Realism Wolf Head, Outer Forearm
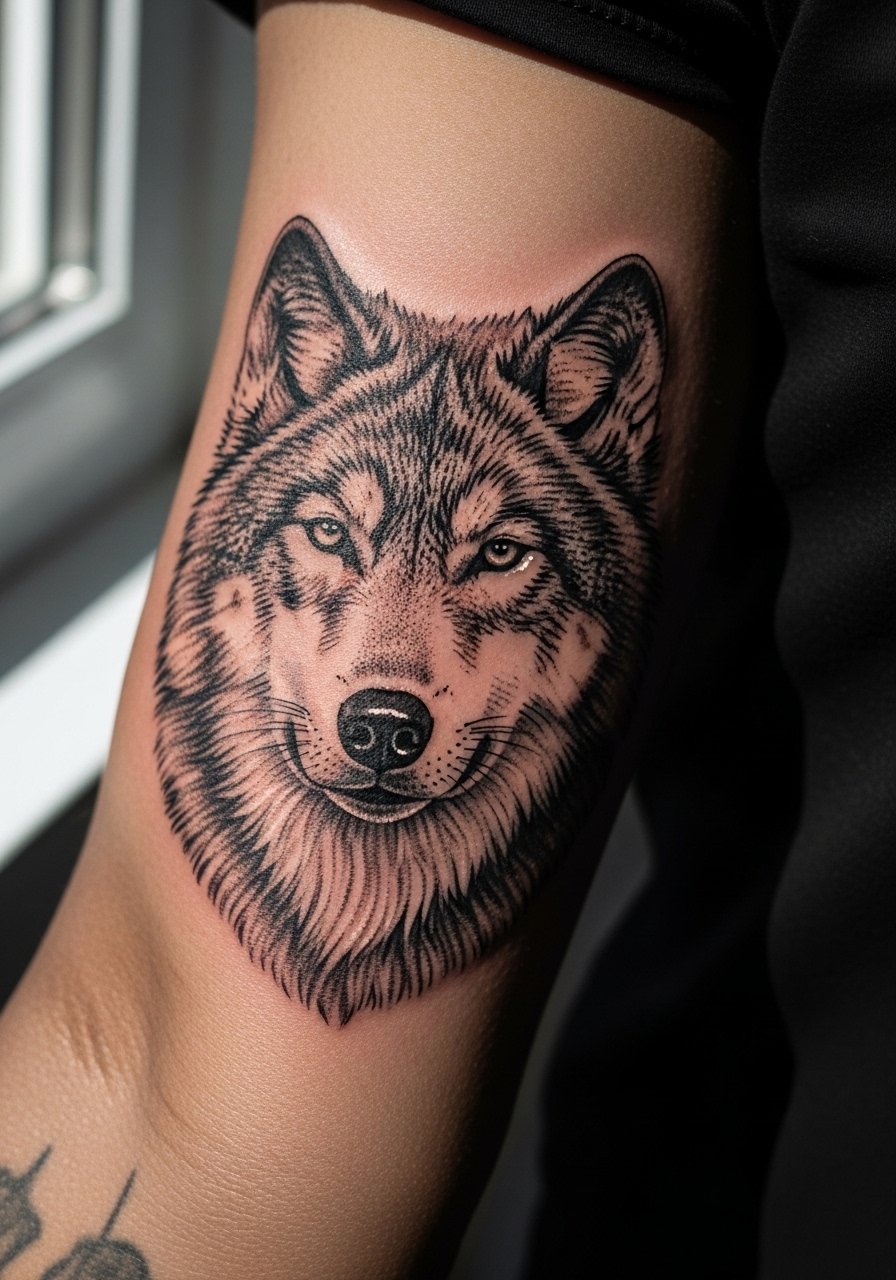
Visual impact is high with micro-realism animal totems at a small scale when the artist nails contrast. The outer forearm is a forgiving spot for tiny realism because it stays relatively flat. A frequent error is shrinking a realistic reference down without adjusting contrast, which leaves the piece muddy after healing. Ask for slightly stronger contrast and dot work to hold texture. Session time may stretch to two to three hours. Blowout risk is moderate if needles are pushed too deep. Expect a touch-up at year two, especially if you want to retain tiny highlights.
5. Neo-Traditional Eagle Accent Near Wrist
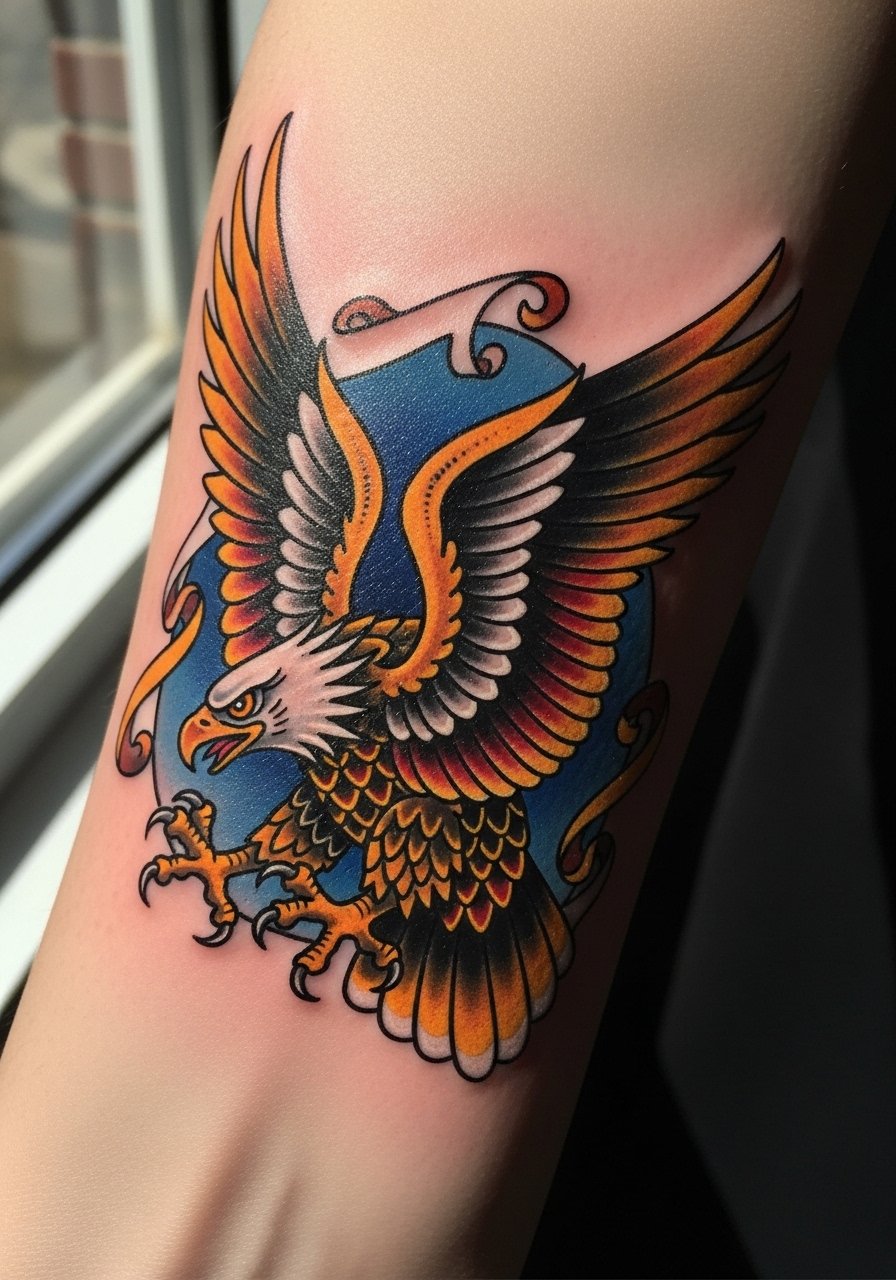
There is something satisfying about compact neo-traditional pieces near the wrist because the bold linework reads at distance. For men who want classic iconography without sleeve commitment, this fits. A common mistake is over-detailing the feathers at a small scale. Tell the artist to prioritize clear wing shapes and strong black outlines so the design keeps shape as it softens. Session time is under two hours. Pain spikes are brief near the wrist bone. Touch-ups at two to four years keep saturation tight if you wear shirts that expose your wrist a lot.
6. Small Skull with Single Rose, Outer Forearm
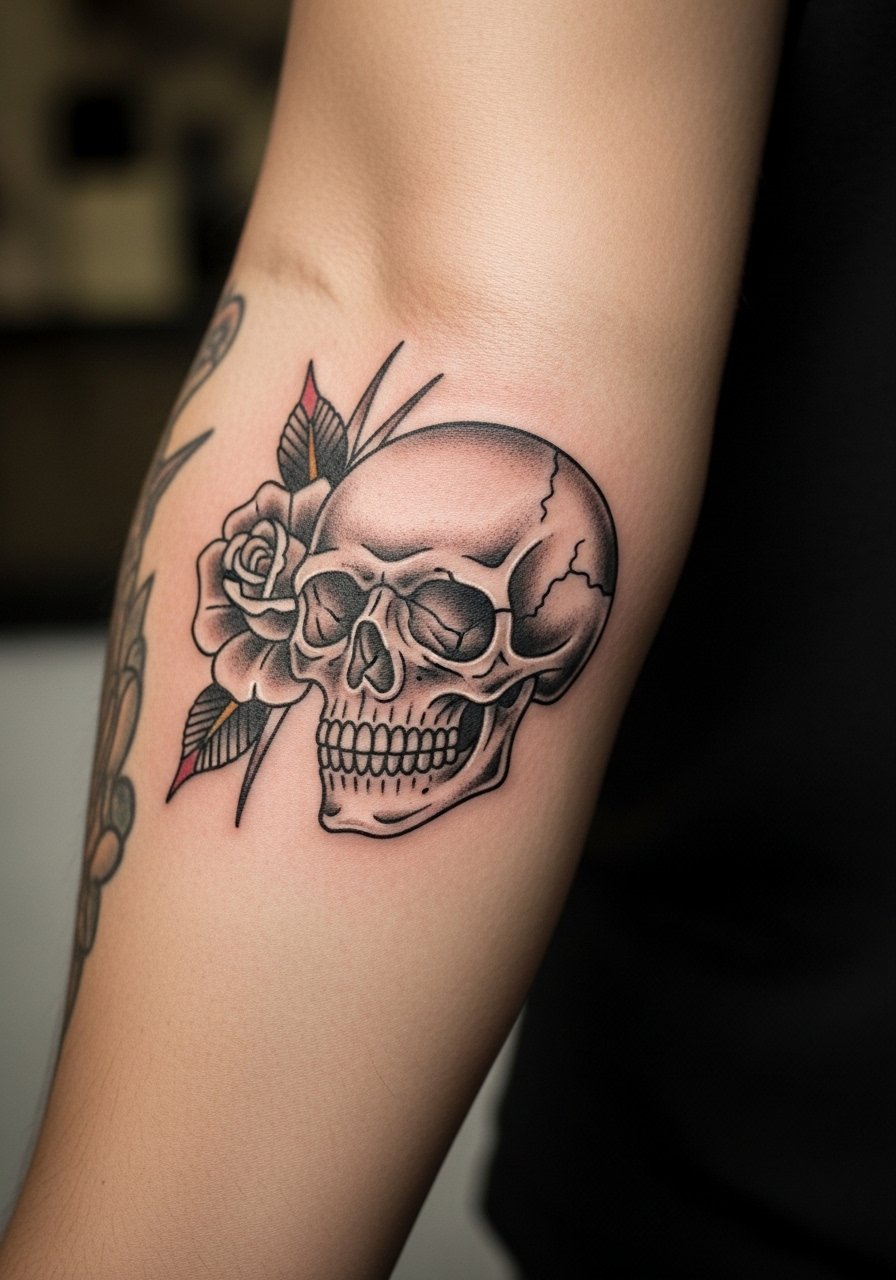
When you want something that nods to classic tattoo history, a skull paired with a single rose remains useful without overwhelming the arm. The skull should be simplified at small size so the hollows do not merge over time. Discuss contrast and solid black in the core details during the consultation. The outer forearm makes shading easier and reduces blowout risk compared with softer skin zones. Expect a two to three hour session. As it heals, some mid-tone gray will soften, and a touch-up at year three is common if you want to keep the rose petals crisp.
7. Vintage Black Rose, Vertical Forearm Starter
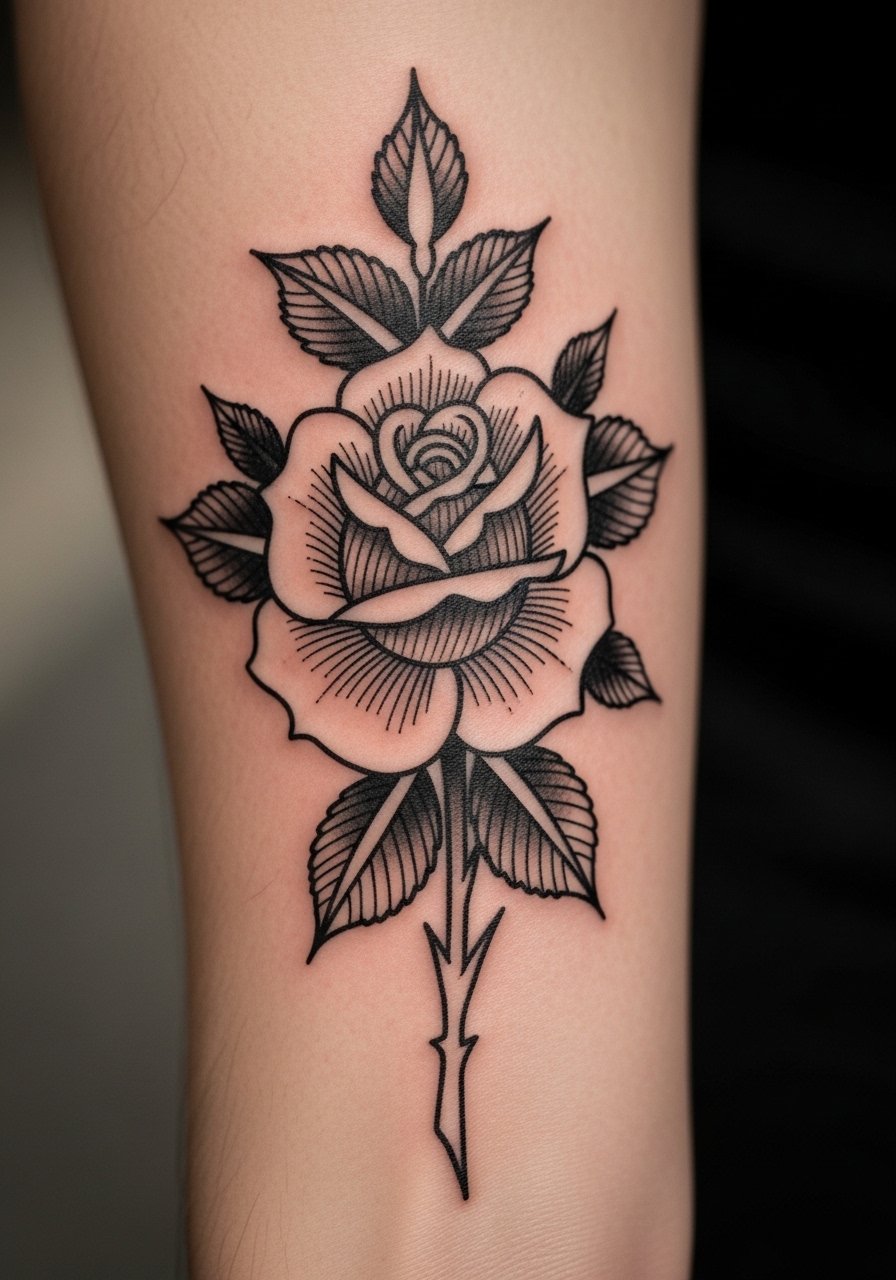
This is my go-to sleeve starter for clients who want a flexible anchor piece. The rose’s petals should use heavy contour linework and selective saturation so the flower ages into the rest of a sleeve. A frequent mistake is choosing too many tiny petals at small scale, which results in muddied detail after a year. Ask for simplified petal shapes and a bold stem. Session time is usually one to two hours. Pain is low to moderate on the mid-forearm. When you expand into a sleeve later, the rose connects well via smoke or wave elements.
8. Norse Rune Mjölnir, Outer Forearm Dynamics
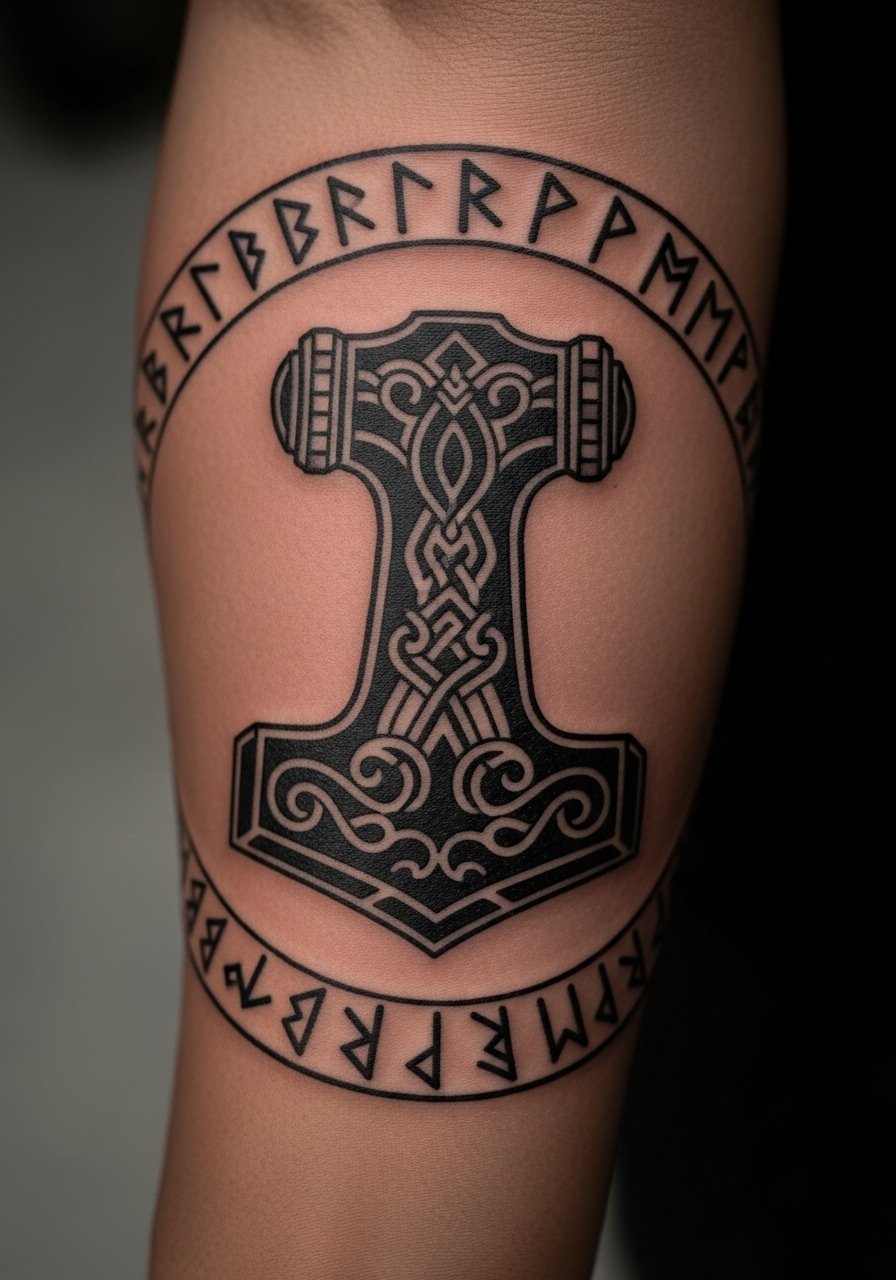
People drawn to runic iconography like the dynamic read Mjölnir gives on the outer forearm. This design benefits from strong black fills and clear runes so the negative space reads when your arm moves. Cultural origin note: this imagery traces to Norse tradition, so many clients choose simplified or stylized runes rather than direct replicas. Tell your artist which runic alphabet version you prefer so the spacing stays consistent. Session time is short, under two hours. Blowout risk is low with solid black fills, and touch-ups may be rare if saturation is dense.
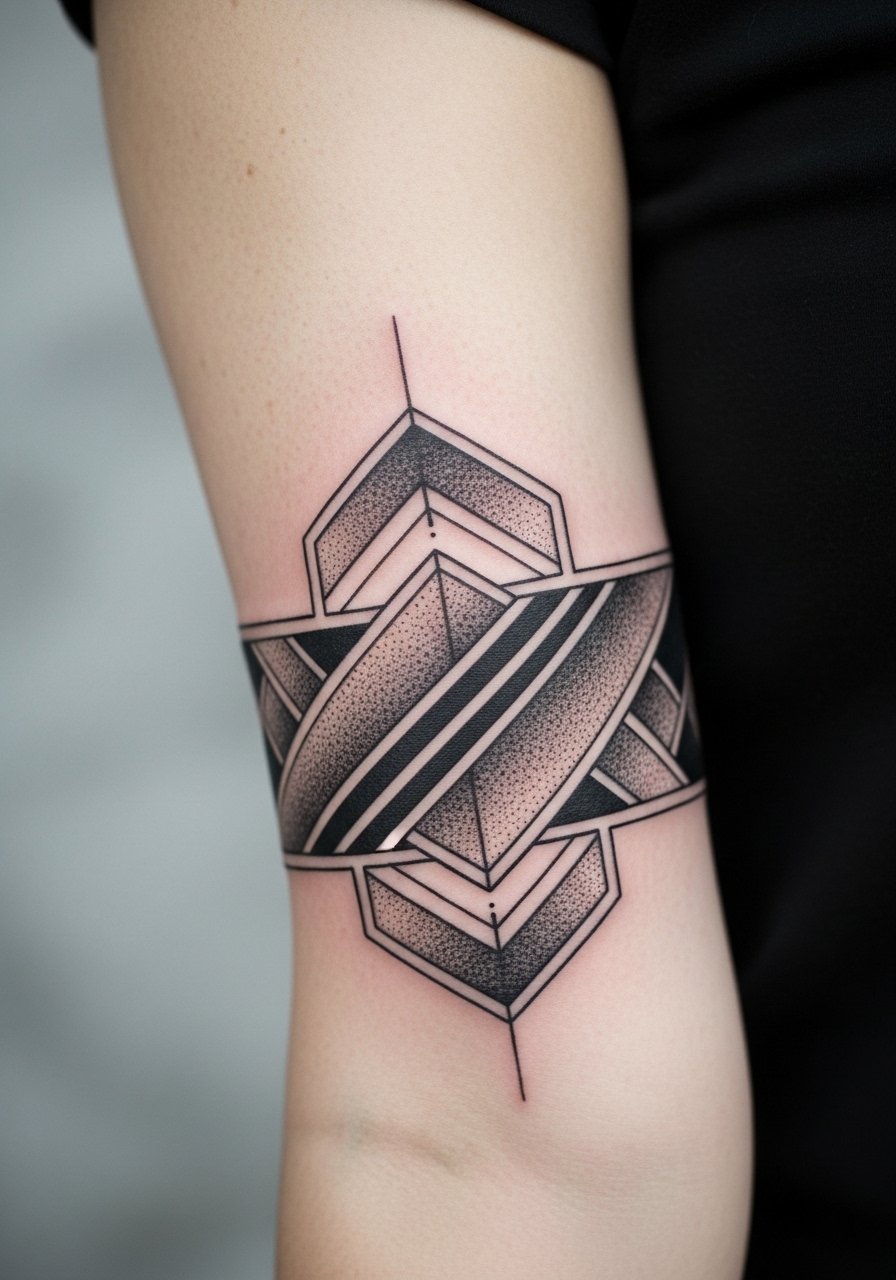
9. Small Compass Rose, Central Forearm
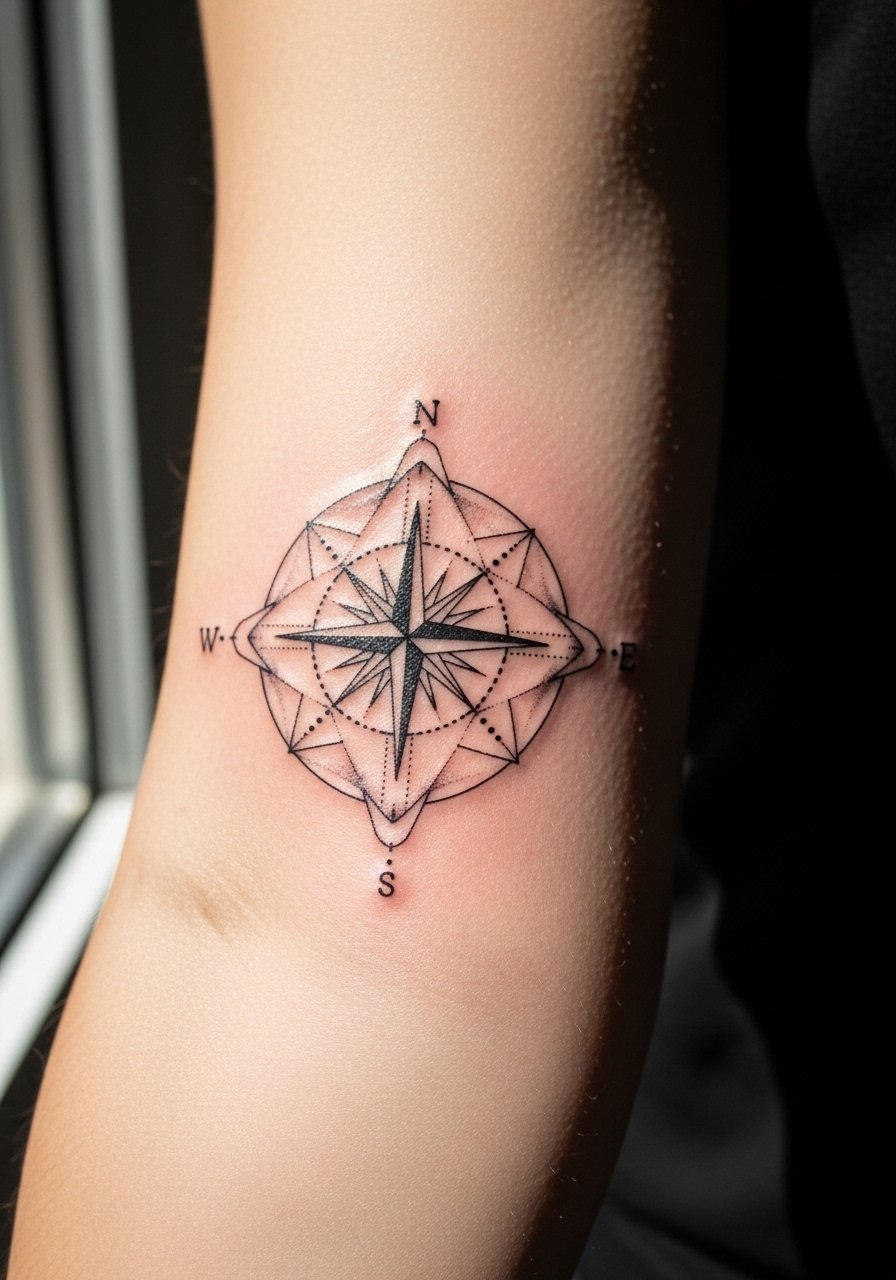
When guidance or travel themes matter, a compact compass rose sits well in the center of the forearm and keeps balance visually. One mistake is making the compass too small and packing in decoration. The lines need room to stay crisp. Tell your artist you want crisp cardinal points with a clean center point and some stipple shading around the edges. Pain is moderate near the center. Session time is often under two hours. Over five years expect softening at the outer points and a single touch-up can restore crisp angles.
10. Single Wave Curve, Inner Forearm Flow
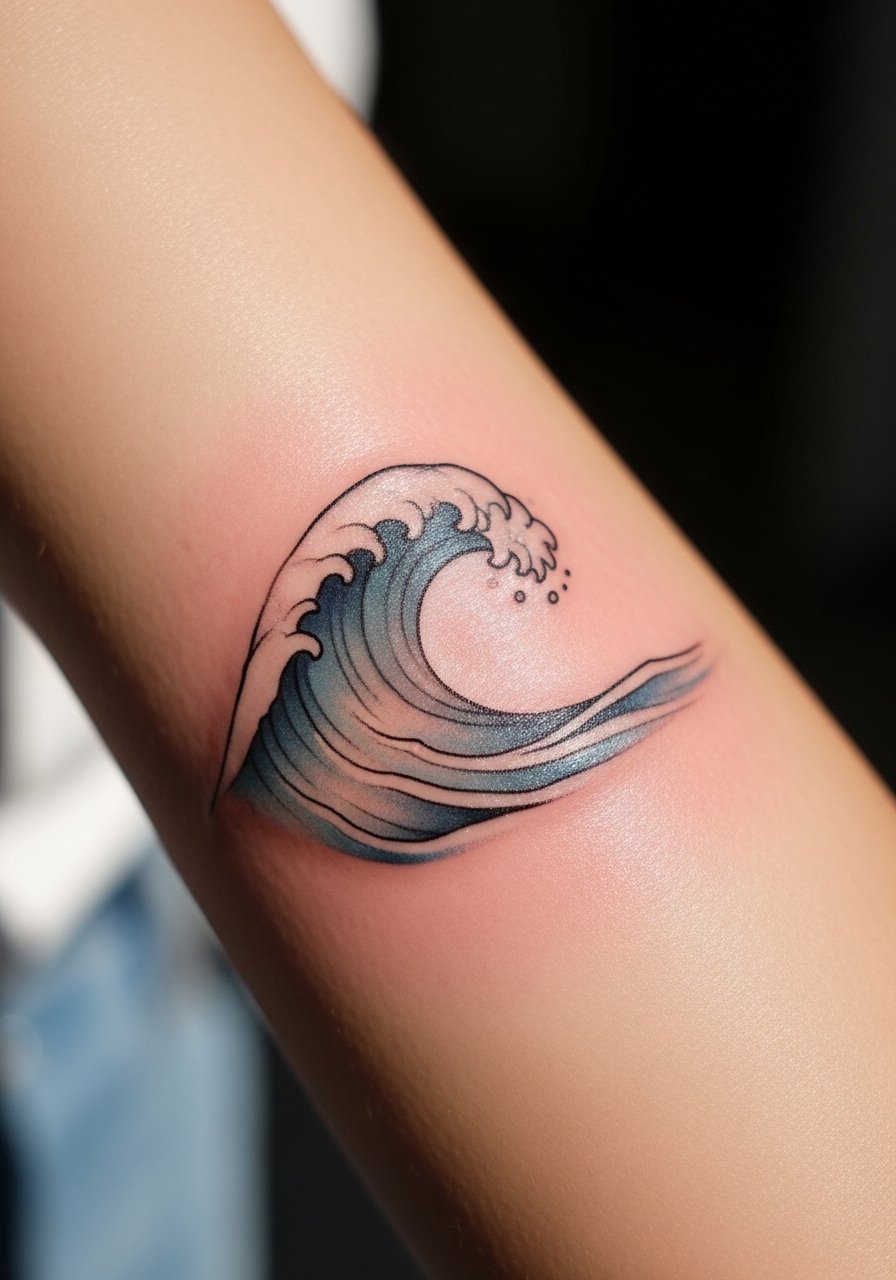
Most surfers and ocean fans pick a single flowing wave for a forearm piece because it moves with the arm. The inner forearm helps the curve sit naturally with muscle. The trick is to avoid high-saturation watercolor fills that can blow out when small. Ask for gradient washes rather than wide splashes so color sits within linework. Session time is about one to two hours. Pain is slightly higher on the inner forearm near the wrist. Expect color to need refreshing by year two if you spend a lot of time in sunlight.
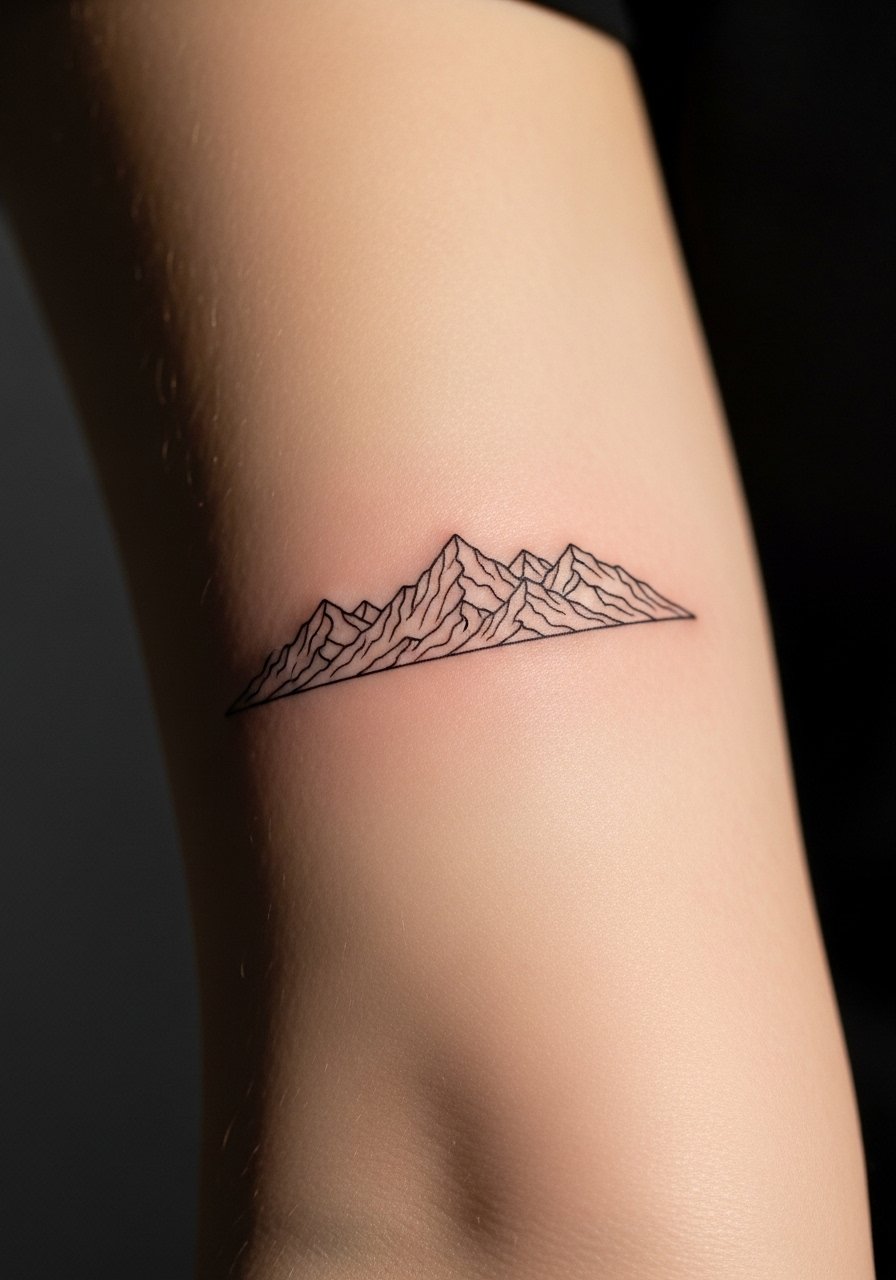
11. Stipple Shaded Mountain Range, Outer Forearm
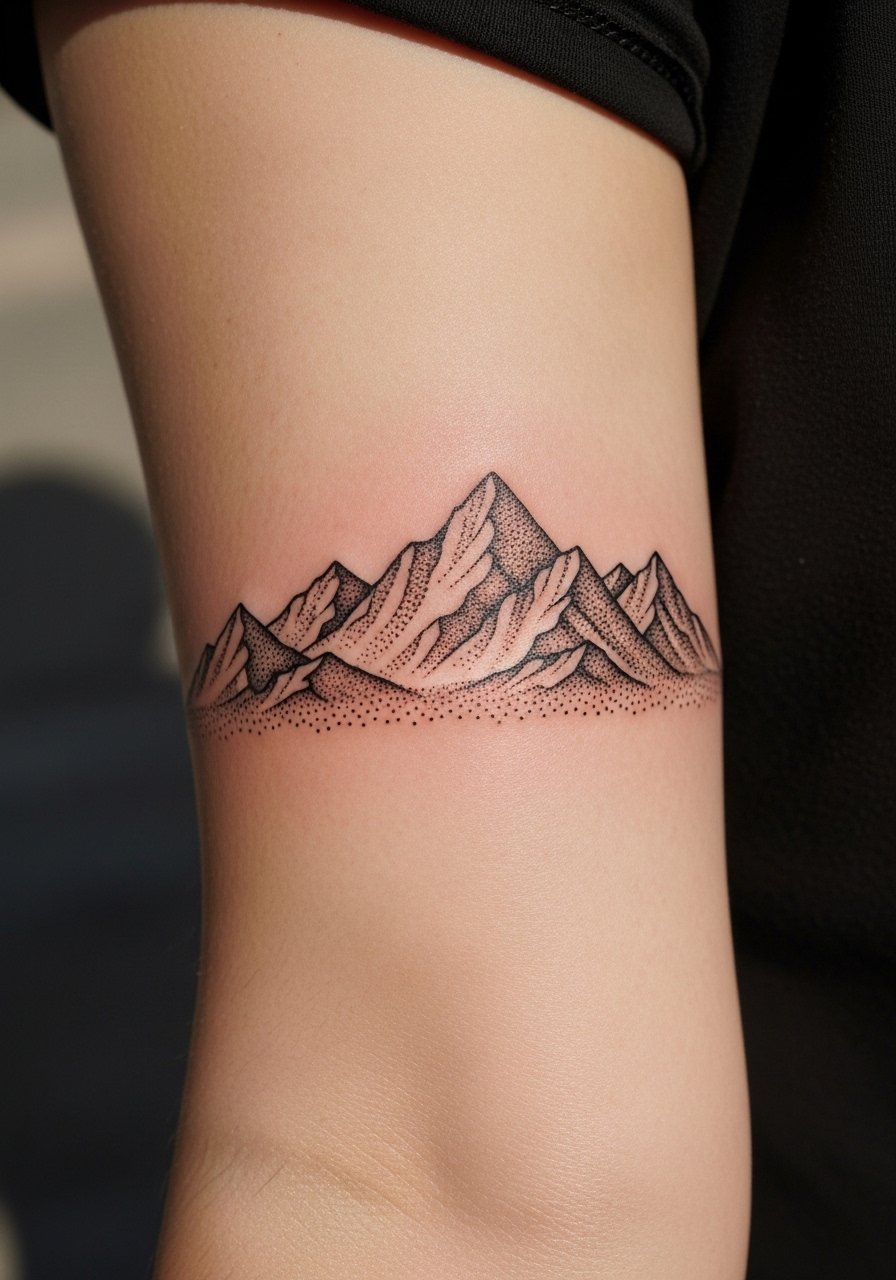
I've noticed stipple shading holds up surprisingly well on forearm skin because dot work avoids continuous lines that can blur. This horizontal mountain motif works for men who want landscape imagery that can grow into a sleeve. A common version that ages poorly uses continuous gray wash instead of dots. During consultation ask for stipple density and how it will read from arm distance. Session time is commonly two hours. Pain is mild. Touch-ups are mostly aesthetic and often optional unless you plan to add more elements.
12. Small Cross with Scrollwork, Outer Forearm
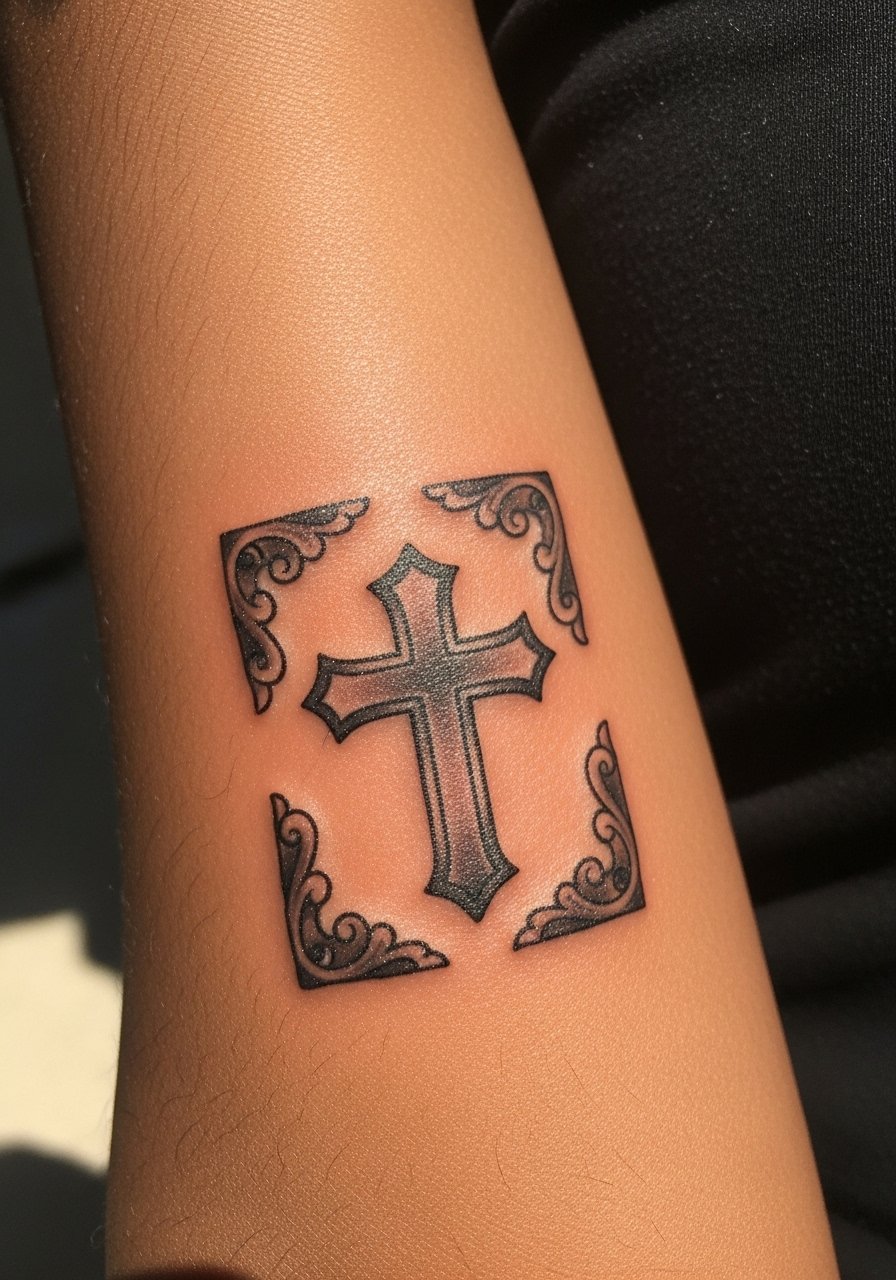
For a faith reminder that is easily covered, a compact cross with restrained scrollwork keeps details readable. Cultural sensitivity matters here in that symbols carry meaning; many people choose slight style changes to fit personal context. Ask the artist for simplified scrolls so the filigree does not collapse as the tattoo ages. Session time is under an hour. Pain is low to moderate. Expect this to need minimal touch-ups unless you expose it to heavy sunlight.
13. Minimalist Mountain Range, Inner Forearm Linework
When someone wants a subtle piece for a first tattoo, a minimalist mountain range is approachable. Inner forearm placement makes it feel private yet visible when you want to show it. The controversy about fine line versus thicker lines applies. One camp prefers ultra-thin strokes for the discreet look. The other suggests slightly thicker line weight to avoid early blurring. Tell your artist which side they lean toward and plan for a touch-up at year two if you choose the thinner route. Session time is short and pain is moderate near the wrist.
14. Compass Coordinates in Monospace, Vertical Forearm
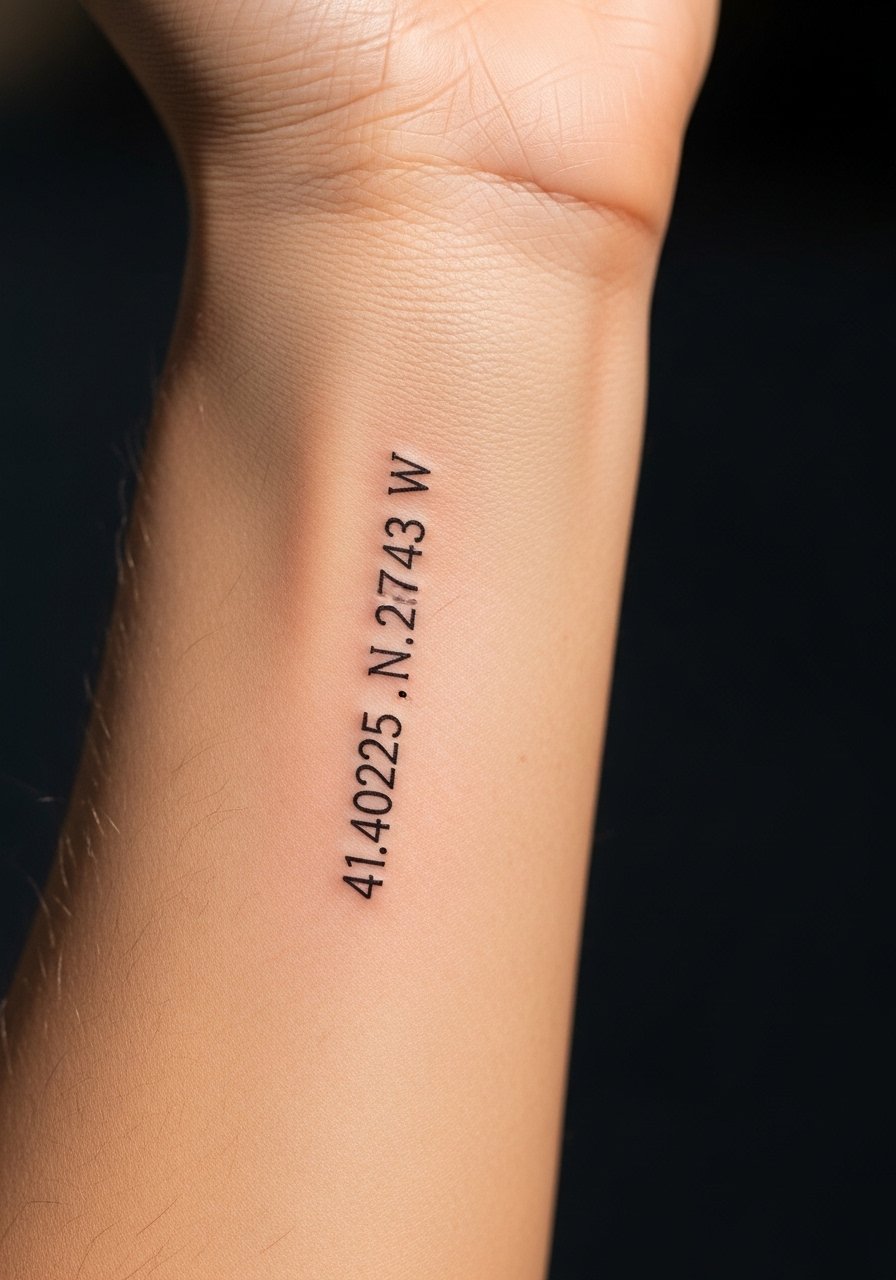
Bring exact text when you book this one because image prompts need precise lettering. Coordinates read cleanly in monospace and make for a discreet travel memento. A real mistake is picking tiny type size. The numbers need room to avoid blurring of adjacent digits. Tell the artist the exact font weight and that you want slightly larger spacing between characters. Session time is under an hour. Pain is low. Expect letters to soften around year three and consider a touch-up if you want razor-sharp numerals.
15. Dot Work Sun, Near Elbow Forearm
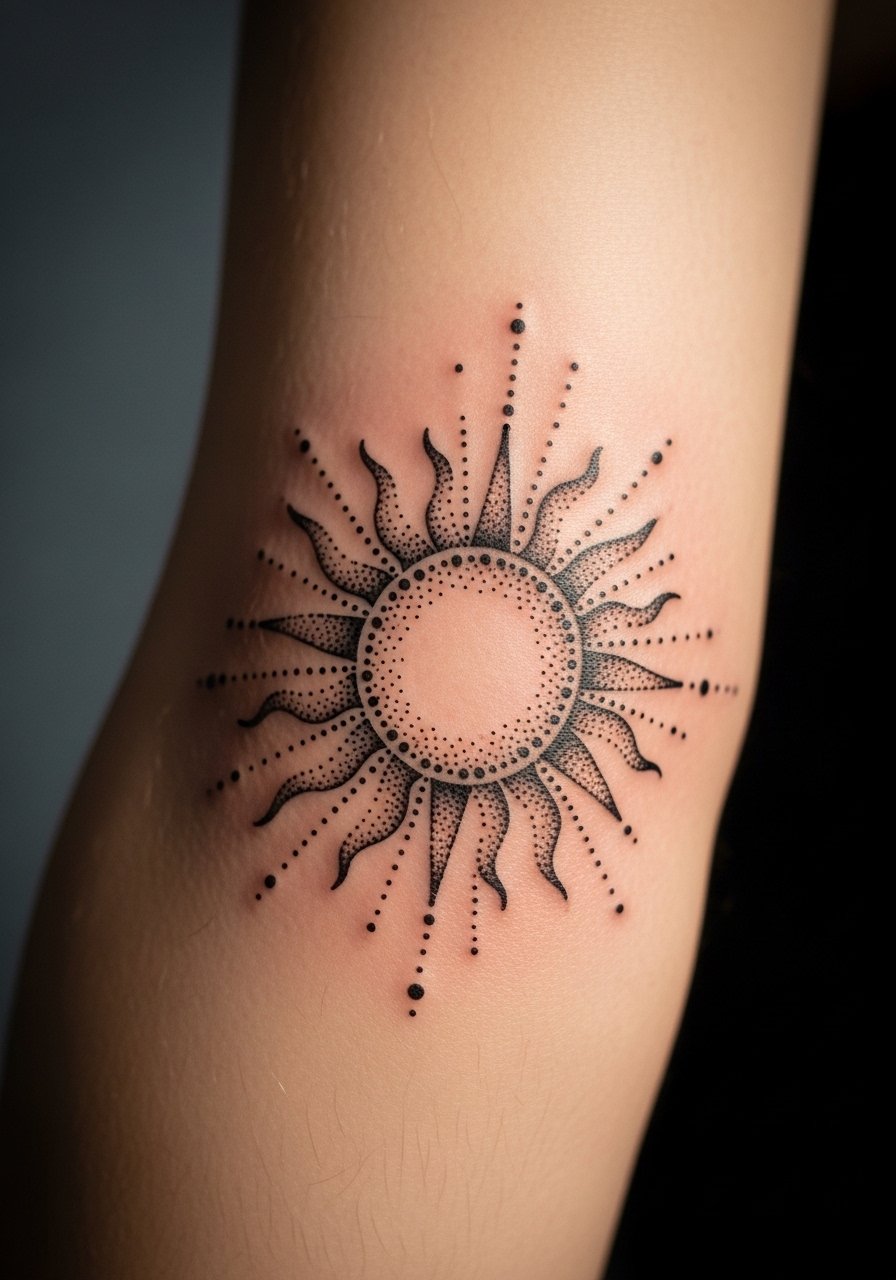
Visual impact is subtle when you use dot work to suggest light rather than solid fills. Placing this near the elbow creates a natural focal point that reads while wearing short sleeves. A common error is asking for too many tiny gradients which can look muddy later. Ask for clear core rays and light stipple fade. Session time around two hours. Pain increases near the elbow joint. Touch-ups are optional and depend on how much sun exposure the area gets.
16. Tribal Blackwork Panel, Outer Forearm
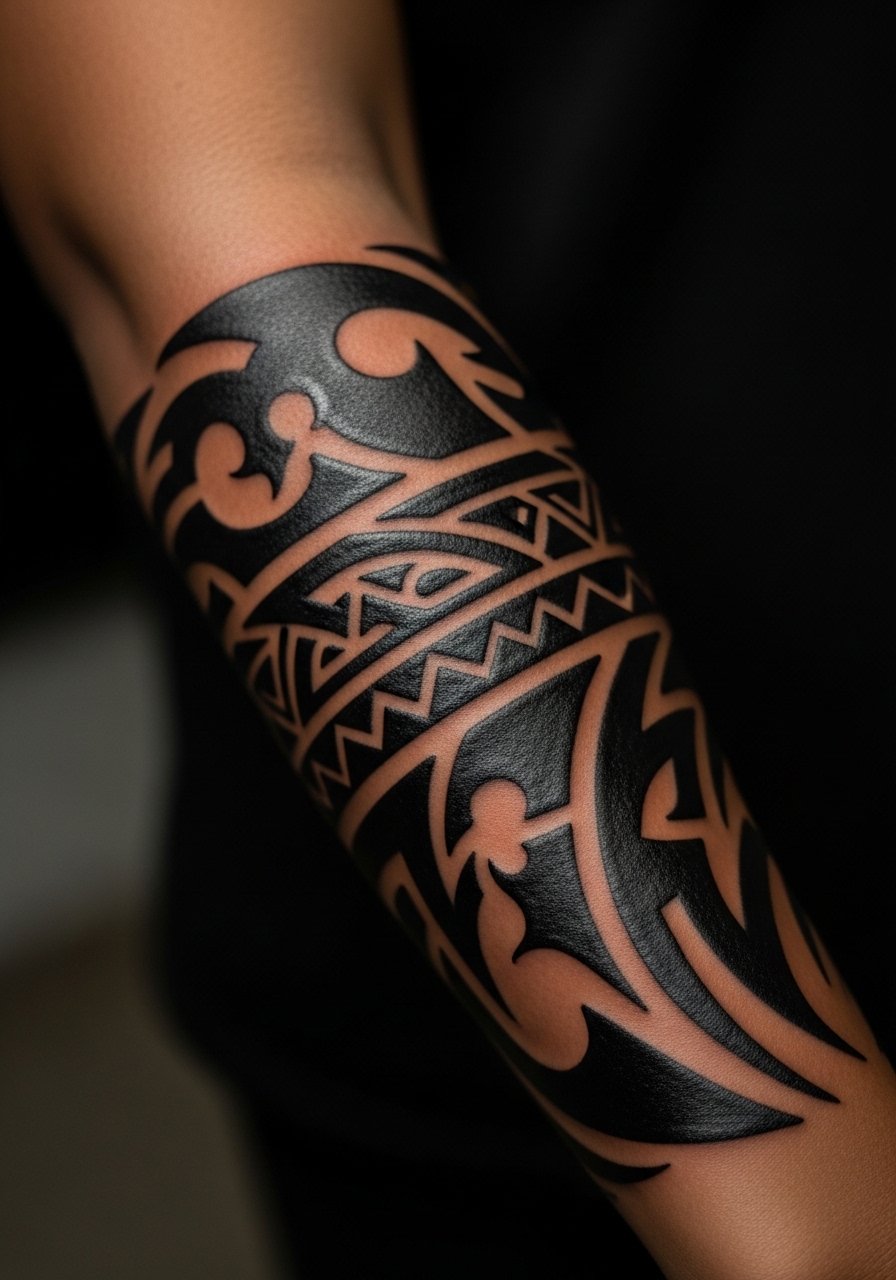
Bold tribal work is trending for men who want graphic contrast and movement with muscle. This style benefits from heavy saturation and clean edges so it still reads after years. A mistake is overcomplicating the pattern at a small scale. During consultation, discuss how the design will flex with your muscle and where negative space should sit. Session time can be two to three hours for solid fills. Pain is moderate. Solid black holds well and often needs fewer touch-ups than fine line pieces.
17. Tiny Anchor with Rope Twist, Outer Forearm Near Wrist
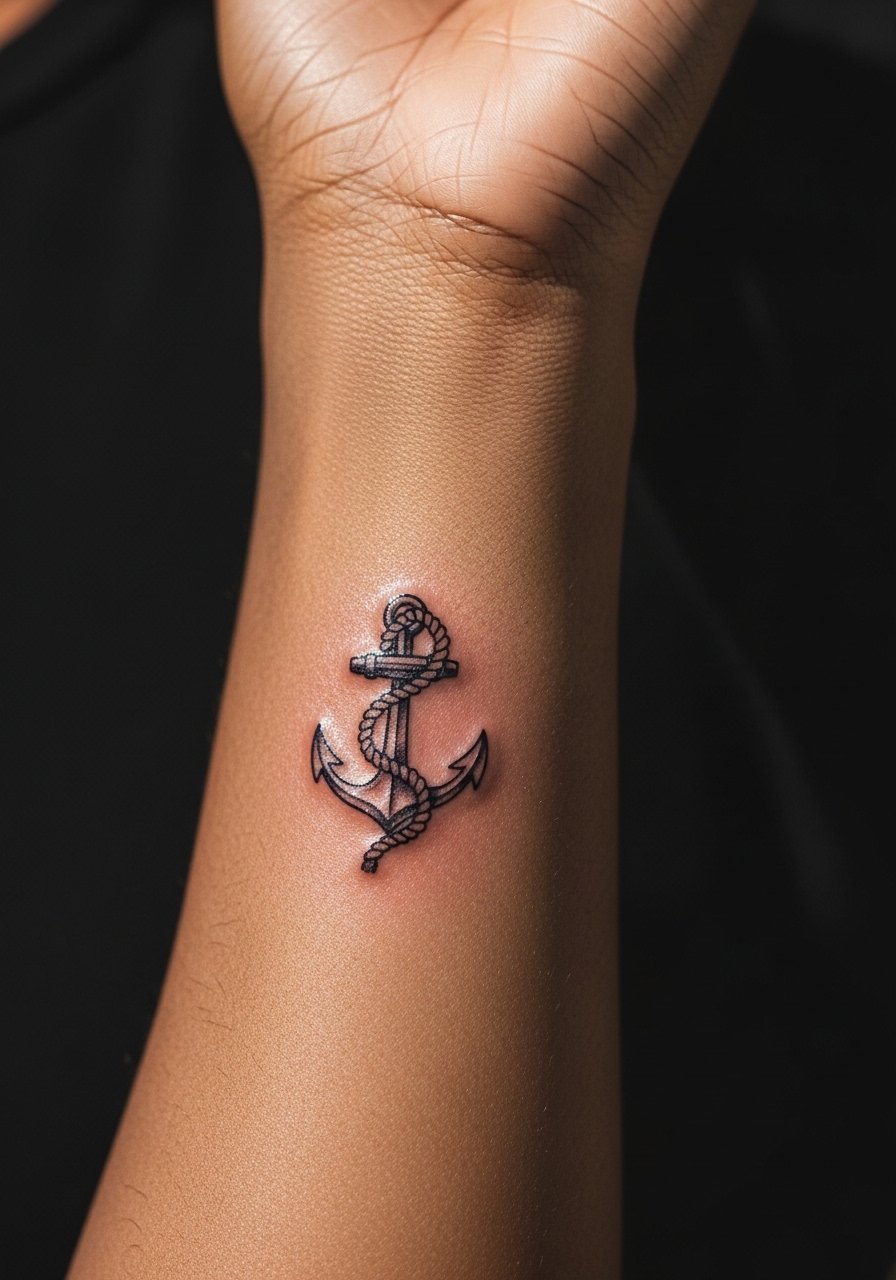
The visual compactness of a small anchor is useful if you want a nautical nod. The rope twist adds texture, but too-fine rope detail will blur. Tell your artist to simplify the twist into readable loops and emphasize the anchor’s silhouette. Session time is under an hour. Pain is noticeable near the wrist bone. Expect some softening around year two and a quick touch-up if you want the rope detail redefined.
18. Single Line Portrait Silhouette, Inner Forearm
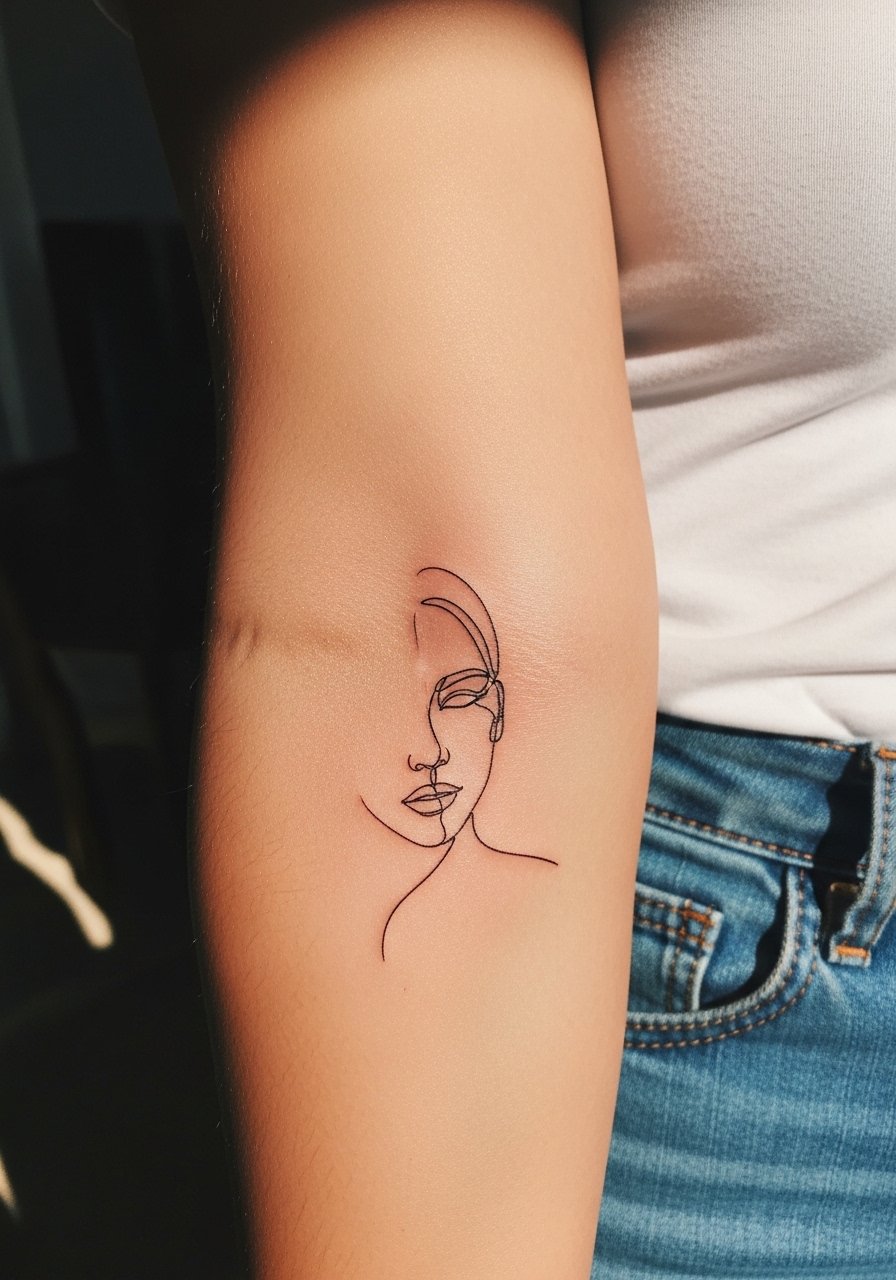
A continuous single-line portrait reads personal without being literal. The inner forearm gives the artist space to keep the silhouette smooth. A common mistake is asking for facial detail in single-line style. Simplicity is the point. Tell the artist which facial feature to emphasize so the silhouette captures the person without crowding the design. Session time is one to two hours. Pain is moderate. This style ages mostly by softening edges, and a touch-up at year three can sharpen the silhouette.
19. Stag Head with Stipple Antlers, Mid-Forearm
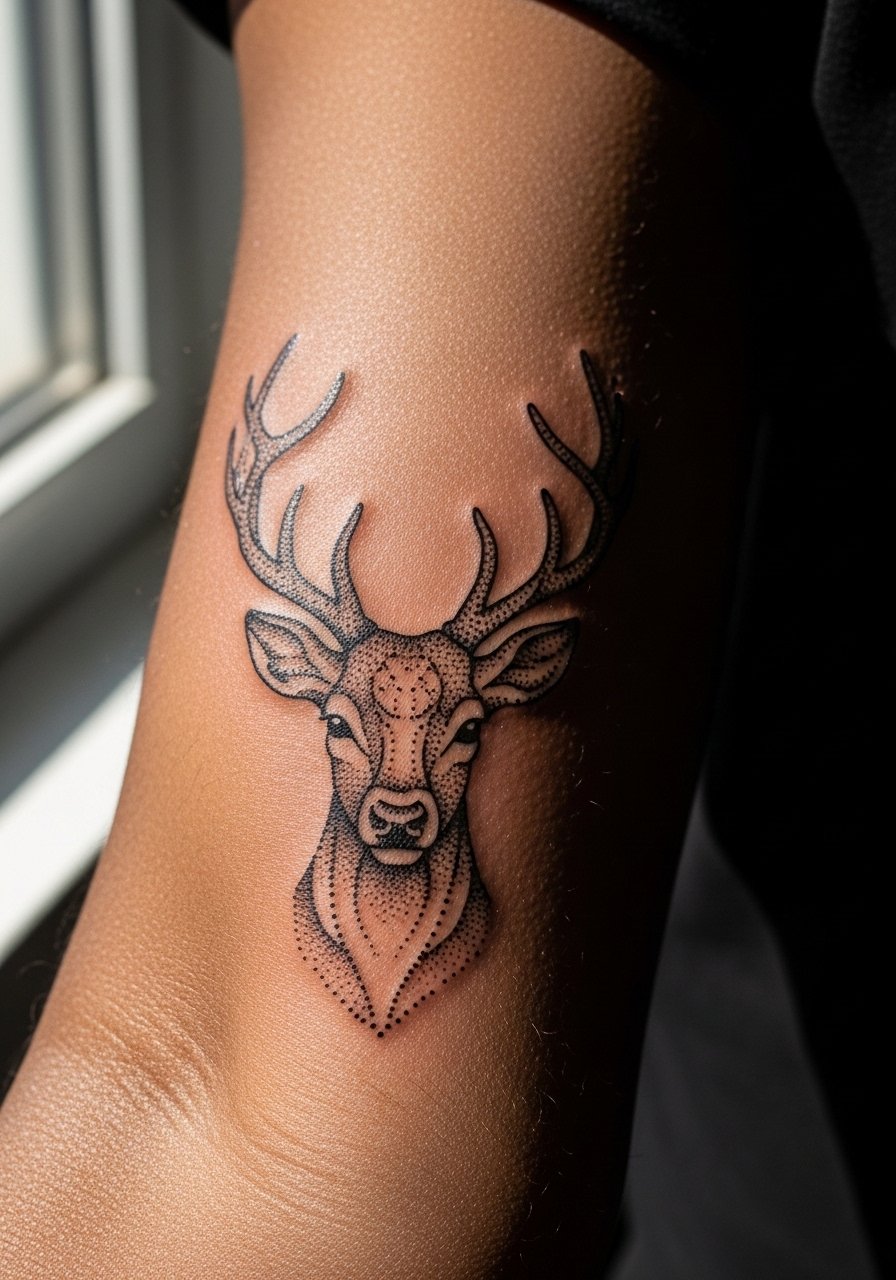
For a masculine totem that reads well at small scale, a stag head with stipple antlers combines linework and dot shading for texture. A frequent error is packing too many tiny lines into the antlers. Recommend larger, open antler shapes and stipple texture for fill. Session time is two to three hours depending on size. Pain is mild to moderate on the mid-forearm. Touch-ups at year three keep the dot work crisp if you want to preserve the contrast.
20. Small Mandala Quarter Wrap, Outer Forearm Edge
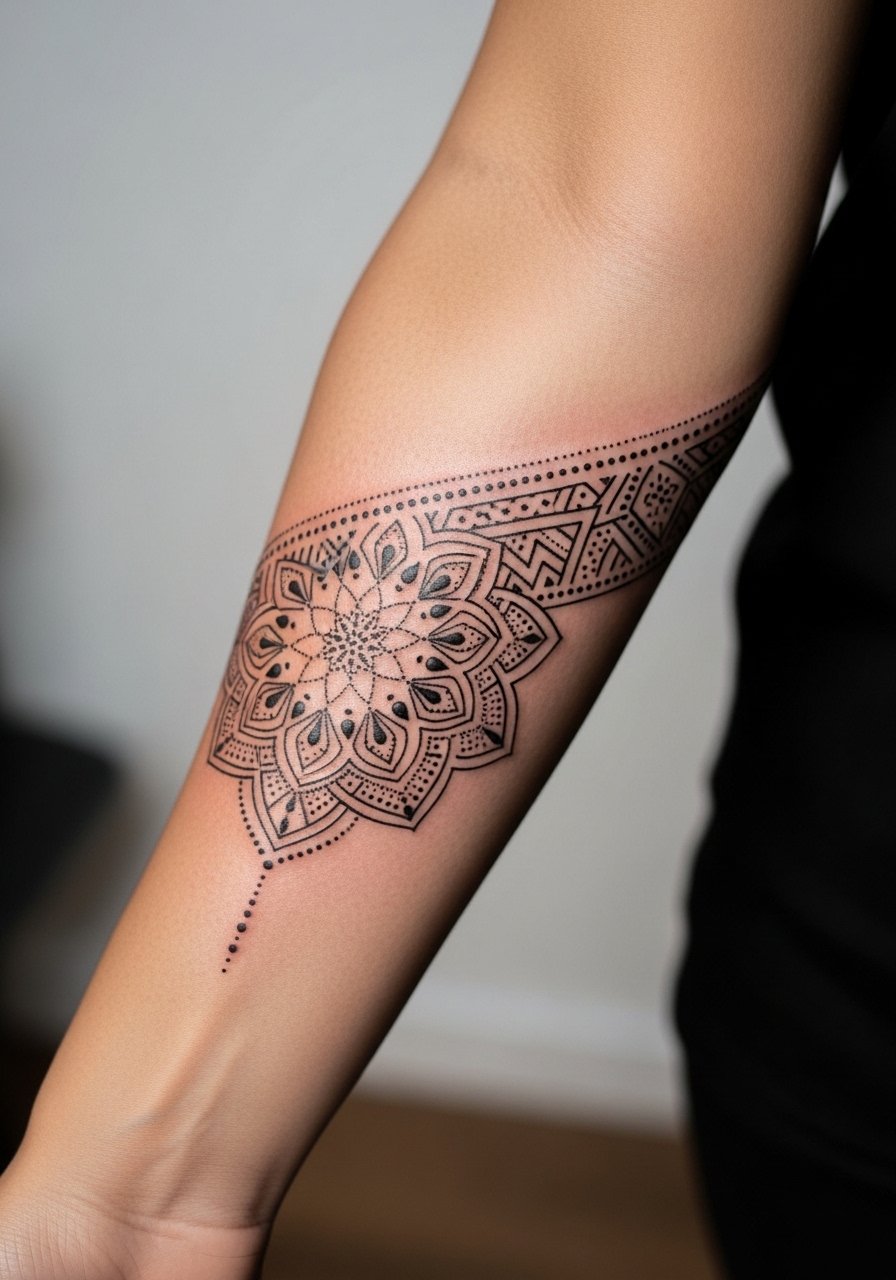
What makes this work is placing a quarter of a mandala near the edge of the forearm so it can expand into a sleeve later. Cultural origin note: mandala patterns have spiritual roots, so many clients opt for stylized geometry rather than direct sacred motifs. Avoid over-detailing tiny petals. Ask your artist for clean radial spacing and strong primary lines. Session time is under two hours. Pain is low. Expect radial points to soften with time and a touch-up at year three if you want sharp geometry.
Tattoo Prep and Aftercare Essentials
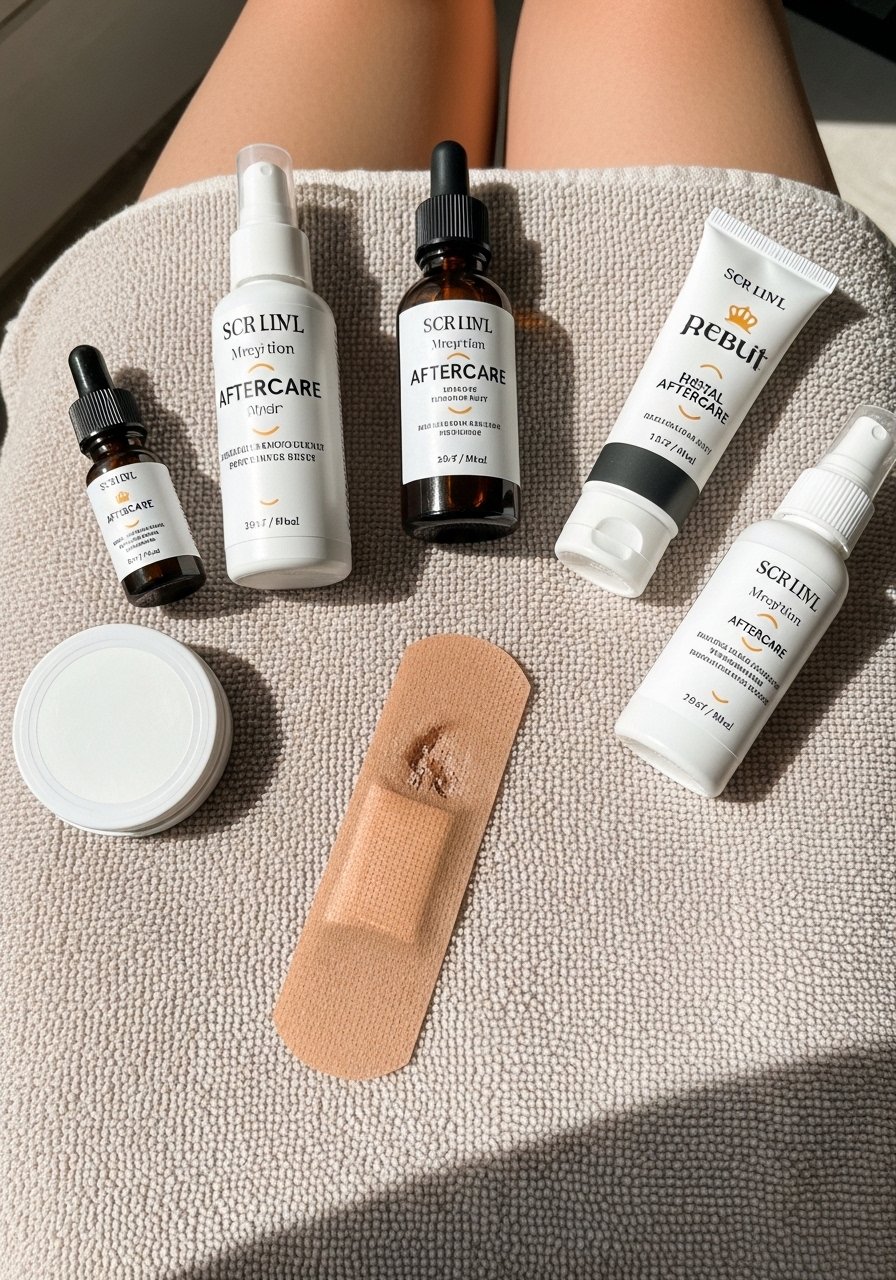
Below is a compact shopping list for prepping and maintaining small forearm tattoos. Items listed with practical context and Amazon links.
Fragrance-free gentle foaming cleanser for sensitive skin. Use for the first week to keep the area clean without stripping natural oils. Gentle foam removes blood and ointment without harsh rubbing.
Medical-grade second skin bandage, single-use sheets. Useful for the first 24 to 48 hours when artists recommend an occlusive layer. Helps reduce scabbing and keeps bacteria out.
Lightweight fragrance-free balm in a small tub. Apply sparingly after initial cleansing. It prevents excessive dryness without clogging pores.
Sterile non-stick gauze pad pack. Keep a few on hand for blotting during the first day if a bandage needs replacing.
Aquaphor Healing Ointment. One mainstream product I mention for its wide availability. Use only for short-term sealing during the first 48 hours, then switch to a balm.
SPF50 mineral sunscreen stick for tattoos. Long-term UV protection is the single best thing you can do to preserve saturation and stop premature fading.
Silicone scar sheets for long-term maintenance. If you notice raised or uneven healed areas after months, a short silicone sheet run can flatten texture before deciding on touch-ups.
Every tattoo is different. Always follow your artist's specific aftercare instructions. Consult a dermatologist if you have skin concerns or unusual healing issues.
Frequently Asked Questions
Q: Will a fine line forearm tattoo blur faster than a bold blackwork piece?
A: From what I have seen, fine line tends to soften sooner on forearm skin because the lines are thinner and there is more surface area for movement. The tradeoff is subtlety. If longevity matters, ask the artist to slightly increase line weight or leave more space between strokes. Many people choose touch-ups at year two to keep fine line pieces crisp.
Q: Is the inner forearm much more painful than the outer forearm for small pieces?
A: Inner forearm pain is commonly described as more sensitive, especially near the wrist and inner elbow. The outer forearm is generally easier to tolerate. If pain is your main concern, pick a mid-forearm outer placement. Numbing creams exist but use them sparingly and discuss with your artist.
Q: How should I tell an artist I want a tattoo that will age well on a muscular forearm?
A: Be specific. Say you want slightly thicker linework, open negative space, and strong solid blacks rather than tiny shaded details near flex zones. Bring photos that show healed work on muscular arms. You can also reference portfolio pieces with similar placement and ask about expected touch-up timelines.
Q: Do watercolor-style forearm tattoos need different aftercare than traditional blackwork?
A: The basics are the same: gentle cleansing, light balm, and sun protection. Color preservation for watercolor styles relies more on careful sun avoidance and frequent SPF use. If you choose softer gradients, expect color refreshes earlier than with dense blackwork.
Q: If I want to expand a small forearm piece into a sleeve later, what should I ask for at the first session?
A: Ask the artist to leave clear negative space around the piece for future flow, and to position the design so natural elements like smoke or waves can connect upward. Mention sleeve expansion at booking so the artist can plan composition. Also bring sleeve reference images from hashtags like #forearmtattoomen and app portfolios.
Q: Where can I find artists who show healed work on different skin tones?
A: Use discovery paths like #finelineforearm, search Tattoodo portfolios, and filter Instagram or TikTok for skin tone examples from the last year. Look for portfolios that explicitly show healed photos on medium and dark skin. That helps you see how saturation and contrast translate across tones.
