

Someone I know booked a rib tattoo thinking the hardest part was choosing a picture. The real surprise came the day of the session when the pain felt sharper than expected and a fine line rose lost clarity after a year. I have spent time in five shops across Brooklyn and watched trends shift from watercolor to neo-traditional for longevity. Below are twelve rib tattoo ideas that balance how they feel, how they heal, and how they age so you pick what actually works for you.
1. Fine line floral branch along ribs
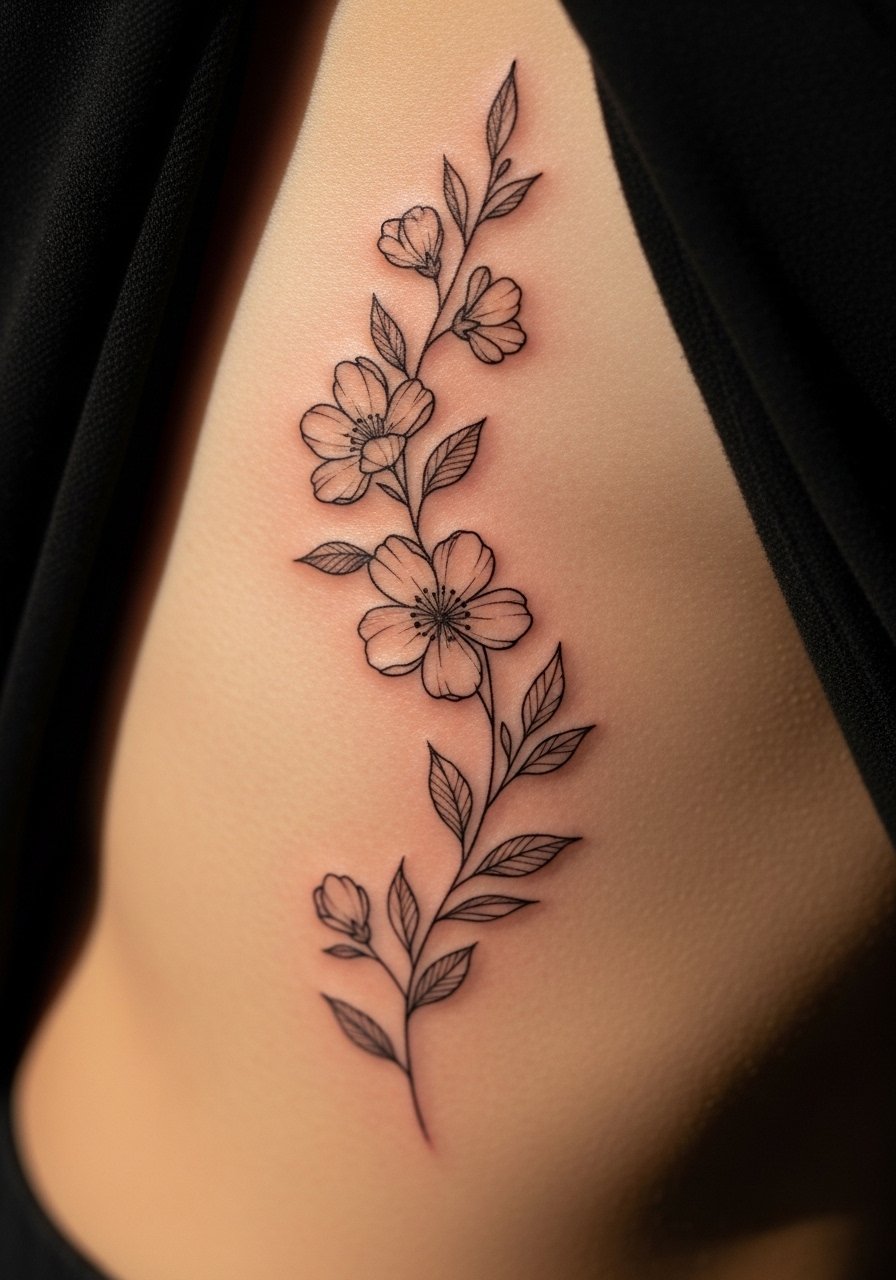
Fair warning: ribs rank high on standard pain scales, yet fine line florals remain one of the most requested rib tattoos for women because they tuck under clothing easily. I recommend telling your artist you want slightly heavier line weight than a hairline and one to two millimeters of spacing between petals so the flowers do not blur together as the skin moves. A common mistake is asking for ultra-fine stems that vanish after a year. Expect one session for a 4-6 inch piece and a touch-up at 12 months if lines soften. Blowout risk is moderate near rib edges, so avoid packing tiny black dots close to each other.
2. Watercolor rose cascade on the side ribs
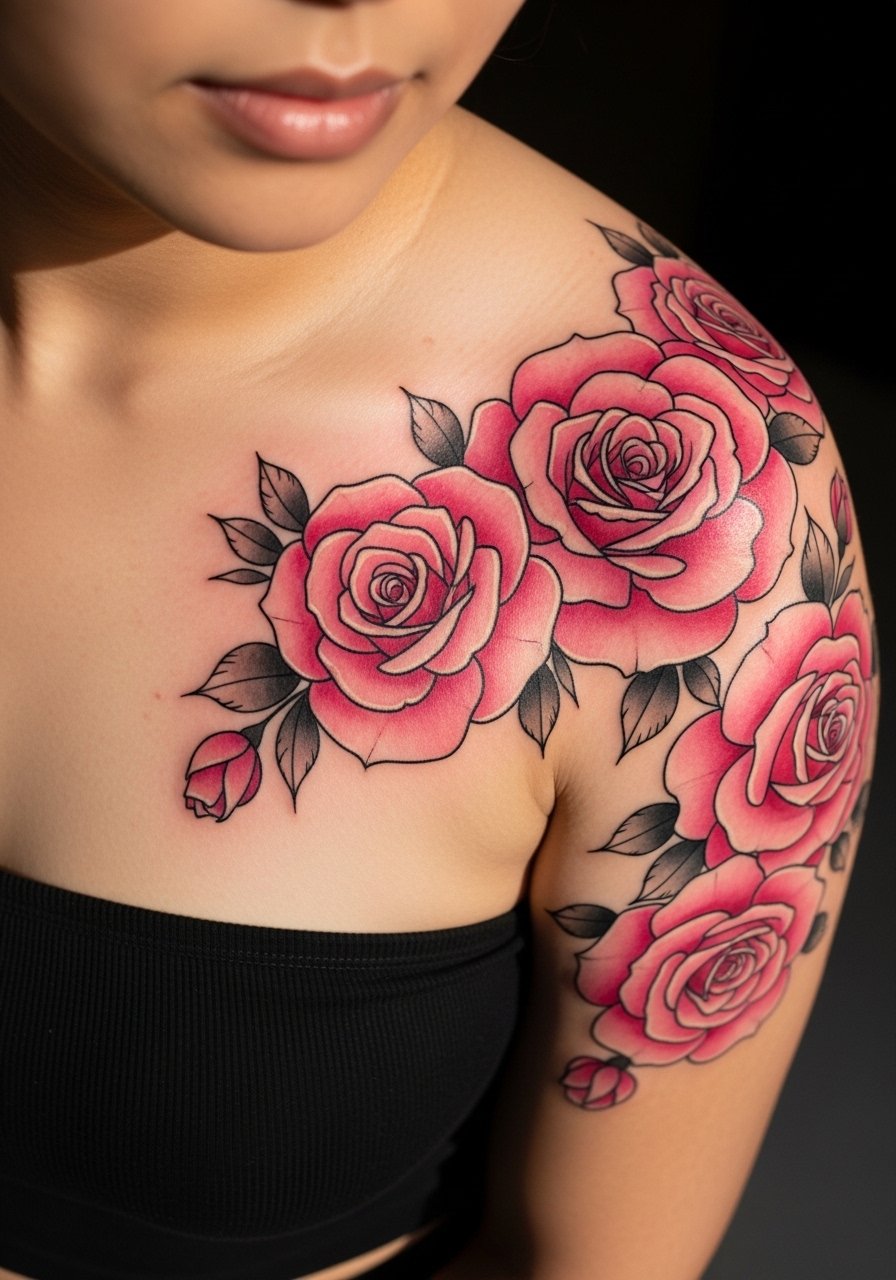
Most watercolor styles from five years ago faded into washed-out smudges, and artists have reacted by pairing watercolor fills with firmer black outlines. If you want the cascade to last, ask for color saturation in key shadow areas and for the artist to plan a touch-up at 9 to 18 months. Sessions vary from one to two depending on size. Expect the session to feel like long stretches of buzzing shading along the ribs, so break it up into shorter sittings if your tolerance drops. A common version that ages poorly uses only pale washes without anchor lines. Add clothing protection and SPF on healed skin to keep the petals lively.
3. Minimalist script quote curving with the ribs
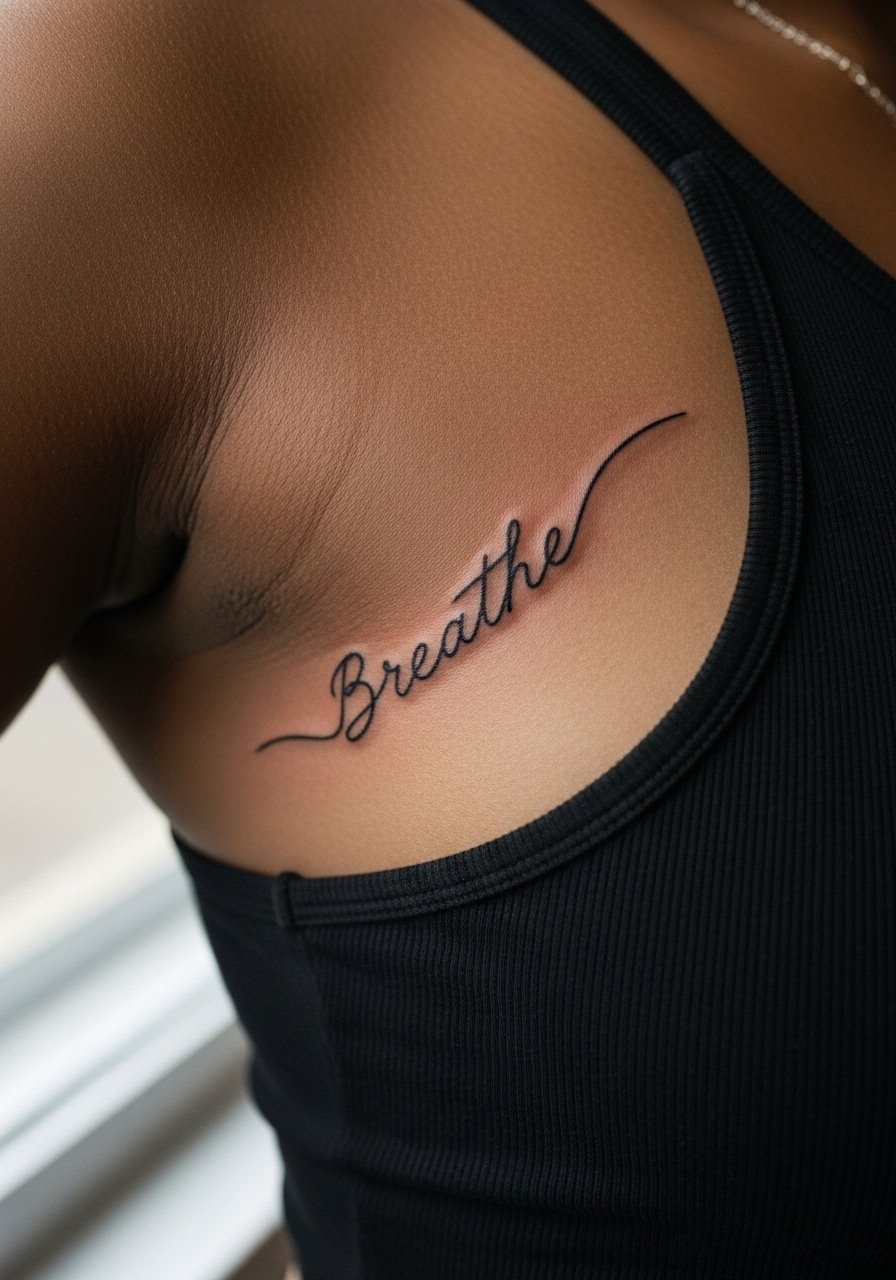
Someone I know hid a mantra beneath a ribcage dress and loved the private placement. For script, bring the exact line and font sample. I advise using a slightly thicker stroke than you might want at first so the script stays readable after one to two years. The session is usually quick, often under an hour for a short quote, but the pain spikes when lines cross ribs directly. Common mistakes include choosing too-small lettering or cursive with tight loops that blur into a single black mark. Plan a touch-up if letters look fuzzy after six months.
4. Blackwork feather drifting down the ribs
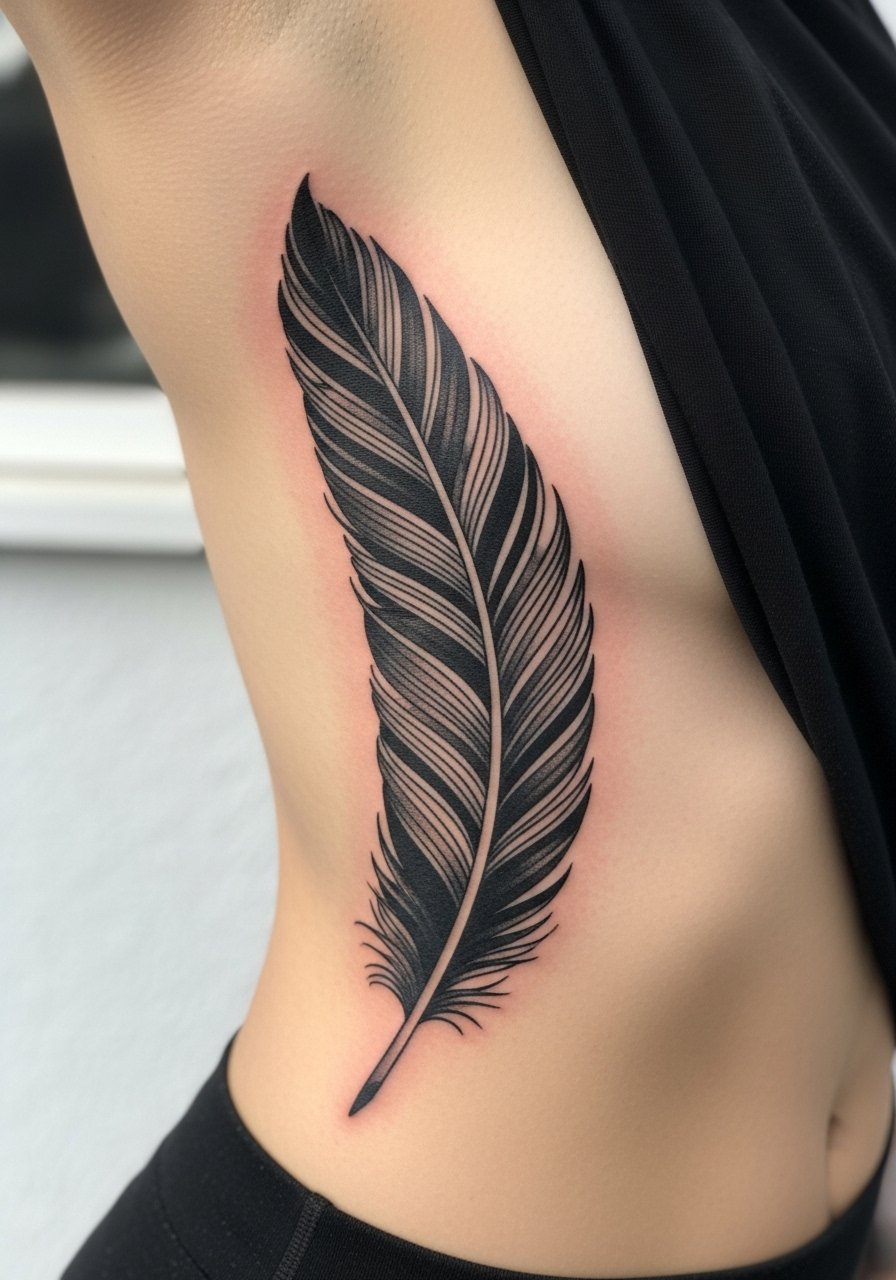
There is a real debate around heavy blackwork on curvier areas like ribs. One camp warns that large solid fills can shift and feel heavy on healing skin. The other camp says dense saturation holds up longer than thin lines. If you choose a feather, discuss how much negative space to leave to prevent the piece from reading like a blob over time. Expect two to three sessions for saturation and touch-ups at year two if any patchiness shows. The session intensity is high when filling near the underarm because of rib movement. Mention skin stretch to the artist so the feather contours the torso without crowding ribs.
5. Neo-traditional lotus mandala on the lower ribs
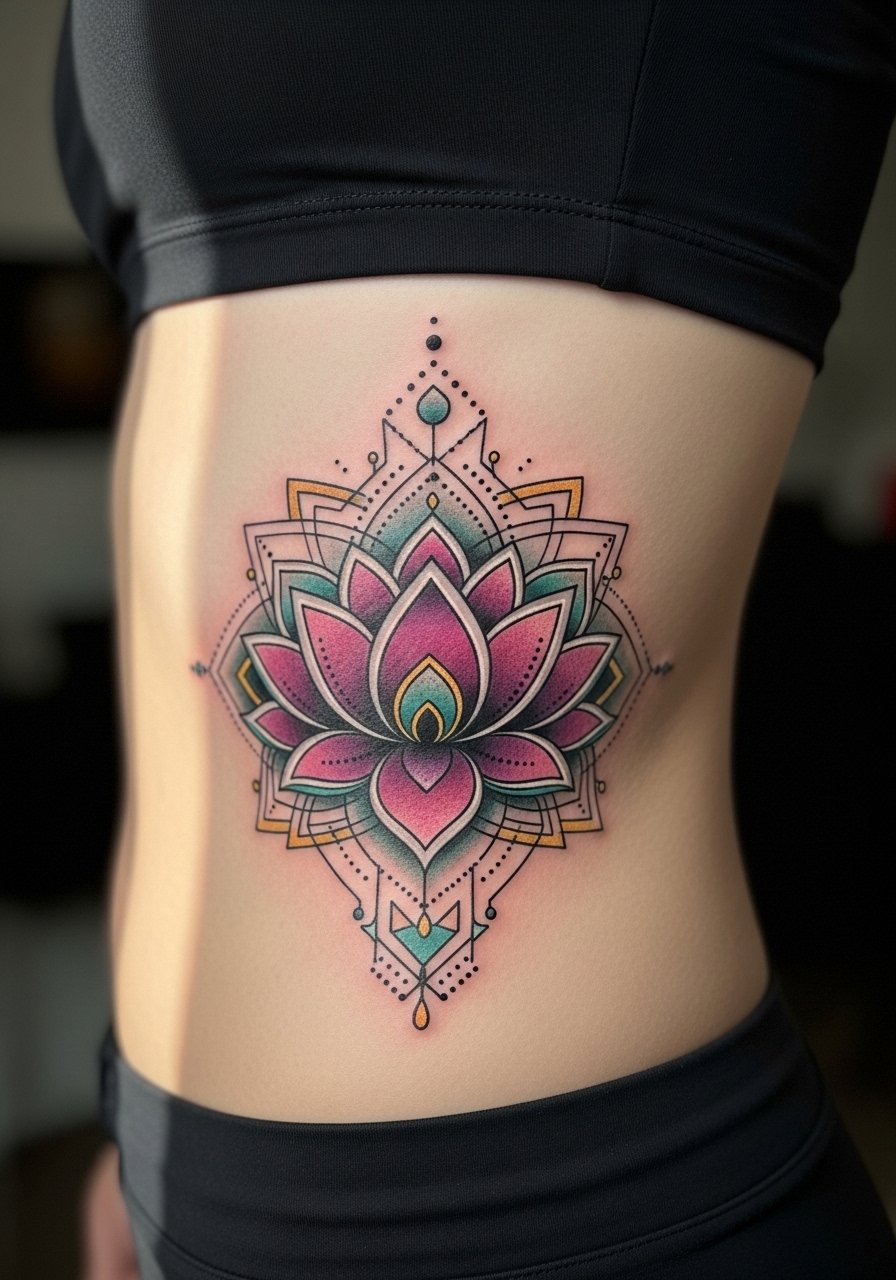
When a mandala moves onto the lower ribs, plan symmetry around the waist curve. In consultation, bring front-facing photos of the torso and ask the artist to mark reference points while you stand and breathe. A common mistake is insisting on perfectly mirrored patterns while lying down only, which can skew once you stand. Expect multi-session work that totals two to three visits for lines, color, and saturation. In my experience people who add small geometric anchors at the hip find the mandala ages more predictably than those who keep only delicate dot work.
6. Micro-realism butterfly emerging from the ribs
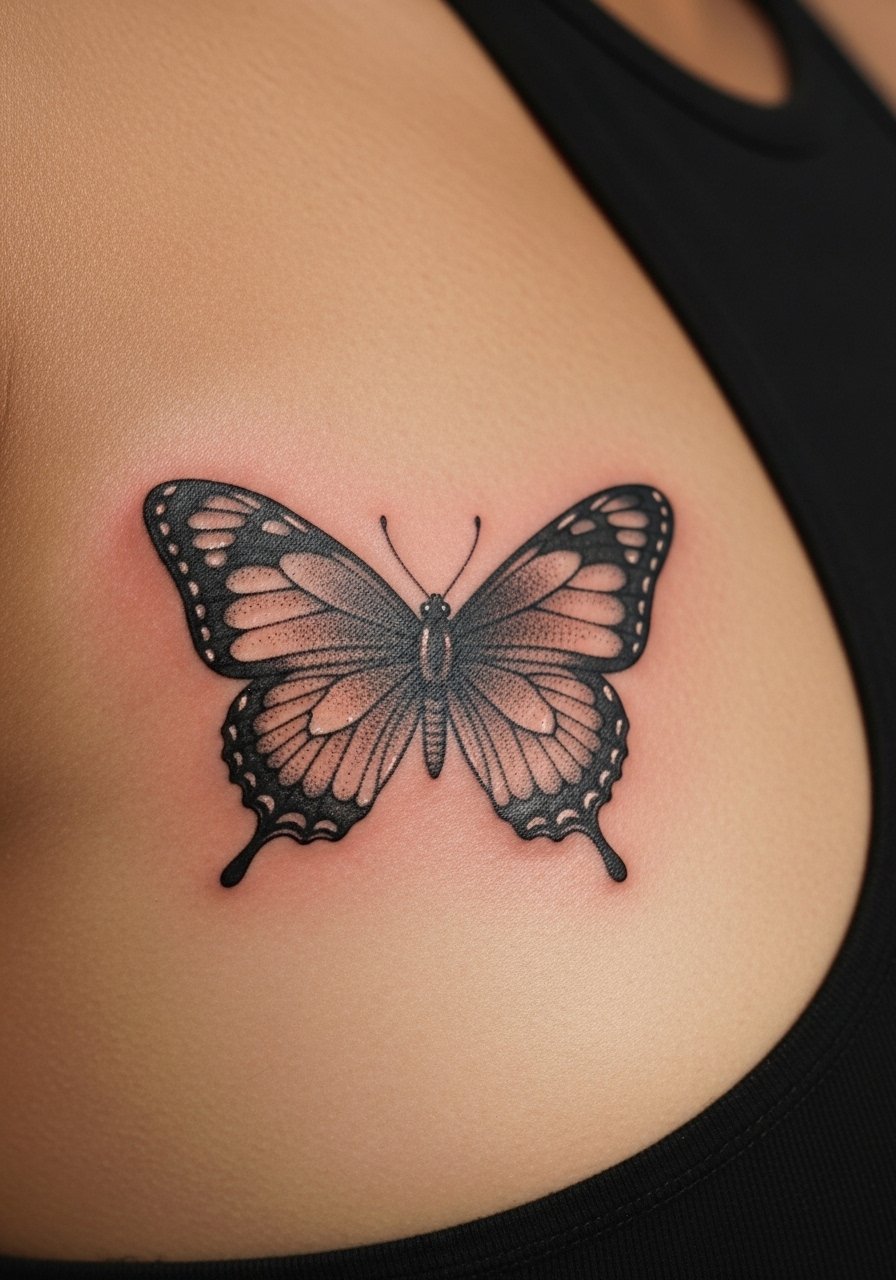
Visual impact lead: micro-realism reads like a tiny photograph against skin and looks sharp closest up. For small micro-realism, tell the artist you want crisp contrast between wing shadows and highlights and to use dot work for soft texture. The seat of the ribs makes lines feel sharper during needle passes, and shading can sting for a prolonged time. Expect one to two sessions for a 3-inch piece and a touch-up at 6 to 12 months for edge cleanup. A frequent error is asking for photo-level detail in a piece that is too small to hold it. Push size slightly larger if you want lasting micro detail.
7. Ornamental snake coiling across the ribs
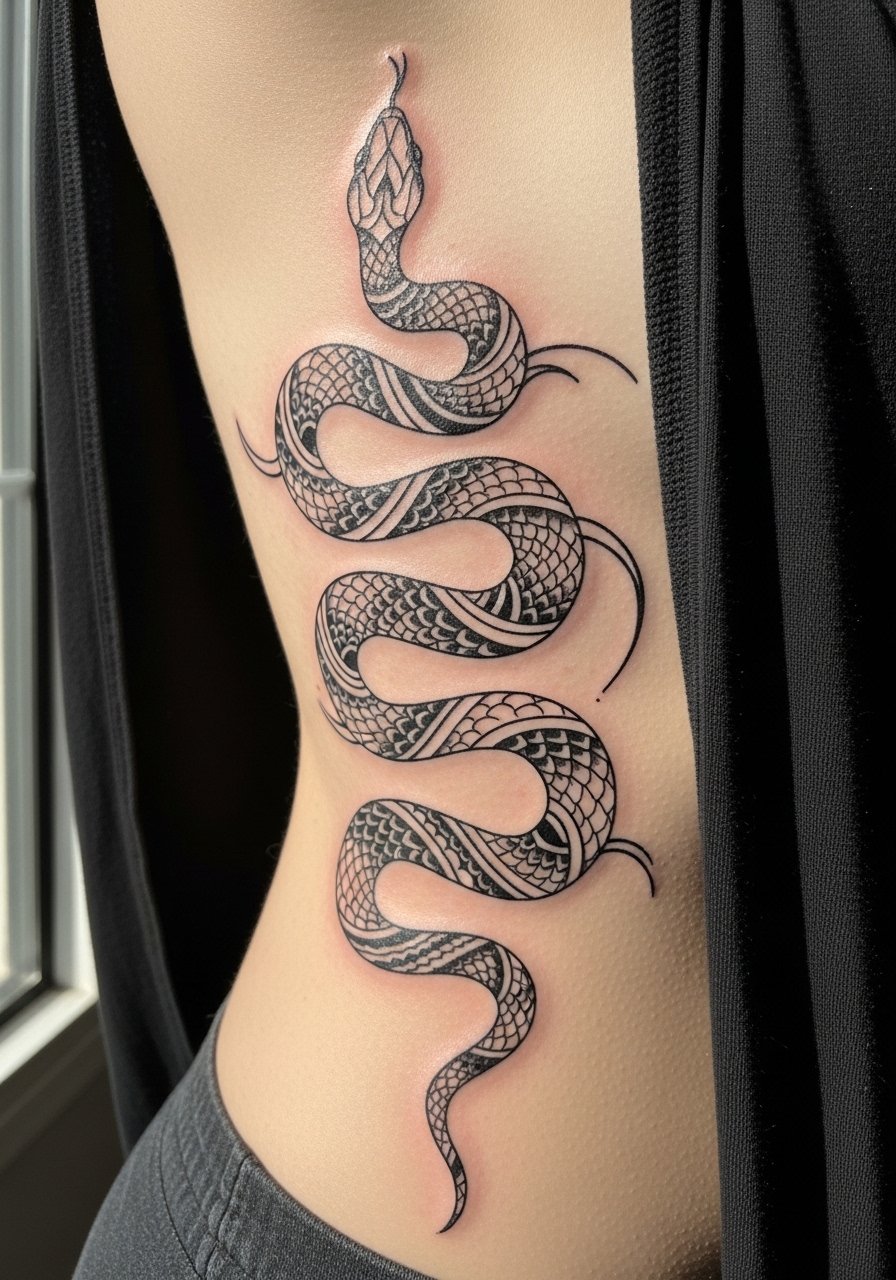
Consultation lead: when you sit with your artist for a snake coil, specify where the head and tail should align with your underarm and hip so it reads as movement rather than a static band. This design often requires three to four sessions for scale patterning and shading. Pain-wise expect stinging along the lower ribs when the needle crosses bony edges. A common mistake is packing too many tiny scales into a small area which blurs into gray over time. For people who plan to expand into a full cage later, design the snake with clear negative space to allow future elements to breathe.
8. Traditional cherry blossom branch vertically from shoulder to waist
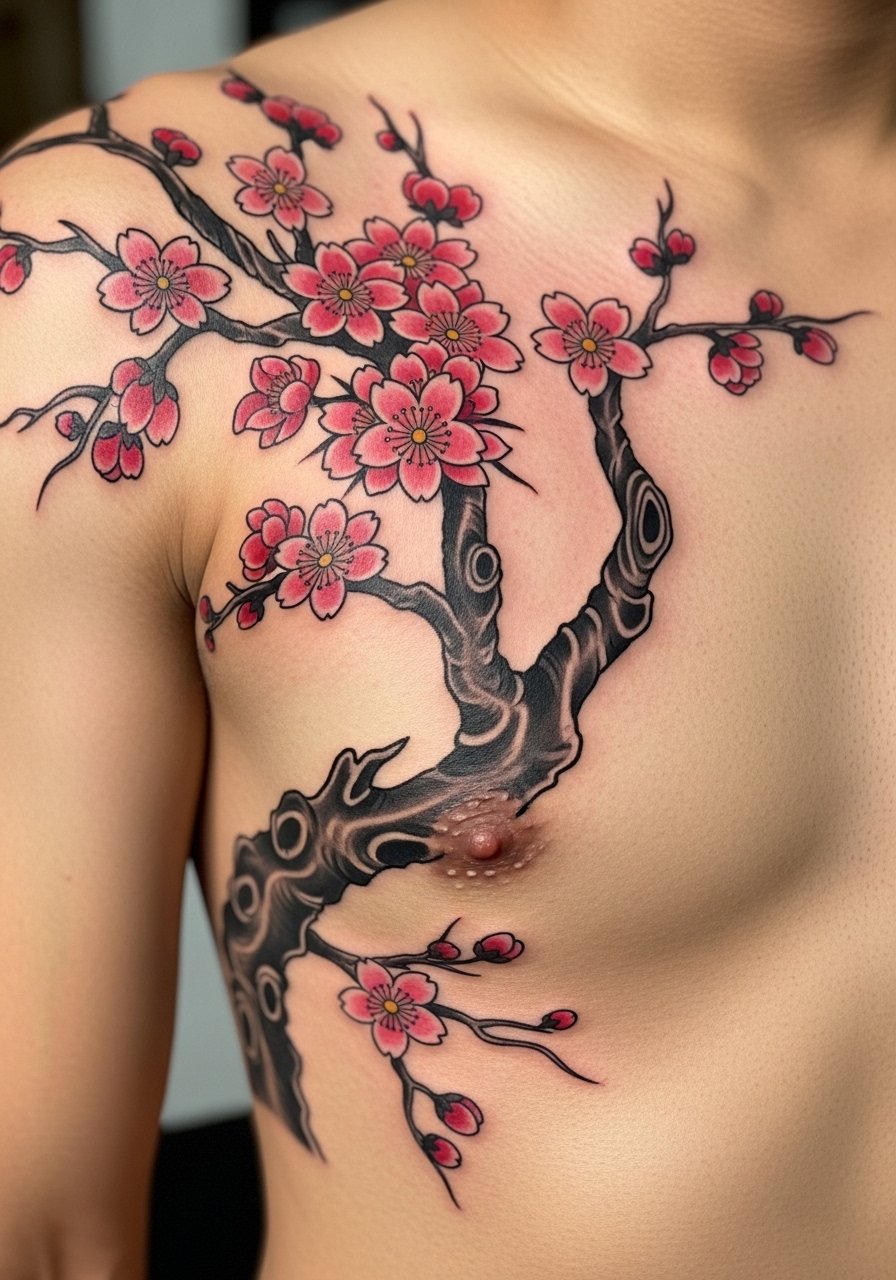
Visual rhythm is important for long vertical pieces that follow breathing. Ask your artist to plan blossom clusters with occasional spaced gaps so the branch keeps shape as skin shifts. This style usually takes two sessions and holds color well if the outlines stay bold. Expect more discomfort near the sternum or lower ribs where bone is closer. A common aging problem is using too many pastel petals without outlines which fade quickly from sun exposure. For cultural sensitivity note that this motif draws on Japanese imagery so some people opt to personalize patterning rather than copy traditional compositions exactly.
9. Ignorant style mountain range across upper ribs

Mistake lead: the biggest error with sketchy, ignorant style pieces is over-detailing the sketch lines. This style thrives on suggestion and negative space so keep the peaks loose. It is usually a single session piece and it is forgiving on aging because the rough lines blend into a deliberate look over time. The session feels like quick passes for outline and sparse shading, which helps if you want a shorter sitting due to rib pain. If you plan to expand later, tell the artist where future elements should align so the composition grows cohesively.
10. Fine line coordinates with tiny stars on lower ribs
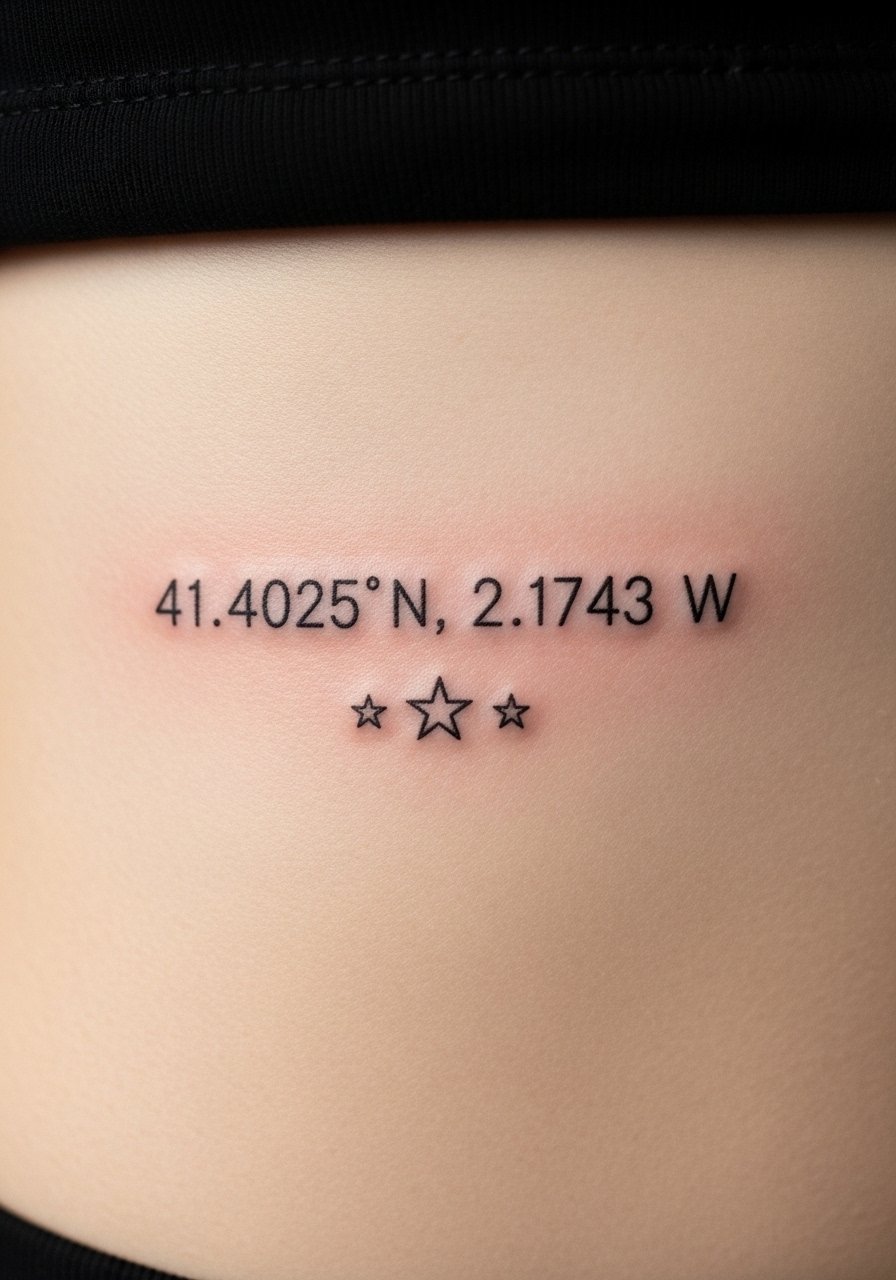
Consultation lead: exact text matters here, so provide the coordinates in the correct format and request a mono space or fine serif font sample. Lower ribs can lose micro lettering clarity faster than a forearm so ask for slightly larger numerals to retain legibility. Session time is short, often under 45 minutes, but expect a twinge when the needle hits thin areas. Common mistakes include asking for coordinates that are too tiny or ornate fonts with tight counters that merge. Plan a touch-up if numbers begin to blur after six months.
11. Watercolor moon phases stacked vertically on ribs
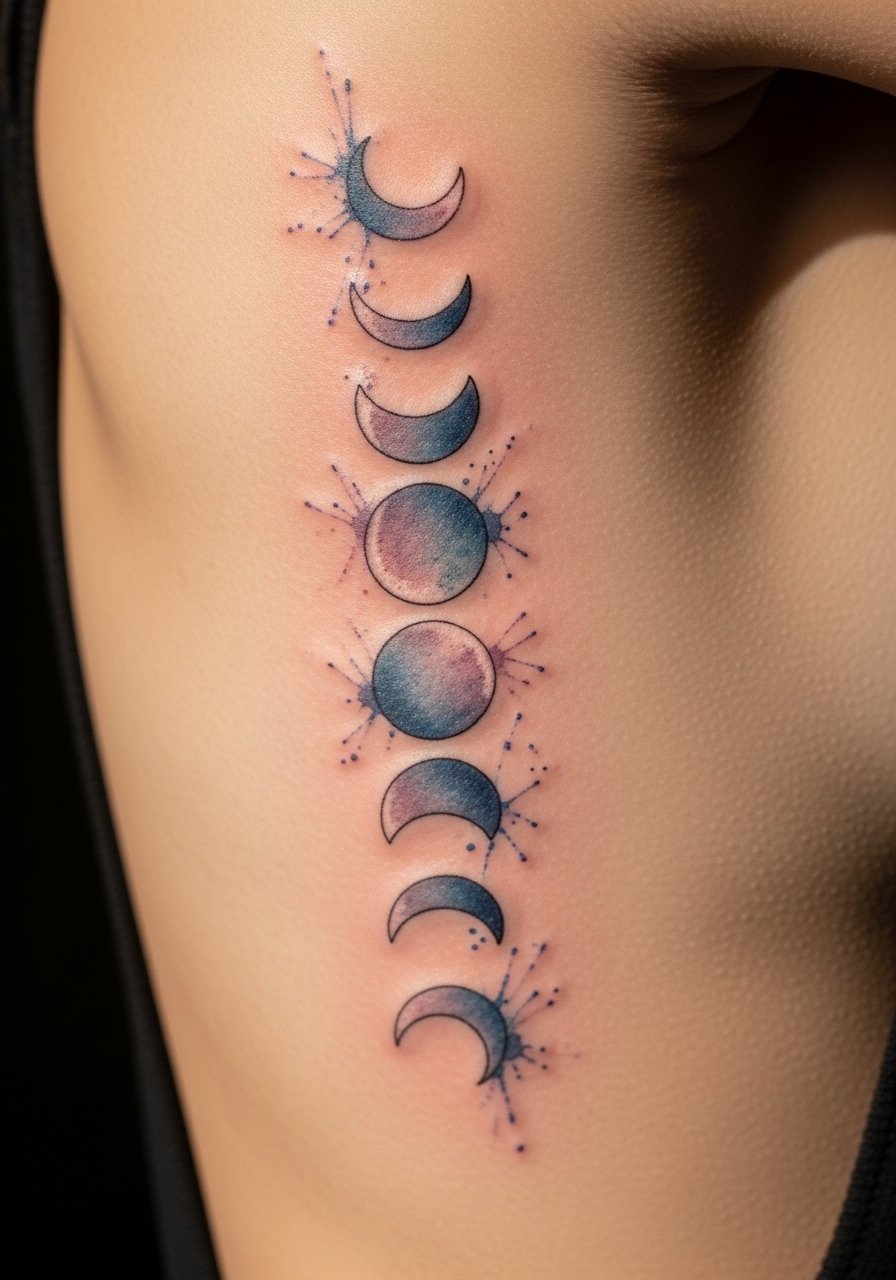
Aging lead: watercolor fades faster than black and gray, so artists now pair phases with faint outlines or slight stipple shading to anchor the color. If you want dreamy gradients, ask for saturated edges in shadow areas so the moons keep shape as they fade. Sessions are typically two visits for layering. The ribs sting during wash shading, so split the session if you have low tolerance. A common mistake is choosing barely-there washes with no anchors which can look like bruises after a year. Plan sunscreen for long-term preservation.
12. Black and gray dragon wrapping the torso ribs
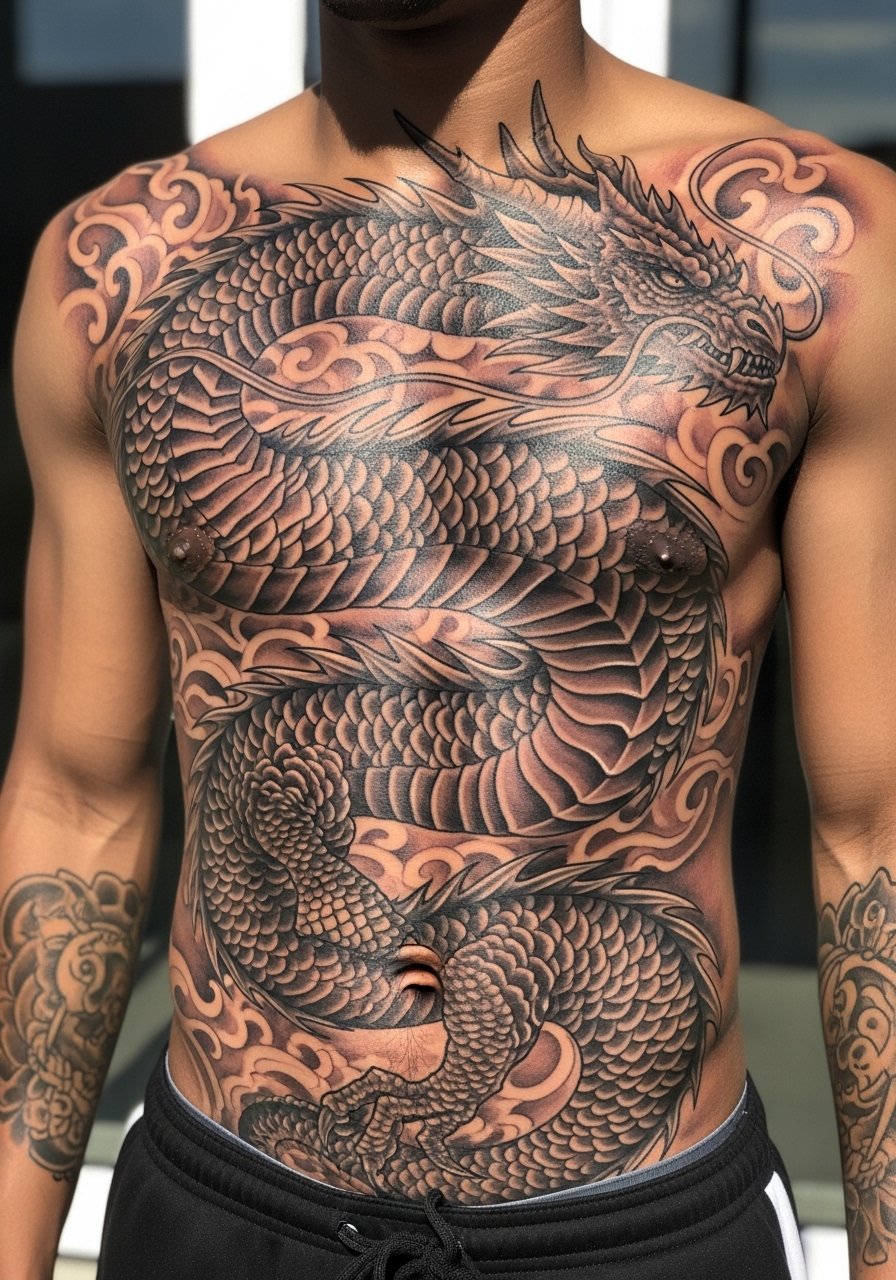
Mistake lead: collectors who want a full-wrap dragon often rush placement and find proportions look off once they stand and move. Bring multiple standing and side photos and ask the artist to mark the key attachment points on your body before inking. Expect four or more sessions and realistic shading means long sessions with strong sting near rib bones. Touch-ups at year two are common for complex shading to rebalance saturation. For larger tattoo builds mention where future pieces may join so seams match and negative spaces remain intentional.
Tattoo Prep and Aftercare Essentials
When ribs are involved, a focused prep and aftercare plan matters more than on other placements. From what I have gathered, wear loose, button-up tops for the day of the session and plan for shorter sittings if you are new to rib pain. Aftercare has two camps on the table for bandaging. One camp prefers occlusive bandage systems for moist healing, and the other prefers dry breathing methods to reduce mash-like skin. Ask your artist which method they use and follow their directions. Below is a practical shopping list geared to the rib area and sensitive skin types.
Fragrance-free gentle foaming cleanser for daily tattoo cleaning. Use this in the first week to remove surface ink and balm build-up without stripping skin oils.
Lightweight fragrance-free moisturizing balm, non-greasy texture. Apply sparingly after the initial healing film lifts to reduce itching and prevent pore clogging.
Medical-grade second skin bandage, 6-inch roll, breathable. Use for the first 24 to 48 hours if your artist recommends occlusive healing.
Soft bamboo or cotton button-up shirt for post-session wear. Loose tops cut down friction during the first week and help with itch management.
Non-stick sterile gauze pads in small sizes. Good for blotting excess fluids without pulling scabs.
Silicone-based scar sheet for long-term texture smoothing. Consider this after full healing to minimize raised edges from heavy shading.
SPF 50+ broad spectrum sunscreen stick. Apply to healed ribs before sun exposure to protect color.
Cooling gel pack, reusable, soft cloth cover. Use in the 24 to 48 hour window to manage swelling and soreness.
Travel-size saline wound wash spray. Handy for gentle rinsing when showering and for keeping the area debris-free.
Every tattoo is different. Always follow your artist's specific aftercare instructions. Consult a dermatologist if you have skin concerns or unusual healing issues.
Frequently Asked Questions
Q: Will a fine line floral on ribs blur faster than the same piece on a forearm?
A: In my experience fine line does tend to soften sooner on ribs because the skin stretches more with breathing and body movement. Ask your artist to increase line weight slightly and plan a touch-up at 12 months if you want the same sharpness as a forearm piece.
Q: Do watercolor rib tattoos need different care than black and gray pieces?
A: Yes, watercolor benefits from extra sun protection once healed because pigments fade faster under UV. During healing treat both the same with gentle cleaning and light moisturizing, but prioritize SPF and covering for watercolor to preserve vibrancy.
Q: Is it okay to use an occlusive bandage on rib tattoos or should I dry heal?
A: There are two camps. One prefers occlusive wraps for a moist, protected first day or two. The other warns moist systems can macerate delicate ribs. Ask the artist which method they use and follow their guidance because both approaches can work when applied correctly.
Q: How many sessions does a neo-traditional lotus mandala on the lower ribs usually need?
A: Expect two to three sessions for a detailed mandala with color accents. Larger pieces that aim for precise symmetry may require separate linework and color sessions so the artist can assess healing between visits.
Q: Will an ornamental snake wrapping the ribs limit future expansion into a full cage?
A: It can if placement is not planned. Tell your artist you want future work and have them leave intentional negative spaces so new elements can connect without awkward seams. This planning prevents composition mismatches later.
Q: What should I ask an artist about touch-ups for blackwork versus micro-realism on ribs?
A: Ask how they schedule touch-ups for saturation and for edge cleanup. Blackwork often needs touch-ups to even out large fills at year one or two. Micro-realism may need earlier edge sharpening if details soften. Request examples of healed work at similar placements when you book.
