
A friend booked a fine line spine tattoo and the sessions kept getting rescheduled because her artist's back cramped. She also found the lines faded faster than she expected where her lower-back dimples hit chair seams, and the pain over bone surprised her. After talking to artists in five shops across Brooklyn and watching recent reels, I pulled together ten spine tattoo directions that balance look, heal, and future touch-ups.
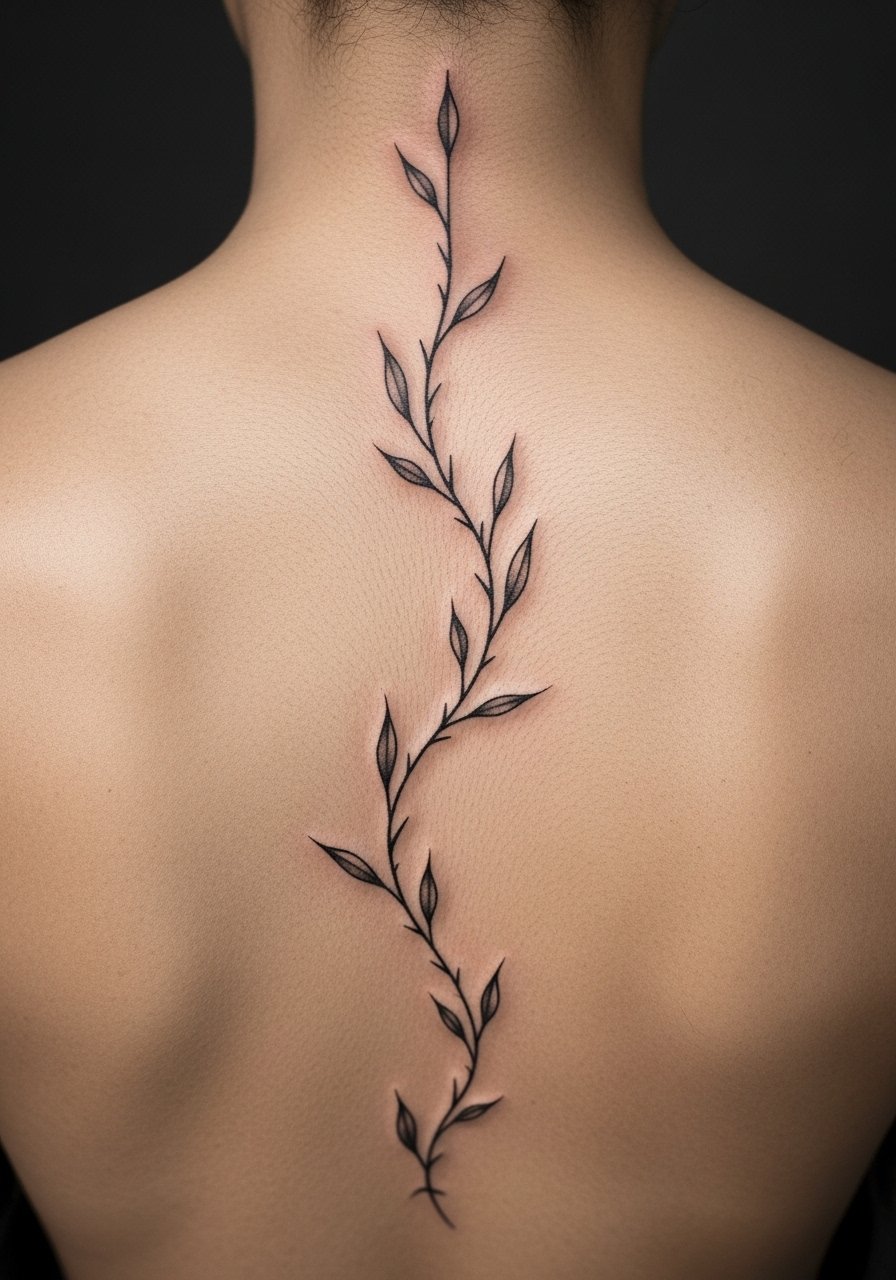
1. Fine line floral cascade along the spine
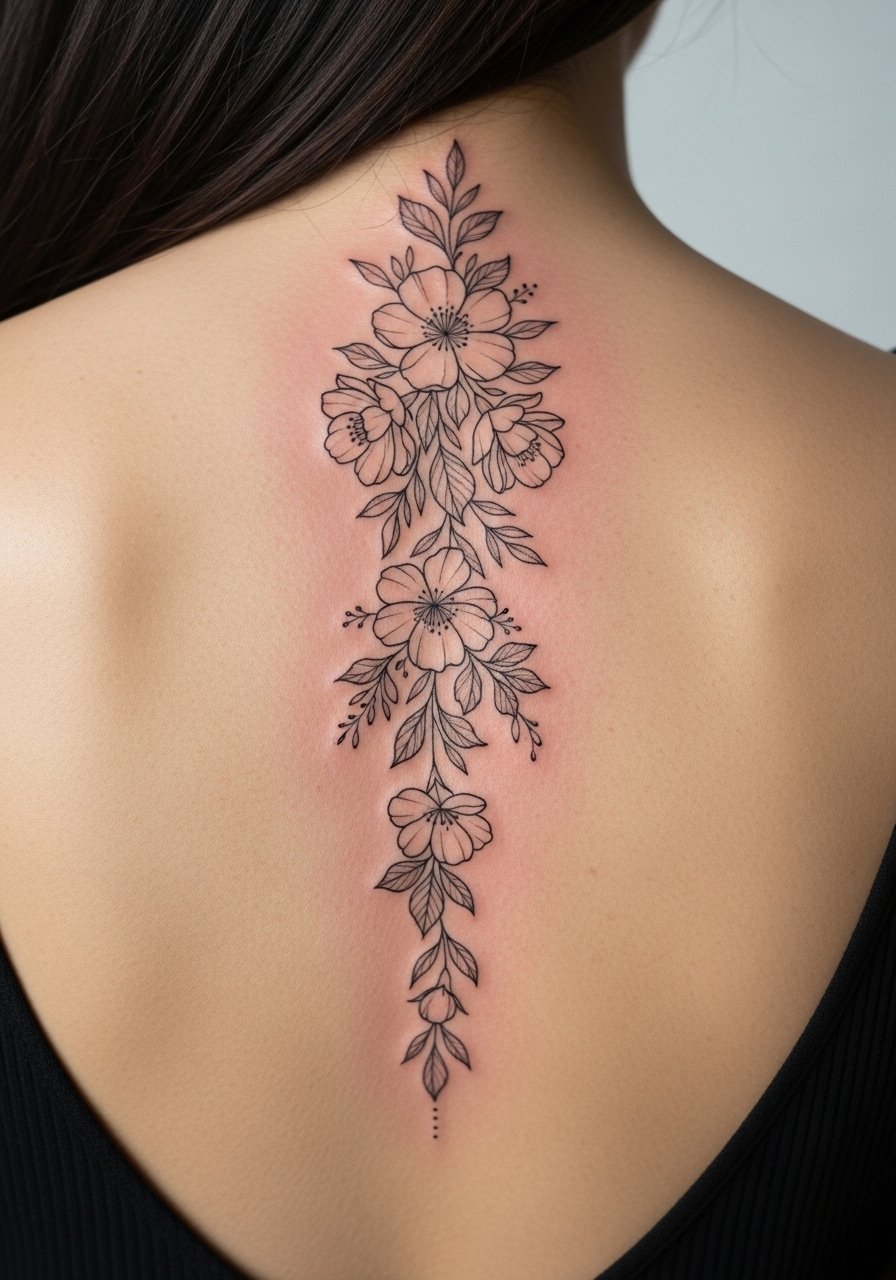
When you sit down with your artist for a floral cascade, bring images that show the exact line weight and the flow you want along the spine. Expect pain spikes over the thoracic vertebrae, and plan a one to two hour session with breaks. Fine line fans split into two camps about longevity. One camp says fine lines fade too quickly on the spine because of friction and thin skin. The other camp says precise depth and slightly bolder hairlines keep the motif readable for years. Ask about touch-up timing, usually around year two, and avoid requesting ultra-tiny blossoms that risk blowout or premature loss of petal detail.
2. Geometric mandala mapped to vertebrae
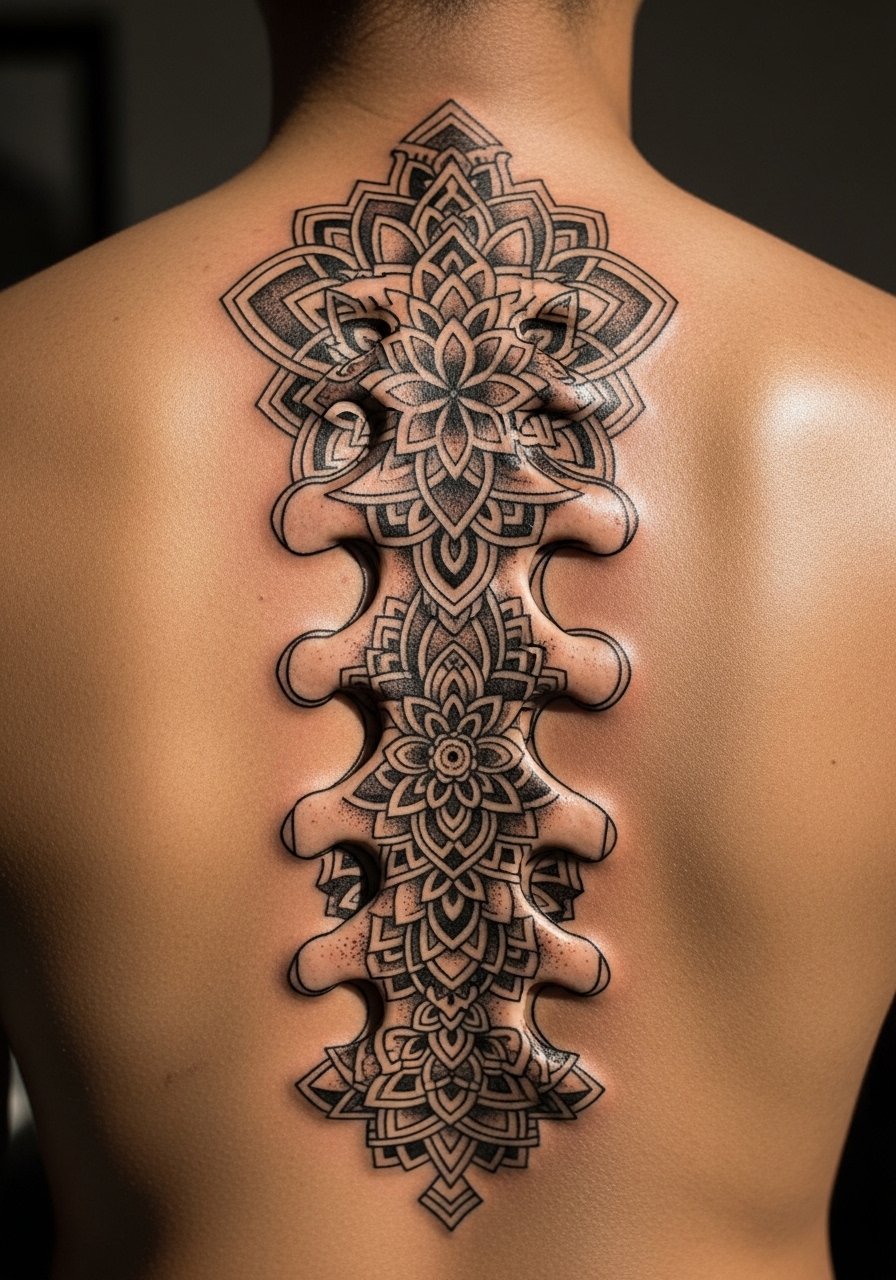
Fair warning, this one reads best with room. The biggest mistake with vertebrae-mapped mandalas is shrinking the pattern too small. Linework needs breathing space so triangles and circles do not blur together as the skin ages. Mandala designs trace back to Buddhist geometry, so many people opt for abstracted elements rather than direct religious copies. For placement, center the main axis on the spinous processes and let smaller motifs fall between vertebrae. Expect two to four sessions if you want shaded gradients with stipple shading. If you sit upright for a long time during sessions you will feel sharper taps near bone, so schedule shorter sittings.
3. Minimalist script quote down the spine

Most script down the spine is chosen for discreet visibility under clothing and personal rhythm. Plan for one session if you keep the text to a single line. A common version that ages poorly uses extremely fine single-needle lettering without enough spacing. That causes letters to merge after a year or two, especially where the lower back meets clothing. To avoid that, ask your artist to slightly increase kerning and use a hairline that can take a touch-up. Pain is concentrated where ribs meet the spine if the quote climbs high, so adjust length if you want a shorter, less painful session.
4. Neo-traditional celestial trail: stars and moon
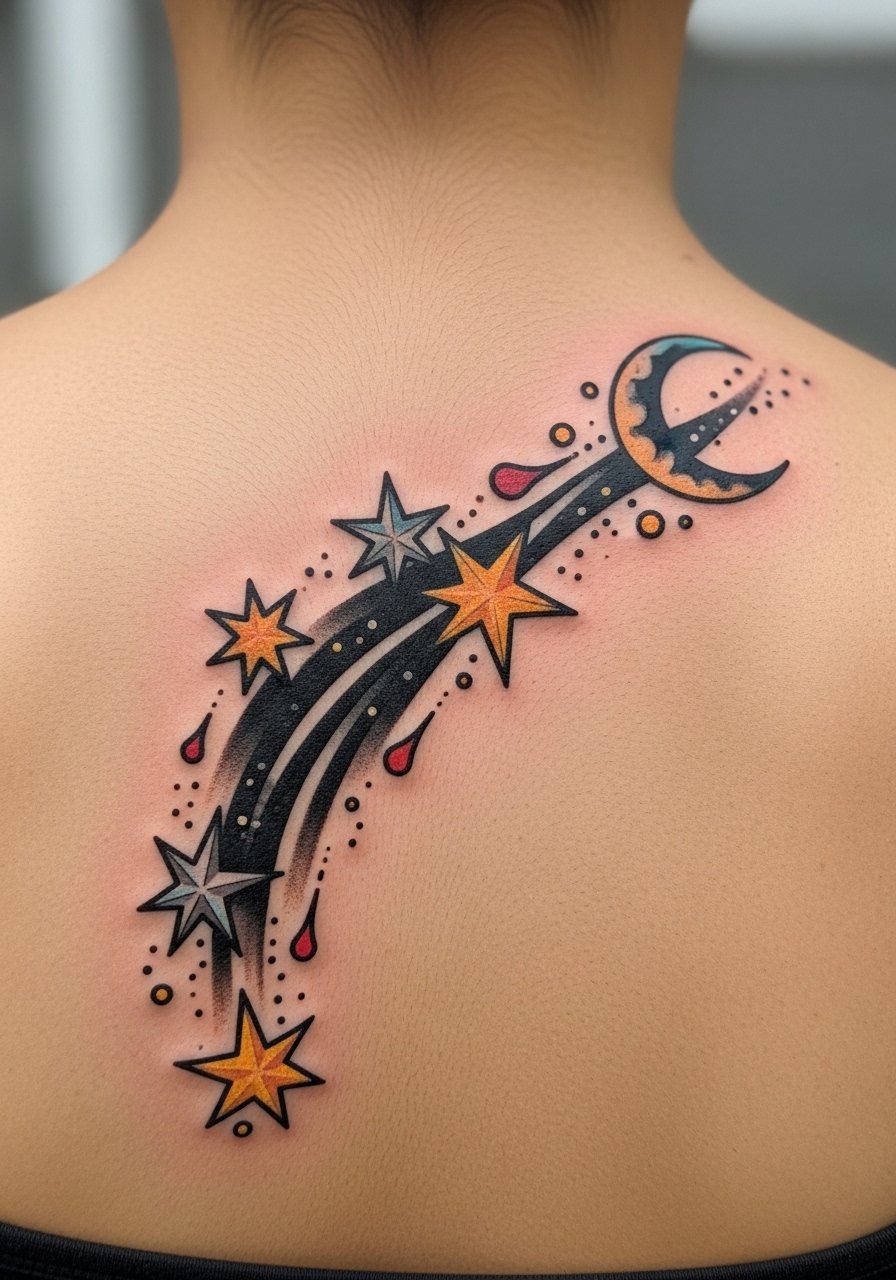
There is something about bold outlines with color pops that reads from across a room. Celestial trails use solid outlines to protect saturation where clothing rubs. If you prefer color washes, note that watercolor areas near the spine fade faster than black outlines. Schedule multiple passes for saturation and expect two to three sessions. A common mistake is asking for tiny stars with watercolor fill only, which loses life as the ink migrates. For longevity, combine outline anchor points with softer fills and plan a touch-up at one year if colors look thin.
5. Ornamental vine with thorns wrapping the spine
The vine with thorns is great for elongating the back visually and hiding small movement marks. The mistake I see most often is wrapping the vine too tightly over lower-back dimples. That makes the image warp if weight fluctuates. Test placement with a temporary decal and move the design a half inch if you sit mainly or sleep on your back. This style needs a mix of thin linework and small areas of saturation to avoid disappearing into chair friction. Expect one to two sessions and a likely touch-up window around year two.
6. Hyperrealistic animal portrait that wraps the mid-spine
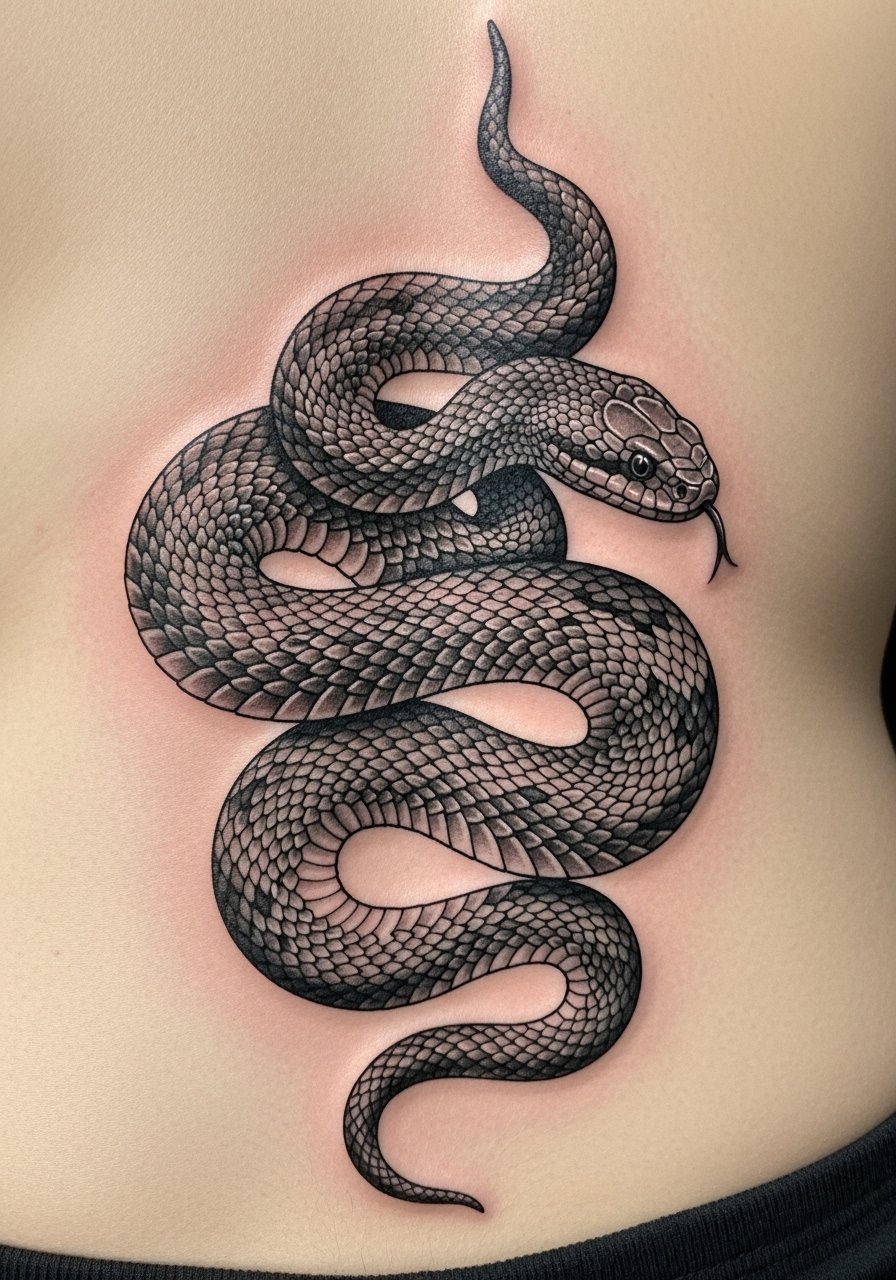
Someone I know chose a snake to wrap the mid-spine and booked multiple sessions to build contrast slowly. Realistic portraits require layered shading and longer sessions, often four to six sittings for high detail. Blowout risk rises if the portrait is placed too low near the lumbar area because skin shifts more there. Communicate during consultation that you want crisp edges around eyes and scales, not soft blurred patches. Plan touch-ups to restore highlights and re-saturate deep blacks after one to two years if the piece sits under frequent friction.
7. Anatomical heart aligned left of the spine, under the breast
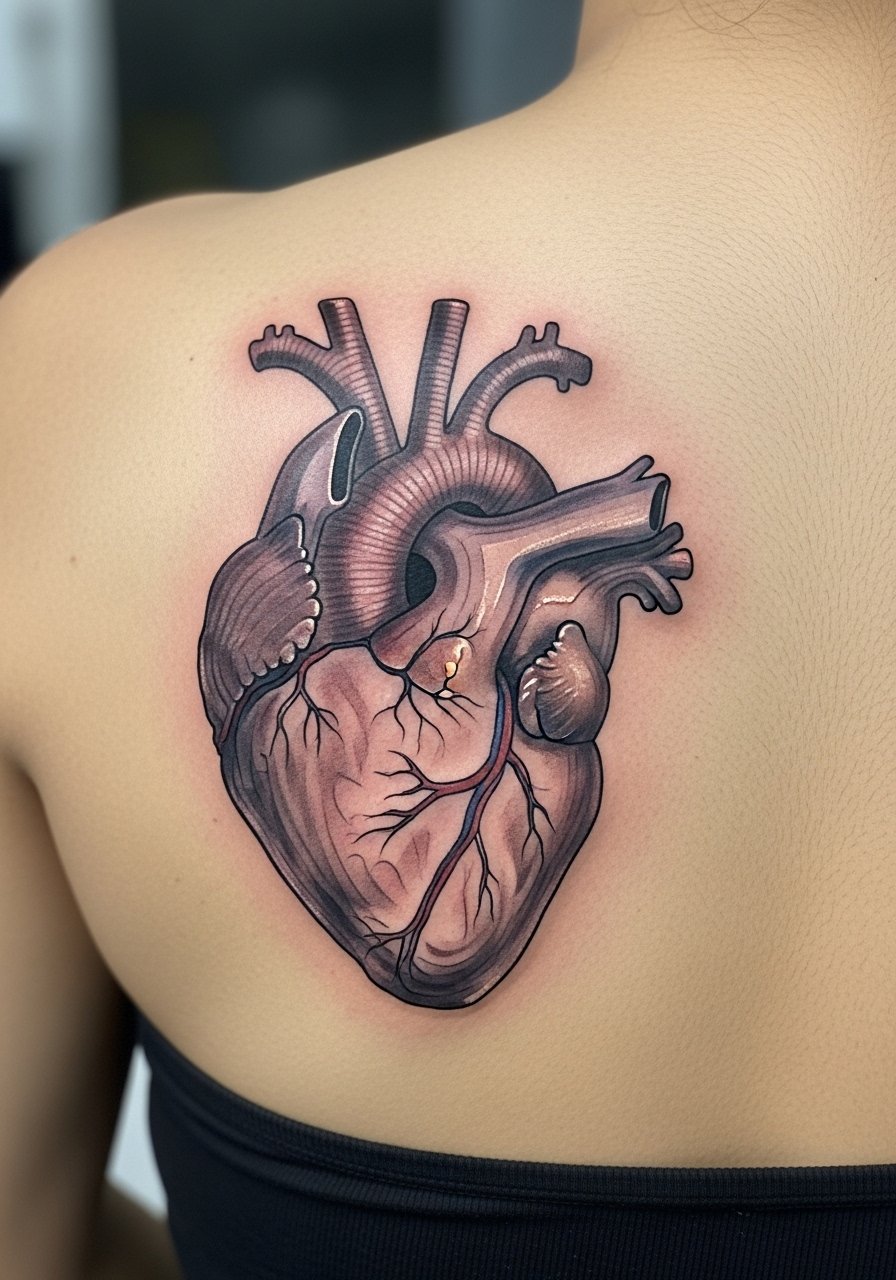
Artists and clients split on placement for left-of-spine anatomical hearts. One group argues it reads as intimate and aligns visually with the chest. The other group warns of distortion from breast movement and suggests offsetting the design slightly. If you choose this placement, a shorter width and clear negative space around the heart help it age cleaner. Note that this is a sensitive placement requiring an artist experienced with curved surfaces. Consider how bras and underwire sit over healing skin, and ask about session timing to avoid pressure on fresh work.
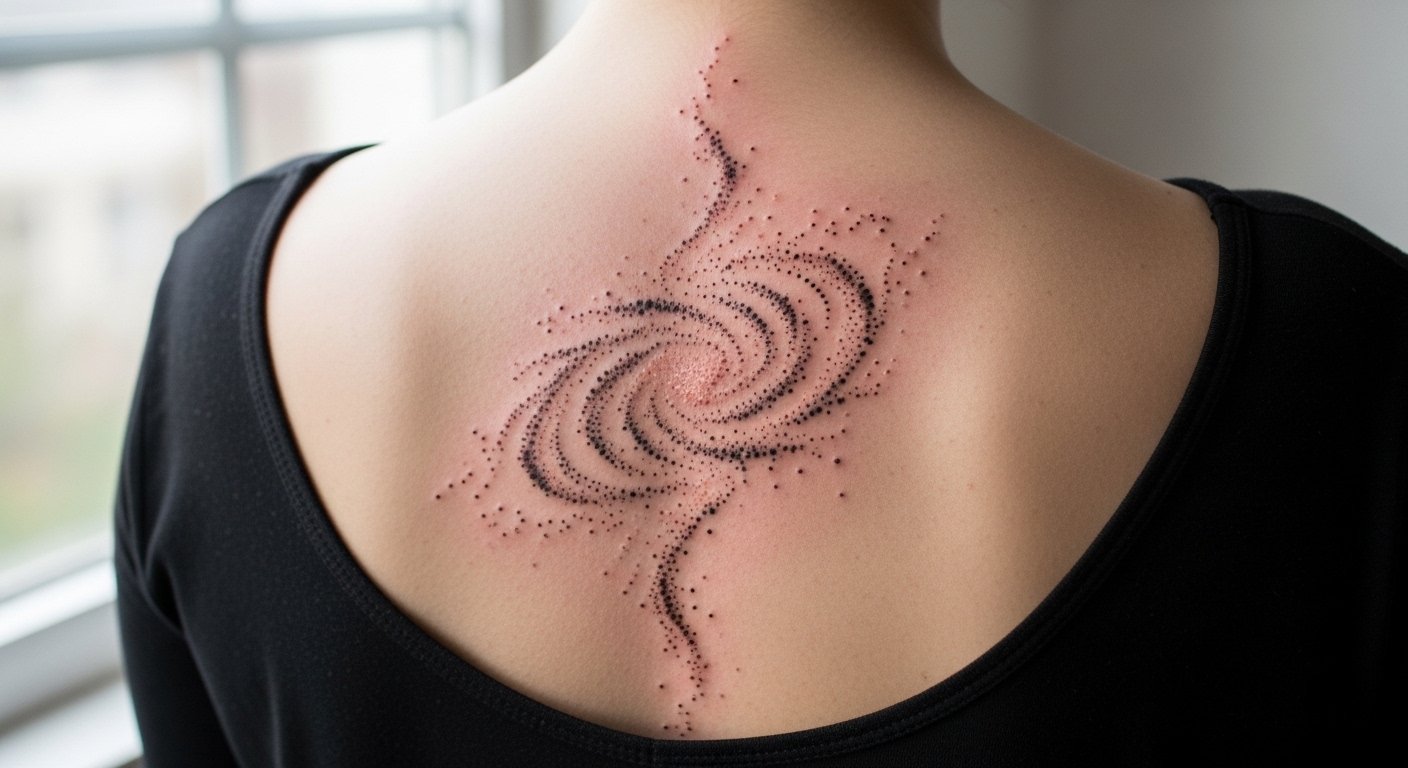
8. Dotwork galaxy descending the spine
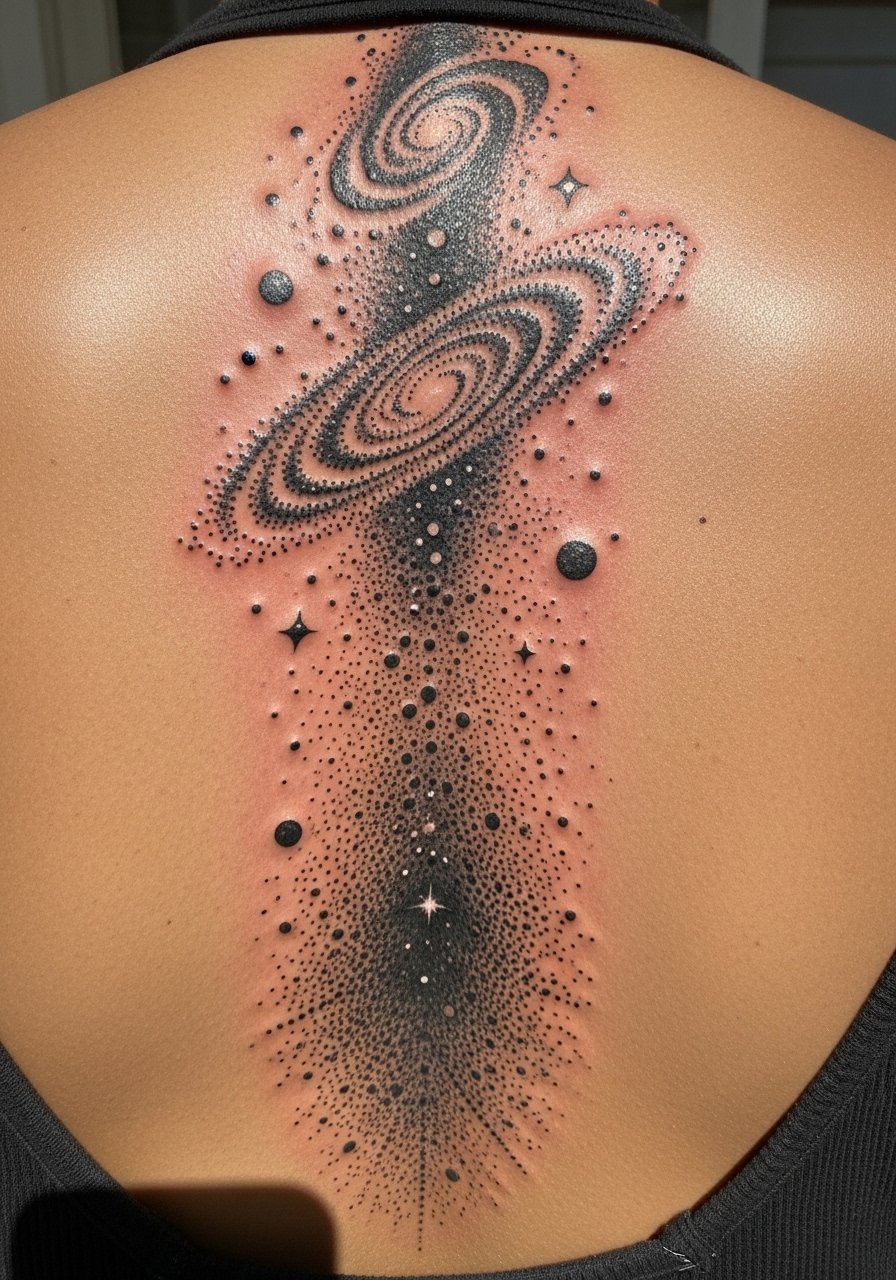
When you want an ethereal look that resists some color fade, dot work offers control by spacing dots to create contrast rather than relying on color saturation. The visual trick is to map darker clusters between vertebrae so negative space mimics the spine. Sessions are usually three long sittings if you want a full-length galaxy. A real mistake is packing dots too tightly in thin-line areas, which can lead to muddy patches. Plan on touch-ups where the skin rubs most, commonly the mid to lower back.
9. Cyber sigilism: glyph lines along the backbone
When you tell an artist you want cyber sigilism, bring schematic references and note the exact line weight you prefer. This emerging style plays well with straight vertical lines and angular knots that follow vertebrae. The controversy here is small: some people see it as purely decorative, while others treat glyphs as symbolic language. If you use glyph-like marks, decide if they are abstract or meant to carry meaning. Sessions typically run two to three sittings depending on complexity, and blowout prevention is about giving lines room and avoiding overly shallow passes.
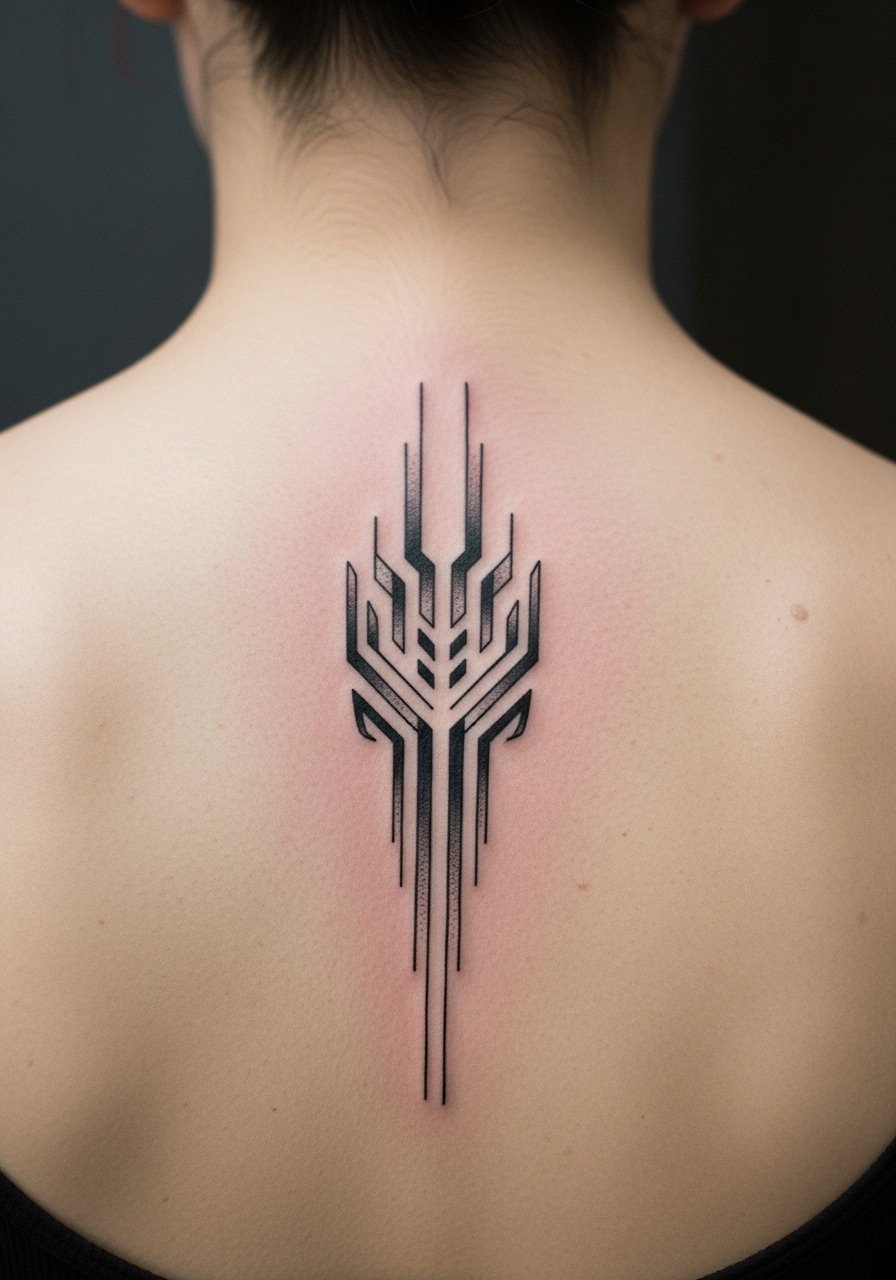
10. Lower spine blackwork tribal extension for dimples and concealment
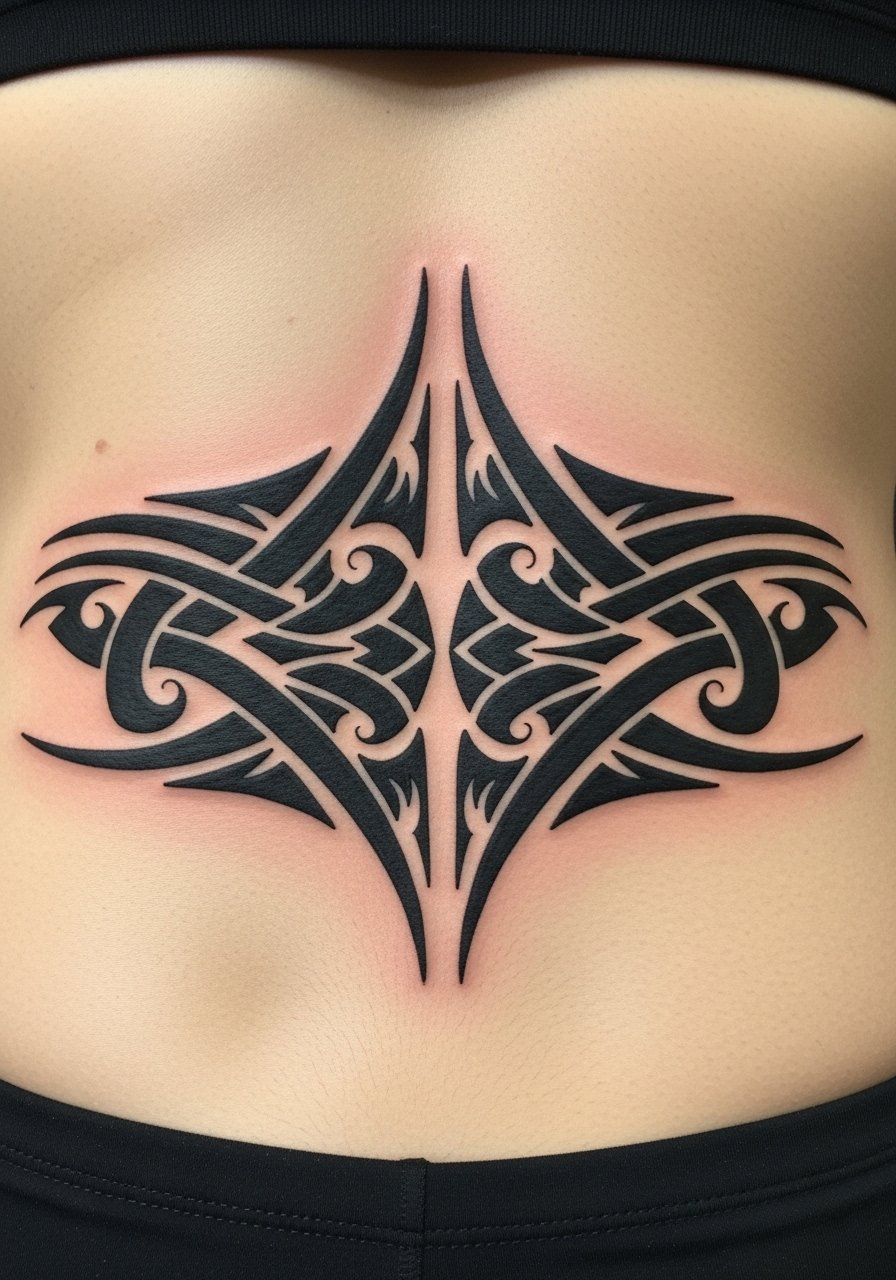
The lower spine is ideal for a concealable tribal extension that plays with dimples at the hips. The main mistake is using fine filigree too close to the dimples, which warps if the skin stretches. Solid black fills age predictably, and a modest five inch element often heals the cleanest. This design traces to heritage motifs in various cultures, so many people either adapt motifs or work with an artist who can suggest respectful variations. Expect one to two sessions and plan for an annual check to maintain solid saturation.
Tattoo Prep and Aftercare Essentials
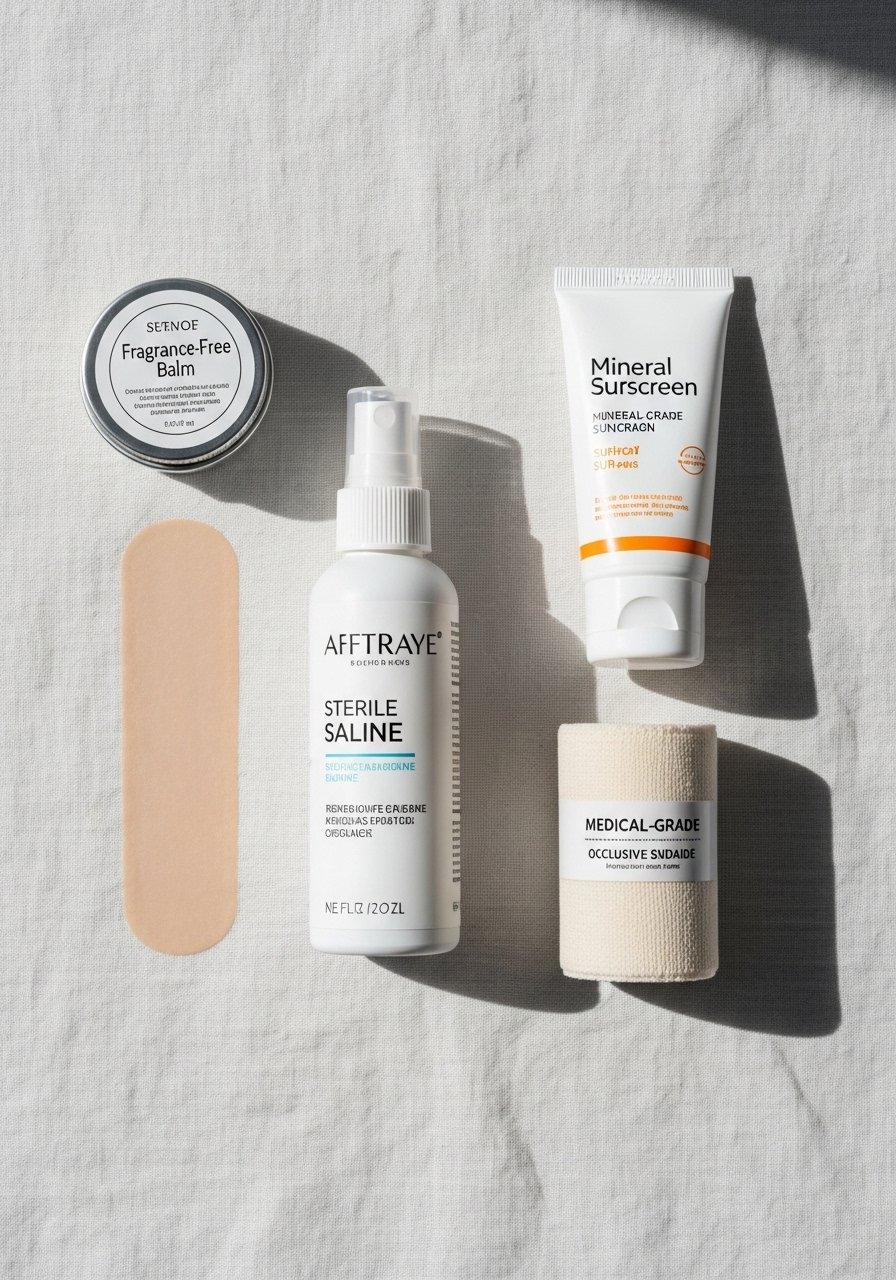
Below is a practical kit for spine tattoos that covers pre-appointment prep, immediate healing, and long-term maintenance. I built this list from conversations with artists in several studios and from watching healed photos across skin tones. Links go to Amazon search pages with the affiliate tag so you can compare options.
Healing and aftercare essentials
Fragrance-free gentle moisturizing balm for tattooed skin. Use sparingly after initial peeling drops to keep skin supple without clogging pores. Apply only when your artist says the tattoo is past the scabbing stage.
Medical-grade occlusive bandage, 6-inch roll for curved areas. Useful for the first 24 to 48 hours if your artist prefers a second-skin approach. Swap daily if you keep it covered.
Antimicrobial tattoo ointment, non-petroleum formula. Lighter than petroleum options and helps reduce trapped oil on curved areas like the spine.
Unscented sterile saline spray, travel size. Good for gentle cleansing when showering or after light sweating.
Pre-appointment prep
Fragrance-free gentle foaming cleanser. Use nightly the week before to reduce body oils and flaky skin.
Loose, soft cotton shirt for post-session wear. Avoid tight waistbands that press into fresh lower spine work.
Long-term maintenance
Broad-spectrum mineral sunscreen, SPF 50 stick for the back. Keep healed spine tattoos out of UV to prevent fading.
Silicone scar therapy sheet pack. Useful if you notice raised areas during healing and your artist recommends it.
Every tattoo is different. Always follow your artist's specific aftercare instructions. Consult a dermatologist if you have skin concerns or unusual healing issues.
Frequently Asked Questions
Q: How bad is spine tattoo pain compared with other spots, and how can I manage it?
A: Pain over spinal bone tends to spike compared with fleshy areas like the thigh. Shorter sessions, breaks, and scheduling when you are well-rested help. Some people use topical numbing, and artists are split on it. Tell your artist how you want breaks and whether you prefer numbing so you both set expectations.
Q: Will fine line florals fade faster than geometric blackwork on the spine?
A: From what I've seen, very fine single-needle lines blur sooner, especially where clothing rubs. Geometric blackwork with slightly thicker linework and controlled saturation generally keeps its form longer. Expect a touch-up window around one to three years for fine line pieces.
Q: How can I see my own spine tattoo for photos without distorting it?
A: Ask a friend to help with photos, use a wall mirror and a phone camera timer, or photograph while standing with your back to a window for even light. If the piece is lower, lie flat and have someone shoot from above for accurate straight-on images.
Q: Do spine tattoos work well on darker skin tones and what should I ask an artist?
A: Blackwork and high-contrast shading typically read best on darker tones. Ask to see healed work on similar skin tones. Discuss slightly stronger line weight and strategic negative space so the design maintains clarity over time.
Q: For watercolor lotus cascades, do I need different aftercare than for blackwork?
A: Watercolor areas depend more on color saturation, so keeping sun exposure low during healing and long term matters more. Use the gentle balm and mineral sunscreen listed above once healed. If color looks thin at one year, a targeted touch-up will restore vibrancy.
Q: Is the second-skin wrap method safe for curved spine areas, or should I let it breathe?
A: Artists disagree. One camp likes second-skin wraps for protection and less scabbing. The other camp prefers dry healing to avoid trapped moisture on curved areas. If you choose a wrap, change it daily and watch for irritation. If you see redness that spreads or unusually strong odor, remove the wrap and contact a professional.
