
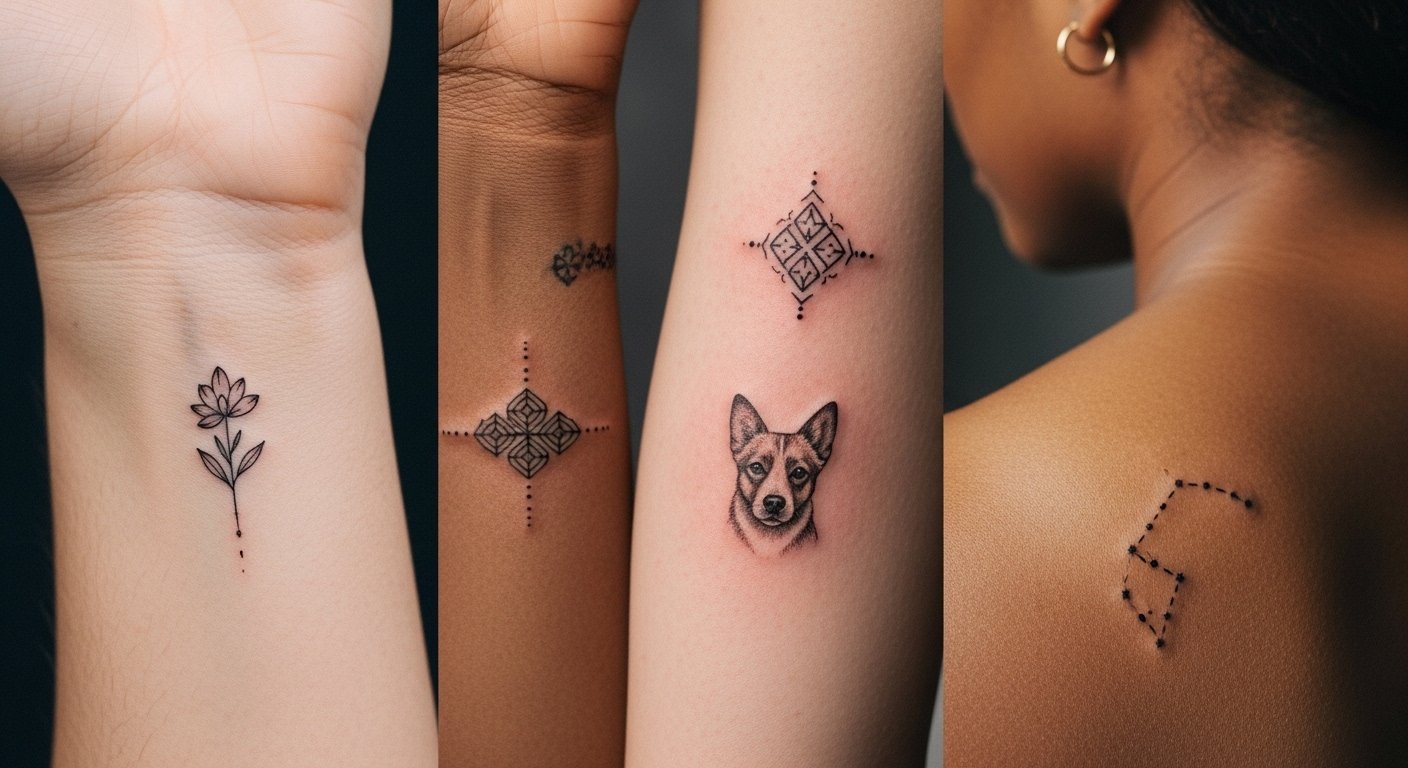
I spent months bookmarking tiny tattoos I loved, then realized the hard part wasn't the design. It was knowing which micro styles actually stay sharp after a year. These 30 micro tattoos are the ones I keep circling back to—precise, healed examples that still read clean in real life. I wrote these from conversations with artists and my own experience getting small, detailed pieces.
This list focuses on micro styles—fine line, single-needle, micro-realism, and blackwork. These ideas work great on wrists, fingers, behind the ear, ankles, and ribs. From what I've seen in 2026, artists push crisp linework and carefully placed micro pieces that age better than overly crowded tiny designs.
1. Fine Line Mini Rose on Wrist
Style/Technique: Fine Line / Minimalist
Pain Level: Low (2-3/10)
Session Time: 30-60 minutes
Best For: First small visible piece
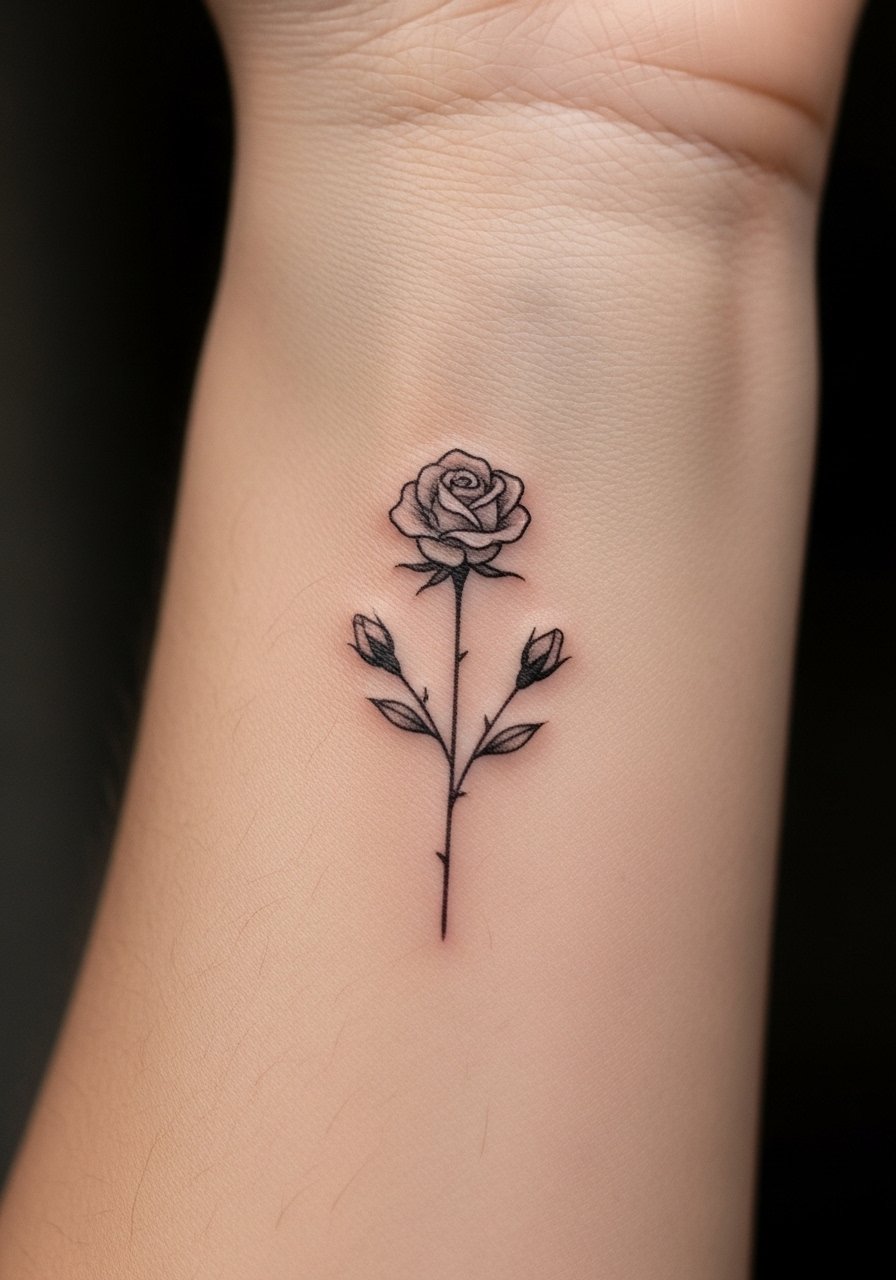
I love how a tiny rose reads as timeless and meaningful without screaming for attention. On the wrist it faces outward and moves with the arm, so the lines must be precise. Expect light sting. Healing is usually two weeks for surface flaking; use fragrance-free lotion. Fine line blurs faster on high-friction spots—ask for slightly bolder line weight if you want it to last. Avoid overly tiny texturing inside petals; it often fills in when healed. Look for an artist known for single-needle work and healed photos.
2. Micro-Realism Pet Portrait Behind Ear
Style/Technique: Micro-Realism / Single-Needle
Pain Level: Low-Medium (3-4/10)
Session Time: 45-90 minutes
Best For: Personal, hidden placement
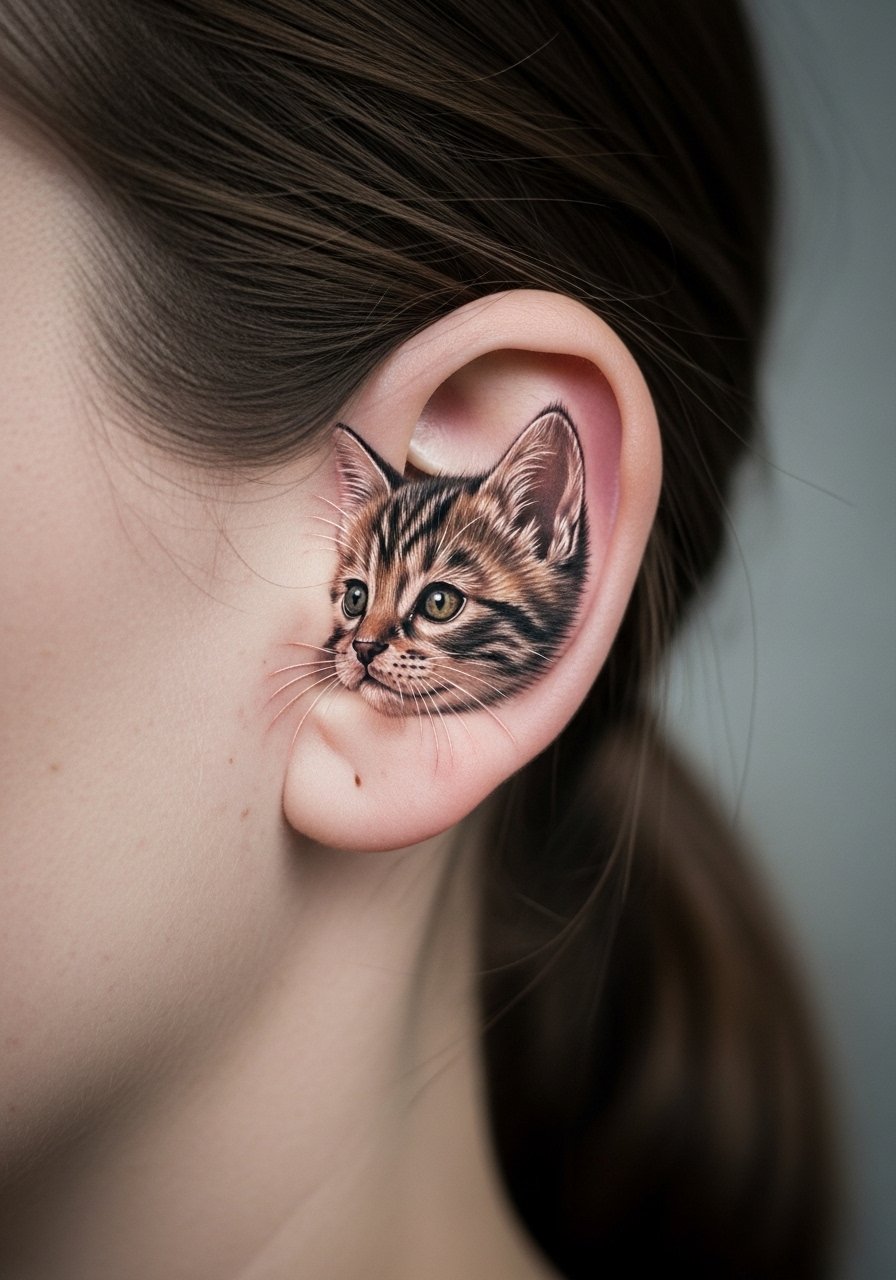
Micro-realism can capture a pet's face in a thumbnail-sized tattoo. Behind the ear hides mistakes while keeping the piece intimate. It hurts a bit from thin skin but heals clean if you avoid scratching. Fine shading needs an expert—small, soft dots age better than tiny cross-hatching. I always ask to see on-skin healed shots from the artist, not just fresh work. Common mistake: pushing too much tiny detail into a space that will naturally blur a touch over time.
3. Minimalist Line Art Mountain on Ankle
Style/Technique: Minimalist / Fine Line
Pain Level: Medium (4-5/10)
Session Time: 30-60 minutes
Best For: Easy-to-hide, travel-friendly placement
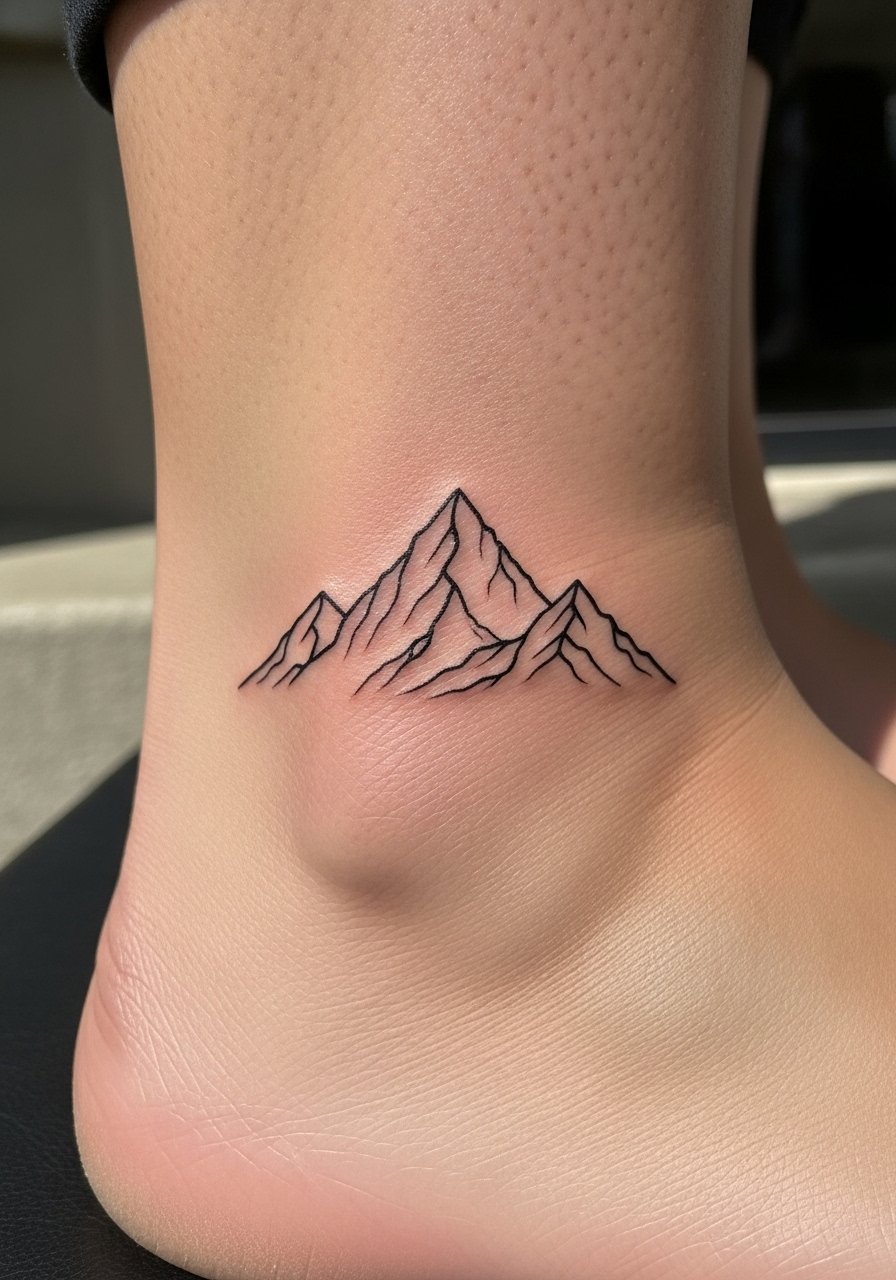
A small mountain line gives an outdoorsy, timeless vibe. Ankles are mobile and see friction from socks, so healing needs careful aftercare. Pain is higher than forearm but tolerable. Lines should be simple—avoid tiny texture inside peaks. From what I've noticed, minimalist mountain lines keep their shape if the artist uses slightly stronger line weight. Ask for healed examples on ankle placement and expect 2-3 weeks of surface healing.
4. Blackwork Micro Mandala on Back of Neck
Style/Technique: Blackwork / Dotwork
Pain Level: Medium (4/10)
Session Time: 45-90 minutes
Best For: Centered, statement-but-hidden option
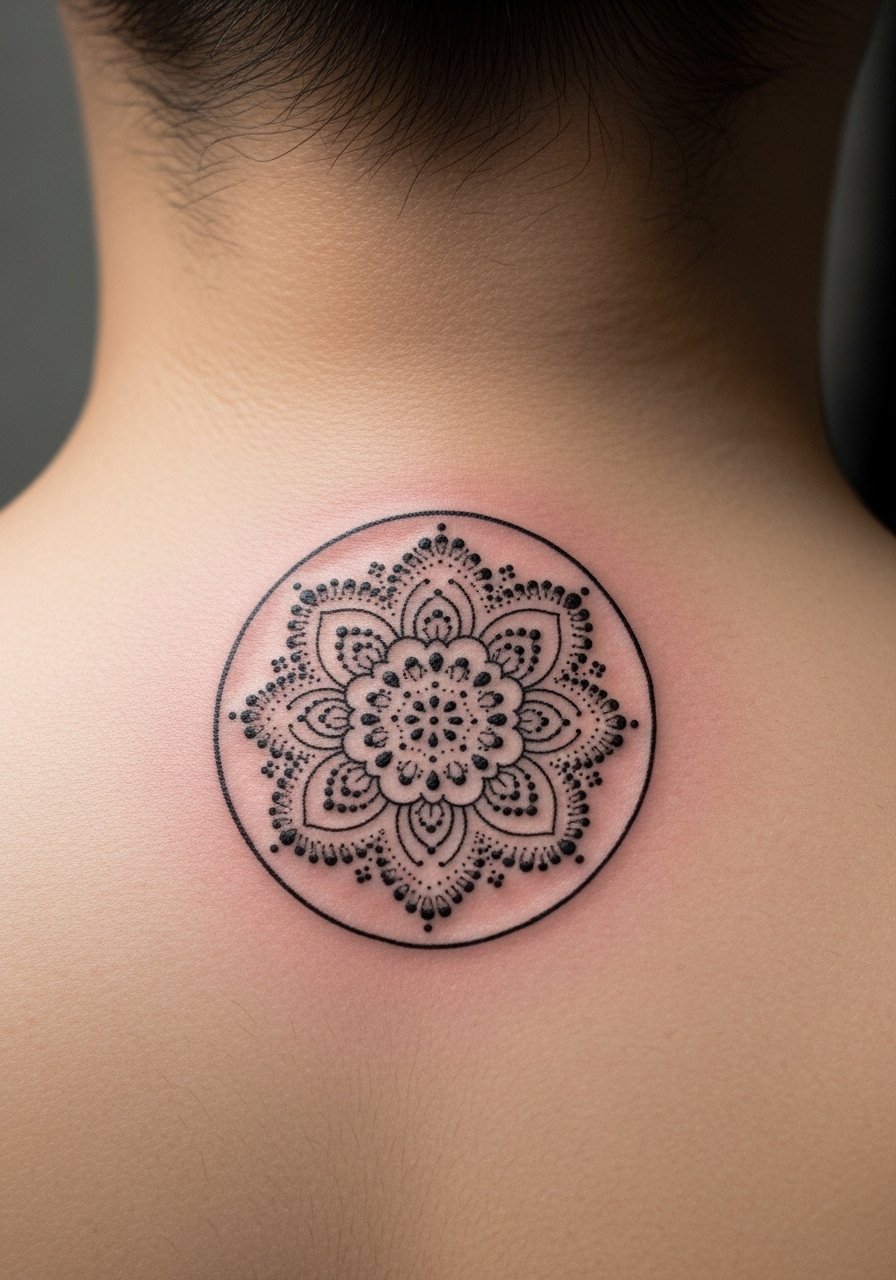
Tiny mandalas read as ornamental and timeless. The back of the neck sits well under hairlines and with collars. Dotwork holds up because it's about value, not single lines, but small dots can blur if placed too close. Pain is manageable. Healing can be tricky if hair rubs the area—keep it protected. Avoid cramming too many rings; the common mistake is over-detailing that loses contrast when healed. Find an artist experienced in micro dotwork.
5. Micro Script Name on Side of Finger
Style/Technique: Minimalist / Script
Pain Level: High (7/10)
Session Time: 15-30 minutes
Best For: Tiny, meaningful words
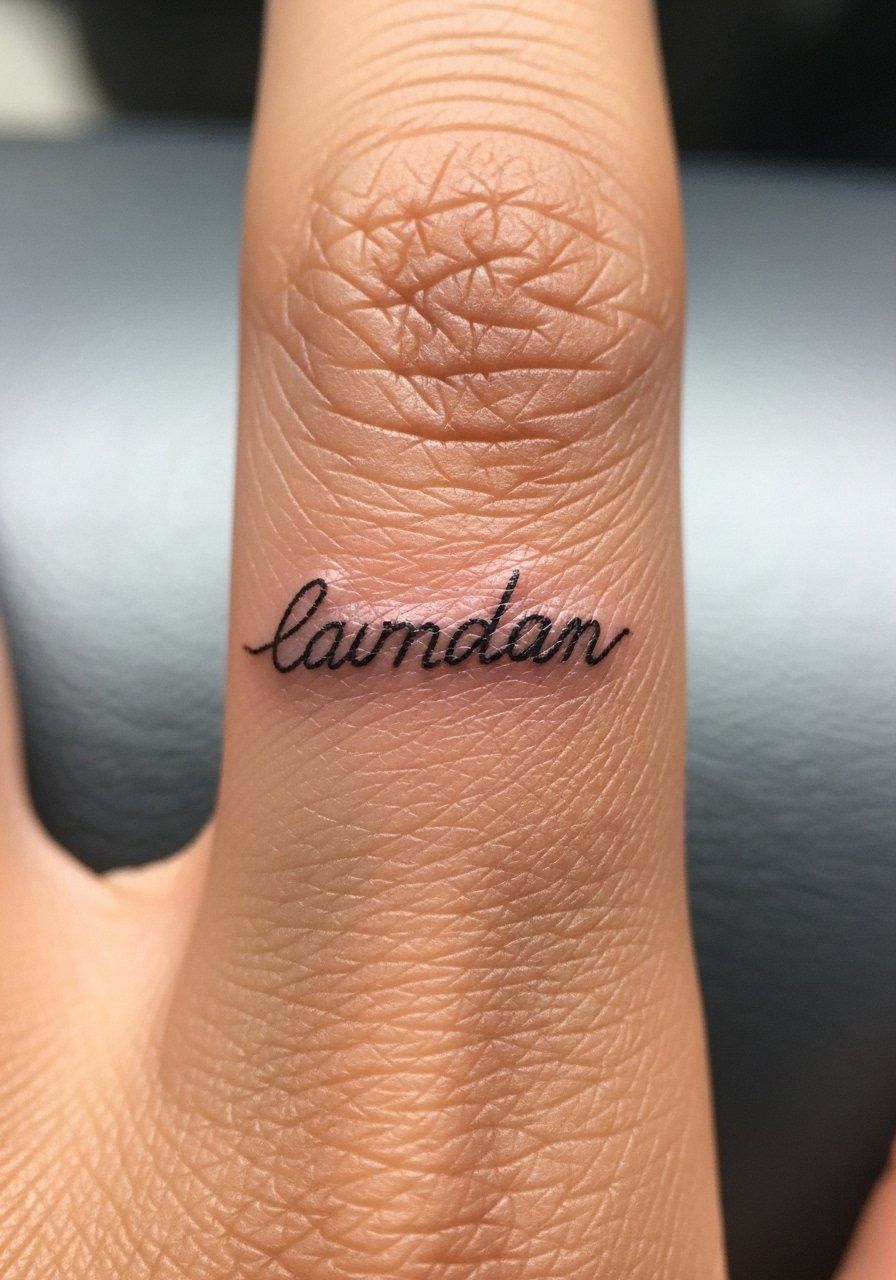
Finger placement is tempting but notorious for fading and blurring. Script here feels intimate and meaningful. Expect more pain and faster touch-ups. In my experience, thicker script and slightly increased letter spacing age far better than ultra-thin cursive. Healing needs vigilance—avoid soaking and heavy use of hands for two weeks. Ask your artist about touch-ups; it's common with finger work. Avoid tiny serif fonts that merge when healed.
6. Tiny Geometric Compass on Ankle Bone
Style/Technique: Geometric / Fine Line
Pain Level: Medium (4-5/10)
Session Time: 30-60 minutes
Best For: Travel or direction-themed micro
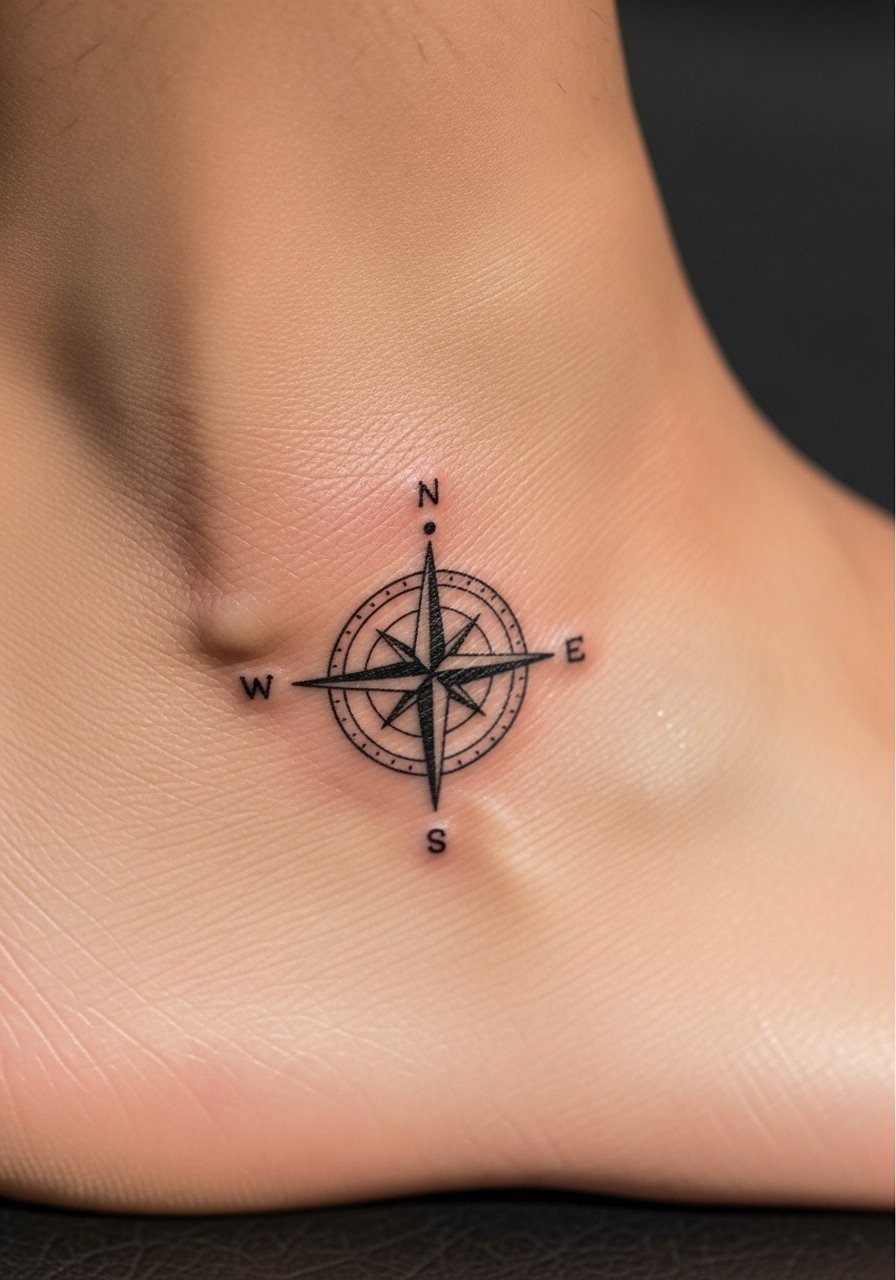
Micro compasses give a modern, minimal feel. The ankle bone shows edges well but sits in a high-movement zone. Pain is moderate due to bone proximity. I tell people to pick simpler geometry—too many tiny triangles equal future blur. Healed photos should show crisp cardinal points; if not, ask for slightly bolder lines. Keep clean and moisturized while it peels.
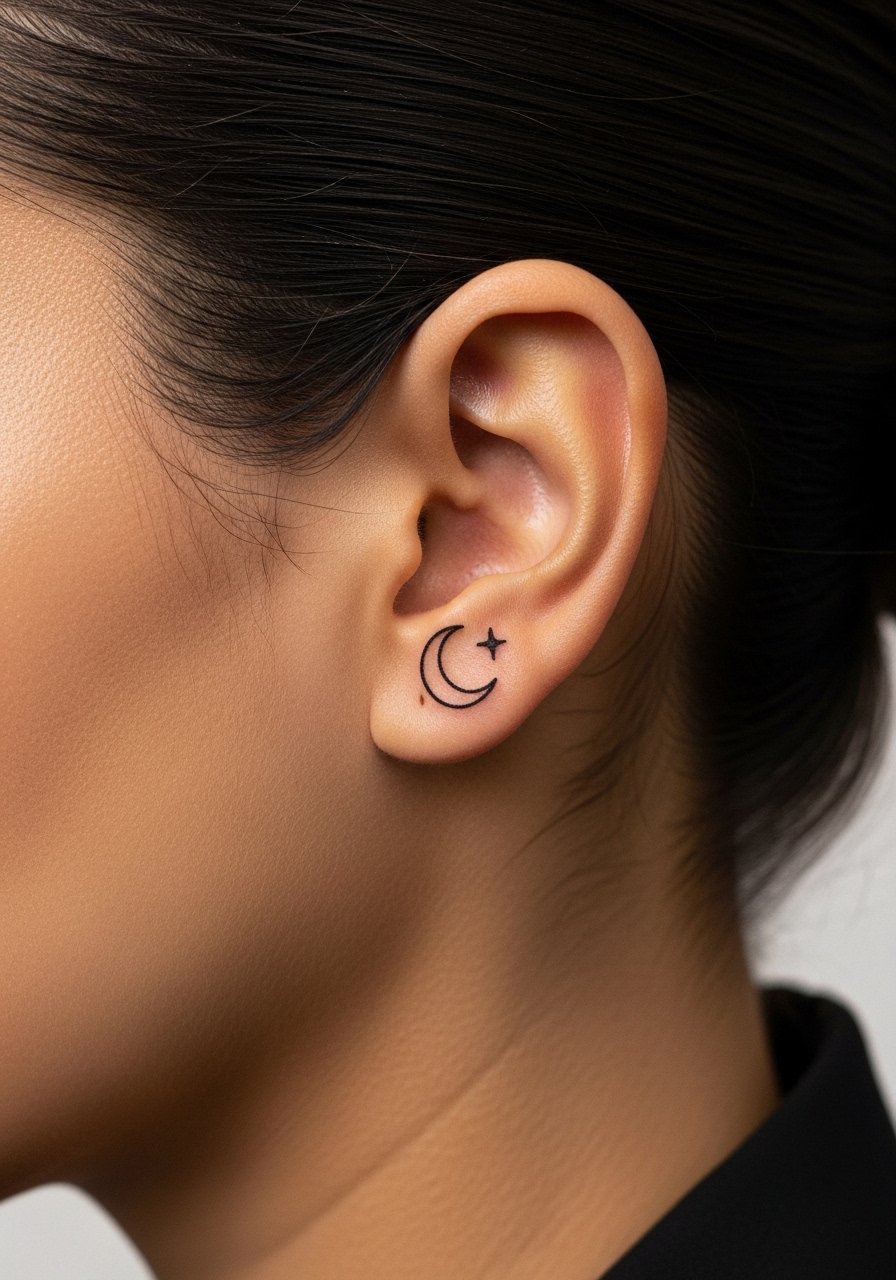
7. Single Needle Tiny Crescent on Collarbone
Style/Technique: Single-Needle / Minimalist
Pain Level: Medium (4/10)
Session Time: 20-40 minutes
Best For: Subtle, feminine placement
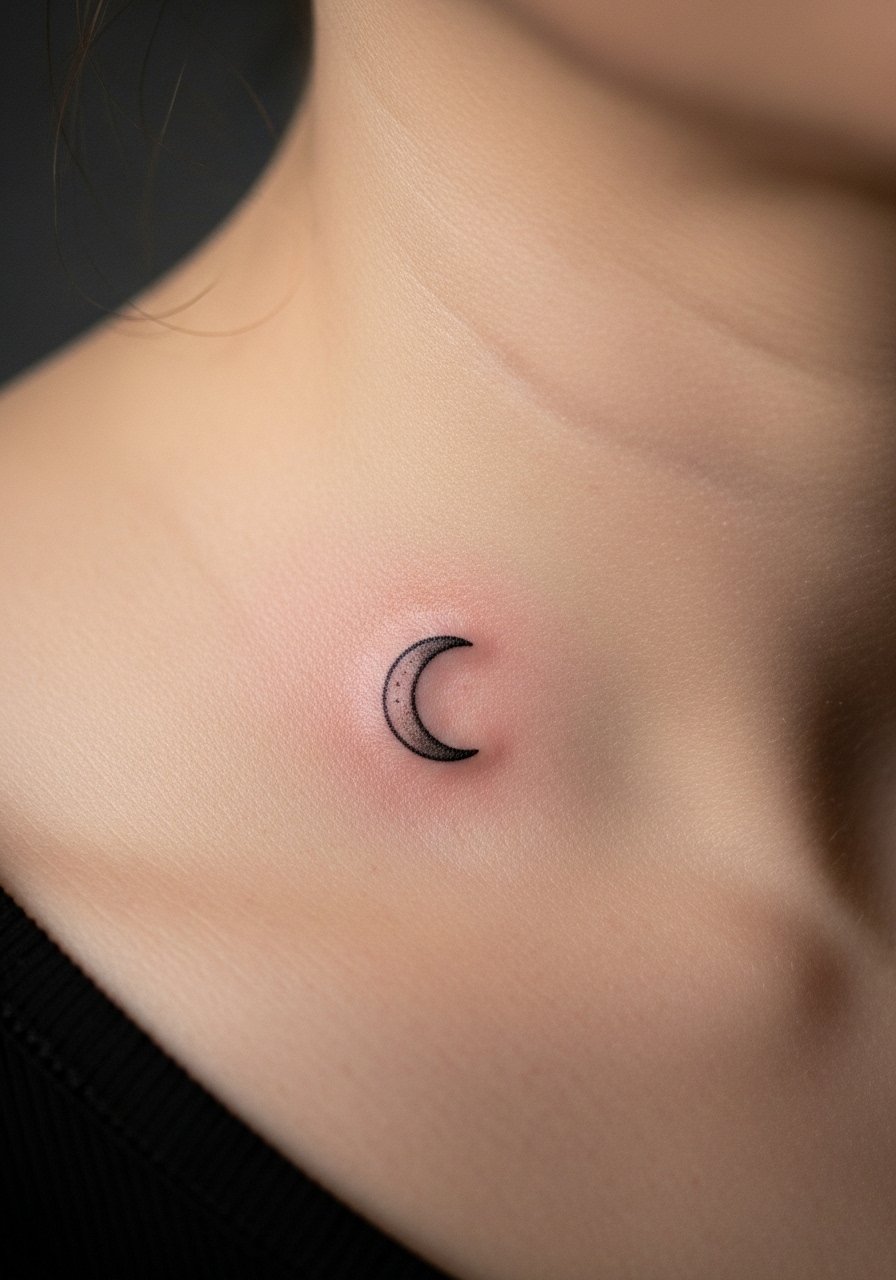
A crescent on the collarbone reads delicate and timeless. Collarbone is flatter and photographs well, but you feel some scrape during the session. Single-needle crescents heal quickly but can fade at edges—ask for a subtle thicker edge if you want longevity. Avoid over-shading inside the crescent; it often fills in. Use SPF long-term—the collarbone sees sun and UV fades ink.
8. Micro-Realism Tiny Eye on Forearm
Style/Technique: Micro-Realism / Fine Shading
Pain Level: Low-Medium (3-4/10)
Session Time: 45-75 minutes
Best For: Symbolic, protective motif
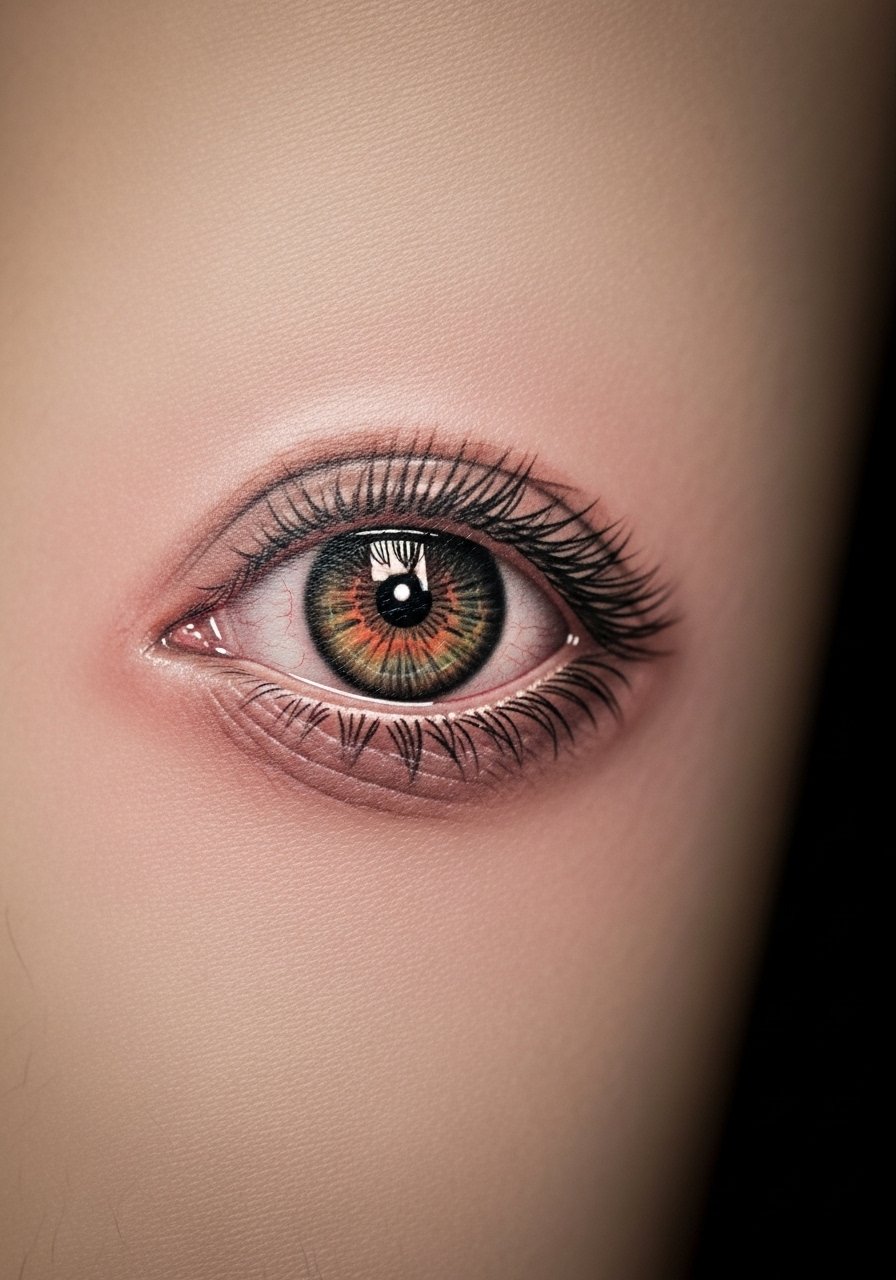
A tiny eye can feel protective or symbolic. On the inner forearm it reads clear and is easy to show or hide. Micro shading survives well if the artist uses soft stippling instead of aggressive hatch marks. Pain is mild. Expect a few weeks of surface dulling; the highlights pop back once healed. Common mistake: over-detailing the sclera area—keeps the design flatter when healed.
9. Tiny Botanical Sprig on Ribcage
Style/Technique: Fine Line / Illustrative
Pain Level: High (6-8/10)
Session Time: 30-60 minutes
Best For: Hidden, personal pieces
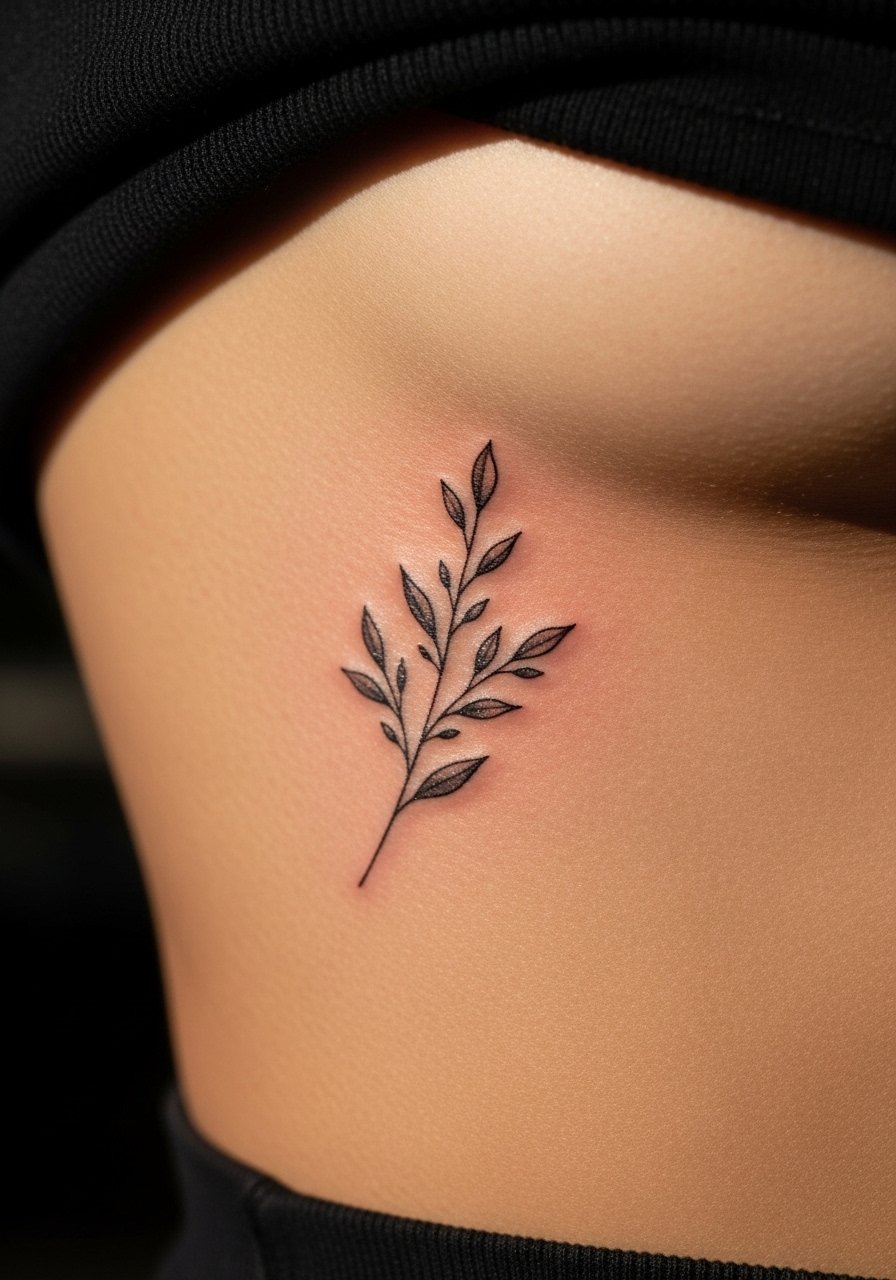
Ribcage tattoos hurt more but sit discreetly. A small sprig here feels intimate and feminine. Fine lines can blur if the area stretches, so ask for slightly bolder stem lines. Healing needs patience—sleeping position matters. I've seen plant sprigs look best when the artist leaves negative space and avoids tiny vein details that disappear. Use gentle cleansers and moisturizing for a smooth heal.
10. Micro Dotwork Constellation on Wrist
Style/Technique: Dotwork / Minimalist
Pain Level: Low (2-3/10)
Session Time: 20-40 minutes
Best For: Subtle, celestial nods
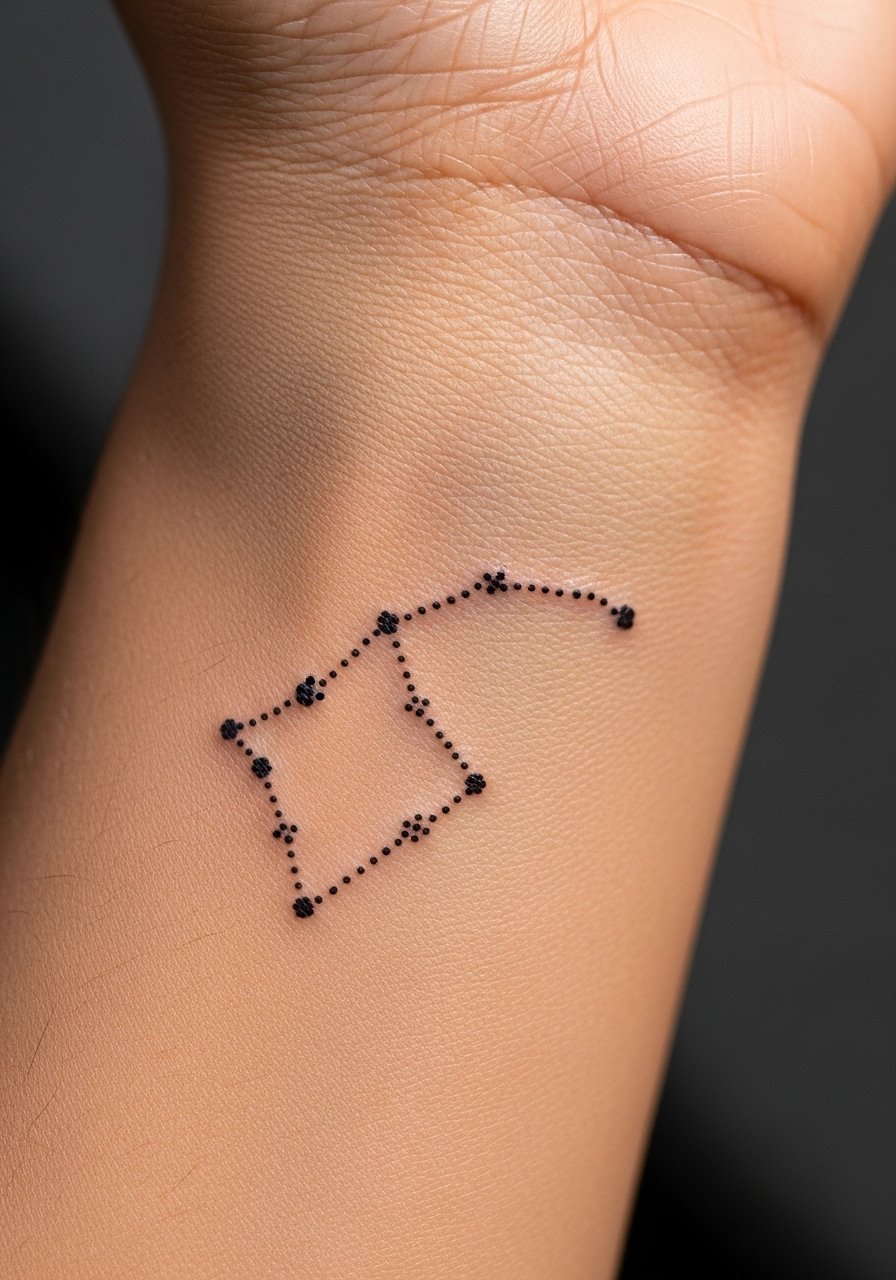
Constellation tattoos are personal and clean at micro scale. The wrist is visible, so precise spacing matters. Dotwork holds better than thin lines in this spot. Pain is low. Expect some early scabbing where dots are dense. I recommend asking for reference spacing—too-close dots merge. Artists who specialize in tiny dot compositions will show healed wrist photos.
11. Tiny Blackwork Triangle on Finger
Style/Technique: Blackwork / Minimalist
Pain Level: High (6-7/10)
Session Time: 10-20 minutes
Best For: Bold, tiny symbol
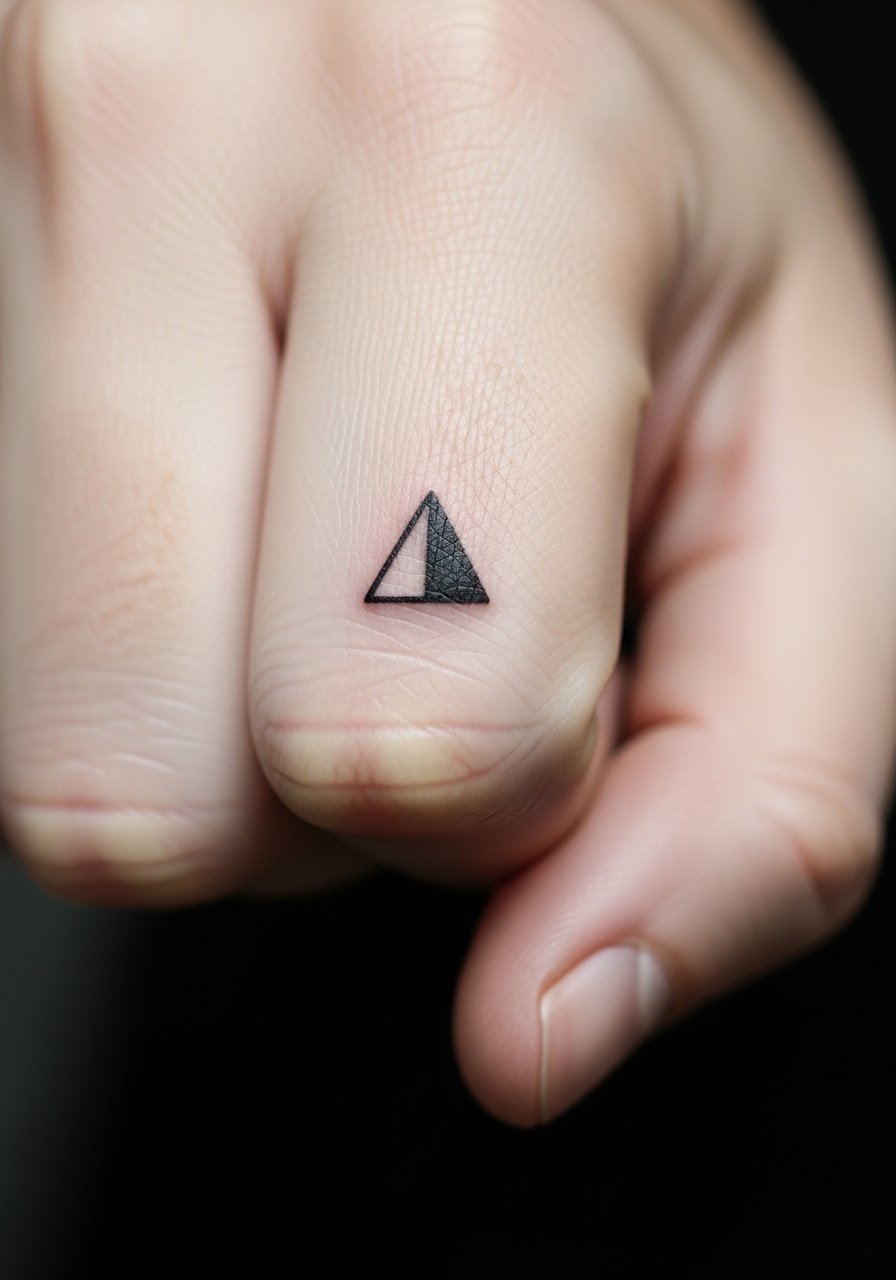
Solid black shapes on fingers read bold despite size. Fingers fade faster, so solid black fills compress better than lines. Expect touch-ups. The knuckle area is painful and needs careful aftercare to avoid scabbing that distorts the shape. I always ask artists for healed finger examples before committing. Avoid tiny internal detail; keep it solid and simple.
12. Micro Watercolor Splash on Ankle
Style/Technique: Watercolor / Minimalist
Pain Level: Medium (4/5)
Session Time: 30-60 minutes
Best For: Color-forward tiny piece
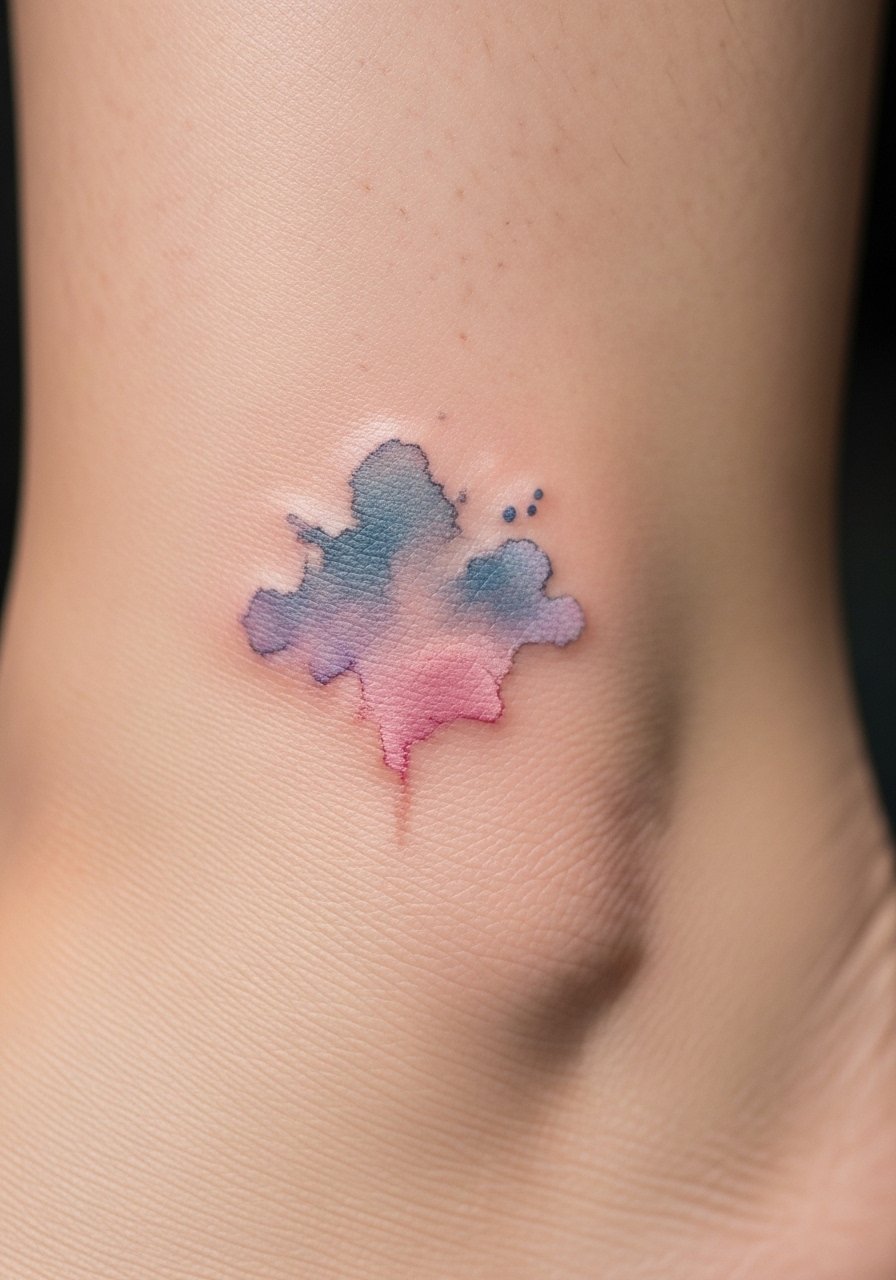
Micro watercolor adds color without heavy outlines. On the ankle it looks whimsical and fresh. Color fades faster than black—sunscreen matters. Pain is moderate. Tiny watercolor works best when paired with a thin black anchor line to keep shape. Common mistake: too many blended colors—stick to 1-2 hues. Ask the artist about pigment saturation for healed vibrancy.
13. Micro-Neo Traditional Tiny Anchor on Wrist
Style/Technique: Neo-Traditional / Micro
Pain Level: Low-Medium (3/4)
Session Time: 30-60 minutes
Best For: Small classic symbol with personality
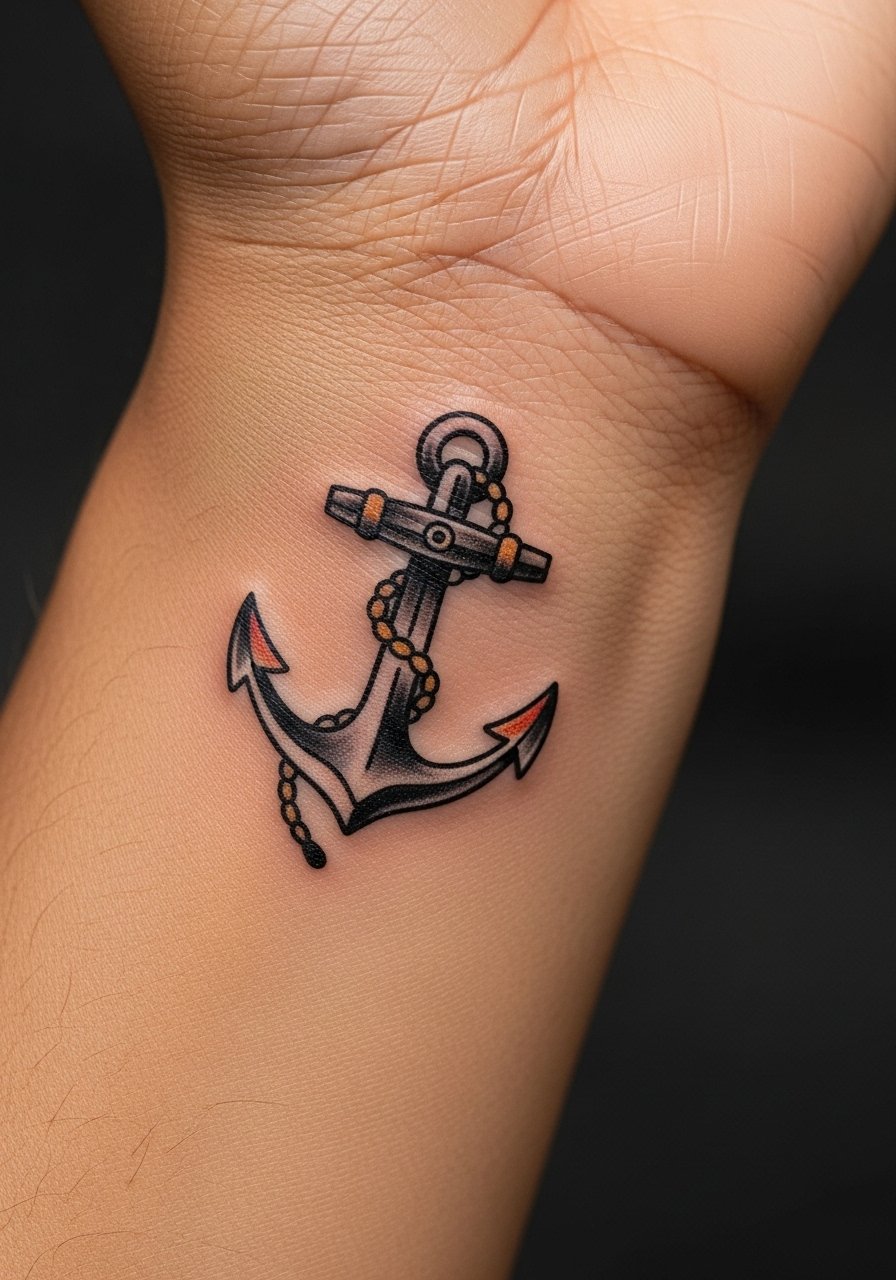
Neo-traditional micro pieces use strong outlines with restrained color, which helps longevity. An anchor on the wrist is classic. Outlines keep shape when tiny shading softens with time. Pain is low. Healed photos often show color softening but clear edges—ask for bold outlines. Avoid too many tiny decorative elements that will bleed together when healed.
14. Tiny Barcode-Inspired Line on Side Rib
Style/Technique: Minimalist / Graphic
Pain Level: High (6-8/10)
Session Time: 20-40 minutes
Best For: Conceptual, hidden placement
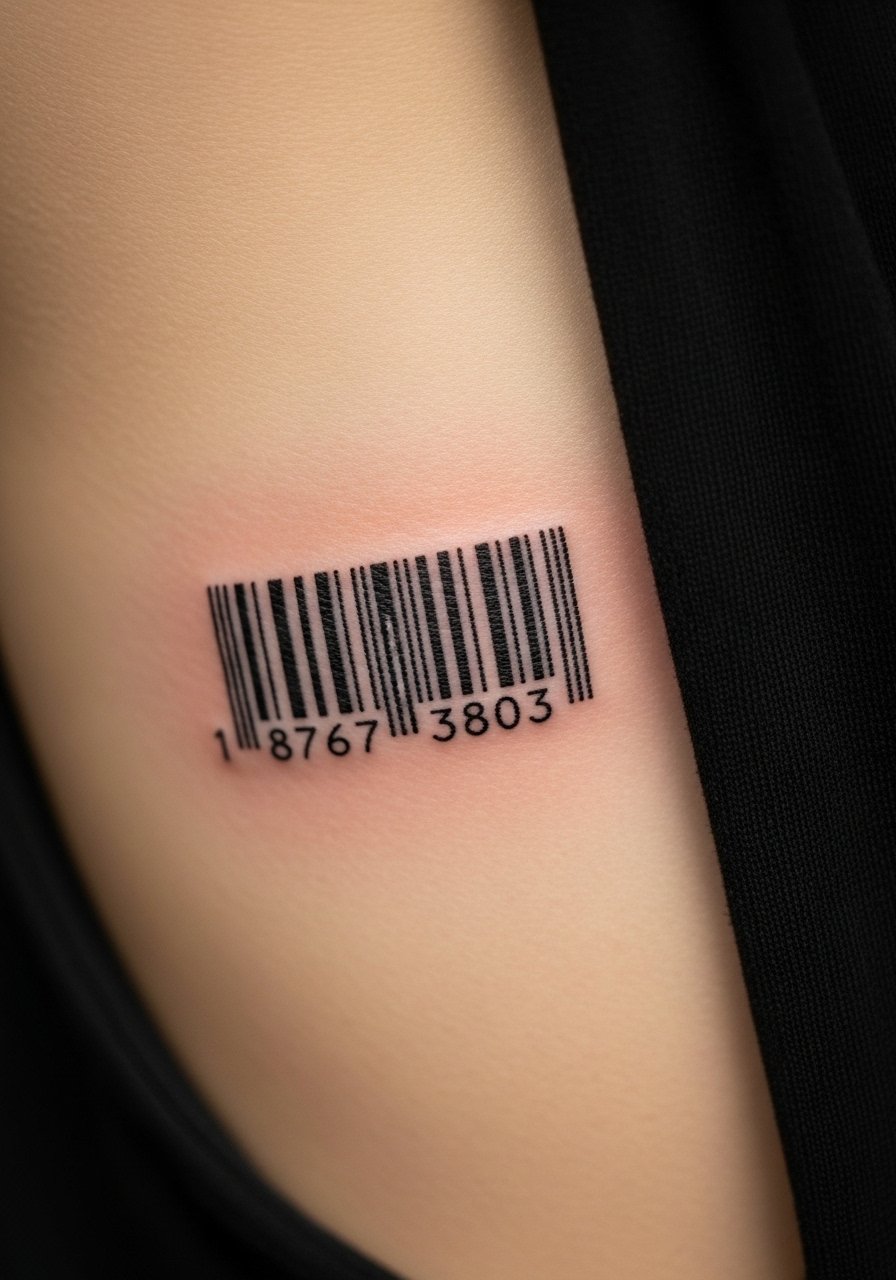
Graphic barcode lines feel modern and abstract. Side ribs are painful but great for hidden statements. Thin vertical lines age okay if spaced properly—dense bars can blur. I recommend asking for slightly thicker bars and steady spacing. Healing needs minimal movement. Don't expect perfect machine-readable bars—this is aesthetic, not functional.
15. Single-Needle Tiny Paw Print on Ankle
Style/Technique: Single-Needle / Micro-Realism
Pain Level: Medium (4/5)
Session Time: 20-40 minutes
Best For: Pet memorials
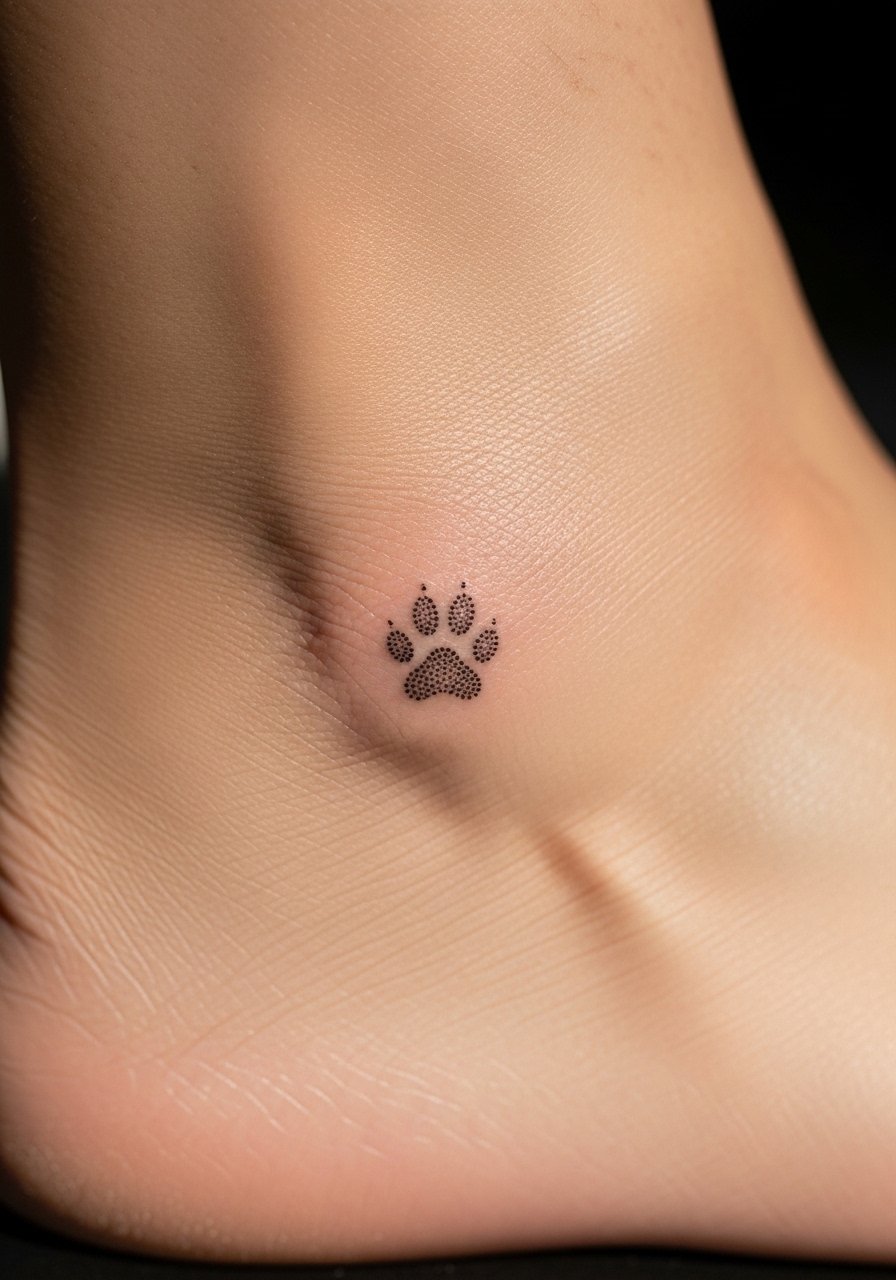
Tiny paw prints are a sweet, discreet nod to a pet. Single-needle texture can suggest pads without heavy ink. Ankles are mobile; monitor for friction. Pain is moderate. Ask for slightly denser dotwork rather than super-thin outlines so the print remains readable. Avoid trying to cram toenail details into a postage-stamp size.
16. Micro-Lettering Date on Collarbone
Style/Technique: Minimalist / Script
Pain Level: Medium (4/10)
Session Time: 20-40 minutes
Best For: Significant dates
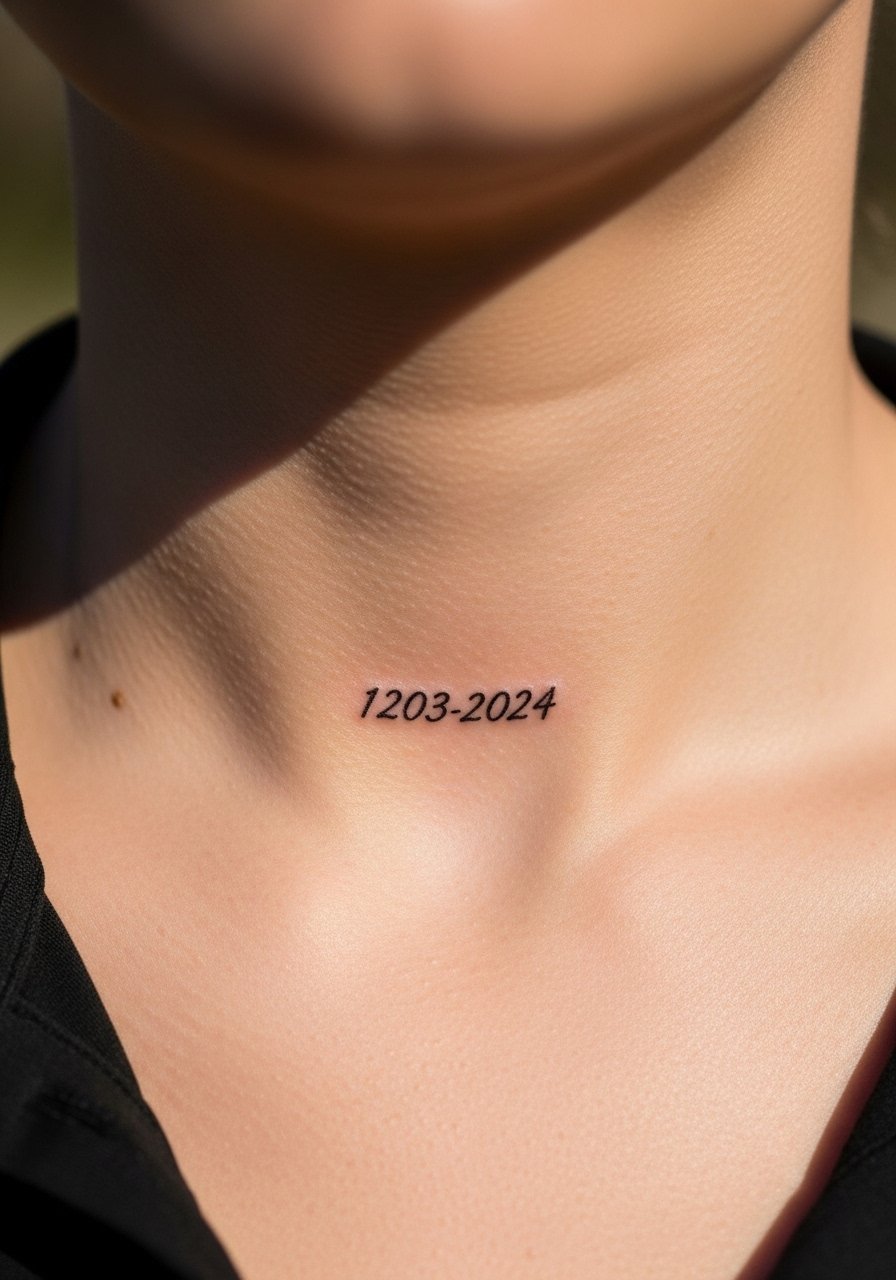
Dates on the collarbone are intimate and easy to show. Fine numerals need spacing to avoid merging. Collarbone holds ink well but sees sun—use SPF. Pain is manageable. I tell people to pick a clean font and slightly increase kerning for longevity. Common mistake: using ornate fonts that blur into unreadable marks.
17. Tiny Lightning Bolt Behind Ear
Style/Technique: Minimalist / Blackwork
Pain Level: Low (2-3/10)
Session Time: 10-20 minutes
Best For: Bold, hidden symbol
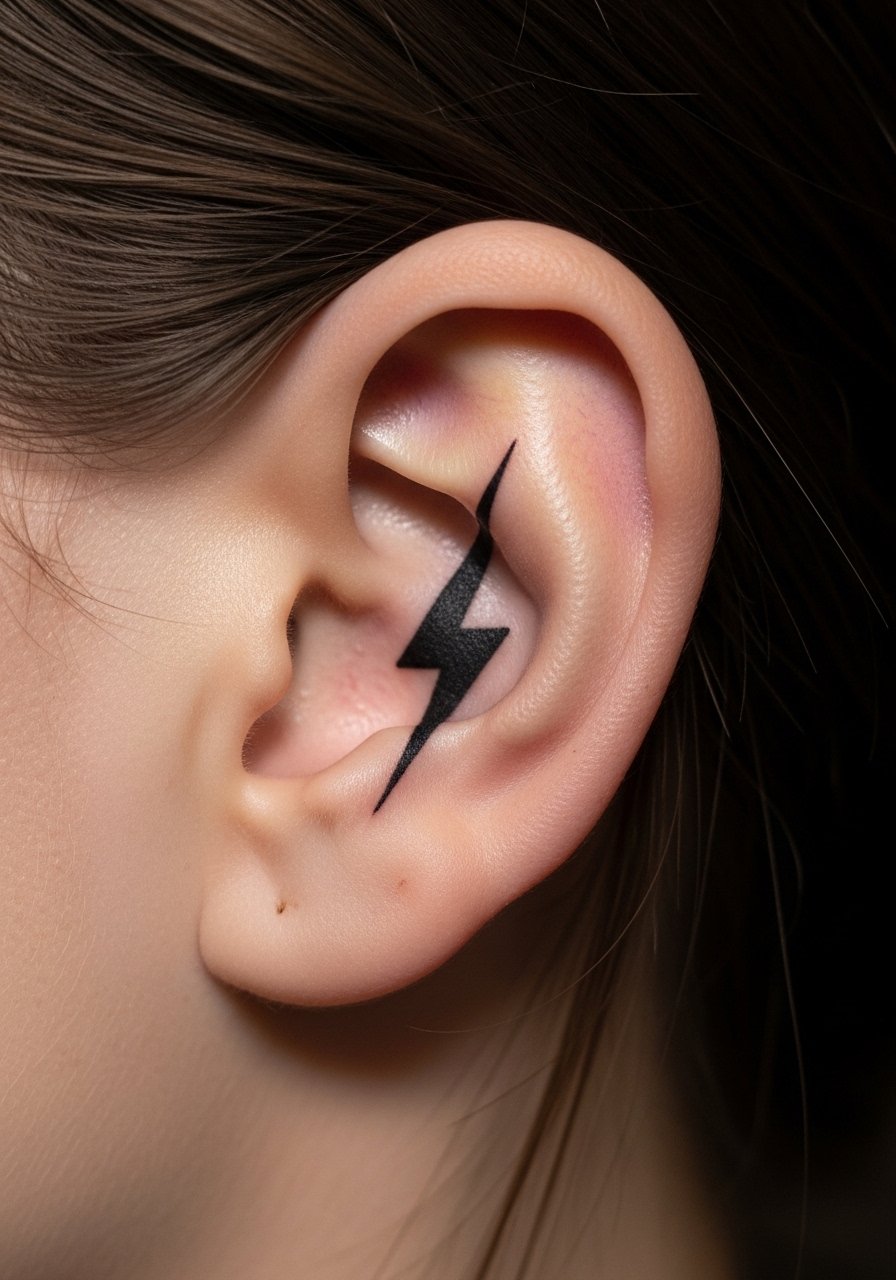
A tiny bolt behind the ear reads playful and edgy. This spot hides well. Pain is low. Solid black shapes work better than delicate outlines in this area. Healed bolts should have a crisp point—if not, ask for slightly thicker line. Watch for hair rubbing during early healing.
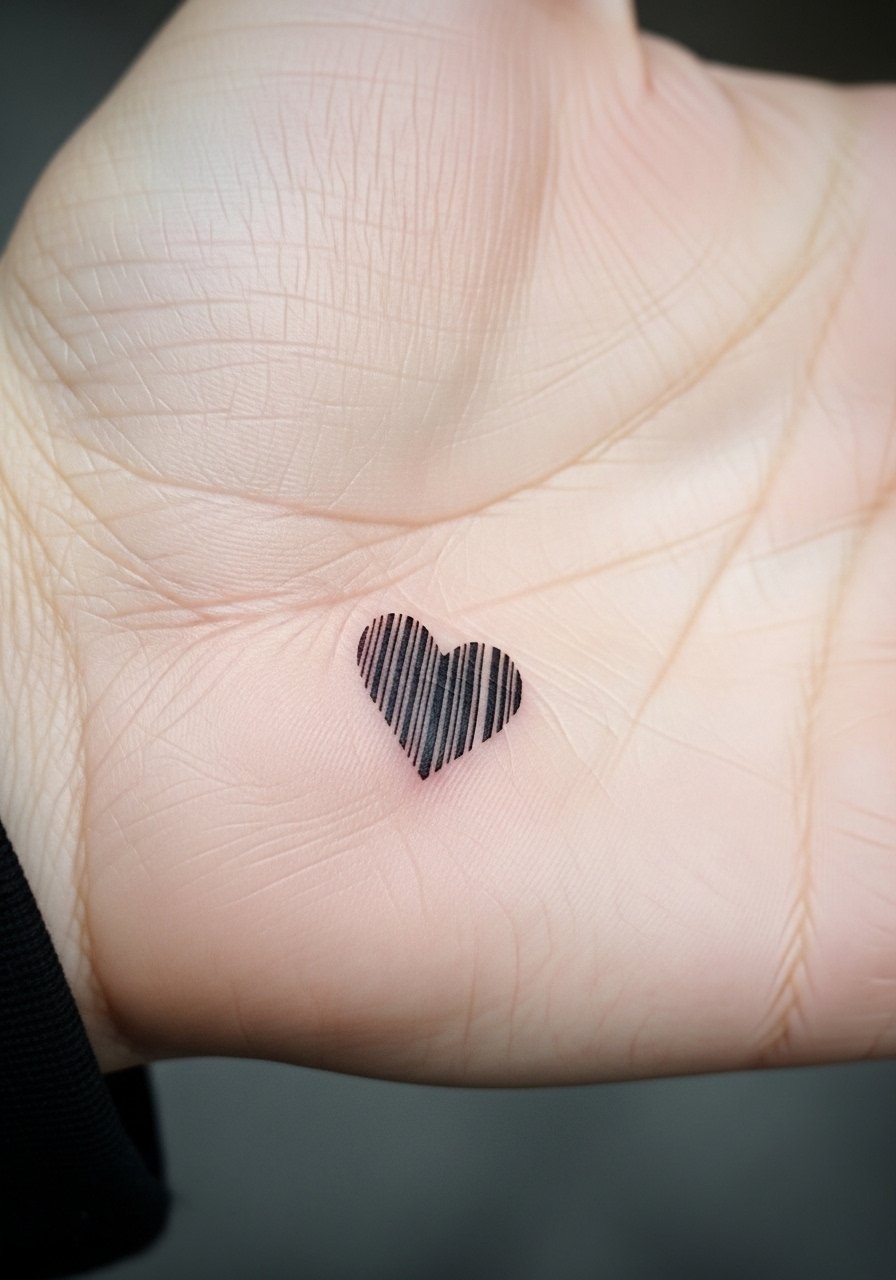
18. Micro-Fingerprint Heart on Chest
Style/Technique: Micro-Realism / Symbolic
Pain Level: Medium (4-6/10)
Session Time: 45-75 minutes
Best For: Personalized keepsake
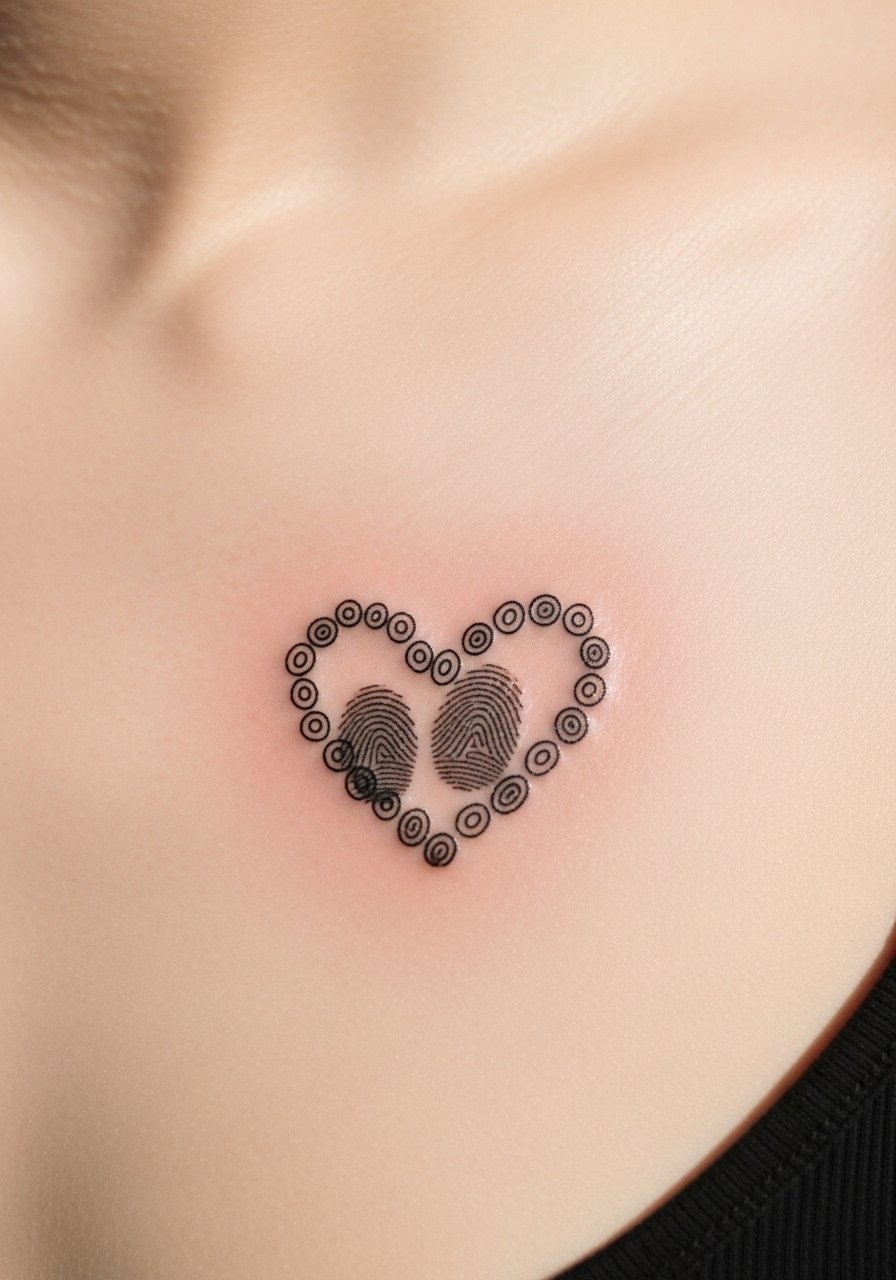
Turning a fingerprint into a tiny heart is deeply personal. Chest skin takes ink well but can be tender. Expect moderate pain. The key is simplified ridges—too much fidelity becomes noise when healed. I always ask artists to stylize the ridges slightly for clarity. Keep the area moisturized and avoid friction from clothing while it heals.
19. Micro-Architecture Tiny Window on Wrist
Style/Technique: Fine Line / Illustrative
Pain Level: Low (2-3/10)
Session Time: 30-45 minutes
Best For: Unique, story-driven tiny
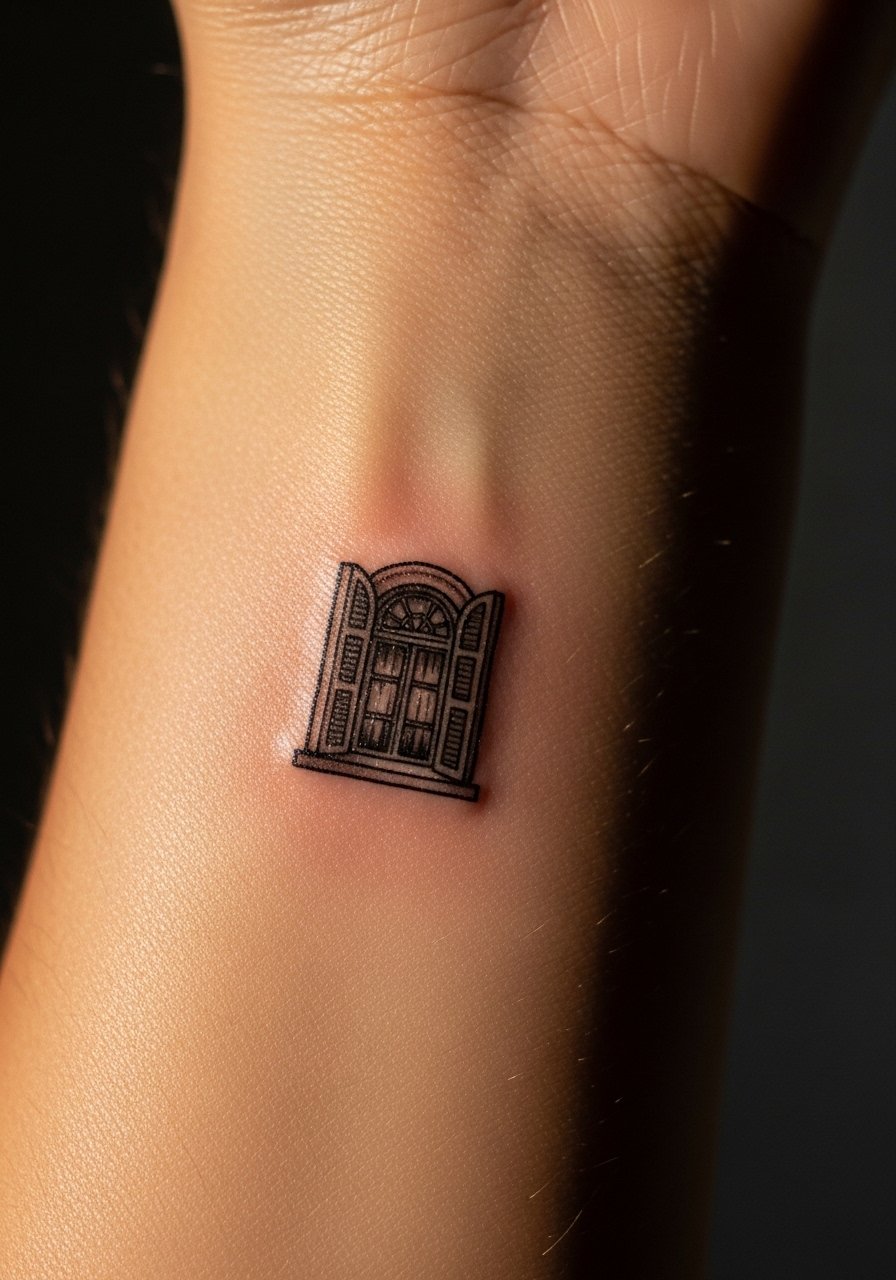
Tiny architectural motifs feel like a snapshot of a place. Wrist shows details well but needs simple composition. Fine line windows should avoid minute brick textures—keep bold frame lines. Pain is low. Healed images look best when artists slightly exaggerate key lines. Ask for healed shots of similar pieces.
20. Micro-Heartbeat Line on Ribcage
Style/Technique: Minimalist / Blackwork
Pain Level: High (6-8/10)
Session Time: 20-40 minutes
Best For: Personal, emotional symbols
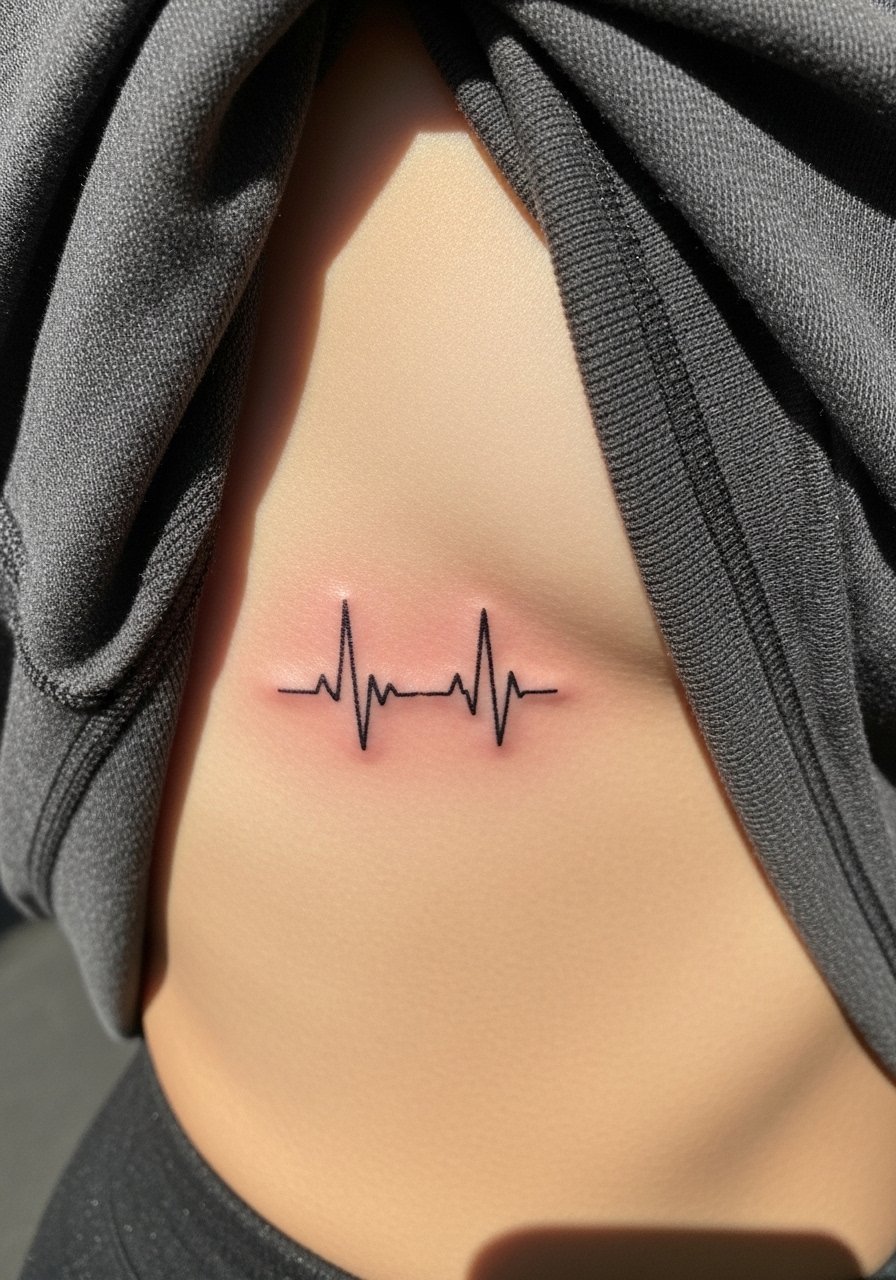
Heartbeat motifs on the ribs are intimate and meaningful. Lines need clear peaks; otherwise they look like a smeared mark. Ribs hurt more, so be ready. Healing is sensitive to movement and breath. I prefer slightly thicker peaks and clean spacing so the rhythm reads even after subtle blur. Avoid adding tiny text next to it unless you want frequent touch-ups.
21. Micro-Animal Silhouette on Ankle
Style/Technique: Blackwork / Silhouette
Pain Level: Low (2-3/10)
Session Time: 20-30 minutes
Best For: Subtle portrait or totem
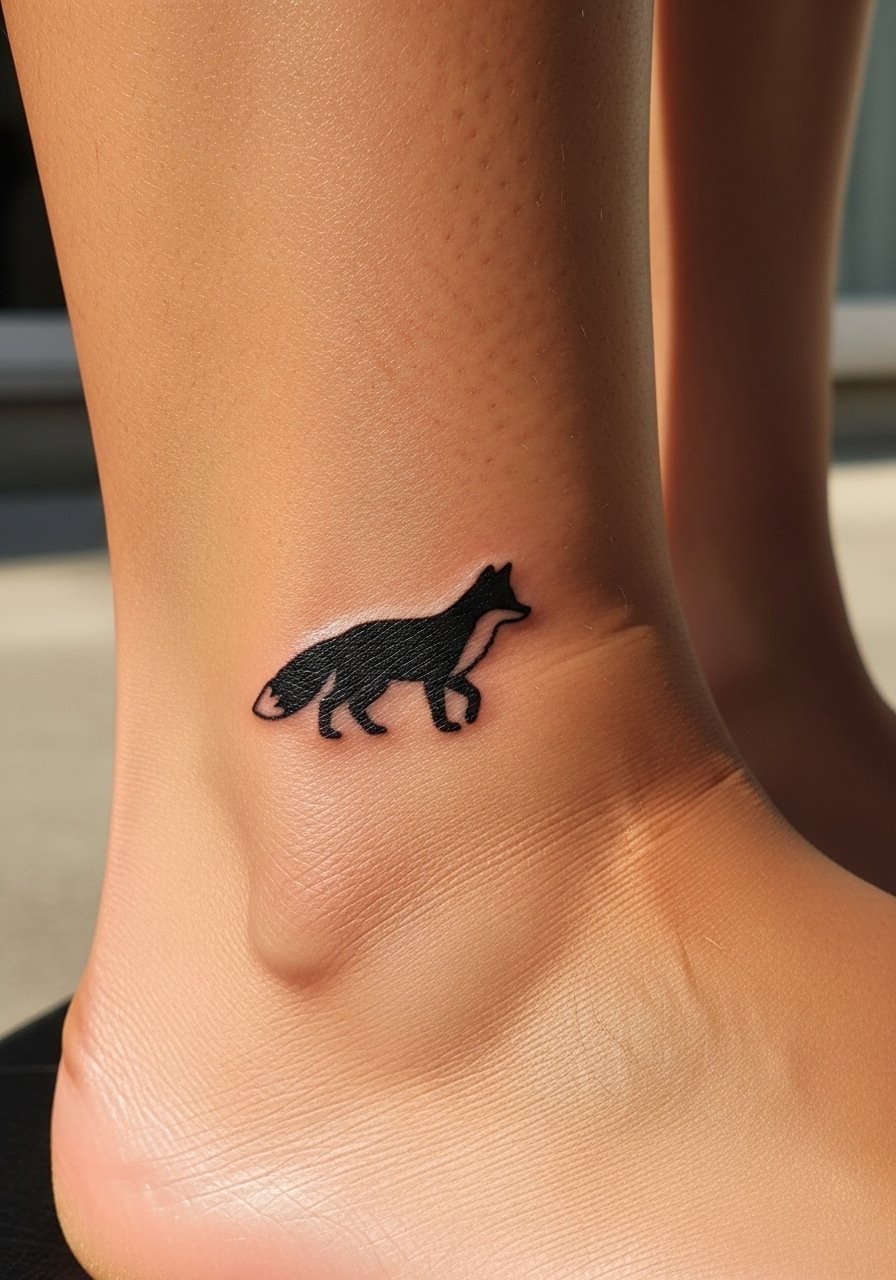
Silhouettes read clearly at micro sizes because they rely on shape, not detail. Ankle works well visually. Pain is low. Keep the silhouette bold enough to withstand slight blur. I've noticed tiny legs or tails can get lost—simplify the outline. Ask to see healed silhouettes on similar placements.
22. Tiny Arrow Trio Behind Finger
Style/Technique: Minimalist / Fine Line
Pain Level: High (6-7/10)
Session Time: 15-30 minutes
Best For: Directional or symbolic nods
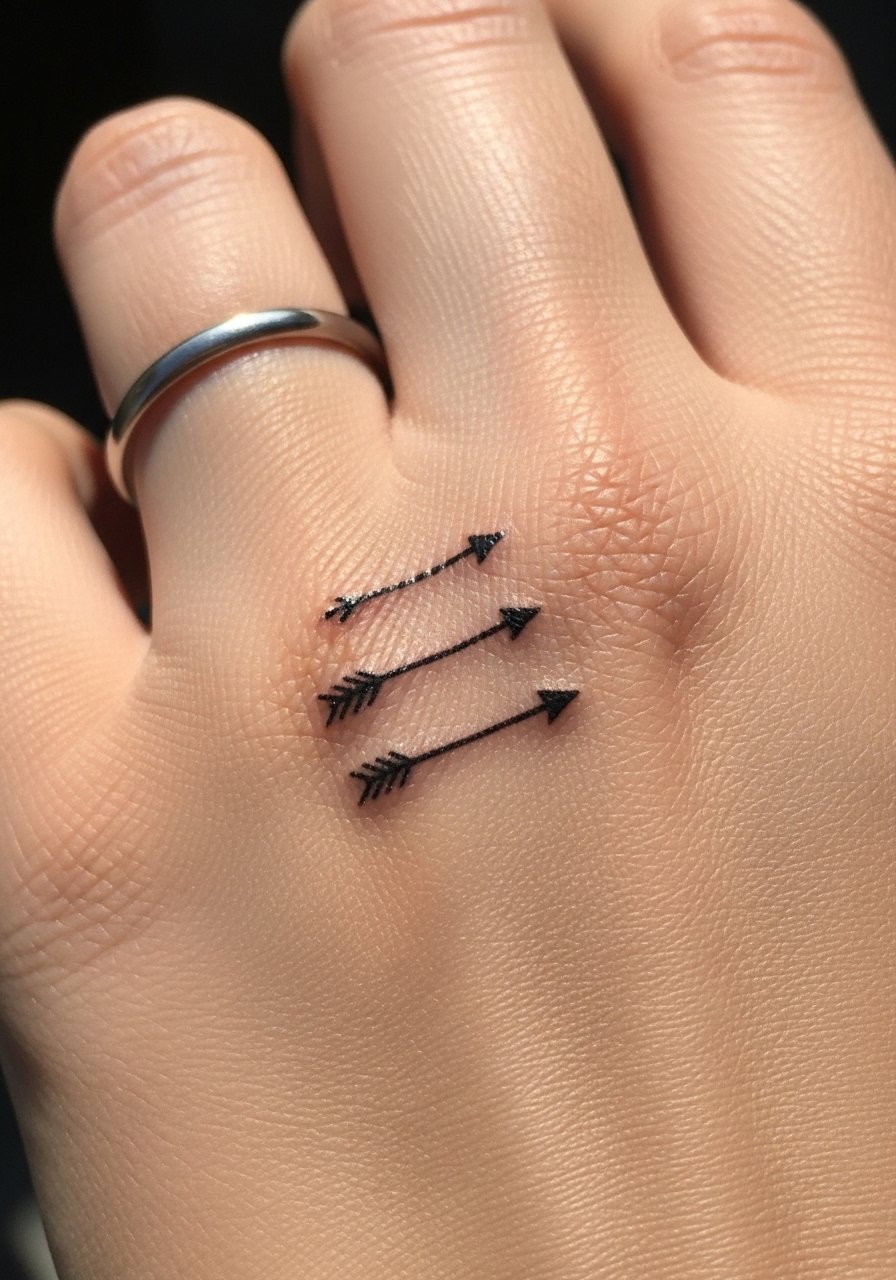
Arrows behind a finger look crisp but suffer from frequent fading. Keep arrows simple and slightly spaced. Expect higher pain and eventual touch-up. From my experience, slightly thicker shafts and bold arrowheads age better. Avoid tiny feather details that vanish.
23. Micro-Plant Seedling on Thumb
Style/Technique: Fine Line / Illustrative
Pain Level: High (6-7/10)
Session Time: 20-40 minutes
Best For: Growth symbolism in small space
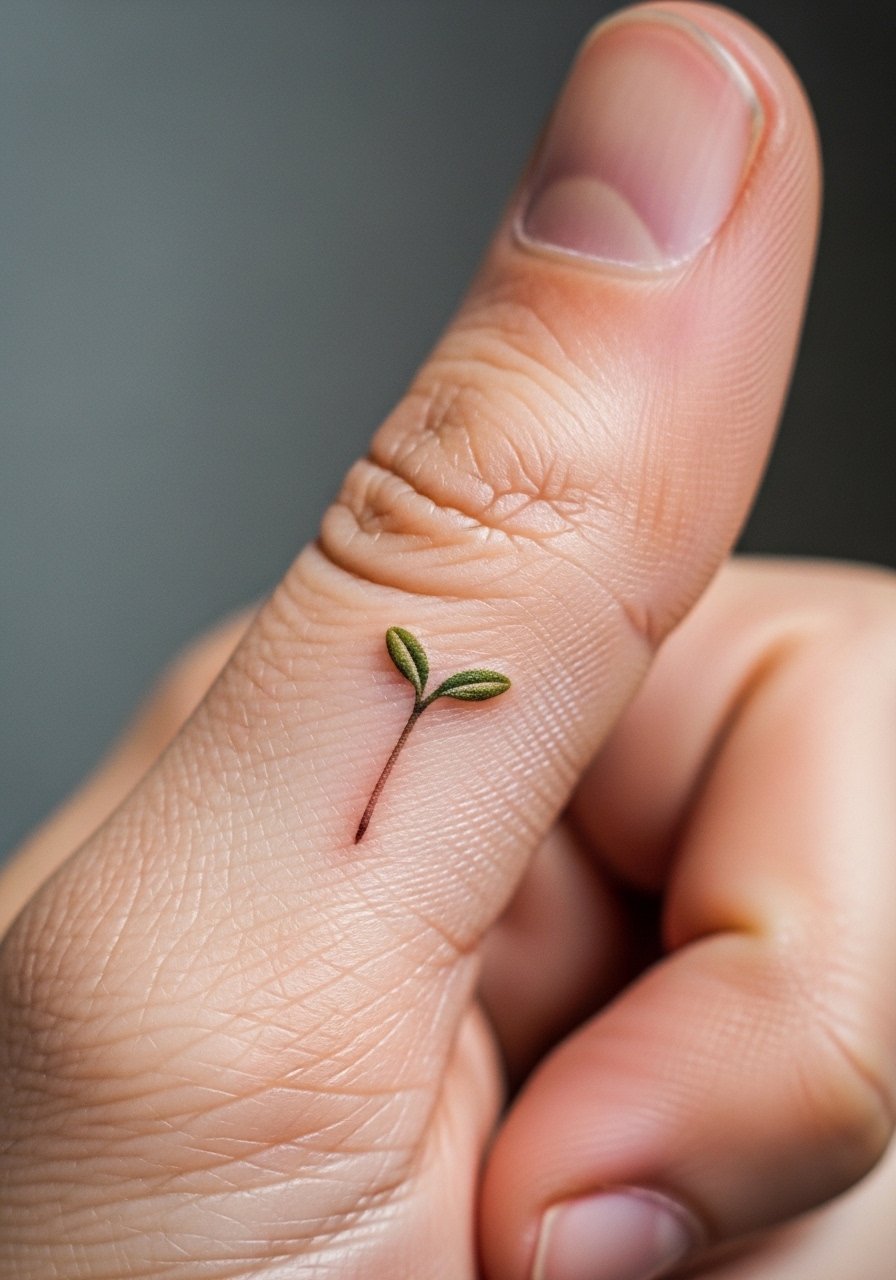
Thumb placements are visible and get lots of use. Seedlings here symbolize growth but risk faster fading. Pain is higher due to movement and skin thickness. I recommend simple stems and clear leaf shapes rather than veining. Healed seedling photos should show preserved silhouette—if not, adjust line weight.
24. Tiny Crescent And Star On Behind Ear
Style/Technique: Minimalist / Symbolic
Pain Level: Low (2-3/10)
Session Time: 10-20 minutes
Best For: Celestial accent
This pair feels classic and discreet. Behind the ear is forgiving for small motifs. Pain is low. Keep the star simple—five-point details can merge. Artists who do micro symbols will suggest clean negative space so the star reads. Avoid tiny dot shards around it that clutter the design.
25. Micro-Barcode Heart on Side of Palm
Style/Technique: Graphic / Blackwork
Pain Level: High (7-9/10)
Session Time: 20-40 minutes
Best For: Concealed, tactile placement
Palms are aggressive on fading but offer a bold statement. Lines here need to be confident—expect frequent touch-ups. Pain is high. I advise simplified shapes and acceptance that palm tattoos often require refreshes. If you want longevity, pick less-used hand areas instead.
26. Tiny Floral Dotwork on Ear Conch
Style/Technique: Dotwork / Blackwork
Pain Level: Low-Medium (3-5/10)
Session Time: 20-40 minutes
Best For: Subtle ear adornment
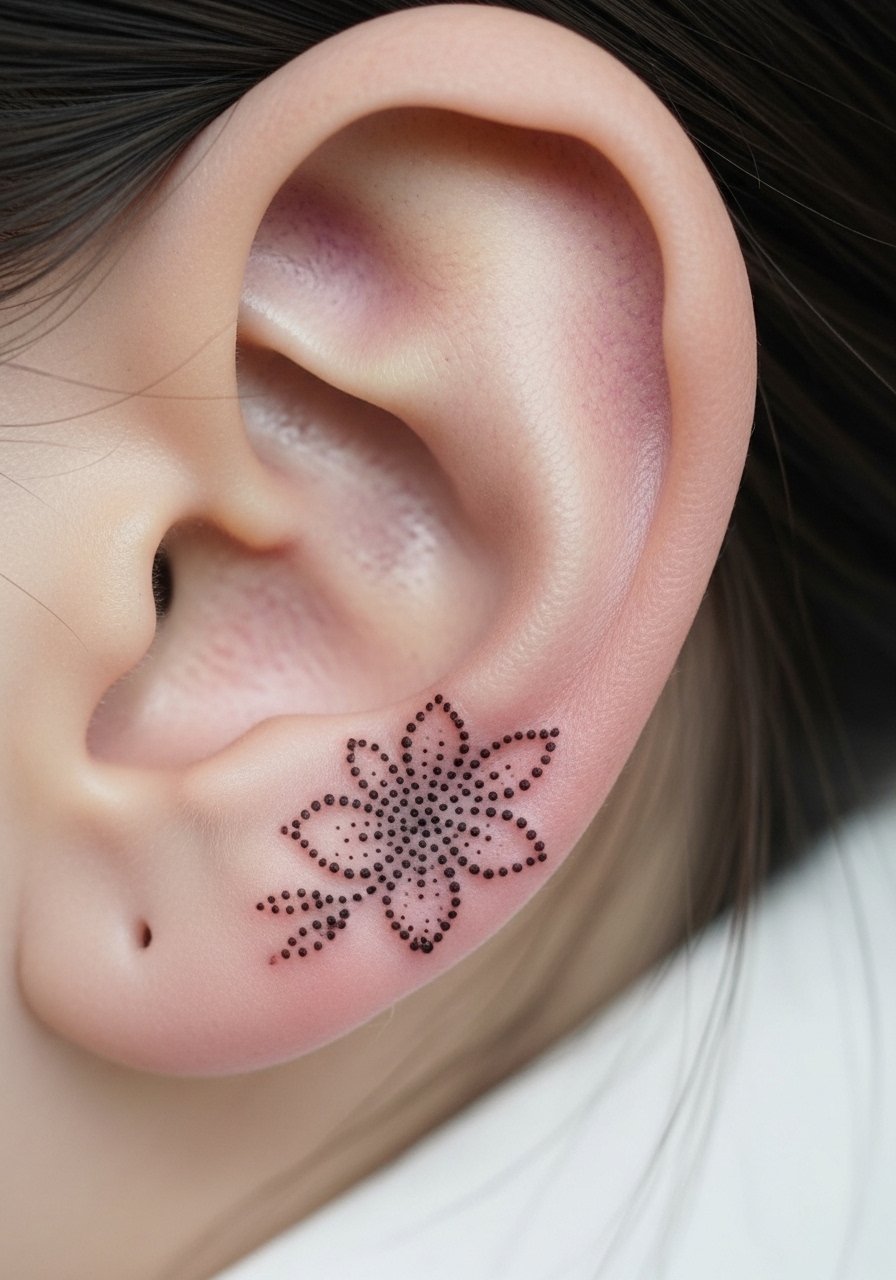
Ear conch tattoos are decorative and modern. Dotwork suits the curved canvas. Pain is moderate but tolerable. Dots spaced well avoid merging. Keep the flower simple—too many petals equal muddy heals. Artists who tattoo ears often show healed ear portfolios; check those.
27. Micro-Silhouette Mountain Peak on Rib
Style/Technique: Blackwork / Minimalist
Pain Level: High (6-8/10)
Session Time: 20-40 minutes
Best For: Hidden adventurous nod

Solid silhouettes on the rib keep form without needing fine lines. The rib's pain is a trade-off for a private placement. Solid black retains presence better than thin lines. I recommend bold yet simple shapes. Healing needs careful clothing choices to avoid irritation.
28. Micro-Coordinate Numbers on Inner Wrist
Style/Technique: Minimalist / Numeric
Pain Level: Low (2-3/10)
Session Time: 15-30 minutes
Best For: Location-based memory
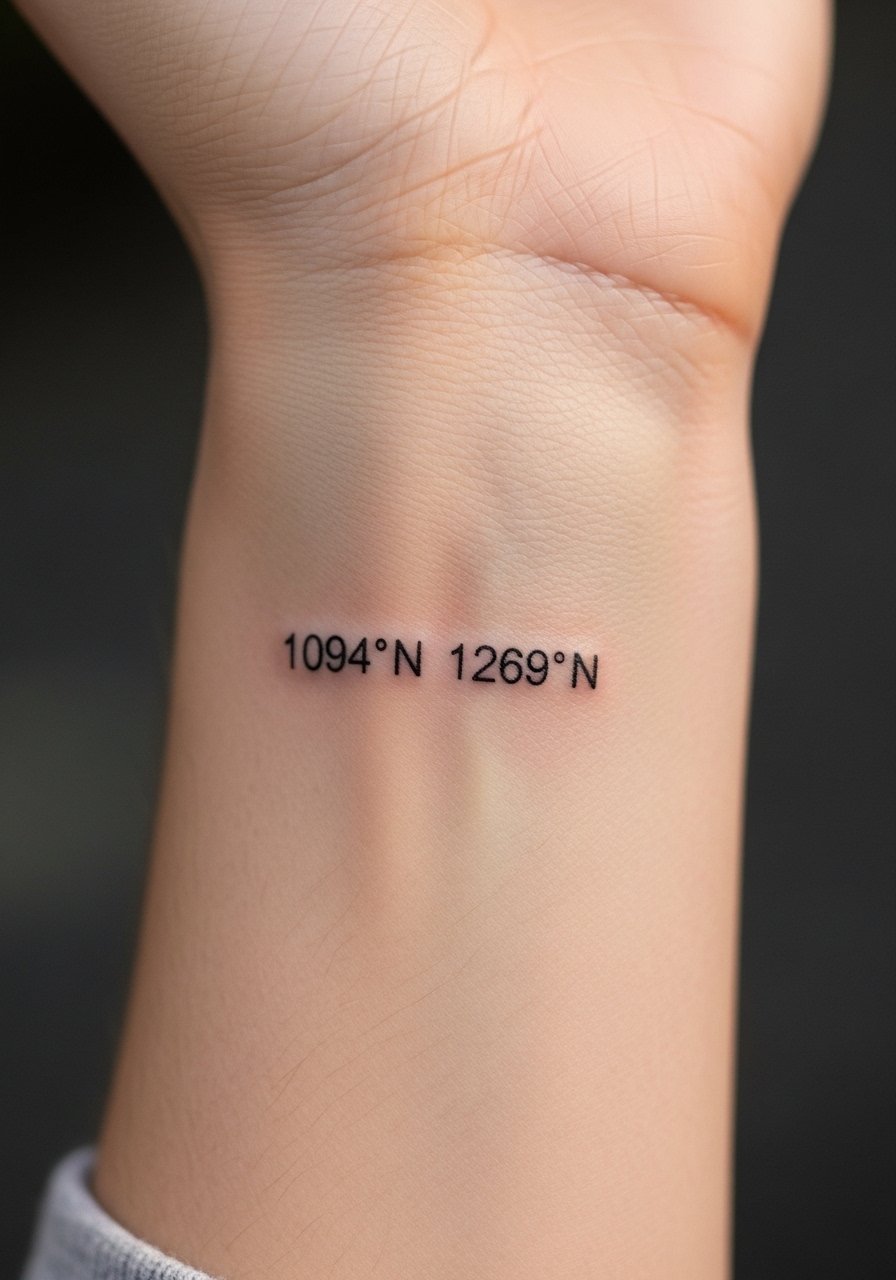
Coordinates are meaningful and subtle. Inner wrist shows them well. Use a simple, spaced font for legibility as numbers can blur. Pain is low. I often tell clients to increase kerning slightly. Avoid adding punctuation that can merge into dots.
29. Micro-Plant Seed Pod on Toe
Style/Technique: Fine Line / Minimalist
Pain Level: Medium (4-6/10)
Session Time: 15-30 minutes
Best For: Tiny, hidden botanical
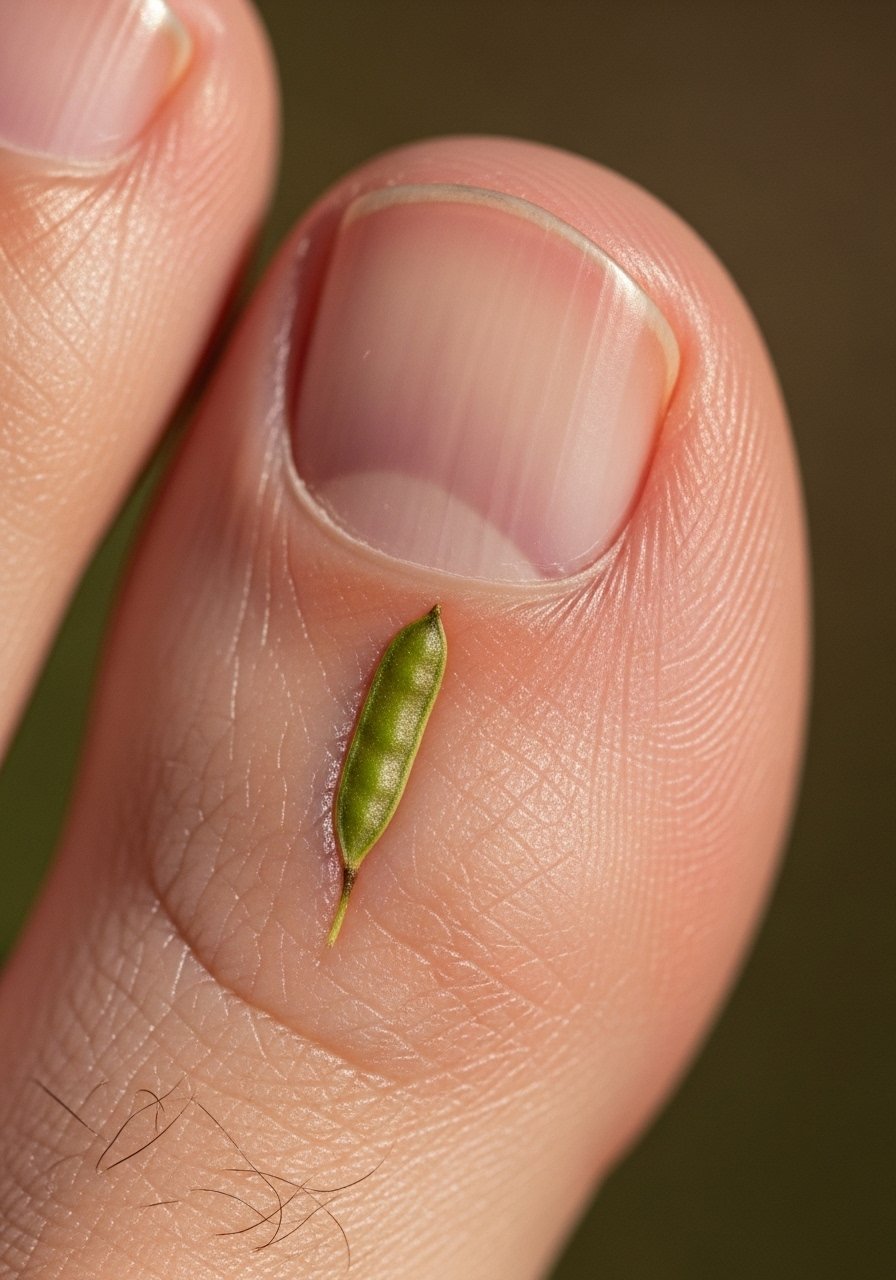
Toe tattoos get friction but read charmingly. Seed pods are small and symbolic. Pain varies—toes can be sharp. Keep lines simple and avoid tiny internal texture. Expect some early wear from shoes; choose placement toward outer toe edge for longer clarity.
30. Micro-Fingerprint Initial on Inner Arm
Style/Technique: Micro-Realism / Personal
Pain Level: Low-Medium (3-4/10)
Session Time: 30-60 minutes
Best For: Personalized monogram or keepsake
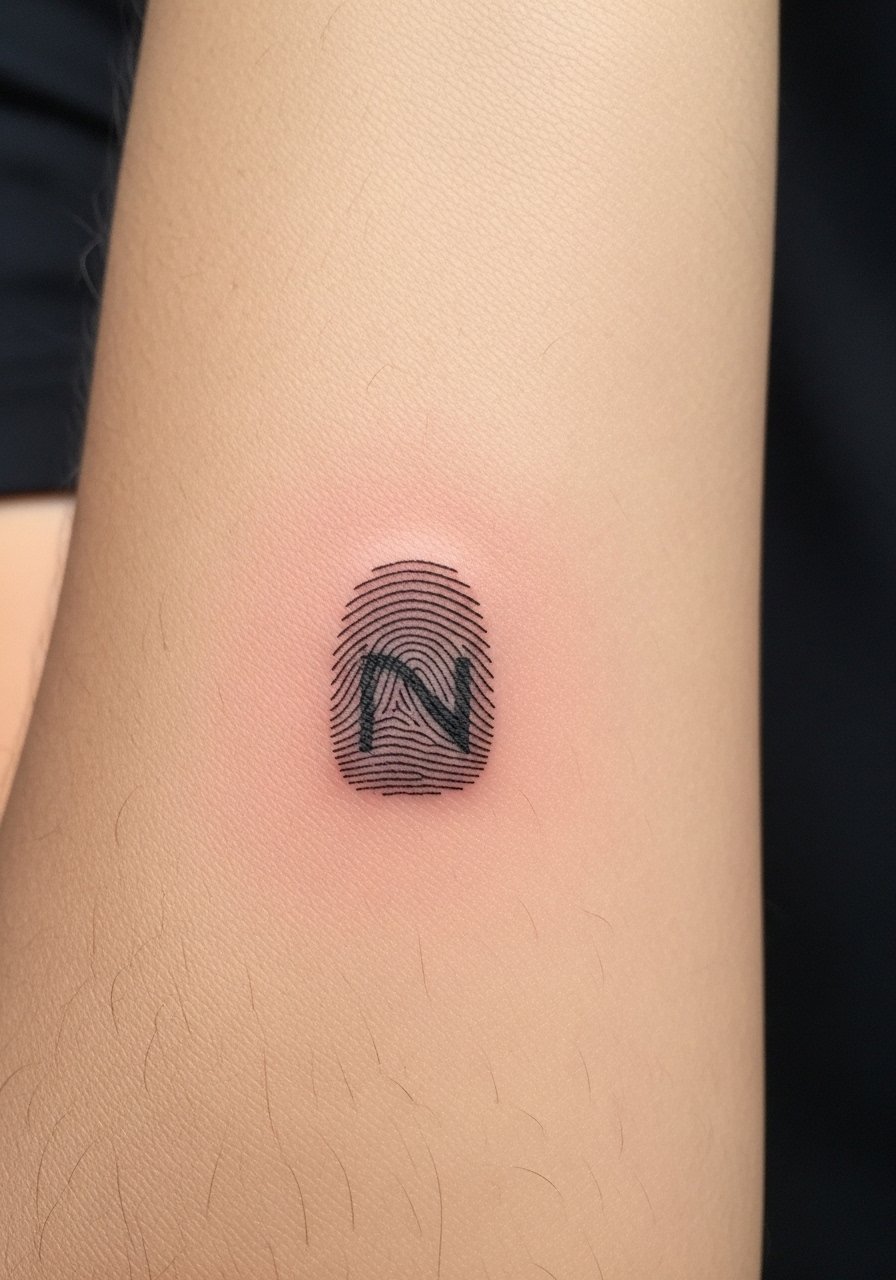
Turning a fingerprint into an initial blends identity and design. Inner arm heals reliably and shows detail. Pain is low. Make sure the artist stylizes ridges for readability—pure replication on a tiny scale often becomes muddled. Ask to see healed on-arm examples before booking.
Tattoo Prep and Aftercare Essentials
Aftercare Essentials:
- Aquaphor Healing Ointment, 14oz tube — Use first 3-5 days for greasy protection
- Saniderm Transparent Adhesive Bandage, 6-inch roll — Second-skin healing option for 24-72+ hours
- CeraVe Fragrance-Free Moisturizing Lotion — Lightweight daily moisturizer for days 4-14
Before Your Appointment:
- Tattoo Numbing Cream 5% Lidocaine — Apply 30-45 min before if artist approves
- Tattoo Stencil Transfer Paper — Handy if mapping placement at home
Long-Term Maintenance:
- SPF 50+ Sunscreen Stick for Tattoos — Daily protection to slow fading
- Mad Rabbit Tattoo Balm, 1oz — For healed tattoo upkeep and vibrancy
- Hustle Butter Deluxe, 2oz — Vegan balm option for healed skin
Optional Comfort Items:
- Tattoo Numbing Spray — For touch-ups or sensitive areas
- Hydrocolloid Bandages (Large) — Useful for small tattoo protection during activities
Frequently Asked Questions
Q: How bad does a tattoo actually hurt?
A: Pain depends on placement and your tolerance. Outer arm or forearm = lower pain. Ribs, spine, fingers, and hands = higher pain. It's more of a prolonged scratching or burning than a single sharp shock. For sensitive areas try numbing cream 5% lidocaine if your artist approves.
Q: How long until a micro tattoo heals?
A: Surface healing is usually 2-3 weeks. Full settling can take 2-3 months. The first week needs the most attention—clean gently with mild soap, use Aquaphor early, then switch to a fragrance-free lotion like CeraVe.
Q: Will tiny tattoos blur fast?
A: Some do. Fine line and single-needle work are more delicate. From what I've seen, micro pieces on low-friction areas (inner forearm, behind ear, collarbone) age much better than on fingers or palms. Ask your artist about slightly bolder line weight for longevity.
Q: Can I exercise after getting a micro tattoo?
A: Wait at least 48-72 hours for low-sweat activity, longer for heavy workouts. Sweating and friction can introduce bacteria and disrupt healing. If you're heading back sooner, cover the spot sparingly and avoid excessive movement. Keep a healing ointment on hand like Aquaphor.
Q: How do I keep color tiny tattoos bright?
A: Sunscreen is non-negotiable. I apply an SPF stick like SPF 50+ Sunscreen Stick whenever the tattoo is exposed. Also keep skin moisturized with a balm or lotion; dry skin dulls color.
Q: Do tattoos look different across skin tones?
A: Yes. Black and gray show well on all skin tones. Bright yellows and whites can be muted on deeper skin. From my conversations with artists, the best approach is to look at healed examples the artist has done on similar skin tones and discuss color saturation.
Q: Should I get a test small tattoo to see my pain tolerance?
A: Only if you actually want that design. Pain varies by placement more than size. If you're nervous, pick a low-pain area like the outer forearm or upper arm and get a small design you genuinely like.
Q: What if my micro tattoo needs a touch-up?
A: Touch-ups are common—especially on fingers, hands, and soles. Expect to return if lines soften or color thins. Talk to your artist about their touch-up policy before booking.
