
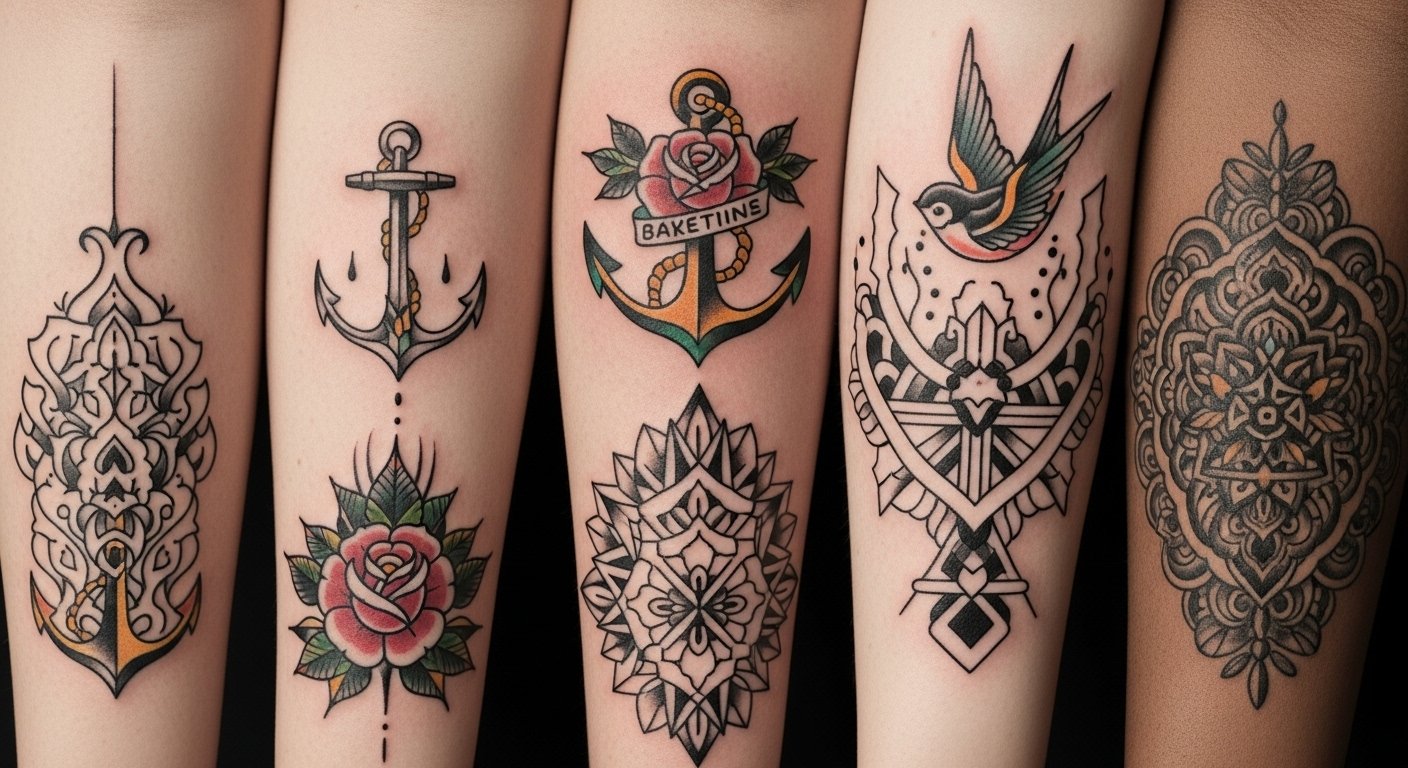
I spent months wanting a subtle tattoo that actually read as part of my skin—not a billboard. The trick I learned was picking white ink designs that work healed, not just fresh. These 26 ideas lean minimalist and exclusive—styles I’ve seen age best and the ones artists keep recommending in 2026.
This roundup focuses on minimalist white ink looks: fine line, micro-realism, subtle geometry, and negative-space pieces. They work well on wrists, ribs, forearms, hands, and behind the ear. From what I’ve seen, artists are pairing white ink with tiny black anchors or using it alone for a very discreet, timeless result.
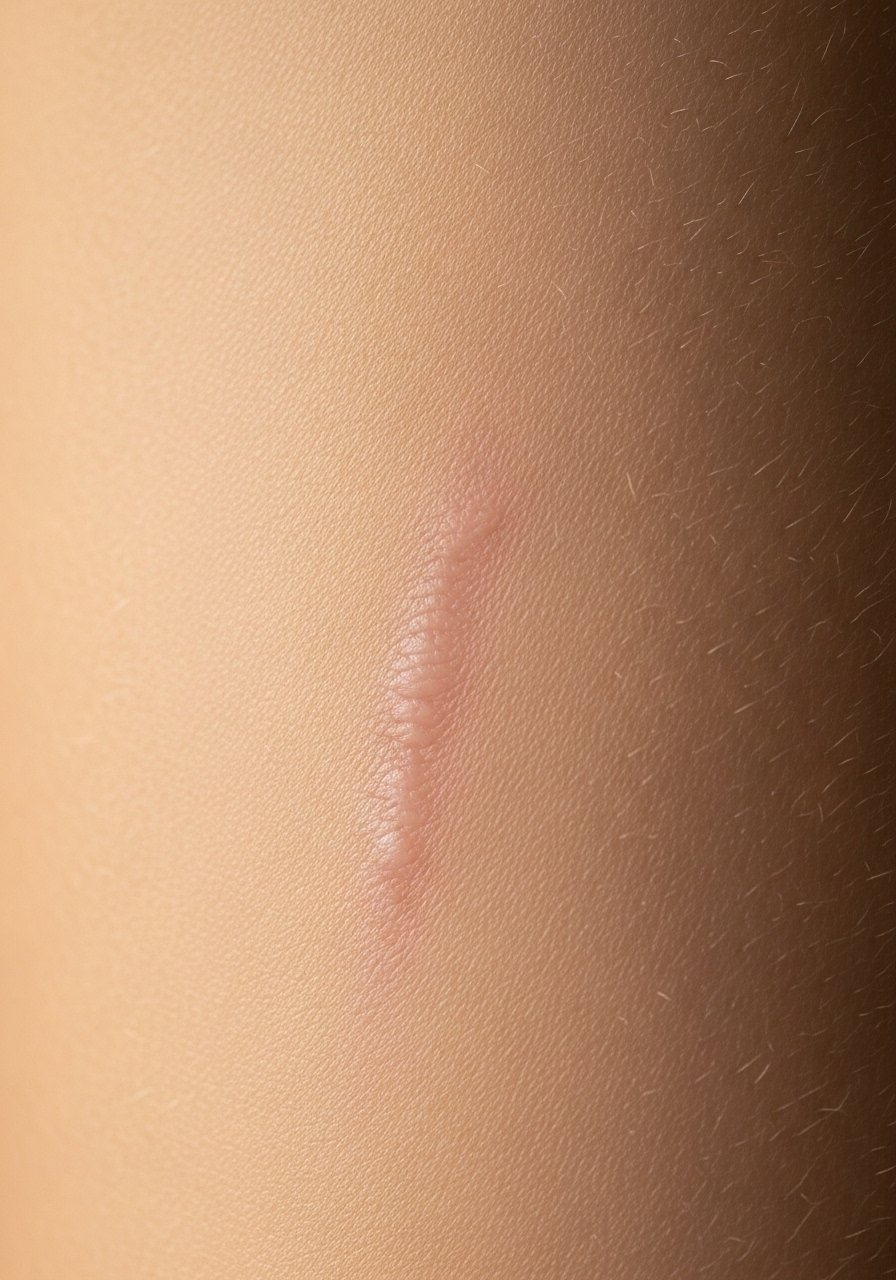
1. Fine Line White Botanical on Inner Forearm
Style/Technique: Fine Line / Minimalist
Pain Level: Low-Medium (3-4/10)
Session Time: 1-2 hours
Best For: First-timers who want quiet detail
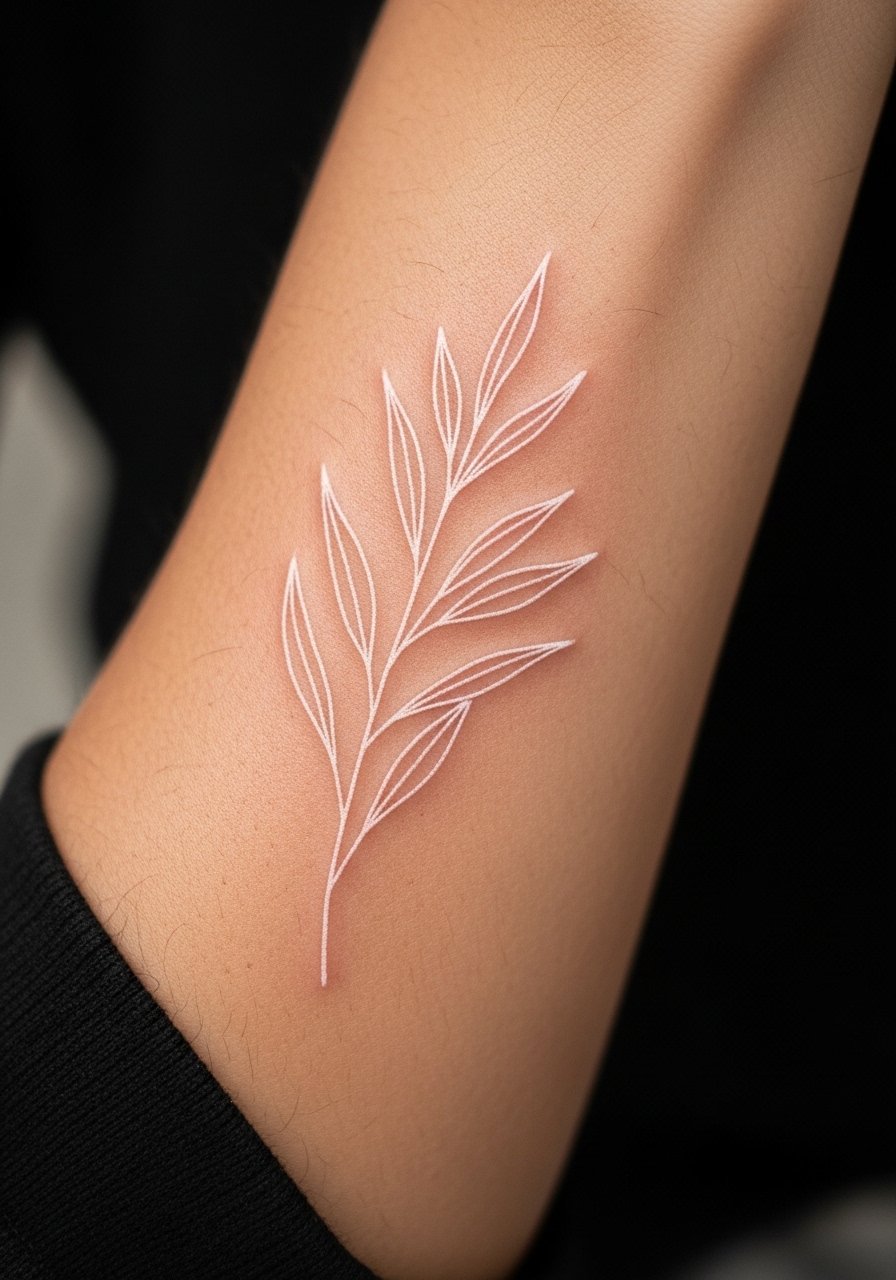
I picked a botanical white piece because it reads like a scar or birthmark after healing—very private. Fine line white takes skill; I asked my artist for healed photos of similar work. Expect light stinging, not sharp pain, and surface healing in 2-3 weeks. White fades and can yellow if overexposed to sun, so SPF maintenance matters. A common mistake is asking for lines too tiny—white needs slightly bolder strokes than black. Ask for subtle raised texture and avoid placing on high-friction spots. This placement hides under sleeves and ages gently; I saw mine soften into the skin over months, keeping a delicate, timeless feel.
2. Micro-Realism White Pet Portrait on Shoulder Blade
Style/Technique: Micro-Realism / White Ink Accent
Pain Level: Low (2-3/10)
Session Time: 1-3 hours
Best For: Meaningful, discreet portraits
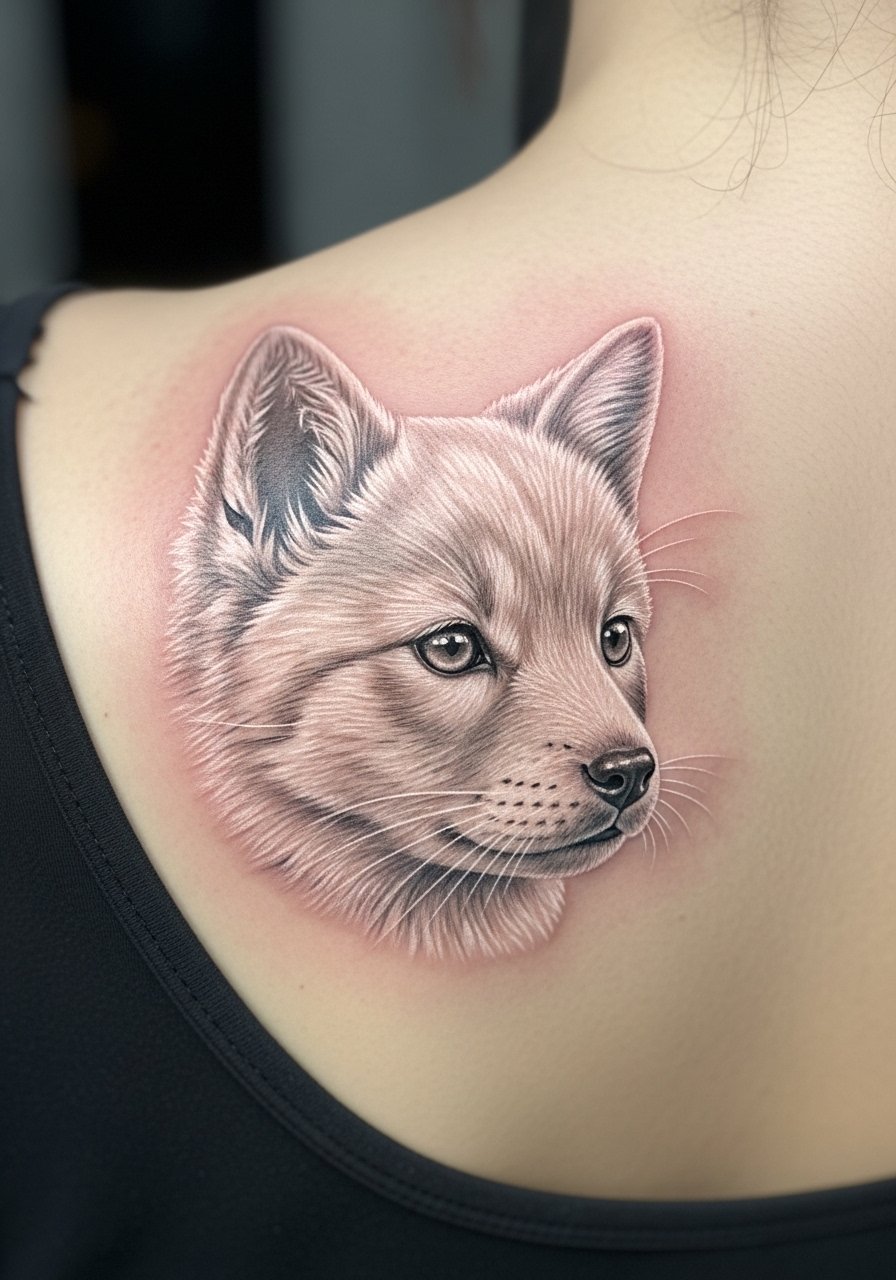
White works beautifully as highlight in a tiny micro-realism pet portrait. I had mine blended with faint gray to suggest fur and kept pure white for whisker and eye reflections. Shoulder blade is a forgiving area for healing and easy to hide. Expect minimal pain and a single-session piece if kept small. White highlights can soften or disappear on deeper skin tones, so talk to an artist about contrast—sometimes a mix of diluted gray with white gives permanence. A common mistake is overusing white; subtlety retains emotion and longevity. Bring good reference photos and ask for healed examples from the artist.
3. Minimalist White Script on Inner Wrist
Style/Technique: Minimalist / Script
Pain Level: Medium (4-5/10)
Session Time: 30–60 minutes
Best For: Small, visible reminders
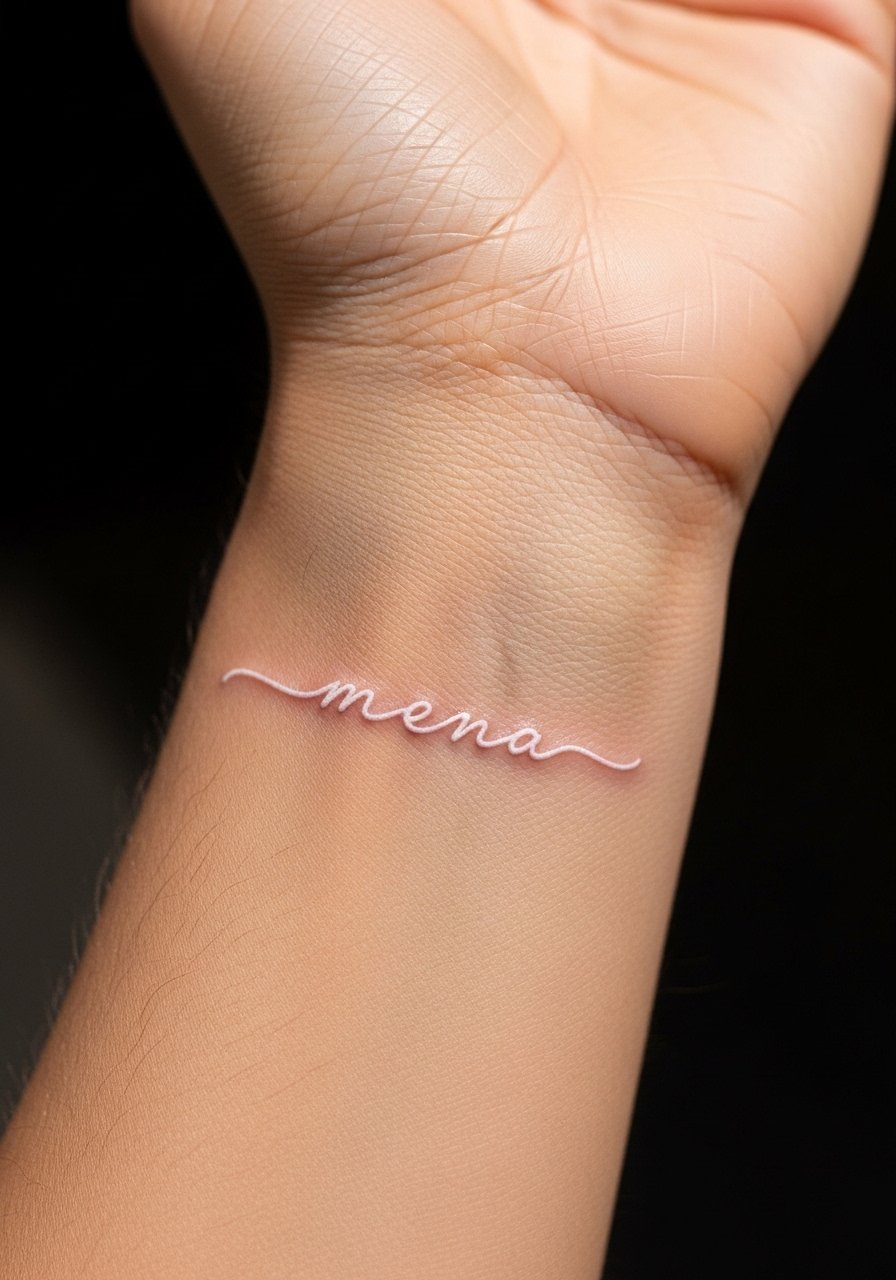
I chose a short word in white script to keep it intimate. The inner wrist can sting more than the forearm but heals quickly. White script looks ghostly when healed; at first it may be very visible, then it softens into the skin. Tip: avoid extremely thin lettering—white needs a touch more weight. Healing requires gentle moisturizing and sun avoidance. I recommend artists who do delicate lettering and can show 6–12 month healed shots. The biggest regret I’ve seen is picking a long phrase—short works best for white.
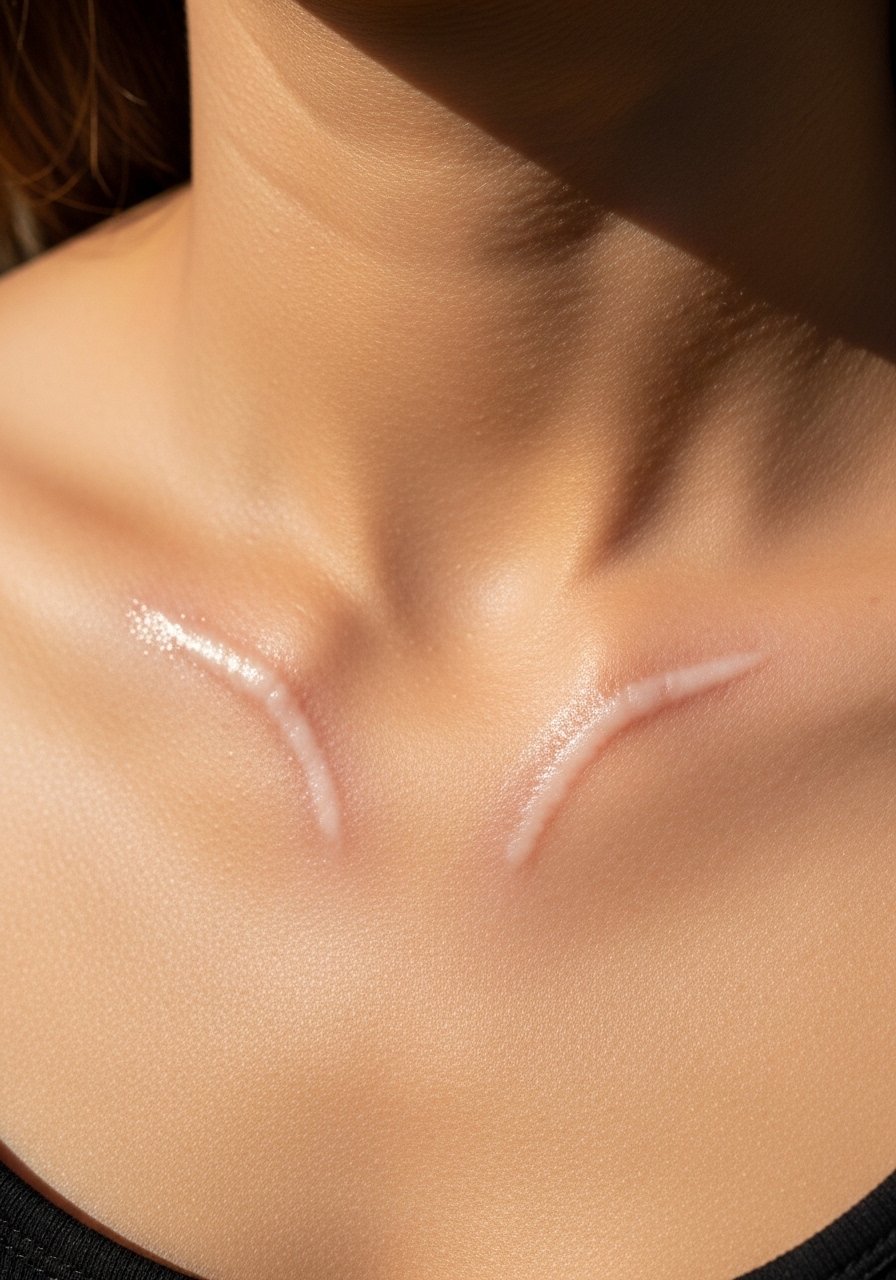
4. White Ink Constellation on Ankle
Style/Technique: Minimalist / Dotwork
Pain Level: Medium (4/10)
Session Time: 45–90 minutes
Best For: Discreet, personal symbols

I love tiny constellations on the ankle because they peek out and don’t demand attention. Dotwork in white reads like tiny scars and keeps a minimalist, meaningful vibe. The ankle can be sensitive; expect some soreness and longer tenderness while shoes rub. White dots tend to blur if placed on very thin skin, so the artist should space dots slightly wider. Aftercare: keep covered from rubbing and use fragrance-free lotion. I asked my artist for micro-dot spacing and got a clean, durable healed result that stayed delicate.
5. White Geometric Band Behind Elbow
Style/Technique: Geometric / Negative Space
Pain Level: High (6-7/10)
Session Time: 1-2 hours
Best For: Statement hidden in motion
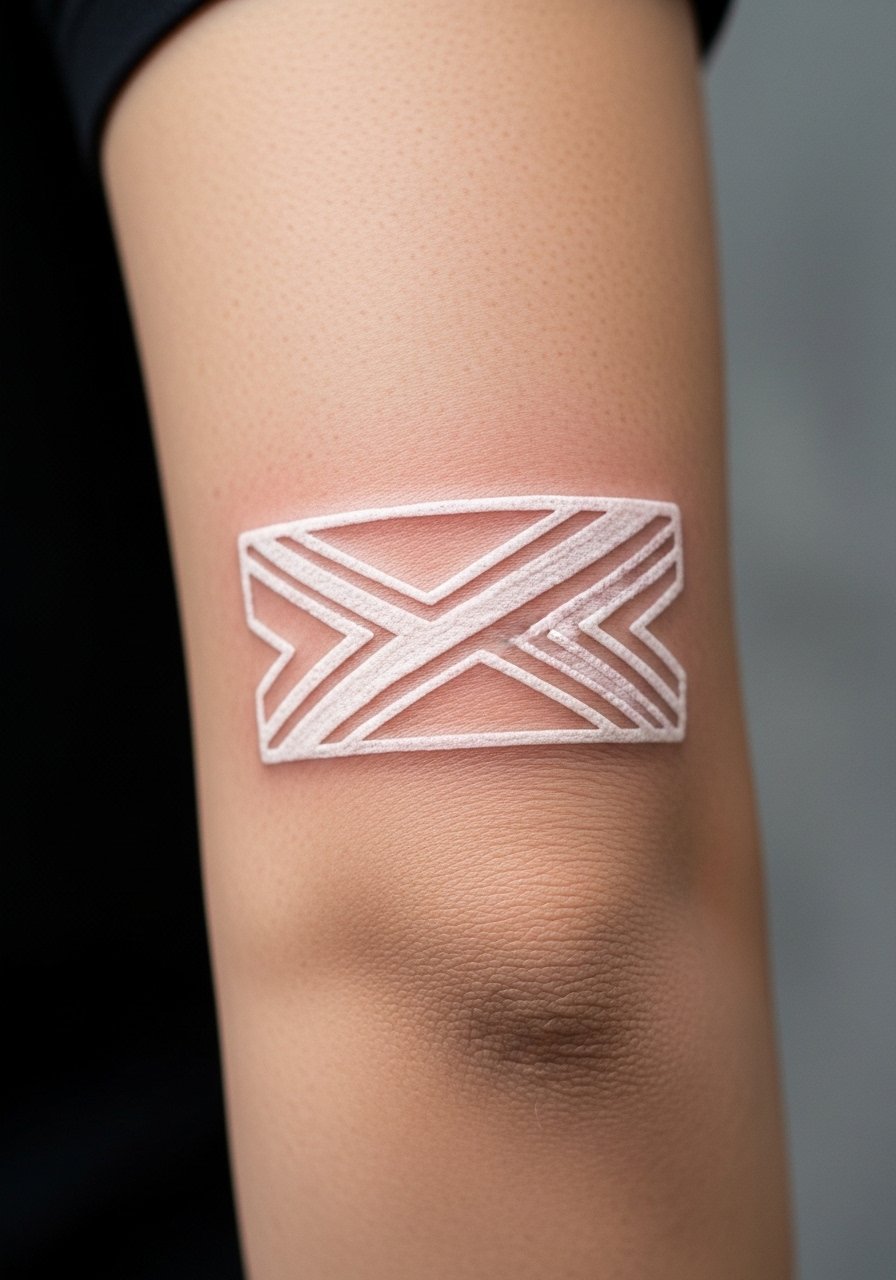
Behind the elbow is finicky: high movement and thin skin make it one of the more painful spots. I chose a geometric band in white because it becomes a subtle visual when the arm moves. Expect slower healing and cautious activity for a couple weeks. White on this area may thin faster; plan touch-ups. A mistake is picking complex interlocking shapes—simplicity holds up better. Ask your artist about movement lines and whether to slightly gap motifs to avoid ink migration. Healed, it looks like a soft, exclusive detail that only you notice unless you point it out.
6. White Ink Freckle Cluster on Cheekbone
Style/Technique: Minimalist / Cosmetic-Style
Pain Level: Low-Medium (3-4/10)
Session Time: 30–60 minutes
Best For: Natural, face-framing accent
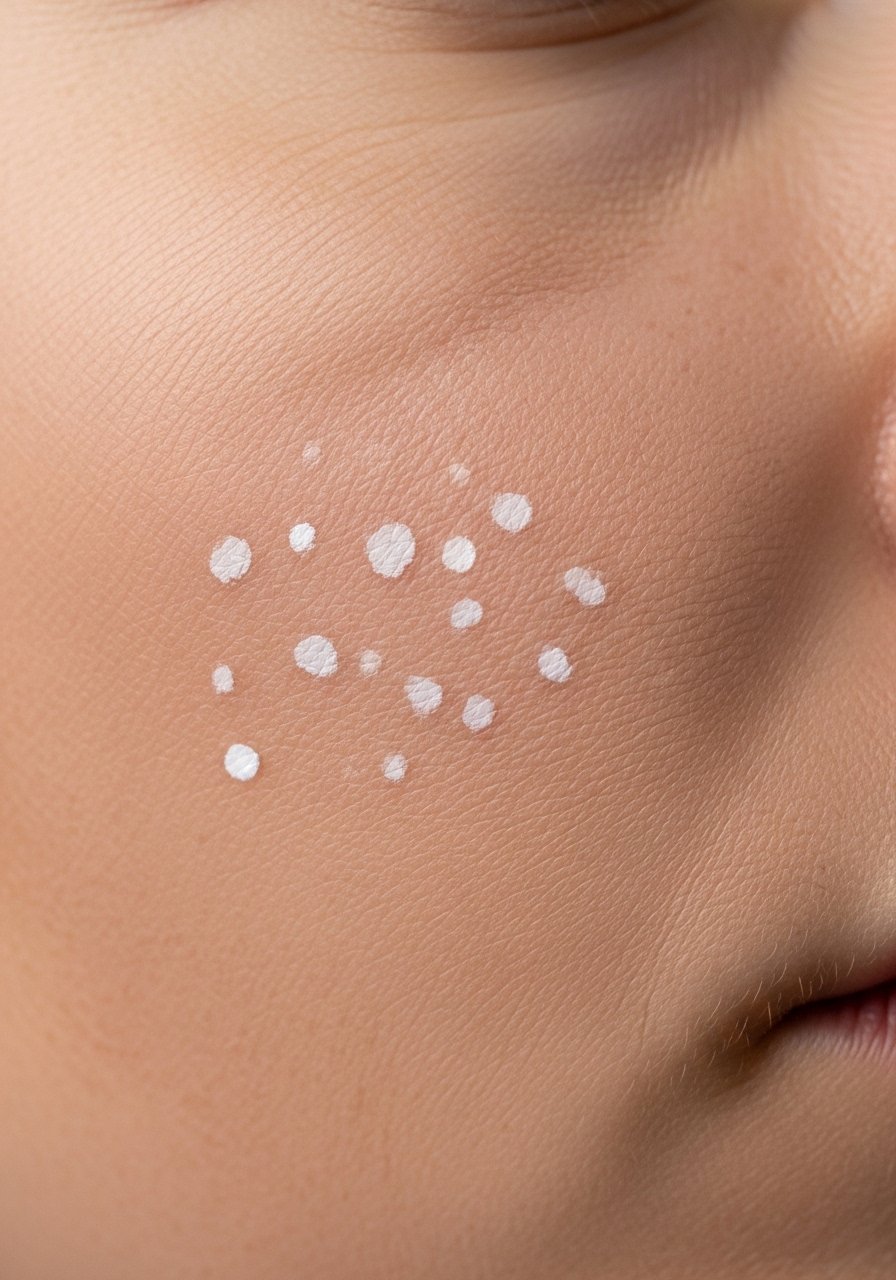
I tested white freckles to add a delicate highlight to my face. Pain is manageable but consider a trusted artist for facial work. White freckles fade naturally and can take on a glow on pale skin. On deeper tones they may be less visible—some artists use a slightly pigmented base to add contrast. A common error is overdoing density; small, sparse clusters look more intentional. Healing requires careful sun protection. I kept mine tiny and asymmetrical; months later they read like a natural skin feature rather than a bold statement.
7. White Floral Ring Around Finger
Style/Technique: Fine Line / Minimalist Ring
Pain Level: Medium (4-6/10)
Session Time: 30–60 minutes
Best For: Subtle symbolic jewelry
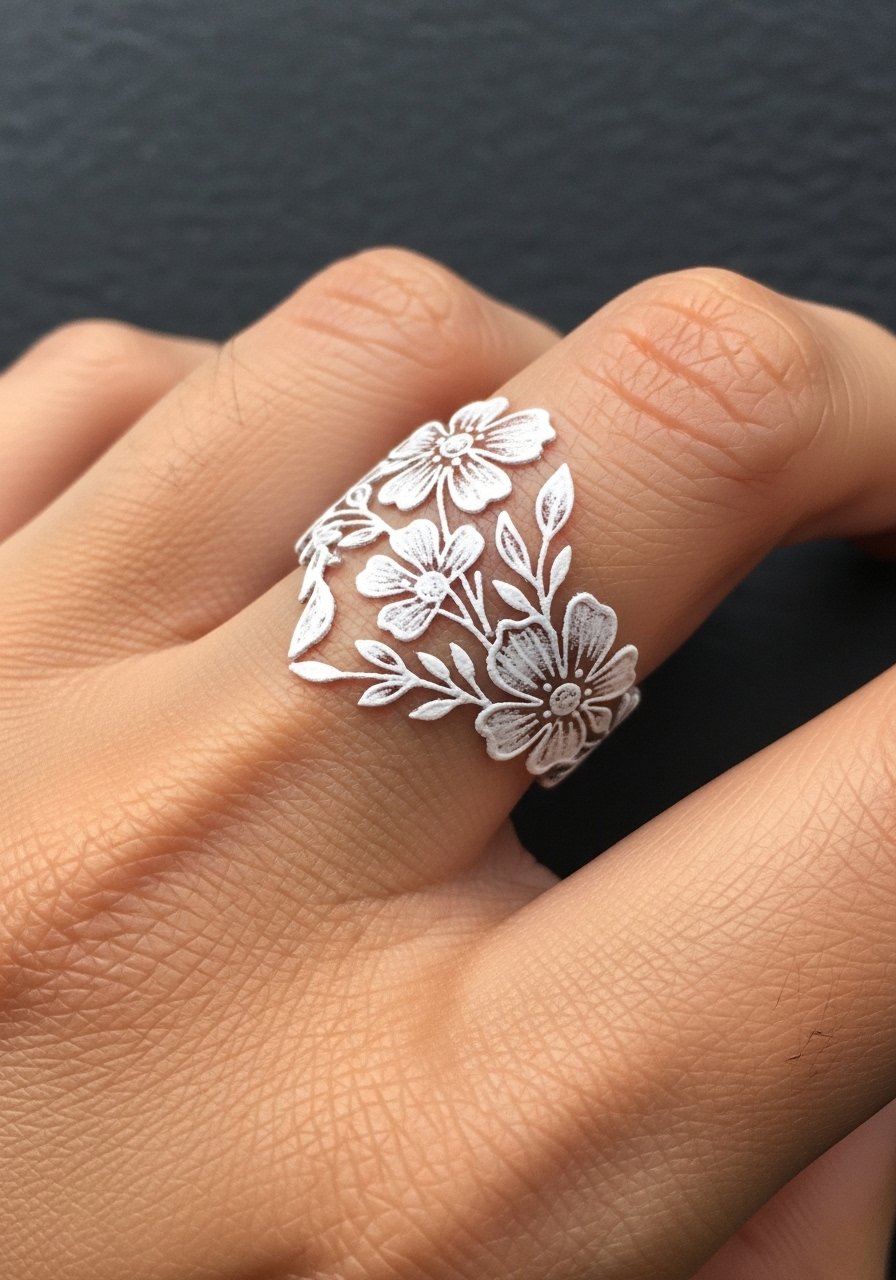
Finger areas are notorious for fading, but a white floral ring feels exclusive while being easy to hide with gloves. Expect moderate pain and a higher chance of early softening due to hand use. I asked my artist to keep the pattern spaced and slightly bold so white lines have staying power. Healing needs minimal washing and avoiding hand-soaking. Common mistake: extremely fine petals that disappear; go for a touch more thickness. I treated mine like jewelry—refreshes may be needed, but the effect is worth it if you want a delicate, private band.
8. White Ink Spine Dot Column
Style/Technique: Minimalist / Linear Dotwork
Pain Level: High (6-8/10)
Session Time: 1-3 hours (may need pause)
Best For: Vertical statement, hidden under hair/clothes

I picked a narrow dot column for the spine to keep a symmetrical, private look. Spine tattoos hurt more because of bone proximity. White dots here become a faint vertical line that reads subtle under clothing. Expect tenderness and longer aftercare due to movement and clothing friction. Avoid super-tight clothes during healing. A mistake is placing dots too close—space keeps dots distinct as the ink settles. If you want to hide it often, this is great; healed, it looks like a faint, personal marking.
9. White Script Nape of Neck
Style/Technique: Minimalist / Script
Pain Level: Low-Medium (3-4/10)
Session Time: 30–60 minutes
Best For: Hidden text, personal reminders
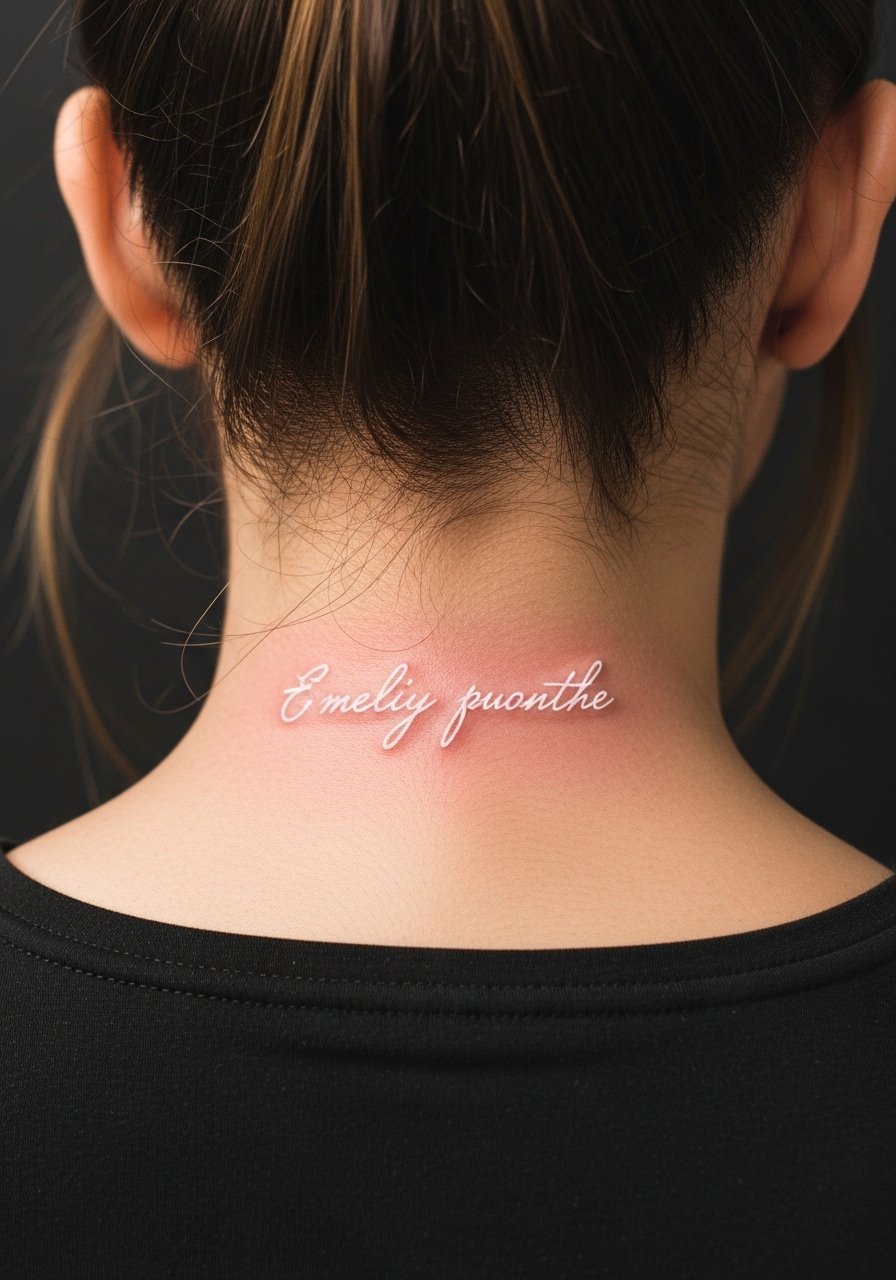
I love tiny nape text because it’s private and shows only when you lift your hair. Pain is mild; the area is soft and heals well. White text fades to a gentle whisper after months, so ask for slightly thicker strokes than black. Avoid long quotes—short words keep clarity. I used moisturizing and SPF once healed to maintain contrast. Artists who do fine script well will advise on letter spacing and weight. Healed, mine reads like a subtle signature, not a billboard.
10. White Ink Ribcage Outline Flower
Style/Technique: Neo-Delicate / Outline
Pain Level: High (7-8/10)
Session Time: 1-3 hours
Best For: Intimate, hidden art
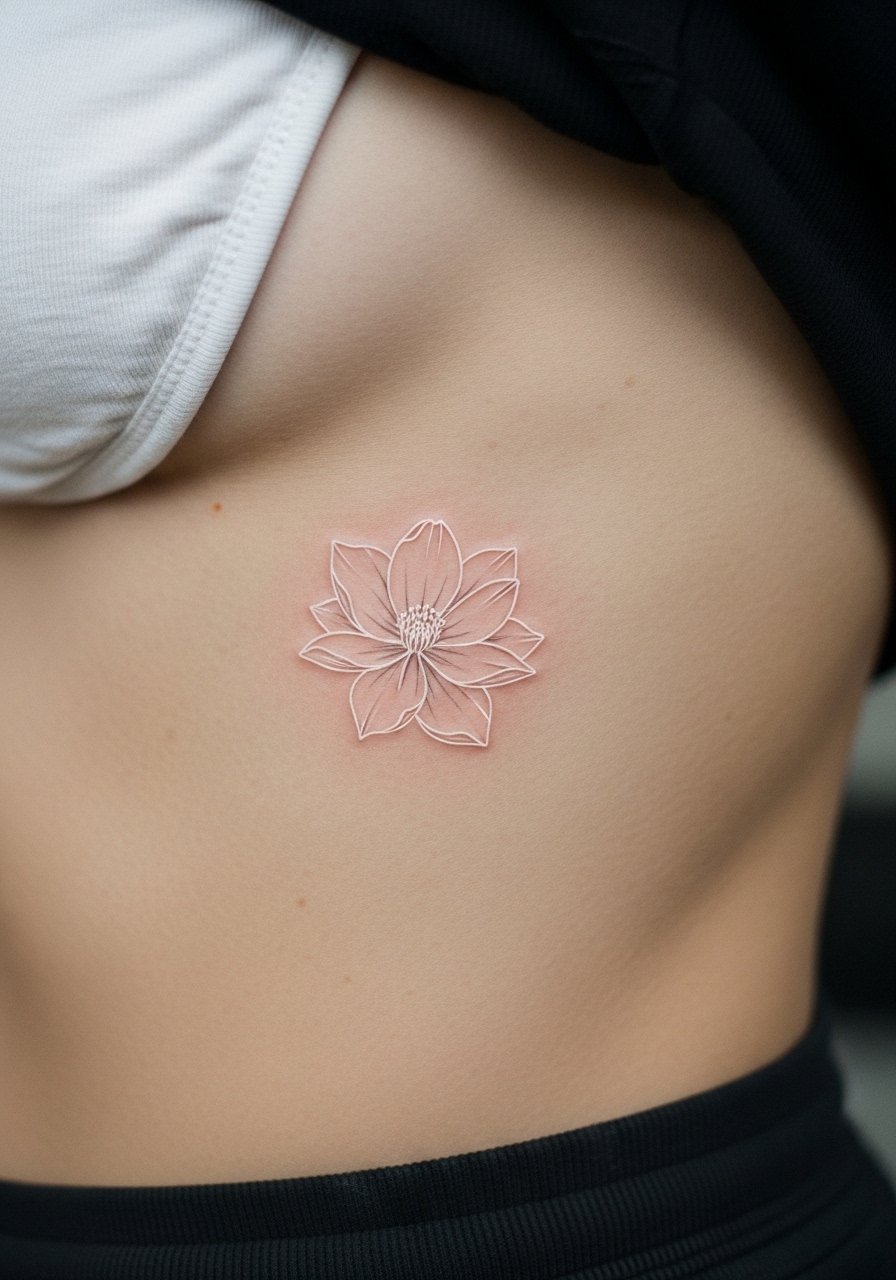
Ribcage is painful, but white outline flowers feel intimate and exclusive. I planned for breaks and brought a playlist. White lines can blur with movement, so the artist should use slightly stronger line weight than black outlines. Healing needs care—avoid tight clothing and heavy activity. A common mistake is choosing too intricate a bloom; simple petal outlines hold best. Over time, white on ribs tends to soften into the skin, which is what I wanted: a private reminder that only shows when I choose.
11. White Ink Behind Ear Crescent
Style/Technique: Minimalist / Micro-Symbol
Pain Level: Low (2-3/10)
Session Time: 15–30 minutes
Best For: Tiny hidden accents
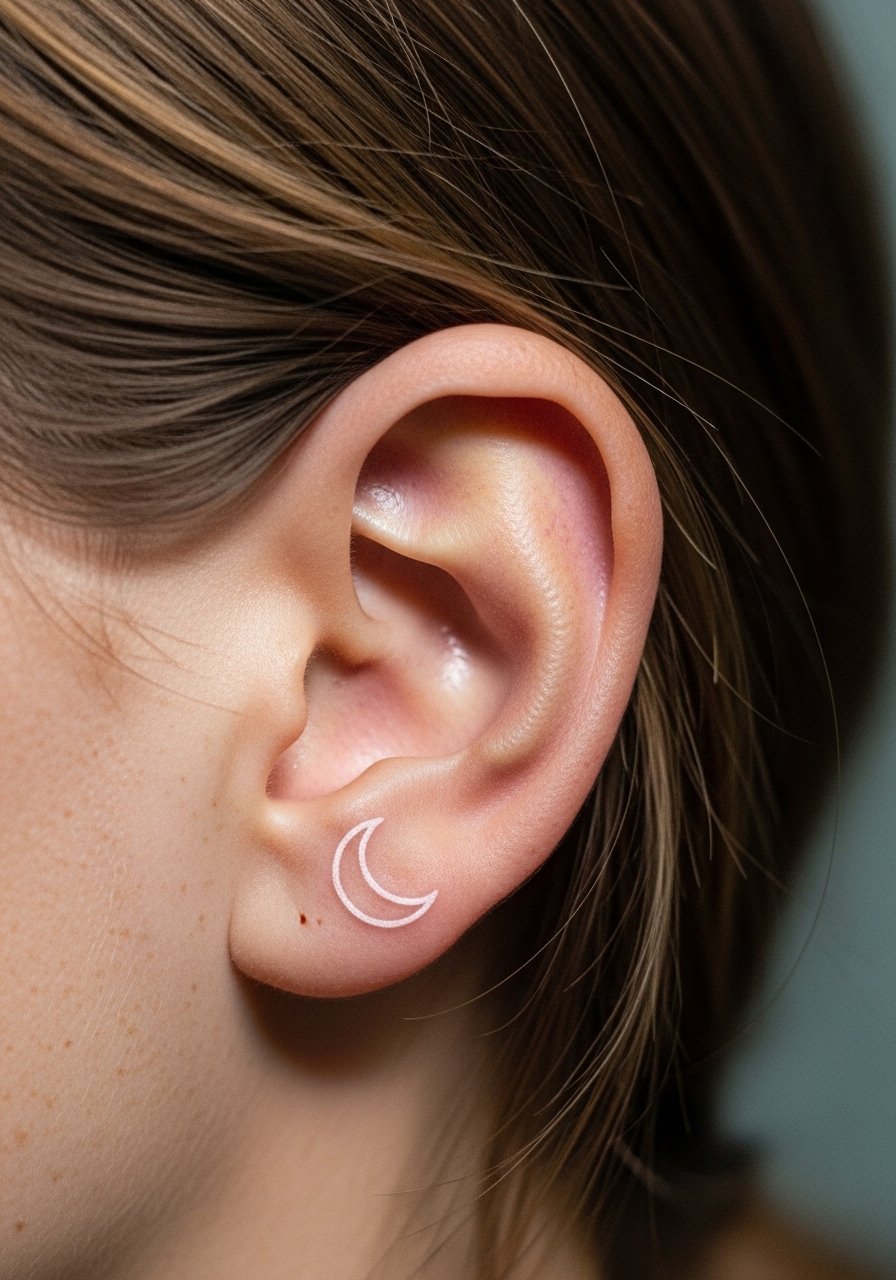
Behind-ear white micro symbols are nearly painless and very private. I chose a crescent for its timeless, calm feeling. The area heals fast but can rub against hair; keep hair away for the first week. White ink here is subtle and may require a touch-up if it settles shallow. Artists who do micro work with steady hands are best. Avoid complex shapes; tiny simple symbols keep their shape and feel exclusive without demanding attention.
12. White Ink Scar Camouflage on Forearm
Style/Technique: Cosmetic / Camouflage
Pain Level: Low-Medium (3-4/10)
Session Time: 1-2 hours
Best For: Blending scars or stretch marks
I experimented with white ink to soften a raised scar. Artists trained in scar work can match tone and texture, creating a subtle blend. This is an under-covered angle I’ve seen less often but with great results. Pain is modest; healing depends on scar tissue. The pitfall is expecting complete invisibility—white can integrate the scar, making it look more like natural skin in texture and tone. Ask for healed portfolios of scar blending specifically. Long-term maintenance includes sunscreen and moisturizing to keep the area even.
13. White Ink Delicate Mandala on Sternum
Style/Technique: Fine Line / Geometric
Pain Level: High (6-8/10)
Session Time: 1-3 hours
Best For: Centerpiece, intimate symmetry
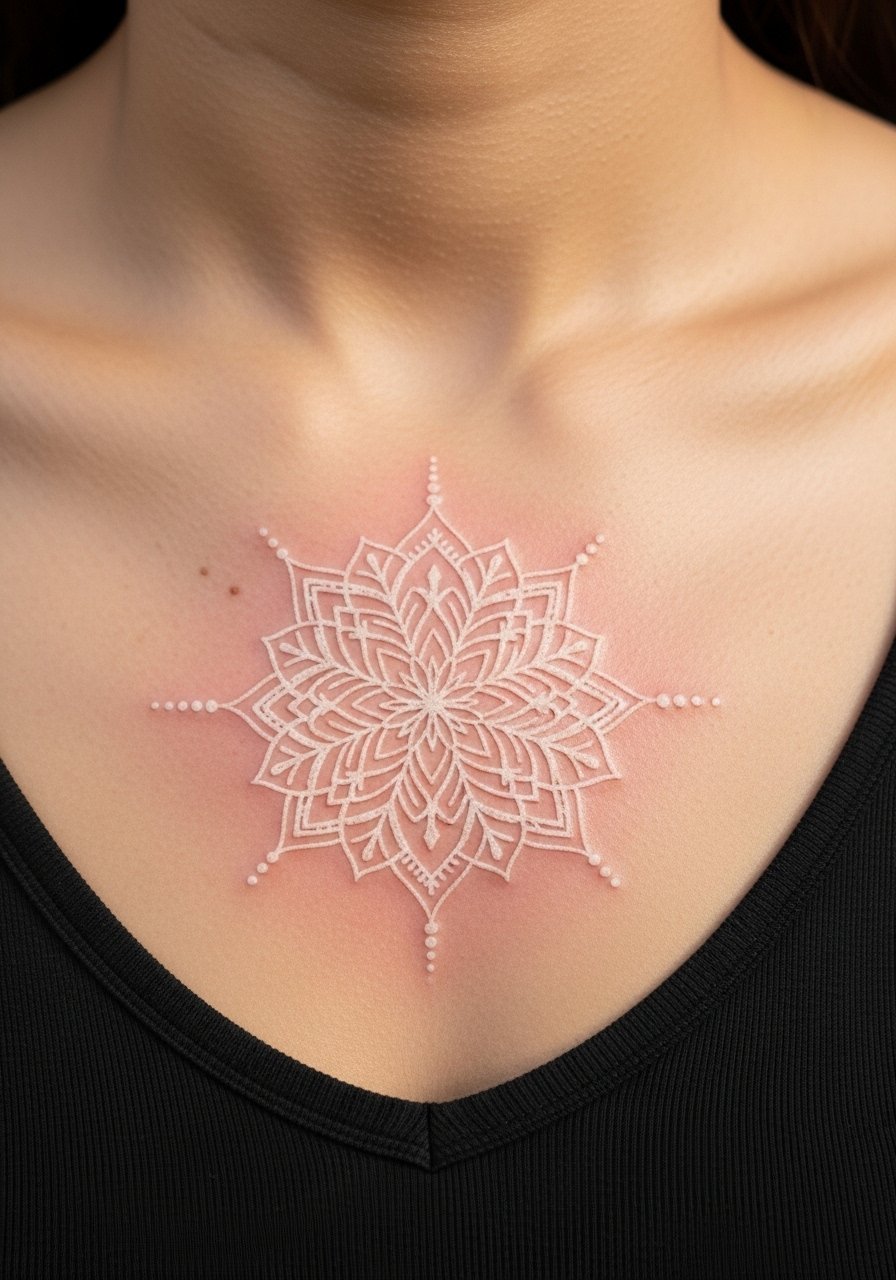
The sternum is sensitive, but a white mandala reads like jewelry. I had short breaks to manage discomfort. White lines here soften over time, giving a lace-like effect under clothing. Artists should slightly thicken the central lines to resist early blur. Healing needs breathable clothing and sleeping adjustments. A common mistake is over-detailing; the sternum favors clear negative space and balanced weight. Healed, this felt like a private ornament rather than a loud chest piece.
14. White Ink Collarbone Accent Arcs
Style/Technique: Minimalist / Accent Lines
Pain Level: Low-Medium (3-4/10)
Session Time: 30–60 minutes
Best For: Subtle highlights under clothing
I like collarbone arcs because they catch light and look like natural highlights. Pain was brief and manageable. These accents age well if kept simple—thin multiple strokes can blur. I asked for slightly curved, spaced lines to follow my bone structure. Avoid placing too close to clothing seams during healing. Sunscreen helps prevent yellowing. Healed, the arcs read like a deliberate, elegant emphasis on the collarbone.
15. White Ink Tiny Star Cluster on Finger Side
Style/Technique: Minimalist / Tiny Icon
Pain Level: Medium (4-6/10)
Session Time: 15–30 minutes
Best For: Subtle visible charm

Finger sides are higher maintenance, but small white star clusters feel personal and discreet. Expect more frequent touch-ups; hands see the most abrasion. The pain is moderate; healing needs careful hand care. Artists should slightly thicken star points to prevent early loss. I used hand lotion and avoided heavy scrubbing during the initial weeks. If you want a tiny visible charm that’s intimate, this placement works well with the caveat of maintenance.
16. White Ink Minimalist Mountain on Ankle Inner Side
Style/Technique: Minimalist / Line Art
Pain Level: Medium (4/10)
Session Time: 30–60 minutes
Best For: Travel-inspired, hidden meaning
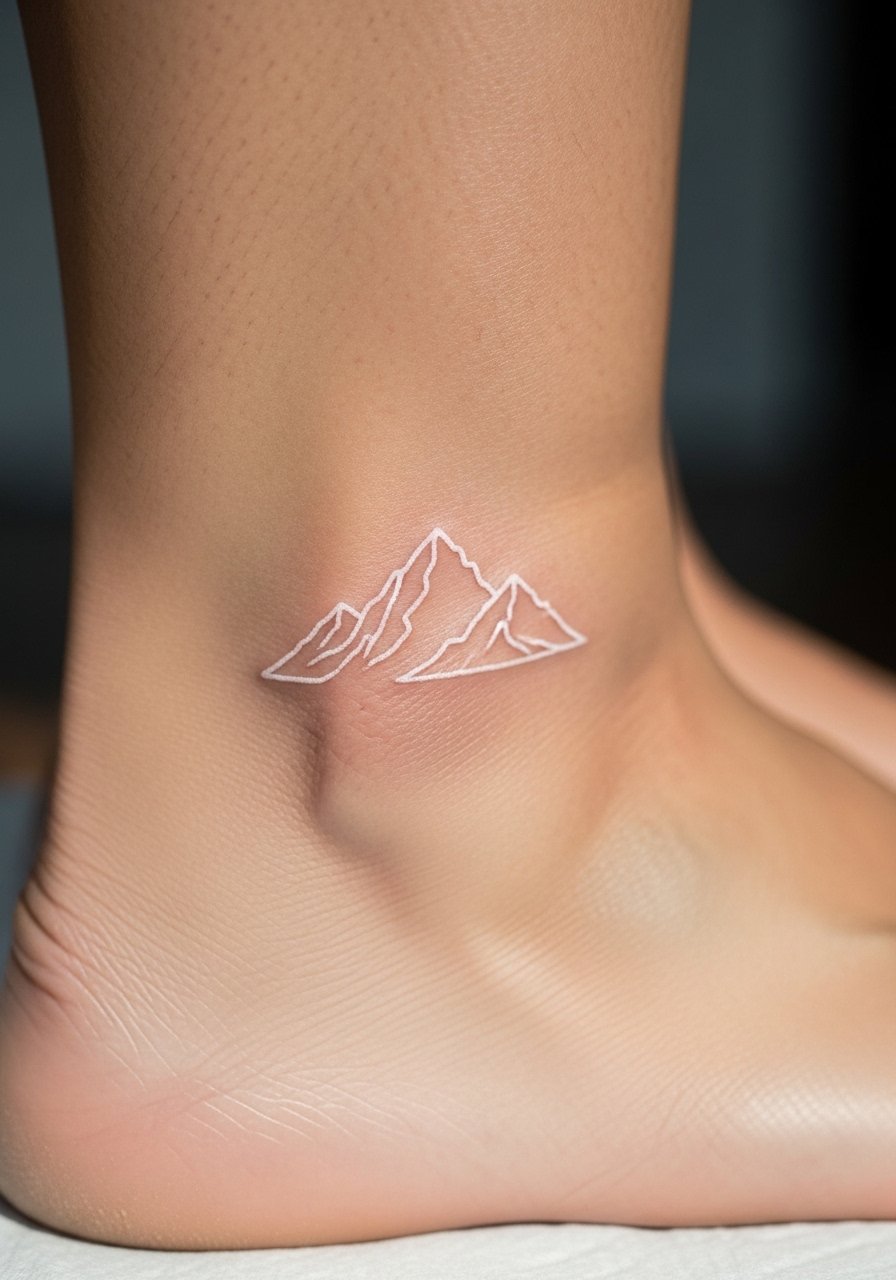
I picked a tiny mountain outline to nod to places I love. The inner ankle is sensitive but heals well if you avoid tight socks. White lines here mellow over months and become an understated badge. Avoid ultra-thin peaks; give the lines slight weight. Artists who specialize in fine line landscapes will advise on spacing for longevity. I keep mine protected from the sun and moisturize to keep the skin supple and the lines readable.
17. White Ink Thin Cross on Sternum Side
Style/Technique: Minimalist / Symbol
Pain Level: Medium (4-6/10)
Session Time: 20–40 minutes
Best For: Subtle symbols with private meaning
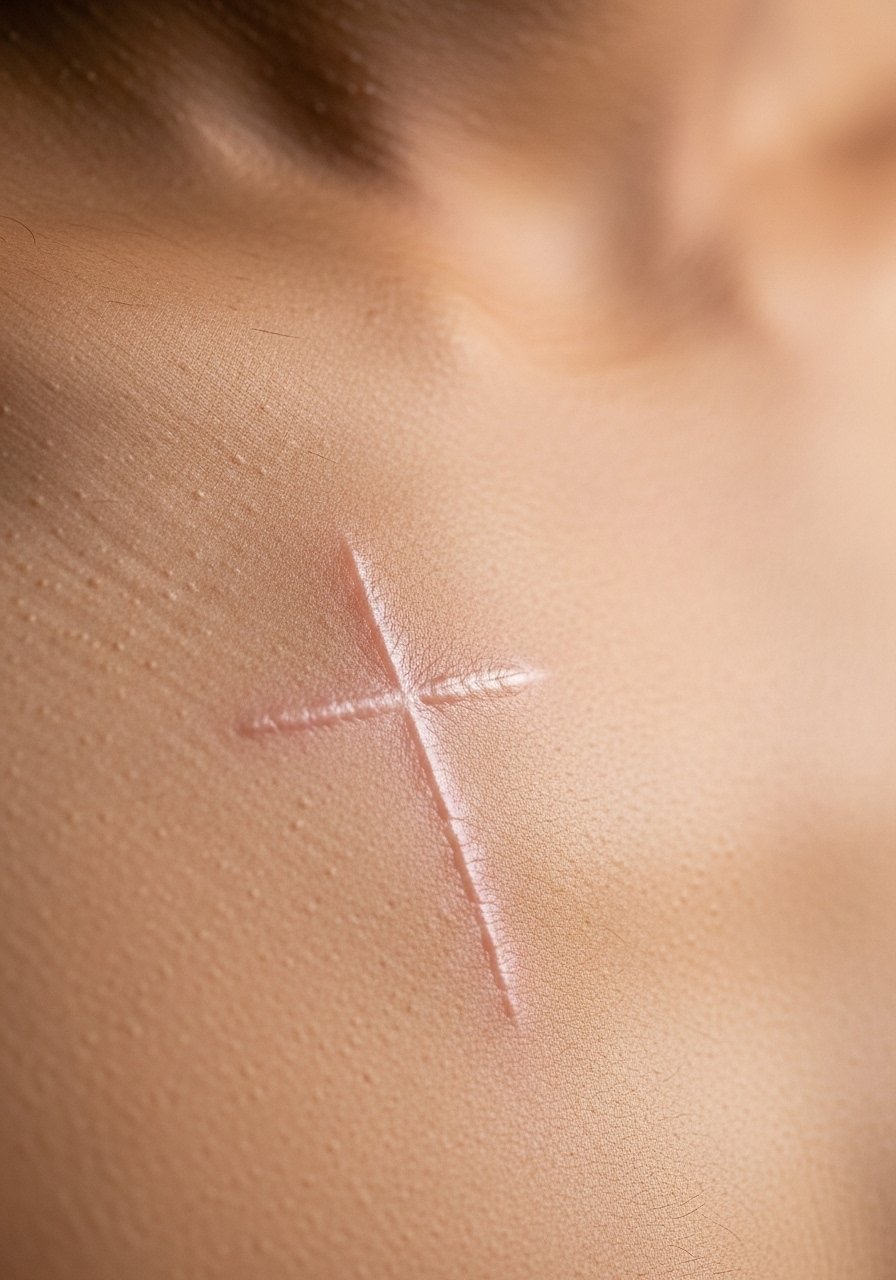
A thin white cross is quiet and personal. The sternum side has some sensitivity, but the session is short. White as a religious or spiritual marker reads softer than bold black. I asked for a slightly thicker line than I thought necessary to ensure longevity. Heal gently—avoid chest-strapping clothing for a week. The common mistake is pick extremely tiny crosses that vanish; give it a touch more presence and it stays meaningful without being obvious.
18. White Ink Minimal Wave Behind Ear Lobe
Style/Technique: Minimalist / Micro-Line
Pain Level: Low (2-3/10)
Session Time: 15–30 minutes
Best For: Tiny movement-friendly marks

Behind-ear micro waves are nearly painless and feel like a private signature. I liked how it showed when hair was tucked. White here stays subtle and needs minimal upkeep. Artists who do micro-lines will recommend slightly bolder strokes than black micro-lines. Avoid complex shapes; small curves work best. Healed, it looks like a faint highlight that only you or a few friends notice.
19. White Ink Ribcage Script Word
Style/Technique: Minimalist / Script
Pain Level: High (7-8/10)
Session Time: 30–90 minutes
Best For: Private phrases and single words
Ribcage script in white is intimate and reads like a secret. Pain is significant, so plan rest and breaks. White letters soften into an understated mark; keep the word short for clarity. I asked my artist to slightly increase stroke width and space letters for better longevity. Healing requires loose clothing and patient aftercare. A mistake is choosing tightly cursive fonts that blur; pick clean, open lettering and check healed examples from your artist.
20. White Ink Subtle Sunburst on Sternum Upper
Style/Technique: Minimalist / Radiating Lines
Pain Level: Medium-High (5-7/10)
Session Time: 30–90 minutes
Best For: Hidden radiance, center-focused pieces
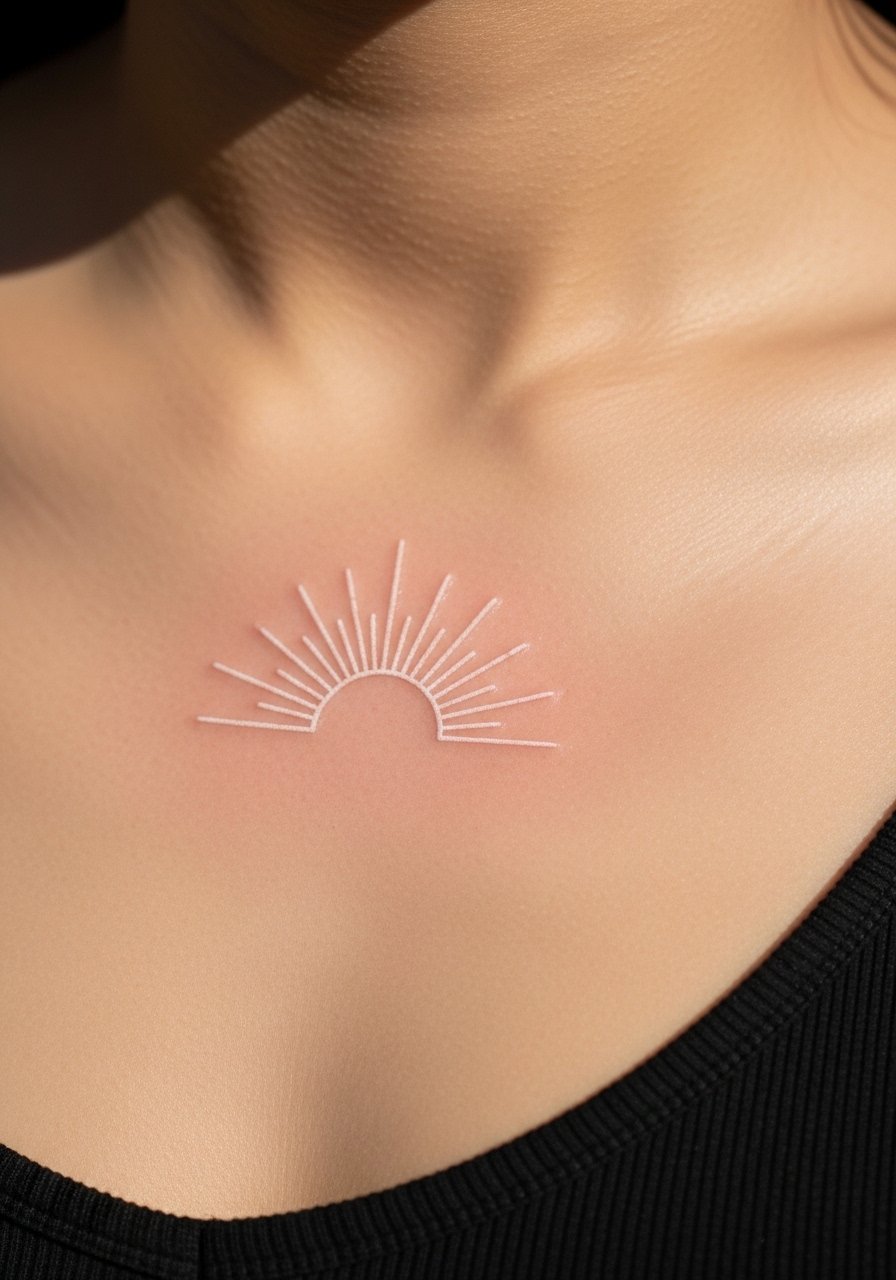
A tiny sunburst above the sternum looks like skin catching light. Pain is manageable but expect tenderness. White rays should be kept short and spaced; long rays blur as they settle. I avoided too many rays and kept negative space for clarity. Healing involves avoiding chest compression and wearing soft fabrics. Healed, it looks like a personal glow rather than a bold design.
21. White Ink Tiny Heart on Inner Thumb
Style/Technique: Minimalist / Micro-Symbol
Pain Level: High (5-7/10)
Session Time: 15–30 minutes
Best For: Intimate visible mark

Thumb tattoos are exposed and heal tricky, but a tiny white heart feels private and meaningful. Expect more fading and touch-ups. Pain is sharper due to thin skin. I asked for a rounded heart with a bit of weight so it survives daily use. Avoid elaborate details; keep it simple. Aftercare is crucial—limit water immersion and heavy gripping in the first two weeks. Healed, mine reads like a soft dot of affection.
22. White Ink Minimal Arrow on Rib Side
Style/Technique: Minimalist / Line Arrow
Pain Level: High (7/8/10)
Session Time: 20–40 minutes
Best For: Directional symbolism, hidden placement
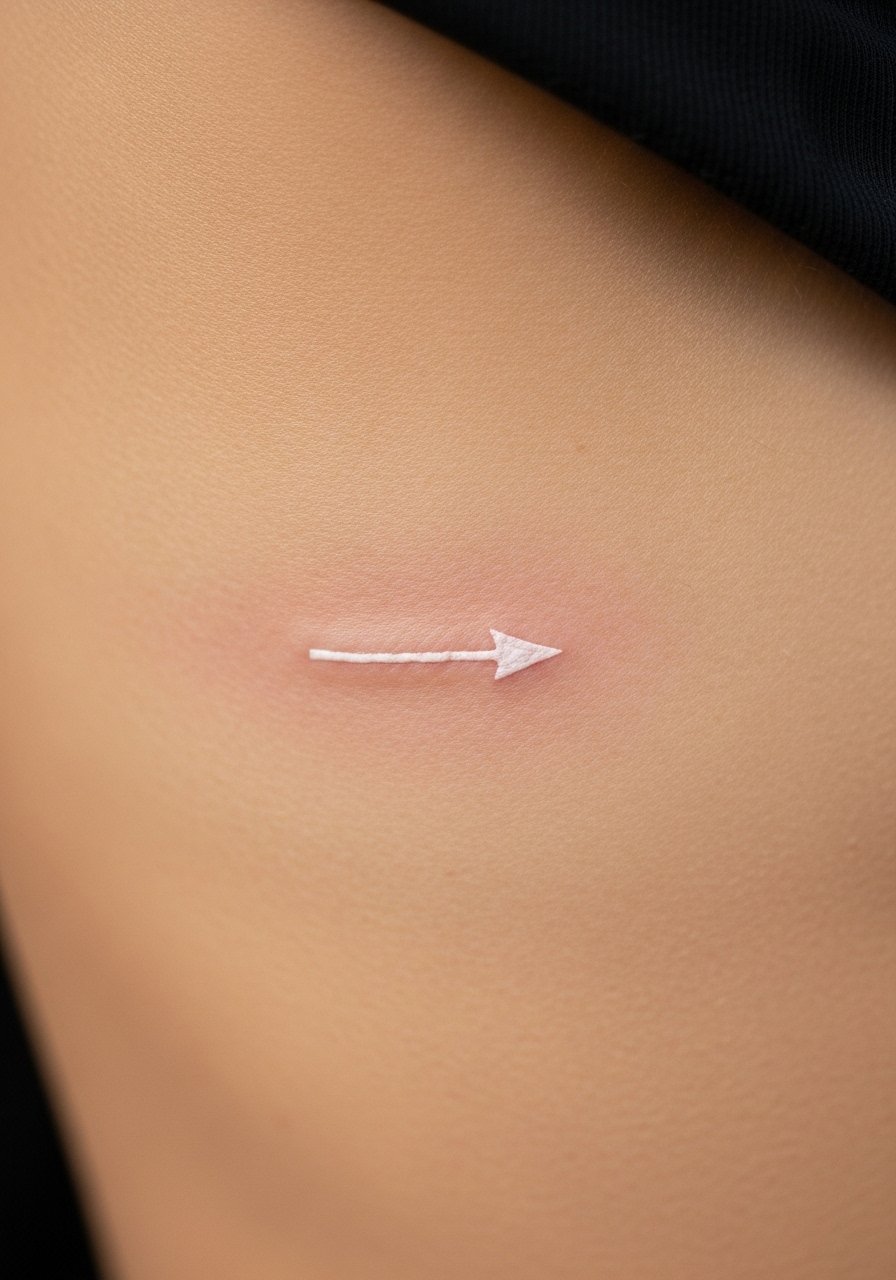
An arrow on the rib side feels private and symbolic. Pain is high but the session short. White arrows should have modest length and clear negative space; too long a shaft blurs. I had mine positioned to follow my rib curve. Healing needs gentle movement and breathable clothing. Ask artists experienced with rib work and white lines. Healed, the arrow reads like a faint guidepost on the body.
23. White Ink Subtle Ear Helix Line
Style/Technique: Micro-Line / Minimalist
Pain Level: Low (2-3/10)
Session Time: 10–20 minutes
Best For: Tiny decorative accents
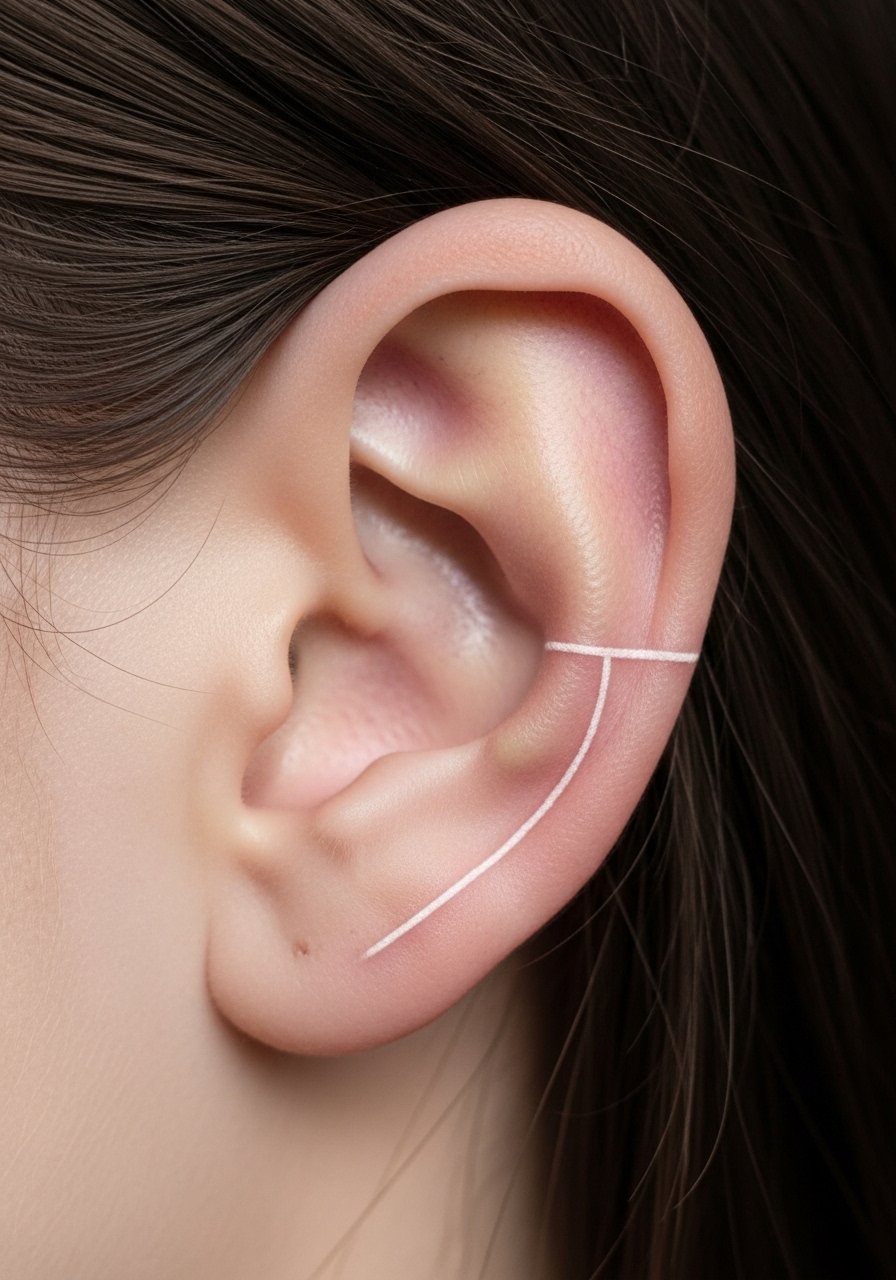
Helix micro-lines are quick and nearly painless. I chose a short white line to accent my ear cartilage. White here is delicate and can fade, but the visual is private and classy. Keep it simple; don’t add bulky patterns that the small area can’t hold. Aftercare involves avoiding headphones that press on the area. Healed, it feels like a tiny, intentional flourish.
24. White Ink Abstract Brush Stroke on Shoulder Top
Style/Technique: Minimalist / Brush Stroke
Pain Level: Low-Medium (3-4/10)
Session Time: 30–60 minutes
Best For: Artistic, modern accents

I wanted something art-forward but subtle—an abstract white brush stroke fit. Shoulders heal well and tolerate movement. White strokes should be bold enough to retain shape as they settle. The common mistake is too thin an edge that vanishes; ask for a slightly textured finish. Healed, it looks like paint settled into skin, modern and private.
25. White Ink Tiny Eye on Inner Elbow
Style/Technique: Micro-Realism / Symbol
Pain Level: High (6-7/10)
Session Time: 30–60 minutes
Best For: Protective symbols, discreet visibility
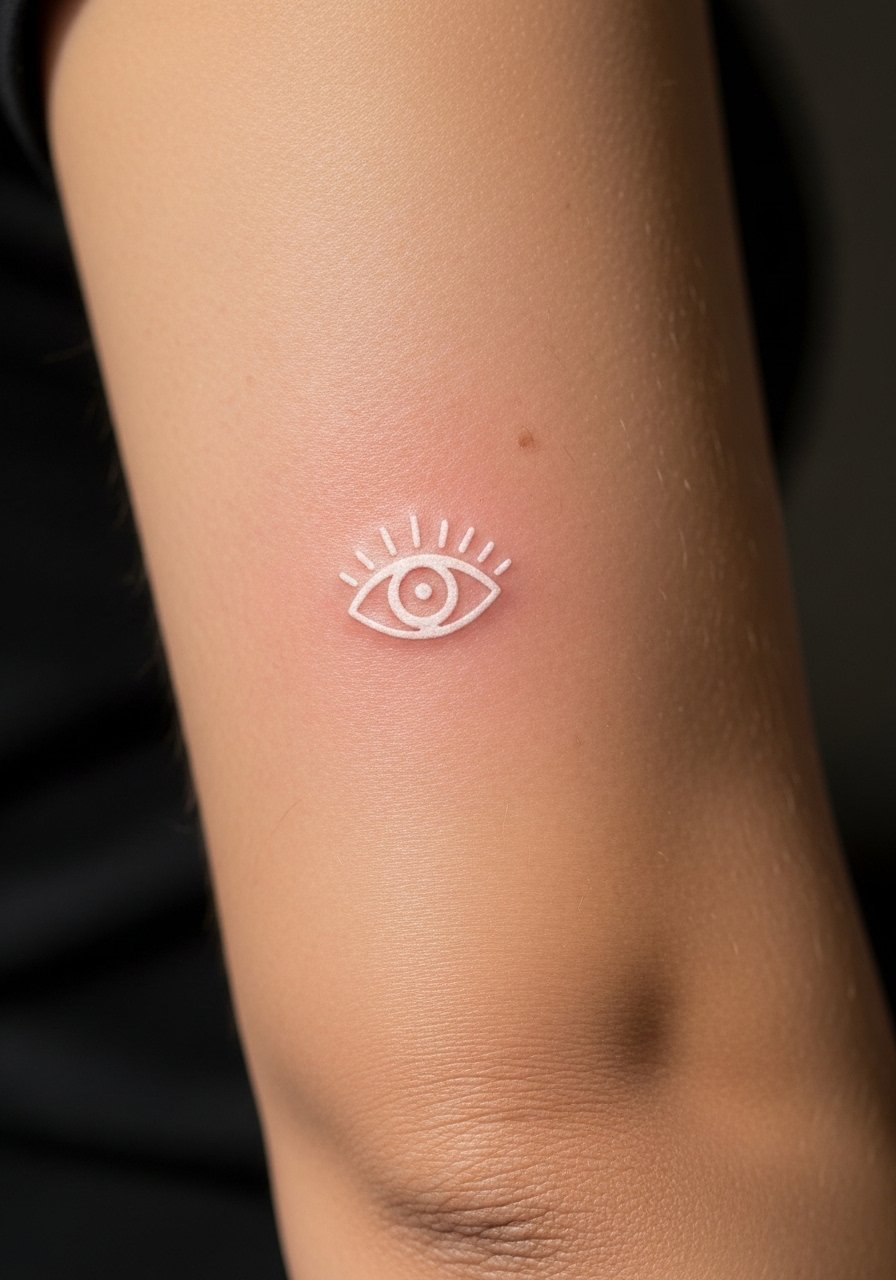
Inner elbow tattoos are painful and need careful aftercare due to movement. I picked a tiny white eye as a protective symbol; it reads faintly and becomes more personal over time. Keep the iris simple and avoid extreme detail. Healing requires limited heavy arm flexing for the first week. A common mistake is placing too much fine detail; go for a clean icon and ask the artist for healed examples on flex areas.
26. White Ink Crescent on Rib Lower Side
Style/Technique: Minimalist / Micro-Curve
Pain Level: High (7-8/10)
Session Time: 20–40 minutes
Best For: Quiet moon symbolism
I closed the list with a white crescent on the lower rib—intimate and quiet. Pain is noticeable but tolerable for a small piece. White crescents age into delicate marks that can look like natural skin highlights. Artists should avoid paper-thin crescents; give it a hair more thickness for retention. Healing needs gentle clothing choices and sun avoidance. Healed, it reads like a small personal talisman.
Tattoo Prep and Aftercare Essentials
Aftercare Essentials:
- Aquaphor Healing Ointment, 14oz tube — Industry standard for first 3-5 days
- Saniderm Transparent Adhesive Bandage, 6-inch roll — Second-skin healing option many artists recommend
- CeraVe Fragrance-Free Moisturizing Lotion, 12oz pump — For days 4-14 to keep skin hydrated
- Dr. Bronner's Unscented Castile Soap, 32oz — Gentle cleaning during early healing
Before Your Appointment:
- Tattoo numbing cream with 5% lidocaine — Use only if your artist approves, apply 30–45 minutes prior
- Tattoo stencil transfer paper — Useful if you want to test placement at home
Long-Term Maintenance:
- SPF 50+ Sunscreen Stick for Tattoos — Daily sunscreen is non-negotiable to prevent fading
- Mad Rabbit Tattoo Balm, 2oz — Keeps healed tattoos vibrant and moisturized
- Hustle Butter Deluxe, 2oz — Vegan aftercare alternative for ongoing moisturizing
Optional Comfort & Tools:
- Tattoo numbing spray — For touch-ups or very sensitive areas (ask artist first)
- Hydrocolloid bandages, large packs — Great for small blisters or hotspots during healing
Frequently Asked Questions
Q: How bad does a tattoo actually hurt?
A: Pain depends on placement and personal tolerance. Outer forearm or shoulder = lower end (2–4/10). Ribs, spine, inner elbow = higher (6–8/10). White ink feels the same as black during the session; thin-skin areas sting more. For sensitive spots, consider a numbing cream with 5% lidocaine only if your artist agrees.
Q: Will white ink show on darker skin tones?
A: From what I’ve seen, white ink can be nearly invisible on deep skin tones when used alone. Artists often suggest using white as a highlight with gray or black or opting for slightly pigmented blends. Ask to see healed examples on skin tones like yours.
Q: How long before a white ink tattoo looks “settled”?
A: Surface healing: 2–3 weeks. Full settling and color shift: 3–12 months. White tends to soften and blend into skin over months; it often loses that initial bright look. Keep it out of strong sun and moisturized with CeraVe lotion.
Q: Can white ink yellow or change color?
A: Yes. From what I’ve gathered, exposure to UV and certain skin products can make white ink take on a slightly yellow tone. Daily SPF 50+ sunscreen and gentle moisturizers help prevent this.
Q: How do I keep a white tattoo looking crisp?
A: Avoid heavy exfoliation and sun. Use fragrance-free moisturizers and sunscreen. Consider touch-ups after the first year if lines fade. Products like Mad Rabbit Tattoo Balm help maintain vibrancy for healed skin.
Q: Is white ink more likely to cause allergic reactions?
A: I’ve heard mixed experiences. White pigments can contain different formulations, so discuss allergies with your artist and consider a small test spot if you have sensitive skin.
Q: Can you combine white with black for contrast?
A: Absolutely. I often ask artists to use white as highlights against soft black or gray. That combo improves visibility and longevity, especially on medium-to-deep skin tones.
Q: How careful should I be during the first week of healing?
A: Very. Keep the area clean with gentle soap like Dr. Bronner’s Unscented, apply a thin layer of Aquaphor for the first few days if recommended, and avoid soaking or heavy sweating.
