
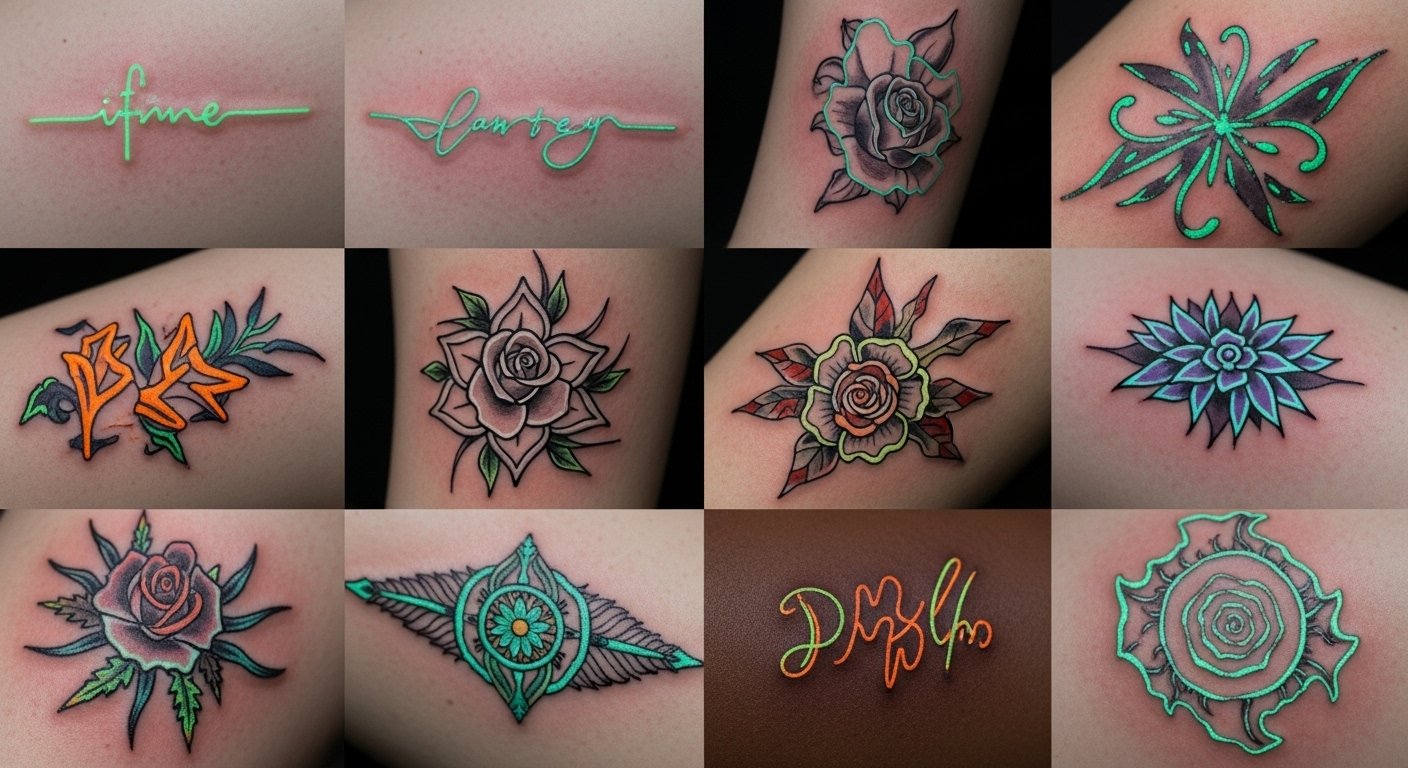
I spent weeks hunting for glow tattoos that actually look good healed, not just lit under a blacklight. The surprise was how many designs only work fresh—while the best ones read as normal tattoos by day and come alive after dark. These 22 glow tattoo ideas highlight styles that age well, hide smartly when needed, and really pop under UV.
This list focuses on UV-reactive fine line, neo-traditional, and minimalist neon vibes. Placements range from wrists and behind-the-ear spots to sleeves and ribs. From what I've seen in artist feeds for 2026, combining tiny UV accents with standard black ink gives the most wearable result.
1. Fine Line Floral Accents on Inner Forearm
Style/Technique: Fine Line / Minimalist
Pain Level: Medium (3-4/10)
Session Time: 1–3 hours
Best For: First-timers who want subtle glow
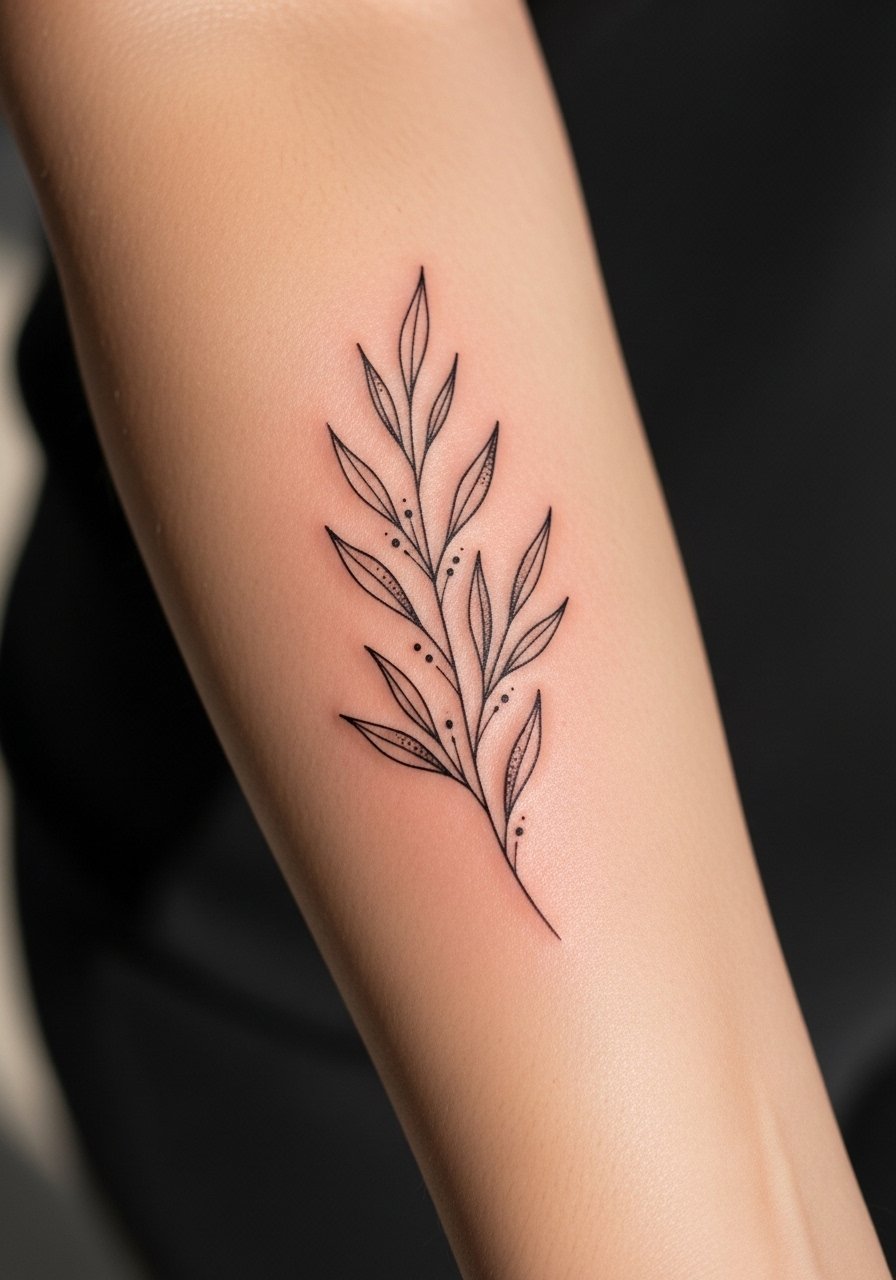
I like this because the black stems read as a clean tattoo by day, while the UV dots and small blossoms glow under blacklight. Placement on the inner forearm is visible but easy to cover with a sleeve. Expect moderate discomfort from shading near the wrist. Heals in 2–3 weeks on the surface; full settling takes a few months. Artists I trust recommend keeping UV color as highlights rather than full fill—too much neon can blur faster. Avoid tiny single-line letters as they blur quicker; ask for slightly bolder fine lines if you want longevity.
2. Neon Script Name on Collarbone
Style/Technique: Minimalist / Script
Pain Level: Medium (4/10)
Session Time: 1–2 hours
Best For: Meaningful, visible piece
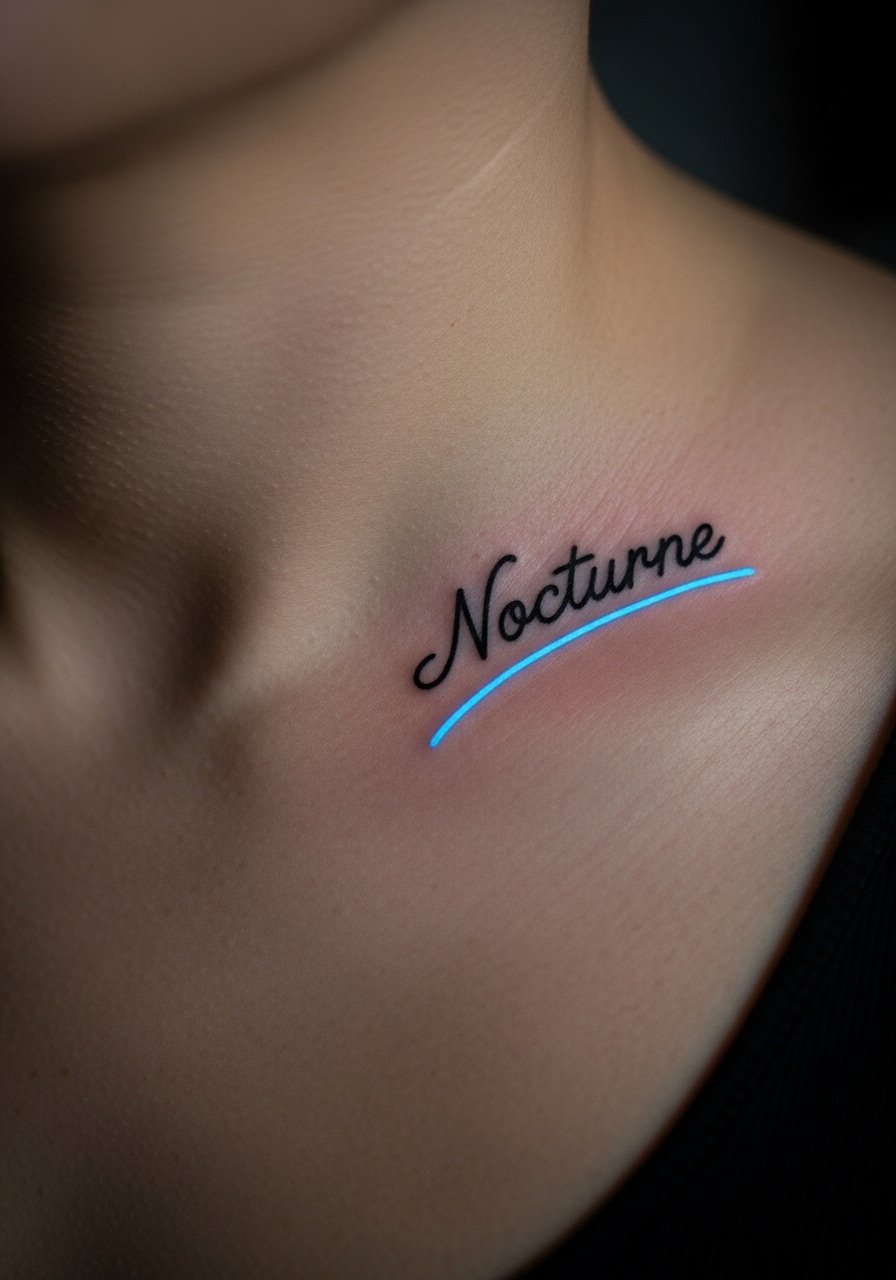
A script on the collarbone is delicate by day, with UV underlines or dots that create a halo after dark. Collarbone stings more than forearm—expect sharp, brief pain. Healed look is elegant: black ink stays crisp, UV pigments act like accents. Healing requires avoiding friction from clothing. I’ve seen artists suggest layering—black outline first, neon layer second—to preserve clarity. Common mistake: asking for full neon fills in script; they tend to lose crispness when healed.
3. Constellation Cluster Behind Ear
Style/Technique: Dotwork / Micro-Constellation
Pain Level: Low-Medium (3/10)
Session Time: 45–90 minutes
Best For: Hidden, subtle glow
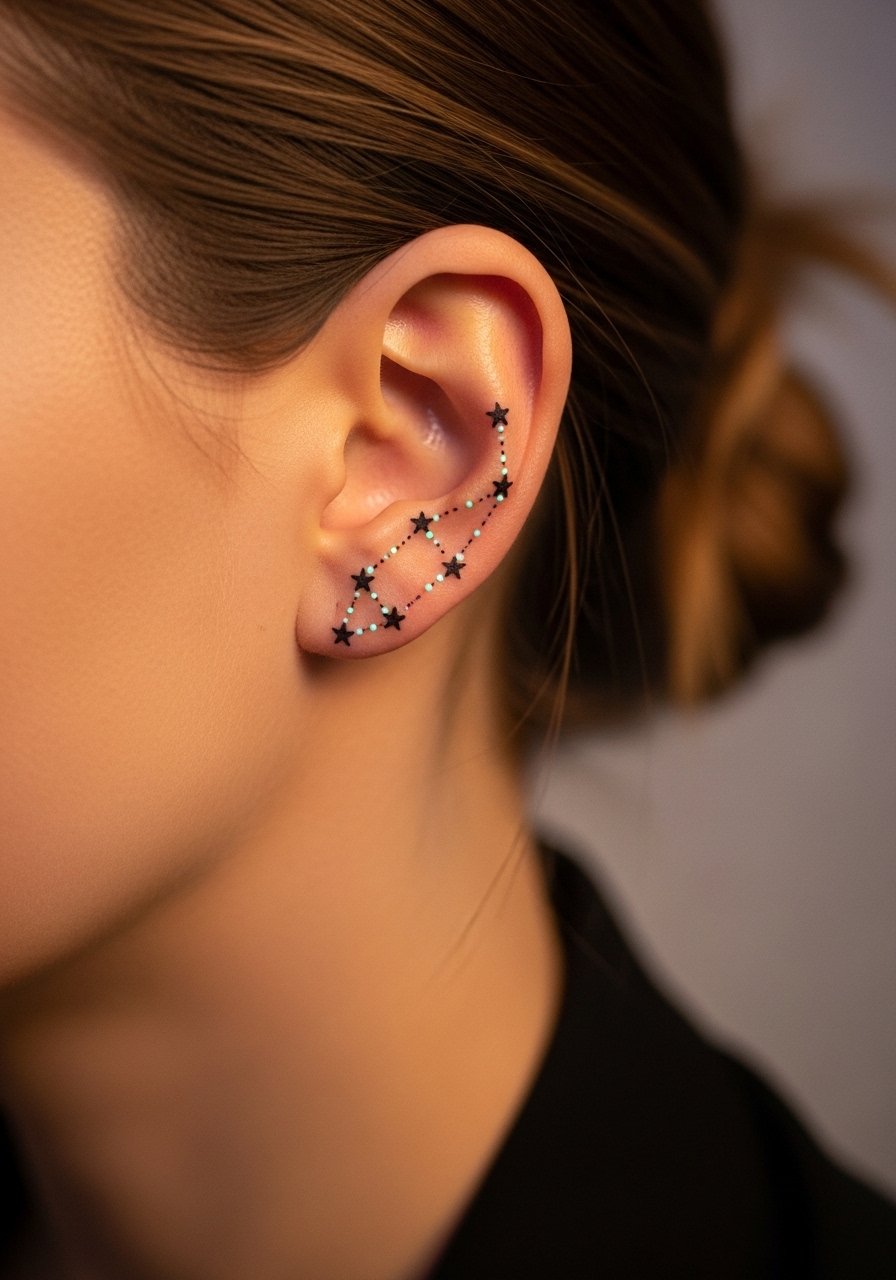
Behind-the-ear glow constellations are tiny and playful. By day it’s a delicate dotwork cluster; under blacklight the stars and connecting UV lines pop. Pain is brief due to thin skin but short session time helps. Heals quickly if you avoid sleeping on that side. From my experience, smaller elements need slightly bolder black anchors so the pattern reads when the neon fades a bit. Don’t place too deep near cartilage—ink settles oddly there.
4. Bioluminescent Jellyfish on Upper Arm
Style/Technique: Micro-Realism / Neo-Realistic
Pain Level: Low-Medium (3-4/10)
Session Time: 2–4 hours
Best For: Statement piece, nature lovers
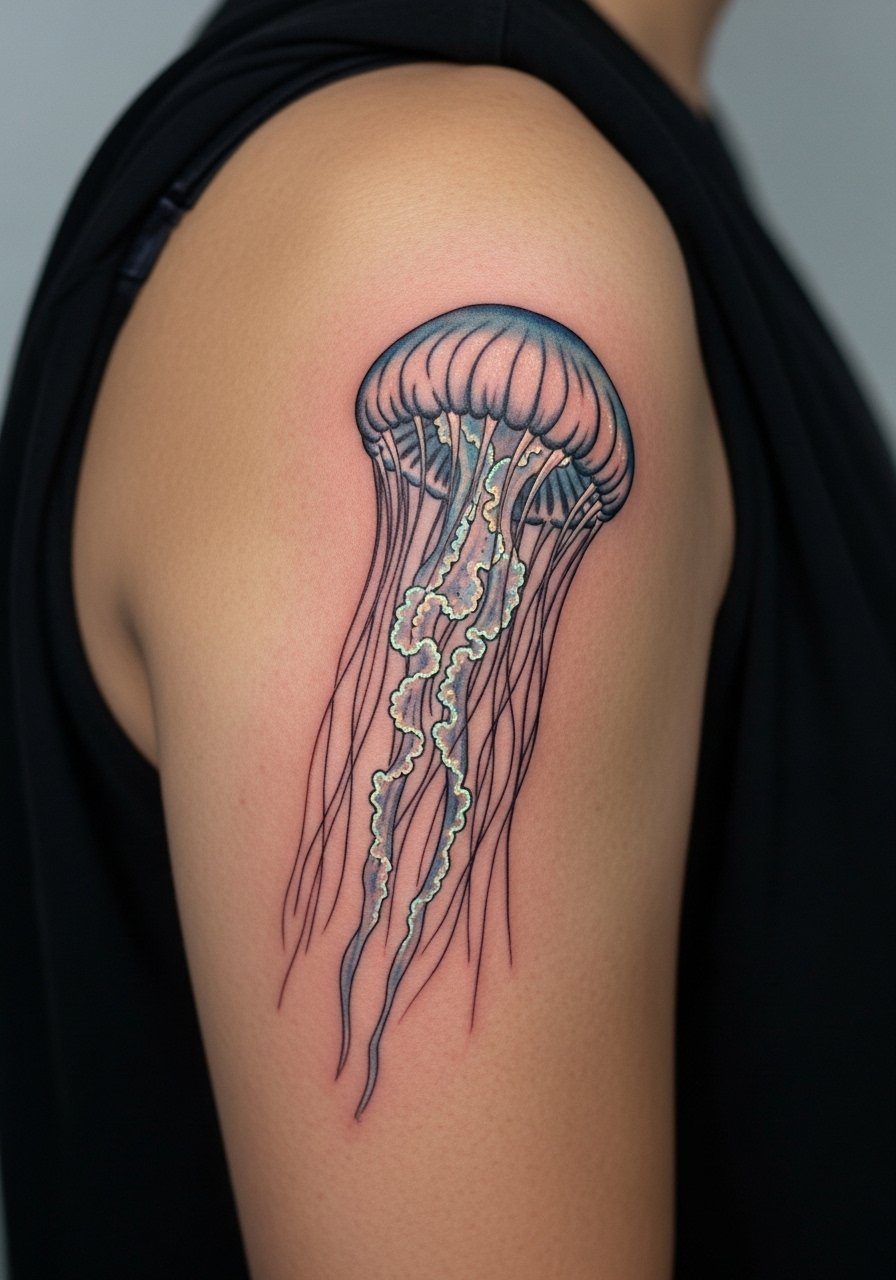
A jellyfish looks amazing when artists combine soft gray shading with UV blue/purple in the tentacles. Upper arm tolerates sessions well and ages gracefully. Healing is straightforward; avoid direct sun while pigment stabilizes. I’ve noticed UV blues can dull faster than black, so ask your artist to prioritize crisp black outlines and use UV as accents. Artists who do marine realism make these sing.
5. Geometric Mandala at Nape of Neck
Style/Technique: Blackwork / Geometric
Pain Level: Medium (4/10)
Session Time: 2–4 hours
Best For: Symmetry, midline statement
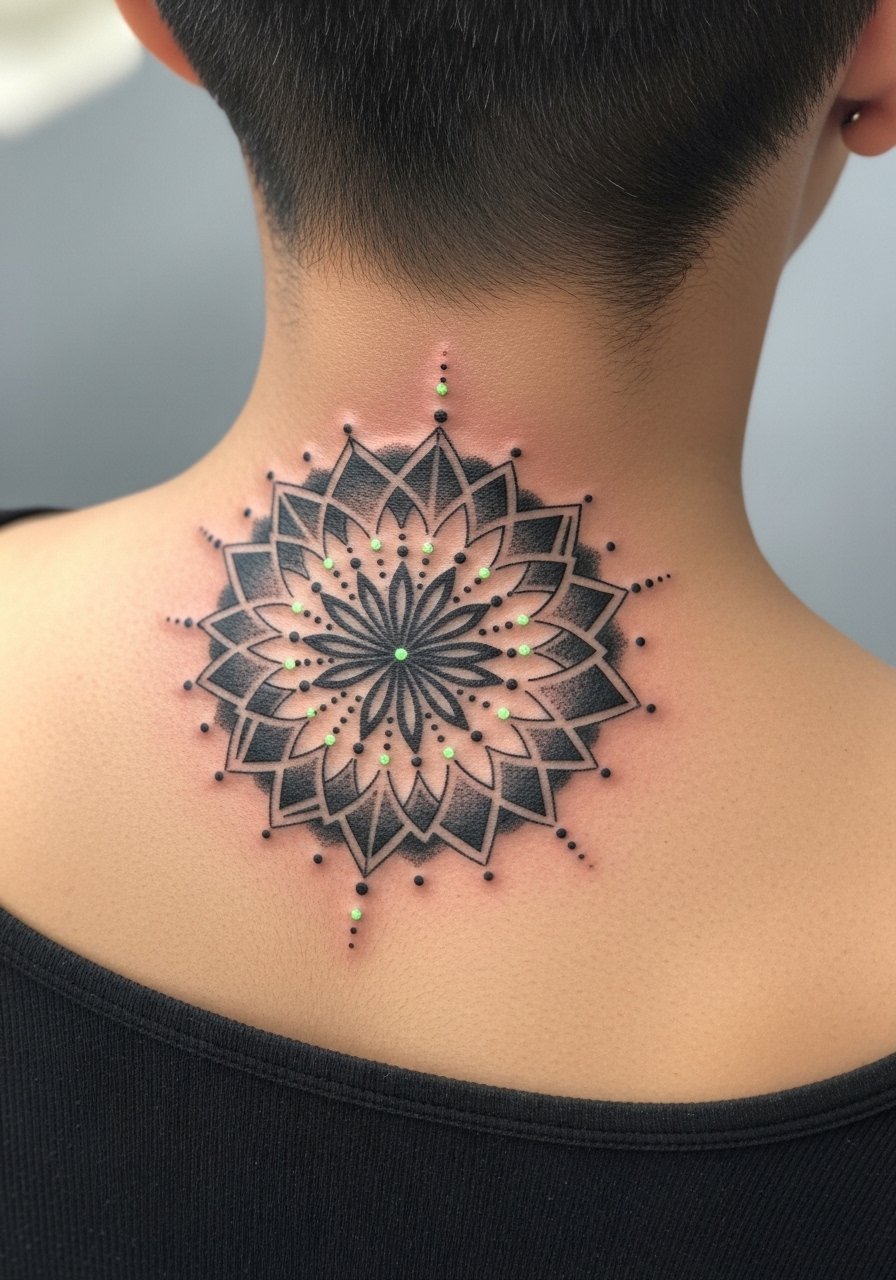
A mandala at the nape reads classic and becomes ethereal under UV with strategically placed glowing dots. The nape can be fussy—hair and clothes can irritate. Pain is manageable but expect sensitivity along the spine line. These hold well when the central blackwork is the anchor; UV points are decorative. Avoid overly thin spokes; they can blur into the skin over years.
6. Neon Freckle Cluster on Cheekbone
Style/Technique: Minimalist / Cosmetic-Style
Pain Level: Low (2–3/10)
Session Time: 30–60 minutes
Best For: Playful, subtle nighttime effect
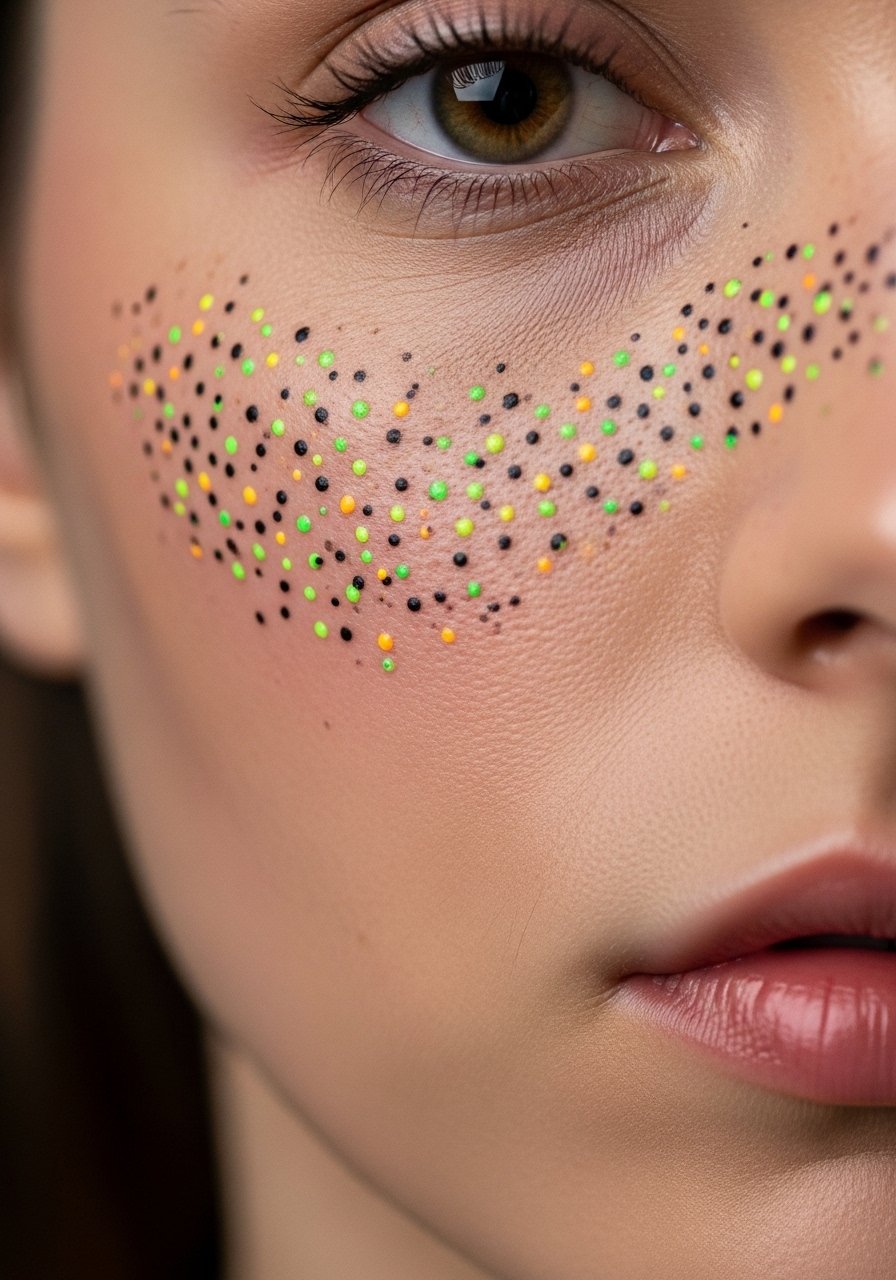
Glow freckles are an underrated fresh angle I’ve seen popping up. They look natural by day—tiny black dots—and glow in playful colors at night. Facial placement needs an artist experienced with delicate skin; healing is quick but avoid heavy makeup. Expect low pain but pick an artist who regularly tattoos faces. A common mistake is overcrowding the area; less is more for long-term clarity.
7. Traditional Rose with Neon Veins on Upper Arm
Style/Technique: Neo-Traditional / Traditional
Pain Level: Low-Medium (3/10)
Session Time: 2–4 hours
Best For: Timeless design with a twist
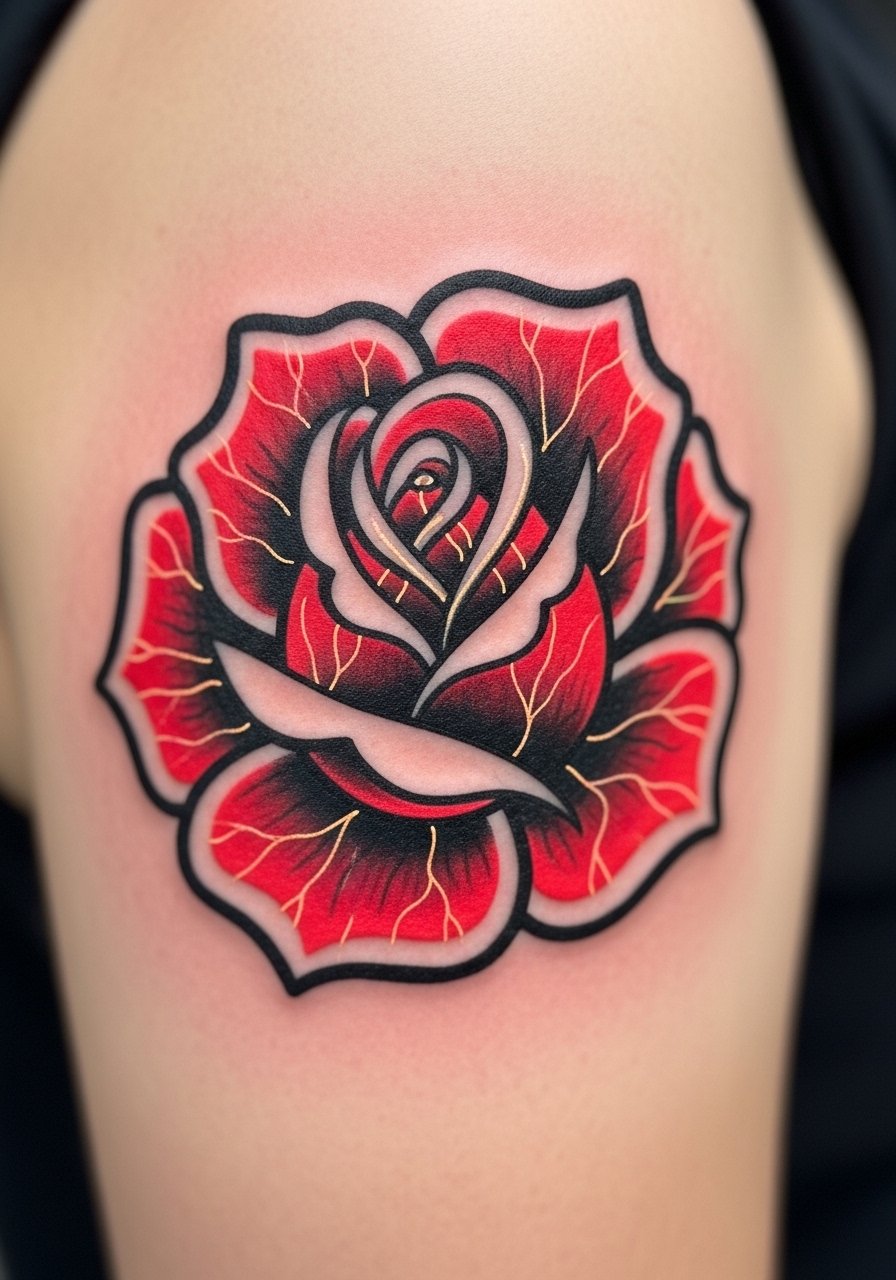
Combining classic rose shapes with UV veins gives a timeless piece that doubles as a night accent. Upper arm tolerates bold lines well and ages predictably. I recommend strong black outlines first—UV pigments as a top layer. Healed photos show UV peeking through without overpowering. Avoid asking for neon fills over the whole petal; it can muddle as it fades.
8. UV Circuitry Sleeve on Forearm
Style/Technique: Blackwork / Tech-Inspired
Pain Level: Medium-High (5/10)
Session Time: Multiple sessions
Best For: Statement, sleeve integration
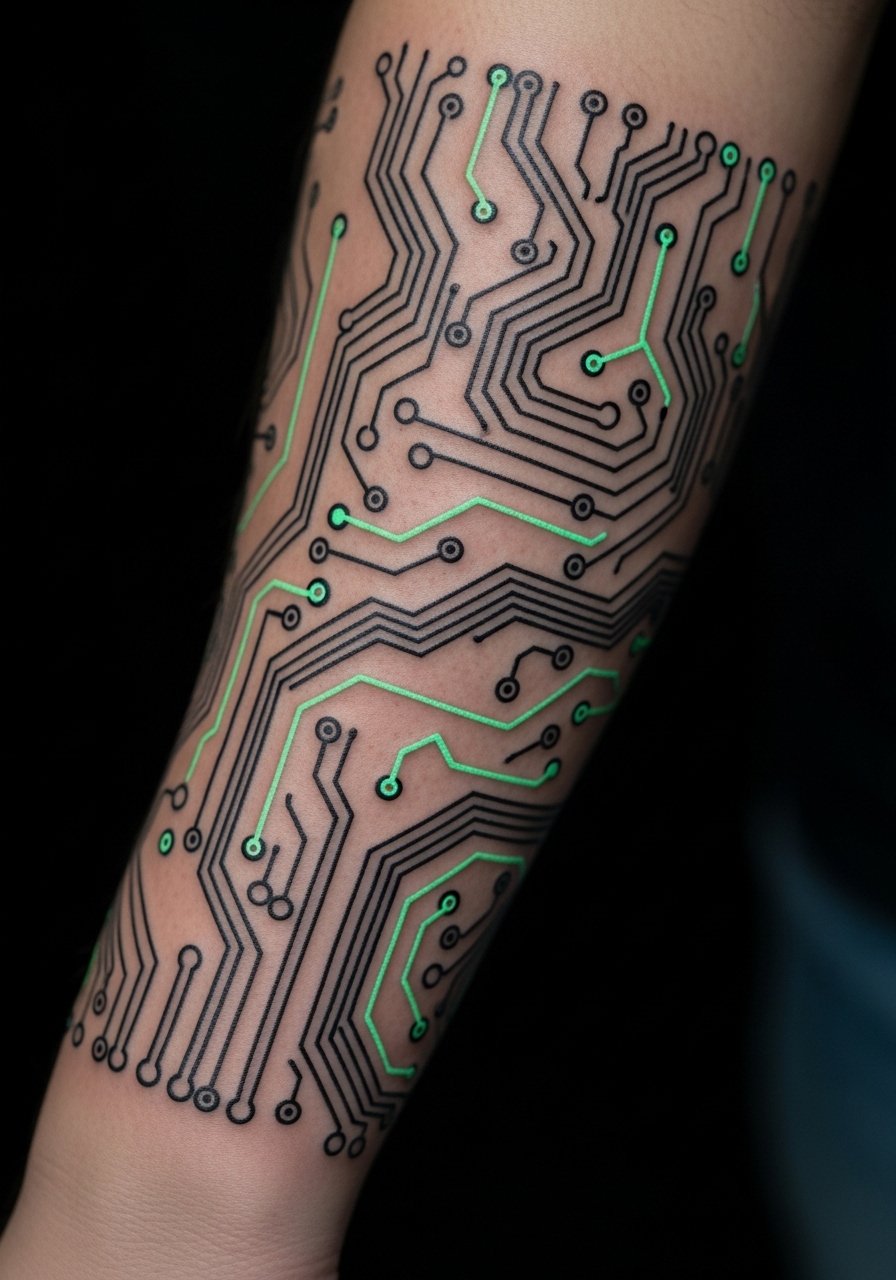
A circuitry sleeve is a modern, under-covered angle I’ve been excited by—black geometric traces with UV lines that light up like energy. Forearm placement is perfect for visibility and cover-up options. Sessions can be long; expect soreness on inner forearm near bone. Heals predictably if you follow aftercare. Ask your artist about layering so the UV sits on top and isn’t buried under heavy black.
9. Micro-Realism Eye on Chest with UV Iris
Style/Technique: Micro-Realism / Portrait-Style
Pain Level: Medium-High (5-6/10)
Session Time: 3–6 hours
Best For: Statement center chest piece
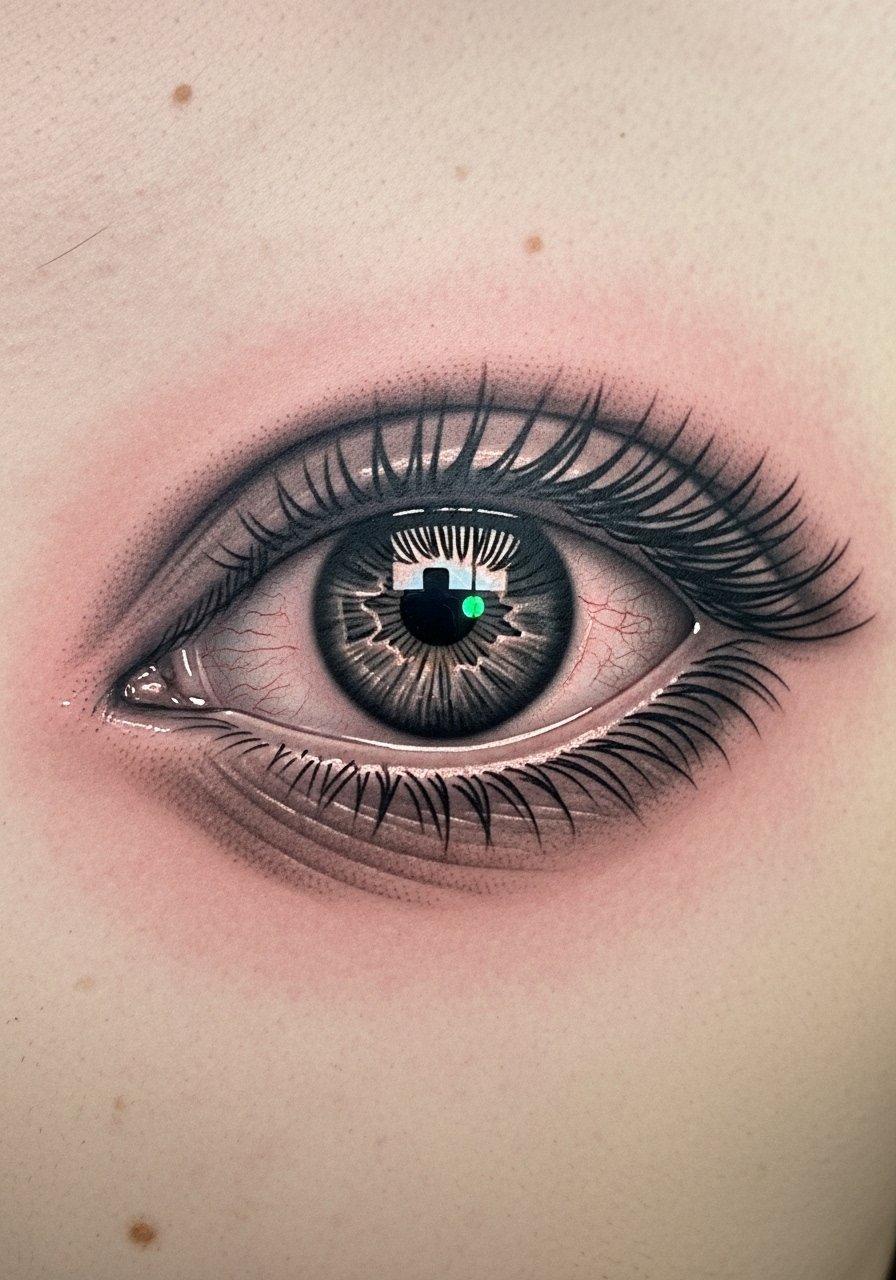
A realistic eye with a UV iris is striking. Chest placement is intimate and can be sensitive over sternum areas. Expect moderate to strong discomfort if over bone. Healed pieces benefit from crisp black shading; UV should be used sparingly to keep realism intact. Don’t ask for heavy neon shading around the eye—small highlights age better.
10. Glow Tribal Band Around Biceps
Style/Technique: Tribal / Blackwork
Pain Level: Low-Medium (3-4/10)
Session Time: 1–2 hours
Best For: Bold, easily covered with sleeves
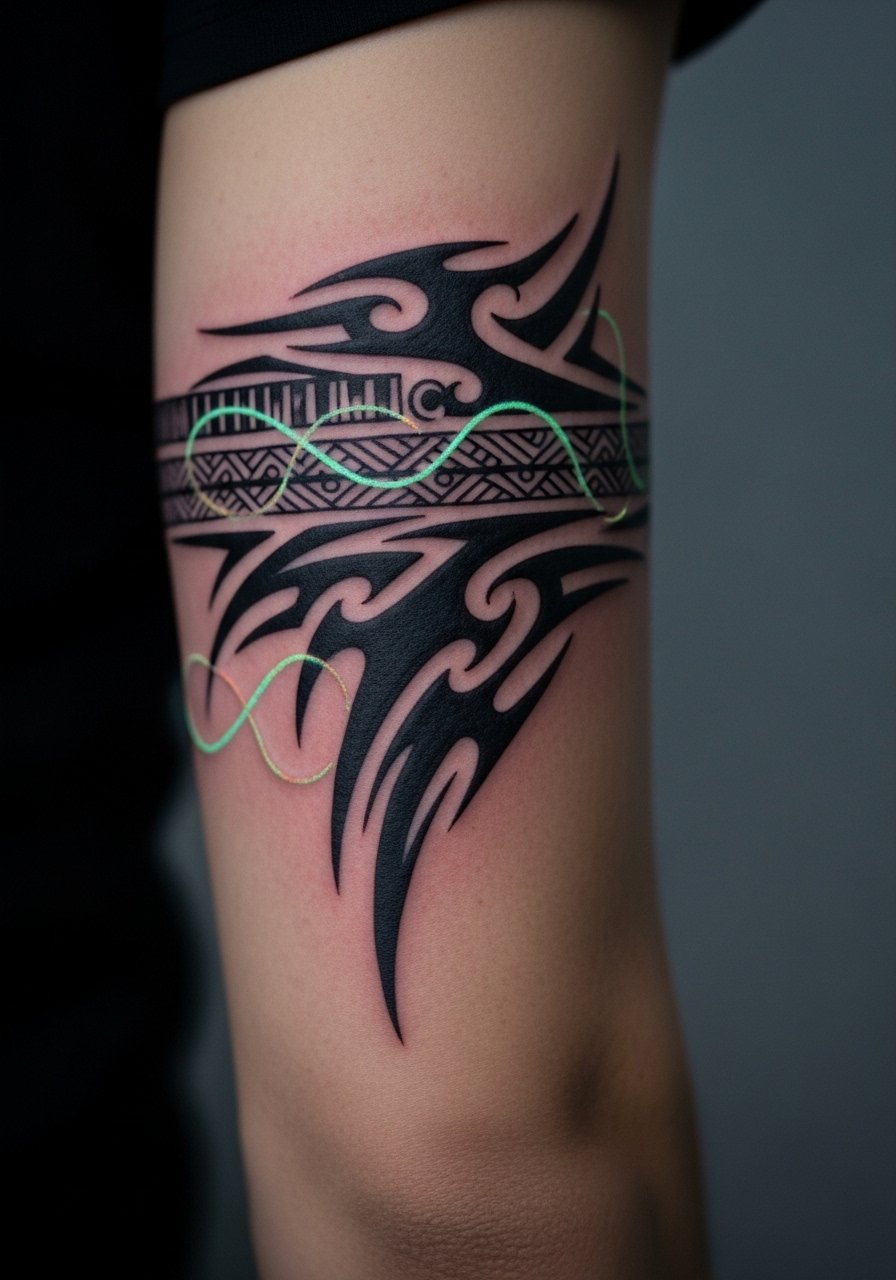
Tribal bands translate well to UV: bold black forms the skeleton and UV lines accentuate motion at night. Biceps are forgiving for sessions; pain is minimal. These age well because the main work is black. I’ve seen artists recommend keeping UV as a thinner layer—too much neon can flake or blur. Avoid overly intricate knots that merge over time.
11. Watercolor Galaxy on Thigh with UV Stars
Style/Technique: Watercolor / Painterly
Pain Level: Low-Medium (3-4/10)
Session Time: 2–5 hours
Best For: Large, hidden canvas
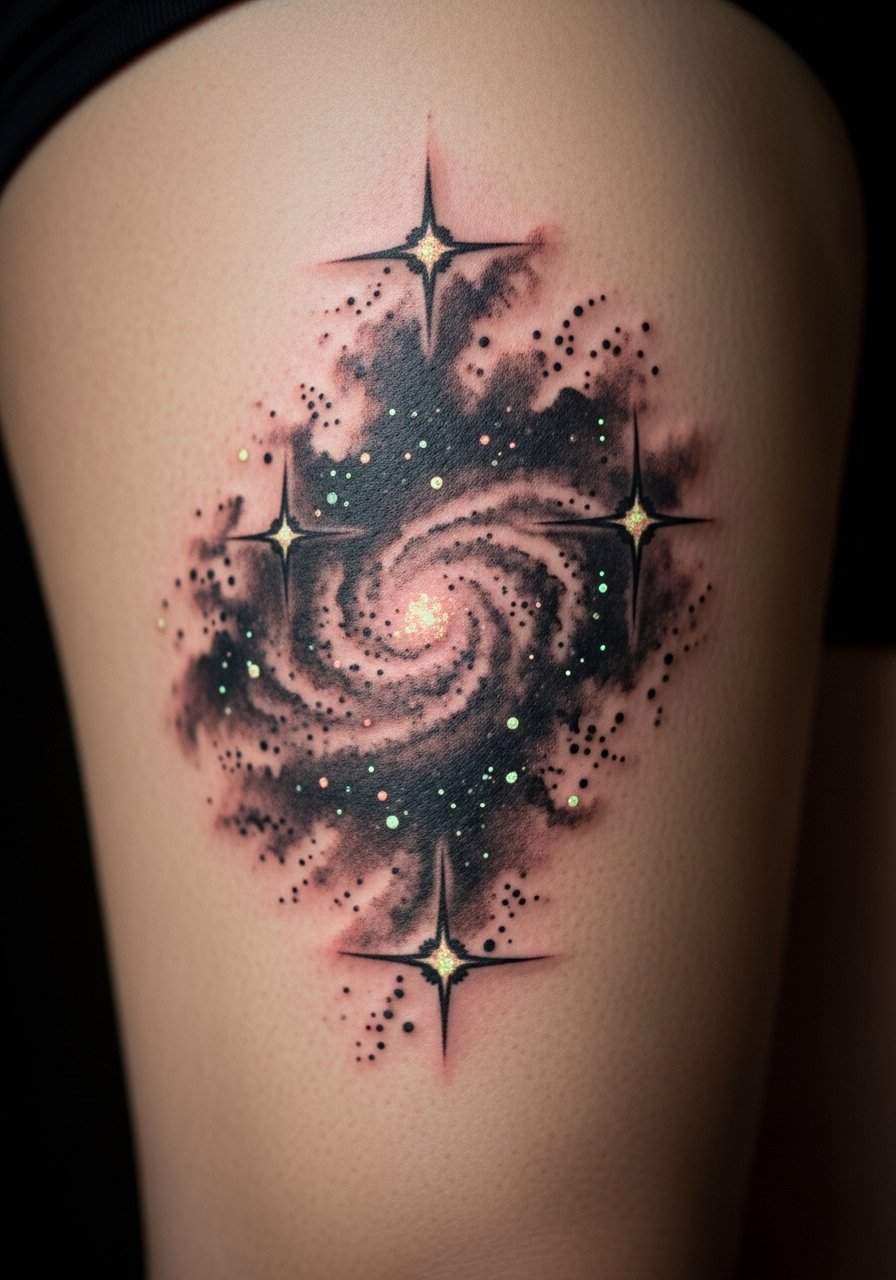
Thigh canvases allow painterly UV galaxies that stay intimate by day and luminous at night. Pain is lower on the fleshy thigh, and healing is usually uneventful. Watercolor can blur if applied too thinly, so artists I follow stress bold basework with UV top-layers. Keep in mind movement and clothing friction can affect edges during healing.
12. Minimalist Mountain Range on Ankle with UV Peaks
Style/Technique: Minimalist / Line Art
Pain Level: Medium (4/10)
Session Time: 1–2 hours
Best For: Small, meaningful piece

An ankle mountain is subtle everyday and magical under blacklight when the peaks glow. Ankles are bony—expect sharper pain. Healing needs attention to shoes and socks to avoid rubbing. From what I’ve seen, slightly thicker lines retain shape better around the ankle. Ask for UV highlights only on peaks rather than full fills.
13. Neon Script Bar Code on Inner Wrist
Style/Technique: Minimalist / Barcode Script
Pain Level: Medium (4/10)
Session Time: 1–2 hours
Best For: Small, techy accent
A barcode or linear script with UV gaps is a subtle tech aesthetic. Inner wrist is sensitive but quick. Heals fast if kept clean and moisturized. I recommend bold black bars with UV negative spaces instead of neon ink in wide areas. Common mistake: ultra-thin lines that blur—ask for slightly heavier line weight.
14. Glow Koi Along Ribcage
Style/Technique: Neo-Traditional / Flowing Realism
Pain Level: High (7-8/10)
Session Time: Multiple sessions
Best For: Dramatic, private piece
Ribcage koi are beautiful but painful. The ribs are notorious for sharp, persistent pain during long sessions. Heals over weeks; expect tenderness. UV accents along scales look incredible but shouldn’t be the structural element. I’ve seen artists recommend starting with black composition and adding UV in touch-ups to control saturation.
15. UV Lace Collar on Chest
Style/Technique: Ornamental / Decorative
Pain Level: Medium (4-5/10)
Session Time: 2–3 hours
Best For: Feminine, covered-to-revealed piece
A lace collar reads like jewelry by day and shines subtly after dark. Upper chest placement is sensitive near clavicle but offers great framing. Heals well if you avoid tight clothing. Ask for slightly bolder black lace strands so the pattern remains readable as UV tones shift. Avoid overly fine filigree that can merge.
16. Glow Animal Silhouette on Calf
Style/Technique: Silhouette / Minimalist
Pain Level: Low (2-3/10)
Session Time: 1–2 hours
Best For: Personal symbolism, easy conceal

Calf silhouettes are great for larger shapes with UV outlines that activate at night. Calf flesh is forgiving—pain is low. Heals reliably with standard aftercare. I’ve noticed solid black silhouettes retain shape long-term; UV outlines should be crisp but thin. Avoid filling the interior with neon; keep neon as contouring.
17. Micro-Realism Pet Portrait on Forearm with UV Eyes
Style/Technique: Micro-Realism / Portrait
Pain Level: Medium (4-5/10)
Session Time: 2–5 hours
Best For: Emotional keepsake
Pet portraits with a tiny UV glint in the eye are touching and wearable. Forearm offers visibility and decent healing. Realism depends on artist skill—UV should be a final highlight, not competing with fine shading. I’ve seen stronger results when artists do the portrait in black/gray and reserve UV for one focal accent.
18. Glow Barcode Around Finger (Ring Tattoo)
Style/Technique: Minimalist / Linework
Pain Level: High (6-7/10)
Session Time: 30–60 minutes
Best For: Tiny, symbolic placement
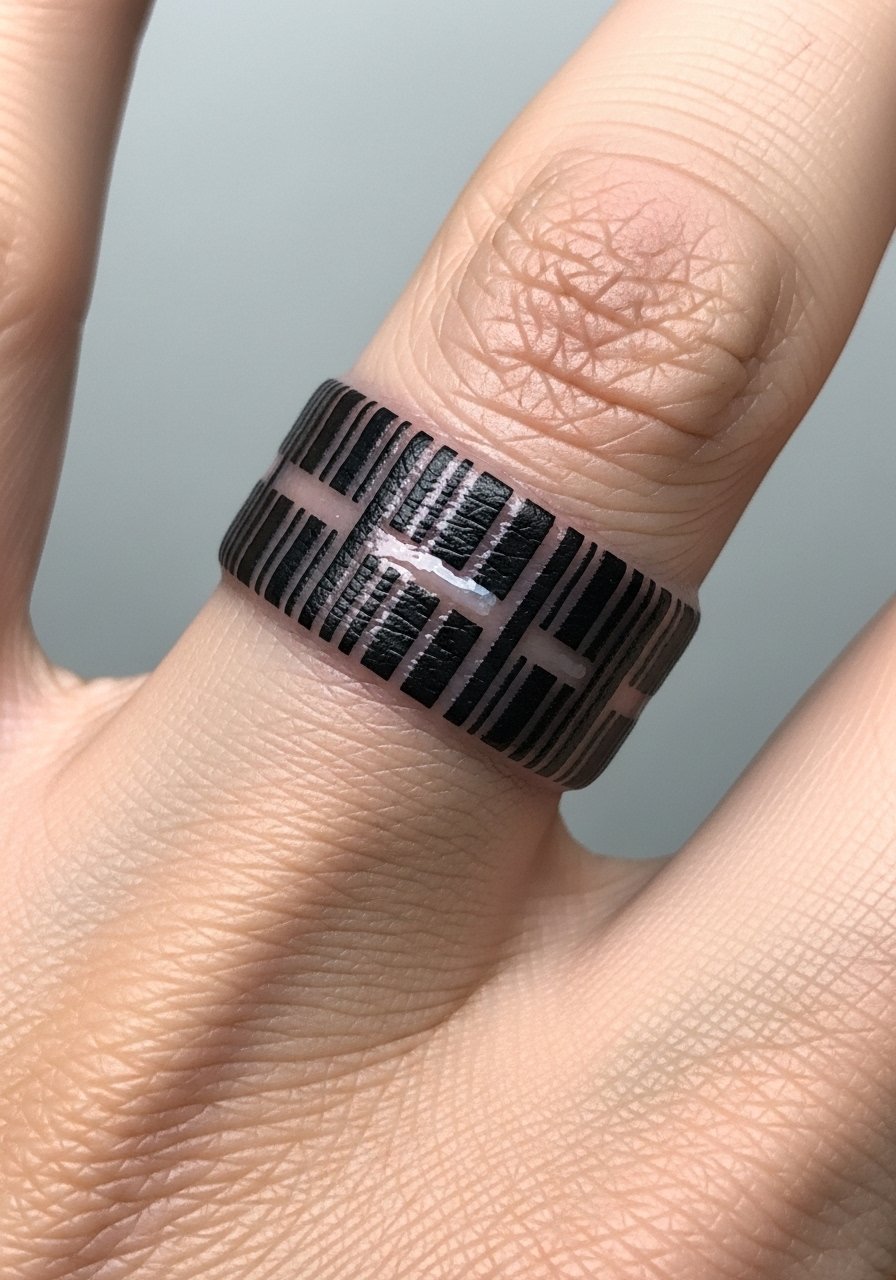
Fingers are brutal for longevity but make bold statements. Ring tattoos fade quicker due to constant use and washing. If you want glow, consider a slightly thicker band and UV accents—expect touch-ups. Pain is sharp but brief. I recommend this only if you accept future maintenance.
19. Glow Halo Behind Ear (Tiny Ring)
Style/Technique: Minimalist / Symbolic
Pain Level: Low (2/3)
Session Time: 30–45 minutes
Best For: Subtle, nightly effect
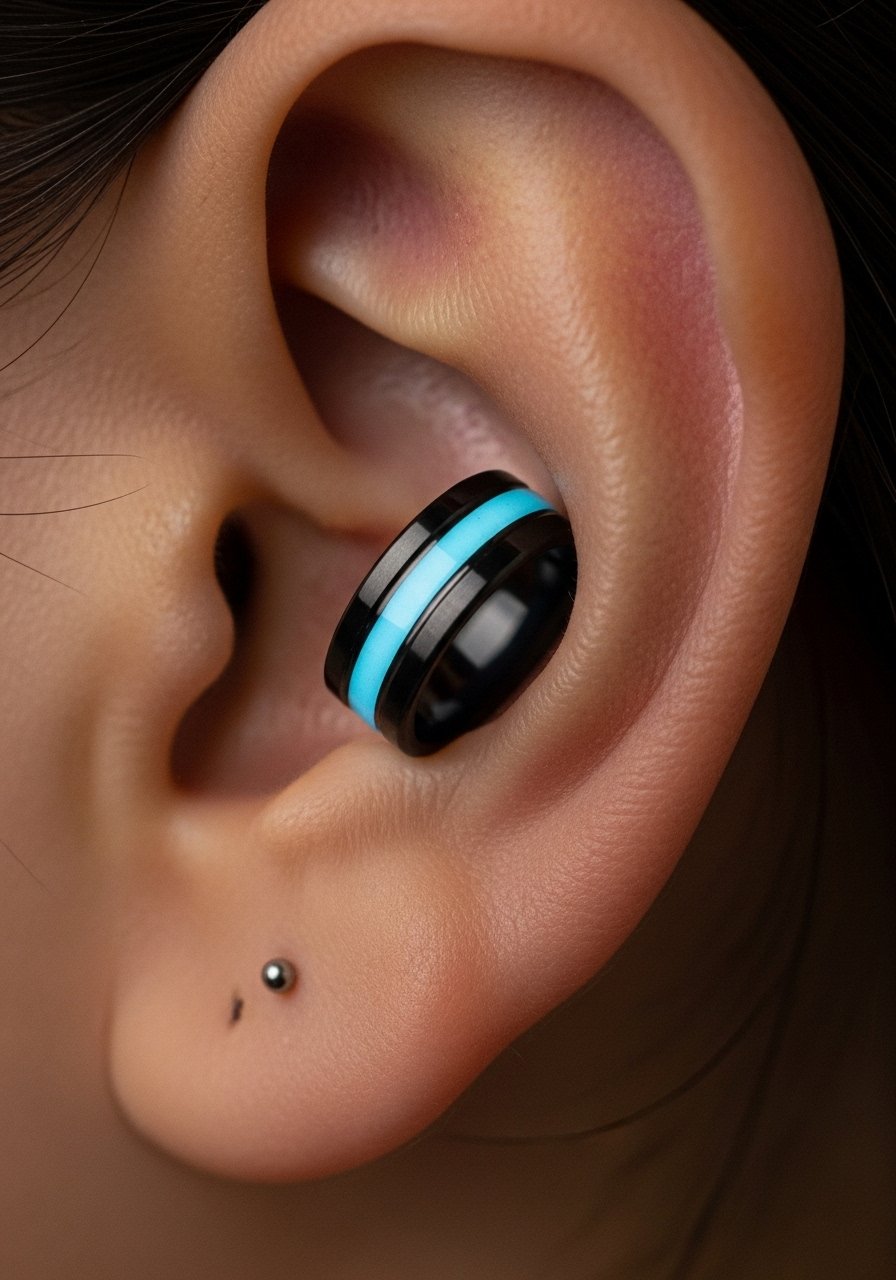
A tiny halo or ring behind the ear is discreet and glows like a secret. Low pain, short session, quick healing. Keep it tiny—artists stress simple shapes for longevity. Don’t overcomplicate with tiny filigree that loses definition.
20. UV Dotwork Spine Line
Style/Technique: Dotwork / Vertical Linework
Pain Level: High (6-8/10)
Session Time: Multiple short sessions
Best For: Centered statement, spiritual vibe
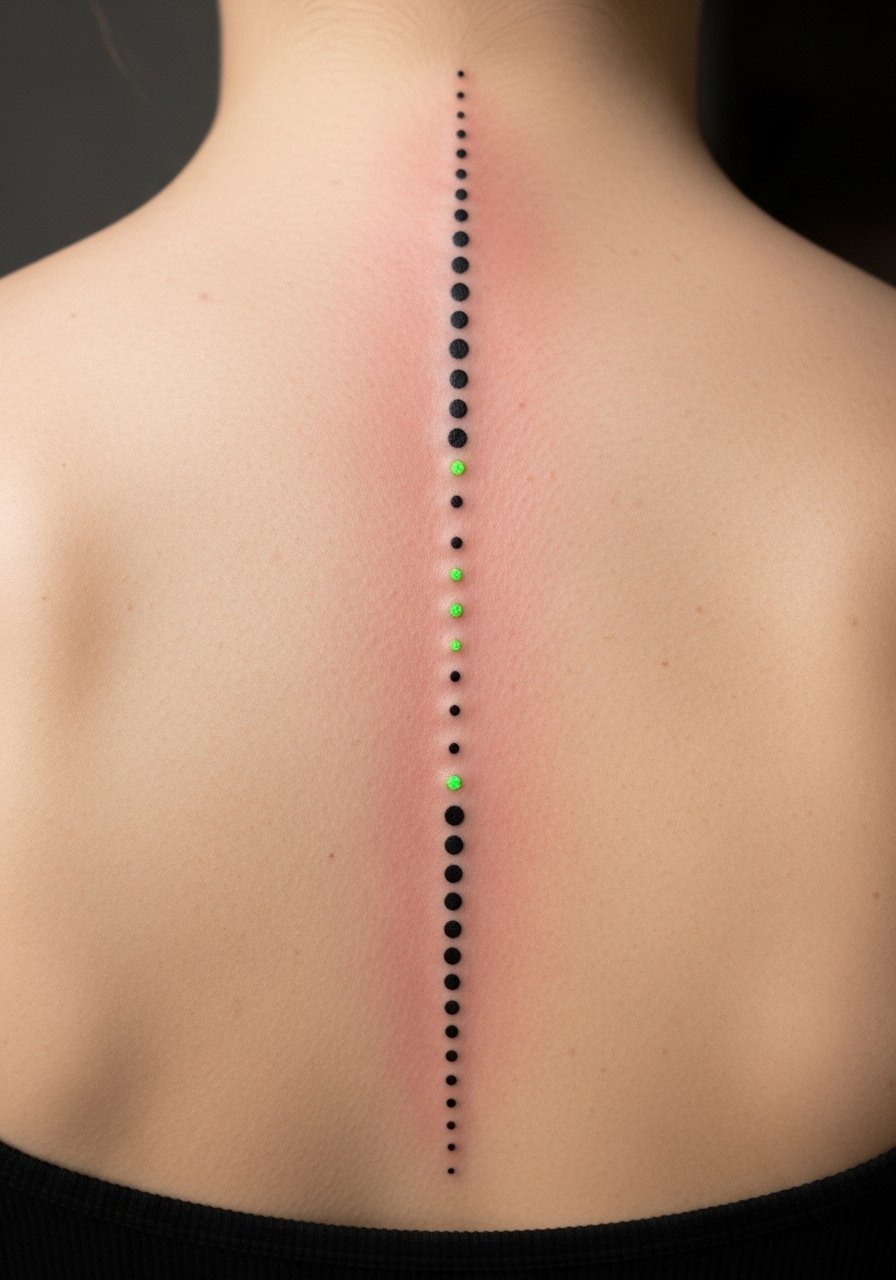
Spine line dotwork is visually striking and glows down the center at night. Spine placement is painful—expect high sensitivity. Heals slowly if near bone. Artists I follow recommend spacing dots intentionally to avoid merging. UV dots as spacing markers work beautifully when balanced with bold black anchors.
21. Neon Floral Anklet Around Foot
Style/Technique: Ornamental / Minimalist
Pain Level: Medium (4/10)
Session Time: 1–2 hours
Best For: Wearable, seasonal reveal
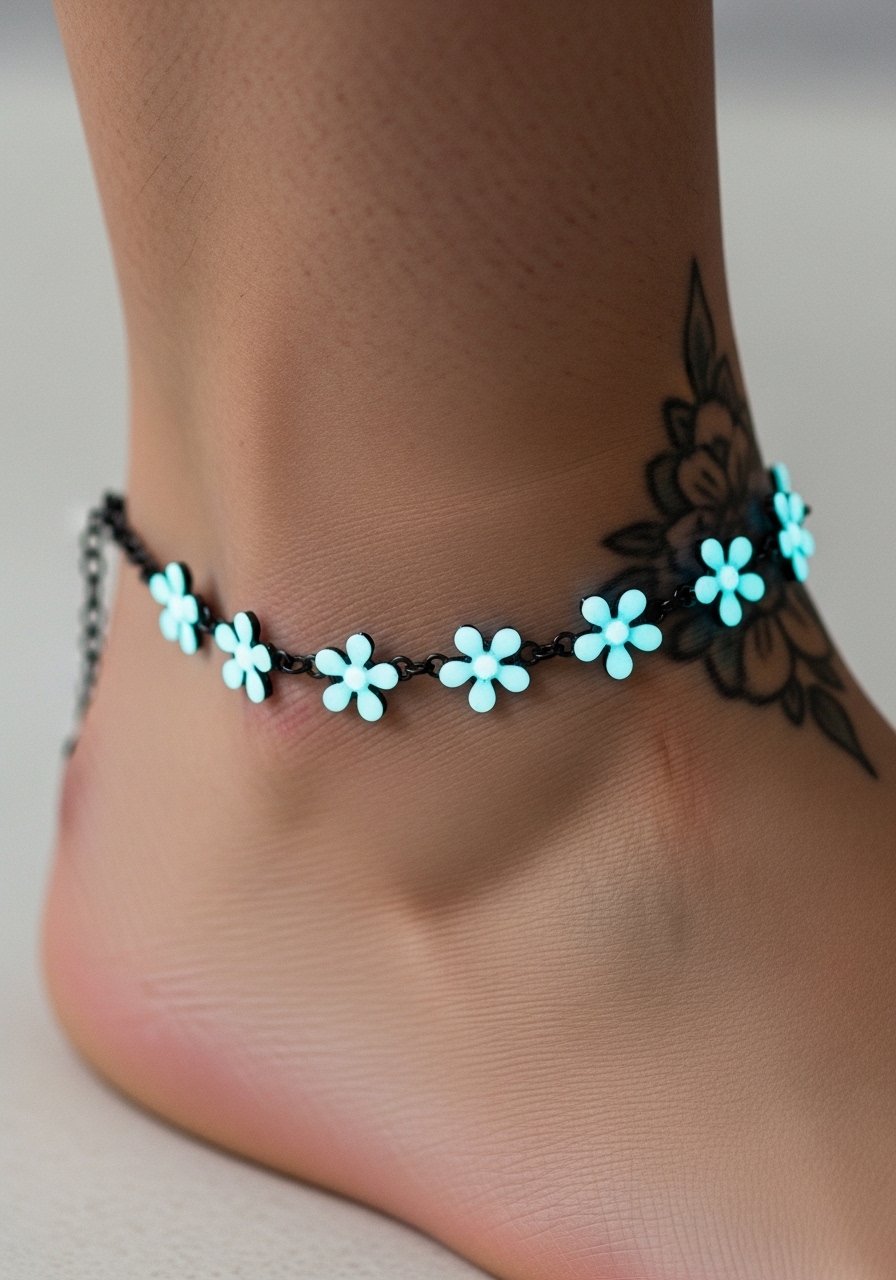
Anklets are feminine and fun; UV flowers peek at night. Foot tattoos are prone to fading due to friction; choose bold black links with UV flower centers. Pain is moderate. I’ve seen better longevity when the anklet sits slightly above the ankle bone to avoid constant rubbing.
22. UV Freckle Sleeve Accent Along Shoulder
Style/Technique: Scatter / Accent Work
Pain Level: Low-Medium (3-4/10)
Session Time: 1–2 hours
Best For: Subtle shimmer across a larger area
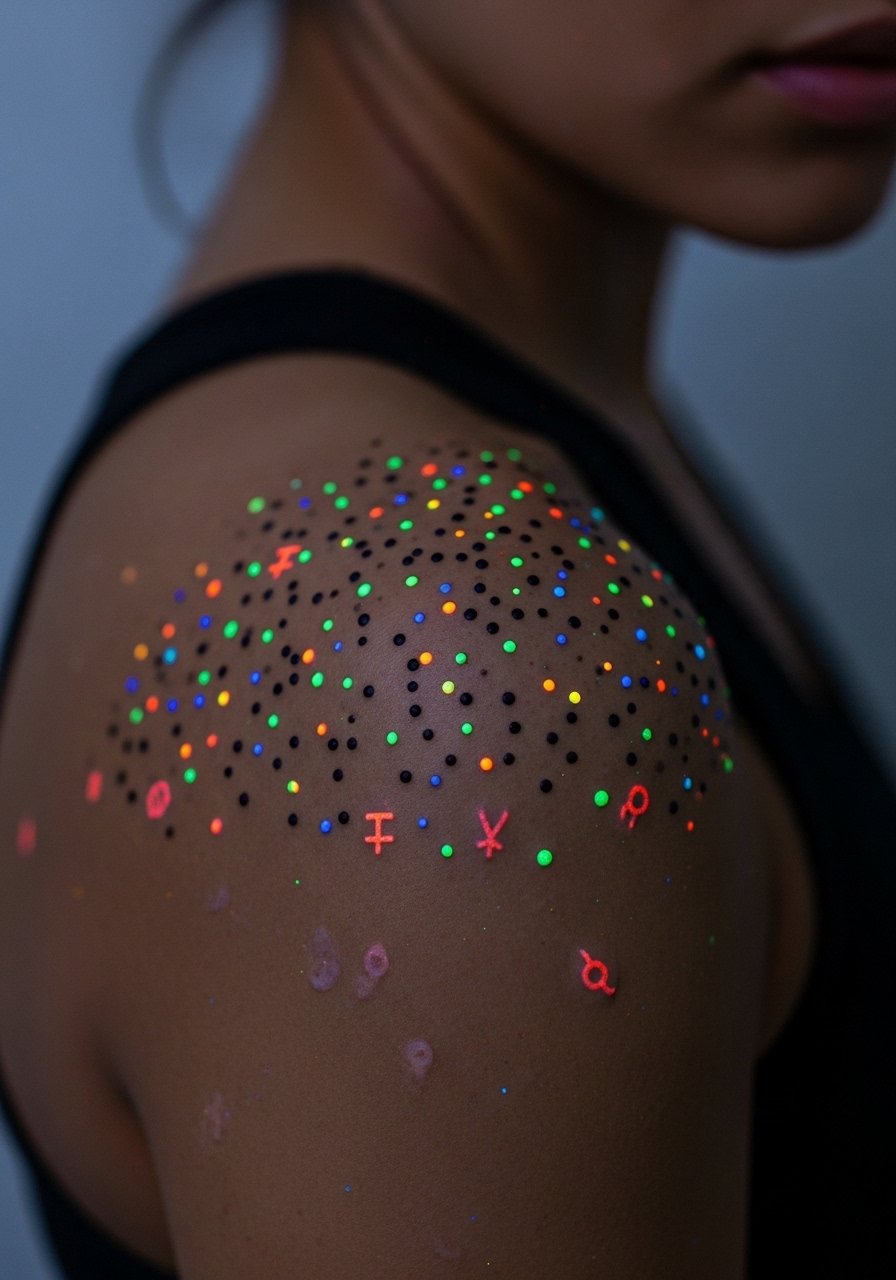
A scatter of UV freckles or tiny symbols across the shoulder is an under-used idea I love—wearable and playful. Shoulders tolerate sessions well and heal predictably. Keep the pattern sparse to avoid a muddy look over time. Artists recommend a mix of black anchors with UV highlights for contrast and longevity.
Tattoo Prep and Aftercare Essentials
Aftercare Essentials:
- Aquaphor Healing Ointment, 14oz tube — For first 3–5 days after session
- Saniderm Transparent Adhesive Bandage, 6-inch roll — For sealed first-skin protection
- CeraVe Fragrance-Free Moisturizing Lotion, 12oz — Day 4+ moisturizer I use
Before Your Appointment:
- Tattoo Numbing Cream 5% Lidocaine — Ask your artist before using
- Tattoo Stencil Transfer Paper — Useful for mockups at home
Long-Term Maintenance:
- SPF 50 Sunscreen Stick for Tattoos — Daily protection keeps colors brighter
- Mad Rabbit Tattoo Balm — For ongoing moisturization
- Hustle Butter Deluxe, 2oz — Vegan aftercare option
Optional Comfort Items:
- Tattoo Numbing Spray — For touch-ups or sensitive spots
- Hydrocolloid Bandages, Large — For spot protection during peeling
- Dr. Bronner's Unscented Castile Soap, 32oz — Gentle daily wash
Frequently Asked Questions
Q: How bad does a glow tattoo actually hurt?
A: Pain depends on placement and tolerance. Outer arm/calf = lower (2–4/10). Ribs/fingers/spine = higher (6–8/10). Glow inks don’t change pain—placement does. For sensitive spots try a 5% lidocaine numbing cream after checking with your artist.
Q: Will UV ink fade faster than regular ink?
A: From what I’ve seen, UV tones can lose brightness faster than black. The trick is using UV as accents over solid black anchors. Keep sunscreen on healed pieces and expect touch-ups if you want the glow to stay intense.
Q: Can any artist do glow tattoos?
A: Not always. I look for artists who post healed UV work and understand layering. Ask to see healed photos on your skin tone and for their experience with the specific pigments.
Q: How should I care for a glow tattoo while it heals?
A: Clean gently with a mild soap like Dr. Bronner’s Unscented Castile Soap, keep it lightly moisturized with Aquaphor initially, and switch to a fragrance-free lotion after a few days. Avoid heavy sun and soaking.
Q: Are UV inks safe?
A: I’ve talked to artists who use FDA-compliant pigments and those who prefer established brands. Safety comes down to reputable ink and experienced application. If you have sensitive skin, do a patch test and tell your artist about any reactions.
Q: Can glow tattoos be covered up or removed later?
A: Yes—black elements cover best. UV-only fills can be trickier. Laser removal works but is a long process. If you think you might change your mind, design with black anchors to allow future cover-ups.
Q: How long until a glow tattoo looks “normal” and then glows again properly?
A: Surface healing is 2–3 weeks; colors settle over 2–3 months. UV glow may look muted during healing and will reach the intended effect after skin fully regenerates. Keep moisturized and protected during that time.
