
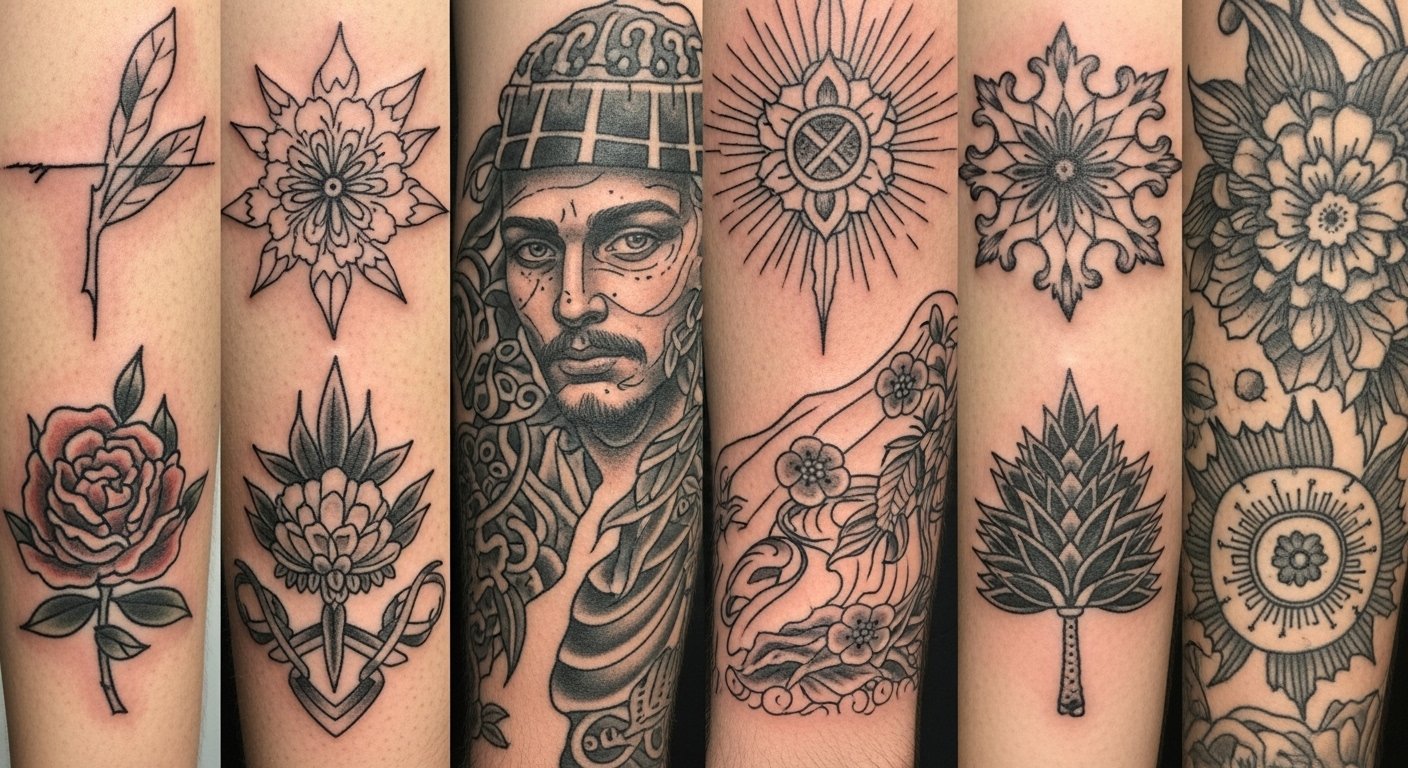
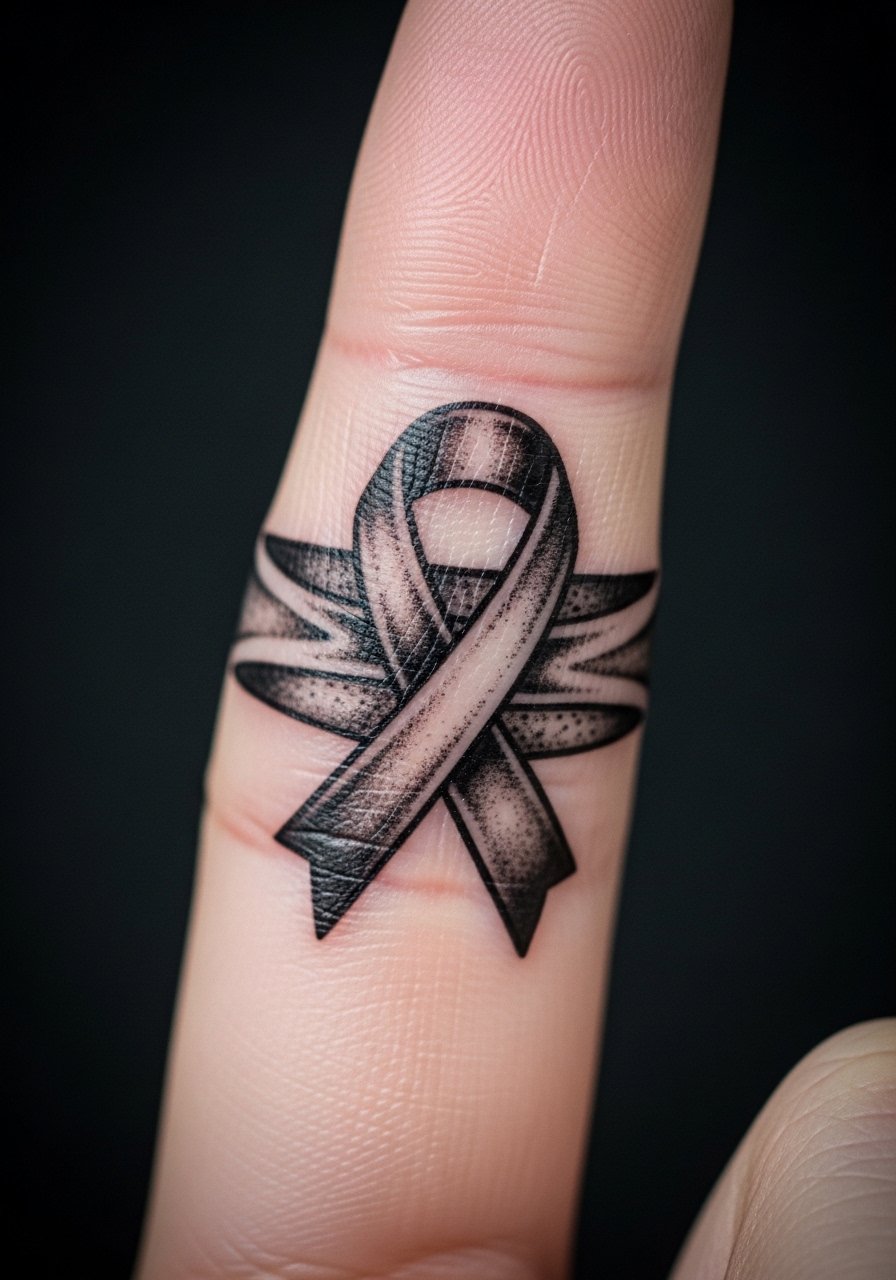
I spent months pinning 3D tattoos and testing what actually looks like depth once healed. The trickiest part wasn't finding an eye-catching design—it was picking a style that still reads as 3D after months of sun and movement. These 30 ideas focus on optical illusion, shadow work, and micro-realism techniques that artists I follow are favoring in 2026—and what to expect when you sit in the chair.
This list focuses on 3D, trompe-l'oeil, and hyperrealistic styles. Placements range from forearm and ribs to fingers and chest—ideal for both first-timers and collectors. From what I've seen in artist feeds, shadow work and negative space are key to believable depth.
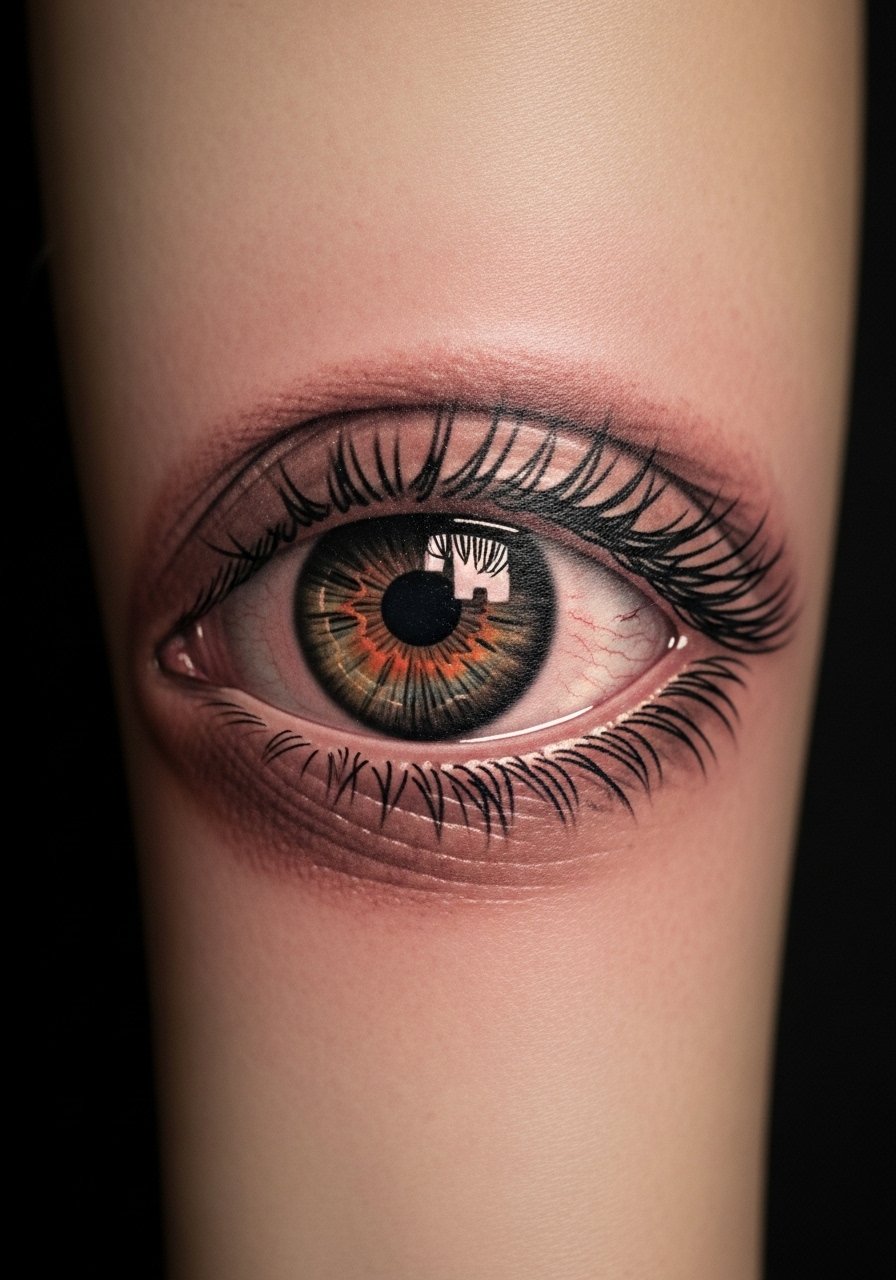
1. Micro-Realism Eye On Inner Forearm
Style/Technique: Micro-Realism / Hyperrealism
Pain Level: Low-Medium (3-4/10)
Session Time: 1-3 hours
Best For: Visible statement, easy to cover with long sleeves
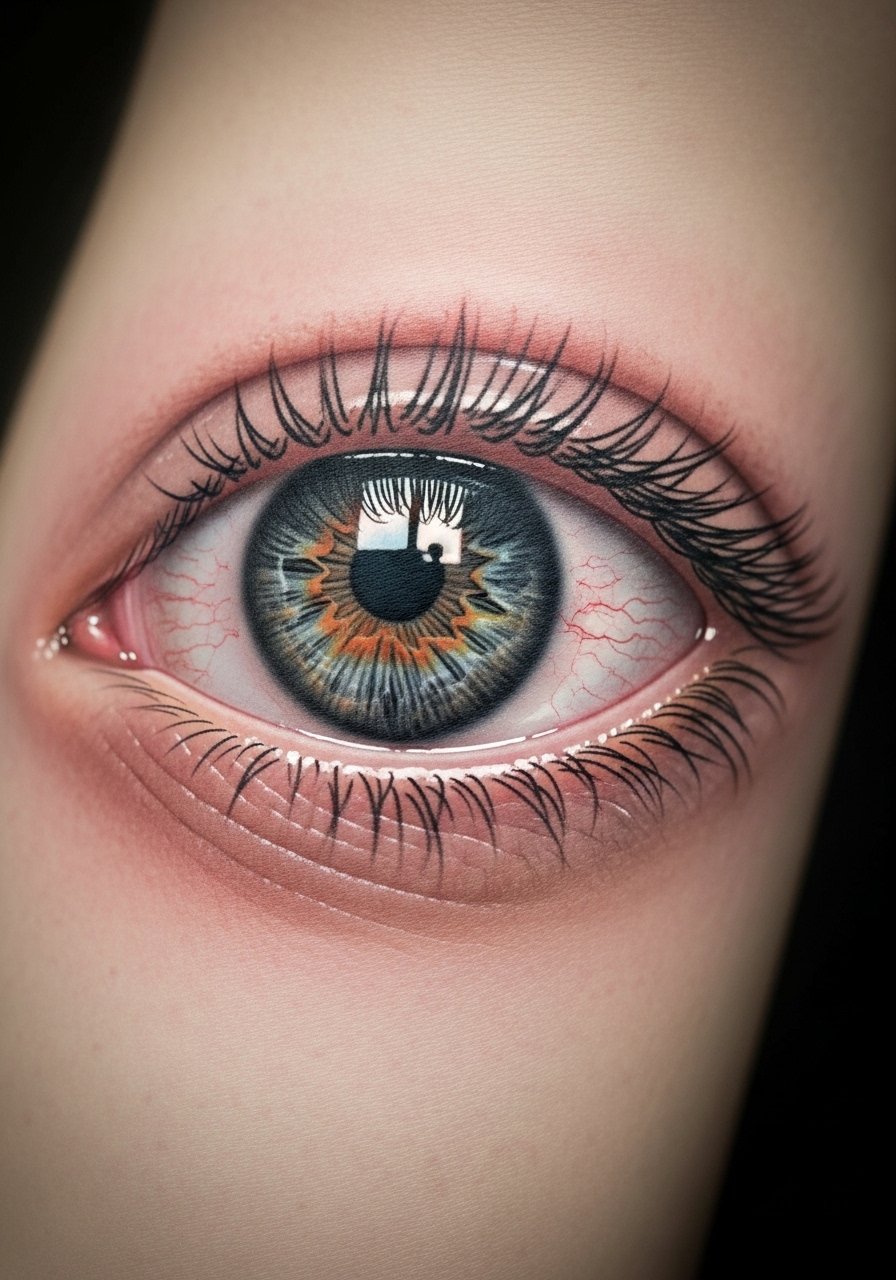
I first saw this on an artist who builds depth with tiny needles and soft gray washes. The eye feels alive because of crisp whites, tiny lashes, and layered shadow—ask for reference photos of healed work, not just fresh shots. Inner forearm is forgiving for detail and usually heals smoothly; expect mild swelling day one and settled details by 6–8 weeks. Common mistake: too-thin whites or over-saturated highlights that disappear once healed. Request an artist experienced in micro-realism and shadow work; they’ll plan contrast so the piece still reads as 3D after a year.
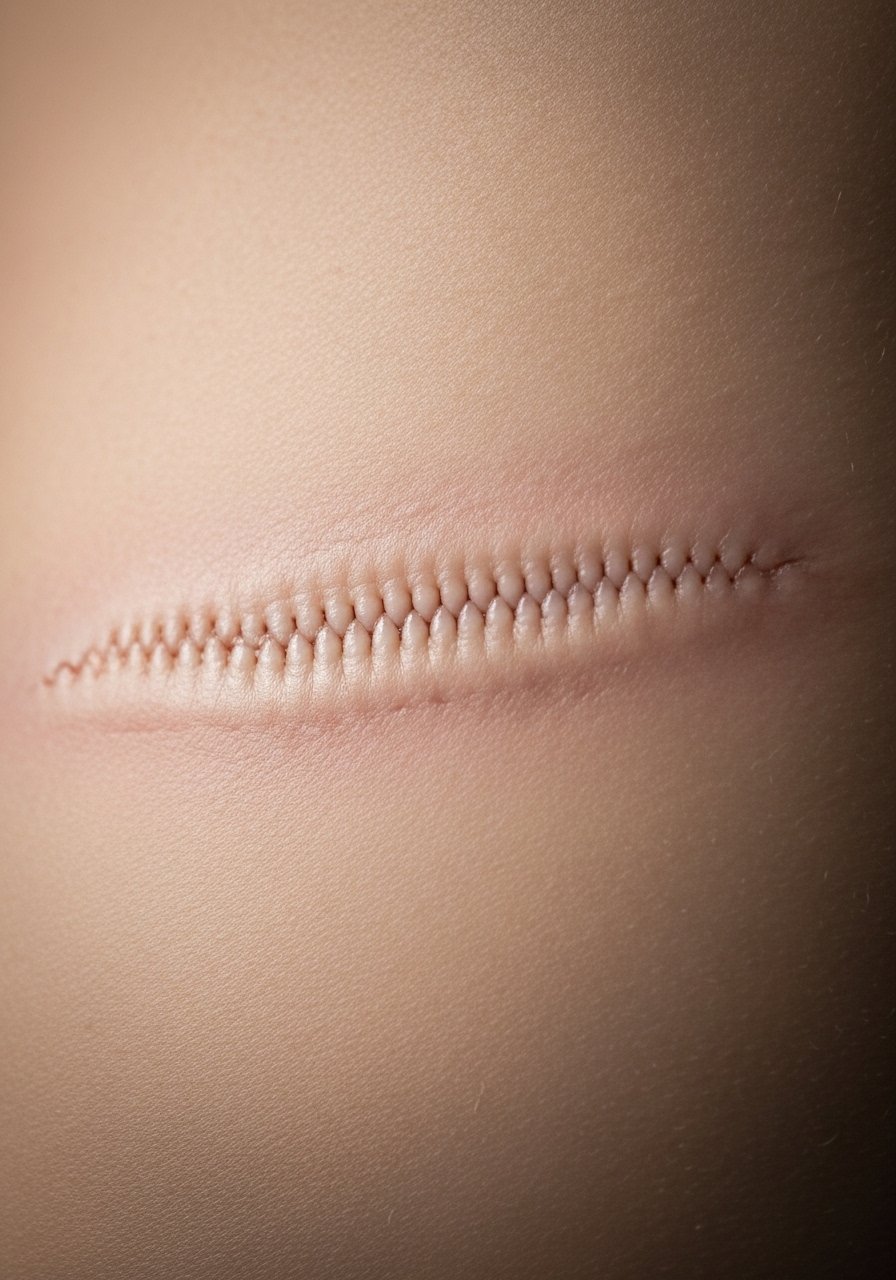
2. Trompe L’oeil Zipper On Ribcage
Style/Technique: Trompe L’oeil / Realism
Pain Level: High (7-8/10)
Session Time: Multiple sessions, 3+ hours each
Best For: Bold chest/rib statement, hidden when needed
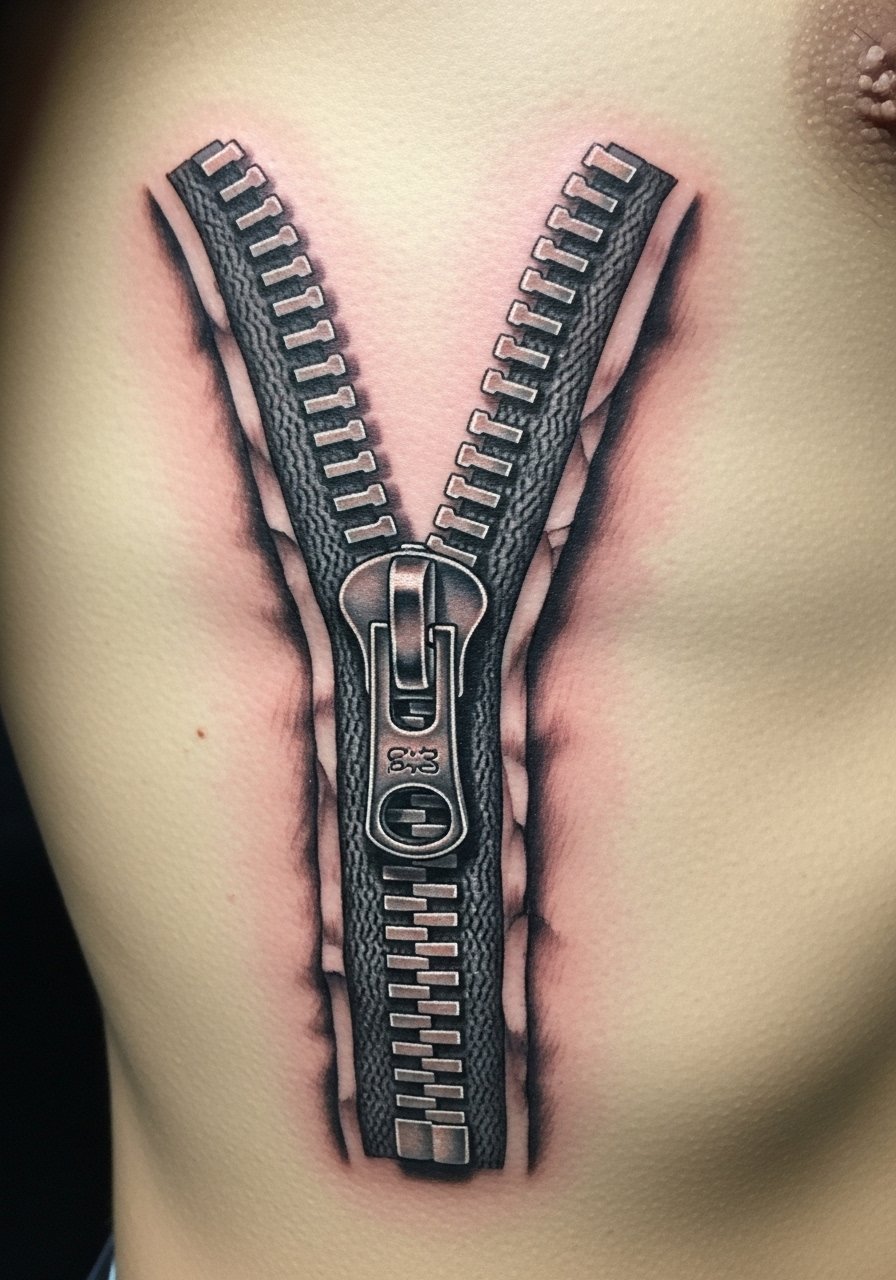
A zipper illusion on the ribs sells depth by combining metallic highlights and deep shadowing along the skin folds. I saw one heal unevenly because the artist used too-light gray; make sure they plan dark core shadows. Ribs are painful and take longer to sit through, but movement of breathing adds realism during sessions. Expect surface healing in 2–3 weeks and full settling by 3 months. Avoid overly thin teeth or flat highlights—ask for textured metal reference and healed photos to judge how the gray scales hold up.
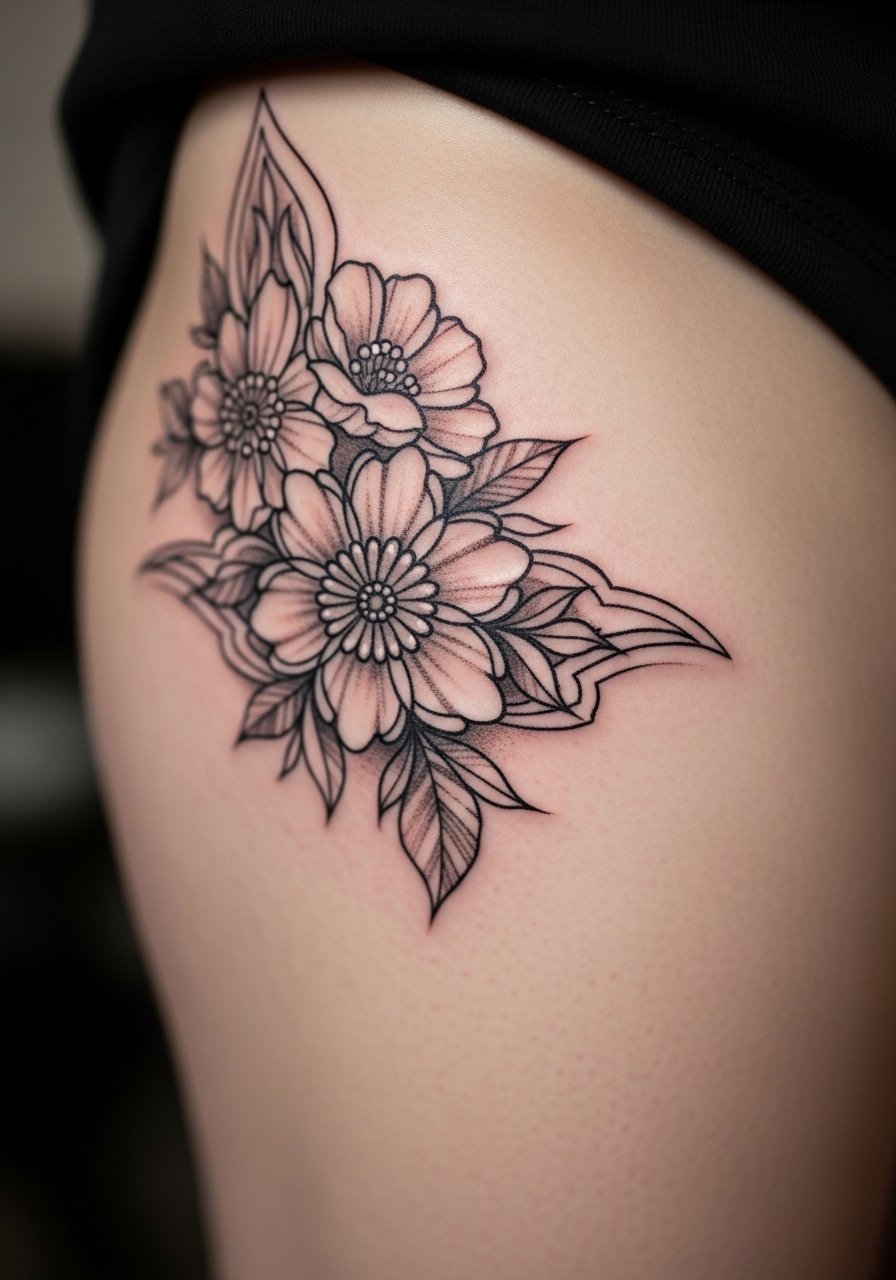
3. 3D Butterfly Perched On Collarbone
Style/Technique: Neo-Realism / Fine Line
Pain Level: Medium (4-5/10)
Session Time: 1-2 hours
Best For: Feminine accent, visible with low-cut tops
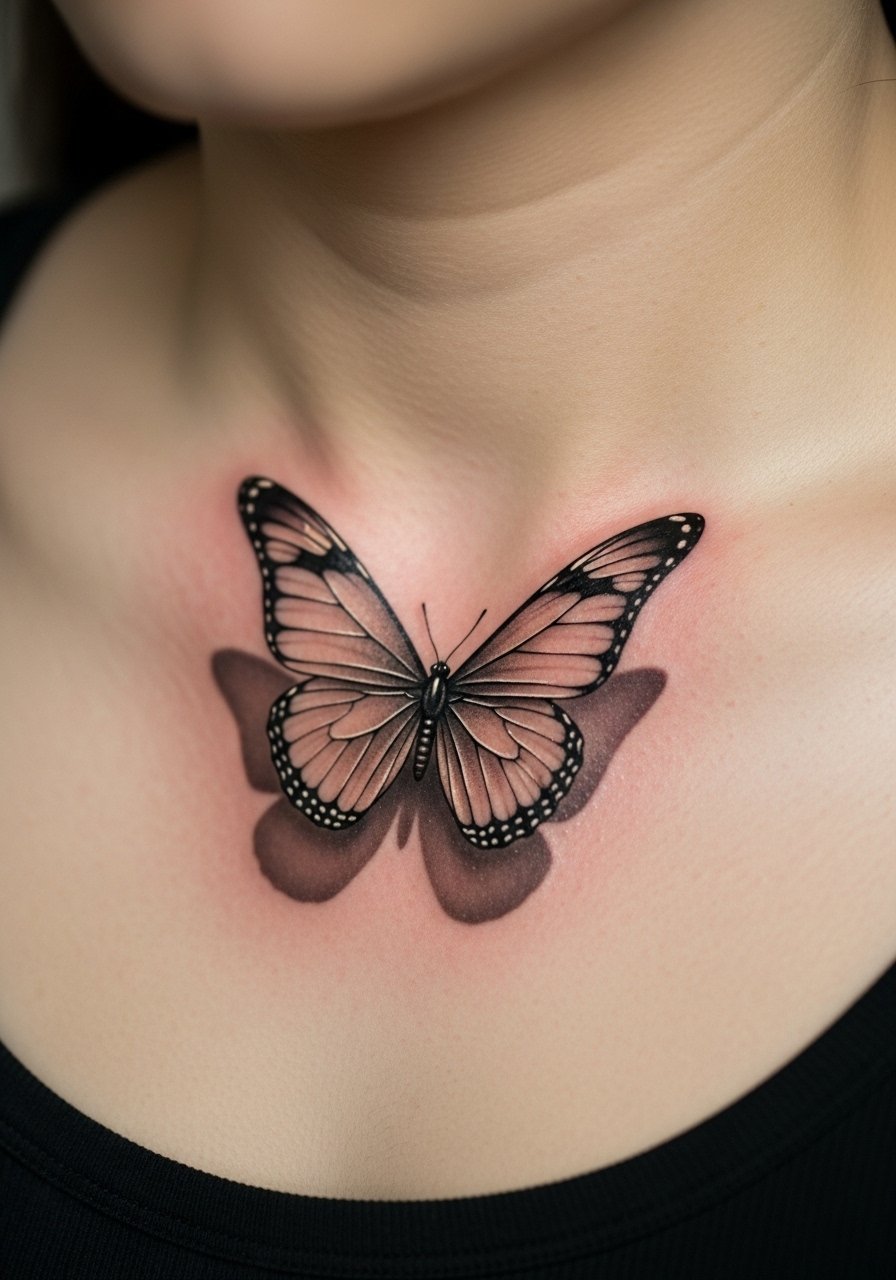
A butterfly with low-slung shadow and soft wing gradients reads like it's hovering. Collarbone placement gives a natural drop shadow if the artist layers soft gray beneath the wings. This area can sting when over bone but heals predictably if you avoid tight clothing. Watch for over-detailing in wing veins—too many tiny lines can blur. Ask your artist about pigment saturation and healed examples on the collarbone so you know how the shadowing ages.
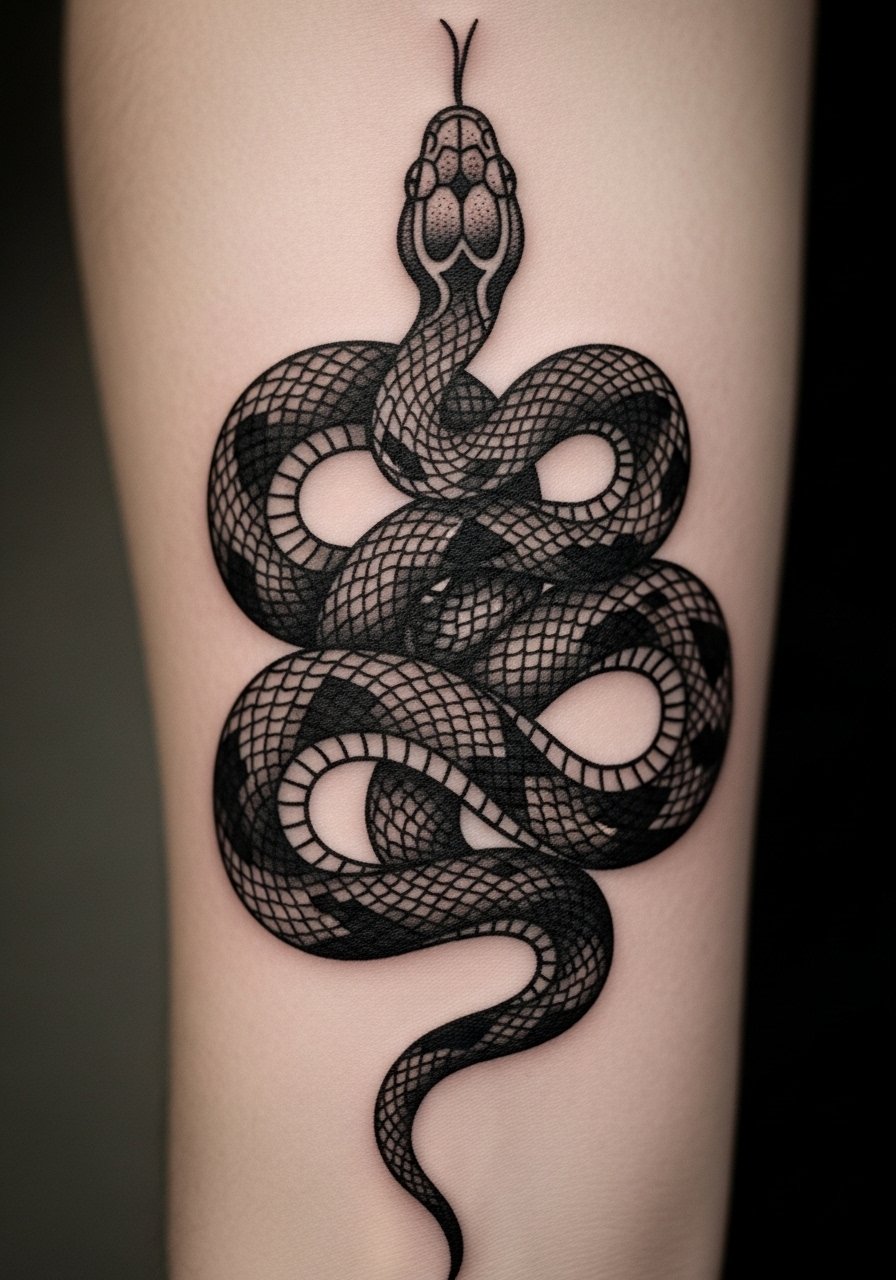
4. Optical Snake Wrapped Around Wrist
Style/Technique: Blackwork / Shadow Work
Pain Level: Medium (4/5)
Session Time: 1-3 hours
Best For: Wrap-around statement, visible daily
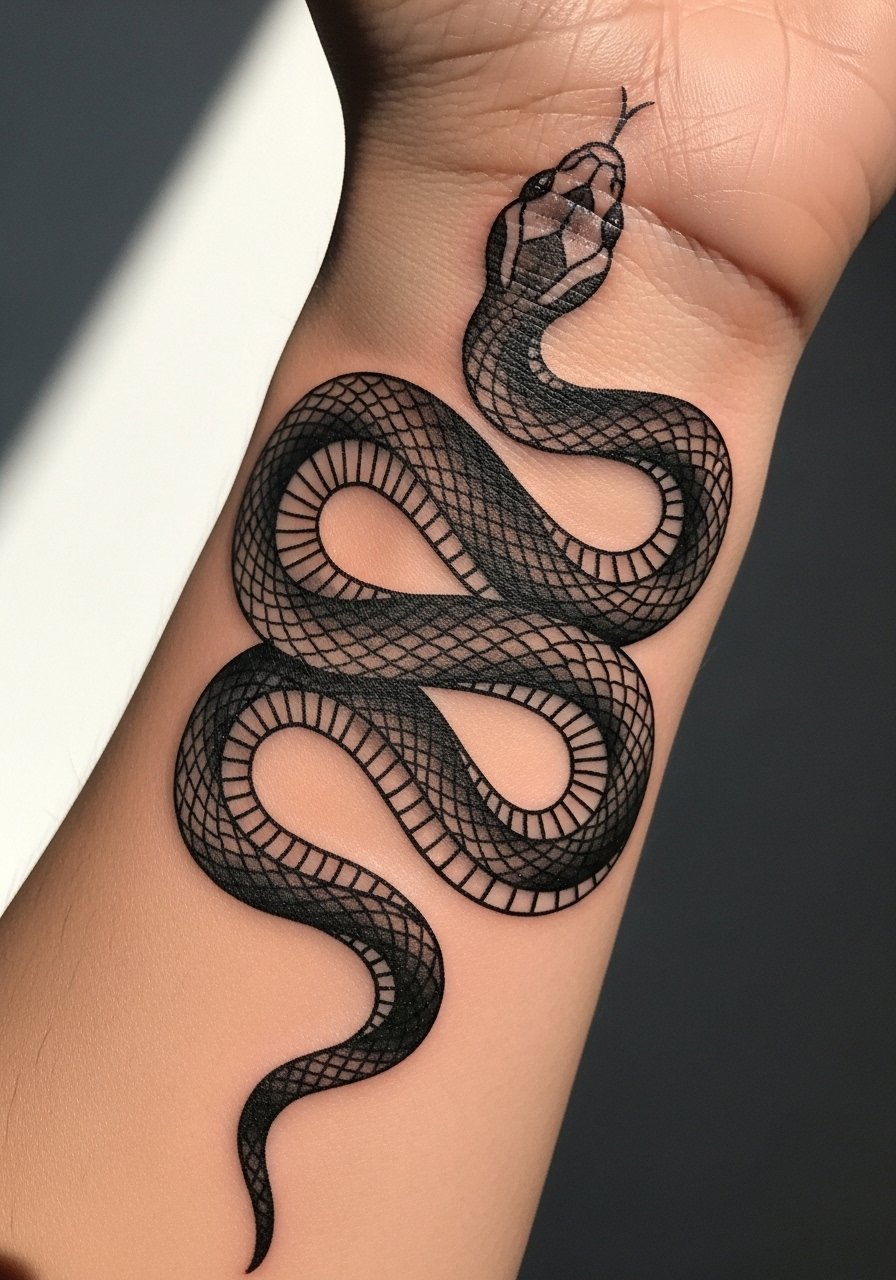
Blackwork with heavy shadow and negative space makes a coil look raised above skin. On the wrist, movement helps the illusion but also stresses the ink during healing—expect scabbing along thin lines. Pain is moderate; the dorsal wrist is more sensitive. Common mistake: losing contrast by over-blending shadows. Tell the artist you want bold core shadows and crisp edges; a stencil mock-up wrapped around the wrist helps visualize the 3D effect before needle meets skin.
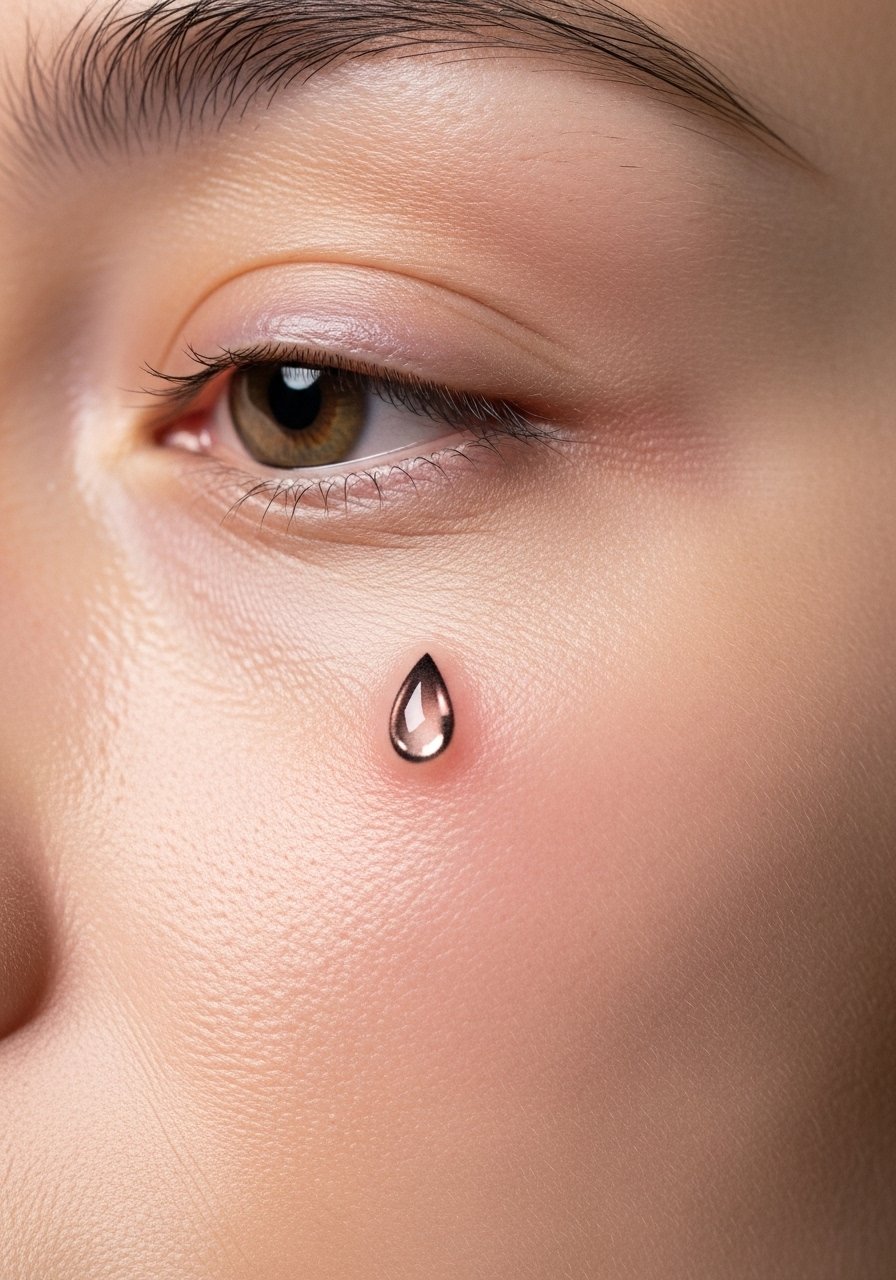
5. Floating Gemstone Behind Ear
Style/Technique: Micro-Realism / Minimal Color
Pain Level: Low (2-3/10)
Session Time: 30-90 minutes
Best For: Subtle sparkle, easy to hide
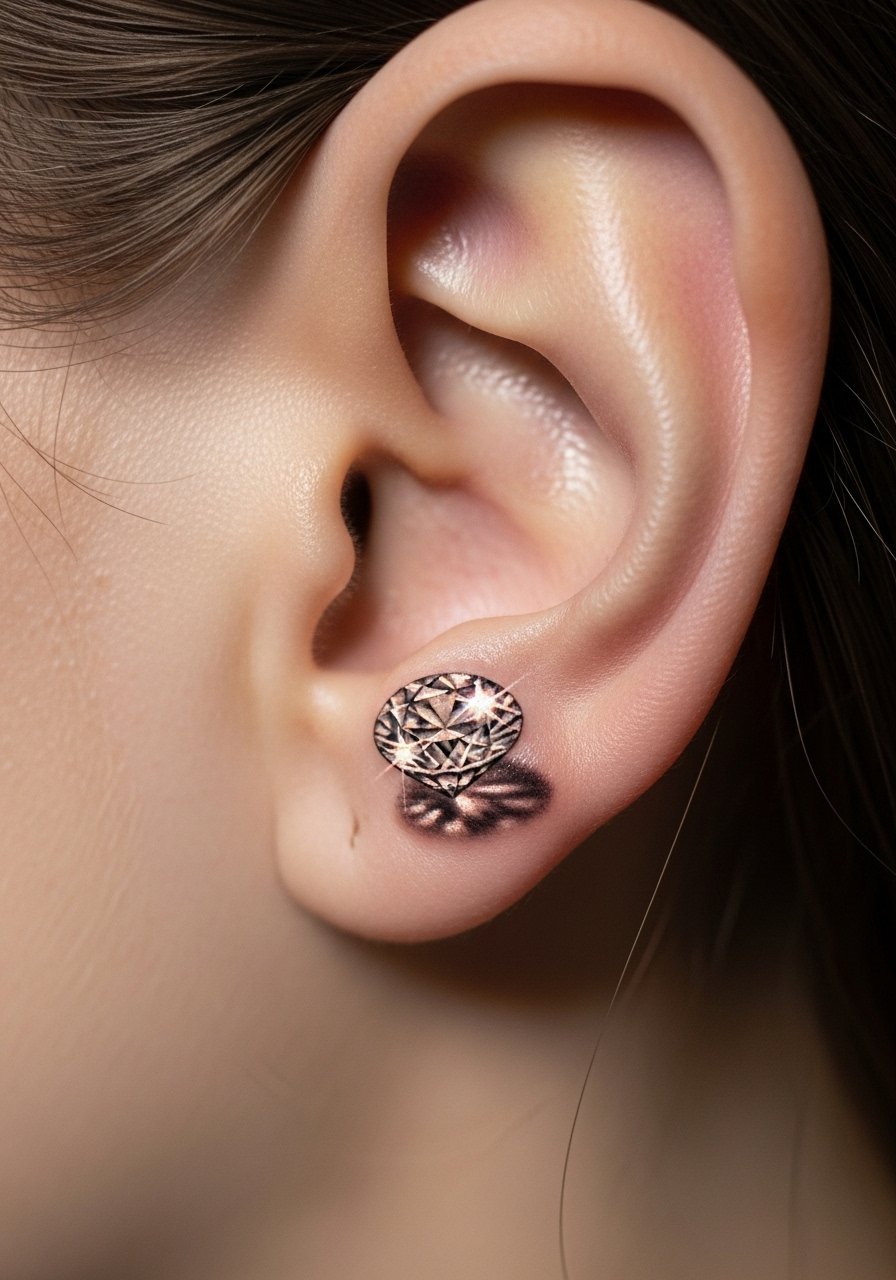
Tiny gems use concentrated white highlights and a soft drop shadow to look raised. Behind the ear is low-pain and great for someone wanting a discreet 3D accent. Healed gems need strong contrast; artists often layer tiny dots rather than solid blocks. A common misstep is overusing white ink—on some skin tones white fades quickly. Ask for healed examples on similar skin tones and for artists skilled in micro-dot shading.
6. Inserted Screw On Forearm (Industrial)
Style/Technique: Hyperrealism / Industrial
Pain Level: Medium (4/5)
Session Time: 1-3 hours
Best For: Bold mechanical vibe, visible arm art
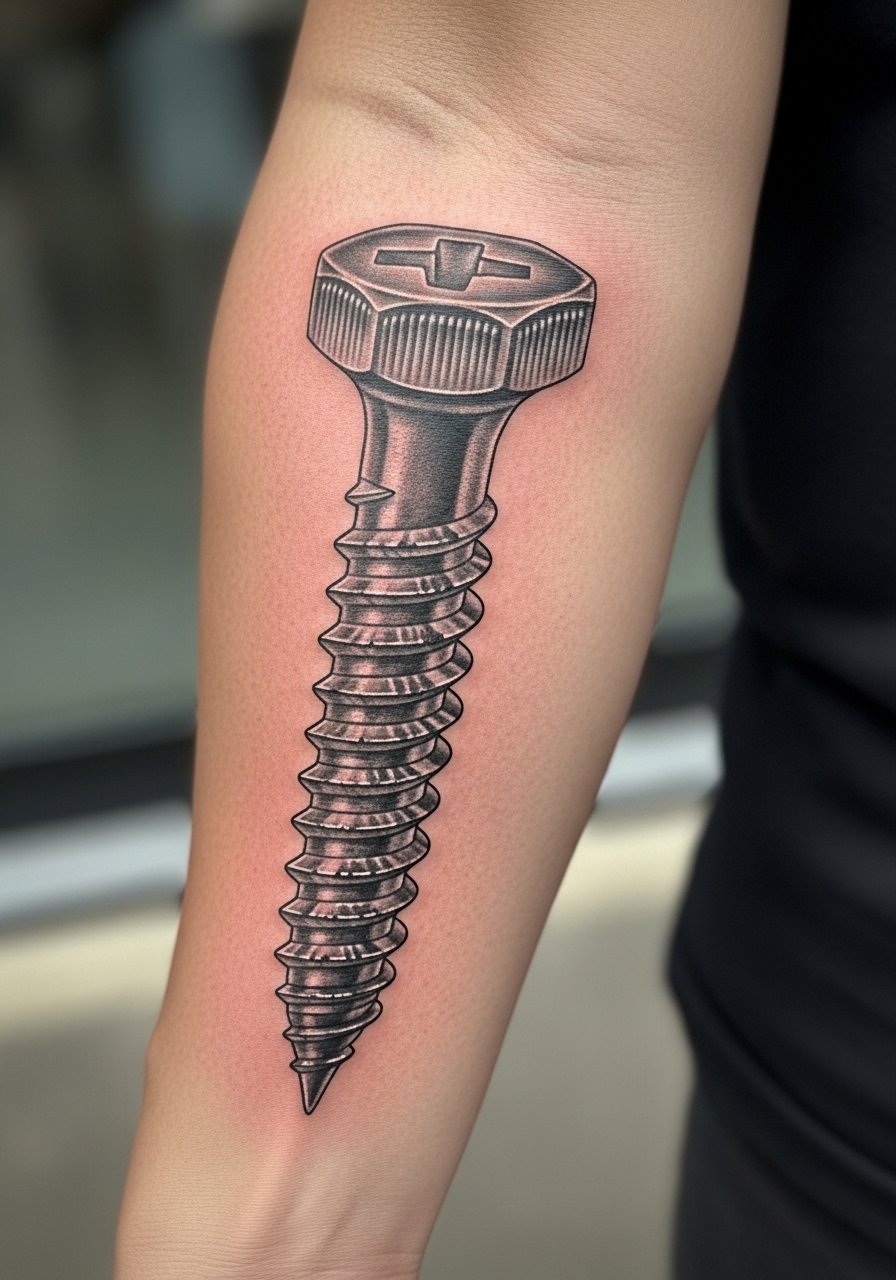
A realistic screw pushes depth by using inset shadows and metallic highlights. Forearm placement is comfortable during sessions and heals reliably. Expect some swelling day one; fine metal highlights will mellow as the skin heals. Artists who do biomechanical or surgical realism excel at this. Avoid flat gray; insist on layered shadow and a subtle skin crease to sell the illusion.
7. Ripped Skin With Flower Underneath On Thigh
Style/Technique: Trompe L’oeil / Color Realism
Pain Level: Medium (4/5)
Session Time: Multiple (2–4 hours)
Best For: Large, hidden statement, can be shown selectively
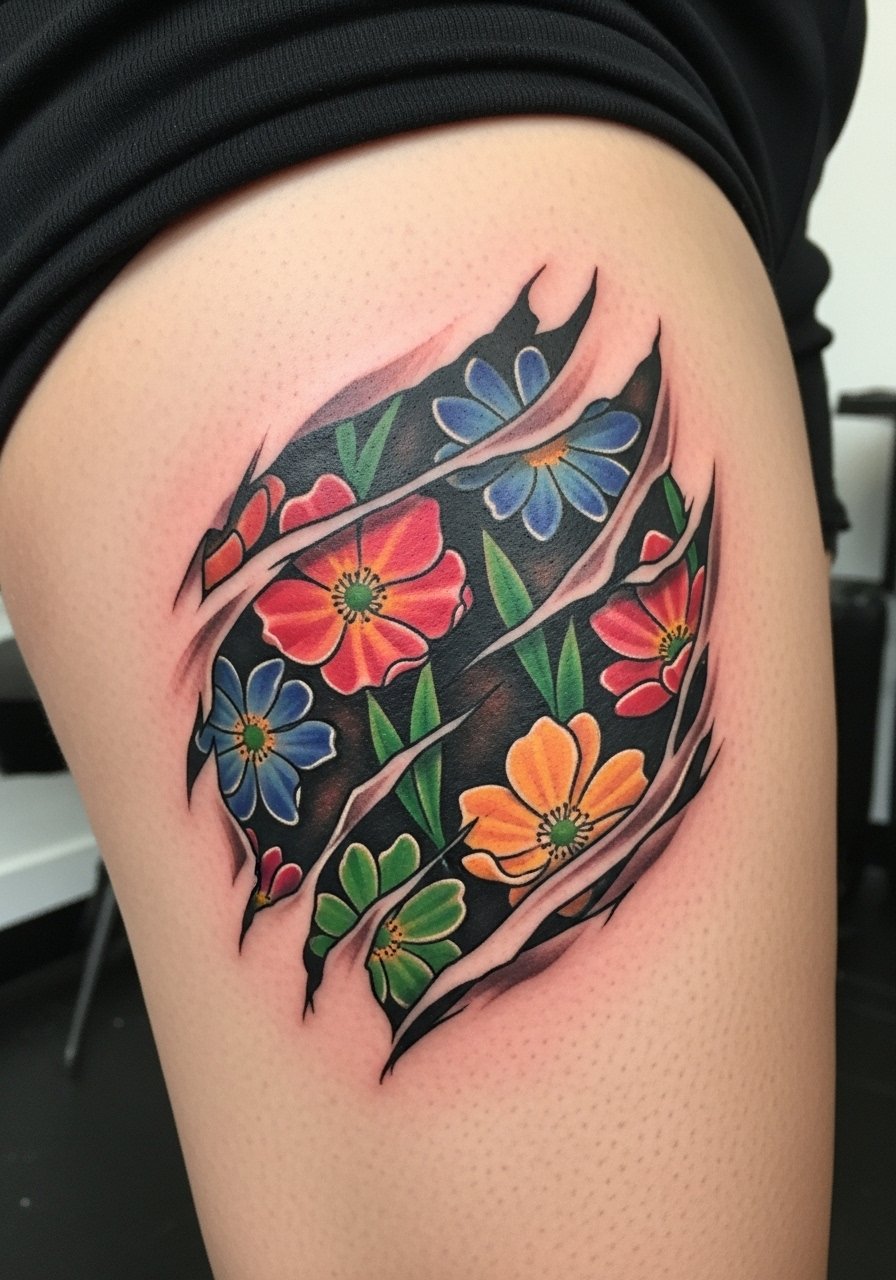
This layered design uses torn-edge shadows to appear as if the skin is peeled back to reveal color underneath. Thigh flesh hides movement well, so color saturation holds. Pain is milder than ribs, but longer sessions can be tiring. The main pitfall is over-saturating the "torn" border; you want textured shading, not hard lines. Ask artists for healed portfolios that show edge shadow and color blending months after tattooing.
8. 3D Geometric Cube On Back Of Hand
Style/Technique: Geometric / Blackwork
Pain Level: High (6-7/10)
Session Time: 1-2 hours
Best For: Small statement, visible daily
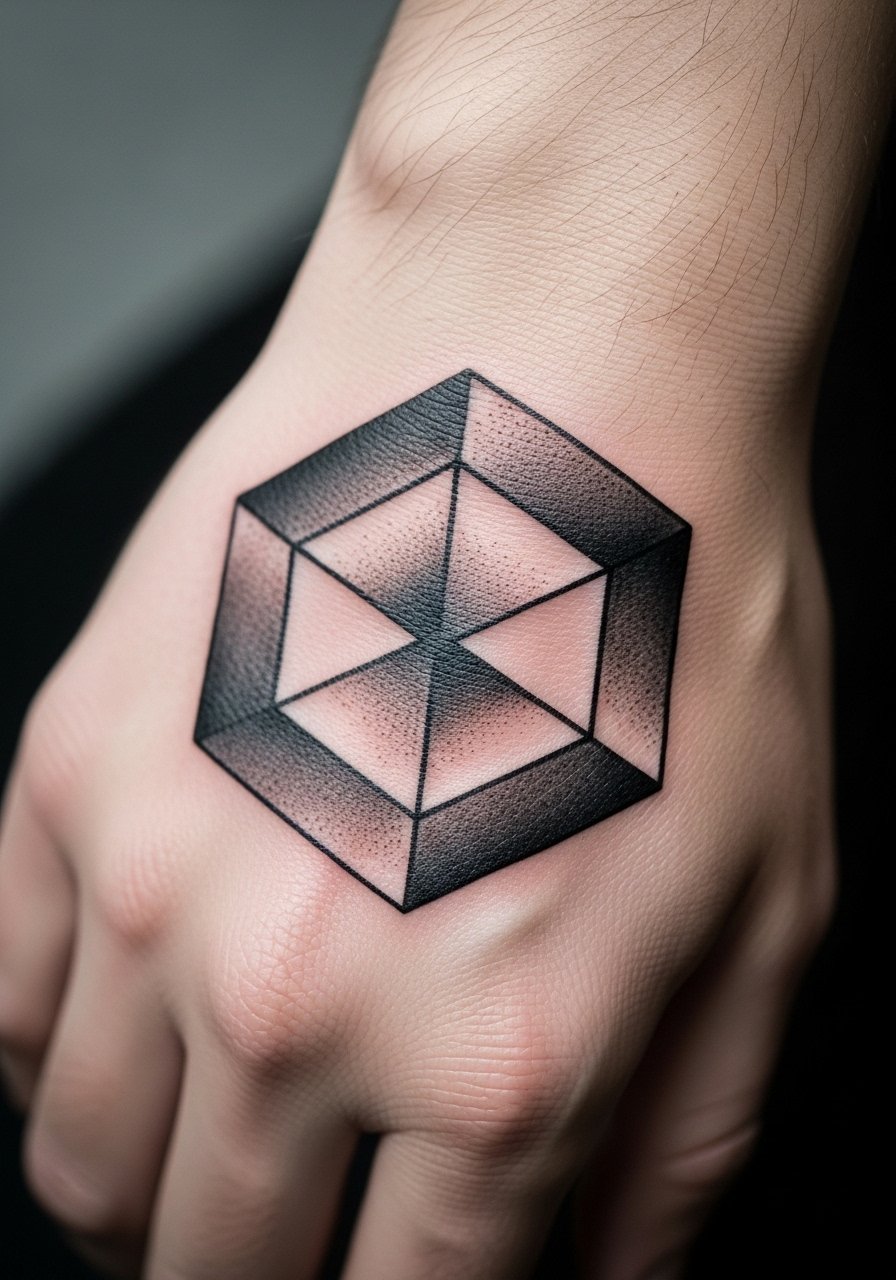
Sharp geometry needs crisp lines and carefully placed drop shadows to read as a cube on the hand. Hands are high-movement and high-fade areas; lines can blur faster here. Expect touch-up needs and slower healing due to constant use. Avoid super-fine single-line edges—thicker, clean outlines with measured shading last better. Ask your artist about healed hand pieces and how they did touch-ups.
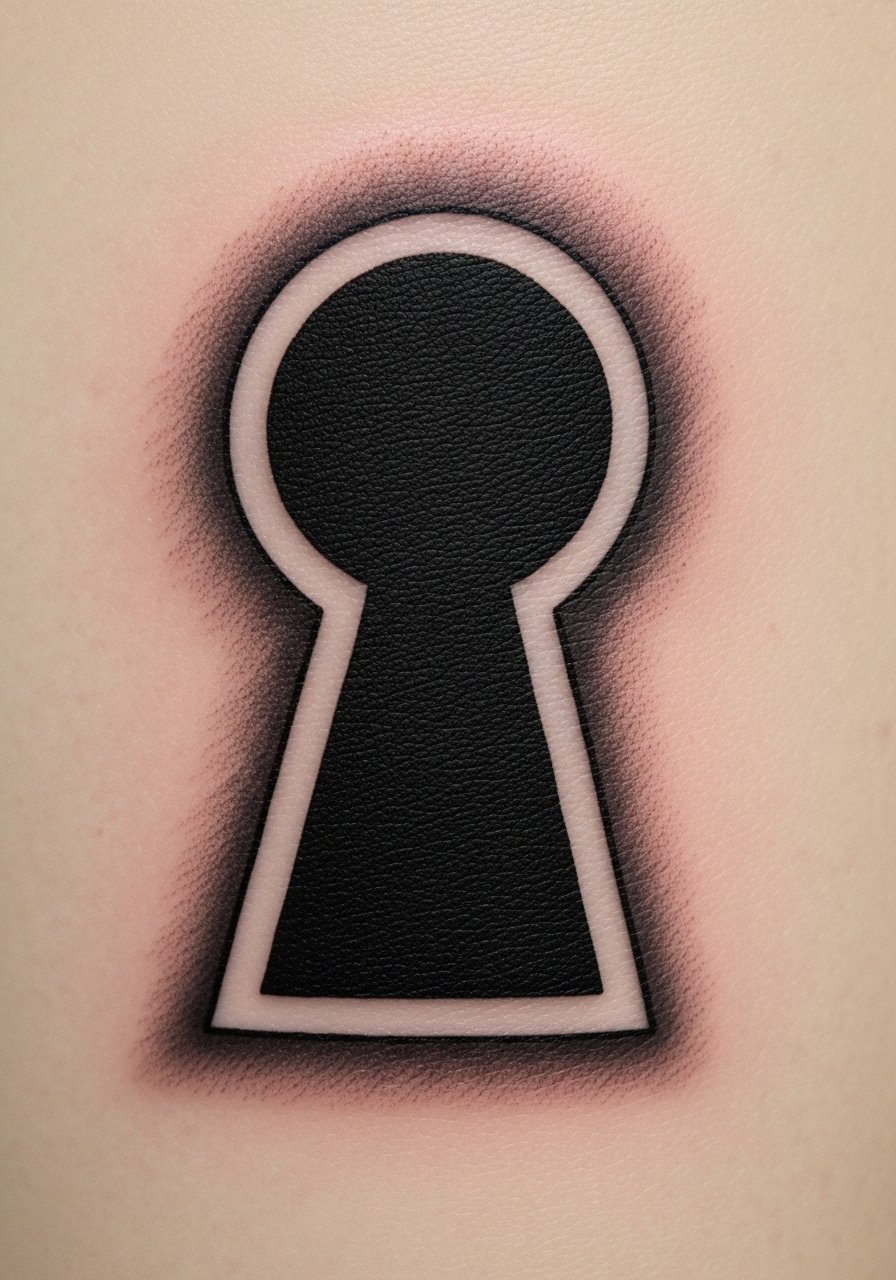
9. Floating Keyhole On Upper Chest
Style/Technique: Fine Line / Shadow Work
Pain Level: Medium (4/5)
Session Time: 1-2 hours
Best For: Chest accent, symbolic pieces
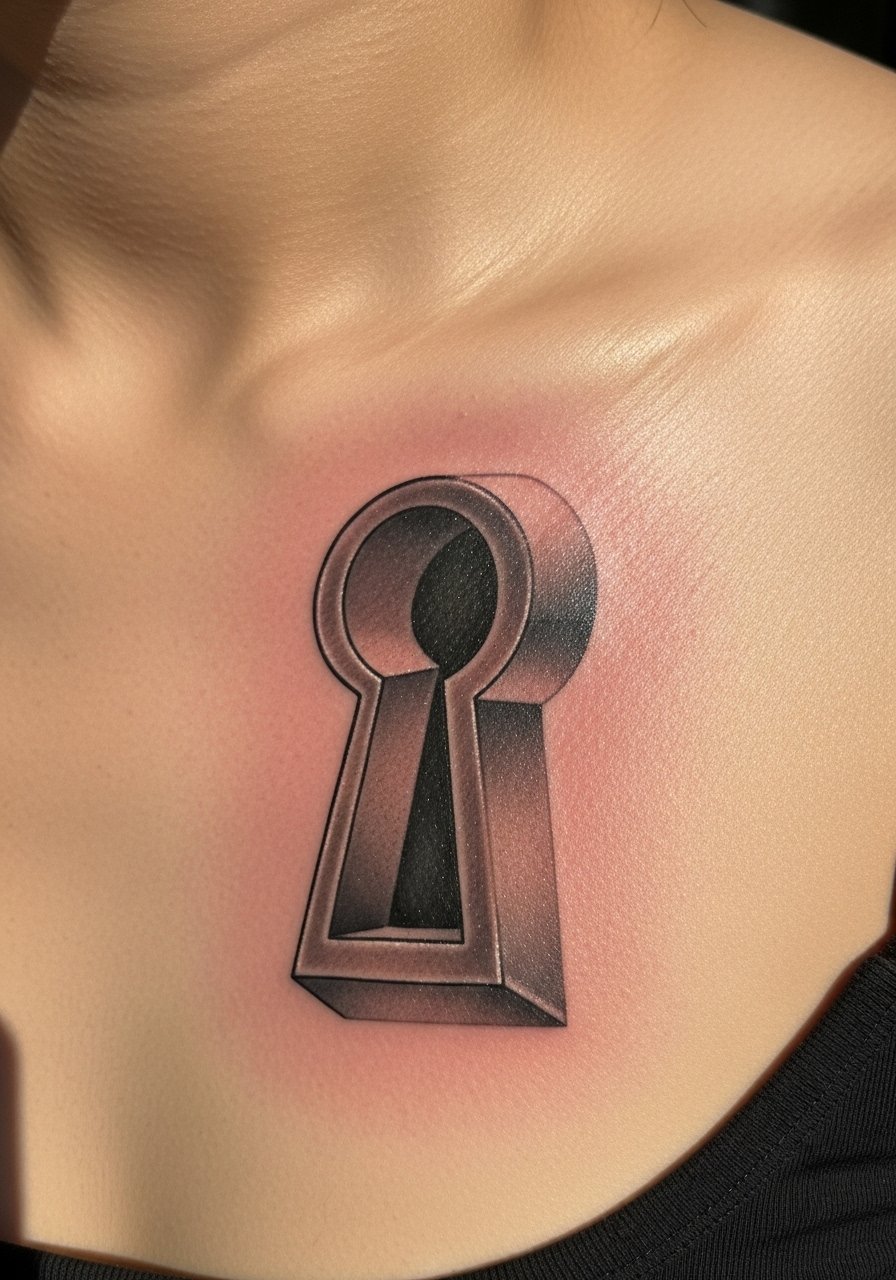
A keyhole relies on inner dark gradients and a soft outer shadow to look recessed. Upper chest gives a nice flat canvas and is less painful than sternum. Healed depth depends on the artist creating a darker core and a subtle feathered shadow. Don't ask for too many ornate inner details that can blur. Look for an artist skilled in negative space and shading transitions.
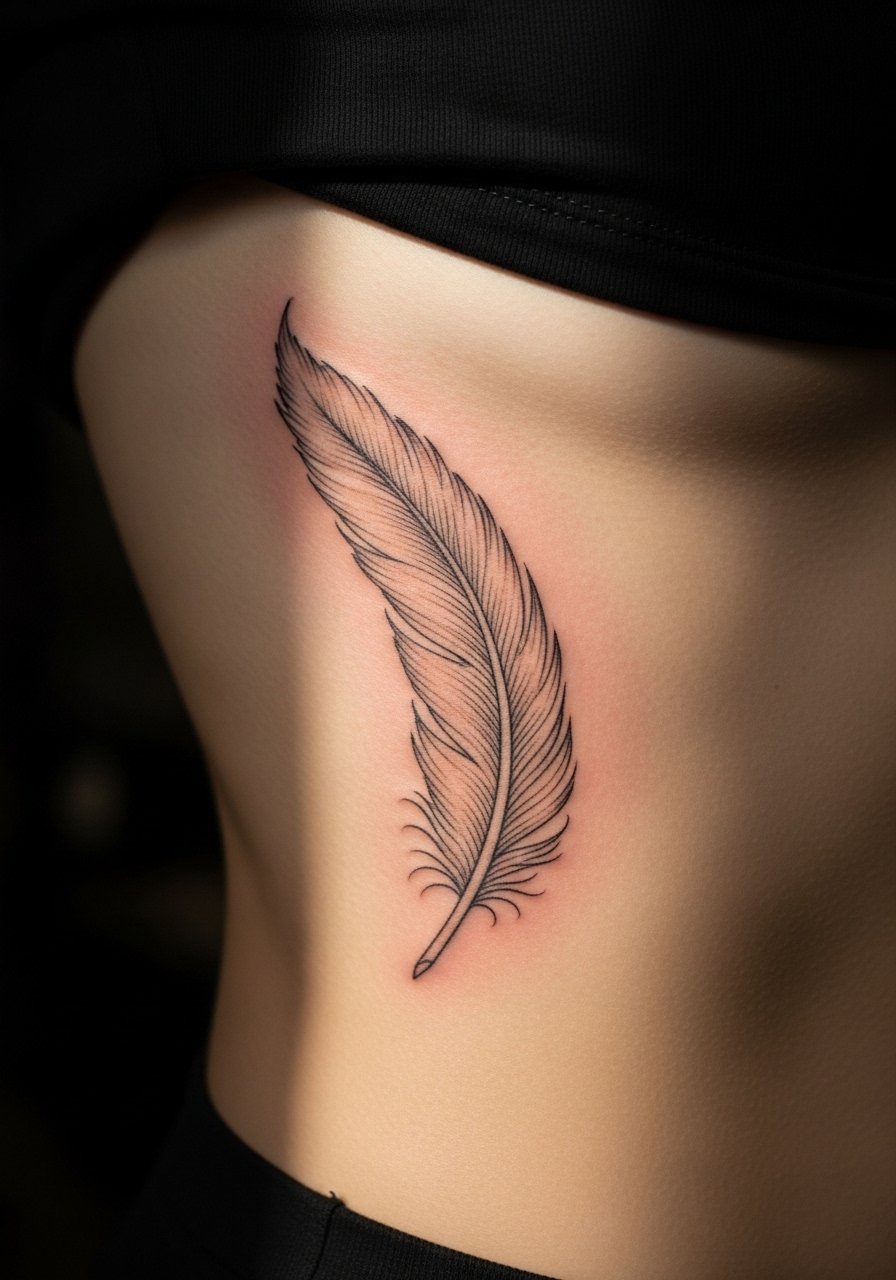
10. Floating Feather Casting Shadow On Side Rib
Style/Technique: Fine Line / Illustrative
Pain Level: High (7/8/10 on ribs)
Session Time: 1-2 hours
Best For: Delicate large pieces, looks natural with body curves
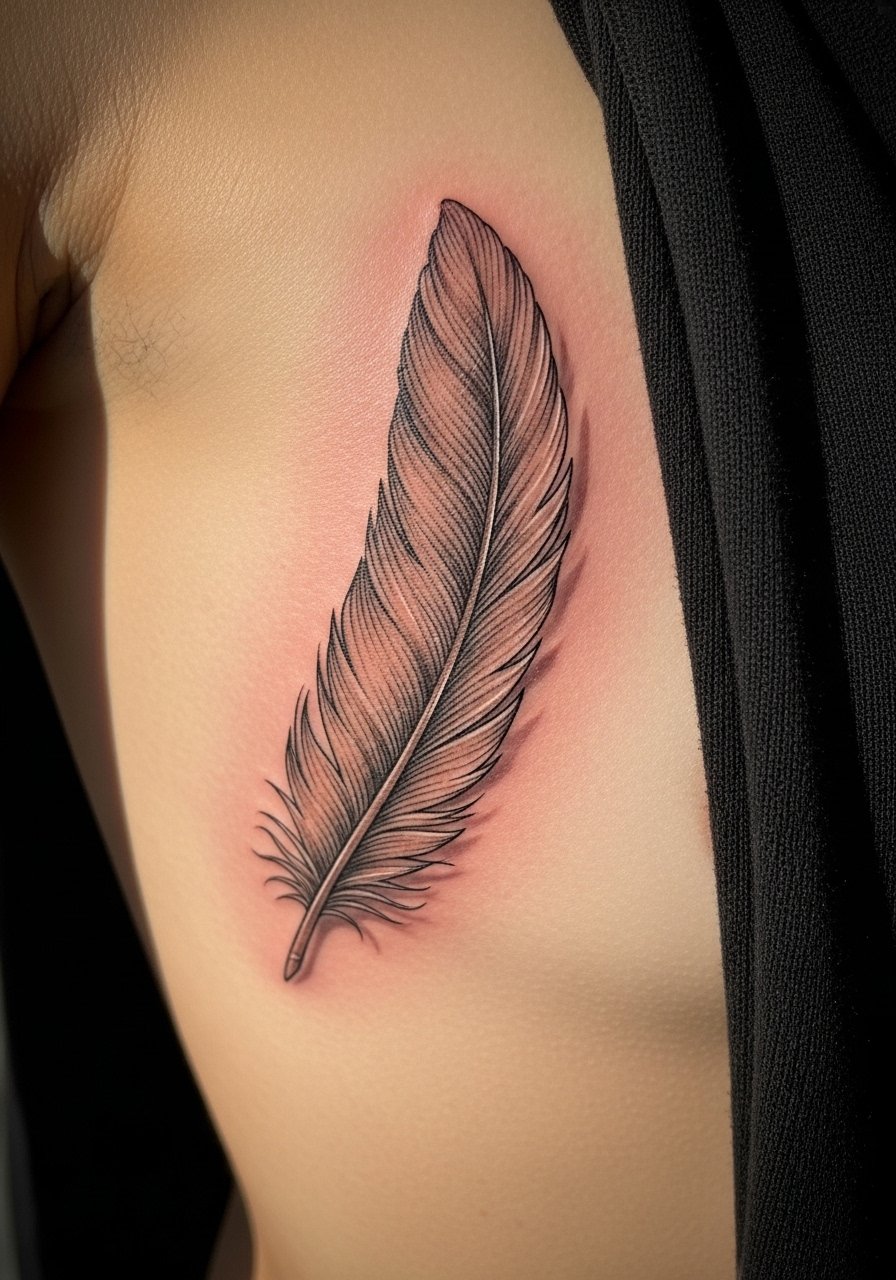
Feathers with a faint shadow look like they're lifted off the skin. Ribs are sensitive, so plan short breaks. Feathers can blur if lines are too thin; thicker quill lines and soft shading hold better healed. Expect surface peeling and reduced highlight brightness during the initial weeks. Ask to see healed feather work on ribs specifically—placement changes how shadows read when you breathe.
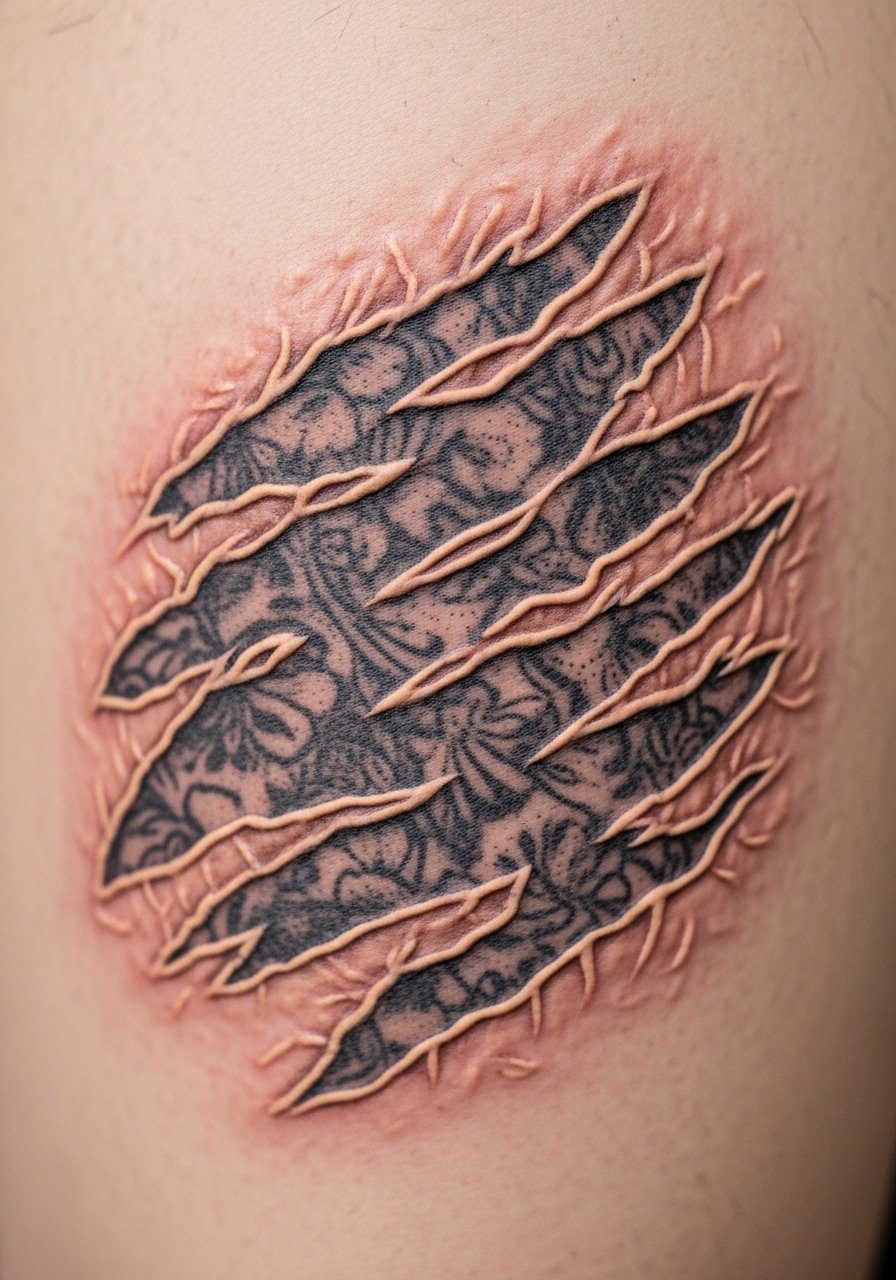
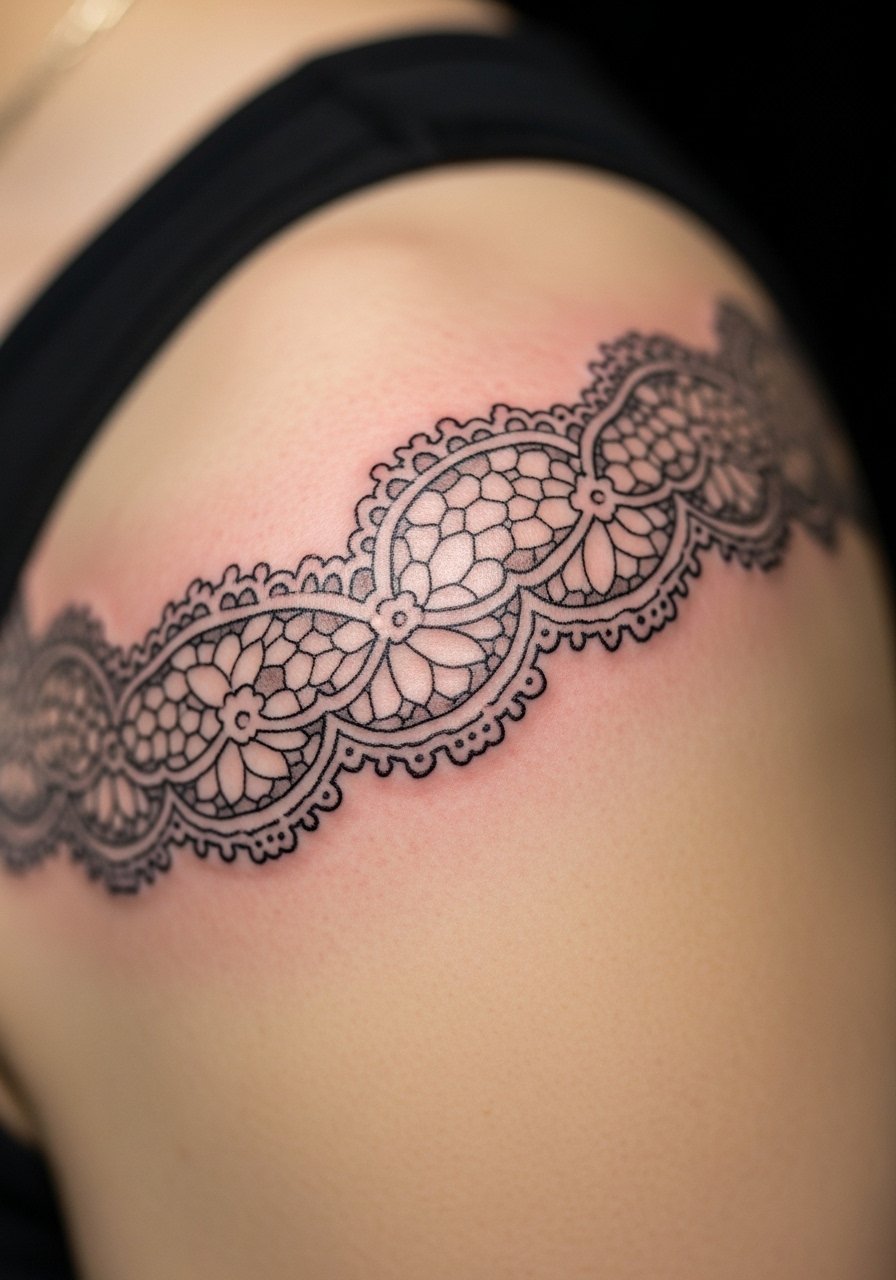
11. Layered Lace Peeking From Sleeve On Shoulder
Style/Technique: Neo-Traditional / Texture Work
Pain Level: Medium (4/5)
Session Time: 2-4 hours
Best For: Feminine sleeve starters, can be extended
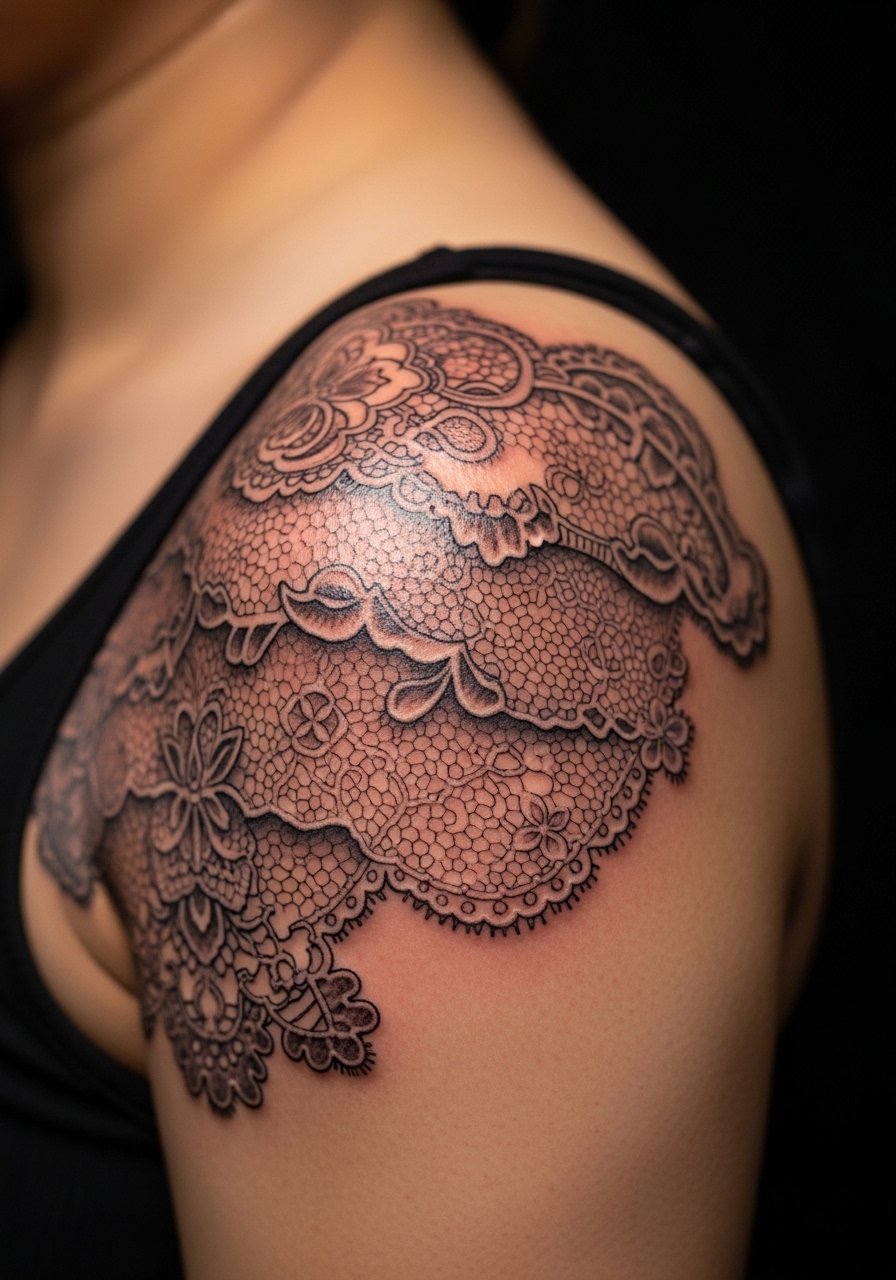
Lace patterns gain 3D effect from tiny shadows between threads and lightly shaded edges. Shoulders offer a smooth canvas and heal well. A common error is a too-flat lace pattern; insist on layered shading and tiny negative-space highlights to mimic overlap. Artists who do delicate dotwork and texture are best. Healed lace maintains detail if the lines were bold enough initially.
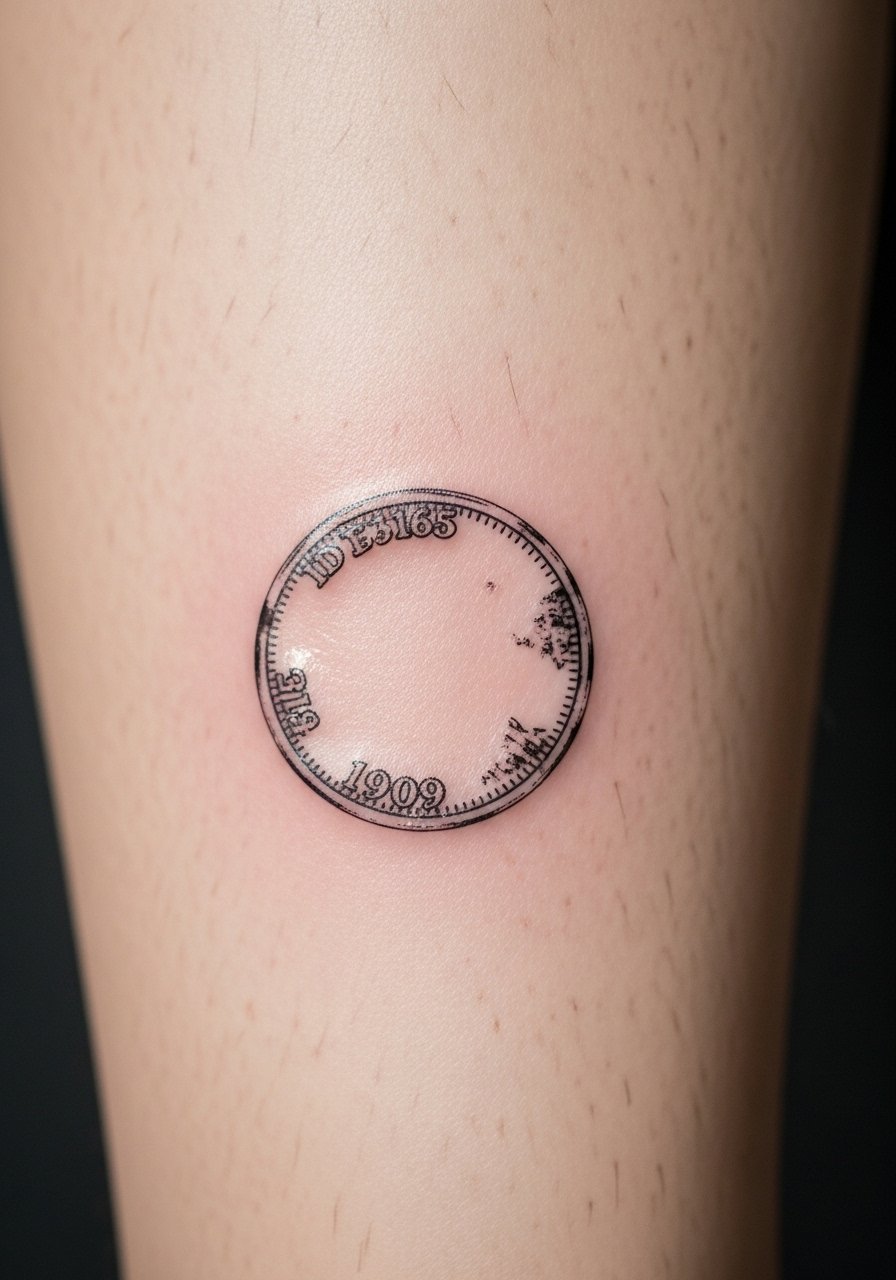
12. Realistic Coin Inserted In Skin On Calf
Style/Technique: Hyperrealism / Metallic Work
Pain Level: Medium (4/5)
Session Time: 1-2 hours
Best For: Playful realism, leg visibility
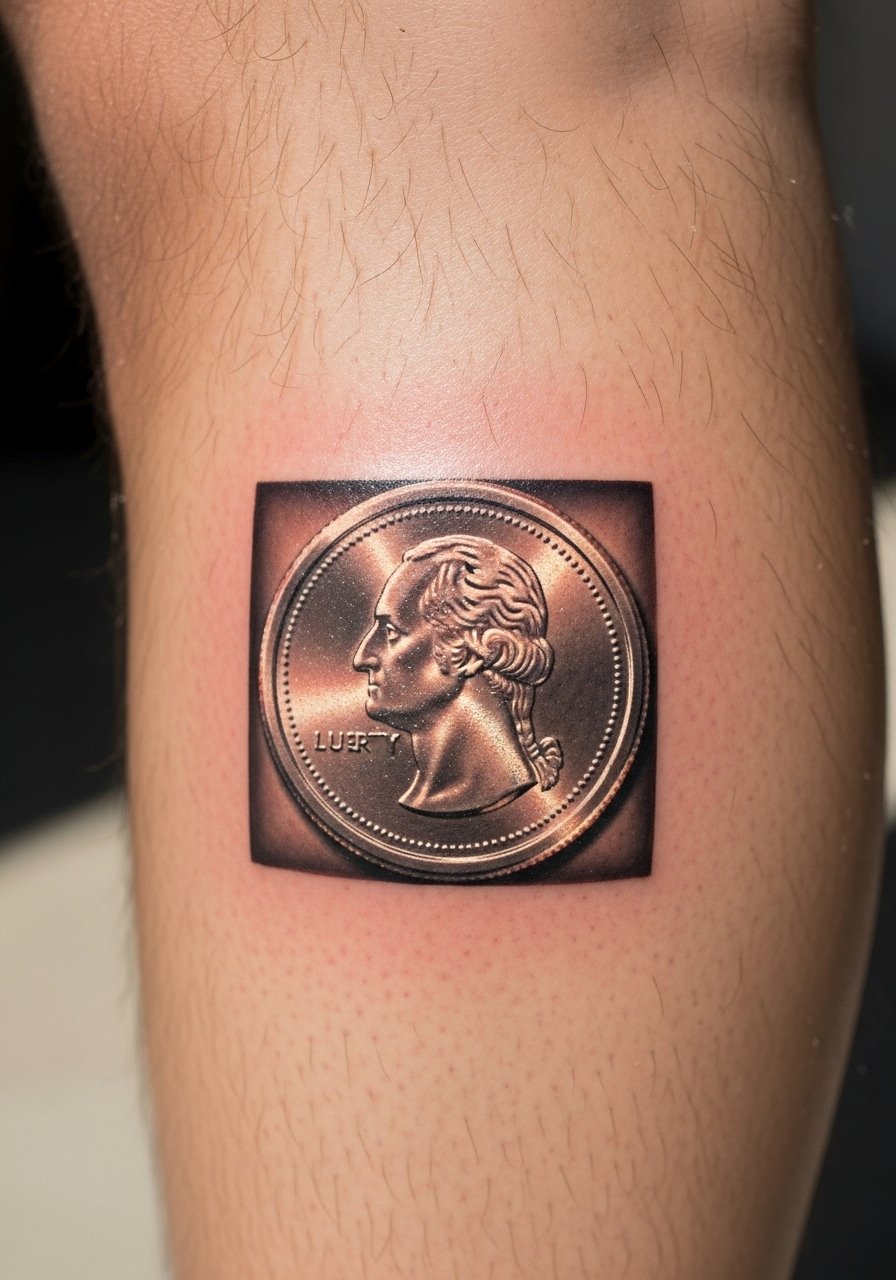
Metallic realism uses pure white highlights and deep grays to mimic reflections. Calf tissue holds pigment well, so small metal textures stay crisp. Beware of using too much white ink; it can disperse in the first months. Ask the artist for healed metallic examples and how they layered highlights without over-relying on white ink.
13. 3D Stitched Heart On Sternum
Style/Technique: Neo-Traditional / Realism
Pain Level: High (8/10)
Session Time: 2-3 hours
Best For: Intimate centerpiece, symbolic pieces
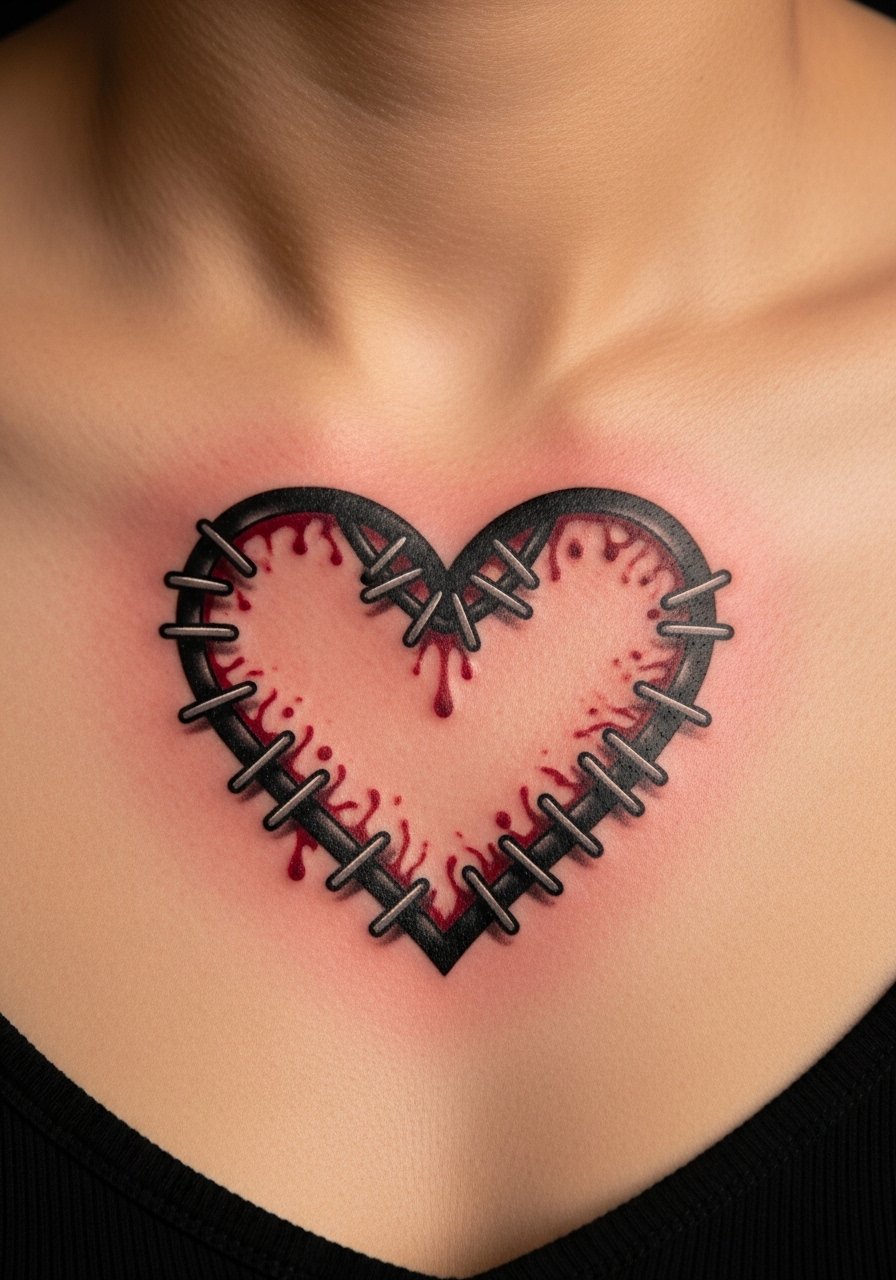
Stitched pieces sell depth by pairing raised stitch highlights with recessed thread shadows. Sternum pain is intense but the central placement makes the illusion dramatic. Healing requires avoiding tight clothing. Common mistake: overdoing red shading that heals patchy. Ask your artist how they balance color and shadow so the stitches still read after months.
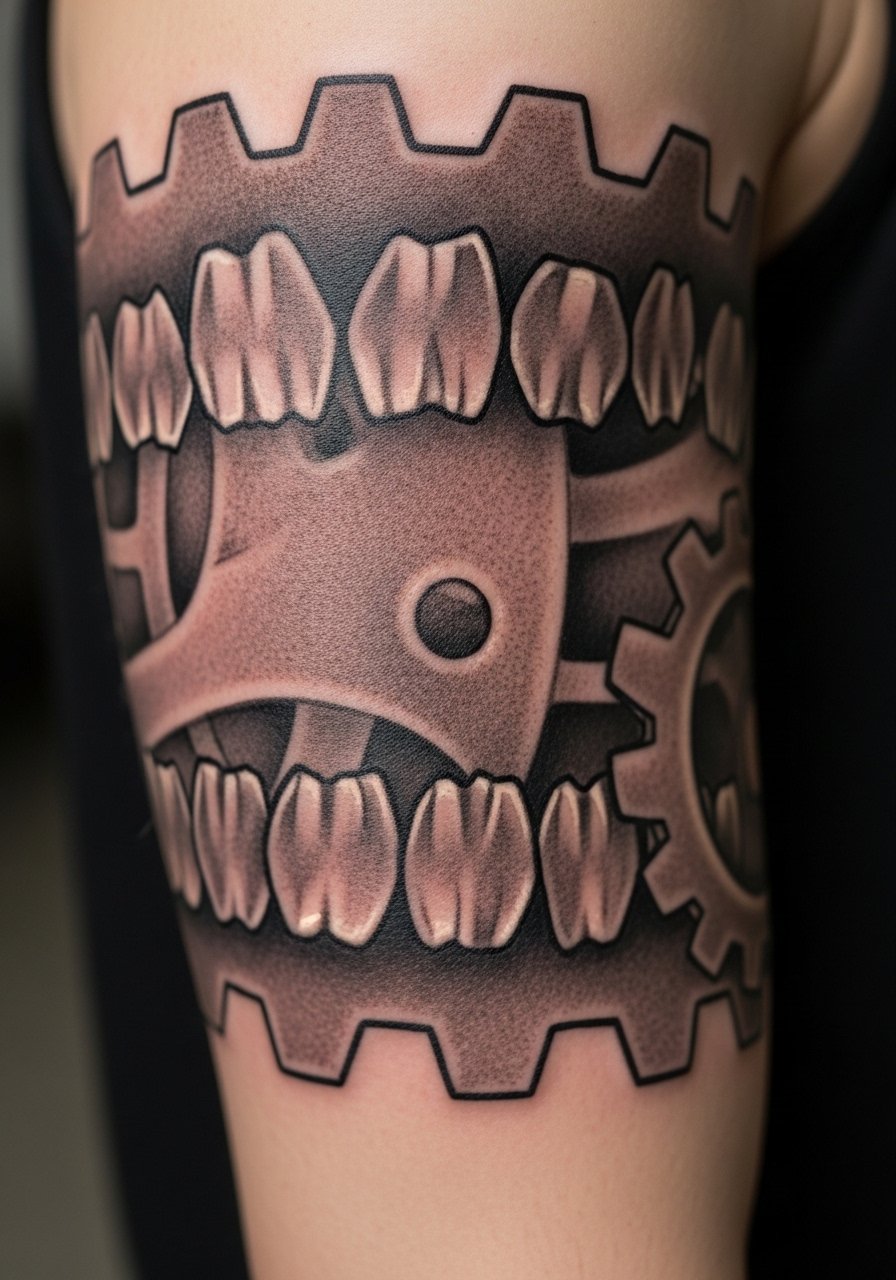
14. 3D Mechanical Heart On Upper Arm
Style/Technique: Biomechanical / Realism
Pain Level: Medium (4/5)
Session Time: Multiple sessions, 3+ hours each
Best For: Statement arm piece, blends with sleeve work
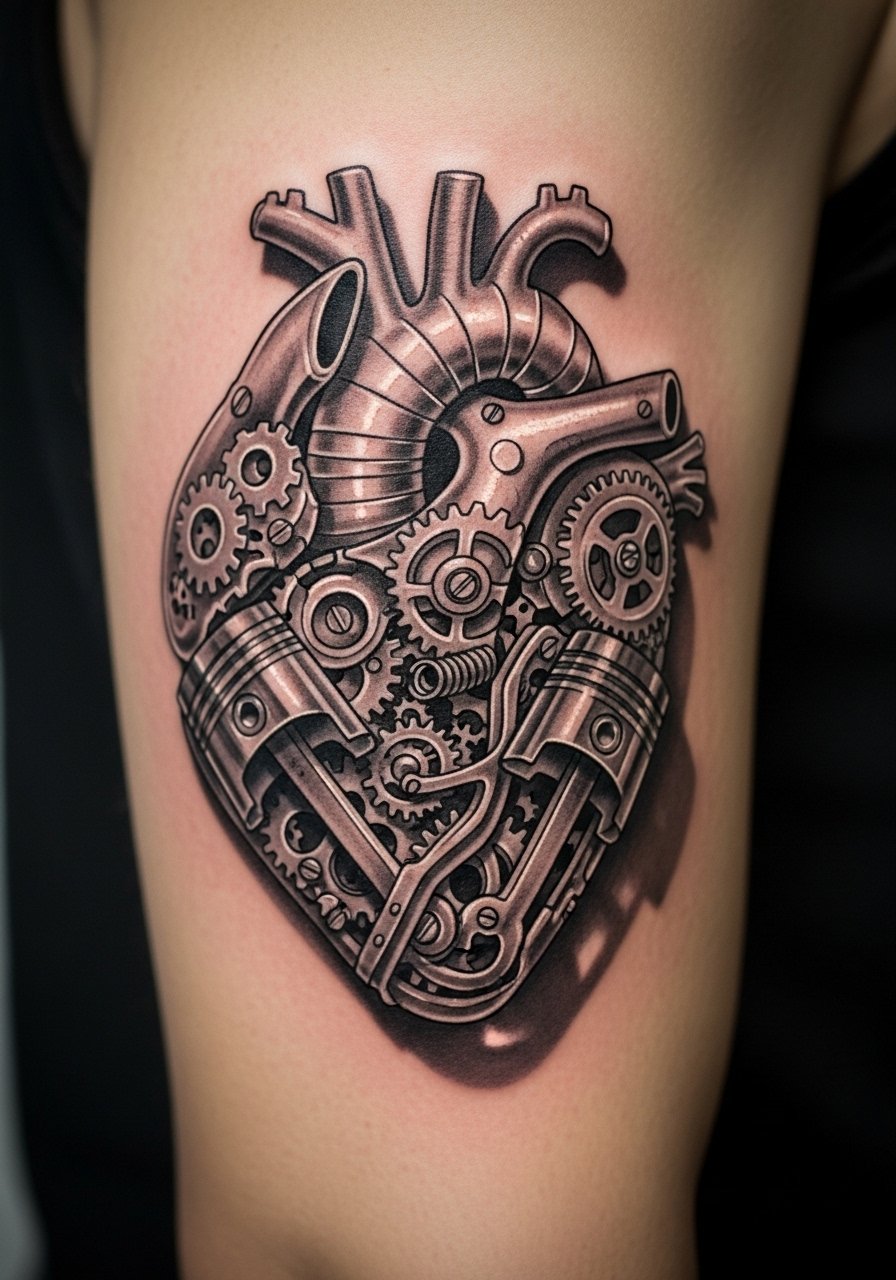
Biomech relies on layered metallic textures and deep cast shadows to look embedded. Upper arm is a forgiving, low-movement area so details heal nicely. The pitfall is making elements too tiny—gears need space to age. Ask artists known for mechanical realism and look for healed gallery photos.
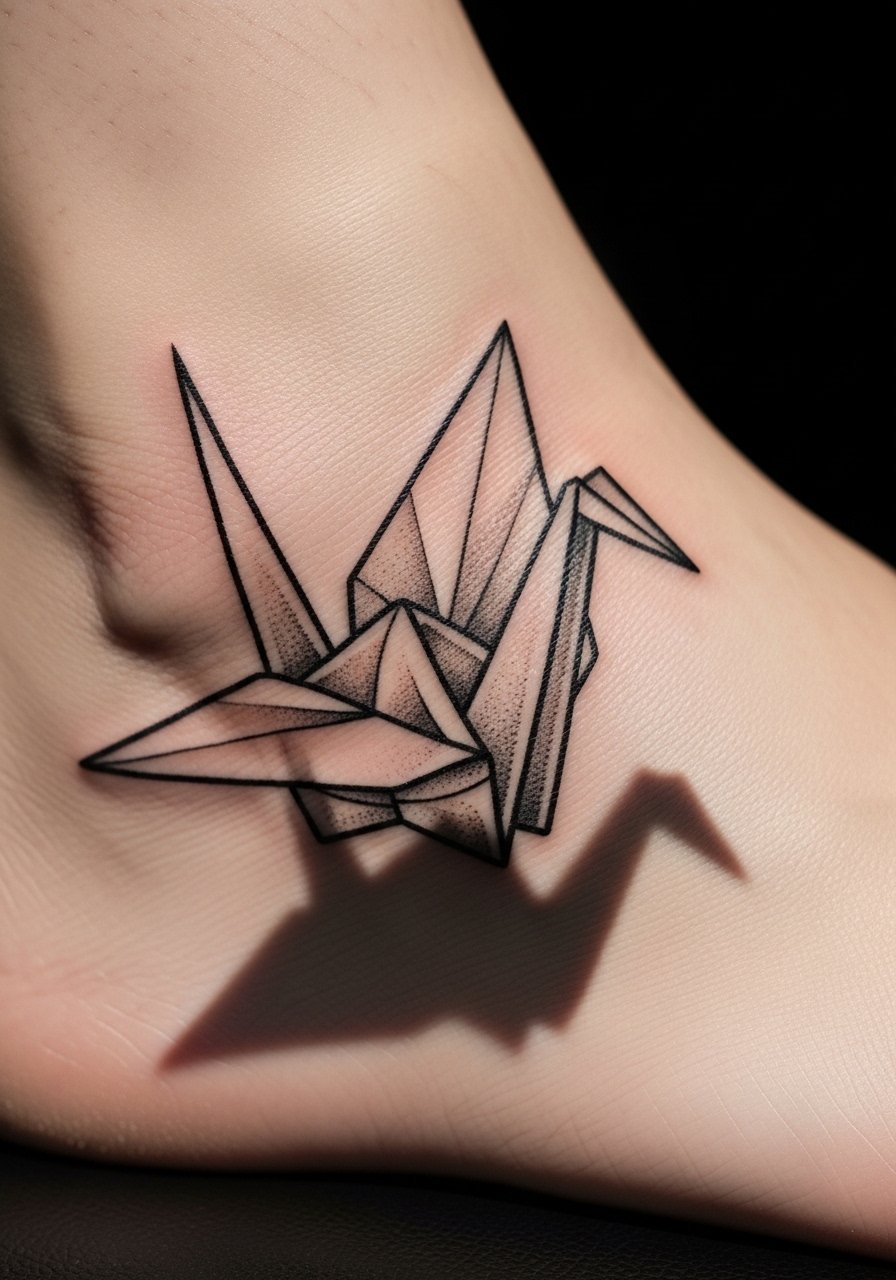
15. Floating Origami Crane On Ankle
Style/Technique: Minimalist / Fine Line / Shadow Work
Pain Level: Medium-High (5-6/10)
Session Time: 1 hour
Best For: Small cultural piece, travel-friendly visibility
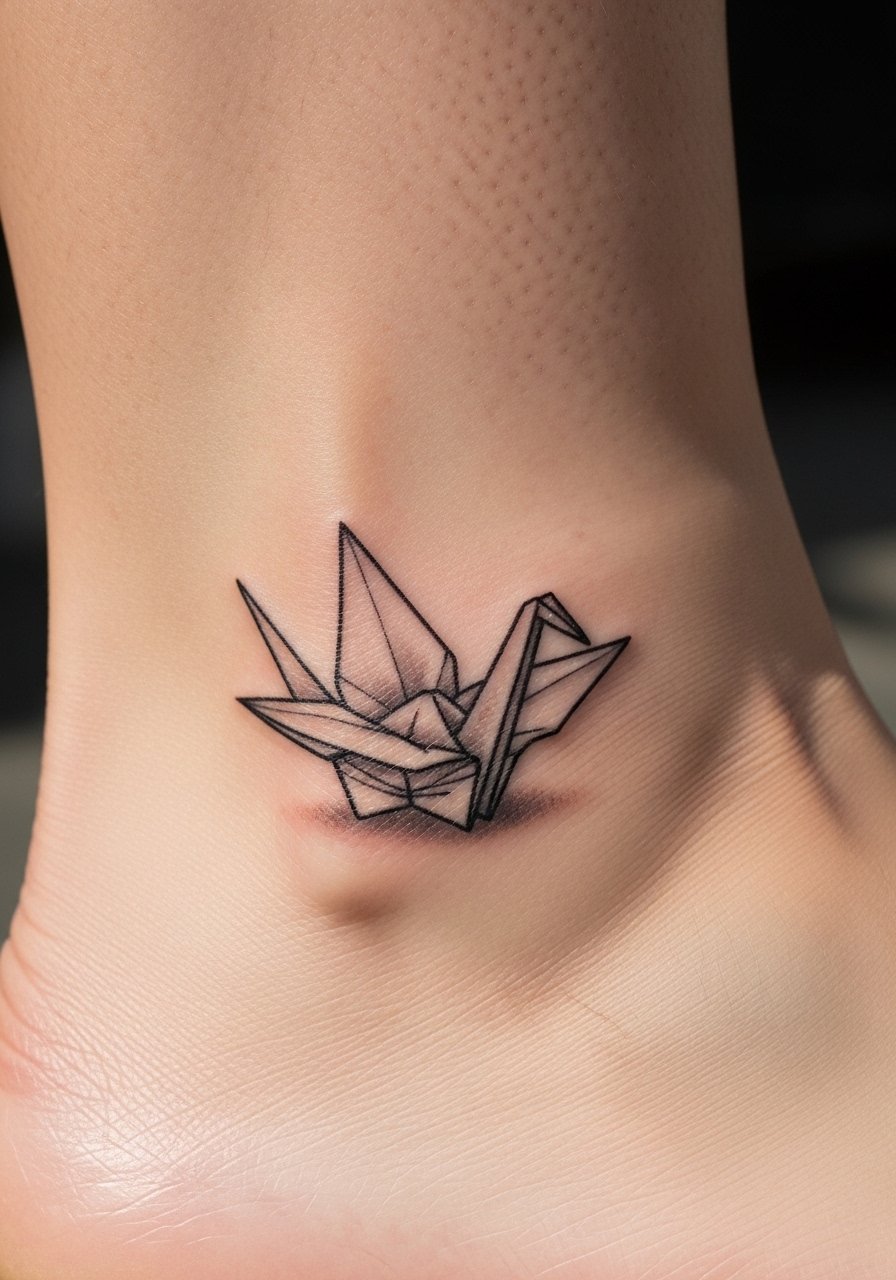
Origami cranes use geometric planes and a crisp drop shadow to appear airborne. Ankles are sensitive and prone to faster fading from shoes and socks. Avoid ultra-fine lines that may blur; ask for slightly bolder contour lines and subtle shadowing. Healed cranes look best when the shadow isn’t just a single line but a soft gradient.
16. 3D Floral Pocket On Upper Thigh
Style/Technique: Micro-Realism / Color Realism
Pain Level: Low-Medium (3-4/10)
Session Time: 2-3 hours
Best For: Hidden floral display, large color canvas
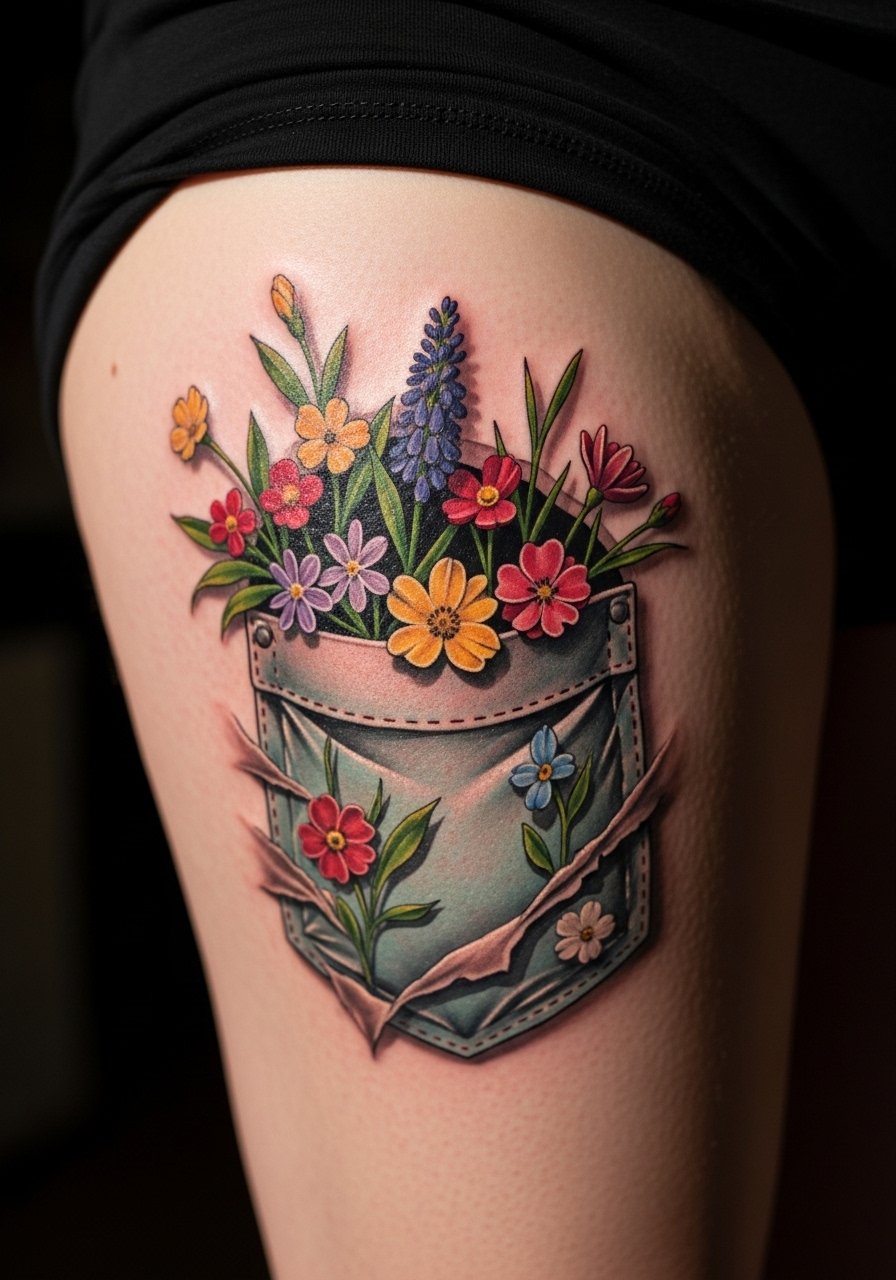
A floral pocket relies on shadowed pocket edges to suggest depth and bright color layering inside. Thigh skin keeps color saturation longer than hands or feet. Pitfall: too-flat pocket edges—demand a soft inner shadow and subtle highlights to mimic fabric. Artists with color realism portfolios handle this well.
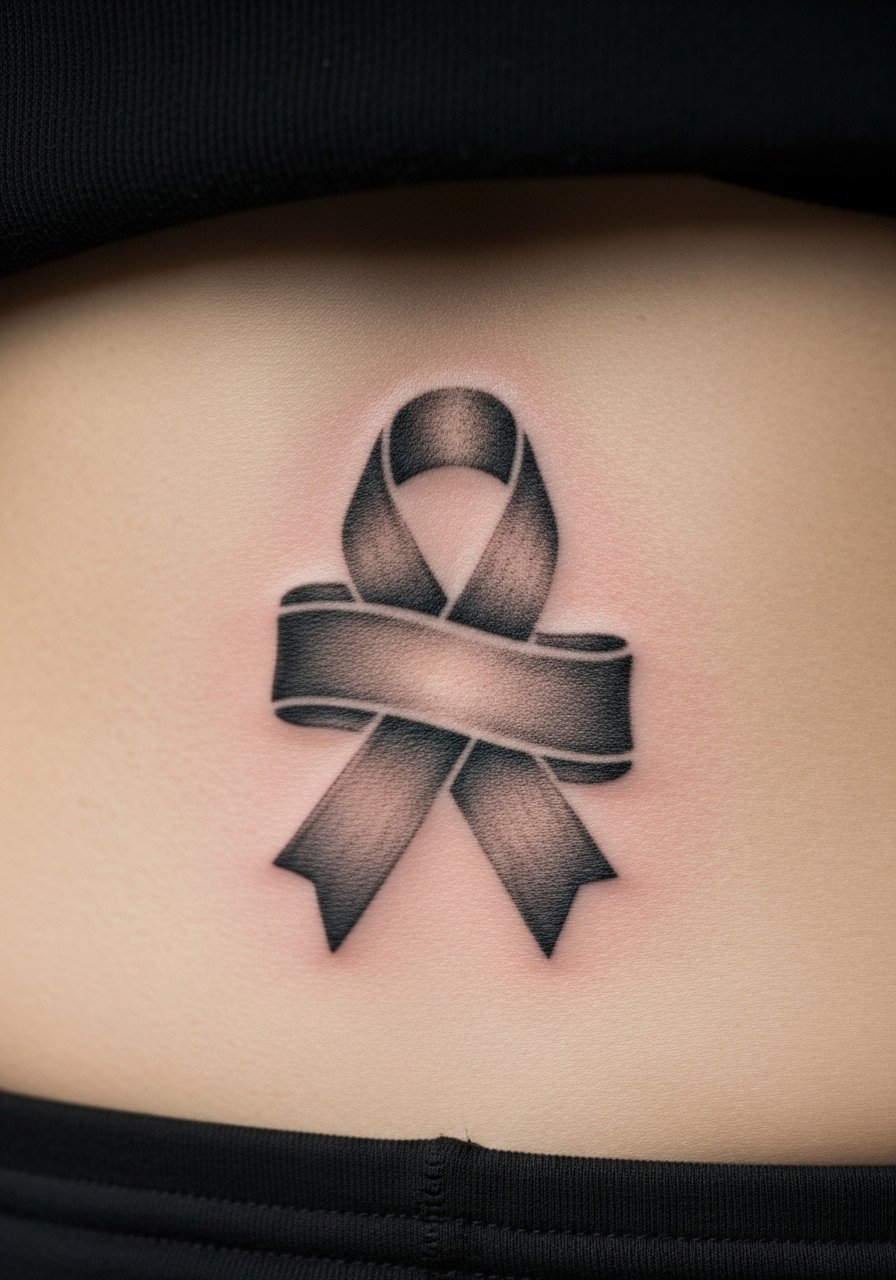
17. Floating Ribbon With Shadow On Lower Back
Style/Technique: Illustrative / Fine Line
Pain Level: Medium (4/5)
Session Time: 1-2 hours
Best For: Back accent, easy to hide under clothing
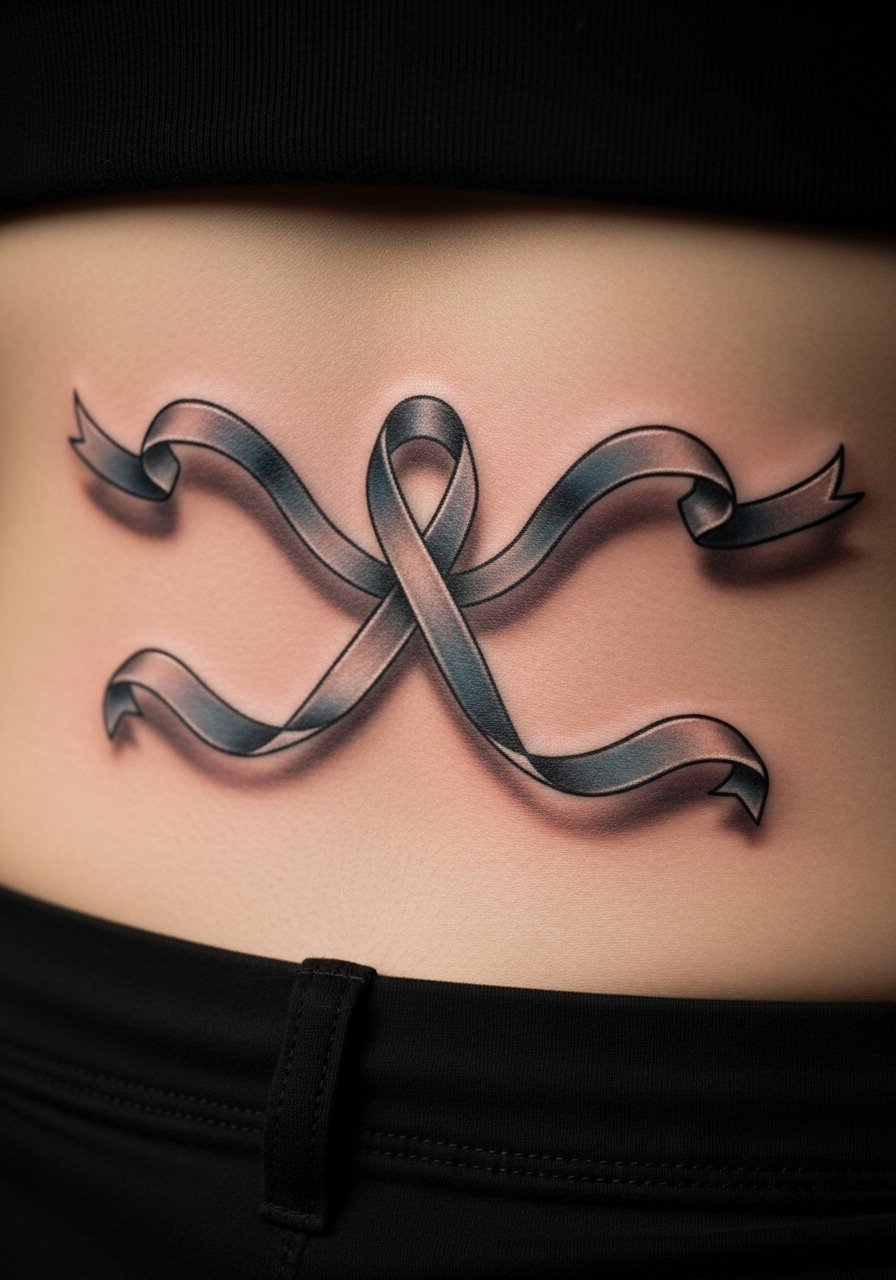
Ribbons read 3D when the artist uses subtle inner gradients on the folds and a soft cast shadow on the skin. Lower back healing is straightforward, though stretching during movement can affect thin lines. Avoid narrow single-line ribbons; request a balanced mix of line and soft shading. Ask for healed ribbon pieces to see how folds keep dimension over time.
18. Realistic Pet Portrait Peeking From Pocket On Forearm
Style/Technique: Micro-Realism / Portrait
Pain Level: Medium (4/5)
Session Time: 2-4 hours
Best For: Sentimental piece, medium-visibility
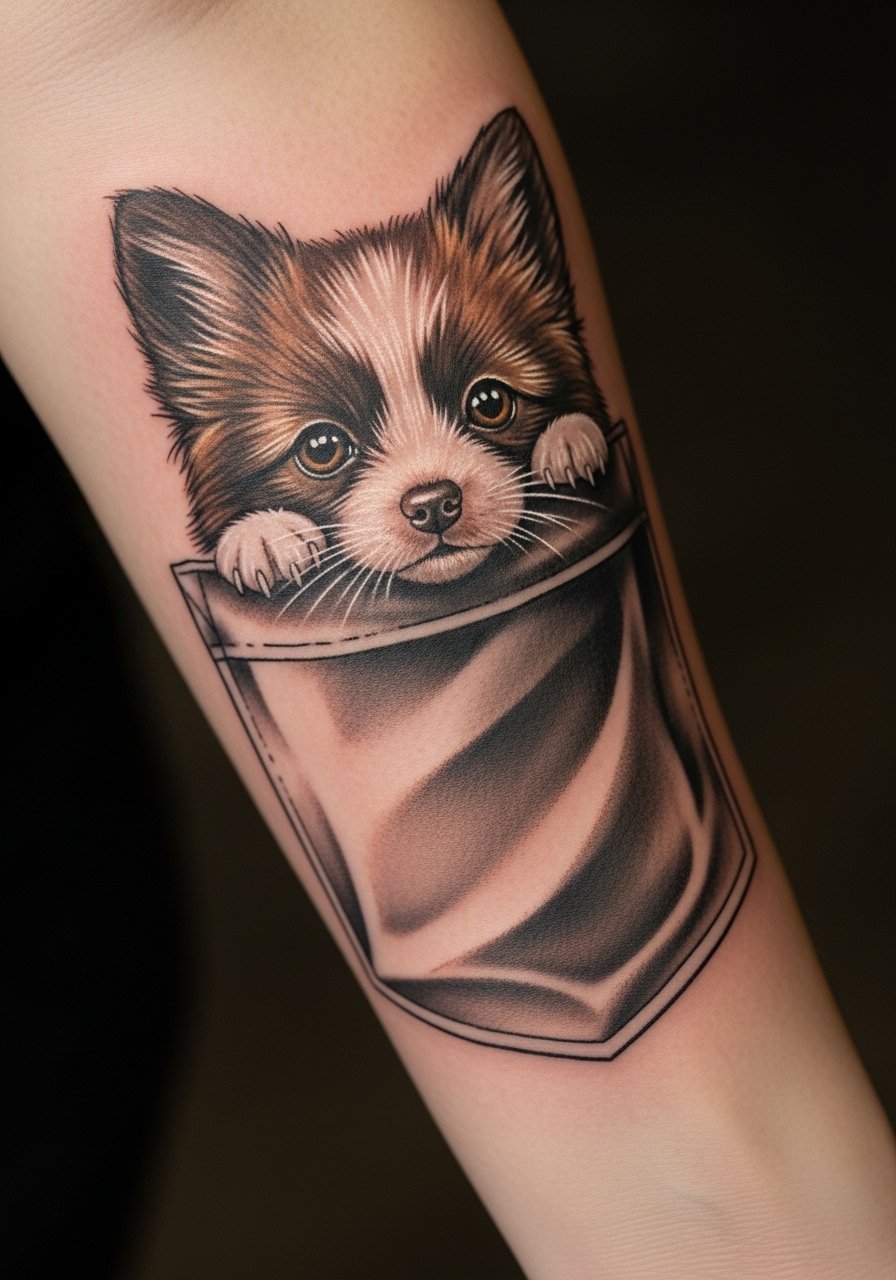
Combining portrait detail with a pocket illusion adds depth and personality. Forearm placement keeps detail readable and heals well. Pitfall: too-much fine detail in fur without contrast—good portrait artists use balanced mid-tones and core shadows so fur reads after healing. Bring multiple favorite photos and ask to see healed portraits, not just fresh work.

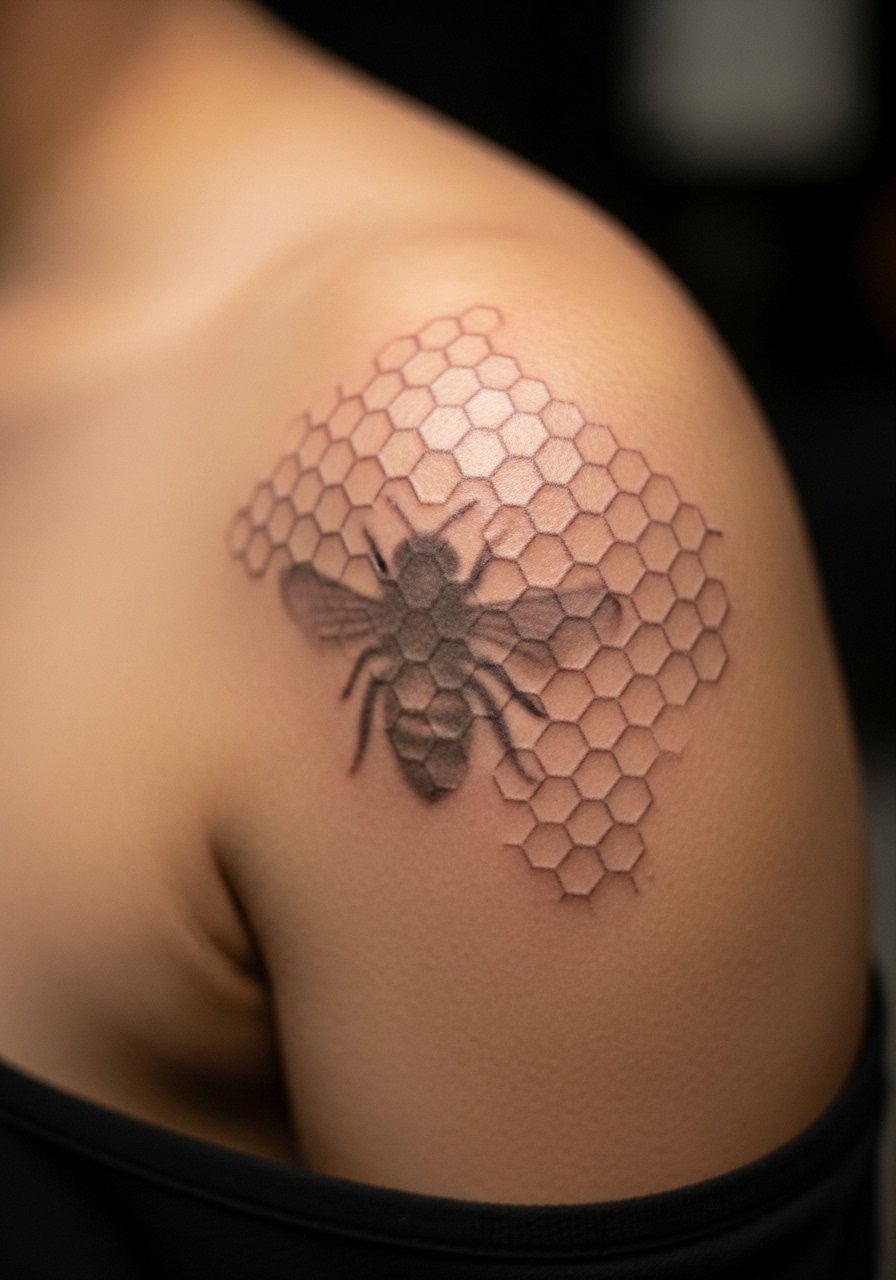
19. 3D Honeycomb With Bee On Back Of Shoulder
Style/Technique: Illustrative / Texture Work
Pain Level: Medium (4/5)
Session Time: 1-2 hours
Best For: Shoulder accents, expandable sleeve pieces
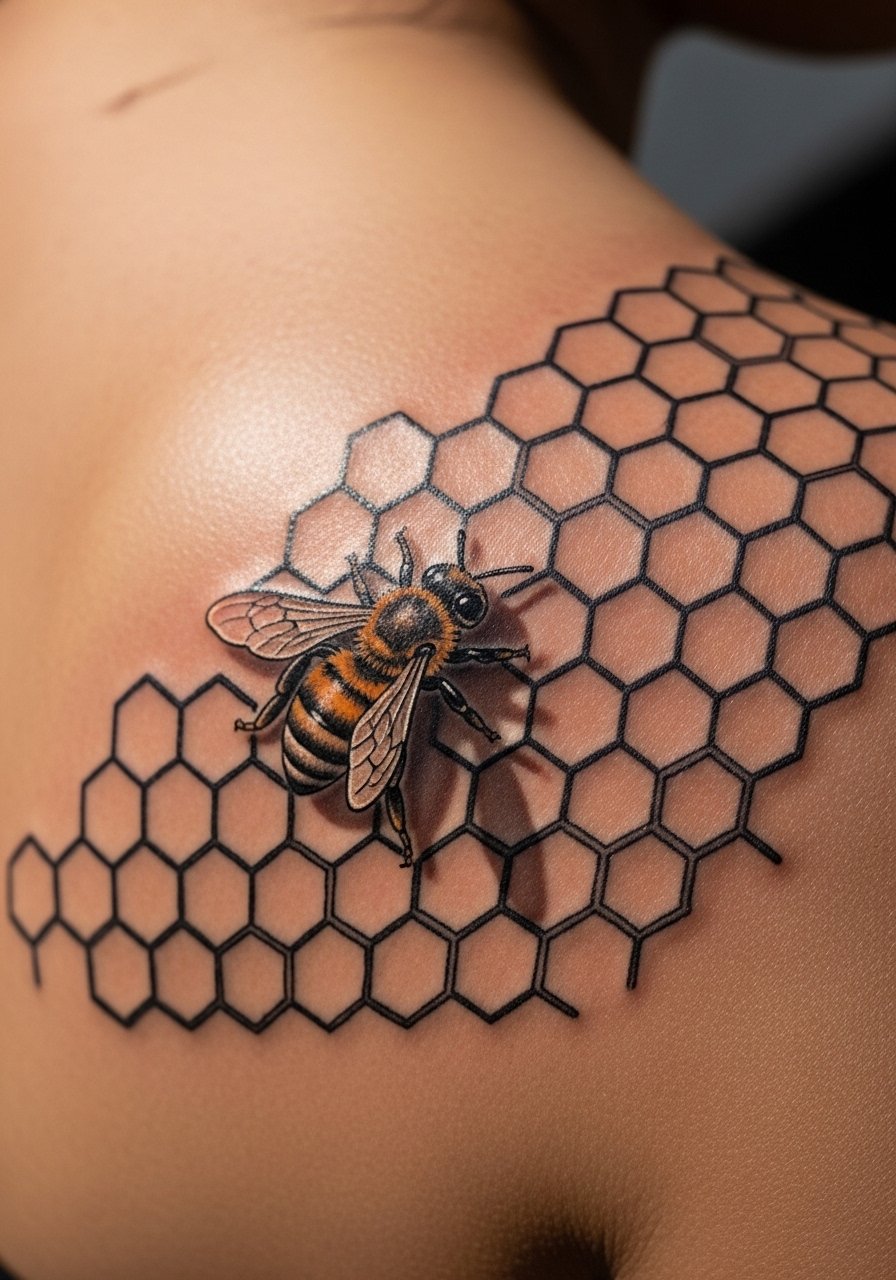
Honeycomb gets depth from cell gradients and small cast shadows inside each hexagon. Shoulders take ink well and retain texture. Watch for repetitive flat cells; insist on varied shading and a tiny wing shadow to make the bee look lifted. Artists who do texture-heavy work are best for this design.
20. Illusory Staircase On Side Ribcage
Style/Technique: Optical Illusion / Black & Gray
Pain Level: High (7-8/10)
Session Time: Multiple sessions, 3+ hours
Best For: Dramatic chest/rib visual, conceptual pieces
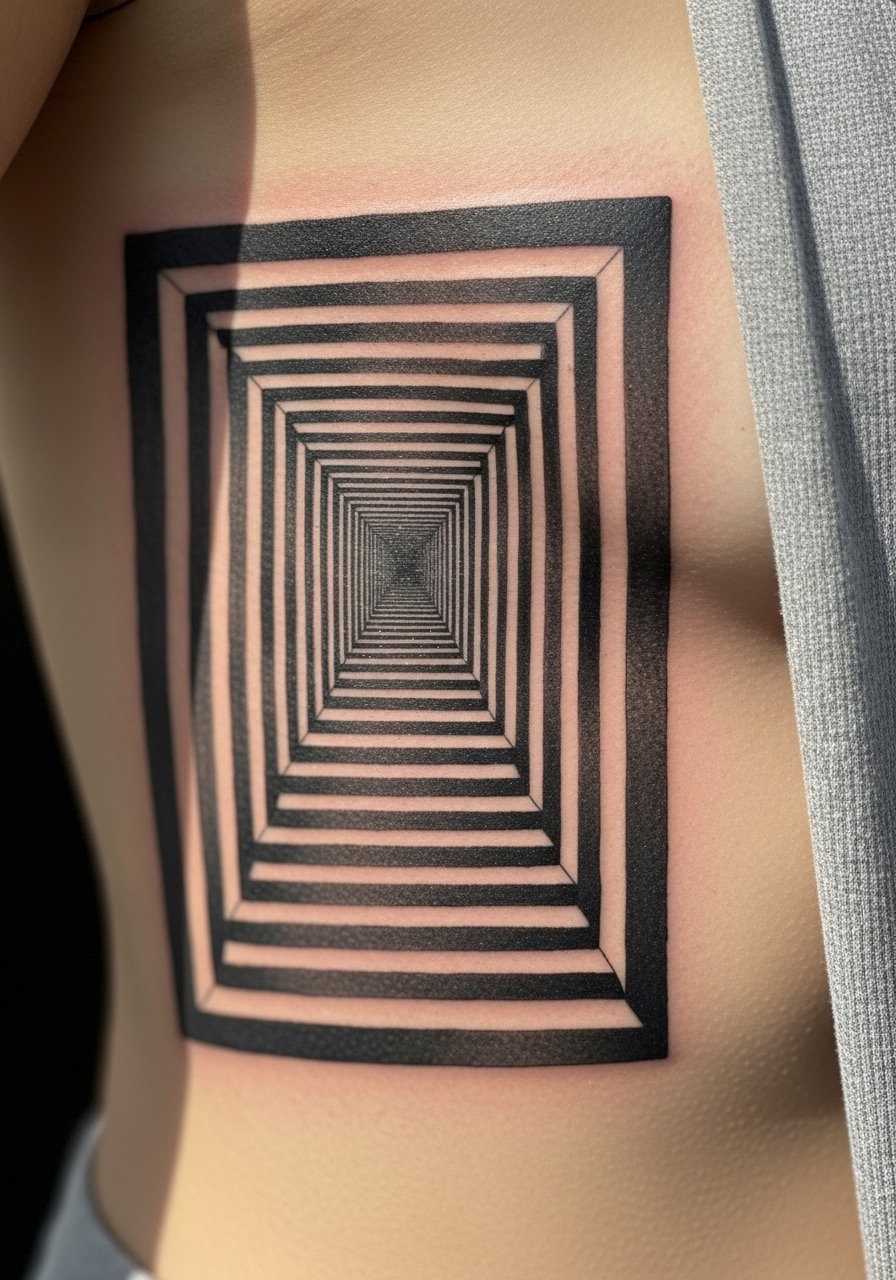
Perspective plays make staircases trick the eye by using consistent light direction and cast shadows. Ribs are painful but present a nice long canvas for perspective. Pitfall: incorrect light source that breaks the illusion—confirm the artist’s plan for light direction across the whole piece. Ask to see other perspective work.
21. 3D Peeling Tape With Note On Inner Bicep
Style/Technique: Trompe L’oeil / Fine Line
Pain Level: Medium (4/5)
Session Time: 1-2 hours
Best For: Playful small piece, hidden when needed
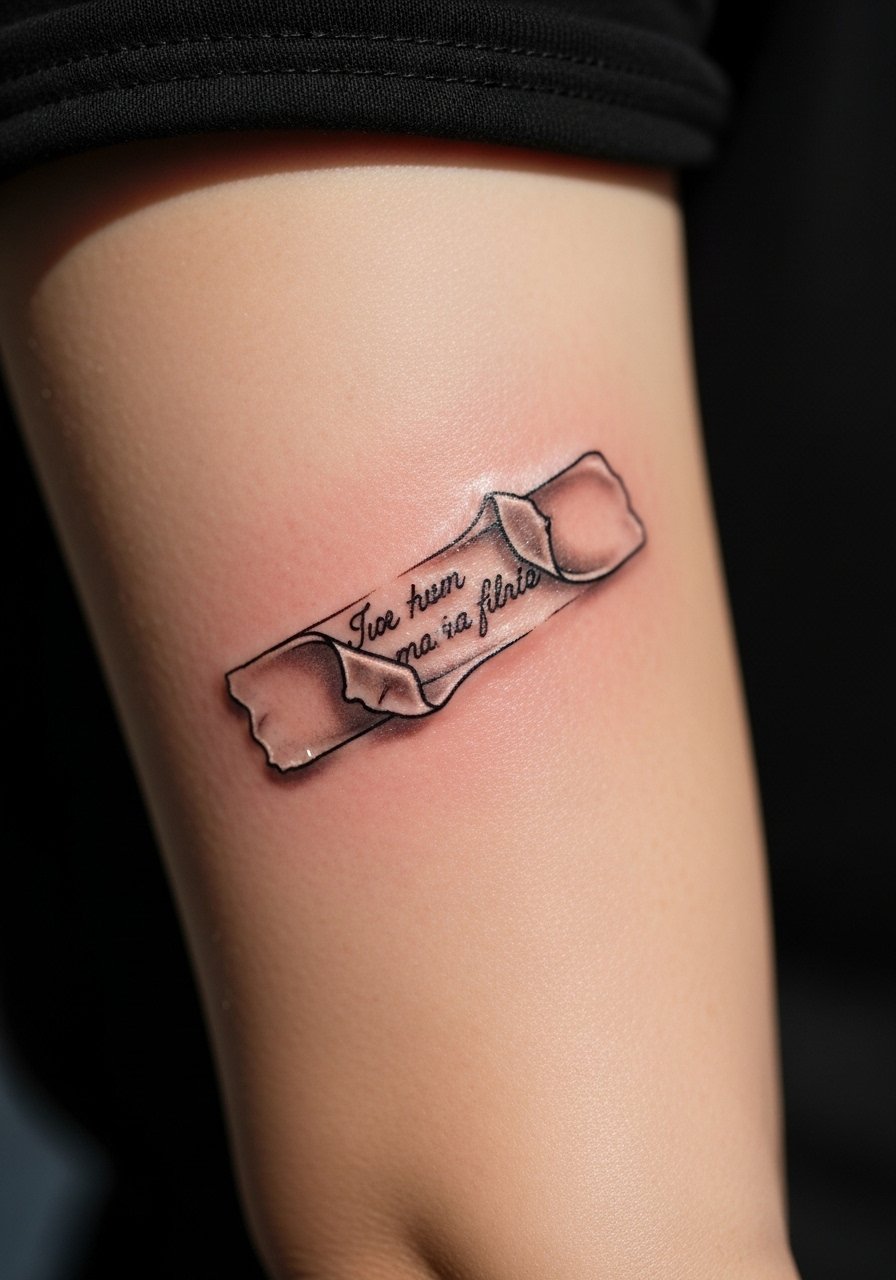
Tape edges and slightly lifted corners rely on crisp highlights and narrow shadows. Inner bicep is less painful and can be private. Common mistake: flat tape with no gradient—insist on textured adhesive edges and a thin inner shadow. Ask for healed samples to ensure white highlight longevity.
22. 3D Scale Armor On Calf
Style/Technique: Blackwork / Texture Realism
Pain Level: Medium (4/5)
Session Time: Multiple sessions, 2–4 hours
Best For: Bold leg pieces, expandable to full sleeve
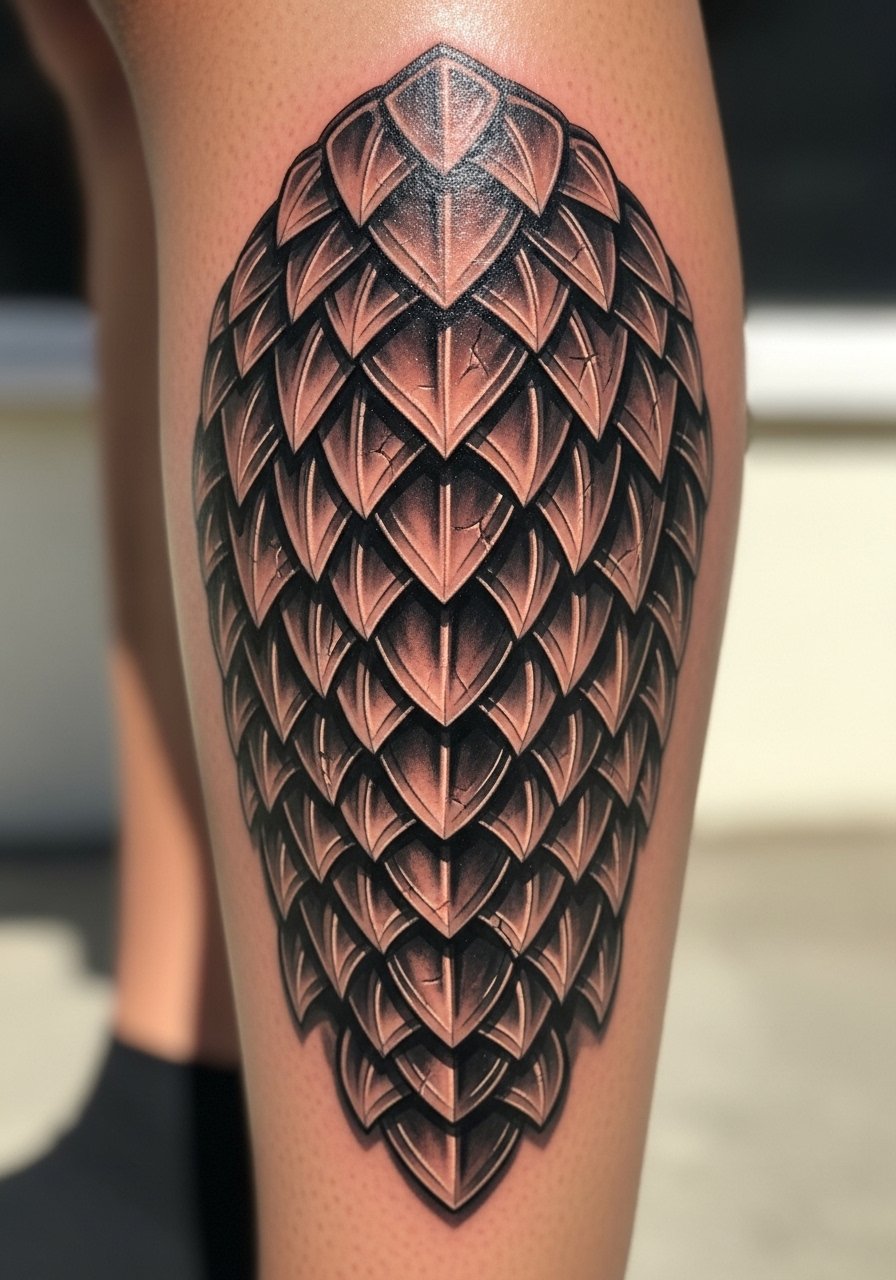
Overlapping scales read as raised when each scale gets a tiny bottom shadow and a soft top highlight. Calf flesh holds texture well. Avoid tiny micro-scales that blur—larger, well-spaced scales retain 3D effect. Artists who do texture realism and blackwork are ideal.
23. Hyperrealistic Tear Drop On Cheek
Style/Technique: Micro-Realism / Portrait Accent
Pain Level: High (7/8/10)
Session Time: 30–60 minutes
Best For: Small facial accent, meaningful pieces
Tiny face pieces require exceptionally steady hands and healed examples—teardrops rely on glossy highlights and micro-shading. Facial skin heals differently and can show slight texture changes. Ask for healed facial work from the artist and expect a longer observation period before picking such a visible spot.
24. Floating Orb With Halo On Chest
Style/Technique: Surreal / Fine Line & Shadow
Pain Level: Medium (4/5)
Session Time: 1-2 hours
Best For: Center chest accents, conceptual tattoos

Orbs look three-dimensional when the artist uses radial shading and an off-surface halo with a ground shadow. Chest placement lends a central focus and heals reliably. Common mistake: halo too bright or too soft—request balanced mid-tones so the orbital depth remains after healing.
25. 3D Ribbon Around Finger (Band Illusion)
Style/Technique: Minimalist / Fine Line
Pain Level: High (6-7/10)
Session Time: 30–90 minutes
Best For: Tiny visible ring substitute, symbolic pieces
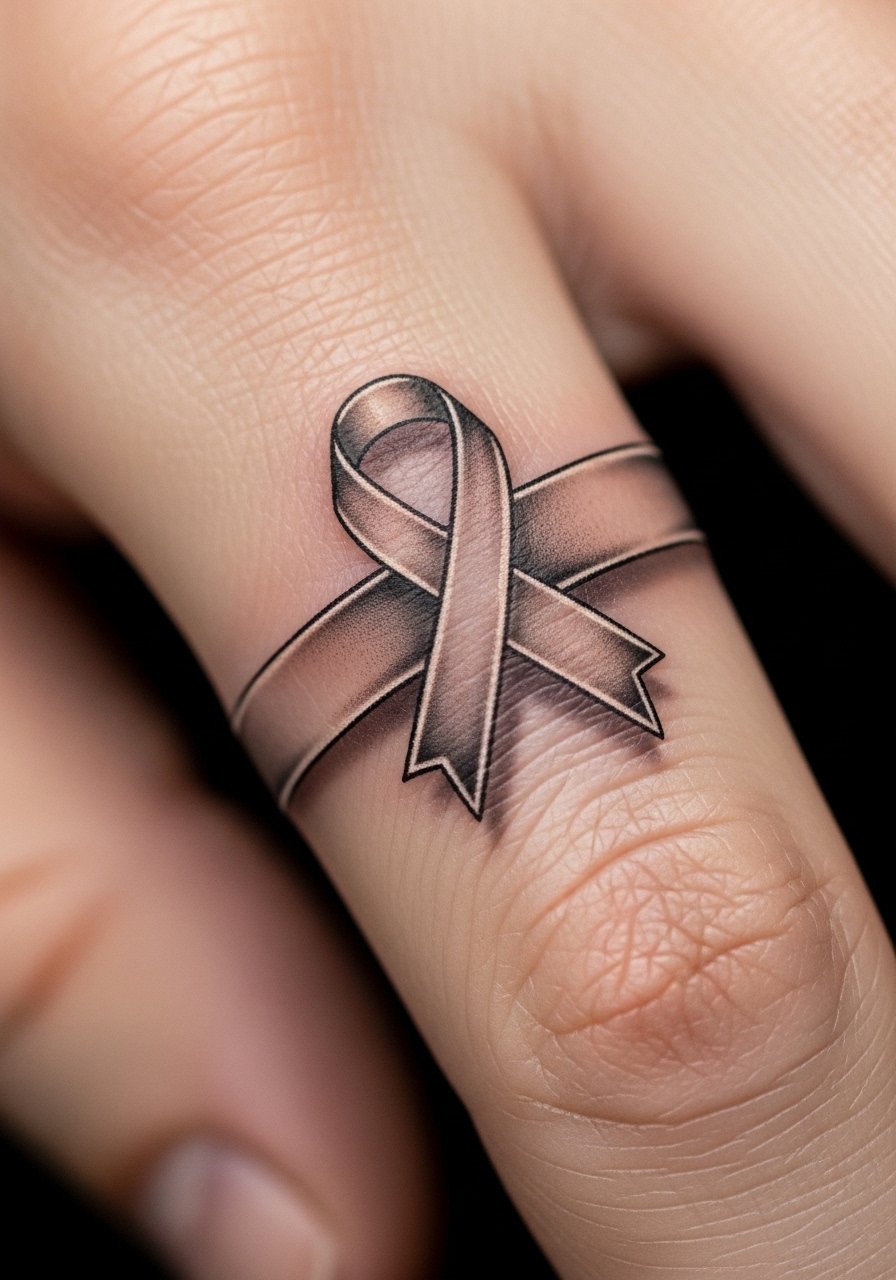
Finger tattoos fade faster, but a small ribbon with consistent shadow and slightly bolder lines can read as a raised band. Expect faster touch-ups and careful aftercare since hands are washed often. Avoid extremely fine lines; ask for slightly thicker strokes to survive healing.
26. Levitation Skull On Upper Arm
Style/Technique: Black & Gray / Hyperrealism
Pain Level: Medium (4/5)
Session Time: 2–3 hours
Best For: Dark, moody arm pieces
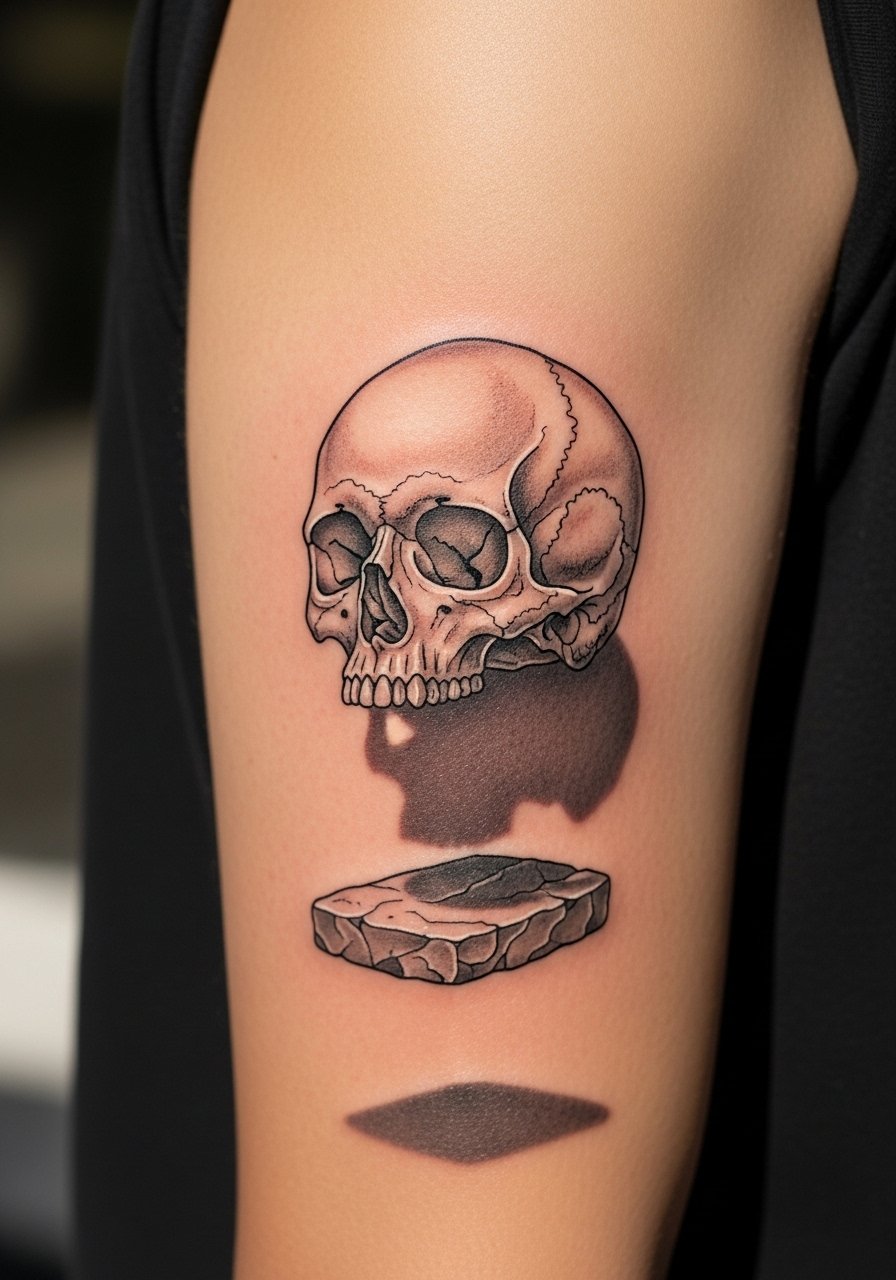
A skull that appears to hover uses deep base shadows and soft ground fade. Upper arm tissue supports shading well and keeps contrast. Pitfall: over-texturing that muddies the skull’s planes—ask for clear separation between planes so the levitation reads months later.
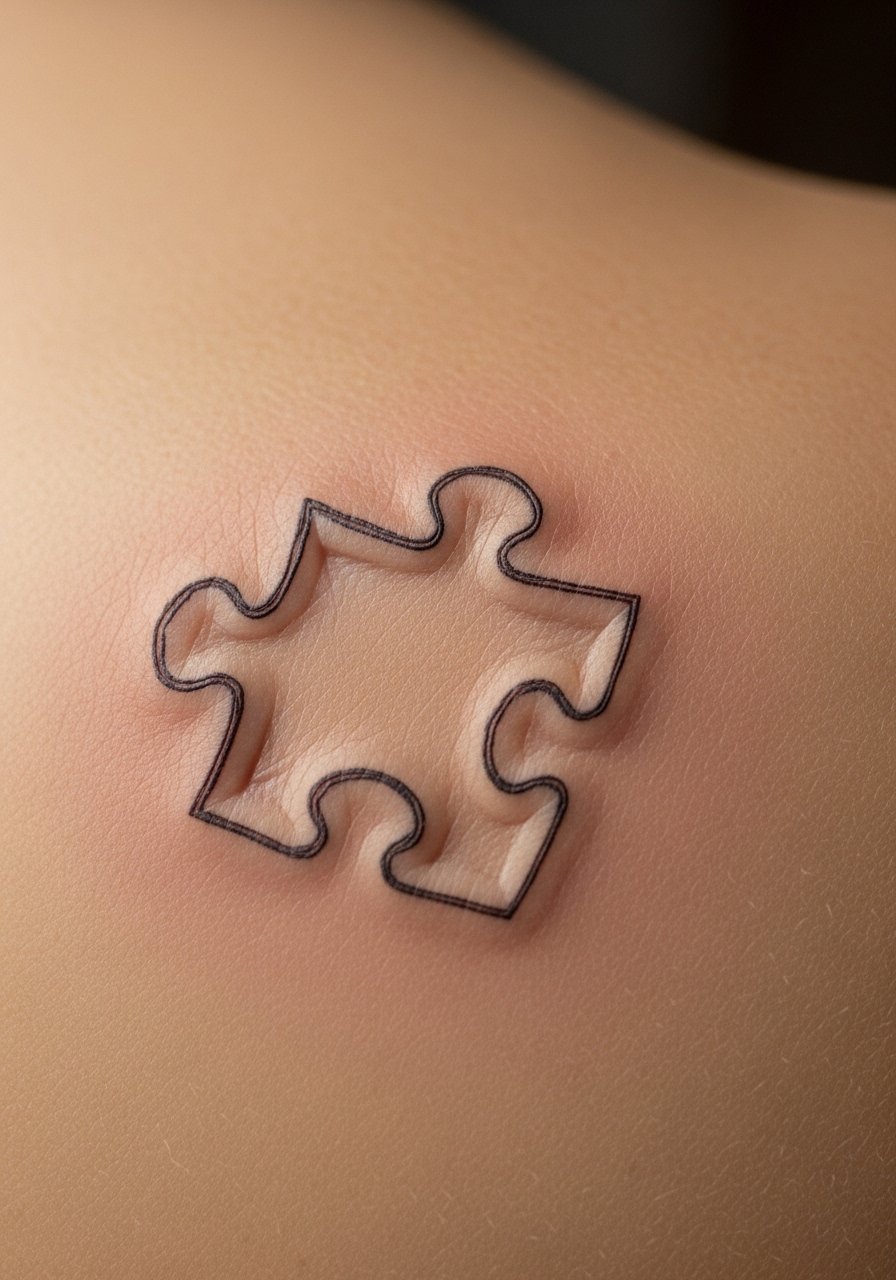
27. 3D Puzzle Piece Missing On Shoulder Blade
Style/Technique: Fine Line / Negative Space
Pain Level: Medium (4/5)
Session Time: 1–2 hours
Best For: Symbolic back pieces, expandable area
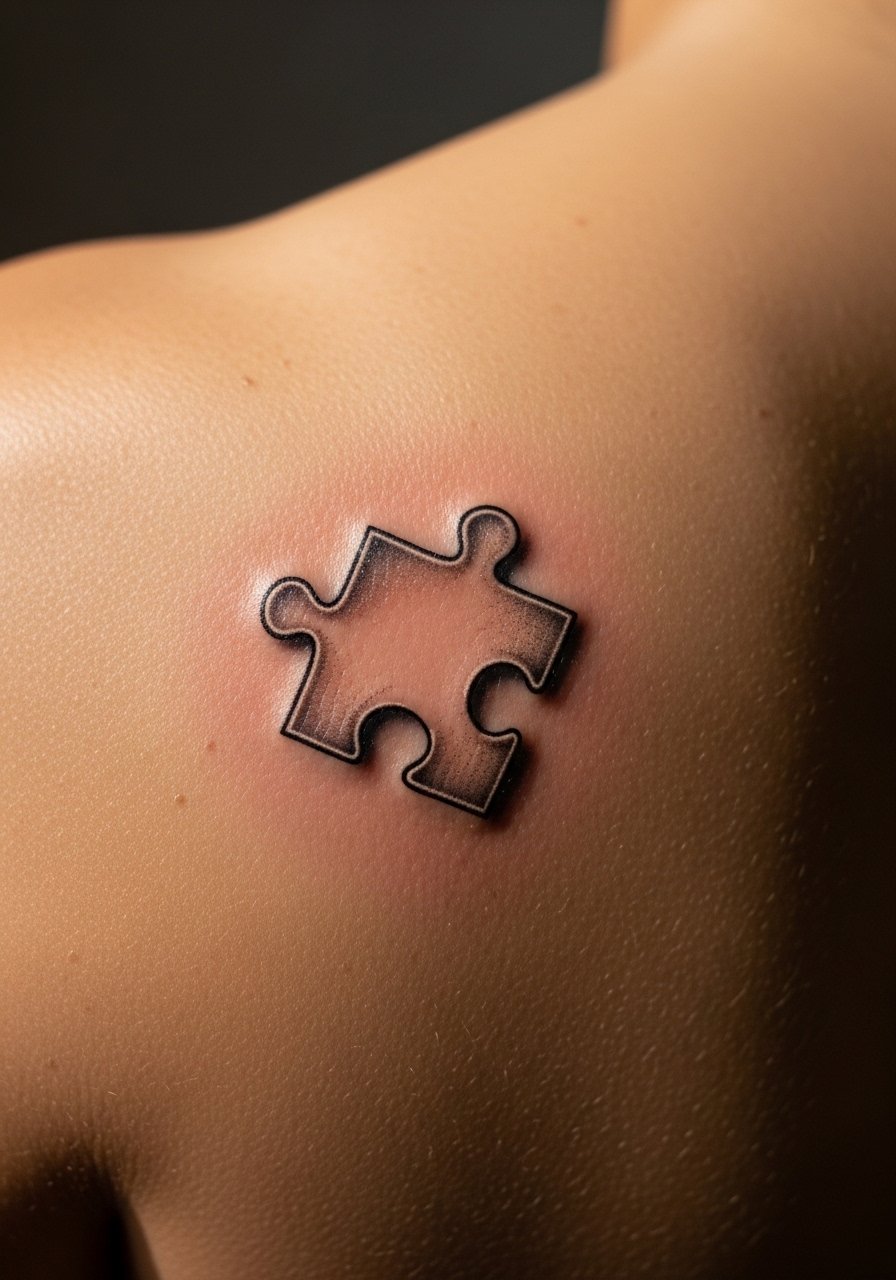
Negative space and inner shading around the recess create the missing-piece effect. Shoulder blade is great for expansion into larger back work and heals predictably. Avoid too-light surrounding shadows—demand a darker interior so the negative space pops.
28. 3D Book Page Turning On Forearm
Style/Technique: Illustrative / Motion Realism
Pain Level: Medium (4/5)
Session Time: 2–3 hours
Best For: Literary pieces, mid-sized forearm art
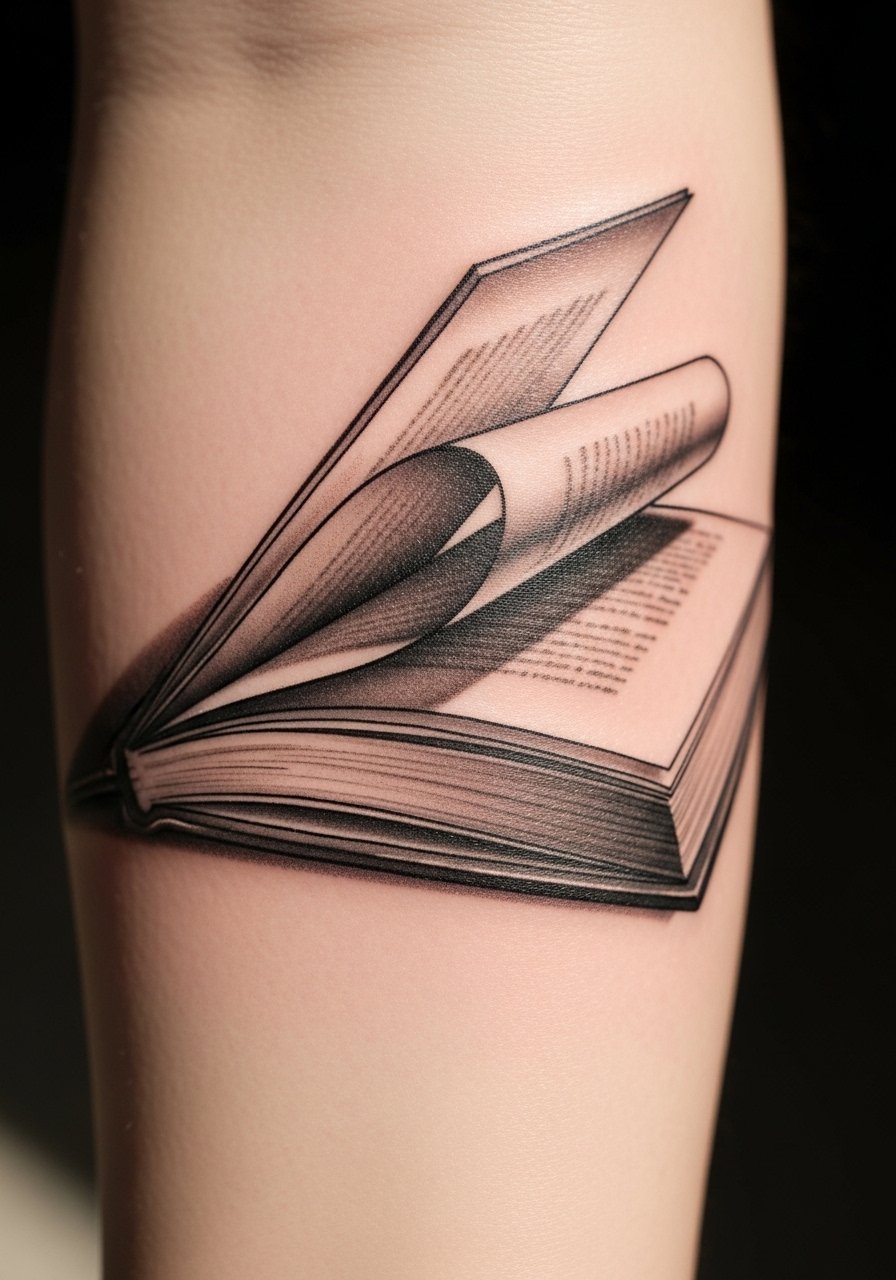
Motion is implied by a curl and its shadow—page edges and tiny text lines should be bold enough to survive healing. Forearm placement shows the movement well. Common mistake: faint text that's unreadable after a few months; request bold micro-type or stylized lines instead.
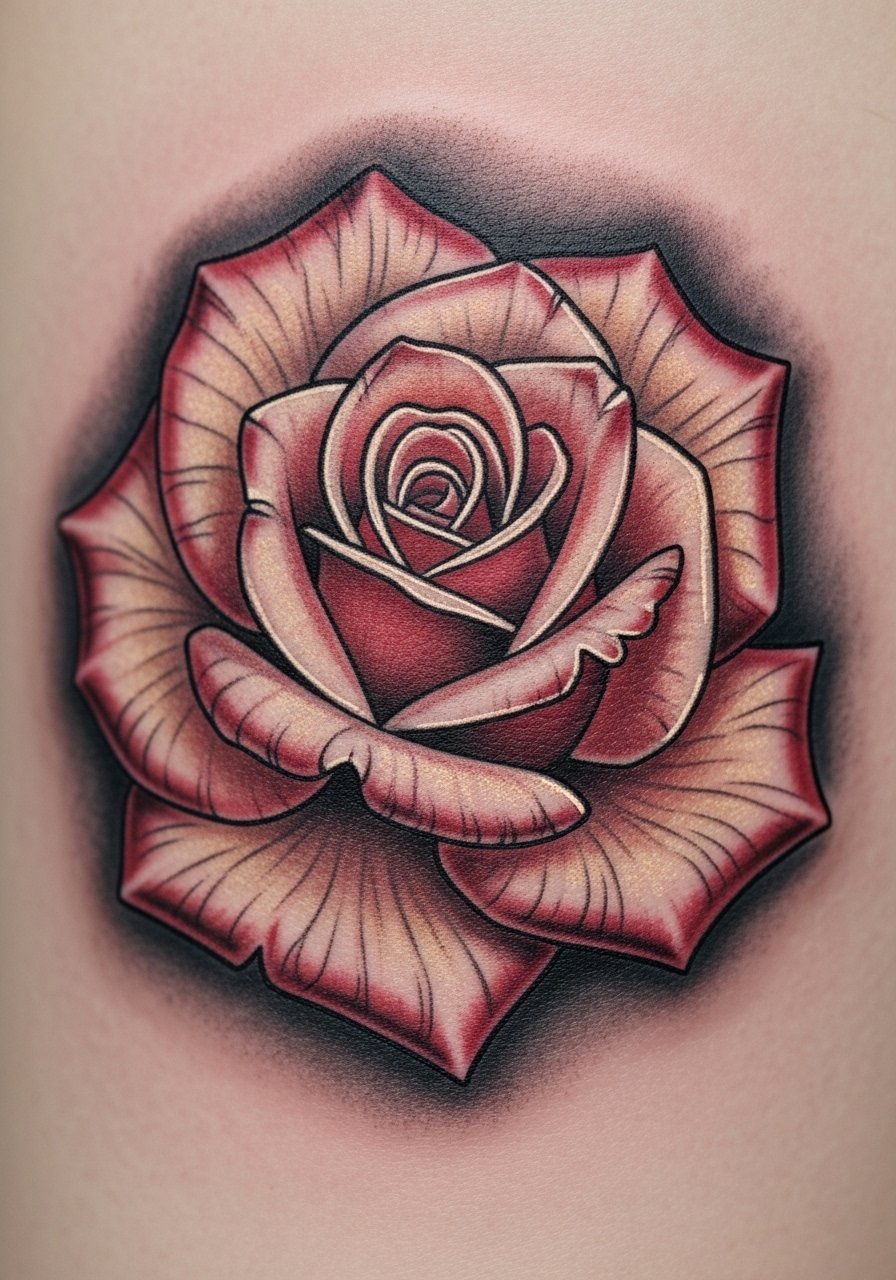
29. 3D Rose Growing Out Of Skin On Upper Arm
Style/Technique: Neo-Traditional / Color Realism
Pain Level: Medium (4/5)
Session Time: 2-3 hours
Best For: Classic imagery with depth, visible arm piece
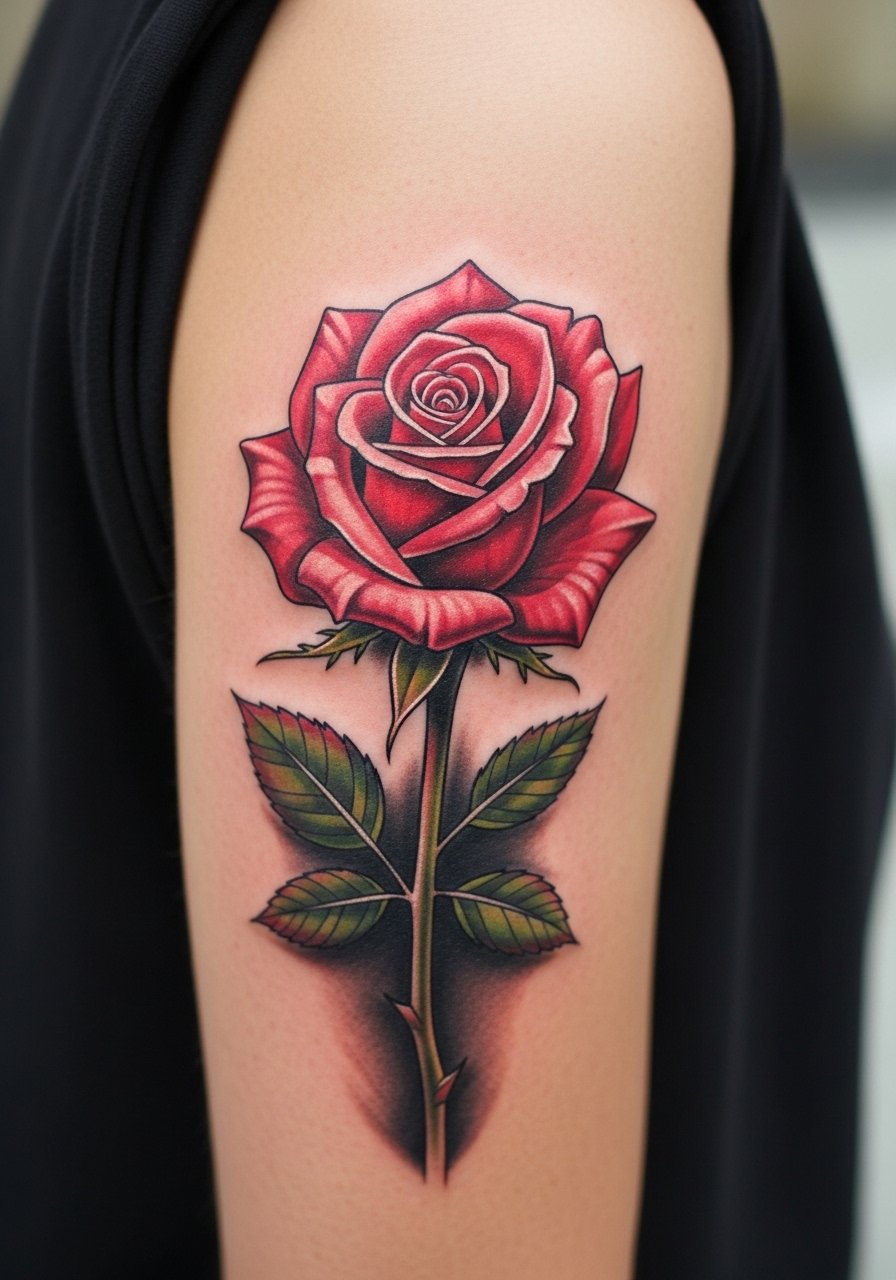
Combining color saturation in petals with a recessed base shadow makes the rose pop. Upper arm is forgiving and holds color nicely. Avoid relying solely on white highlights for petal shine; ask artists to include mid-tone layers so color reads after healing.
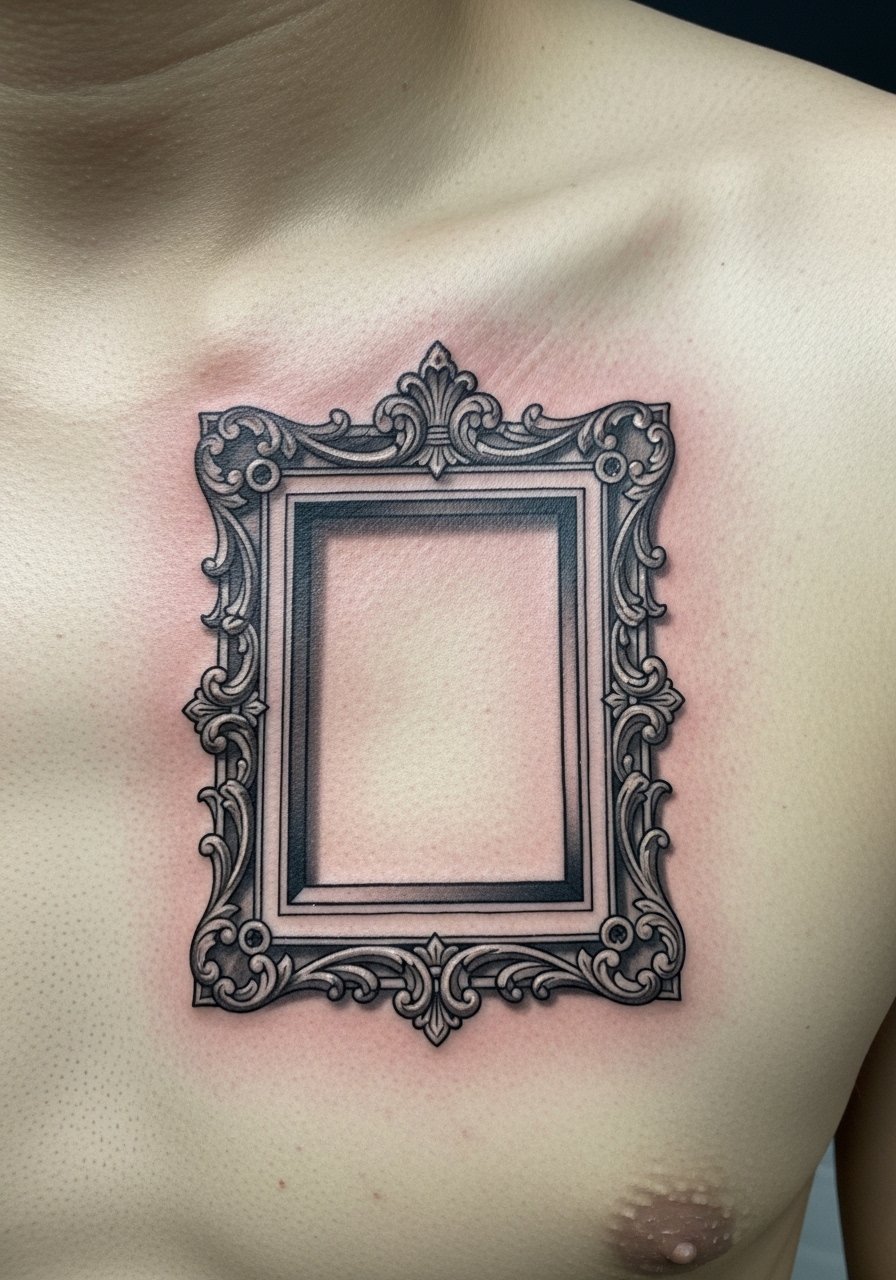
30. Optical Mirror Frame On Sternoclavicular Area
Style/Technique: Optical Illusion / Ornamental
Pain Level: High (7/8/10)
Session Time: 2-3 hours
Best For: Ornamental chest centerpiece, shows symmetry
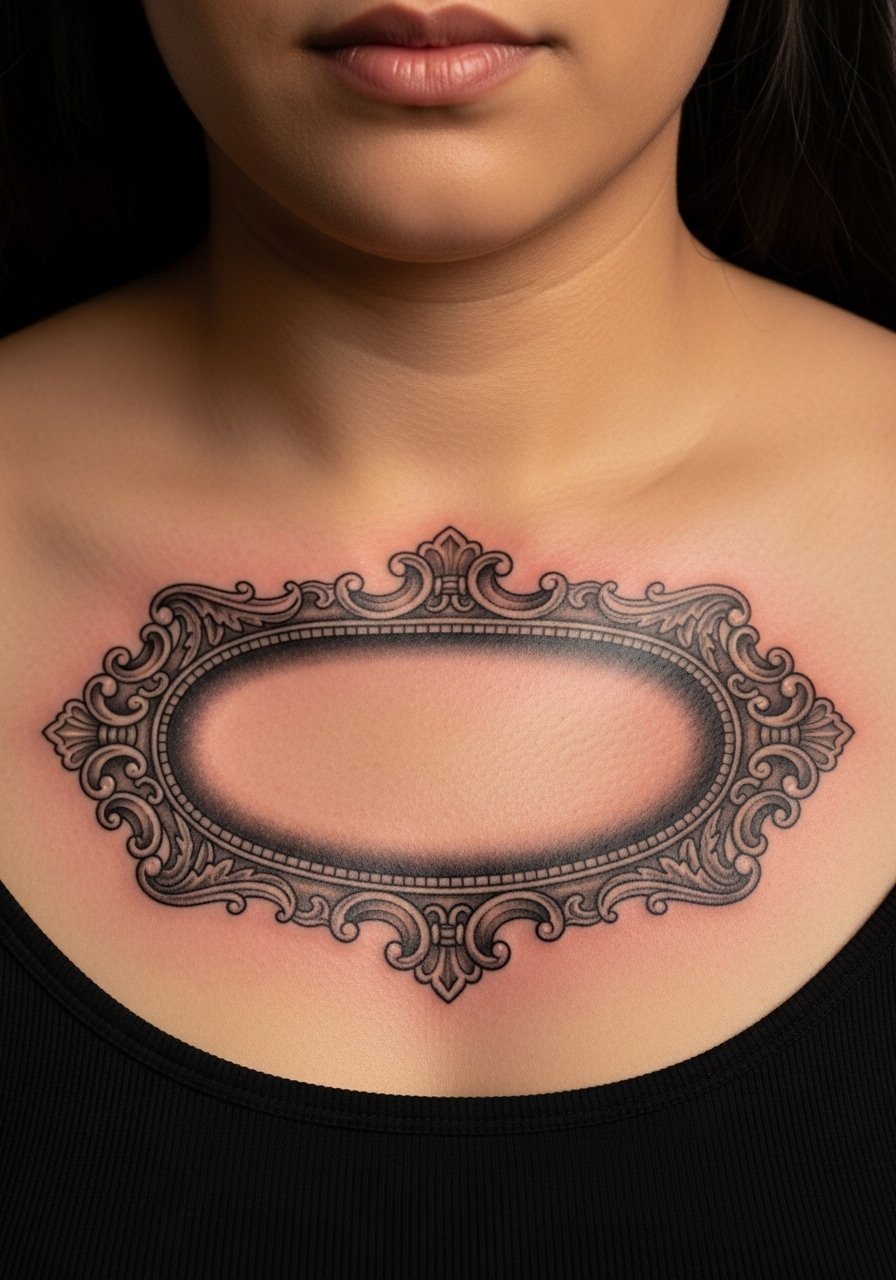
A framed inset feels recessed when inner edges have dark gradients and outer highlights. The sternoclavicular area can be sensitive; expect more breaks during the session. Avoid overly fine filigree that will blur—request slightly bolder lines and balanced shading to maintain the frame's ornate look long-term.
Tattoo Prep and Aftercare Essentials
Aftercare Essentials (First 0–5 days):
- Aquaphor Healing Ointment, 14oz tube — Industry standard for initial moisturizing and barrier protection
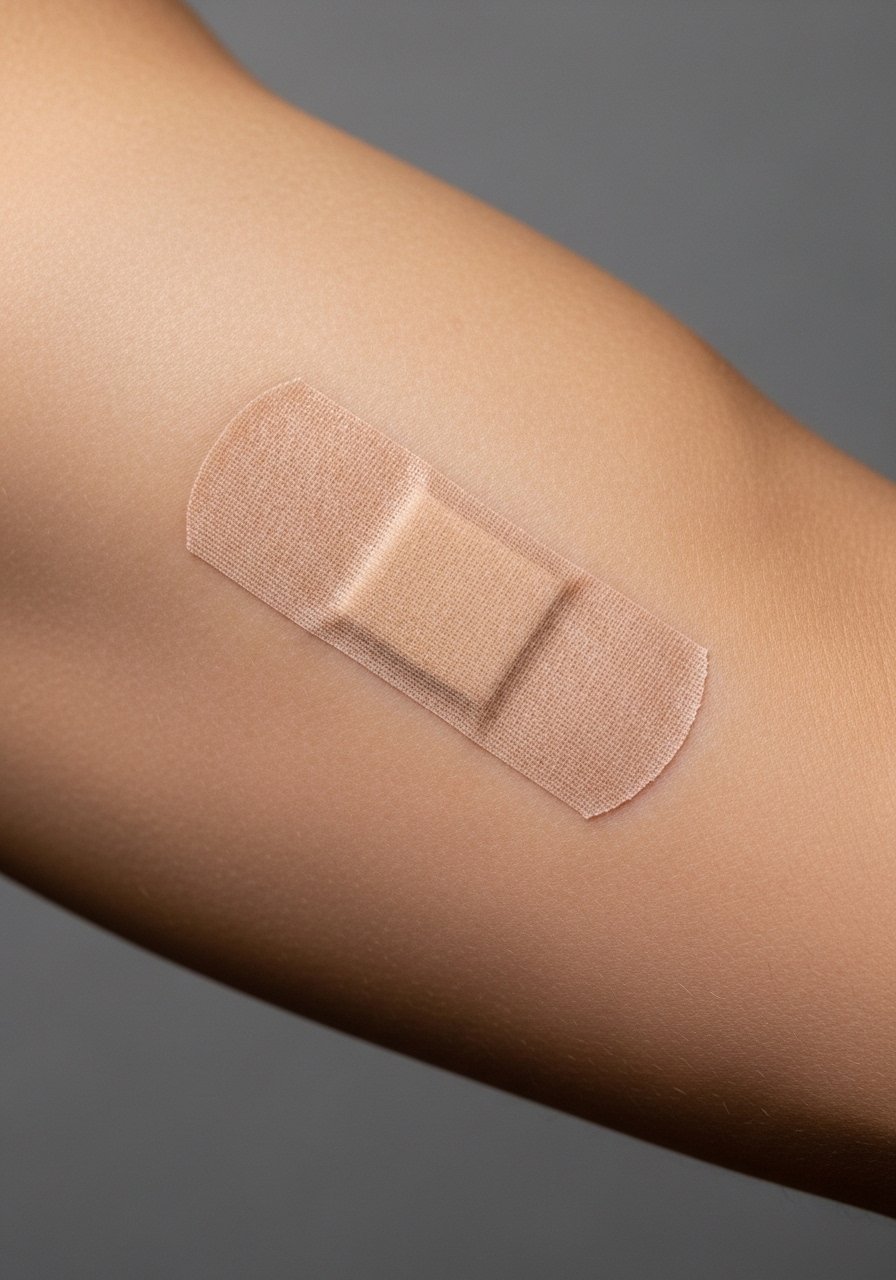
- Saniderm Transparent Adhesive Bandage, 6-inch roll — Second-skin option many artists recommend for the first 24–72 hours
- Dr. Bronner's Unscented Castile Soap, 16oz — Gentle cleanser for daily washes during week one
Ongoing Moisturizers (Days 4–14):
- CeraVe Fragrance-Free Moisturizing Lotion, 12oz — Fragrance-free hydration for healed skin
- Mad Rabbit Tattoo Balm, 2oz — Popular long-term balm to keep color vibrant
- Hustle Butter Deluxe, 6oz — Vegan aftercare alternative some artists like
Sun Protection & Long-Term Care:
- SPF 50+ Sunscreen Stick for Tattoos, 0.6oz — Daily protection; from what I've seen, this is the #1 routine for longevity
- CeraVe Hydrating Mineral Sunscreen SPF 50, 3oz — Broader daily use for exposed tattoos
Prep & Comfort Before Appointment:
- Tattoo Numbing Cream with 5% Lidocaine, 30g — Use only after discussing with your artist; it helps with very sensitive areas
- Disposable Razor Pack, Sensitive Skin — If you need to shave a site, do so gently the night before
Extras & Touch-Up Helpers:
- Hydrocolloid Bandages (Large) — For small outbreaks or protecting scabs
- Aftercare Spray for Tattoos — Light hydration for sensitive areas
I included both mainstream and specialty items—artists I follow often name-check Aquaphor, Saniderm, Mad Rabbit, and Hustle Butter. From what I've gathered, simplicity wins: clean gently, keep it moist but not suffocated, and use sunscreen long-term.
Frequently Asked Questions
Q: How bad does a tattoo actually hurt?
A: Pain depends on placement and your tolerance. Outer arm/forearm = around 3/10. Ribs, sternum, ankle = 7–8/10. It's more a sustained scratching/burning than a single sharp shock. For sensitive spots, ask about tattoo numbing cream with 5% lidocaine but check with your artist first.
Q: How long until my 3D tattoo looks like the healed photos I see online?
A: Surface healing is 2–3 weeks. Fine details and full settling can take 2–3 months. Colors and highlights often look dull at first and brighten after the skin finishes regenerating. I've seen micro-realism settle noticeably between month two and three.
Q: Will the 3D effect fade faster than regular tattoos?
A: Not necessarily. The illusion relies on contrast—if shadows and midtones are placed well, it holds. UV exposure, frequent friction (hands, feet), and poor aftercare fade any tattoo. Use SPF 50+ sunscreen stick daily to protect the depth.
Q: Can I work out after getting a tattoo?
A: Wait 48–72 hours minimum; longer if it's on a flex point like elbow or knee. Sweating and friction risk infection and ink displacement. Keep the area clean with a mild soap like Dr. Bronner's Unscented Castile Soap and reapply recommended ointment.
Q: What if tiny details blur after healing?
A: Fine-line and micro-realism require an expert touch. If lines soften, touch-ups are possible. From what I've seen, it's better to request slightly bolder micro-lines in high-motion areas to avoid early blur.
Q: How do tattoos look on different skin tones?
A: Black and grayscale hold best across tones; bright yellows and whites can be less visible on deeper skin. I've found that artists who regularly tattoo a range of skin tones can show you healed examples so you know how colors read.
Q: Should I use bandage methods like Saniderm or ointment only?
A: Both are valid. Many artists recommend starting with Saniderm for the first 24–72 hours, then switching to a clean routine with gentle soap and a fragrance-free lotion like CeraVe. Follow your artist's protocol—I've seen great results with either when done right.
Q: How long before I can judge if the tattoo is truly healed and the 3D effect works?
A: Give it at least 8–12 weeks. Surface peeling finishes early, but contrast and subtle highlights settle over months. If you’re unsure, compare with healed examples from your artist and plan a touch-up after three months if needed.
