
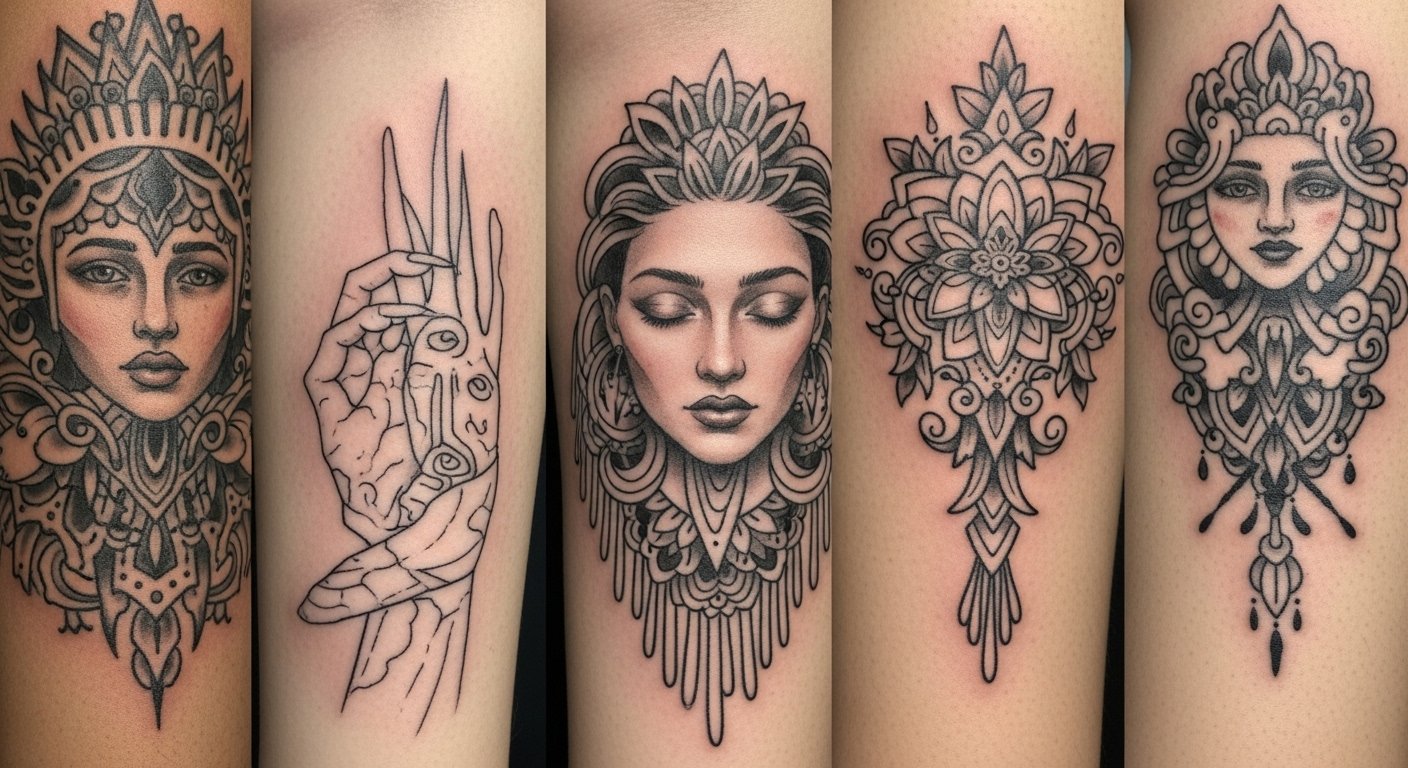
I spent months bookmarking darker tattoo styles before I finally understood why some pieces feel truly mysterious: it's the way negative space, deep blacks, and symbolic imagery age together. I started leaning toward designs that read like secrets on skin — bold where they need to be, delicate where the story asks for it.
This list focuses on dark tattoos — blackwork, fine line, micro-realism, and neo-traditional vibes that read mysterious. These designs work across ribs, forearms, neck, and thighs. From what I’ve seen, artists in 2026 favor strong silhouettes and negative space; these picks hold up healed and look intentional as they age.
1. Fine Line Crescent Moon Behind Ear
Style/Technique: Fine Line / Minimalist
Pain Level: Low-Medium (3/10)
Session Time: 30–60 minutes
Best For: First-time, subtle visibility
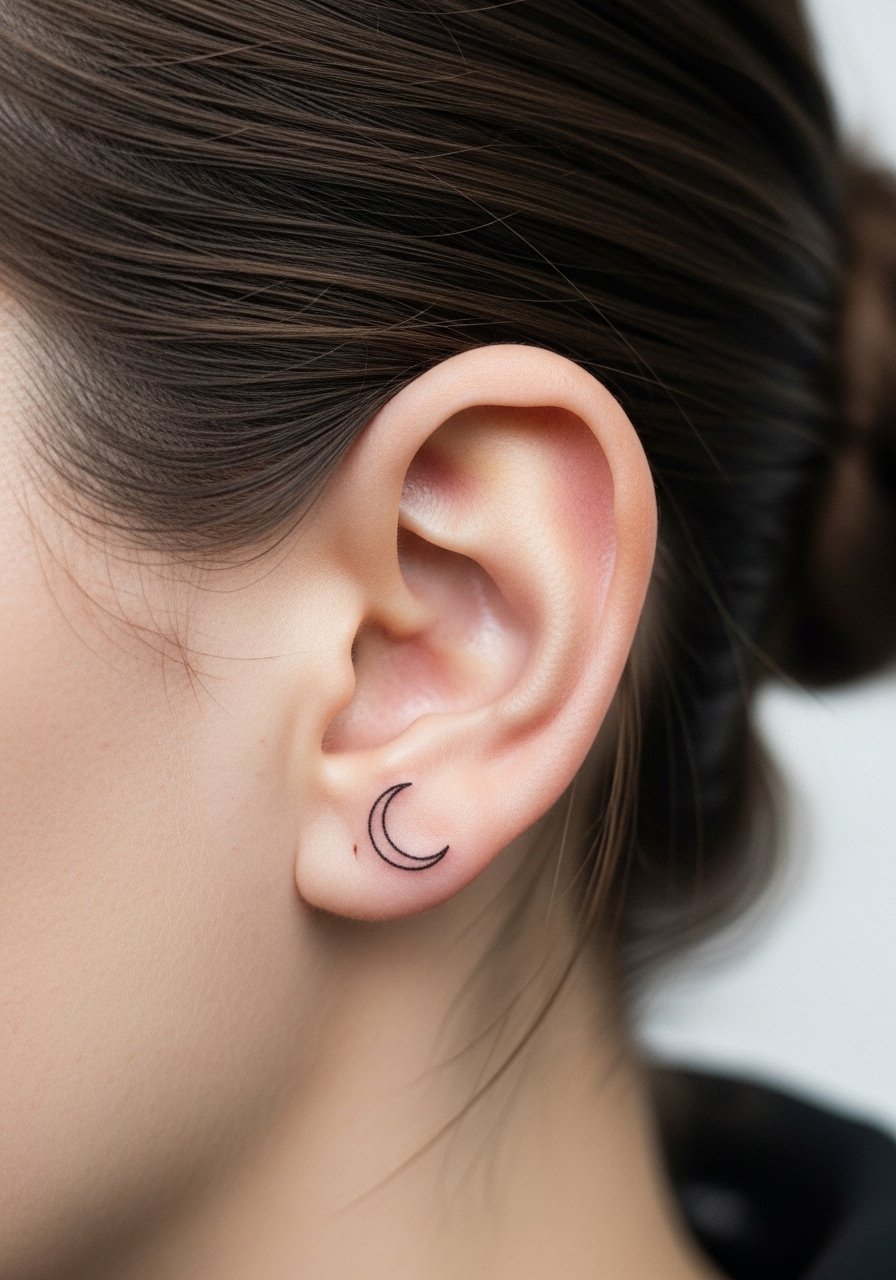
I love this placement for secrecy. The crescent moon reads both delicate and ominous when done in crisp black. Pain is short and tolerable. Heals in 2–3 weeks; expect lines to soften a bit. Fine line blurs faster than bolder work, so ask for slightly stronger line weight if you want longevity. Avoid overly thin single strokes that disappear after a year. Ask an artist who specializes in single-needle work and healed examples on similar skin tones.
2. Blackwork Geometric Mandala on Sternum
Style/Technique: Blackwork / Geometric
Pain Level: High (7/10)
Session Time: 2–4 hours
Best For: Statement piece, central visibility
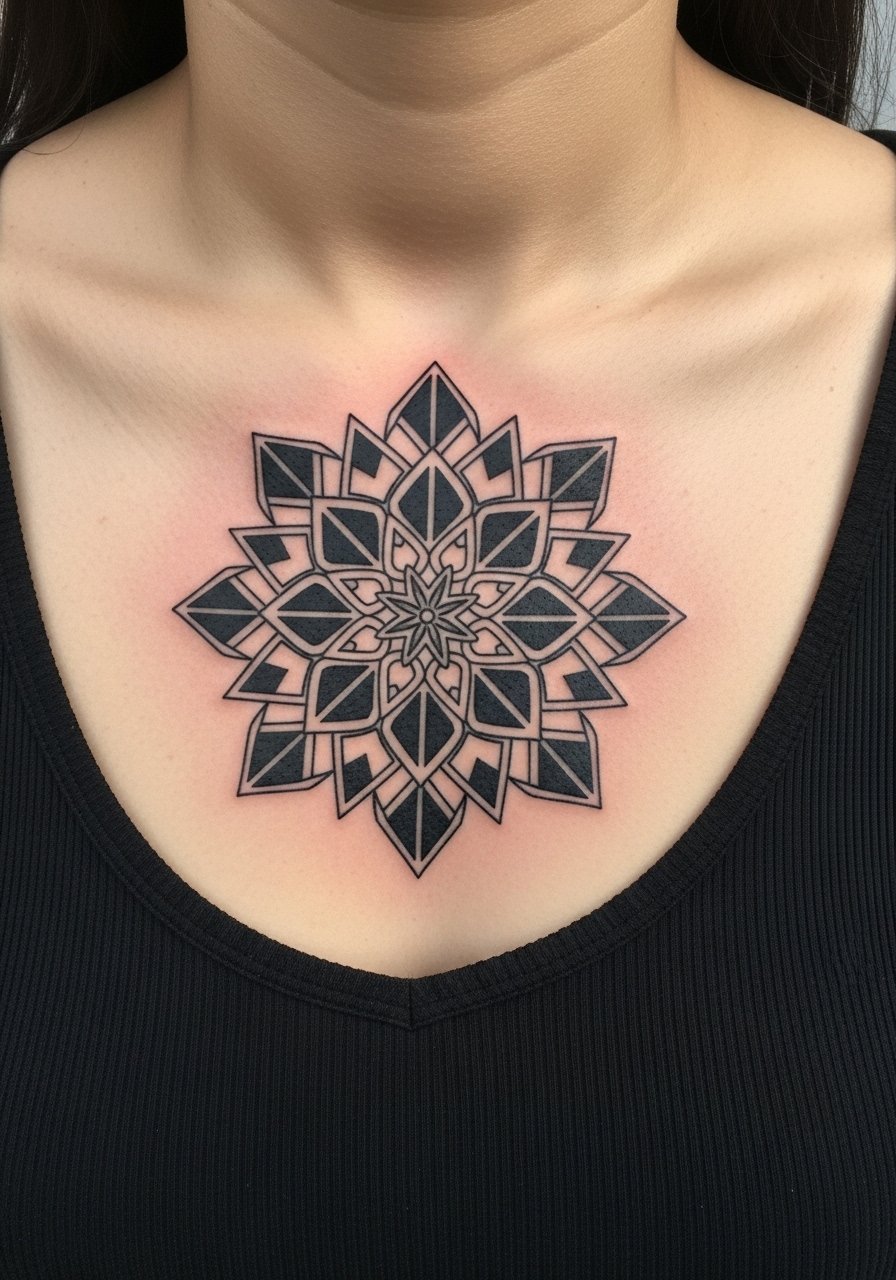
A sternum mandala reads ritualistic. The heavy black and negative space create mystery. Pain is intense near bone and ribs, so expect breaks. Heals over 4–6 weeks; heavy black retains best. Common mistake: too much tiny detail that loses contrast once healed. Ask your artist for bold spacing and strong core shapes so the mandala keeps presence as skin settles.
3. Micro-Realism Raven on Inner Forearm
Style/Technique: Micro-Realism / Black-and-Gray
Pain Level: Medium (4/10)
Session Time: 1–3 hours
Best For: Visible piece, storytelling
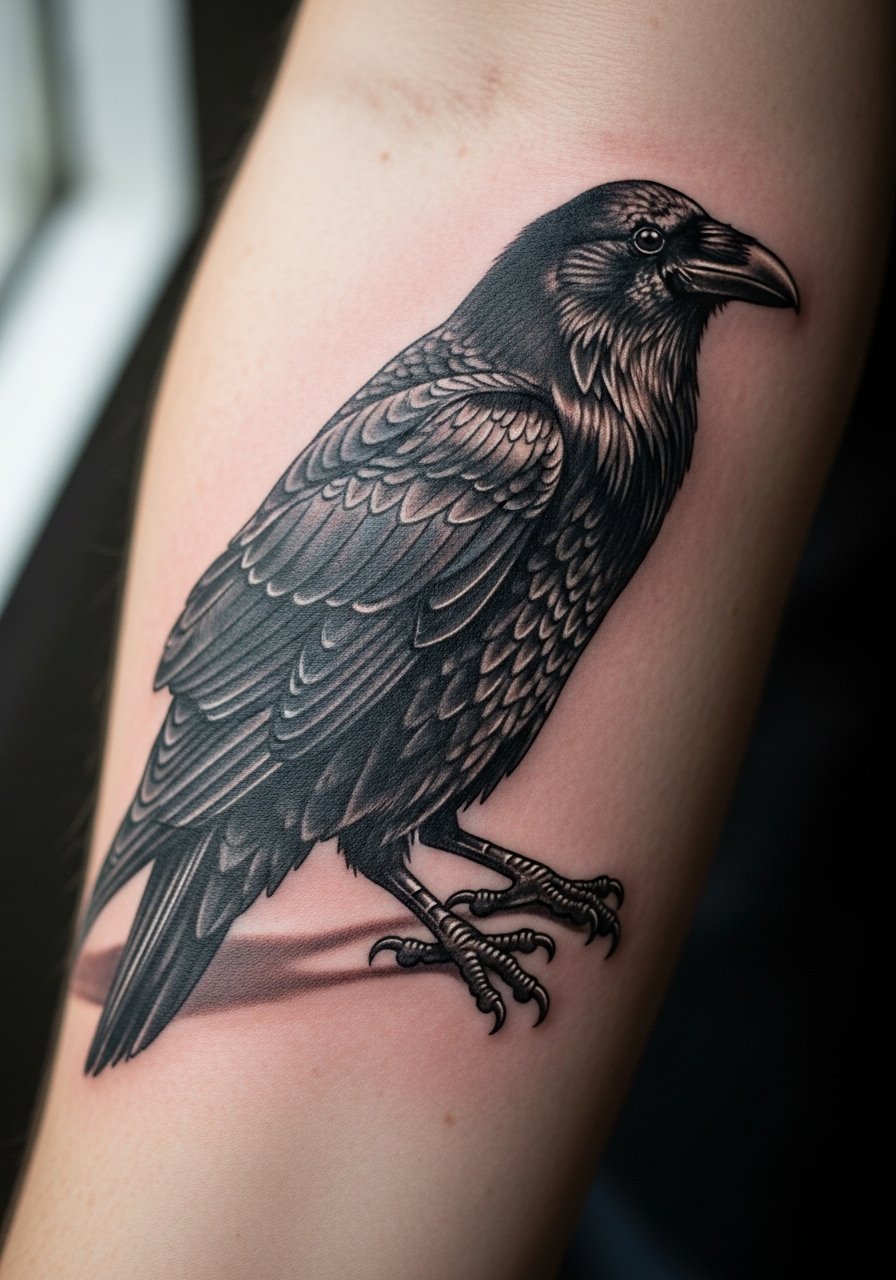
A raven in micro-realism feels like a private omen. On the inner forearm it’s easy to see and cover. Fine shading creates depth; healed photos show slight softening of ultra-fine detail. Artists who excel at pencil-like shading give the best results. Healing is straightforward if kept moisturized. Avoid forcing too many tiny highlights that vanish; ask for contrast to remain after healing.
4. Neo-Traditional Skull and Roses on Upper Arm
Style/Technique: Neo-Traditional / Bold Linework
Pain Level: Low-Medium (3/10)
Session Time: 2–4 hours
Best For: Timeless statement, visible arm placement
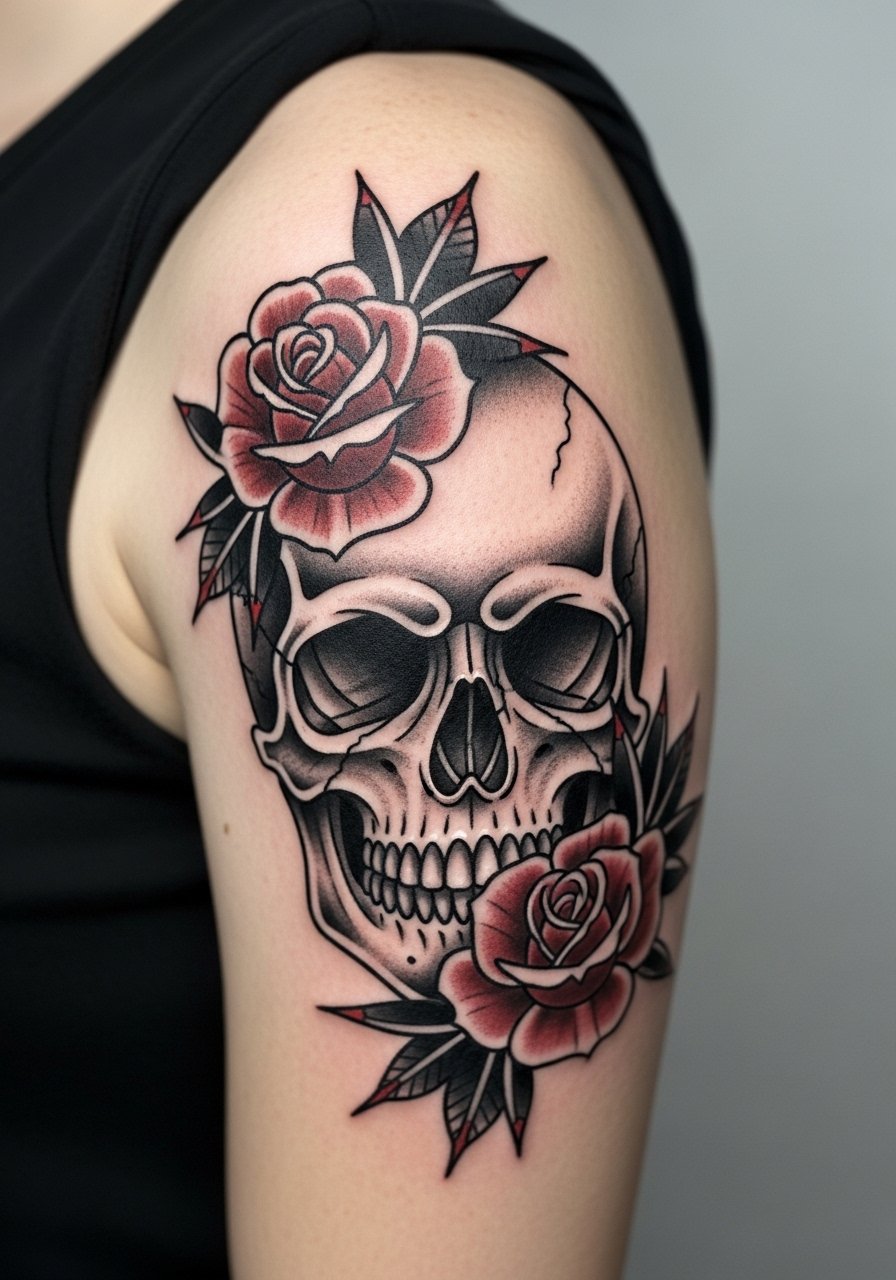
This pairing balances dark symbolism with classic tattoo language. Neo-traditional holds up well because outlines are forgiving. Heals solidly; colors may mute slightly but black anchors the design. Common mistake: tiny script inside dense areas—keep lettering clear or skip it. Ask for saturated black fill and bold outlines so the skull reads from a distance.
5. Dotwork Occult Eye on Back of Neck
Style/Technique: Dotwork / Stippling
Pain Level: Medium (4-5/10)
Session Time: 1–2 hours
Best For: Subtle, symbolic placement
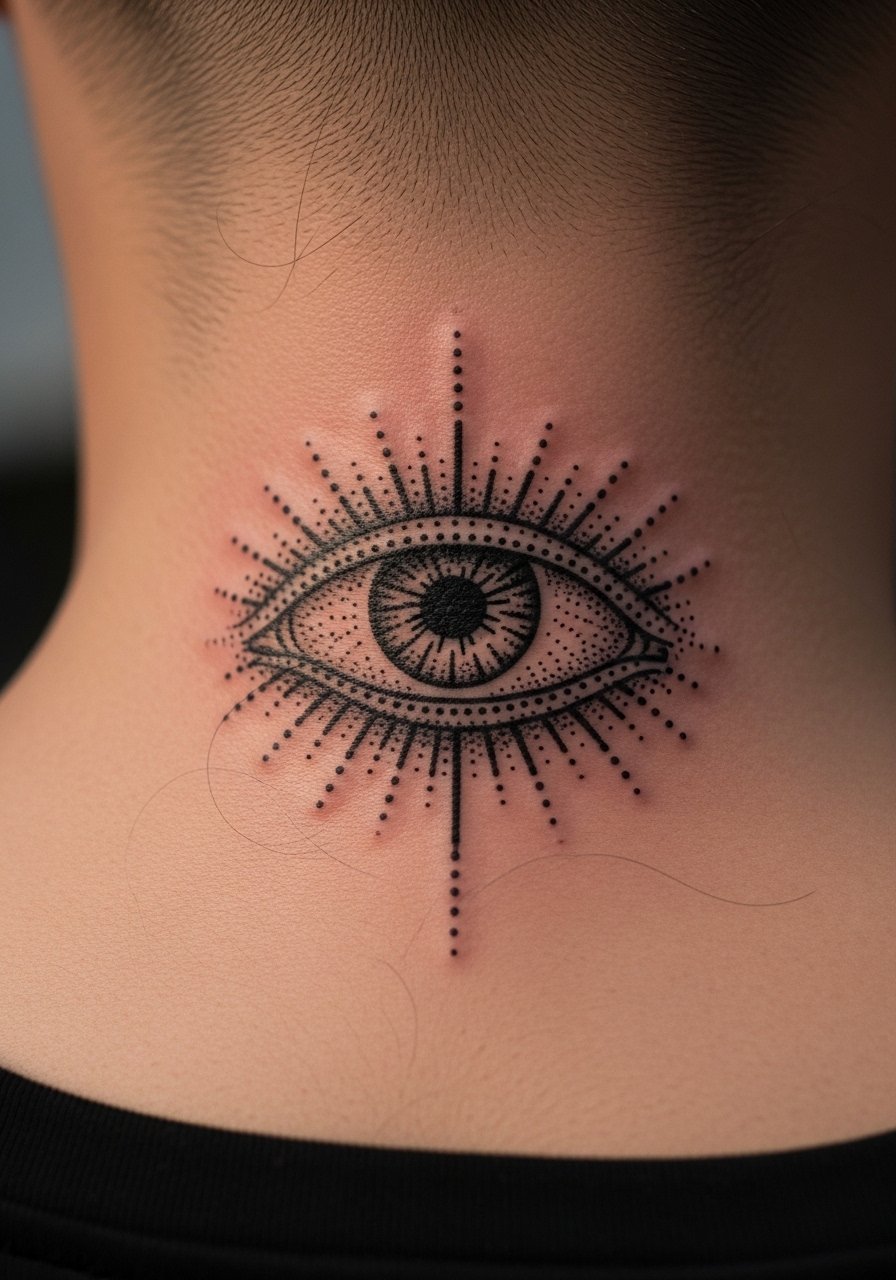
Stippling creates depth without heavy fills. The back of neck gives a peek of mystery under hair. Pain is manageable but proximity to spine can sting. Stippled gradients age predictably if dots are spaced for healing. Avoid overfilling with micro-dots that can merge into gray blocks; ask the artist to space work with long-term healing in mind.
6. Blackout Collarbone Band
Style/Technique: Blackout / Solid Fill
Pain Level: High (7/10)
Session Time: Multiple sessions
Best For: Bold concealment, statement silhouette
Blackout pieces make an undeniable statement. The collarbone is sensitive; expect strong pain and multiple sessions for even saturation. Healed black remains dense but can show texture differences. Aftercare focus on preventing scabbing to avoid patchiness. Avoid uneven edges—ask for precise linework and follow-up sessions for touch-ups.
7. Minimalist Silhouette Forest on Ribcage
Style/Technique: Minimalist / Silhouette
Pain Level: High (7-8/10)
Session Time: 1–3 hours
Best For: Hidden, intimate pieces
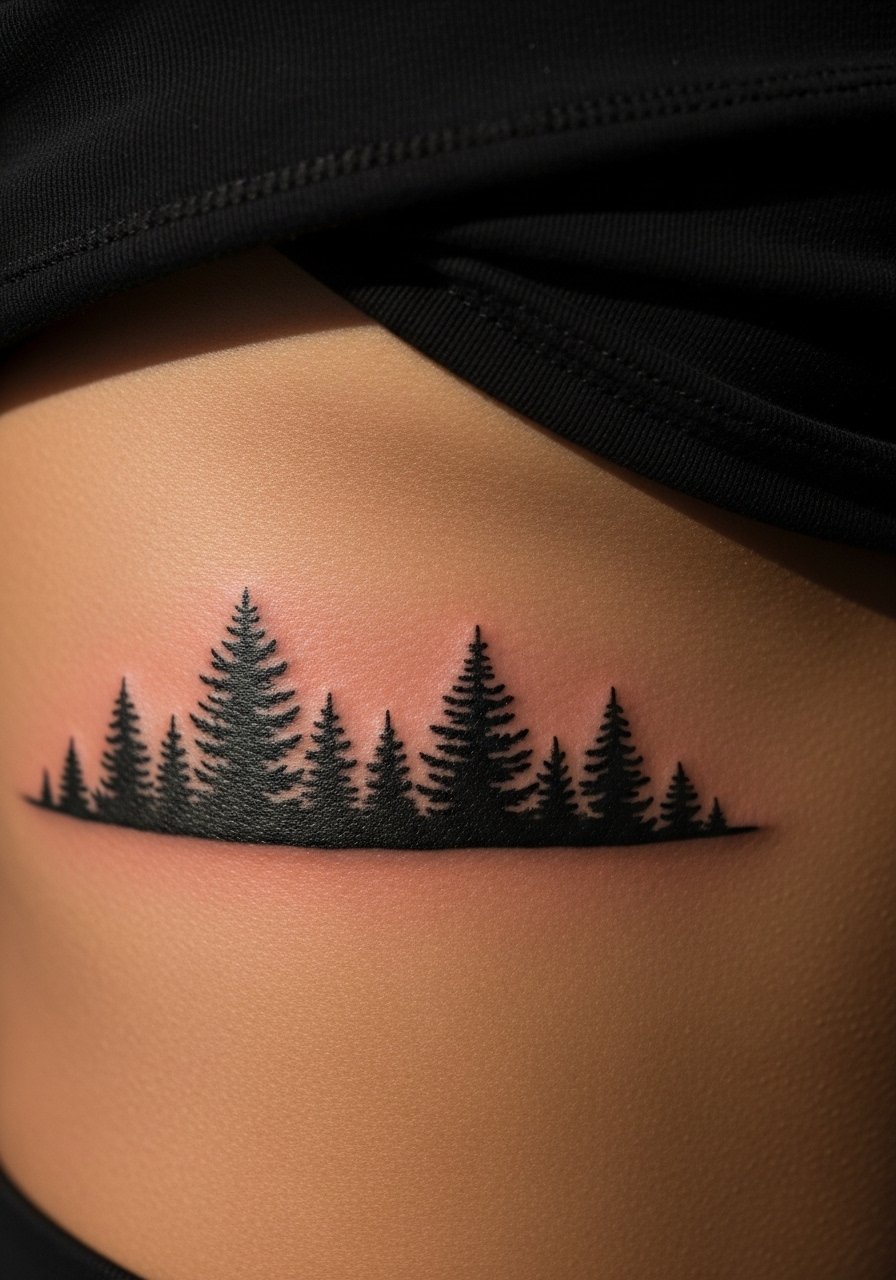
Ribcage silhouettes read moody and private. Pain is high near ribs and breath affects the session. Heals over 4–6 weeks; expect peeling and itching. Silhouettes age well because they rely on shape rather than fine detail. Common mistake: over-detailing foliage; keep shapes bold. Ask for a mock stencil on your body to check scale and flow.
8. Single-Needle Script Quote on Side Wrist
Style/Technique: Fine Line / Script
Pain Level: Low (2-3/10)
Session Time: 30–60 minutes
Best For: Meaningful, visible text

Script at the wrist can be intimate and cryptic. Single-needle text looks elegant but blurs faster; choose slightly thicker strokes for longevity. Healing is quick. Avoid long passages—small letters muddle with time. Ask the artist for examples of healed script they’ve done on wrists.
9. Blackwork Floral Thigh Panel
Style/Technique: Blackwork / Illustrative
Pain Level: Medium (4/10)
Session Time: 2–4 hours
Best For: Larger canvas, concealability
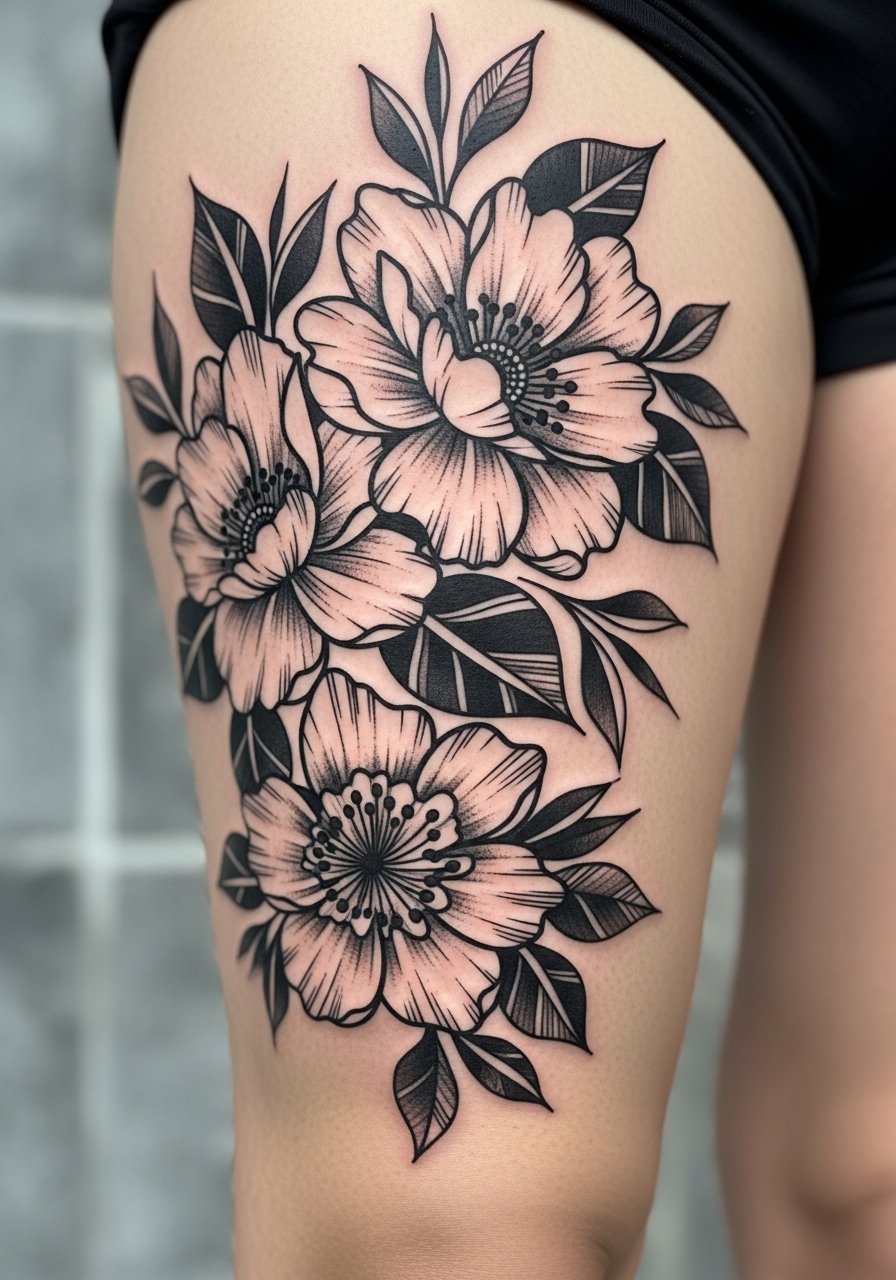
Thigh panels let you go dark without daily display. Blackwork flowers feel dramatic and age well. Sessions are comfortable and healing is forgiving thanks to thicker skin. Common mistake: tiny micro-detail that gets lost—favor bold petal shapes and contrast. Ask artists who do strong black saturation and healed portfolio shots.
10. Micro-Realism Moth on Chest
Style/Technique: Micro-Realism / Black-and-Gray
Pain Level: Medium-High (5-6/10)
Session Time: 1–3 hours
Best For: Symbolic, central placement
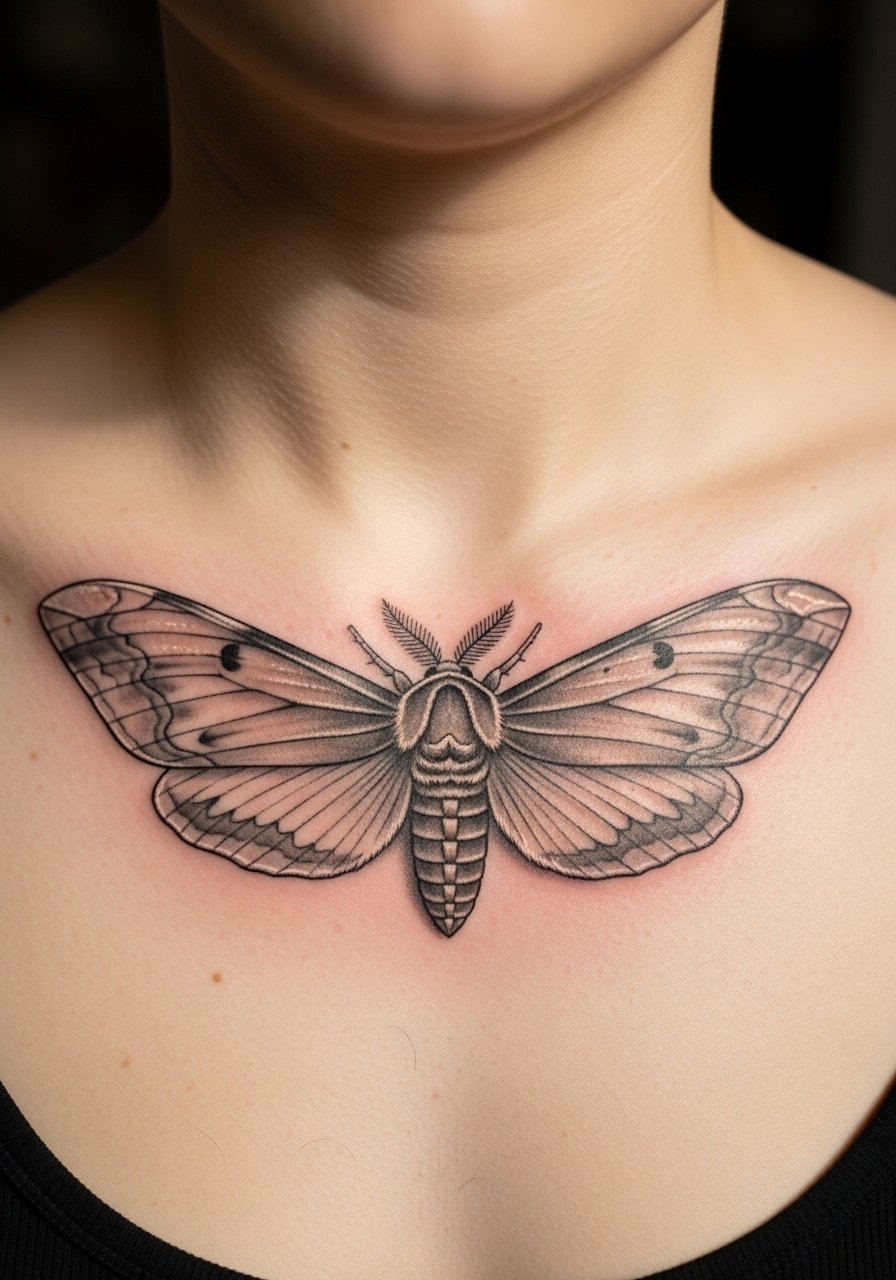
A moth over the chest reads like a talisman. Fine gradients look poetic but soften with healing; ask for solid contrast between darkest blacks and mid-tones. Chest movement affects healing; expect tenderness. Avoid overly tiny highlights that disappear; request a balance of crisp edge and soft shading.
11. Illustrative Grim Reaper on Calf
Style/Technique: Illustrative / Neo-Traditional
Pain Level: Medium (4/10)
Session Time: 2–4 hours
Best For: Visible leg art, narrative pieces
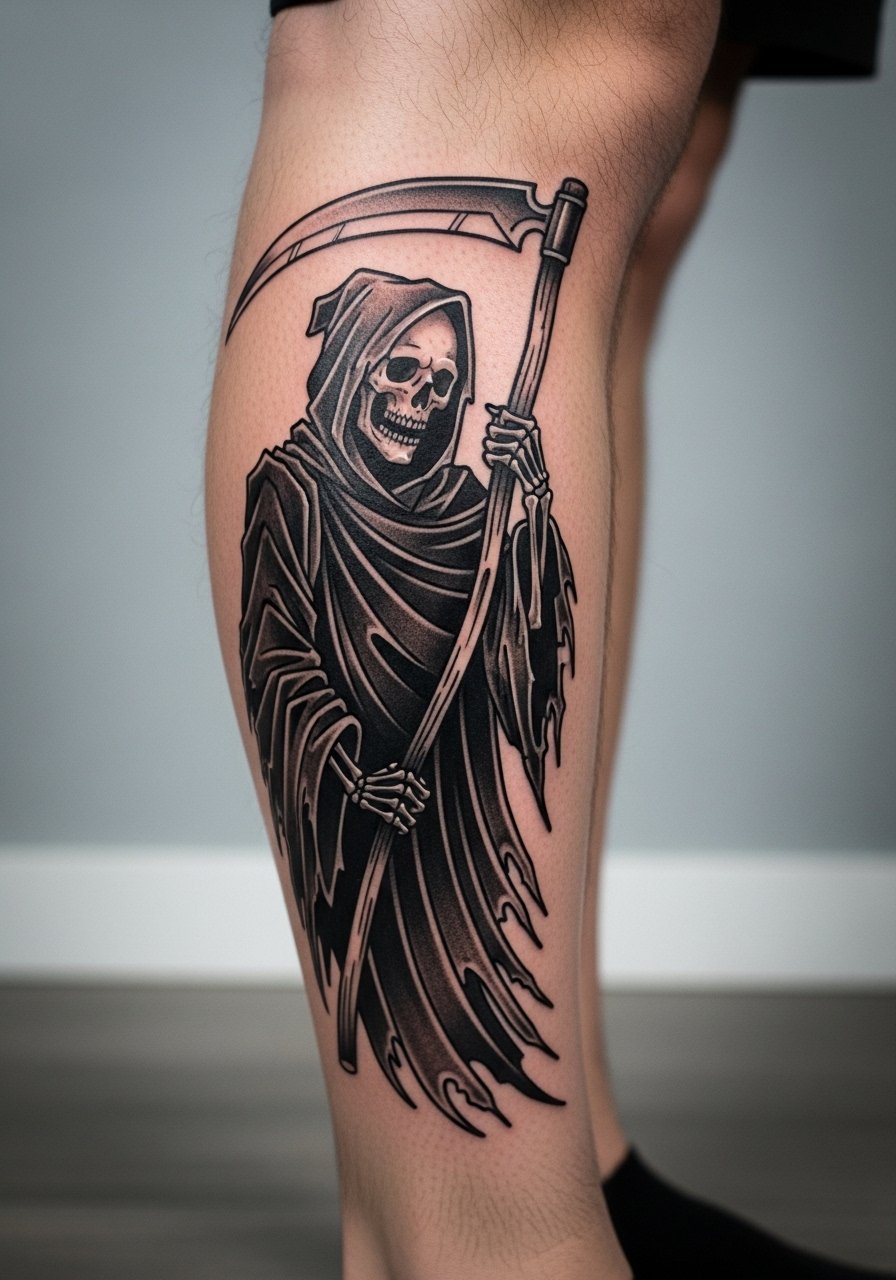
Calf pieces let bold characters breathe. Illustrative styles let you keep dark themes readable from a distance. Heals predictably; shading holds well. Common mistake: crowding the composition—leave breathing room. Ask for healed pics of similar-sized character work.
12. Stippling Crescent Skull on Upper Thigh
Style/Technique: Stippling / Black-and-Gray
Pain Level: Medium (4/10)
Session Time: 1–3 hours
Best For: Hidden, textured look
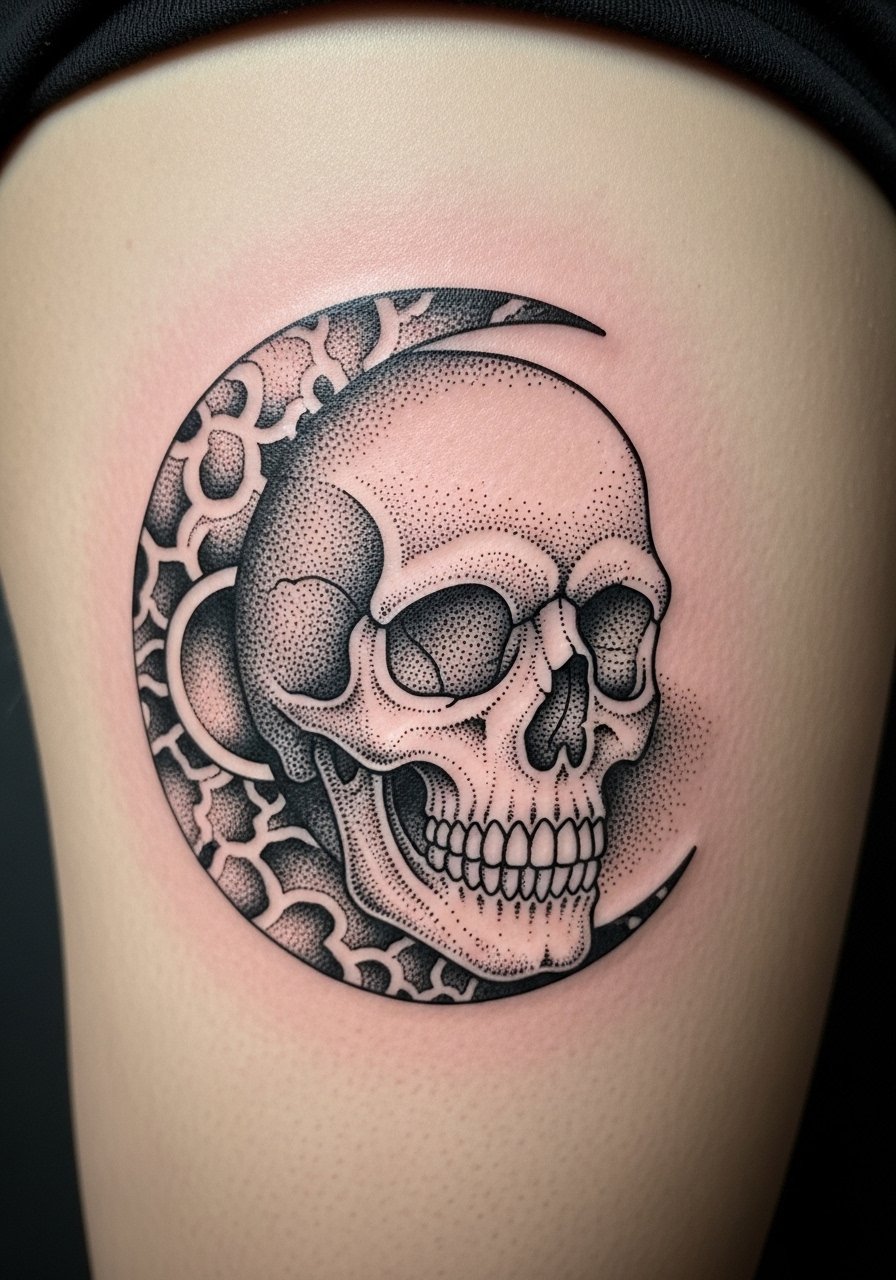
Stipple stippling creates soft gloom without heavy fills. Thigh canvas allows large detail. Dots meld slightly as skin ages, so spacing matters. Avoid overloading tiny dots in tight areas; ask your artist how they plan for healed density.
13. Gothic Script Name on Collarbone
Style/Technique: Blackletter / Script
Pain Level: Medium (4/10)
Session Time: 45–90 minutes
Best For: Visible but refined statement
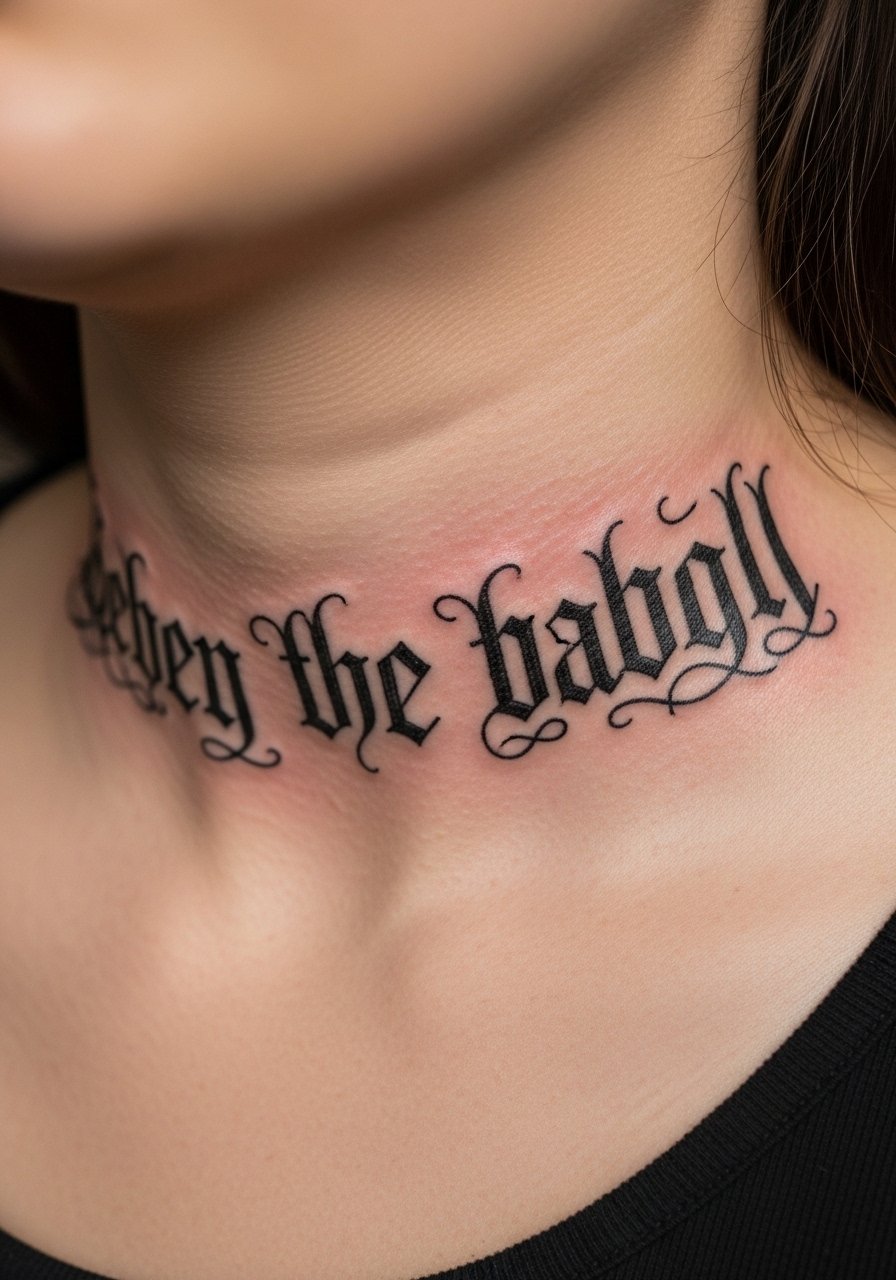
Blackletter reads dramatic and old-world. Collarbone pain is moderate. Healed text keeps strong if strokes are bold. Avoid very thin serifs that blur. Ask for mockups in different sizes to find the right scale.
14. Negative Space Wolf on Back
Style/Technique: Negative Space / Blackwork
Pain Level: High (6-7/10)
Session Time: Multiple sessions
Best For: Large back pieces, high-contrast images
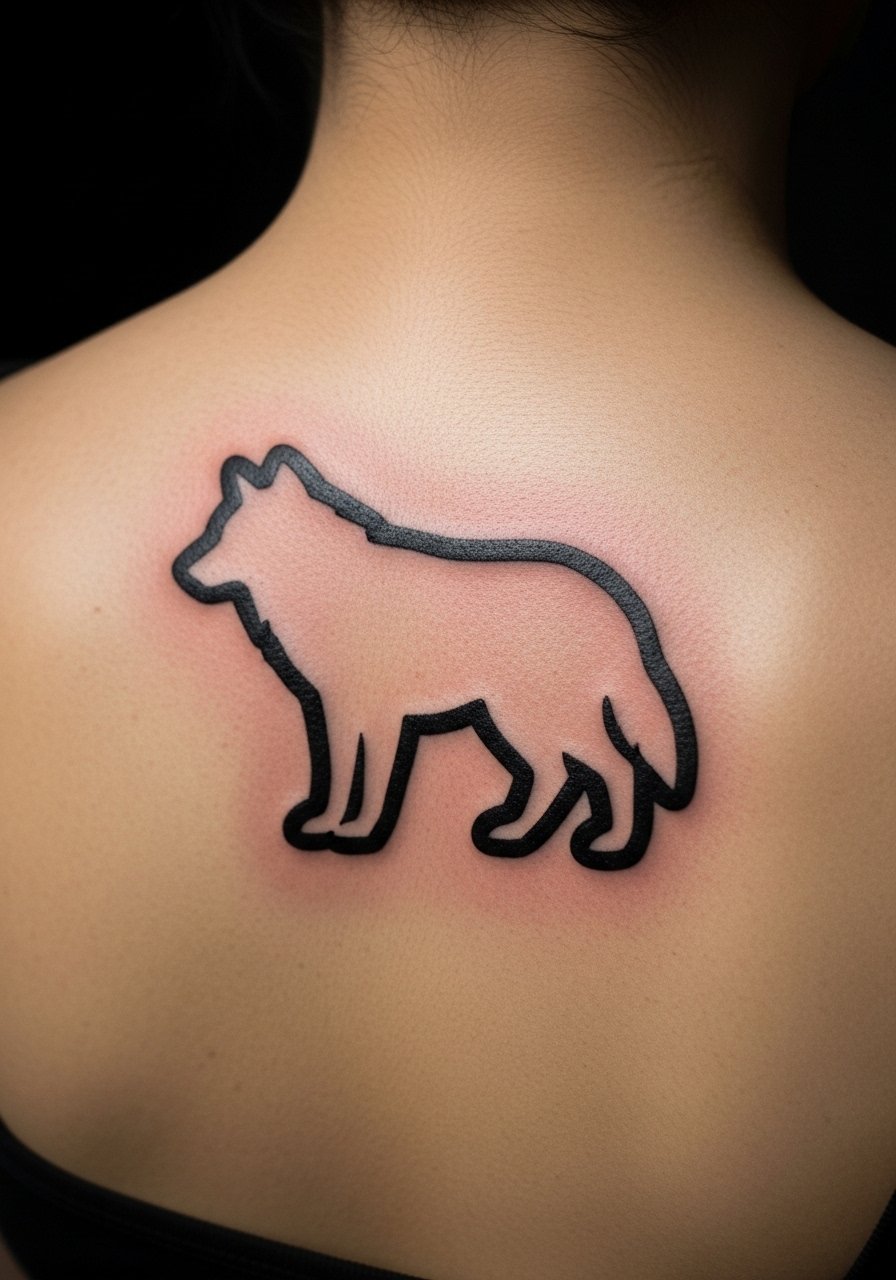
Negative space pieces use contrast to carve shapes. Back allows drama and scale. Heals well if black saturation is even. Common mistake: uneven fills creating texture; insist on touch-ups for smoothness. Ask for healed blackwork portfolios.
15. Micro-Realism Portrait on Inner Bicep
Style/Technique: Micro-Realism / Portrait
Pain Level: Medium (4/10)
Session Time: 3–6 hours
Best For: Personal, highly detailed pieces
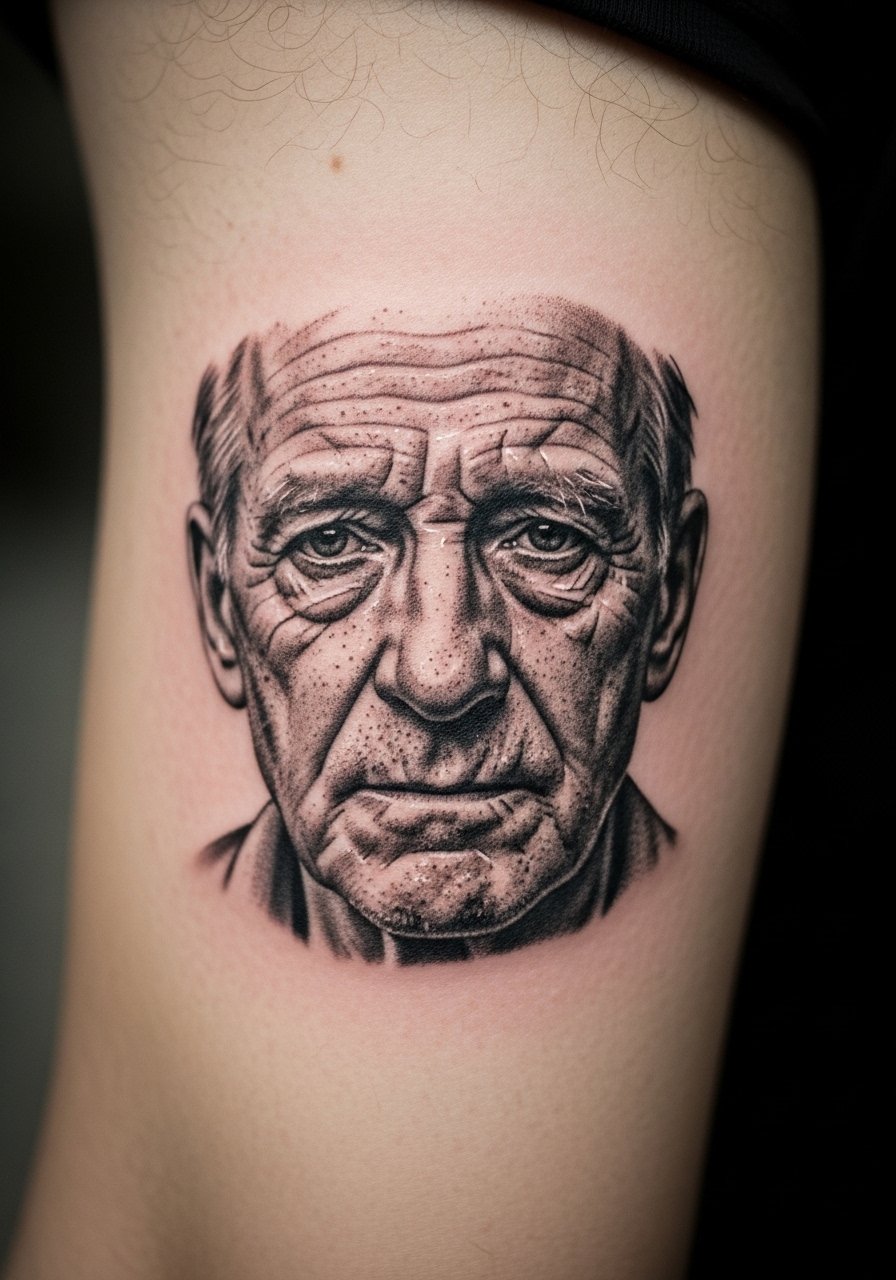
Inner bicep is forgiving for portraits. Micro-realism ages based on skin movement and sun exposure—cover when possible. Artists who do photographic realism and can show healed work are essential. Avoid tiny stray highlights that vanish; prioritize tonal structure.
16. Single-Needle Dagger on Finger
Style/Technique: Single-Needle / Minimalist
Pain Level: High (6-8/10)
Session Time: 30–60 minutes
Best For: Small, bold accent pieces
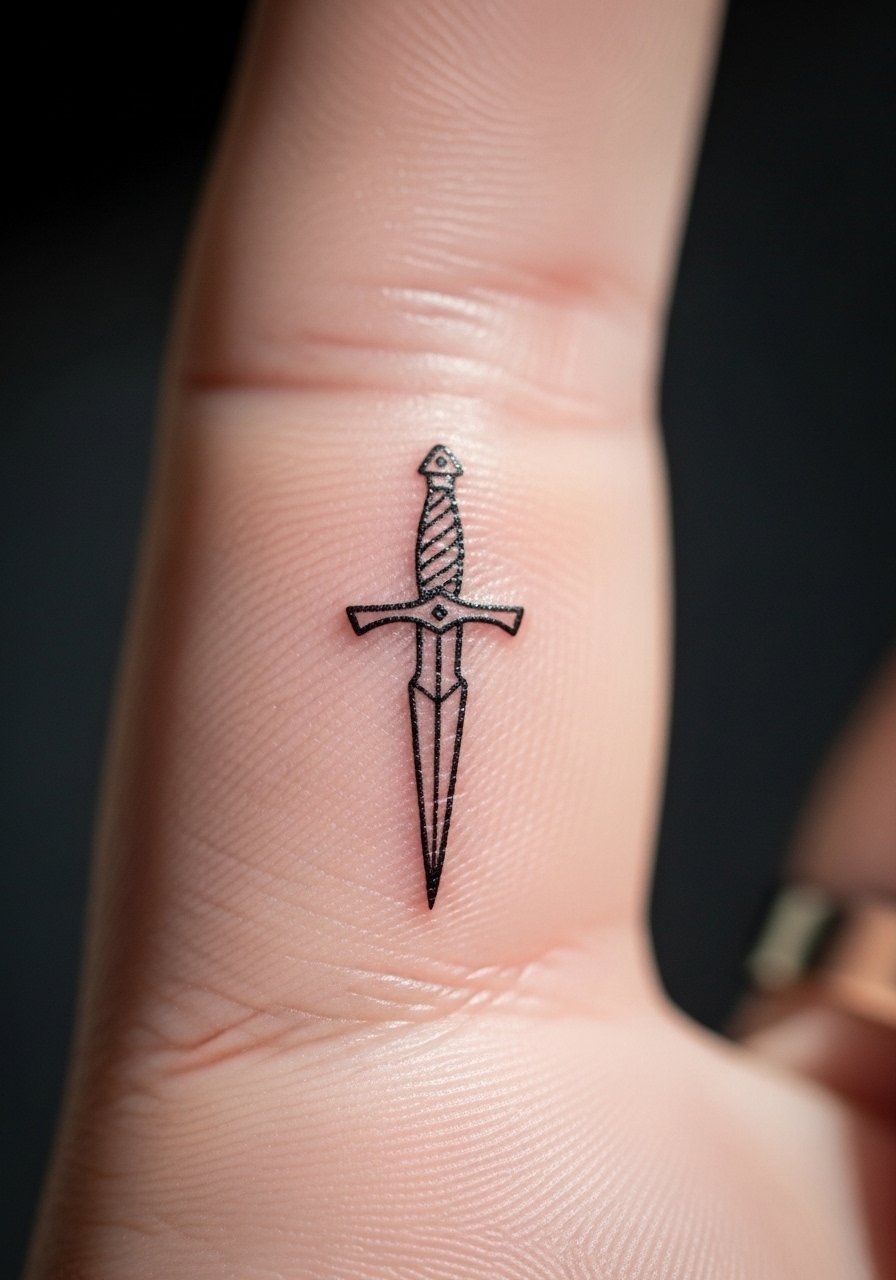
Finger tattoos fade fastest. Single-needle can blur quickly on such mobile skin. If you want longevity, ask for slightly thicker line weight and be prepared for touch-ups. Healing is quick but prone to ink loss.
17. Blackwork Hourglass on Ribcage
Style/Technique: Blackwork / Symbolic
Pain Level: High (7-8/10)
Session Time: 1–3 hours
Best For: Hidden symbolism, intimate placement
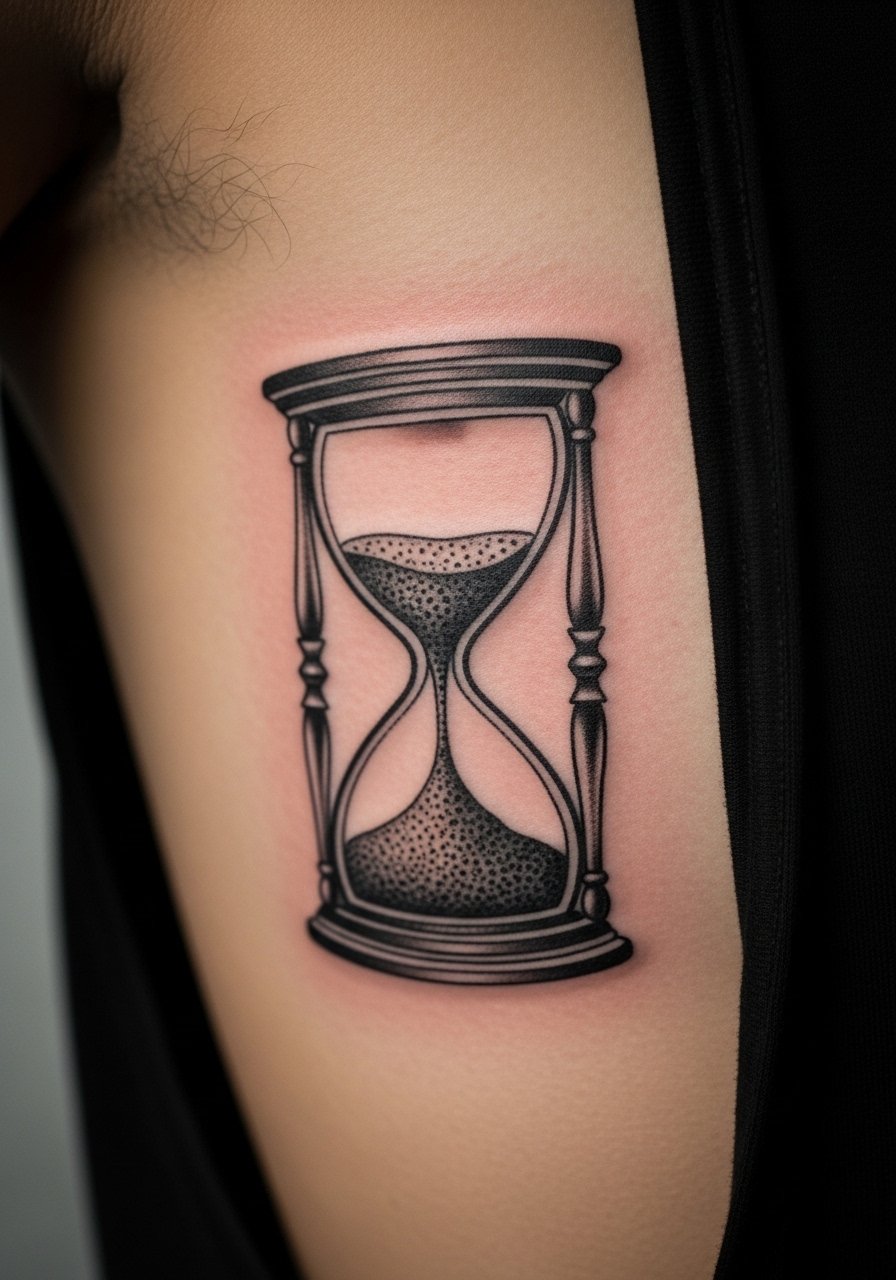
Hourglasses feel timeless and dark in deep black. Ribs are painful but heal into strong shapes when done properly. Avoid tiny internal detail; favor bold shapes that survive healing.
18. Chicano-Style Sacred Heart on Chest
Style/Technique: Chicano / Black-and-Gray
Pain Level: Medium (4/10)
Session Time: 2–4 hours
Best For: Cultural, meaningful chest pieces
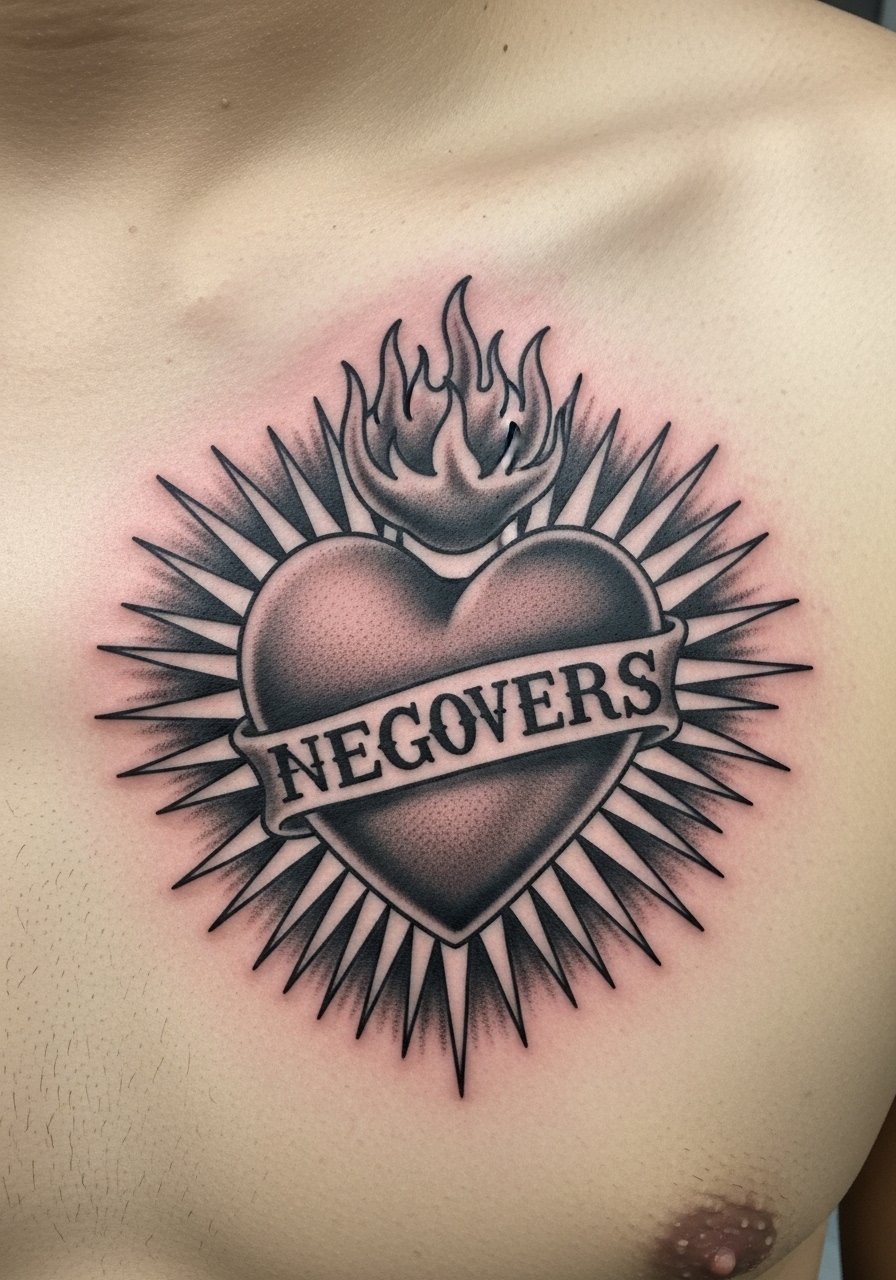
Chicano shading gives a smoky, solemn feel. Chest placements carry meaning and age gracefully if shaded right. Ask for artists versed in this tradition and healed examples.
19. Blackout Finger Knuckles (Symbols)
Style/Technique: Blackout / Minimal Symbols
Pain Level: High (6-8/10)
Session Time: 30–90 minutes
Best For: Small, high-visibility statements

Knuckle tattoos are bold and age quickly due to constant use. Symbols instead of letters avoid readability issues as lines blur. Expect touch-ups. Ask about ink retention on fingers.
20. Negative Space Cross on Spine
Style/Technique: Negative Space / Minimalist
Pain Level: High (6-7/10)
Session Time: 1–2 hours
Best For: Central spine statement, vertical flow

Spine pieces look dramatic and private. Negative space here creates a cut-out effect. Pain is sharp near vertebrae. Heals best with careful movement control. Avoid tiny internal linework that merges.
21. Illustrative Black Snake Coiling Around Arm
Style/Technique: Illustrative / Blackwork
Pain Level: Medium (4-5/10)
Session Time: 2–4 hours
Best For: Sleeve start or wrap-around pieces
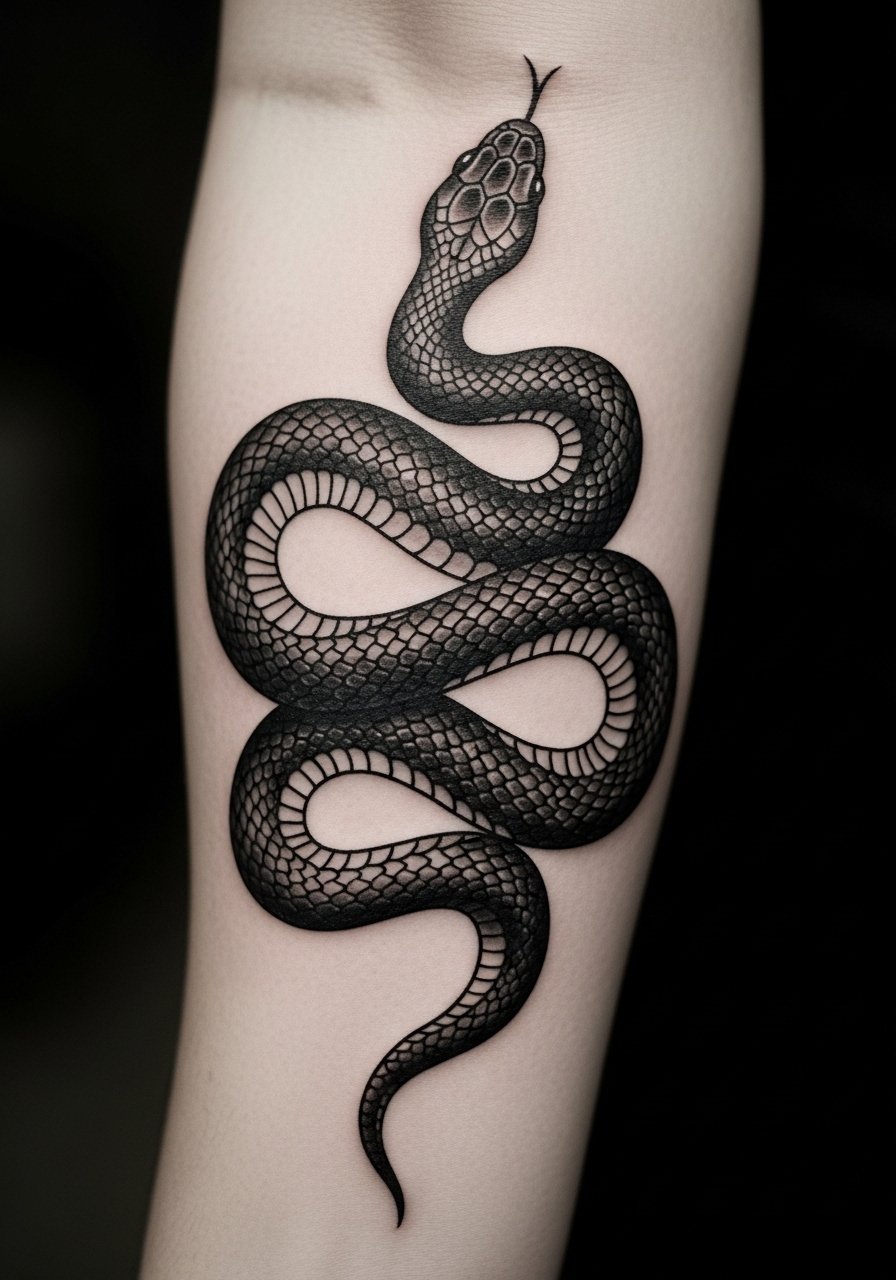
A coiling snake feels furtive and strong. Forearm wrapping reads well in motion. Shading and negative highlights give scale texture. Avoid overly thin scales that blur; ask for bold contrast.
22. Fine Line Constellation on Ankle
Style/Technique: Fine Line / Minimalist
Pain Level: Medium (4/10)
Session Time: 30–60 minutes
Best For: Small, meaningful placement
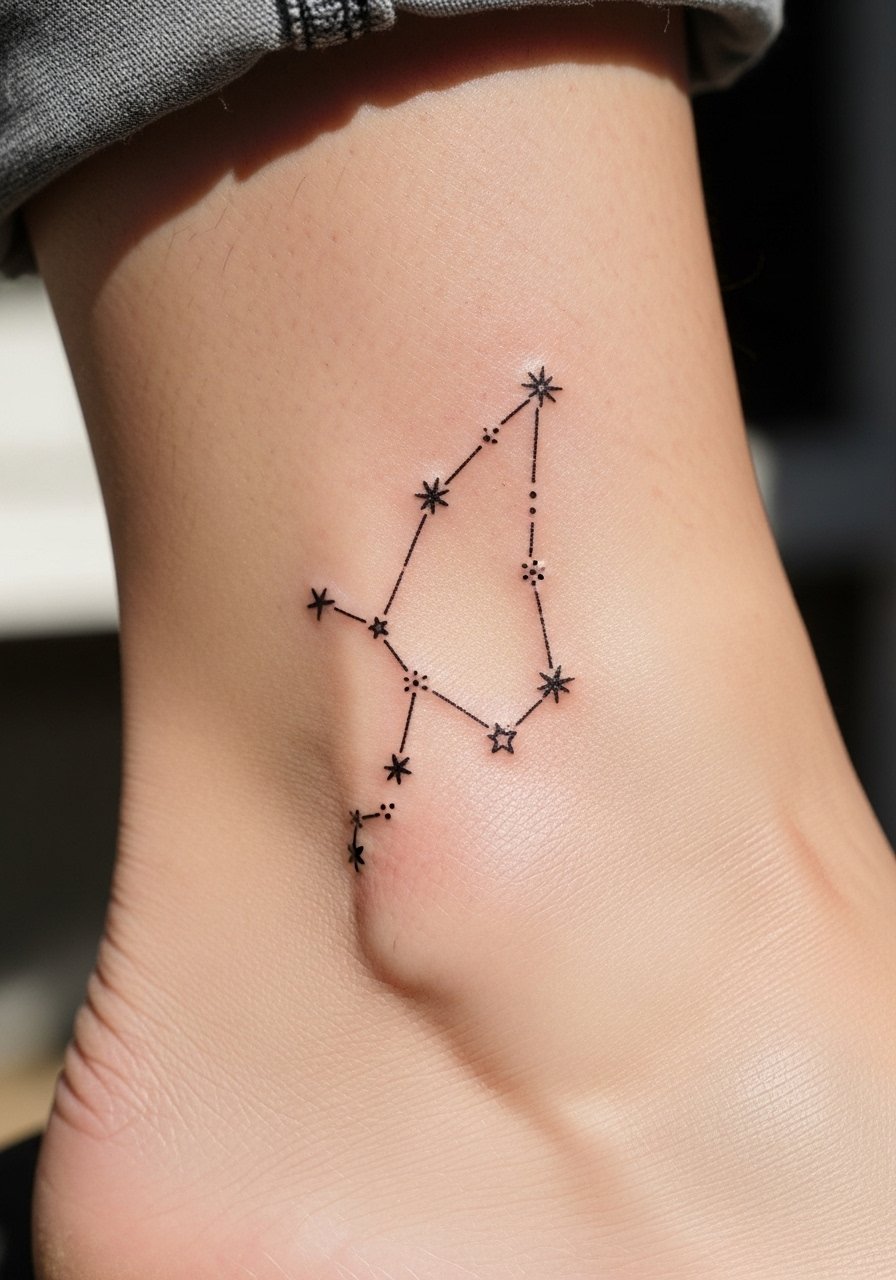
Ankle constellations are intimate and slightly mysterious. Fine lines here may soften due to friction; ask for slightly bolder dots and lines for staying power. Heals in 2–3 weeks if kept clean.
23. Black-and-Gray Atlas Map on Back Shoulder
Style/Technique: Micro-Realism / Black-and-Gray
Pain Level: Medium (4/10)
Session Time: 2–4 hours
Best For: Travel-inspired, large detail
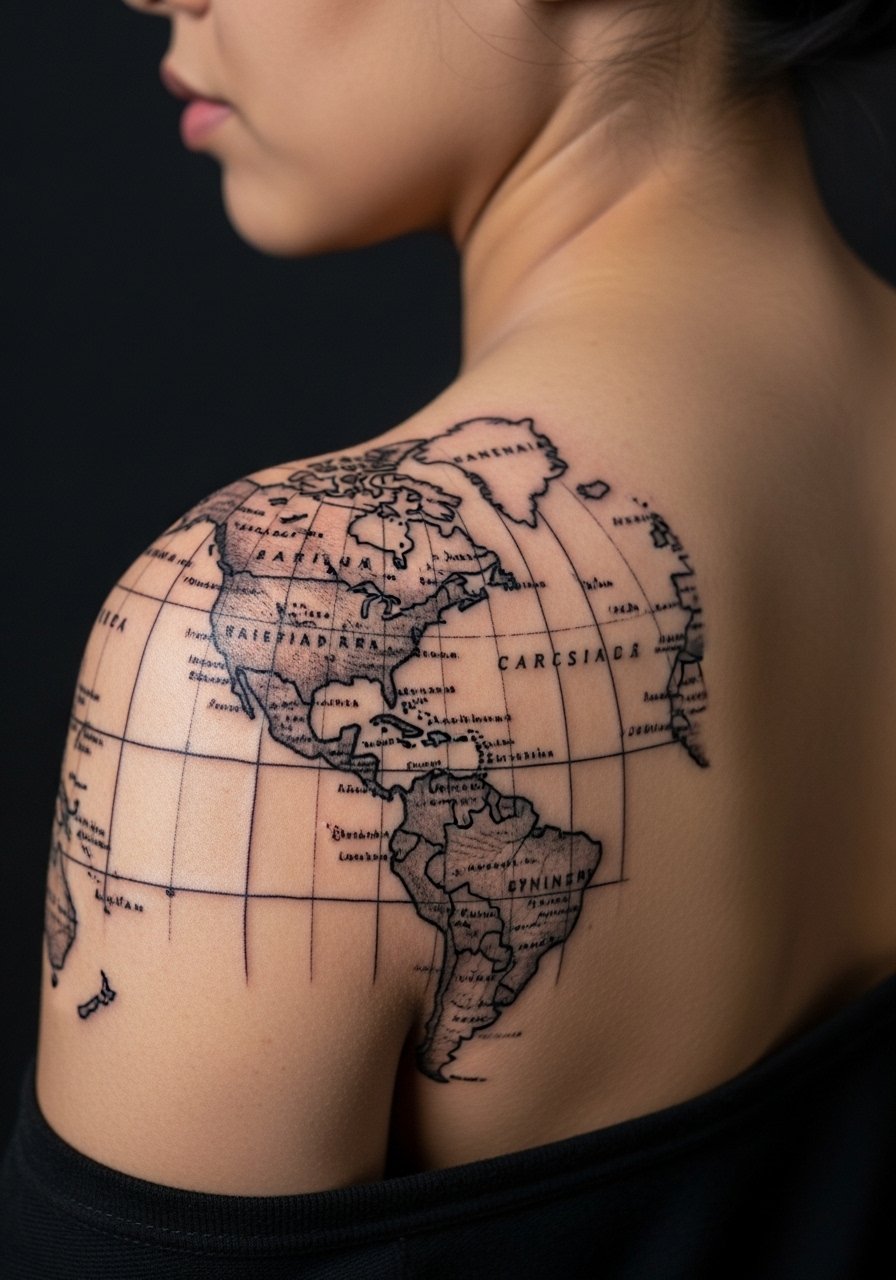
Maps feel secretive and personal. Shoulder pieces heal well and show movement with the body. Artists who do fine shading can keep map lines readable when scaled properly. Avoid tiny text that blurs; favor shapes and shading.
24. Blackout Triangle Over Heart
Style/Technique: Blackout / Geometric
Pain Level: Medium-High (5-7/10)
Session Time: 1–2 hours
Best For: Symbolic, stark design
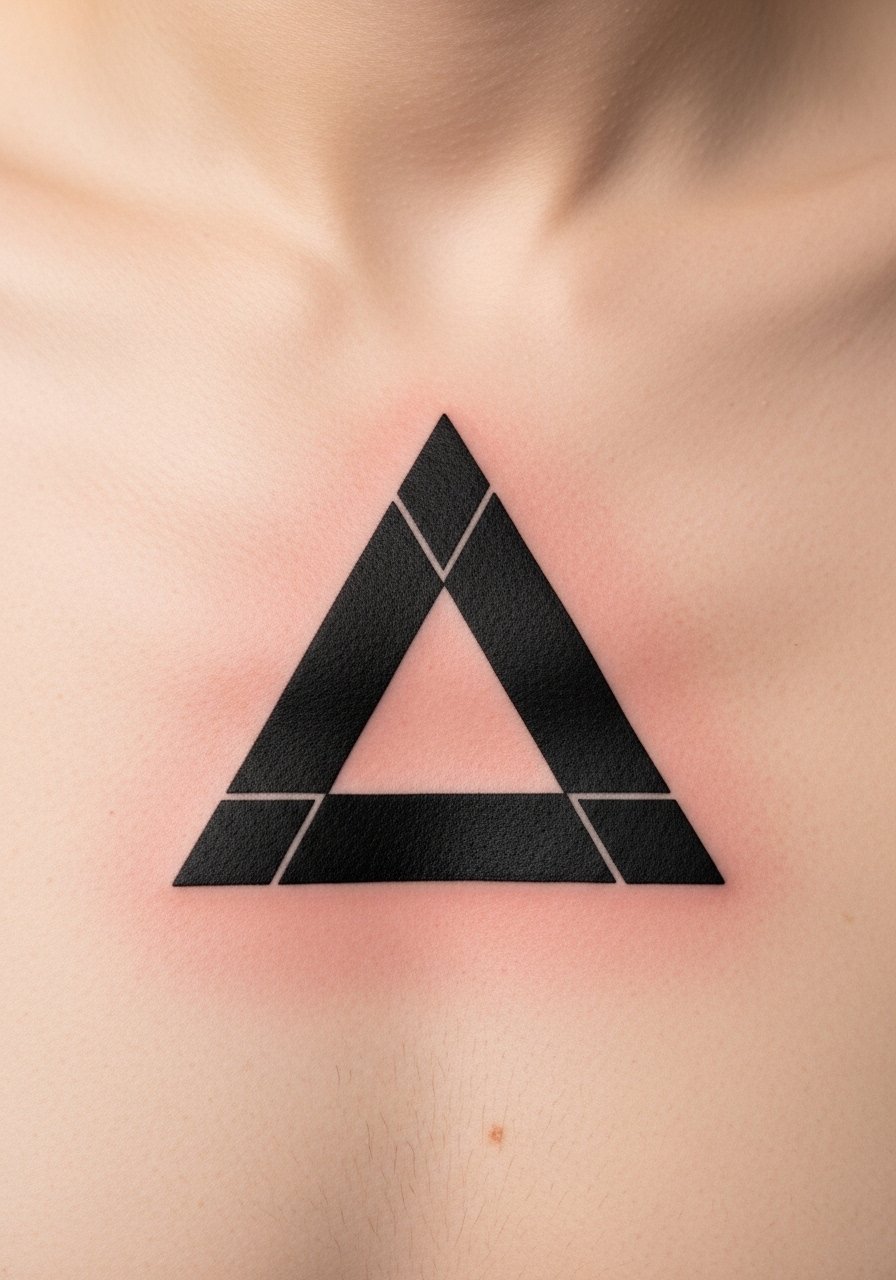
Geometric blackout shapes over the chest give a ritual feel. Heals into solid forms if saturation is even. Pain varies with proximity to bone. Common mistake: uneven edges—insist on crisp lines and touch-up.
25. Micro-Realism Eye on Palm Side of Wrist
Style/Technique: Micro-Realism / Small-Scale
Pain Level: Medium (4-6/10)
Session Time: 1–2 hours
Best For: Symbolic, frequently glimpsed
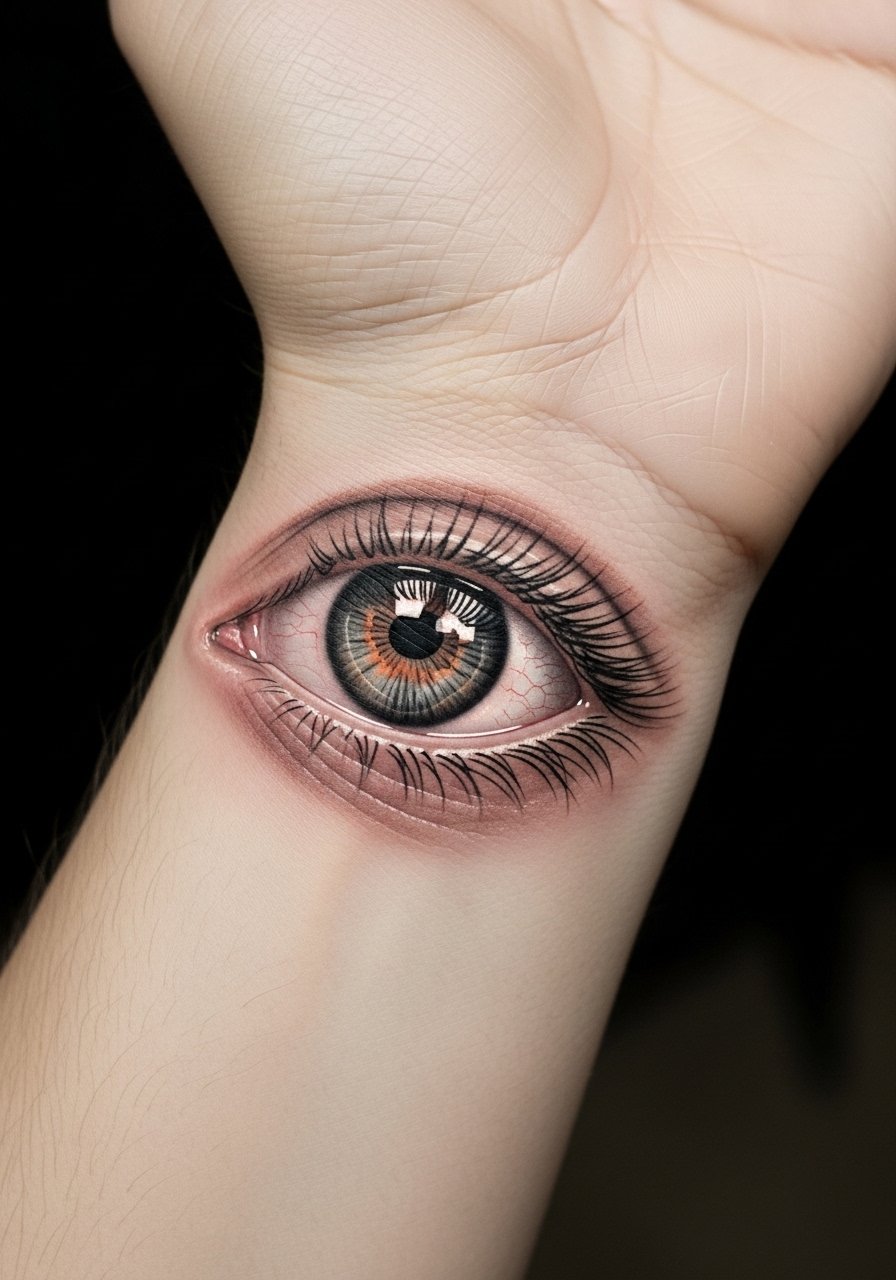
Wrist inner pieces are personal and visible. Micro detail can hold if artist uses stable linework and contrast. Palms fade faster—this area needs extra care and possible touch-ups over time.
26. Single-Needle Floral Behind Ear
Style/Technique: Single-Needle / Botanical
Pain Level: Low (2-3/10)
Session Time: 30–60 minutes
Best For: Hidden, delicate accent
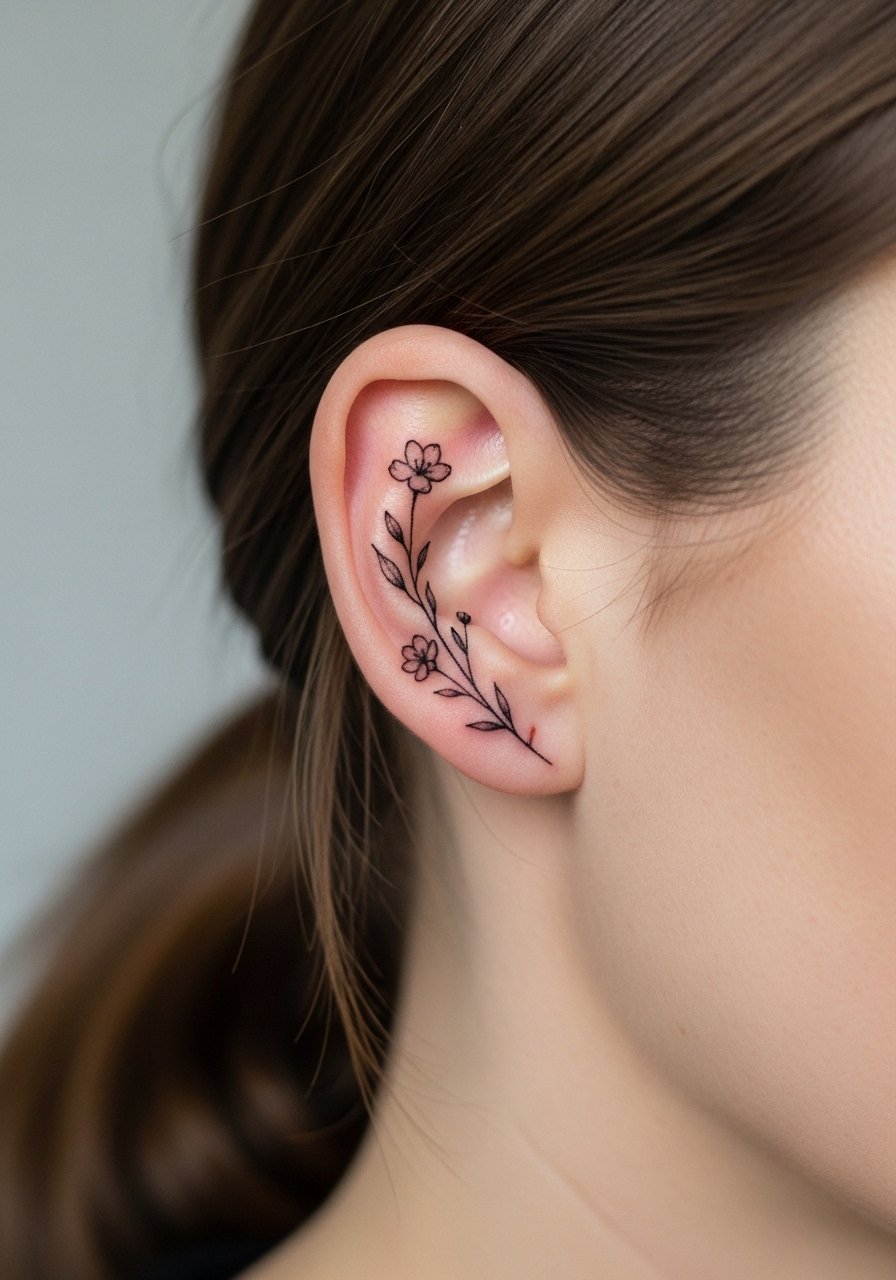
Small botanical behind the ear is quietly dark and feminine. Single-needle can blur; ask for slightly heavier stems for longevity. Heals quickly. Avoid overcrowding tiny petals.
27. Blackwork Celtic Knot on Palm
Style/Technique: Blackwork / Knotwork
Pain Level: High (7-8/10)
Session Time: 1–2 hours
Best For: Cultural, tactile piece
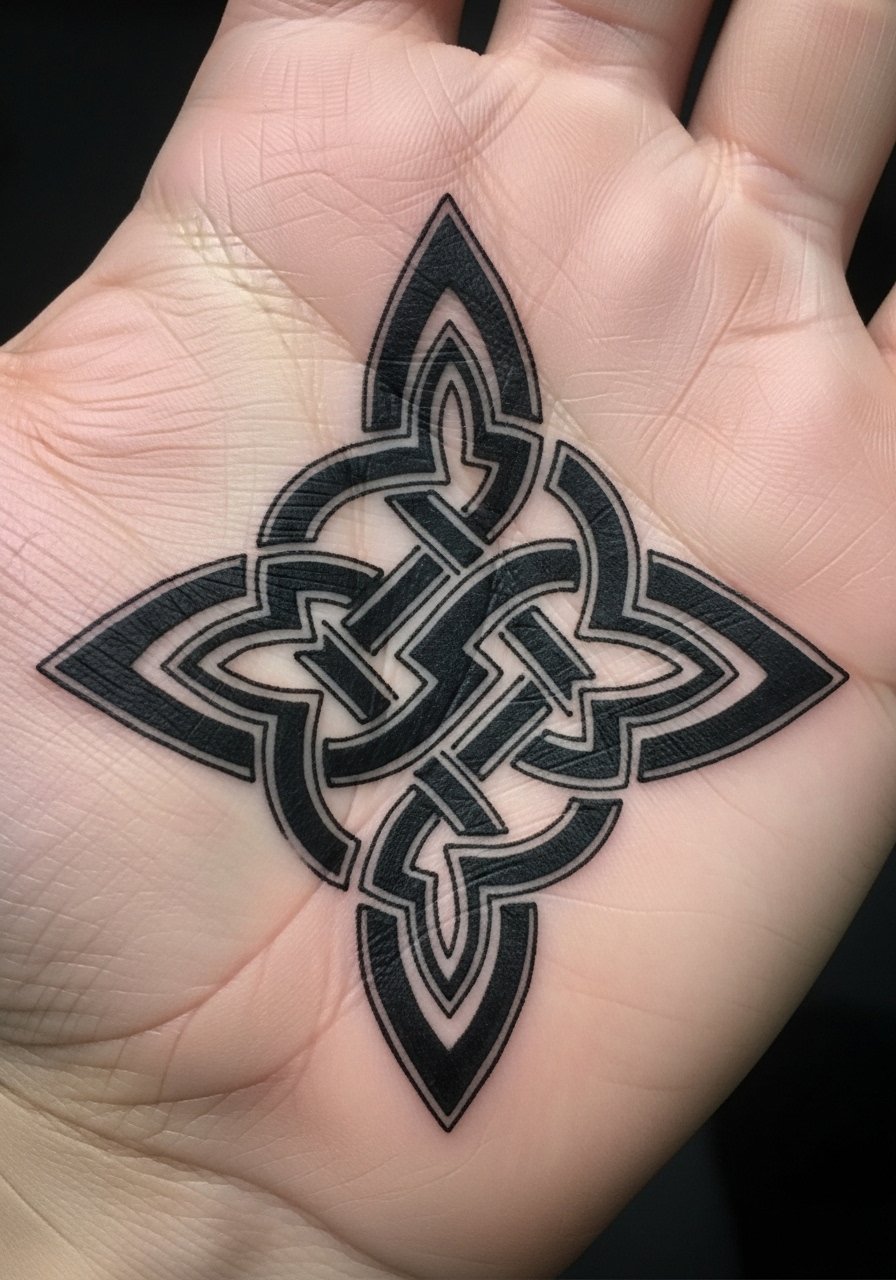
Palms are one of the trickiest surfaces. Ink fades fast here but blackwork can hold if packed well. Expect more touch-ups. Artists who tattoo hands often can advise on longevity.
28. Dark Watercolor Wash With Black Accents on Thigh
Style/Technique: Watercolor-Inspired / Black Accents
Pain Level: Medium (4/10)
Session Time: 2–4 hours
Best For: Painterly, bold-but-soft canvas
Watercolor styles can read moody when paired with black anchors. On the thigh, washes hold color better than exposed areas. Ask for strong black outlines to keep composition defined as colors soften.
29. Micro-Realism Black Cat on Hip
Style/Technique: Micro-Realism / Small Animal
Pain Level: High (6-7/10)
Session Time: 1–2 hours
Best For: Personal charm, hidden placement
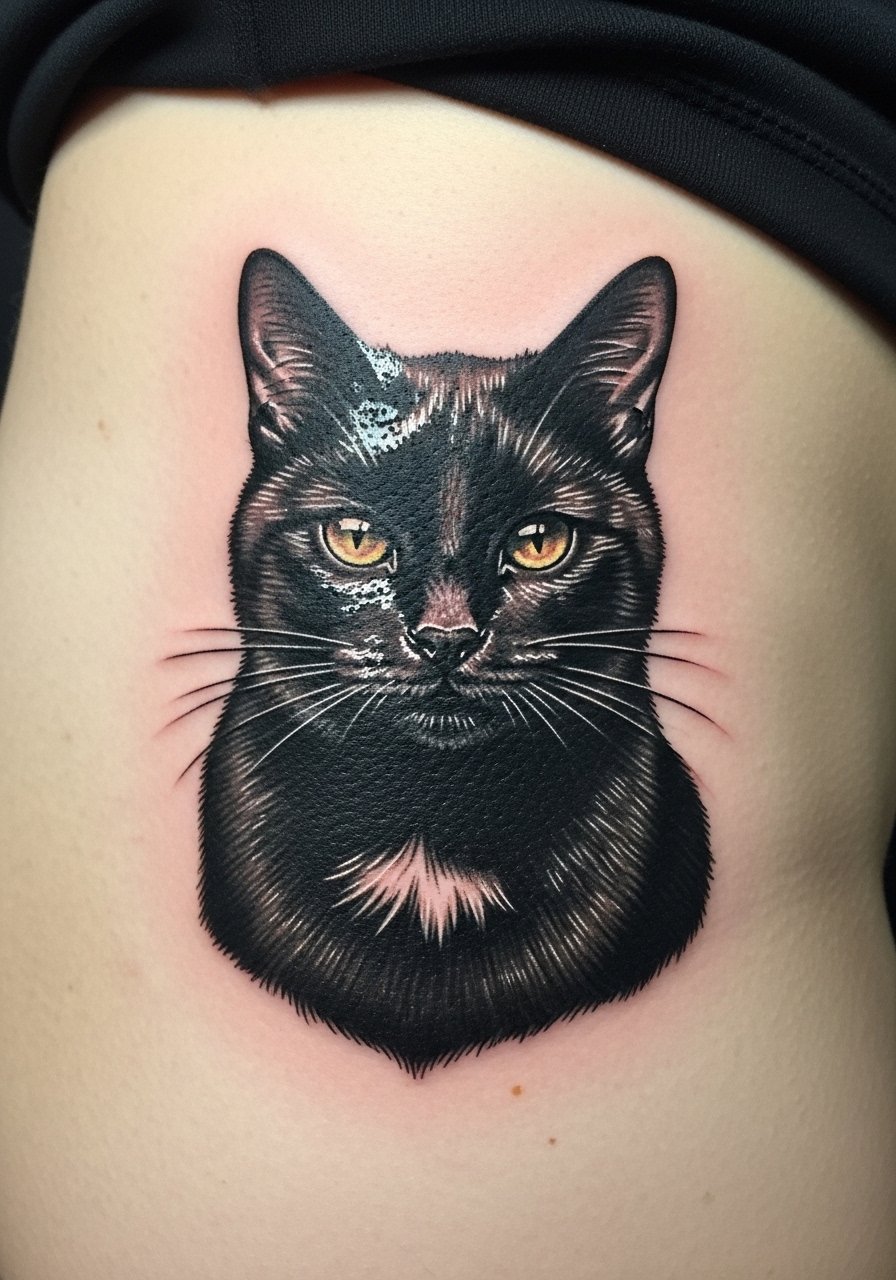
A tiny black cat on the hip is playful and and slightly ominous. Hip pain varies with proximity to bone. Fine detail can remain if shading is balanced and black anchors the piece. Avoid over-reliance on white ink highlights; they can fade.
Tattoo Prep and Aftercare Essentials
Aftercare Essentials:
- Aquaphor Healing Ointment, 14oz tube — Use first 3–5 days for heavy ointment protection.
- Saniderm Transparent Adhesive Bandage, 6-inch roll — Second-skin option for the first 24–48 hours.
- CeraVe Fragrance-Free Moisturizing Lotion, 12oz — Lightweight, daily moisturizer during weeks 2–6.
- Dr. Bronner's Unscented Castile Soap, 32oz — Gentle cleaning in the first two weeks.
Before Your Appointment:
- Tattoo Numbing Cream with 5% Lidocaine, 30g — Apply 30–45 minutes before if artist approves.
- Tattoo Stencil Transfer Paper, 8.5×11 pack — Useful when refining placement at home.
Long-Term Maintenance:
- SPF 50 Sunscreen Stick for Tattoos, 0.5oz — Daily protection to prevent fading.
- Mad Rabbit Tattoo Balm, 2oz — Maintenance balm for healed tattoos.
- Hustle Butter Deluxe, 8oz — Vegan aftercare option for ongoing hydration.
Optional Comfort Items:
- Tattoo Numbing Spray, 1oz — For touch-ups or very sensitive areas.
- Hydrocolloid Bandages (Large), 10-Pack — For small spots or scab protection during healing.
- Tattoo Aftercare Soap and Balm Kit — Starter combo for first two weeks.
Frequently Asked Questions
Q: How bad does a tattoo actually hurt?
A: Pain depends on placement and your tolerance. Outer arm or thigh usually feels like 2–4/10. Ribs, spine, and fingers can hit 7–9/10. It’s more a prolonged scratchy/burning feeling than sharp, sudden pain. For sensitive spots, consider a numbing cream with 5% lidocaine—many artists approve short-term use.
Q: What if I regret the design later?
A: I recommend sitting with big ideas for several months. If you still feel unsure, pick a placement you can cover. Laser removal is an option but it's long and involves multiple sessions. Choosing imagery with personal meaning helps reduce regret.
Q: How do I keep dark tattoos from fading?
A: From what I’ve seen, UV exposure is the main killer. Use a SPF 50 sunscreen stick on exposed tattoos daily. Keep skin moisturized with a fragrance-free lotion like CeraVe to support pigment longevity.
Q: Can I work out after getting inked?
A: Wait at least 48–72 hours for low-sweat activity. For tattoos on joints or areas that stretch (elbow, knee, ribs), wait longer—about a week—so the skin can start forming a proper barrier. Sweat can introduce bacteria and affect healing.
Q: Should I get a small tattoo first to test pain?
A: Only if you actually want that small design. Size isn’t a perfect pain predictor—placement is. A tiny wrist or finger piece might hurt more than a larger forearm piece. If you’re nervous, choose an outer arm or thigh for the first session.
Q: How long will my tattoo take to heal?
A: Surface healing is usually 2–3 weeks; full healing can take 2–3 months. The first week is the most hands-on—clean twice daily with gentle soap, use a thin layer of Aquaphor or recommended balm, and avoid picking scabs. Expect peeling around day 3–7; colors will look dull until the skin fully regenerates.
Q: Do tattoos look different on various skin tones?
A: Yes. Deep blacks and crisp linework translate well across tones. Bright colors can read more muted on deeper skin tones; white ink often shows less. I always ask artists to show healed examples on similar skin tones so expectations match reality.
Q: Are certain styles better for longevity?
A: Bold blackwork and neo-traditional pieces generally hold up best. Fine line and single-needle work look stunning initially but can blur faster, especially in high-friction areas. From what I’ve gathered, asking an artist about healed examples is the best predictor of how a style will age.
