
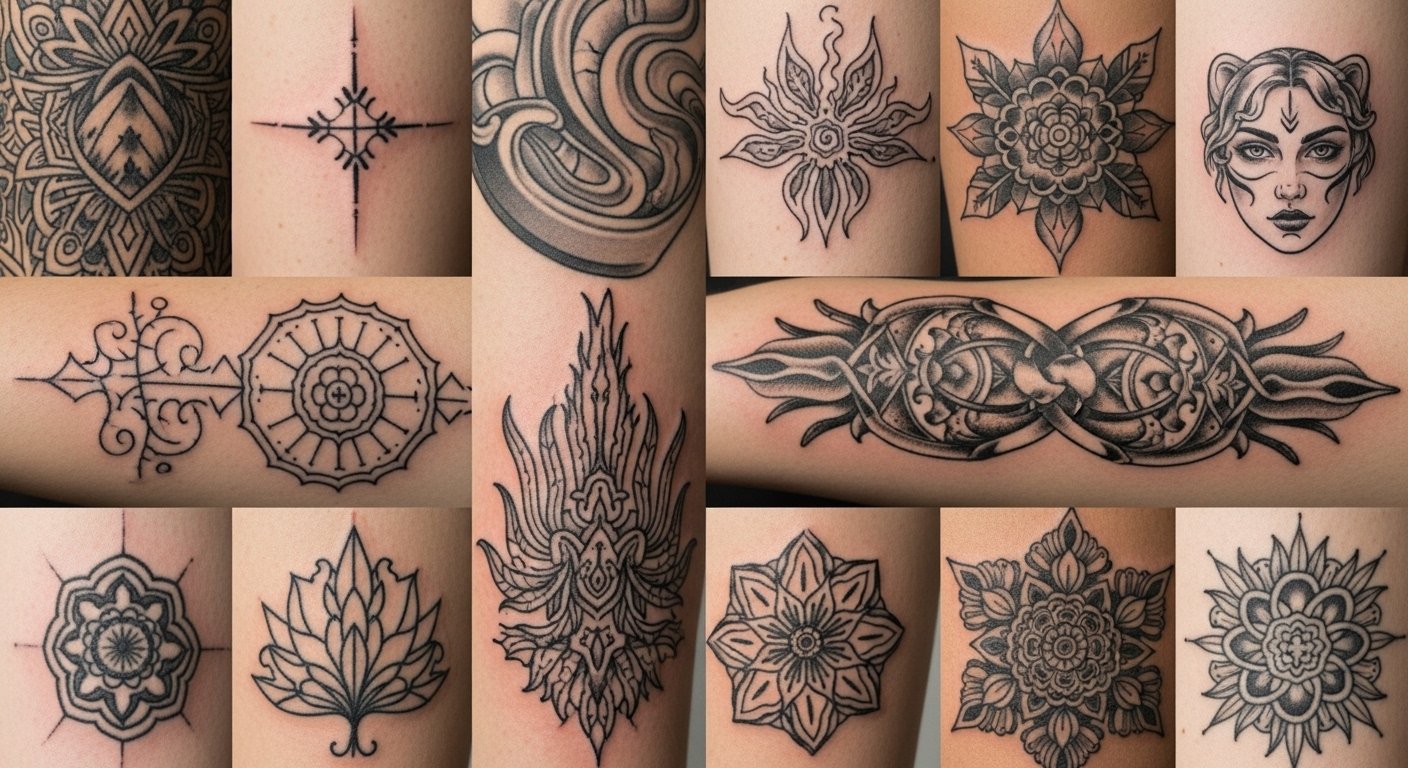
I spent months testing temporary tattoos before committing to any permanent pieces. The hard part wasn't finding pretty designs—it was finding options that actually look real, hold up to life, and show how a permanent version might age. These 24 temporary tattoo ideas are the ones I kept coming back to in 2026: practical, real-looking, and easy to try risk-free.
This list leans toward realistic, healed-looking styles—fine line, traditional, Jagua/henna, airbrush, and waterproof stickers. These ideas work well on forearms, thighs, collarbones, and ankles—the placements I test most. From what I've seen, 15-day waterproof stickers and Jagua stencils give the closest preview of how a permanent piece will sit and fade.
1. Fine Line Botanical Sleeve on Inner Forearm
Style/Technique: Fine Line / Illustrative
Pain Level: Medium (3-4/10)
Session Time: Application: 1–10 minutes (temporary) / Multiple sessions for permanent
Best For: Testing placement for a future sleeve, delicate visuals
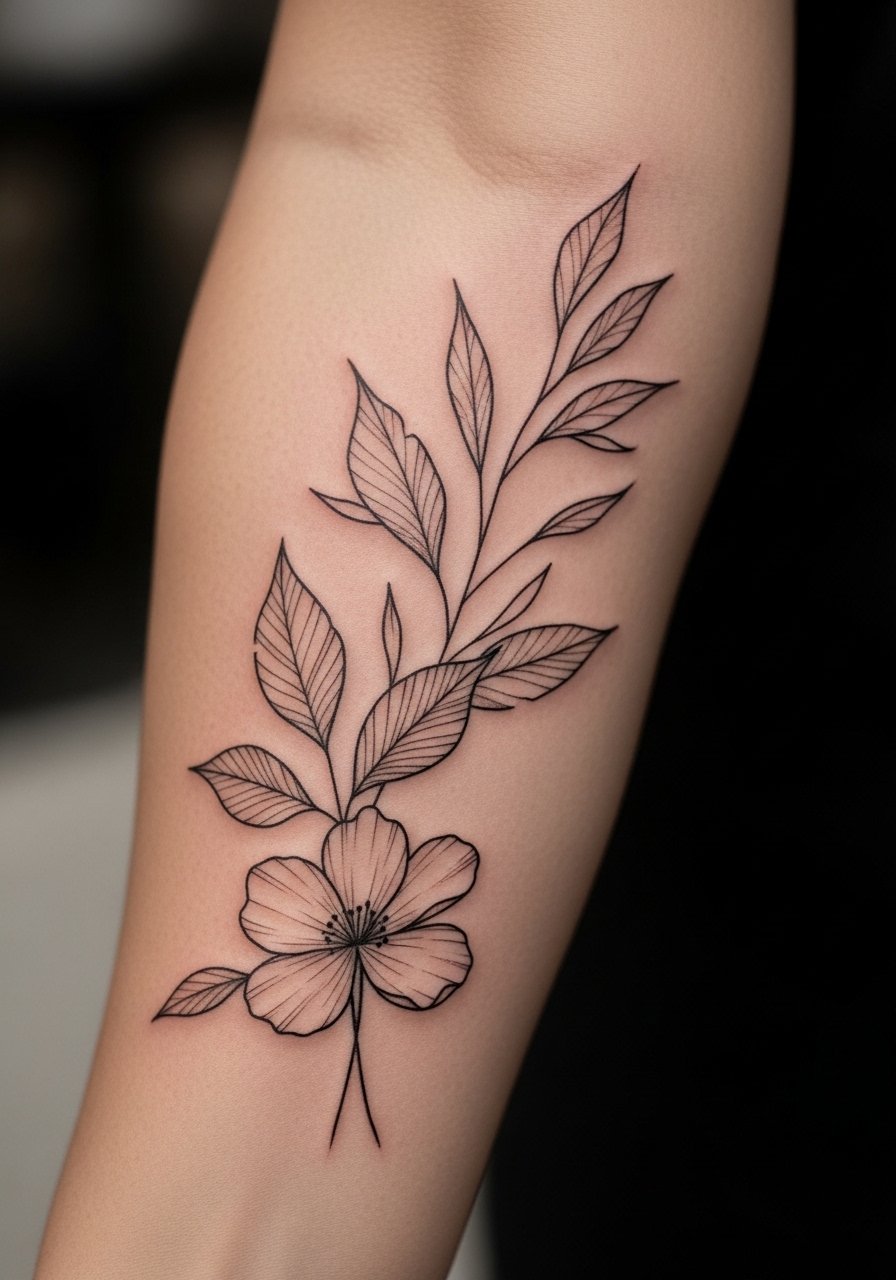
Fine line botanicals read as delicate and personal. Using a water-transfer or inkjet custom temporary lets you try how slender stems flow with your arm movement. For inner forearm placement, expect mild sensitivity if you ever go permanent—temp tattoos teach you how visible the design is when you bend your wrist. Aftercare for temporary application is simple: clean, dry skin and avoid oils. From what I've gathered, fine lines blur faster over years, so if you love crisp detail, ask an artist about slightly bolder lines when you go permanent. A common mistake is placing tiny details too close together—give space so the design ages well.
2. Micro-Realism Pet Portrait on Thigh
Style/Technique: Micro-Realism / Photo-Realistic
Pain Level: Low-Medium (2-3/10)
Session Time: Application: 5–15 minutes (temporary) / Several hours for permanent
Best For: Testing portrait scale and placement before committing
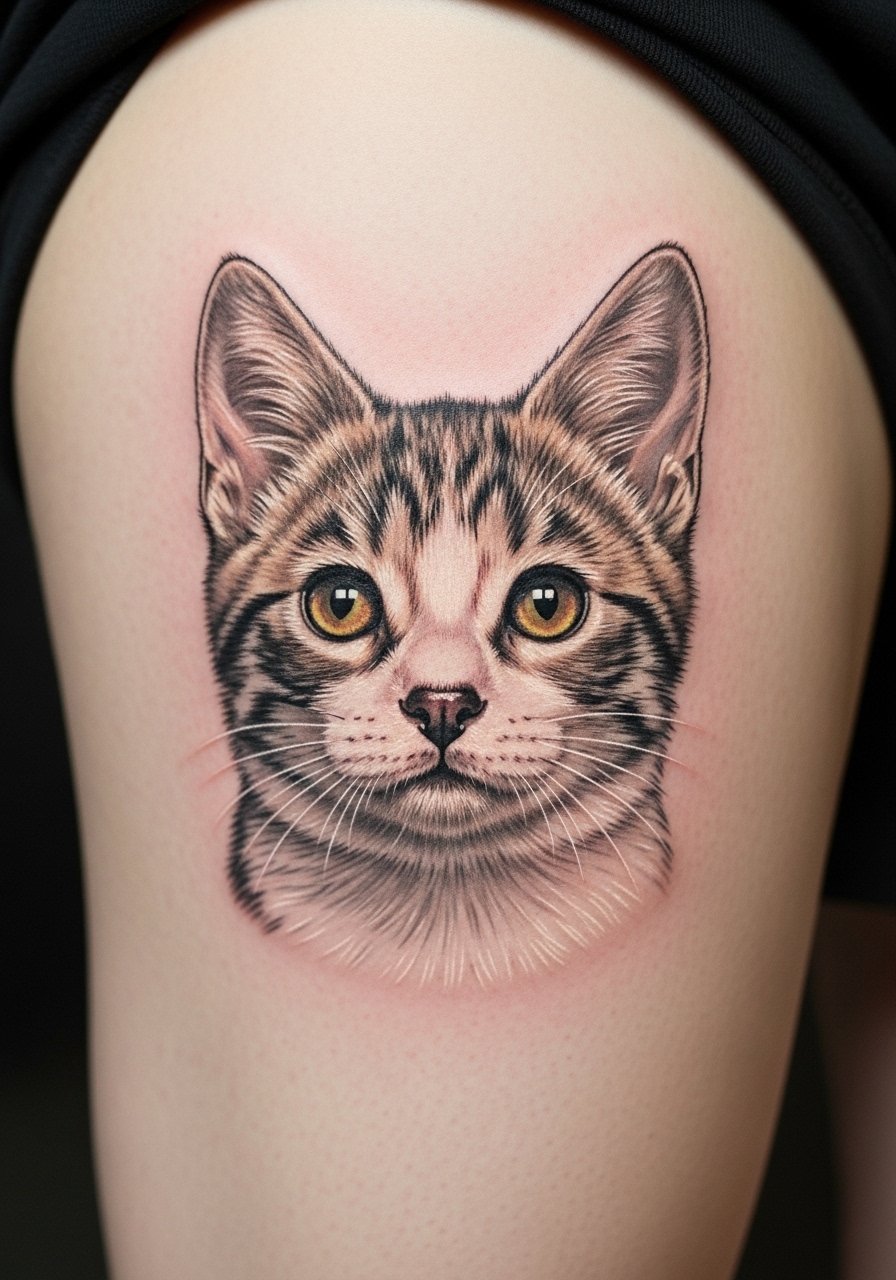
If you want to try a pet portrait without the commitment, a high-quality water-transfer or custom inkjet temporary gives you the scale and placement preview. Thigh skin takes shading well; a temporary helps you see if you want that image on a place you might hide or show. For realism, choose darker tones—I've noticed muted or pastel transfers vanish on some skin tones. A frequent error is picking a tiny portrait for an area where artists need room to shade; test a larger size first to see if features stay recognizable.
3. Minimalist Line Art Mountains on Ankle
Style/Technique: Minimalist / Sticker
Pain Level: Medium (3-5/10 at ankle)
Session Time: Apply in 30–60 seconds (sticker)
Best For: First-timers, subtle outdoorsy vibe
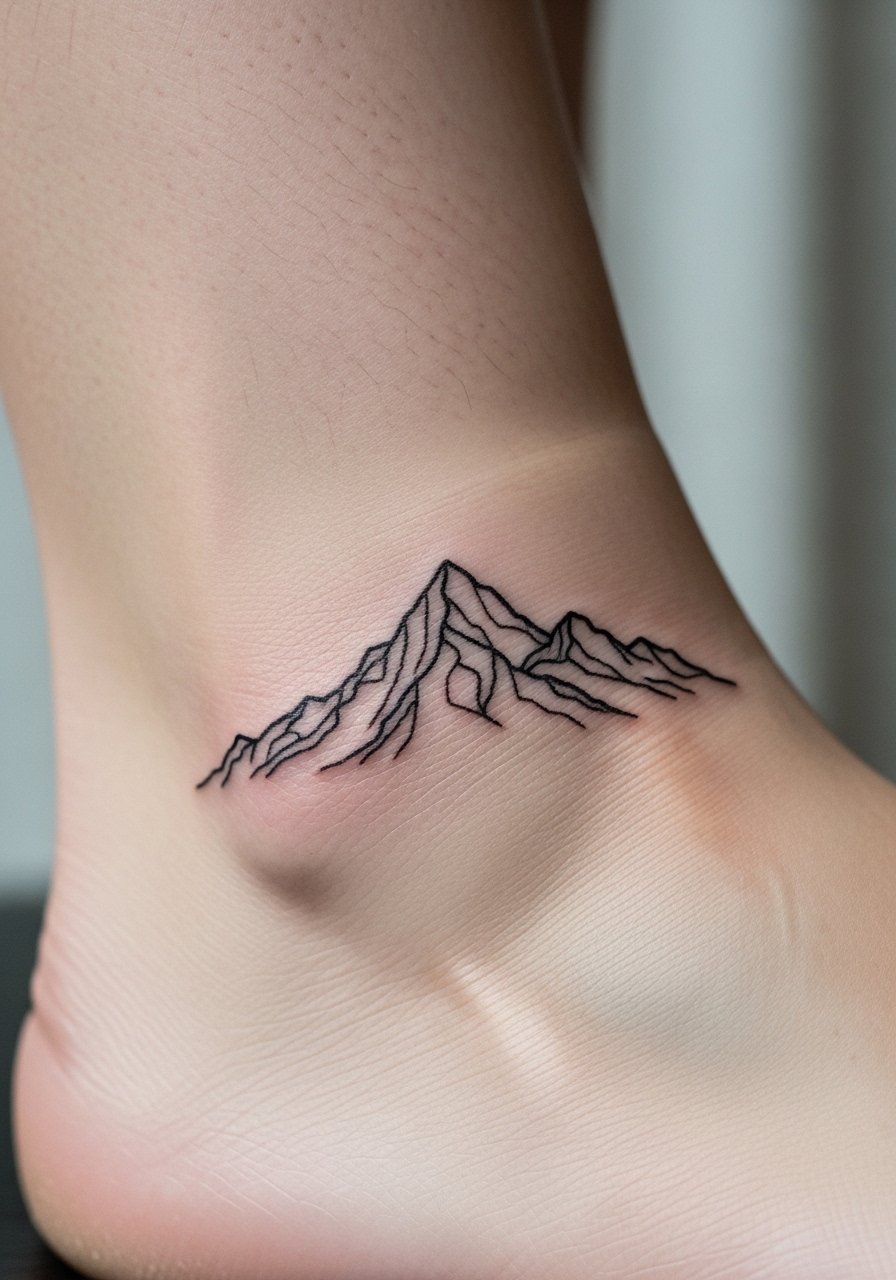
Minimalist geometric mountains make a quiet statement. Stickers or waterproof temporary tattoos are perfect for this placement—instant, peel-and-stick, and they show how a small design interacts with footwear and socks. Ankle placement can be more painful if you go permanent, so testing pain tolerance here really helps. Avoid white or pale ink in small designs—I've seen those disappear on deeper skin tones. Keep the lines simple to avoid muddiness when the temporary is applied.
4. Blackwork Geometric Mandala Down Spine
Style/Technique: Blackwork / Geometric
Pain Level: High (6-8/10 on spine)
Session Time: Application: 5–15 minutes (stencil/airbrush)
Best For: Testing larger vertical pieces and symmetry

Spine pieces need careful planning; a temporary mandala is the safest way to check alignment and center. Jagua or stencil airbrush temporaries offer dark contrast that mimics true blackwork. Pain on the spine is realistic to experience if you go permanent, so the temporary warns you about the discomfort. One mistake is expecting perfect symmetry without testing—place the temporary, move, bend, and check in a mirror before booking a session.
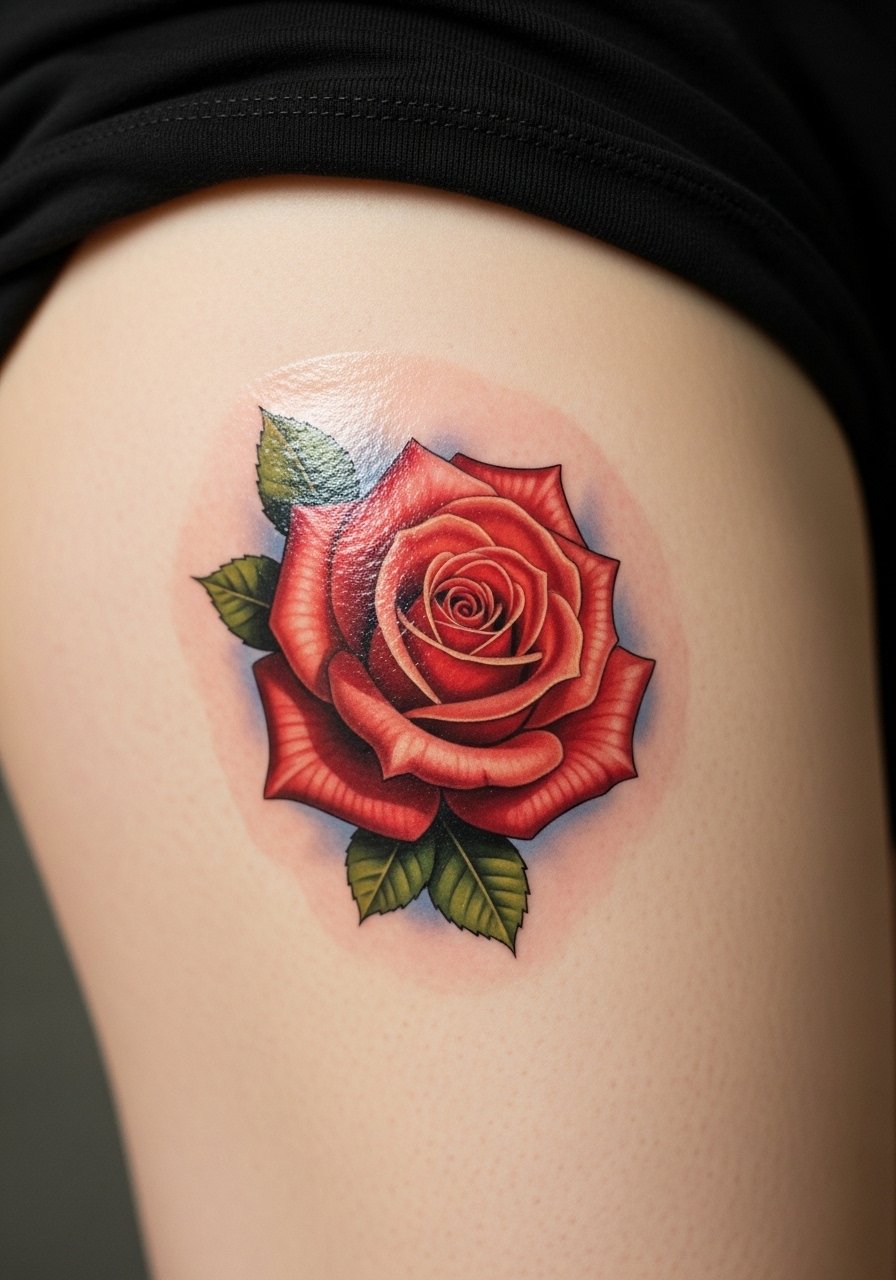
5. Bold Traditional Rose on Upper Arm
Style/Technique: Traditional / American Traditional
Pain Level: Low (2-3/10)
Session Time: Application: 1–5 minutes (flash temporary)
Best For: Timeless motifs, easy to hide or show
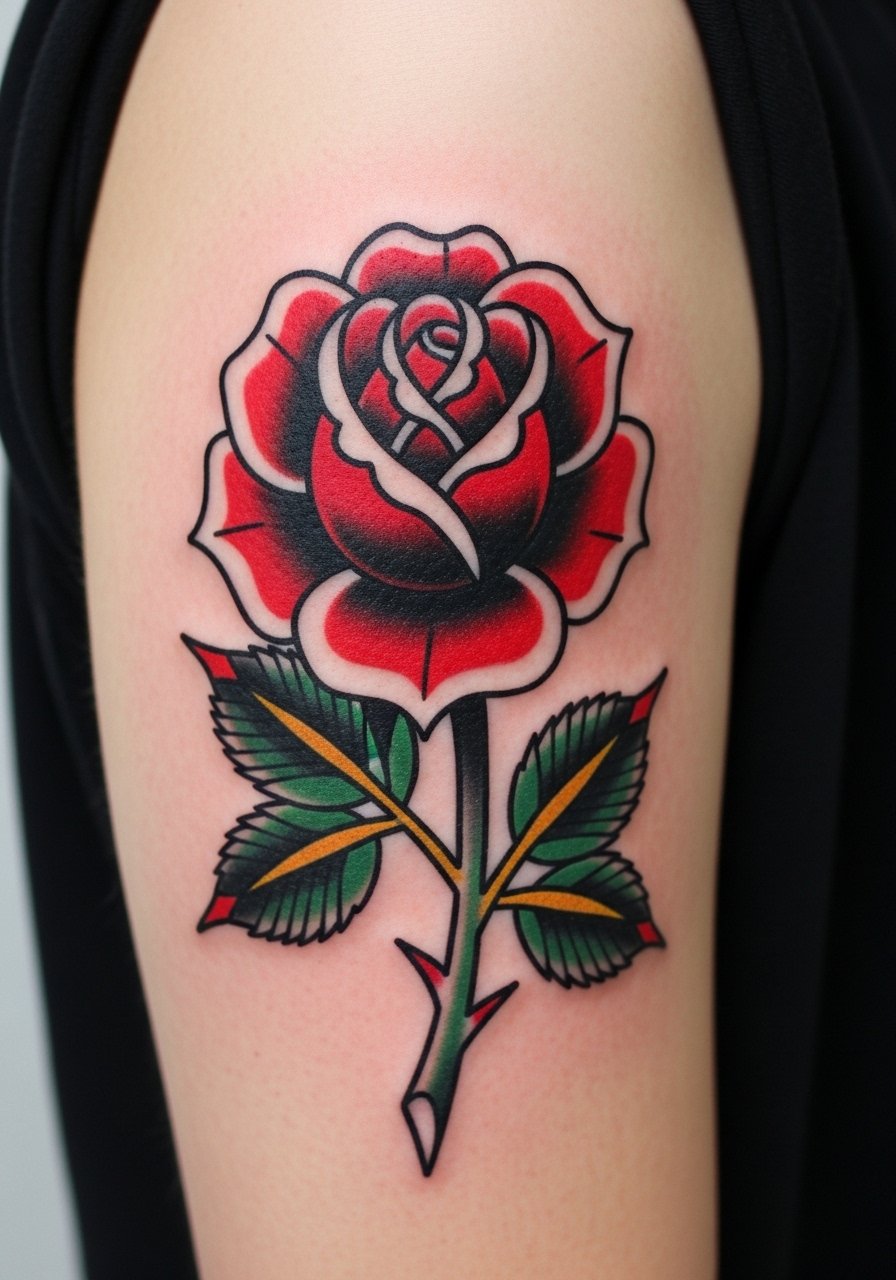
Traditional flash translates well into temporary tattoos—the bold outlines and solid fills stay readable as the skin moves. An upper-arm rose is forgiving; it shows how color saturation looks over time without worrying about detail loss. If you’re testing a permanent, note how the red and green read on your skin; darker tones often pop more. Avoid overly tiny roses for this style—traditional relies on solid, simplified shapes to last.
6. Delicate Script Name on Inner Wrist
Style/Technique: Delicate Script / Flash
Pain Level: Low (2-3/10)
Session Time: Apply in under a minute (water-transfer)
Best For: Testing font, spacing, and legibility
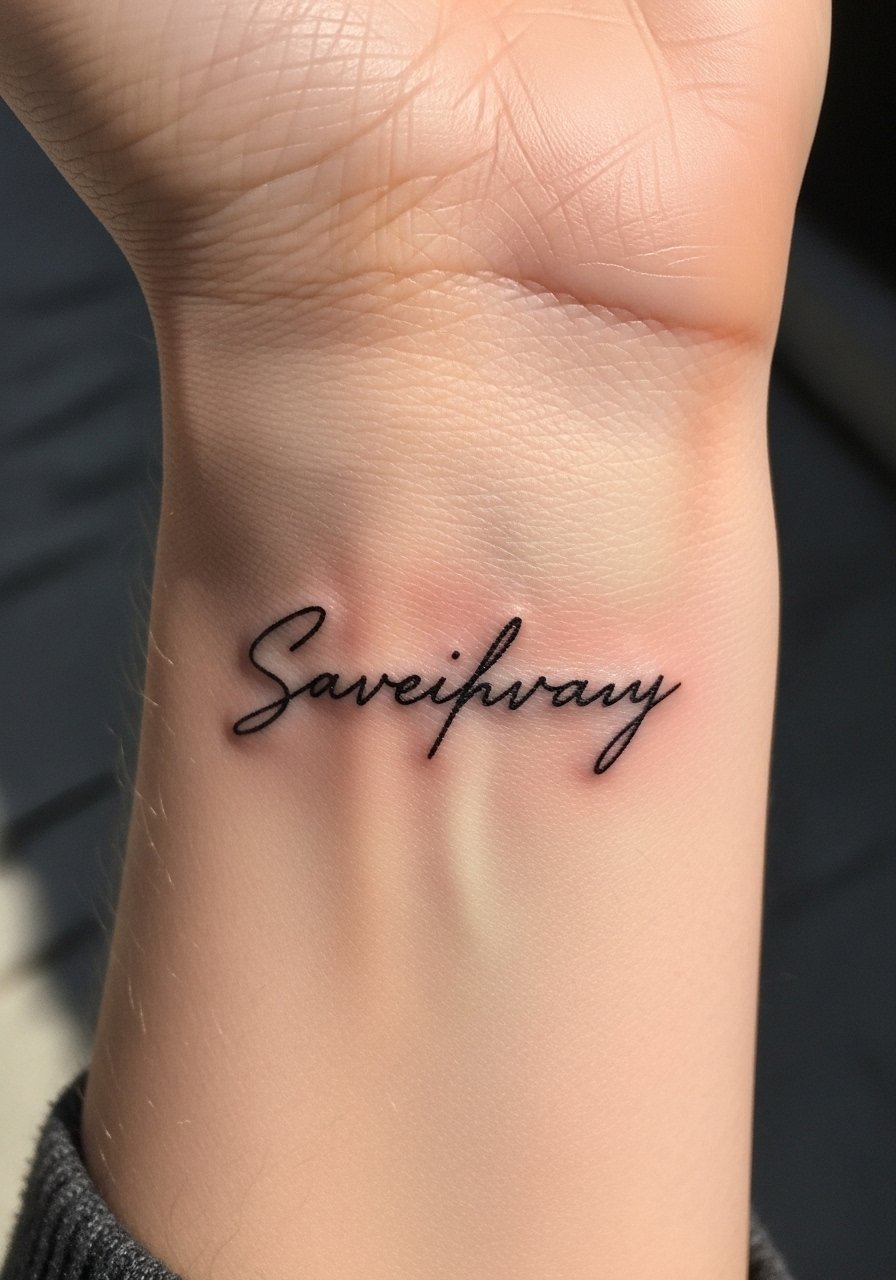
Script tattoos are personal, but fonts read very differently in motion. A temporary script on the wrist helps you see letter spacing when you gesture or type. Because wrist skin moves a lot, thin strokes can fade faster if you go permanent—I've seen artists recommend slightly thicker strokes for longevity. One common regret is picking a trendy fancy font that looks messy when it softens; use the temporary as a real-world test.
7. Floral Water-Transfer on Ankle or Wrist
Style/Technique: Water-Transfer / Realistic Floral
Pain Level: Low (2-3/10)
Session Time: Apply in 30–60 seconds (water-transfer)
Best For: Try-before-you-ink florals and color placement
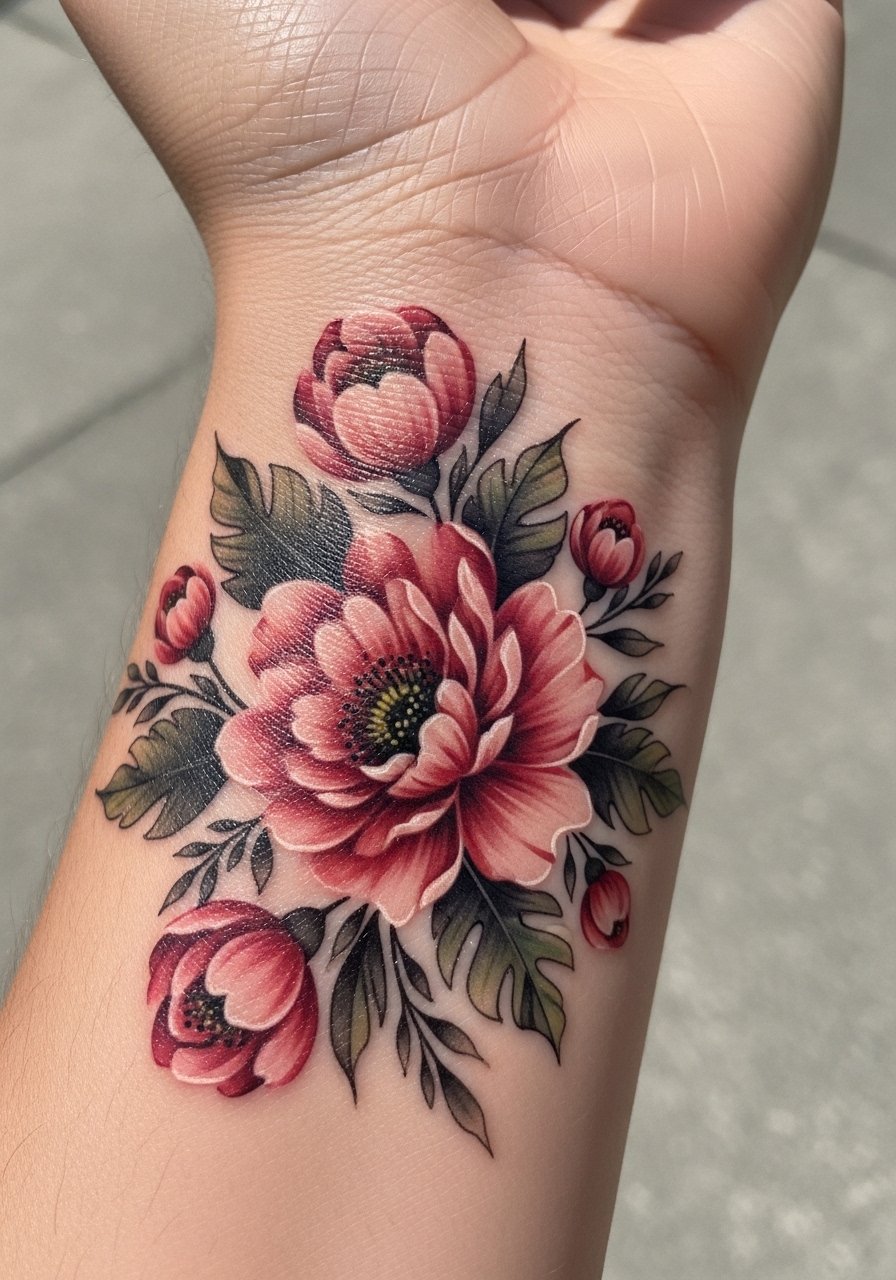
Water-transfer floral sheets give you color and placement in seconds—great for testing feminine patterns without commitment. I use these to check how petals overlap joints and whether colors suit my skin tone. These stickers can look very realistic if applied carefully and kept dry during the first hours. Avoid applying over lotion or damp skin; poor adhesion ruins the illusion.
8. 15-Day Waterproof Abstract Shape on Ribcage
Style/Technique: Waterproof Sticker / Abstract
Pain Level: Medium-High (ribcage sensitivity 5-7/10)
Session Time: Apply in 1–2 minutes (sticker)
Best For: Active people who want a durable test run during workouts

If you need a temporary that survives showers and workouts, 15-day waterproof stickers are where I start. Abstract shapes test whether a bold, non-figurative piece works with your body curves. On the ribcage, movement and breathing reveal how a design sits—try it during exercise to see if it peels. From what I've seen, these stickers survive short swims and gym sessions better than basic transfers.
9. Jagua Gel Mandala on Hand
Style/Technique: Jagua / Natural Stain
Pain Level: Low (hand sensitivity 3-4/10)
Session Time: Application: 20–90 minutes (drying time)
Best For: Realistic dark stain without permanent ink
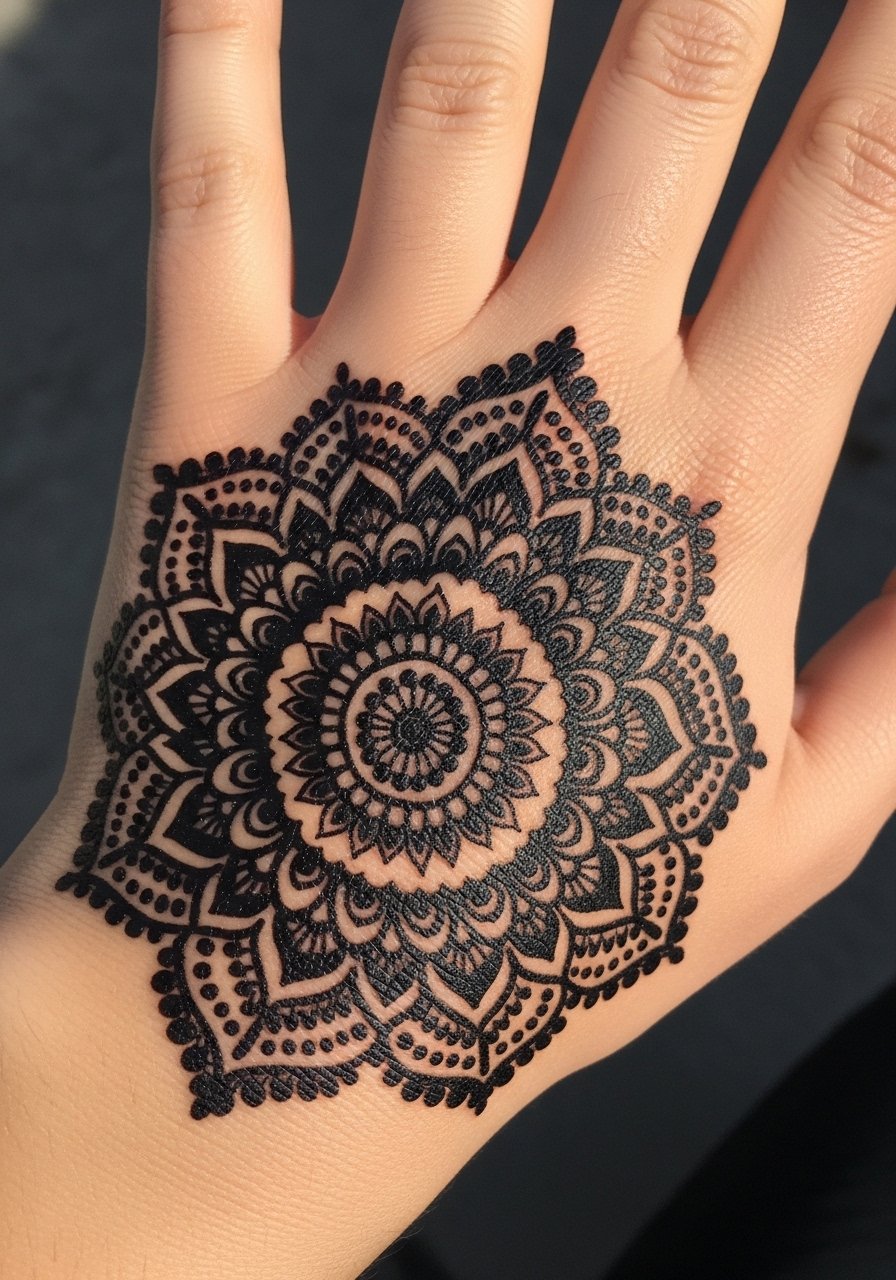
Jagua gives a near-black stain that mimics permanent ink remarkably well. For intricate mandalas, Jagua is my go-to for trying out detailed placements—hands show how patterns hold up to washing and movement. Always patch test Jagua; I've seen rare reactions, so a 24-hour check is smart. Let the gel dry untouched for the timeframe the kit recommends to get the darkest, most even result.
10. Lotus Henna Design on Upper Back
Style/Technique: Henna / Traditional
Pain Level: Low (2-3/10)
Session Time: Application: 60–90 minutes (drying time)
Best For: Cultural motifs or growth symbolism trials
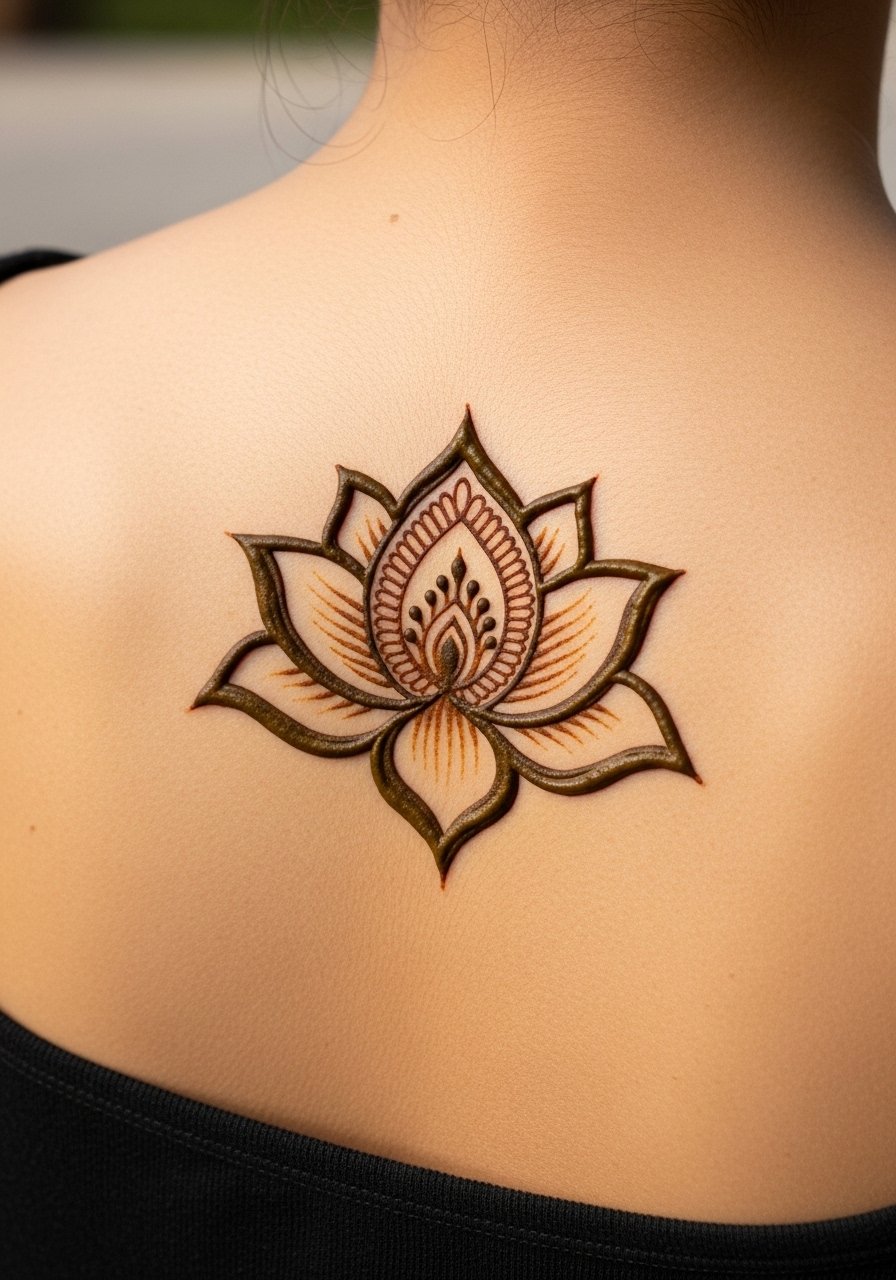
Henna provides an earthy, brown-toned preview that lasts one to three weeks. I use henna to test larger decorative pieces like lotus motifs on the back—it’s forgiving, and you can see how a pattern behaves with clothing and hair. Patch testing is important for henna too; look for allergen-free or pure henna products. Henna dries darker over days, so give it time before judging saturation.
11. Butterfly Henna on Shoulder
Style/Technique: Henna / Decorative
Pain Level: Low (2/10)
Session Time: Application: 30–90 minutes (including dry time)
Best For: Events and transformation-themed trials
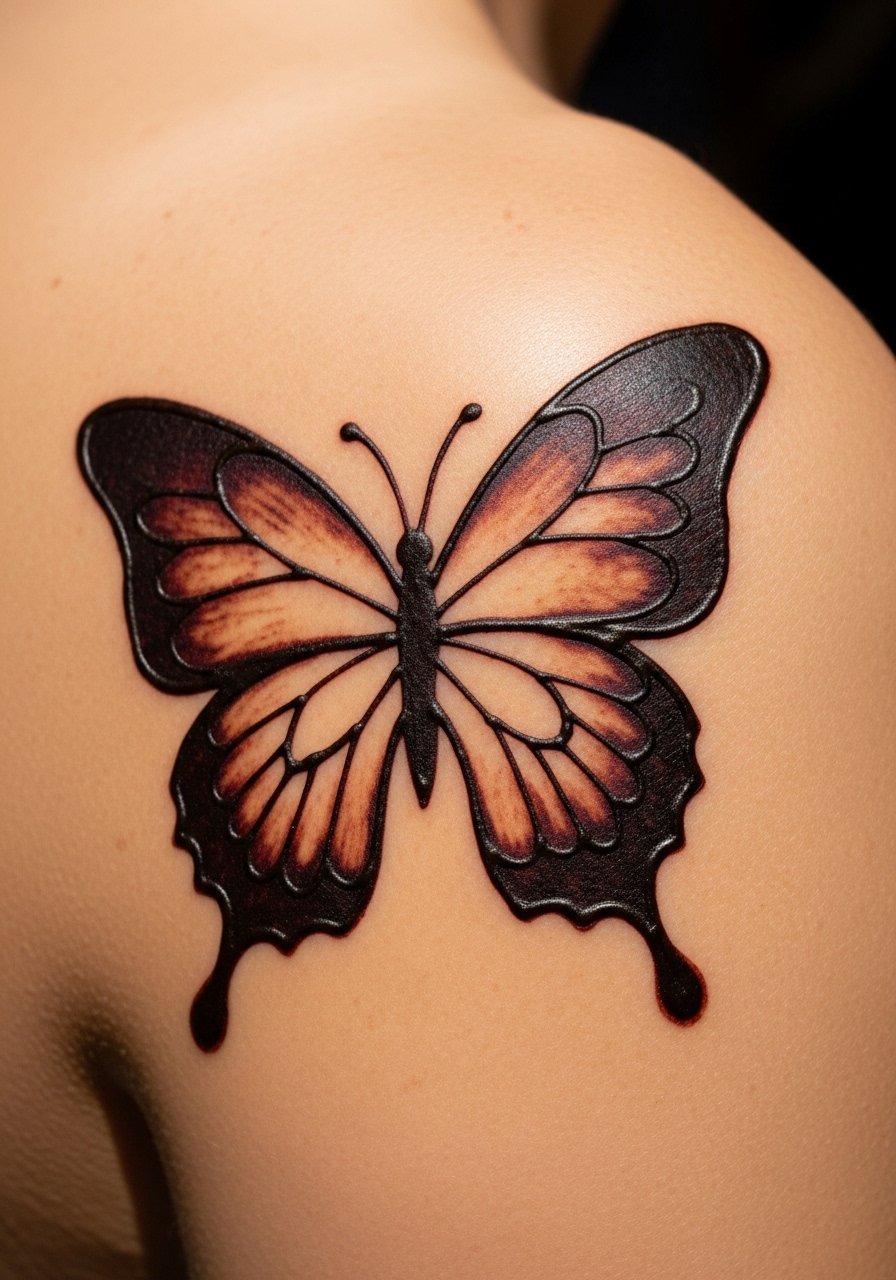
Butterfly henna designs are perfect for event wear and testing larger motifs. On the shoulder, they move with clothing, so I try both strapless and sleeved outfits with the temporary to see how visible it is. Henna’s natural brown stain gives a different emotional tone than black ink—expect it to fade over one to three weeks depending on care.
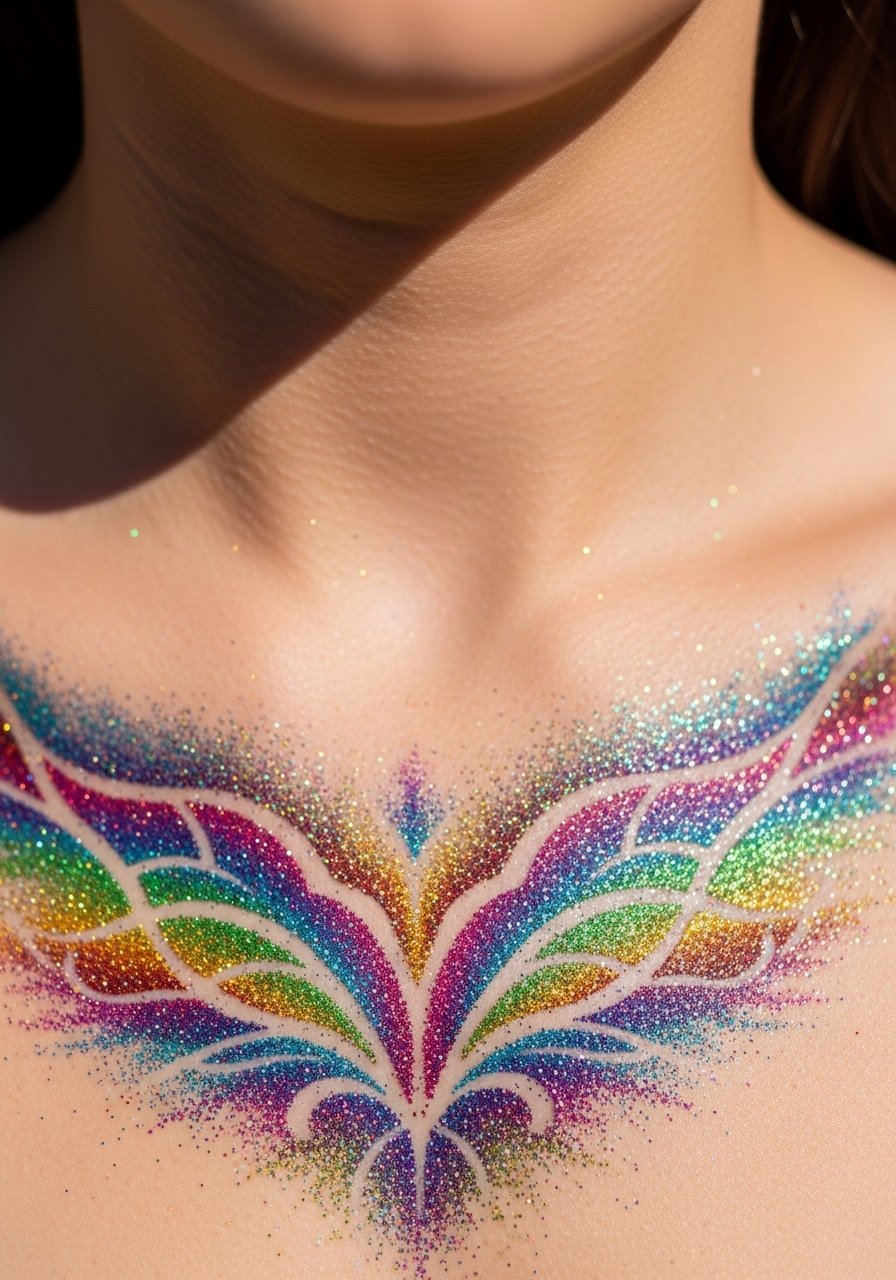
12. Glitter Floral Stencil on Collarbone
Style/Technique: Glitter / Stencil
Pain Level: Low (2/10)
Session Time: Apply in 5–15 minutes (stencil + glitter)
Best For: Parties, photoshoots, short-term sparkle
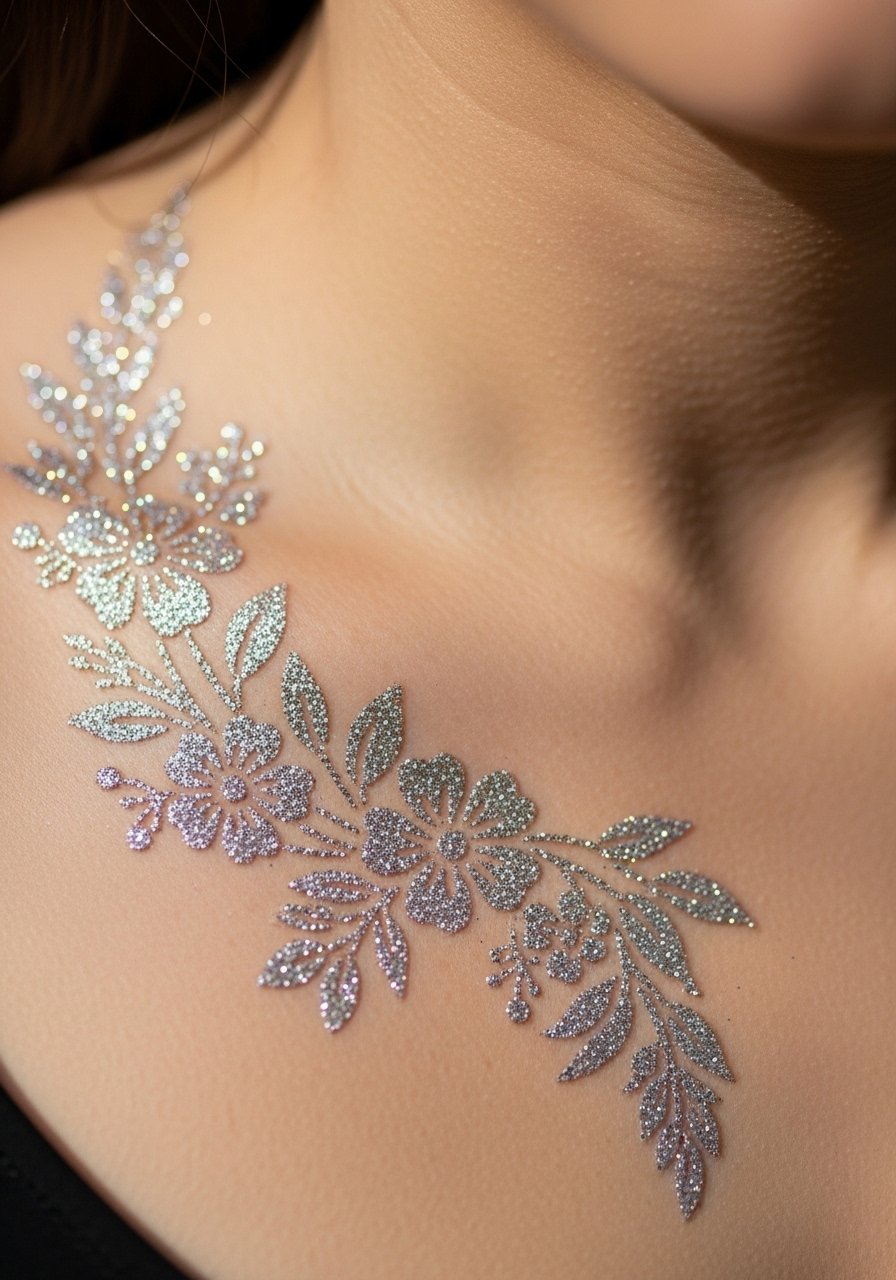
Glitter stencils add instant glamour for nights out. I test collarbone glitter pieces for visibility in photos and to see how long the adhesive holds through a night. Use skin-safe cosmetic glitter and plant-based adhesives if you care about ingredients. The downside: glitter flakes over time and often needs gentle reapplication for multi-day events.
13. Flash Metallic Foil Anklet Tattoo
Style/Technique: Metallic Foil / Flash
Pain Level: Low (1-2/10)
Session Time: Apply in 1–2 minutes (foil transfer)
Best For: Jewelry alternative and festival wear
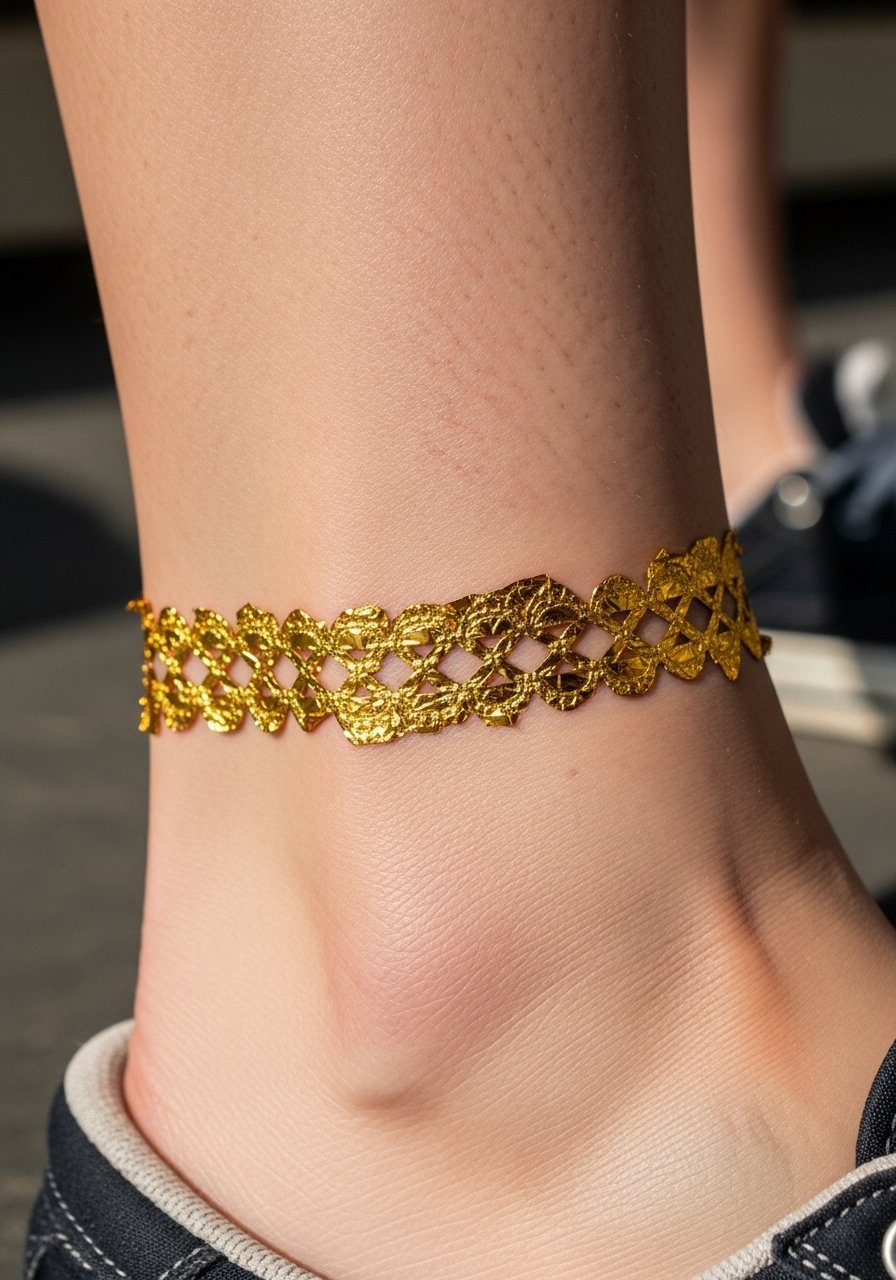
Foil flash tattoos look like bracelets and are a low-effort way to see if you want permanent jewelry-style ink. They’re vegan-friendly and photograph well. I use foil anklets to judge if I want a permanent armband or delicate chain design—if it looks right with shoes and movement, it's likely a keeper.
14. Lion Airbrush on Bicep
Style/Technique: Airbrush / Realistic
Pain Level: Low (2-3/10 for temporary)
Session Time: Application: 10–30 minutes (airbrush)
Best For: Bold event pieces and realism tests
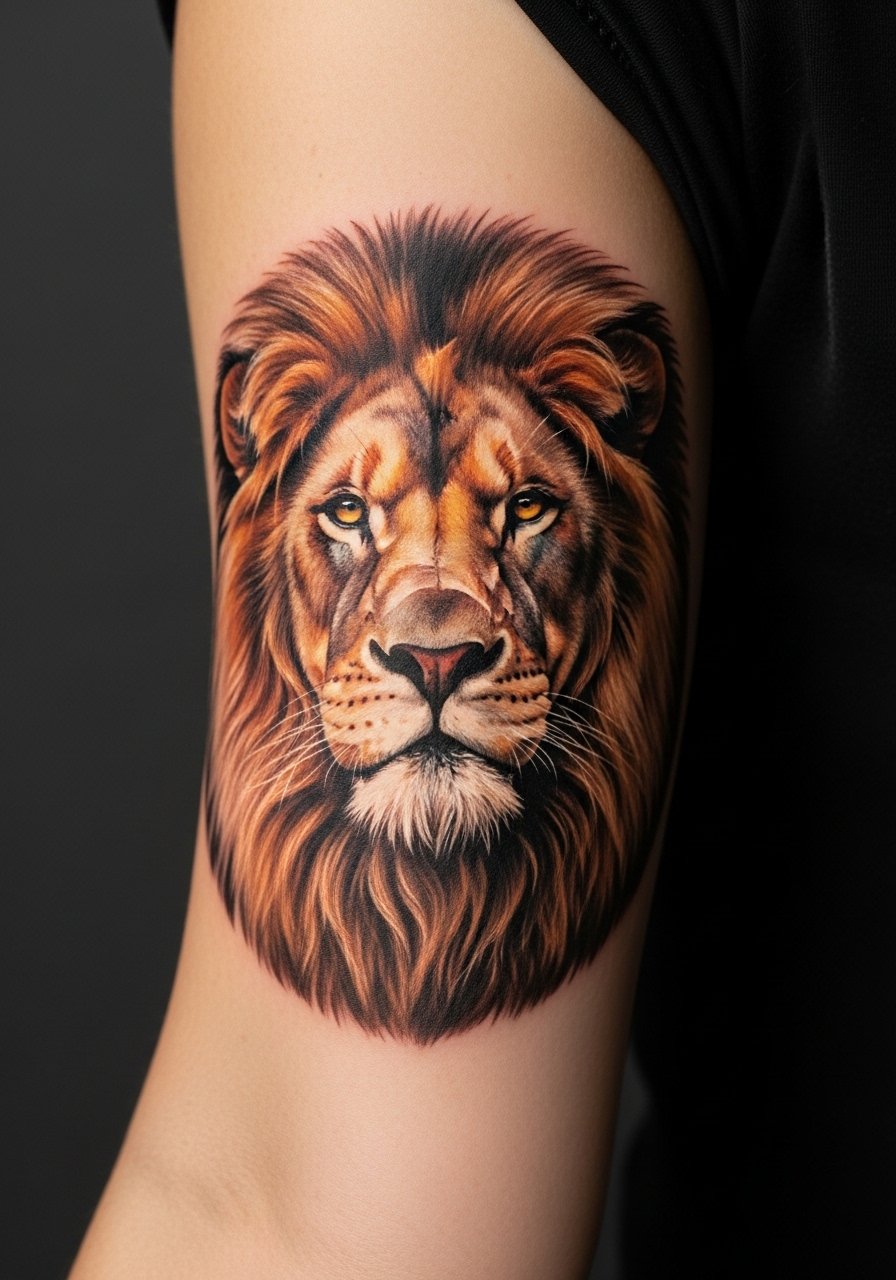
Airbrush temporary tattoos can achieve realistic shading and color gradation, great for a bold lion motif on the bicep. I try airbrush pieces to test dominance and balance in visible arm placements. They last roughly a week with care and are useful for seeing how full-color realism will read when you move.
15. Tribal Airbrush Pattern on Calf
Style/Technique: Airbrush / Tribal
Pain Level: Medium (4-6/10 if permanent)
Session Time: Application: 10–30 minutes (airbrush)
Best For: Testing bold heritage-inspired panels
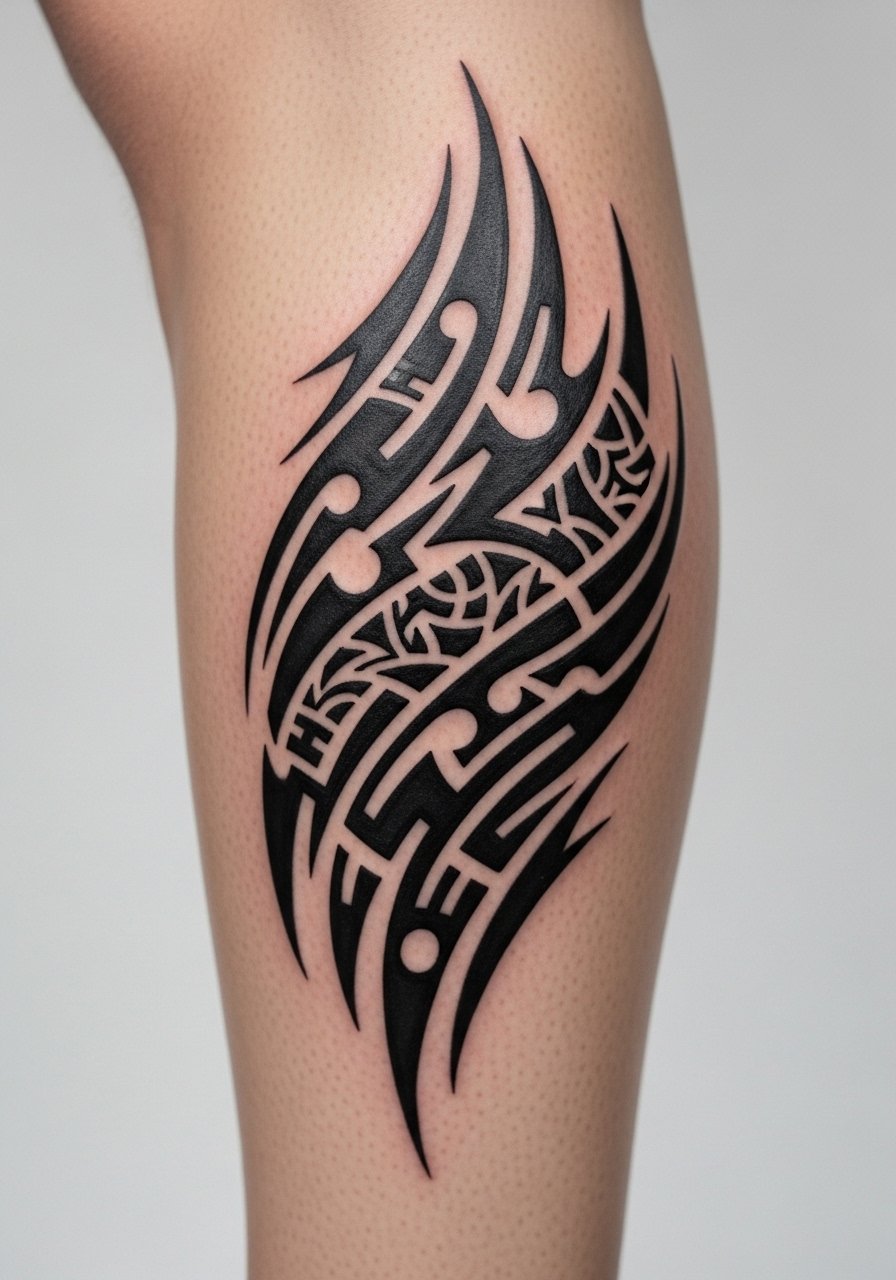
Tribal patterns demand correct scale; temporary airbrush pieces show how wraps work with leg curves. Calf placement lets you test whether a large, black design complements muscle tone. When considering permanence, check how changes in muscle size might affect the design’s balance—temporary tattoos reveal that.
16. Custom Inkjet Inner Arm Test
Style/Technique: Inkjet Custom / DIY
Pain Level: Low-Medium (3/4 on inner arm)
Session Time: Print-and-transfer: 5–20 minutes
Best For: Personal designs and precise placement checks
DIY inkjet temporary tattoos from services like StickerYou let you print personal art and test scale. I use these to try lettering, logos, or unusual placements. The inner arm is forgiving and shows whether your custom line weight reads well. A practical tip: avoid using white ink elements—printers often omit white, making those areas transparent on skin.
17. Animal Quote Sticker on Neck
Style/Technique: Sticker / Illustrative + Text
Pain Level: Medium (neck sensitivity 4-6/10 for permanent)
Session Time: Apply in 30–60 seconds (sticker)
Best For: Symbolic combos and visible small statements
Combining an animal motif with a short quote is a popular temporary choice for neck placement. Stickers show readability and how movement affects text. The neck is a higher-visibility area—use temporary pieces to live with the attention before committing. Watch font size; tiny script often blurs when permanent.
18. Rose Water-Transfer Semi-Permanent on Thigh
Style/Technique: Semi-Permanent Water-Transfer / Floral
Pain Level: Low (2-3/10)
Session Time: Apply in 1–3 minutes (transfer)
Best For: Longer trials of a classic motif in a private spot
Semi-permanent water-transfer roses last up to two weeks and are excellent for testing a large, private piece like a thigh rose. I like using these to evaluate how clothing affects visibility and how the color settles against body tone. They give a better sense of aging than a one-day sticker.
19. Micro-Dot Constellation Behind Ear
Style/Technique: Micro-Dot / Minimalist
Pain Level: Low (2-3/10)
Session Time: Apply in under a minute (sticker or transfer)
Best For: Tiny, discreet celestial motifs
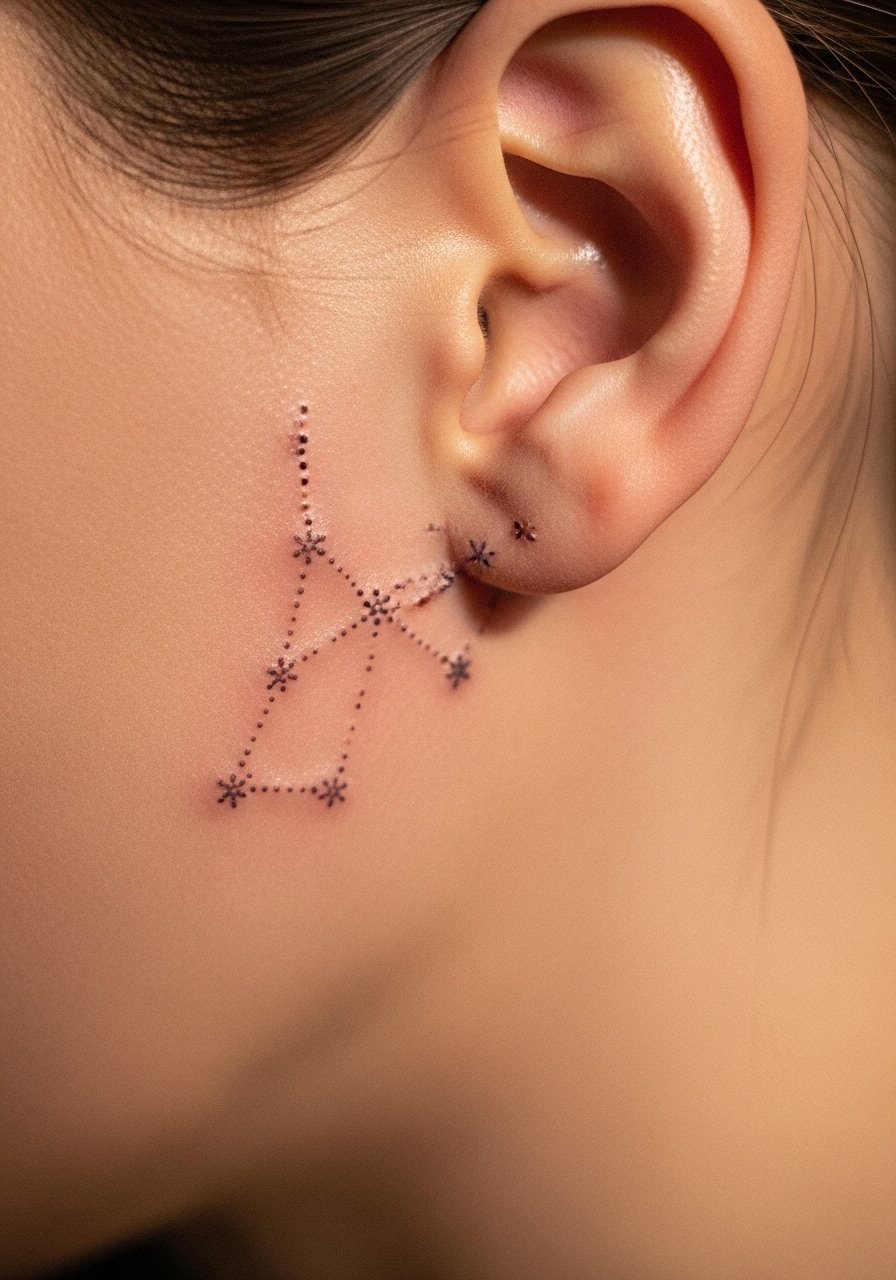
Tiny dotwork constellations behind the ear are subtle and testable with tiny stickers. They’re great if you want to preview visibility in photos or with hair up. Keep dots spaced—crowding reduces clarity when the piece heals.
20. Neo-Traditional Anchor on Forearm
Style/Technique: Neo-Traditional / Bold Color
Pain Level: Low (2-3/10)
Session Time: Apply in 1–5 minutes (flash temporary)
Best For: Vintage-inspired, colorful statement pieces
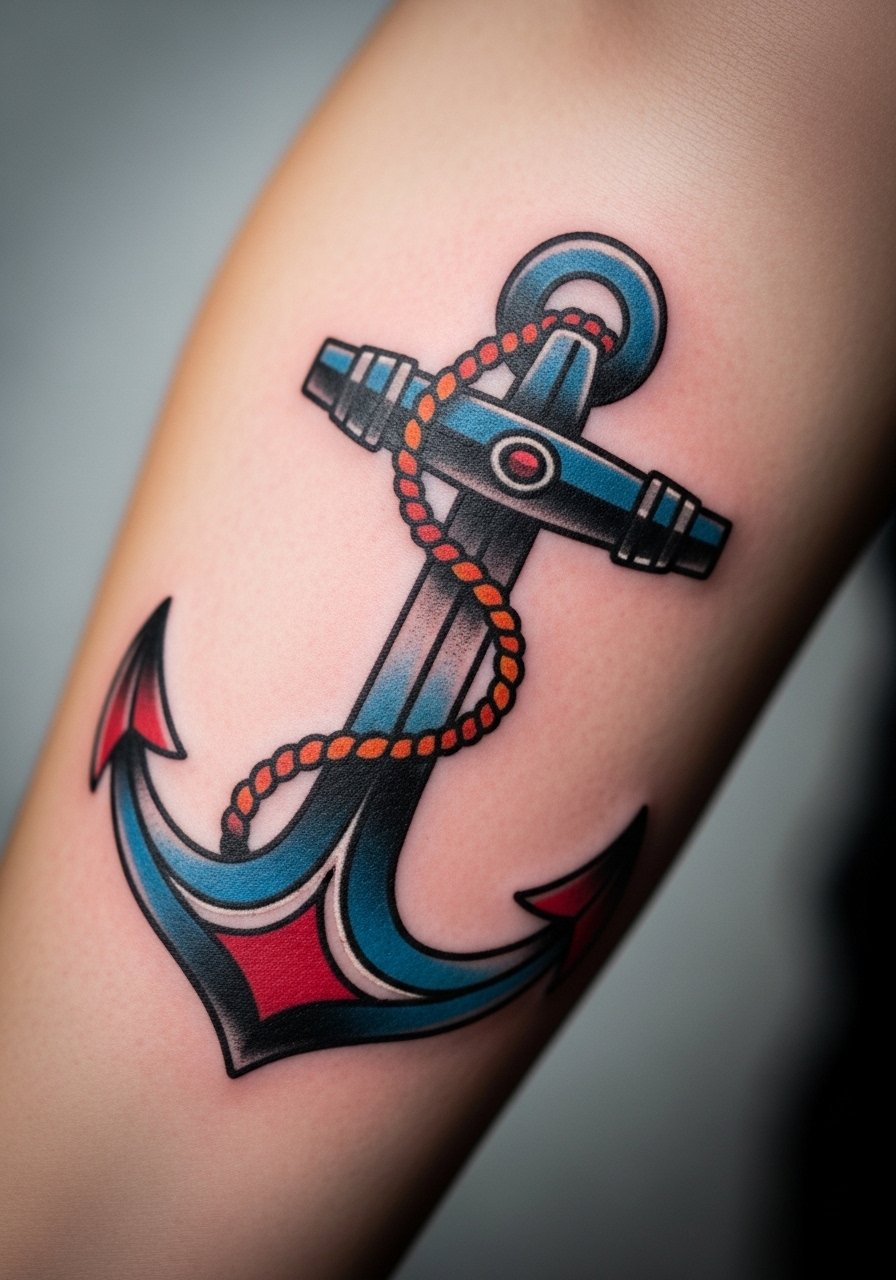
Neo-traditional designs keep bold lines but add richer color palettes. A temporary anchor on the forearm tests color harmony with skin tone and sleeve choices. If you love saturated hues, see how they soften over time—some colors show more during healing.
21. Minimalist Geometric Sticker on Outer Forearm
Style/Technique: Sticker / Minimalist Geometric
Pain Level: Low (2/3/10)
Session Time: Apply in seconds (peel-and-stick)
Best For: Clean, modern looks and quick trials
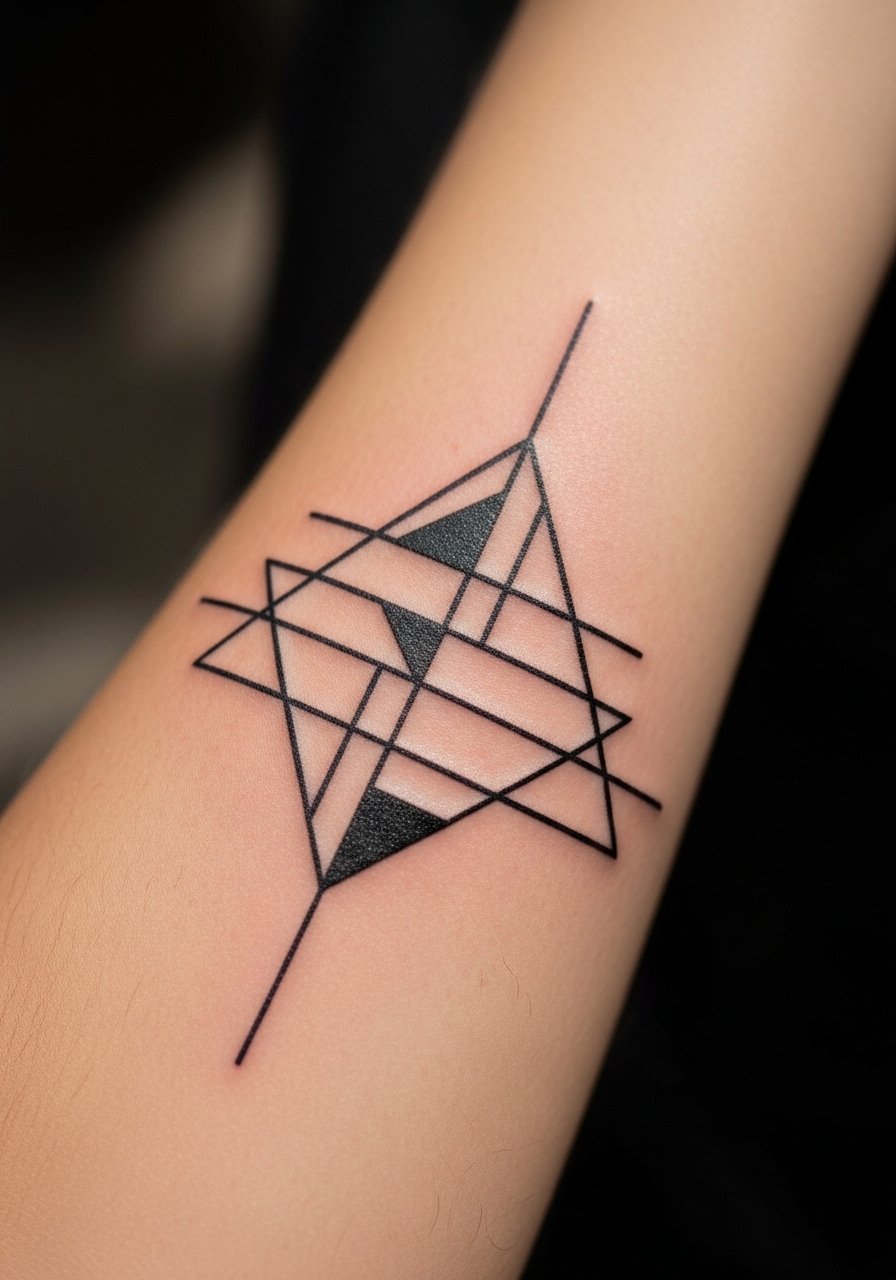
Geometric stickers let you test modern composition and symmetry. The outer forearm is highly visible—use a temporary to check daily interaction and whether the shape distracts during work or photos. These stickers are instant answers to "do I like this daily?"
22. Watercolor Temporary Sleeve on Lower Arm
Style/Technique: Watercolor Transfer / Painterly
Pain Level: Medium (3-4/10)
Session Time: Apply in 1–5 minutes (water-transfer)
Best For: Testing color blends and large visual impact
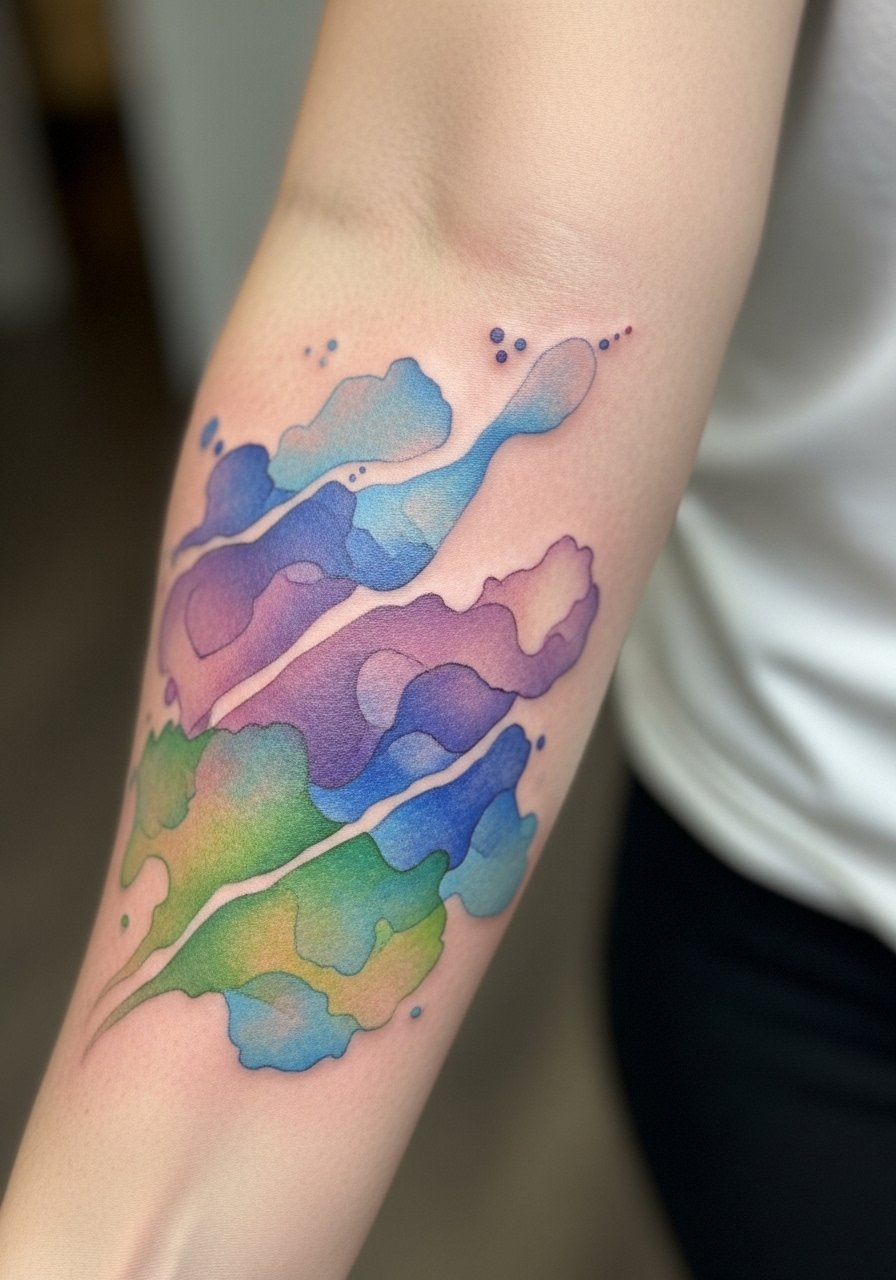
Watercolor transfers test color flow across limbs without needle trauma. I try sleeves like this to see if the painterly aesthetic suits my everyday wardrobe. Note that watercolor fades more obviously than blackwork—use the temporary to judge how often you’d want touch-ups.
23. Glitter Powder Stencil Festival Chest Piece
Style/Technique: Glitter Powder / Stencil
Pain Level: Low (1-2/10)
Session Time: Apply in 5–20 minutes (including setting)
Best For: Short-term statement pieces and photos
Glitter powder stencils are an underused festival option—especially flattering on darker skin where sparkle reads vibrantly. I test these for multi-day events to see if they stay intact with movement and sweat. Use skin-safe adhesives and set carefully; the result is attention-grabbing but short-lived.
24. Jewelry-Inspired Henna Armlet
Style/Technique: Henna / Jewelry Motif
Pain Level: Low (2/10)
Session Time: Application: 30–90 minutes (drying)
Best For: Trying decorative bands and ornamental placement
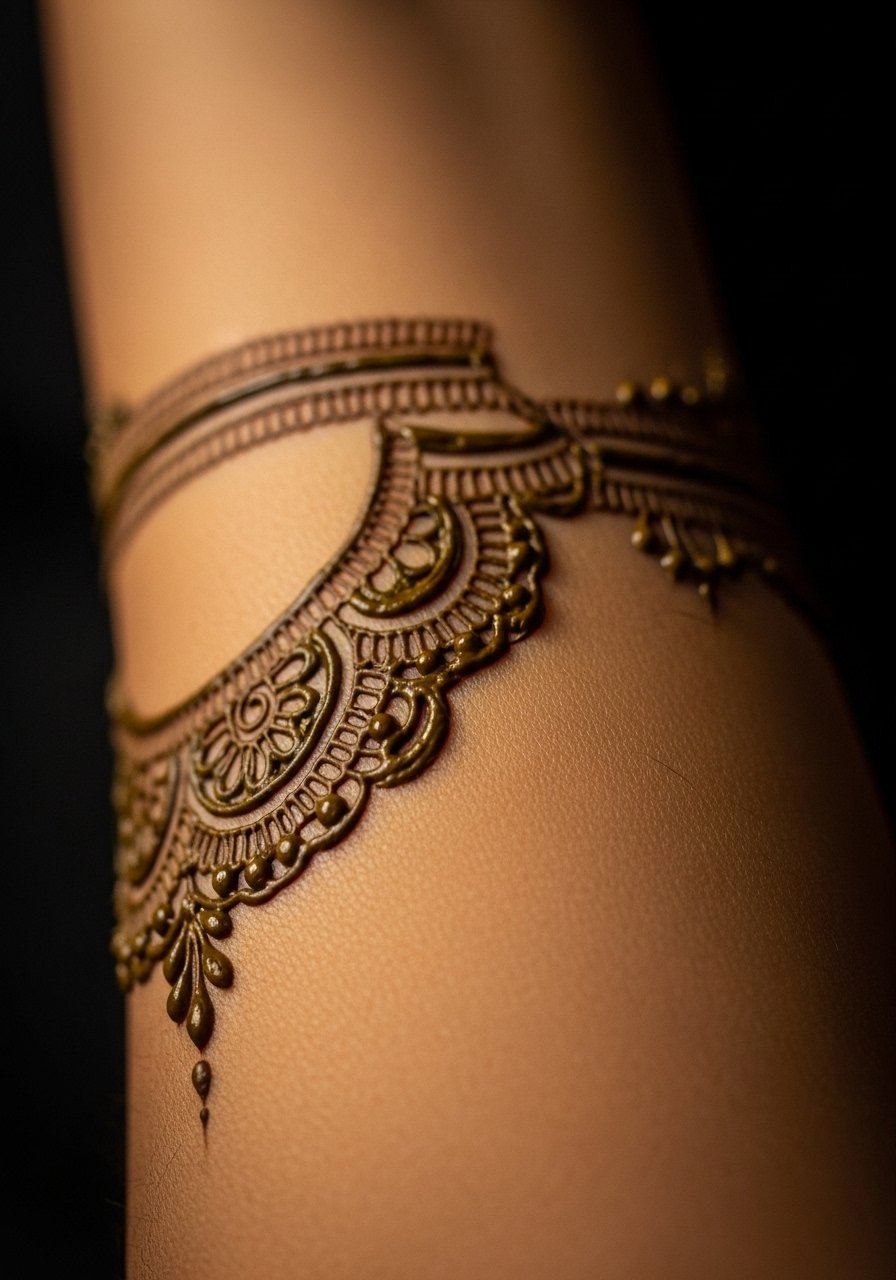
Henna armlets mimic cuff bracelets and let you test whether a permanent ornamental band will feel like jewelry or a heavy commitment. I use them to see how layered bracelets and sleeves interact. They’re comfortable and low-risk; do a patch test if you have sensitive skin.
Tattoo Prep and Aftercare Essentials
Aftercare Essentials:
- Aquaphor Healing Ointment, 14oz tube — For first 3–5 days to keep a fresh piece moist and protected. Artists still recommend this for initial care.
- Saniderm Transparent Adhesive Bandage, 6-inch roll — Second-skin option many artists suggest for the first 24–48 hours.
- Dr. Bronner's Unscented Castile Soap, 32oz — Gentle daily clean for the first two weeks. Use diluted and rinse well.
- CeraVe Fragrance-Free Moisturizing Lotion, 12oz — Fragrance-free moisturizer to keep healed skin supple (use after initial ointment phase).
- Mad Rabbit Tattoo Balm, 2oz — Popular for long-term maintenance to keep healed color vibrant.
- Hustle Butter Deluxe, 3.5oz — Vegan aftercare alternative many artists mention for healing and ongoing care.
- SPF 50 Sunscreen Stick for Tattoos — Daily sun protection keeps tattoos from fading; use on healed tattoos every day.
- Hydrocolloid Bandages, Large — For small blistering or high-friction spots during early healing.
- Tattoo Numbing Cream 5% Lidocaine — If you plan touch-ups or have sensitive areas, consult your artist first and test beforehand.
- Tattoo Stencil Transfer Paper — Useful if you’re printing custom temporary designs at home before committing.
- Tattoo Aftercare Kit (Starter) — Includes soap, balm, and instructions—handy for first-timers.
- Tattoo Numbing Spray — For quick relief on sensitive areas (ask your artist before use).
Before any application—temporary or permanent—I always clean and fully dry the area, and skip lotions or oils. For Jagua or henna, do a 24-hour patch test. For waterproof stickers, press firmly and avoid immediate heavy sweating to lock edges.
Frequently Asked Questions
Q: How bad does a tattoo actually hurt?
A: Pain is placement-dependent. Outer forearm or upper arm is usually low (2–3/10). Ribcage, spine, and ankle tend to be higher (6–8/10). I tell friends that most of it is an annoying scratching or burning rather than sharp agony. For sensitive zones, try a small temporary in the same area first and consider a numbing cream with 5% lidocaine if your artist approves.
Q: Will a temporary show me how a permanent tattoo will age?
A: Temporaries give a strong visual preview—especially Jagua and 15-day waterproof stickers. I’ve used Jagua to see how line weight and shading appear after a few days. Remember, actual ink is deeper and ages differently, but temporary tests reveal placement issues and whether you like the daily look.
Q: How do I make a temporary tattoo last longer?
A: Start with clean, dry skin and avoid oils. For stickers, press edges firmly and let them set before moving. Waterproof 15-day designs hold up best for showers and workouts. For longer staining options, Jagua or henna last 1–3 weeks if you avoid scrubbing and exfoliation.
Q: What if I have a reaction to henna or Jagua?
A: Patch test for 24 hours on an inconspicuous spot. I’ve seen rare reactions, so test first—especially if you have sensitive skin. If irritation occurs, stop use and consult a dermatologist.
Q: Can I exercise after applying a temporary tattoo?
A: Wait at least 24 hours for most transfers to fully adhere. For Jagua or henna, wait until the stain has set per product instructions—usually 24–72 hours. Heavy sweating can lift edges and cause premature fading.
Q: Do colors look different on various skin tones?
A: Yes. From what I've seen, black and deep grays read consistently across tones. Bright pastels or white can look muted on deeper skin. Always test color saturation with a temporary in the exact spot you plan for a permanent piece.
Q: Is it smart to test a design with a DIY inkjet temporary?
A: Absolutely. Custom inkjet transfers let you try scale, wording, and composition before committing. Just avoid white ink elements—printer transfers render white areas transparent, which can surprise you.
Q: How long does a temporary Jagua or henna take to show final color?
A: Jagua usually darkens over 24–72 hours, and henna deepens over several days. I recommend waiting two full days to judge final saturation before deciding if you want a permanent version.
