

I spent months saving reference photos and talking to artists before I finally understood the problem: picking a Christian tattoo isn’t just about a cool image. It’s about choosing a symbol that will still feel right years from now and that will age well on your skin. These 30 purpose-driven Christian tattoos focus on meaning, placement, and real-life healing so you can walk into your appointment confident.
This list leans into black and grey realism, minimalist Christian tattoos, and a few neo-traditional and geometric takes I keep seeing in 2026. These ideas work on forearms, chest, back, ribs, and ankles—places artists recommend for detail or concealment depending on your needs. From my conversations with artists, black and grey pieces age best; watercolor needs extra maintenance.
1. Minimalist Cross with Wings on Inner Forearm
Style/Technique: Minimalist / Fine Line
Pain Level: Low (2-3/10)
Session Time: 1 session, 30–90 minutes
Best For: First Christian tattoo, everyday wear
I got a version of this as my first faith tattoo. The tiny wings add a protection vibe without shouting. Forearm placement makes it easy to show or cover with sleeves. Pain is modest—more of a steady buzzing than sharp pain. Fine line needs a steady artist; otherwise lines can blur slightly with time. I’ve seen fine line crosses soften after a year, so ask for slightly bolder line weight if you want longevity. Ask your artist for examples of healed minimalist cross work and mention “minimalist Christian tattoos” when booking.
2. Black and Grey Jesus Portrait on Chest
Style/Technique: Black and Grey / Realism
Pain Level: Medium-High (5-7/10)
Session Time: Multiple sessions, 3+ hours each
Best For: Devotional statement, chest or back centerpiece
A realistic Jesus portrait is the most intimate way I’ve seen people express devotion. Chest placement sits close to the heart and reads as solemn. Expect longer sessions and a solid healing timeline—realism relies on smooth shading that can look dull while healing but brightens once settled. From what I’ve observed, black and grey holds detail better across skin tones than bright color portraits. Common mistake: choosing an artist without healed portfolio shots—always ask to see healed realism examples and artists who specialize in portrait shading.
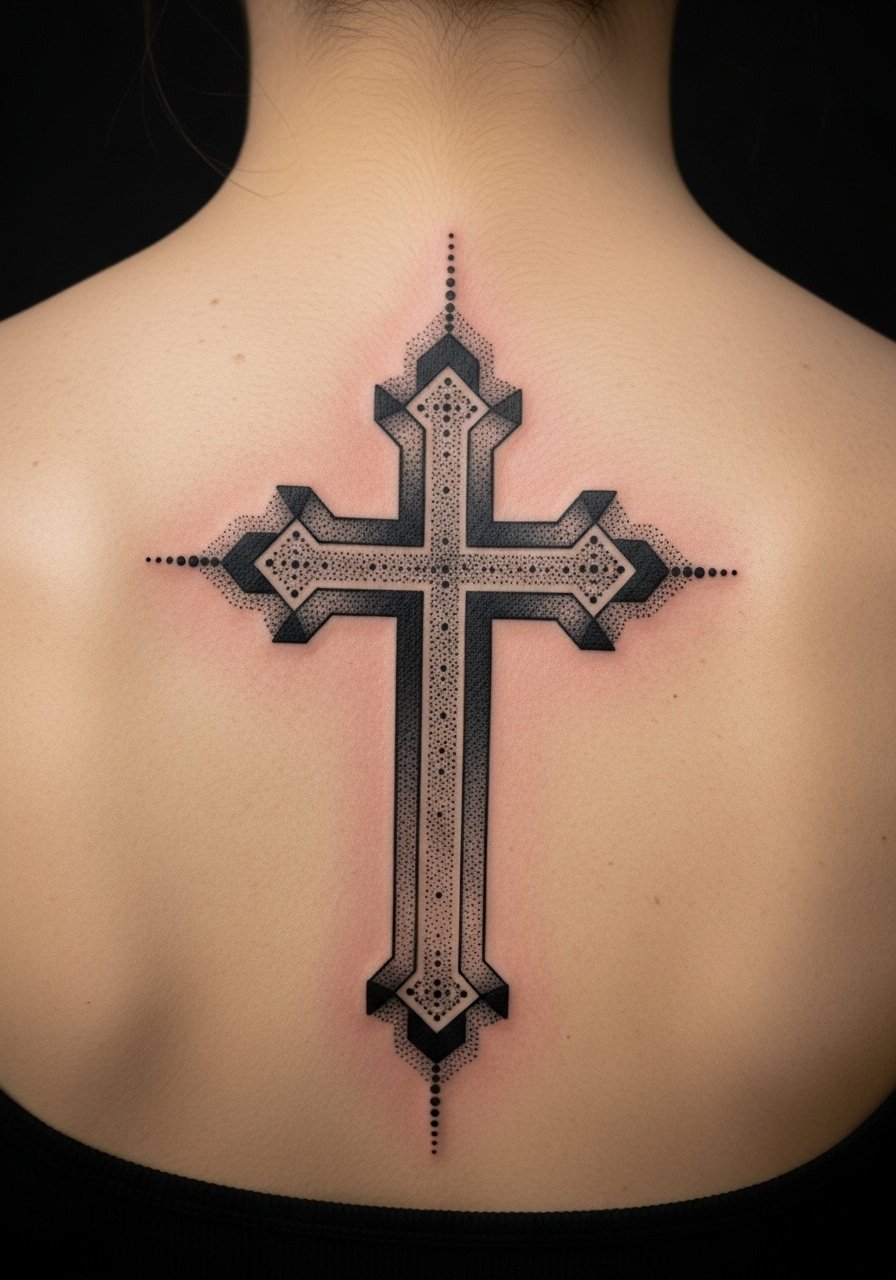
3. Cross with Crown of Thorns on Forearm
Style/Technique: Black and Grey / Textured Shading
Pain Level: Medium (4-6/10)
Session Time: 1–2 sessions, 2–4 hours
Best For: Visible faith symbol, meaningful daily reminder
The crown-of-thorns cross is raw and symbolic of sacrifice. Forearm placement keeps it visible and easy to touch up if lines soften. Textured shading gives the thorns a tactile feel; that same texture can blur if the lines are too fine. I’ve seen artists use thicker strokes in the thorn areas to help longevity. Healing is straightforward but protect from sun—black ink still fades slowly. Ask for “black and grey cross tattoo” examples and request healed photos when consulting.
4. Dove with Olive Branch on Shoulder Blade (Watercolor Accent)
Style/Technique: Watercolor Accent / Fine Line
Pain Level: Low-Medium (3-5/10)
Session Time: 1–2 hours
Best For: Subtle Holy Spirit symbolism, feminine placement
A dove with an olive branch reads as peace and Holy Spirit. I love it on the shoulder blade—easy to conceal yet elegant under a tank. Watercolor gives a soft, ethereal vibe but demands extra maintenance; from what I’ve seen, watercolor fades faster than black and grey. If you want color, ask the artist how they handle color saturation and touch-ups. A common mistake is tiny watercolor washes that vanish—go slightly bolder or pair with black outlines for longevity.
5. Praying Hands with Cross on Wrist
Style/Technique: Neo-Traditional / Bold Outline
Pain Level: Medium (4-6/10)
Session Time: 1–2 hours
Best For: Visible prayer reminder, everyday symbolism
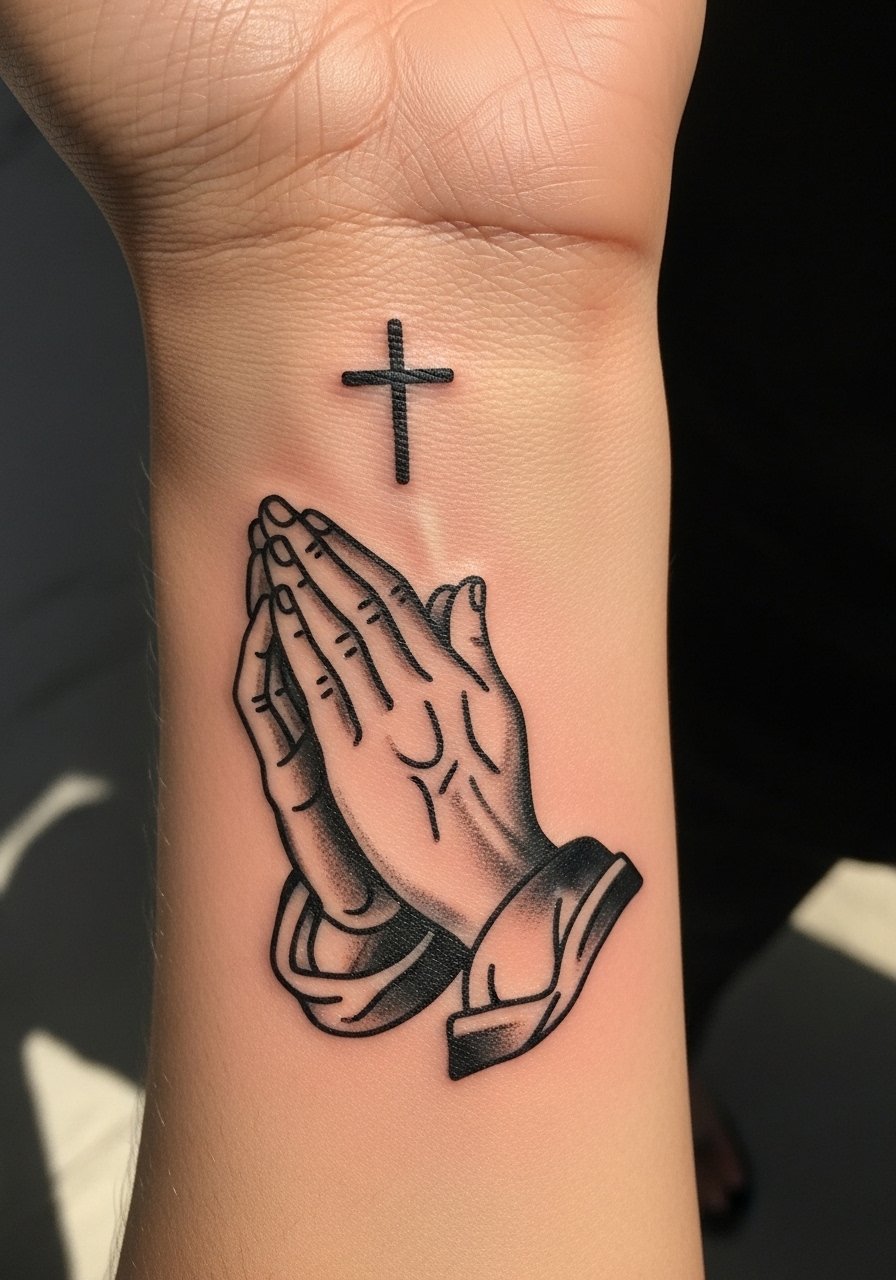
Praying hands with a cross are a humble daily reminder. Wrist placement is meaningful but can sting more than the forearm. Bold lines of neo-traditional work hold up well—I've seen many healed wrist pieces retain clarity when outlines are strong. The main complaint: people pick tiny script near the wrist that blurs. Ask for clear bold outlines and healed wrist photos. Mention “praying hands” and “cross tattoo meaning” in your consult.
6. Christian Cross with Vine and Flowers on Outer Forearm (Traditional)
Style/Technique: Traditional / Color
Pain Level: Low (2-4/10)
Session Time: 1–2 sessions, 2–4 hours
Best For: Forearm sleeve start, symbolic growth motif
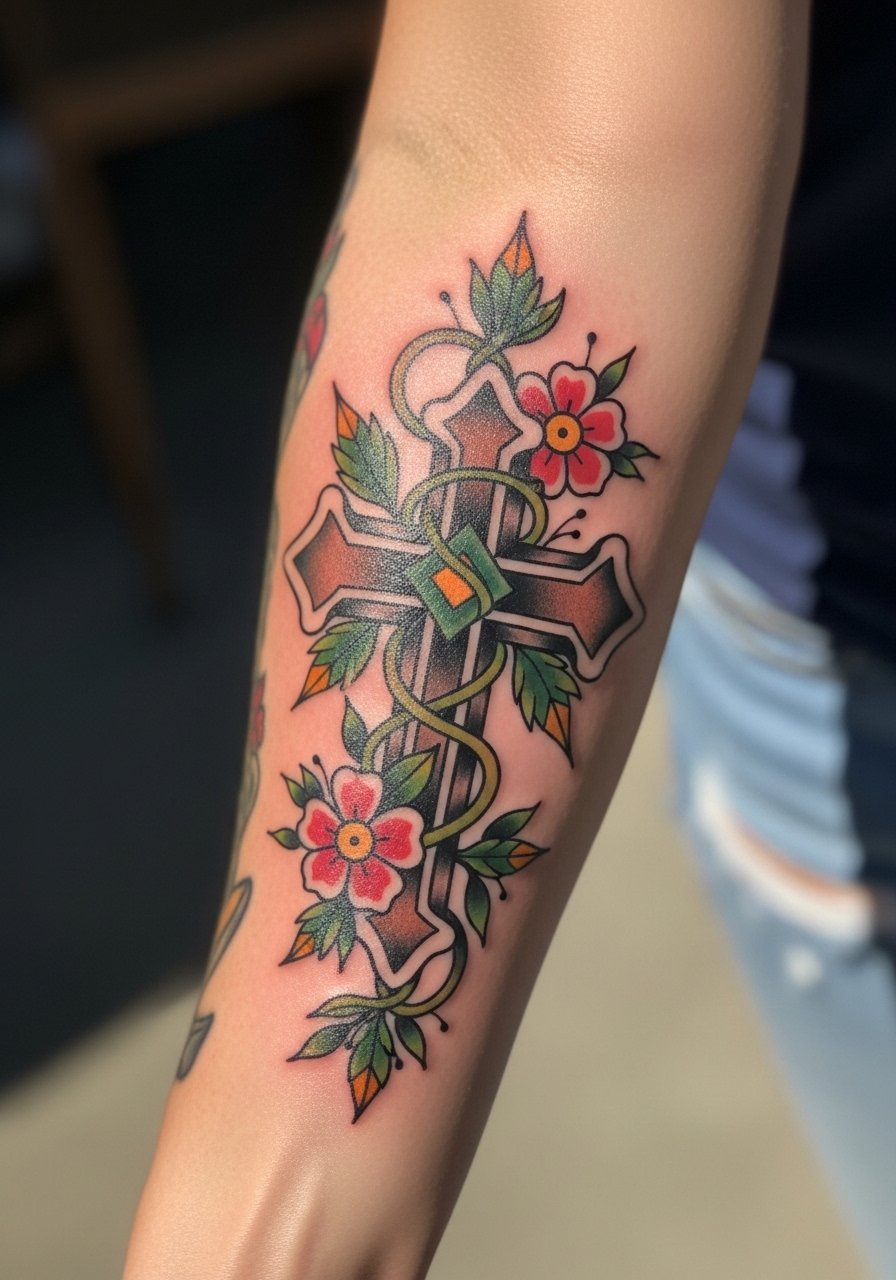
A cross wrapped in vine and flowers feels like resurrection and growth. The forearm is perfect for elongated designs that flow into a sleeve. Traditional colors look strong healed if the artist packed ink well. From my experience, florals hide small aging shifts better than flat backgrounds. Avoid tiny petal details that blur—ask for solid color blocks and bold outlines. Artists who do neo-traditional or traditional religious work will have the right color saturation technique.
7. Geometric Flaming Horse and Cross on Calf
Style/Technique: Geometric / Dotwork
Pain Level: Medium (4-6/10)
Session Time: 2–3 sessions
Best For: Dynamic apocalyptic imagery, calf or bicep placement
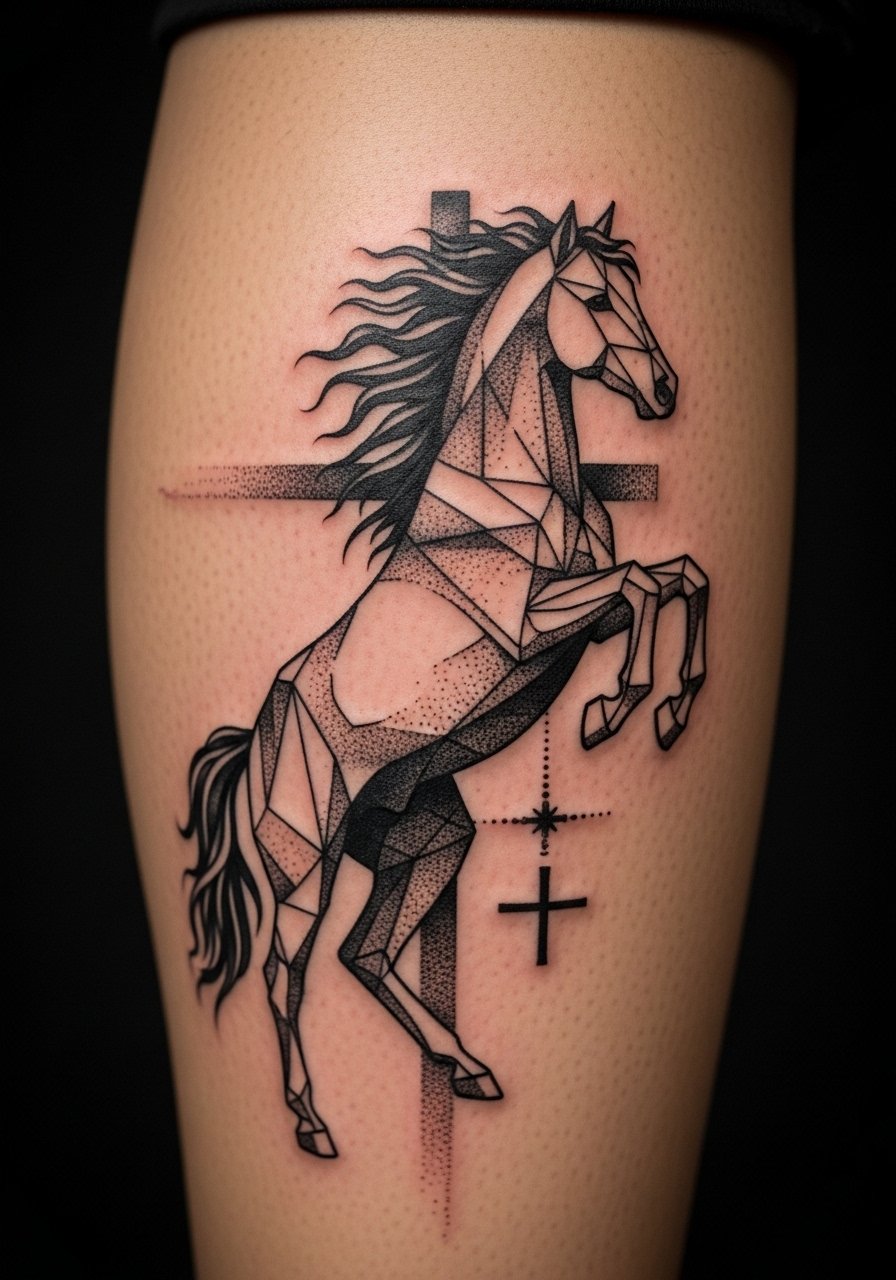
This striking design pairs a geometric cross with a flaming horse—bold and story-driven. Calf placement handles larger scale and movement well. Dotwork and geometric lines create modern contrast to classical symbolism. From what I’ve seen, dotwork needs time to heal to reveal full texture; too-fine dots can disperse. Common mistake: overcomplicated geometry that loses form when healed. Seek artists experienced in geometric blackwork and ask for healed dotwork photos.
8. Christian Warrior with Grizzly Bear on Upper Arm (Black and Grey)
Style/Technique: Black and Grey / Neo-Realism
Pain Level: Medium (4-6/10)
Session Time: 2–3 sessions
Best For: Protective, masculine themes, upper arm showcase
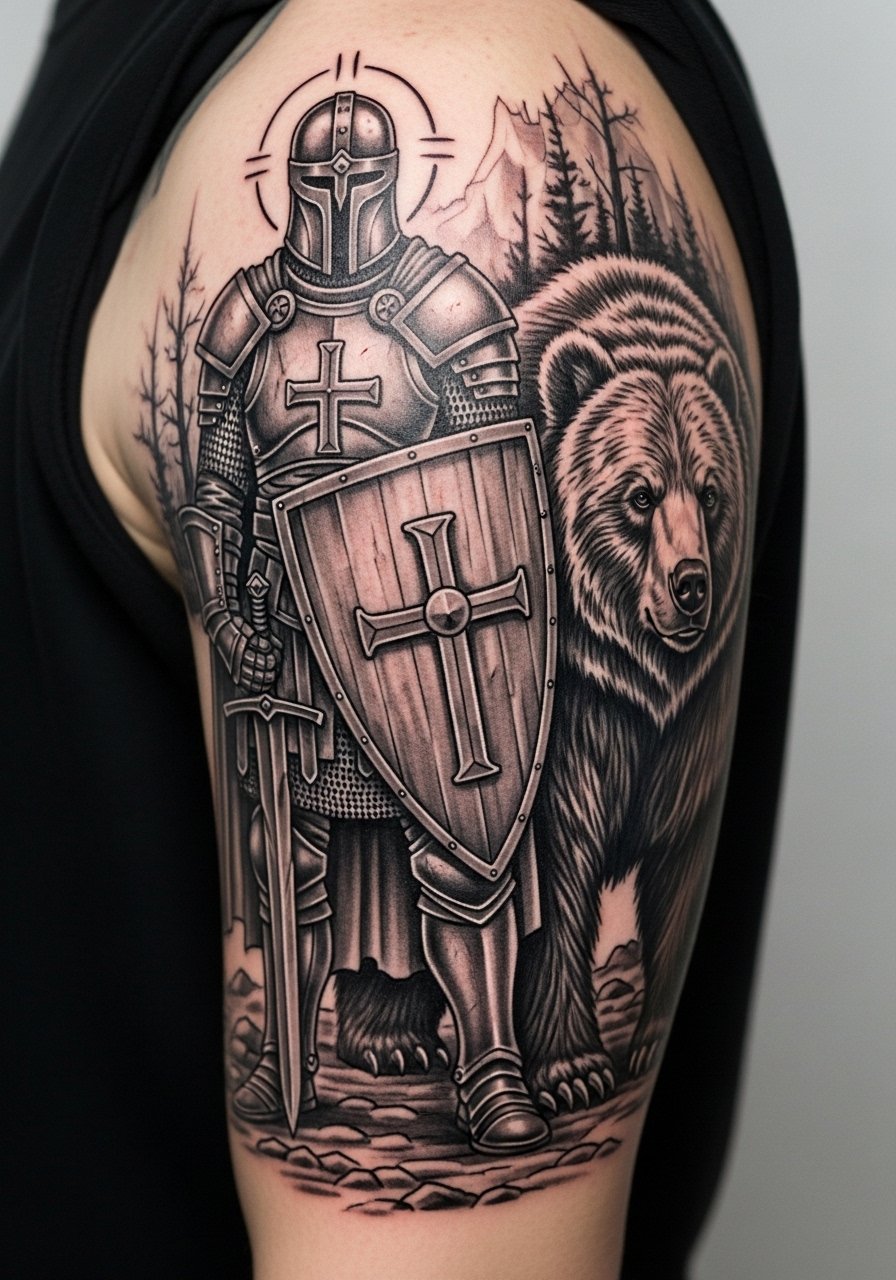
The warrior-with-bear motif reads as spiritual strength and protection. Upper arm is forgiving for larger shading and allows a dramatic silhouette. Black and grey shading gives a timeless feel—I've noticed it stays legible longer than thin color work. Watch for overly busy backgrounds that muddy the focal figures when healed. Ask for artists who list “biblical warriors” or “neo-realism” in their portfolio.
9. Sacred Heart with Thorns on Bicep (Traditional Color)
Style/Technique: Traditional / Bold Color
Pain Level: Low-Medium (3-5/10)
Session Time: 1–2 sessions
Best For: Symbol of love and sacrifice, visible upper arm piece
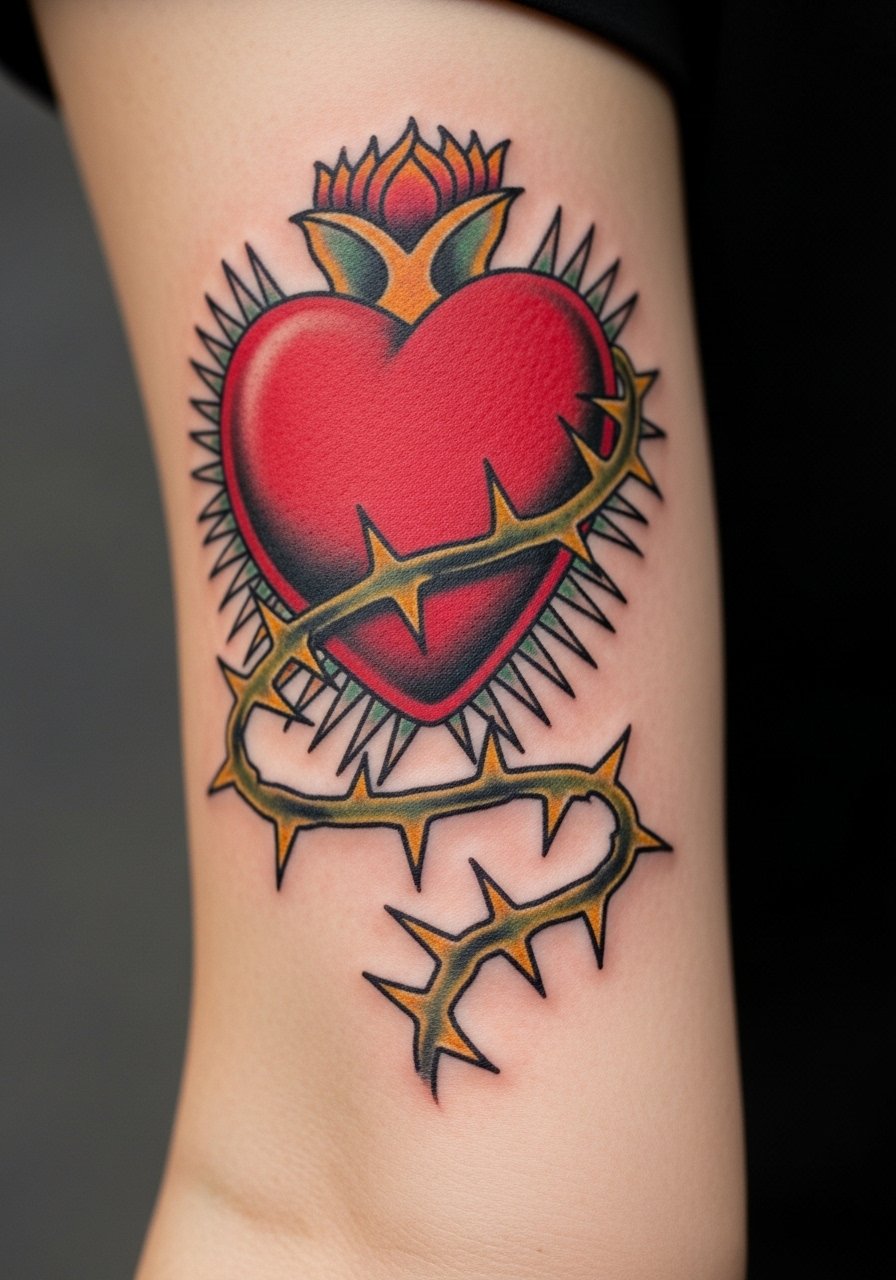
The sacred heart is vivid and emotional. Bicep placement keeps it visible and allows bold color fields. Traditional styles are forgiving as colors age in blocks rather than fragile lines. I recommend strong outlines so the heart stays defined as skin changes. Ask to see healed traditional religious pieces—artists familiar with classic religious iconography will know color placement that ages gracefully.
10. Cross with Starry Sky on Upper Back (Black and Grey + Dotwork)
Style/Technique: Black and Grey / Dotwork Background
Pain Level: Medium (4-6/10)
Session Time: 2–3 sessions
Best For: Large statement, spiritual wonder motif
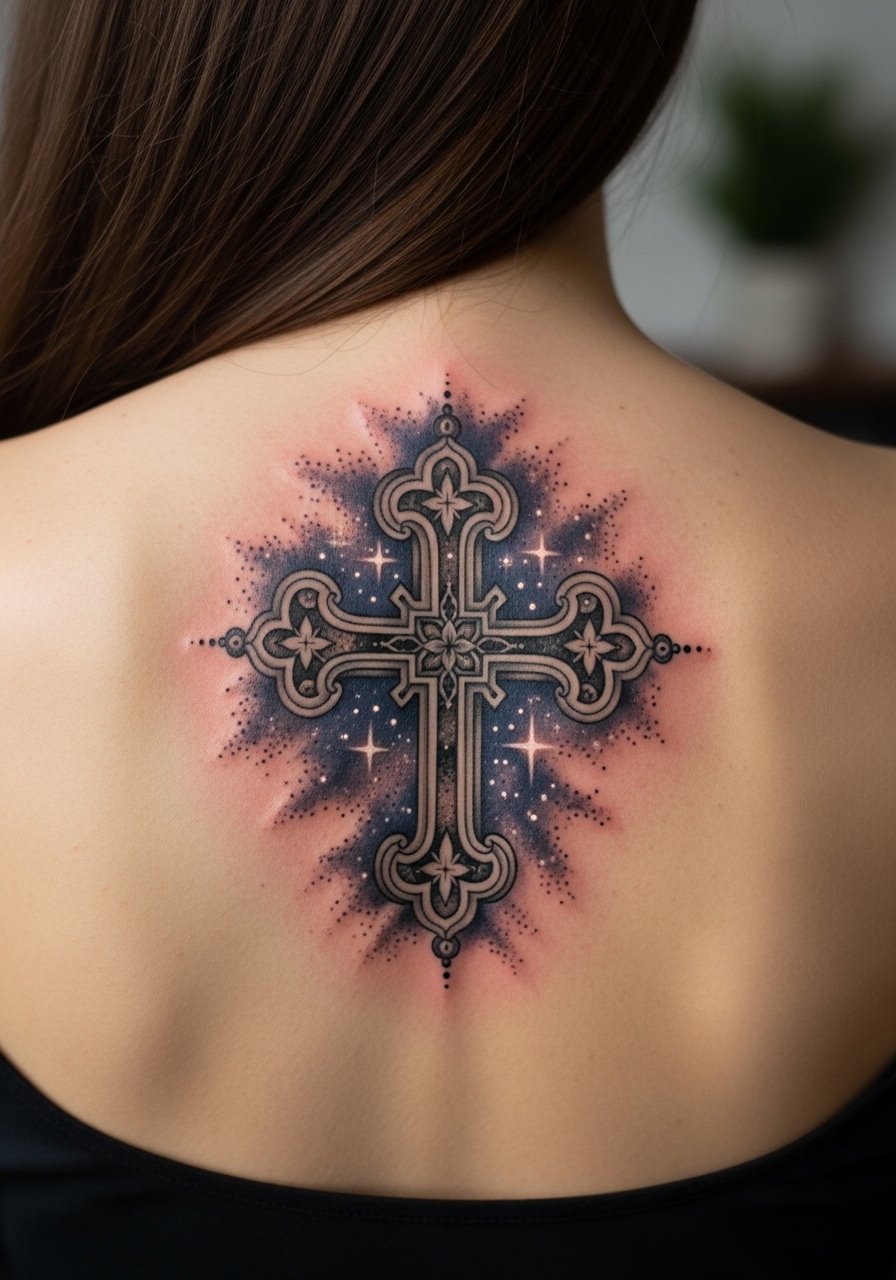
A cross set against a starry sky feels like cosmic devotion. Upper back gives room for scale and dotwork depth. Dotwork stars age well if they’re slightly larger—tiny dots can merge over time. From what I’ve seen, black and grey stars pair perfectly with a solid cross to ensure the focal point stays crisp. Common mistake: too-tight negative space around details—leave breathing room so the design settles nicely during healing.
11. Tau Cross with Ichthys on Ankle (Minimalist Ancient Symbols)
Style/Technique: Minimalist / Historical
Pain Level: Medium (4-5/10)
Session Time: 1 session, 1–2 hours
Best For: Subtle historical faith mark, ankle or behind ear
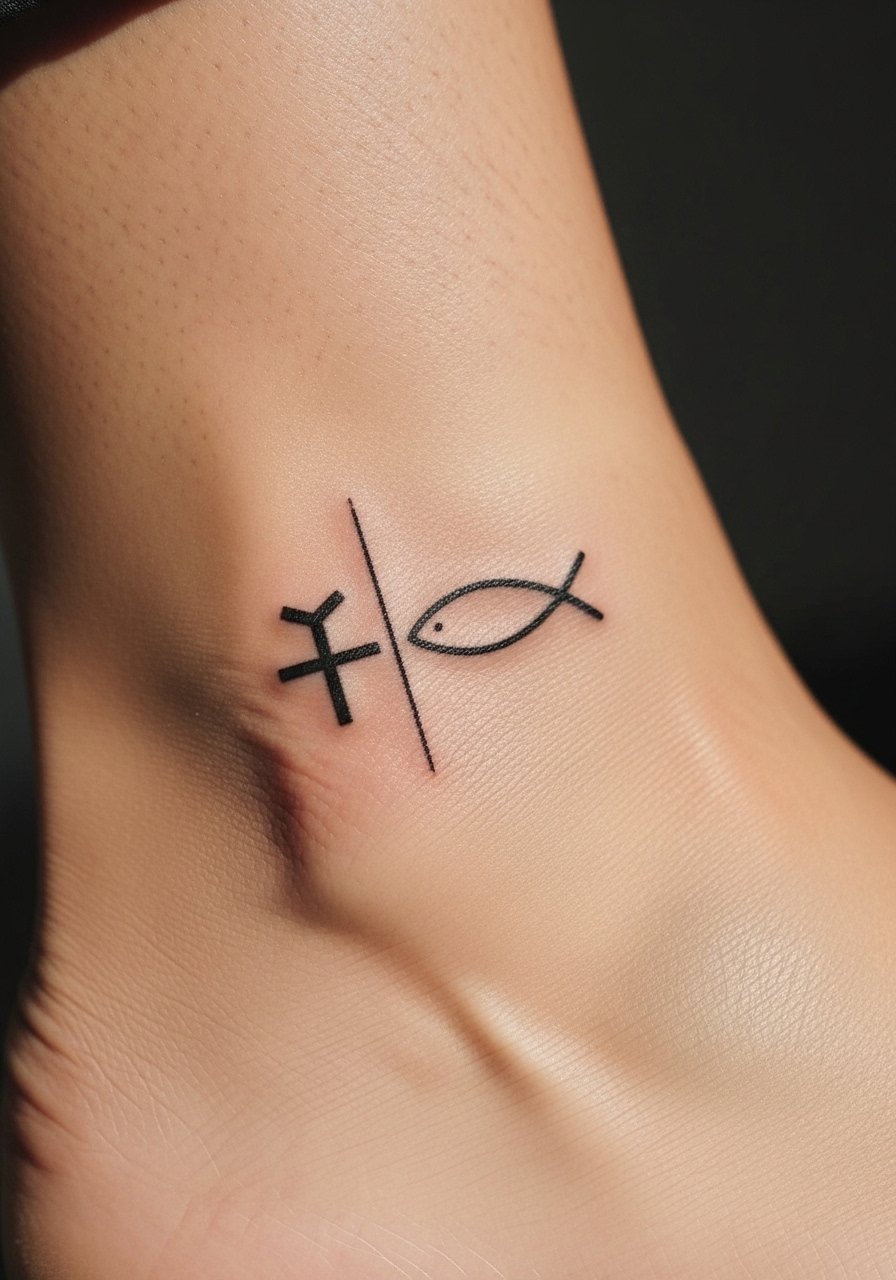
This pair taps into early Christian symbolism in a low-key way. Ankle placement is discreet but can hurt more due to thin skin. I recommend slightly bolder lines than you might for the forearm so the symbols remain legible. I don’t see this combo often, so it reads as thoughtful rather than trendy. Ask your artist for “tau cross” and “ichthys” healed examples.
12. Pocket Watch with Cross and Compass on Wrist
Style/Technique: Black and Grey / Micro-Realism
Pain Level: Medium (4-6/10)
Session Time: 1–2 sessions
Best For: Time and redemption motif, personal reminder on wrist
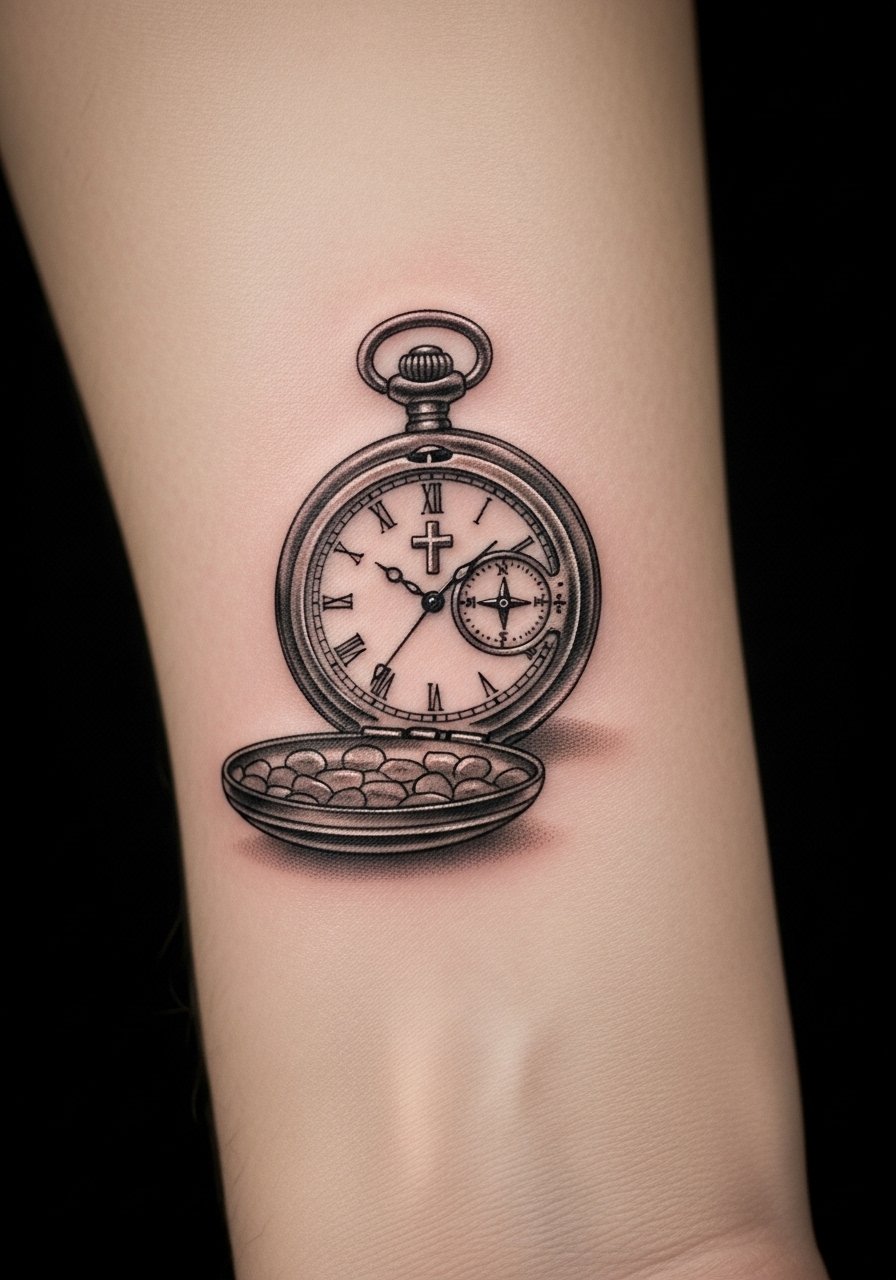
This unique combo blends time, direction, and faith. A wrist watch motif reads like a life-story reminder. Micro-realism looks amazing when healed but depends on artist skill—tiny details can blur. I’ve seen better longevity when artists slightly exaggerate line weight so details don’t disappear. Ask for healed wrist micro-realism photos and artists who specialize in small portraiture.
13. Chain Breaker Cross on Forearm (Cover-Up Friendly)
Style/Technique: Blackwork / Symbolic
Pain Level: Low-Medium (3-5/10)
Session Time: 1–2 sessions
Best For: Symbol of freedom, forearm cover-ups
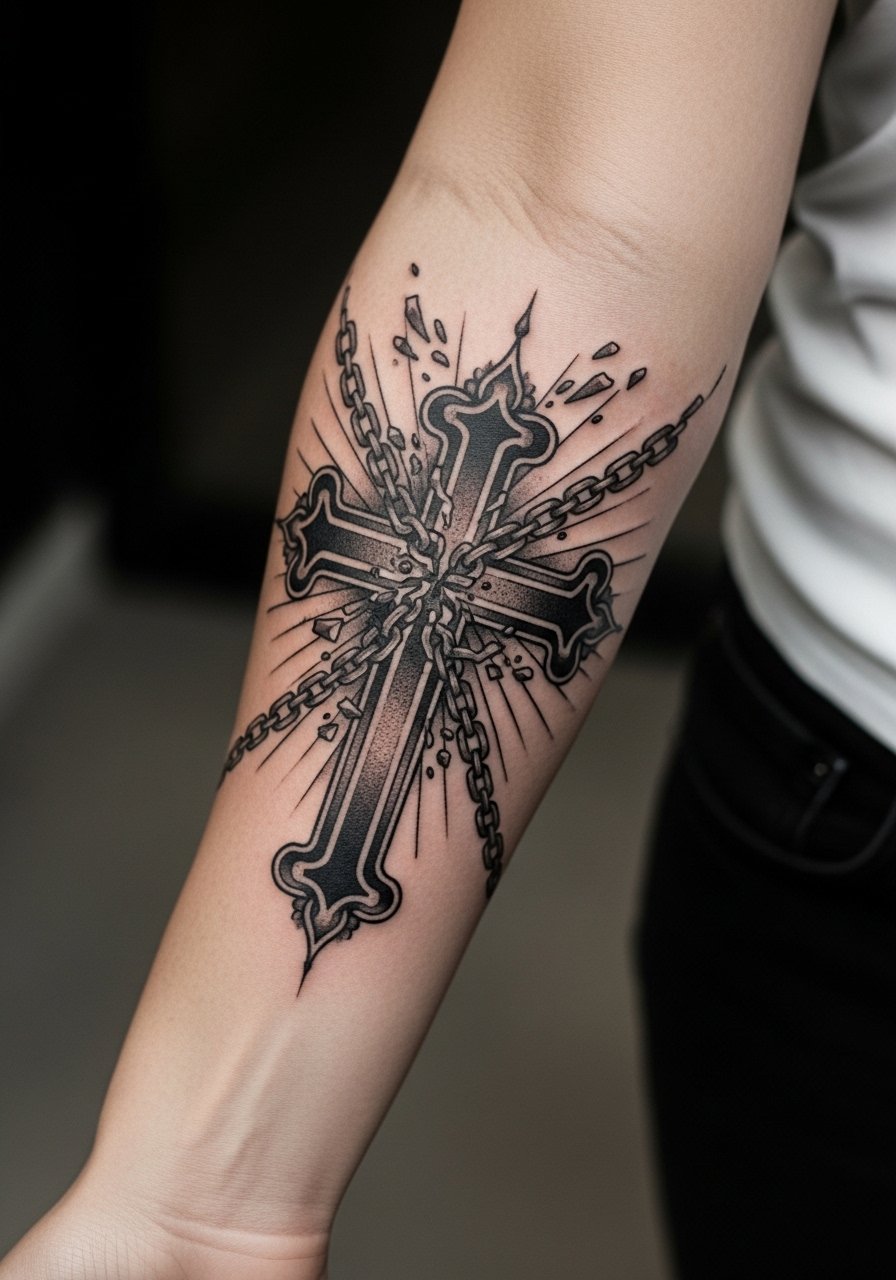
Chain-breaker crosses are great for marking personal transformation. Forearm placement lets you display the “freedom” message openly or hide it. Blackwork fills hold up exceptionally well—especially useful when covering older ink. From what I’ve gathered, artists recommending cover-ups will design bold blacks and negative space to mask previous lines. Don’t underestimate how big a cover-up needs to be; ask for honest feedback.
14. Majestic Angel with Cross on Shoulder/Back
Style/Technique: Black and Grey / Realistic
Pain Level: Medium-High (5-7/10)
Session Time: 2 sessions
Best For: Guardian motif, back or shoulder canvas

Angels convey guardianship and solace. Shoulder or upper back allows for wingspan and detail. Realistic feathers and soft shading look impressive healed but require skill. I’ve noticed healed feather work reads best when shading transitions are smooth and not too faint. Common mistake: tiny feather lines that look busy after healing—ask for layered shading and healed shots of similar angel pieces.
15. Orthdox Cross with Lion on Thigh (Heraldic Blackwork)
Style/Technique: Blackwork / Heraldic
Pain Level: Low-Medium (3-5/10)
Session Time: 1–2 sessions
Best For: Fierce protection theme, thigh or back piece
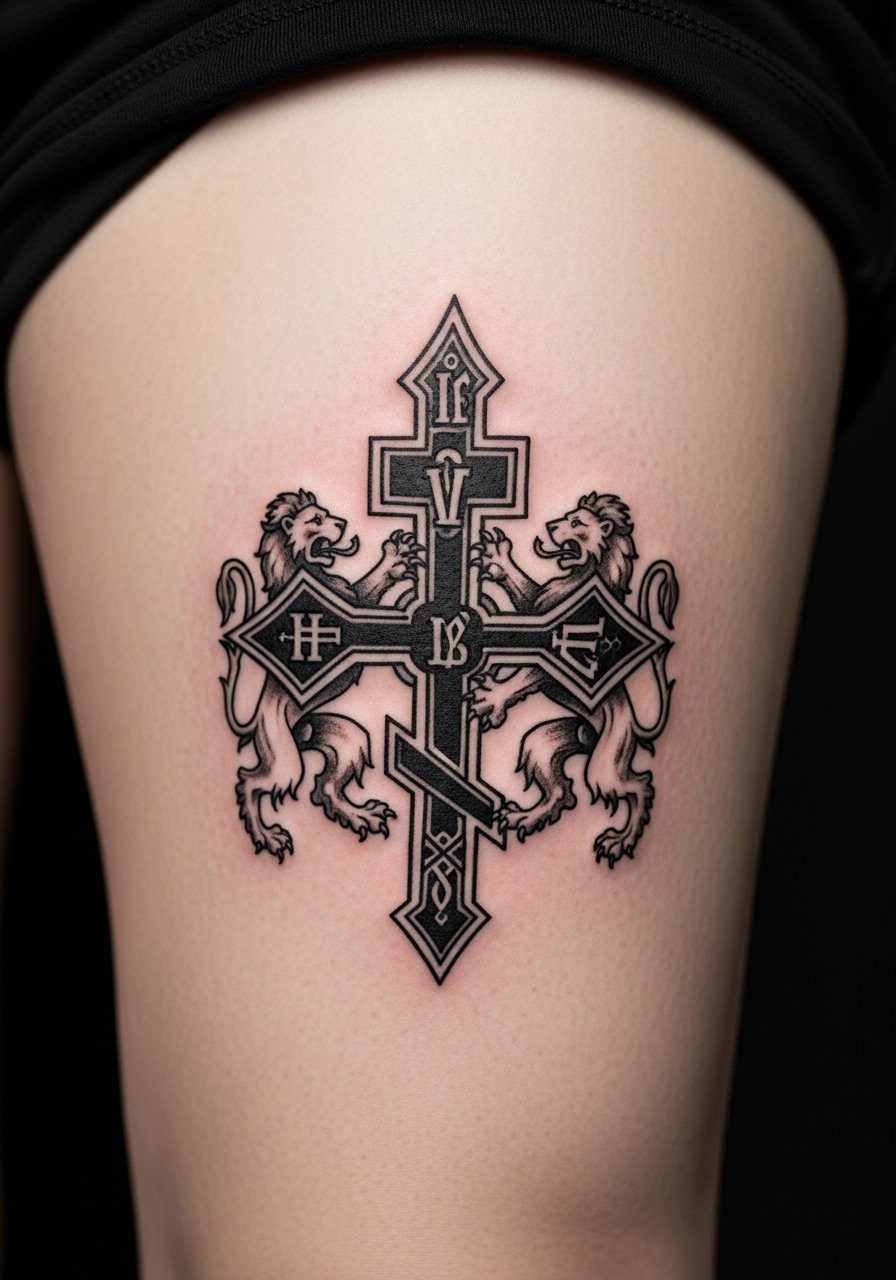
This heraldic combo reads as strength and watchfulness. Thigh placement gives a large flat area and is relatively low-pain. Solid black areas age gracefully and keep the heraldic shapes clear. If you want a crisp lion mane, look for artists experienced in blackwork animal textures. Avoid overly intricate tiny details that can blur—bold graphic shapes are safer.
16. Scripture Verse in Elegant Script on Ribcage
Style/Technique: Minimalist / Script
Pain Level: High (6-8/10)
Session Time: 1 session, 1–2 hours
Best For: Personal mantras, memorials, private placement
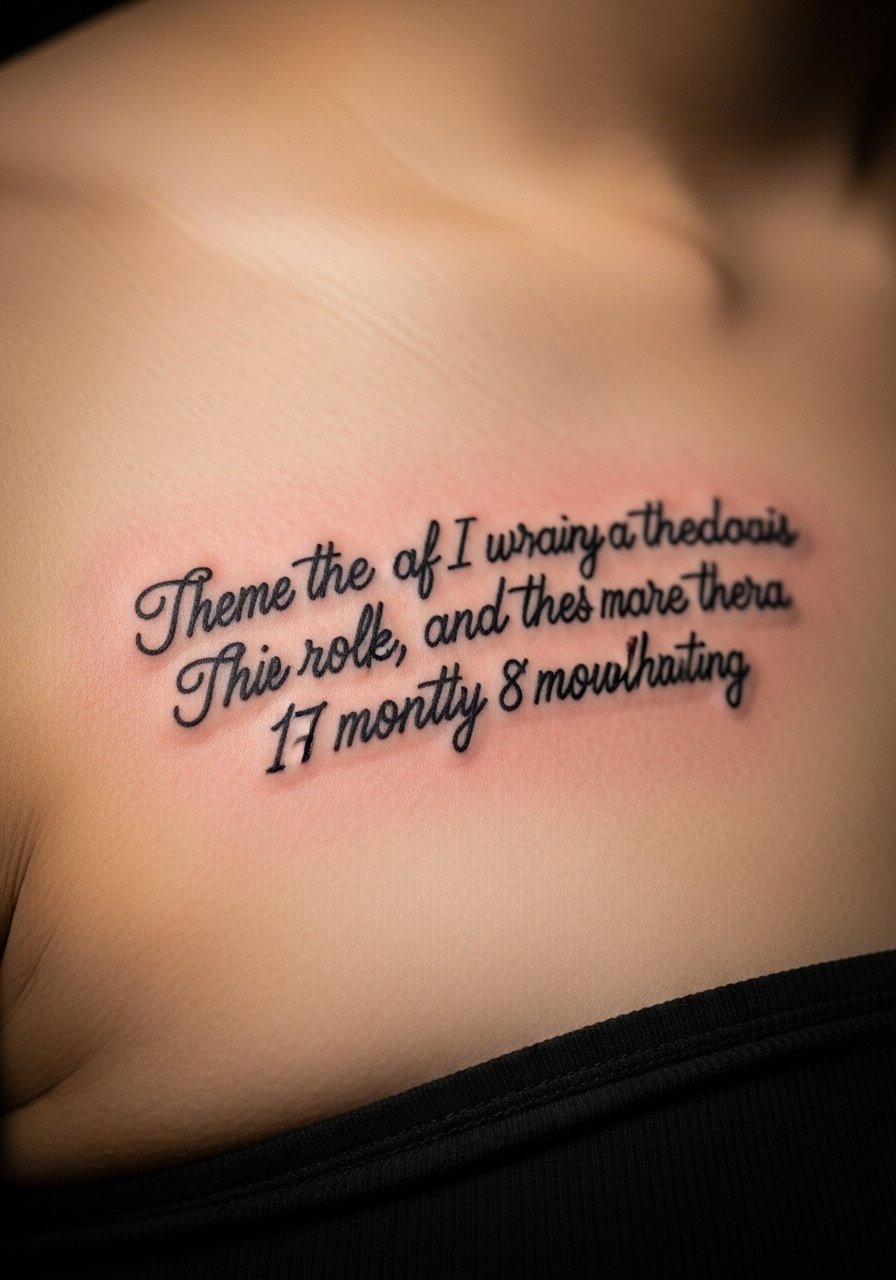
Scripture tattoos are deeply personal. Ribcage placement is private but painful—expect sharp, sustained sensitivity. Fine script can blur if too small; I advise slightly larger lettering and asking the artist about letter spacing for healed clarity. From my experience, choosing a timeless script style helps avoid regret. Bring the exact verse and font reference, and have the artist show it flipped on your body or via Tatship-style mockups.
17. Rose and Cross Thighpiece (Neo-Traditional)
Style/Technique: Neo-Traditional / Color
Pain Level: Low-Medium (3-5/10)
Session Time: 1–2 sessions
Best For: Feminine devotion, thigh display

Combining a rose with a cross blends love and faith. Thighs hold color well and let the design breathe. Neo-traditional bold outlines and color blocks age predictably, and florals help mask minor touch-ups later. I’ve noticed healed color looks different across tones—ask for healed examples on skin similar to yours. Avoid tiny gradients that flatten with time.
18. Geometric Cross Down the Spine (Blackwork + Dotwork)
Style/Technique: Geometric / Blackwork
Pain Level: High (6-8/10)
Session Time: Multiple sessions
Best For: Statement spine piece, modern sacred geometry
Spine pieces read as disciplined and modern. Geometric lines and dotwork can be hypnotic when healed but demand precision. The spine is sensitive, so expect higher pain. From what I’ve seen, artists who do geometric blackwork will plan negative space carefully to prevent merging. Ask for healed dotwork spine photos and expect multiple sessions for clean lines.
19. Lily Flower with Virgin Mary Outline on Rib/Thigh
Style/Technique: Sketch / Fine Line
Pain Level: Medium-High (5-7/10)
Session Time: 1–2 sessions
Best For: Marian devotion, ribcage or thigh placement
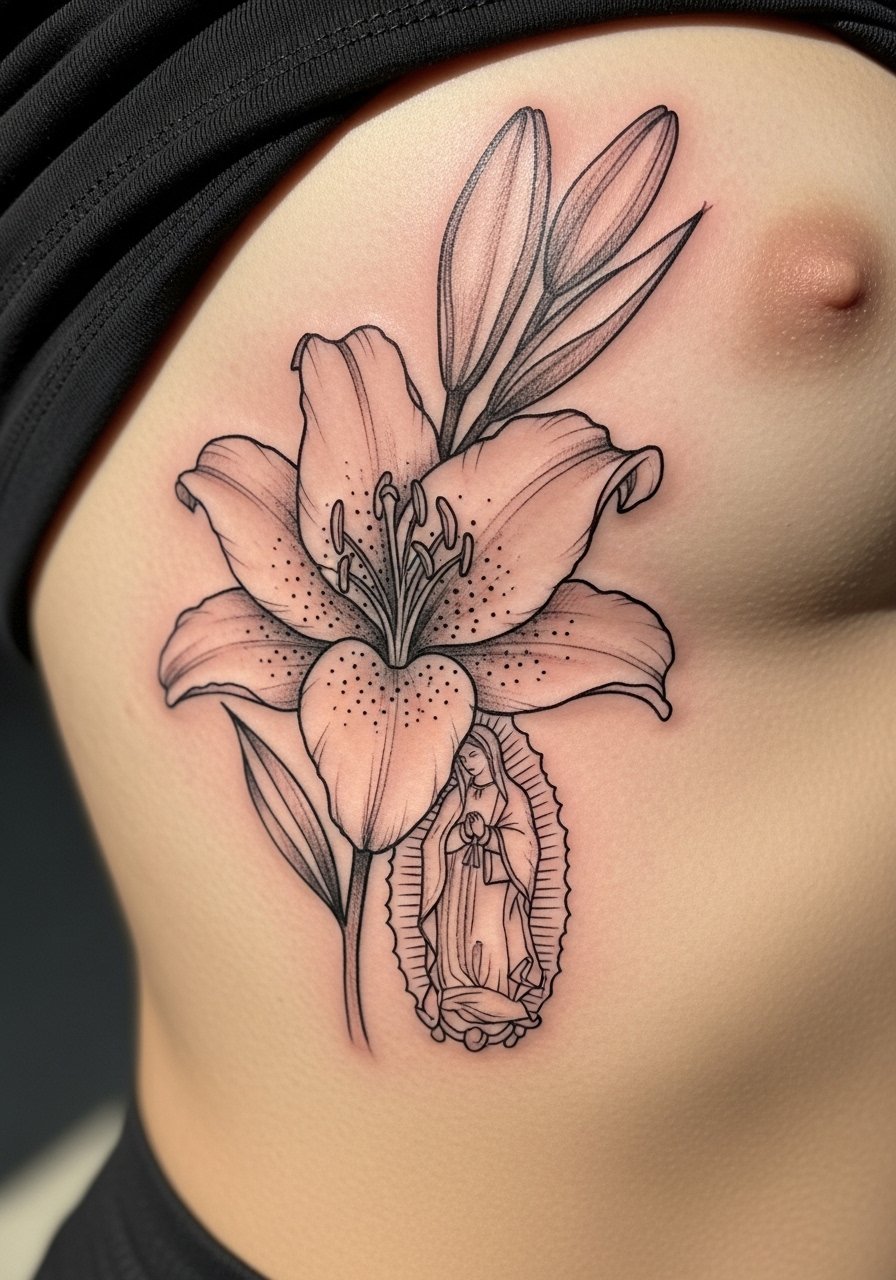
A lily paired with a Mary outline carries purity and maternal devotion. Ribcage makes it intimate; thigh is a less painful alternative. Sketch style looks delicate but needs careful line weight to prevent fading into a blur. I recommend artists who specialize in sketch or illustrative religious pieces and to request healed examples on similar placements.
20. Small Ichthys (Fish) Behind Ear or Ankle (Minimalist)
Style/Technique: Minimalist / Micro
Pain Level: Low-Medium (3-5/10)
Session Time: 30–60 minutes
Best For: Discreet faith mark, first Christian tattoo
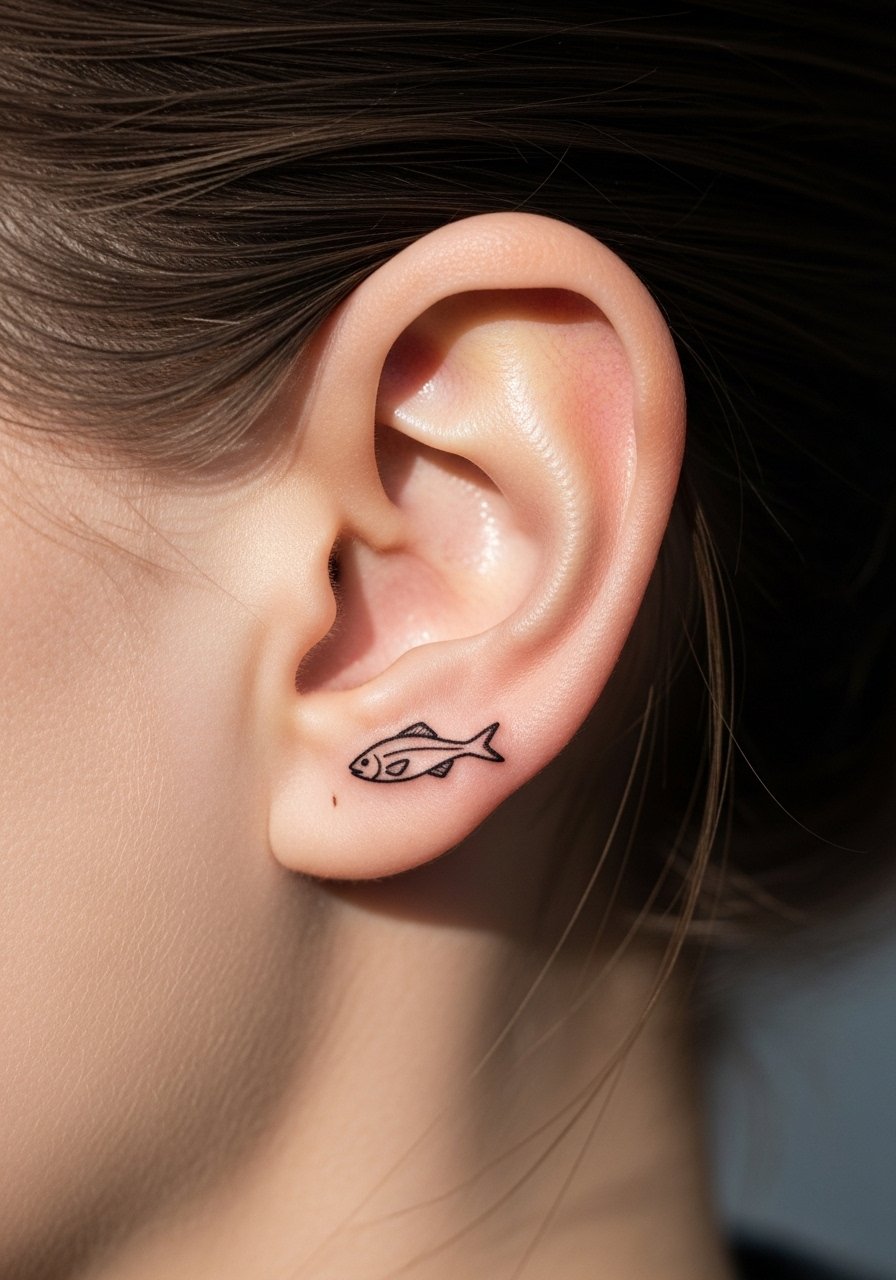
The ichthys is a quiet, early-Christian emblem that works well small and subtle. Behind the ear is intimate; ankle offers concealment. Micro tattoos can fade if lines are too thin; I’ve seen better results when artists slightly thicken the outline. If this is your first Christian tattoo, this is a discreet, low-commitment option—ask about “first Christian tattoo” considerations during consult.
21. Small Crown of Thorns on Collarbone (Delicate Blackwork)
Style/Technique: Blackwork / Delicate
Pain Level: Medium (4-6/10)
Session Time: 1 session, 30–60 minutes
Best For: Subtle sacrifice symbol, collarbone visibility
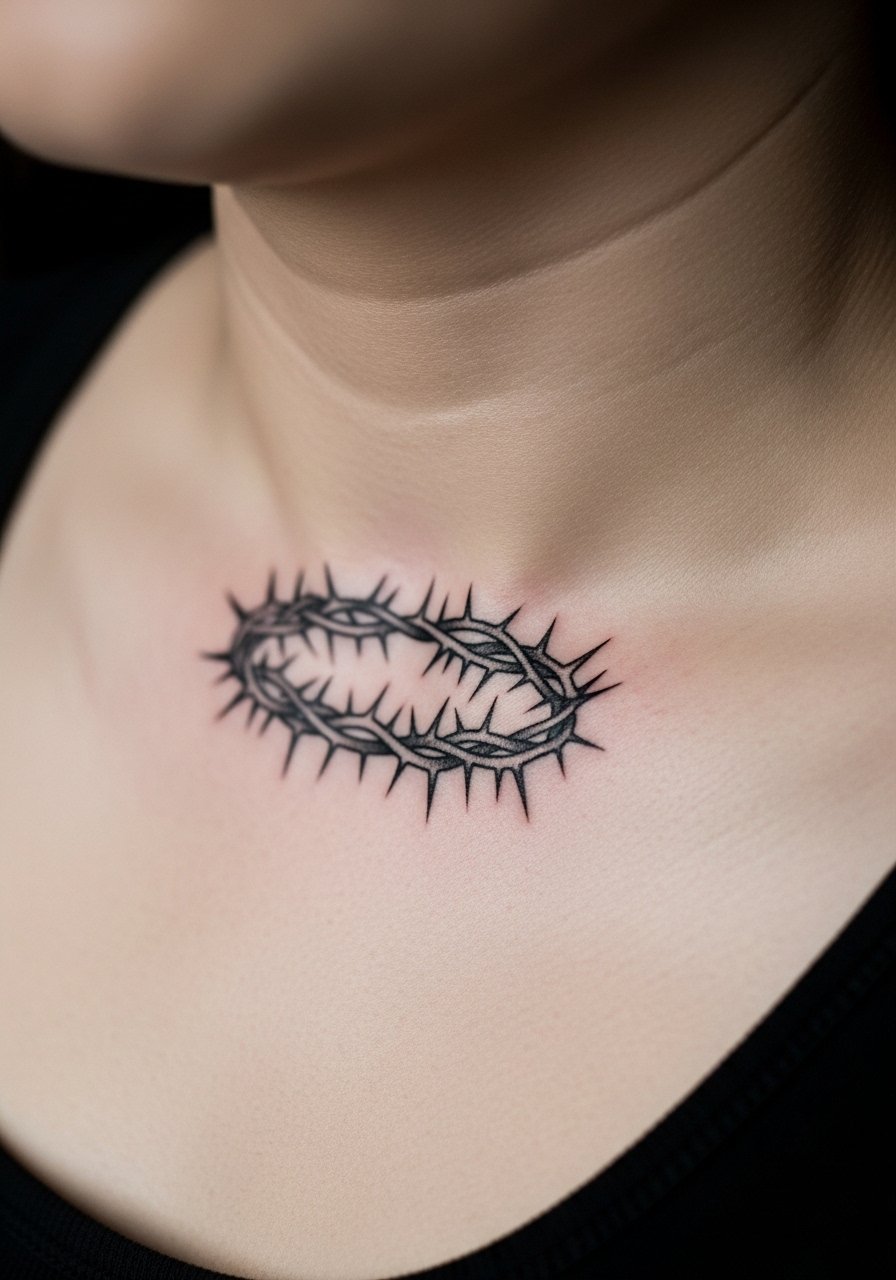
A collarbone crown of thorns is understated and meaningful. Collarbone tattooing can be sensitive, but small pieces heal cleanly. From what I’ve observed, slightly bolder thorn tips prevent the design from dissolving into a smudge over time. Avoid overly fine spikes and request healed collarbone photos.
22. Compass with Cross Needle on Wrist or Forearm
Style/Technique: Black and Grey / Micro-Realism
Pain Level: Low-Medium (3-5/10)
Session Time: 1–2 hours
Best For: Guidance and faith, daily reminder
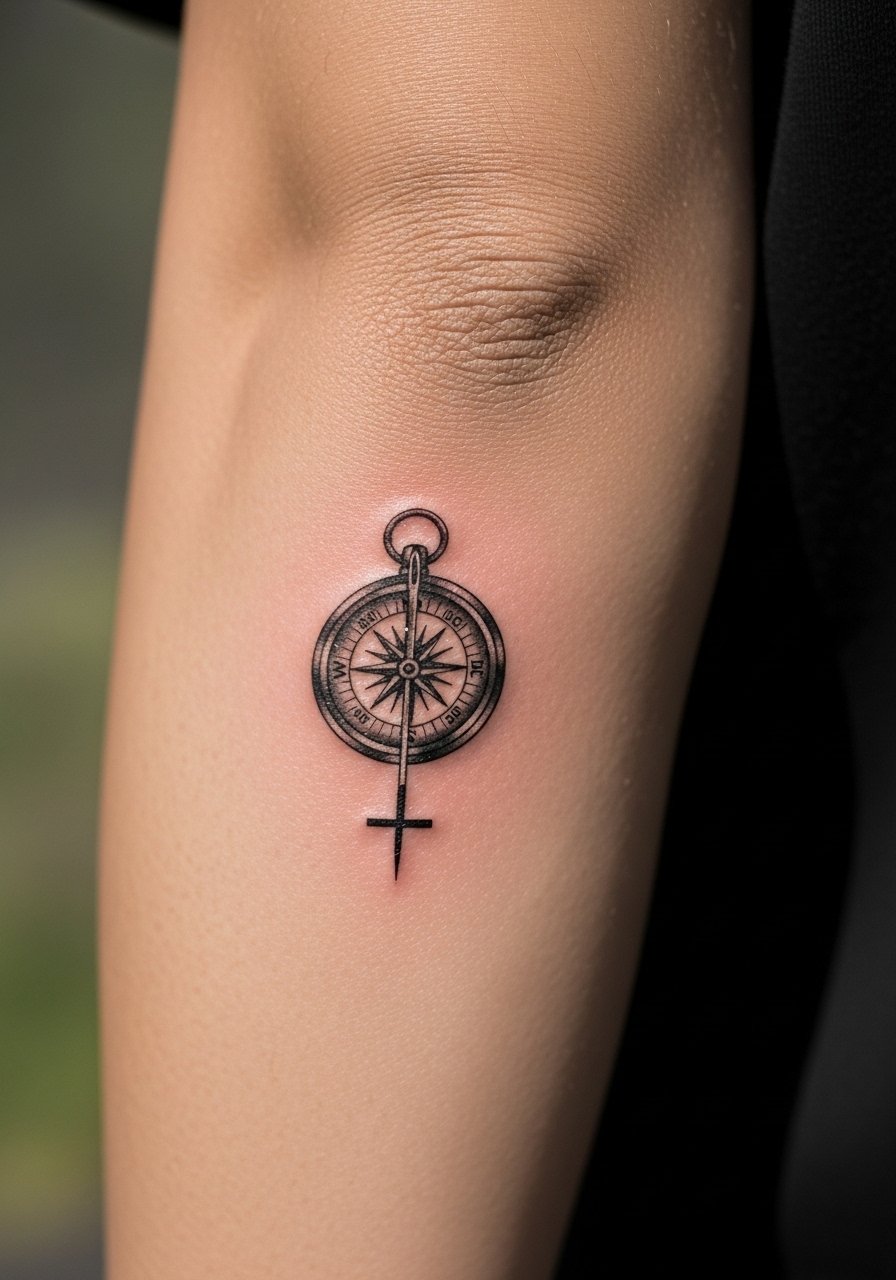
A compass where the cross is the needle reads as faith guiding life. Forearm or wrist placement makes it practical and personal. Micro-realism demands subtle shading—ensure your artist knows how to balance detail with line weight. I’ve seen healed compasses look best when the artist uses solid black anchors for the major shapes.
23. Stained-Glass Cross on Upper Arm (Color Blocks)
Style/Technique: Neo-Traditional / Color Block
Pain Level: Low-Medium (3-5/10)
Session Time: 1–2 sessions
Best For: Bold religious art, upper arm or calf

Stained-glass cross pieces read like wearable church art. Upper arm gives enough area for color panels. Color block techniques age well if the artist packs pigment deeply; thin washed color can fade unevenly. From my conversations, artists who do neo-traditional stained-glass will show healed color samples—ask for them.
24. Small Rosary Looping Around Wrist (Blackwork)
Style/Technique: Blackwork / Minimalist
Pain Level: Medium (4-6/10)
Session Time: 1 session, 1–2 hours
Best For: Continuous prayer reminder, bracelet-style placement
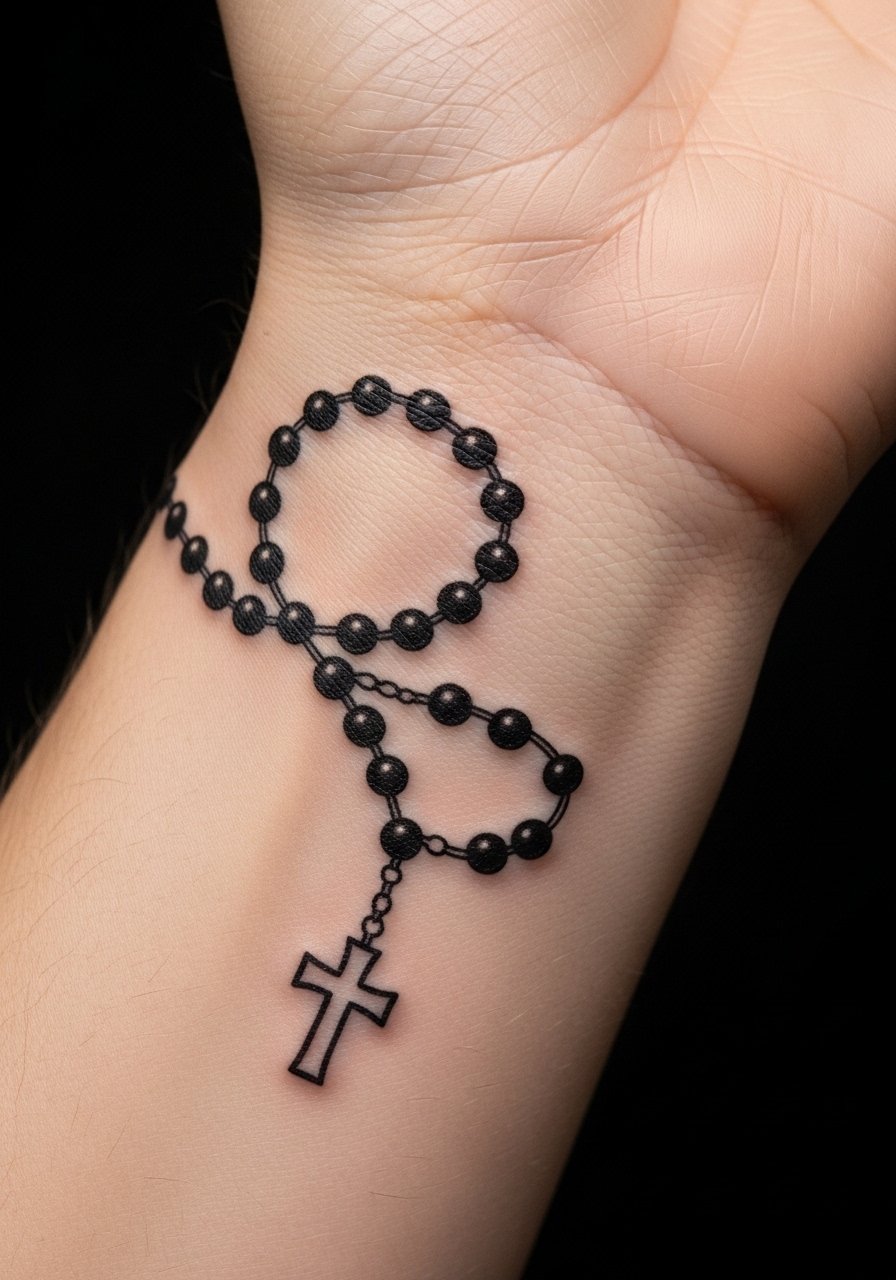
A rosary tattoo around the wrist functions like jewelry and prayer combined. Bead spacing matters—too close and beads blur. I’ve seen the best results when artists ink slightly larger beads and bold connecting lines. Wrist area sees a lot of wear, so plan for future touch-ups. Ask your artist for healed wrist rosary examples.
25. Lion of Judah Chest Patch (Black and Grey)
Style/Technique: Black and Grey / Realism
Pain Level: Medium-High (5-7/10)
Session Time: 2+ sessions
Best For: Regal faith symbol, chest or upper arm
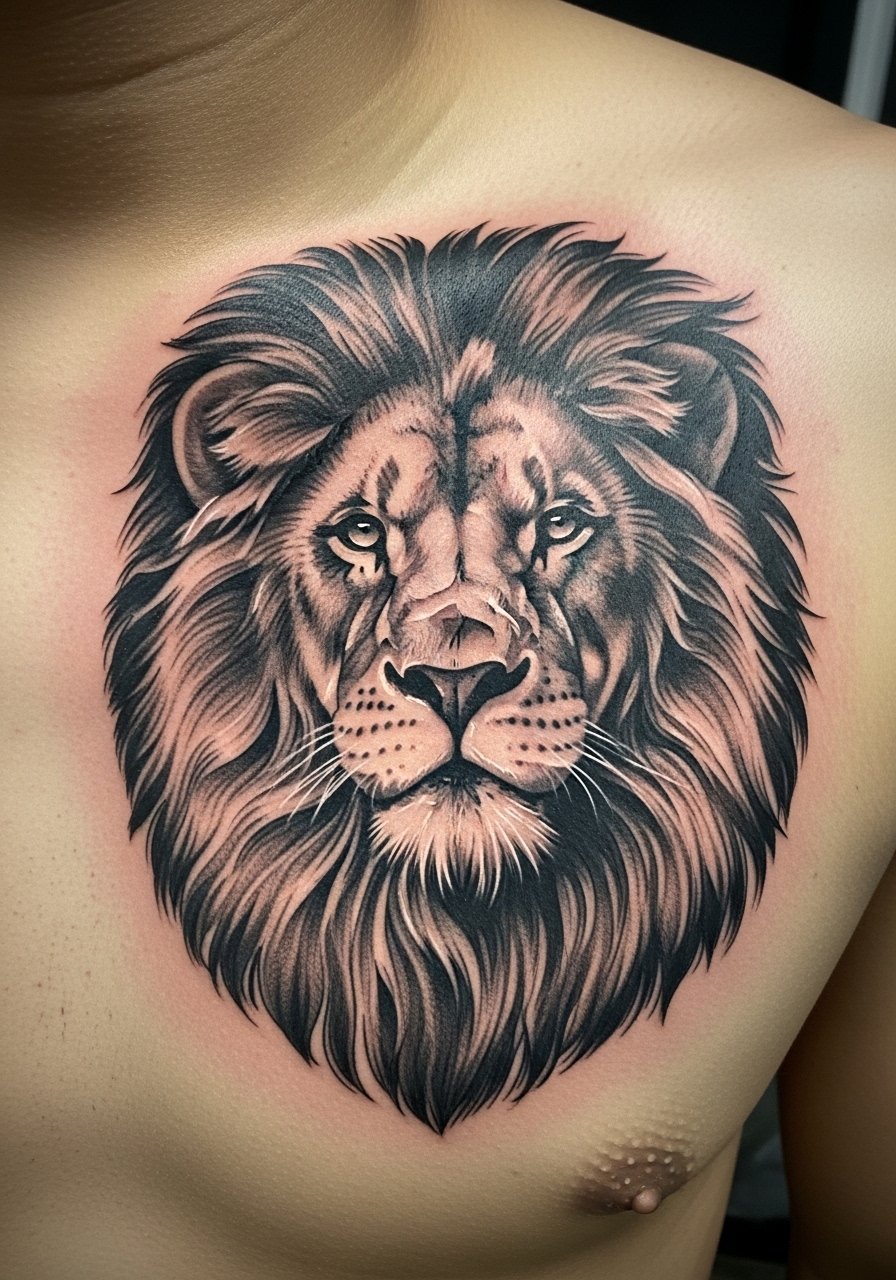
The Lion of Judah is powerful imagery for strength and heritage. Chest placement anchors it emotionally. Realism here showcases mane texture—ask for healed large-animal portraits to ensure the artist handles fur shading well. Avoid tiny facial details that can soften—bold contrasts read better over time.
26. Small Anchor Cross on Ankle (Nautical Faith)
Style/Technique: Minimalist / Linework
Pain Level: Medium (4-5/10)
Session Time: 30–60 minutes
Best For: Stability motif, ankle or foot placement
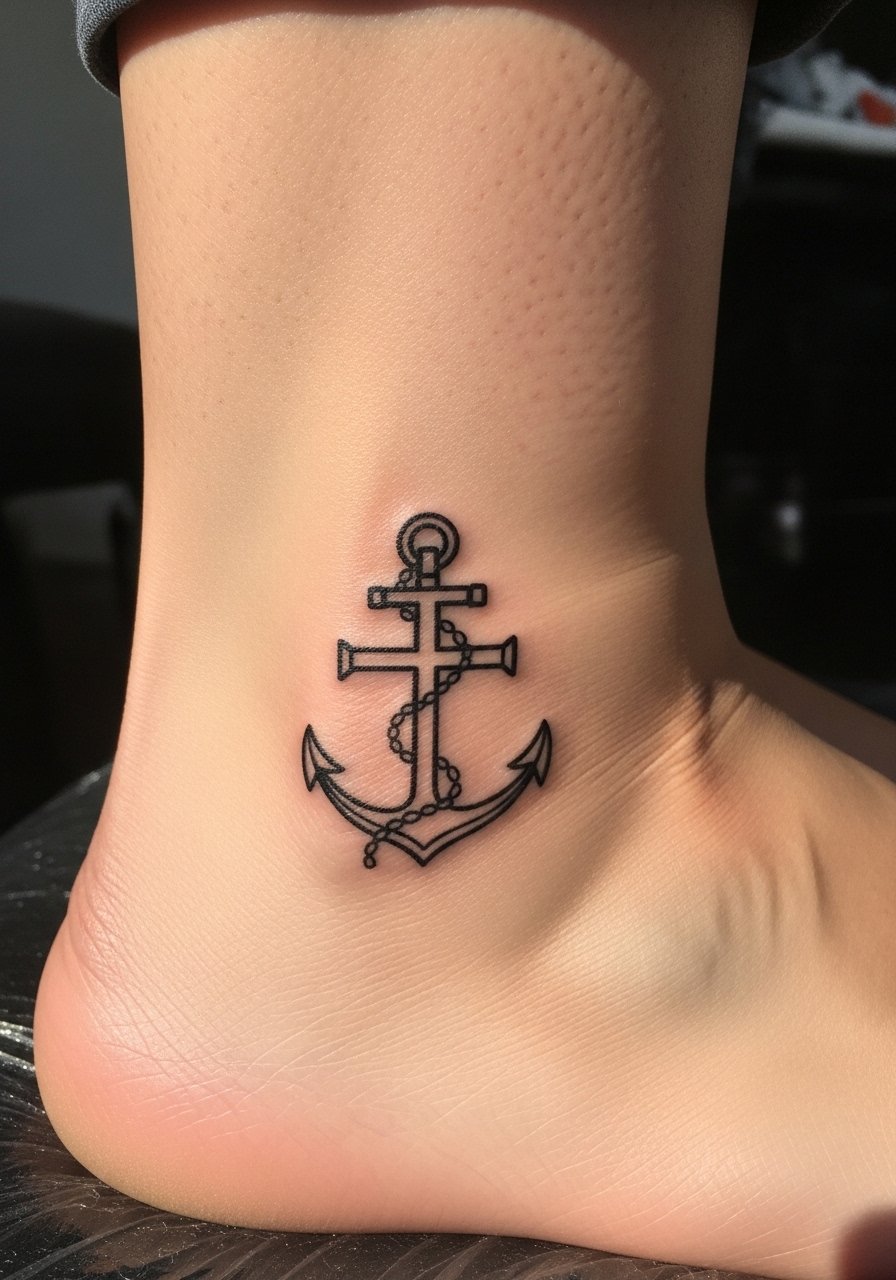
An anchor cross symbolizes steady faith. Ankle placement is discreet and symbolic. The foot/ankle area can be finicky—ink needs to be robust to withstand friction from shoes. From what I’ve seen, slightly thicker outlines prevent premature blurring. Discuss aftercare for foot tattoos since healing can be trickier.
27. Chapel Window Silhouette on Upper Back (Blackwork)
Style/Technique: Blackwork / Silhouette
Pain Level: Medium (4-6/10)
Session Time: 1–2 sessions
Best For: Architectural devotion, upper back statement
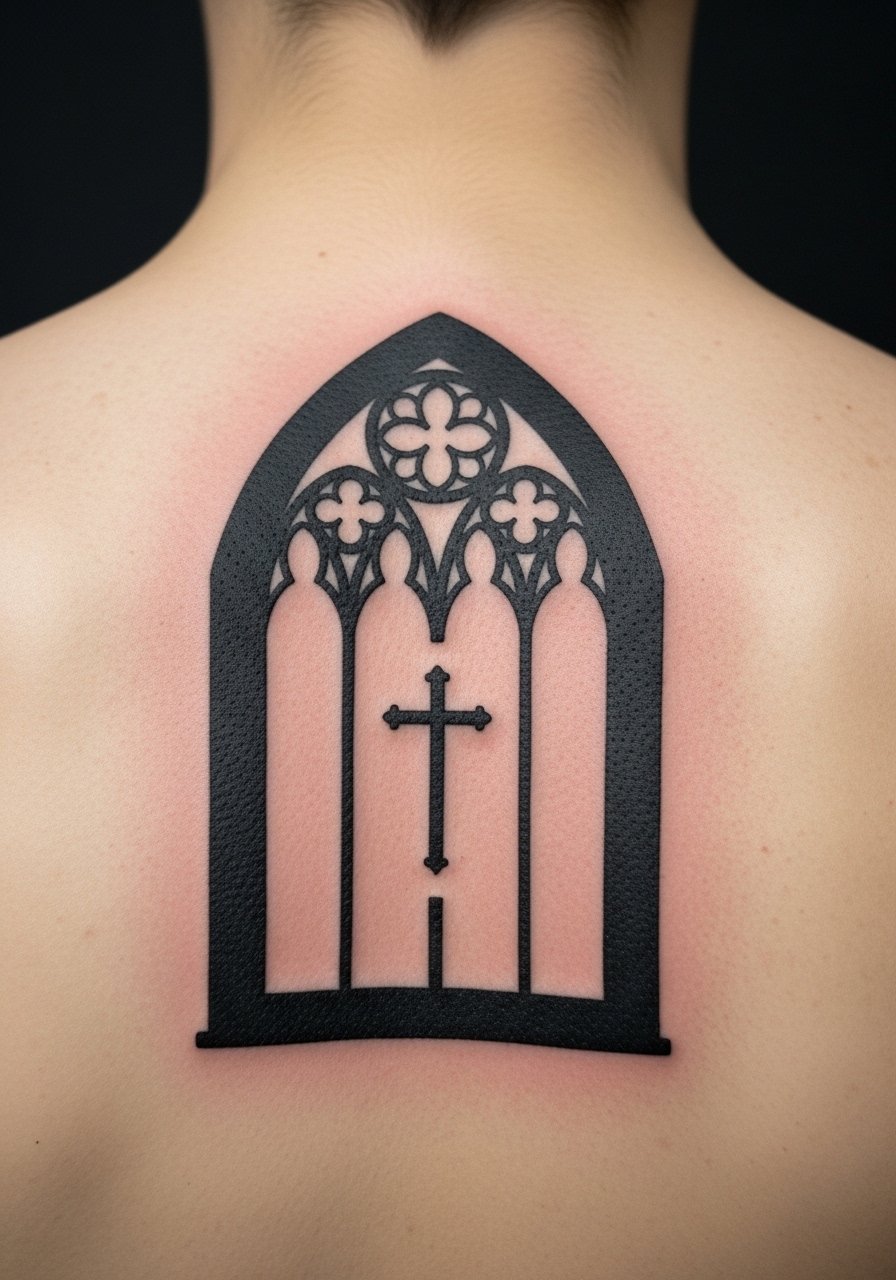
A chapel window silhouette is understated reverence. Upper back placement gives scale without constant visibility. Solid silhouettes age very well—there’s little detail to blur. I recommend artists with blackwork or graphic portfolios. Avoid tiny interior lines that won’t read once healed.
28. Small Palm Branch with Cross on Side Rib
Style/Technique: Sketch / Fine Line
Pain Level: High (6-8/10)
Session Time: 1 session, 1–2 hours
Best For: Palm Sunday symbolism, intimate placement
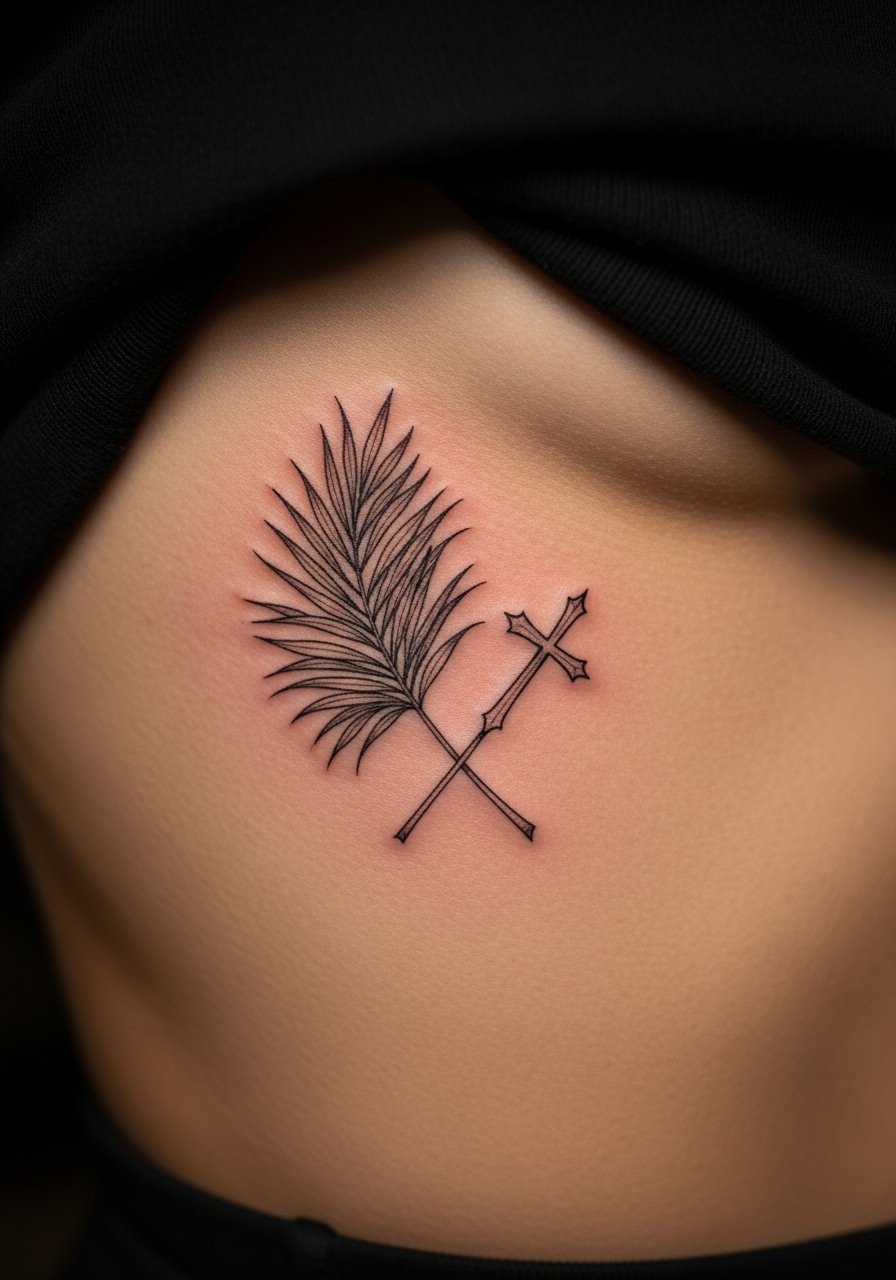
Palm branches paired with a cross are seasonal but timeless in symbolism. Rib placement offers discretion but higher pain. Fine sketch lines can stay delicate if spaced correctly—don’t ask for ultra-thin strokes that will fade into a smudge. Ask to see healed ribcage sketches before committing.
29. Simple Monogram Cross (Initials Integrated) on Collarbone
Style/Technique: Minimalist / Monogram
Pain Level: Medium (4-5/10)
Session Time: 1 session, 30–60 minutes
Best For: Personalized faith tribute, memorial, collarbone or wrist
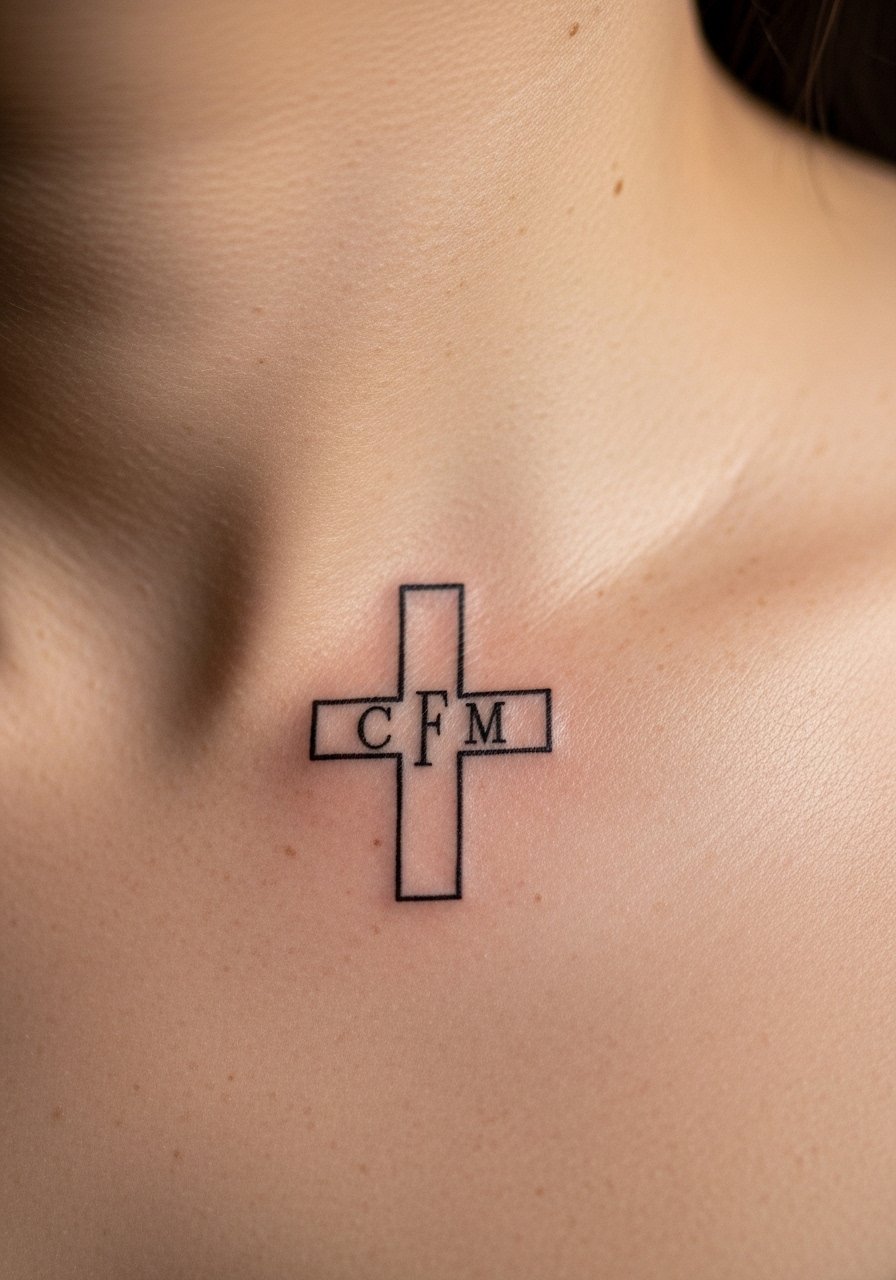
Integrating initials into a cross makes the piece deeply personal—great for memorials or family faith. Collarbone placement sits nicely with necklaces and is often visible. Make sure the letters remain legible when healed by asking for slightly larger letterforms. Artists familiar with script and minimal religious symbols will help refine the design.
30. Small Anchor with Bible Verse Shortcode on Inner Forearm (Minimalist Script)
Style/Technique: Minimalist / Script + Icon
Pain Level: Low-Medium (3-5/10)
Session Time: 1 session, 1 hour
Best For: Compact devotion, forearm visibility
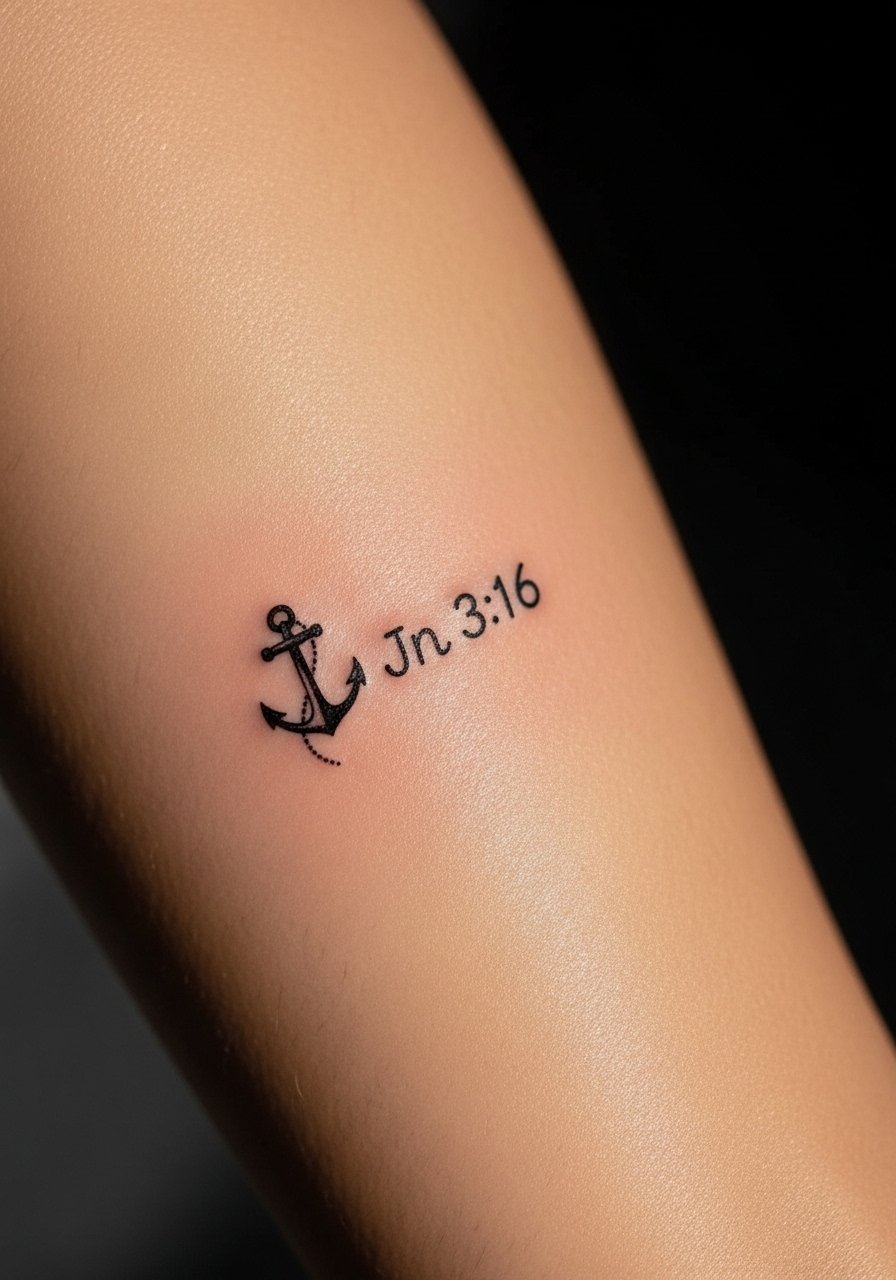
Pairing a tiny anchor with a scripture shortcode is a compact, meaningful option. Inner forearm placement makes it easy to read and reflect on. Script needs clear spacing—I've seen verse codes blur when letters are too tight. Ask your artist for script examples and mention you want the verse to remain legible on healed skin. This is a great “first Christian tattoo” approach if you want something small but purposeful.
Tattoo Prep and Aftercare Essentials
Aftercare Essentials:
- Aquaphor Healing Ointment, 14oz tube — Recommended for first 3–5 days to keep ink moist
- Saniderm Transparent Adhesive Bandage, 6-inch roll — Second-skin healing option many artists use
- CeraVe Fragrance-Free Moisturizing Lotion, 12oz — Daily moisturizing after initial healing phase
- Dr. Bronner's Unscented Castile Soap, 16oz — Gentle cleaning during first two weeks
Before Your Appointment:
- Tattoo Numbing Cream with 5% Lidocaine, 30g — Ask your artist before using; good for sensitive placements
- Stencil Transfer Paper, Tattoo Stencil Sheets — If you’re testing placement at home
Long-Term Maintenance:
- SPF 50+ Sunscreen Stick for Tattoos — Daily protection to prevent fading
- Mad Rabbit Tattoo Balm, 2oz — Keeps healed tattoos vibrant, artist-recommended in many shops
- Hustle Butter Deluxe, 8oz — Vegan aftercare option some artists prefer
Optional Comfort & Repair:
- Hydrocolloid Bandages (Large) — For dots or blisters during healing
- Tattoo Aftercare Kit (Gentle Soap + Balm) — Convenient multi-item kit for travel
Most artists I’ve talked to recommend starting with Saniderm or a thin layer of Aquaphor, then switching to fragrance-free lotion. Sunscreen is non-negotiable for long-term pigment preservation.
Frequently Asked Questions
Q: How bad does a tattoo actually hurt?
A: Pain depends on placement and your tolerance. Forearm/outer arm tends to be low (around 2–4/10). Ribcage, spine, and ankle often score higher (6–8/10). It’s more of a sharp scratching than stabbing. For sensitive areas try a numbing cream with 5% lidocaine after checking with your artist.
Q: How should I prepare the day before my appointment?
A: Sleep well, stay hydrated, and avoid alcohol. Wear easy clothing for the placement area. If you plan to use a numbing product, bring it and confirm timing with your artist. Having stencil transfer paper copies of your design helps communication.
Q: How do I keep my Christian tattoo from fading?
A: From what I’ve seen, daily sunscreen is the biggest factor. Use an SPF 50+ sunscreen stick when exposed to sunlight. Keep the skin moisturized with a fragrance-free lotion like CeraVe. Black and grey tends to hold up best; watercolor needs more upkeep.
Q: How long does healing take?
A: Surface healing is usually 2–3 weeks; full settling can take a few months. The first 3–5 days are critical—use Aquaphor or follow your artist’s Saniderm protocol. Expect peeling and dull color while skin regenerates.
Q: What if I regret my tattoo later?
A: Give your idea time before committing—sit on it for months. If regret happens, laser removal exists but is a long process. If you’re unsure about visibility, pick a concealable spot like the ribcage or upper thigh.
Q: Will tattoos look different on darker skin tones?
A: Yes. Black and grey designs and strong contrast show best across tones. Bright pastels and white ink often don’t translate the same on deeper skin. I always ask artists to show healed work on skin tones like mine to set realistic expectations.
Q: Can I work out after getting inked?
A: Wait at least 48–72 hours before heavy sweating near the tattoo. For flex areas (knees, elbows) wait longer. Sweat can irritate and introduce bacteria. Keep cleaning simple—gentle soap like Dr. Bronner's Unscented Castile Soap and light moisturizing.
Q: Are there sacred symbols I should avoid using disrespectfully?
A: I’ve seen people misuse icons without understanding their context. If your tattoo references scripture or saints, take time to learn the symbol’s meaning and discuss it with your artist—many will have helpful cultural sensitivity advice.
