
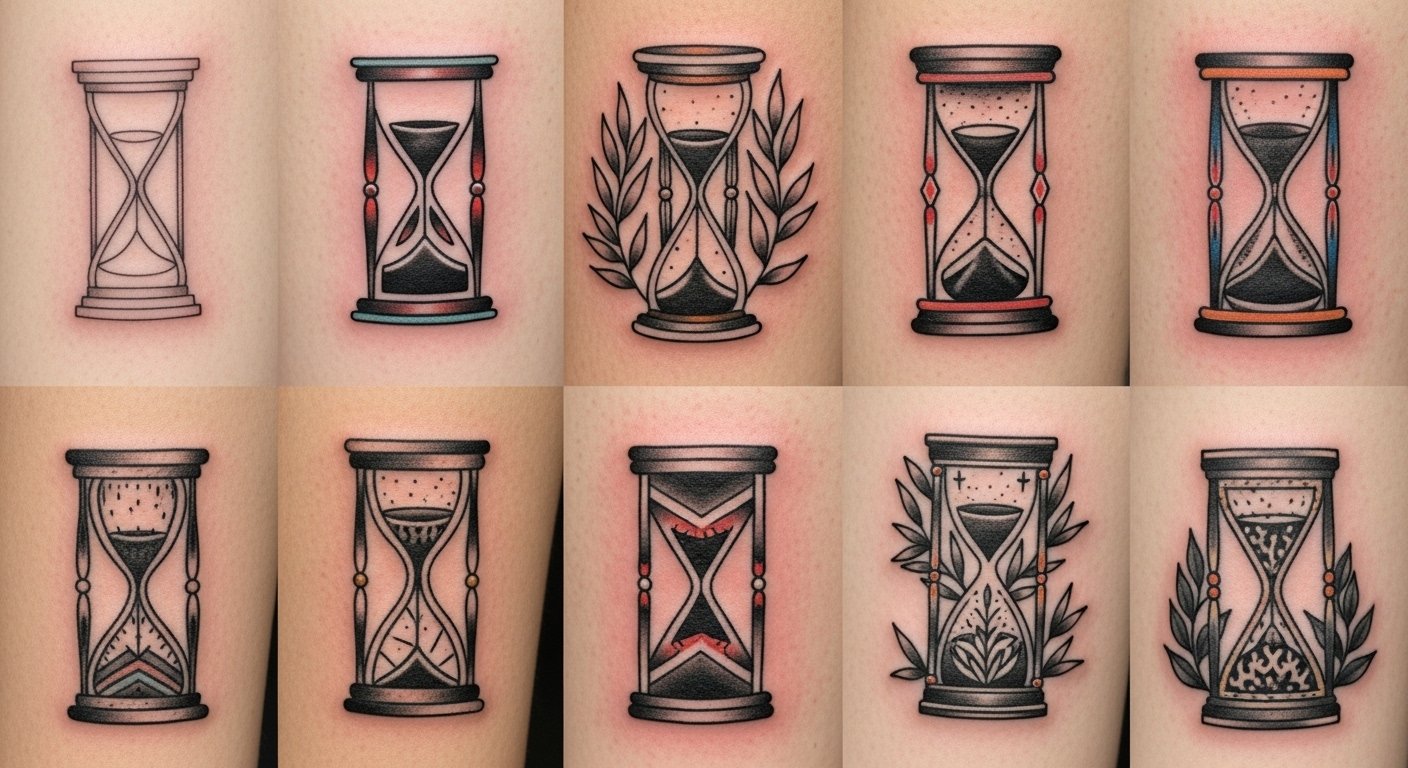
I spent months stalking hourglass tattoos on Instagram before I realized the real question: which hourglass will still feel right five years from now? I wanted designs that say something about life—balance, loss, growth—without being a cliché. Below are 30 hourglass tattoo ideas I collected from studio walls, artist portfolios, and my own ink experiments—each with placement, pain reality, healed-look notes, and the common mistakes I tell friends to avoid.
This list focuses on fine line, blackwork, neo-traditional, and micro-realism hourglass tattoo designs. These ideas work well on wrists, forearms, ribs, calves, and behind the ear. From what I’ve seen, fine line and blackwork hold up best over time, while watercolor accents look incredible fresh but need more maintenance.
1. Fine Line Hourglass Silhouette on Wrist
Style/Technique: Fine Line / Minimalist
Pain Level: Low (2-4/10)
Session Time: 1 session, 30–90 minutes
Best For: First tattoo, discreet meaningful piece
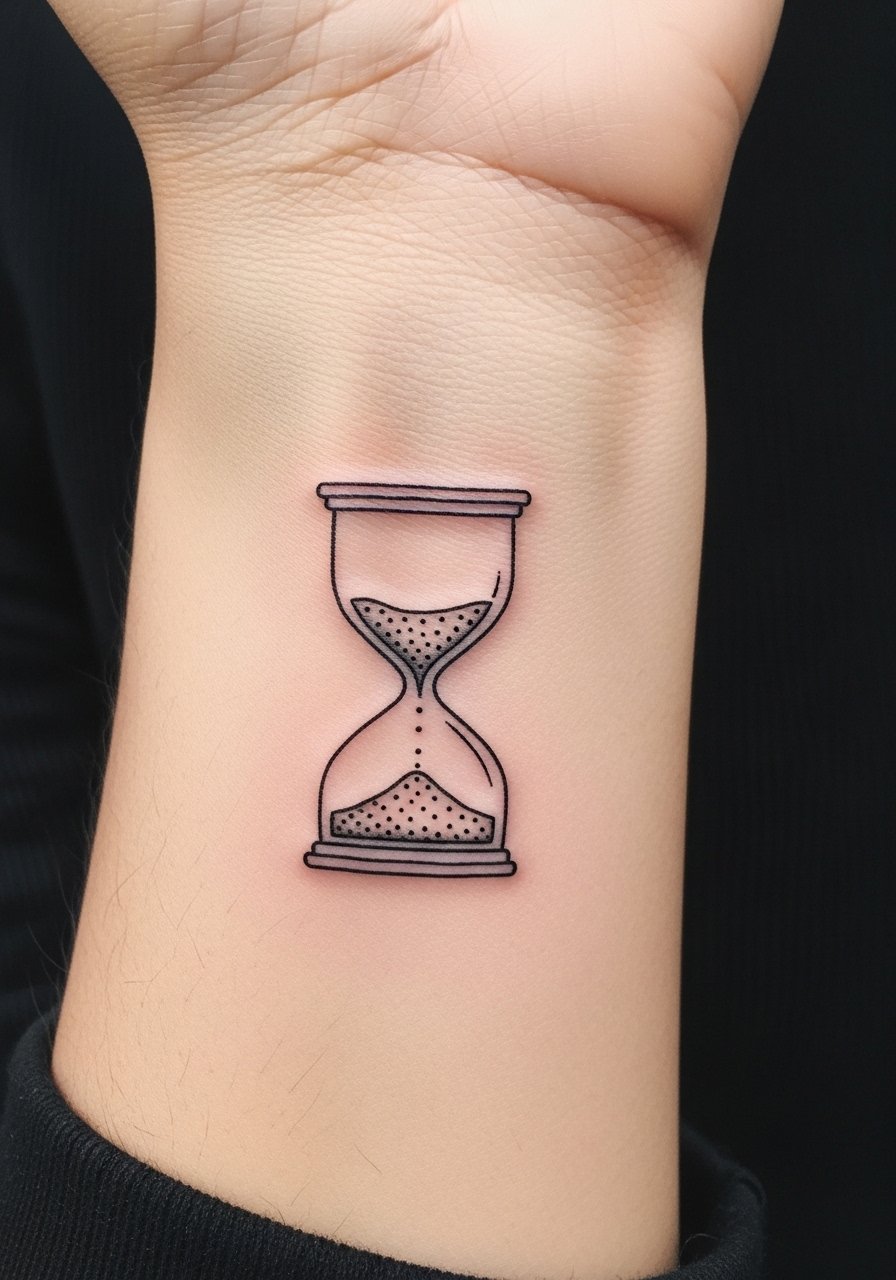
I got a tiny wrist hourglass to remind me of small daily choices—simple, elegant, and easy to hide with a watch. Fine line works here because the canvas is small; the look is clean and “timeless.” Expect light soreness for a day and surface healing in 1–2 weeks. From what I’ve seen, single-needle lines can blur slightly over years, so ask your artist about slightly thicker outlines if you want longevity. A common mistake is placing it too close to the bone—ask for a small mock stencil so the hourglass sits where you can see it. For a fine line hourglass tattoo, look for artists with micro-line portfolios and healed photos on Instagram.
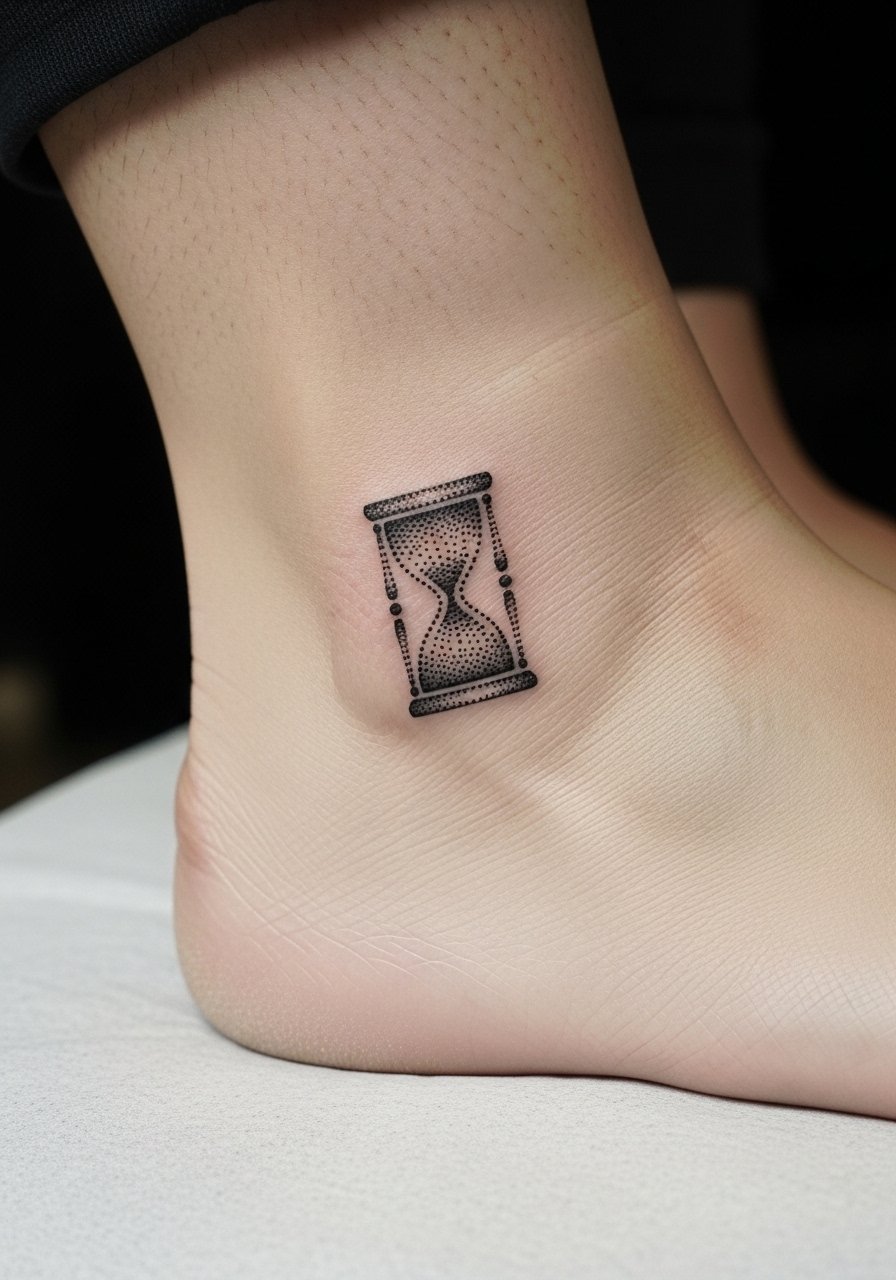
2. Minimalist Hourglass Outline on Ankle
Style/Technique: Minimalist / Fine Line
Pain Level: Medium (4-6/10)
Session Time: 1 session, 45–90 minutes
Best For: Subtle reminder, easy-to-hide placement
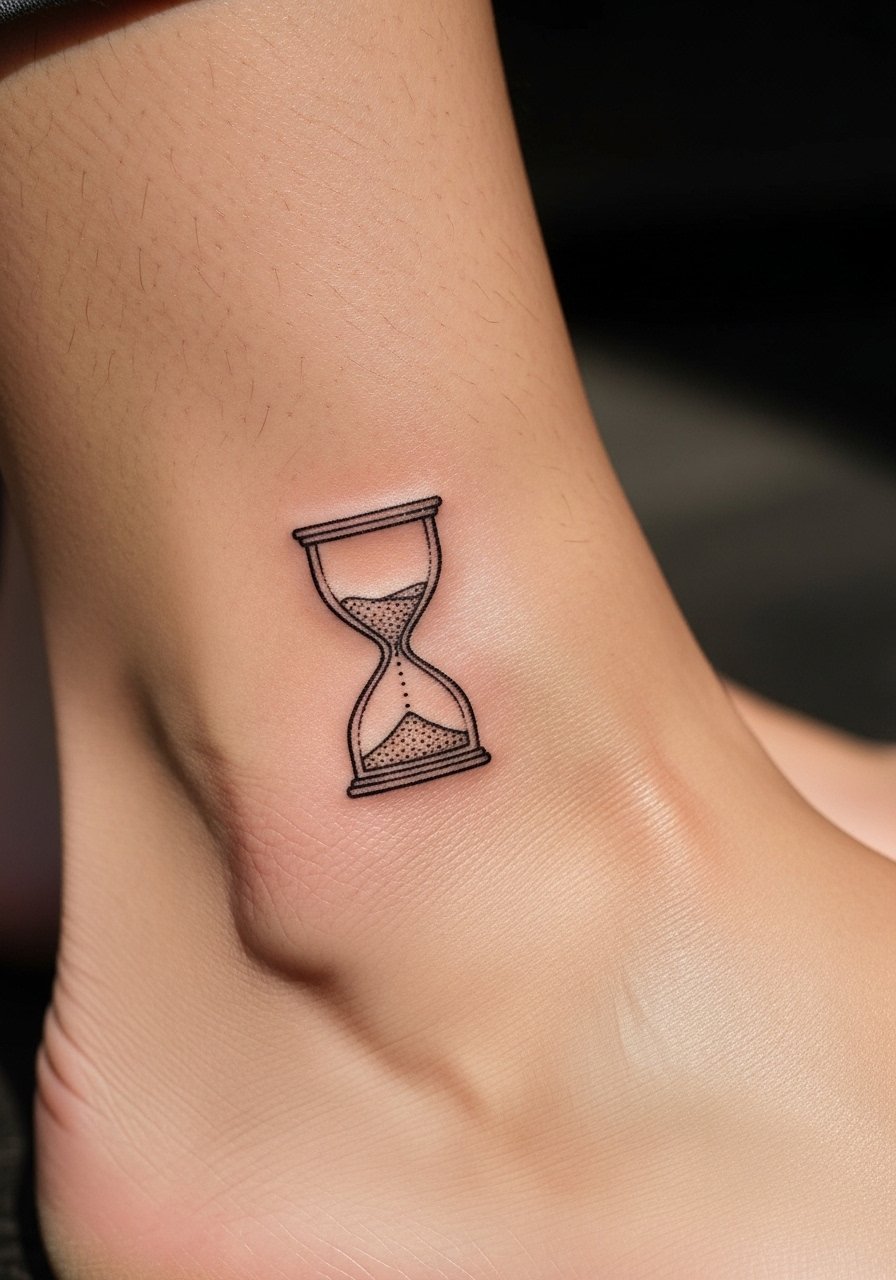
Ankle placement gives a small hourglass a private spot that shows when you want it to. I usually recommend this to friends nervous about visibility; it’s discreet and pairs well with tiny dotwork. Pain is higher than the forearm because there’s less flesh; plan for 24–48 hours of tenderness. Minimalist outlines age nicely if lines aren’t paper-thin—ask your artist to balance delicacy with a touch of boldness. Many people regret tiny ankle pieces that fade, so keep aftercare strict and use sunscreen once healed. If you want to grow the design later, the ankle gives room for floral wraps or a small script.
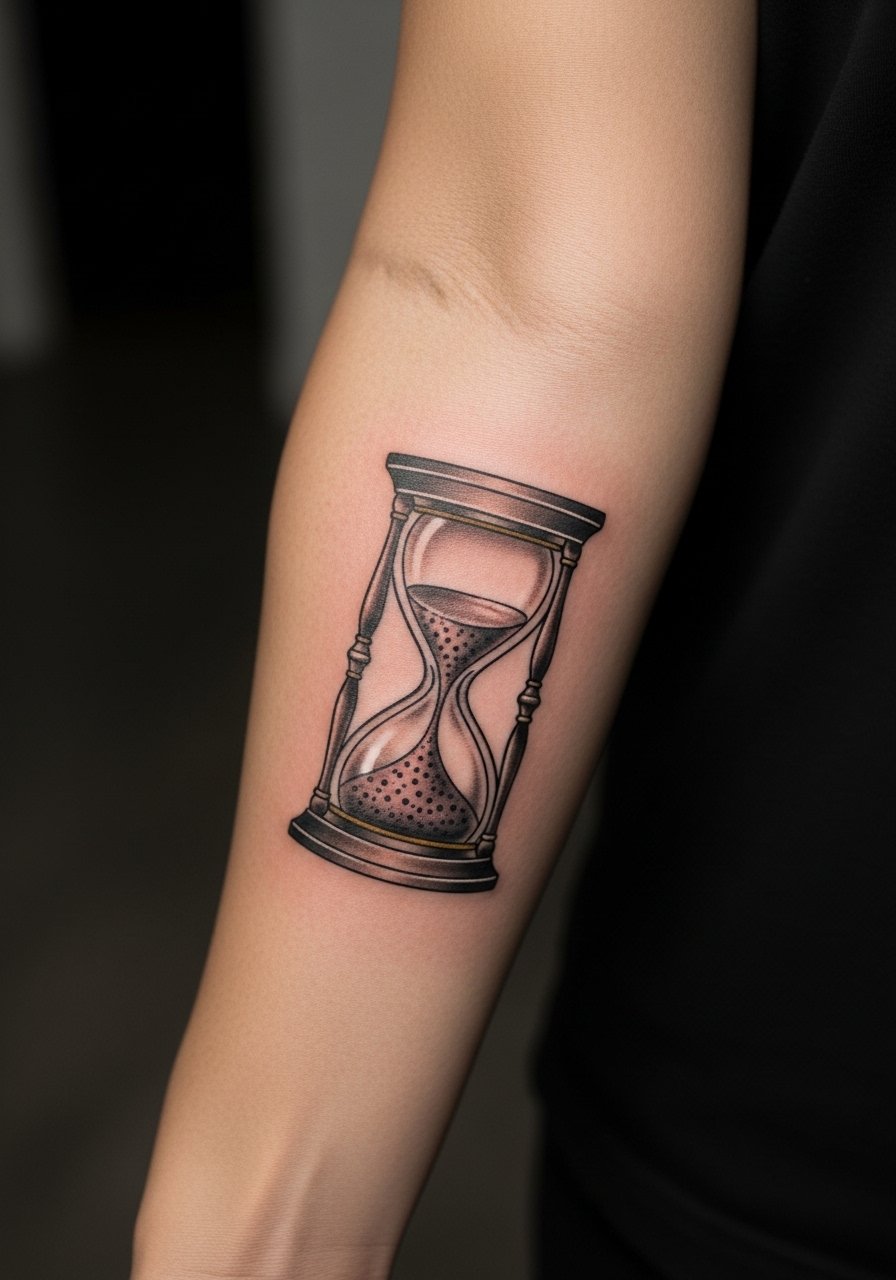
3. Symmetrical Hourglass With Sand Flow on Forearm
Style/Technique: Illustrative / Blackwork
Pain Level: Low-Medium (3-4/10)
Session Time: 1–2 sessions, 1.5–3 hours
Best For: Visible statement with clear symbolism
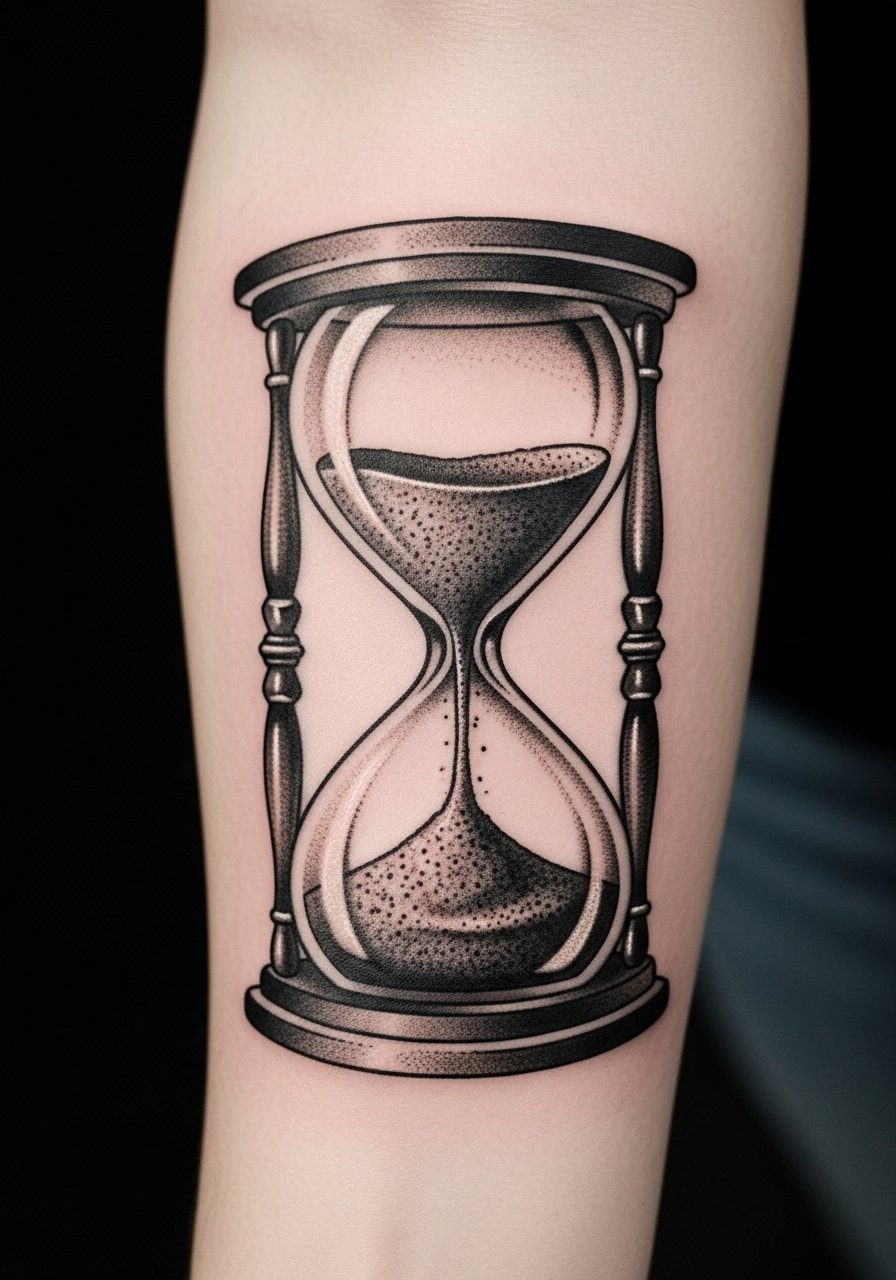
A centered forearm hourglass feels balanced—literally and visually. I like this placement because it reads clearly whether you’re dressed up or not. Blackwork shading keeps the piece bold as it heals and ages. Expect light discomfort, but the forearm heals quickly and is easy to protect. One thing artists stress to me is to keep the sand flow legible in healed photos; overly fine sand details can disappear. Ask for reference photos of healed blackwork hourglasses to ensure the symmetry and sand contrast will hold up. This style is great if you want your hourglass to double as a conversation starter about balance and the passage of time.
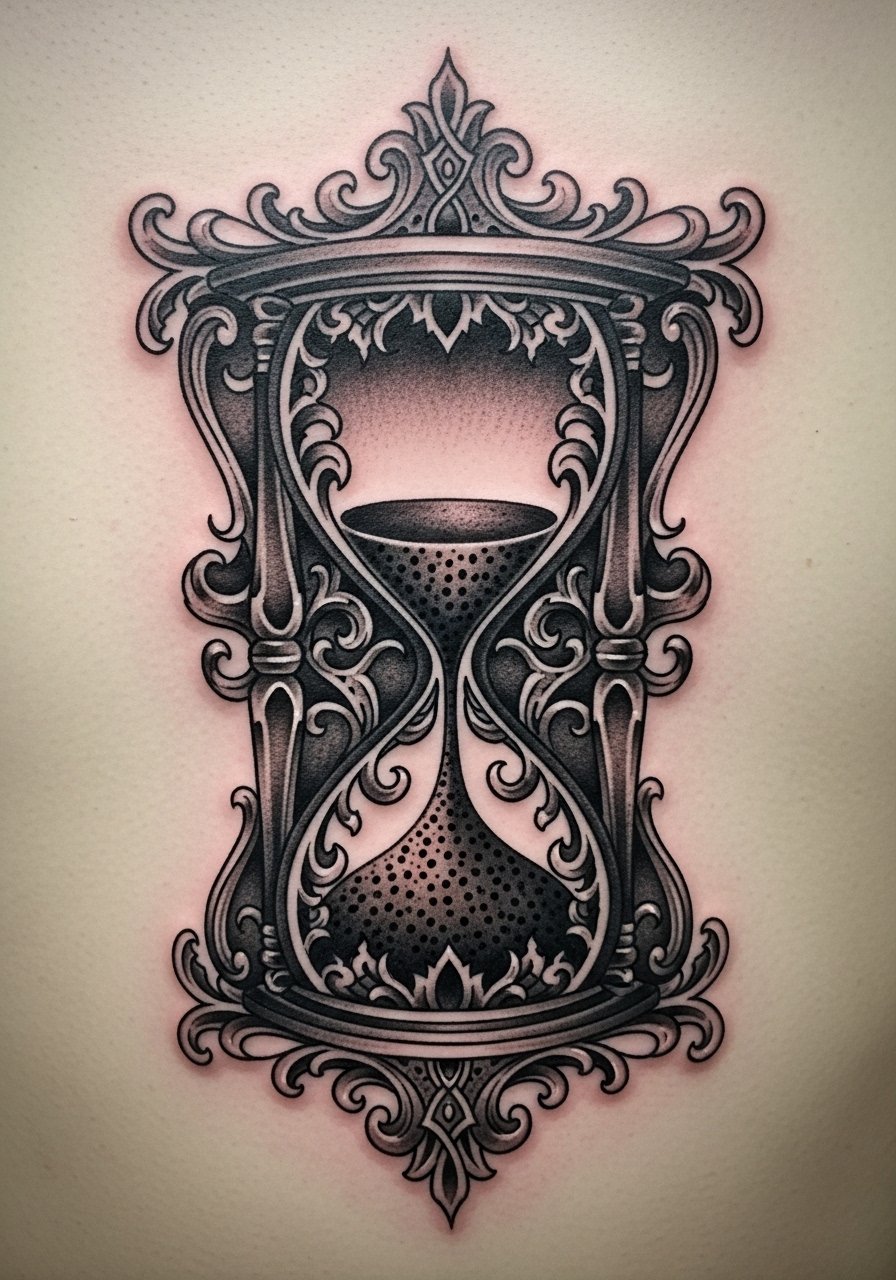
4. Ornate Hourglass With Roses on Collarbone
Style/Technique: Neo-Traditional / Illustrative
Pain Level: Medium-High (5-7/10)
Session Time: 2 sessions, 2–4 hours total
Best For: Feminine statement, meaningful centerpiece
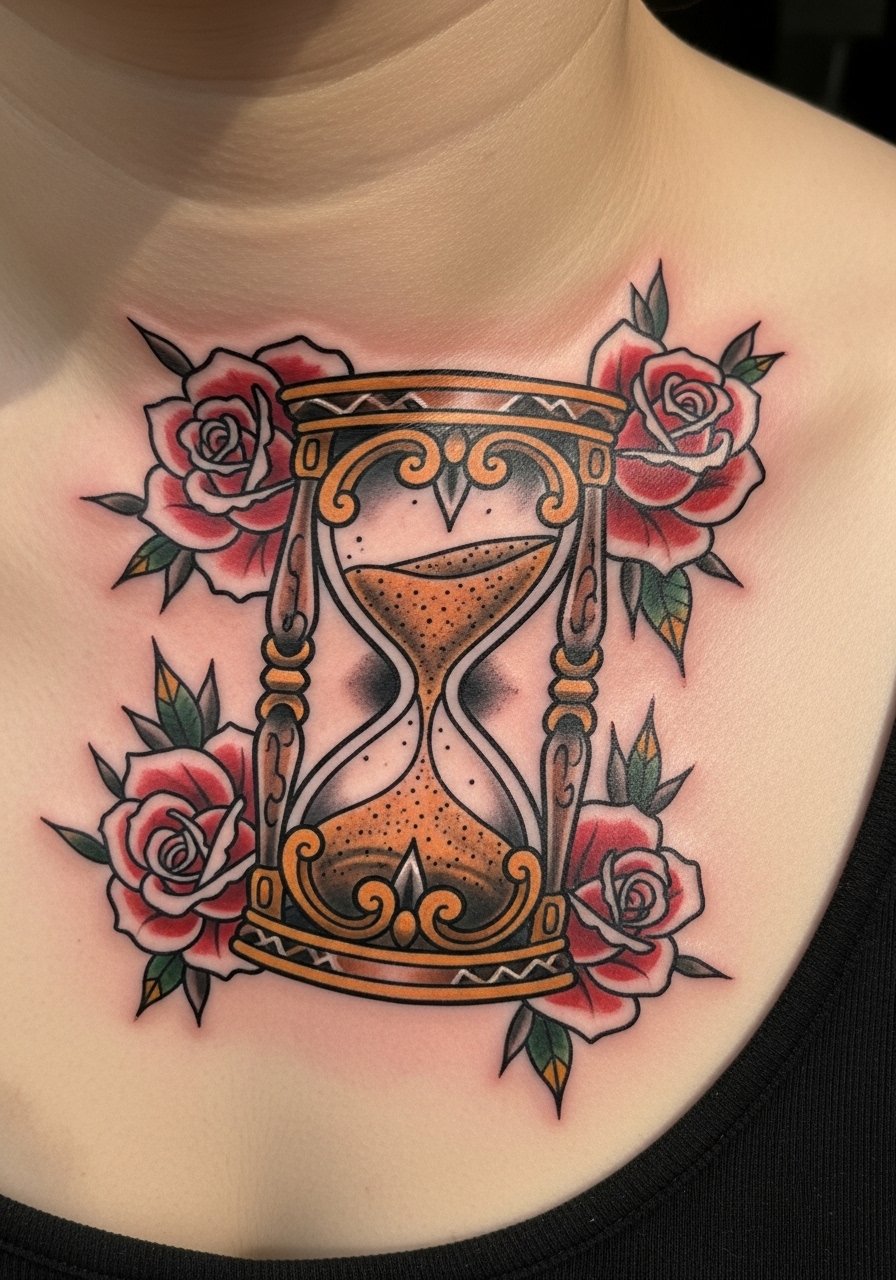
I fell for a collarbone hourglass wrapped in roses because it blends mortality with beauty—perfect if you want “life and love” symbolism. Collarbone sessions can be twingey; expect sharp spots near bone. The ornate frame and blooms let you personalize: specific flowers for anniversaries or growth markers. Color accents look striking fresh but can soften with time—black outlines and deep shading around the glass help maintain definition. Avoid asking for tiny, delicate petals in a very small piece; scale up so details survive healing. Look for artists experienced in neo-traditional floral work and ask to see healed photos on collarbones.
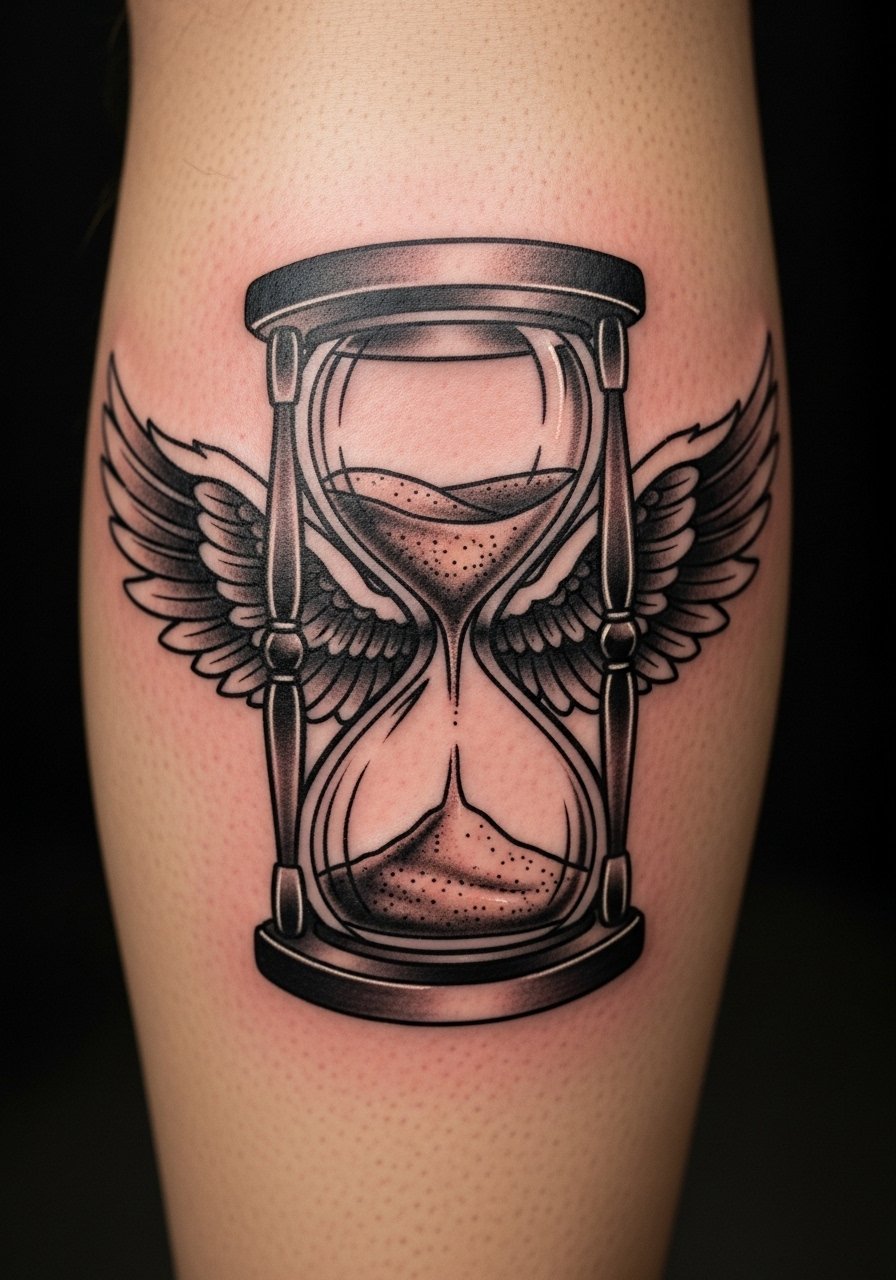
5. Winged Hourglass (Time Flies) on Shoulder Blade
Style/Technique: Traditional / Neo-Traditional
Pain Level: Low-Medium (3-5/10)
Session Time: 1–2 hours
Best For: Motivational “seize the day” theme, medium visibility
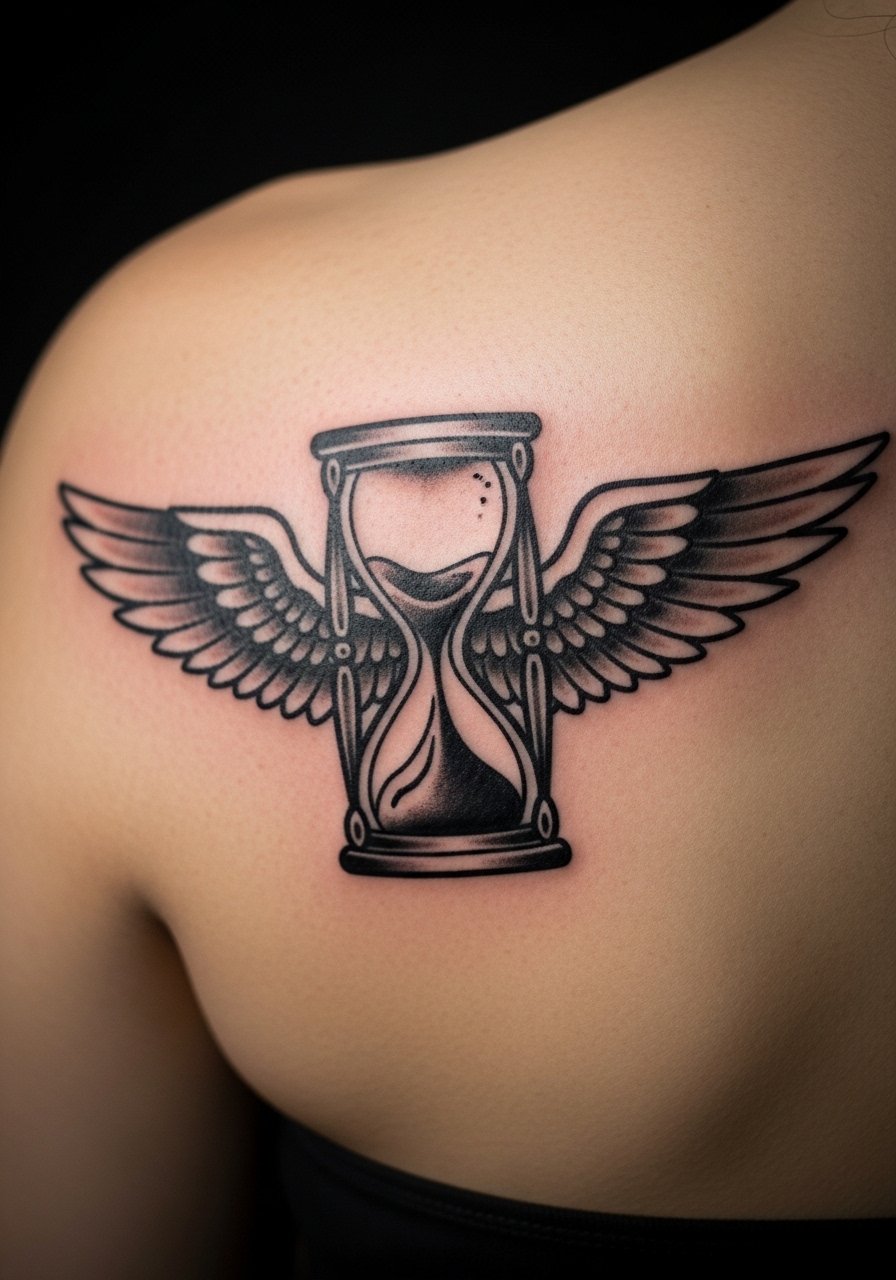
The winged hourglass is a classic visual for “time flies.” I’ve seen people choose it when they want a daily nudge to move forward. Shoulder blade placement lets it sit on a wide, low-pain canvas that’s easy to cover. Traditional linework and solid blacks mean it ages predictably—good if you want longevity without frequent touch-ups. Watch out for overly intricate feather details in small sizes; they can blur into a texture that reads messy later. Ask your artist about wing scale so the motif remains readable from across a room. This design pairs well with short scripts or small clouds for extra context.
6. Hourglass With Skull on Bicep
Style/Technique: Blackwork / Dark Art
Pain Level: Low-Medium (3-5/10)
Session Time: 2 sessions, 2–4 hours
Best For: Bold memento mori piece, large visibility
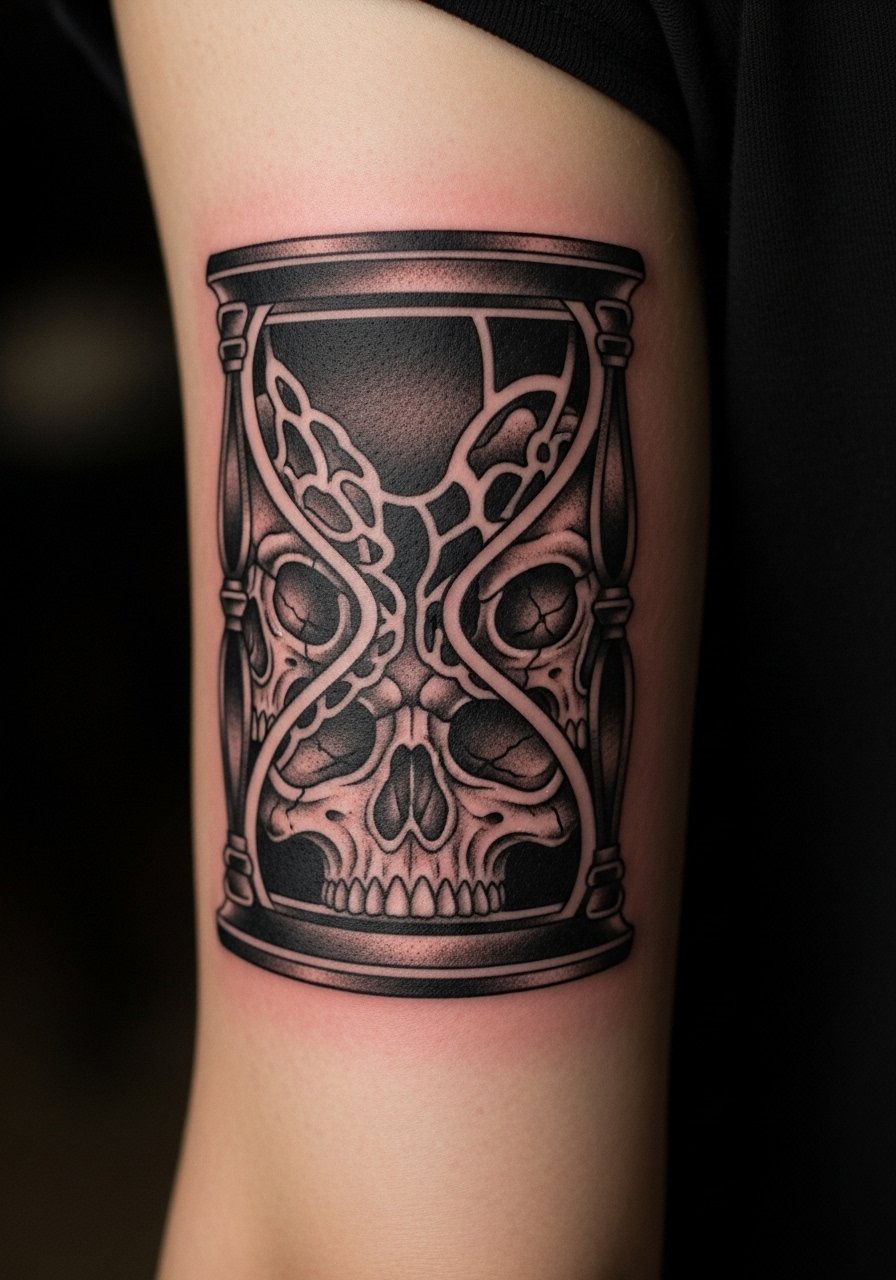
If you want a clear memento mori, pairing an hourglass with a skull says it plainly. I’ve seen this choice from collectors who like darker, thought-provoking pieces. The bicep is forgiving for size and shading; it’s also relatively low on the pain scale. Blackwork keeps the skull readable as the skin ages. The one mistake I see is cramming too many tiny skull details into a mid-sized piece—scale up the skull or simplify. Ask artists who specialize in dark art or blackwork and bring references of healed work. This is a piece that carries weight—both visually and personally—so be intentional about the symbolism.
7. Broken Hourglass On Thigh
Style/Technique: Illustrative / Realism
Pain Level: Medium (4-6/10)
Session Time: 1–2 sessions, 1–3 hours
Best For: Narrative about letting go or major life change
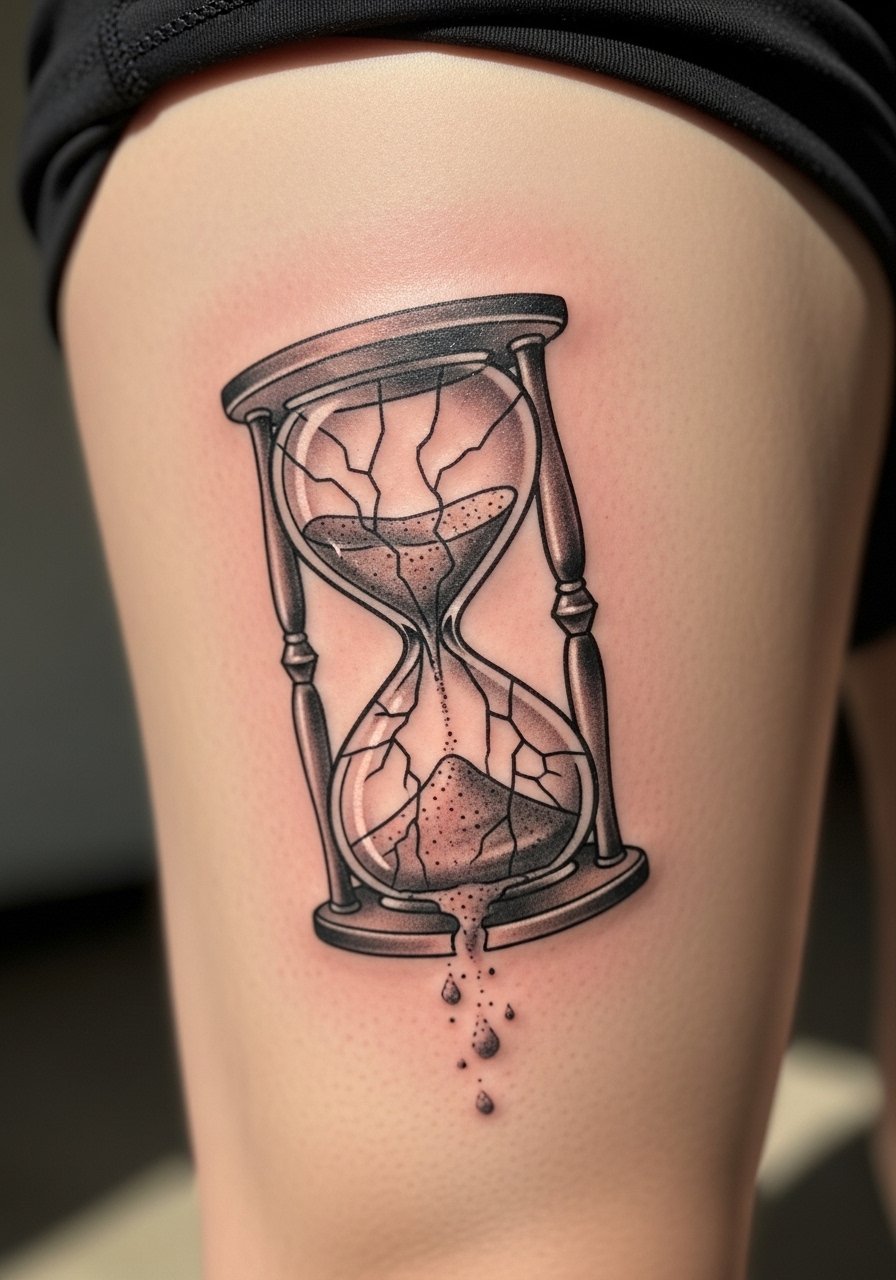
Broken hourglasses read as “letting go” or reclaimed time. I’ve recommended this to friends after major life shifts. Thigh placement lets you choose scale and keep the piece private. Expect some soreness during session but easy aftercare because the area isn’t exposed to constant friction. The key is dramatic, readable cracks—tiny hairline cracks can look like scabs after healing. I advise clients to ask for clear negative space and bold shadowing around broken edges. This design ages well if the primary lines are bold and the spilled sand is slightly exaggerated for visibility.
8. Celestial Hourglass With Stars on Inner Arm
Style/Technique: Illustrative / Watercolor Accents
Pain Level: Low-Medium (3-5/10)
Session Time: 1–2 sessions, 1.5–3 hours
Best For: Philosophical or spiritual meaning
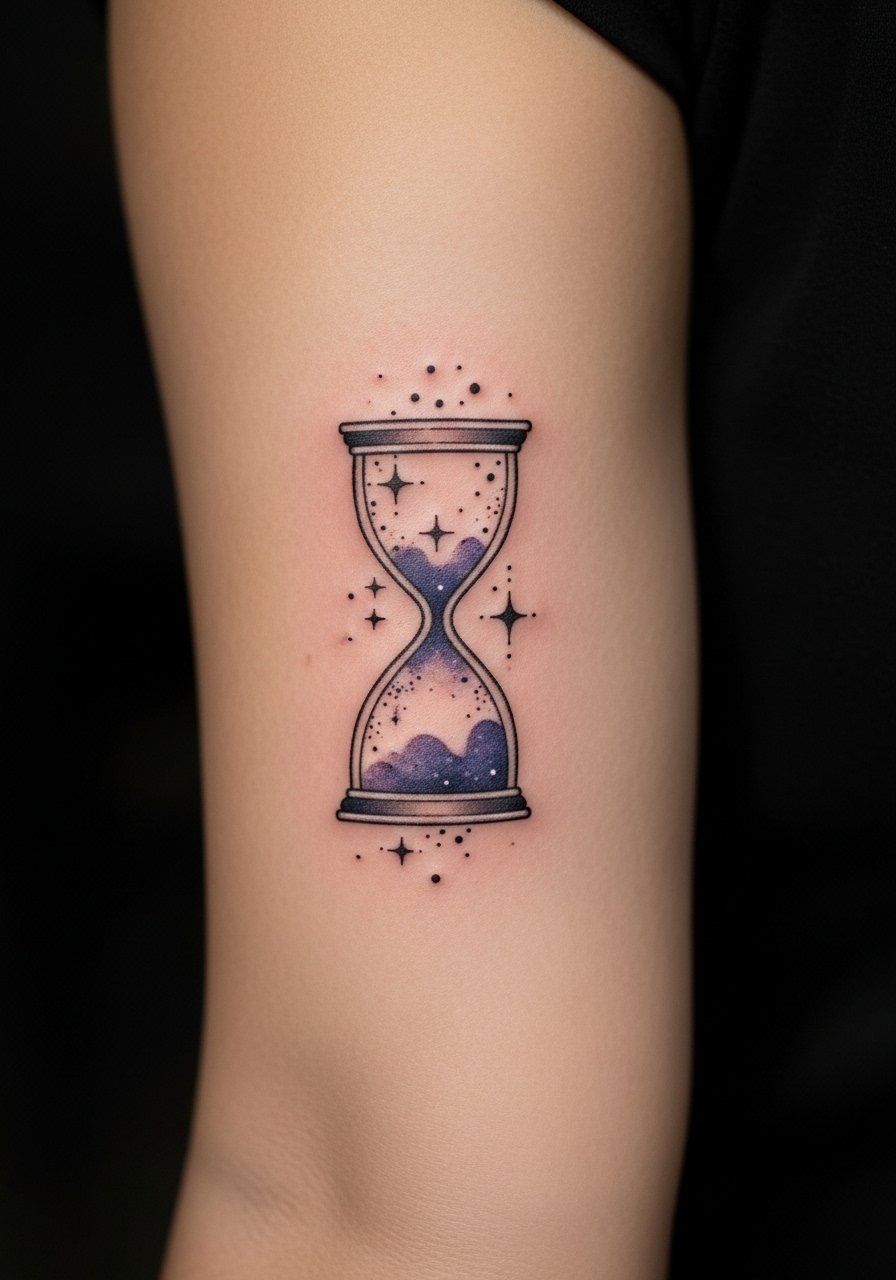
A celestial hourglass ties fleeting time to cosmic ideas—perfect for people who want a spiritual bent. The inner arm keeps it private but visible when you want to read the message. Watercolor accents look amazing fresh; in my experience you’ll see some softness after a year, so balance with dark outlines. Pain is manageable on the inner arm, though sensitive near the armpit. Avoid placing too many tiny stars or thin gradients into a compact design; ask your artist where color saturation will hold up. For depth, request a mix of blackwork shading and restrained color patches to maintain contrast as it heals.
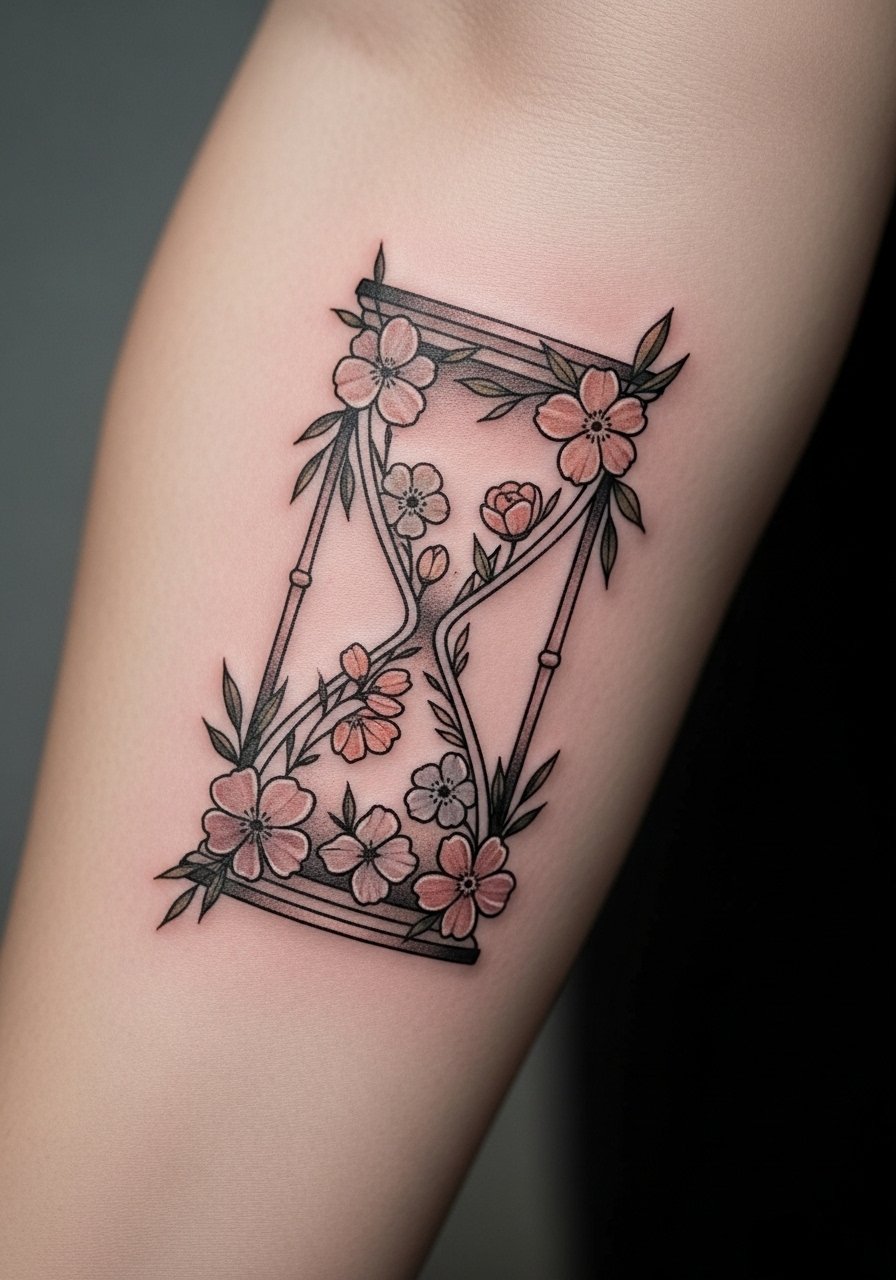
9. Hourglass Tattoo With Floral Wrap on Wrist
Style/Technique: Botanical Illustrative / Fine Line
Pain Level: Low (3-4/10)
Session Time: 1 session, 1–2 hours
Best For: Meaningful, feminine, visible daily reminder
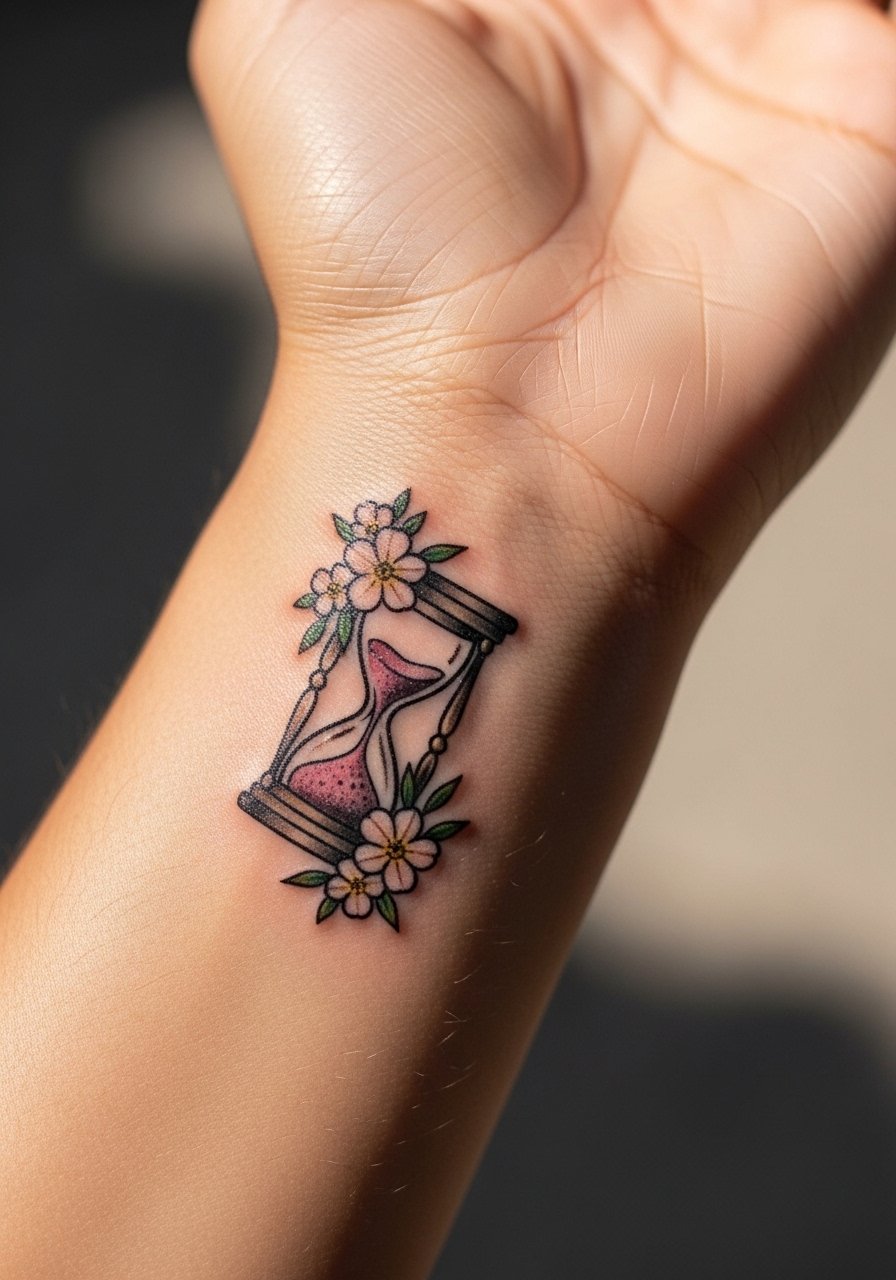
I’ve recommended floral wraps when someone wants extra personal meaning—different flowers can mark birthdays, loss, or growth. Wrist placement is intimate and easy to show. Pain is low but expect tenderness for a couple of days. With floral wraps, avoid packing too many tiny petals into a small piece; healed photos often show petals blending. Ask your artist for slightly bolder petal edges and a clear negative space around the glass so the hourglass remains the focal point. Black and gray glass with colored blooms often gives the best long-term contrast.
10. Micro-Realism Sand-Flowing Hourglass on Forearm
Style/Technique: Micro-Realism / Realism
Pain Level: Medium (4-6/10)
Session Time: Multiple passes, 2–4 hours
Best For: Collector piece, hyper-detailed statement
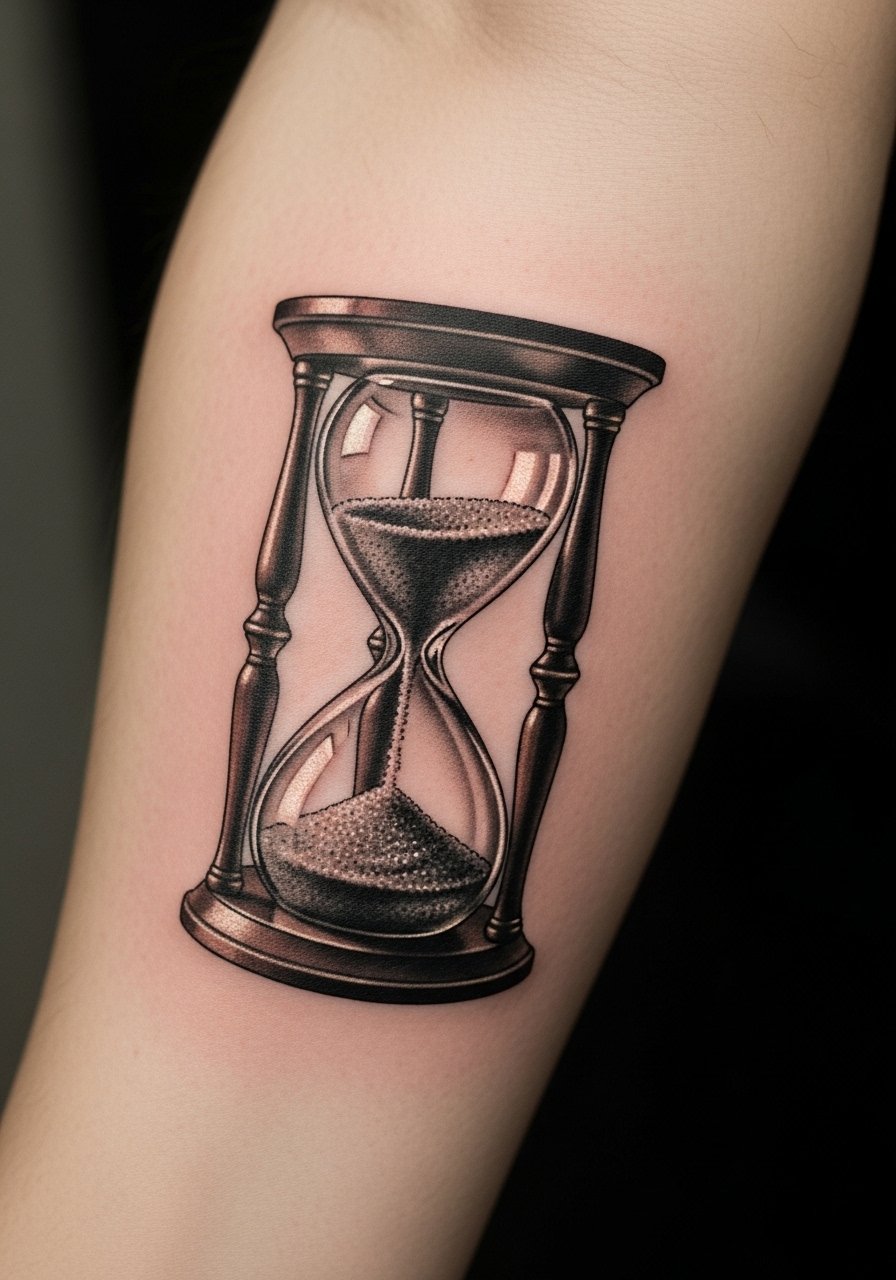
Micro-realism hourglasses can be mesmerizing—the tiny sand granules and glass reflections tell a story. I’ve seen reels with these and they age surprisingly well when done by a realism artist. Forearm is ideal for showing off the tiny detail. Expect longer sessions and some soreness as the artist layers depth. A common mistake is asking for micro-realism in a space too small; insist on a size that lets the artist render the grains and reflections. Look for artists with healed micro-realism portfolios and ask for close-up healed photos. This style reads as a serious statement about time’s passage.
11. Hourglass Yin-Yang Balance on Sternum
Style/Technique: Symbolic / Blackwork
Pain Level: High (7-9/10)
Session Time: 1–2 sessions, 2–3 hours
Best For: Deep symbolism, central body canvas
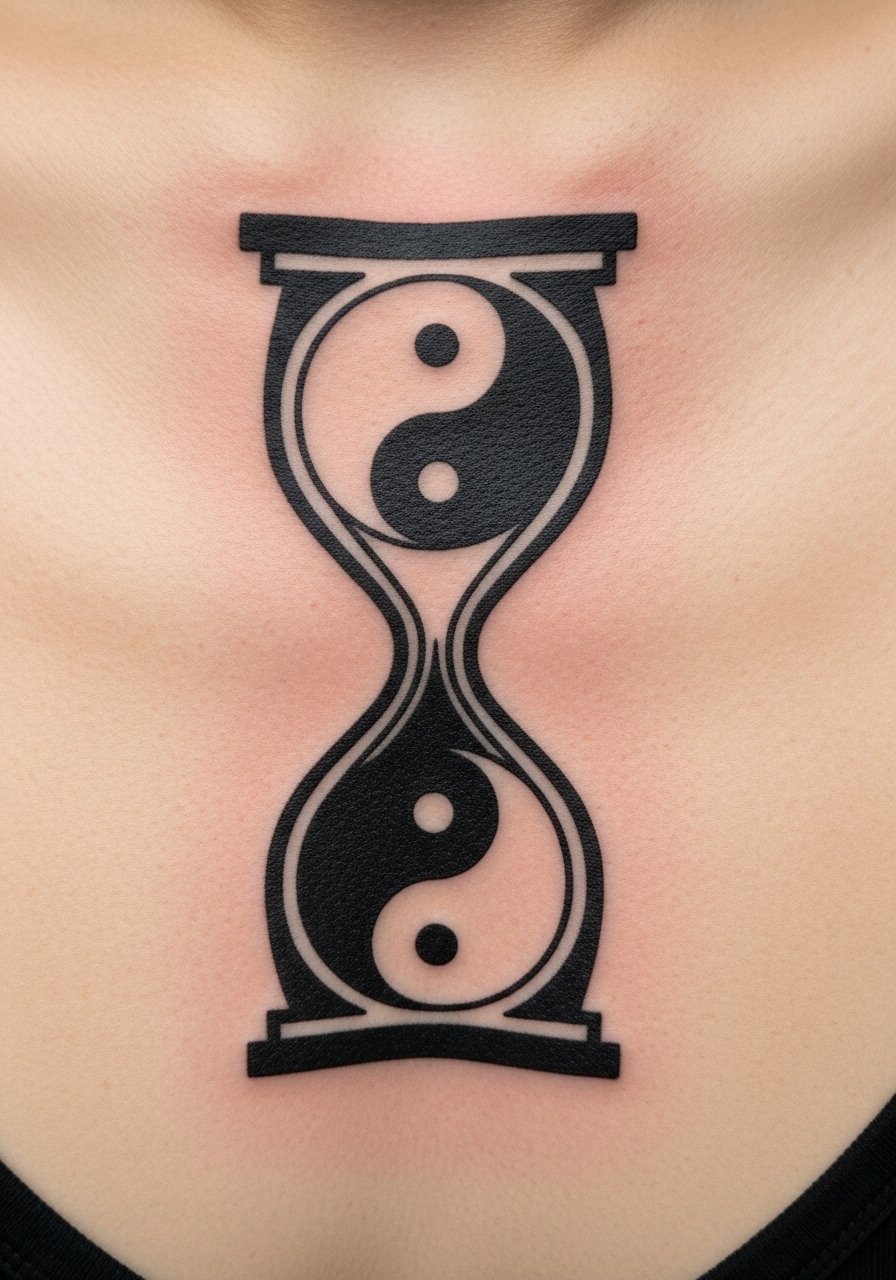
An hourglass melded with yin-yang emphasizes balance between opposite forces. Sternum placement is dramatic and intimate—great if the symbolism is central to you. Pain is high around the sternum and ribs; plan accordingly. Blackwork keeps contrast strong as the skin ages. I’ve told friends to be ready for aftercare challenges because clothing can rub the area; sleep elevated and avoid bras that irritate. The biggest error is making the design too small for the sternum’s movement—scale it so the curves read well as you breathe. Ask to see healed sternum photos from your artist.
12. Gothic Hourglass on Ribcage
Style/Technique: Gothic / Dark Illustrative
Pain Level: High (7-9/10)
Session Time: 2 sessions, 2–4 hours
Best For: Dramatic, moody memento mori
Ribcage hourglasses are dramatic and private—great for deep symbolism. The pain is intense for many people, so expect breaks. Gothic elements—filigree, ornate frames—add personality, but too much tiny detail can be problematic when the skin shifts. I advise larger filigree lines and strong black fills to keep the piece readable after healing. Recovery requires attention because the rib area moves with every breath; keep clothing loose. Look for artists who show healed ribcage pieces in their portfolio.
13. Hourglass With Wings And Sand Spill on Calf
Style/Technique: Neo-Traditional / Illustrative
Pain Level: Low-Medium (3-5/10)
Session Time: 1–2 sessions, 1.5–3 hours
Best For: Dynamic movement, visible in shorts
Calf placement gives room for movement in winged compositions. I’ve seen people pick this for travel or life-change symbolism—the flying hourglass feels kinetic. The calf is forgiving pain-wise and easy to show. Make sure the sand spill has enough negative space between grains so it doesn’t blend into a gray patch later. Artists who do neo-traditional work often render wings and sand well in this scale. Consider adding subtle color to the sand to create focal contrast that ages more noticeably than faint pastels.
14. Small Hourglass Tattoo Behind Ear
Style/Technique: Fine Line / Micro
Pain Level: Medium (4-6/10)
Session Time: 1 session, 30–60 minutes
Best For: Tiny, private reminders, first tiny tattoo
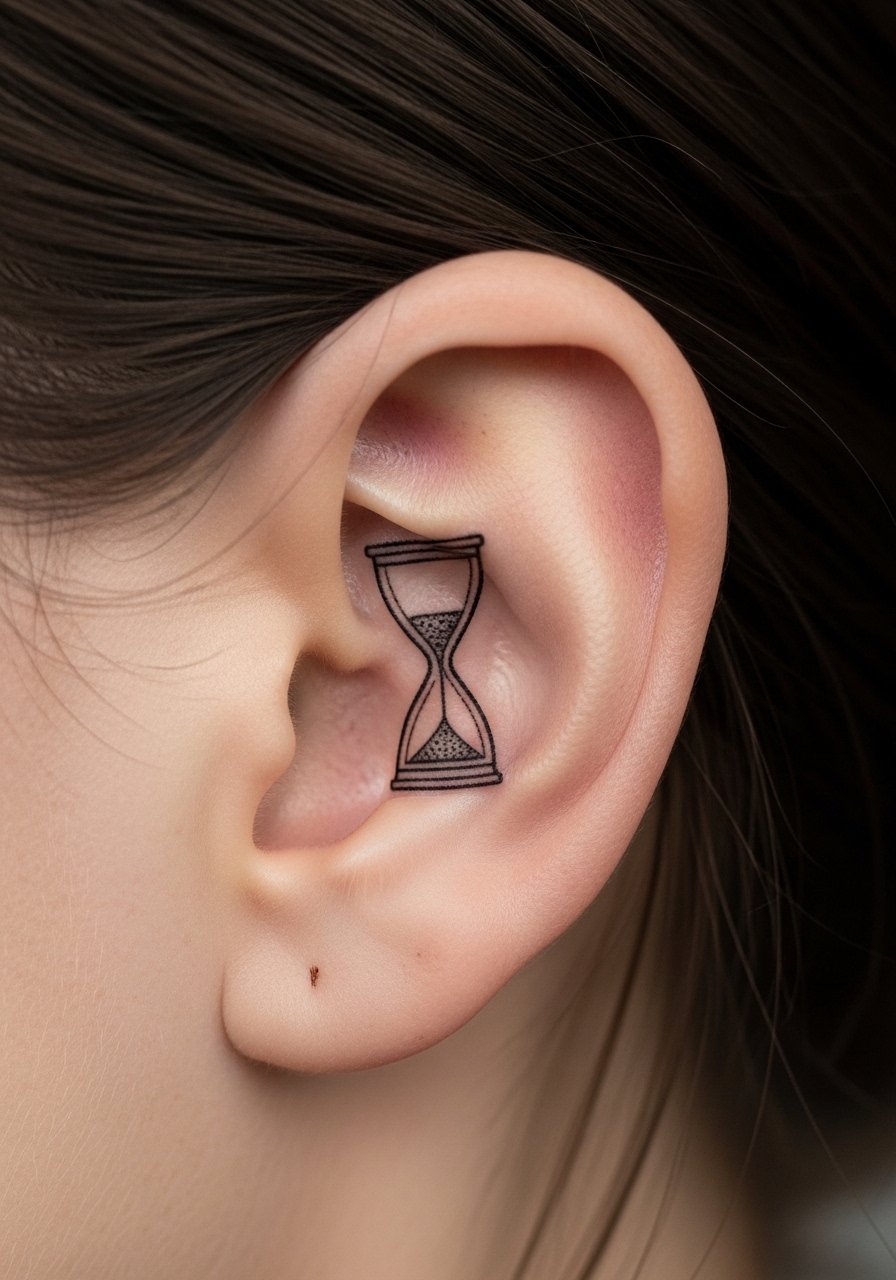
Behind-the-ear hourglasses are a whisper of meaning—tiny and easily hidden by hair. Pain is short but sharp. Because the area is small, keep the design minimal: outline and a dot or two for sand. From experience, very thin lines can blur here, so ask your artist for slightly darker single strokes. Also, discuss hair growth and hairstyles that might rub the area. This is a great starter spot if you want to test commitment to symbolic ink.
15. Floral-Wrapped Hourglass on Inner Forearm
Style/Technique: Botanical Illustrative / Fine Line
Pain Level: Low (3-4/10)
Session Time: 1–2 sessions, 1–3 hours
Best For: Visible daily reminder with growth symbolism
Inner forearm is one of my favorite places for botanical hourglasses—you can see it daily and it reads clearly. I like the narrative potential: choose flowers representing people or milestones. Pain is manageable and healing is straightforward. Keep bloom details bold enough to survive skin movement; tiny leaves can blur. Artists who specialize in botanical illustrative work can show how the colors and lines age. If you want scalability, the forearm is perfect for later additions like dates or a small quote.
16. Hourglass With Script Date On Rib
Style/Technique: Illustrative / Script Integration
Pain Level: High (7-9/10)
Session Time: 1–2 sessions, 1.5–3 hours
Best For: Memorial or milestone with private placement
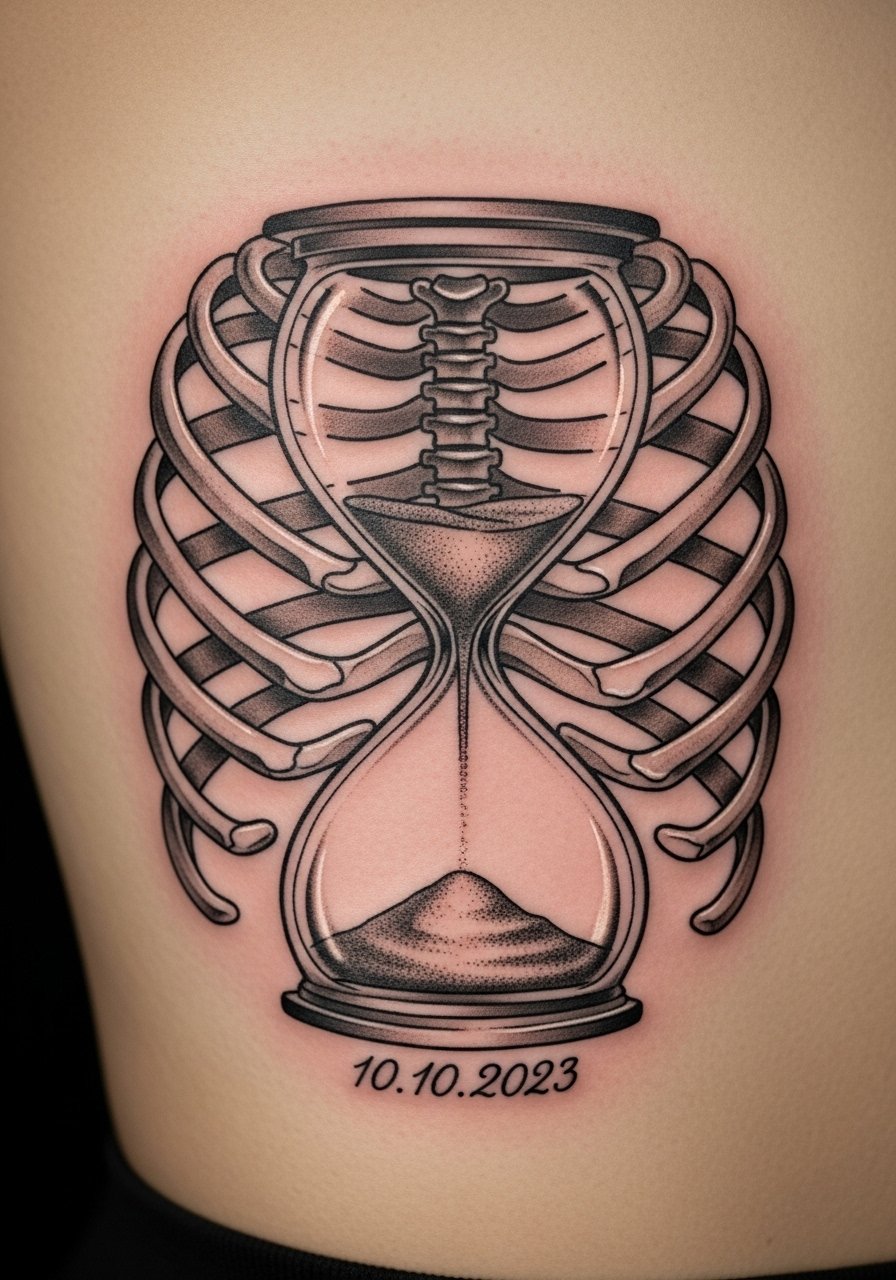
Pairing a date with an hourglass makes the meaning explicit—birth, loss, recovery. Rib placement keeps it private and personal. Ribs hurt, so expect to schedule accordingly. Script needs readable size; tiny cursive often blurs, so ask the artist for a slightly larger, simpler font. I’ve seen healed rib scripts lose fine curls, so opt for legibility over flourish. This design often becomes a quiet talisman because of its location.
17. Broken Glass Hourglass With Flowers on Thigh
Style/Technique: Illustrative / Symbolic
Pain Level: Medium (4-6/10)
Session Time: 1–2 sessions, 1–3 hours
Best For: Rebirth narrative, larger privacy canvas
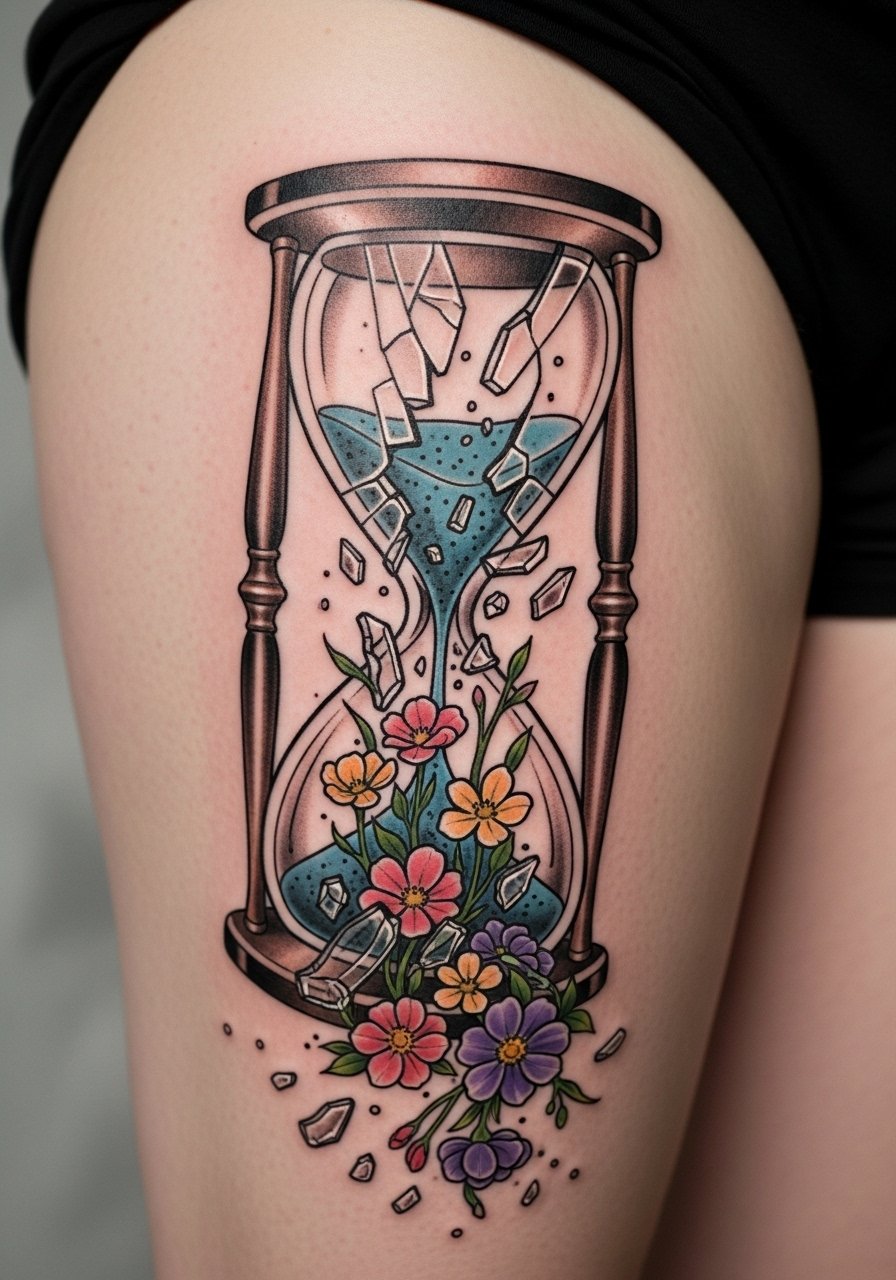
Combining a broken hourglass with flowers turning up from spilled sand tells a story I often recommend: endings that give rise to new beginnings. Thigh placement lets you go larger and include many details. Pain is moderate and healing is generally easy. Make sure the broken glass lines are bold enough so cracks remain visible; delicate spider cracks vanish after healing. Ask for a composition that leaves negative space around the flowers to keep them from blurring into the spill.
18. Hourglass Mandala Down Spine
Style/Technique: Geometric / Blackwork
Pain Level: High (7-9/10)
Session Time: Multiple sessions, 2–5 hours total
Best For: Meditative, balanced full-back or spine piece
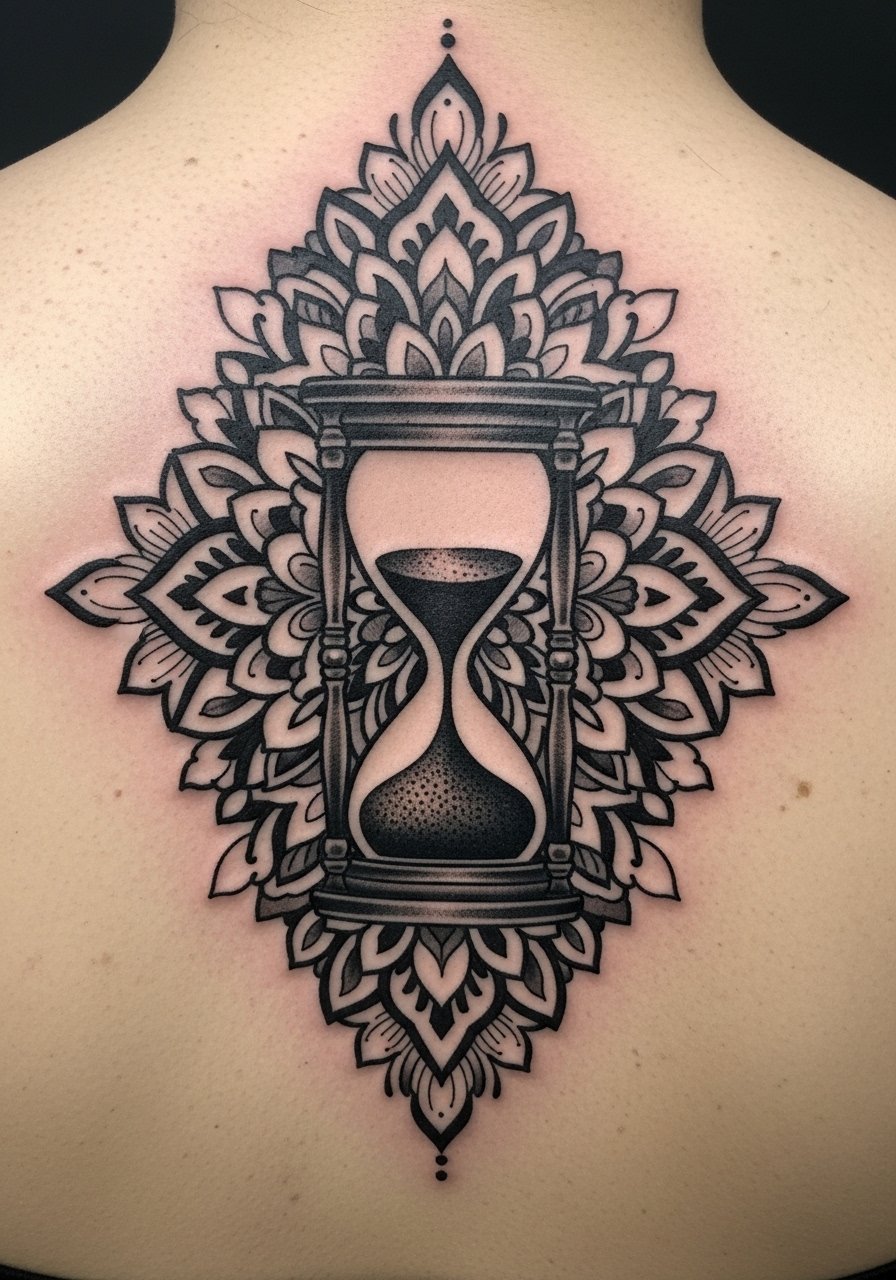
A spine mandala with an hourglass centralizes balance and fleeting time—very symbolic for people into meditation or spiritual practice. Spine work is intense pain-wise, and symmetry is crucial; I tell clients to insist on precise stencils. Blackwork mandala lines hold up well if bold enough. The mistake I see is tiny dot mandala fills that merge over time—ask for solid negative space and bolder primary lines. This is a commitment piece and looks powerful healed.
19. Hourglass With Celestial Moon Phases on Thigh
Style/Technique: Illustrative / Botanical + Celestial
Pain Level: Medium (4–6/10)
Session Time: 1–2 sessions, 1.5–3 hours
Best For: Cycles of life theme, larger customizable canvas
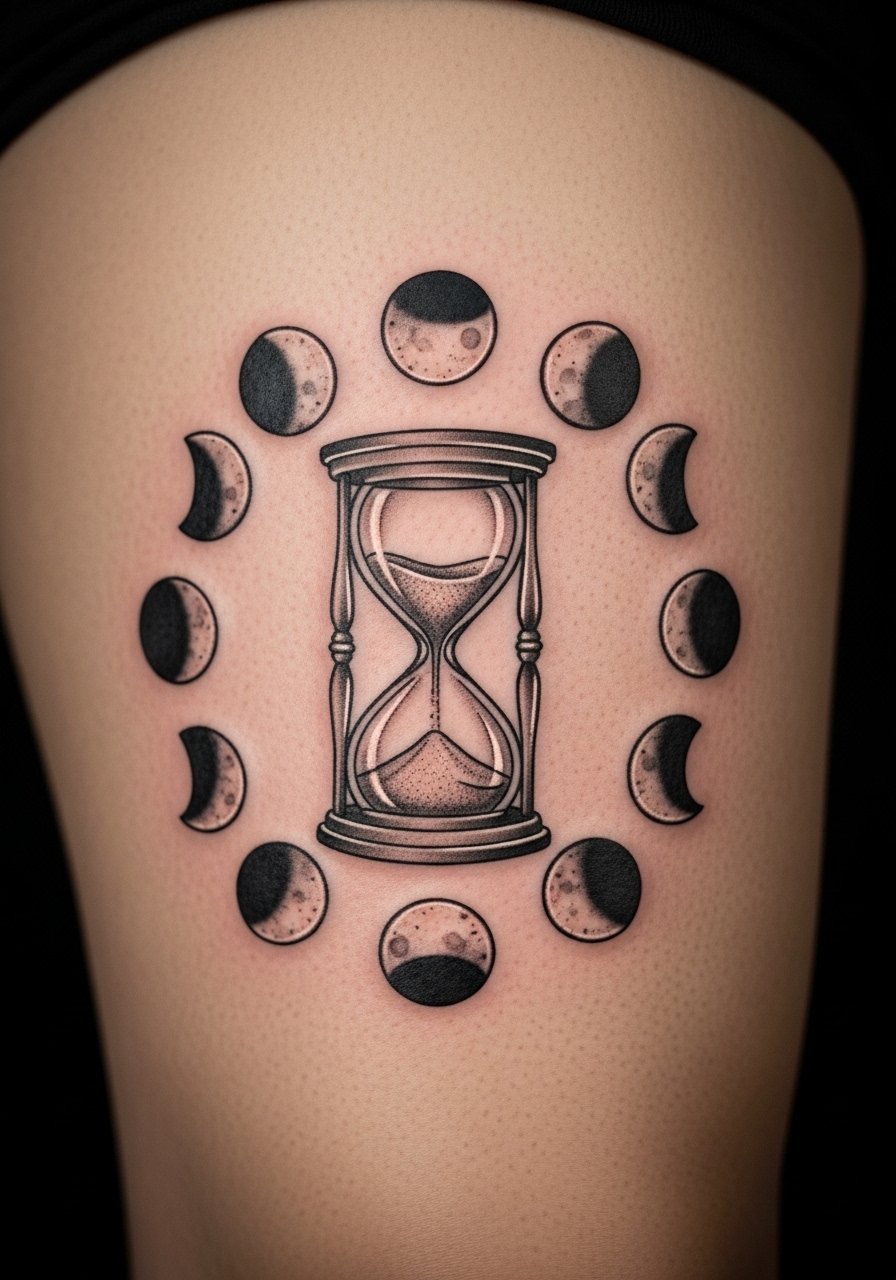
Moon phases around an hourglass emphasize cycles—perfect for someone tracking personal growth or sobriety. The thigh gives enough room for both the hourglass and phased moons. Expect moderate soreness but good healing. Artists should ensure the moons are spaced and sized for long-term clarity—tiny crescents can become smudges. Combine with subtle botanical elements to soften the composition if you want a more organic feel.
20. Tiny Dotwork Hourglass on Ankle
Style/Technique: Dotwork / Minimalist
Pain Level: Medium (4–6/10)
Session Time: 1 session, 30–60 minutes
Best For: Micro symbolism, first-timers testing fine line commitment
Dotwork gives a delicate vibe without relying on thin continuous lines. I’ve seen this used by people who want a subtle nod to impermanence. Ankle placement means watch footwear and socks during healing. The pitfall is requesting too many dots close together—artists need space to keep dots separate when healed. Talk to your artist about how dense the dotwork should be to keep the silhouette readable over time.
21. Hourglass Pocket Watch Hybrid on Chest
Style/Technique: Illustrative / Neo-Vintage
Pain Level: Medium-High (5–7/10)
Session Time: 1–3 sessions, 2–4 hours total
Best For: Nostalgic, blended timepiece symbolism

Merging a pocket watch and an hourglass creates a layered statement about time—mechanical and organic. Chest placement reads well and lets you go mid-size. Expect moderate pain in sternum-adjacent areas. Make sure the artist balances gear detail with glass readability; tiny gear teeth can blur, so keep primary shapes bold. This hybrid is great if you want something both sentimental and visually complex.
22. Hourglass With Compass on Upper Arm
Style/Technique: Illustrative / Nautical
Pain Level: Low-Medium (3–5/10)
Session Time: 1–2 sessions, 1–3 hours
Best For: Directional life choices, travel symbolism
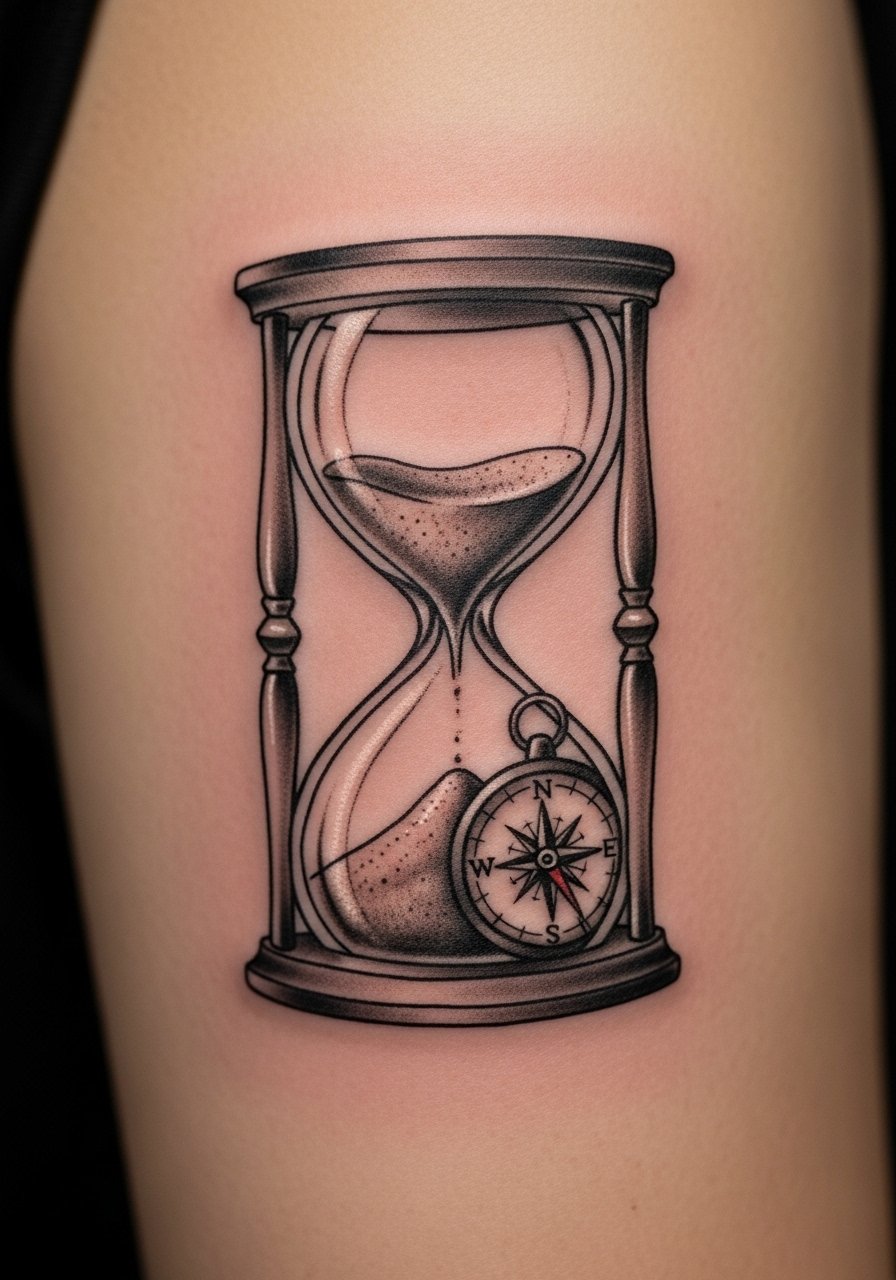
Adding a compass turns the hourglass into a life-navigation piece—perfect for travelers or people undergoing big directional shifts. Upper arm placement is low pain and easy to show. Keep compass details bold; tiny needles and degrees are a common pitfall. I recommend strong lume or shadowing under the compass for depth. Ask artists who tattoo nautical designs for healed examples.
23. Hourglass With Phoenix Rising on Back
Style/Technique: Neo-Traditional / Symbolic
Pain Level: High (7–9/10)
Session Time: Multiple sessions, 3–6+ hours total
Best For: Rebirth narrative, large dramatic piece
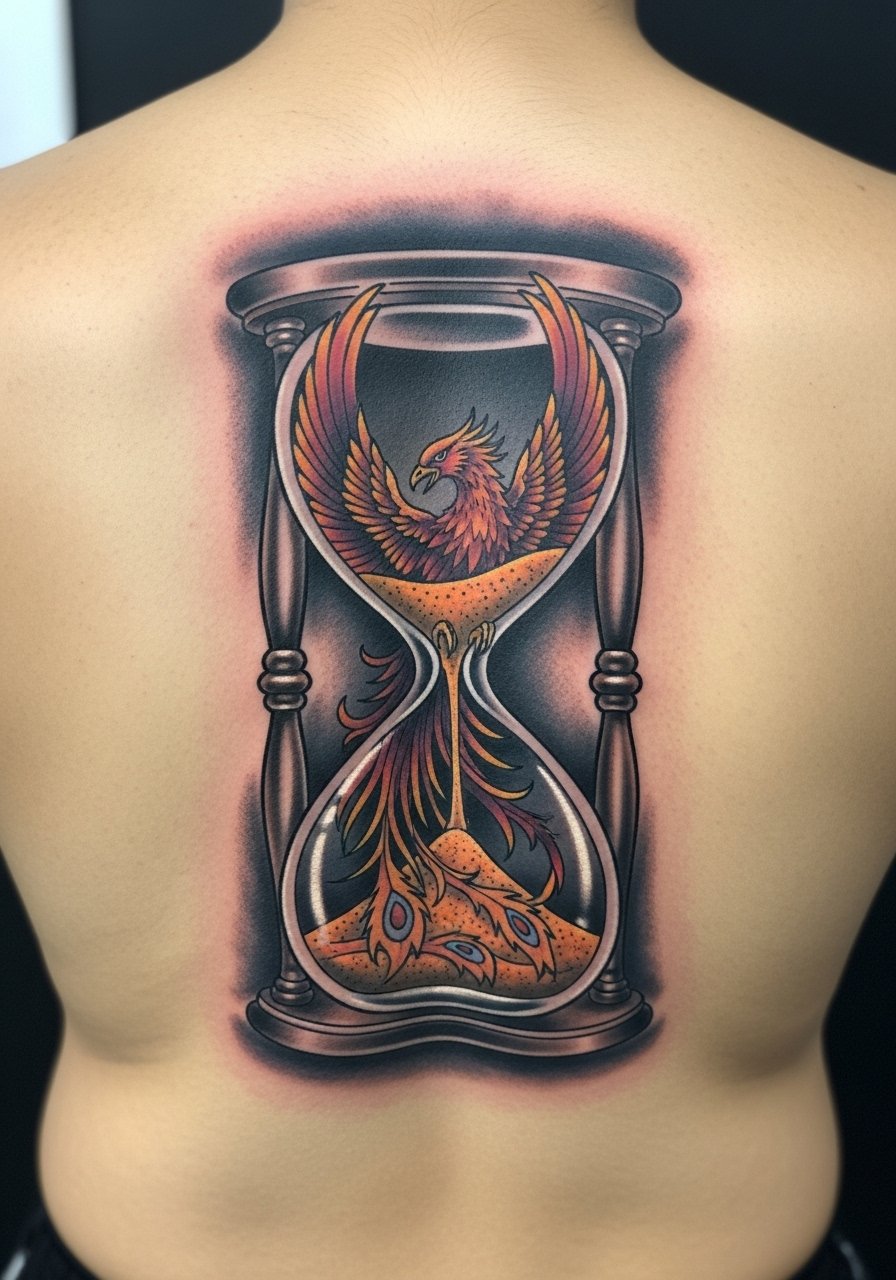
A phoenix emerging from an hourglass is an unmistakable rebirth image. Back placement affords scale and drama. Be prepared for longer sessions and staged healing. Color and black contrast help the phoenix remain vibrant as pigments settle. Don’t compress too many flames into a small area—give the wings space. Find an artist who shows healed large pieces and can plan a multi-session layout.
24. Geometric Hourglass With Sacred Lines on Calf
Style/Technique: Geometric / Linework
Pain Level: Low-Medium (3–5/10)
Session Time: 1–2 sessions, 1–2 hours
Best For: Minimalist spiritual aesthetics, symmetry lovers
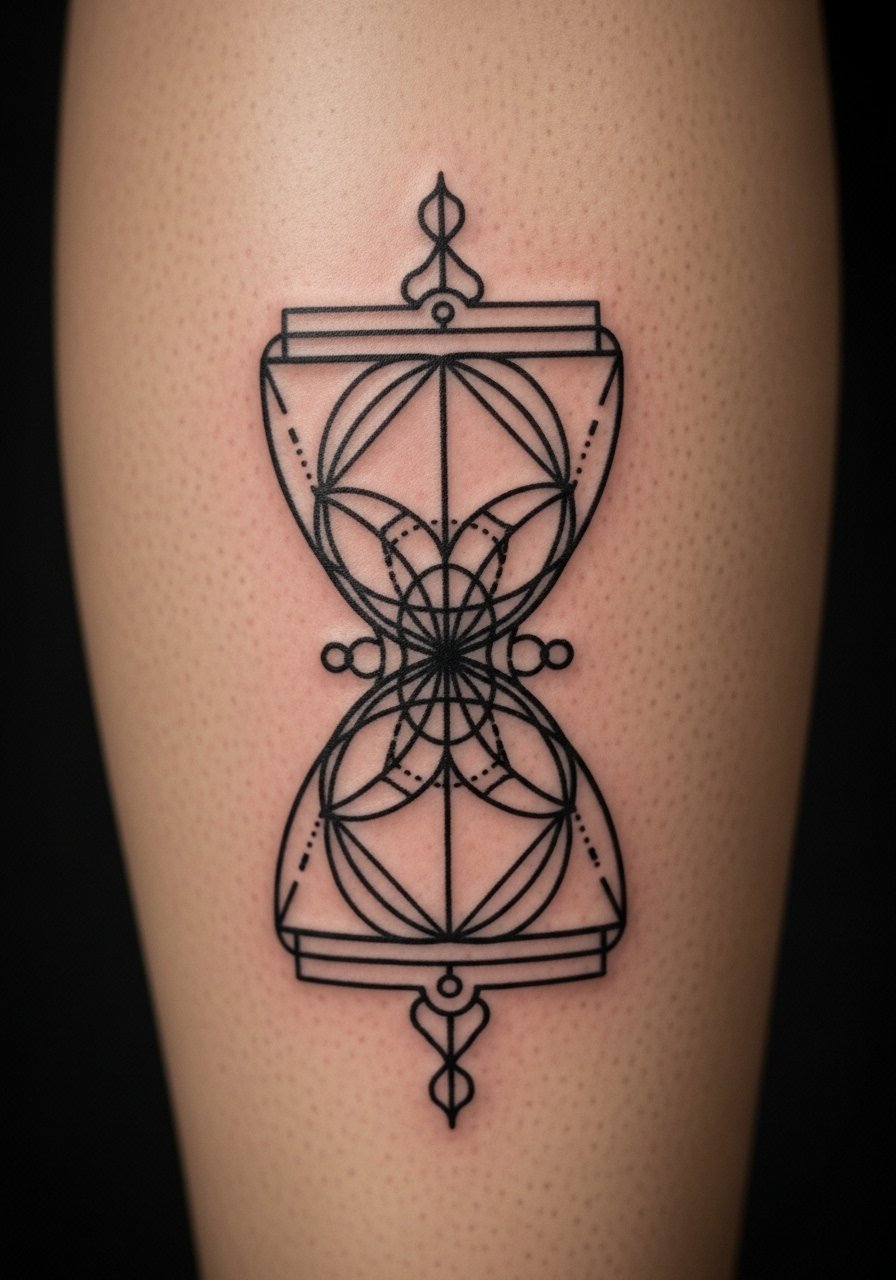
Geometric hourglasses emphasize balance through symmetry—great if you prefer an abstract, meditative look. Calf placement gives room and low pain. Straight lines and intersections must be crisp; ask the artist to preview how lines will read once skin settles. The main mistake is overcomplicating the geometry in a small area; let negative space help the composition breathe.
25. Watercolor Hourglass With Abstract Splash on Shoulder
Style/Technique: Watercolor / Illustrative
Pain Level: Low-Medium (3–5/10)
Session Time: 1–2 sessions, 1–3 hours
Best For: Painterly feel, expressive personal art
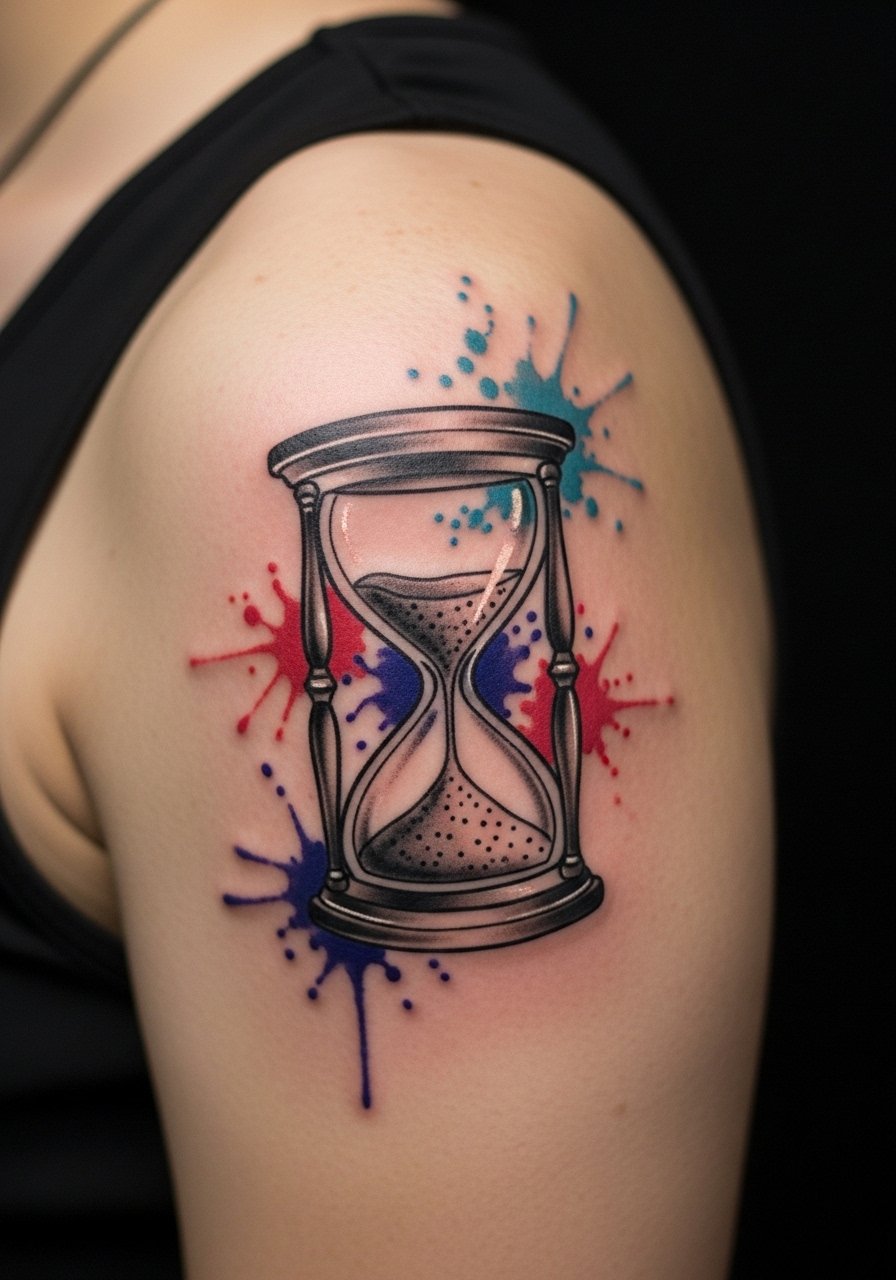
Watercolor hourglasses read like paintings on skin—expressive and modern. Shoulders provide a relaxed canvas and manageable pain. Keep in mind I often tell people watercolor softens with time; combine it with firm black outlines to preserve the hourglass silhouette. Avoid asking for extremely light pastels in very small areas; they can vanish. If you want an expressive piece that reads like an original, seek artists with watercolor portfolios and healed examples.
26. Hourglass With Animal Motif (Fox) on Thigh
Style/Technique: Illustrative / Animal Symbolism
Pain Level: Medium (4–6/10)
Session Time: 1–2 sessions, 1.5–3 hours
Best For: Personal totems, narrative tattoos
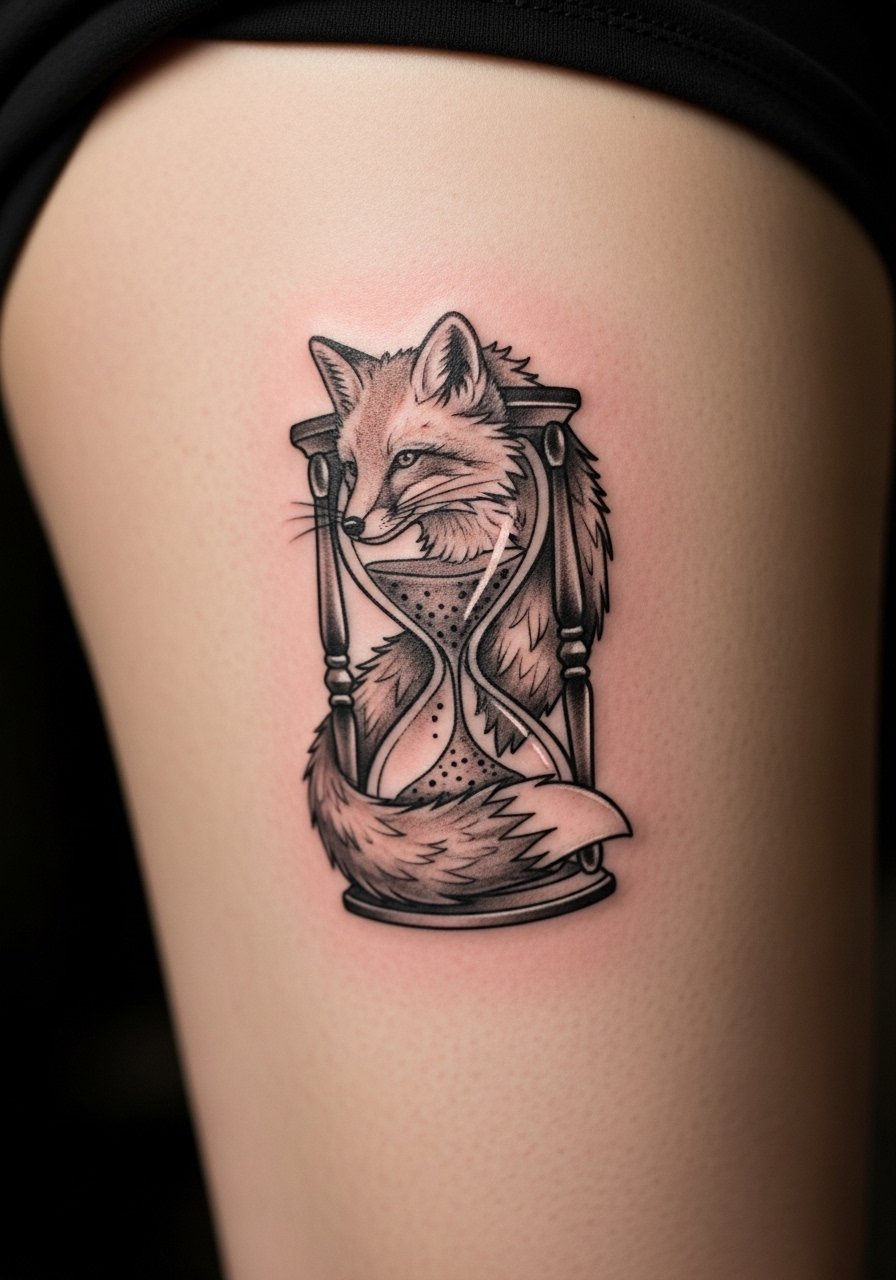
Pairing animals with hourglasses adds personal mythology—foxes, for example, can signify cleverness or survival. The thigh lets you render both the animal and hourglass in readable detail. Make sure the animal’s lines aren’t too intricate for the chosen scale. I’ve seen animal features blur if shaded too softly; ask for slightly firmer linework around key facial features. This is a strong option if you want a character-driven narrative.
27. Hourglass As Part Of Sleeve Start On Outer Forearm
Style/Technique: Illustrative / Transitional Sleeve
Pain Level: Low-Medium (3–5/10)
Session Time: Multiple sessions, modular design
Best For: Building a larger narrative sleeve over time
If you’re thinking long-term, make the hourglass the anchor of a sleeve. I’ve planned sleeves where the hourglass guides themes—growth, loss, triumph. Outer forearm pain is mild and the area’s straight surface is sleeve-friendly. Discuss future expansion with your artist so they’ll design transitional edges and negative space. A common issue is getting a standalone hourglass that can’t integrate later—plan the sleeve hierarchy from the start.
28. Hand-Poked Minimalist Hourglass On Finger
Style/Technique: Hand-Poked / Micro
Pain Level: Medium-High (5–7/10)
Session Time: 1 session, 20–45 minutes
Best For: Authentic handpoke aesthetic, tiny daily reminder
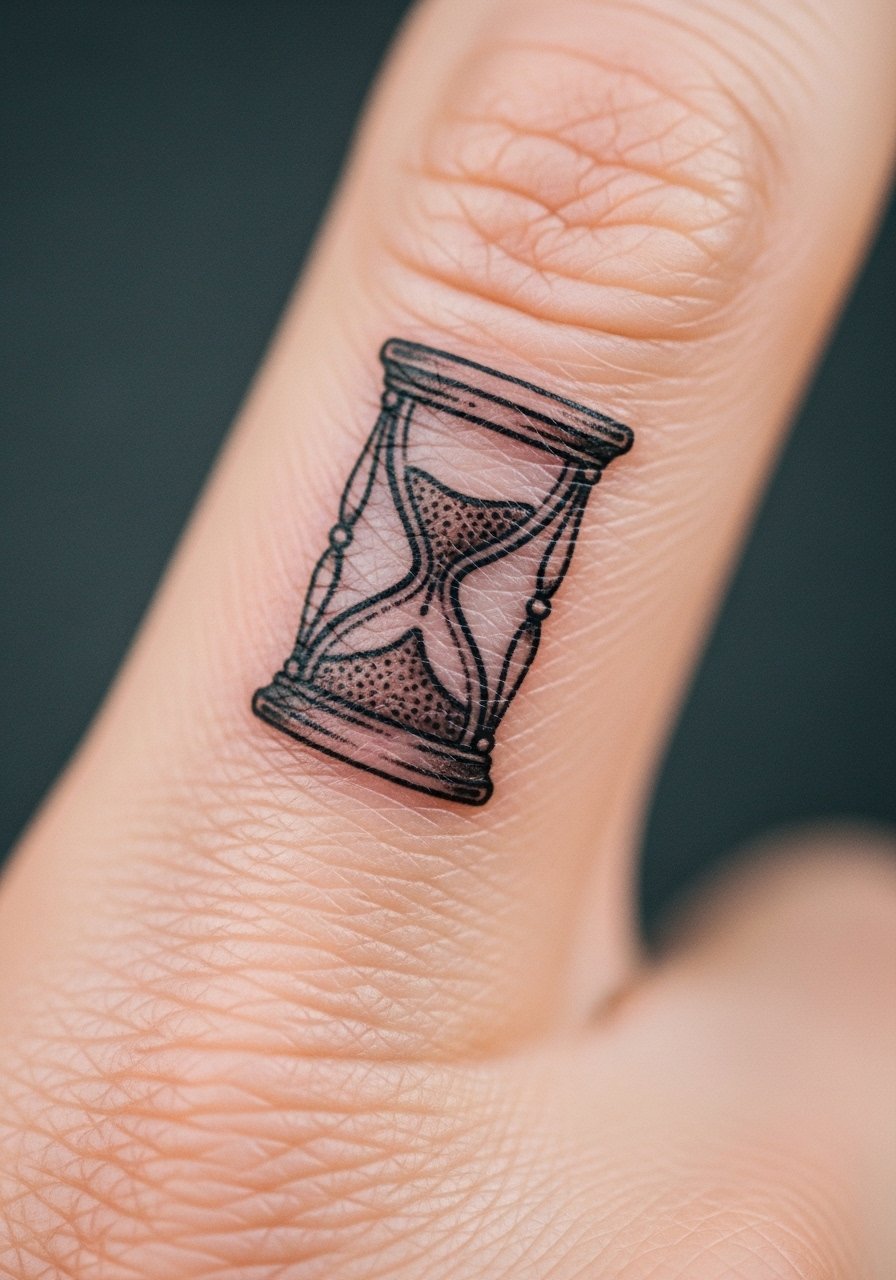
Hand-poked hourglasses have an organic, intentional handmade look. Fingers are tricky—the skin renews quickly and ink can fade, so be ready for touch-ups. Pain is short but sharp. From what I’ve gathered, artists who specialize in handpoke will set realistic expectations about fading and texture. If you want a handmade vibe and accept the maintenance, finger placement can be deeply personal.
29. Hourglass With Nautical Rope Frame On Calf
Style/Technique: Traditional / Nautical
Pain Level: Low-Medium (3–5/10)
Session Time: 1–2 sessions, 1–3 hours
Best For: Maritime symbolism, travel and time combined
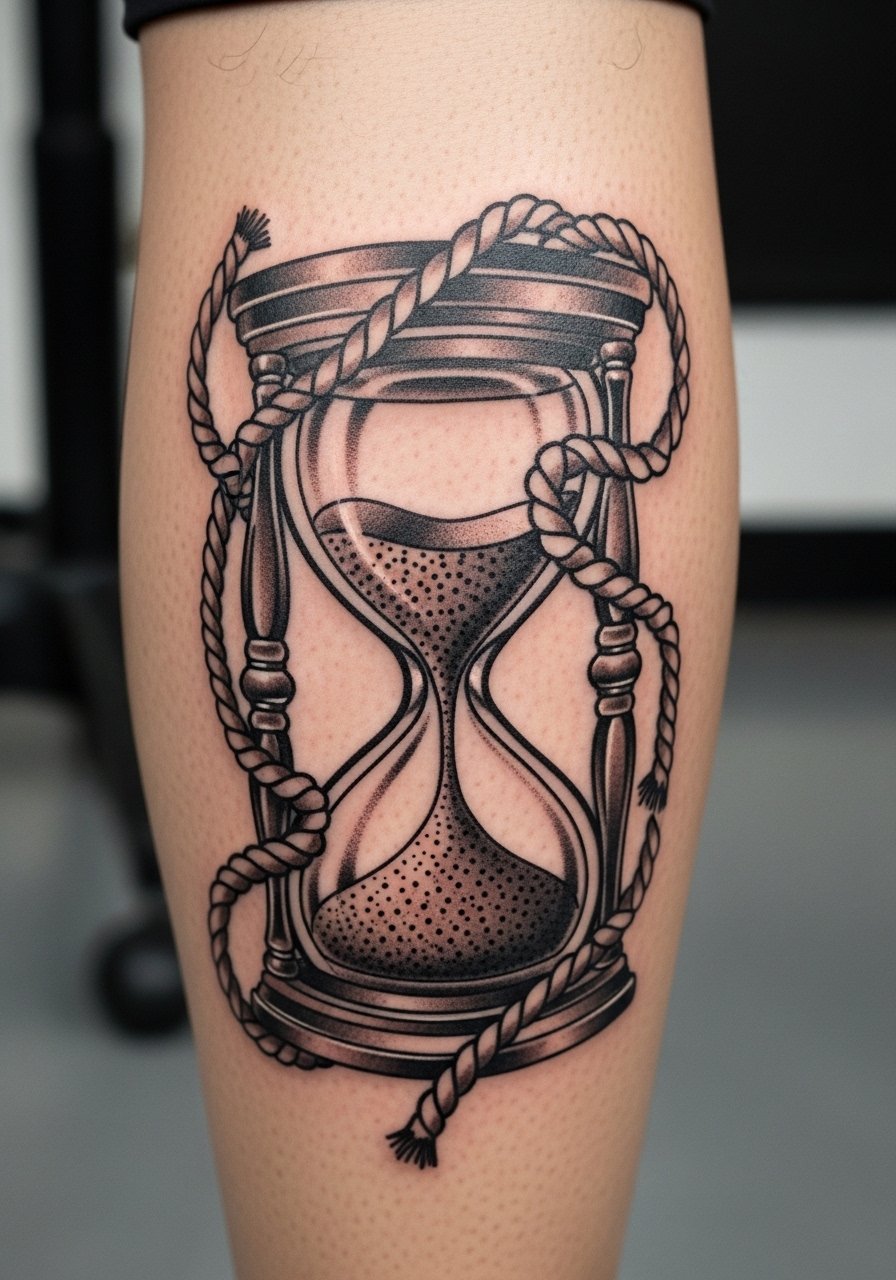
Rope-framed hourglasses feel sturdy and timeless. I see them chosen by sailors or travelers but they suit anyone who values direction and passage. The calf supports texture detail in the rope without being too painful. Ensure the rope’s twists are bold enough so they remain readable after healing; tiny rope crosshatching often blurs. Traditional shading and solid blacks help this motif age well.
30. Celestial Broken Hourglass On Upper Back
Style/Technique: Illustrative / Surreal
Pain Level: Medium-High (5–8/10)
Session Time: 1–3 sessions, 2–4 hours total
Best For: Surreal storytelling, larger canvas with visibility control

A shattered celestial hourglass spilling stars makes a poetic statement: time breaks open and releases the cosmos. Upper back placement lets you go large and keep it hidden under shirts. Expect moderate-to-strong pain near the spine and shoulder blades. Make sure your artist balances detail with negative space so star fields don’t become a gray mass. This sort of surreal composition shows best with a mix of blackwork and selective color.
Tattoo Prep and Aftercare Essentials
Aftercare Essentials:
- Aquaphor Healing Ointment, 14oz tube — Recommended for the first 3–5 days to lock in moisture.
- Saniderm Transparent Adhesive Bandage, 6-inch roll — Second-skin option many artists actually recommend for initial protection.
- CeraVe Fragrance-Free Moisturizing Lotion, 12oz — Use after the ointment phase for daily hydration.
- Dr. Bronner's Unscented Castile Soap, 16oz — Gentle cleanser for the first week while washing tattoos.
Before Your Appointment:
- Tattoo Numbing Cream with 5% Lidocaine, 30g — Ask your artist before using; helpful for rib or sternum sessions.
- Tattoo Stencil Transfer Paper, Pack — Useful if you’re experimenting with placement at home.
Long-Term Maintenance:
- SPF 50 Sunscreen Stick for Tattoos — Sunscreen is the #1 daily defense against fading in my experience.
- Mad Rabbit Tattoo Balm, 2oz — Popular for keeping healed tattoos vibrant.
- Hustle Butter Deluxe, 4oz — Vegan aftercare alternative artists sometimes recommend.
Optional Comfort & Repair Items:
- Tattoo Numbing Spray, 1oz — For touch-ups or highly sensitive spots.
- Hydrocolloid Bandages (Large) — For covering small areas or blisters during healing.
- Tattoo Aftercare Travel Kit — Handy if you travel after your session.
Note: Every artist has preferred products—I’ve found Aquaphor and Saniderm mentioned most in the communities I follow. Ask your artist what they endorse and follow their specific timeline.
Frequently Asked Questions
Q: How bad does a tattoo actually hurt?
A: Pain varies by placement and tolerance. Outer forearm or upper arm usually feels like a steady scratching (around a 3/10 in my experience). Ribcage, sternum, and ankle hit harder—expect sharp stings and longer soreness. For sensitive spots consider discussing a numbing cream with lidocaine with your artist.
Q: What if I regret the symbolism later?
A: Sit with a design for several months and personalize it—flowers, dates, or animals make hourglasses uniquely yours. If you’re still unsure, start with a small, hidden placement to test commitment. Laser removal exists, but it’s a long path; thoughtful design choices upfront save hassle.
Q: How do I keep my hourglass tattoo from fading?
A: From what I’ve seen, sunscreen is non-negotiable. Use an SPF 50 sunscreen stick on tattoos exposed to sun. Keep skin moisturized with a fragrance-free lotion like CeraVe and avoid harsh exfoliation on the area.
Q: Can I work out after getting a tattoo?
A: Wait at least 48–72 hours before intense workouts to reduce sweat exposure and friction. If your tattoo is in a flex area (elbow, knee, ribs), give it a full week before resuming heavy movement. Keep the area clean and follow your artist’s aftercare advice.
Q: Should I get a small hourglass first to test my pain tolerance?
A: Only if you genuinely want a small design. Pain depends more on placement than size—a tiny wrist piece can sting more than a larger thigh piece. If you’re anxious, pick a low-pain area like the outer arm or thigh.
Q: How long does a tattoo take to heal?
A: Surface healing is usually 2–3 weeks; full skin regeneration can take up to 2–3 months. The first week is critical: keep it clean, moisturized, and protected. Use Saniderm or Aquaphor during the initial phase and expect peeling around days 3–7—don’t pick.
Q: Do hourglass tattoos look different on darker skin tones?
A: Yes. Black and gray designs show reliably across skin tones. Bright colors can look more muted on deeper skin, so discuss saturation with your artist. I always suggest asking to see healed photos on similar skin tones so you know how the ink settles.
