

I spent months bookmarking tree tattoos before I realized my real problem: some designs look amazing fresh but lose their emotional impact once they heal. I wanted ideas that not only say “growth” but actually age well, feel personal, and work with real skin and movement. These 28 tree tattoo concepts are the ones I keep coming back to in my feed—and the styles artists recommend most right now.
This list leans into tree of life motifs, Nordic blackwork, fine-line botanicals, and a few under-covered ideas I rarely see healed photos of. Most work for forearms, backs, thighs, ankles, and collars—places that let branches and roots flow with the body. From what I've seen, the bold line pieces and black-and-gray realism hold up best over time.
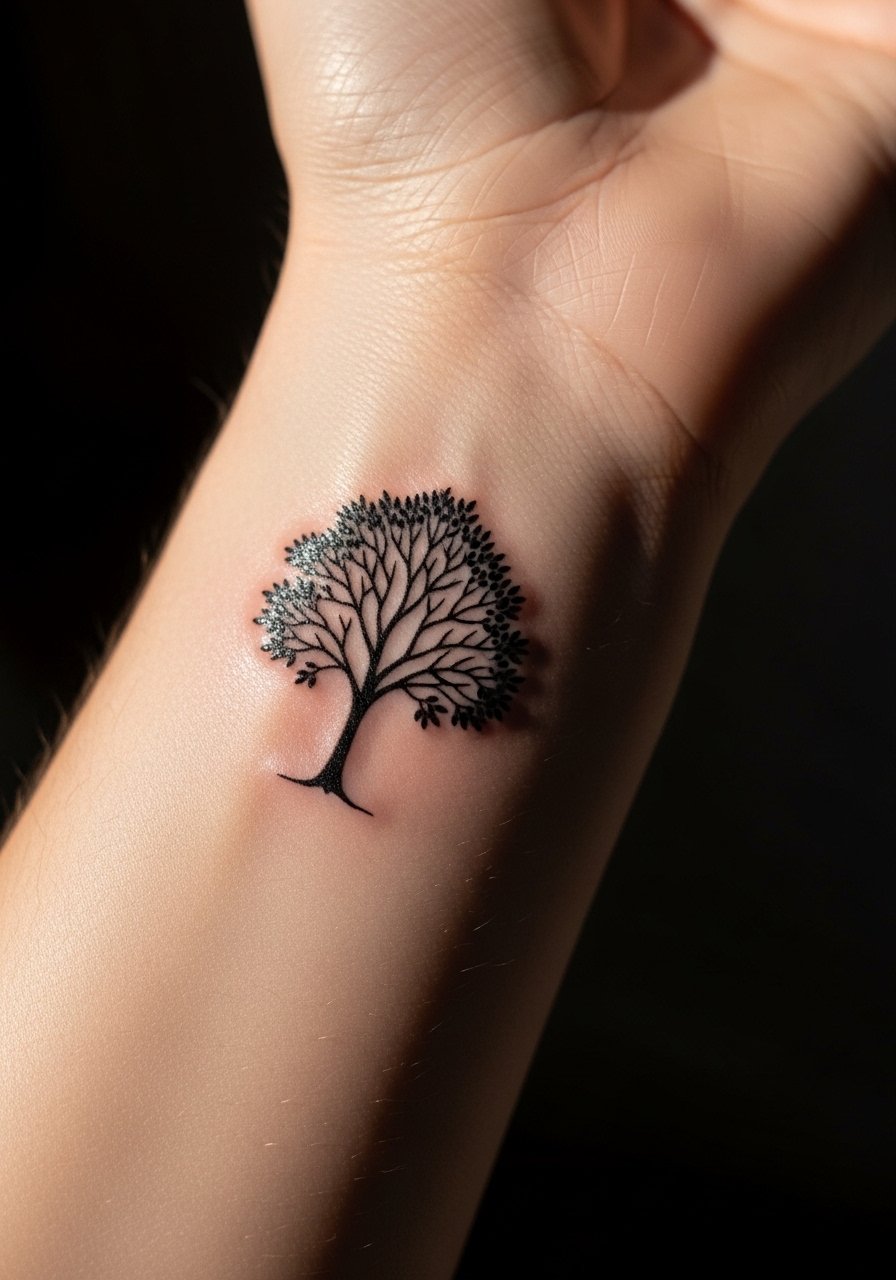
1. Fine Line Tree of Life on Inner Forearm
Style/Technique: Fine Line / Illustrative
Pain Level: Medium (3-4/10)
Session Time: 1–3 hours
Best For: First tree tattoo, visible meaningful piece
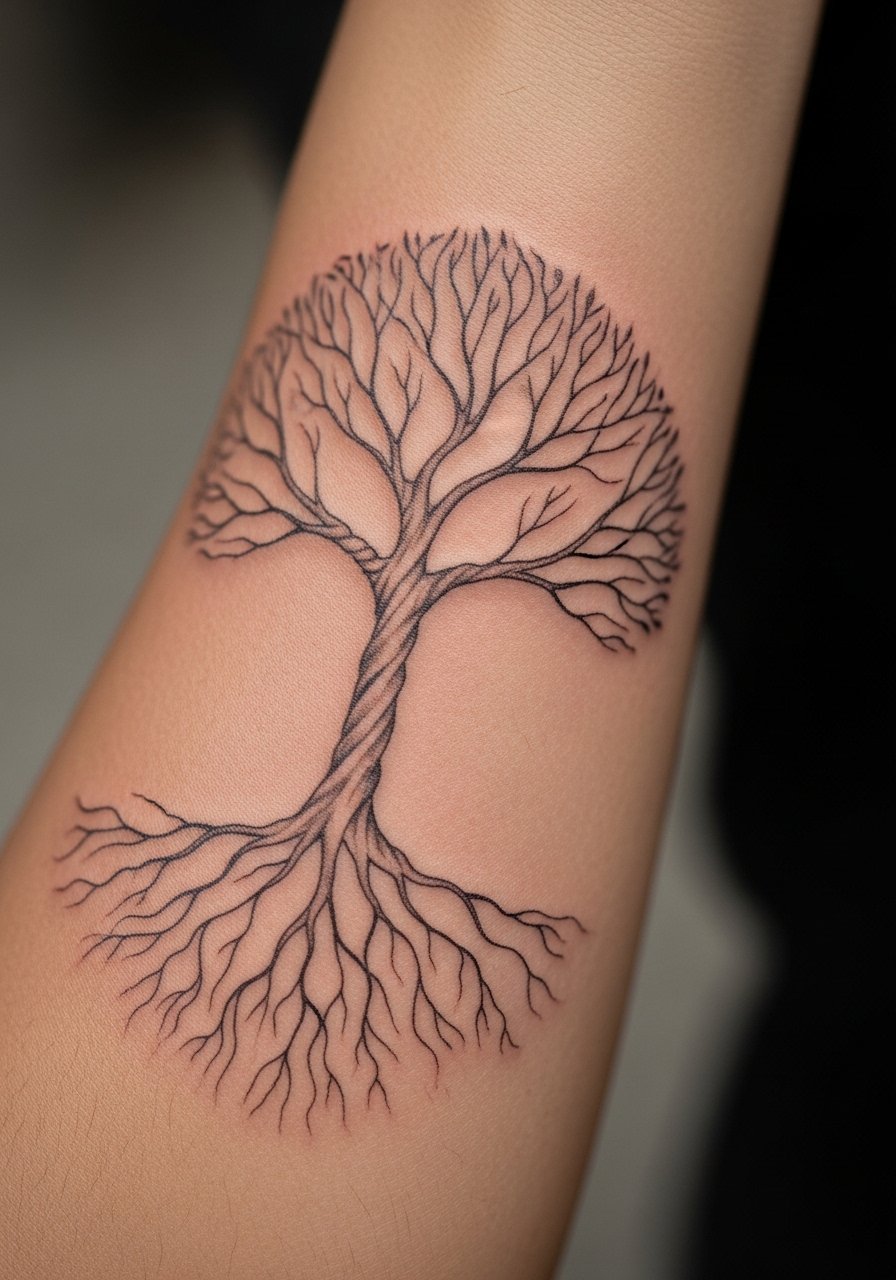
I chose a tree-of-life fine-line on my inner forearm years ago because it reads as delicate and meaningful. Visually it’s graceful—the branching lines express interconnectedness without crowding the skin. Placement on the forearm lets the branches follow natural curves and is an easier pain zone than ribs or spine. Expect the first month to show slight feathering in the thinnest lines; in my experience, telling your artist you want slightly bolder lineweights up front avoids early blur. Aftercare should focus on gentle cleansing and moisturization so branches don’t scab harshly. Ask to see healed examples of fine-line work on similar skin tones—artists vary hugely in how crisp those hairlines remain.
2. Nordic Yggdrasil Chest Piece
Style/Technique: Blackwork / Nordic
Pain Level: Medium-High (5-6/10)
Session Time: Multiple sessions
Best For: Mythology lovers, mid to large statement
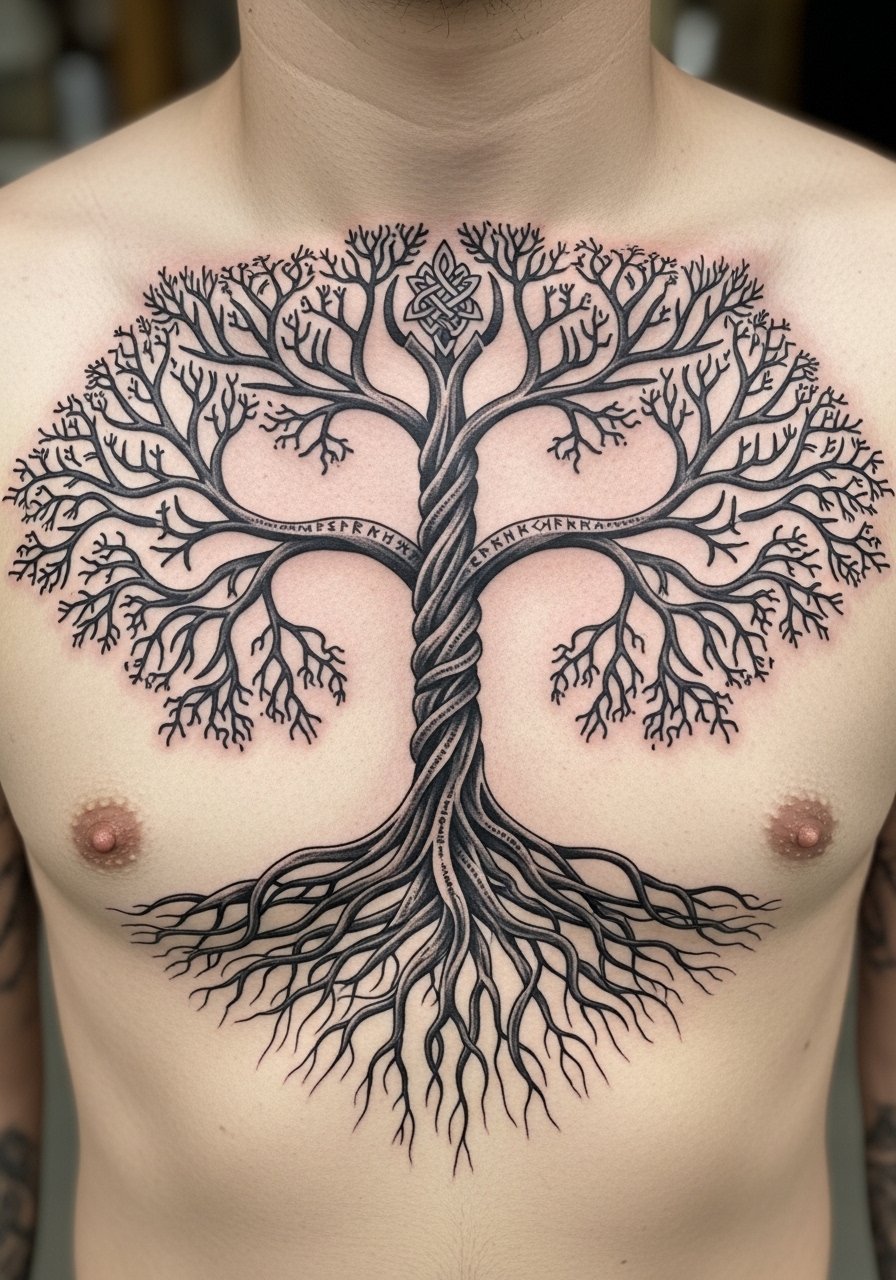
I’m drawn to Yggdrasil designs because they feel ancient and connected. On the chest, a Yggdrasil spreads across the sternum and up toward the collarbones—perfect for bold linework and symbolic roots. This placement can be stingier than the arm, so expect patience during sessions. Blackwork holds up well here; I’ve noticed Nordic black lines keep their silhouette after years, unlike faded color washes. The look reads powerful and timeless, and it’s a style where bold linework and negative space age better than delicate thin branches. One mistake I see is over-detailing tiny knots and runes; they can smudge into a texture that loses meaning, so keep the important symbols slightly larger.
3. Nordic Tree of Life Back Panel
Style/Technique: Traditional Blackwork / Panel
Pain Level: Medium (4-5/10)
Session Time: Multiple long sessions
Best For: Full-back statement, ancestral symbolism
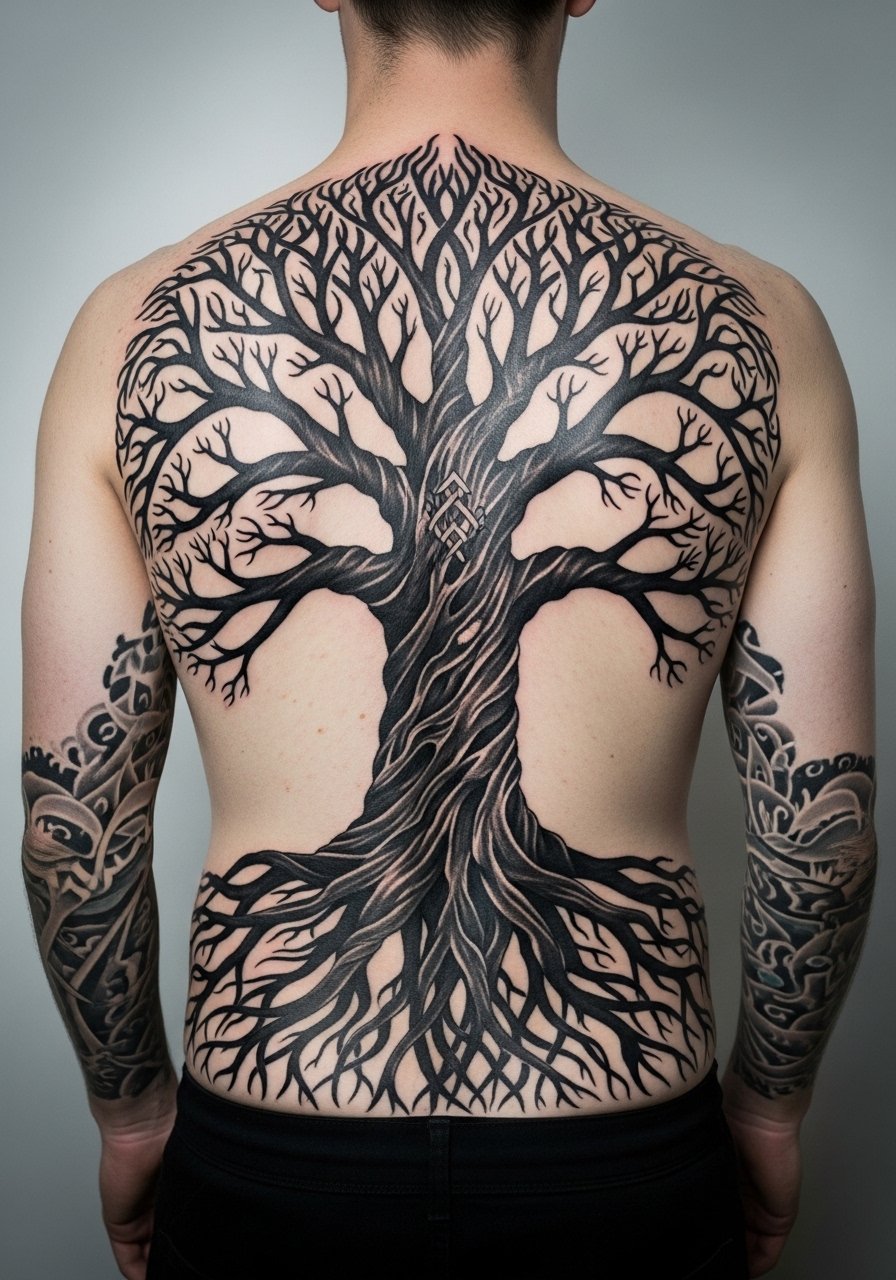
A full-back tree is a commitment I’ve seen collectors choose when they want ancestry, growth, and a narrative canvas. The back lets branches breathe and gives room for Norse knots or runes without crowding. Blackwork is forgiving here—bold shapes keep form as skin ages. During healing, movement of the scapula matters; I’ve learned to avoid overly thin filigree along shoulder blades because it puckers with motion. Expect several sessions and stagger healing; artists usually map the tree to body contours so the trunk follows the spine for a natural, grounded feel.
4. Tree of Life and Death Duality on Forearm
Style/Technique: Neo-Traditional / Dark Illustrative
Pain Level: Medium (3-5/10)
Session Time: 2–3 hours
Best For: Narrative symbolism, visible arm piece
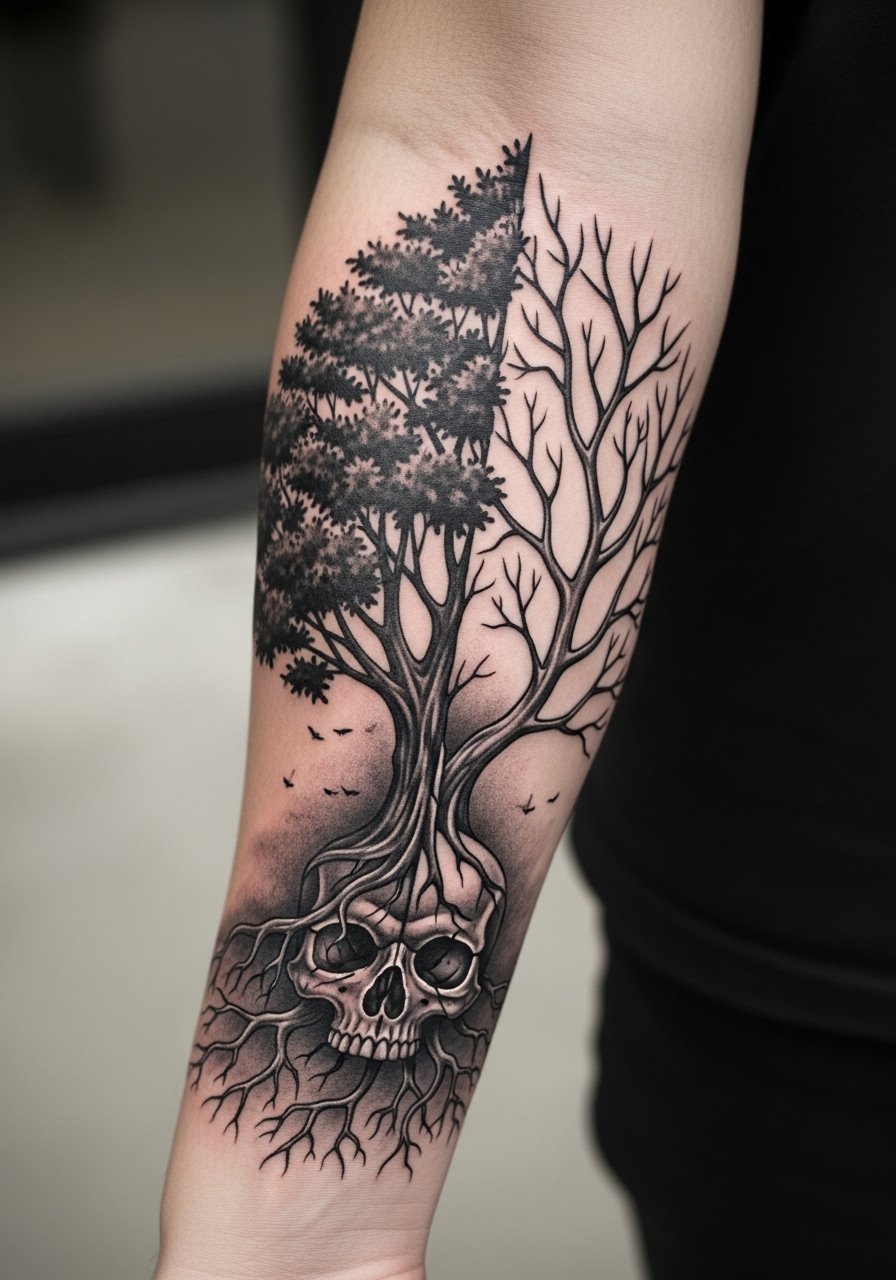
I love duality pieces because they hold a clear story—growth and decay in one frame. On the forearm, the split-canopy composition reads well in daily life and sparks conversations. Neo-traditional shading gives depth while black-and-gray keeps it readable as it heals. Artists I follow suggest heavier silhouettes on the dead side so both halves remain distinct over time. Expect peeling and dullness in the first two weeks; the depth returns once the skin finishes regenerating. The most common mistake is tiny, competing details; keep the main elements bold enough to survive touch-ups down the line.
5. Monochromatic Tree of Life on Thigh
Style/Technique: Realism / Black & Gray
Pain Level: Low-Medium (2-4/10)
Session Time: 2–4 hours
Best For: Larger, private pieces that flow with the leg

A leg or thigh piece gives scale without constant visibility, which I appreciate for personal narratives. Monochrome realism shows bark texture and root detail beautifully; it’s one of those styles where healed photos look richer than fresh ones because shadows settle. Thigh placement is also kinder on pain nerves, and it lets the tree wrap slightly for a 3D impression. I’ve noticed realistic shading holds up well, but very fine stippling can lighten over years—ask for slightly stronger contrast to compensate. Keep movement in mind; if the design crosses muscle flex points, expect slight stretching during sessions.
6. Apple Tree With Red Accents on Shoulder
Style/Technique: Illustrative / Minimalist Color
Pain Level: Low (2-3/10)
Session Time: 1–2 hours
Best For: Symbolic pop-of-color, small-medium visible piece
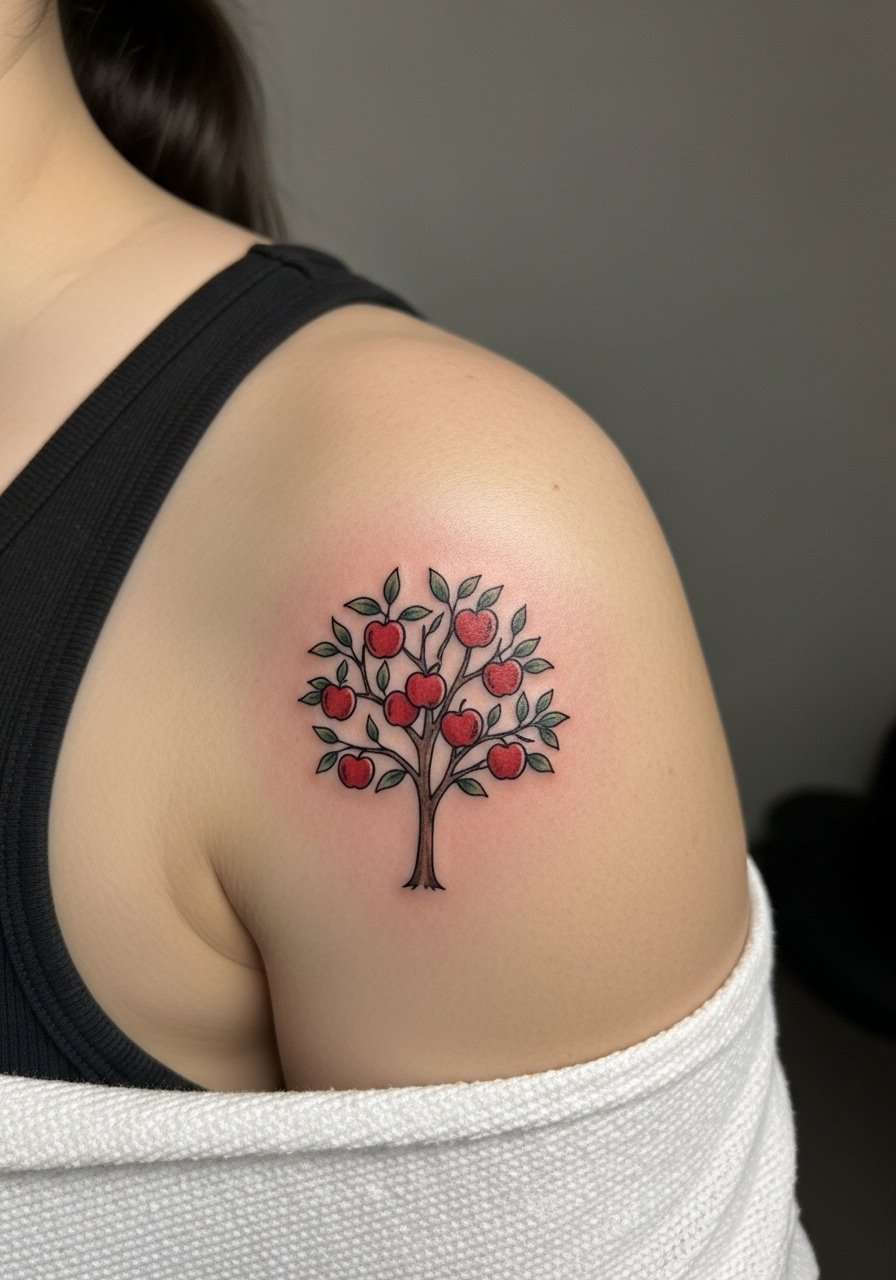
I’ve seen apple tree tattoos used to symbolize knowledge, joy, or personal memory. Keeping color minimal—just red apples—creates focus and reduces early fading problems that full watercolor pieces face. Shoulder placement follows muscle curves and is a lower-pain, high-visibility spot when you want it to show. Artists I trust recommend asking for saturated pigment on red accents, since reds can dull quicker. One common error is using too many tiny apples; one or two pops read cleaner over time. For aftercare, I treat colored spots with extra sunscreen once healed.
7. Redwood Silhouette Along Forearm
Style/Technique: Silhouette / Minimalist
Pain Level: Low-Medium (3/4/10)
Session Time: 1–2 hours
Best For: Sleeve starters, resilience motif
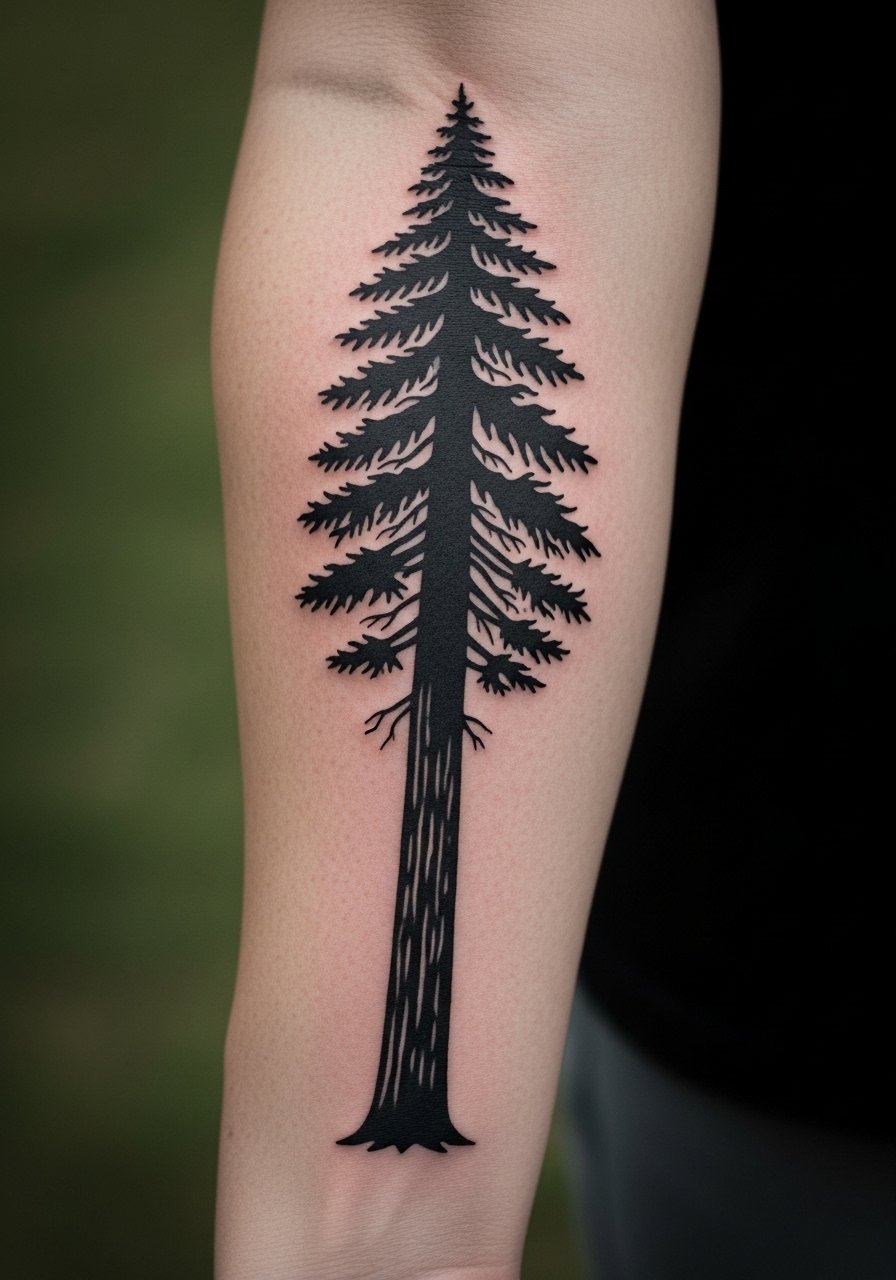
Silhouette trees are striking and low-maintenance. A tall redwood silhouette plays well down the forearm and starts a sleeve without demanding intricate branchwork. I chose a silhouette when I wanted the message—resilience—without fiddly lines that fuzz with time. Pain is moderate on the forearm, and the healed look remains bold for years if the silhouette is solid black. Avoid cramming tiny branch details into silhouettes; they blur and lose shape. This is a great “first tree tattoo” idea if you want something readable and easy to maintain.
8. Butterfly and Tree Combo on Upper Arm
Style/Technique: Watercolor / Neo-Traditional
Pain Level: Medium (3-5/10)
Session Time: 2–3 hours
Best For: Expressive, colorful upper-arm pieces
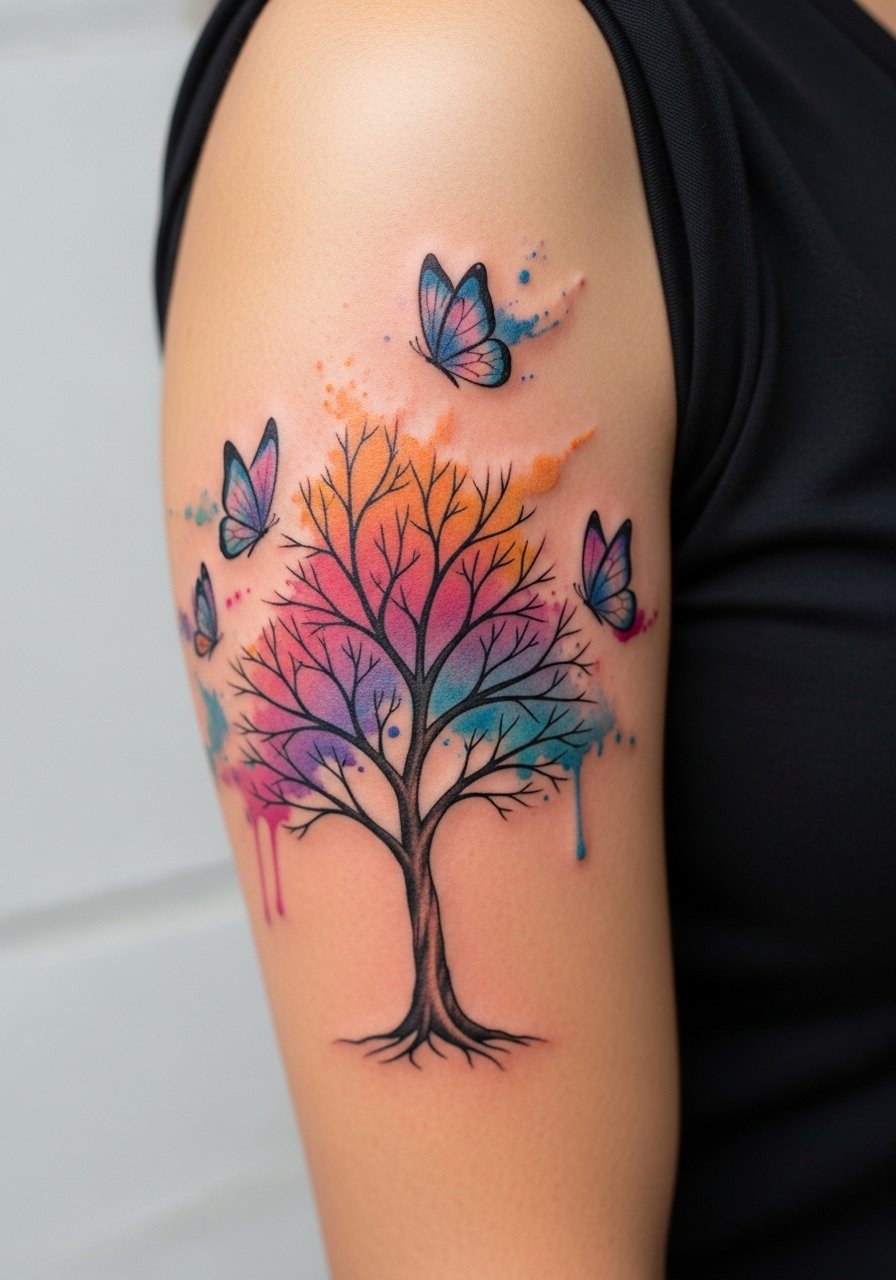
Pairing butterflies with a tree makes the symbolism richer—growth plus transformation. Watercolor hues bring the butterflies to life around a more solid trunk. From what I’ve observed, watercolor needs artist experience to age gracefully; edge bleeding is common if the color is too dispersed. Upper arm placement is forgiving pain-wise and lets colors nestle into muscle contours. Ask to see healed watercolor examples from your artist, especially on your skin tone. The typical mistake is overusing pale pigments—stronger saturation avoids early dulling.
9. Snake Entwined Tree on Ribcage
Style/Technique: Illustrative / Traditional
Pain Level: High (7-8/10)
Session Time: 2–3 hours
Best For: Narrative, dramatic placement
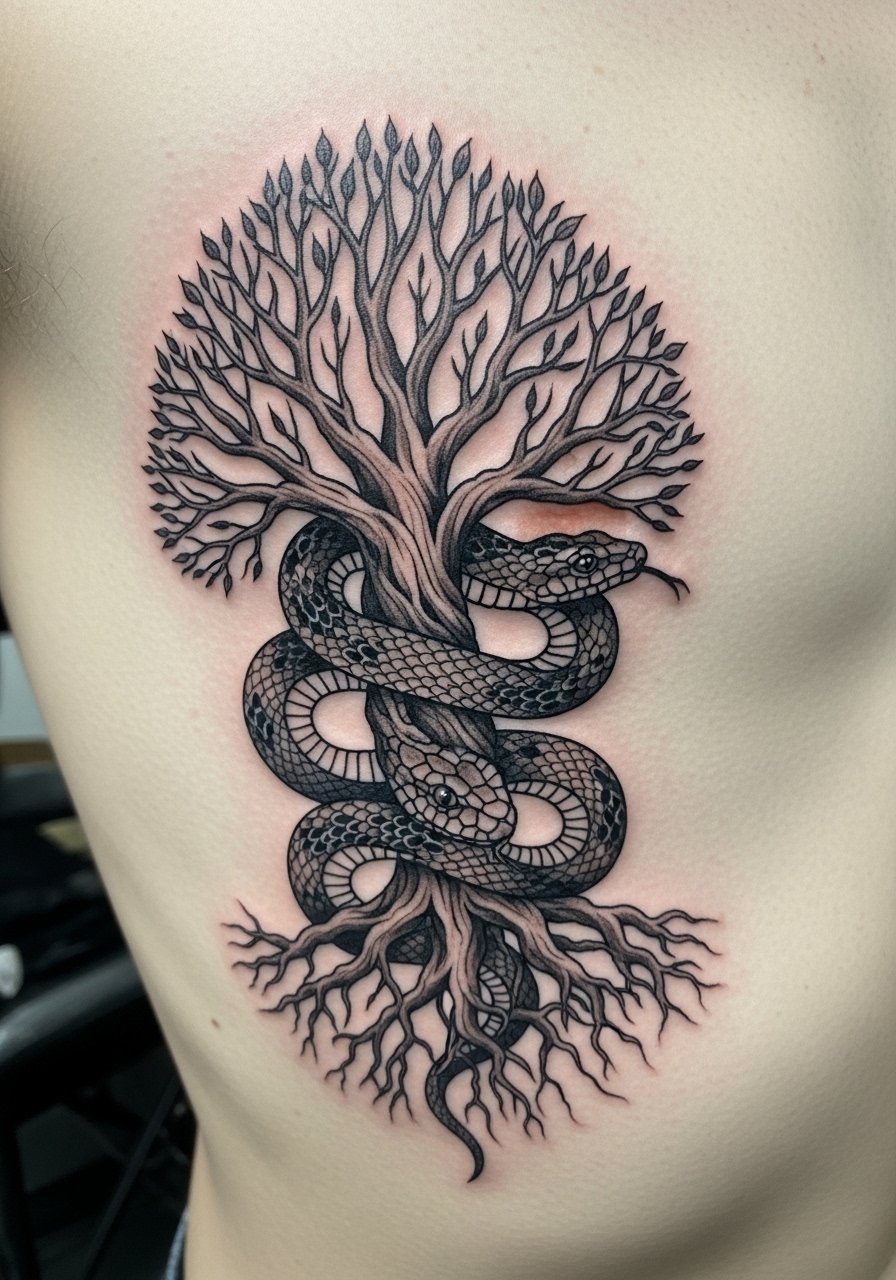
A snake-and-tree motif reads like a short myth tattooed on your body; the ribcage amps the drama but also the pain. I experienced strong vibration sensations in that area during a session—bring breaks. The interplay of snake scales and bark textures makes for a compelling healed texture if the artist spaces elements well. Avoid overly fine snake scales in small pieces; they can merge with shading. This design rewards patients—both in sitting through sessions and in following careful aftercare to preserve the contrasts.
10. Root-Focused Ankle Tattoo
Style/Technique: Fine Line / Blackwork
Pain Level: High (6-7/10)
Session Time: 1–2 hours
Best For: Grounded symbolism, intimate placement
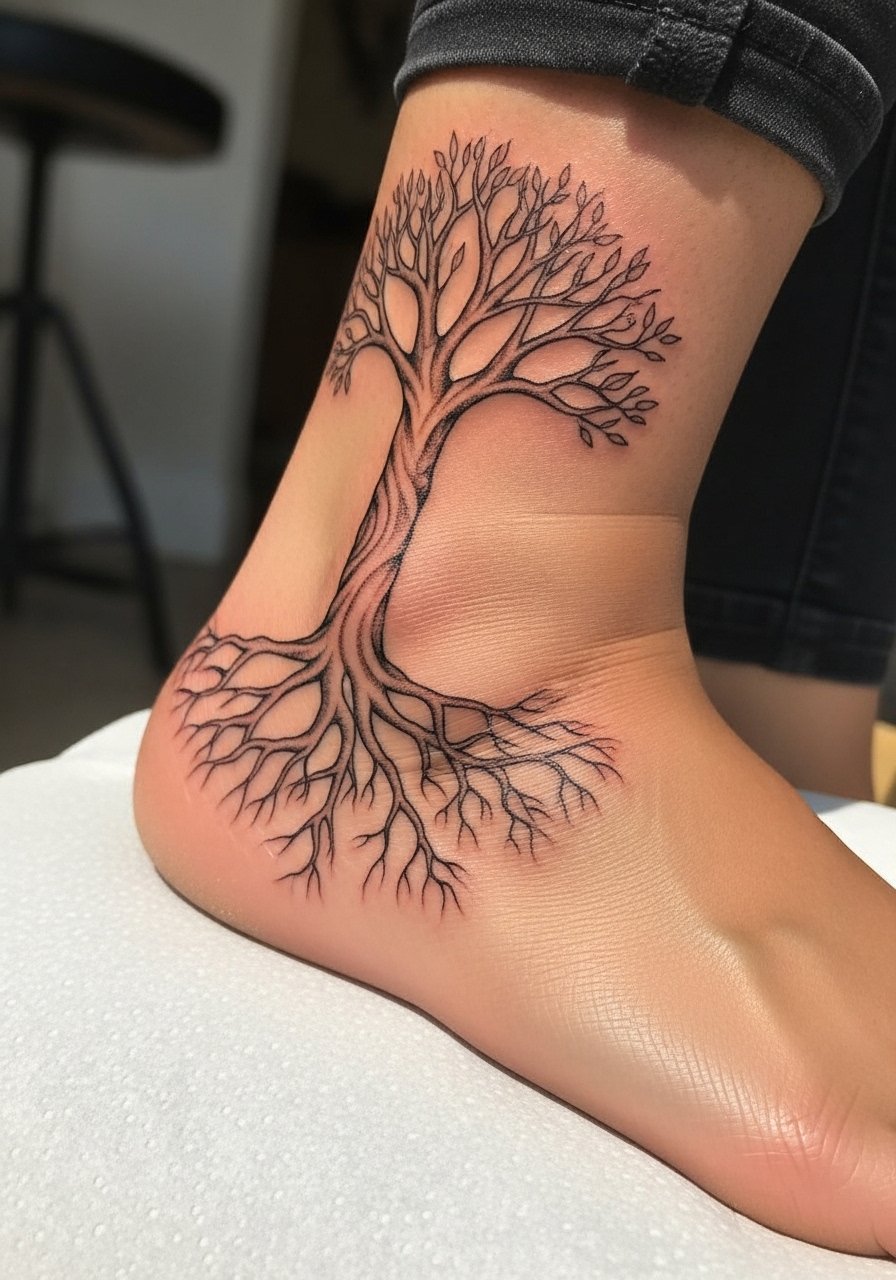
Roots can be as expressive as branches—roots symbolize grounding and origin. An ankle root piece looks delicate but the area is bony and can sting. I know people who chose ankle roots to remind themselves to stay grounded; because the bones are close to the surface, fine lines may soften faster here. My tip: ask for slightly thicker root lines so the pattern endures, and expect touch-ups in a couple of years. Keep socks loose while healing to prevent rubbing.
11. Skull and Dead Tree Chest Juxtaposition
Style/Technique: Dark Traditional / Realism
Pain Level: Medium (4-6/10)
Session Time: Multiple sessions possible
Best For: Heavy symbolism, statement chest piece
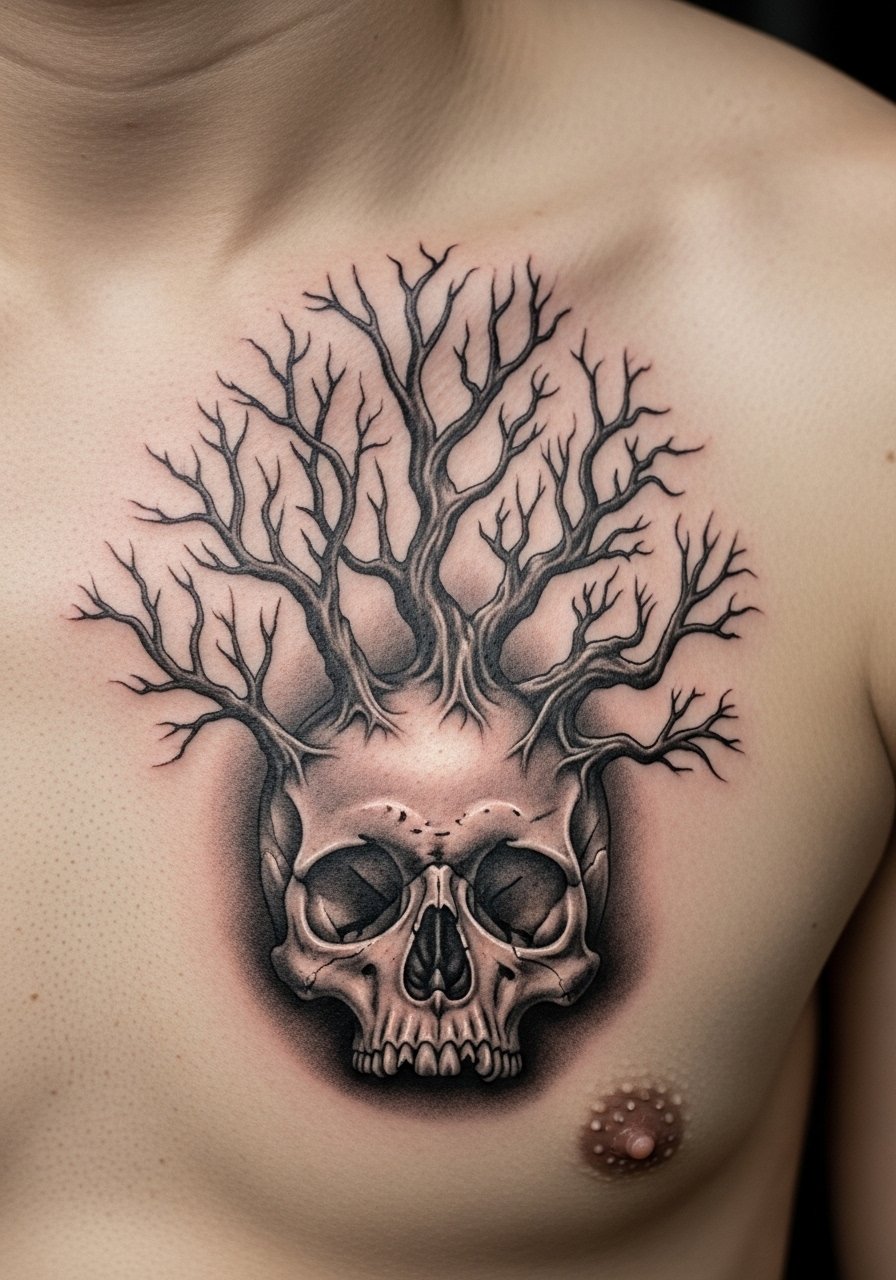
I’ve always found skull-and-tree imagery powerful—it’s a literal life/death interplay. On the chest the composition breathes and can be read from a distance. Realistic shading keeps the skull and dead branches distinct even after some fading. Many people rush detail into small skulls; that’s a trap—keep scale large enough to preserve features. The chest can be sensitive during sessions; plan for breaks. Moisturizing keeps the dark grays supple as they heal.
12. Pine Evergreen Motif on Calf
Style/Technique: Realism / Geometric Combo
Pain Level: Low-Medium (2-4/10)
Session Time: 1–3 hours
Best For: Nature lovers, endurance symbolism
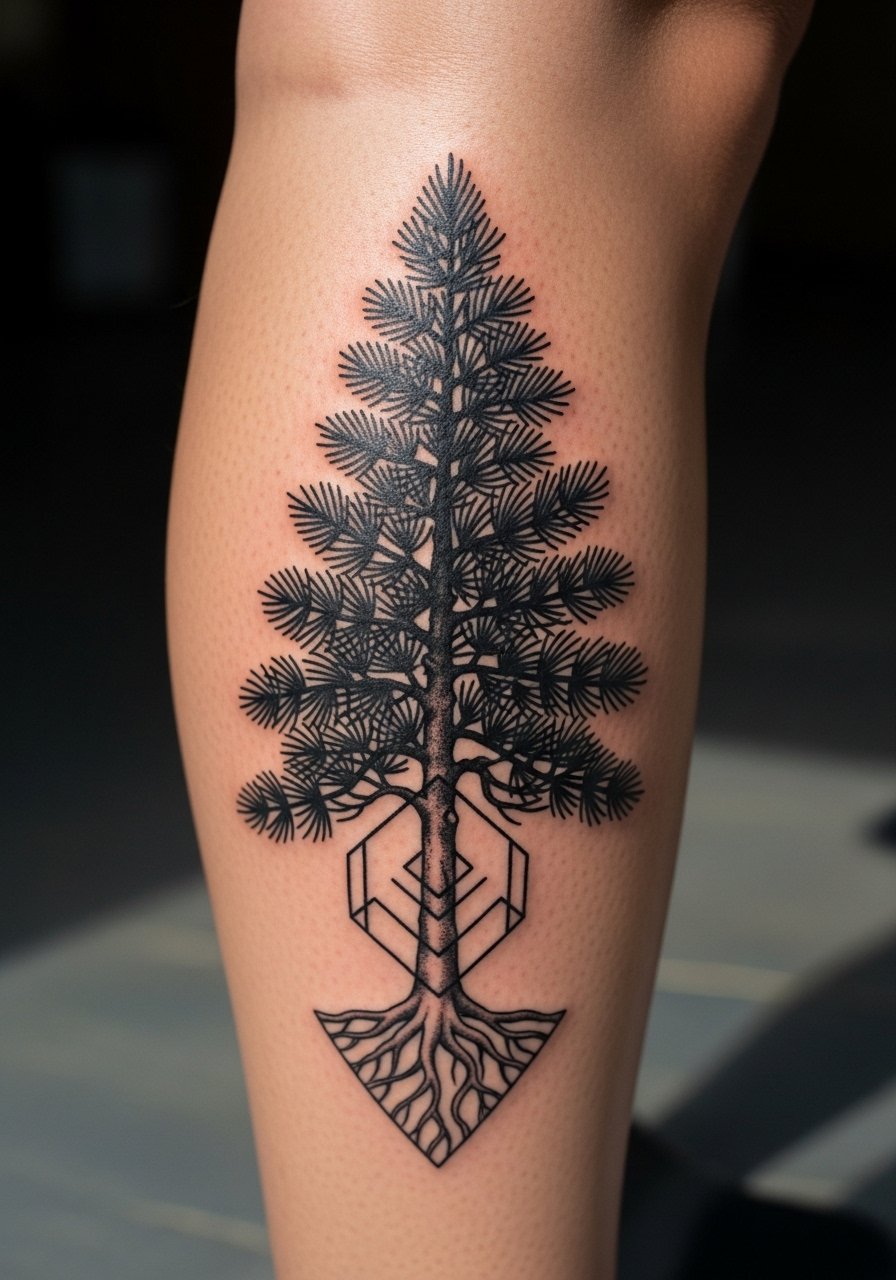
Pines and evergreens read as resilience—and they translate well to calf placement where there’s room to play with verticality. I like pairing realistic needles with a geometric base to modernize a classic motif. The calf is forgiving pain-wise and shows bark texture nicely. Avoid crowding the silhouette with tiny needle clusters; larger strokes keep the silhouette clear as it ages. For long-term care, use sunscreen on the lower leg during summer hikes—I've seen sun dull rich greens over time.
13. Blossoming Cherry Tree on Back
Style/Technique: Watercolor / Japanese-Inspired
Pain Level: Medium (4-5/10)
Session Time: 2–4 hours
Best For: Feminine, seasonal symbolism, larger canvas
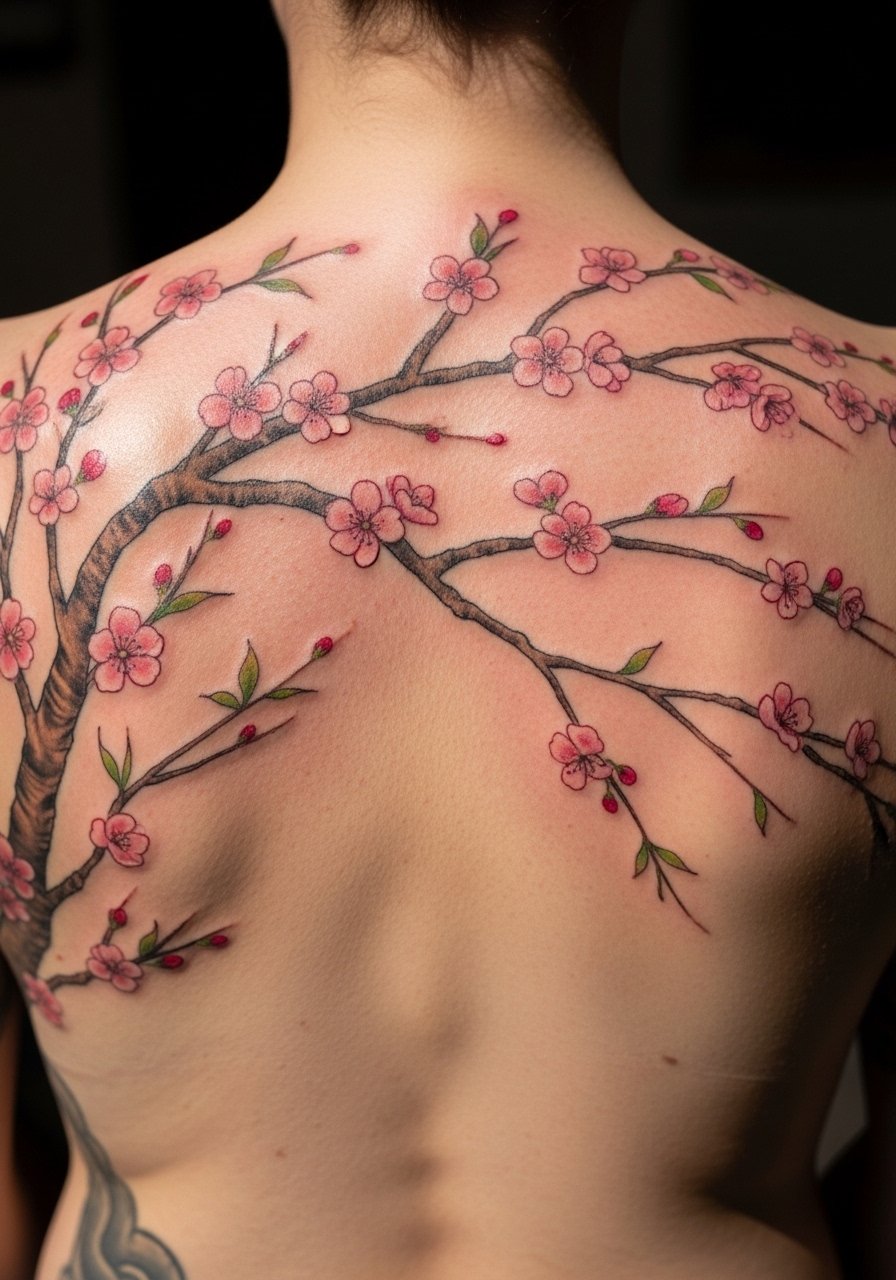
Cherry blossoms capture transience and growth—perfect for a back piece where branches can arch and fall. I’ve noticed healed cherry pieces often look softer than fresh, so expect initial vibrancy to mellow into a gentle palette. This is where placement matters: a back tree should follow shoulder contours. Watercolor makes the blossoms feel airy, but it requires an artist comfortable with saturation control. Avoid tiny scattered petals that turn into indistinct smudges; cohesive clusters hold up better.
14. Minimalist Tree Silhouette on Wrist
Style/Technique: Minimalist / Silhouette
Pain Level: High (6-7/10)
Session Time: 30–60 minutes
Best For: First tree tattoo ideas, subtle symbolism
Wrist tattoos are visible and intimate but the thin skin and bone make them painful. For a small tree silhouette, simplicity is your friend—clean shapes read clearly and age better than tiny branch filigree. I’ve seen lots of tiny wrist trees that blurred into a dark spot; to avoid this, ask for a slightly bolder outline. Expect quick sessions and careful aftercare; wrist movement requires weeks of gentle cleansing and lotion to avoid scabbing.
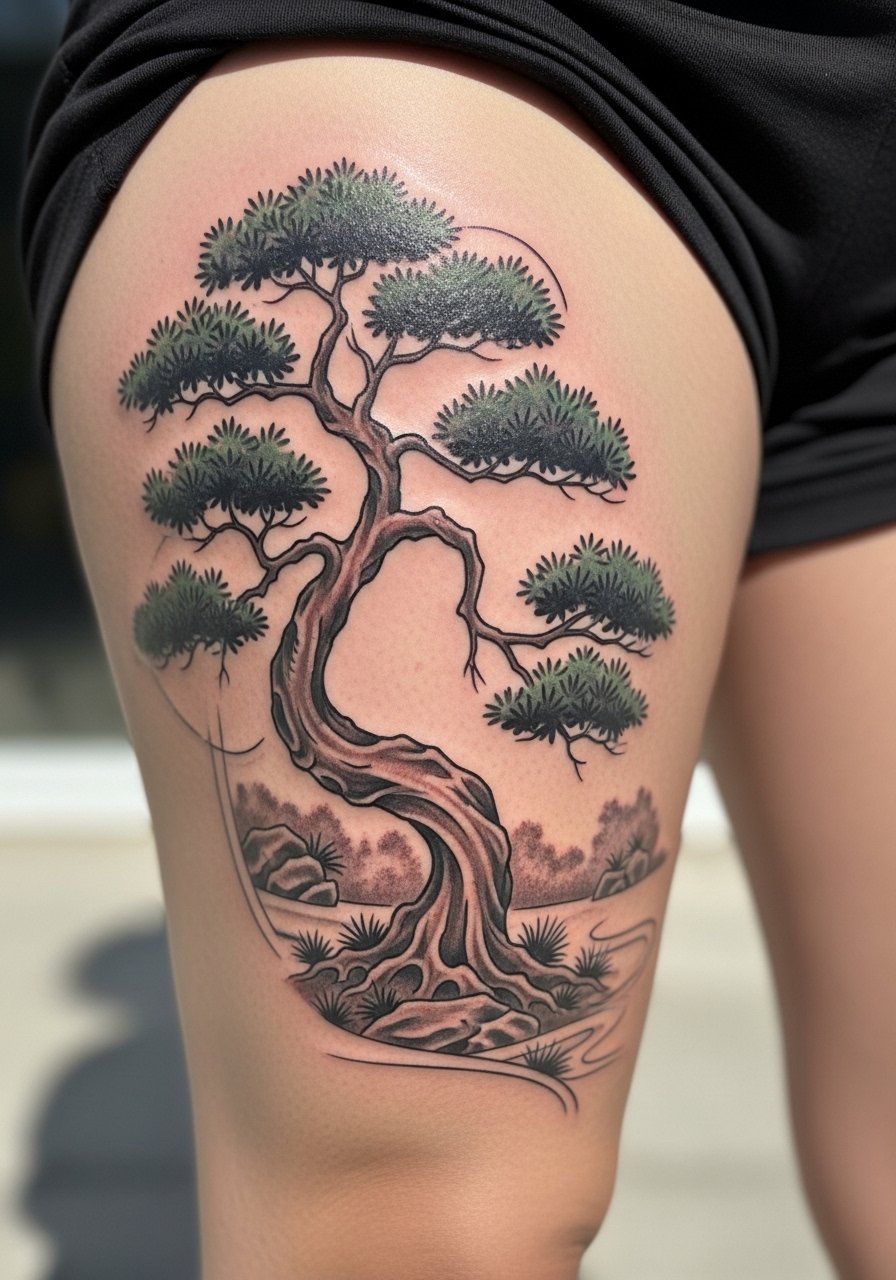
15. Tiny Bonsai On Behind Ear
Style/Technique: Micro-Realism / Minimalist
Pain Level: Low-Medium (3-5/10)
Session Time: 30–60 minutes
Best For: Subtle artistry, symbolic restraint
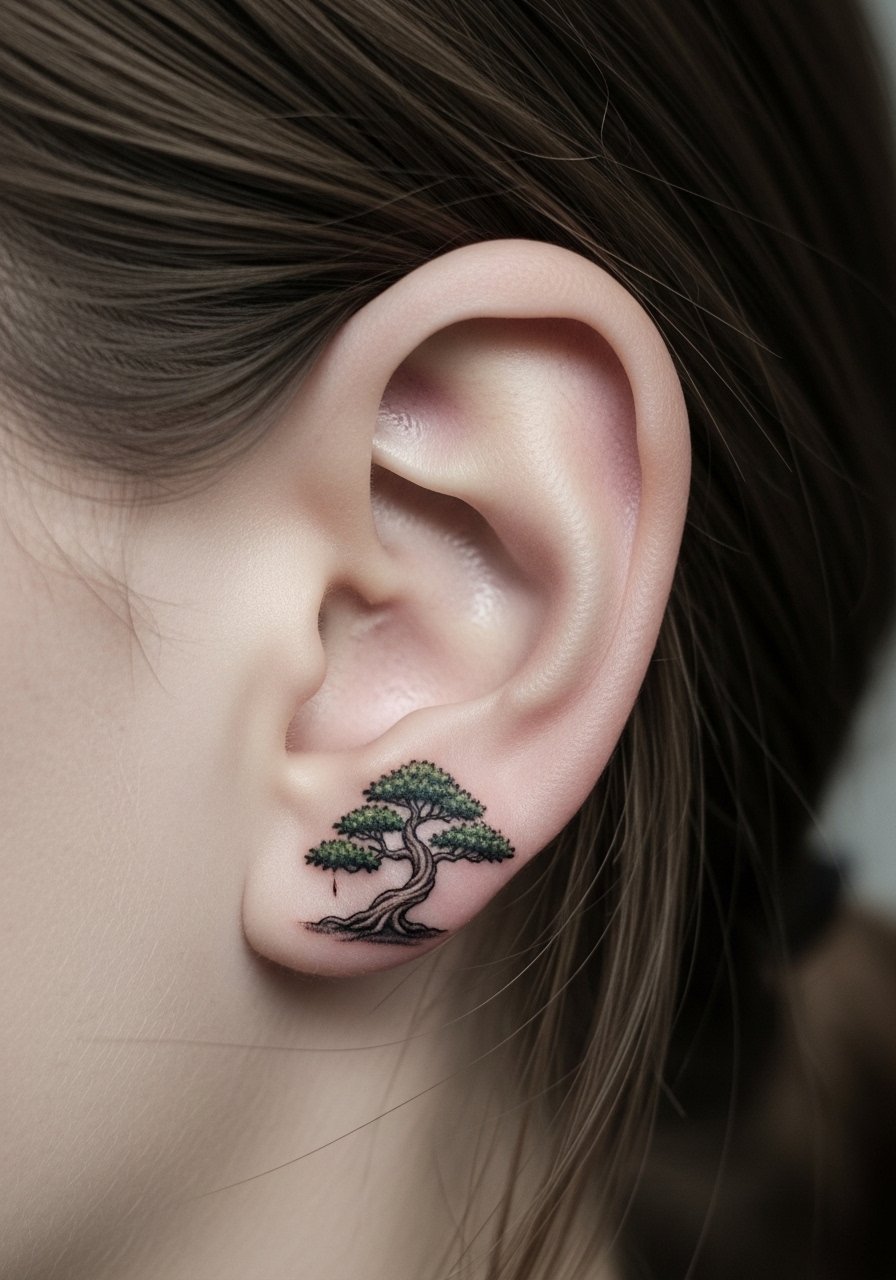
A bonsai behind the ear looks like a secret reminder of patience and growth. Micro-realism in tiny spaces requires an artist experienced with small detail and how it heals. I picked a similar spot once; the key is clean negative space to prevent the tree from becoming a blur. Behind-ear tattoos can fade faster from sun and hair friction, so plan touch-ups and protect with SPF when exposed.
16. Family Tree With Names On Ribcage
Style/Technique: Illustrative / Fine Line
Pain Level: High (7-8/10)
Session Time: Multiple short sessions
Best For: Personal memorials, family symbolism
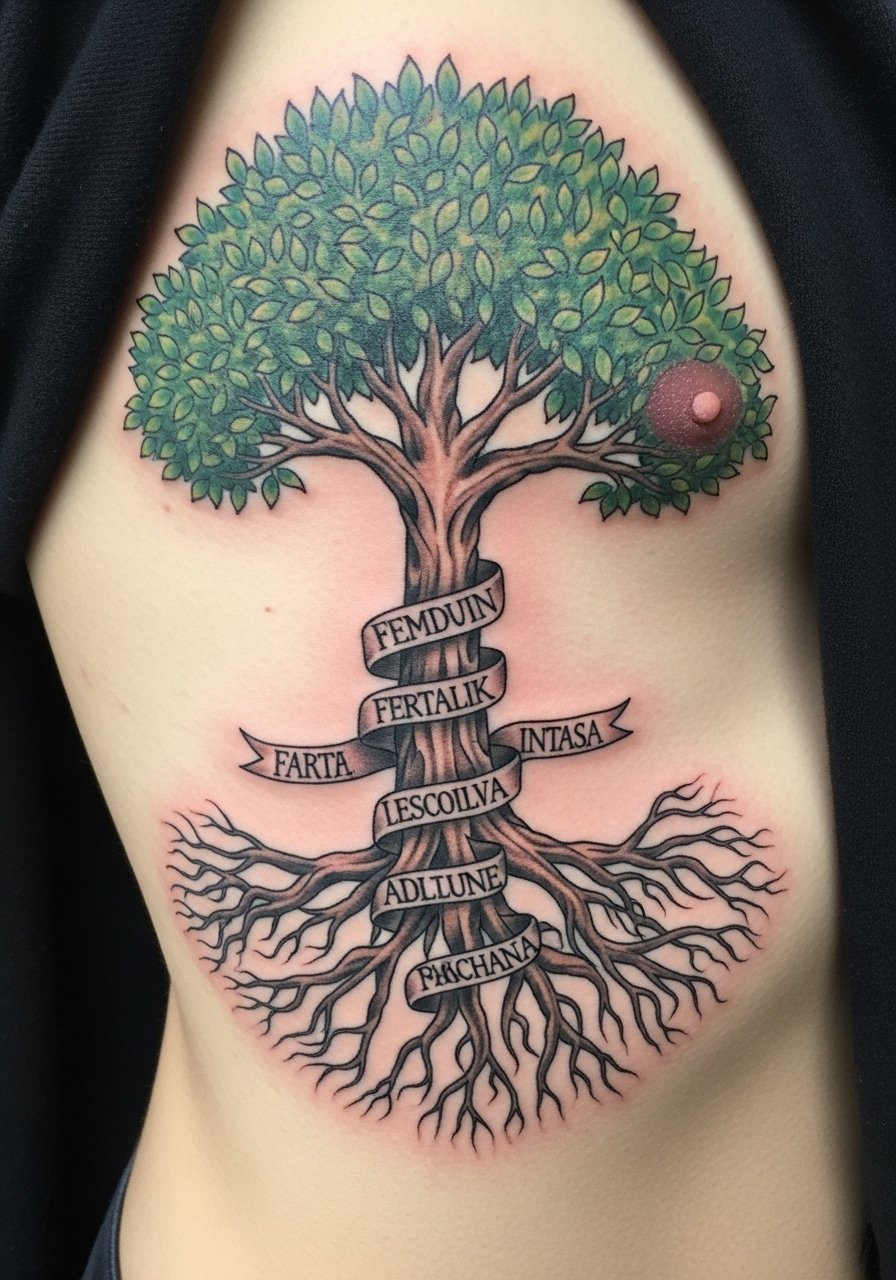
Commemorative family trees are meaningful, but including text means the lettering must be sized for longevity. I’ve seen names become unreadable when letters are too tiny. On the ribcage this is a high-pain area, so plan multiple appointments if needed. The advantage is a private, expansive canvas to place branches and names thoughtfully. Ask artists for healed examples of lettered tattoos to ensure the script holds.
17. Geometric Tree Spine Blackwork
Style/Technique: Blackwork / Geometric
Pain Level: Medium (4-6/10)
Session Time: Multiple sessions
Best For: Bold vertical composition, back or spine alignment
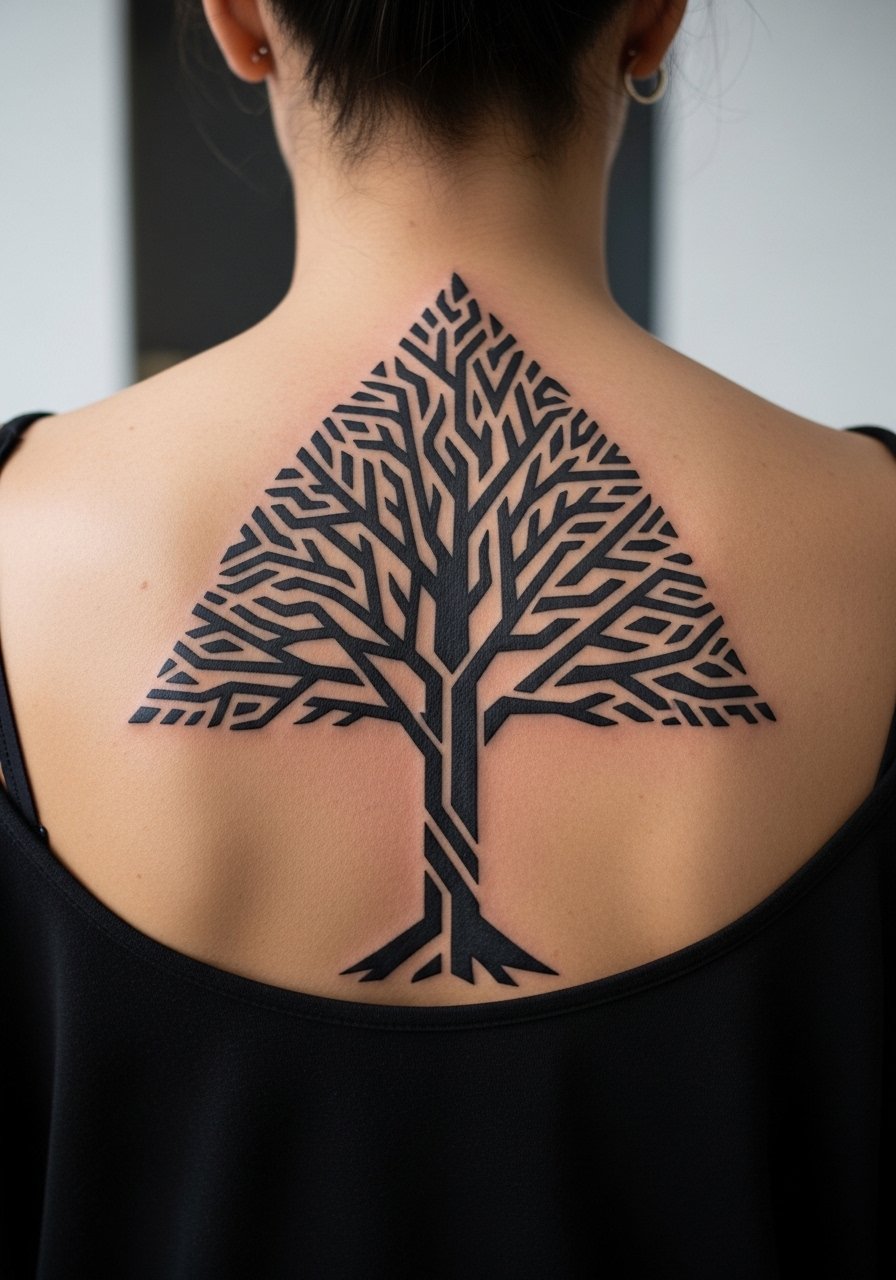
A spine-aligned geometric tree makes use of vertical body symmetry for a modern take on growth. Black geometric panels and negative space create a striking silhouette that remains coherent as skin ages. I like that this style avoids tiny leaf work, which is helpful along the spine where motion can blur filigree. Pain on the spine can be higher near vertebrae, but the visual payoff is strong. One tip: maintain consistent black saturation across sessions to avoid patchy healing.
18. Watercolor Leafy Shoulder Blade
Style/Technique: Watercolor / Soft Illustrative
Pain Level: Low-Medium (3-4/10)
Session Time: 1–2 hours
Best For: Feminine placement, soft color work
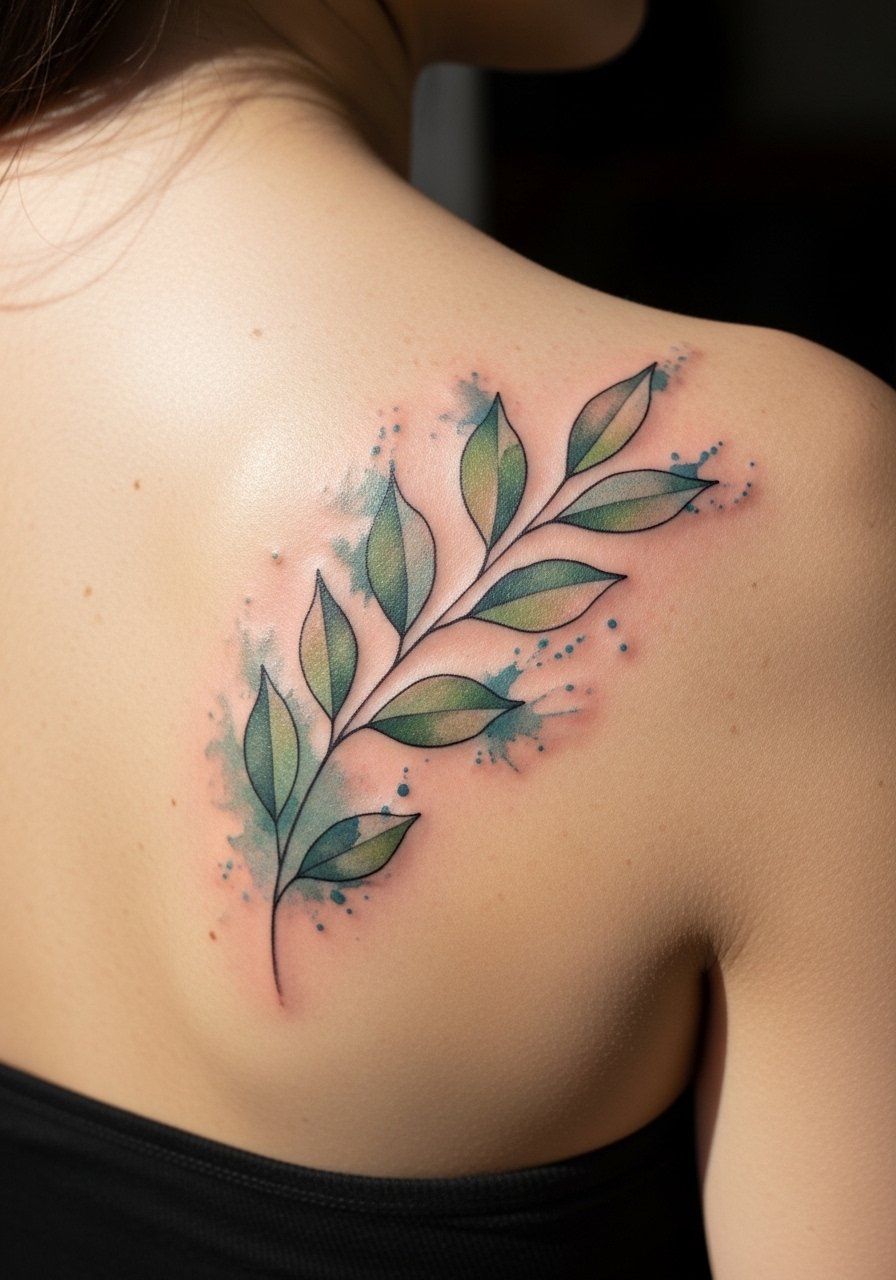
A leafy watercolor piece across the shoulder blade is airy and moves with shoulder rolls. In my experience, soft watercolor reads beautifully healed if the artist uses controlled saturation and deliberate edges. The shoulder blade is comfortable to sit for during sessions, and the healed color stays delicate. Common mistakes include too-splattered color without anchor lines; I prefer a fine trunk or branch to keep the piece grounded visually as it ages.
19. Moon and Tree Feminine Balance on Upper Thigh
Style/Technique: Fine Line / Celestial Fusion
Pain Level: Low-Medium (2-4/10)
Session Time: 1–2 hours
Best For: Feminine symbolism, hidden placements
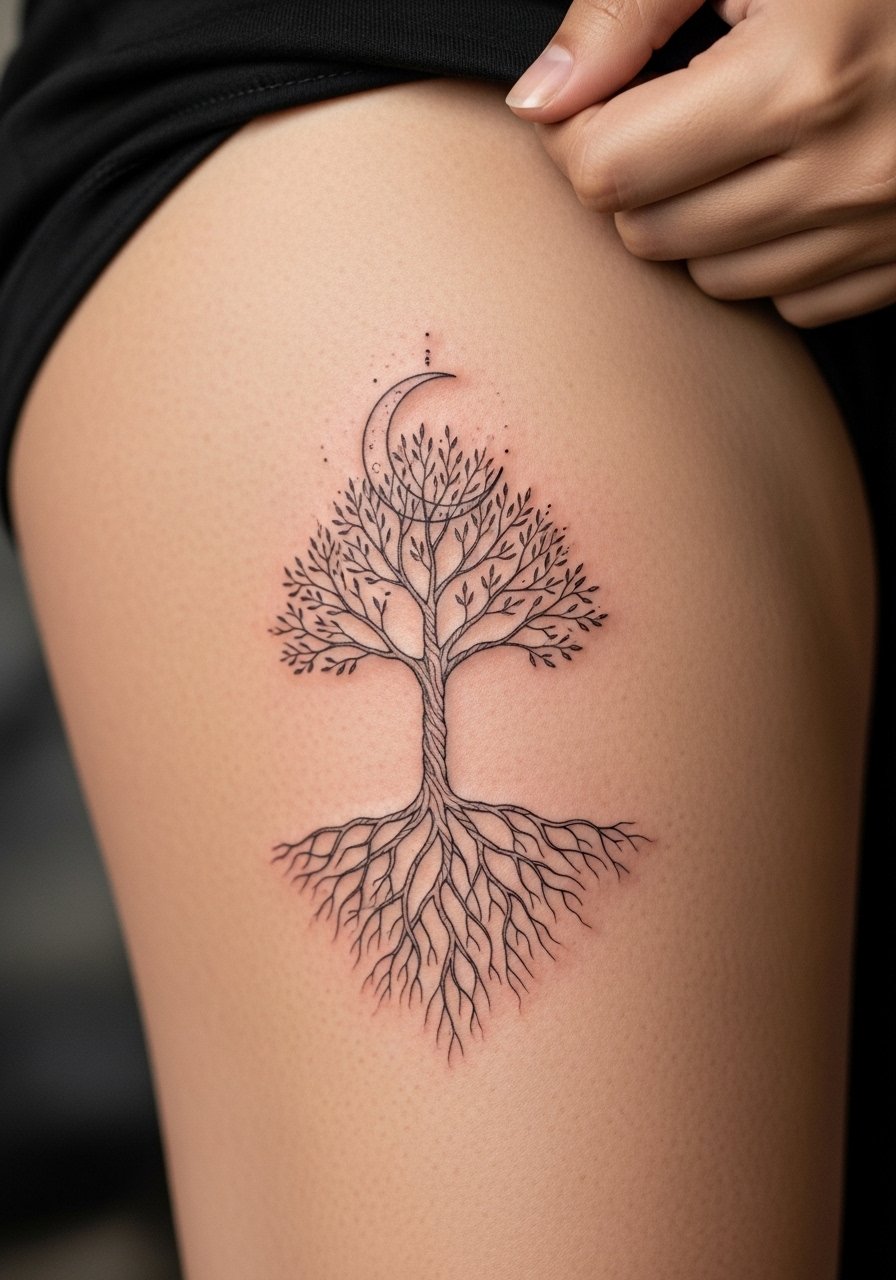
Pairing a moon with a tree gives intuition and growth a poetic frame. Upper-thigh placement keeps it private and allows for a slightly more detailed canopy. I’ve seen moon-tree combos photograph well healed—the moon acts as a clean negative-space backdrop that preserves branch silhouettes. If you want subtlety, choose muted lineweights; if longevity matters more, ask for slightly bolder anchors around the moon. Thighs are forgiving during healing, but avoid tight clothing for the first two weeks.
20. Oriental Garden Contextual Tree on Thigh Panel
Style/Technique: Japanese-Inspired / Scenic
Pain Level: Medium (4-6/10)
Session Time: Multiple sessions
Best For: Story-driven pieces, immersive panels
This is one of the under-covered ideas I love: placing a tree within a tiny garden scene gives context and narrative. The thigh is ideal because it allows a panel layout—rocks, water lines, and a small tree create an immersive feel. I’ve noticed few lists include full-context trees; most focus on standalone symbols. The risk here is overcrowding small elements; I recommend a stronger focal tree with simpler supporting elements so the panel reads clearly as it heals.
21. Gothic Cathedral Backdrop Tree
Style/Technique: Dark Illustrative / Architectural Fusion
Pain Level: Medium-High (5-7/10)
Session Time: Multiple sessions
Best For: Heritage-themed back pieces, moody narratives
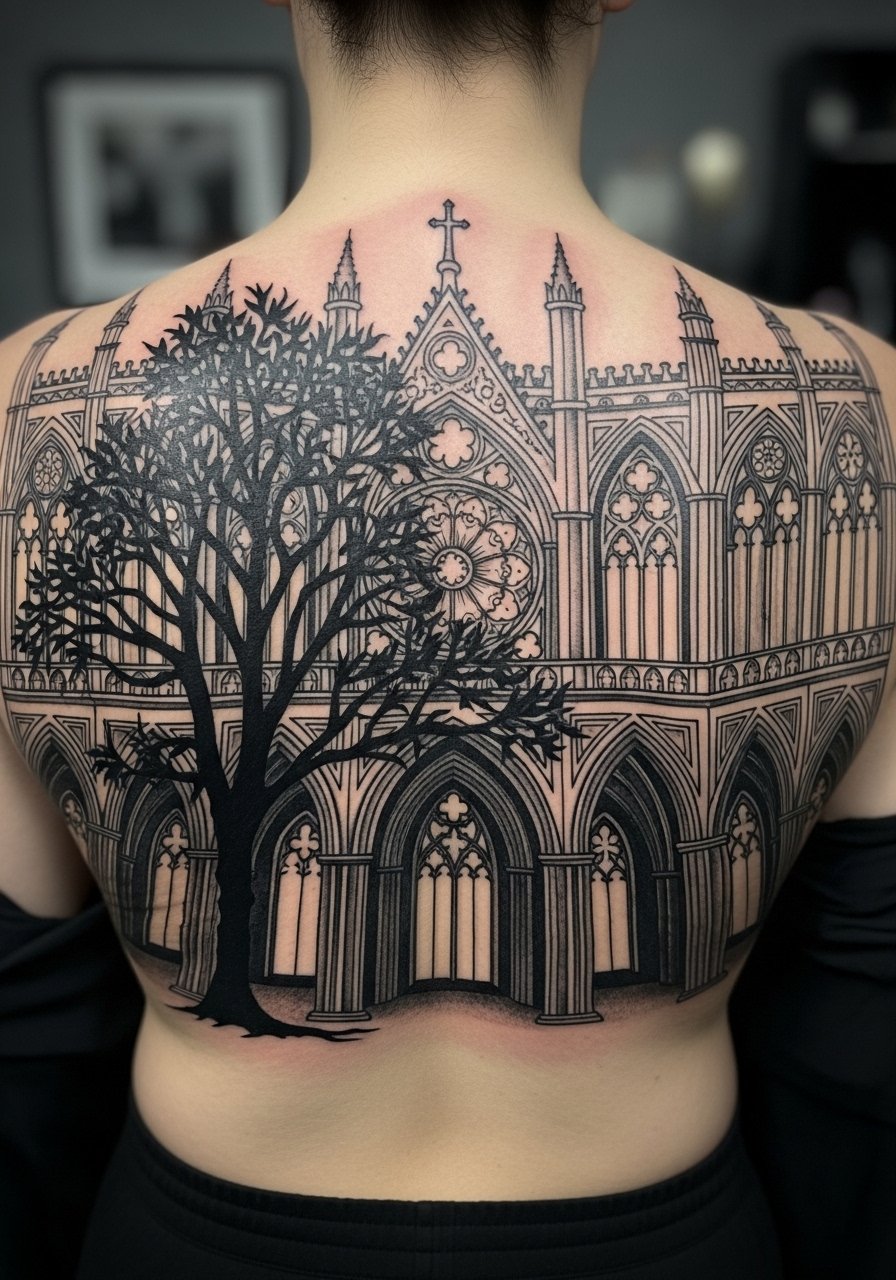
Pairing a tree with gothic architecture creates a haunting, heritage-rich piece. I’ve only seen a few artists execute this well—it's a niche that combines structural linework with organic branches. The back gives the room needed for arches and buttresses, and I find that strong black outlines help the cathedral remain readable as the tattoo ages. Keep the architectural details bold; fine tracery often blurs. This design is one of the less-common, high-impact concepts I recommend if you want something different and meaningful.
22. Forest Mystery Multi-Tree Sleeve Start
Style/Technique: Blackwork / Atmospheric Realism
Pain Level: Medium (4-6/10)
Session Time: Multiple sessions
Best For: Sleeve projects, moody narratives
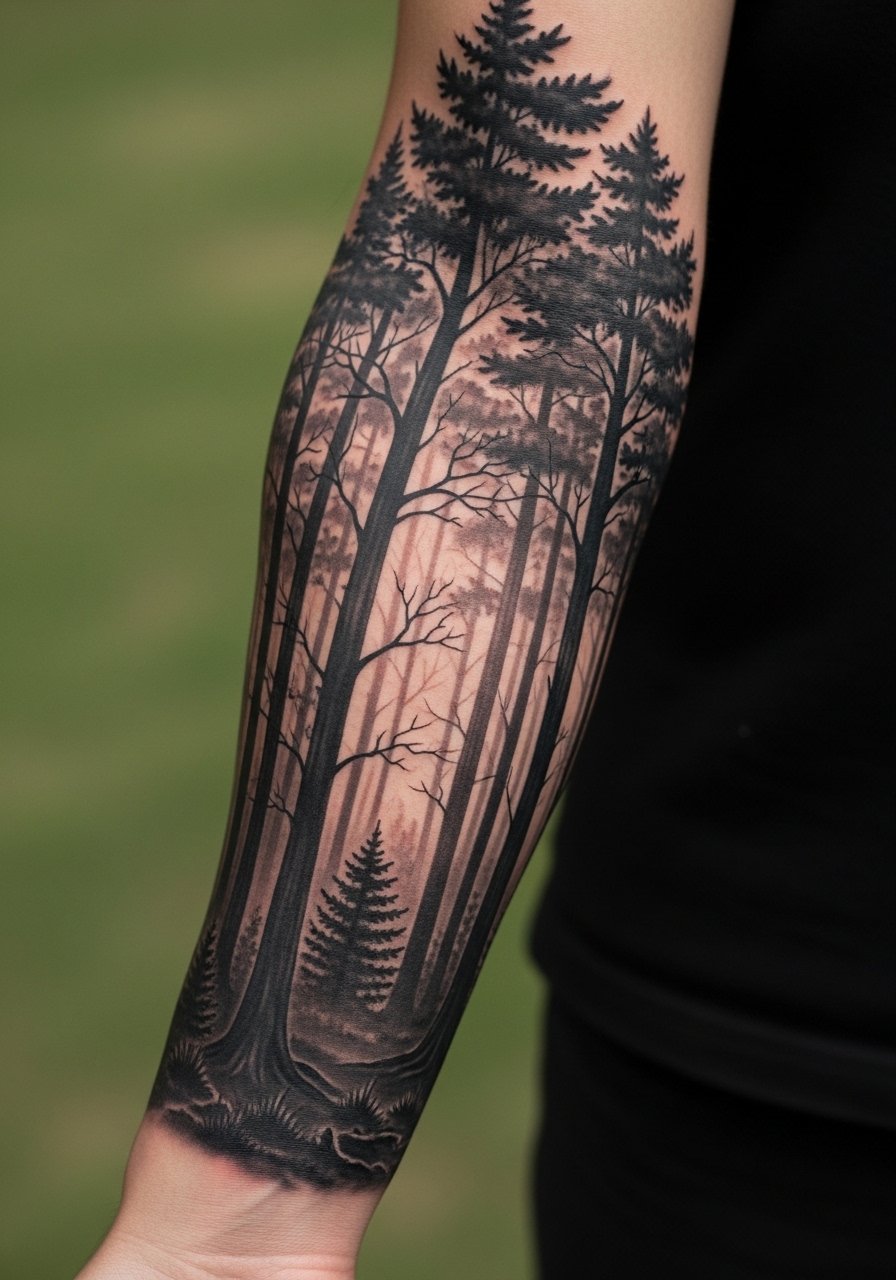
A forest sleeve invites exploration—multiple trunks, layers of fog, and fading silhouettes create depth. I started a sleeve like this and appreciated how healed photos show softer depth than fresh ink. Black-and-gray gradients read as distance, and the layered approach ages nicely if the darkest areas are saturated well. Avoid over-detailing every tree; vision reads better when the foreground has the most contrast and background trees soften.
23. Seasonal Change Holiday-Themed Tree on Calf
Style/Technique: Illustrative / Playful Seasonal Motif
Pain Level: Low-Medium (2-4/10)
Session Time: 1–2 hours
Best For: Fun personal statements, seasonal symbolism
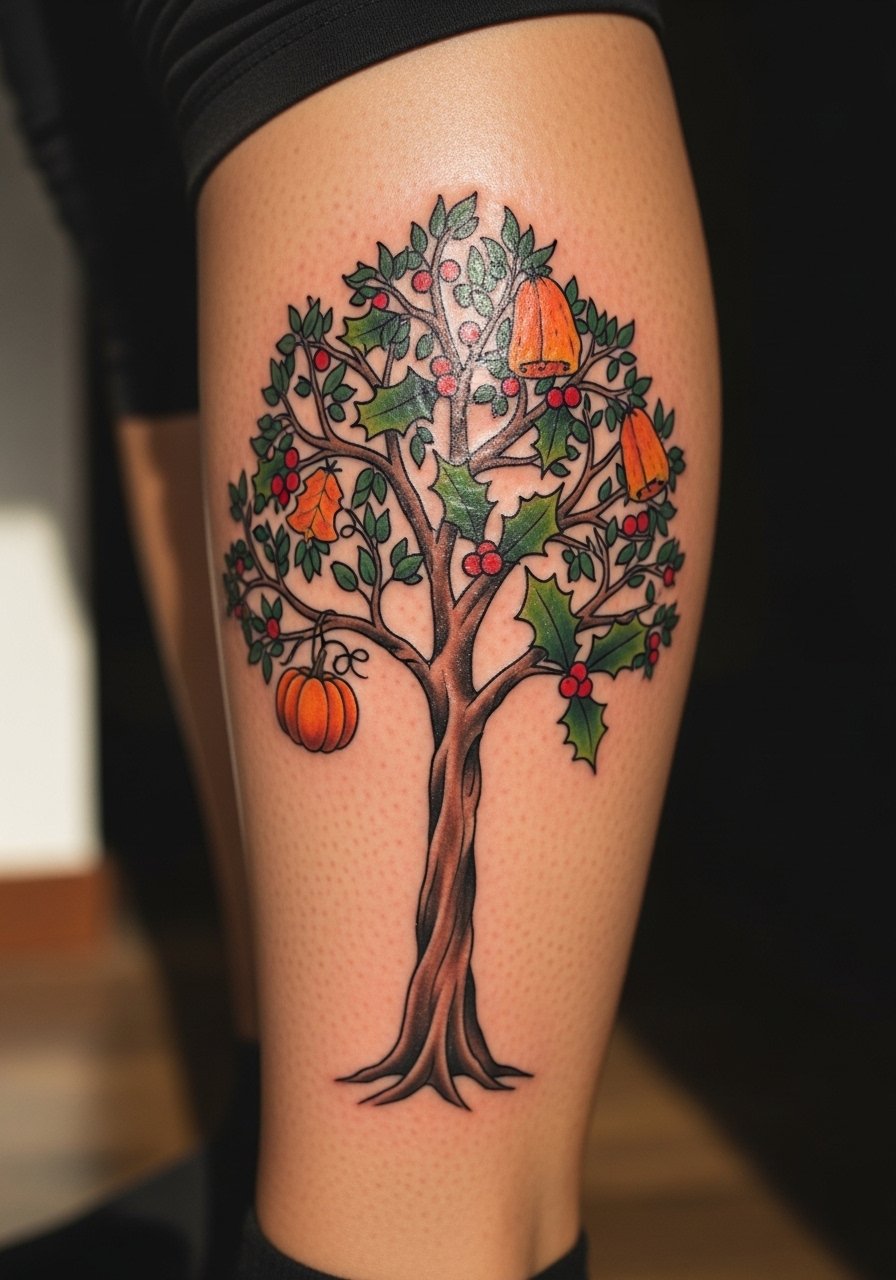
This is a playful take I've seen little of: marking seasonal milestones with small motifs on tree branches. It can be as subtle or literal as you like—one tiny leaf change or overt holiday symbols. Calf space lets you add small seasonal icons without crowding the tree silhouette. The downside is it risks feeling gimmicky; I recommend integrating seasonal changes as subtle accents rather than full costume changes on the tree.
24. Mountain and Tree Ankle Combo
Style/Technique: Minimalist / Line Art Combo
Pain Level: High (6-7/10)
Session Time: 1 hour
Best For: Outdoorsy symbolism, small landscape tattoos
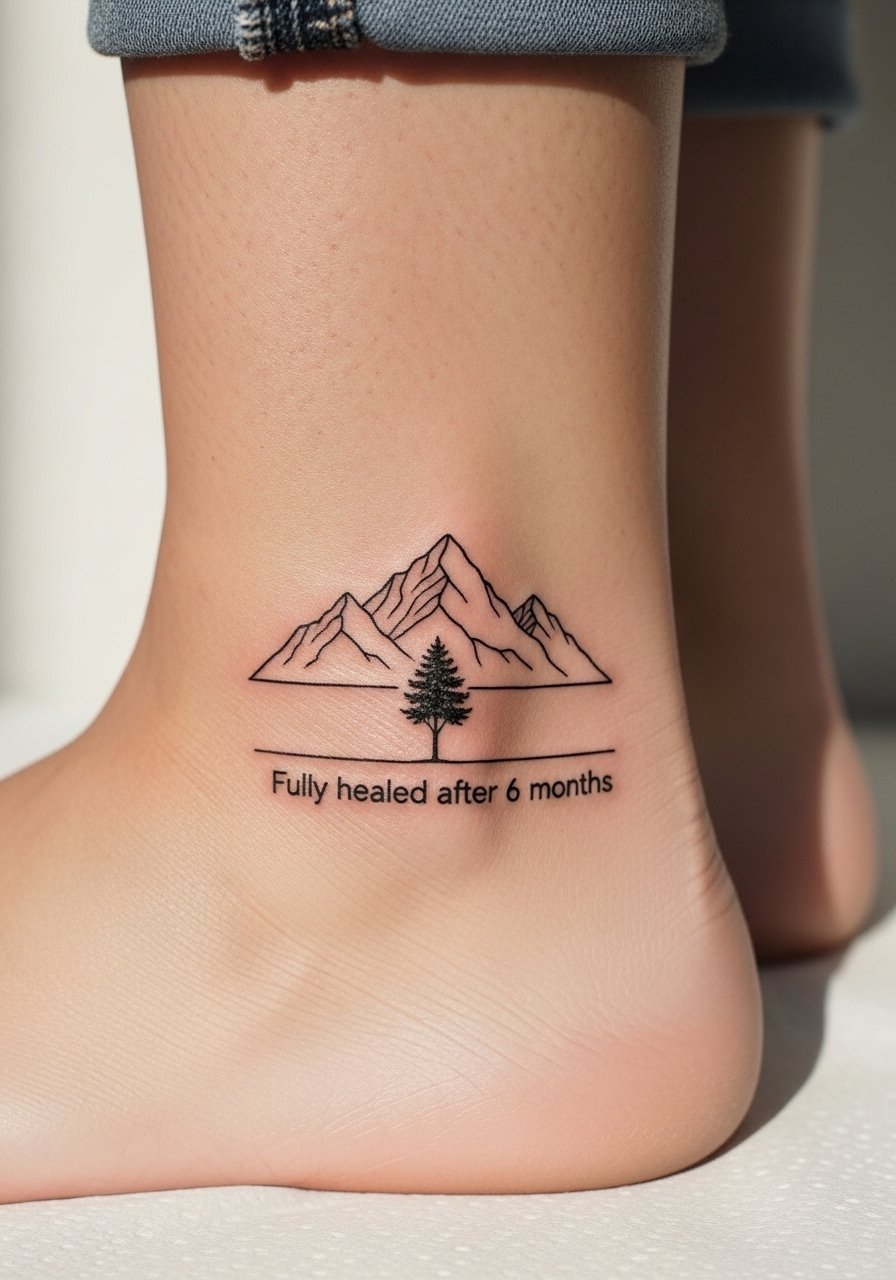
Combining mountains with a tree tells a clearer story of growth through challenge. I like this compact landscape for ankles because it balances horizon and verticality. Keep lines bold enough to resist ankle blur—tiny peaks with very thin ink can vanish over time. The ankle’s sensitivity again demands good aftercare; avoid tight footwear during early healing.
25. Micro Sapling Finger Tattoo
Style/Technique: Micro / Minimalist
Pain Level: High (7-8/10)
Session Time: 15–30 minutes
Best For: Tiny reminders, discreet symbolism
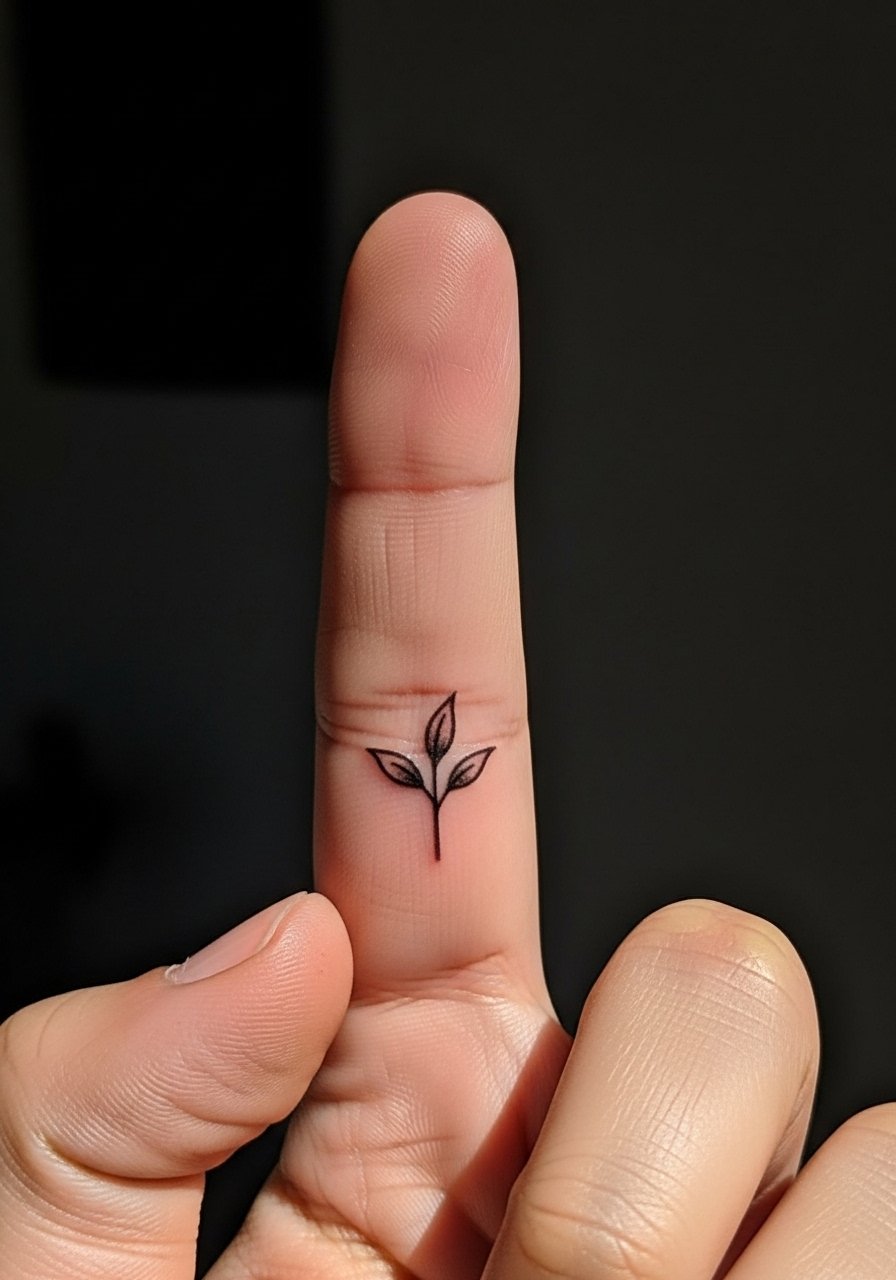
Fingers are highly sensitive and exposed, so micro saplings are a bold personal choice. I tried a tiny finger tattoo once and found it faded faster than expected; regular touch-ups are common. If you want a sapling for growth symbolism, consider a slightly thicker stem or placing it on the side of the finger (less friction) to improve longevity. Expect to baby it—keep it dry and protected early on.
26. Tree Ring Growth Circle on Forearm
Style/Technique: Geometric / Symbolic Realism
Pain Level: Low-Medium (3-4/10)
Session Time: 1–2 hours
Best For: Symbolic design, growth markers
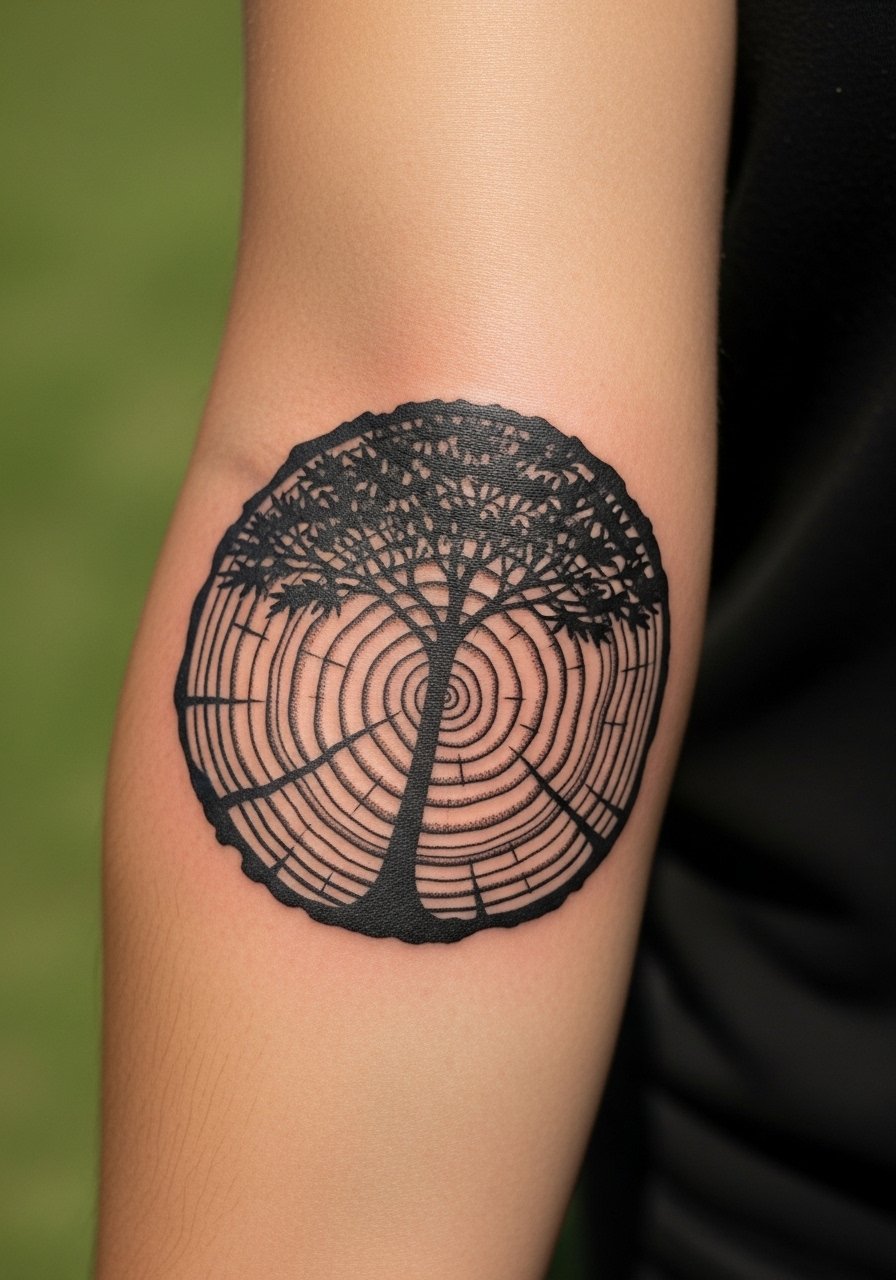
Tree rings are literal markers of growth and time. A forearm circle with subtle rings reads like a personal timeline and keeps design compact. I like it because it’s graphic and ages well—lines are less likely to blur into indistinct texture if spaced properly. Ask for clear spacing between rings and a steady hand on circular symmetry. This is a tasteful way to express growth without an entire tree silhouette.
27. Negative Space Root Thigh Panel
Style/Technique: Blackwork / Negative Space
Pain Level: Low-Medium (2-4/10)
Session Time: 1–3 hours
Best For: Bold contrast, thigh canvases
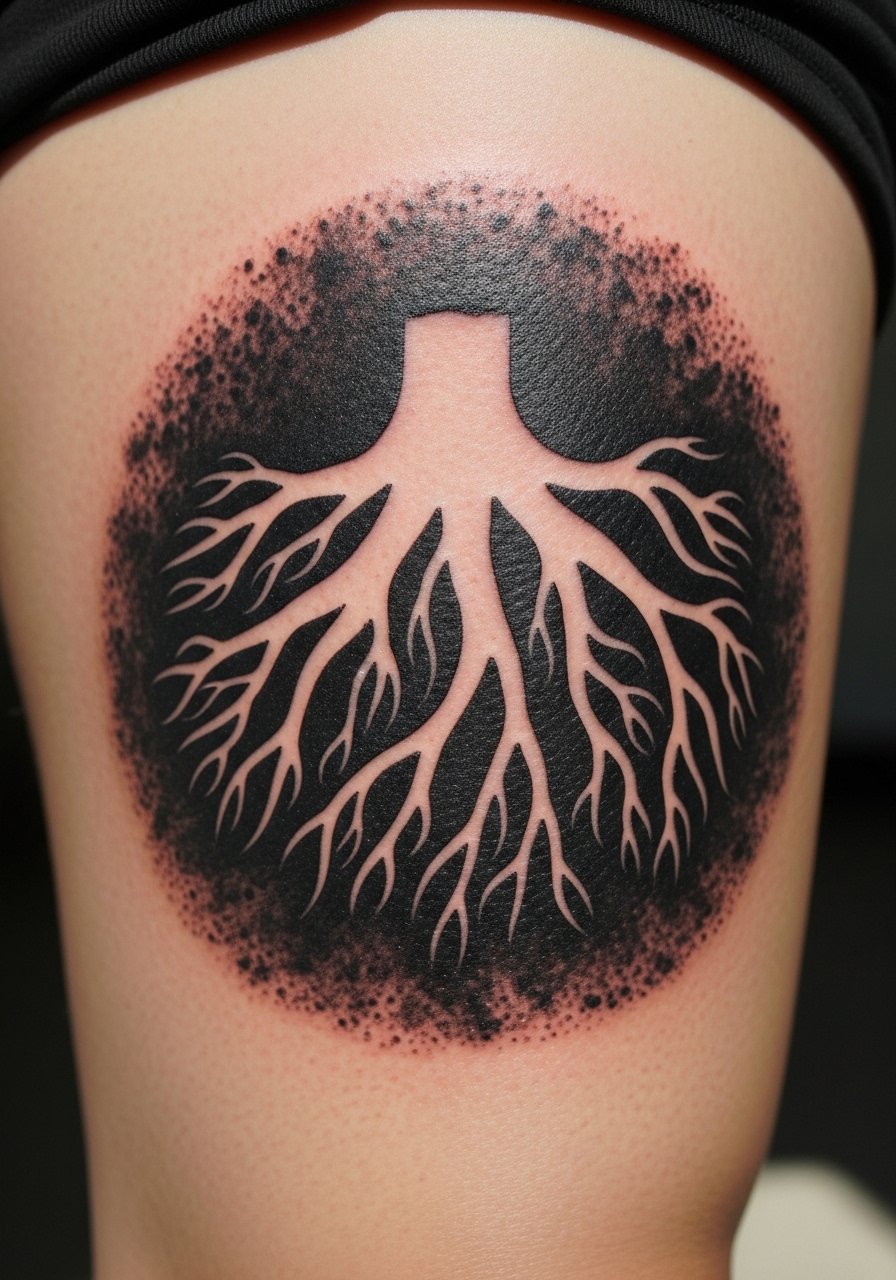
Negative-space root work creates drama: solid black blocks let the skin form the root shapes. I’ve noticed negative-space pieces age well because there’s less reliance on tiny lines. On the thigh the area can absorb large blocks well, and the result reads like a graphic print. Avoid placing negative roots where clothing constantly rubs; choose inner-thigh or outer-thigh depending on comfort.
28. Bonsai-Style Tree Ring On Upper Arm
Style/Technique: Micro-Realism / Circular Composition
Pain Level: Low-Medium (2-4/10)
Session Time: 1–2 hours
Best For: Compact, meditative pieces
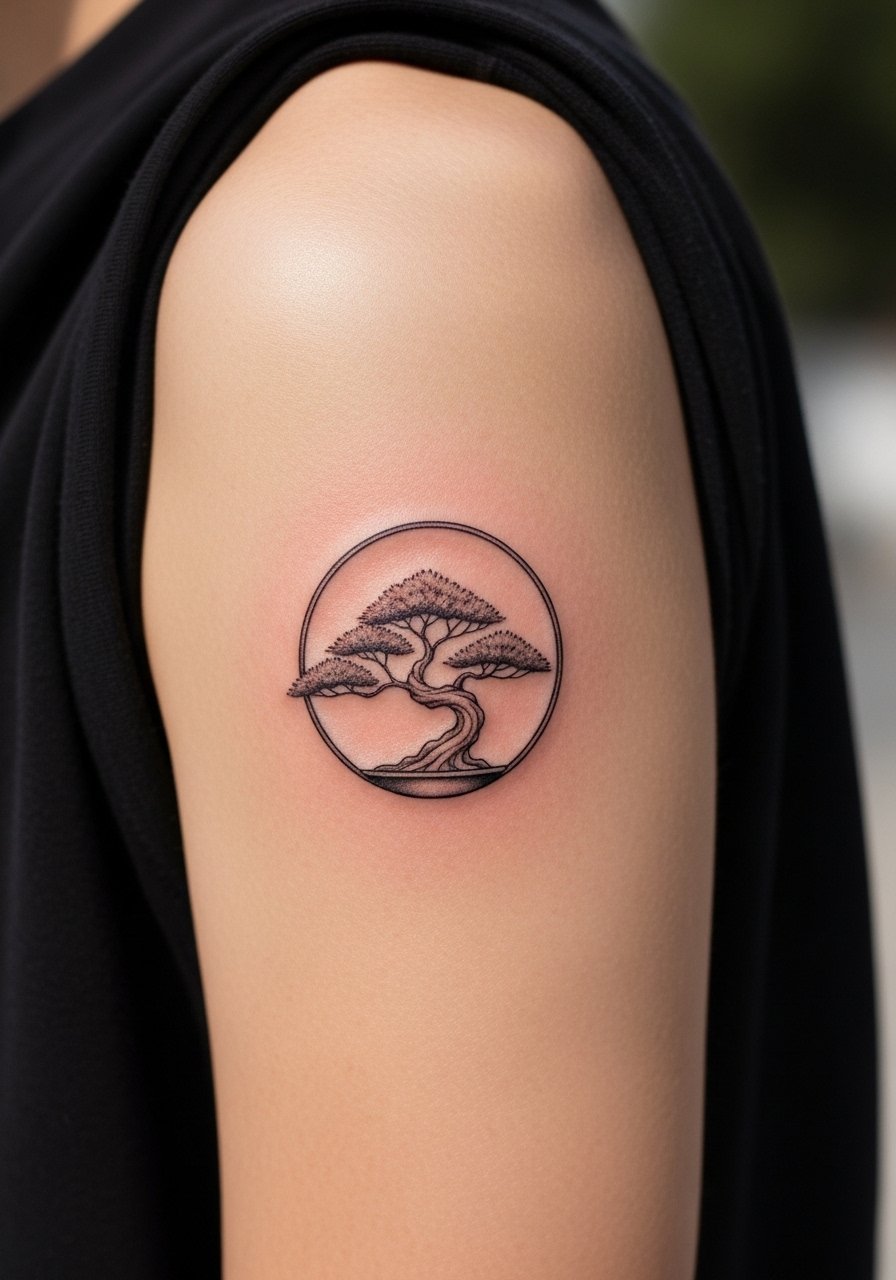
Rounding out the list with another compact idea I’ve loved: a bonsai tree encased in a circular ring evokes cultivated growth and patience. Upper-arm placement is forgiving and lets the circular motif sit naturally with muscle curves. I favor slightly bolder trunk lines in small circular pieces—tiny twig details can get lost. This reads calm and focused on healed skin, making it a recommended “first tree tattoo” if you want meditation symbolism without a large commitment.
Tattoo Prep and Aftercare Essentials
Aftercare Essentials:
- Aquaphor Healing Ointment, 14oz tube — Recommended for first 3–5 days to keep detailed lines supple
- Saniderm Transparent Adhesive Bandage, 6-inch roll — Second-skin method many artists use for branch-heavy pieces
- CeraVe Fragrance-Free Moisturizing Lotion, 12oz — Daily moisturizer for days 4–14
Before Your Appointment:
- Tattoo Numbing Cream 5% Lidocaine — Use only after checking with your artist, 30–45 minutes prior
- Procreate Pocket Stylus & Notebook (for design sketches) — Helpful when prepping custom tree-of-life drafts
Long-Term Maintenance:
- SPF 50+ Sunscreen Stick (travel size) — Daily protection to prevent fading
- Mad Rabbit Tattoo Balm, 2oz — Keeps healed tattoos vibrant
- Hustle Butter Deluxe, 2oz — Vegan long-term moisturizer many artists recommend
Optional Comfort Items:
- Tattoo Numbing Spray — Useful for touch-ups or sensitive placements
- Hydrocolloid Bandages (large) — For spot protection during activity
- Dr. Bronner's Unscented Castile Soap, 32oz — Gentle cleaning during early healing
I personally pack these items before appointments and follow the basic rhythm: clean gently, thin layer of ointment for first few days, then fragrance-free lotion and sunscreen long-term. Every artist I’ve spoken with stresses sunscreen and avoiding heavy friction during initial healing.
Frequently Asked Questions
Q: How bad does a tattoo actually hurt?
A: Pain depends on placement and your tolerance. Forearm and thigh are lower on my pain chart—more annoyance than sharp pain. Ribcage, spine, and ankle are higher and sting more. From what I've experienced, pacing yourself with breaks and breathing helps a lot. For very sensitive spots, tattoo numbing cream 5% lidocaine can reduce sensation—check with your artist first.
Q: How do I pick a tree design I won't regret?
A: I recommend choosing symbolism that matters to you—family, resilience, rebirth. Sit with a few sketches for months and test placement with temporary tattoos to see how they flow with movement. If you want longevity, favor bold linework or black-and-gray realism over extremely delicate watercolor for primary elements.
Q: How do tree tattoos age and what should I expect healed vs. fresh?
A: Fresh tattoos are brighter and crisper. Over months, fine lines soften and colors mellow. From what I’ve seen, blackwork and bold silhouettes keep meaning and shape best; fine line branches may blur a bit and need touch-ups. Always ask to see healed portfolios from your artist.
Q: What aftercare actually matters for branches and roots?
A: Keep it clean, avoid heavy rubbing, and moisturize consistently. Use a breathable wrap like Saniderm if your artist recommends it for detailed branch work, and switch to CeraVe once peeling finishes. Sunscreen later is essential for all tree tattoos.
Q: Can I work out after getting a tree tattoo?
A: Wait at least 48–72 hours and longer for high-friction areas. Sweating can trap bacteria and cause excess scabbing, which harms fine branches. If your tree crosses a joint (elbow, knee), give it extra rest and avoid stretching the area while surface healing is happening.
Q: Are certain styles better for darker skin tones?
A: I’ve noticed black-and-gray, bold silhouettes, and high-contrast blackwork show nicely on all tones. Bright pastels and subtle watercolor can appear muted on deeper skin—if color is important, ask your artist for saturation strategies and healed examples on similar skin tones.
Q: Should I get a small tree first to test pain and healing?
A: Only if you actually want a small tree. Small pieces can hurt more than you expect on bony spots. Consider placement first and use a discreet area like the upper arm if you're testing pain tolerance.
Q: How long until a tree tattoo is fully healed?
A: Surface healing usually takes 2–3 weeks; full skin regeneration can run 2–3 months. The first week is critical: keep it clean, use recommended ointment, and avoid sun and heavy friction. From my experience, colors and depths settle and look their true selves after a few months.
