
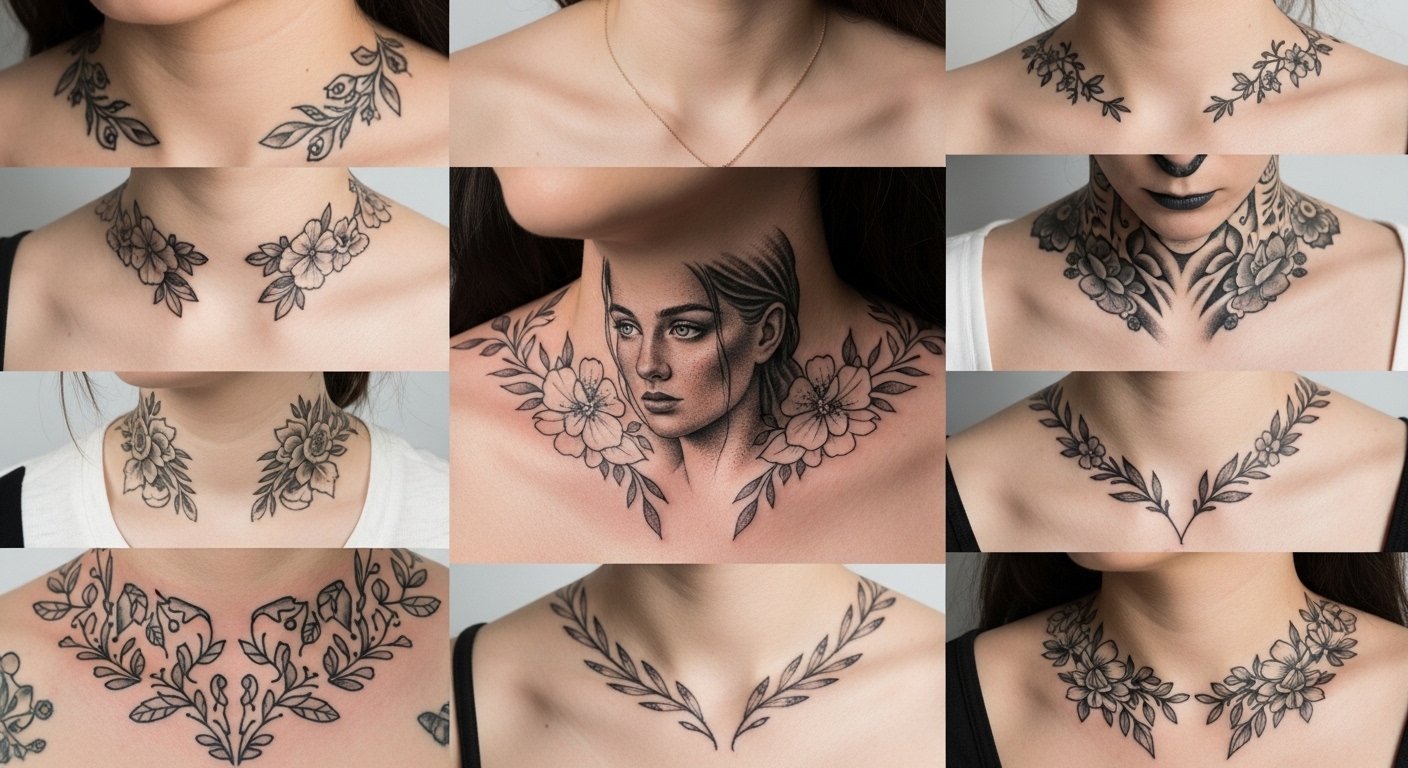
I spent months pinning collarbone tattoos and talking to artists before I realized the trick: the clavicle is a small canvas that demands a design that breathes with your bone, not fights it. These 22 ideas focus on delicate lines, placement that flatters clothing and jewelry, and how each style actually looks healed—not just fresh off the needle.
Quick context: These picks lean toward fine line, minimalist, and micro-realism styles. All work across collarbone placements—single-side, mirrored, and center-sternum connectors. I used 2025 trend notes about subtle jewelry tattoos and negative-space designs when choosing these.
Stat notes: About 30% of U.S. adults have a tattoo (Harris Poll, 2019). Young adults show the highest rates—roughly 47% for ages 18–29 (Statista). Tattoo regret and removal interest remain small but real, so design longevity matters (sources: Harris Poll; Statista).
Fine Line Botanical Collarbone Accent
Style/Technique: Fine Line / Botanical
Pain Level: Low-Medium (3/10)
Session Time: 1 session, 1–2 hours
Best For: First delicate visible piece

I love fine botanical lines on the clavicle because they mimic the bone’s curve. It reads like jewelry. Pain is usually mild—surface skin with little muscle. Expect light scabbing and 2–3 weeks of surface healing. Fine lines can blur slightly over years, so ask an artist who specializes in single-needle work. Avoid going too tiny; single-needle tattoos need slightly bolder spacing to stay crisp when healed.
Minimalist Single-Word Script Along Collarbone
Style/Technique: Single-Line Script / Minimalist
Pain Level: Low (2-3/10)
Session Time: Under 1 hour
Best For: Meaningful, readable text

A short, meaningful word sits beautifully under the clavicle. Script should be tested in a stencil across your collarbone—curves and spacing change when you move. Pain is low because the area is shallow, but stretching to keep the stencil aligned can feel odd. Heals in about two weeks on the surface. Avoid overly ornate fonts; simple, readable script ages better.
Micro-Realism Flower on Outer Collarbone
Style/Technique: Micro-Realism / Floral
Pain Level: Medium (4/10)
Session Time: 1–2 hours
Best For: Small, detailed statement

Micro-realism gives a tiny photographic feel without taking over. On the collarbone it looks like a pressed flower. Expect more needle passes for shading—so slightly higher discomfort. Healing shows the fine shading soften; colors settle into skin tone. Ask for healed examples from your artist. Common mistake: packing too much tiny detail into a very small space—it blurs over time.
Mirrored Minimal Motifs on Both Clavicles
Style/Technique: Minimalist / Symmetrical
Pain Level: Low (2-3/10)
Session Time: 1–2 hours
Best For: Fashion-forward, mirrored look
Mirrored designs feel intentional and balance jewelry and neckline choices. They’re forgiving to placement shifts because symmetry reads from movement. Pain is similar to other collarbone spots. Heals cleanly if lines have consistent depth. Avoid mismatched stencils—ask your artist to photograph and mirror the design before inking.
Delicate Dotwork Curve Following the Clavicle
Style/Technique: Dotwork / Geometric
Pain Level: Low-Medium (3-4/10)
Session Time: 1–2 hours
Best For: Subtle texture, low-visibility
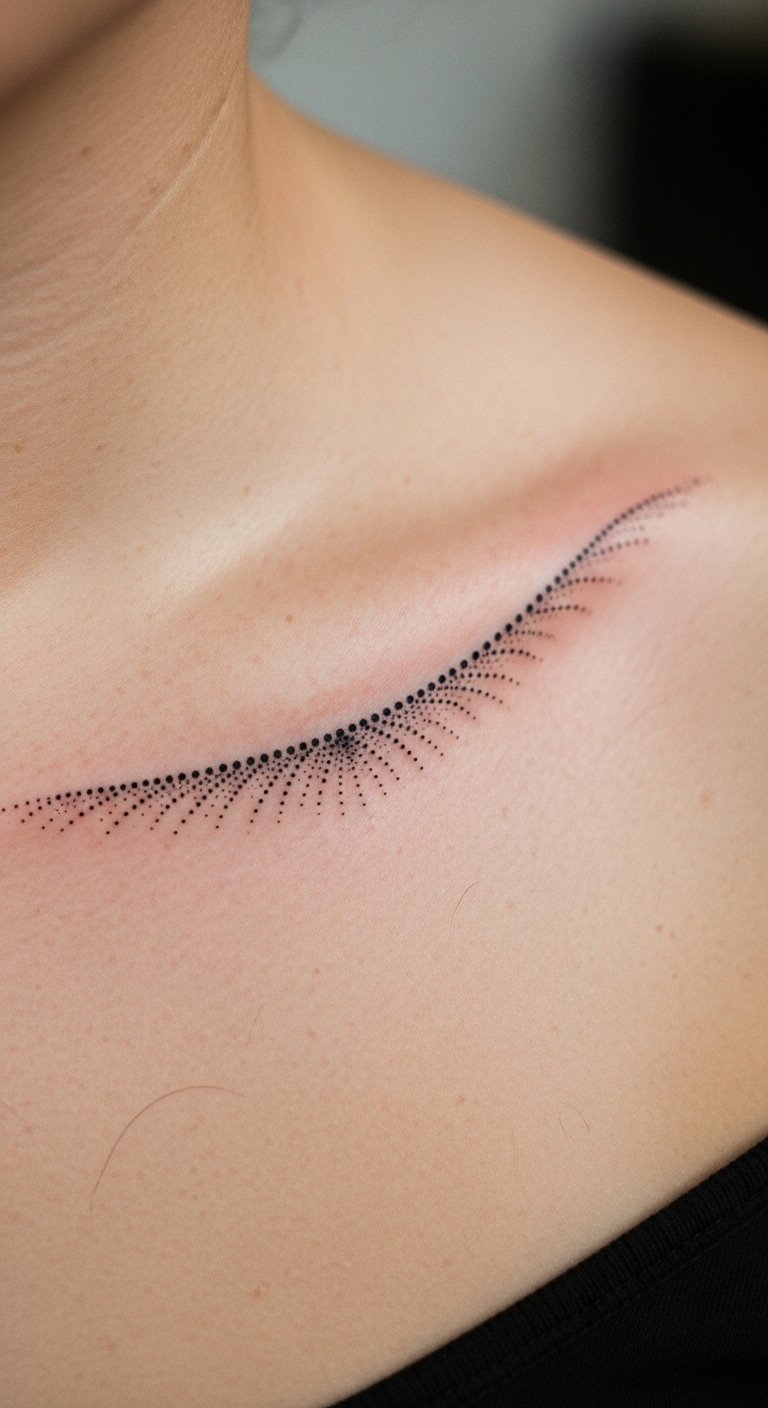
Dotwork uses tiny points to create a soft line that reads delicate. It flatters the bone by adding texture without heavy ink. Expect light tenderness; dotwork sessions are repetitive but not deep. Healing is smooth; stippling can fade unevenly if not dense enough. Ask for slightly denser dots to preserve shape long-term.
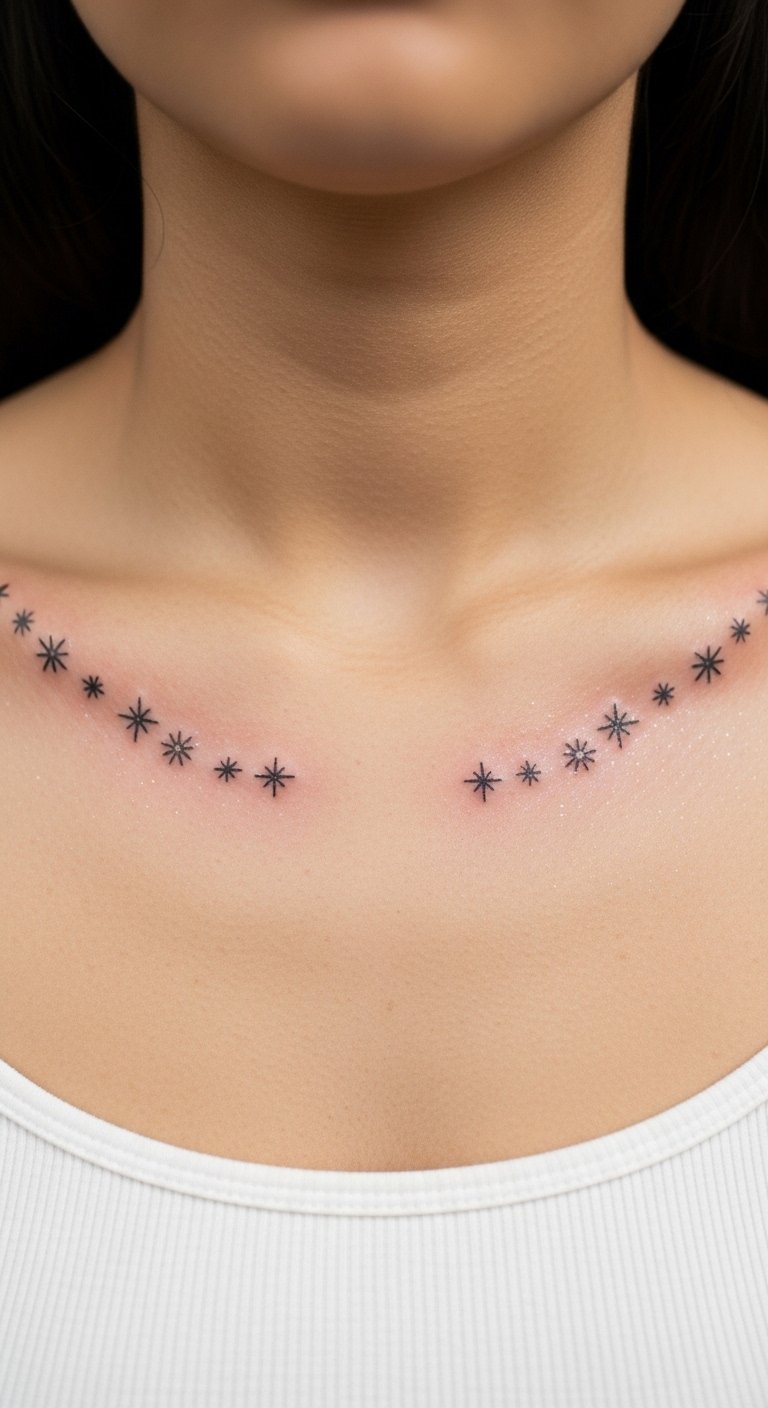
Tiny Constellation Cluster Centered Above Sternum
Style/Technique: Minimalist / Celestial
Pain Level: Medium (4/10)
Session Time: Under 1.5 hours
Best For: Centered collarbone connector

A small constellation that sits between the clavicles reads like a star map necklace. The sternum area can be ticklish and slightly more painful than outer collarbone. Healing needs gentle motion care; avoid tight tops for a week. It ages well if dots are slightly bolder than expected.
Watercolor Wash Accent Along Clavicle Edge
Style/Technique: Watercolor / Painterly
Pain Level: Low-Medium (3-4/10)
Session Time: 1–2 hours
Best For: Soft color, artistic vibe
Watercolor gives a wash of color that feels airy on the collarbone. Because colors need saturation, pick pigments that heal well on your skin tone. Expect mild pain. Healed watercolor looks muted—don’t expect neon vibrancy. Ask artists for healed color photos; over-saturated fresh photos are misleading.
Single Needle Lace-Like Collarbone Band
Style/Technique: Single Needle / Ornamental
Pain Level: Medium (4/10)
Session Time: 1–2 hours
Best For: Jewelry-like permanent band
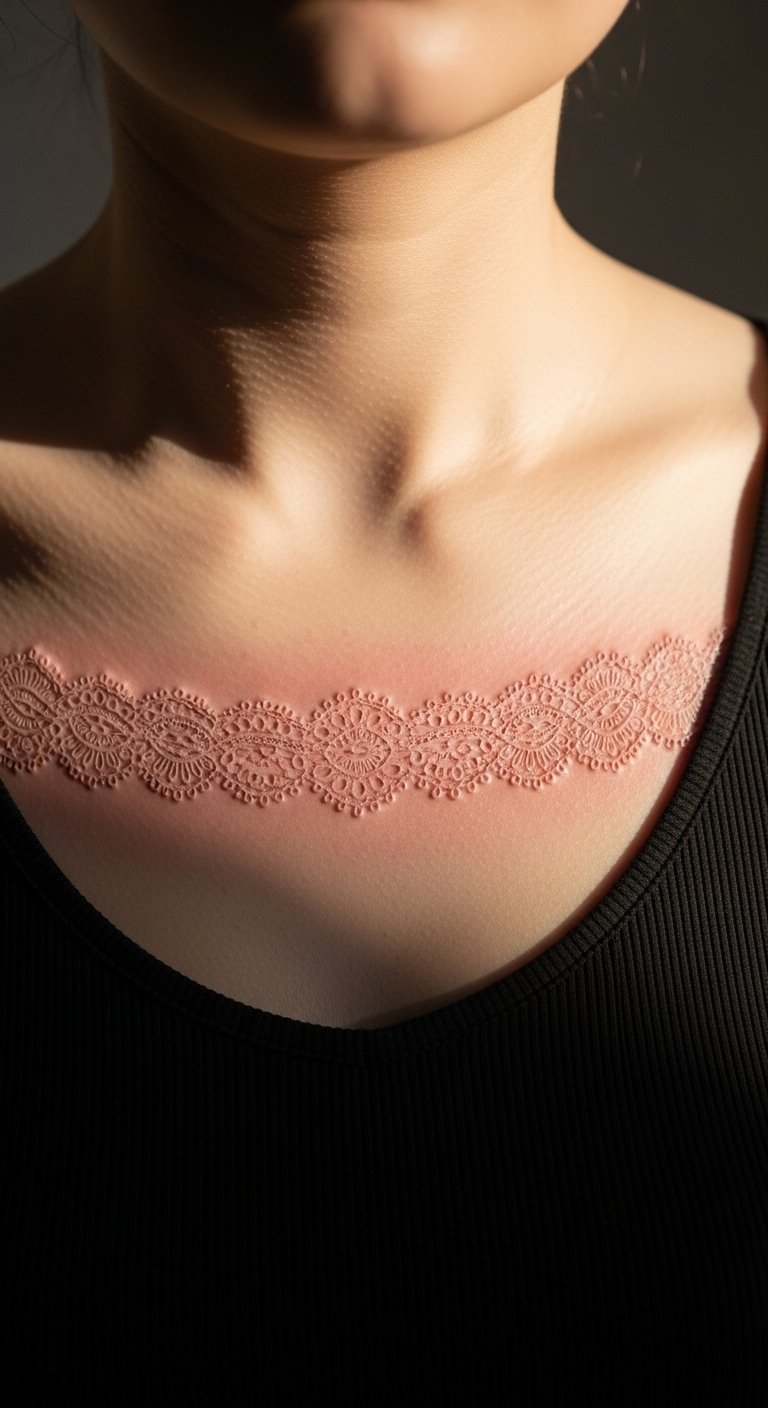
A lace band reads like a necklace. Single-needle detailing makes it delicate, but keep line density enough to remain legible when healed. Pain is moderate because the needle stays in shallow skin for detail. Healing requires careful moisturizing to prevent flaking across thin lines.
Tiny Pet Portrait Edge-On Collarbone
Style/Technique: Micro-Realism / Portrait
Pain Level: Medium (4/10)
Session Time: 1–2 hours
Best For: Personal, small memorial pieces
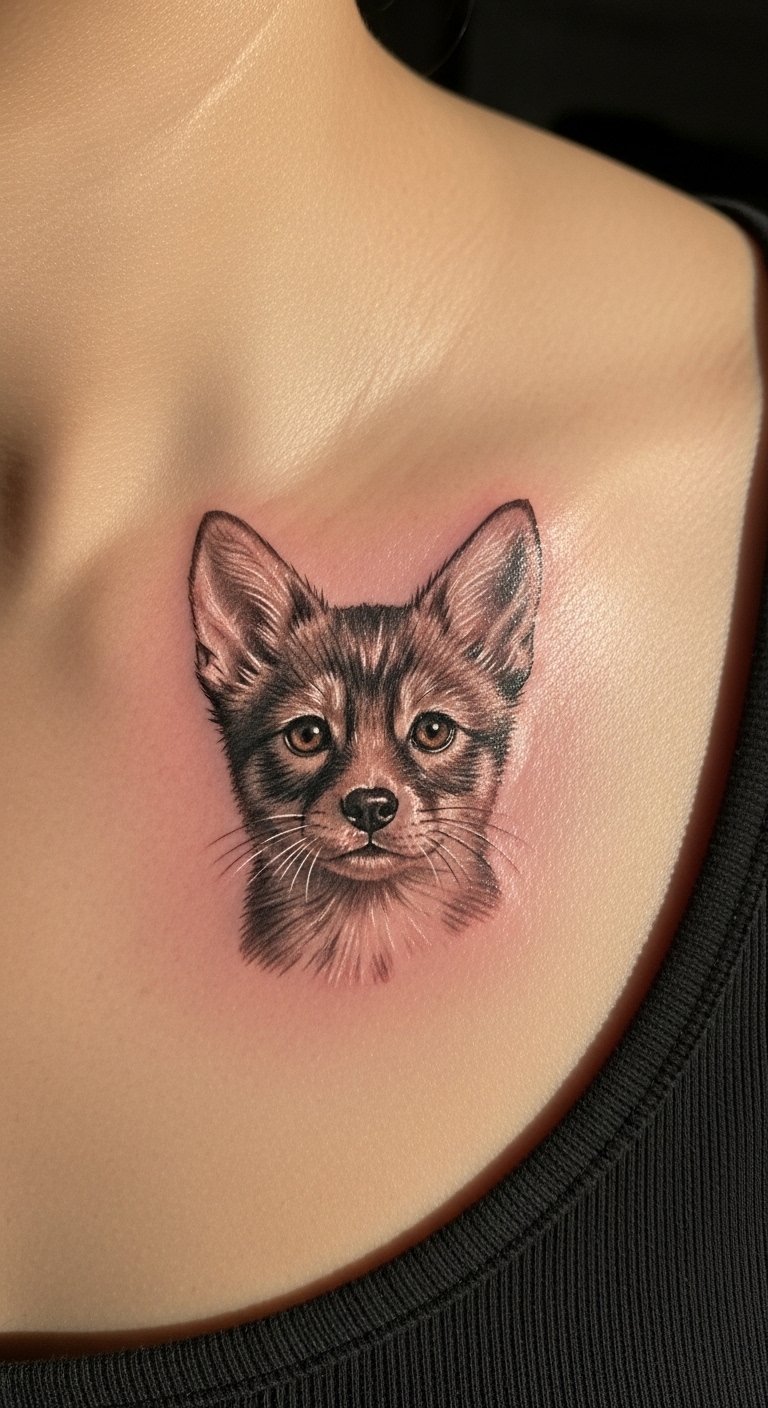
A miniature pet portrait can be intimate on the collarbone. Micro shading holds if the artist compresses features slightly for longevity. The area is sensitive for tiny shading; plan for touch-ups down the line. Bring photos and ask for healed examples on similar placement.
Negative Space Collarbone Crescent
Style/Technique: Blackwork / Negative Space
Pain Level: Low-Medium (3-4/10)
Session Time: 1–2 hours
Best For: Bold-but-delicate contrast

Negative space uses solid ink to carve out a delicate shape that follows your clavicle. It creates contrast without tiny lines that blur. Solid areas can feel more intense during inking but heal reliably. The main risk is ink migration if edges are too thin—ask for clean, slightly thicker borders.
Minimal Chain Necklace Tattoo Along Clavicle
Style/Technique: Fine Line / Jewelry Tattoo
Pain Level: Low (2-3/10)
Session Time: Under 1 hour
Best For: Tattoo-as-accessory, pairs with real jewelry
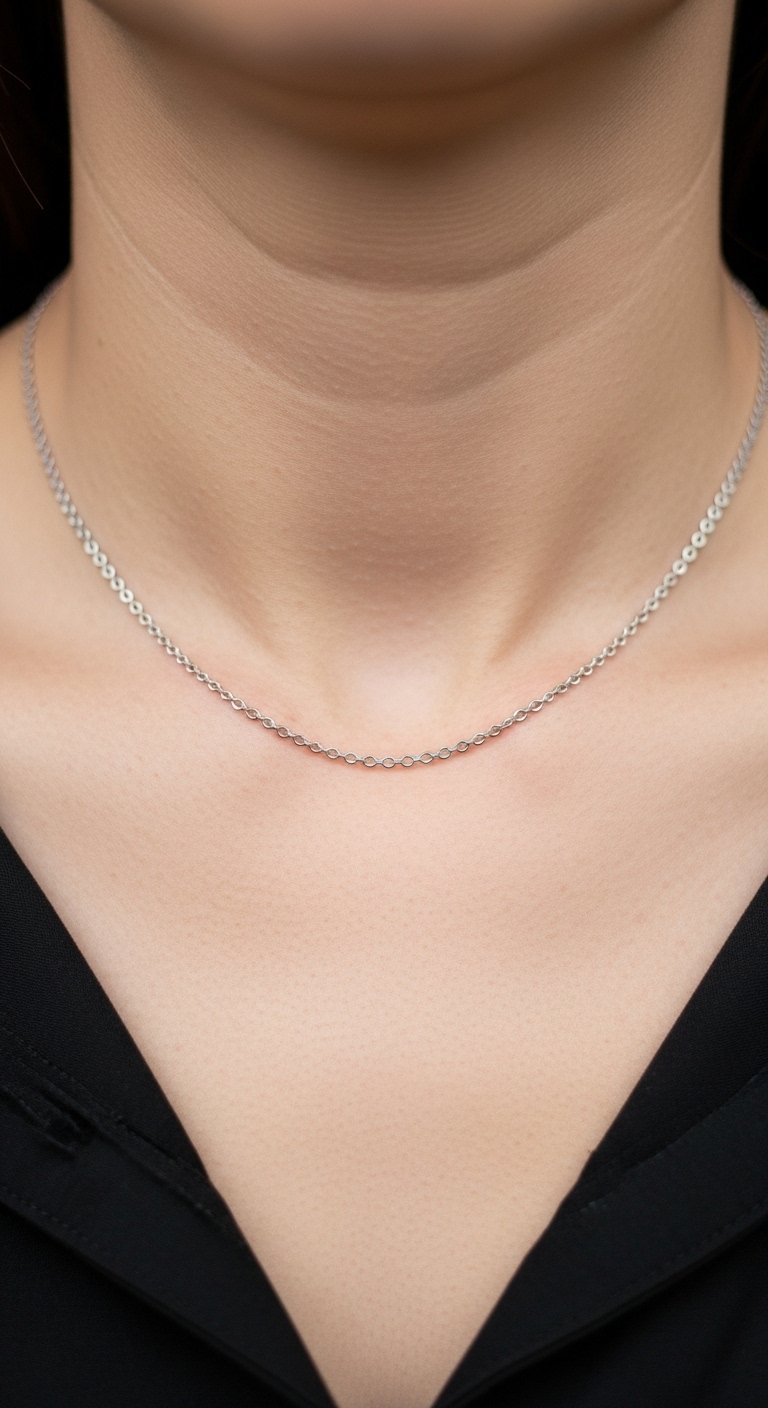
Chain tattoos mimic jewelry and layer well with real necklaces. They’re low pain and very visual. Healed chains look subtle; ensure link spacing is big enough to stay clear. Avoid tiny links that fill in over time.
Single-Needle Script Under Collarbone Curve
Style/Technique: Single-Needle Script / Minimalist
Pain Level: Low (2-3/10)
Session Time: Under 1 hour
Best For: Short quotes or dates
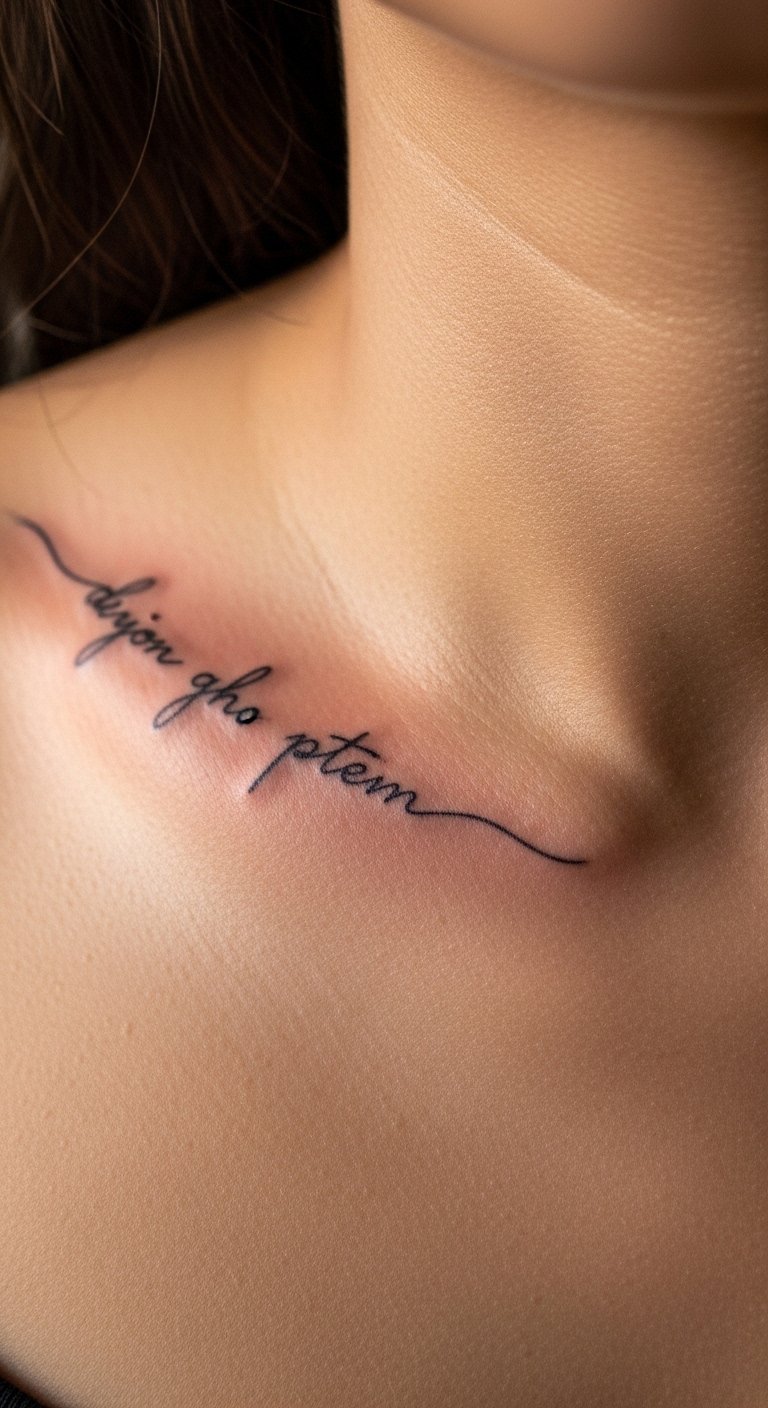
Single-needle script is intimate and subtle beneath the clavicle. Keep characters spaced; tight letters blur. Pain is low but the thinness means long-term softening is likely. Plan for future touch-ups to keep edges crisp.
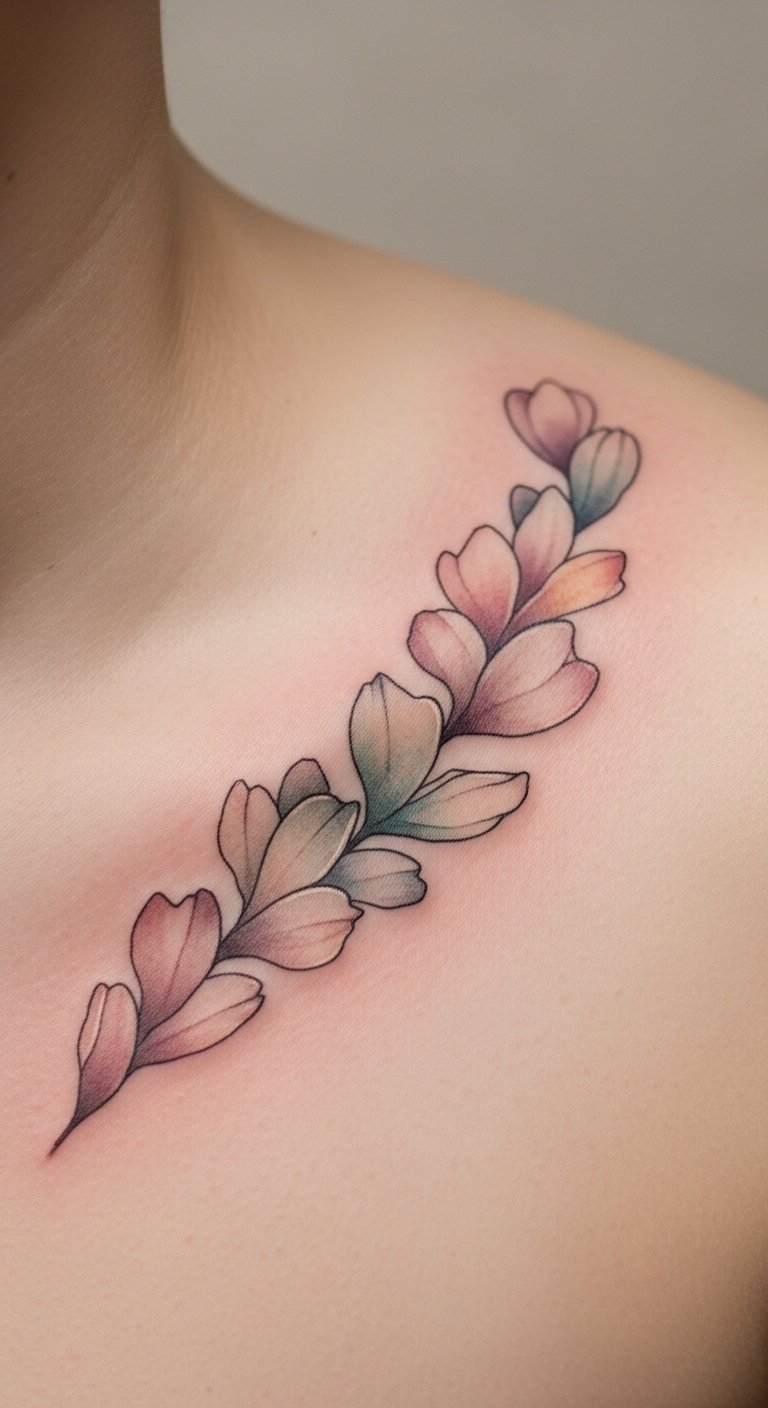
Floral Vine That Wraps Toward Shoulder
Style/Technique: Fine Line / Vining Floral
Pain Level: Medium (4/10)
Session Time: 1–2 hours
Best For: Flowing, asymmetrical pieces

A vine that follows the clavicle toward the shoulder accentuates movement. It looks natural with summer tops. Pain rises near the shoulder joint but remains moderate. Heals well if you avoid friction from straps while fresh.
Tiny Anchor or Symbol Near Inner Collarbone
Style/Technique: Minimalist / Tiny Icon
Pain Level: Low (2-3/10)
Session Time: Under 1 hour
Best For: Subtle symbols, anchors, tiny icons

Small icons sit well next to the clavicle’s hollow. They’re quick and low pain. Bold, simple shapes age better than intricate mini icons. Keep line weight consistent to avoid spotty healing.
Delicate Mandala Slice at Collarbone Edge
Style/Technique: Dotwork / Mandala Slice
Pain Level: Medium (4/10)
Session Time: 1–2 hours
Best For: Ornamental, partial mandalas

A mandala slice uses symmetrical form but only a sliver on the clavicle. It reads ornate without covering a large area. Expect repetitive dotwork discomfort. Heals into a textured design that still reads delicate.
Single-Needle Fern Frond Along Clavicle
Style/Technique: Single-Needle / Botanical
Pain Level: Low-Medium (3/10)
Session Time: 1 hour
Best For: Natural, soft look

A fern frond follows the clavicle’s natural rhythm. Single-needle is ideal, but leave space between fronds so they don’t blend. Heals gently and looks like a subtle accent.
Small Arrow Parallel to Clavicle
Style/Technique: Minimalist / Geometric
Pain Level: Low (2-3/10)
Session Time: Under 1 hour
Best For: Directional, clean lines
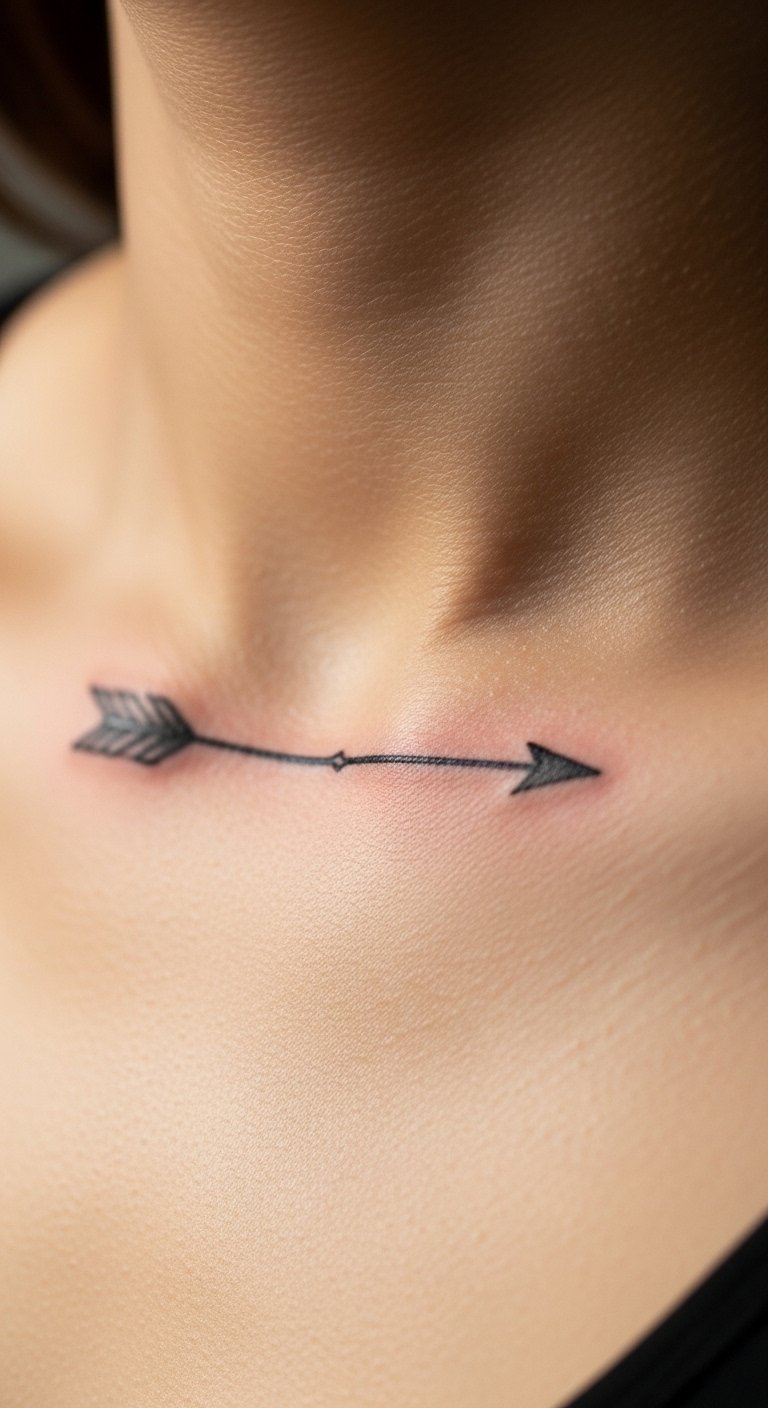
An arrow is simple and reads clearly on the collarbone. It’s one of the least problematic choices for aging. Keep the shaft a hair thicker than you imagine to prevent blur.
Watercolor Petal Trails Along Collarbone
Style/Technique: Watercolor / Organic
Pain Level: Medium (4/10)
Session Time: 1–2 hours
Best For: Painterly color accents
Petal trails add soft color without strong outlines. Colors heal muted; bring realistic healed photos. The area tolerates color but needs proper moisturization to avoid patchy healing.
Tiny Crescent Moon at Clavicle Dip
Style/Technique: Minimalist / Celestial
Pain Level: Low (2/10)
Session Time: Under 1 hour
Best For: Subtle, symbolic tattoo
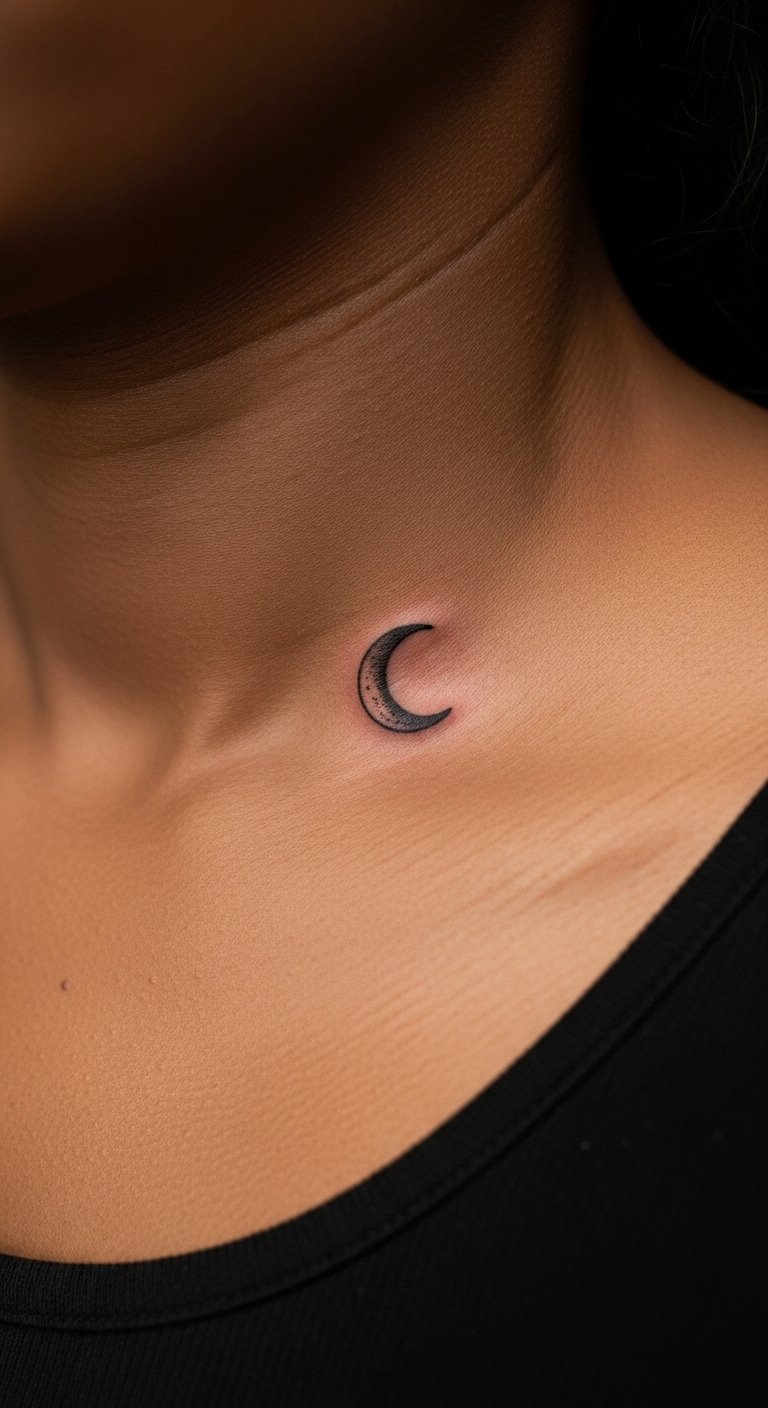
A small moon in the clavicle dip is understated and photogenic. Low pain. Keeps meaning without dominating your neckline.
Abstract Line Art That Follows Bone
Style/Technique: Fine Line / Abstract
Pain Level: Low-Medium (3/10)
Session Time: 1 hour
Best For: Modern, wearable art

Abstract single-line designs read like wearable art. They look intentional with the right negative space. Avoid too many micro-intersections that blur when healed.
White Ink Highlight Under Collarbone
Style/Technique: White Ink / Highlight
Pain Level: Low (2-3/10)
Session Time: Under 1 hour
Best For: Subtle highlights or accent with other ink
White ink can be an accent or the whole piece. It’s very subtle and depends heavily on skin tone. It may fade faster and needs touch-ups. Ask for healed white-ink examples on similar skin.
Geometric Triangle Cluster Along Clavicle
Style/Technique: Geometric / Blackwork
Pain Level: Low-Medium (3-4/10)
Session Time: Under 1.5 hours
Best For: Modern, structural look

Triangles and geometric clusters create a modern contrast to the collarbone’s curve. Clean geometry age well if line weight is steady. Avoid ultra-thin lines for filled shapes.
Tiny Paper Crane Near Clavicle
Style/Technique: Minimalist / Origami-Inspired
Pain Level: Low (2-3/10)
Session Time: Under 1 hour
Best For: Symbolic, delicate motif

A tiny paper crane reads as hope and portability. It’s quick, meaningful, and low pain. Keep the folds simple to prevent future blurring.
Tattoo Prep and Aftercare Essentials
Aftercare Essentials:
- Aquaphor Healing Ointment, 14oz tube — Recommended for the first 3–5 days to keep thin collarbone skin from drying.
- Saniderm Transparent Adhesive Bandage, 6-inch roll — Second-skin option for low-friction areas.
- CeraVe Fragrance-Free Moisturizing Lotion, 12oz — Daily moisturizer once initial scabs fall.
- Dr. Bronner's Unscented Castile Soap, 18oz — Gentle cleaning during the first week.
- Hustle Butter Deluxe, 4oz — Vegan option artists often recommend for healing.
- Mad Rabbit Tattoo Balm, 2oz — For long-term vibrancy on healed pieces.
- SPF 50 Sunscreen Stick for Tattoos — Daily protection to prevent fading.
- Hydrocolloid Bandages, 10 count — For small spots that need extra protection.
- Tattoo Numbing Cream with 5% Lidocaine — Use only after checking with your artist and for very sensitive clients.
- Tattoo Aftercare Kit (multi-item) — Handy if you want all essentials together.
- Microfiber Pillow Protector — Keeps bedding clean while your collarbone heals.
Notes: Artists I trust often recommend Saniderm or Aquaphor initially, then fragrance-free lotion for weeks 2–6. Sunscreen is non-negotiable for long-term color retention.
Frequently Asked Questions
Q: How bad does a collarbone tattoo actually hurt?
A: The collarbone is shallow with little fat. Expect an annoying scratching or buzzing more than sharp pain. I rate it about 3–4/10. For sensitive folks, consider a numbing cream—ask and use tattoo numbing cream with 5% lidocaine only after consulting your artist.
Q: Will collarbone tattoos blur faster than other placements?
A: Thin-line work can soften over time because the skin stretches. Solid shapes and slightly bolder lines hold better. Regular sunscreen and moisturizer slow fading.
Q: How long until I can wear necklaces or bras?
A: Avoid tight necklaces and straps for at least 3–5 days to prevent rubbing. If you use Saniderm, you can be more flexible but still avoid heavy friction.
Q: How long to fully heal?
A: Surface healing 2–3 weeks. Full dermal settling 2–3 months. Keep the area moist and protected with products like Aquaphor early on.
Q: Can I get color on the collarbone?
A: Yes, but expect watercolor and lighter pigments to look muted when healed. Ask for healed photos on similar skin tones.
Q: What if I regret the placement later?
A: Placement regret is common. If you’re unsure, pick a motif that’s easy to cover or integrate into larger work. Laser removal exists but takes multiple sessions and recovery.
Conclusion
Start with a clear stencil and healed photos from your chosen artist. I’d recommend a single session for most collarbone designs to see how your skin settles. Keep your aftercare essentials close—Saniderm or Aquaphor made my collarbone tattoos heal cleaner. Which delicate collarbone idea are you leaning toward?
