
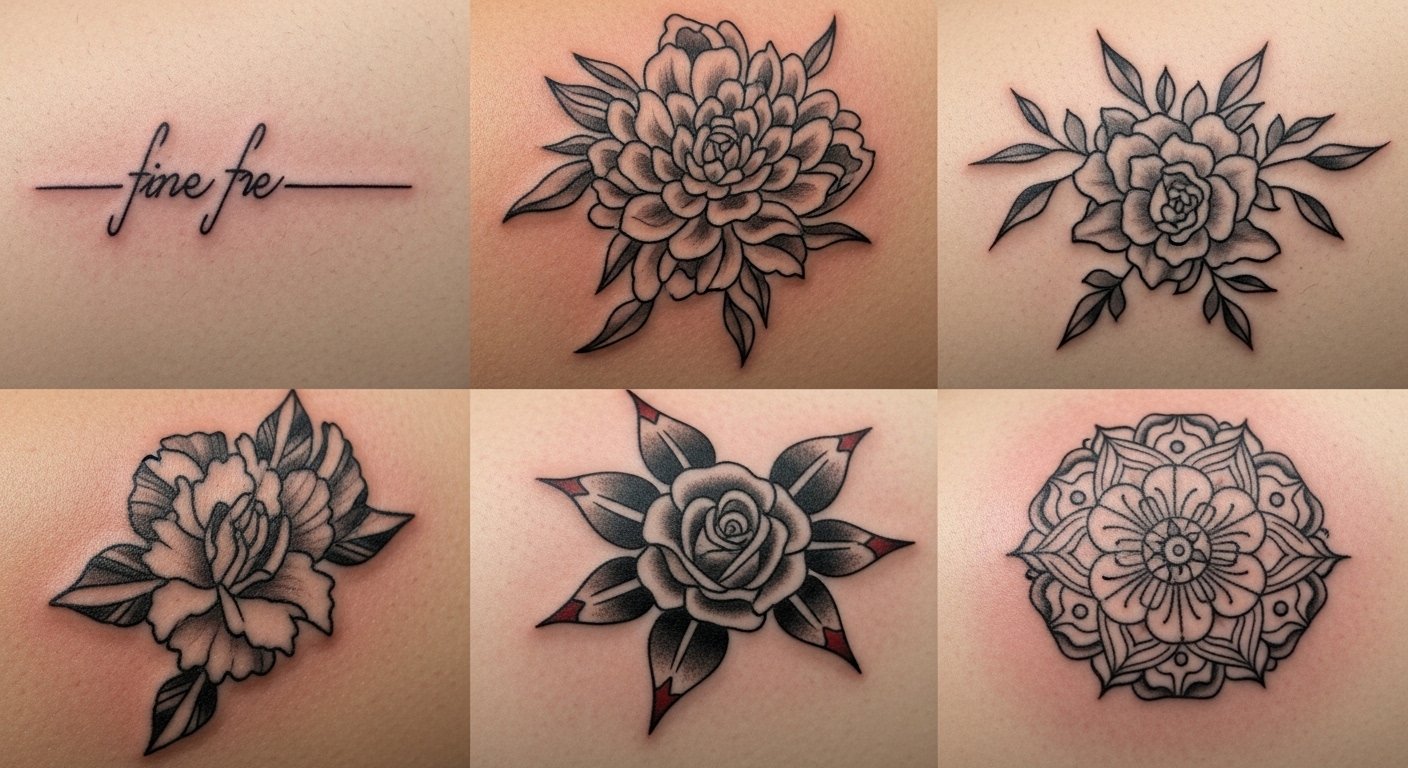
I spent months sketching sleeve ideas and asking artists one simple question: will this still read well on skin after five years? The answer changed how I design sleeves. These concepts are built like scenes — they read in motion, hold up healed, and work with real pain and healing realities so your sleeve feels cinematic for years.
Quick context: This list focuses on narrative-driven sleeve tattoos — fine line, neo-traditional, blackwork, and micro-realism. These designs work as full sleeves, half sleeves, or forearm pieces. I leaned into 2025 trends like storyboard layouts, negative-space motion, and AR-ready accents.
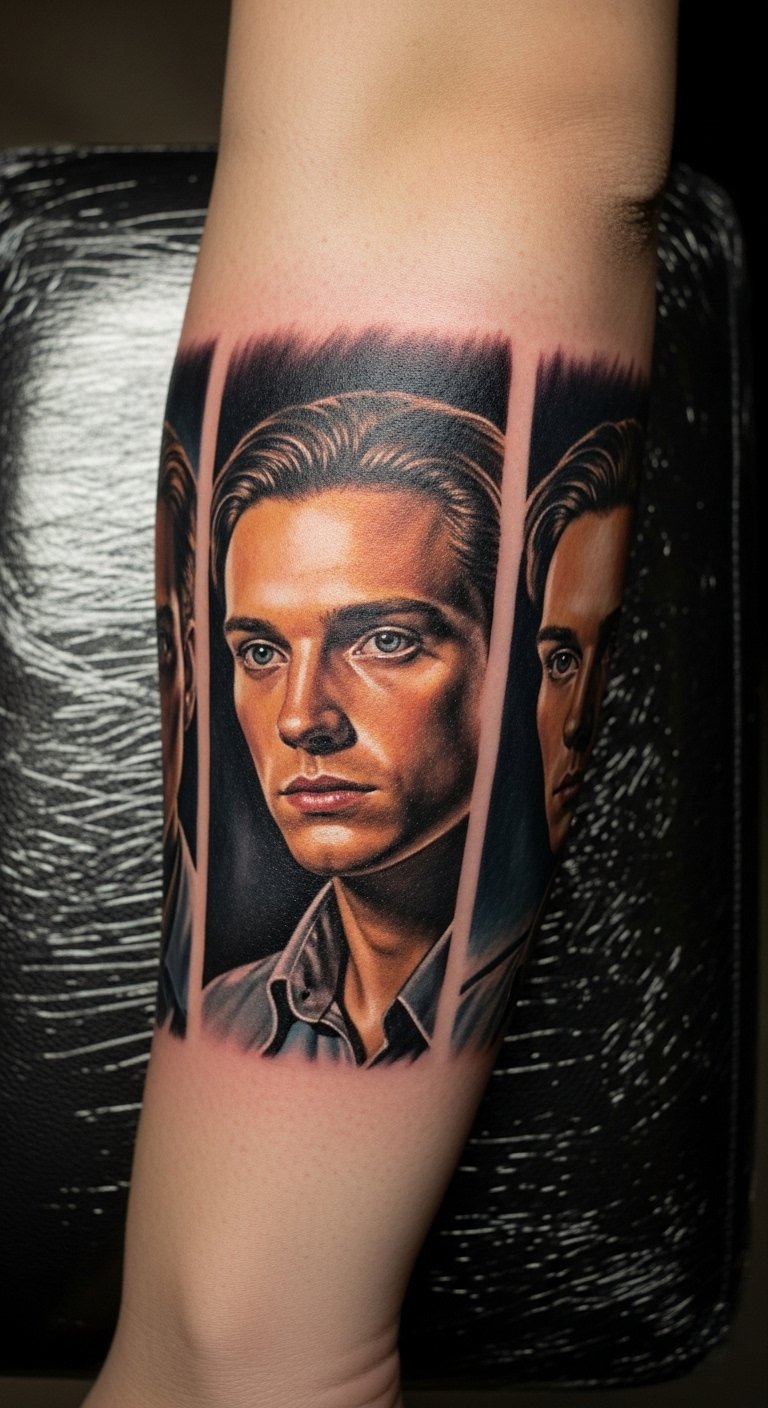
Cinematic Storyboard Sleeve on Full Arm
Style/Technique: Illustrative / Sequential frames
Pain Level: Medium (4/10)
Session Time: Multiple sessions across 3–6 sittings
Best For: Statement sleeve, clear narrative arcs
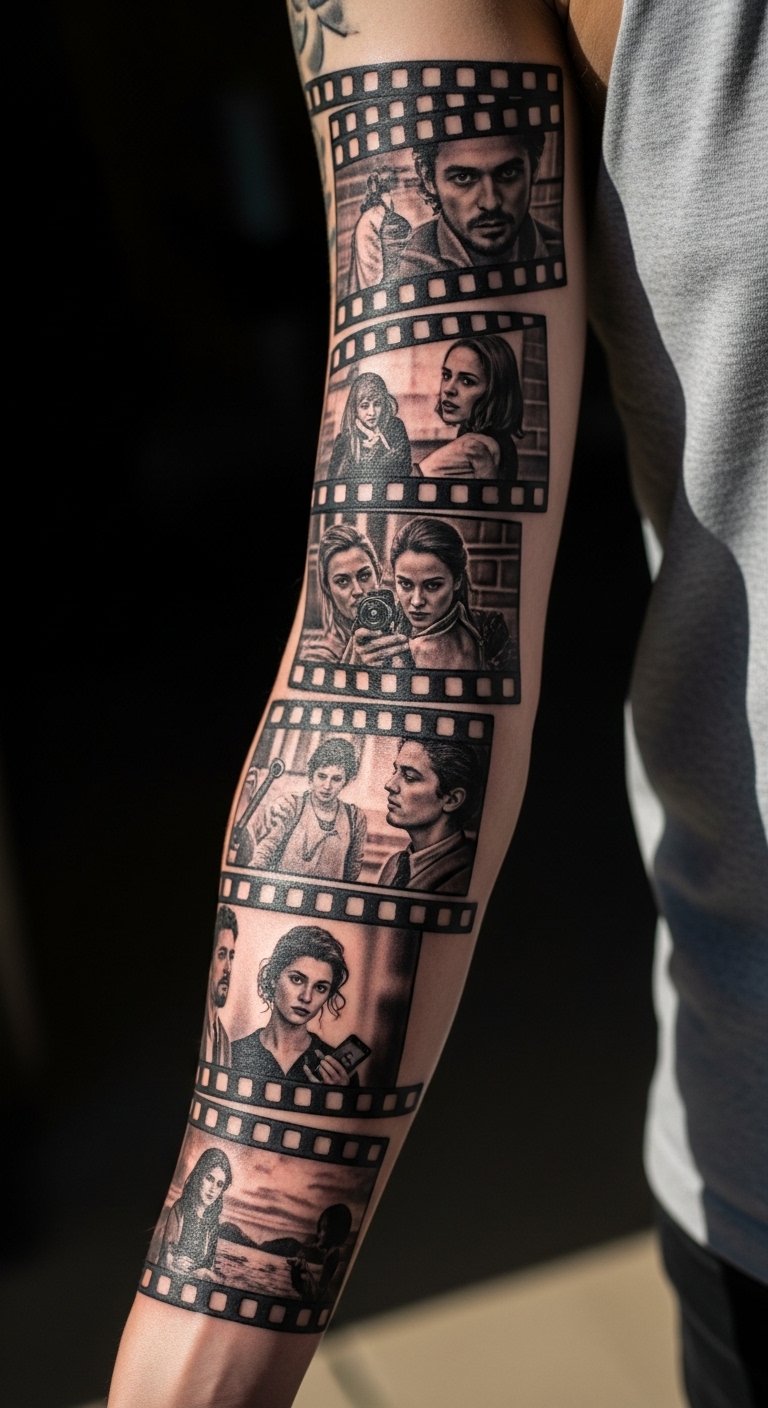
I love sleeves that read left to right like a movie. This uses paneling, negative space gutters, and recurring motifs to guide the eye. Placement across the outer arm is forgiving for pain and visible storytelling. Expect standard healing (2–3 weeks surface, months internal). Fine lines inside frames can blur if the artist overworks delicate details — ask for slightly bolder primary lines and soft gray shading. This style ages well if contrasts are strong; framed panels protect small details from stretching. Ask your artist for experience with illustrative sequencing.
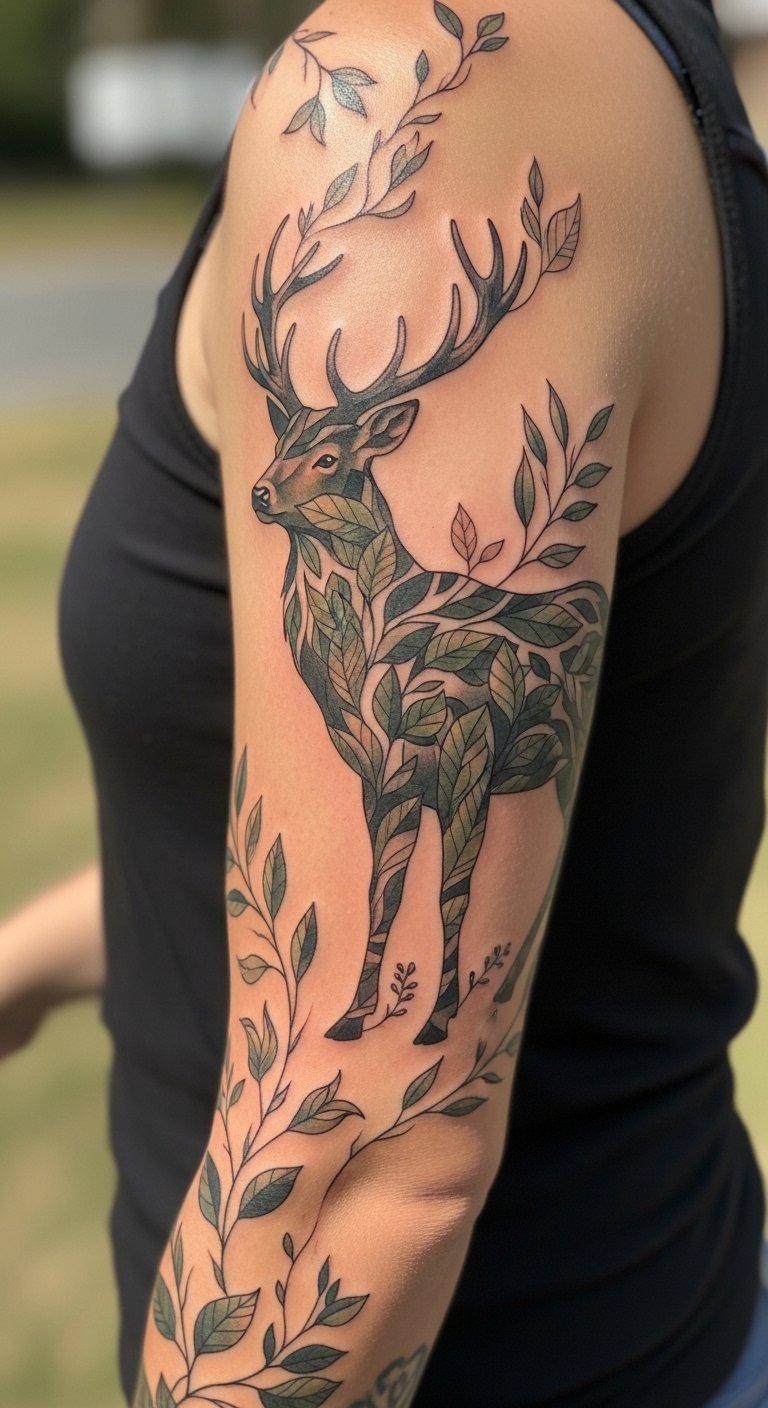
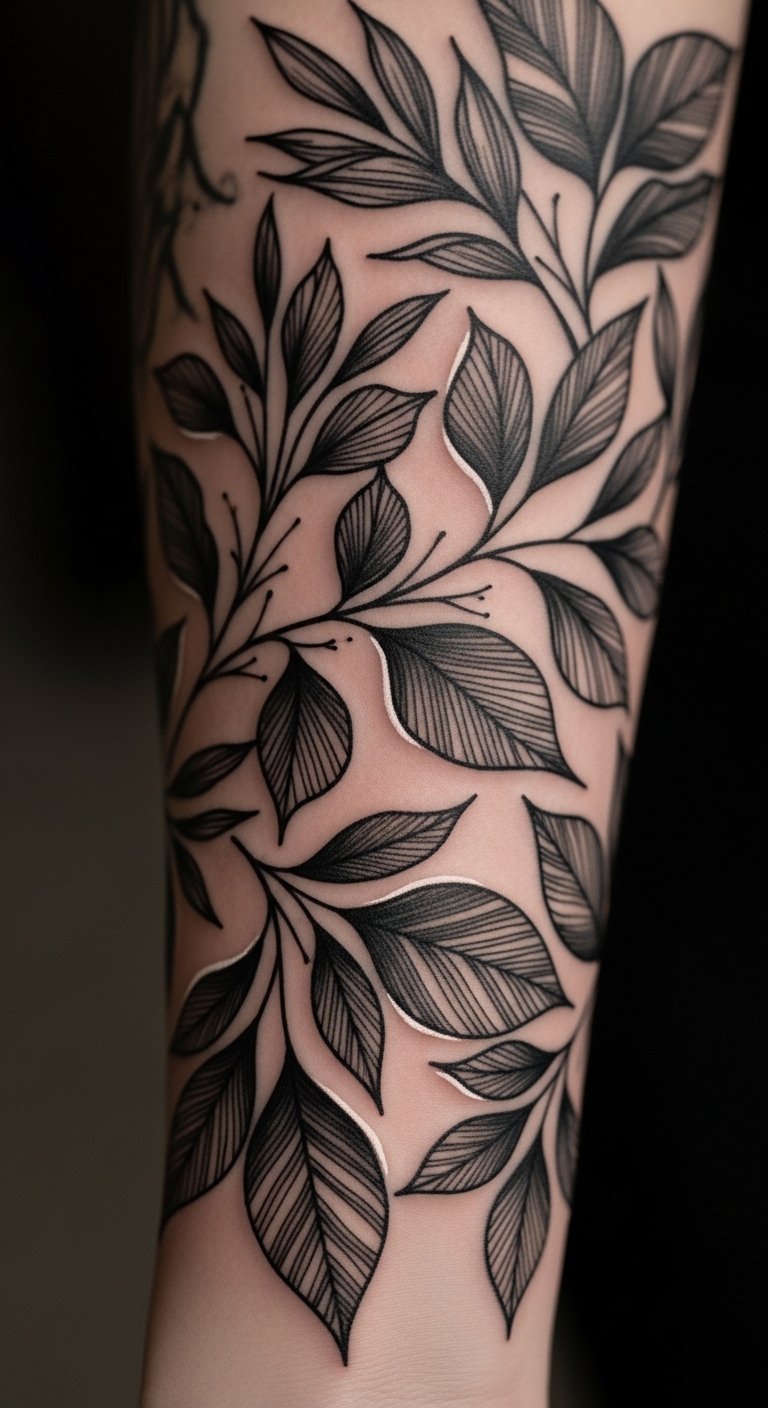
Fine Line Botanical Sleeve on Inner Forearm
Style/Technique: Fine Line / Illustrative
Pain Level: Medium (3-4/10)
Session Time: 3–5 sessions, 2–4 hours each
Best For: Meaningful, elegant sleeve; easy to cover
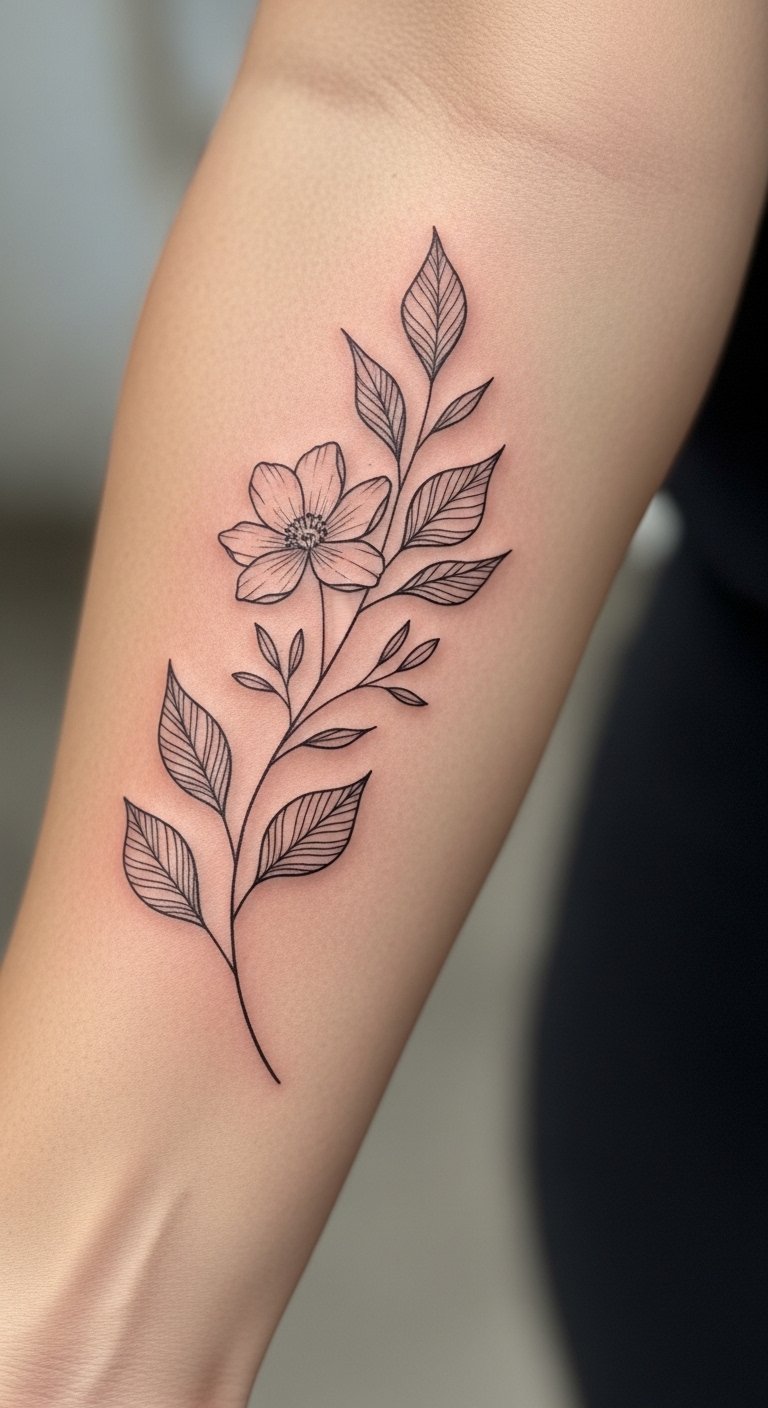
Fine line botanicals feel intimate. Placing them on the inner forearm gives you a flat canvas and lower pain than ribs. Healed examples show lines soften; thin stems should be planned slightly thicker than sketch lines. Healing time is predictable; keep moisturized and avoid over-scrubbing. This look pairs well with small micro-realistic accents. Common mistake: tiny isolated details that won’t read in a year. Seek an artist skilled in fine-line work and botanical anatomy.
Neo-Noir Portrait Sleeve on Upper Arm
Style/Technique: Micro-Realism / Neo-Noir
Pain Level: Low-Medium (3/10)
Session Time: Multiple sessions for realism detail
Best For: Statement portraits that read from a distance
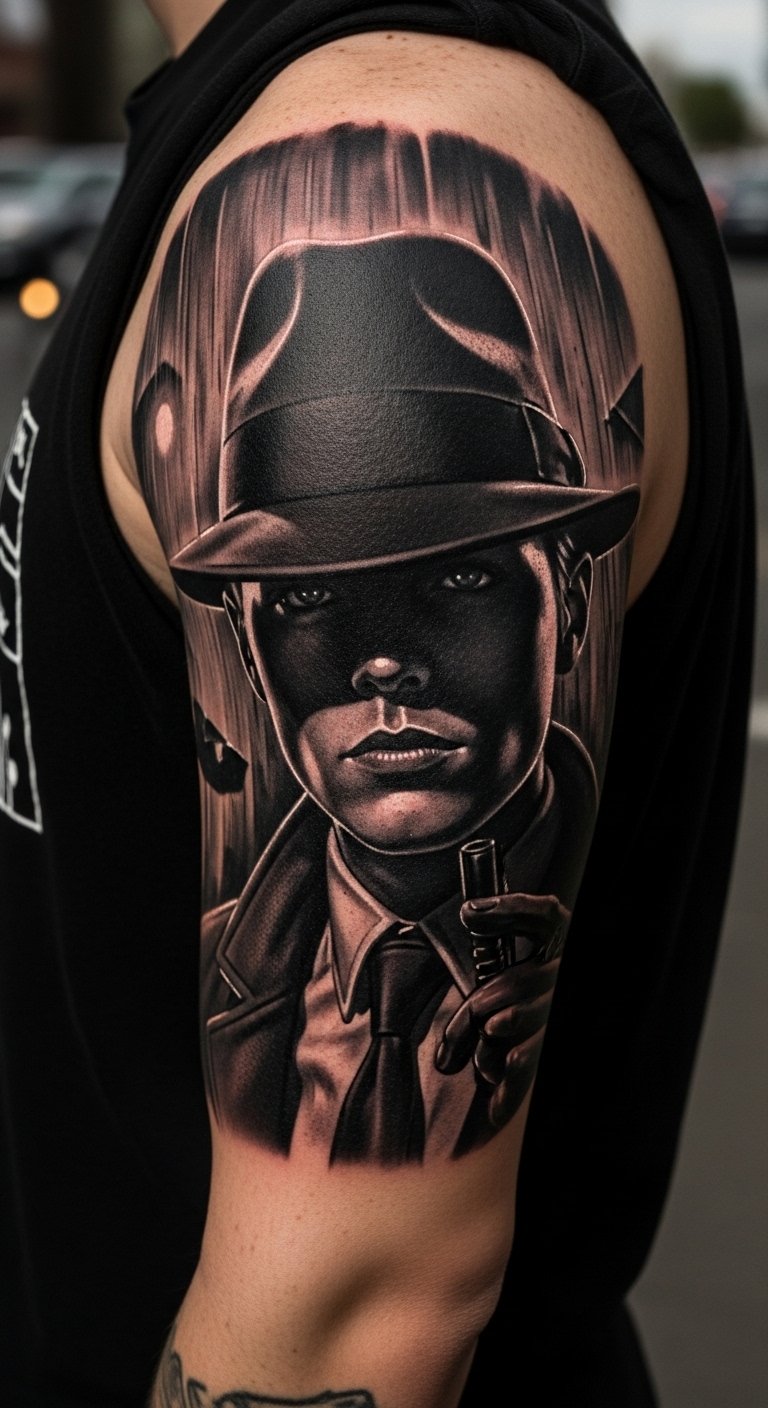
Portrait realism with dramatic contrast feels cinematic. Upper arm placement is less painful and gives volume for shading. Expect longer sessions; realism needs skin-friendly layering and patience during healing. Healed portraits often soften; plan for slightly higher contrast initially so features remain legible. A common mistake is overcrowding portraits with heavy background that competes with the face. Ask for artists who show healed portraits, not just fresh photos.
Traditional Sailor Sleeve on Outer Arm
Style/Technique: American Traditional / Bold Color
Pain Level: Low (2-3/10)
Session Time: 2–4 hours per major piece
Best For: Timeless look, holds color well
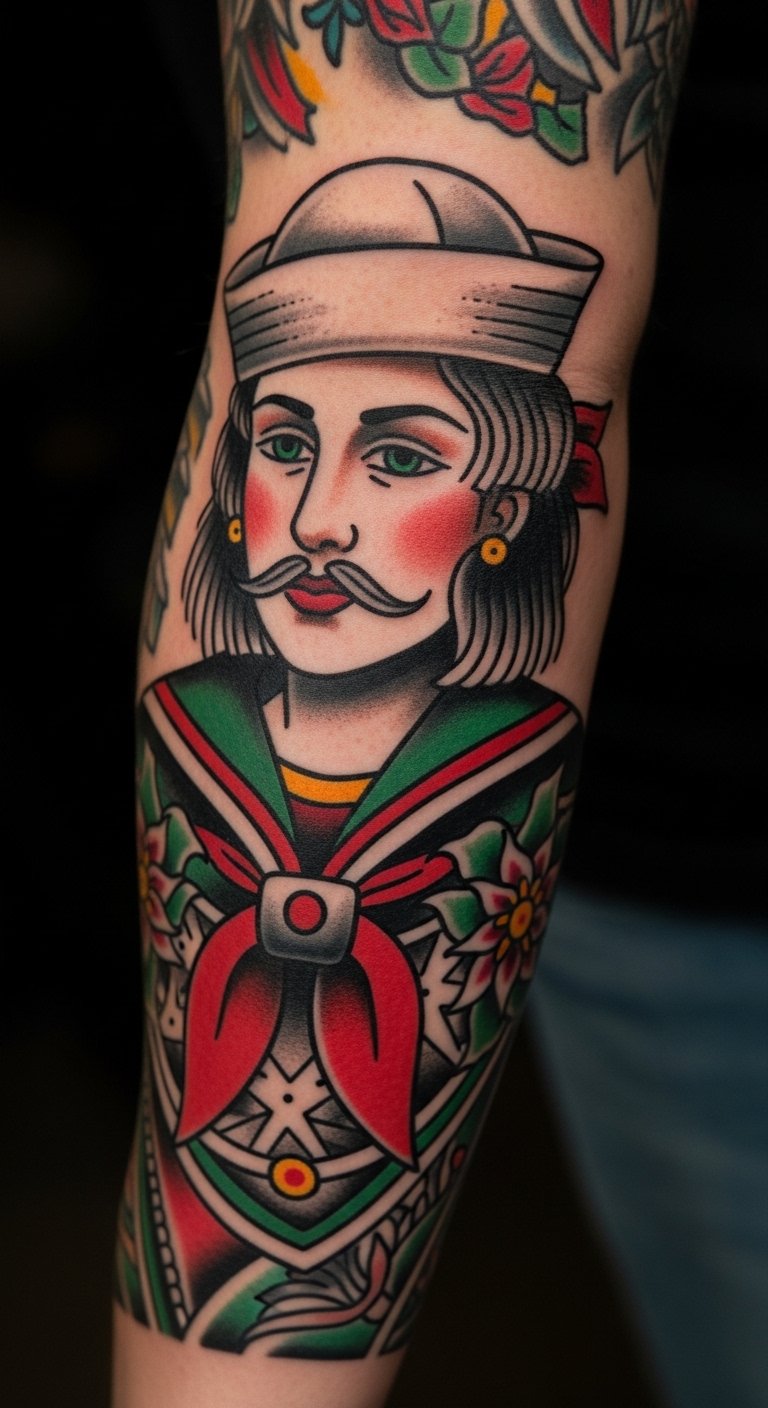
Traditional tattoos are forgiving as sleeves because bold lines and solid fills age predictably. Outer arm and biceps are low-pain and great for large anchors, ships, and banners. Colors will mellow but maintain readability. Avoid tiny text or ultra-fine details in banners — they blur. Artists trained in classic flash know how to space motifs so the sleeve breathes. Maintenance is minimal besides sun protection.
Blackwork Mythical Sleeve on Full Arm
Style/Technique: Blackwork / Graphic
Pain Level: High on inner arm/near elbow (6/10)
Session Time: Multiple long sessions for solid fills
Best For: High-contrast drama, cover-up friendly
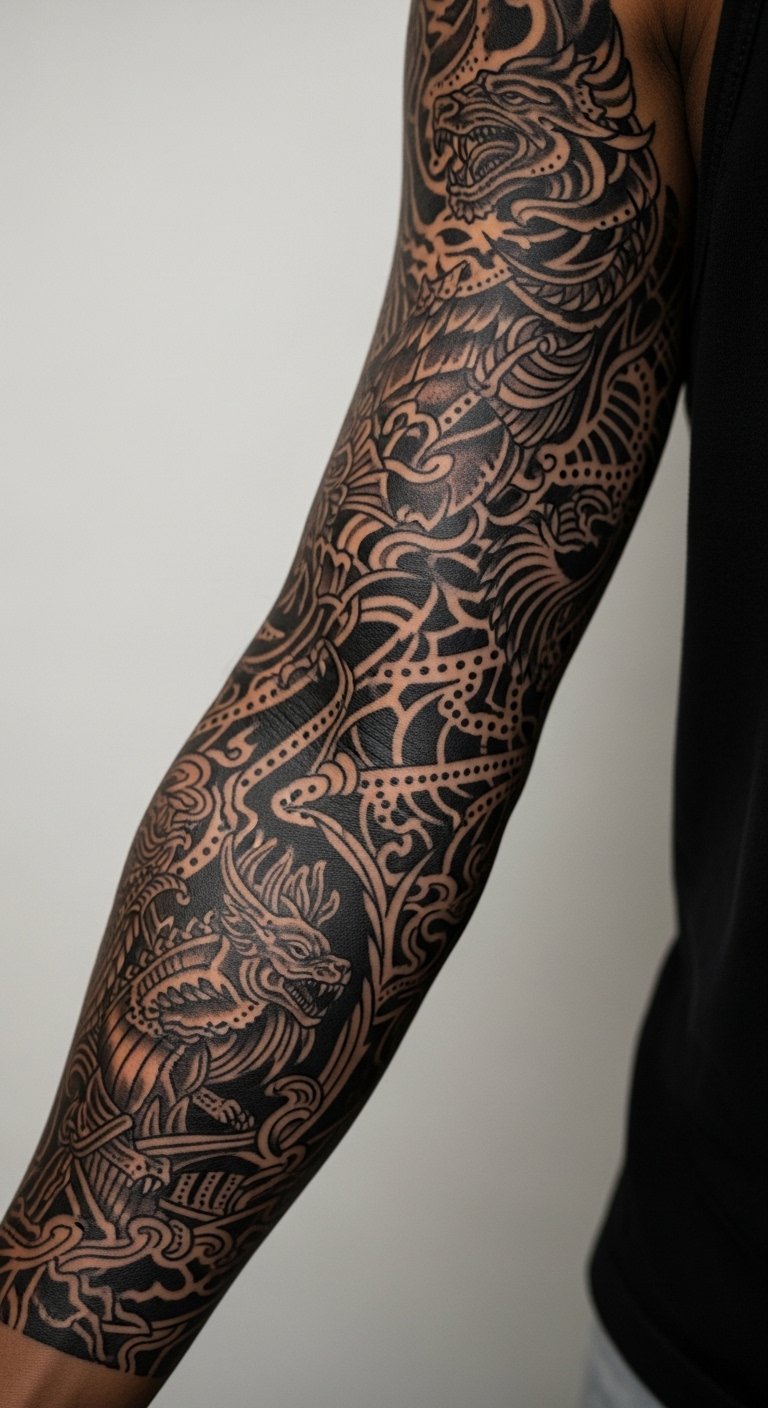
Blackwork creates movie-poster energy. Thick fills and negative space ages well on many tones. Expect heavier discomfort near the elbow and inner arm. Solid black requires proper aftercare to avoid patchy healing. Common mistake: uneven fills from rushed sessions — choose an artist experienced in dense black. This style can be used to merge disparate tattoos into a cohesive narrative.
Watercolor Sky Sleeve on Shoulder to Wrist
Style/Technique: Watercolor / Painterly
Pain Level: Medium (3-5/10)
Session Time: Several sessions to layer color
Best For: Ethereal visuals, gradient color blends
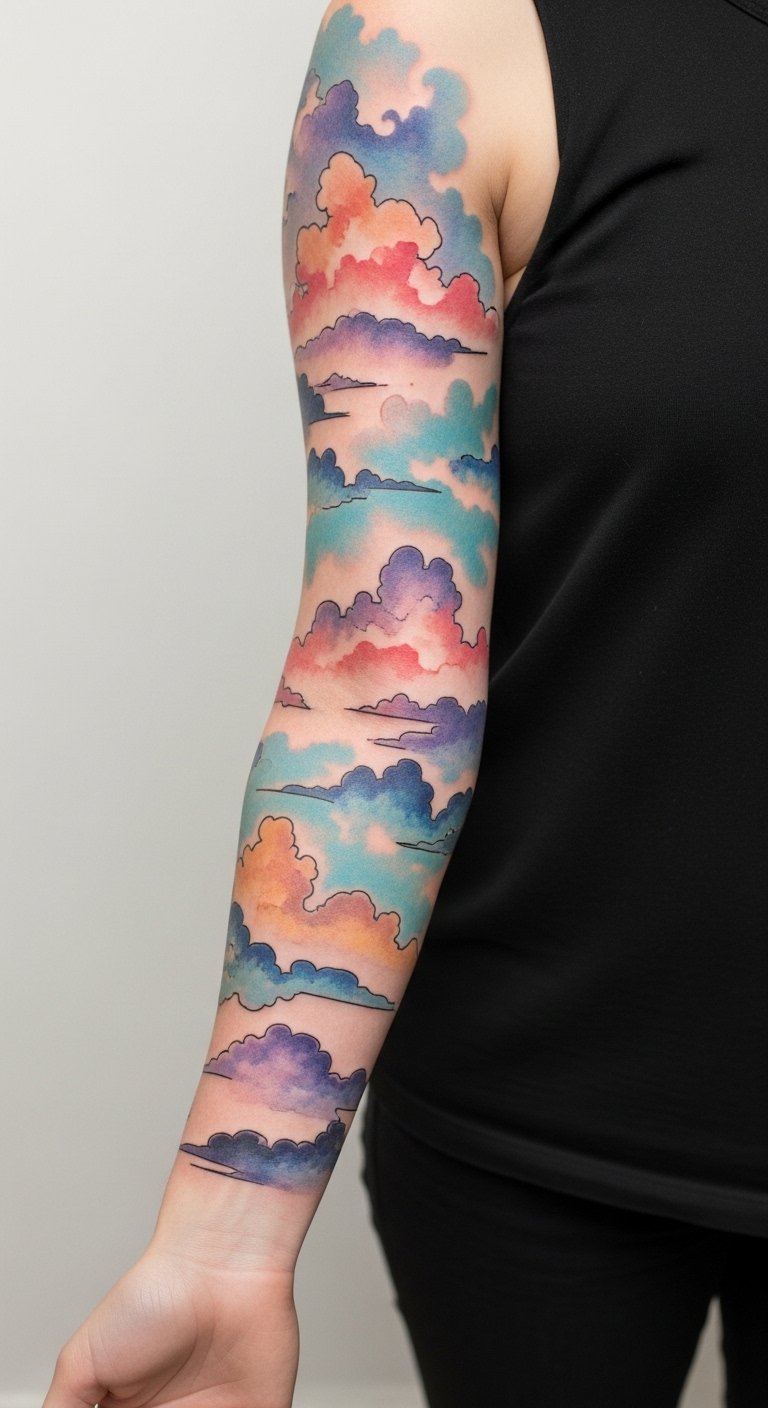
Watercolor sleeve gives motion and emotion with painterly washes. Shoulder to wrist placement avoids constant rubbing and helps colors settle. Healed watercolor can fade faster than solid black, so color saturation and layering during sessions matters. Artists should build layers rather than overwork in one go. Avoid ultra-fine, outline-free elements in high-friction areas. Plan touch-ups down the road if you want colors bright long-term.
Micro-Realism Nature Montage on Sleeve
Style/Technique: Micro-Realism / Photoreal
Pain Level: Medium (4/10)
Session Time: Multiple detail-focused sessions
Best For: Pet portraits, insects, realistic flora
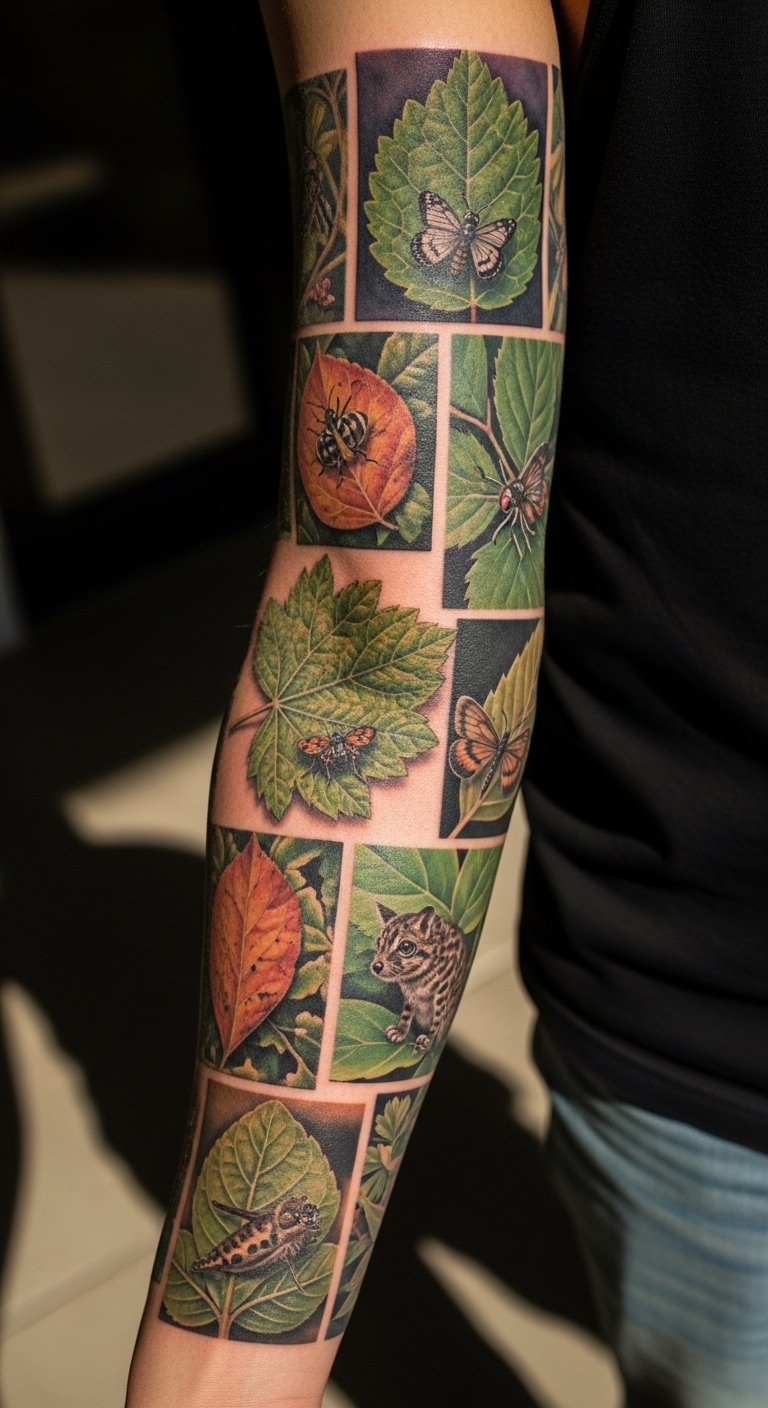
Tiny realistic elements stitched into a larger sleeve feel cinematic up close. The forearm or outer arm works best for visibility. Micro-realism ages as line edges soften; the trick is to prioritize contrast and texture over microscopic detail that will blur. Artists should show healed macro photos. Pain is manageable, but expect long sessions for delicate stippling and smooth shading.
Neo-Traditional Story Sleeve on Upper Arm
Style/Technique: Neo-Traditional / Bold Illustrative
Pain Level: Low-Medium (3/10)
Session Time: 2–4 sessions for composition and color
Best For: Graphic narrative with strong silhouettes
Neo-traditional uses updated palettes and illustrative shading to tell a story. Upper arm placement keeps it low-pain while allowing bold silhouette work. Heals cleanly when colors are packed well. Common error: overcomplicating silhouettes; keep shapes readable from a distance. If you want dramatic but timeless imagery, this is a solid approach.
Negative Space Motion Sleeve on Forearm
Style/Technique: Blackwork + Negative Space / Graphic Motion
Pain Level: Medium (4/10)
Session Time: 2–3 sessions
Best For: Dynamic movement, minimalist narratives

Negative space can suggest speed or time slipping, perfect for cinematic sleeves. Forearm placement shows motion when you move your arm. Healed examples keep strong contrast; make negative spaces large enough to remain crisp. Avoid thin connecting skin bridges that can blur. Artists who do graphic design or bold geometric work translate well here.
Mythic Landscape Sleeve on Outer Arm
Style/Technique: Illustrative Landscape / Layered Depth
Pain Level: Low (3/10)
Session Time: Multiple sessions for depth
Best For: Panoramic narrative across arm circumference
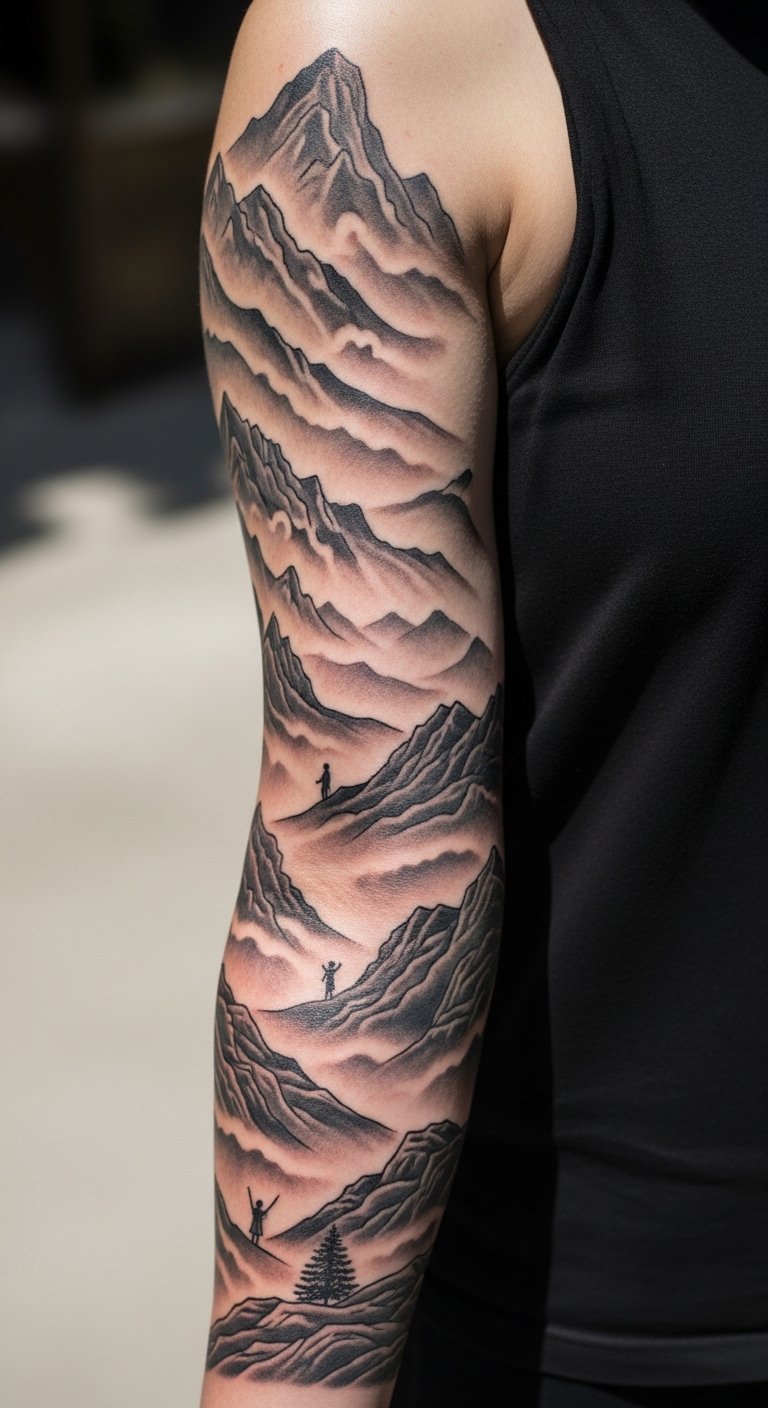
A panoramic landscape wraps the arm and reads differently from each angle — cinematic in motion. Outer arm placement avoids extreme pain and friction. Layered graywash creates depth; heal bright if contrast is set correctly in the sessions. Avoid tiny, unreadable background details. Ask for reference photos of healed landscape sleeves.
Gothic Script and Symbols on Inner Forearm
Style/Technique: Lettering + Minimal Icons / Gothic
Pain Level: Medium (3-5/10)
Session Time: 1–3 hours per block
Best For: Personal narrative, quotes, mottoes

Script and iconography can anchor a sleeve’s story. Inner forearm is readable and moderate in pain. Lettering heals distinctly if strokes are given enough weight initially. Common mistake: choosing overly ornate type that becomes illegible as lines blur. Discuss kerning and line weight with your artist to keep long-term legibility.
Stained-Glass Panel Sleeve on Arm
Style/Technique: Neo-Traditional + Geometric / Vibrant Panels
Pain Level: Low-Medium (3/10)
Session Time: 3–5 sessions for color continuity
Best For: High-contrast color play and structured storytelling
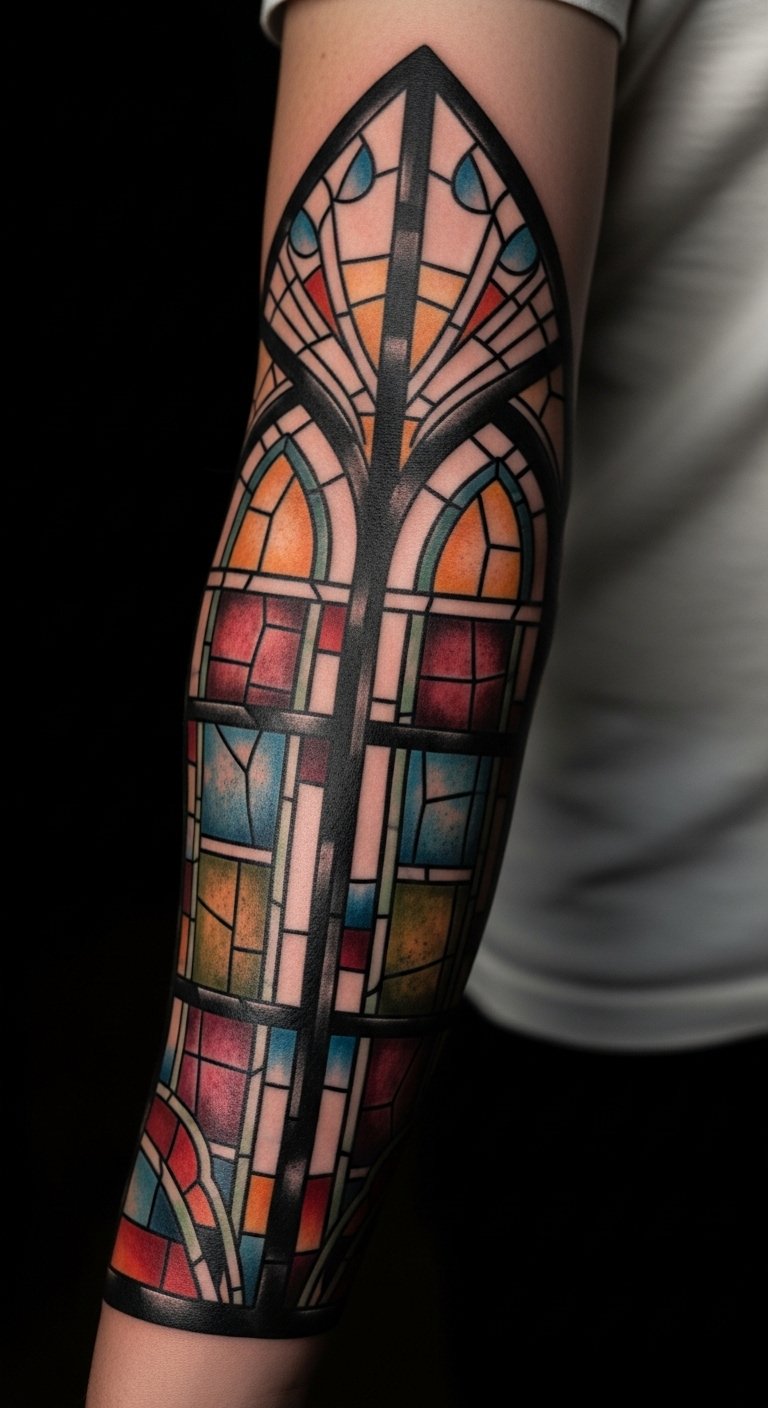
Stained-glass sleeves use black lead lines and color blocks for strong reading distance. Panels create natural beats in a storyline. Heals predictably when color is packed properly. Avoid tiny color chips that will fade into mud; use larger color fields. Artists who work with tattoo murals or color-block work are best for this.
Compass and Map Narrative on Lower Sleeve
Style/Technique: Traditional/Illustrative / Mapwork
Pain Level: Medium (4/10)
Session Time: 2–4 sessions
Best For: Travel narratives, life journeys
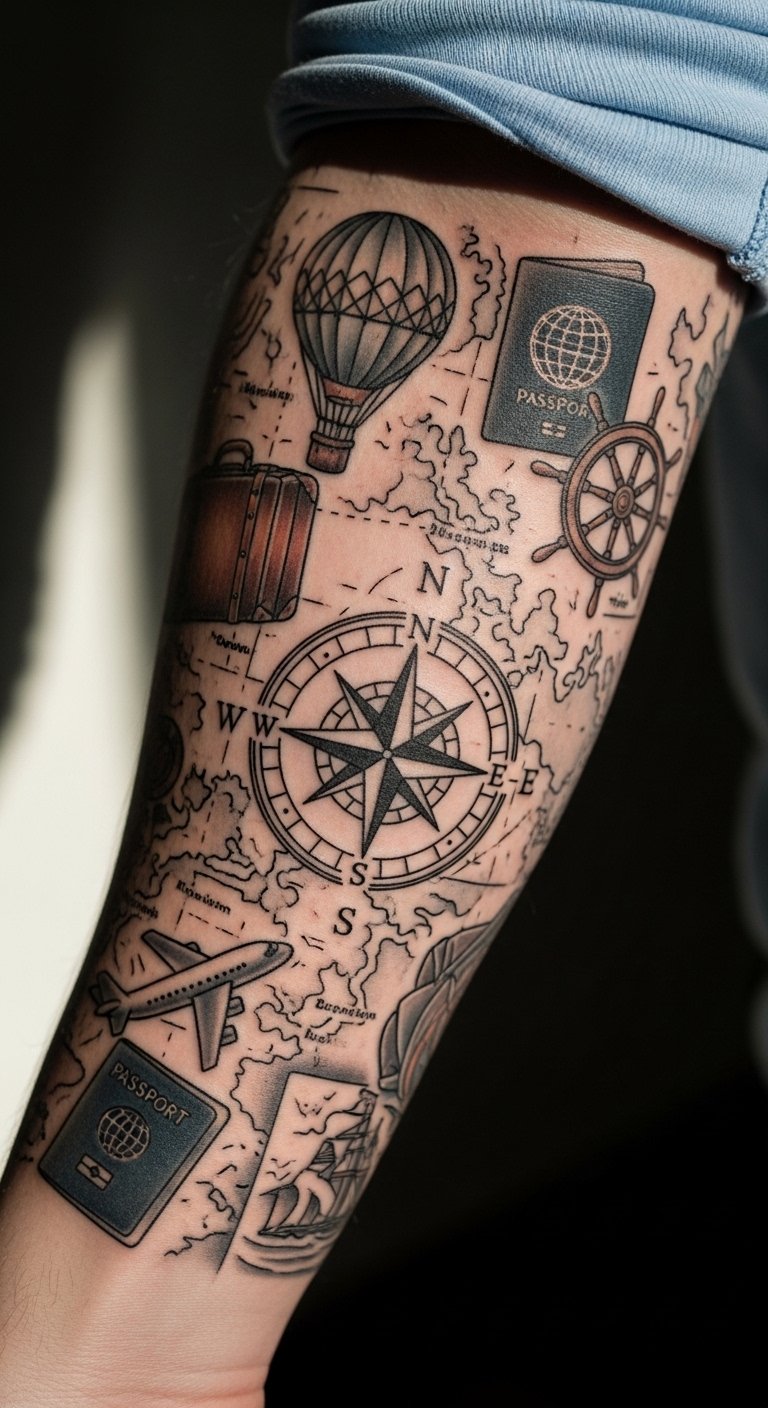
Maps and compasses make sleeves feel like a life journey. Lower arm or forearm placement shows travel milestones. Fine map lines need thicker primary routes to survive healing. Common mistake: over-detailing coastal lines that blur. This style pairs well with stamped dates or small micro-realism icons representing memories.
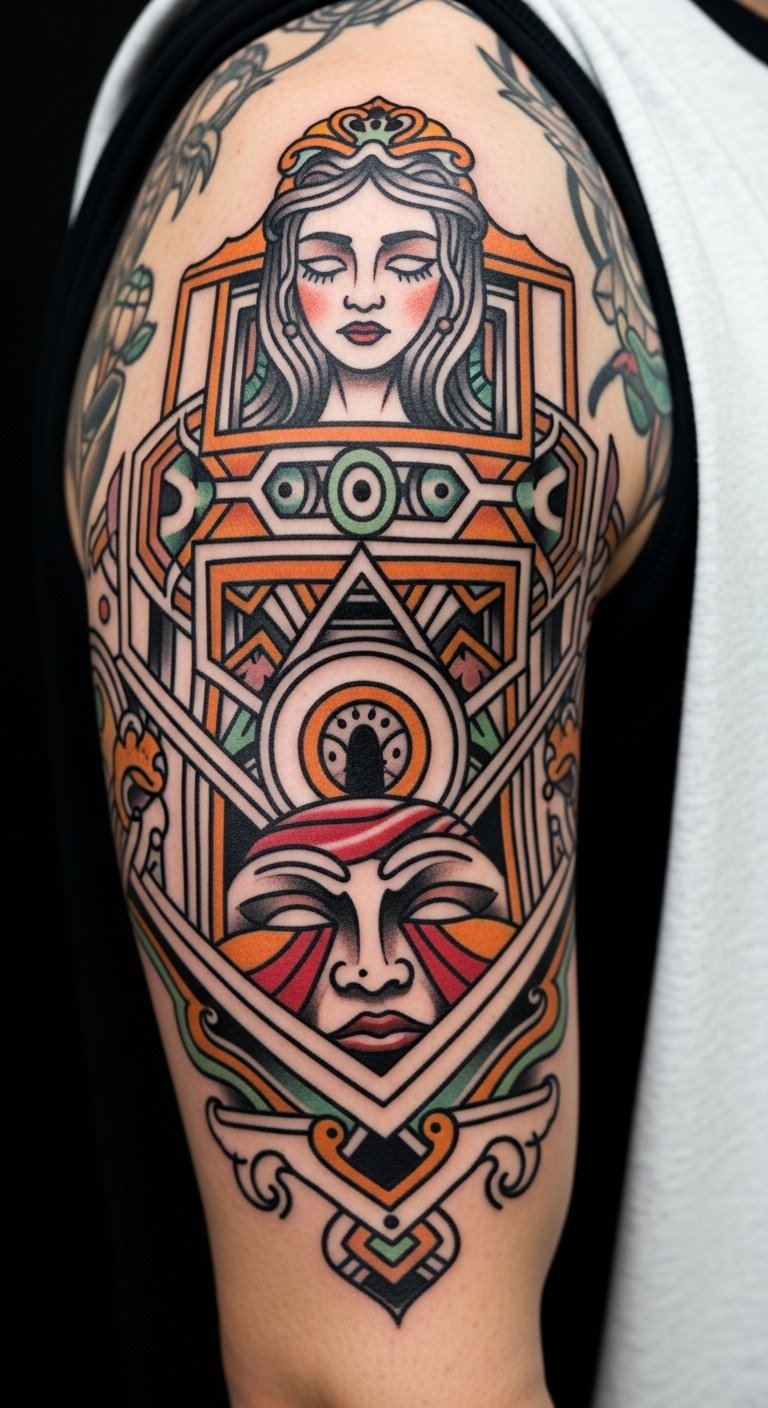
Art Deco Film Noir Sleeve on Upper Arm
Style/Technique: Art Deco / Graphic Noir
Pain Level: Low (3/10)
Session Time: 2–3 sessions
Best For: Stylish, vintage cinematic vibes
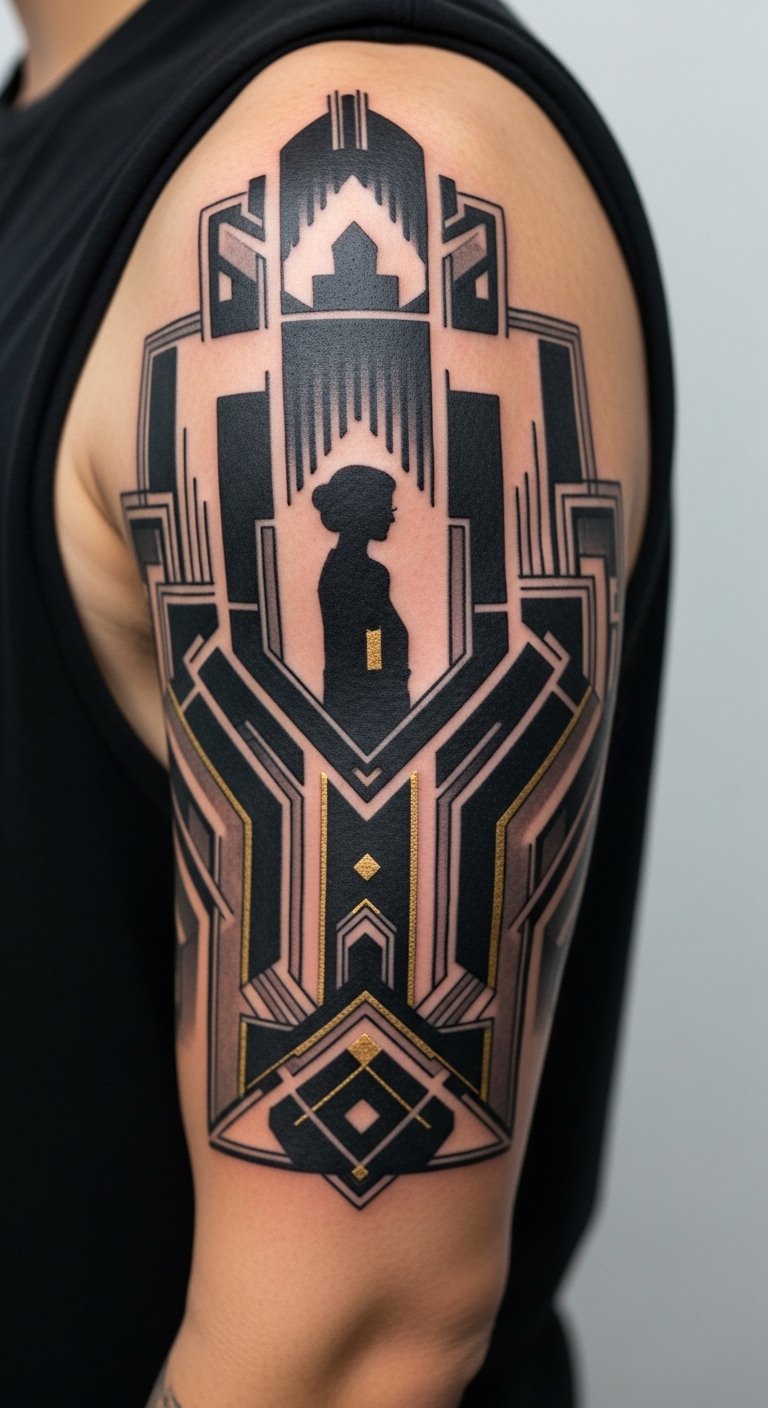
Art Deco motifs create a retro cinematic aesthetic. Upper arm placement keeps silhouettes clean and shows architectural shapes well. Healed geometric lines need precision — uneven lines will show. Artists with graphic illustration experience handle this best. Use negative space to suggest motion or lighting.
Folklore and Myth Sleeve on Full Arm
Style/Technique: Narrative Illustrative / Folkloric
Pain Level: Medium (4/10)
Session Time: Multiple sessions for cohesive storytelling
Best For: Cultural stories, legend retellings
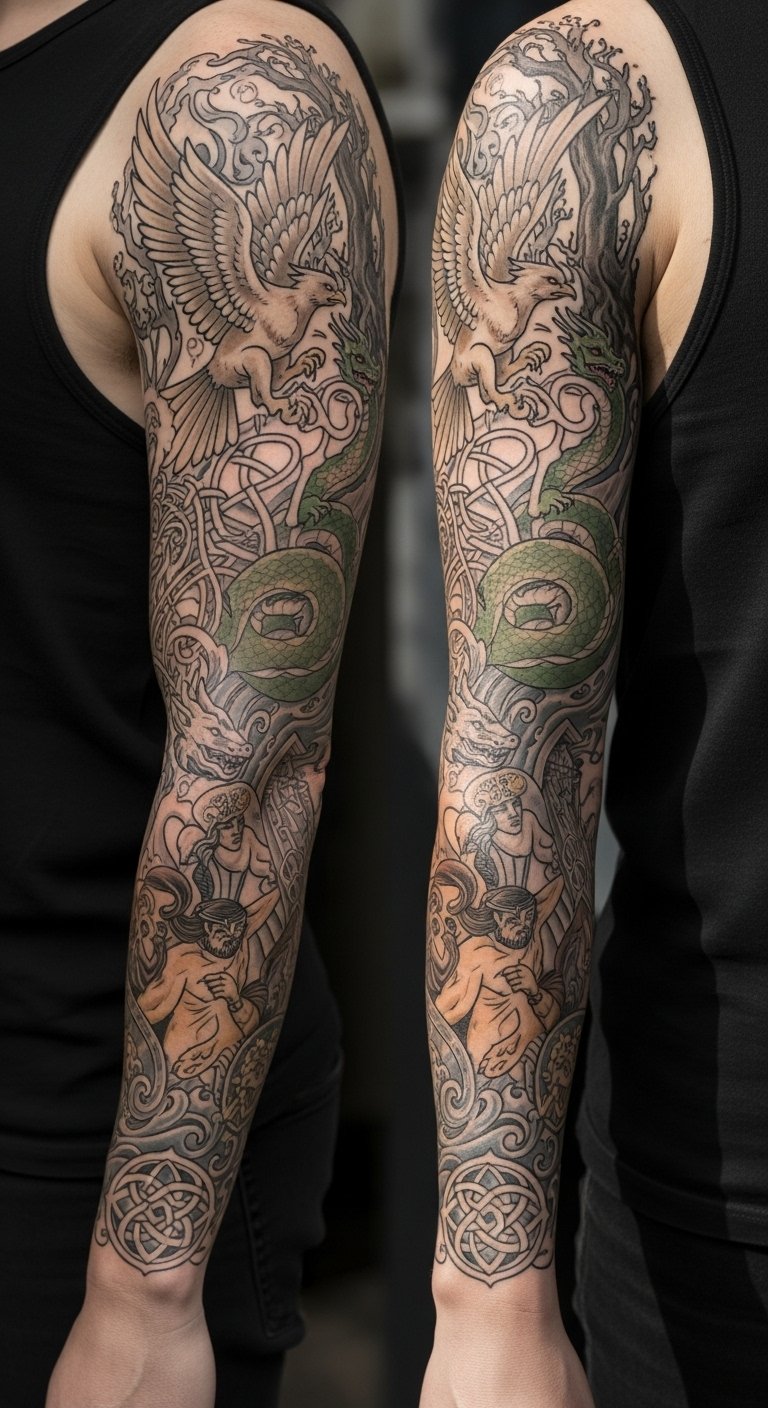
Telling a folk tale over a sleeve gives a timeless feel. Full-arm wraps allow scenes to unfold. Pain varies with inner-arm panels. Healed narrative clarity depends on spacing and silhouette hierarchy — avoid clustering too many tiny vignettes. Ask your artist how they plan transitions between scenes.
Mechanical Clockwork Sleeve on Outer Arm
Style/Technique: Steampunk / Mechanical Realism
Pain Level: Low-Medium (3-4/10)
Session Time: 2–4 sessions
Best For: Precision, layered detail, symbolic time motifs
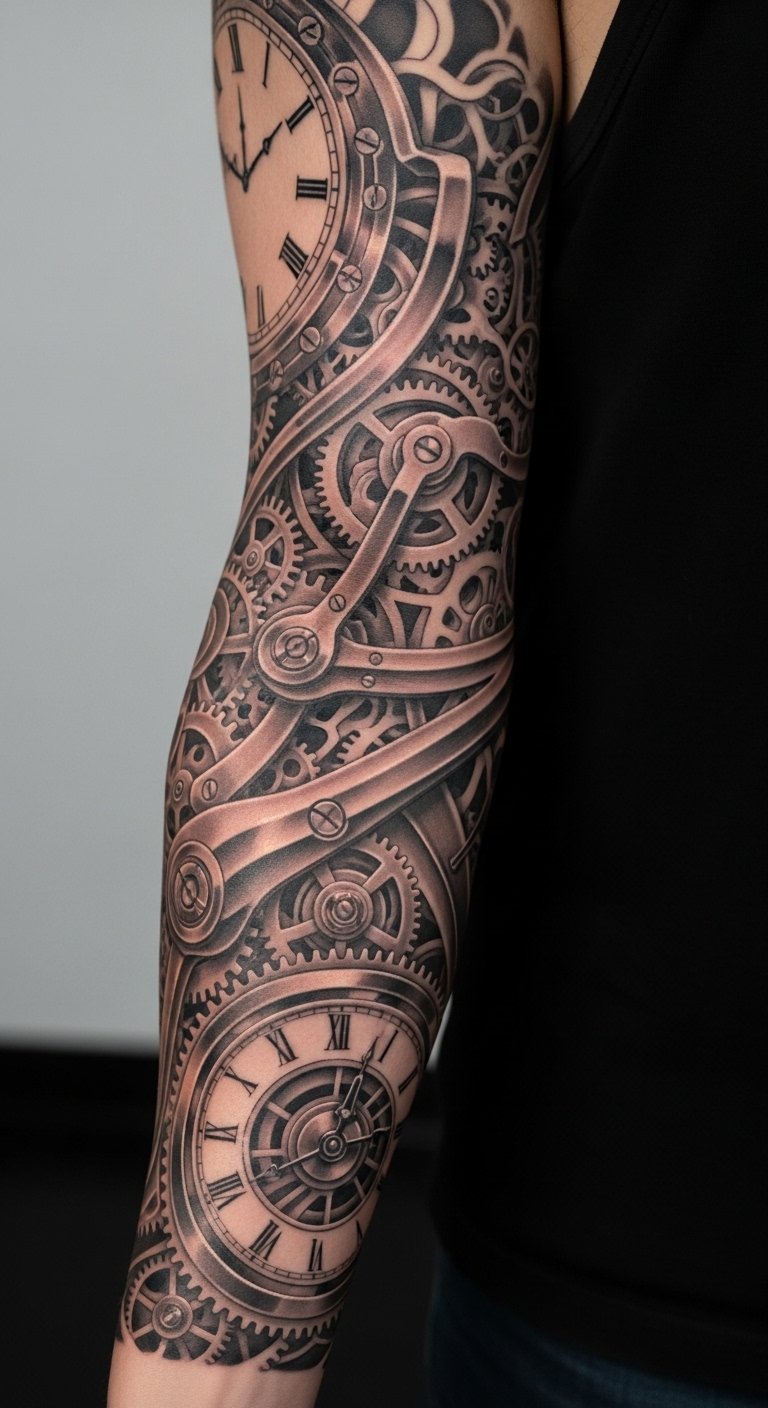
Clockwork sleeves use layered gears to suggest time passing — very cinematic. Outer arm spacing helps small gear teeth remain legible. Healed metallic tones require careful gray layering. Avoid over-etching micro-teeth; broader shapes read longer. Artists with mechanical illustration experience help the sleeve age well.
Surreal Collage Sleeve on Arm
Style/Technique: Surreal / Collage Composition
Pain Level: Medium (4/10)
Session Time: Multiple sessions for composition
Best For: Dreamlike, narrative-driven imagery
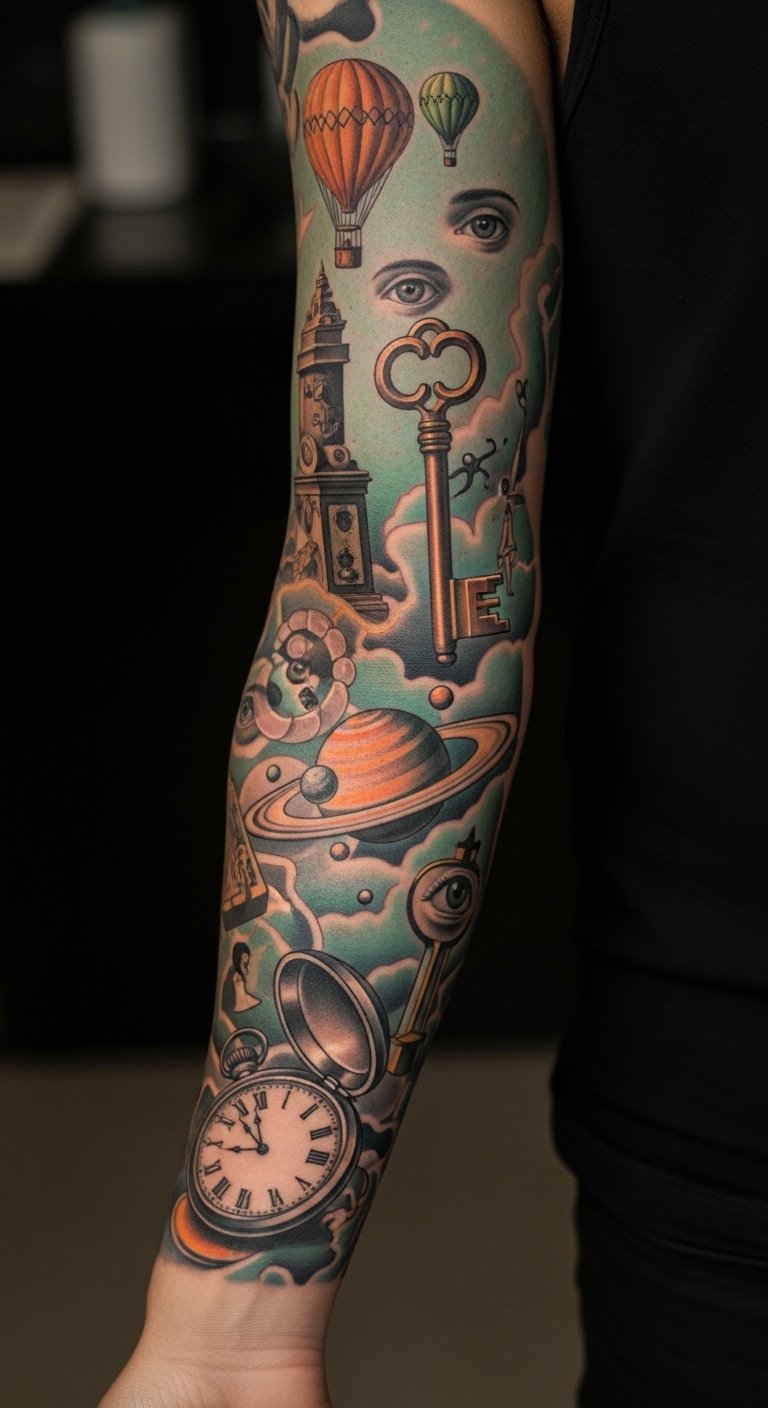
Surreal collage sleeves read like a sequence of dream shots. Placement across arm circumference allows elements to peek into view. Heals predictably if the artist balances contrast across the sleeve. Common mistake: lack of anchor motif — include a repeating symbol to tie scenes together.
Botanical-to-Animal Metamorphosis Sleeve
Style/Technique: Illustrative / Morphing Design
Pain Level: Medium (3-4/10)
Session Time: Several sessions for smooth transitions
Best For: Symbolic personal transformations
Designs that morph one image into another feel cinematic when transitions are seamless. Heals best on outer or upper arm. Plan transitions with medium-weight lines so the morph reads even as lines soften. Avoid tiny in-between details that will blur. Artists skilled in illustrative composition handle this well.
Graffiti-Inspired Motion Sleeve on Forearm
Style/Technique: Street Art / Graphic Motion
Pain Level: Medium (4/10)
Session Time: 2–3 sessions
Best For: Bold urban narratives and color streaks
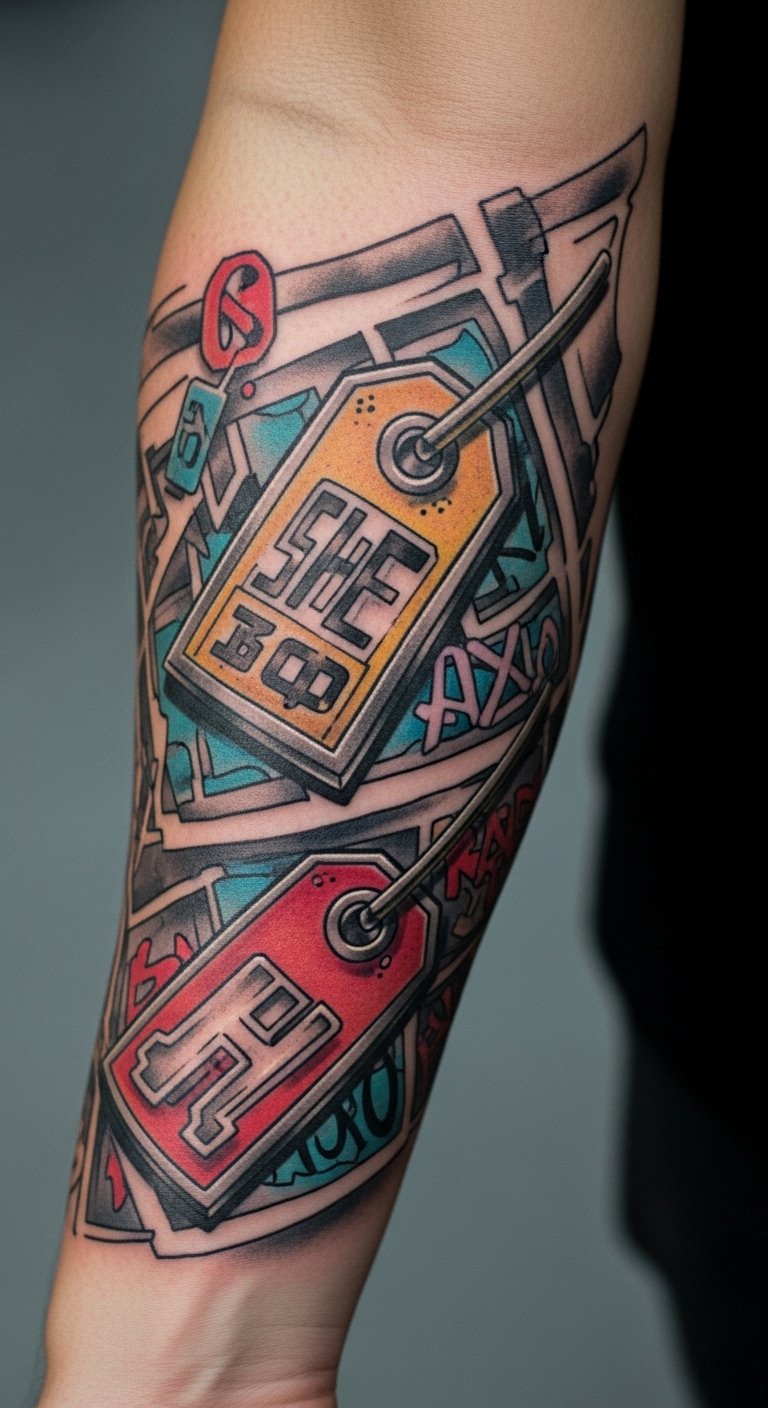
Graffiti sleeves bring kinetic energy. Forearm placement shows motion while you gesture. Heals with some color fading — plan color saturation accordingly. Common issue: too many tiny tag-style lines that become mushy; keep shapes larger. Artists who translate street art to tattoo form are ideal.
Tattoo-As-Panel Comic Sleeve on Arm
Style/Technique: Comic/Graphic Novel / Ink Linework
Pain Level: Low-Medium (3/10)
Session Time: Multiple sessions for line and color
Best For: Sequential storytelling with dialogue banners
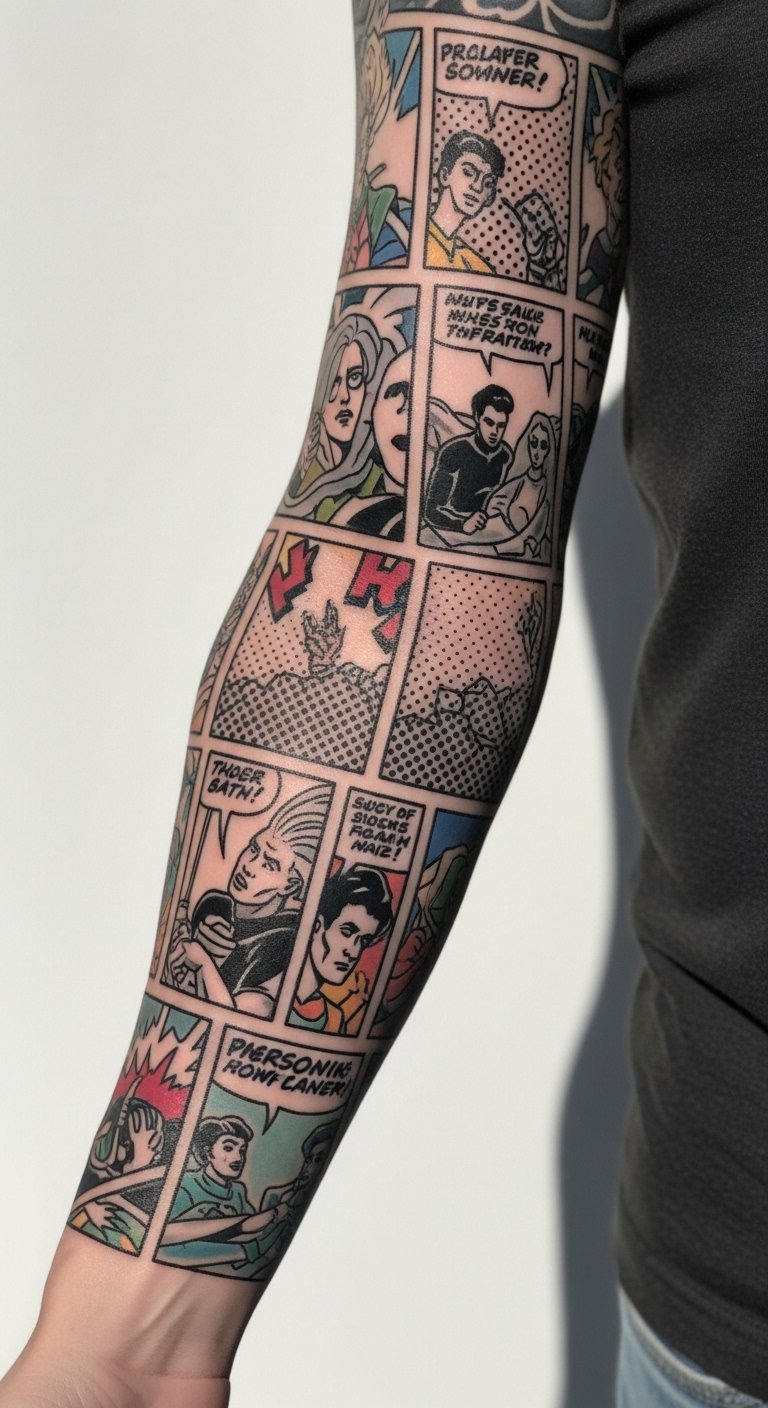
Comic panel sleeves create literal cinematic frames and are great for personal stories. Outer arm works best. Heals well if linework is solid and halftones are planned as dots rather than thin lines. Avoid tiny speech text; keep words short or use symbols. Artists experienced in graphic novel style will ensure legibility over time.
Maritime Fog and Lighthouse Sleeve
Style/Technique: Realistic/Illustrative / Atmospheric Shading
Pain Level: Medium (4/10)
Session Time: 3–5 sessions for atmosphere
Best For: Moody storytelling, directional light motifs
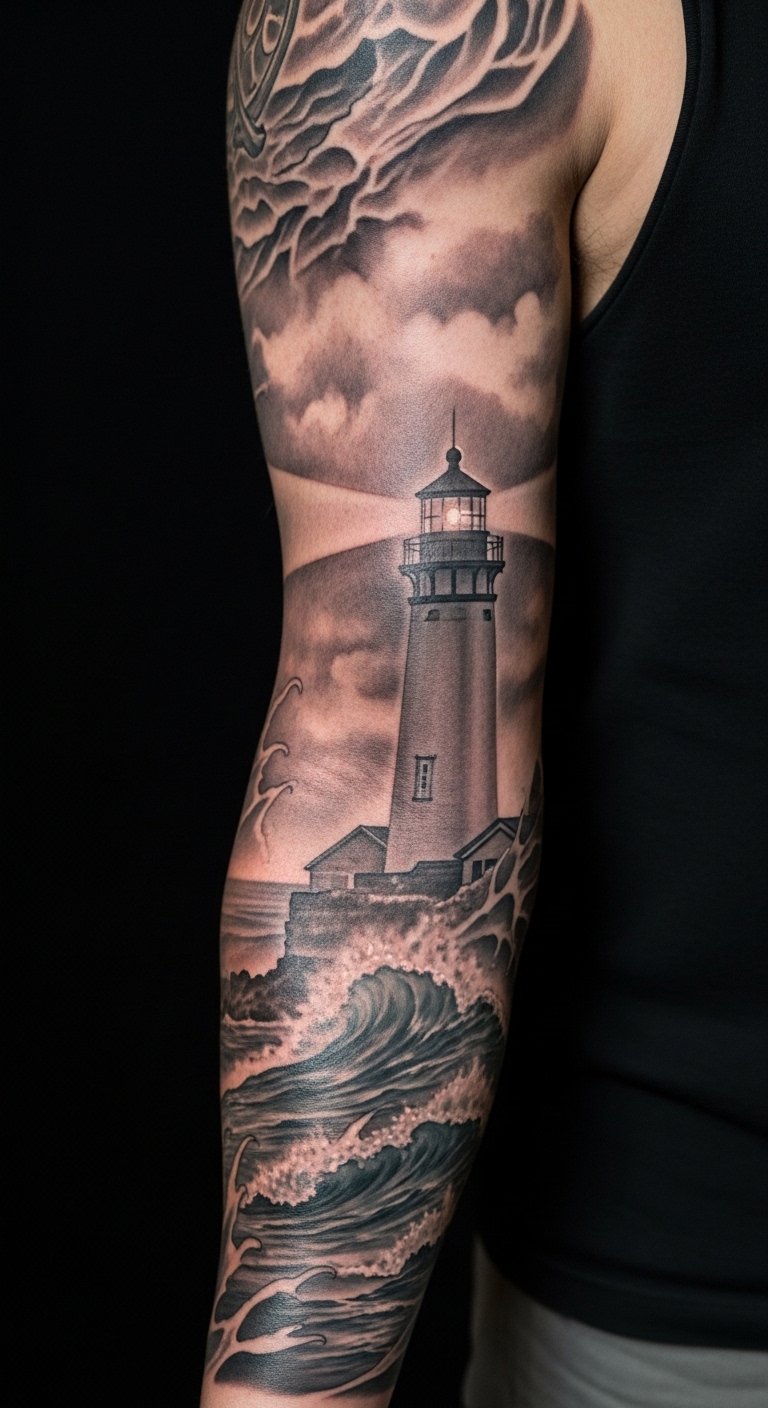
Foggy maritime sleeves are cinematic because they play with light. Outer arm or bicep placement helps maintain soft gradients. Healed graywash stays readable if contrast is built in sessions. Avoid overly faint midtones that disappear. Look for artists who can photograph healed graywash work.
Portrait Triptych Sleeve on Arm
Style/Technique: Triptych Portrait / Sequential Mood
Pain Level: Medium (4/10)
Session Time: Multiple portrait sessions
Best For: Emotional arcs, aging, family narratives
A triptych of faces across a sleeve reads like a character arc. Keep portraits spaced with negative space to let each breathe. Healed photos matter here; portraits need contrast to remain legible. Overcrowding will flatten emotional impact. Artists who present healed triptychs are best.
Botanical Blackwork Sleeve with White Highlights
Style/Technique: Blackwork + White Ink Accents / High Contrast
Pain Level: Medium (4/10)
Session Time: 2–4 sessions for solid fill and highlights
Best For: Dramatic silhouette-driven sleeves
Blackwork botanicals feel iconic and age predictably. White highlights add sparkle but may fade faster; use them sparingly for healed pop. Heavy fills can be painful in some spots; schedule accordingly. Common mistake: overuse of white ink. Choose artists experienced in blackwork with white ink knowledge.
Time-Lapse Seasonal Sleeve on Arm
Style/Technique: Illustrative Sequence / Seasonal Changes
Pain Level: Low-Medium (3/10)
Session Time: Multiple sessions to map seasons
Best For: Life cycles and time motifs
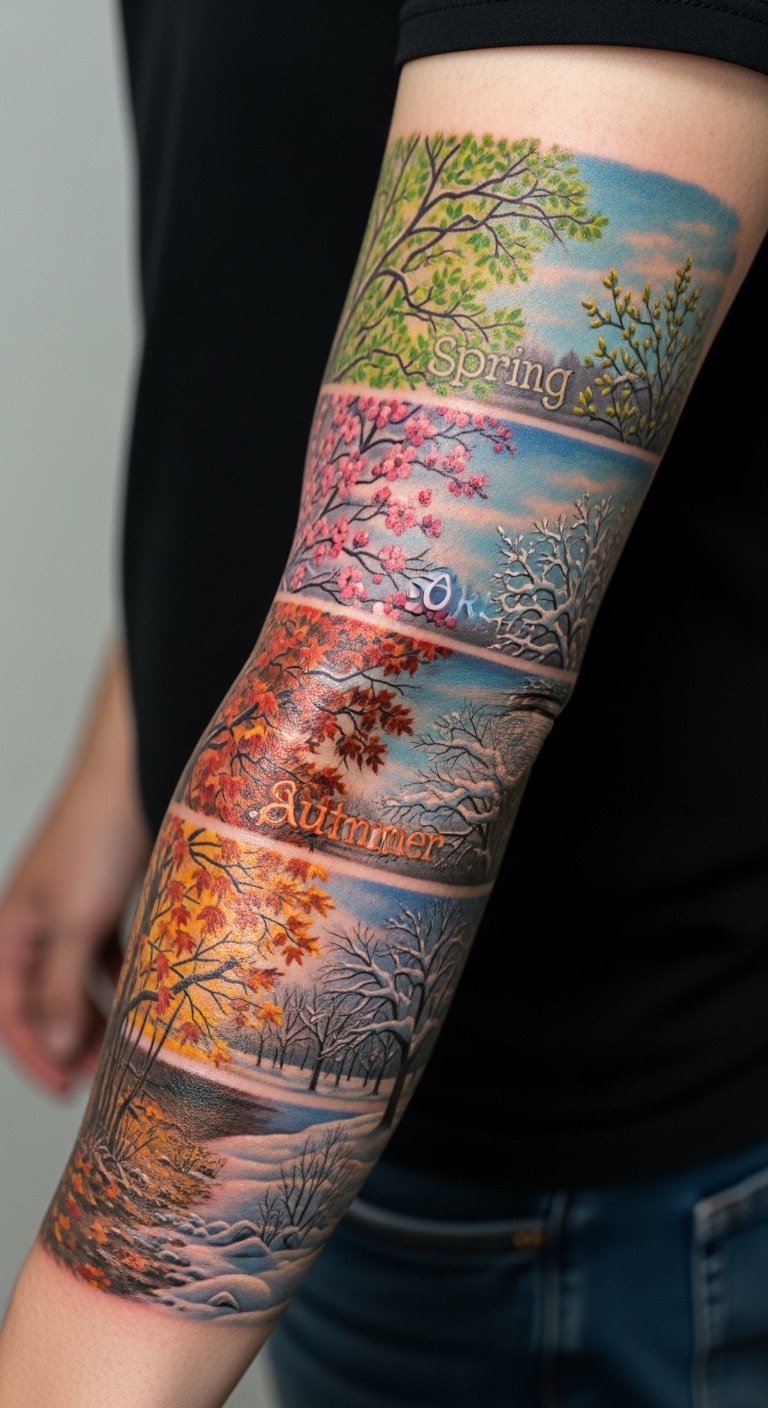
Designing seasons around the arm gives a cinematic passage of time. Upper arm or outer forearm keeps details readable. Healed sections will shift slightly in tone — plan color transitions with that in mind. Avoid tiny seasonal symbols that will blur; prioritize silhouette and color fields.
AR-Ready Accent Sleeve (UV + Micro-Detail)
Style/Technique: Mixed Media Tattoo / UV Accents + Fine Line
Pain Level: Medium (4/10)
Session Time: Multiple sessions, including UV passes
Best For: Photos, nightlife, interactive elements

This is one of the fresh angles I found — subtle UV ink accents or micro-details meant to show up in photos or under blacklight. Base sleeve should be solid and coherent; UV is an accent, not a replacement. UV ink heals like regular ink but can fade differently; discuss long-term visibility with your artist. This creates a cinematic dual-life effect: day and night versions.
Motion Blur Sleeve with Layered Lines
Style/Technique: Graphic / Motion Blur Technique
Pain Level: Medium (4/10)
Session Time: 2–3 sessions
Best For: Suggesting speed and transit
Motion blur sleeves use repeated contour lines to suggest movement. Forearm placement amplifies motion during gestures. Heals well if primary lines are strong. Avoid overcrowding with too many overlapping thin strokes. Artists who also do printmaking or motion design adapt well.
Anime Story Arc Sleeve
Style/Technique: Stylized / Anime Paneling
Pain Level: Low-Medium (3/10)
Session Time: Multiple sessions for color and outlines
Best For: Fans wanting literal narrative arcs
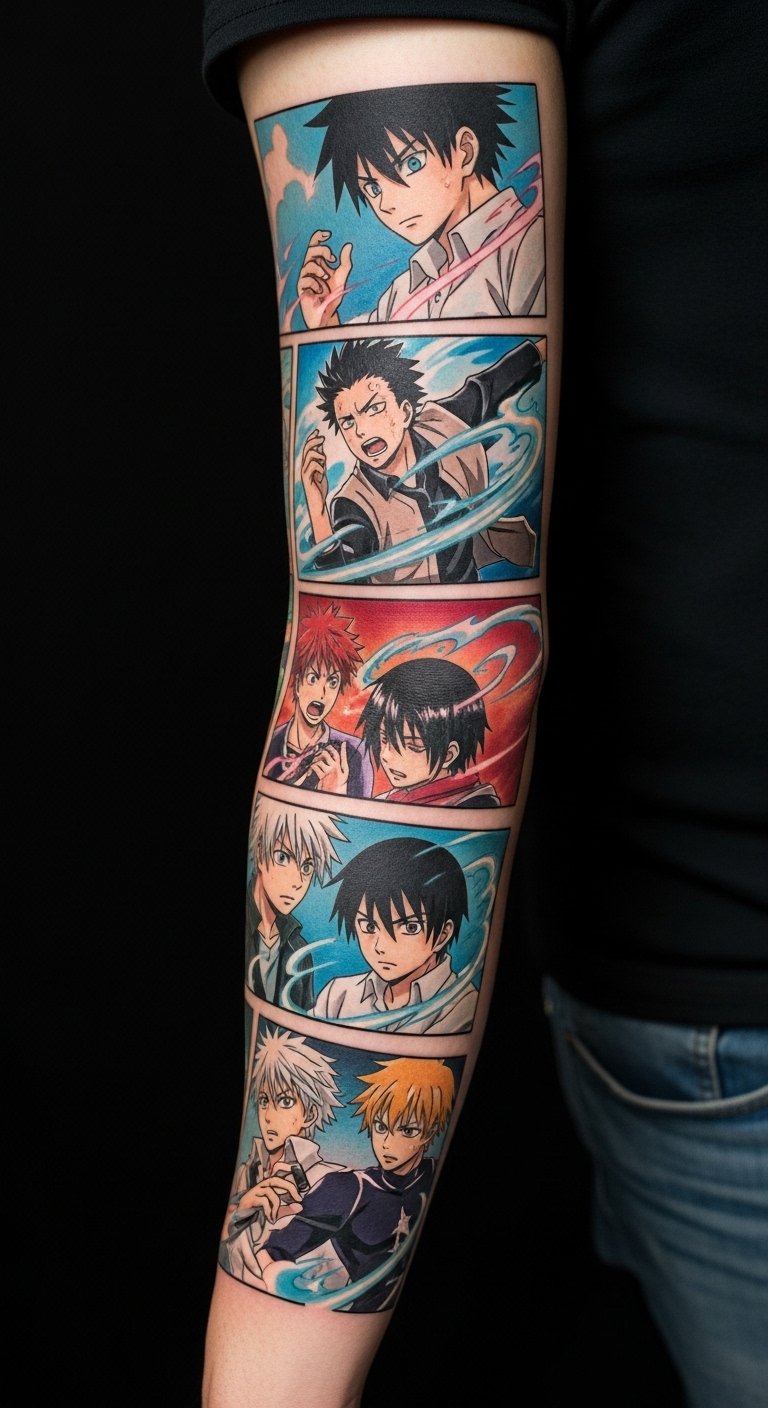
Animating a personal story in anime panels can feel cinematic and immediate. Keep outlines bold and colors saturated for long-term readability. Small screentone dots should be scaled to survive healing. Artists familiar with illustrative cel-shading are best.
Architectural Ruins Sleeve on Upper Arm
Style/Technique: Architectural Illustrative / Ruins and Light
Pain Level: Low (3/10)
Session Time: 2–3 sessions for structure and washes
Best For: Structural, moody narratives
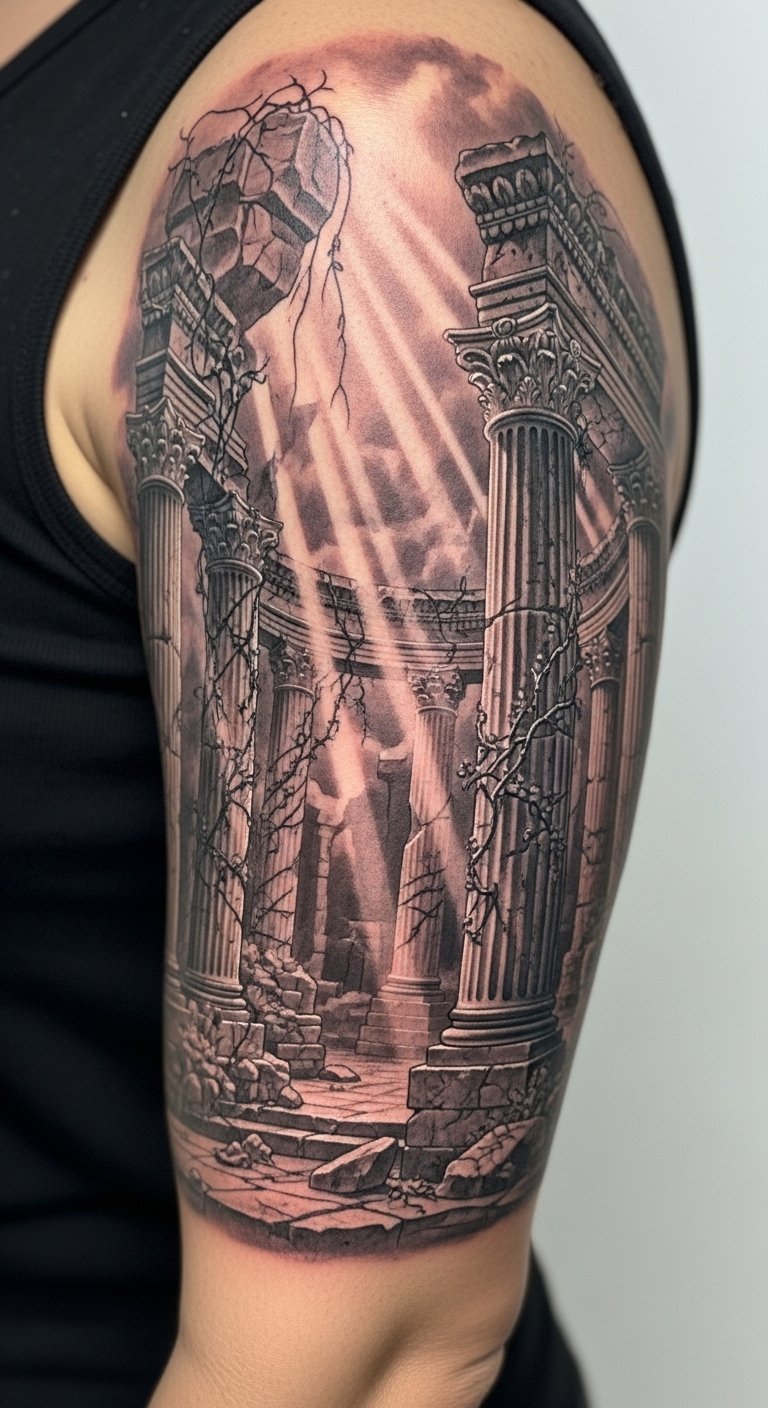
Ruins and shafts of light create cinematic chiaroscuro. Upper arm placement allows for controlled perspective and less pain. Heals clearly when lines are crisp and shadows layered. Avoid tiny brickwork details that blur; use larger planes for textural illusion. Artists with architectural sketching skills excel here.
Collapsed Timeframe Sleeve (Aging Portraits)
Style/Technique: Sequential Aging / Portrait Series
Pain Level: Medium (4/10)
Session Time: Multiple portrait sessions
Best For: Generational narratives or life chapters
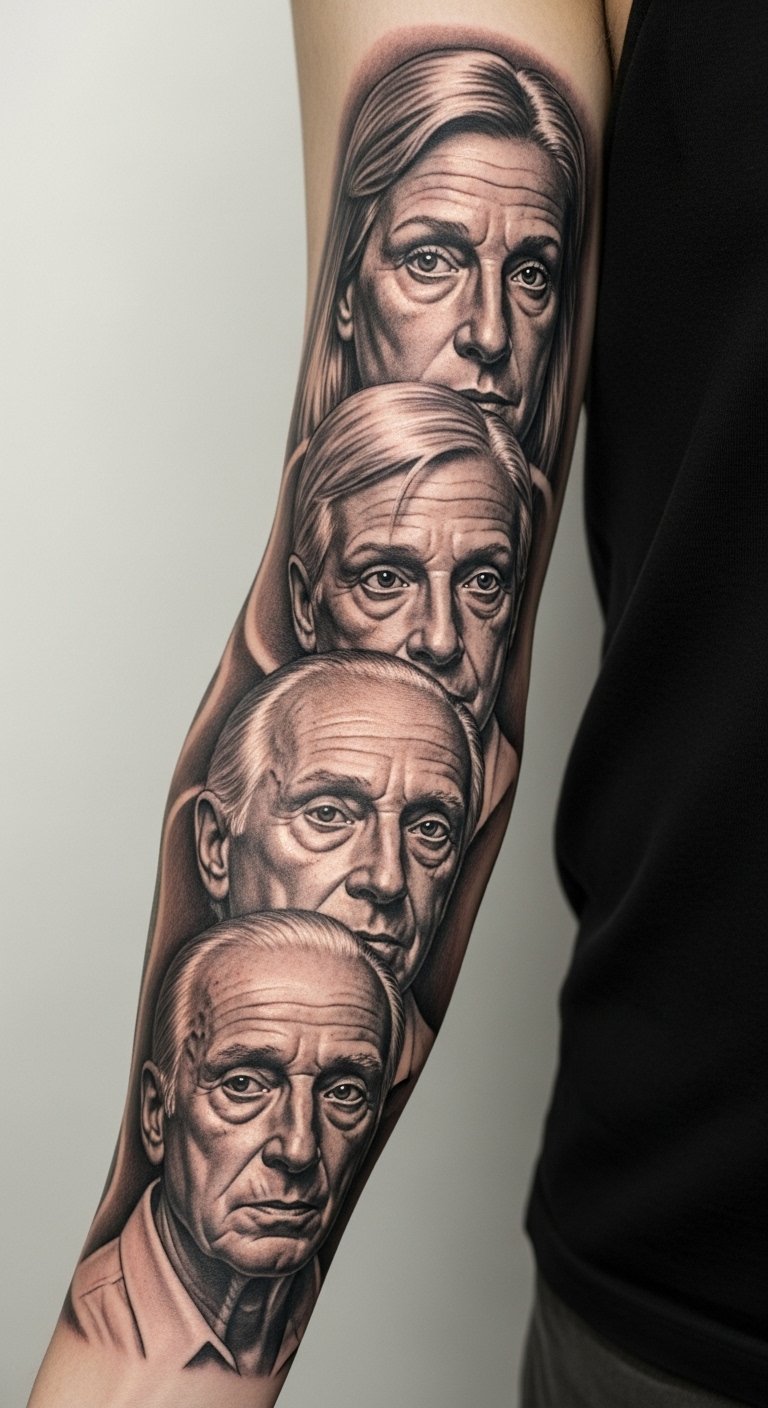
Sequential aging portraits show a life timeline in one sleeve. Keep each portrait separated by negative space for legibility. Healed portraits need strong contrast; plan accordingly. Common mistake: compressing too many ages into a small area. Artists who show healed multi-portrait sleeves are necessary.
Minimalist Line Story Sleeve on Inner Arm
Style/Technique: Minimalist Line / Continuous Linework
Pain Level: Medium (3-4/10)
Session Time: 1–3 sessions
Best For: Subtle narrative, easy to conceal
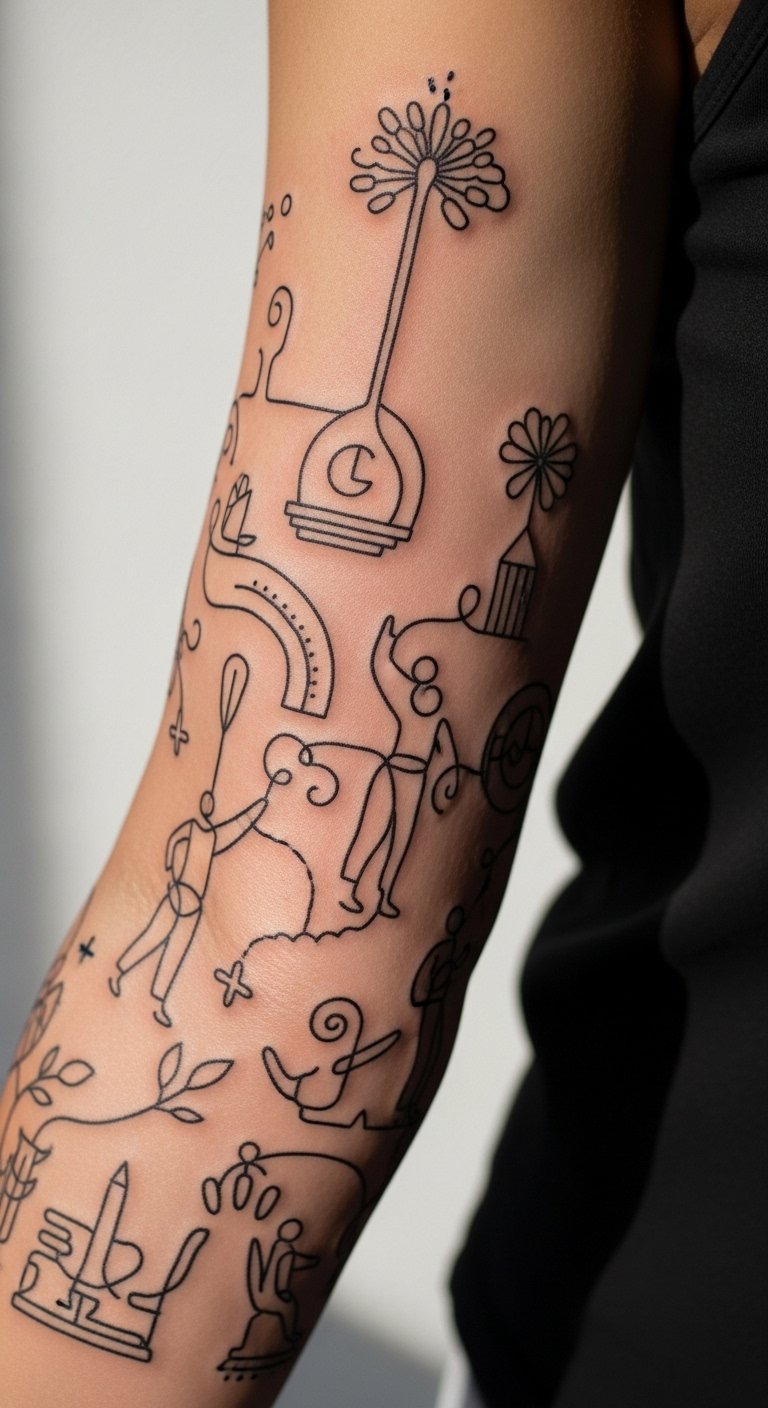
Continuous-line sleeves are quiet and elegant. Inner arm placement keeps them private and lower pain than ribs. Lines will soften over time; plan slightly bolder initial strokes. Avoid ultrafine single-line loops that can blur into a single mark. Artists who specialize in minimal line illustration are ideal.
Cosmic Journey Sleeve with Stars and Planets
Style/Technique: Illustrative / Cosmic Motif
Pain Level: Low-Medium (3/10)
Session Time: Multiple sessions for depth and color
Best For: Expansive narratives, symbolic exploration
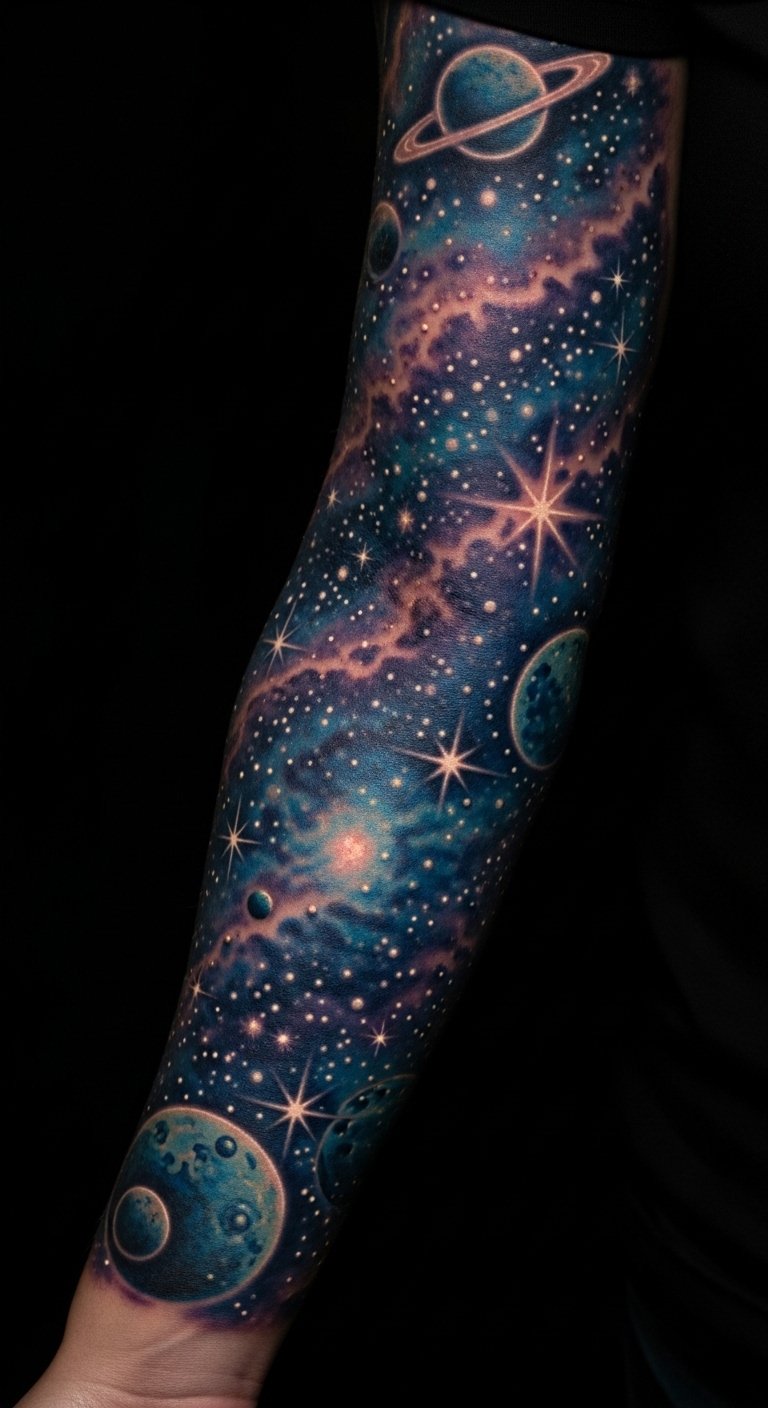
Space sleeves feel cinematic by default — they can suggest travel, wonder, and scale. Outer arm shows planetary orbits well. Healed galaxies retain mood if highlights are placed judiciously. Avoid tiny pinpoint stars that may fade; cluster them into readable patterns. Artists who paint celestial scenes on skin are best.
Urban Noir Sleeve with Reflective Surfaces
Style/Technique: Realism + Graphic / Nightscapes and Reflections
Pain Level: Medium (4/10)
Session Time: Multiple sessions for reflective detail
Best For: City narratives, reflective moods
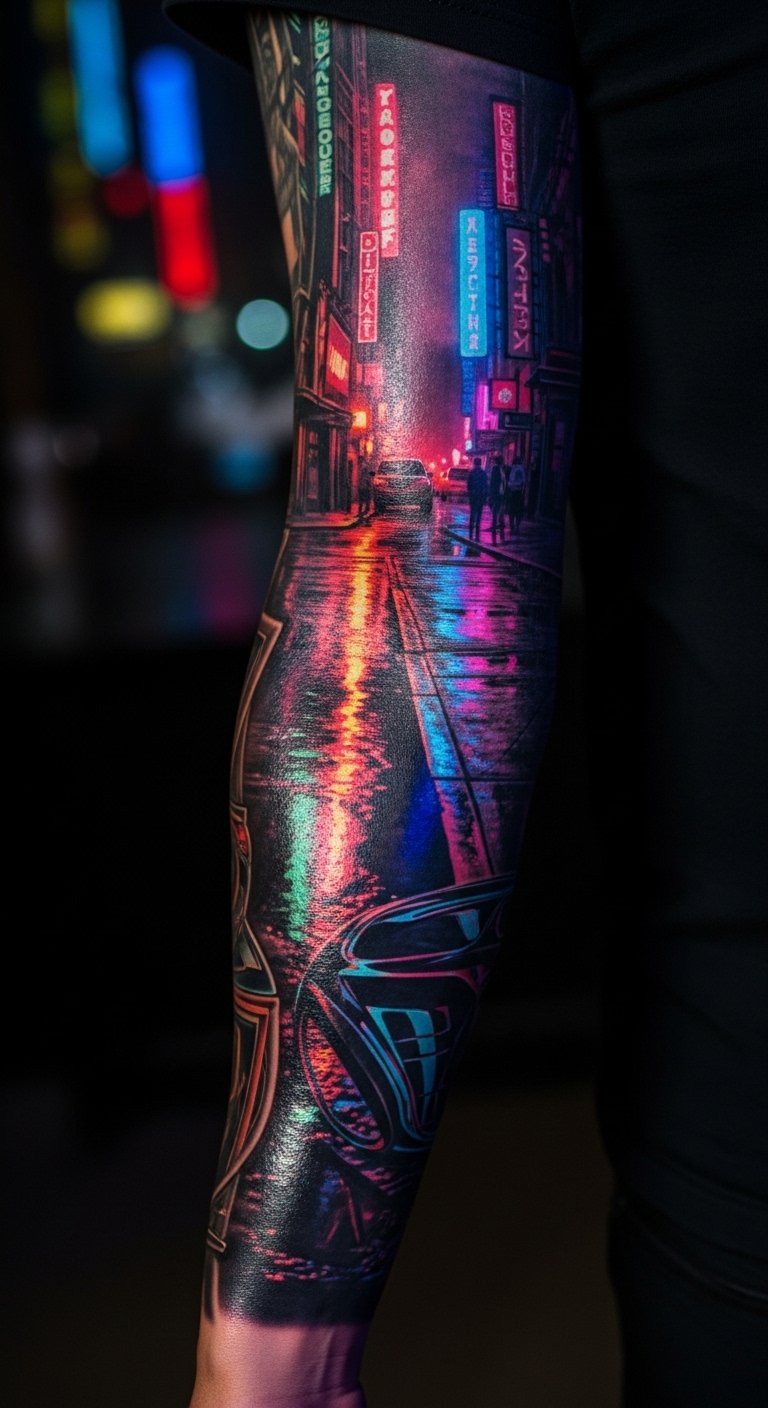
Urban noir uses reflections and neon to create cinematic frames. Forearm or outer arm placement shows light play during motion. Healed reflective textures need layered glazes to maintain shine. Artists who photograph cityscapes well will translate this into lasting ink.
Ephemeral Ink — Sand and Wind Sleeve
Style/Technique: Fine Line + Soft Washes / Ephemeral Motifs
Pain Level: Low (3/10)
Session Time: 2–3 sessions
Best For: Subtle, contemplative narratives
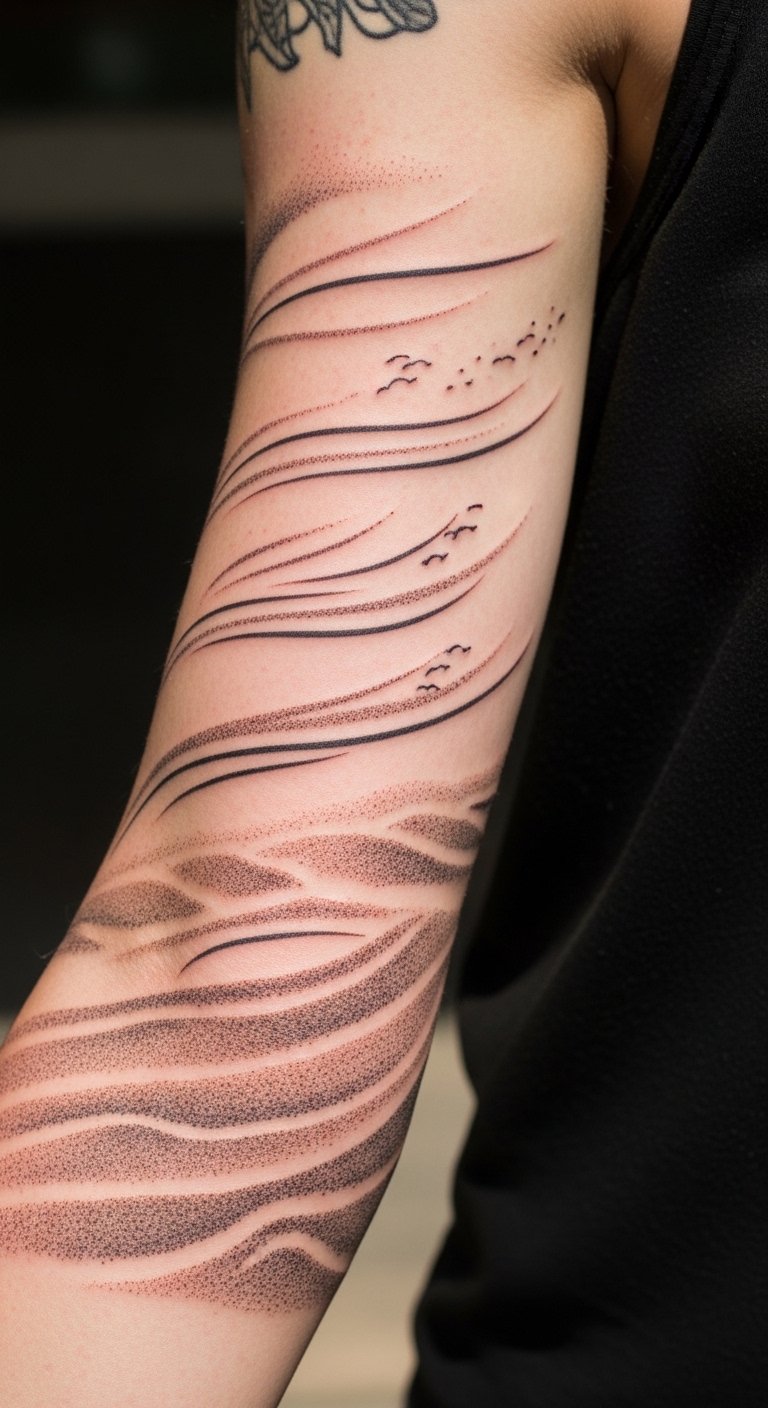
This under-covered angle focuses on movement of natural elements like sand or wind. It reads delicately and ages gracefully if contrasts are planned. Keep washes slightly stronger than sketch to survive healing. Artists with subtle shading control are best.
Tattoo Prep and Aftercare Essentials
Aftercare Essentials:
- Aquaphor Healing Ointment, 14oz tube — Recommended for first 3–5 days to keep a fresh tattoo protected
- Saniderm Transparent Adhesive Bandage, 6-inch roll — Second-skin option many pros recommend for initial coverage
- CeraVe Fragrance-Free Moisturizing Lotion, 12oz — For days 4–14 when you need gentle daily moisture
- Dr. Bronner's Unscented Castile Soap, 32oz — Gentle cleansing during the first week
Before Your Appointment:
- Tattoo numbing cream with 5% lidocaine — Ask your artist before use; can help on sensitive areas
- Tattoo stencil transfer paper — If you’re testing layouts at home
Long-Term Maintenance:
- SPF 50 sunscreen stick for tattoos — Daily UV protection prevents fading
- Mad Rabbit Tattoo Balm 1.7oz — Popular for keeping healed ink vibrant
- Hustle Butter Deluxe 4oz — Vegan aftercare alternative many artists recommend
Optional Comfort Items:
- Tattoo numbing spray — For touch-ups or sensitive patches
- Hydrocolloid bandages (large) — Good for small irritation spots or blisters
Frequently Asked Questions
Q: How bad does a tattoo actually hurt?
A: Pain varies by placement and tolerance. Outer arm and thigh are around 2–4/10; ribs, spine, and ankle can be 7–9/10. It’s more a burning or scratching feeling than sharp agony. For sensitive areas, consider discussing a 5% lidocaine numbing cream with your artist.
Q: What if I regret a tattoo?
A: Sit with designs for months. If visibility worries you, start on the upper arm or thigh. Laser removal exists but is a long process. Designing a sleeve as a narrative makes cover-ups and updates easier later.
Q: How do I keep my tattoo from fading?
A: UV exposure is the main culprit. Use an SPF 50+ sunscreen stick daily and keep skin moisturized with a fragrance-free lotion like CeraVe. Black and gray holds longest; bright yellow/orange fade fastest.
Q: Can I work out after getting a tattoo?
A: Wait 48–72 hours at minimum. Sweat can irritate a fresh tattoo and introduce bacteria. For sleeves that cross joints, wait longer until scabs fall away and you can move without pulling skin.
Q: Should I get a small tattoo first to test pain tolerance?
A: Only if you actually want a small piece. Placement matters more than size. A tiny wrist tattoo can hurt more than a larger outer arm piece.
Q: How long does a tattoo take to heal?
A: Surface healing ~2–3 weeks; deeper healing 2–3 months. The first week is critical — clean gently with unscented soap and use recommended ointment like Aquaphor.
Q: Do tattoos look different on different skin tones?
A: Yes. Black and gray shows strongly on all tones. Bright colors may appear more muted on deeper skin; white ink can be subtle or invisible. Ask to see healed work on skin tones similar to yours.
Conclusion
Start with a clear visual story. A thoughtful consultation and reference of healed work will turn a cinematic idea into a sleeve that still reads years from now. Protect your investment with Aquaphor for early healing and daily SPF 50+ long-term. Which filmic sleeve idea are you most drawn to?
Quick stats I leaned on while researching: about 30% of U.S. adults report having at least one tattoo (Statista, 2021). A 2020 survey showed younger adults drive most new tattoo trends and favor meaningful, narrative designs (Pew Research Center, 2020).
