
Vintage flash sheets keep showing up in shop windows and on saved boards, but trends and what lasts rarely match. Small single-needle banners look great on a flat screen and then soften into a blur. Bigger, bolder flash with confident linework and limited palette often reads better after two summers of sun. Read these practical flash sheet designs, how they heal, and what to tell the artist to make one hold its shape.
1. Traditional Rose Flash Sheet
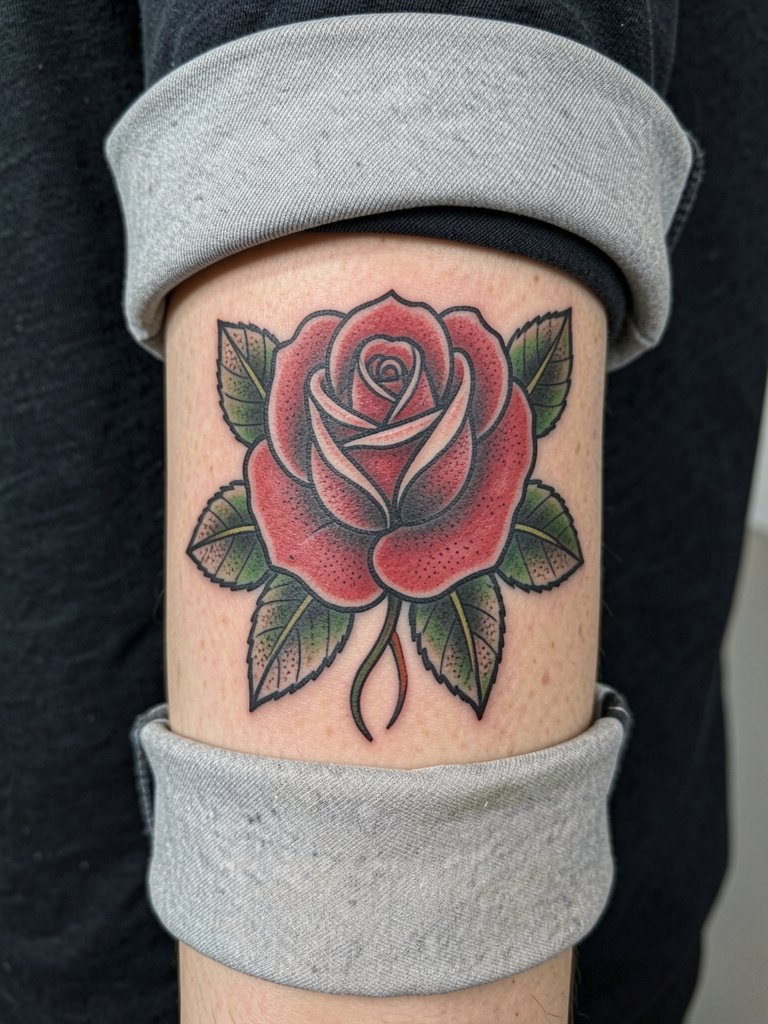
Roses are the anchor motif for most vintage flash sheets because they scale and age reliably. I recommend choosing a version with a slightly wider petal outline than the reference image so the silhouette keeps its clarity at year two and beyond. During the consultation, show the exact petal sketch and ask for the leaf veins to be rendered as stipple shading rather than micro detail. A common mistake is asking for tiny inner petal details that fill in during healing. Forearm placement feels like a three out of ten on the pain chart and usually takes a single one-hour session for a medium motif. For showing it off, pair the forearm with a rolled sleeve shirt that keeps the tattoo visible without distraction.
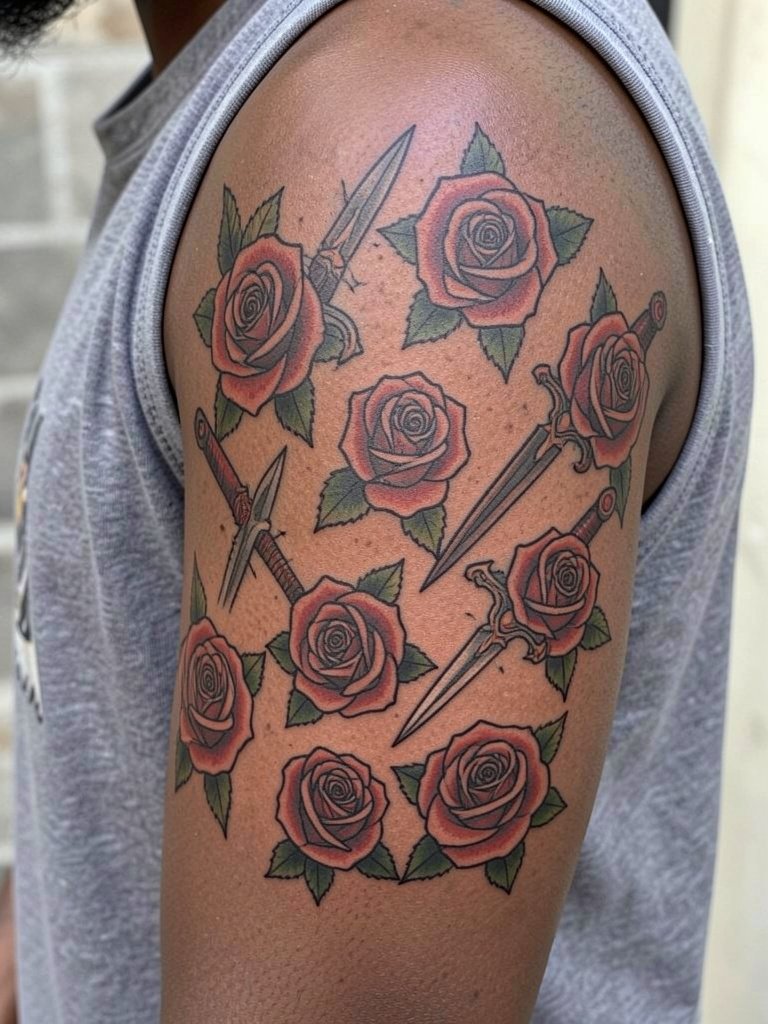
2. Dagger and Rose Combo Flash
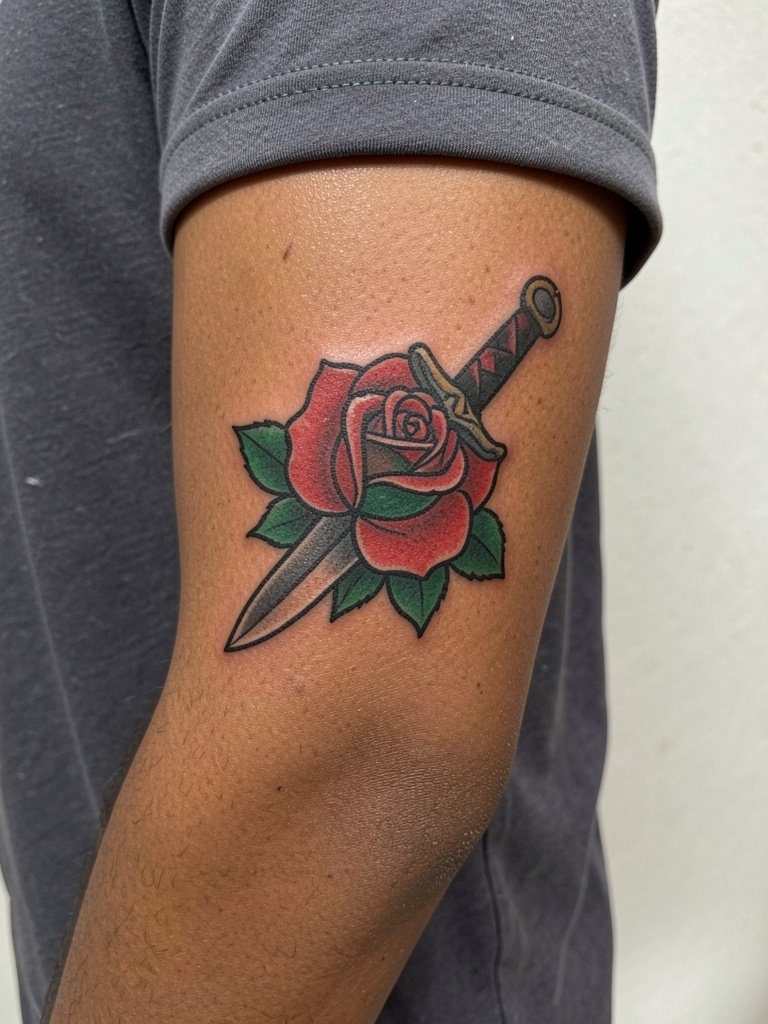
The dagger-and-rose pairing reads as contrast, so prioritize clean negative space around the blade to avoid muddiness. Tell the artist to keep the blade edge as a bold single outline with a small amount of internal shading, rather than a dense internal texture. If you pick a forearm placement, expect sharp linework to hold better than micro detail over the first five years. One real mistake is crowding banners and small script into the handle area. Session time for a medium dagger piece is usually 60 to 90 minutes. Wear a sleeveless tank to the appointment so the artist can access the arm cleanly.
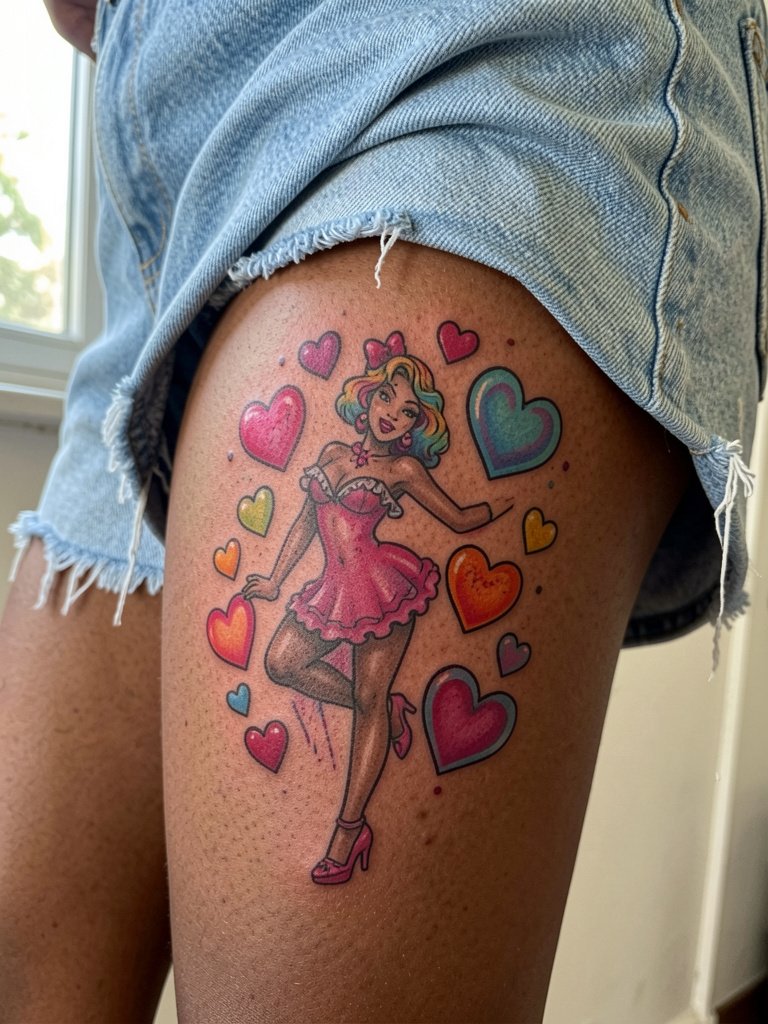
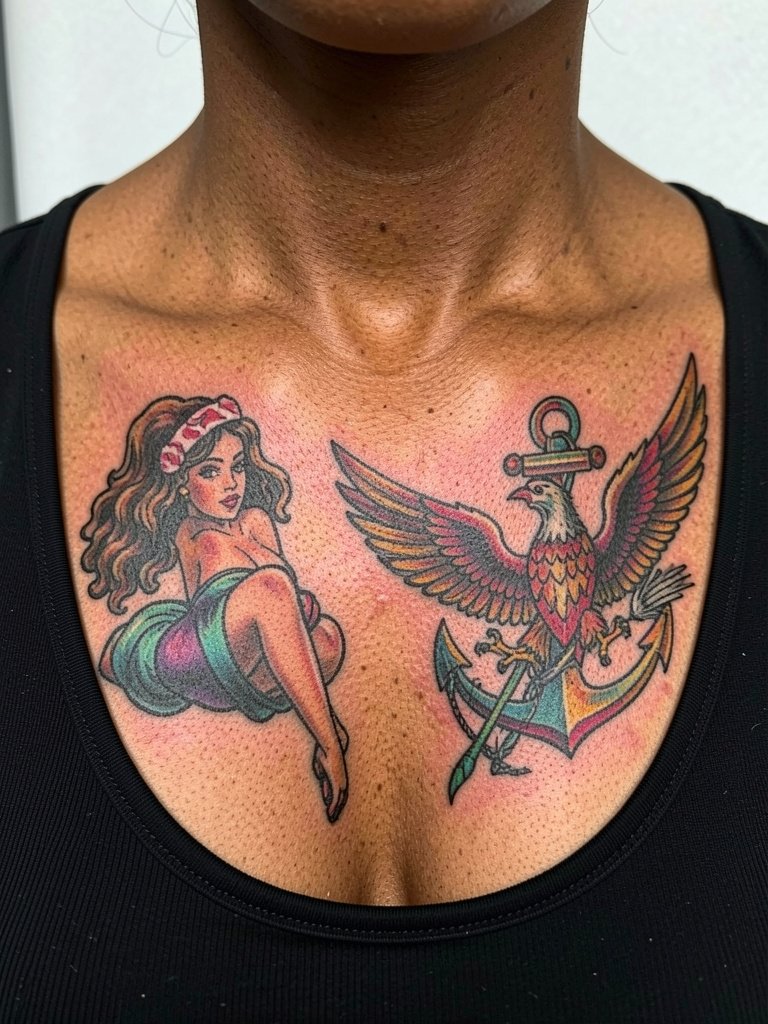
3. Pin-Up Girl Flash Sheet
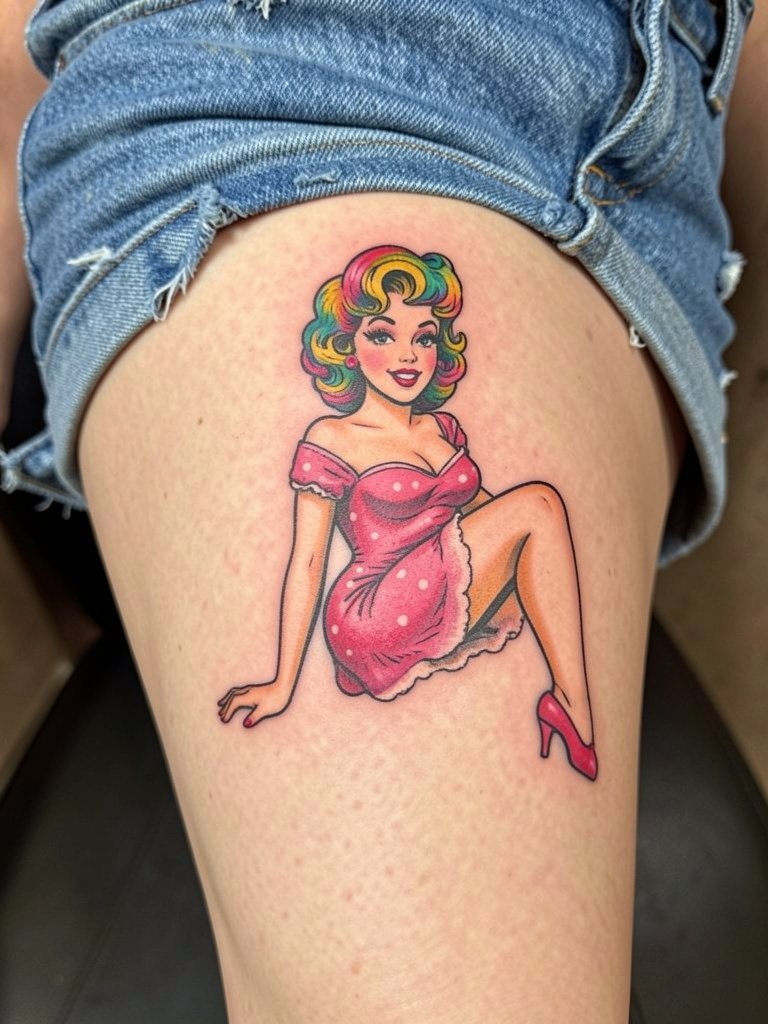
Pin-up sheets are one of the more complex vintage motifs because they often become focal pieces. If you want a pin-up that ages well, pick a design where facial features are simplified and hair mass is bold rather than finely shaded. Ask the artist to map out how the face reads at both three and five inches in height, and to show you a stencil at those scales. A common error is shrinking the portrait too small and expecting detail to survive. Thigh placement can be lower on the pain scale but larger in session time, often two sessions for a medium composition. To dress the piece when it heals, a pair of high-slit skirts frames the artwork without obscuring its silhouette.
4. Swallow Flash
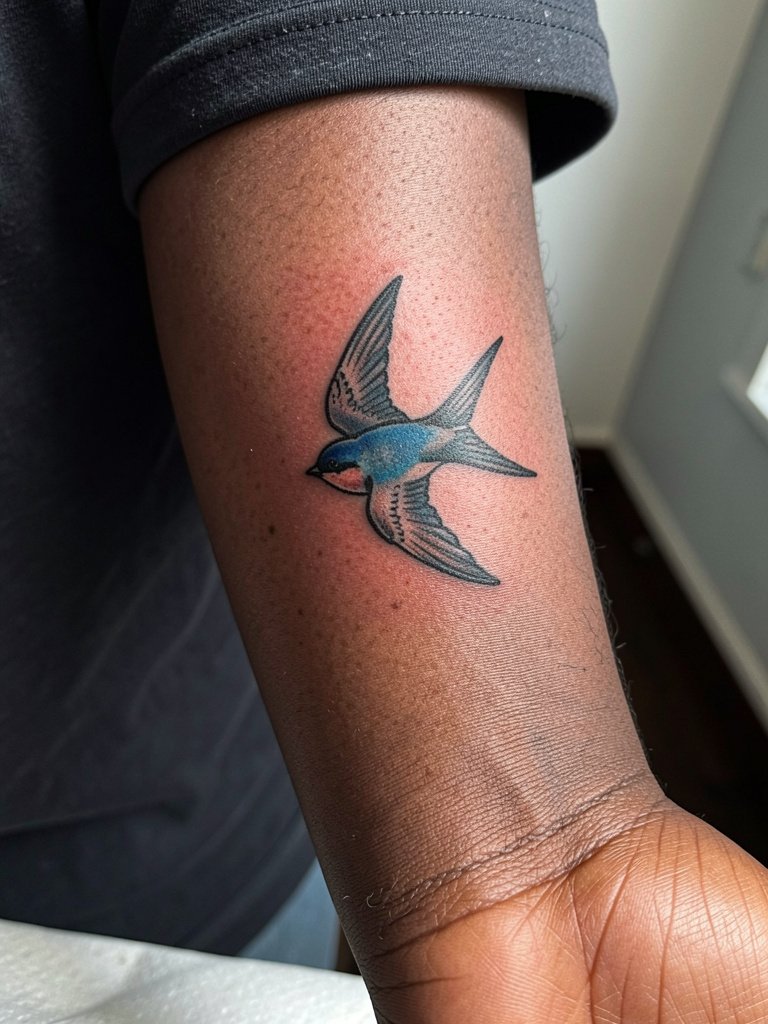
Swallows are compact and forgiving, so they make great first flash tattoos. If you want one that will read for years, ask for the wing feathers to be indicated as block shapes rather than fine feather lines. A frequent mistake is shrinking a swallow down so small that the tail feathers lose separation after six months. Inner forearm placement has moderate blowout risk if the linework sits too shallow near the wrist joint. Expect a 30 to 60 minute session for a small swallow. Wear a short sleeve tee the day of the appointment so the artist can position the stencil with your wrist relaxed.
5. Bettie-Style Dagger, Heart, and Banner
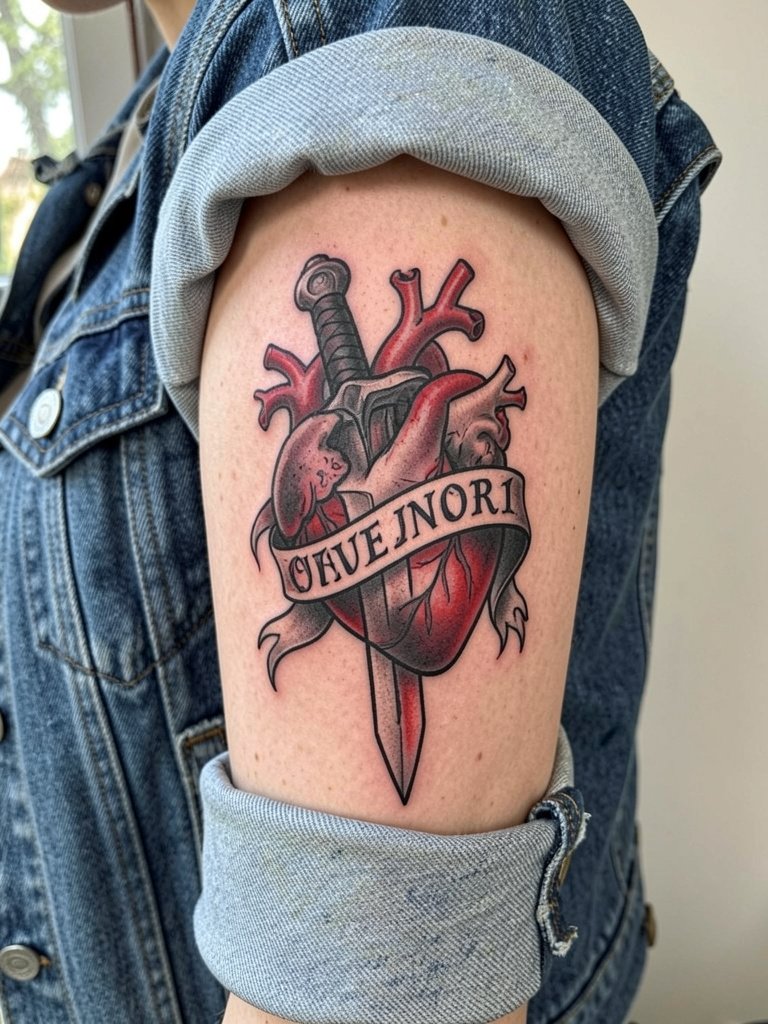
Banner pieces excel when you want personalization without overcomplicating the vintage look. Before booking, decide the exact short phrase and the letter case you want in the banner. Bring two reference fonts and ask the artist to show how each reads at the banner width. A common error is trying to squeeze dates and long phrases into a narrow banner. Outer bicep sessions tend to be a two out of ten on pain and usually one session for a medium composition. For evenings out, this style pairs well with a denim jacket worn open so the arm art stays visible.
6. National Sheet Flash Reproductions
Archive reproductions bring an antique aesthetic that collectors love, but they also spark a debate. One camp values repetition because shared motifs carry historical weight and read as authentic. Another camp worries that repeating the same dated set makes the work feel generic rather than individualized. If you pick an archival sheet, ask the artist to show how they will slightly age the palette or adjust spacing so the tattoo sits well on your anatomy. These pieces usually age well because of bold outlines, but a mistake is copying tiny period details that were meant for paper, not skin. Wear a boxy t shirt to the session so the artist can place motifs against your shoulder and arm contours.
Before You Book
The first six designs above favor bold outlines and readable silhouettes, so a few small items smooth the session and the first week of wear.
-
Stencil transfer paper kit. Lets you preview linework at different scales on your skin before the needle meets it, which helps avoid the common issue of overcrowded detail.
-
Topical tattoo numbing cream. Useful for wrist and rib placements that flare sensitivity so you can get through a longer outline pass.
-
Thin protective film roll. Keeps small hand and ankle pieces protected from friction during the first few days of intense movement.
-
Fragrance-free gentle body wash. Cleans the area without stripping inks or irritating fresh linework during showers.
-
Aquaphor healing ointment. A mainstream, widely used option for the initial thin-layer phase that keeps the skin moisturized without clogging pores.
7. American Traditional Feminine Flash
Feminine traditional flash updates old-school vocabulary while keeping linework strong. One camp sees these reinterpretations as a legitimate branch of the tradition because flash has always reflected its era. The other camp argues that heavy gendered remixes drift away from the rough-and-ready roots and can feel trend-driven. When asking for a feminine flash sheet, be explicit about saturation and contour so bright color does not overwhelm linework. A common mistake is asking for ultra-saturated pastels that migrate during touch-up windows. Thigh placement is a five out of ten on pain and typically two sessions for a larger sheet. For nights out, pair the thigh piece with bike shorts or high-slit skirts to keep it visible.
8. Black-and-Gray Flash Sheet Designs
Color versus black-and-gray divides collectors. One group argues that the classic flash palette of bold reds and greens is more authentic and makes small motifs read instantly. The other group prefers black-and-gray because it can age more gracefully and sit quieter on the body over time. If you favor black-and-gray, tell the artist which areas you want stipple shading versus smooth wash so the piece keeps its texture. A frequent error is asking for tiny gray gradients that flatten into indistinct patches after two years. Calf placement lowers blowout risk and is good for collectors building a patchwork. For showing off, cropped straight jeans let the calf read clearly, and they are an easy outfit choice for sessions.
9. Ready-to-Tattoo Flash Sheet Assortments
Ready-to-tattoo assortments are perfect if you want a quick, walk-in classic without a drawn-out custom process. When you pick a ready sheet, choose one where the motifs have consistent line weight and ask the artist to show a mock layout on your chosen placement. A mistake is stacking disparate sheet elements without considering spacing, which can make a patchwork look crowded. Small motifs on the forearm usually heal well in single short sessions and only need touch-ups if linework softens. For showing the assortment, a cropped chore jacket keeps the cluster visible while matching the vintage aesthetic.
10. Vintage Ship and Nautical Flash
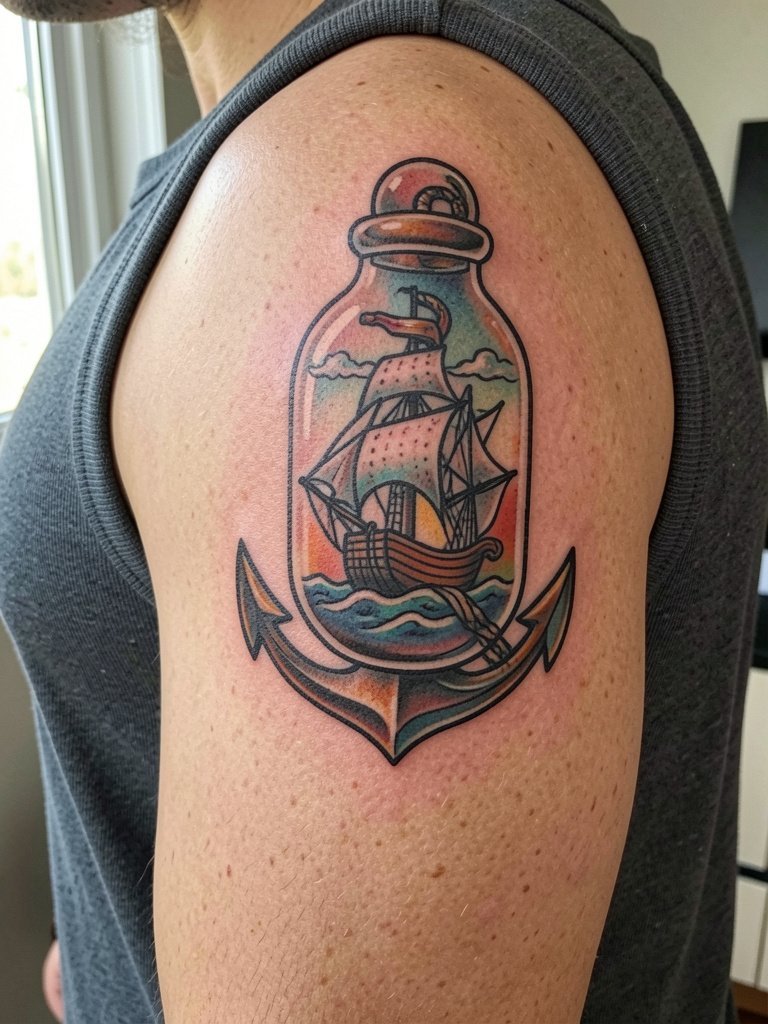
Nautical flash reads as archetypal vintage, and it works in many sizes. For a ship motif, insist on clear horizon lines and solid black mastwork so the silhouette stays readable. People sometimes request tiny rigging detail that fills in after a single season at sea. Upper arm placement suits the larger ship pieces and typically takes one to two sessions depending on scale. The session feels steady because the canvas is broad and stable. To show a nautical piece, pair it with muscle tanks that match the era feel and keep the art visible on the bicep.
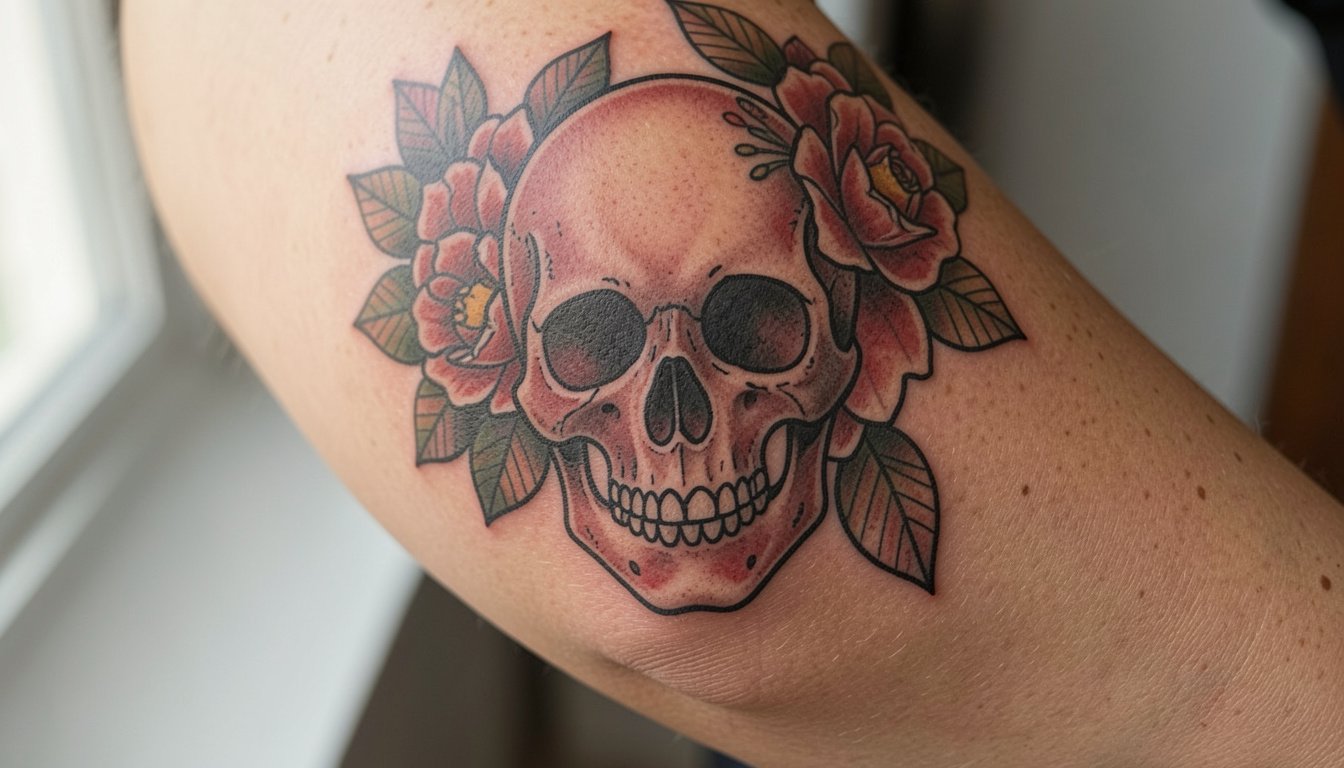
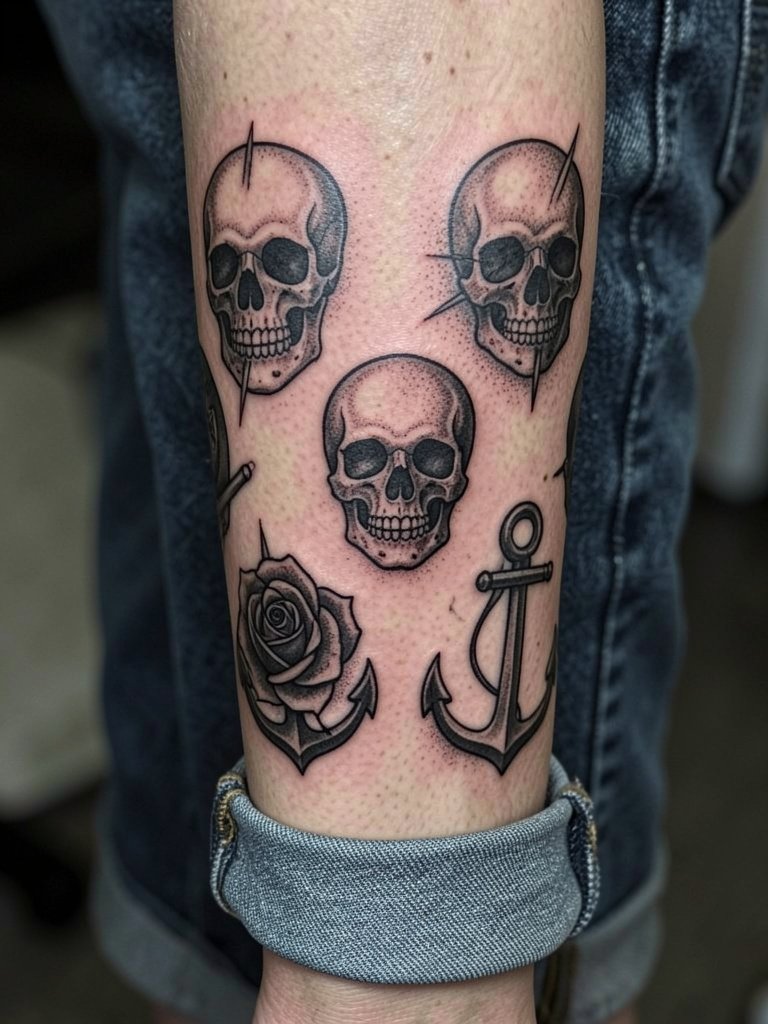
11. Skull Flash
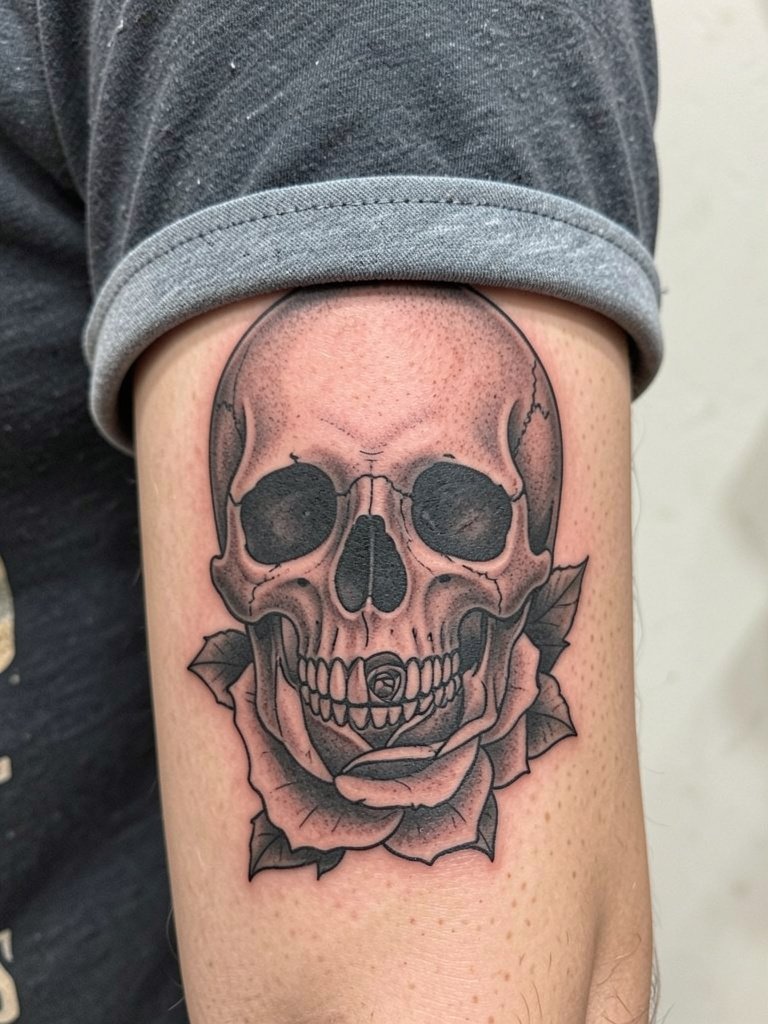
Skull motifs remain a versatile vintage choice. Decide early whether you want a playful, cartoonish skull or a more anatomical contour because that choice changes line weight and shading technique. A common mistake is asking for super fine internal teeth detail at a small scale, which tends to blur. Forearm placement offers visibility and lower touch-up frequency when outlines are bold. The session typically runs 45 to 75 minutes for a medium skull. This motif also pairs with layered short-sleeve looks, and a rolled sleeve shirt highlights the piece without covering it.
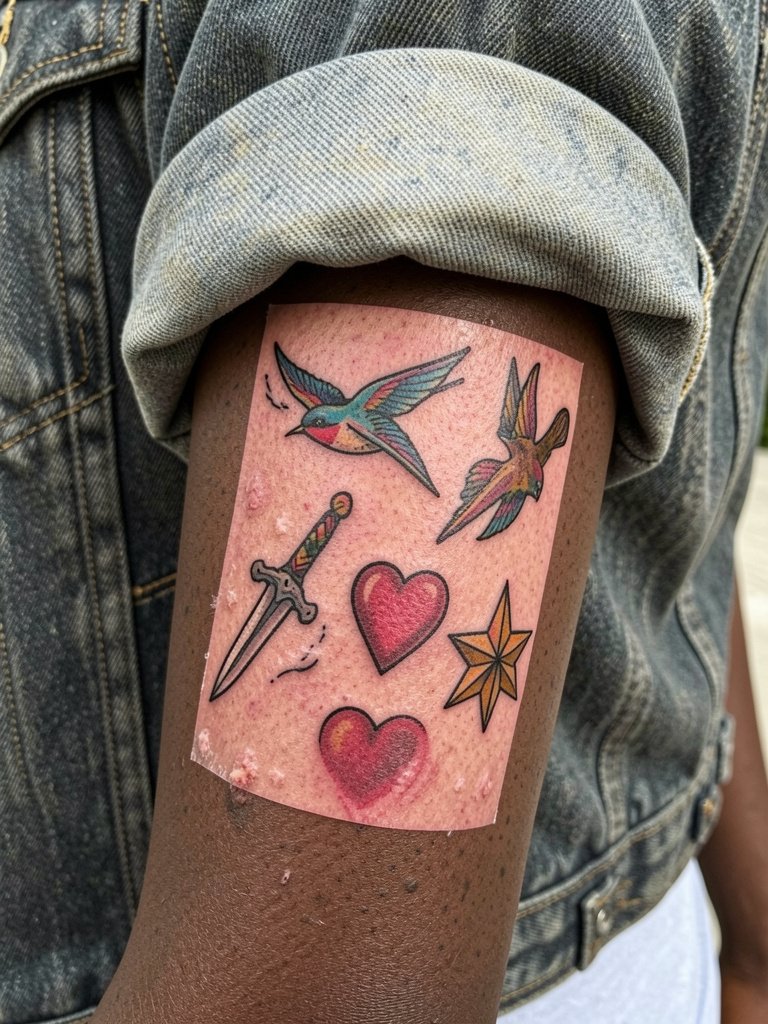
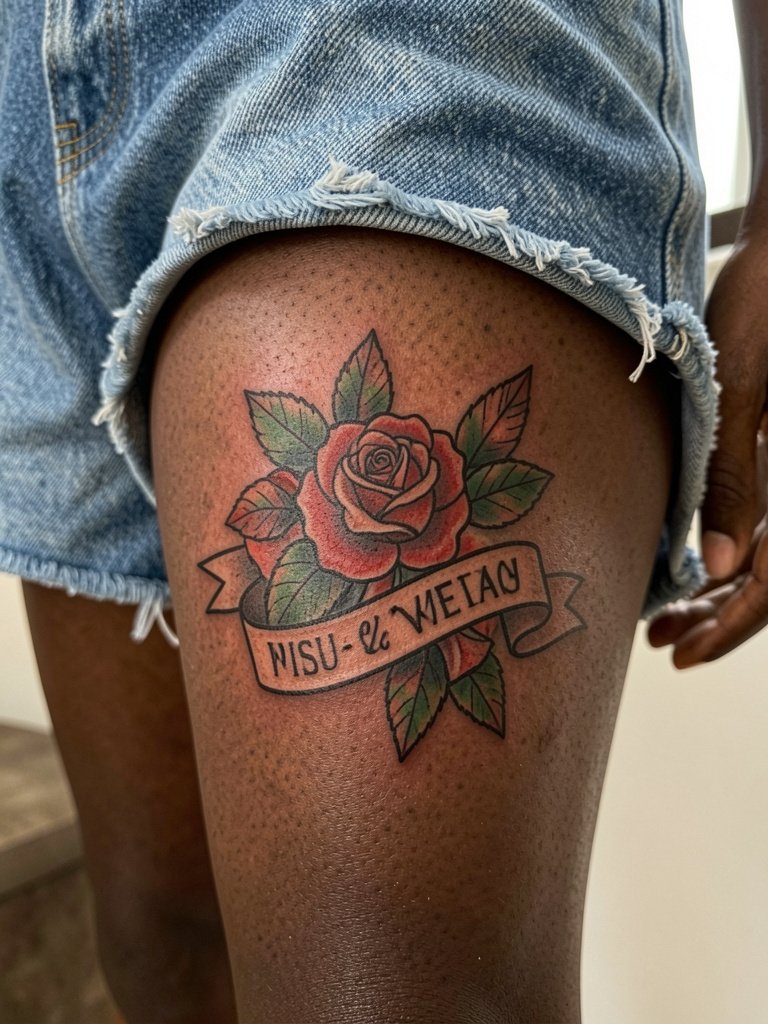
12. Flash Sheet Hearts and Banners
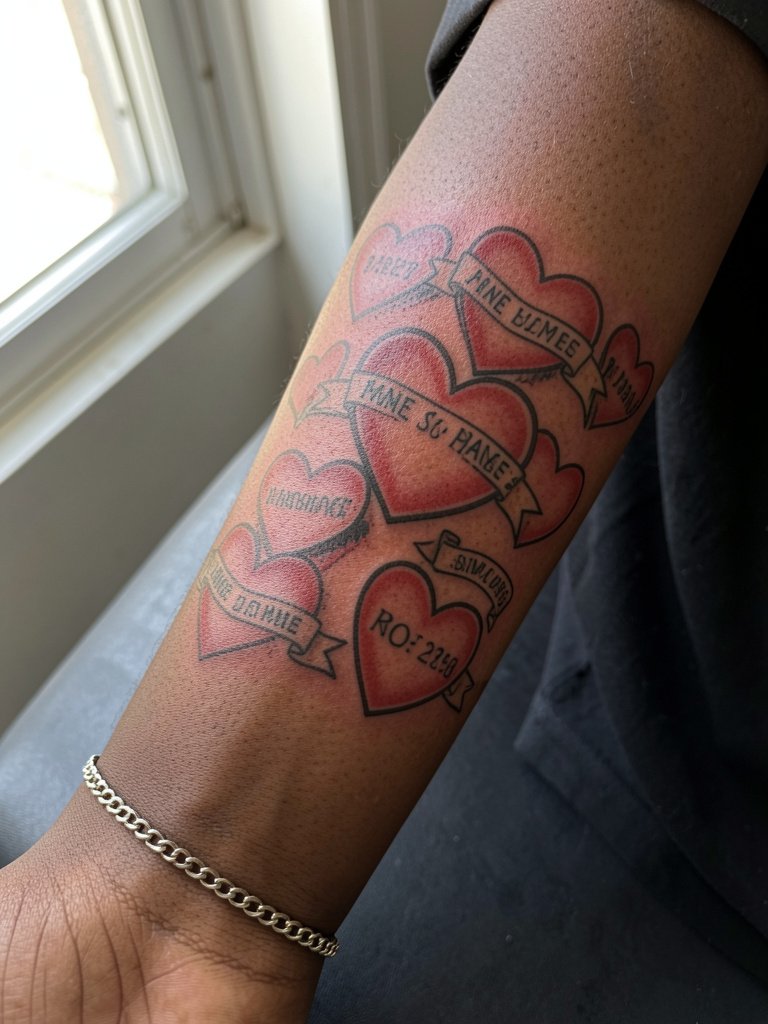
Hearts and banners are flexible but cherry-picking text too small is a frequent mistake. One camp argues that keeping banners short and bold preserves legibility and the vintage look. The other camp thinks adding names and long phrases is fine if you accept potential touch-ups. If you want lettering, bring the exact text formatted as you want it so the artist can show a scaled stencil. Wrist versions need a slightly heavier line weight to avoid loss of definition around joints. Session wear should be a short sleeve or rolled cuff so the artist gets a flat surface for the stencil. For accessories, a thin chain bracelet on the opposite wrist keeps attention balanced.
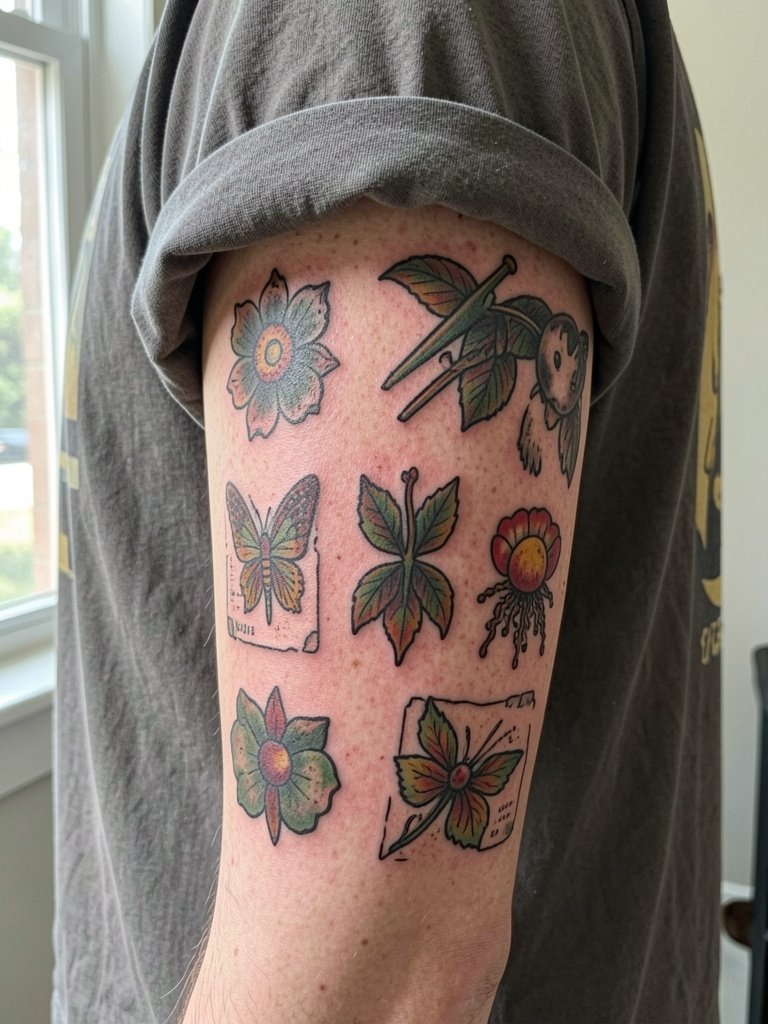
13. Archive-Style Mixed Flash Sheets
Mixed sheets let collectors build a coherent body of work, but they need a spacing strategy. When you commit to a patchwork, ask the artist how motifs will be spaced and what will serve as negative space so the set reads as curated rather than random. A mistake is starting with several similarly sized motifs that then compete for attention. Calf and lower leg placements are forgiving and reduce blowout risk for solid fills. These sessions are often spaced across multiple visits to let the skin settle between additions. For everyday wear, cuffed straight jeans frame the assembled pieces cleanly, so bring a pair to the appointment to preview the final look.
14. No-Color Linework Flash
If you want the vintage structure without color commitment, no-color linework is a smart path. For small ankle motifs, ask the artist to slightly thicken the line weight compared with the reference because ankle skin and friction from shoes can soften thin lines. A common error is insisting on ultra-fine single-needle lines at tiny scale on the ankle. Expect a 30 to 45 minute session for small black-only motifs. For footwear pairing, cropped jeans or midi skirts keep the ankle art visible and protected, and a pair of cropped jeans works well both during healing and after.
15. Sailor Jerry-Style Swash Sheets
Sheets inspired by mid-century flash masters carry a distinctive palette and bold linework. For collarbone placements, ask the artist about spacing so the highest motion area of the sternum does not compress tiny details. People often ask for tiny scripts along the collarbone and then find the letters blur after a year. A strategic choice is to increase letter size slightly and keep outlines robust. Collarbone work feels like a five to seven on the pain scale depending on proximity to bone, and session length varies with complexity. Pair the chest piece with wide-neck tops to frame the artwork and short layered necklaces for a balanced look.
16. Tiny Flash Motif Sheet for Fingers
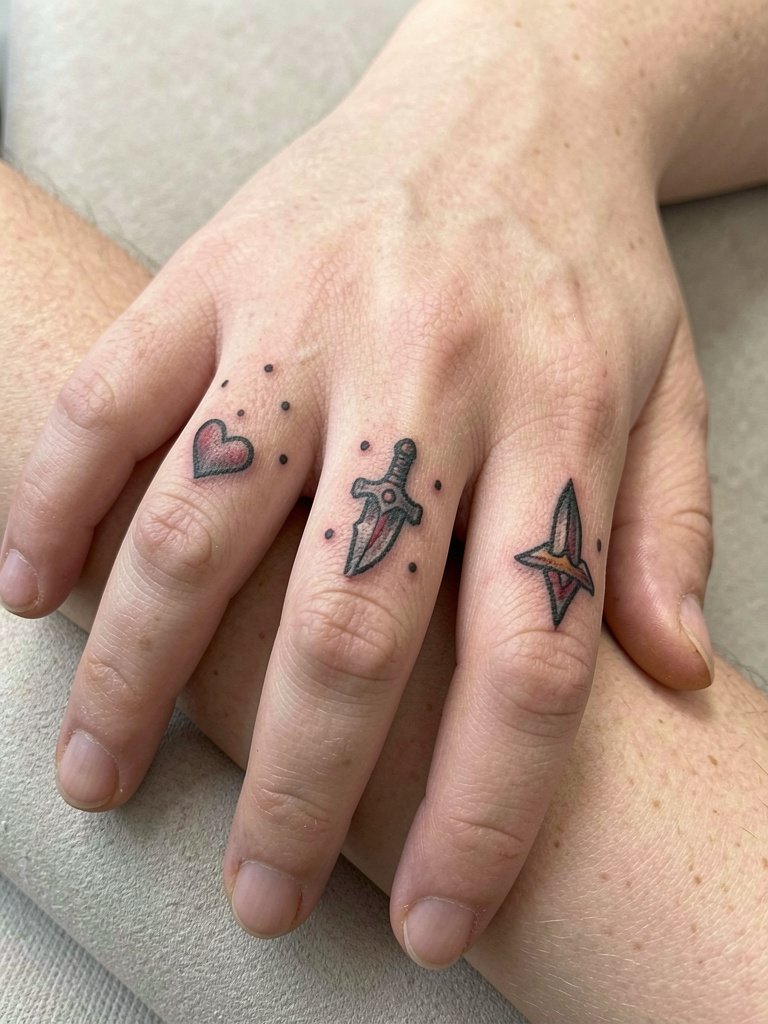
Finger tattoos from flash sheets are popular, but they have unique longevity challenges. If you choose a finger motif, ask the artist to make the outline slightly thicker than the reference to allow for routine fading. A common mistake is requesting ultra-fine detail on the finger surface where friction and handwashing are constant. Expect multiple touch-ups over the first two years for knuckle or finger placements. Session time is brief but the work requires precise stencil placement. For session wear, avoid long-sleeved garments that could rub the fresh ink and bring any rings off the target hand to give the artist unobstructed access.
17. Anchor and Wheel Nautical Cluster
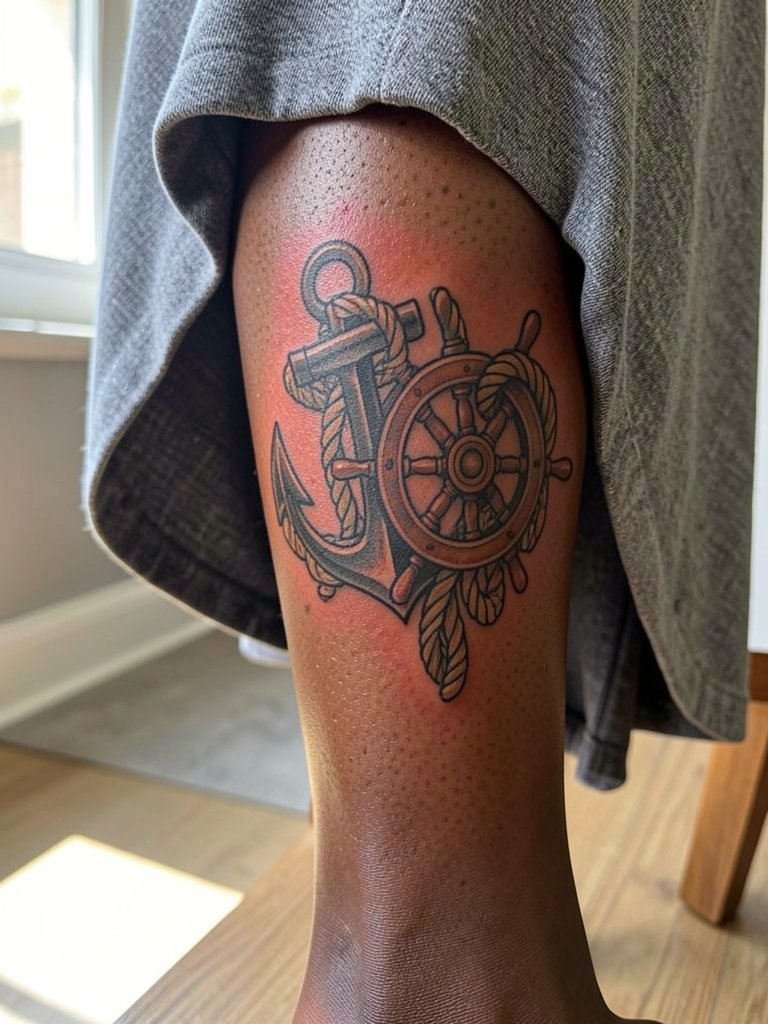
Clustered nautical elements form a narrative without becoming a single large piece. For an ankle-to-calf run, ask for consistent line weight across the cluster so individual motifs do not fight each other visually. Mistakes occur when anchors and wheels are done in different style weights. These placements usually require two shorter sessions to avoid overworking the skin. The calf is a friendlier canvas for saturation and touch-ups. Wear a long skirt or rolled jeans to preview how the cluster will show in everyday outfits.
18. Compass Rose Flash
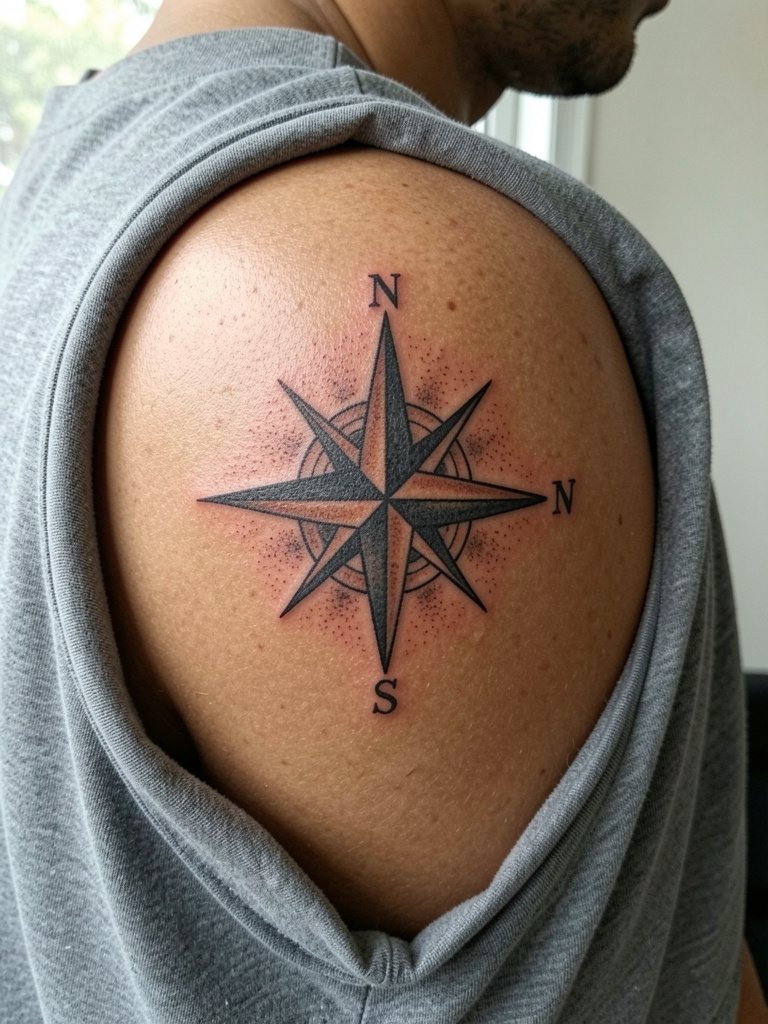
Compass roses read well as isolated motifs and tend to age cleanly when their linework is bold. When selecting scale, ask the artist to demonstrate how the cardinal points look at three inches because small tips can round out over time. A frequent error is putting a compass too small on a shoulder blade and losing the point definition after a year. Shoulder blade sessions are typically tolerable on pain and can be done in one session for medium sizes. For showing the piece, a wide-neck shirt frames the shoulder and keeps the art visible on cooler days.
19. Traditional Sparrow Pair
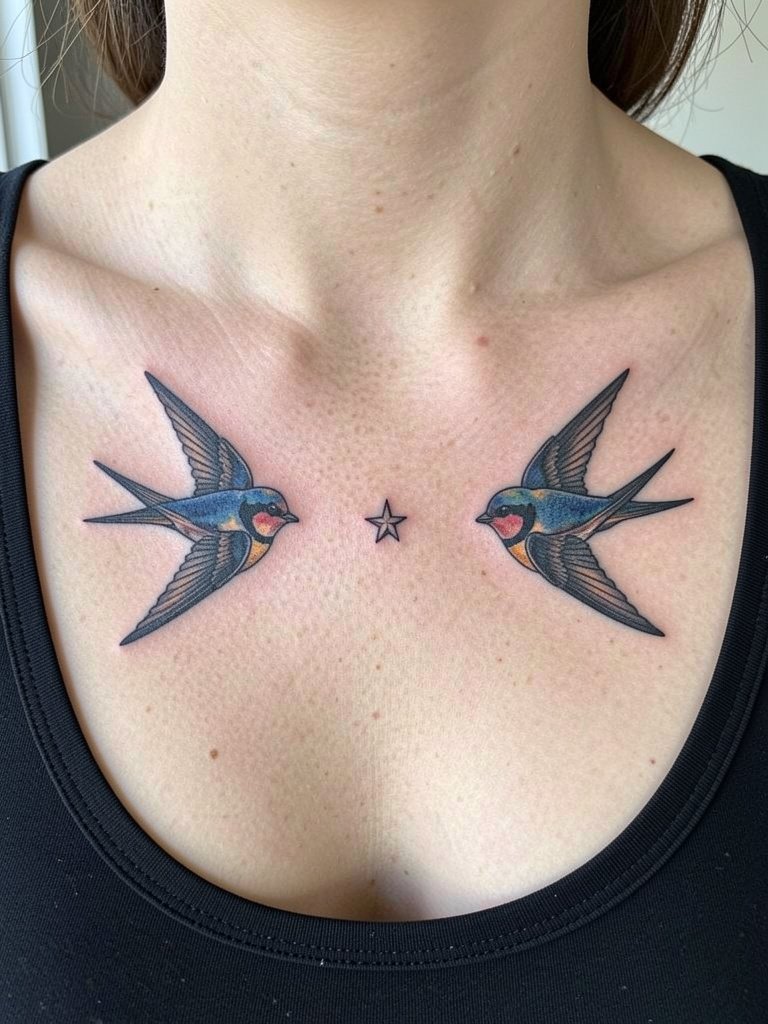
Paired sparrows make a tidy chest composition that balances well with neckline clothing. Ask the artist to size each bird so there is a margin of negative space between them and the star. A common mistake is centering both birds too close, which compresses the composition as you move. Chest placements near bone feel like a five to eight on the pain scale depending on your tolerance. Sessions are usually single visits for medium pairs. For outfits, scoop-neck tanks or wide-neck sweaters highlight the symmetry and let the pair read clearly.
20. Traditional Rose and Dagger Sleeve Filler
If you are building a sleeve from sheet motifs, think about which pieces will act as anchors and which will be filler. Tell the artist which motif you want as the visual anchor and how much negative space you want between elements. Mistakes appear when clients add too many same-sized pieces, resulting in a busy sleeve that lacks hierarchy. Upper arm sleeves take multiple sessions and may require specific touch-up timelines to keep saturation even. For session wear, bring a sleeveless top so the artist can wrap and map out the sleeve without bunching fabric. Sleeveless looks also show how the sleeve reads with clothing.
21. Anchor Mini Tattoos for Calf or Wrist
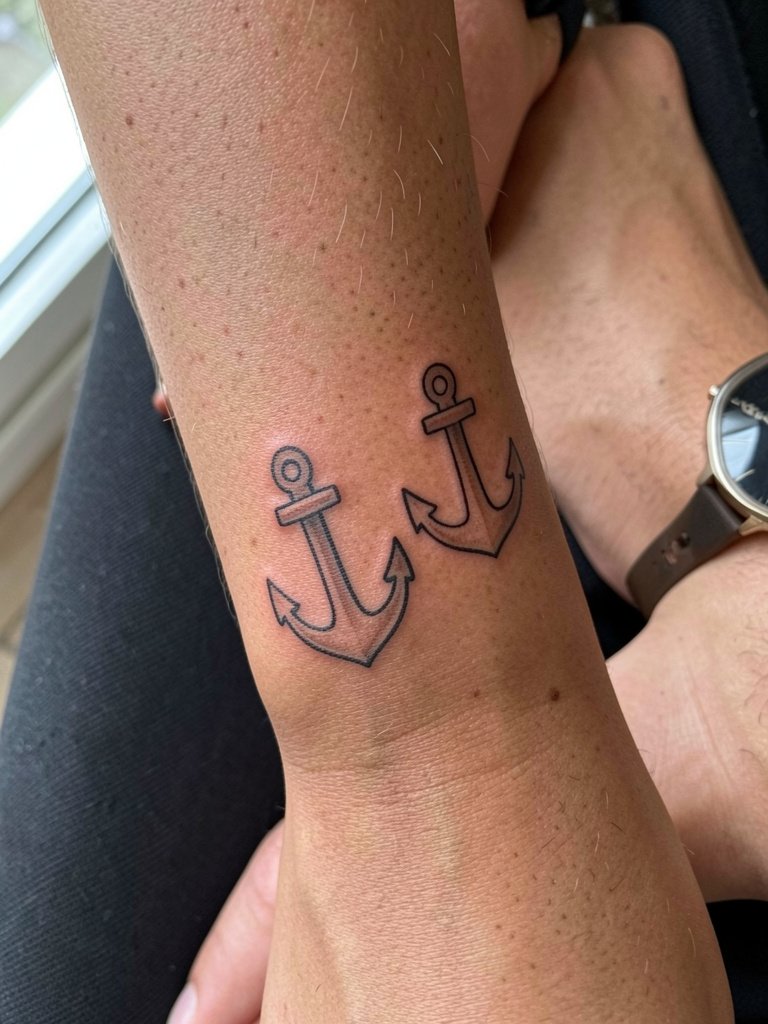
Mini anchors are versatile and low commitment. For wrists, specify slightly heavier lines and ask the artist to avoid tight curves near the joint that will blur. A mistake is expecting ultra crisp micro anchors on the wrist without accepting future touch-ups. Calf versions hold up better and may need less maintenance. Session time is short, but the wrist can be sensitive so plan brief breaks. For styling, simple accessories on the other wrist and a minimal watch help balance attention without rubbing the fresh ink.
22. Mixed Motif Patch for Thigh
Thigh patches let you go larger while keeping a vintage flash language. When planning, ask the artist to mock up how the motifs will look when seated or standing since the thigh curves change the composition. People make the mistake of losing negative space by cramming too many elements into a small thigh area. Thigh work can be more comfortable than ribs and often takes one to two sessions. Session wear is loose shorts or a skirt so the artist can access the canvas easily. For showing the piece, vintage denim shorts frame the artwork while keeping it wearable.
23. Archive-Inspired Full Sheet Collage
A full-sheet collage transferred to skin reads like a living archive when done with intentional spacing. Before you commit, get a visual mock-up that shows how motifs align with your arm contours. A common error is transferring a flat sheet layout without accounting for wrap and muscle movement. Forearm-to-bicep collages must consider long-term touch-up scheduling because adjacent fills settle differently. These projects usually require several sessions spaced across months. Wear a boxy t shirt so the artist can audition placement and you can preview how the collage sits with everyday clothing.
Frequently Asked Questions
Q: How do I choose between black-and-gray flash and full-color vintage work?
A: Black-and-gray tends to sit quieter on the body and can age with less visual contrast, especially in smaller motifs. Full-color pieces use limited saturated pigments that read strongly at a distance but may need touch-ups to keep saturation bright. Look at healed photos at multiple year marks and decide which visual weight appeals to you long term.
Q: Where can I find vintage flash sheets and healed examples online without naming specific artists?
A: Search hashtags like #traditionaltattoo, #americantraditional, and #vintagetattooflash on Instagram and TikTok, filter by location if you want local portfolios, and browse Pinterest boards and Etsy listings for sheet styles. Reddit communities focused on traditional flash are also useful for comparing healed results across skin tones and placements.
Q: What should I bring to my consultation to make a flash sheet adaptation work on my body?
A: Bring clear photos of the sheet, two reference scales for how large you want the motifs, and pictures of the exact placement area on your body in natural light. Ask the artist to show a stencil mock-up so you can see spacing and silhouette before any needlework begins.
Q: How do flash sheets fit into a coordinated patchwork collection?
A: Start with one or two anchor pieces in bold linework, then add smaller filler motifs with consistent line weight and palette to create visual rhythm. Space matters more than matching subject matter exactly. For wardrobe previews, use items like cuffed straight jeans to see how multiple pieces interact.
Q: Will a vintage flash tattoo on the ribs or sternum hurt more and what should I expect?
A: The ribs and sternum are among the higher sensitivity areas because the needle rides close to bone. Sessions there are often split into shorter passes with breaks built in. Discuss numbing timeline and session pacing so you know whether to plan one long visit or multiple shorter ones.
Q: How often do traditional flash tattoos need touch-ups?
A: Touch-up frequency depends on placement, line weight, and your day-to-day friction and sun exposure. Broadly, visible areas with strong outlines may only need minor refreshes every few years, while high-friction spots like fingers and wrists often need touch-ups within one to three years. The artist can recommend a realistic maintenance plan based on your anatomy and the sheet style.
