
The travel tattoo you actually still like when it peels and fades is rarely the most literal option. Trends push tiny planes and filigree compasses because they photograph well the day you get them. In practice the designs that age best have space, slightly heavier linework where it matters, and composition that reads at arm's length. Below are focused ideas and placement notes that help you pick something that still looks like you after a few summers and a couple of touch-ups.
1. Paper Airplane on the Wrist
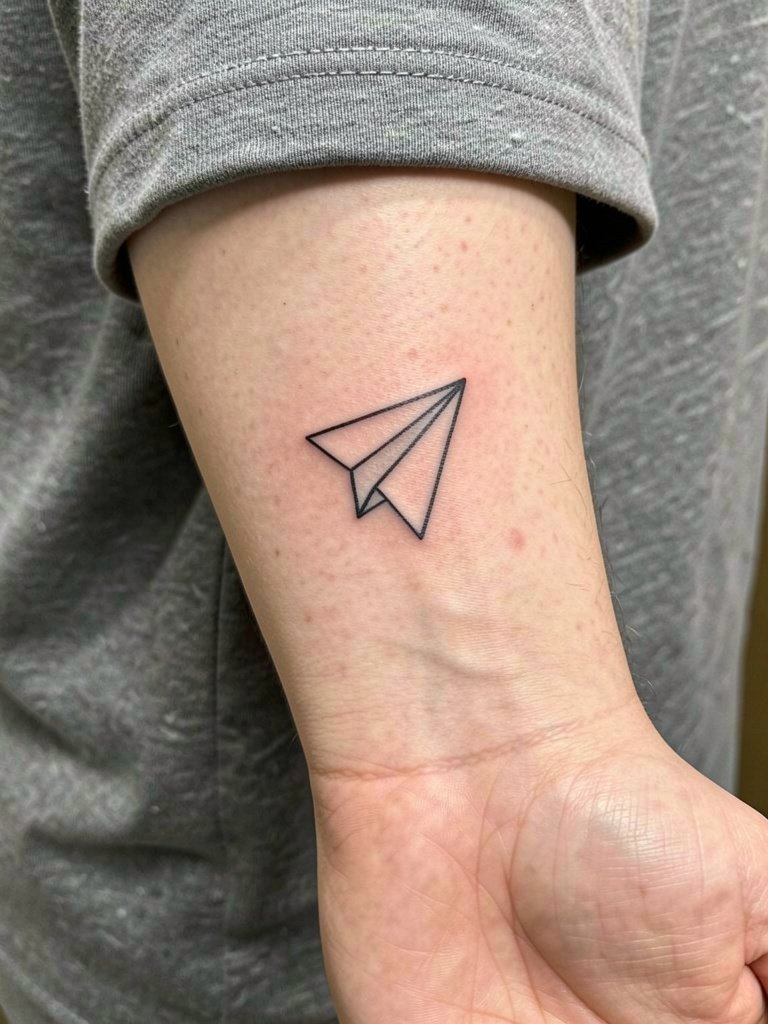
A tiny paper airplane reads as movement without being literal. Recommend slightly heavier single-needle linework than a Pinterest micro so the tail does not blur after a year. Tell your artist you want the plane drawn at a three-quarter angle and show one photo that matches the exact line weight you want. Common mistake is asking for a one-pixel fine trail, which often softens into a hairline. On the wrist this placement is a quick session and feels like light buzzing more than sustained pain. For showing it off, stack with a thin chain bracelet set so the cuff frames the plane without covering it.
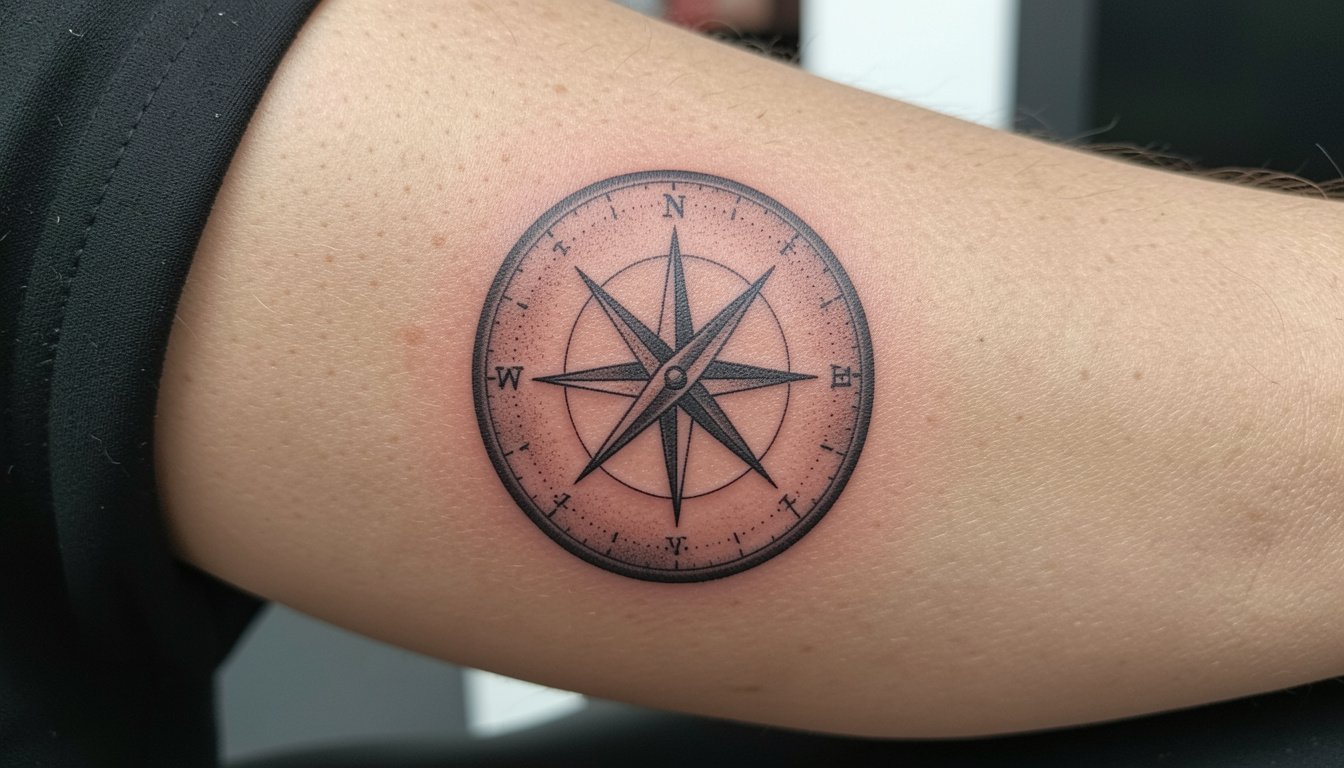
2. Small Compass on Inner Forearm
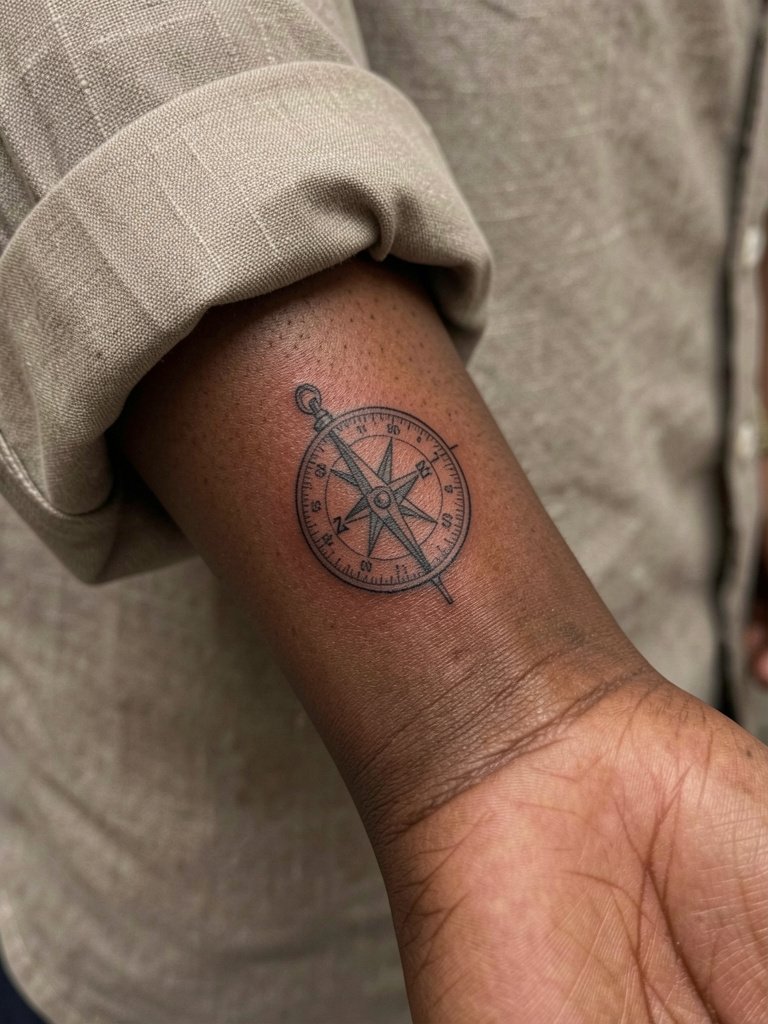
A compact compass works because the circular form keeps linework readable, yet it needs room for ticks. If you compress ticks into a tiny diameter the inner details will merge. Ask for bolder primary points and lighter secondary ticks so the main shape reads from a short distance. Inner forearm pieces age well when spaced at least two to three millimeters between lines. Expect one session and mild discomfort near the wrist joint. Roll sleeves and pair the healed tattoo with a linen button down so the neutral fabric highlights the black linework.
3. Minimal Mountain Range on Inner Forearm
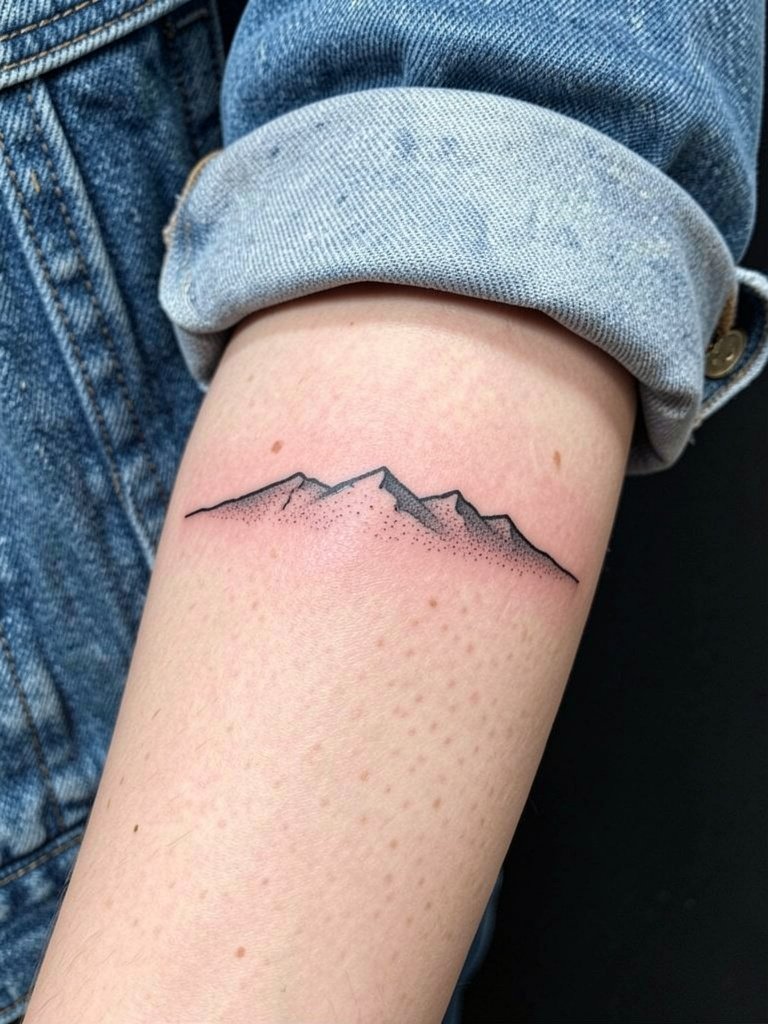
A simple mountain silhouette ages better than a tiny scenic scene because it keeps contrast. For a mountain that still reads at two years, request slightly thicker primary lines and sparse stipple shading instead of soft watercolor. The common error is cramming too many peaks into a small band, which collapses in healing. On the inner forearm the session is comfortable and the surface resists blowout, though sun exposure ahead of long hikes will fade saturation. For daytime wear, crop a jacket or roll a linen sleeve so the horizon sits against open skin. Try pairing it with a cropped denim jacket for an off-duty look.
4. Tiny Bootprint or Footprint at the Ankle
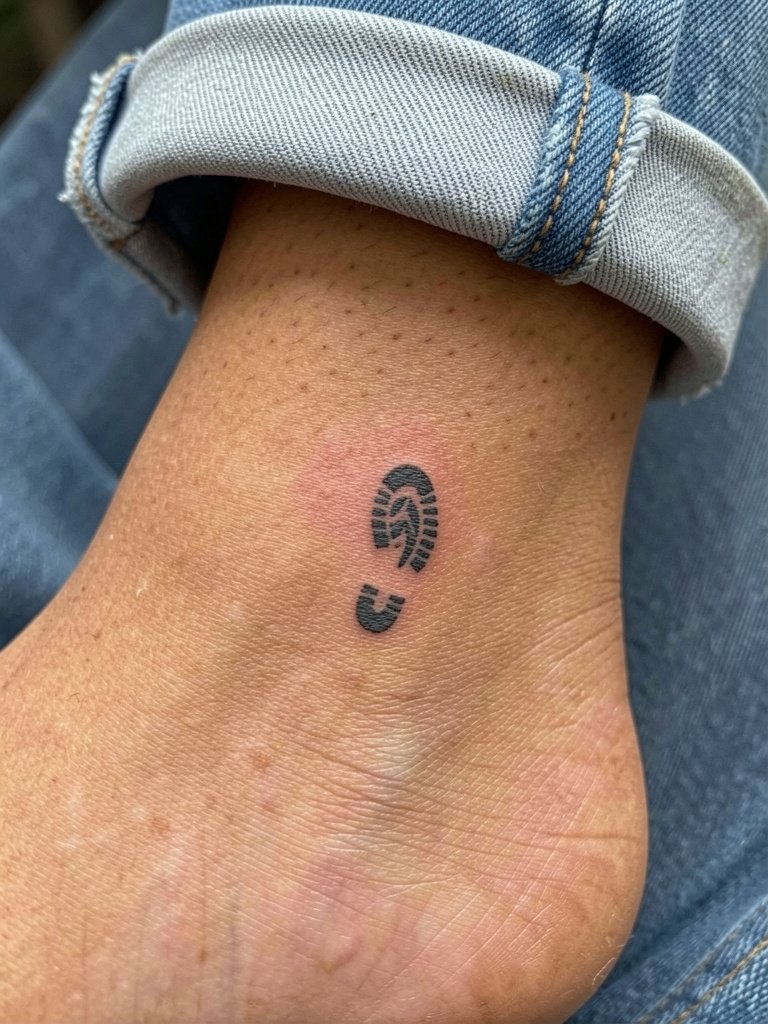
Small footprint symbols read like mileage markers but the ankle sees friction from socks and shoes. To keep the tread crisp, ask for a simplified sole pattern with strong contrast and avoid tiny interior dots. Common mistake is requesting ultra-tiny texture that disappears after a few walks. Pain is low to moderate since the ankle has less flesh. Plan for touch-ups in a year if you wear ankle-high boots often. For showing it off in warm months, pair the ankle tattoo with low top sneakers and cuffed jeans.
5. Fragmented World Map on Upper Arm

A partial world map lets you personalize which continent or route matters. For map clarity avoid tiny islands or micro-detail unless you want a larger canvas. Tell the artist which continent edges must remain legible and request a clean bold coastline with lighter internal texture. The upper arm handles medium detail well and feels like moderate buzzing rather than sharp pain. A common mistake is shrinking a detailed map to tiny scale. Match the map to a sleeve-friendly rhythm and wear it with racerback tanks to highlight the placement.
6. Anchor with Minimal Rope on Calf

Anchors carry both sea travel and home-base connotations. For longevity choose solid black outlines and moderate saturation rather than tiny decorative knots. A common misstep is over-detailing the rope in a small piece, which becomes muddied when healed. Calf placement tolerates denser shading and holds saturation well. The session takes longer than a wrist mark and feels like steady buzzing for the area. Pair with midi skirts or cuffed shorts so the anchor reads against clean skin when you want to show it.
Session Essentials
You just read wrist, forearm, and calf pieces that have different healing needs, so a small kit that covers protection and light moisturization helps the early window.
-
Tattoo Goo. A lighter balm option that some people prefer in the first week when heavier petroleum products feel too occlusive.
-
After Inked Moisturizer. Thin, non-greasy lotion that keeps fine line saturation consistent during the second and third week.
-
Bepanthen Cream. A go-to in travel situations because it travels well and many travelers report reliable results abroad.
-
H2Ocean Saline Spray. Useful for on-the-go cleansing when you are moving between trains and hostels.
-
Saniderm Tattoo Bandage. Protective film that some shops use for the first 24 to 72 hours on wrist and ankle work to reduce friction from clothing.
7. Airplane Silhouette Behind the Ear

Behind-the-ear silhouettes are discreet and photograph well. The space is tiny so specify exact scale and ask for bolder contouring rather than featherweight single-needle trails. A common mistake is requesting too many interior details. This spot is fairly sensitive and sessions are brief but sharp. Healed photos usually show soft edges, so plan a touch-up window at 6 to 12 months. For nights out keep hair up or wear a layered chain necklace to balance the neck area.
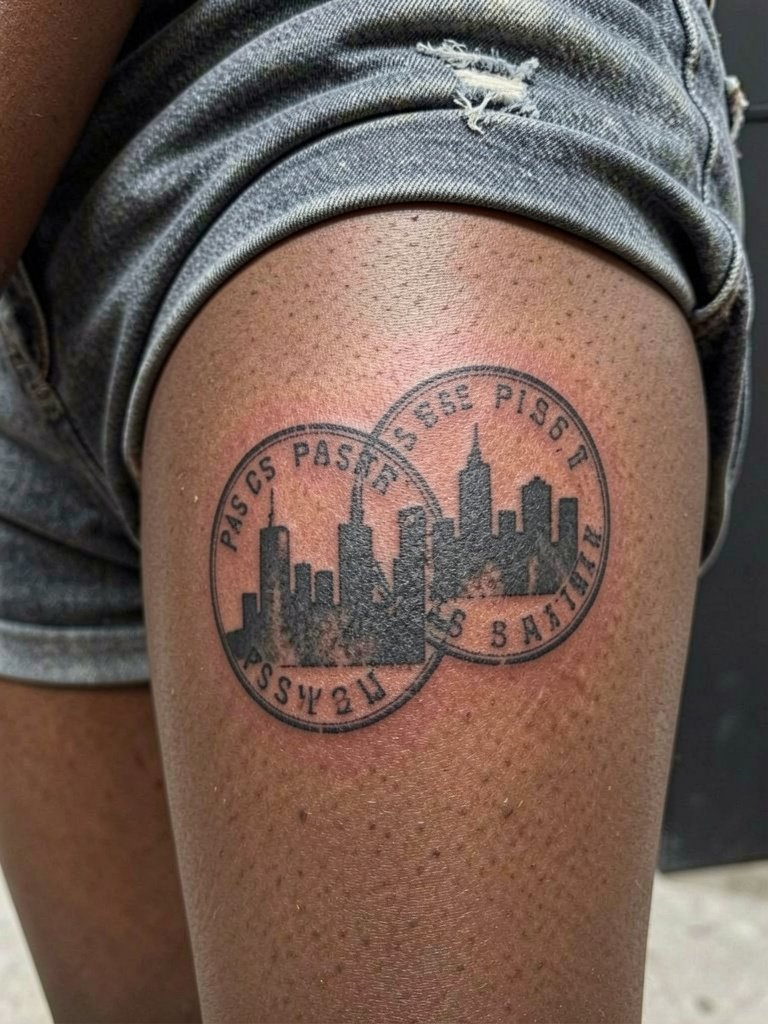
8. Passport-Stamp Patch on the Thigh

Passport-stamp pieces let you anchor a specific trip without relying on clip art. Ask the artist to age the stamp intentionally in black and gray so it reads as a worn imprint. One camp prefers crisp, new-stamp aesthetics. Another camp likes the distressed look because it reads as lived-in. The first group values sharp edges for immediate recognition. The second group says weathered texture makes the piece feel like an actual keepsake. Outer thigh sessions are lower on the pain scale but require a relaxed appointment for privacy. When healed, show it off with high-waist shorts and a flowy summer skirt.
9. Sunrise Silhouette on the Ribcage
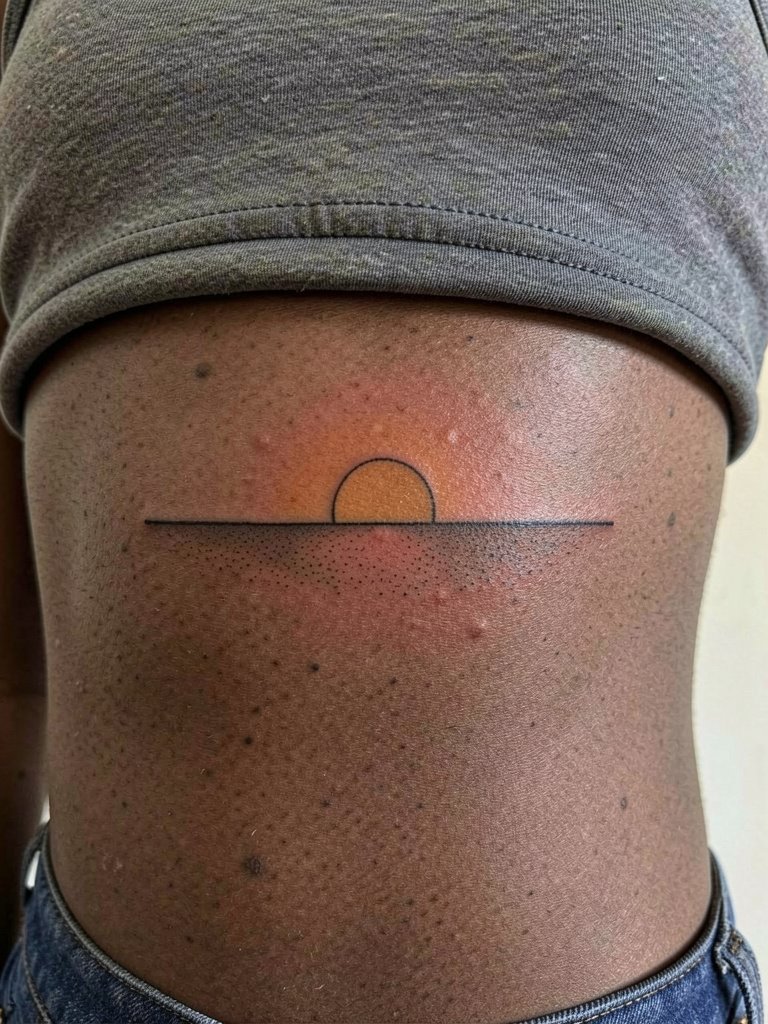
Sunrise scenes can be emotional, but the ribcage is a high-motion area. Artists split into two camps on fine line here. One camp warns that the skin moves and stretches enough that ultra-fine lines blur within two years. The other camp argues that with slightly wider spacing and correct needle depth fine line can still settle well on ribs. If you want color, plan for touch-ups later because saturation fades faster on the torso. Sessions on the ribcage are often the most intense for first-timers, so plan breaks and a numbing timeline if that helps you manage the discomfort.
10. Globe in Micro-Realism on Bicep
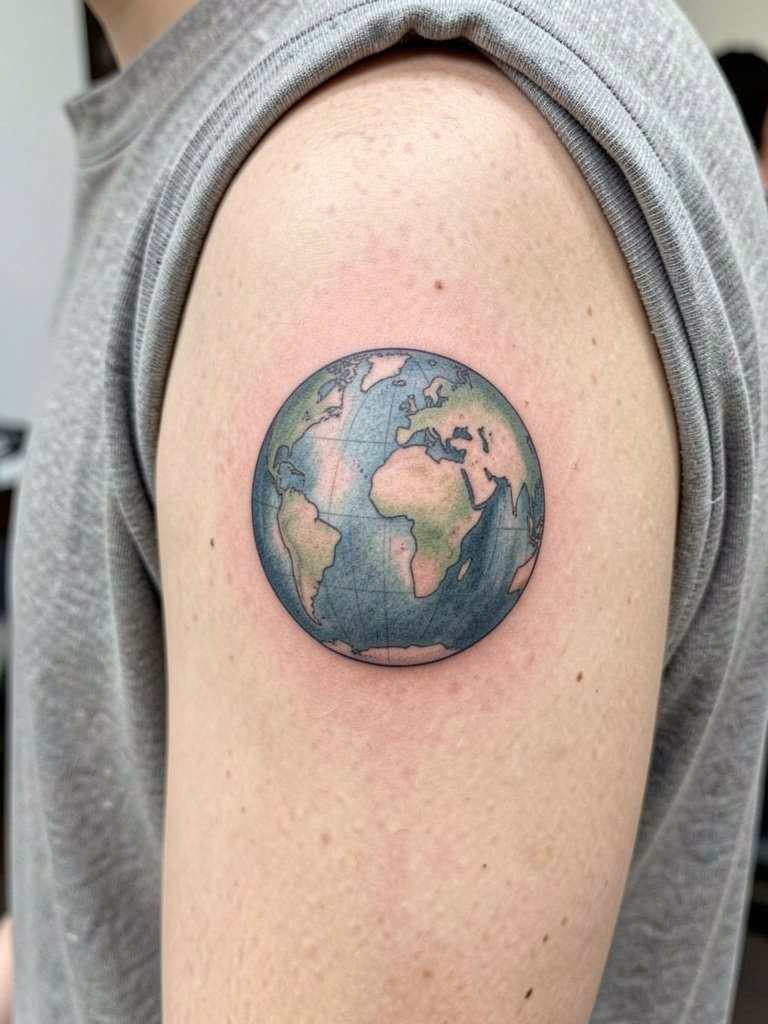
Globes can look literal or artful depending on detail. For this small bicep version, request reduced internal detail and stronger outline so the continents read from a few feet away. A common error is cramming too many coastlines into a tiny diameter. The outer bicep tolerates more saturation than wrist work so the globe stays crisp longer. Session length is moderate and discomfort is low. Pair this with sleeveless tees or a boxy tee to let the round form sit against bare skin.
11. Cactus Linework on Calf
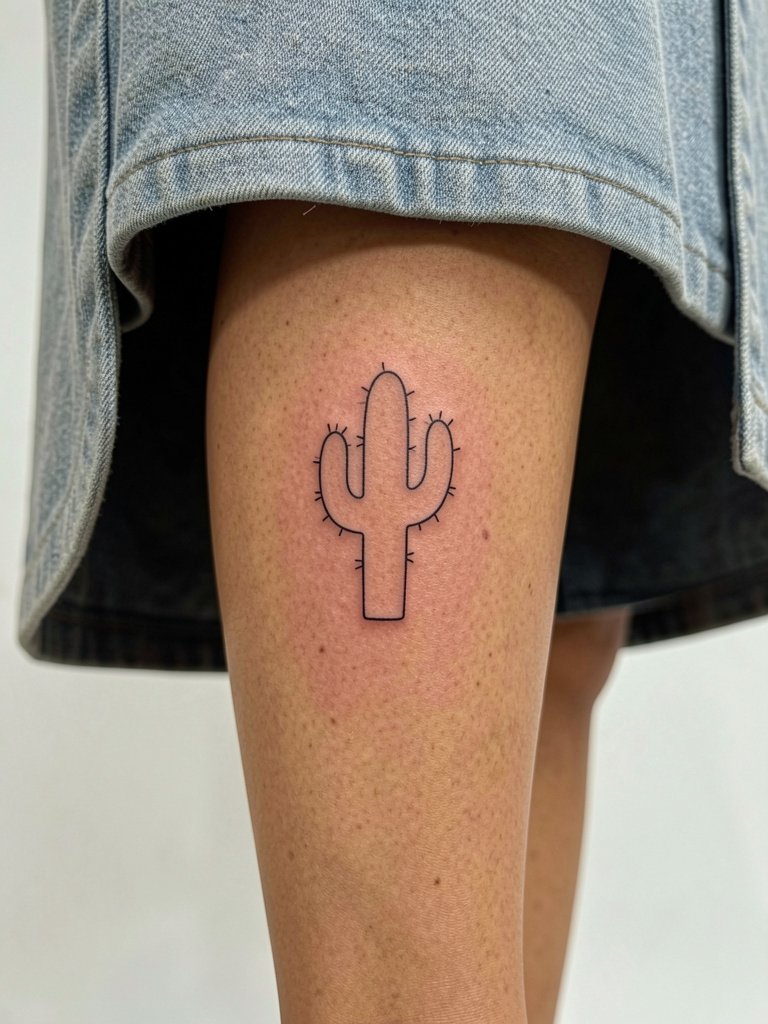
Desert motifs like a cactus read as resilience and road-trip memory. Keep the silhouette bold and the spines minimal so the design stays legible during healing. A common mistake is forcing dot-work spines into a tiny cactus which then blends into texture. The calf gives room to breathe and the session feels steady. Plan a touch-up if you spend time sunbathing without sunscreen since UV affects contrast. For styling try midi skirts that expose the calf and frame the plant.
12. Coordinates Script on Collarbone
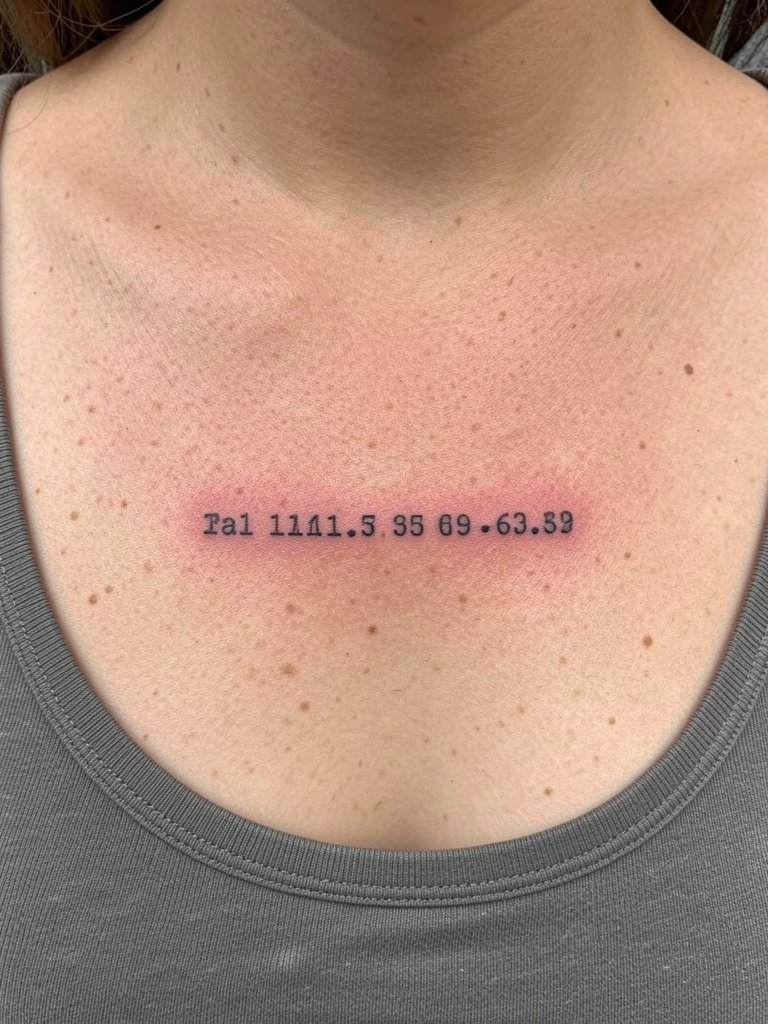
Coordinates feel private but specific. Choose a clear monospace or typewriter font so numbers stay legible rather than a tiny script that softens. One camp values ultra-fine single-needle coordinates as elegant. The other camp recommends moderately thicker numerals so each digit remains distinct after a few years. The collarbone area is visible and can be sensitive when the skin is thin. For session comfort wear an adjustable strap top so the artist has full access. Pair the healed piece with a scoop neck top and a short delicate chain.
13. Ocean Wave on Inner Forearm

Wave motifs are compact and symbolic of ocean travel. For longevity on the inner forearm request black anchors for the main curve and a thin blue accent rather than full watercolor fills. Mistakes happen when people insist on soft color blends at tiny sizes. Forearm placement is low pain and shows well. Expect one session and minimal downtime. Pair the wave with rolled linen sleeves and a neutral overshirt to keep contrast against the skin.
14. Airline Route Linework on Shoulder
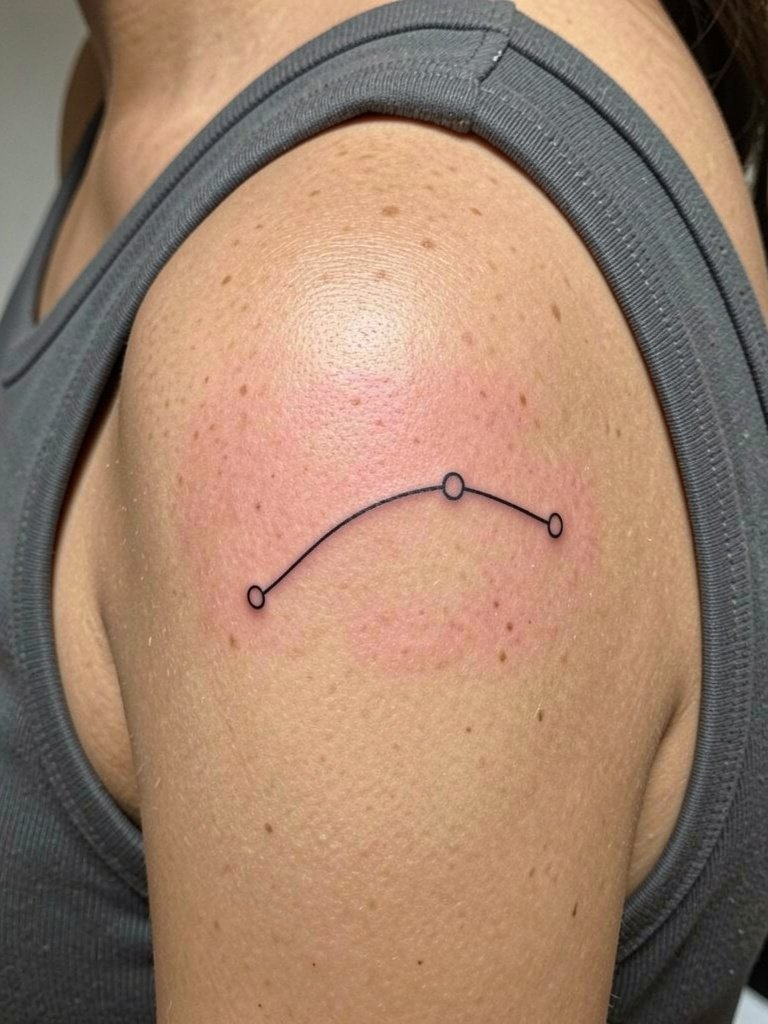
Route-line tattoos encode actual travel history and read as design rather than symbol. Keep node dots slightly oversized and the connecting line simple so the layout survives healing. Common mistake is routing the line directly over a joint where motion will blur it. Shoulder caps are forgiving and let lines sit smoothly with the contour. Session feels like steady work and the placement tolerates a longer sitting for layout adjustments. Show it with tank tops or strappy dresses and consider an off shoulder top to highlight the sweep.
15. Script Travel Quote on Ribcage

Script on the ribs carries emotion but ages with movement. If you choose a script, pick a font with slightly heavier downstrokes so letters do not fill in over time. One common mistake is requesting a very tight script that loses counters between letters. Pain is higher on the ribs, so plan for breaks. Healed photos often show softened edges, and a touch-up at 6 to 12 months is common for text. Wear a loose top to the appointment so the artist can access the side comfortably.
16. Tiny Globe with Compass Rose on Ankle
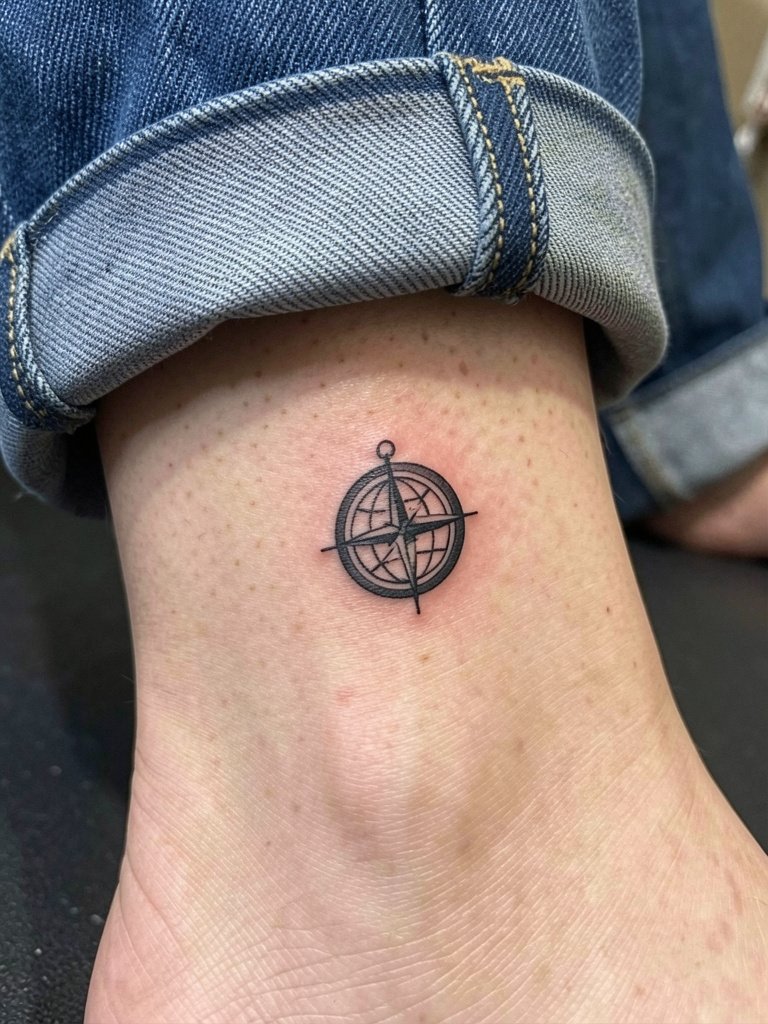
Combining globe and compass compresses travel iconography into a compact badge. For durability make the compass points the primary readable element and keep internal globe lines simplified. Ankle skin sees friction so protect the area with covered shoes while it heals. Sessions are short and mildly uncomfortable. Expect more fading than on the arm and plan a touch-up if you wear low sneakers daily. Pair with anklet jewelry or anklet bracelets when you want to draw attention.
17. Desert Scene on Upper Arm

Desert landscapes read best when pictorial detail is minimal and contrast is clear. Request defined silhouettes and restrained color accents so the piece ages like an emblem rather than a postcard. Upper arm placement tolerates medium detail and holds saturation, which helps color survive sun exposure. Sessions are moderate in length and discomfort is average. For outfit pairing try cuffed denim shorts or cuffed denim shorts that stop just above the design.
18. Route Dots Along the Spine Lower Back

A vertical route down the lower back can map moves between cities, but spacing matters. Ask for node spacing that gives each dot visual room so they do not blur into a dashed band. Lower back skin handles moderate linework but moves with posture. Sessions are longer and you will need to lie face down for a stretch. Common mistake is compressing nodes too tightly. After healing show it with low-rise jeans and a cropped top so the sequence lines up with clothing.
19. Micro-Realistic Compass on Upper Chest

Micro-realism relies on contrast, so bold rim lines with softer internal shading work best. Avoid tiny textual details that need high resolution. Upper chest pieces are visible and sometimes sting due to thinner skin. Ask for healed portfolio examples at that placement so you can see realistic aging. Mistakes include requesting micro text inside the compass that becomes unreadable. For styling layer fine chains or wear scoop-neck tops to frame the piece.
20. Watercolor Sunset on Thigh

Color adds mood but asks for maintenance. Watercolor on the thigh looks gorgeous when given a canvas area that lets pigments sit without crowding. A common error is packing too many hues into a narrow space. Thigh skin accepts saturation and is relatively low friction for healing. Sessions are longer and less painful than ribs. If you travel often and spend time in sun, plan for a sunscreen after the tattoo fully heals. For showing it, try high-waist shorts or swim cover ups that reveal just the right band.
21. Tiny Route Line on Lateral Hip Bone

Hip-area pieces are intimate and flattering, but they sit near moving fabric. Ask for a compact design and request the artist avoid placing the line directly under a waistband seam. Common mistake is putting the line where daily friction will cause accelerated fading. The session is low to moderate pain but requires a calm setting. Once healed you can style it with high-waisted jeans or side-slit skirts that let the design peek out.
22. Vintage Postcard Frame on Calf

Postcard-style patches work well at medium scale on the calf. Ask for a weathered border rather than intricate micro-stamps inside so the main motif does not vanish with time. A common oversight is cramming tiny lettering into the frame. Calf work tolerates richer shading and shows well with simple shoes. Sessions are steady in length and tolerable. Pair the finished work with crew socks and casual shoes for an outfit that frames the postcard.
23. Simple Nautical Wave on Ankle
Ankle and top-of-foot waves are delicate but face constant wear. Ask for a bold primary curve with minimal interior details to keep the shape readable. The common mistake is soft shading at a tiny scale. Pain varies with foot sensitivity and healing can be slower due to shoes. Plan to avoid closed shoes for a few days if possible. For styling choose shoes and hems that allow the wave to peek out.
24. Stacked Passport Stamps on Thigh
Layering stamps creates a scrapbook effect and avoids a single literal icon. Ask for differing ring thicknesses so each stamp remains legible and request the artist map how the overlaps read when healed. A mistake is aligning circles so closely that the borders bleed together. Thigh skin is forgiving and sessions are comfortable. Show it with high-waist shorts or skirts for an intentional peek and consider an high waisted jean silhouette to frame the area.
25. Horizon Line with Tiny Boat on Upper Arm

Small boat-on-horizon designs read as motion without fuss. To ensure longevity request a clear separation between the boat silhouette and the horizon line so they do not merge during healing. The common mistake is placing the boat too close to the line. Outer upper arm placement is forgiving and holds contrast. Sessions are moderate. Pair the healed design with a sleeveless shirt to keep the horizon visible.
26. Compass Rose on Upper Chest Near Sternum
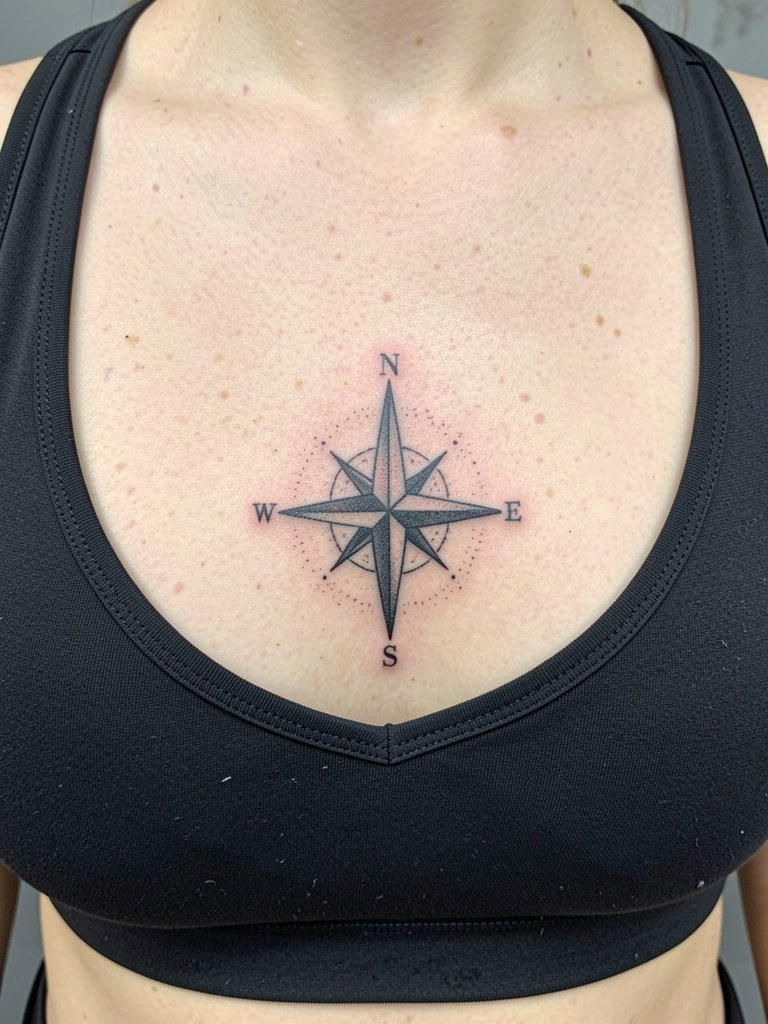
Sternum and upper chest placements demand careful spacing because the skin is thin and moves with breathing. Request slightly wider spacing between points than the smallest reference you like. A common mistake is using a reference scaled for the outer arm and shrinking it into the chest, which loses negative space. Sessions can be intense and require breaks. For aftercare keep the area out of direct sun once healed.
27. Airline Route Wrapped as Bracelet on Wrist

A route-as-bracelet makes travel history wearable in a subtle loop. For durability have the artist map the wrap so nodes fall on flat skin rather than the wrist crease. The common error is placing the line over high-motion creases which softens detail. Wrist wraps are quick sessions with low to moderate discomfort. Pair the finished piece with a minimalist watch or thin bracelets that do not press into the healed ink.
Frequently Asked Questions
Q: How do I find healed portfolio photos for these travel tattoo styles?
A: Search hashtags and location tags on social platforms for phrases like #finelinetattoo, #coordinatestattoo, and #blackworktattoo, then add your city name to find local healed shots. Reddit threads dedicated to tattoo advice are also useful for seeing time-lapse healing photos. Try searching for the exact placement plus the style term when you want to compare how a wrist piece looks at one year versus five.
Q: Which travel designs need bolder linework to age well?
A: Tiny scripts and micro-detail maps benefit from slightly stronger primary lines so counters and small shapes do not fill in over time. For tiny symbols ask for bolder main contours and reduced interior texture. If the piece has color plan for a touch-up schedule because saturation fades faster than black ink.
Q: What should I wear to a session for different placements?
A: Wear clothing that exposes the area without tugging. For inner forearm choose a loose button-down or rolled sleeve. For ribs bring a sports bra or a loose top to lift safely. For hip or upper thigh wear low-rise jeans or modest shorts to expose the zone without fabric pulling. Bringing an extra top you can remove quickly speeds the setup.
Q: Are there major disagreements about fine line travel tattoos?
A: Yes, artists and enthusiasts split into two clear camps about fine line durability on travel designs. One group believes the ultra-delicate single-needle look is the point and prefers small, elegant marks even if they need later touch-ups. The other group argues for slightly heavier linework so symbols stay legible after sun exposure and normal wear. Both positions are common in discussions about travel tattoos, so ask to see healed examples from the artist at your chosen placement.
Q: How often should I expect to touch up a wrist or ankle travel tattoo?
A: Expect that wrists and ankles may need touch-ups sooner than upper arm or calf placements, often within one to three years depending on sun exposure and friction. Plan touch-ups as part of the ownership cycle rather than a sign of poor work, and budget time if you travel frequently and expose the piece to sun or abrasion.
