

Someone I know spent months narrowing down a design only to realize the real problem was placement, not art. Would it hold up on a wrist, look muddy on darker skin, or read as a realistic portrait after a week of summer festivals? I talked with artists at three shops across Brooklyn and scanned convention portfolios to pick styles that read like real ink but work as temporary options. Try these 20 realistic temporary tattoos to see which one fits your life and timeline.
1. Fine Line Arrow on Inner Forearm
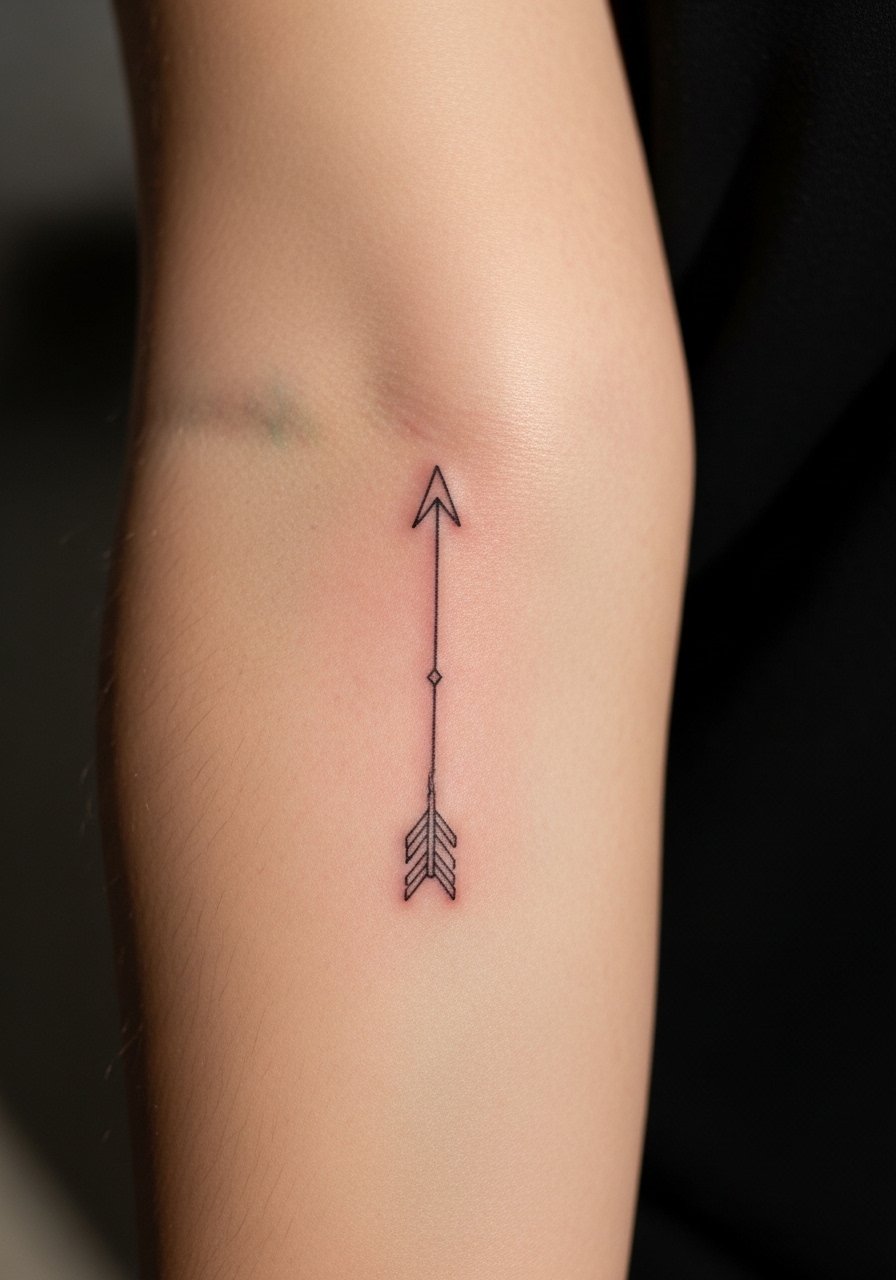
Someone I know first saw this on a friend's forearm and could not stop staring at how crisp the linework read. Fine line on the inner forearm is low on pain and quick to apply, usually a single short session that lasts under an hour. It suits someone who wants subtle realism without bold saturation. The common mistake is going too small. Lines need room or they blur at six to twelve months. If you want it to hold as a temporary, ask for slightly bolder lineweight than a permanent fine-line and plan a touch-up sooner. Expect mild fading in daily sun exposure.
2. Micro-Realism Wolf Head on the Bicep

Visual impact lead works here because the bicep has space for detail. This placement is medium pain and takes one to two short sessions, depending on size. Micro-realism reads best when you ask your supplier for high-contrast shading and defined edges, not overly feathered gradients. One camp says true micro-realism needs dense saturation to last. The other camp warns that too much saturation on a temporary print can look cake-like. If you want longevity, choose a slightly larger scale and accept touch-ups at the one to two month mark for the crispest look.
3. Botanical Wrist Band in Stipple Shading

The wrist is an intimate placement and can be higher pain for some. Stipple shading looks realistic because the dot work mimics skin texture rather than flat fills. Best for people who garden or work with their hands and want something that reads handcrafted. A common mistake is over-cluttering the band with tiny leaves. For a temporary, scale up the dots and keep negative space so the design ages cleanly. Ask for reference photos that show stipple at various distances, and plan to replace or reapply after heavy washing or sunscreen use.
4. Micro-Portrait Patch on Upper Back

There is a debate about micro-portraits for temporary use. One camp says they offer the most convincing realism for events. The other camp argues that portraits need perfect placement and will look off if stretched or misaligned. Upper back placement is lower pain and gives a flat canvas. Tell the artist or vendor to preserve contrast in the eyes and jawline, not just midtones. Expect the edges to soften after a week or two. If the portrait carries a name or personal meaning, consider sizing it slightly larger than you think you need.
5. Geometric Mandala on Sternum
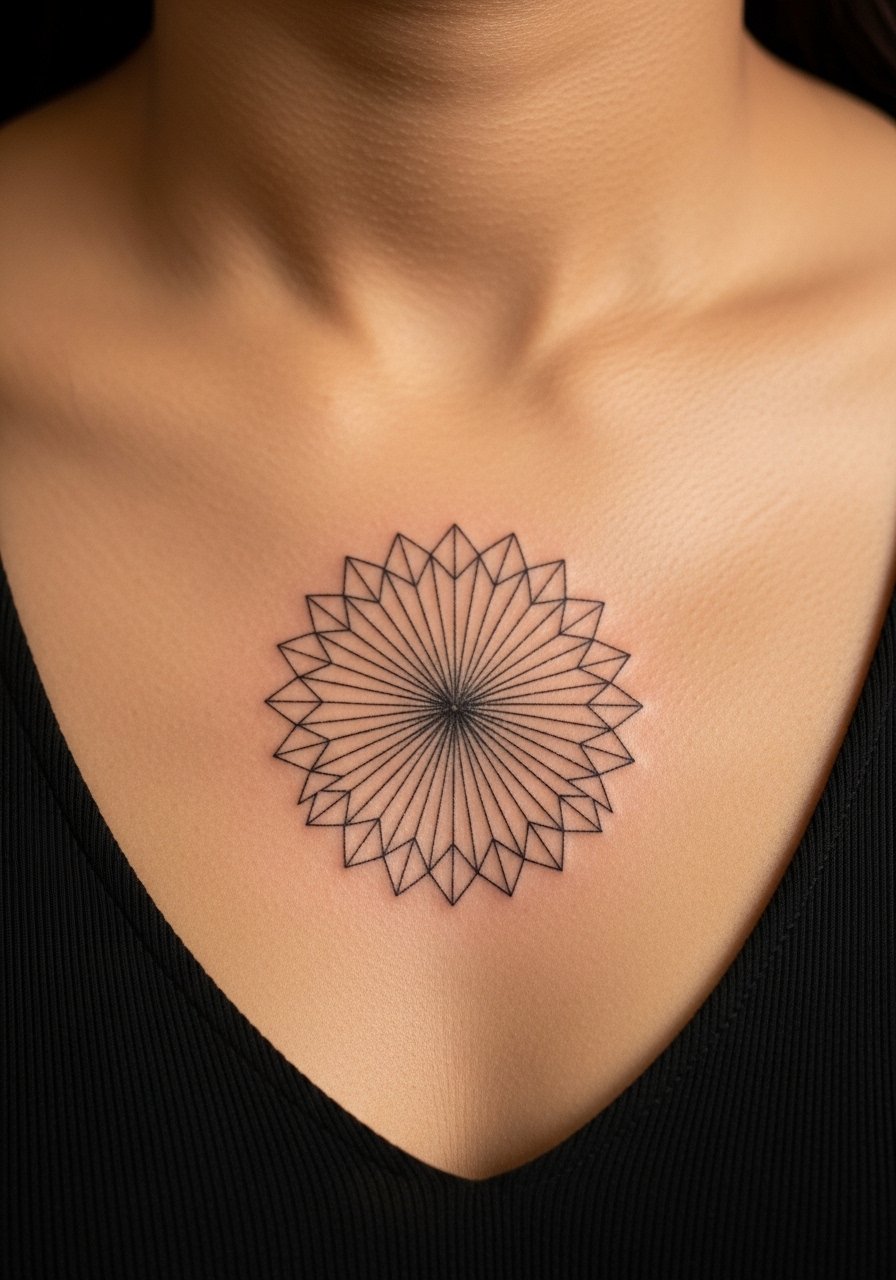
Fair warning: sternum placement rates higher on pain and needs careful positioning. Geometric mandalas read as realistic when every radial line has even spacing. Artists split on whether tiny radial details hold on the sternum. One side says skin movement blurs lines within months. The other side says if the spacing is generous, it settles well. For a temporary, ask for slightly thicker ring lines and avoid overly intricate fill. If culture ties are present, note the pattern origin and consider a respectful variation rather than a direct replica.
6. Minimalist Script "Breathe" on Side of Ribcage

Pain warning lead applies because ribs are commonly a 7 out of 10. Script reads intimate and realistic when the letter spacing is clear and the ink contrast is preserved. The main mistake is choosing ultra-thin strokes on mobile skin. Artists diverge on ribs: one camp says fine script blurs fast, the other says correct depth saves it. Ask the vendor to nudge up thickness just enough to stay legible as it wears. Sensitive placement note: ribcage work benefits from a specialist who understands stretch and breathing during application.
7. Realistic Matchstick with Flame on Wrist

There is something about bold outline and saturated color that reads from across a room. A matchstick tattoo is a short session and low pain. If you want realism, ask for a gradient flame and a slightly textured wooden shaft. The common error is using flat orange without contrast. For temporary pieces, expect color to lose vibrancy faster than black. If you handle liquids or lotions daily, plan for visible fading at two to three weeks. This design suits festival wearers or short-term statement looks.
8. Watercolor Hummingbird on Shoulder Blade

Most watercolor tattoos from years ago now look like washed bruises. This temporary approach holds up if you insist on defined focal points, like the beak and eye, surrounded by softer washes. For the shoulder blade, pain is low and the canvas is forgiving. The mistake is relying solely on watercolor washes with no anchor lines. Tell the artist to include subtle linework under the washes so the shape survives fading. Expect the washes to blur first, with the focal points lasting longest.
9. Stipple Moon Phase on Ankle

The ankle is a common placement with variable pain and lots of friction. Stipple moon phases read as realistic because dot density creates depth without heavy shading. A real mistake is packing dots too densely in a small area. That leads to early muddiness. For a temporary, space the dots and keep the crescents clean. Touch-ups may be needed after consistent sock or shoe friction. If you wear boots daily, pick an ankle side with less rubbing to prolong clarity.
10. Micro-Realism Bee with Glossy Wing Highlights on Forearm
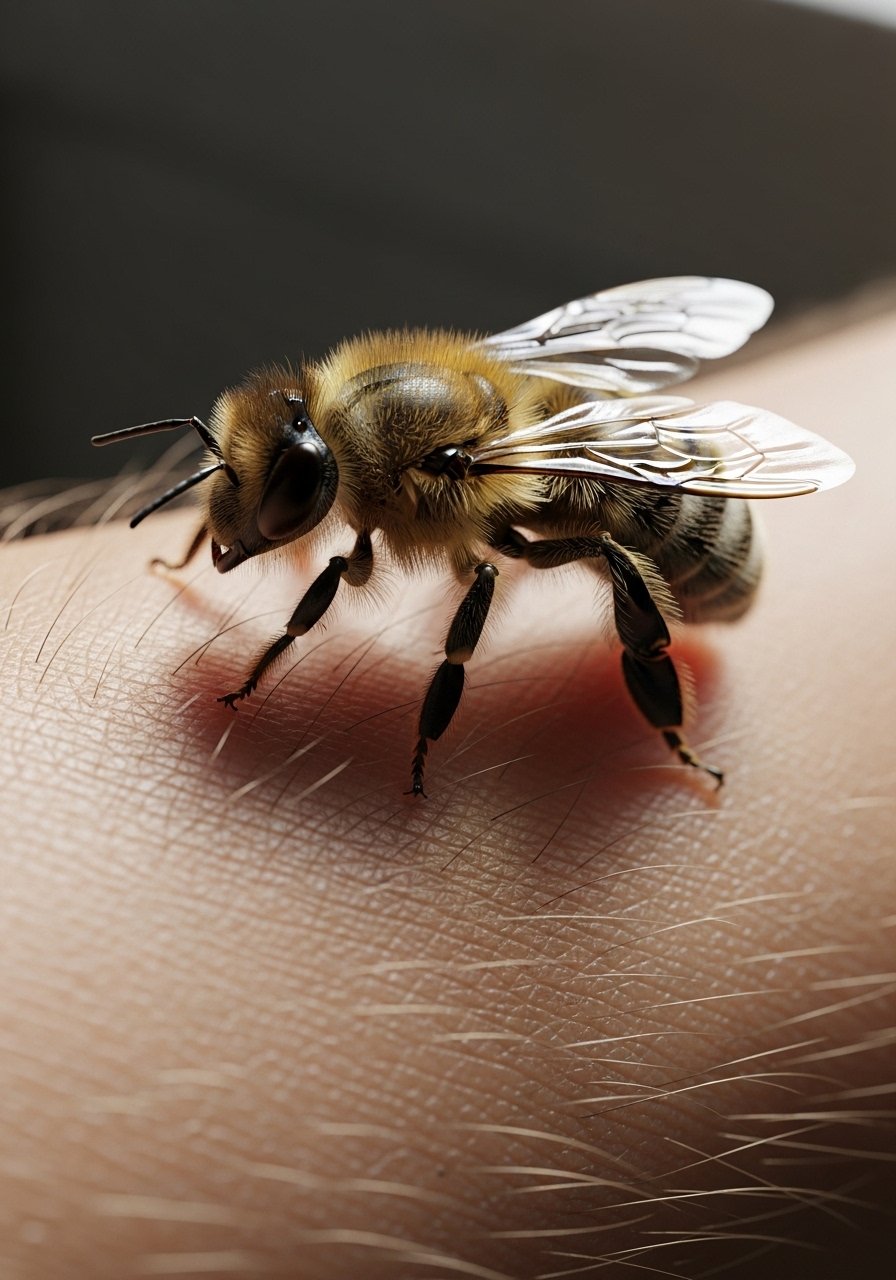
Visual impact sells this one because the forearm shows texture well. Expect low to medium pain and a short session. Ask for tiny highlights in the wings to mimic gloss rather than adding actual shine. People often request too much background, which blurs quickly. Keep the bee isolated with modest contrast. For a temporary, the legs and antennae are the first details to soften. Plan a touch-up if you want the legs to remain visible after a week in chlorinated pools.
11. Single-Color Blackwork Rose on Thigh

There is a visual punch to blackwork that makes it read realistic from a distance. The thigh is low pain and great for larger pieces that hold saturation. A typical mistake is tiny petals inside tight outlines. For a temporary, choose slightly larger petals and heavier outlines so the silhouette survives. Black fades into softer grey first. Expect a more even fade on protected thigh skin, with touch-ups rarely needed if you keep it dry for the first 24 hours.
12. Tiny Micro-Realism Leopard Cub Behind Ear
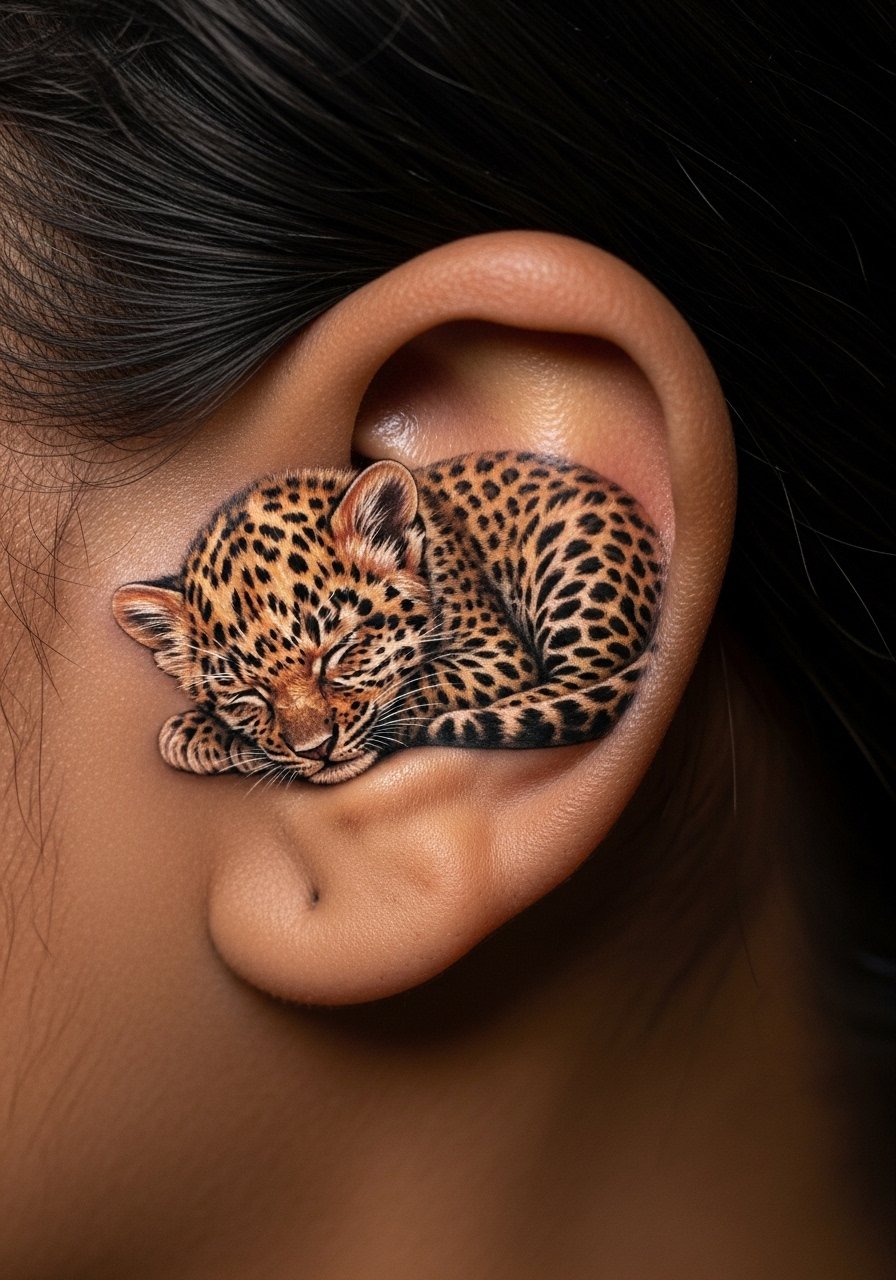
Consultation lead: tell your vendor you want defined eyes and nose, not just a blur of fur. Behind-ear placement is sensitive and can be higher pain for some. The common mistake is trying to cram too much detail into a very small space. For a temporary, slightly increase the scale and reduce midtone texture so the facial features remain readable. Hair growth and natural oils can soften edges faster. If you need it to last through a weekend event, avoid heavy sweating and repeated touching.
13. Textured Scar-effect for Film Work on Forearm
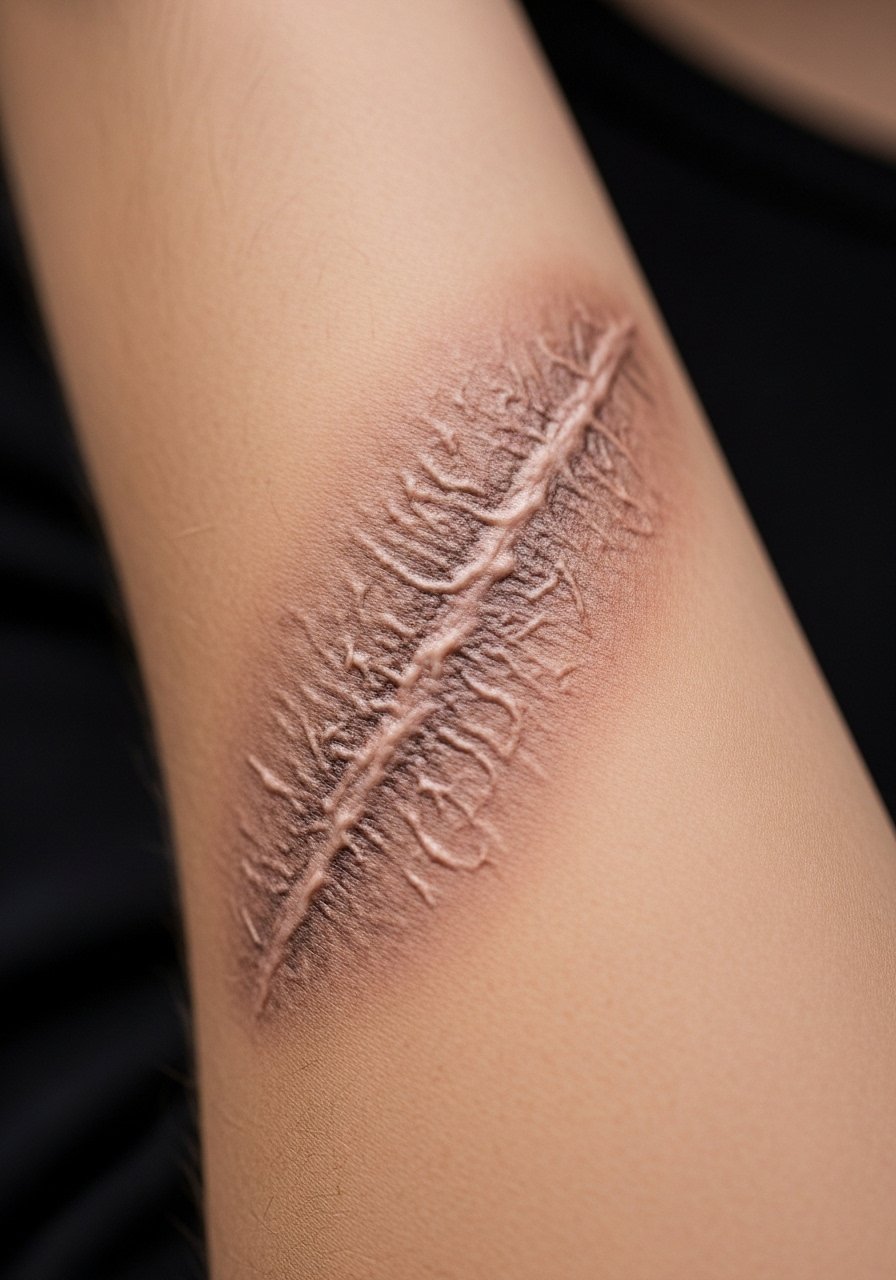
This idea borrows from film makeup and works when you want realism without commitment. The session is quick and pain-free since it is surface application. A common mistake is using flat red tones without shadow to read as depth. For convincing results, ask for a combination of shadow and pale highlights to mimic raised edges. There is a small controversy about whether scar-effects should try to replicate medical scarring exactly. One camp advises stylized versions out of respect, the other allows medical accuracy for storytelling. Pick your approach based on context.
14. Botanical Single-Leaf in Whip Shading on Collarbone

Collarbones are visually dramatic and can be sensitive. Whip shading gives a lived-in texture that looks realistic on healed skin. The usual error is asking for dense black on thin collarbone skin. For a temporary, request airy whip shading and a slightly bolder stem so the piece keeps its silhouette. Expect lines near the bone to soften faster. If your workplace limits visible ink, remember collarbone options can be covered by clothing easily.
15. Realistic Feather with Micro Striations on Side Rib
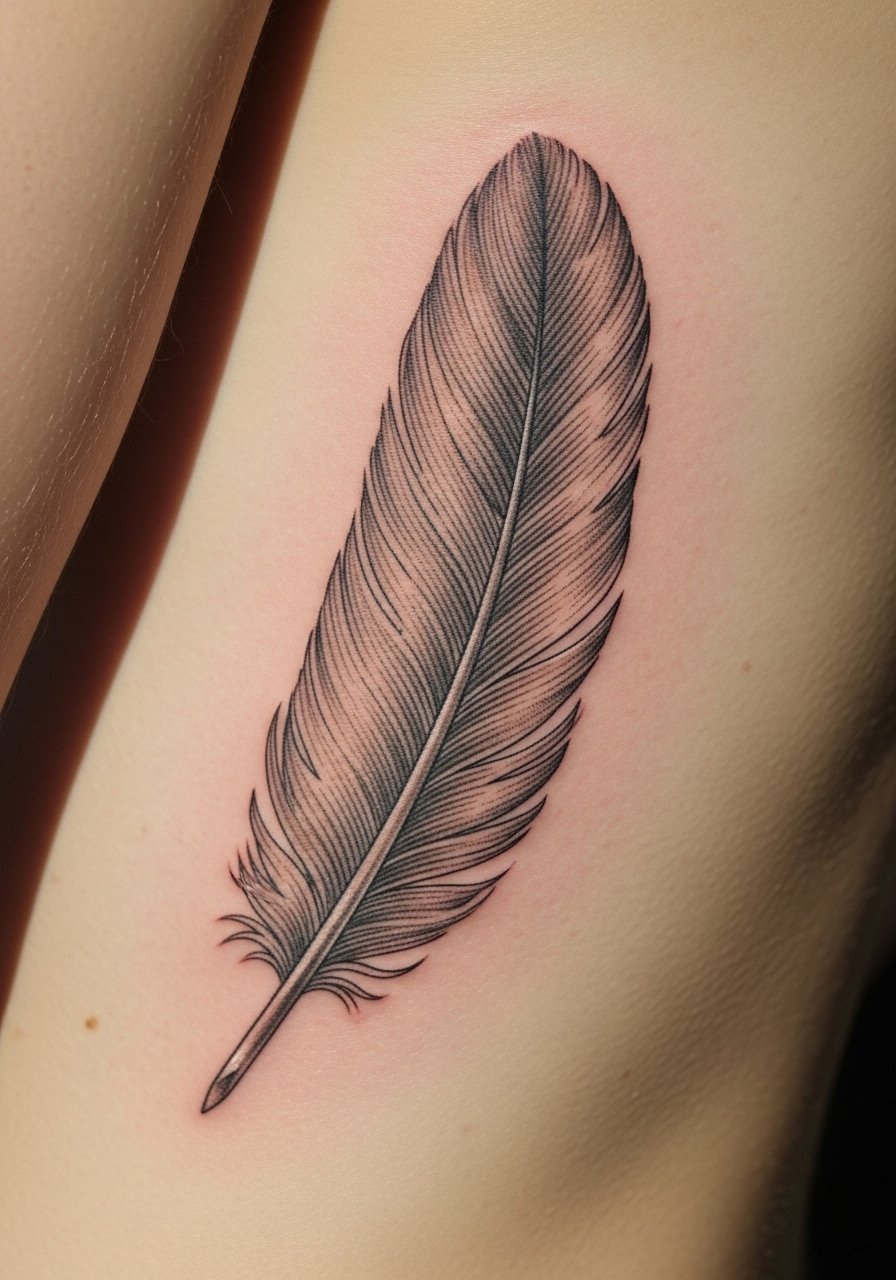
Aging and healing lead fits: fine feathers tend to blur as the barbs close in. Side ribs are a sensitive area and high on the pain scale. For a convincing temporary, ask for a strong quill line and spaced barbs. One mistake is choosing ultra-delicate barbs that fuse into a smudge when worn. Expect noticeable softening in three to six weeks. If you plan to wear swimwear, consider how movement and sun exposure will affect edge crispness.
16. Minimalist Coordinate Tattoo in Monospace on Wrist

Consultation lead: specify exact punctuation and font because image generators often garble numbers. The wrist is a visible place and medium pain for some. The mistake is using too thin a font. For a temporary, a slightly heavier monospace keeps numbers legible as they fade. Expect the edges to soften first, especially if you wash hands a lot. Small text requires more frequent reapplications to maintain clarity over multiple weeks.
17. Tiny Realistic Shell on Ankle with Natural Highlights
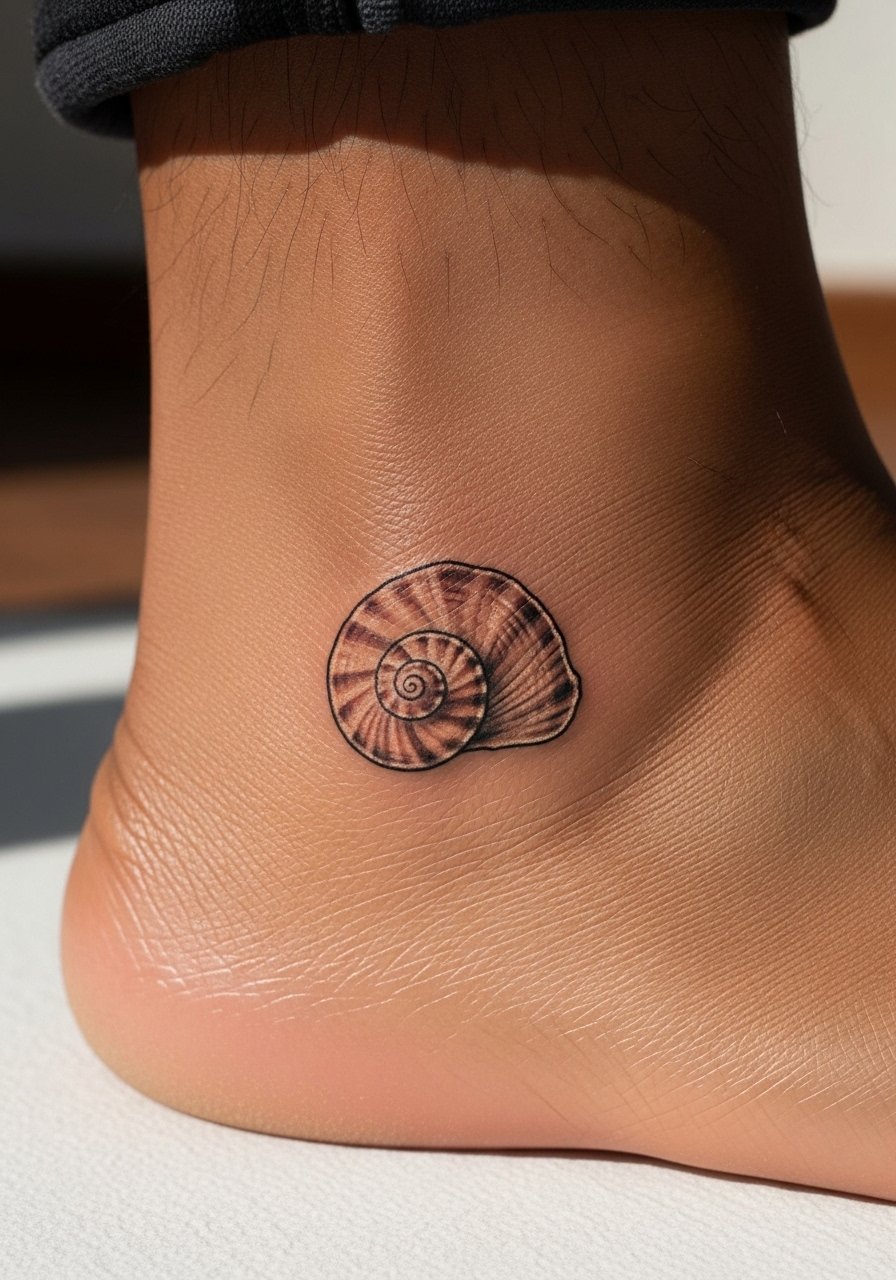
The ankle handles small nature studies well if you avoid tiny hairline textures. This placement is subject to friction, so expect early softening. The common error is adding reflective spots without shadow. For a believable look, keep the highlight conservative and use contrast under the ridges. Plan reapplication after heavy walking or beach days to keep definition intact. If the shell design is culturally specific, note its origin and consider a respectful, simplified version.
18. Geometric Arrow Cluster on Upper Arm
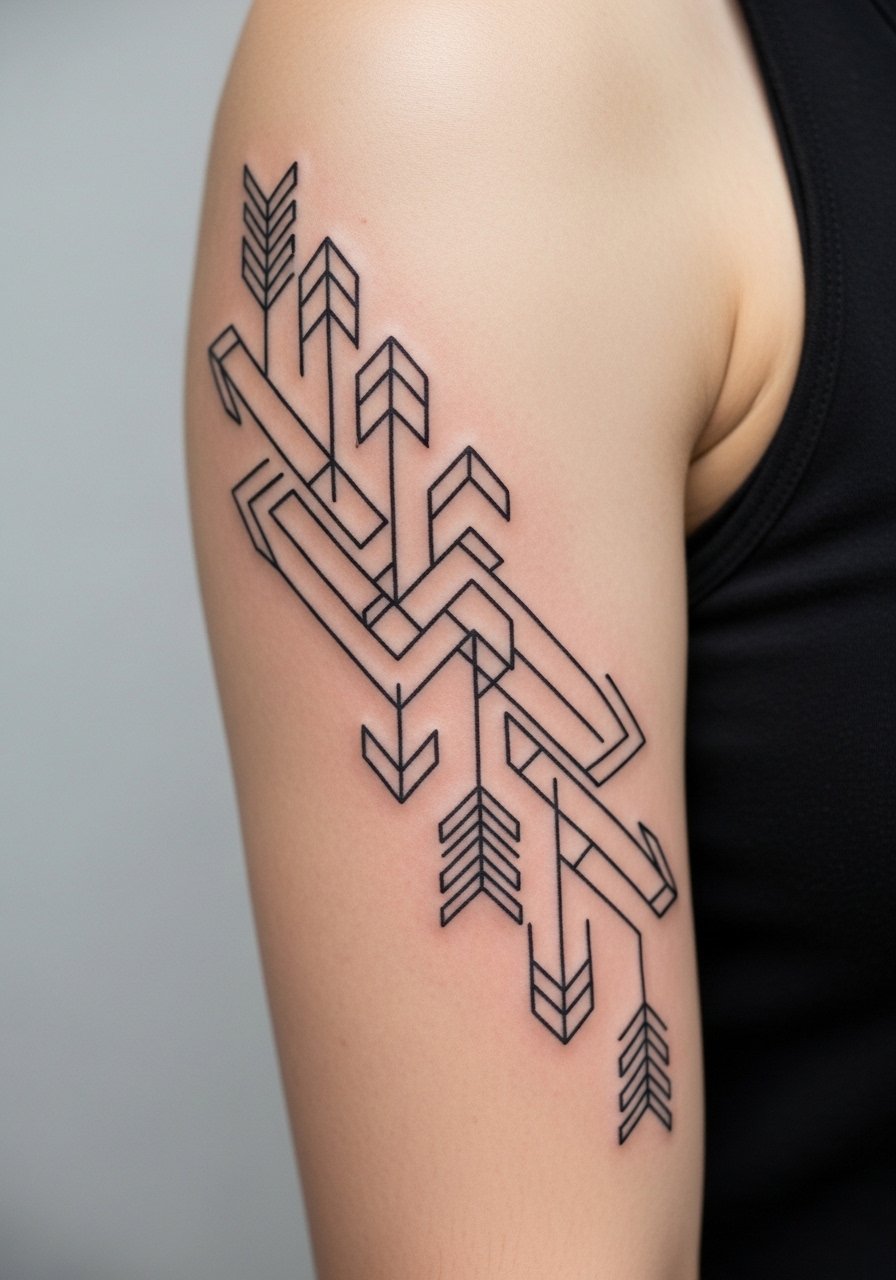
Aesthetic lead: geometric arrows offer movement and scale that read realistic when lines have even spacing. Upper arm placement is low pain and forgiving. The frequent mistake is running arrows too close together. For a temporary, leave breathing room between arrows and ask for consistent line weight. Expect the negative space to help the shapes age gracefully. This design suits someone who wants structure without heavy shading.
19. Micro-Realism Cat Eye on Inner Wrist
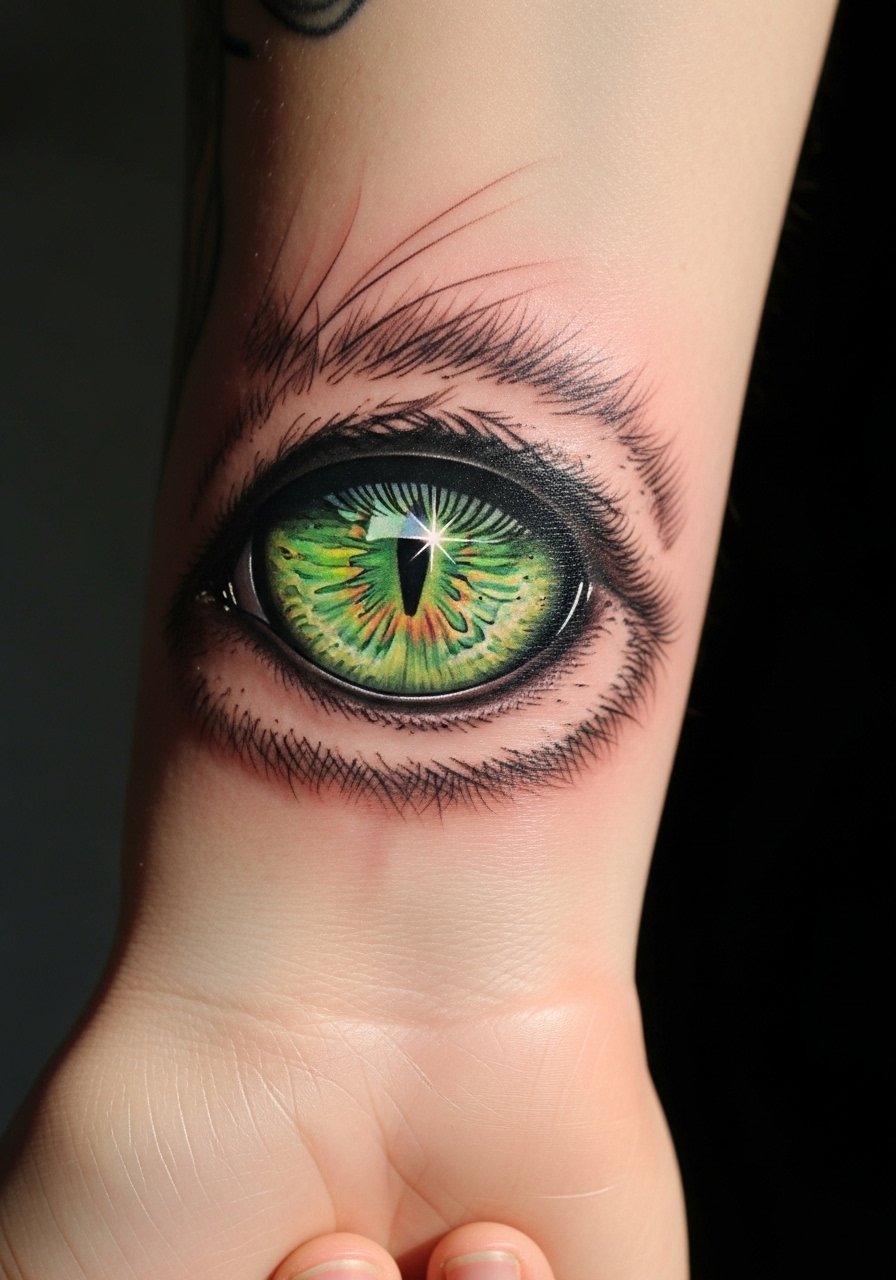
Mistake lead: small animal or eye features lose fascination if printed without a clear focal point. Inner wrist is visible and a slightly sensitive spot. For realism, insist on a crisp pupil and a single highlight. Artists differ on how small an eye can be and still read. One camp says anything under 2 centimeters blurs, the other says precise contrast can keep it legible. Plan to touch up if you want the highlight to stay bright during a multi-day event.
20. Realistic Leaf Skeleton on Forearm in Stipple and Linework
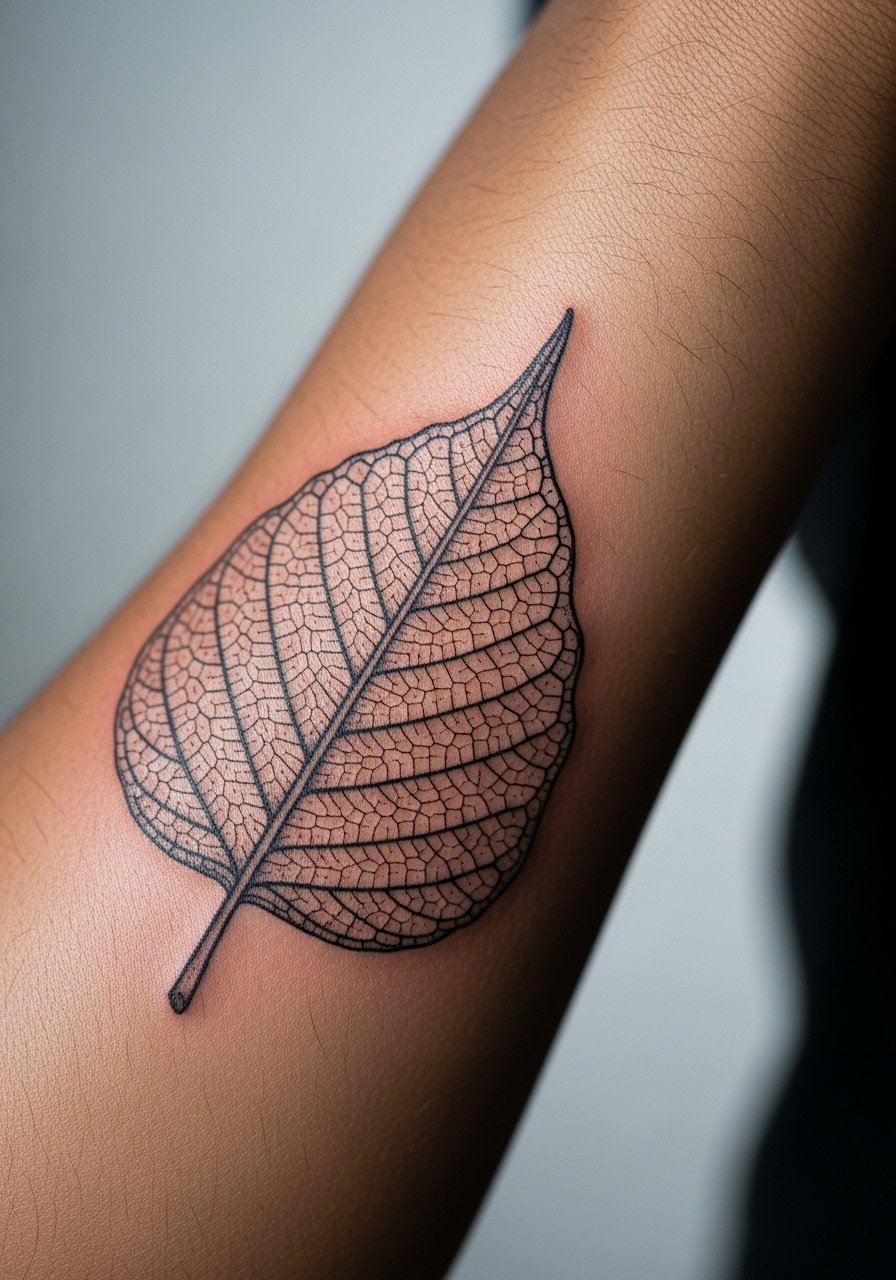
Consultation lead: bring shots of real leaves to show vein patterns. Forearm placement is low pain and displays texture well. The common mistake is over-symmetrizing the veins. Real leaves have irregularities that sell realism. Stipple keeps the midtones without heavy fills. Expect the thinnest veins to soften first, so keep primary veins slightly bolder for longevity. This is a great temporary for nature lovers who want botanical detail with low commitment.
Tattoo Prep and Aftercare Essentials
Lightweight fragrance-free balm. Use for short-term moisture after initial application, especially when air is dry. It keeps the edges from flaking and helps color read truer in the first week.
Gentle pH-balanced foaming cleanser. Use for daily washes without stripping pigment. Gentle formulas reduce early fading from over-cleaning.
Medical-grade second skin bandage, 6-inch roll. Helpful for initial protection when you need waterproofing during travel or showering.
Non-comedogenic hydrating lotion. Use long-term to keep skin supple and prevent flaky patches that make temporary ink look patchy.
Sterile saline wound wash. Useful if you need to gently rinse an area that got sweaty or dirty right after application.
Saniderm occlusive bandage (single mainstream option). This counts as the one mainstream product in the list. It can protect a fresh temporary through a busy day, but some people find breathability better with lighter dressings.
Alcohol-free antiseptic wipes. Use for quick cleanups without harsh drying.
Broad-spectrum SPF 50 mineral sunscreen stick. Sunscreen is one of the best ways to extend the look of any temporary pigment when you are in the sun.
Every tattoo is different. Always follow your artist's specific aftercare instructions. Consult a dermatologist if you have skin concerns or unusual healing issues.
Frequently Asked Questions
Q: How long do realistic temporary tattoos typically last on forearms and wrists?
A: From what I've seen, forearms tend to hold detail better than wrists because there is less constant rubbing. Expect clear detail for one to three weeks, with gradual softening after that. Factors like soap frequency and sun exposure make a big difference.
Q: Will micro-realism portraits look convincing on darker skin tones?
A: They can, but contrast matters more than fine midtones. Ask for higher contrast in the eyes and jawline and avoid ultra-thin textures. For the best match, bring a photo of the desired effect on similar skin and request slight scale increases.
Q: Do watercolor-style temporary tattoos need different upkeep than blackwork pieces?
A: Yes. Watercolor washes lose vibrancy faster because they rely on subtle color transitions. For events, ask for anchor lines under the washes and avoid heavy scrubbing. Blackwork silhouettes usually fade more evenly and can remain readable longer.
Q: If I want a temporary on the ribs, what should I tell the vendor about line weight?
A: Tell them you prefer slightly stronger lineweight and less micro-detail. Ribs stretch and move, so spacing and modest thickness keep the design readable as it wears. It depends on your breathing and movement, so plan size accordingly.
Q: Can I reuse a temporary tattoo sheet to get the exact same placement later?
A: Reusing a sheet is possible but placement rarely matches perfectly if you do it yourself. For repeat accuracy, save reference marks like small nicks or use light costume tape guides during application. If you want precise repeat placement, consider asking the vendor about multiple prints.
Q: Why do geometric mandalas fade faster on some placements than others?
A: The issue is friction and skin movement. Placements like the sternum and ribs move and rub more, so tiny radial lines fuse sooner. Forearms or upper arms offer flatter, more stable skin, which helps preserve crisp edges for longer.
Q: Which aftercare product helps most for weekend-long events where I need a temporary to stay sharp?
A: A medical-grade second-skin bandage for the initial 12 to 24 hours plus a lightweight fragrance-free balm for daily moisture tends to keep temporary ink looking intentionally crisp during short events. You can find both options via a search on Amazon.
