
Bold black and grey hourglasses often outlast the dainty single-needle pieces that flood inspiration boards. I say that because sand detail needs room, and tiny grains blur faster than solid contour. If you want an hourglass that still reads after a few years, scale and linework matter more than the flashiest ornament. Read on for 23 concrete takes that pair style, placement, and wardrobe so the design actually fits your life.
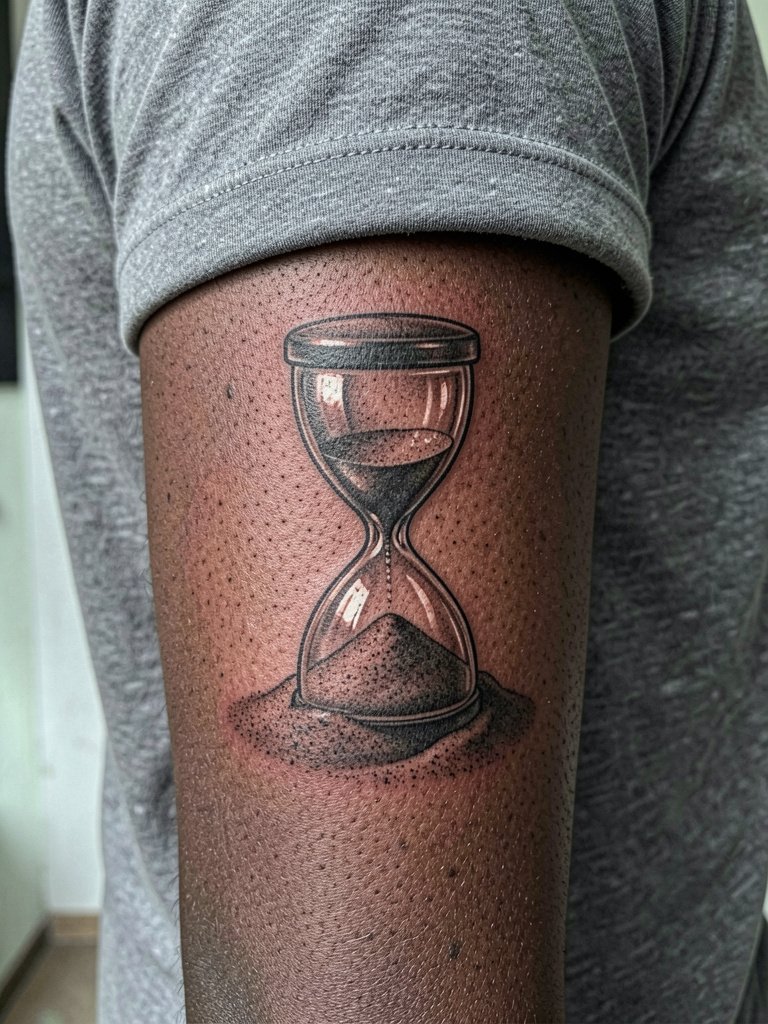
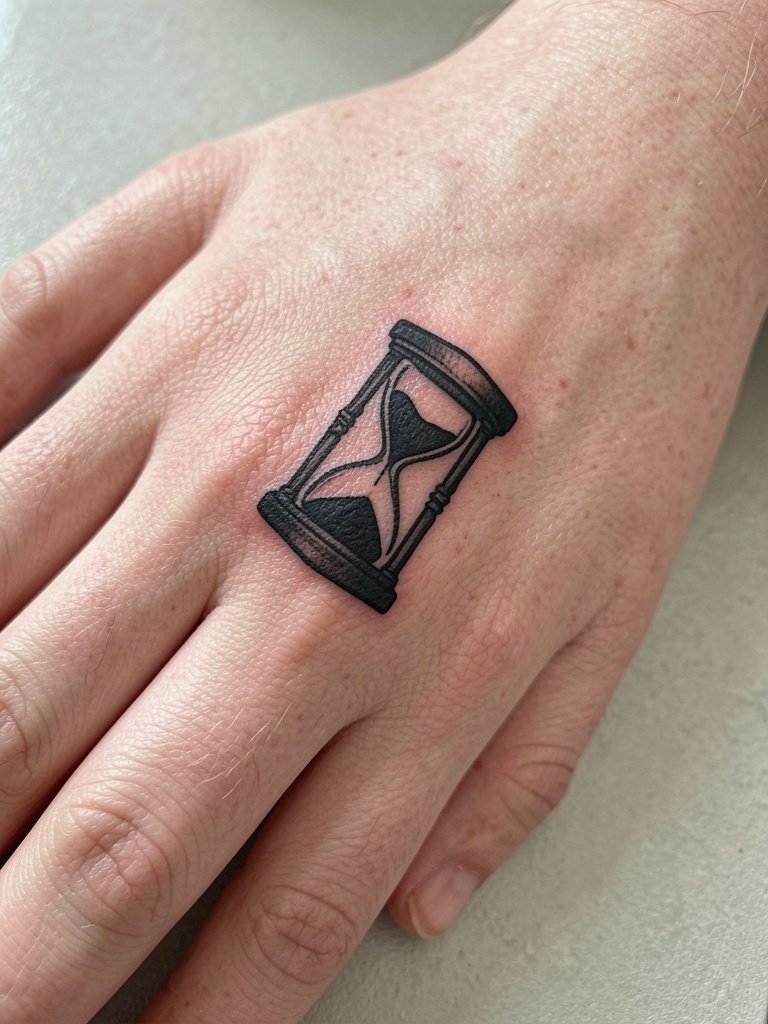
1. Classic Black and Grey Hourglass, Forearm

The outer forearm is the default for this piece because the silhouette reads well at medium size. I recommend a layout three to four inches tall so the sand grains can be dotted and shaded with visible separation. Expect one to two sessions and a touch-up at six to twelve months depending on saturation. A common mistake is asking for tiny sand detail on a two-inch wrist piece where the grains merge into a blur. For showing it off, keep sleeves short and pair with a slim fit t shirt that keeps the forearm as the focal point during casual wear.
2. Hourglass with Skull, Upper Arm
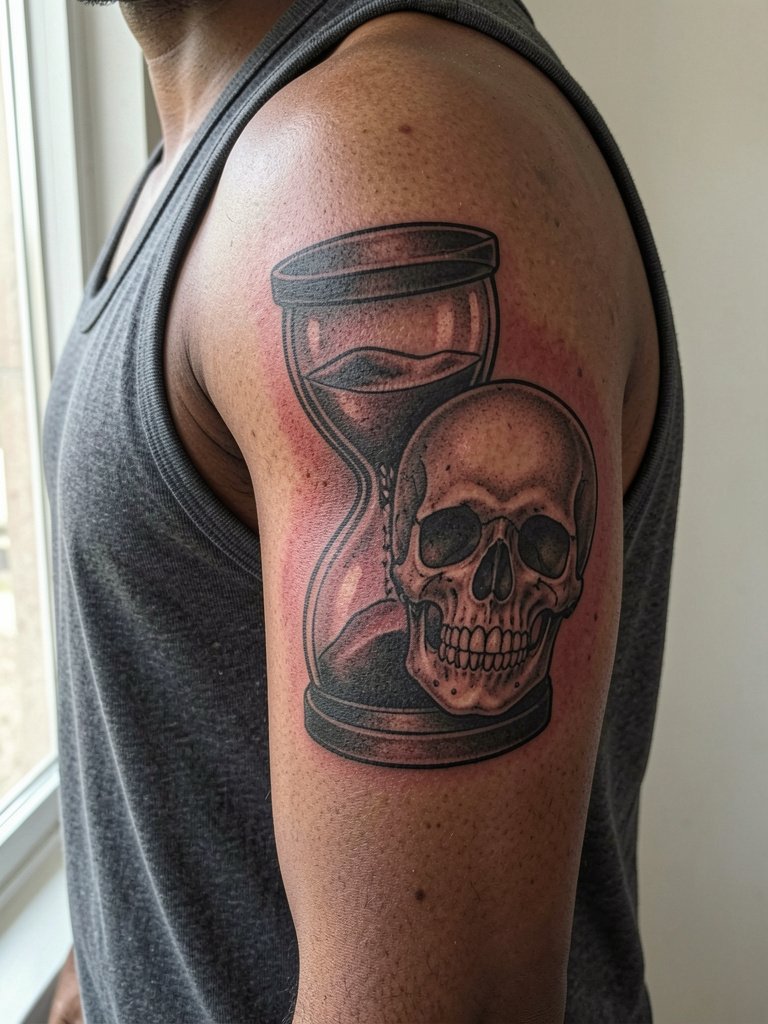
Pairing a skull with the hourglass sharpens the memento mori message and suits upper-arm placements that take bold shading. Ask for clear separation between the skull and the glass plane so the two elements do not compete when healed. Blowout risk is low here if the artist keeps linework bold and avoids micro hairlines near shaded zones. Session time usually runs one to two hours. Show-off tip: wear a sleeveless gym cut or an open overshirt to keep the arm visible, and try muscle tank men styles that frame the piece.
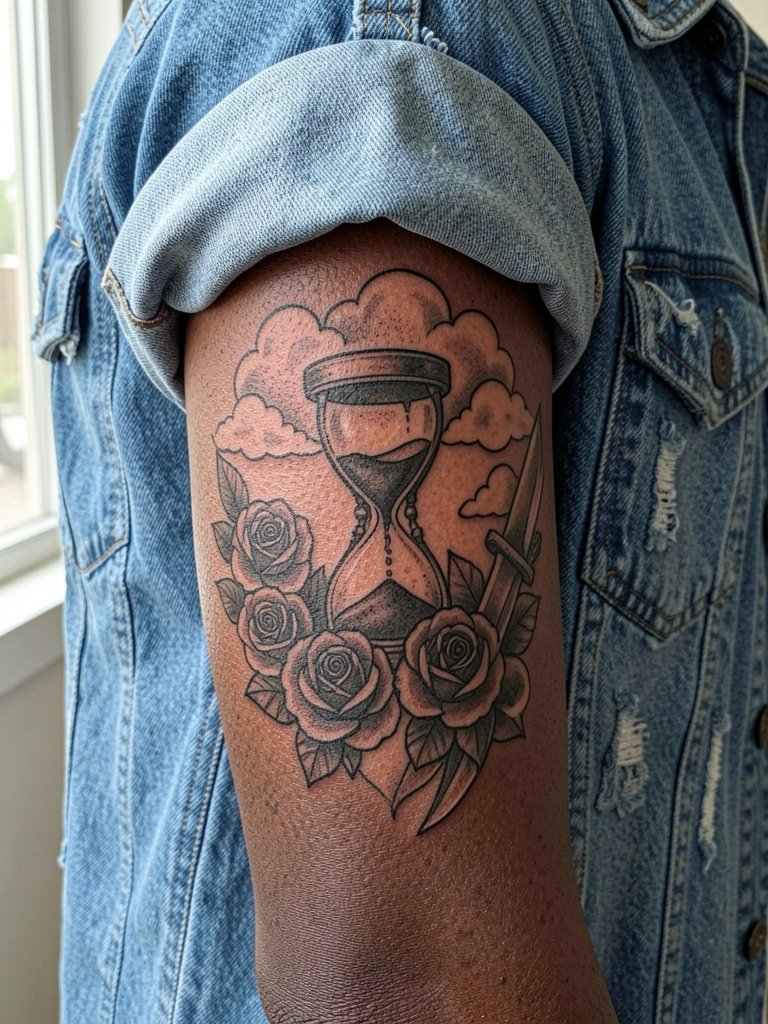
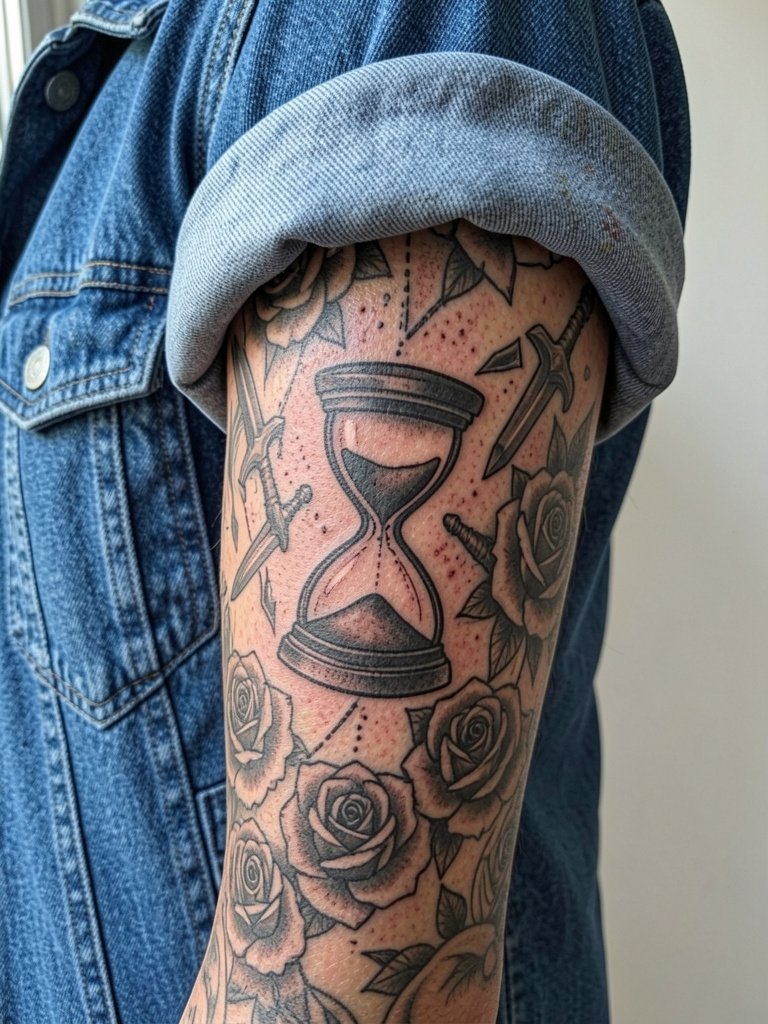
3. Hourglass Framed by Roses, Inner Forearm
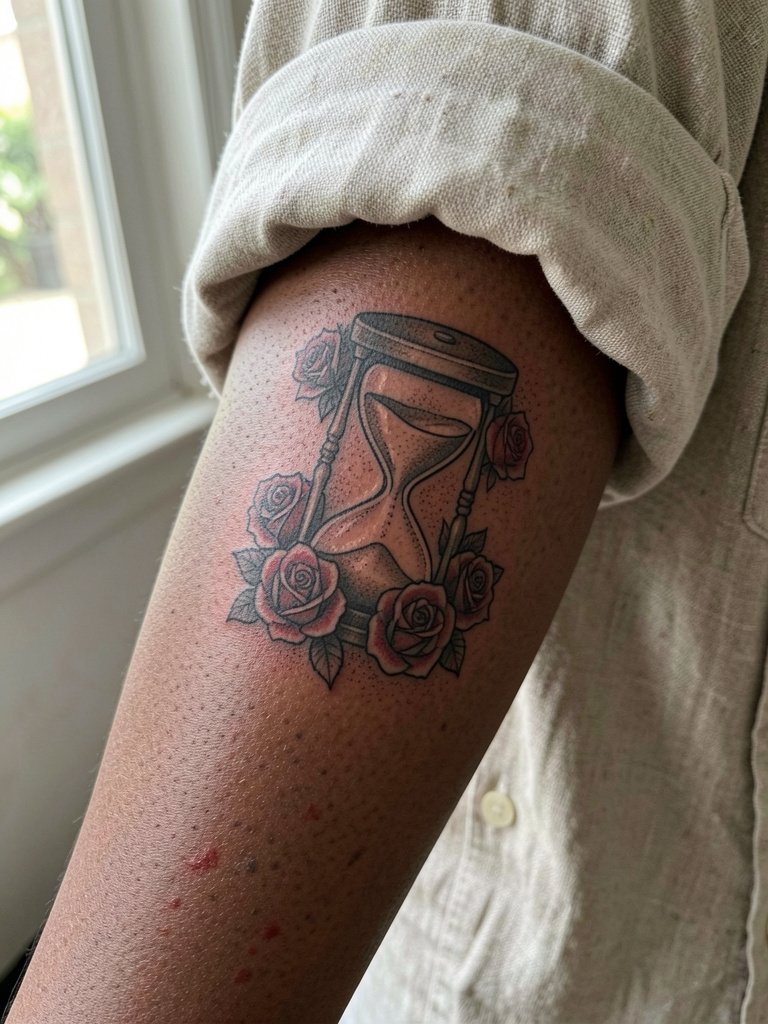
An inner-forearm placement makes rose details readable while offering a slightly private canvas. Ask the artist to space petals so the negative skin reads between blooms, that helps prevent an over-saturated block in two years. Expect one session for medium scale pieces with possible touch-ups later for red saturation. A rookie error is packing tiny petals too close together for the inner-forearm skin. For show-off styling, this layout pairs well with a linen button down shirt worn open at the top so the forearm becomes the visual anchor.
4. Minimalist Fine Line Hourglass, Wrist
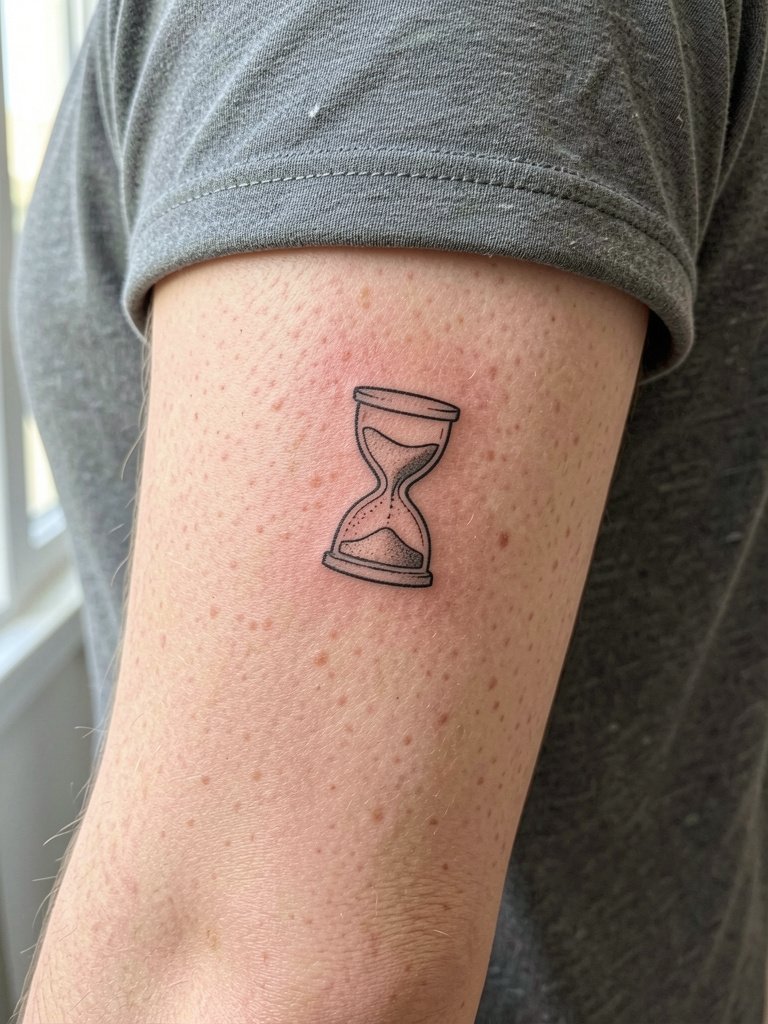
Fine line wrist pieces can be elegant but they split opinion. One camp argues single-needle work fits the delicate feel of an hourglass and keeps the piece discreet. The other camp points out the wrist is a high-motion, high-friction zone where ultra-thin lines often soften into fuzz within a couple of years. If you choose this route, scale up slightly from the smallest mockup and request a slightly heavier contour around the glass so the silhouette survives. For session comfort, wear short sleeves and avoid wrist jewelry on the tattooed side for the first week.
5. 3D Realism Hourglass, Outer Forearm
Realism sells as a statement piece but requires multiple sessions and an artist experienced with highlights and soft gradients. I advise booking a consultation with portfolio photos that show healed realism work, especially on forearms. Expect two to four sittings with a dense saturation plan and realistic touch-up at one year. The common mistake is compressing too much glass detail into a small patch. Keep the size comfortable for the outer forearm and let the piece live beneath neutral tops like a plain crew neck shirt so the art reads without competing patterns.
6. Traditional Bold Outline Hourglass, Upper Arm
Traditional bold outlines are popular because they age predictably and keep the silhouette legible. One camp says bold work is the reliable choice since thick linework resists the smear that appears after years of movement. The opposing camp argues for the modern look of thinner lines and argues that with correct spacing fine detail can hold up. If you favor longevity, request stronger lineweight and flat color fills rather than micro-shading. For sessions, bring a sleeveless top so the upper arm is fully accessible. For evenings out, this style reads well under an open flannel shirt.
Pre-Session Essentials
The first six ideas include wrist, forearm, and upper-arm placements that each heal differently, so a compact kit smooths the session and the first week.
- Fragrance-free tattoo balm. A low-irritant balm keeps newly inked skin moisturized without clogging pores during the initial healing window.
- Medical-grade second skin film. Useful when the artist prefers a sealed first-stage healing method, especially for forearm and chest pieces that rub clothing.
- Unscented SPF 30+ sunscreen. Sunscreen preserves black and grey contrast on visible placements like forearms and calves once healed.
- Topical numbing cream. Applied per the practitioner’s guidance it eases longer sessions such as rib or chest work.
- Thin protective film roll. Keeps finger, wrist, and ankle tattoos cleaner during the early days of heavy friction.
7. Hourglass with Wings, Chest
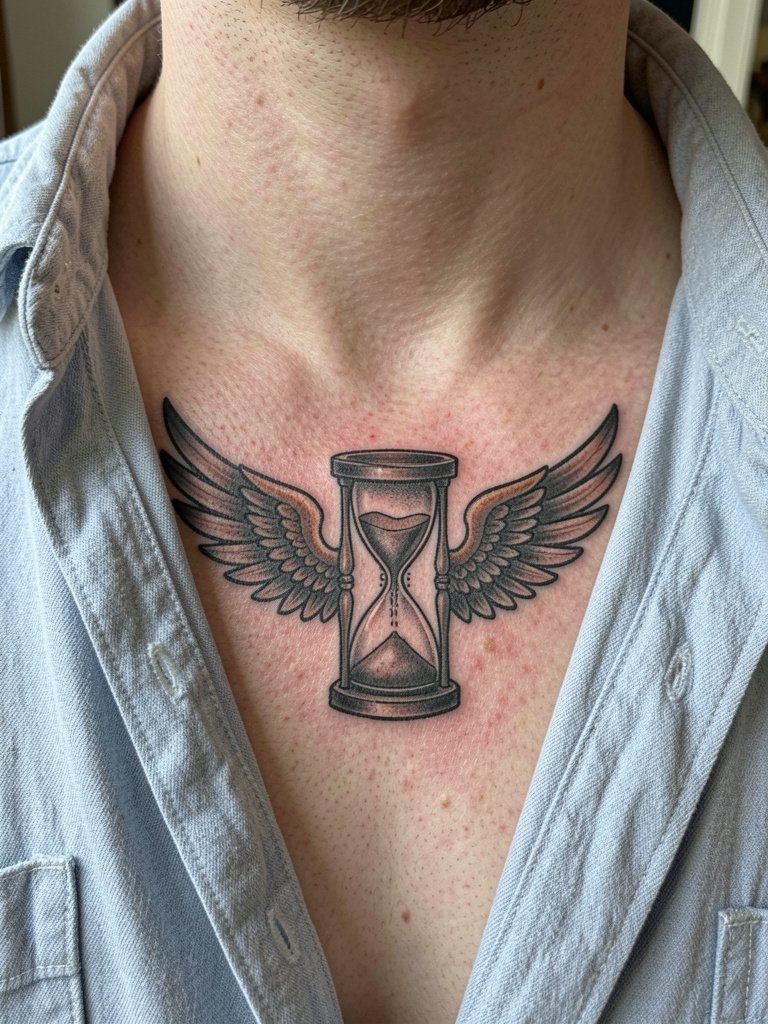
Wings add motion and a "time flies" motif that suits the chest because the area supports larger wingspan compositions. Rib breathing and chest movement affect how stipple shading settles, so request slightly heavier midline anchors so the wings do not appear to float away after healing. Pain level is higher than the arm but manageable across two sessions. For show-off looks, pair with an open-collar shirt or layered chains, and try an open collar shirt to reveal the top of the piece.
8. Broken Hourglass, Forearm or Calf
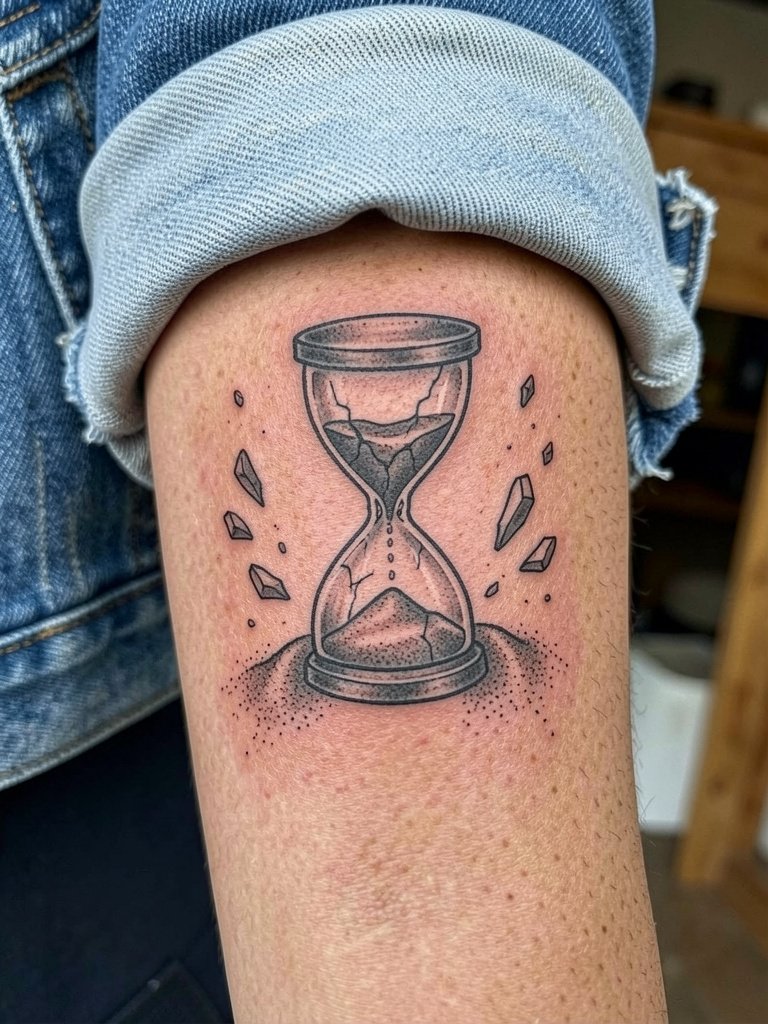
A broken hourglass reads as loss or reset and gives artists space to render cracked glass textures. On the forearm you can get fine shards and directional sand flow. On the calf scale up for readable detail and heavy black shadows to balance the leg’s curvature. A mistake people make is adding tiny shards that blur into a busy patch. If you want to keep contrast, ask for negative-space breaks between shards so the cracks remain distinct as they age.
9. Sand Transforming Into Birds or Petals, Ribcage
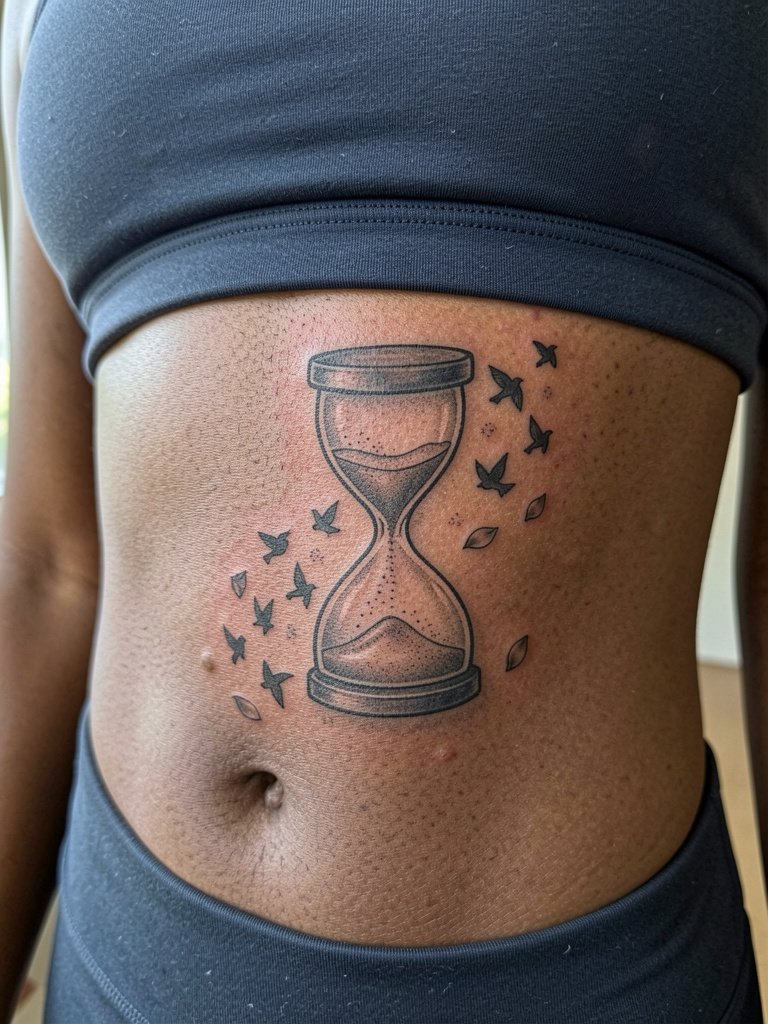
When sand becomes birds the piece becomes narrative rather than just symbolic. Ribcage gives dramatic flow but expect higher pain and longer sessions. Artists often widen spacing in the feather and sand details to accommodate skin stretch during breathing. The common regret is compressing the transformation too tightly in a small rib stencil. For session day wear, pick loose tops that the artist can lift without pressure on seams, and be ready for two to four sittings for a full composition.
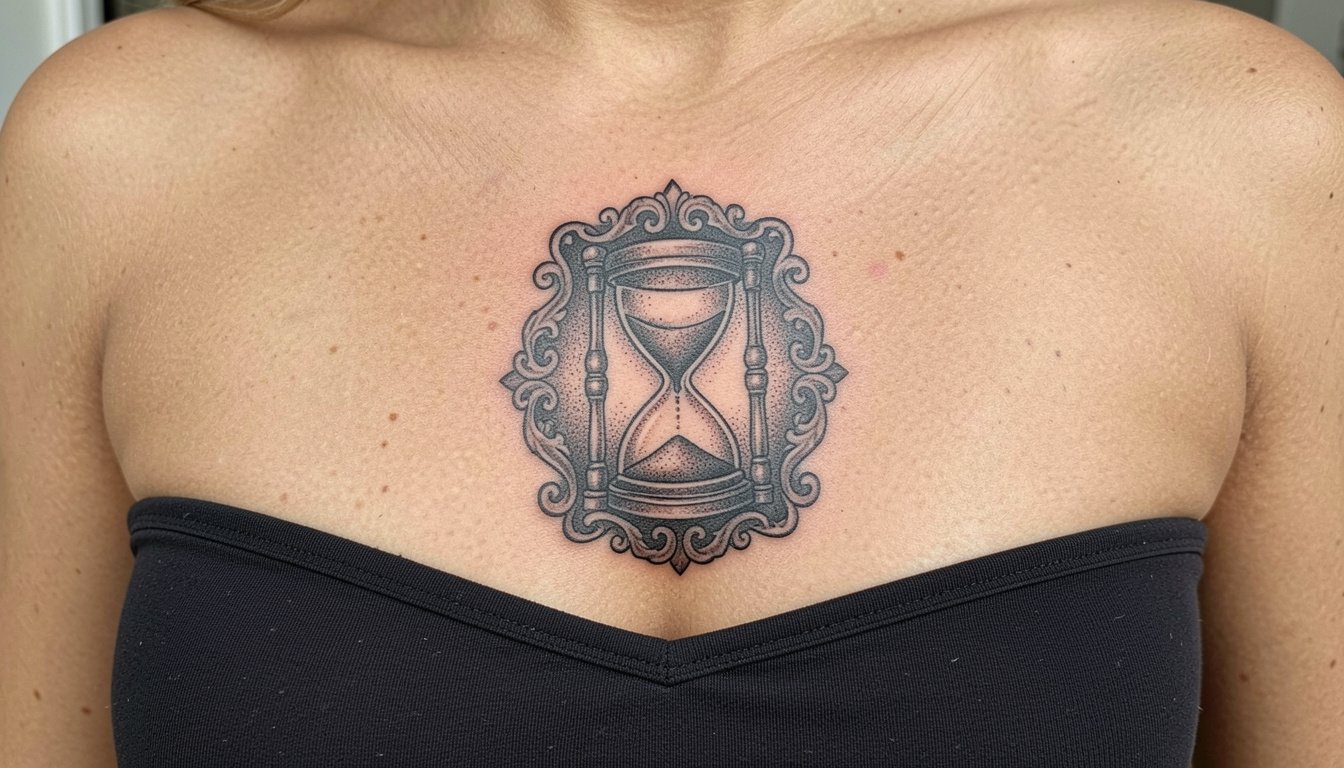
10. Ornamental Filigree Frame, Sternum
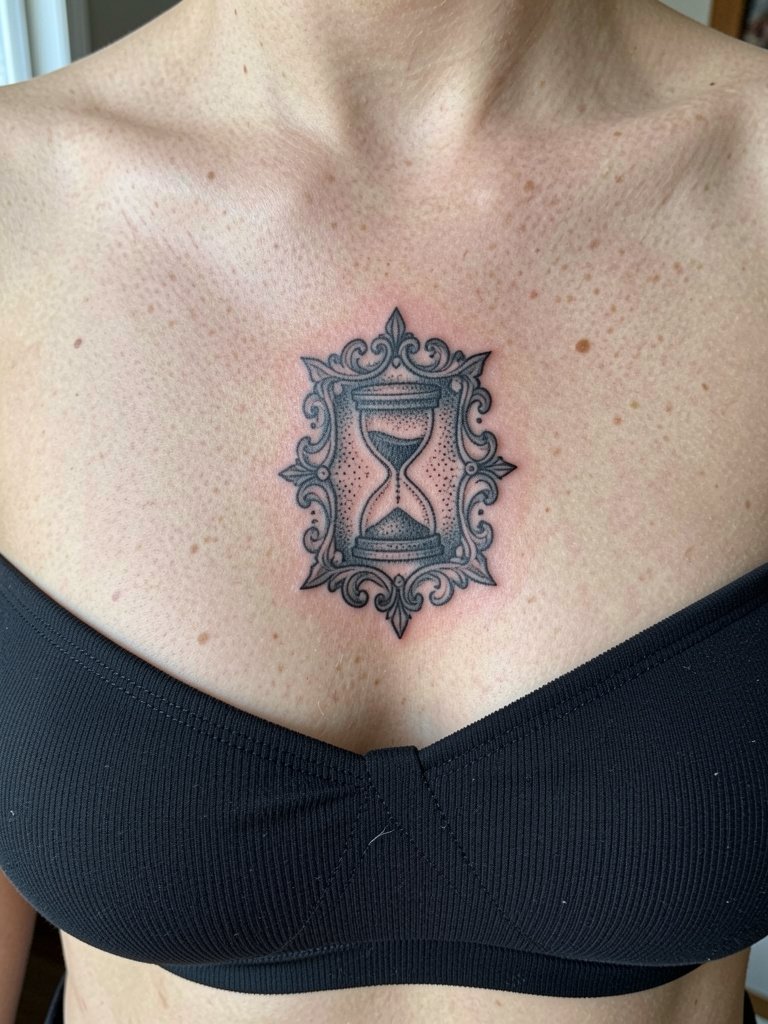
Ornamental frames give collectors a custom, heirloom feel and the sternum supports symmetrical filigree well. The sternum is a sensitive area so plan for shorter sessions spread over time. A frequent error is over-detailing the filigree at small scale which becomes muddy when the skin settles. For wardrobe, open shirts or deep V-necks create a frame around the piece. Consider a deep v neck shirt for occasions you want the sternum visible.
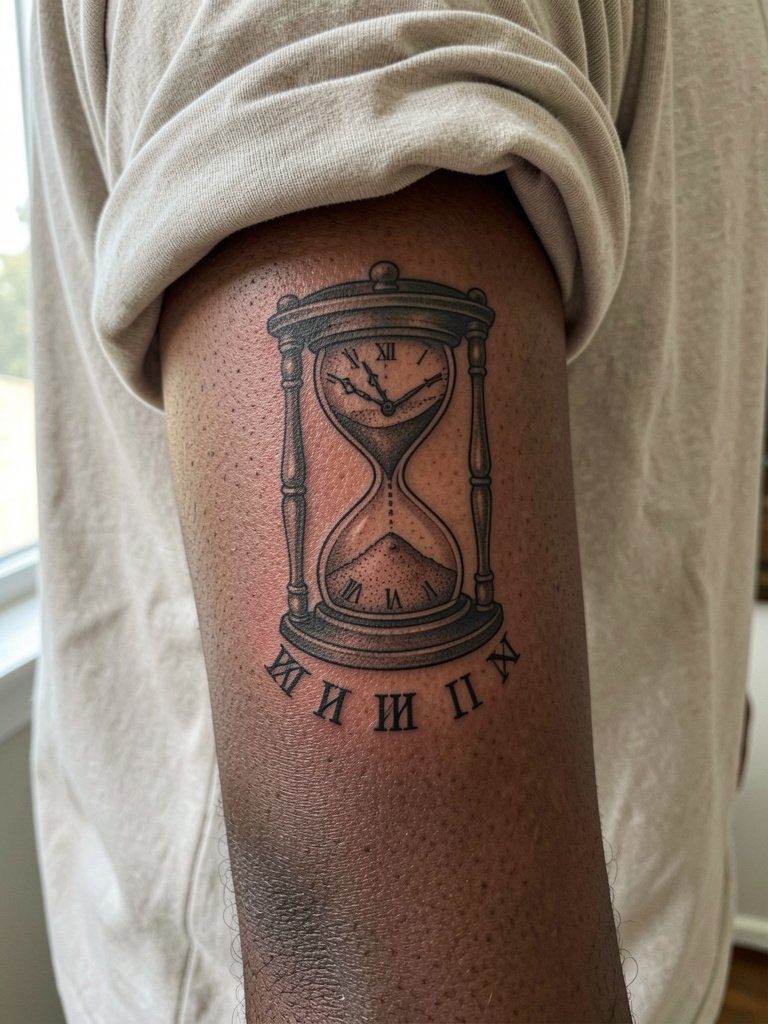
11. Small Hourglass with Roman Numerals, Ankle
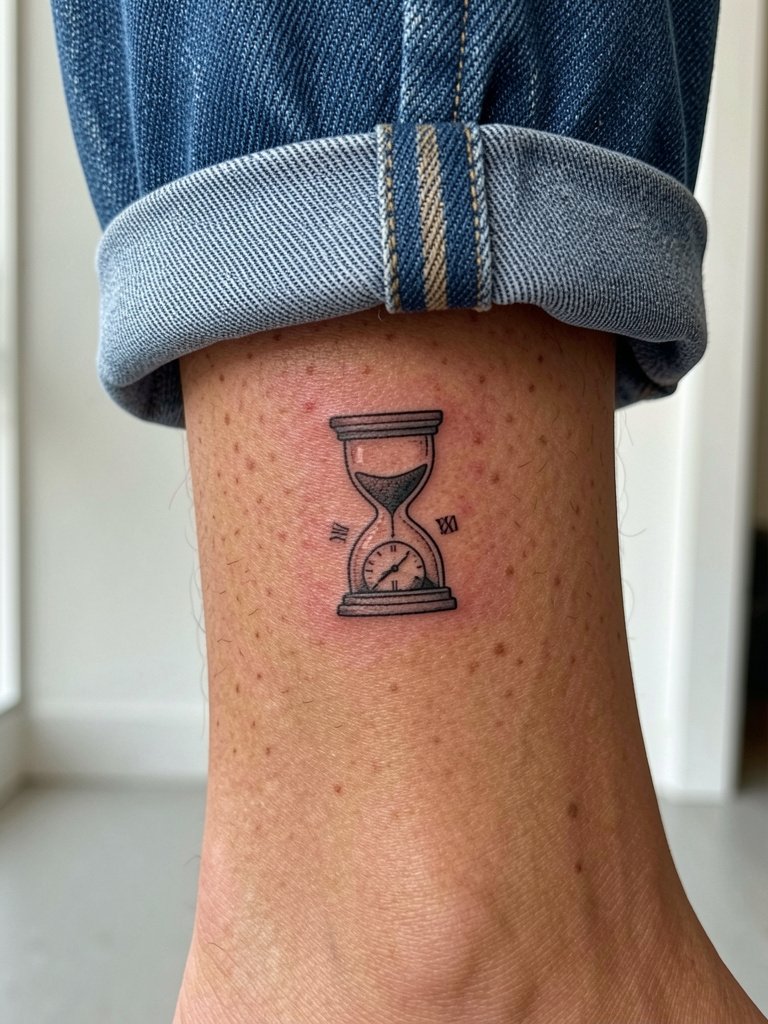
Ankle placements suit tiny script or numeral integration but they face a high-friction environment from socks and shoes. I recommend a compact silhouette with bold contour rather than fragile hairlines. A one-hour session usually suffices, with a likely touch-up at six to twelve months. For summer showing, low-top sneakers and cropped trousers highlight the ankle; try a cropped pants men look when you want it visible.
12. Sleeve-Connector Hourglass, Outer Upper Arm
Use the hourglass to bridge sleeve elements and avoid awkward negative space. When planned as a connector, ask the artist to map how the hourglass silhouette reads from multiple angles so the sleeve flows in motion. This approach usually takes multiple sessions over months and benefits from installing anchors like bold outlines to hold composition. For showing off half-sleeves, an open denim overshirt or rolled short sleeves frame the patchwork and keep the arm balanced with basics like a denim overshirt men.
13. Script Sand, Inner Forearm
Turning sand into script lets you personalize the hourglass without changing the silhouette. Keep the lettering bold enough to survive skin movement, and pick short words or numerals rather than a full sentence. A common mistake is packing too many characters inside the sand flow so the letters blur soon after healing. Session-wise, one appointment usually handles medium-scale inner-forearm script if the artist uses consistent single-needle control. For a clean look, pair with neutral tees and a thin bracelet on the opposite wrist.
14. Heavy Blackwork Hourglass, Calf
Blackwork reads from a distance and suits the calf because the leg handles larger, bold shapes without distortion. The biggest design mistake is adding thin filigree inside heavy black fields; the ornament disappears as ink compresses. One to two sessions will usually get this covered depending on size. For seasonal visibility, cropped pants with rolled hems or crew socks that sit below the tattoo frame the calf, and try rolled hem jeans to show the piece deliberately.
15. Hourglass with Gem or Jewel Accent, Shoulder
Adding a single jewel or gem gives a focal point and justifies limited color usage. Keep color small and saturated so it does not wash when exposed to sun over time. Avoid heavy multi-color palettes that compete with the hourglass silhouette. Session time is short for shoulder spots, usually under two hours, and pain is moderate. For casual reveal, pair with sleeveless or wide-armhole tanks that keep the shoulder unobstructed.
16. Fragmented Glass Close-Up, Ribcage
When the cracked glass is the focal point, you shift the narrative to texture and negative space. The ribcage gives vertical space for long cracks and shadow play. This placement demands patience and multiple short sessions to manage pain and swelling. A common regret is trying to cram hyper-detail into too-small a surface. For comfort, choose session-day clothing with loose side seams so the artist can access the area without tugging.
17. Hourglass as Sleeve Negative Space, Full Sleeve
Using the hourglass as negative space lets it read against denser surrounding imagery and gives sleeves a focal pause. Coordinate the negative zone in sketches so the artist can plan line weight and shading around it. This is a long-term project with many sessions and an evolving touch-up plan. For a balanced outfit, simple neutral tops keep the sleeve as the visual center without competing patterns.
18. Hourglass with Clock Hands or Roman Numerals, Inner Forearm
Combining clock hands or numerals adds timekeeping motifs without changing the silhouette. Make numerals bold enough to avoid smudging over time and position hands so they do not intersect tiny sand grains. Inner-forearm skin tends to keep detail better than wrist skin, so this is a good compromise between scale and discretion. Session time is moderate and touch-ups can be expected around a year. For visibility, linen button-downs with rolled sleeves look refined and keep attention on the inner forearm design.
19. Geometric Hourglass, Inner Bicep
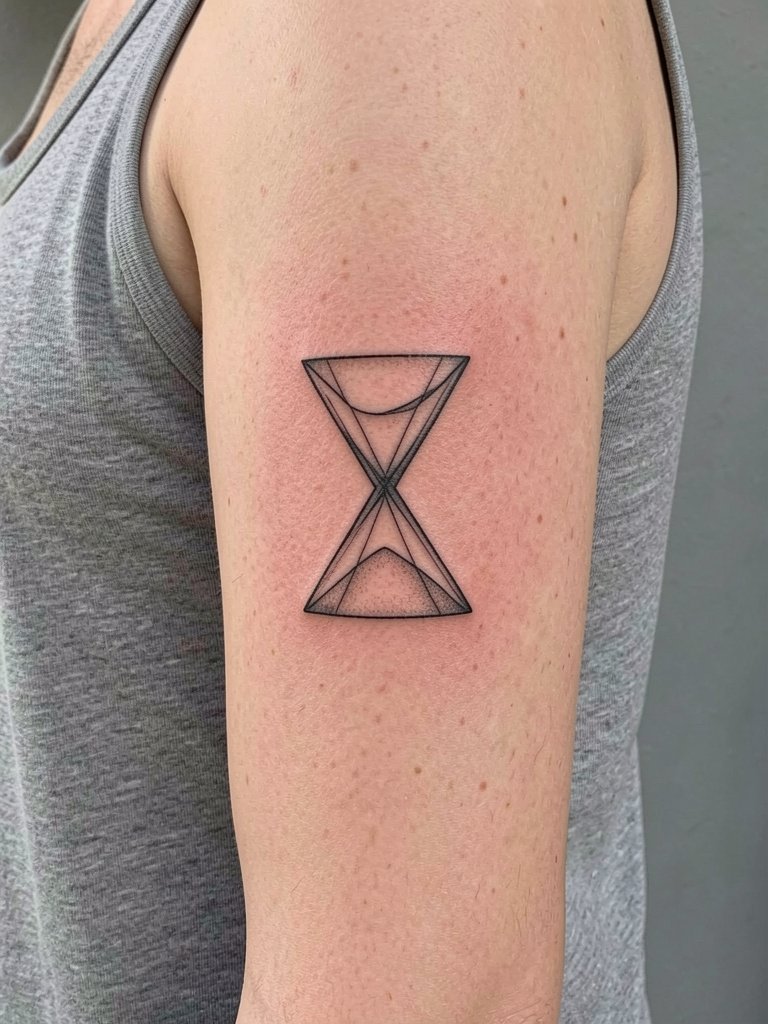
Inner-bicep geometry looks architecturally clean but requires careful spacing so lines do not merge as the skin settles. Arm relaxation during stencil placement avoids skews that later distort when the arm hangs naturally. Common errors include mapping the pattern on a flexed arm which shortens the proportions. For the appointment, wear a sleeveless top so the artist can work with the arm relaxed and still access the inner-facing surface.
20. Large Ornamental Heirloom, Back Between Shoulders
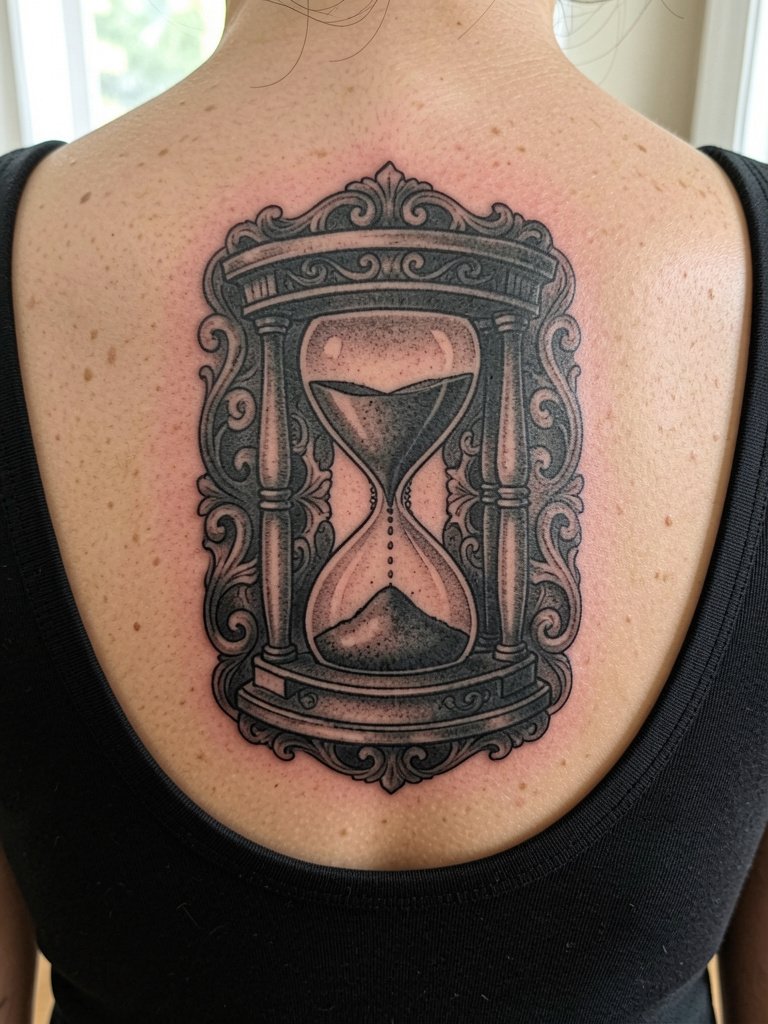
The area between the shoulder blades supports large ornamental pieces with symmetry. Expect multiple sessions and manage aftercare to avoid shoulder strap abrasion during healing. A frequent mistake is underestimating the visibility of healed shading under different lighting. For outfits that reveal the upper back, layered open shirts or vacation shirts keep the composition framed and intentional.
21. Tiny Hourglass with Bold Silhouette, Finger or Side of Hand
Hands and fingers are unforgiving for detail. If you want a small hourglass here, simplify to a bold silhouette rather than thin detail. Expect frequent touch-ups and faster fading because of washing and friction. A common oversight is requesting filigree or small sand grains on a finger. For session comfort, avoid rings on the tattooed hand for the first two weeks and keep the area dry and protected.
22. Ornate Compass-Hourglass Hybrid, Chest Center
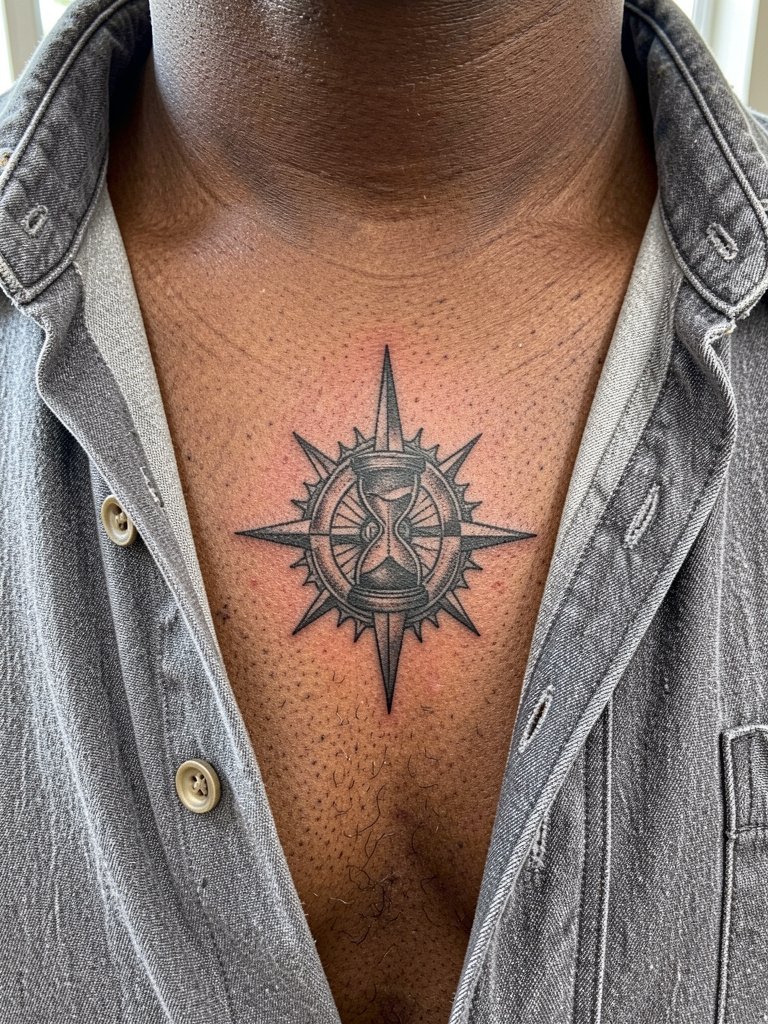
Combining compass points with an hourglass gives directional and temporal symbolism that suits central chest placements. Keep radial lines bold enough and allow breathing space between points to avoid visual clutter after healing. For session planning, note that chest flesh and movement affect how micro-lines heal. For wardrobe, unbuttoned overshirts or layered chains frame the chest center without competing.
23. Patchwork Memorial Hourglass, Inner Forearm
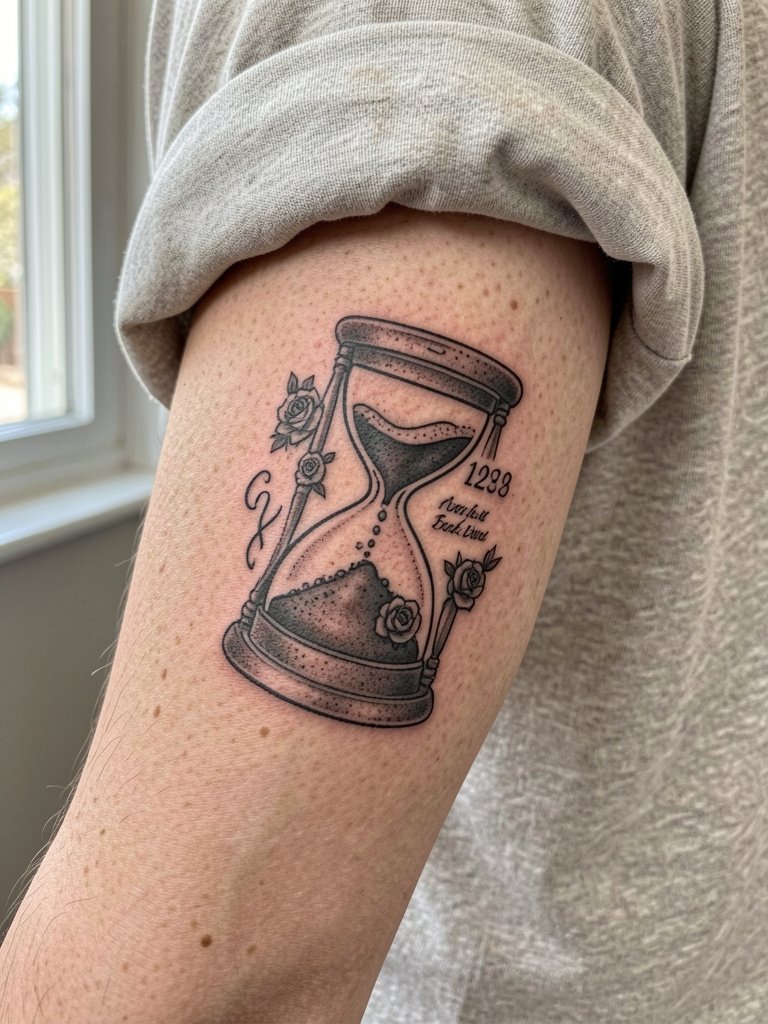
Patchwork memorials work best when each small symbol has breathing room so the overall silhouette of the hourglass remains legible. Avoid cramming script into narrow bands; prefer short dates or initials set apart by negative space. Discuss spacing and healed examples with the artist so you can see how similar commemorative pieces aged. For display, neutral tees and subtle wrist accessories on the opposite arm keep the forearm design readable without distractions.
Frequently Asked Questions
Q: How small can an hourglass be before sand detail is lost?
A: From my experience, sand detail starts to get fuzzy under two to three inches tall depending on the artist’s lineweight. If you want visible grains at year two, scale the hourglass to at least three to four inches or simplify the sand into larger shapes that read as texture rather than individual dots.
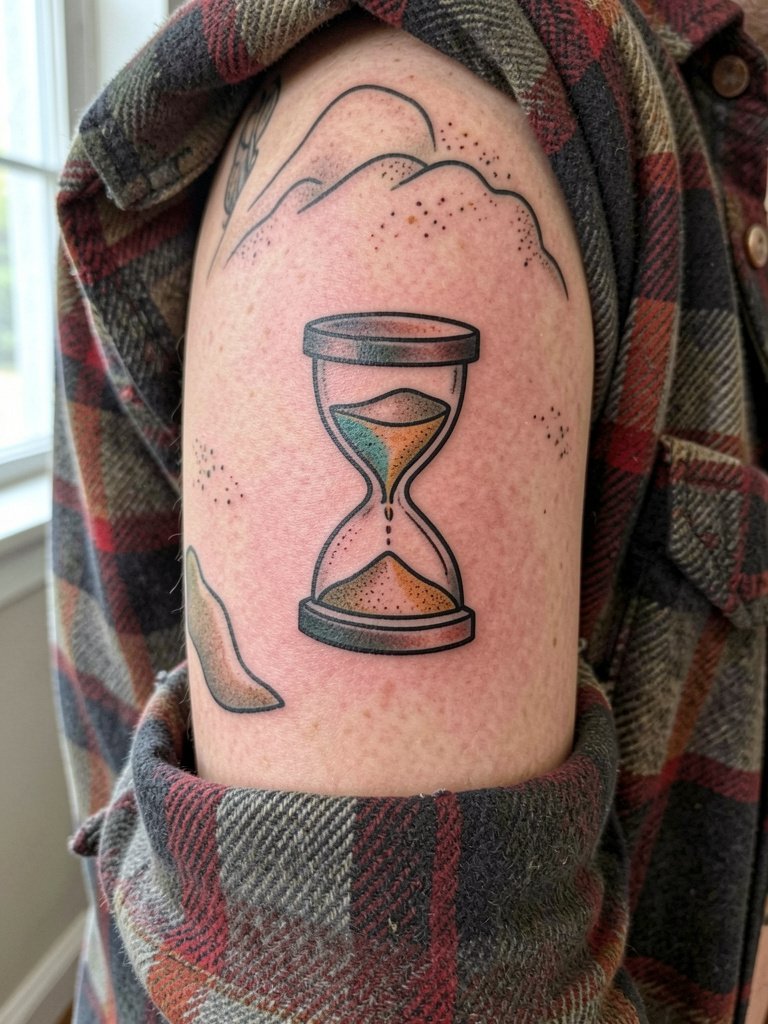
Q: Black and grey or a touch of color for an hourglass, which ages better?
A: Two camps exist on this. One camp prefers black and grey because it ages more predictably and keeps contrast as the skin shifts. The other camp accepts limited color accents for emotional contrast and recommends tiny, saturated pops rather than full-color fills so the piece remains readable over time.
Q: Where can I find artists and healed examples for this style?
A: Search hashtags like #hourglasstattoo and #blackandgreytattoo and filter by city to match local portfolios. Use booking platforms to check availability and portfolio keywords like "realism" or "blackwork," and look for Reddit threads or tattoo-specific galleries that show healed photos for the styles you want.
Q: Why do quotes about price vary so much for the same hourglass idea?
A: Price differences come down to size, session count, and complexity. Expect entry-level quotes for simple outlined flash, mid-range for neo-traditional or blackwork, and higher for micro-realism or multi-session chest and rib pieces. Tipping usually runs fifteen to twenty-five percent in most shops.
Q: Should I pick inner or outer forearm for an hourglass I want to see often?
A: The outer forearm shows more and suits bolder, displayable hourglasses that read at a glance. The inner forearm is better for script integration and more personal compositions. If you want sand detail to last, the outer forearm gives a slightly more forgiving surface for thicker shading and touch-ups.
