
Someone I know spent six months scrolling portfolios before they realized the real problem was not finding a cool design. It was knowing which dark half-sleeve would sit well on their arm, survive sweaty summers, and still read professional at a networking event. I have spent time in five shops across Brooklyn and at one regional convention, and these ten dark half-sleeve directions keep coming up in consultations and portfolios.
1. Heavy Blackwork Skull over the Outer Bicep

If you want a tattoo that reads bold from a distance choose a heavy blackwork skull placed on the outer bicep. Someone I know chose this after trying smaller skull flash and finding the detail lost at arm movement. Tell your artist you want a bold silhouette with clear negative-space highlights so details do not collapse as the skin stretches. Expect firm session time and deeper saturation work, and prepare for moderate pain on the bicep that eases between passes. The common mistake is shrinking the skull to fit a short sleeve container. Give the piece room to breathe and avoid thin detailing inside solid fills because thin work inside huge black areas tends to age into muddiness. Plan a touch-up at year two to restore dense blacks if UV exposure is high.
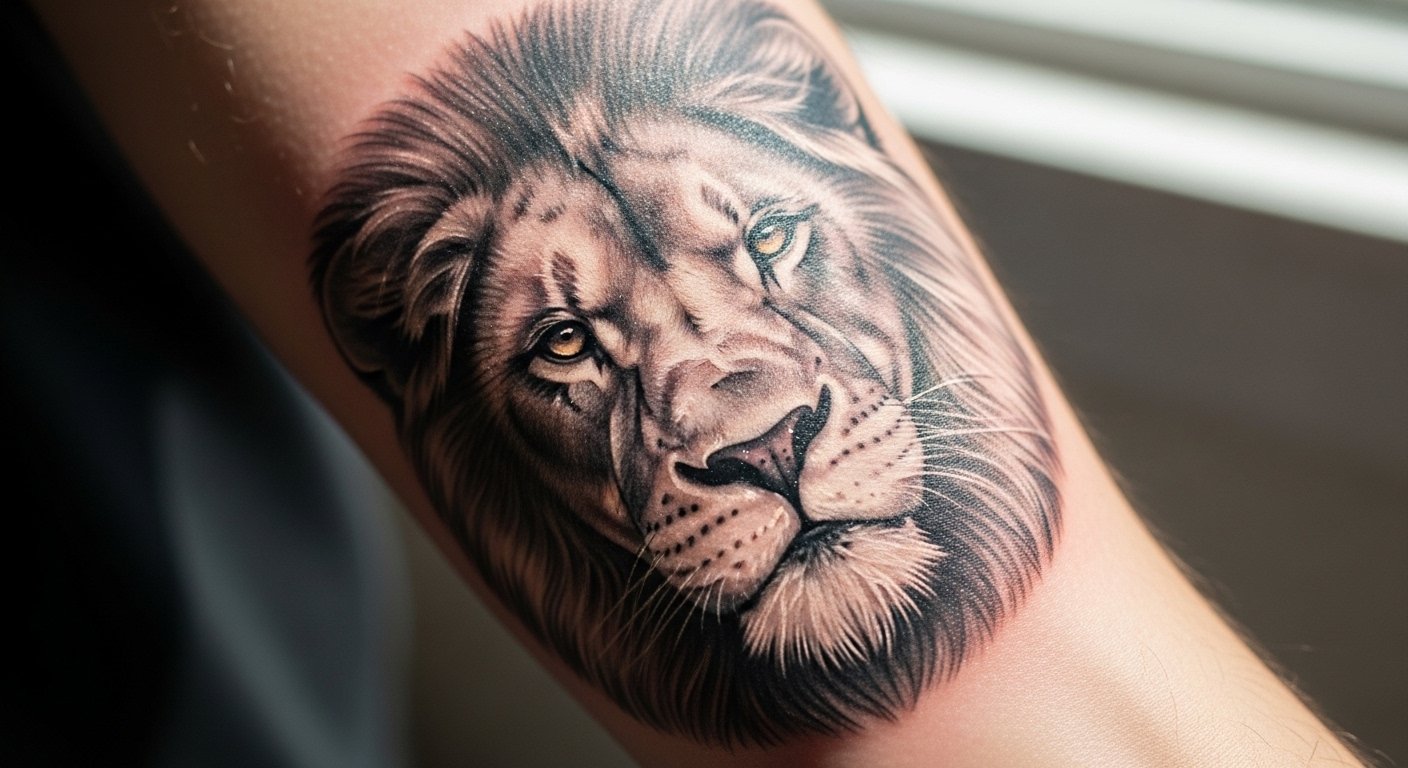
2. Wolf Face in Black and Gray, Front Bicep

When the goal is a predator portrait that still reads masculine from a handshake go realistic with a strong jawline and tight linework. At consultation bring three reference photos showing exactly how much tooth, eye highlight, and fur direction you want. Expect longer sessions because portraiture demands careful saturation and gradual stipple shading, and be ready for the artist to map muscle tracking so the snout sits correctly when your arm moves. One mistake I see is asking for tiny eyes to save space. Tiny eyes lose contrast as skin settles. On darker skin tones ask about contrast strategies so highlights remain visible after healing. A realistic wolf usually needs a one to three year touch-up to refresh midtones.
3. Nautical Ship Through Storm, Outer Bicep to Forearm Flow

There is something about a ship battling waves that works as a vertical narrative for a half sleeve. In conversation with an artist at a shop I visited they recommended mapping the prow on the outer bicep and letting ropes and waves guide toward the forearm for movement. Ask for layered linework and whip shading on the waves to achieve a worn, stormy texture. A common aging issue is over-detailing sails; fine crosshatching on sails blurs faster than heavy waves. Expect four to six hours per session depending on how much negative space you keep. If you want more contrast later, plan a dense black background behind the ship to make it pop.
4. Neo-Traditional Dark Floral Cluster on Upper Arm

Fair warning, florals can read soft if outlined too thin. Neo-traditional dark florals use strong linework and saturated gray washes to keep the composition masculine. When you sit for the consult bring color or black-and-gray references that show exact leaf direction and petal overlap. The usual mistake is cramming many small buds into a narrow space. That causes the piece to look busy as the tattoo heals and lines spread. For longevity ask your artist to prioritize bolder outlines and to keep airy spacing between blooms. On the upper arm pain is mild and the skin holds saturation well, making touch-ups less frequent than on forearm placements.
5. Aztec-Motif Blackwork Banding and Glyphs
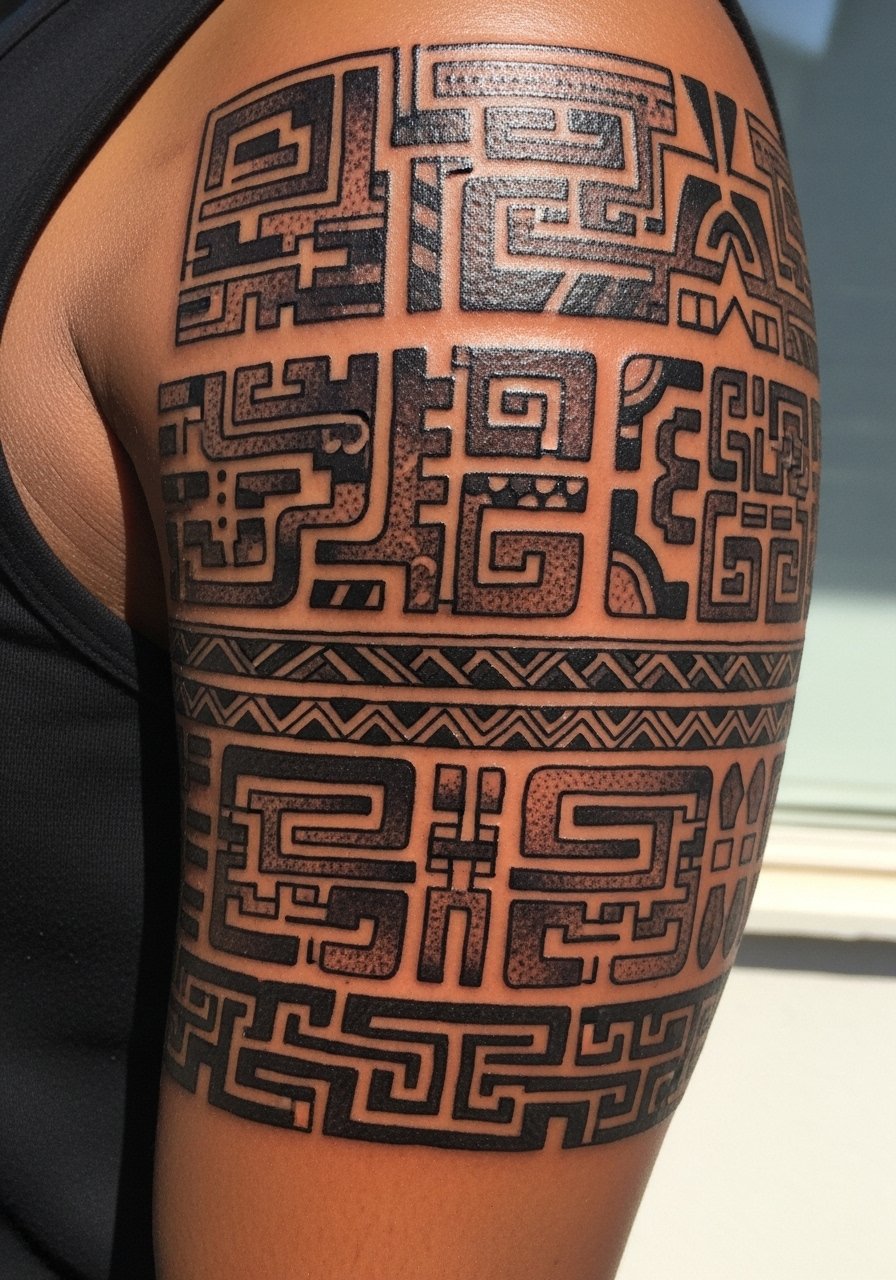
This ornamental route works if you want historical motifs that read as pattern and weight. Be aware of cultural origin sensitivity. These designs trace to specific Mesoamerican traditions, so some people choose adapted motifs instead of direct replicas. In consultations ask about the cultural meaning behind symbols and request subtle adjustments if you do not share that heritage. The biggest mistake is asking for extremely dense tiny glyphs that merge with time. For durability keep motifs slightly larger and prioritize bold negative-space breaks. The banding feels firm during sessions because of many tight lines, and blowout risk rises if lines are placed too close together on thin skin. Expect four to six hours split across sessions.
6. Biomechanical Black and Gray, Shoulder into Bicep
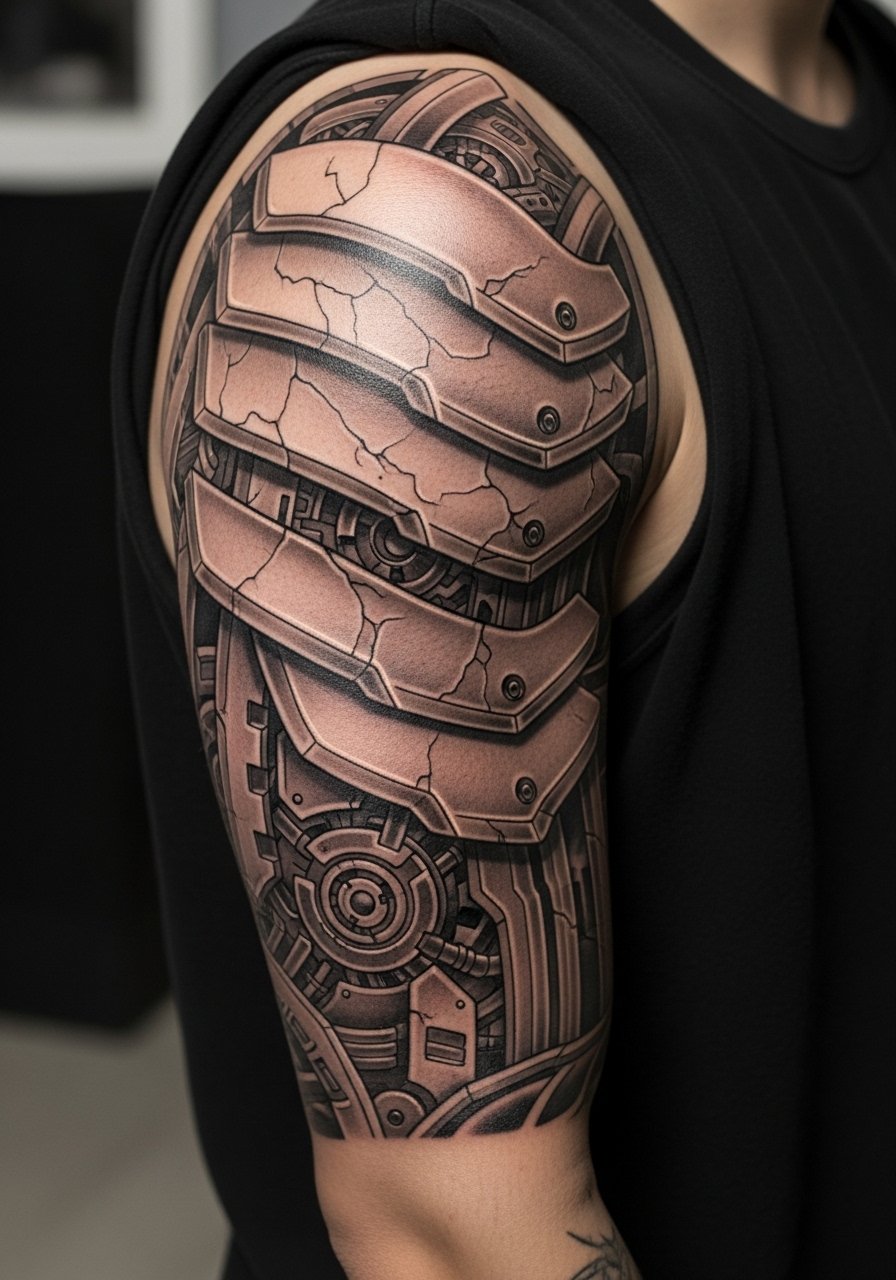
When you want a design that looks like machinery under the skin go with layered plates and strong contrast. A consultation tip is to have the artist draw flow lines over your muscle so plates follow movement rather than cut across it. A common mistake is micro-detailing inner elements that disappear at normal viewing distance. Keep inner micro details bold enough to read after healing. The shoulder takes more time and sometimes a separate day for heavy shading. If you work outdoors consider the long-term effect of UV on metallic shading because highlights can wash. A realistic plan includes a touch-up in two years to re-establish subtle highlights.
7. Geometric Mandala with Dot Work on Inner Arm
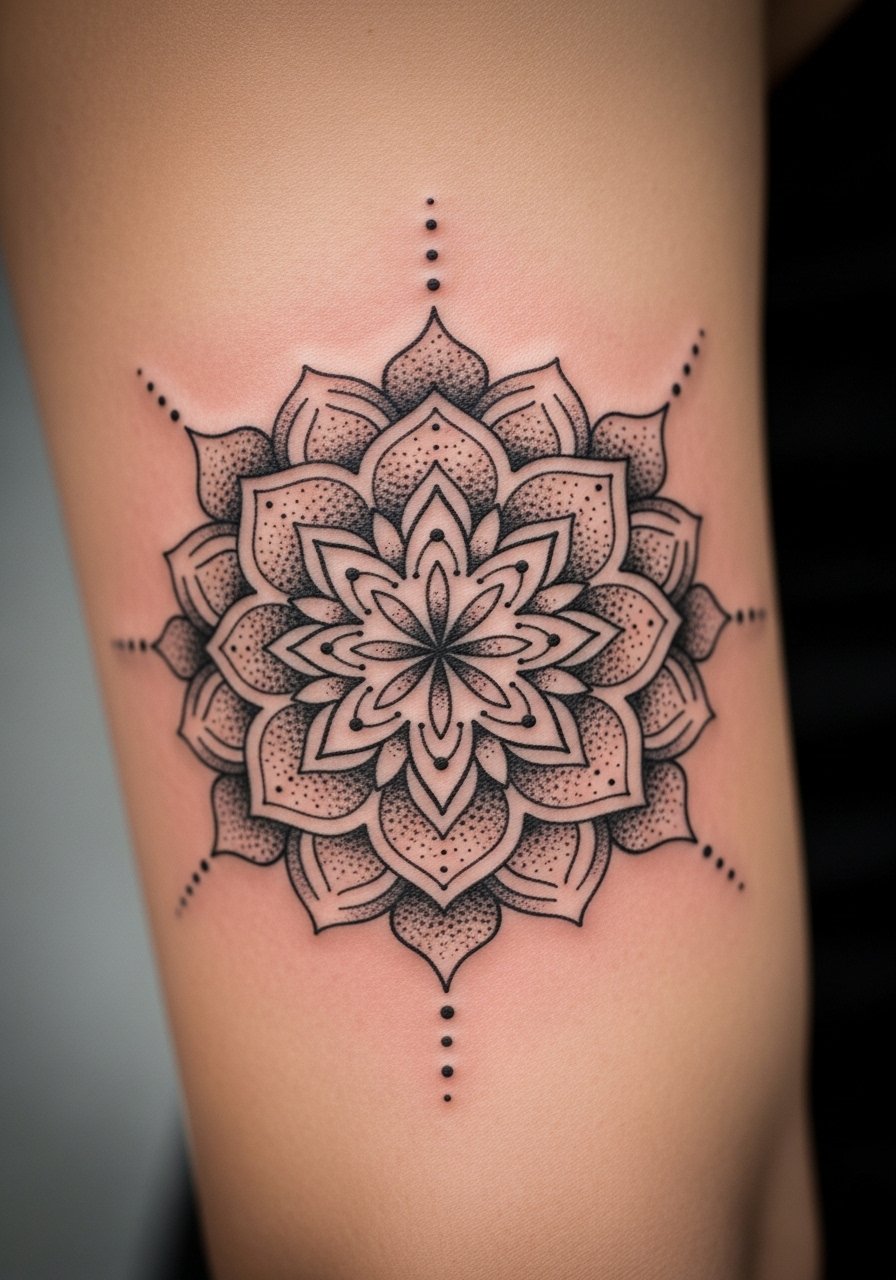
When someone wants crisp geometry on an inner arm I always advise larger scale and precise spacing. Artists are split on fine line in this area. One camp argues that inner-arm skin stretches and fine lines blur within two years. The other camp says that with correct needle depth and spacing fine line mandalas can remain crisp. Ask your artist which camp they follow and request test patches if possible. The common aging issue is crowding lines too close. Dot work requires patience during sessions and can feel ticklish more than painful. Expect dot work pieces to need touch-ups around year three if you are outside often.
8. Sun and Moon Duality Scene, Upper Arm to Elbow Gradient
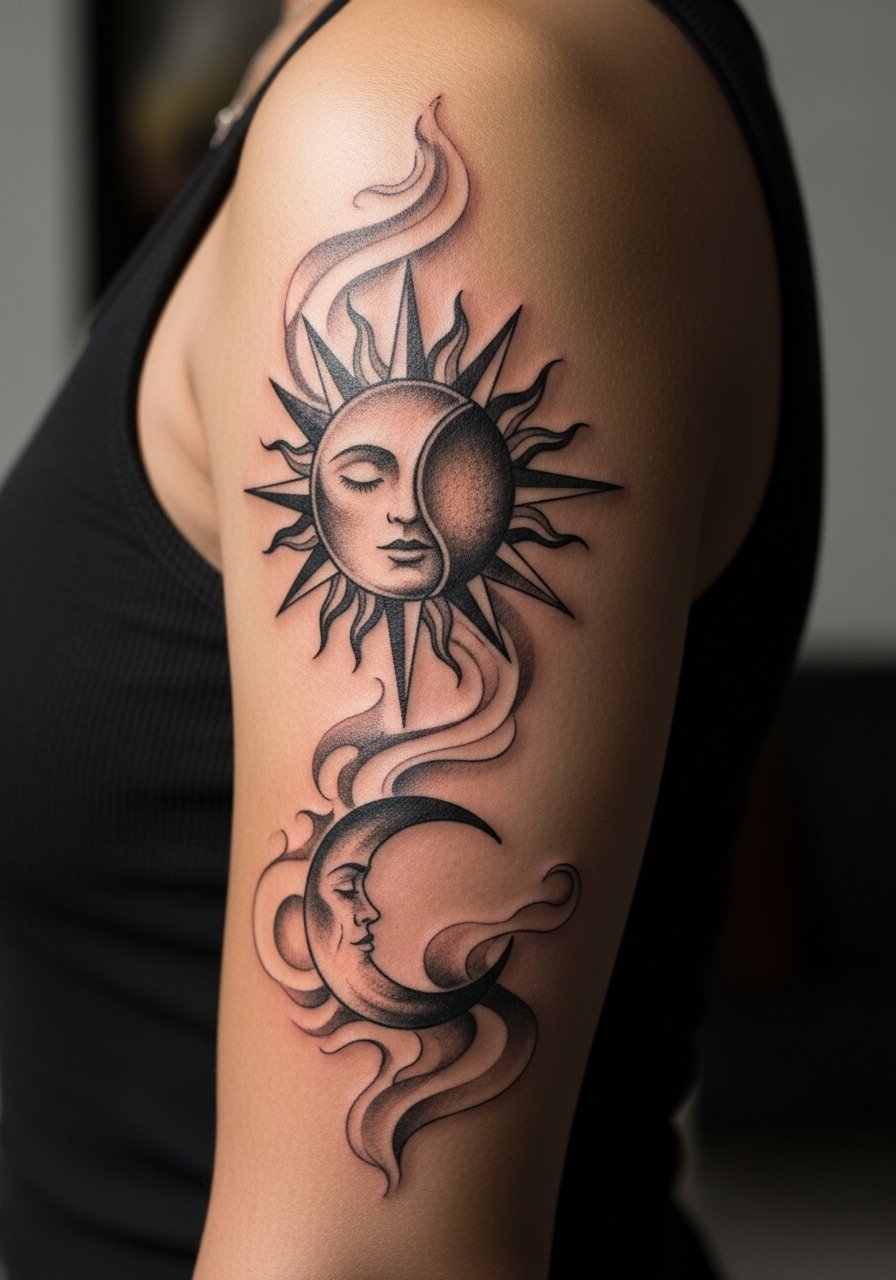
I recommend splitting the two elements across the arm so each has breathing room and a clear focal. Tell your artist you want the sun to read heavier with saturated blacks while the moon keeps lighter stipple shading for contrast. A frequent mistake is forcing equal saturation which makes both elements fight visually as the skin tones settle. Gradient work near the elbow can feel more intense because the skin bends during sessions. Consider scheduling shorter sessions across multiple days to maintain consistent saturation. Expect to plan a small touch-up to even gradients after the initial healing period.
9. Black-and-Gray Portrait Fragment with Dark Background

Portraits work as half-sleeves when paired with a dense black background to anchor the face. When you sit down for a consult bring three references showing exact facial angle and mood. A common mistake is asking for a full head at too small a scale. Faces need room for highlights and soft stipple to maintain expression. Talk about how the background will fade into solid black to protect edges as lines soften. Portrait sessions are long and demand steady hands from the artist. Expect to revisit for a touch-up at year two to restore midtones and eye whites if UV has lightened them.
10. Dark Celestial Scene with Comet Trails and Smoke
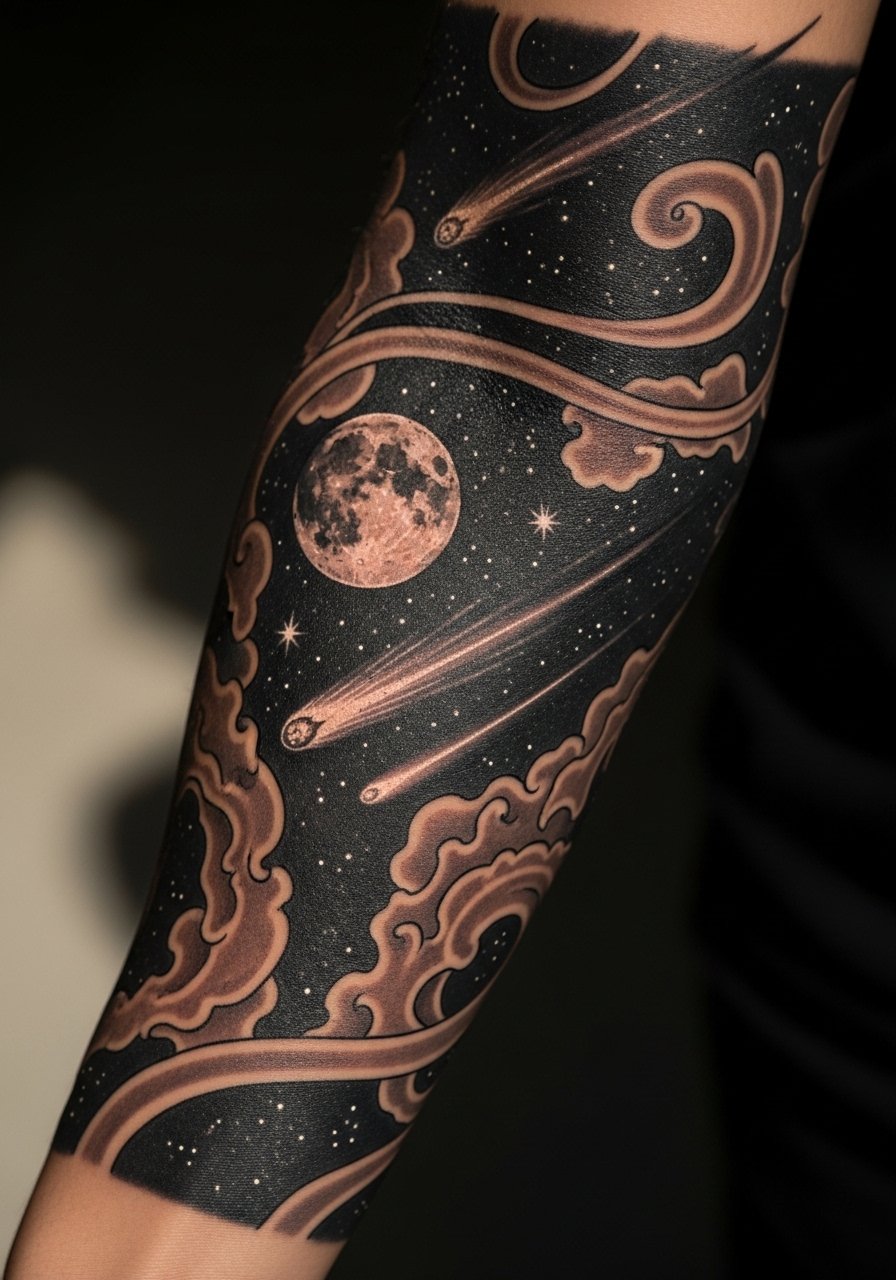
When you want drama without literal faces choose a celestial layout that uses smoke and comet trails to connect elements. In the consultation ask for comet trails that taper into smoke so the piece reads vertically along the arm. The common mistake is making trails too thin. Thin tails disappear as the skin relaxes. This placement can brush the elbow and forearm junction which increases session discomfort for some people. Plan two shorter sessions to keep saturation consistent across the connected pieces. A light background wash helps hold the small highlights and reduces the appearance of patchiness as the tattoo ages.
Tattoo Prep and Aftercare Essentials
Fragrance-free gentle foaming cleanser. Use only through the first week to remove excess plasma and avoid scented soaps that irritate fresh ink. Clean twice daily with gentle pressure and pat dry rather than rubbing.
Lightweight fragrance-free healing balm. Apply a thin layer after cleaning while skin is slightly damp. Keeps the area from flaking excessively without suffocating the ink.
Medical-grade second skin bandage, 6-inch roll. Useful for the first 24 to 48 hours on large half-sleeves or areas that snag on clothing. Follow your artist on timing for removal.
Unscented shea butter balm. For long-term moisturization after the initial healing phase. Apply sparingly to avoid clogged pores.
Antibacterial gentle soap for tattoo care. Use in the first two weeks when showering to reduce infection risk without stripping oils.
Aquaphor Healing Ointment. A mainstream option that some people like for initial thin-layer protection. Use briefly and switch to a lighter balm as recommended by your artist.
Tattoo-specific sunscreen stick SPF 30. After full healing protect dense black areas from UV fading. Apply liberally before sun exposure and reapply according to activity level.
Every tattoo is different. Always follow your artist's specific aftercare instructions. Consult a dermatologist if you have skin concerns or unusual healing issues.
Frequently Asked Questions
Q: Will heavy blackwork on the outer bicep age better than detailed illustrative work?
A: From what I have seen heavy blackwork holds black density longer because solid fills resist the look of scattered fading. Detailed illustrative pieces show more character as they age but may need touch-ups sooner to restore midtones. Ask your artist about planned touch-up windows.
Q: Do portrait fragments need a special aftercare routine compared to floral work?
A: Portraits benefit from meticulous early moisture control to protect soft gradients, while florals tolerate slightly more aggressive moisturization. Both need sun protection after healing. A tattoo-specific sunscreen stick helps preserve portrait midtones.
Q: If I want geometric mandala detail on my inner arm should I be worried about fine line blur?
A: It depends on the artist and your skin. Some artists avoid ultra-fine lines on inner arm skin because of the stretch. The safe move is to ask the artist which line weight they use for inner-arm geometry and request slightly larger spacing to reduce future blur.
Q: How soon should I plan a touch-up for a biomechanical piece with heavy gradients?
A: Plan a touch-up window around year two to three for gradient restoration, especially if you spend time outdoors. Small touch-ups within six to twelve months are also common to even out saturation after the initial healing.
Q: Are there professional considerations for visible forearm extensions of a half-sleeve?
A: Yes, forearm visibility affects workplace impressions. Upper-arm-only placements can be covered by shirts during interviews or formal events, while forearm extensions remain visible year-round. Discuss placement with the artist if concealment matters for your job.
Q: Does aftercare style matter in the Saniderm versus dry healing debate?
A: Artists split into two camps here. One camp favors occlusive dressings like Saniderm to protect and limit scabbing. The other camp prefers open-air cleaning and light balms to let the skin breathe. Both approaches can work depending on the tattoo size and skin type, so ask your artist which method they specialize in and follow their timeline.
