
Tiny, wispy bat tattoos that read great on a saved post often blur into an indistinct smudge within a few years. I have seen bold blackwork silhouettes hold their presence, while single-needle wings vanish on the wrist. If you want a gothic bat that still reads in photos and in five years, plan spacing, linework weight, and placement now instead of shrinking the design to fit a trend.
1. Fine-Line Crescent Moon Wrist Bat
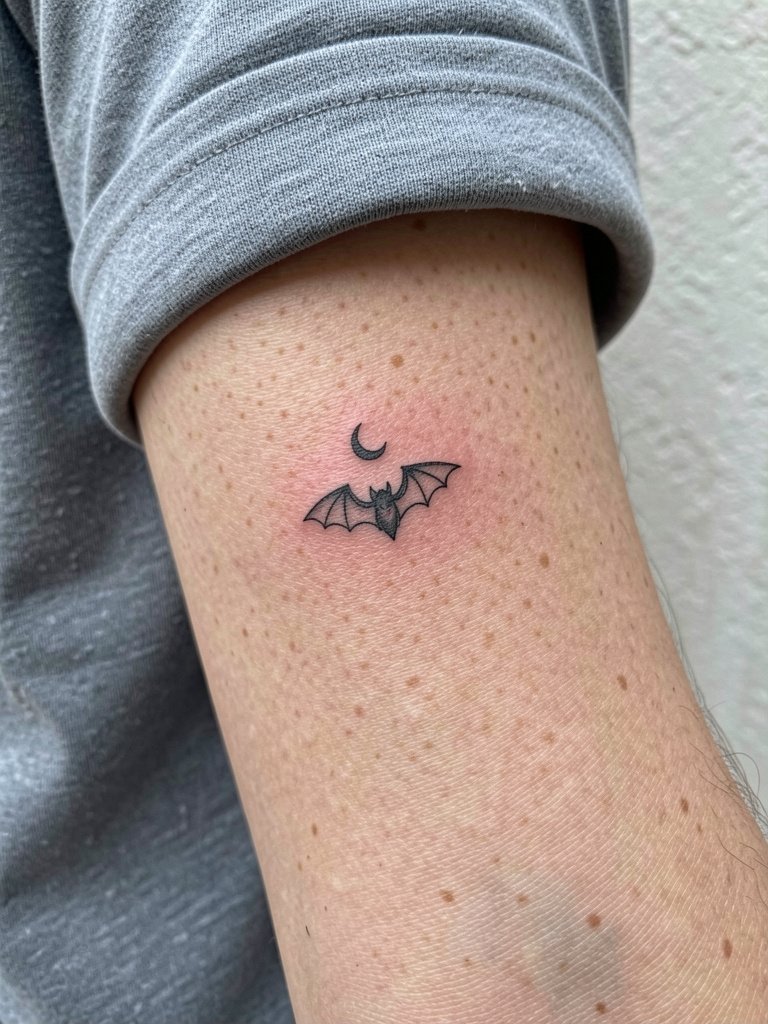
A fine-line wrist bat is the classic first-tattoo pick for people who want something subtle and easy to hide. Plan for slightly heavier single-needle contour than the Instagram reference so wing tips do not merge by year two. The wrist is a high-motion, medium-friction spot, so expect one touch-up between year one and year three for crisp wing tips. Session time is short, usually a single appointment under 45 minutes, and the pain is moderate. For showing it off, pair the wrist with a slim black bangle on the opposite hand and a short-sleeve tee. Black bangle bracelet
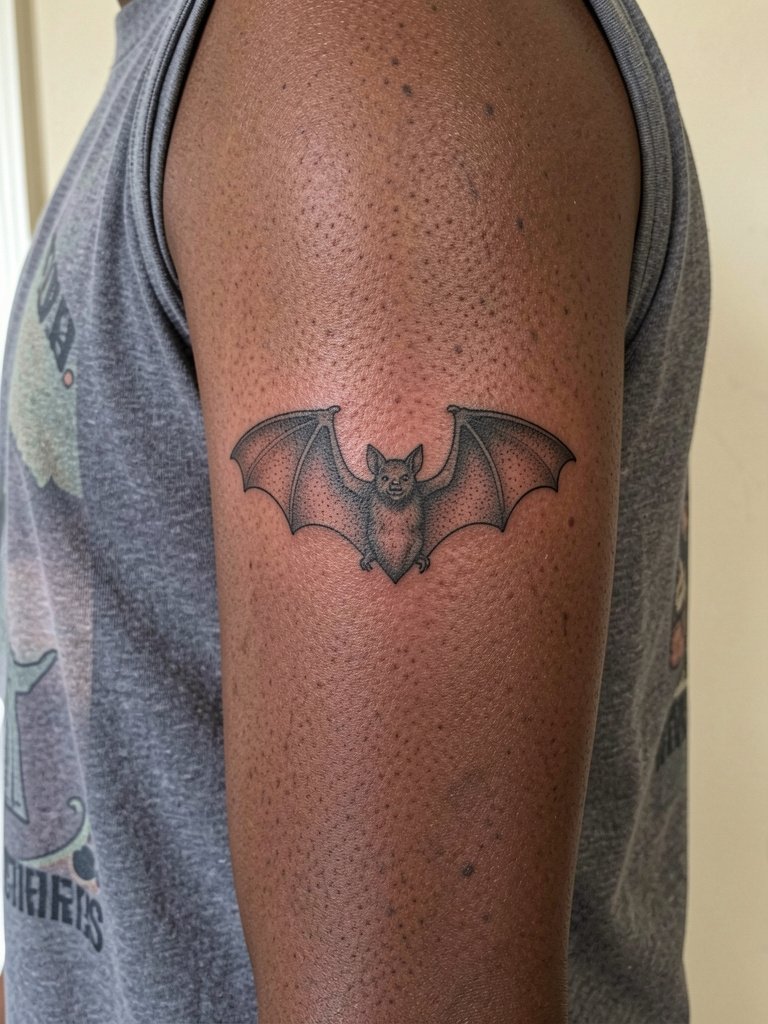
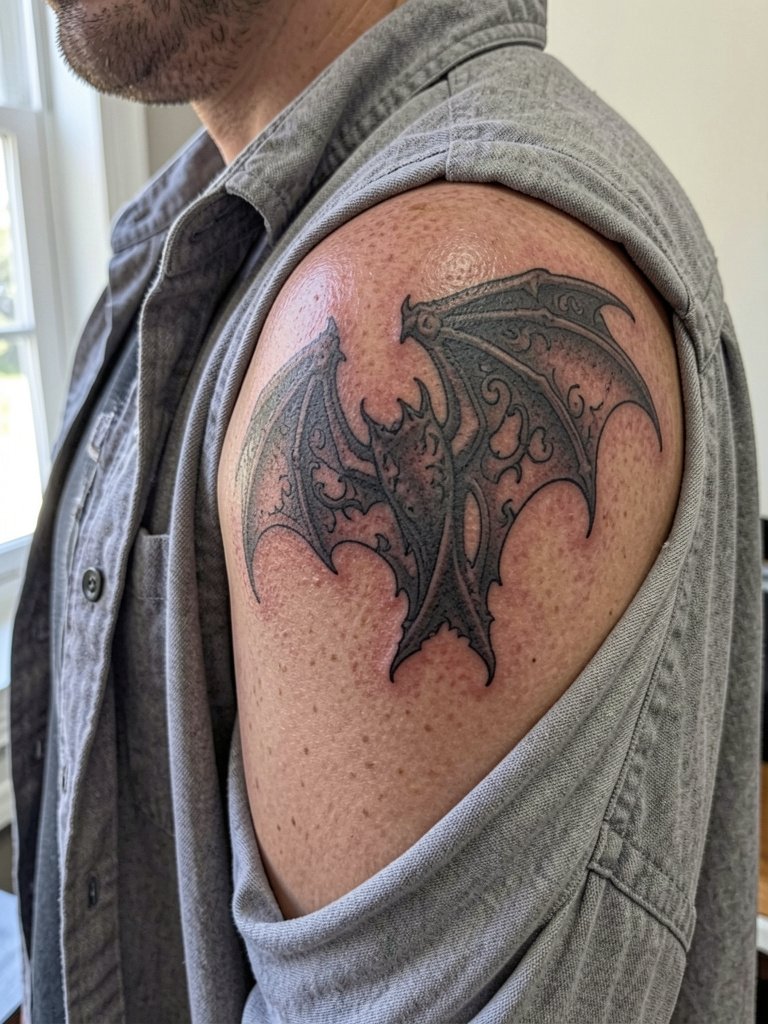
2. Ornate Filigree Upper Arm Bat

Choose an ornate, filigree bat for upper arm placement when you want gothic detail without a full back piece. The extra space lets the artist add lacey wing veins and ornamental frames that age better than cramped decoration. Expect one to three sessions depending on how dense the filigree is, and plan for heavier saturation in the darkest areas so the silhouette stays legible from a distance. During the consult, bring both a filigree reference and a clear photo of the intended arm area so the artist can scale the ornament. For outfits, sleeveless tanks or open overshirts let the piece peek out on warm days. Ribbed tank top
3. Blackwork Winged Silhouette, Upper Arm
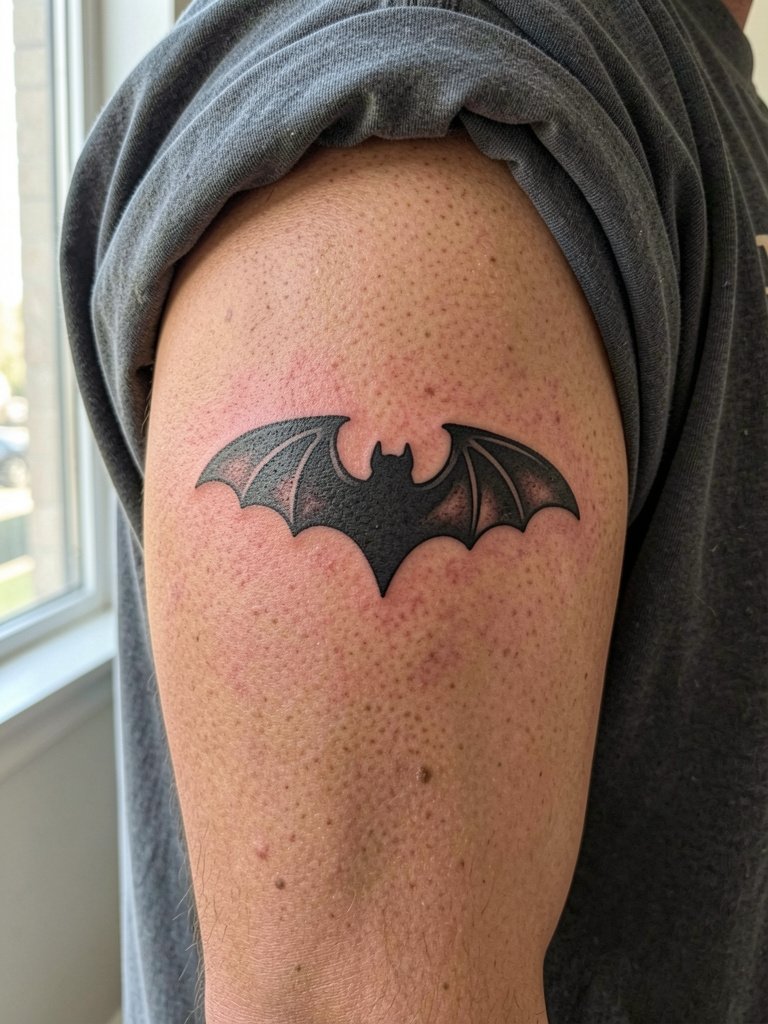
Blackwork bats solve the "too cute" problem by favoring contrast and readability. They tolerate lower maintenance and usually need fewer touch-ups than micro fine-line work in high-friction spots. There is a hot debate about fine line versus bold outlines. One group argues fine line pieces look cleaner and can age well in low-friction spots if spacing is generous. The other group insists bold outlines are safer because thin lines often blur and merge, especially on active skin. For this style, expect a heavier session with more saturation and faster visual payoff. A relaxed muscle tee shows off the piece while keeping the area comfortable during healing. Oversized muscle tee
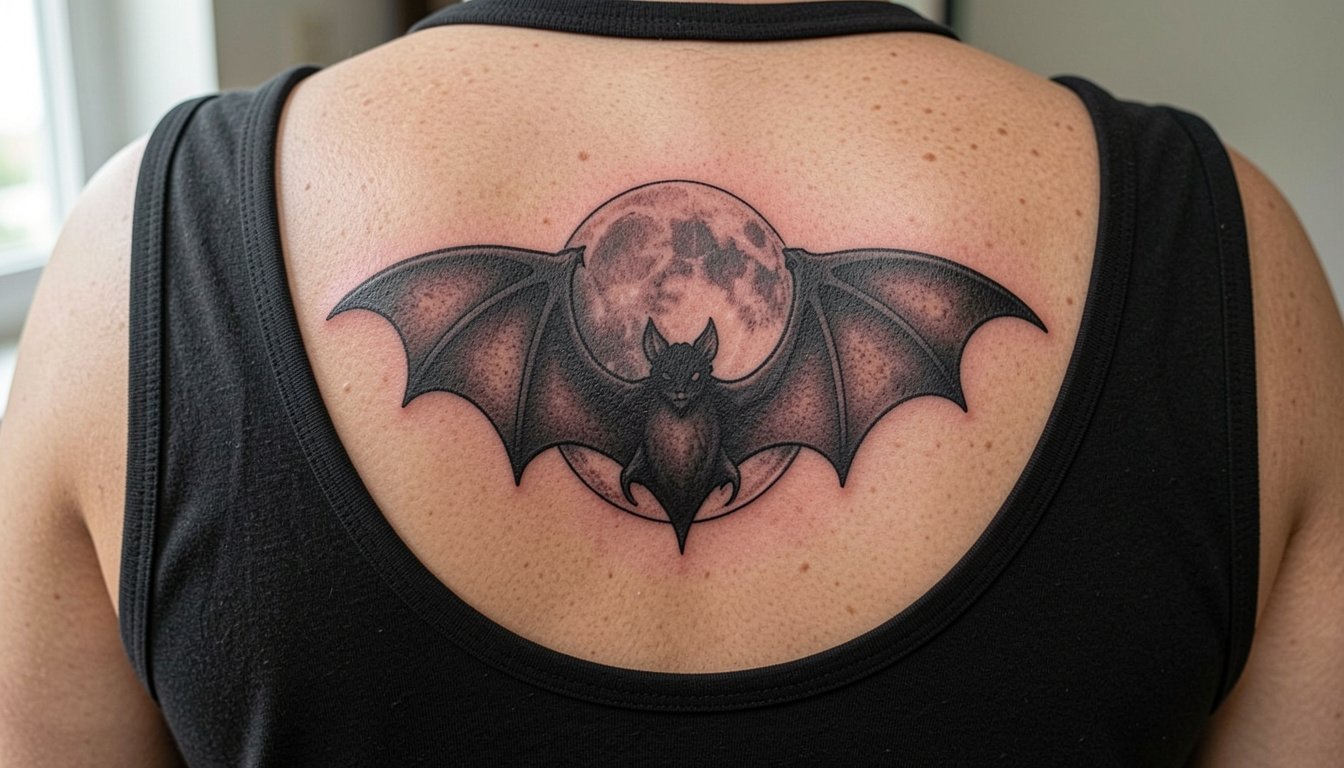
4. Gothic Cathedral Backdrop with Full Moon
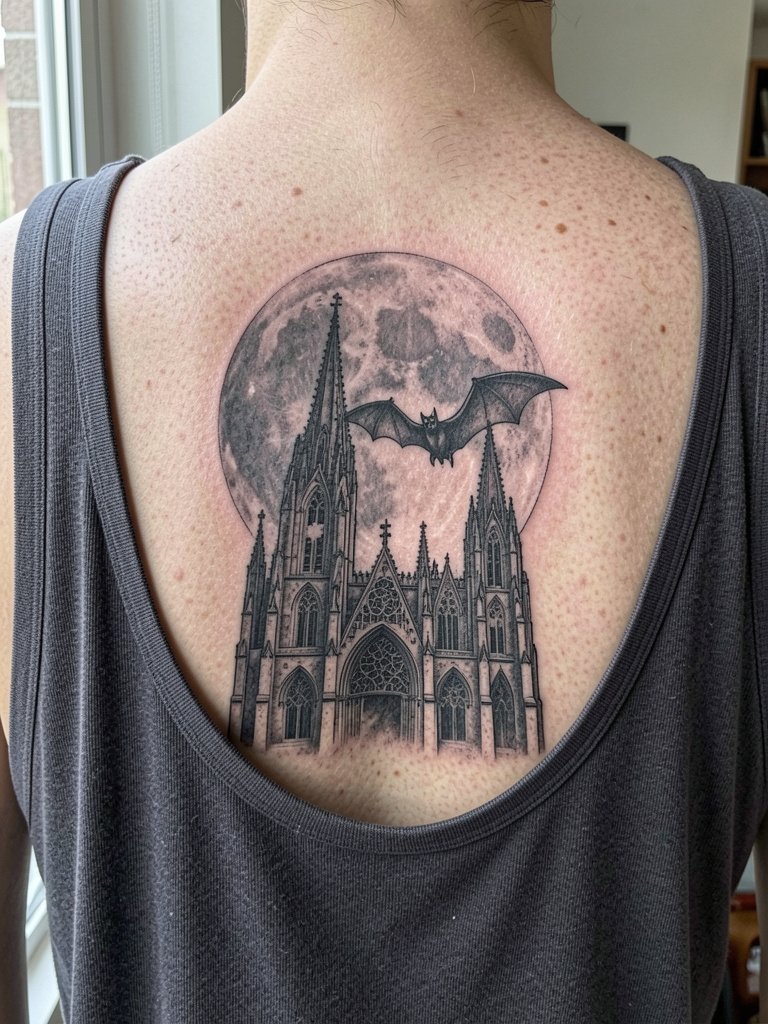
When you want narrative and atmosphere, a cathedral and moon let the bat become a scene rather than a symbol. This is a multi-session piece if you push the architectural detail and moon texture. The common mistake is shrinking the cathedral so the columns blur into wing veins; give the arches clear negative space from the wings. Mid-back placement is forgiving for shading and reads well in photos once fully healed. Expect moderate pain and longer sessions. For show-off styling pick open backs or layered chains that sit above the composition for contrast with the moonlit silhouette.
5. Micro Bat Behind the Ear
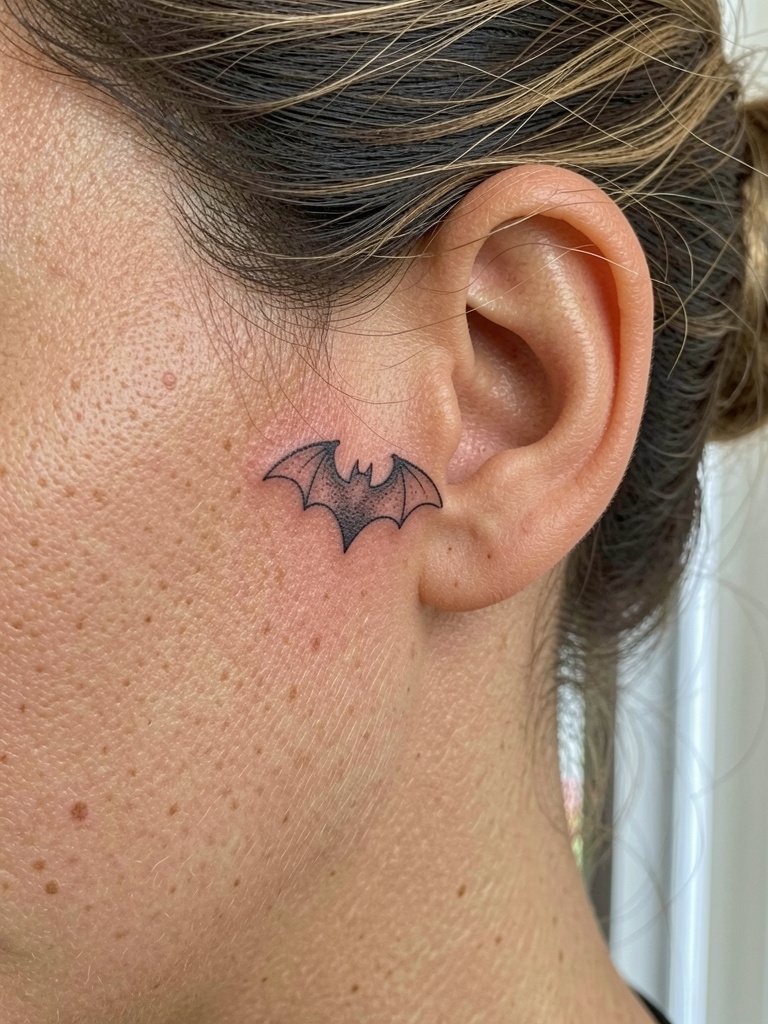
Micro bats behind the ear are a minimalist choice for someone who wants the motif but not constant visibility. Size matters here. Too many clients request ultra-thin wings and then report the shape disappears after healing. Ask the artist to thicken the outline a hair and to place the wings with a little negative space from the hairline. Session time is short and pain is low to moderate. Wear hair clips or a tie-back for the appointment so the artist has clear access. Small hoops or a single stud pair well when you want the tattoo to peek out. Hair clips set
6. Dripping Ink Bat on the Ribcage

Ribcage work reads as dramatic and moody, but the skin stretch and motion demand careful spacing. A common issue is over-detailing the drips at a tiny scale; keep the darkest areas bold and let the drips be graphic shapes so they do not blur into texture over time. Rib sessions are higher on the pain scale and often require breaks, so expect one longer appointment rather than multiple tiny ones. For session wear pick a loose bra or a front-opening top so the artist can access the side comfortably. Allow two to three weeks of gentle movement restrictions while it settles.
Heal Essentials
Those first six ideas include tiny wrist pieces and side-torso shading that heal differently, so pack a few practical items for the chair and the first week.
-
Tattoo Goo Original Aftercare Lotion. A lighter-feeling lotion some people use after the initial ointment phase, useful for small wrist and behind-ear pieces when heavy ointments cause breakouts.
-
Bepanthen Tattoo Aftercare. A gentle healing cream favored in some circles for sensitive skin, good for the ribcage and sternum pieces where moisture control matters.
-
Drapolene Cream. Occasionally recommended for irritated healing skin, handy if you get a patch of stubborn dryness during the first week.
-
CeraVe Healing Ointment. A fragrance-free, less greasy option for people who want moisture without pore-clogging residues on forearm or calf pieces.
-
Second-skin Adhesive Bandage. Useful to protect fresh outer-arm and calf work from friction during the initial healing window.
7. Traditional Flash Bat on the Forearm
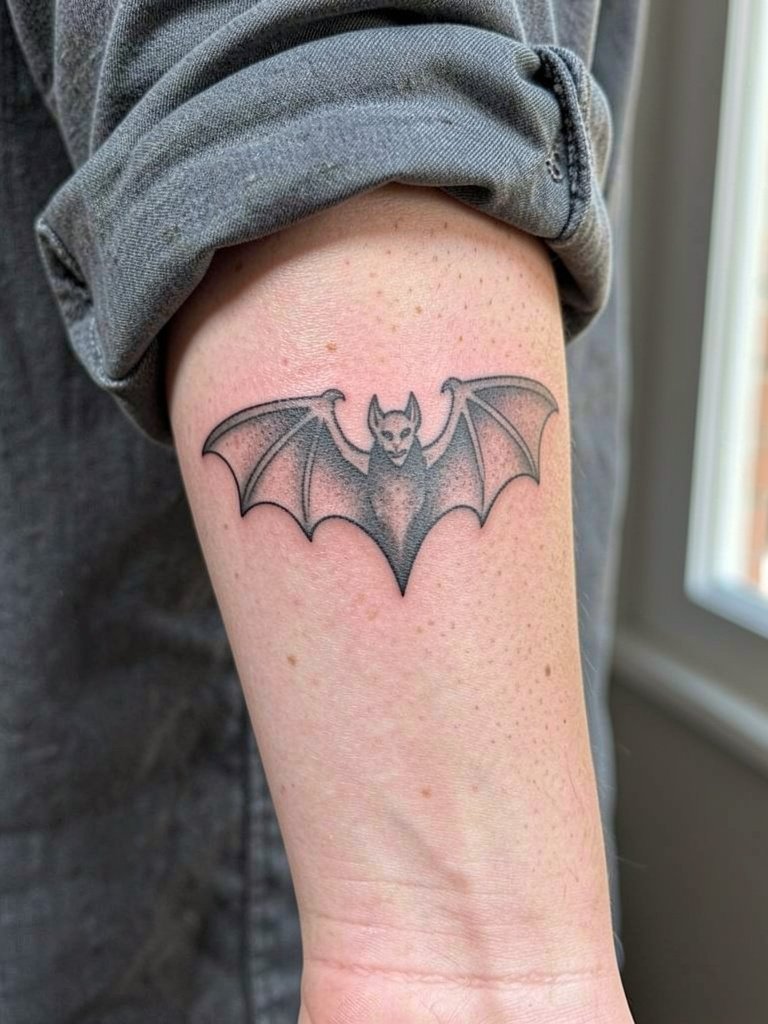
Traditional flash bats are a practical pick if you want longevity and low fuss. Thick outlines and flat black fills age predictably and keep wings readable at smaller sizes. Forearm placement is one of the easiest for sessions and aftercare, with mild pain and a quick touch-up cycle if needed. A typical mistake is adding too many tiny internal details that the classic flash style does not support. For a casual reveal, roll sleeves and stacked rings on the other hand highlight the piece while balancing the arm visually. Roll sleeve button down
8. Neo-Traditional Jewel-Toned Thigh Bat
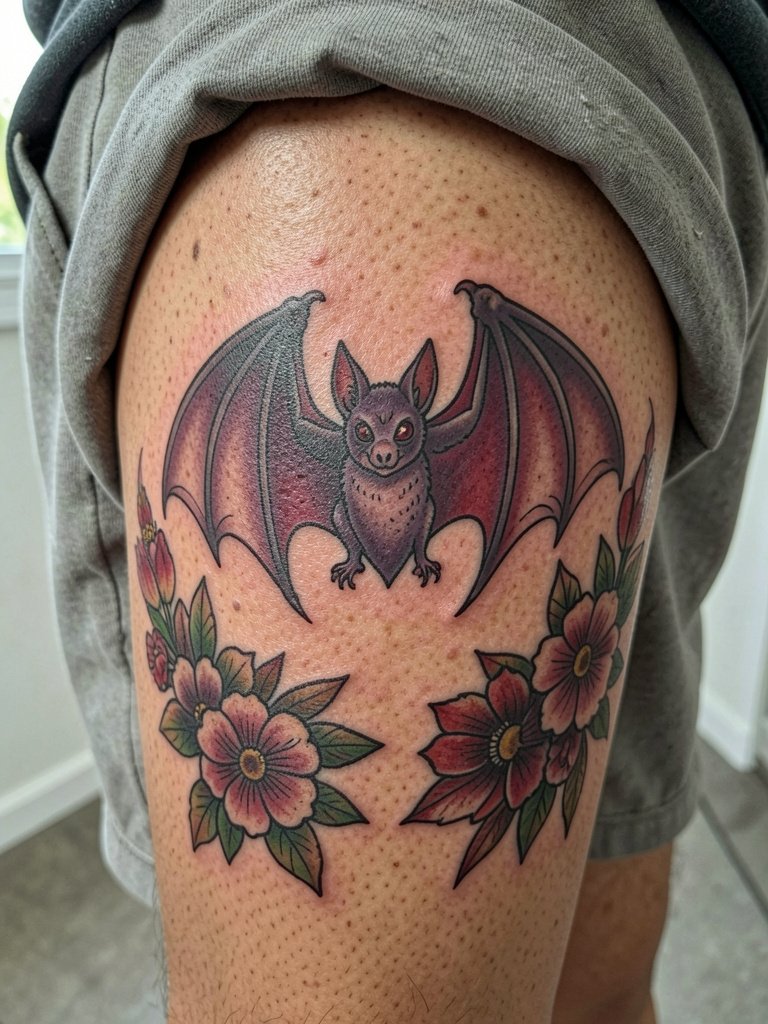
If you want personality beyond monochrome, neo-traditional jewel tones give structure and character while still reading gothic. Thigh placement lets the artist use color accents without the same sun exposure worries as forearms. Plan one to two sessions depending on color layering and expect low-to-moderate pain. The most common flaw is oversaturating tiny color elements that later need touch-ups. For visibility, pair the piece with shorts or high-slit skirts when you want to show it off.
9. Tiny Ankle Silhouette in Motion
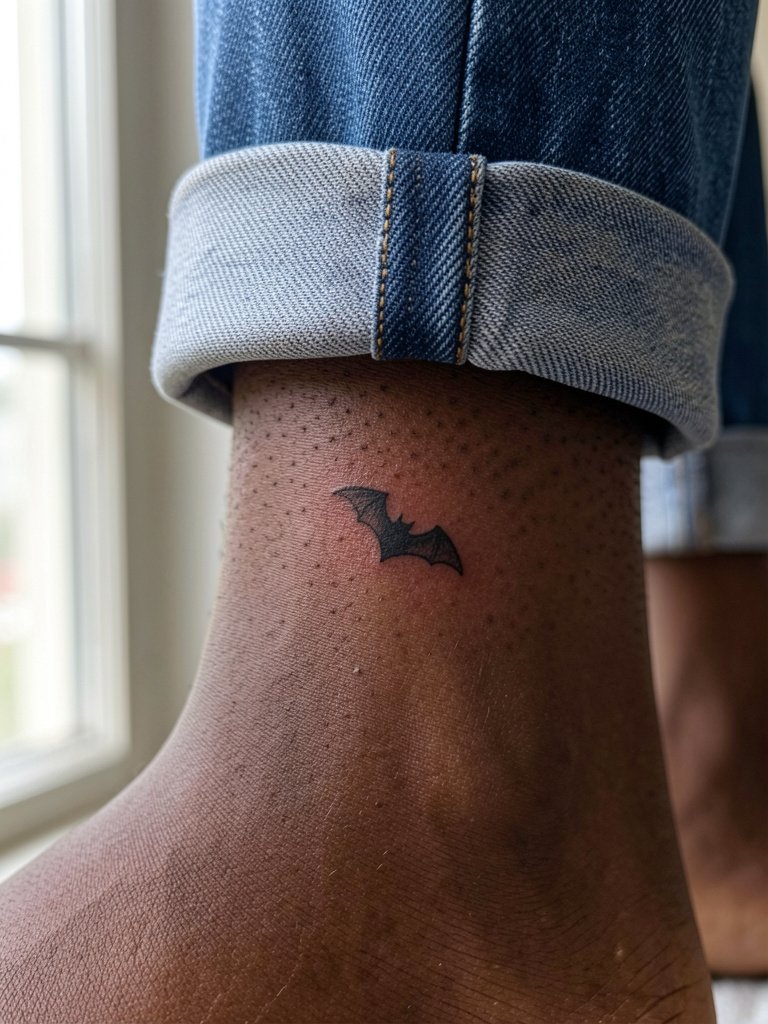
Ankle bats read as discreet and mobile, but friction from socks and shoes makes ink loss a real risk. Small silhouettes are accessible and budget-friendly, but there is a debate about size. One camp loves tiny ankle pieces for first tattoos and low commitment. The other camp argues gothic bats need space for wings and framing or they just look like a generic speck. If you choose the ankle, ask the artist to thicken the outline modestly and keep the wings compact but separated so they hold during healing. For show-off styling, cropped jeans or low sneakers work well. Cropped straight jeans
10. Pair of Bats on the Inner Forearm

Clusters of tiny bats create motion but need proper spacing to avoid merging lines. Inner forearm skin is relatively gentle, so fine line clusters can hold better here than on the wrist. The common mistake is squeezing more bats into a small area for storytelling; instead, give each bat three to four millimeters of clear space. Session time is moderate if you want multiple little figures. Minimalist jewelry and neutral tops help the composition read editorial in photos. Linen button down shirt
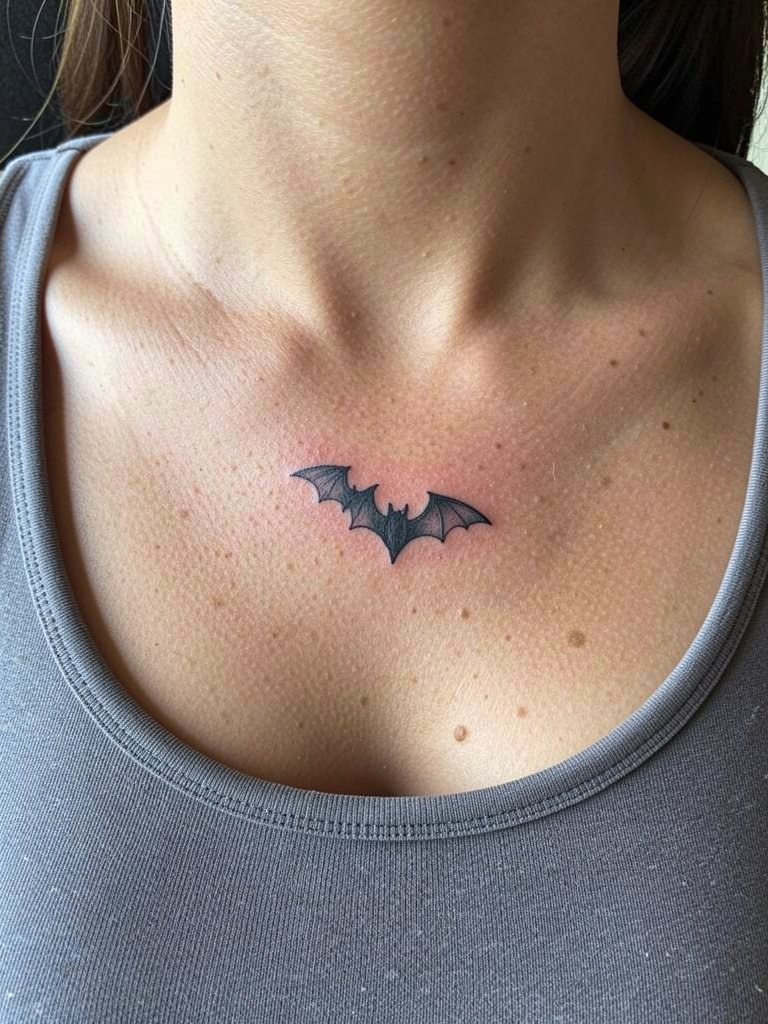
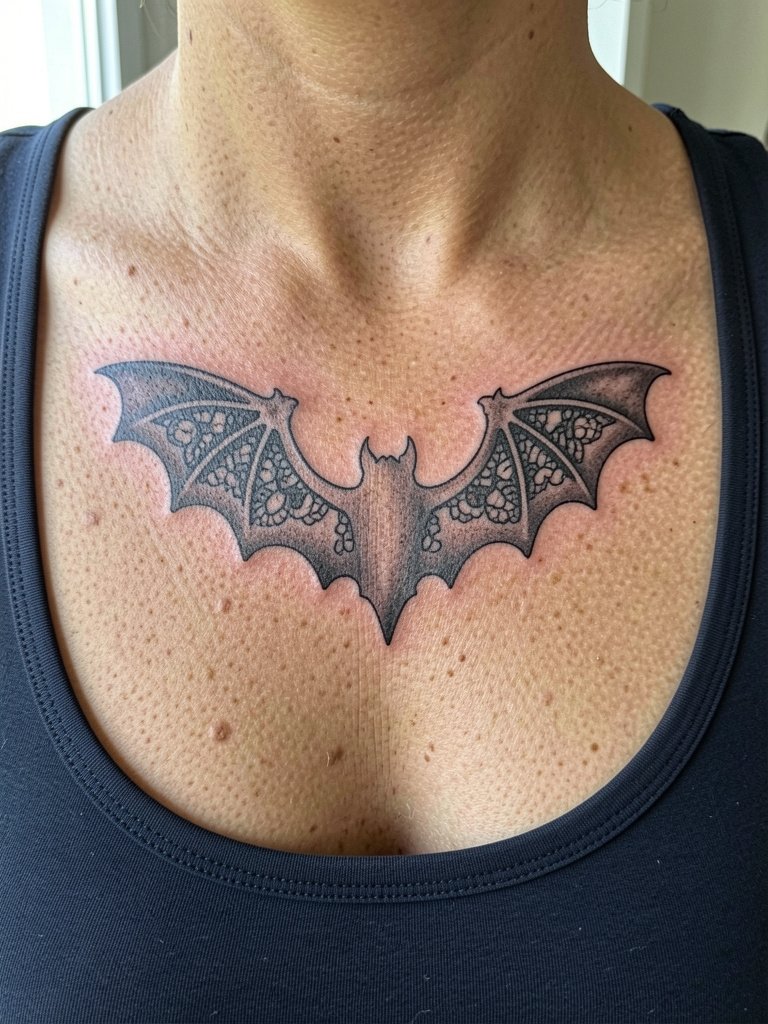
11. Lace-Outlined Sternum Bat
Sternum placements reward symmetry and ornamental framing, but require careful planning for how the design sits under natural body contours. Bring triangular and frontal references so the artist can align the lace pattern to breast positioning. Pain and sensitivity are higher here, and session wear should be a front-opening bra or a removable top to avoid pressure. The piece photographs beautifully with layered necklaces or deep V tops when you want a deliberate reveal. The key mistake is compressing intricate filigree into a narrow band; let the ornament breathe.
12. Cute-Creepy Face Close-Up on the Wrist
A cute-creepy bat face balances charm and edge, but scale is everything. On the wrist, emphasize bold contour on the jawline and ears so the cheek details do not smudge into a blob over time. One common misstep is adding tiny teeth or dot-shading that the wrist will not keep crisp. The session is quick, with mild to moderate pain. For show-off styling, a simple silver chain bracelet on the opposite wrist or stacked rings helps the face pop without competing with the design. Silver chain bracelet stack
13. Large Moonlit Back Composition
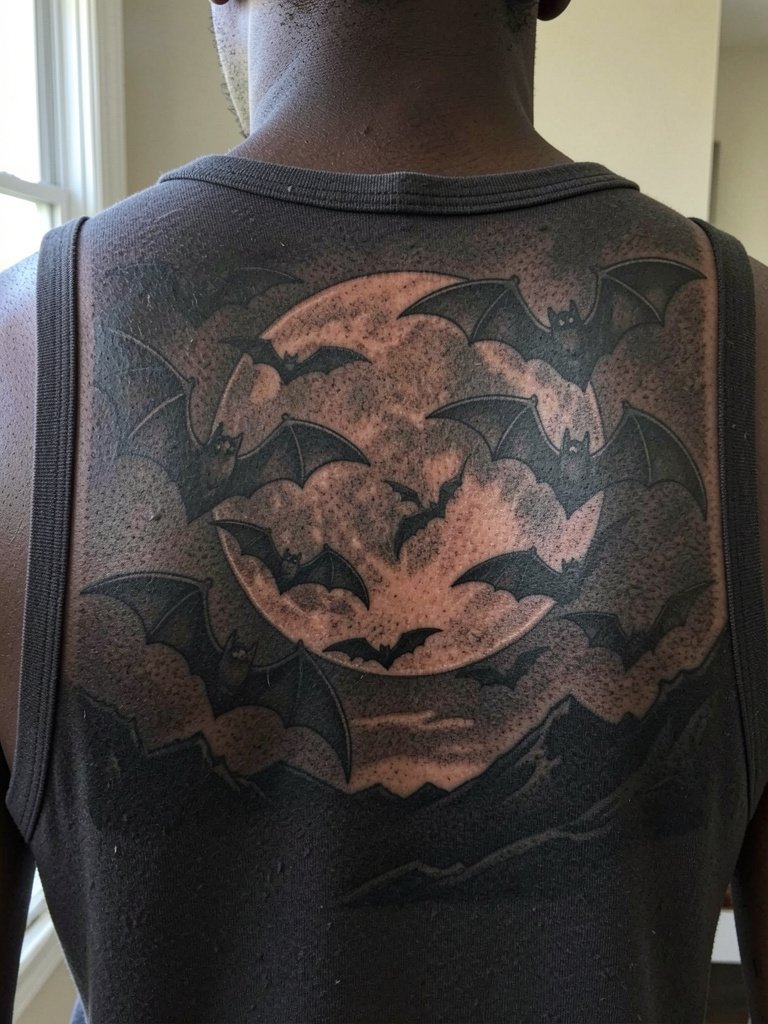
Large back compositions let the bat motif become an environmental scene with depth and motion. These are multi-session projects where touch-ups are part of the plan. The error I see most often is wasting negative space in the moon that should be crisp to contrast the bats. Healing takes time but the payoff is a piece that photographs strongly in low-light editorial shots. Session wear that gives full back access is necessary, and expect discussion about overall composition before any shading begins.
14. Neo-Goth Floral Bat on Outer Forearm

Mixing florals with a bat can soften the horror angle while preserving gothic energy. Outer forearm placement gives the filigree and petals room to sit around the wings without crowding. Avoid putting ultra-fine floral veins too close to dark wing fills, because the two textures will either vanish or muddy. Session time is moderate and pain is low compared with ribs. For everyday styling, rolled cuffs and stacked rings on the other hand balance the piece when you want it subtle yet considered. Stacked ring set
15. Micro Cluster on the Collarbone
Clusters across the collarbone read as delicate movement but demand even spacing to avoid a patchwork look as the skin shifts. Clavicle placement sometimes loses fine dots because of the bone contour. Plan slightly bolder miniatures and ask the artist to map the arc to your bone structure. Pain is low to moderate. For showing off, layered chains and a deep scoop neck frame the flight path smoothly without forcing the area to be always visible. Layered necklace set
16. Heavily Shaded Calf Bat

Calf pieces suit heavy blackwork because the skin tolerates saturation and the area is easy to protect during healing. The most common client regret is underestimating how dark blackwork will read in sunlight after healing; the silhouette will be bold and graphic. Expect one session for medium sized fills, two sessions for expansive black planes. For visibility choose cropped trousers, biker shorts, or boots depending on season. During sessions wear loose joggers that pull up without compressing the area.
17. Stipple-Shaded Nightwing on the Inner Arm
Stipple shading gives a ghostly texture that reads especially well on inner arm placements because the surface is flatter and less sun-exposed. When you pick stipple, expect the artist to plan dot density for longevity. Fine stipple spaced too close will fade into a soft patch; spaced dots hold longer. Inner arm sessions are comfortable with low-to-moderate pain. Wear a loose short sleeve or tank so the area is accessible but not compressed during healing.
18. Single-Needle Nose-to-Head Small Bat

Single-needle micro bats can be elegant when placed on low-friction skin. The realistic risk is that single-needle contours on the dorsal wrist may soften into a fuzzy line within a couple of years if the spacing is too tight. If you want the ultra-fine look, ask for a slightly heavier hairline and keep the silhouette simple. The session is brief and the pain is moderate. Session wear should keep the wrist free of watches or bracelets for the first week.
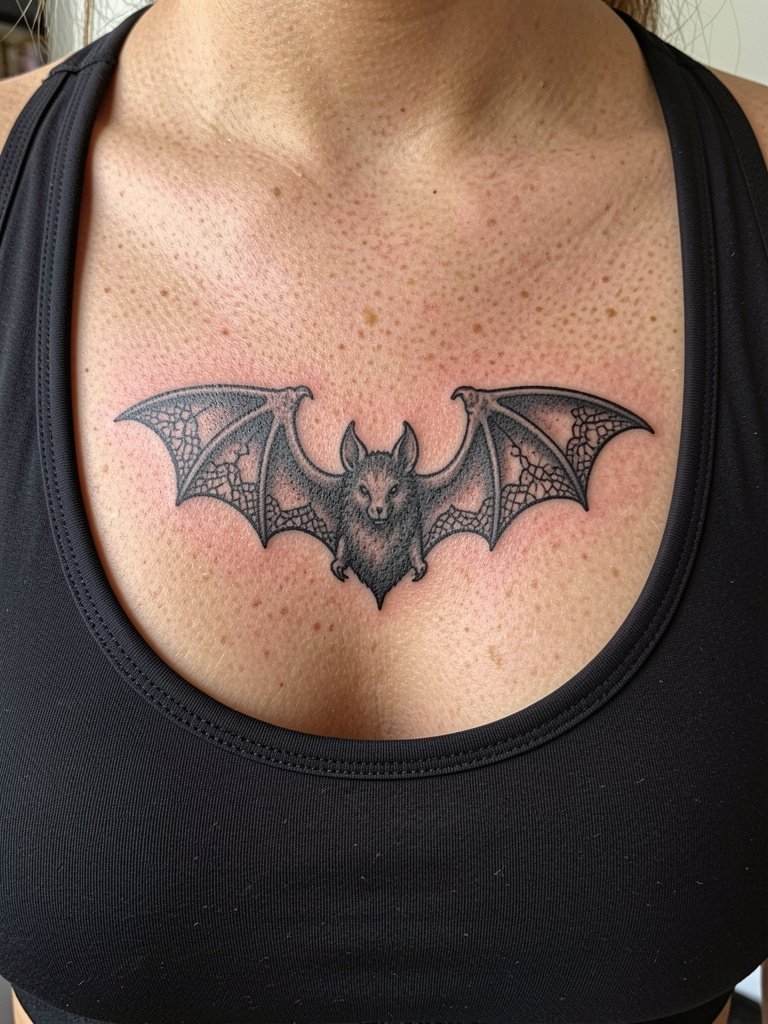
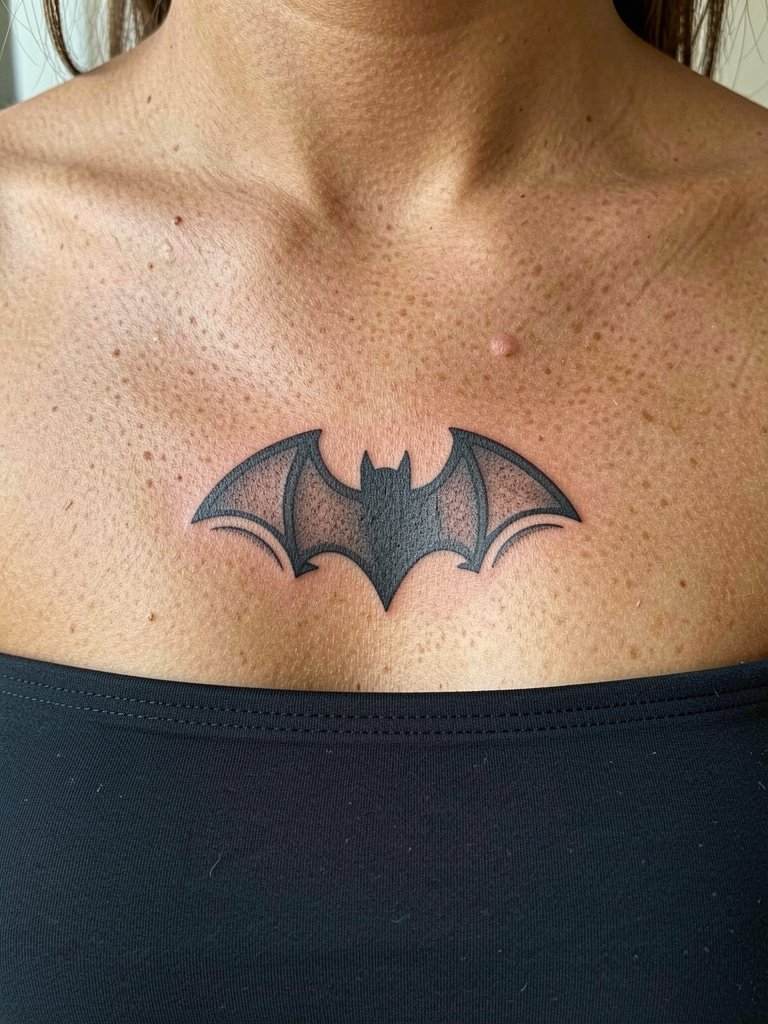
19. Symmetric Chest Bat With Negative Space Lace
Symmetric chest pieces make a strong visual anchor and suit ornamental detail when scaled correctly. The main mistake is letting lace textures get so fine they disappear against movement and breathing. Plan for bolder negative-space shapes and solid wing anchors so the lace reads even as the skin settles. Sessions can be split to allow the artist to step back and check symmetry. Wear a front-opening top or sports bra for the appointment to avoid unnecessary pressure during healing.
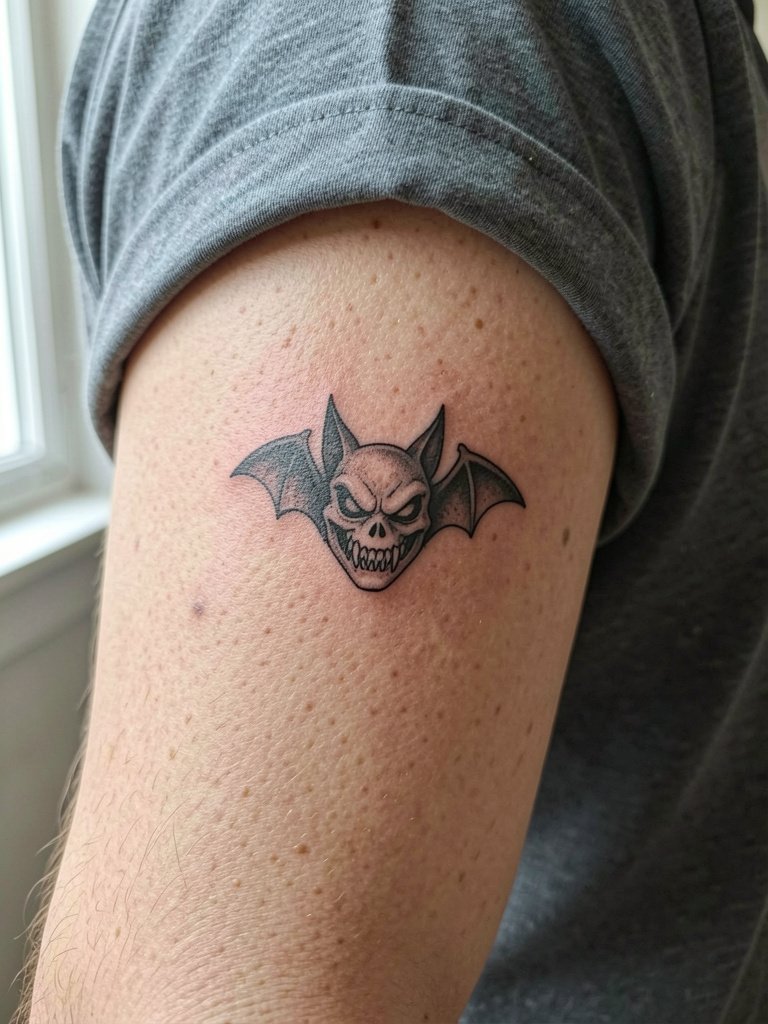
20. Red-Eye Accent Traditional Bat on the Forearm

Tiny color accents like red eyes can make a black bat visually punchy without committing to full color maintenance. The debate here is simple: black-and-grey purists argue monochrome ages more predictably. Others say a small jewel-tone accent is enough to make the piece pop. If you choose red accents, keep them tiny and insulated by solid black outlines so they do not spread visually over time. Forearm placement tolerates color well and sessions are usually quick. For casual looks, oversized tees with clean cuffs do the trick.
21. Micro Cluster on the Thumb Joint
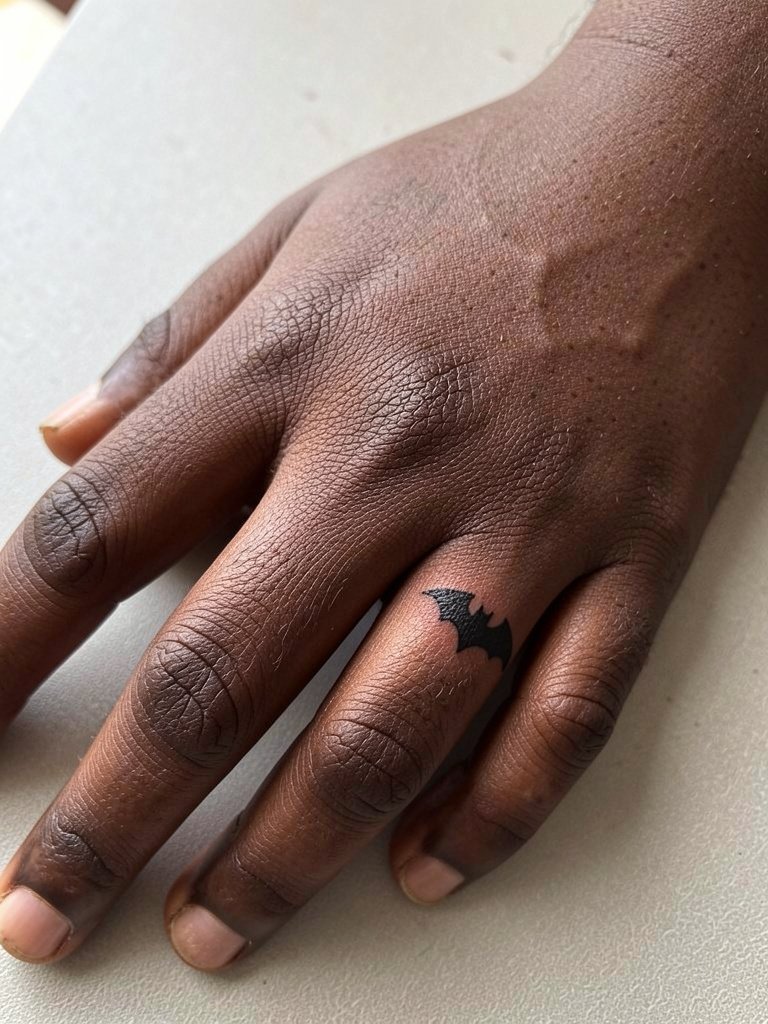
Finger and thumb tattoos are high-wear and need conservative execution. For a thumb bat, thicker contours and less interior detail give the best chance of longevity. The obvious trade-off is that finger skin often requires touch-ups, so clients should expect a realistic maintenance schedule. Appointment wear should avoid rings and tight gloves for a week. Keep the design bold and simple and accept that periodic refreshes are part of the territory.
22. Gothic Oval Framed Bat on the Thigh

Thigh canvases are perfect for neo-traditional framing because they tolerate saturation and larger scale. The common error is trying to cram very small ornamental beads along the oval; make these elements bolder or they will vanish. Thigh pieces heal well if you avoid tight denim and plan session wear like soft athletic shorts. For show-off looks pick shorts or mini skirts depending on season.
23. Minimal Geometric Bat on the Sternum Lower Edge
Geometric simplification on the sternum reads clean and modern, and benefits from symmetrical placement. Because the area is sensitive and occasionally intimate, bring precise measurements and ask the artist to stencil it in place so you can approve exact centering. Session wear should avoid tight undergarments and favor front-opening or removable pieces. Simplicity here is a strength, but avoid micro-patterning that the sternum will not hold.
24. Motion-Blur Bat with Smoke Trails on the Rib Side

If you want a sense of speed, smoke and shadow trails sell motion better than extra bats. The risk is overworking the trailing texture at a small scale. Rib placements accept sweeping shading but require strategic breaks in dotwork so the piece does not become a single grey patch. Pain is higher and sessions may be split. For appointments wear a loose bra or a top that gives side access. After healing the motion reads beautifully in photos with controlled contrast.
25. Tiny Cluster Above the Ankle Bone

Ankle clusters near the bone need bold silhouettes for longevity. Keep bats compact and avoid fine trailing details that will get irritated by socks and shoes. Session wear should include loose pants you can roll comfortably. For styling, low sneakers and cropped trousers put the work on display without risking friction during daily wear.
26. Ornamental Wing Detail Over the Shoulder Blade
Shoulder-blade ornaments let a bat fragment peek out with movement and clothing choices. The visible mistake is asking for ultra-detailed filigree right on the bone edge; instead ask the artist to taper filigree into open negative shapes that survive shifting fabric. Sessions are easy to access and pain is moderate. Open overshirts and tank tops make for natural reveals when you want the detail to show.
27. Healed-Photo Ready Back-of-Neck Mini Bat

Nape placements read as secret and editorial, but they require planning for hair coverage and how the piece photographs once healed. Reinforce single-needle work just enough to keep the contour intact under the hairline. The session is quick and pain is moderate. For the appointment, pull hair into a tidy updo or wear it short so the artist has a clear field.
Frequently Asked Questions
Q: How do I pick between a fine-line bat and a bold blackwork bat for longevity?
A: Fine-line pieces can look elegant but they need low-friction placements and slightly wider spacing than you might expect. Bold blackwork sacrifices micro detail to win on readability over years. If you care about long-term silhouettes in photos, lean toward thicker contour or heavier saturation for wings.
Q: Where can I find real healed photos and local artists who do gothic bat work?
A: Search hashtags like #gothicbattattoo, #battattoo, #blackworktattoo, and #finelinetattoo on TikTok and Instagram and filter by location. Use Pinterest for moodboarding and Reddit threads for healed examples and session stories. When you find good references, check for healed-work shots rather than only fresh-ink images.
Q: What should I wear to a ribcage or sternum session?
A: Wear a front-opening bra or a fitted sports bra and a loose top that can be moved without stretching the tattoo area. For upper thigh or calf work pick loose shorts you can pull up without tight seams. If you want an outfit suggestion for photos after healing, a cropped tee or open-collar shirt often frames the piece well. Front closure bra
Q: Do color accents like red eyes add maintenance?
A: Tiny color accents usually do not add much maintenance if they are small and well insulated by black outlines. Larger color fills require more aftercare attention and may need touch-ups depending on sun exposure, especially on limbs.
Q: How visible are touch-ups for tiny bats on fingers and ankles?
A: Finger and ankle tattoos are higher friction zones and often need more frequent touch-ups. Expect realistic maintenance every few years for fingers and sometimes every few years for ankles, depending on footwear and washing habits.
Q: Can a tiny bat still look gothic without a full moon or cathedral?
A: Yes, tasteful filigree, negative-space lace in the wings, or a small crescent moon are subtle framing options that push a tiny bat toward gothic sensibility without requiring a large composition.
