
Someone I know spent months bouncing between flash sheets and custom sketches before realizing the real decision was how a sleeve would age with their daily life. Geometric work looks precise when fresh, and it can soften into a different kind of character over years. Below are 25 geometric sleeve ideas for men's arms, each with practical notes on placement, aging, consultation cues, and common pitfalls to help you pick a design that actually holds up.
1. Fine Line Triangle Stack on Inner Forearm
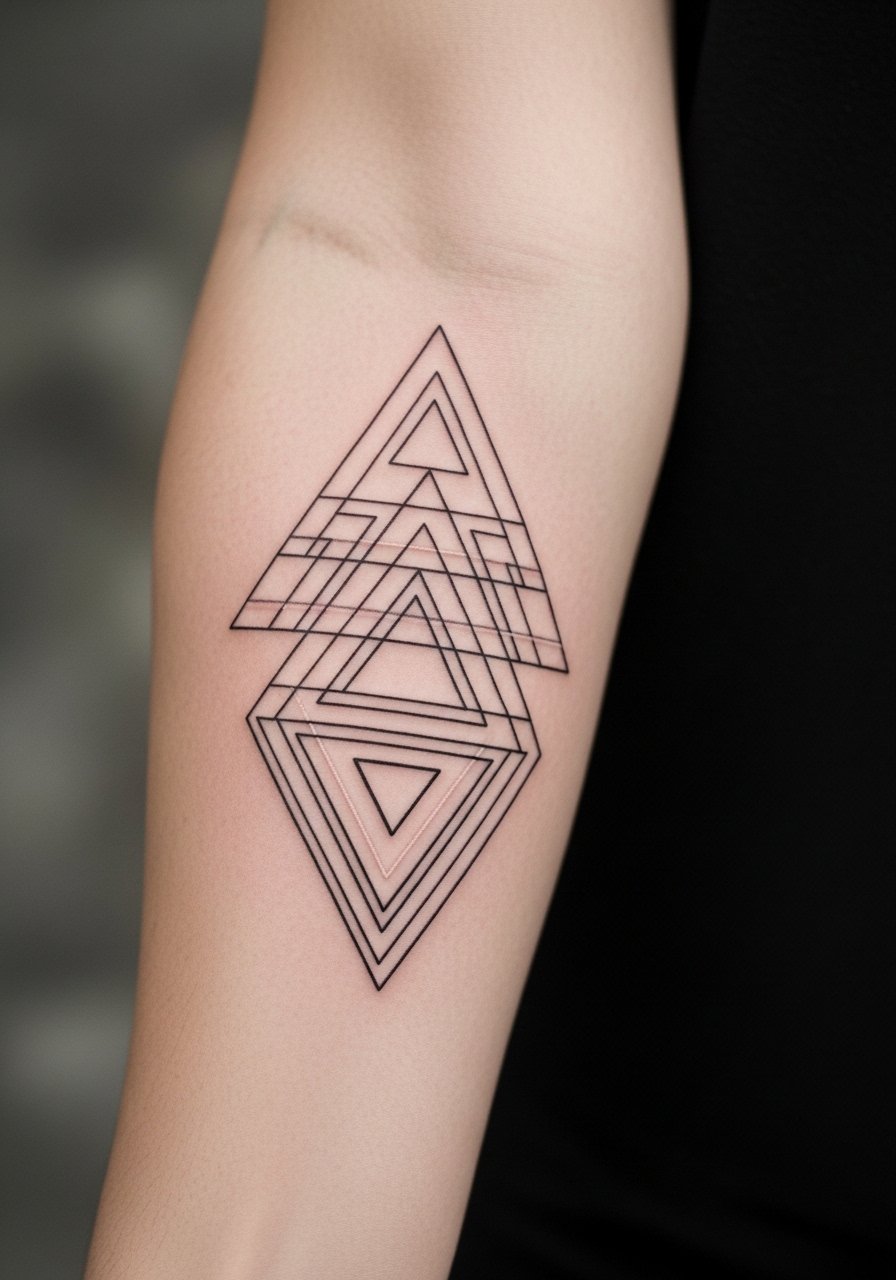
Someone I know first noticed this motif on a friend's forearm and liked how the geometry read from different angles. Ask your artist for slightly heavier primary lines so the smaller interior hatch marks have room to breathe. Fair warning, fine line detail near the wrist fades faster than on meatier forearm flesh. The session is low to mid pain and can run an hour or two depending on scale. A common mistake is asking for micro spacing that ends up muddling after a year. Expect a touch-up at year two to three for crisp inner hatching.
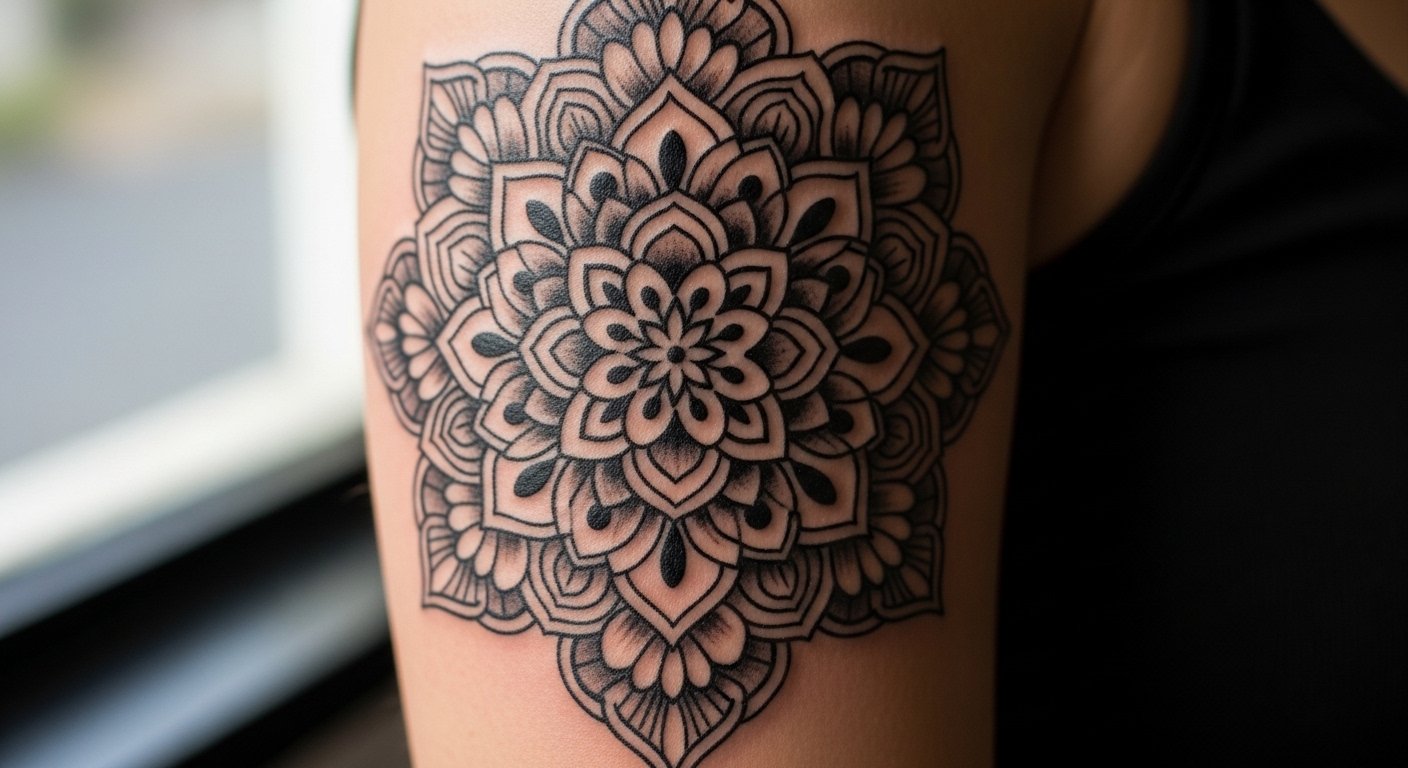
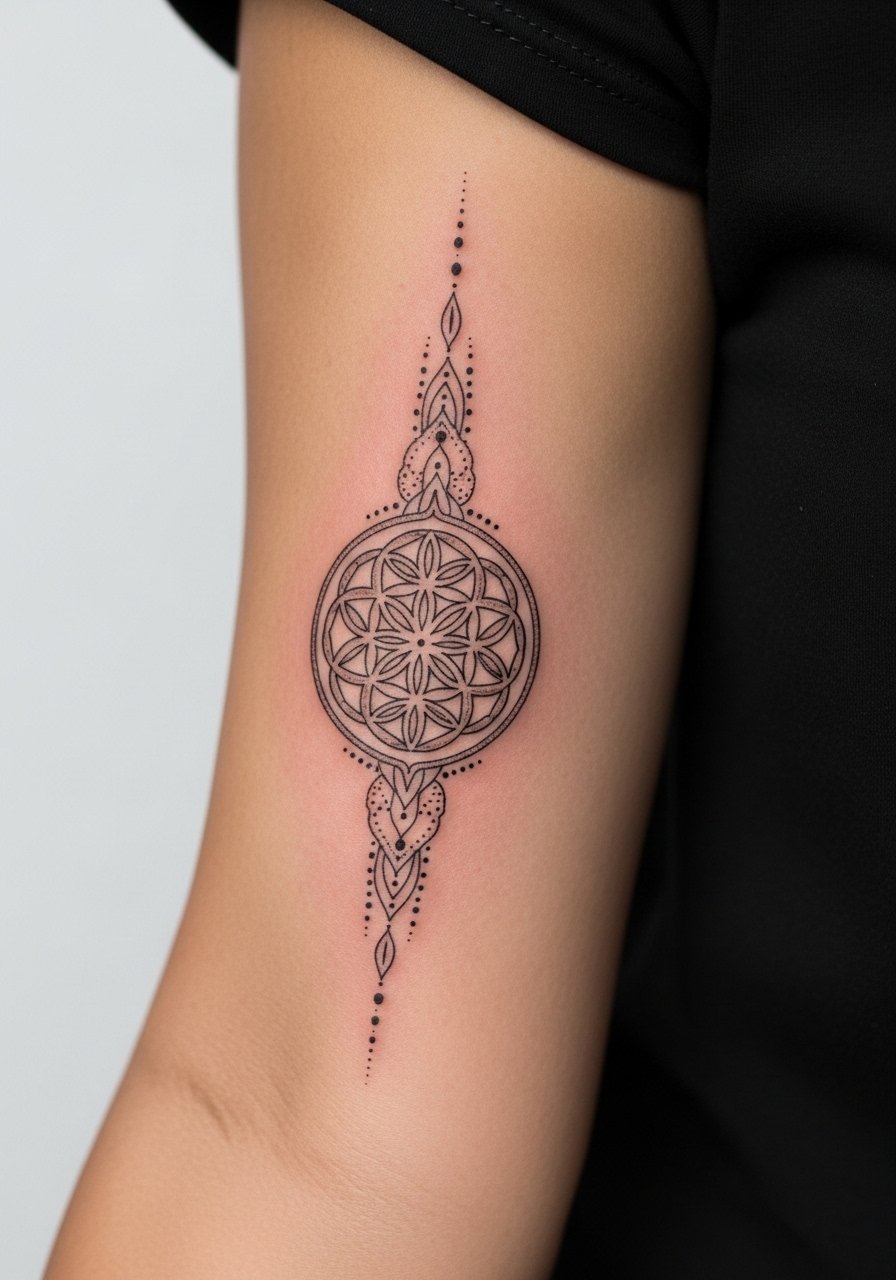
2. Sacred Geometry Mandala Cap at the Shoulder
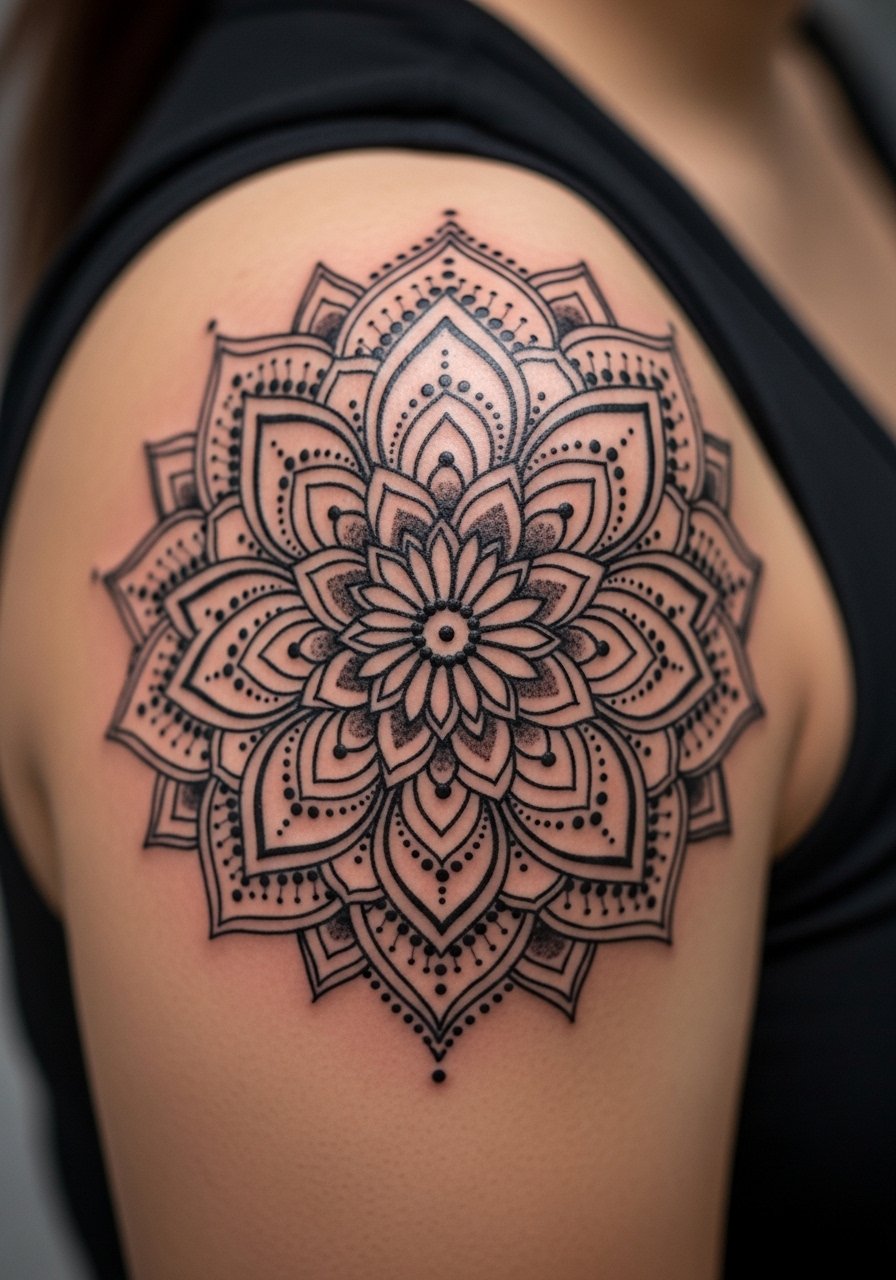
When you want a sleeve that starts as a focal cap, mandalas offer modular growth down the arm. Tell your artist you want concentric repetition with deliberate negative space so the pattern does not overwhelm as you add panels. Some artists split on how dense a mandala should be. One camp builds heavy saturation early, the other keeps it airy to avoid future blurring. Name both camps in your consultation and decide which aging path you prefer. Sessions for a cap run two to four hours. Expect stipple shading to soften at two years and require a touch-up if you want the same punch.
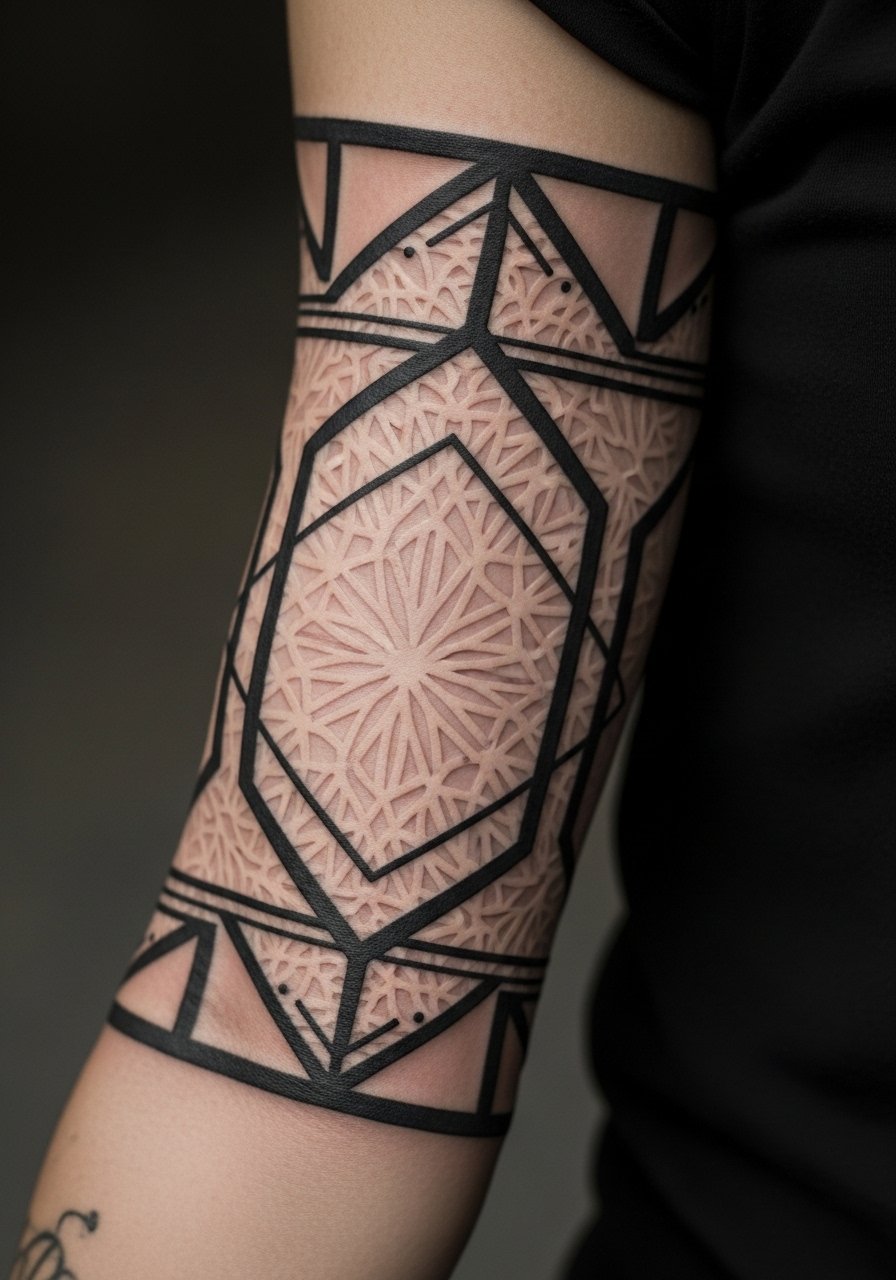
3. Tessellated Bands Around the Bicep
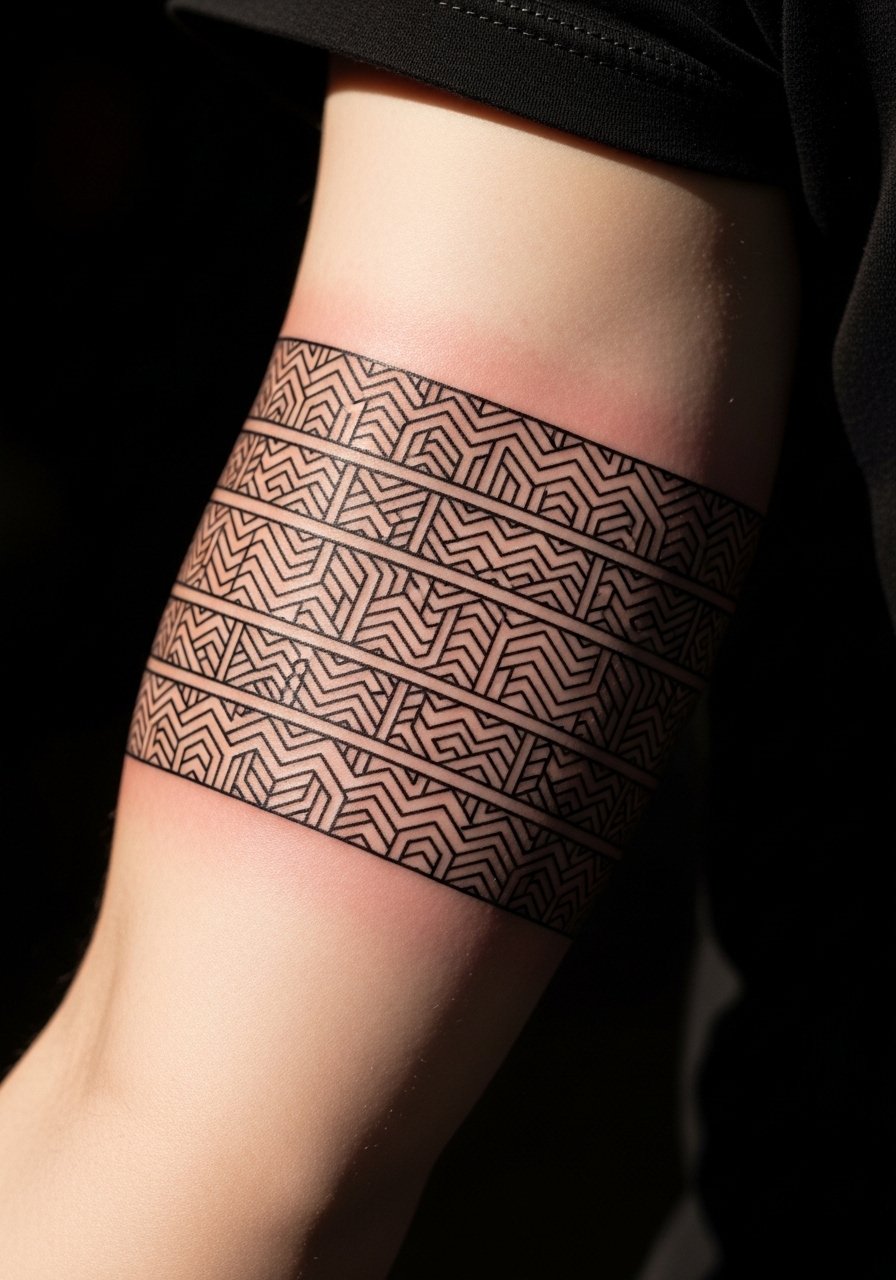
Visual impact lead. Geometric bands around the bicep read like armor in motion and suit guys who want pattern without full sleeve commitment. Tell the artist to keep band widths proportional to your bicep circumference so the repeat does not warp when you flex. The biggest mistake is squeezing too many repeats into a narrow band, which creates a moiré effect as muscle changes. Pain is mild to moderate and sessions often split into two shorter appointments. Over five years the edges may soften, so leave small margins between elements for easier future touch-ups.
4. Dot Work Gradient from Elbow to Wrist
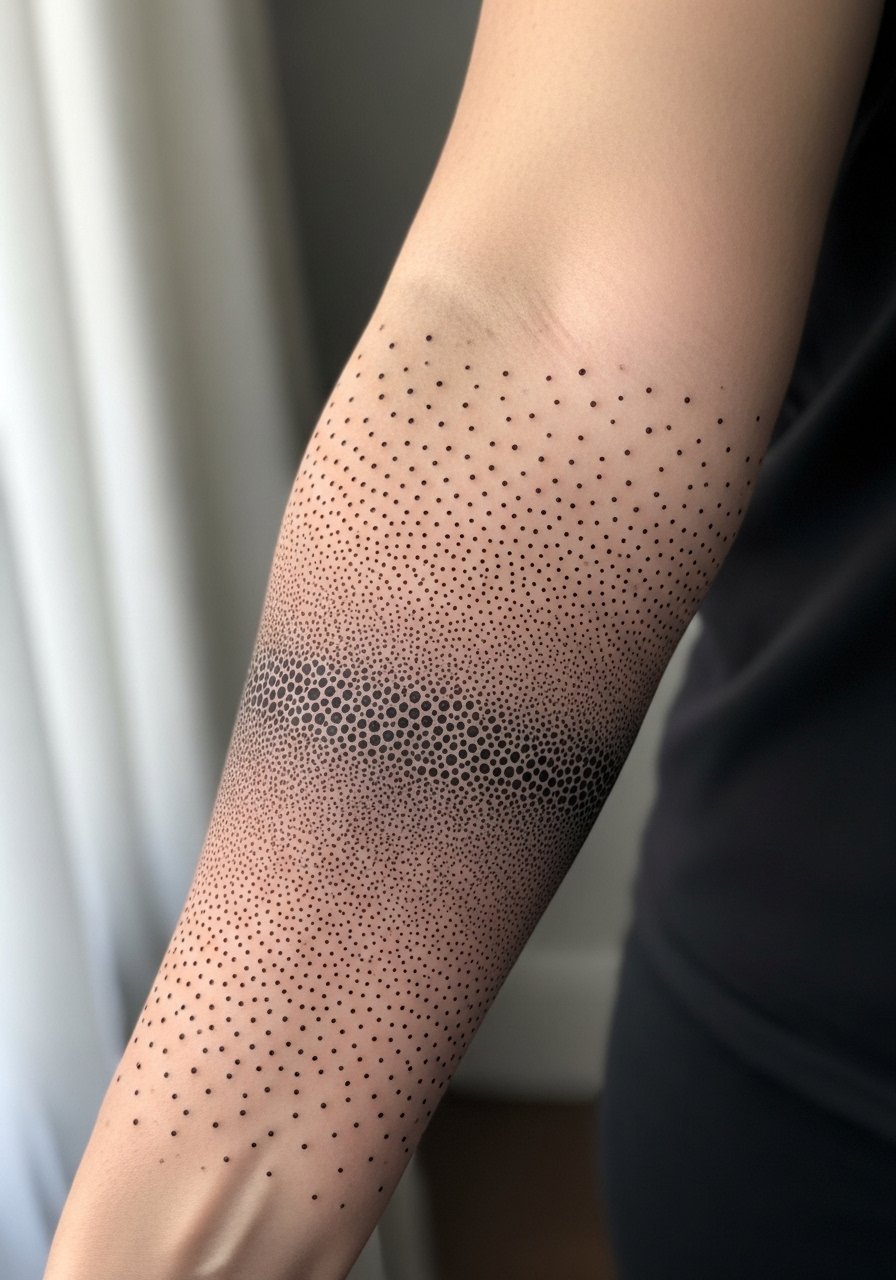
Aging and healing lead. Dot work gradients look delicate but can hold surprisingly well if dots are sized with future skin migration in mind. When you sit down with your artist, show photos demonstrating the exact dot density you want. One mistake people make is asking for hairline dots that disappear on medium and dark skin. For that reason increase dot size slightly for longevity. Sessions are slow because stippling takes time. Expect touch-ups focused on the lighter bands after two to three years.
5. Geometric Animal Hybrid on Outer Forearm
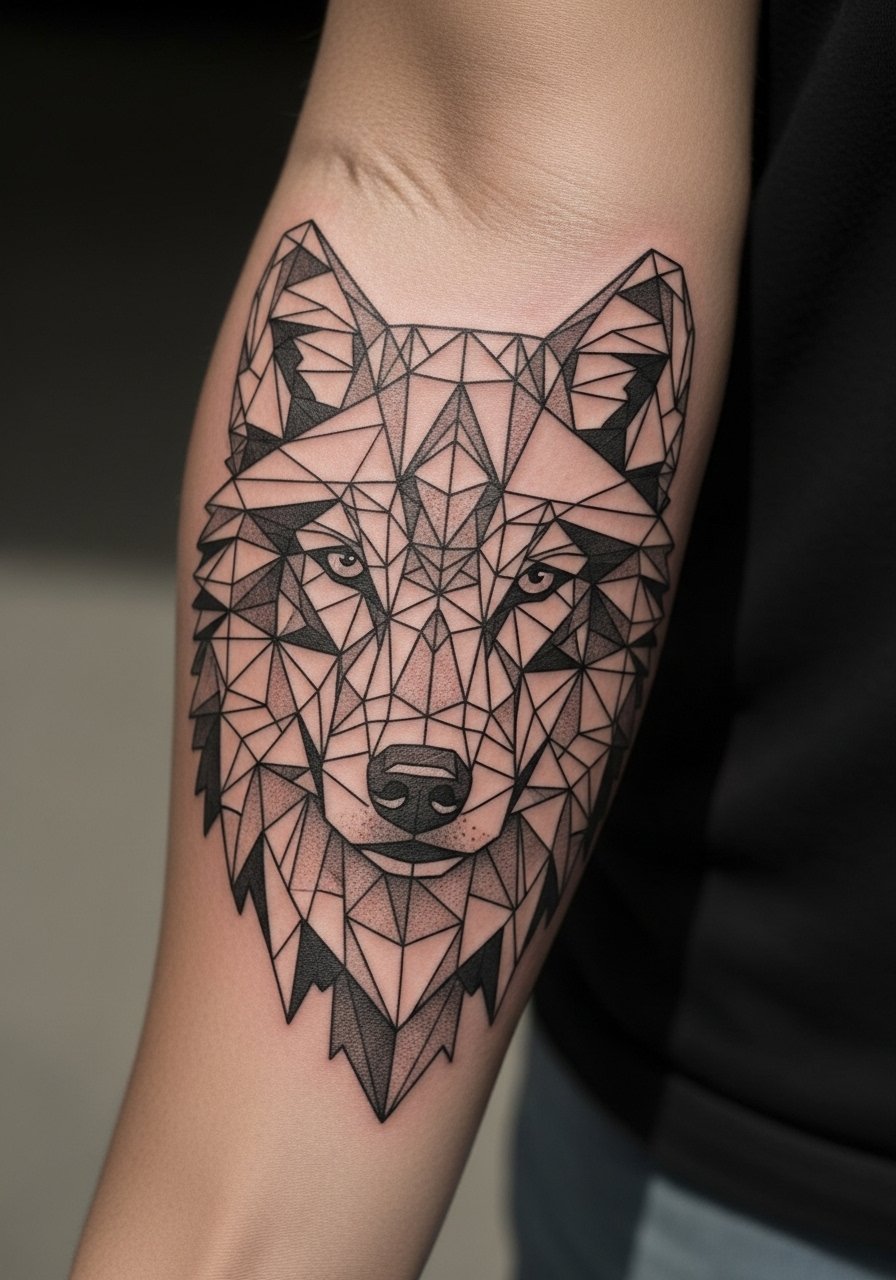
Personal observation lead. I have seen geometric animal hybrids read well on men who want symbolism without realistic portraiture. Ask for clear separation of the animal silhouette from the geometric fill so each element survives aging. A common version that ages poorly fills negative space with tiny micro-lines. Avoid that. The session feels moderate because of contouring along bone. Blowout risk is low on outer forearm, but keep primary lines bold enough to maintain shape over time.
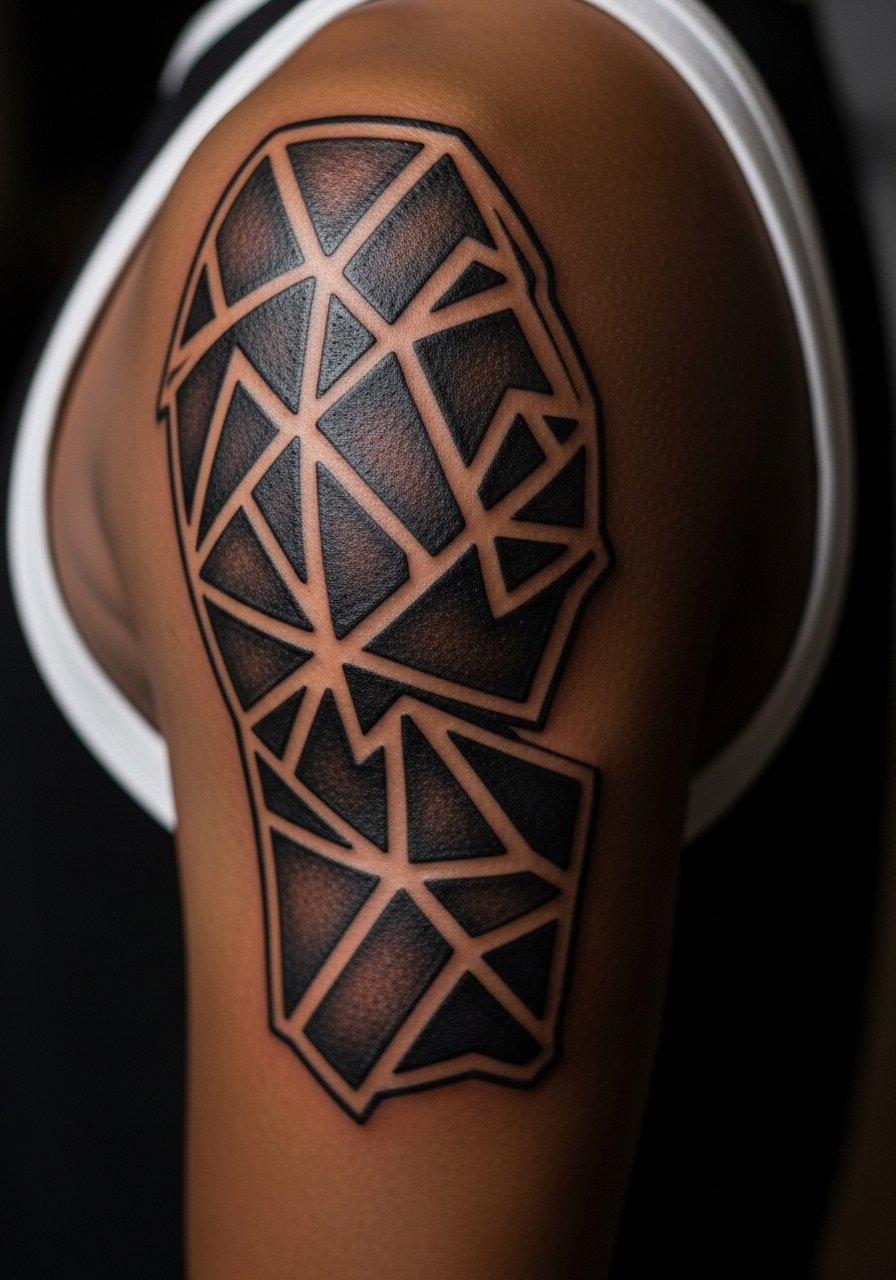
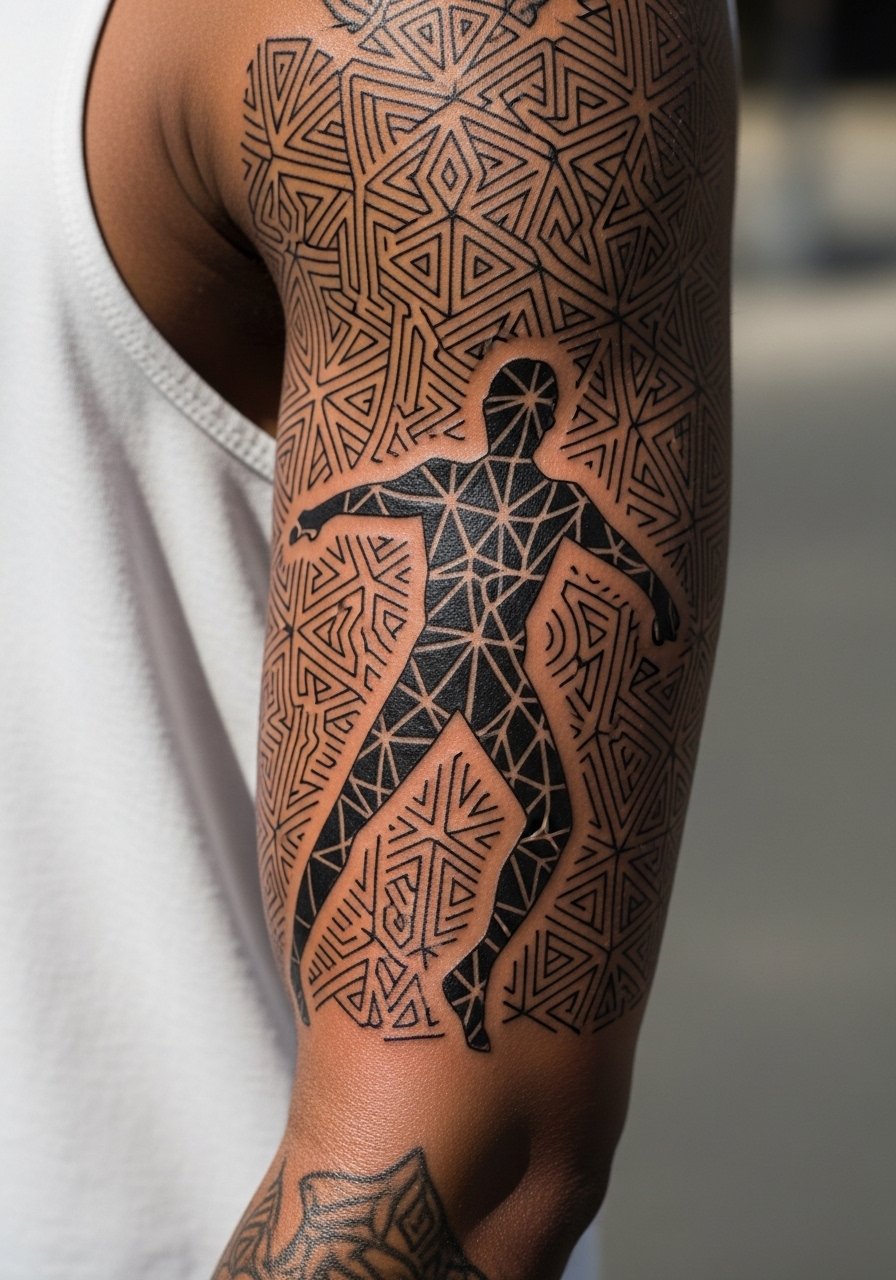
6. Interlocking Cubes Across the Full Sleeve

Visual impact lead. Full-sleeve tessellations demand a plan for flow from shoulder to wrist. Tell your artist how you want perspective to change with arm curvature so cubes do not look distorted when you bend. The biggest mistake is treating the arm like a flat canvas. Sessions are long and will be broken into several appointments. Over two to five years, some edges soften, so reserve margin for a future outline refresh. This style suits someone committed to a multi-session project.
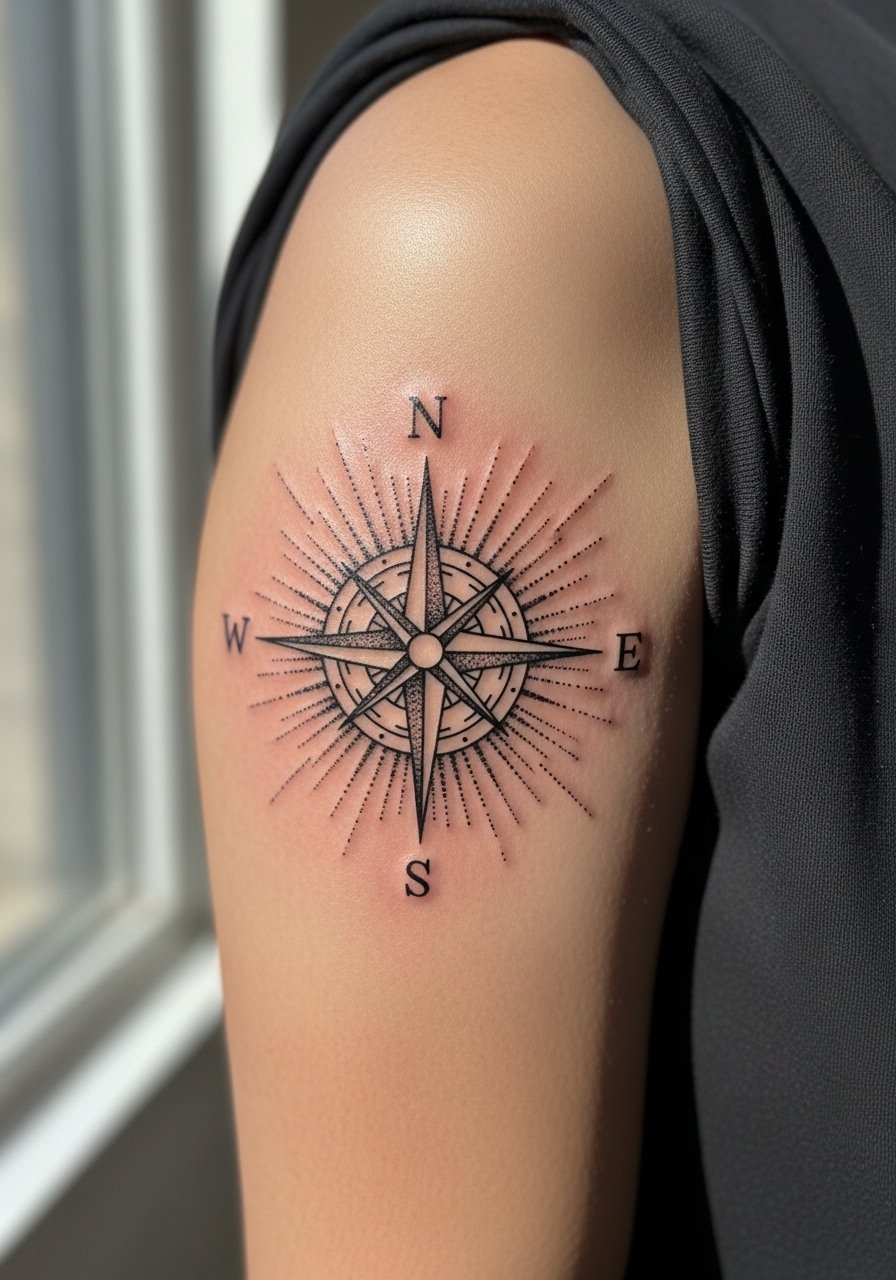
7. Minimalist Compass and Ringing Geometry on Inner Bicep

Consultation lead. When you book this one, bring reference that shows exact ring spacing and compass needle angle. The inner bicep can be softer so keep primary lines slightly bolder than a tiny flash. Pain is moderate because the inner arm is tender. A real mistake is placing too much tiny script inside the compass which blurs into the pattern. Expect a small touch-up at year three if you want the needle to remain crisp.
8. Optical Illusion Sleeve That Wraps the Forearm
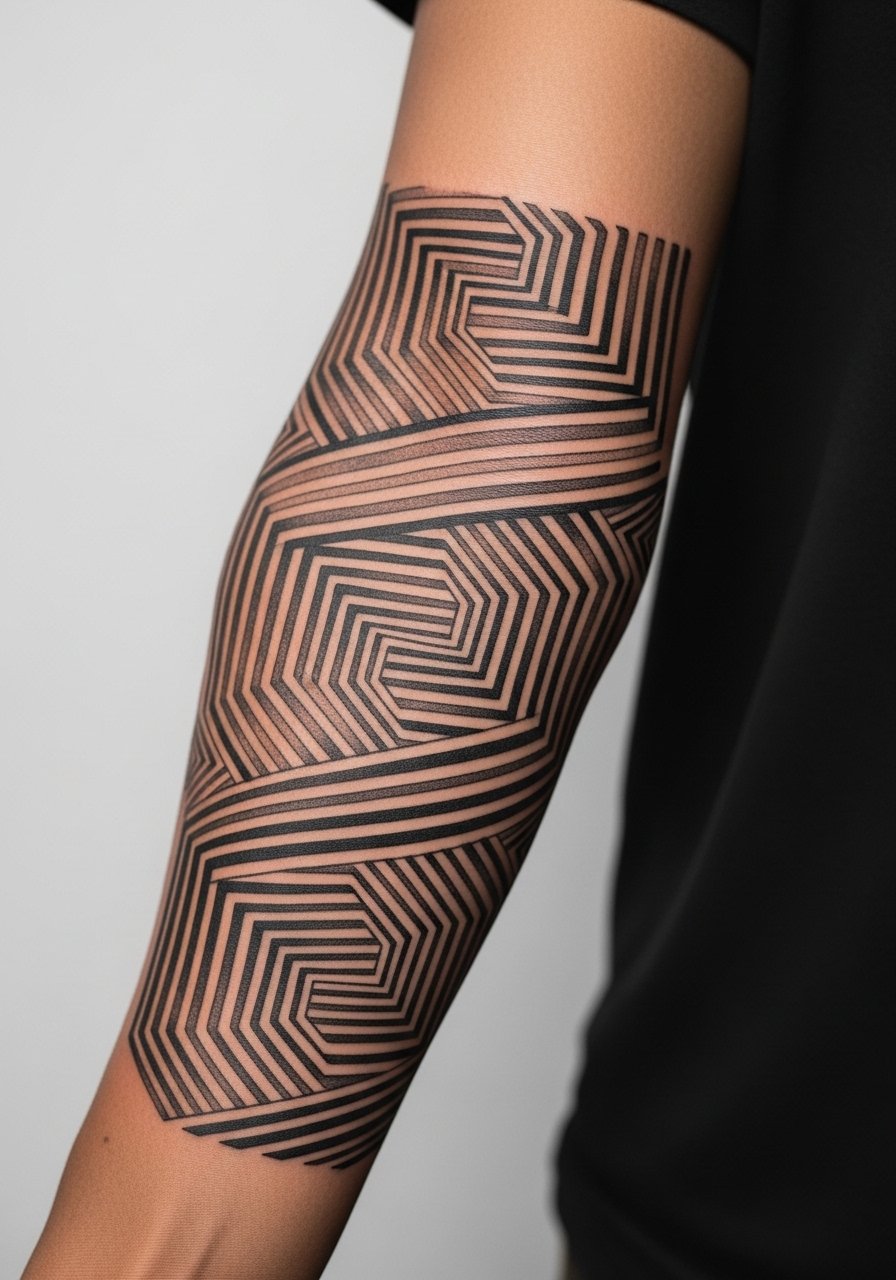
Mistake lead. The biggest mistake with optical illusion sleeves is too-tight line spacing. That spacing looks great fresh but often blurs into a grey block over time. Ask your artist to test a small panel of your chosen spacing directly on your skin. The session is medium in pain and requires steady handwork. Tell the artist you want preserved contrast rather than ultra-fine density. For maintenance expect a touch-up in three to five years to keep optical edges distinct.
9. Hexagonal Honeycomb with Floral Insets on Outer Arm
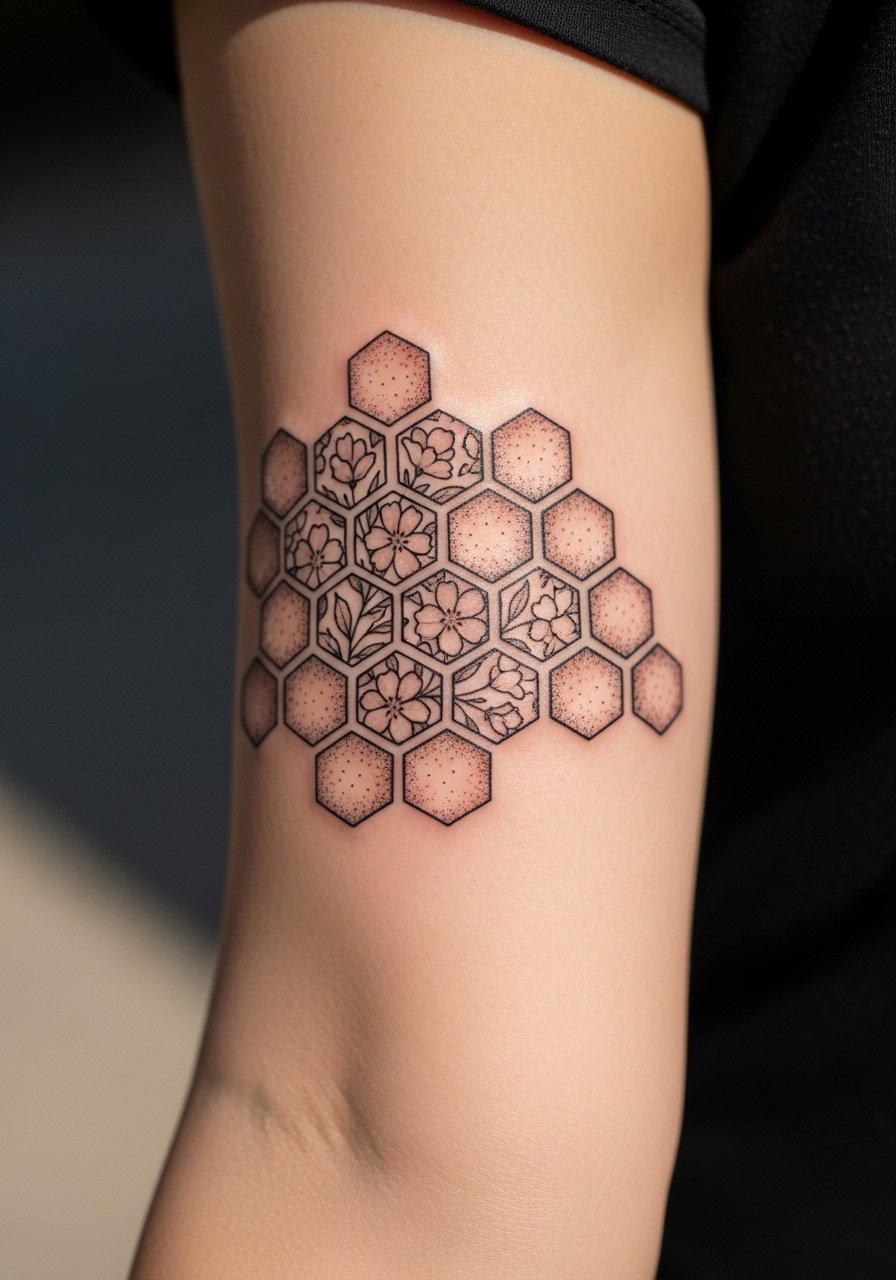
Personal observation lead. Combining geometric grids with organic insets is a simple way to soften hard geometry. During consultation ask the artist to vary saturation between hex walls and floral centers so the flowers do not disappear. A common mistake is equal line weight everywhere which flattens the effect. This placement has low blowout risk and feels moderate to tattoo. At six months the stipple will still be distinct. By year four expect softer edges that may need selective re-inking if you want to restore contrast.
10. Sacred Seed of Life Column Along the Inner Arm
Pain warning lead. Fair warning, inner arm work near the elbow crease can sting more than outer areas. This vertical sacred geometry piece benefits from negative space between orbs so the pattern breathes as skin moves. Tell the artist you want slightly thicker outer circles and lighter interior detailing. A real mistake is crowding the orbs into one another which leads to merging over time. Expect a touch-up at year two to keep circle intersections crisp.
11. Blackwork Polygon Shading That Reads from Distance
Visual impact lead. Heavy blackwork polygons are a good choice if you want something that reads across a room. That said, very dense black will age differently on dark skin compared to lighter tones. Tell the artist to plan for gradual fade rather than total loss of nuance. One camp loves saturated blocks for visual weight, another worries about heavy scarring. Name both options during booking and choose based on your healing history. Sessions are intense and may require several sittings. Touch-ups focus on edges after two to five years.
12. Radial Lines with Negative Space Around the Elbow

Pain warning lead. Elbow-centered geometry splits artists into camps on technique. One camp advises avoiding tight linework over the joint because repeated flexing blurs lines. The other camp says if the lines curve with movement and are spaced wider, they hold. Ask which approach your artist uses and see healed examples. The session has higher pain near the joint. A common mistake is placing intricate detail directly on the elbow. Design around the crease and allow breathing room for longer-term clarity.
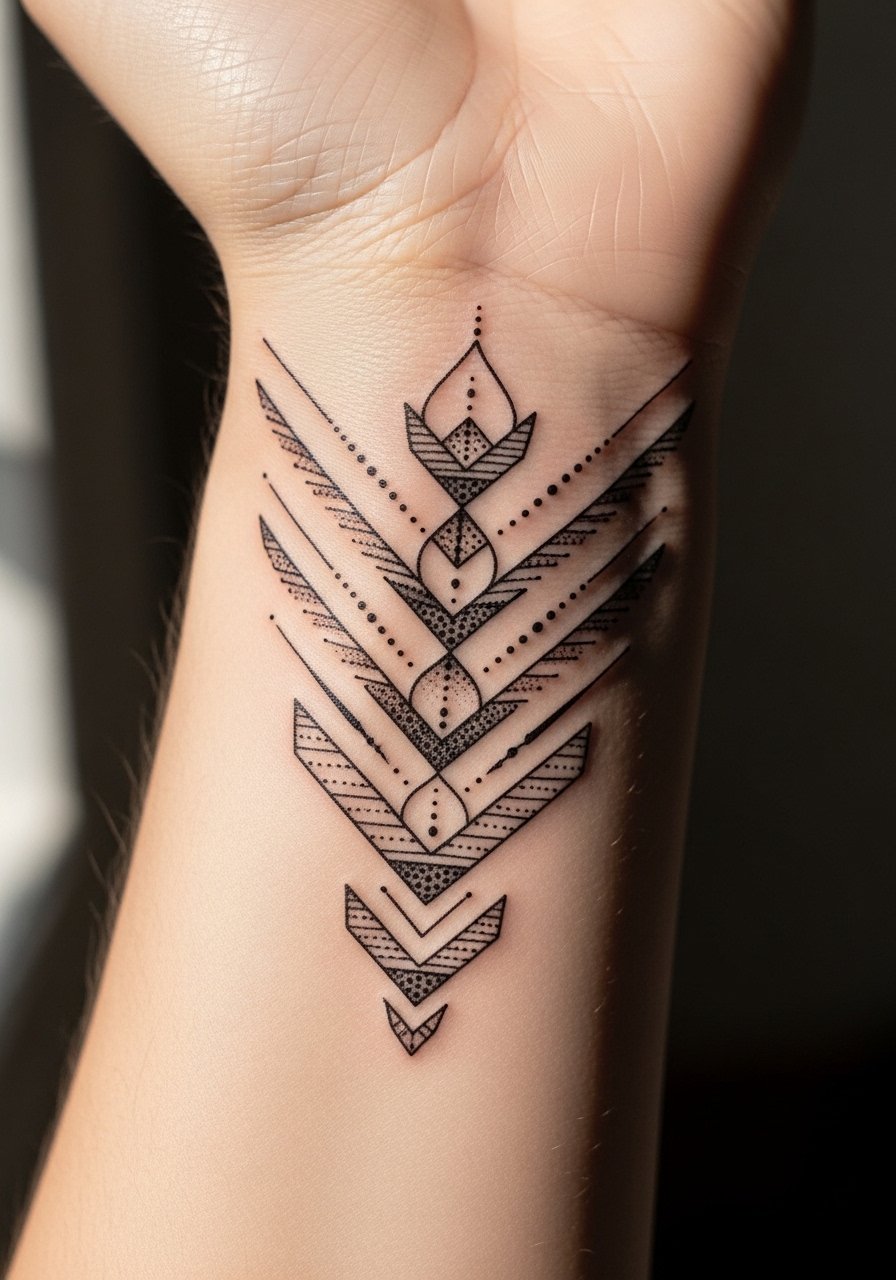
13. Geometric Arrow Flowing Down the Forearm
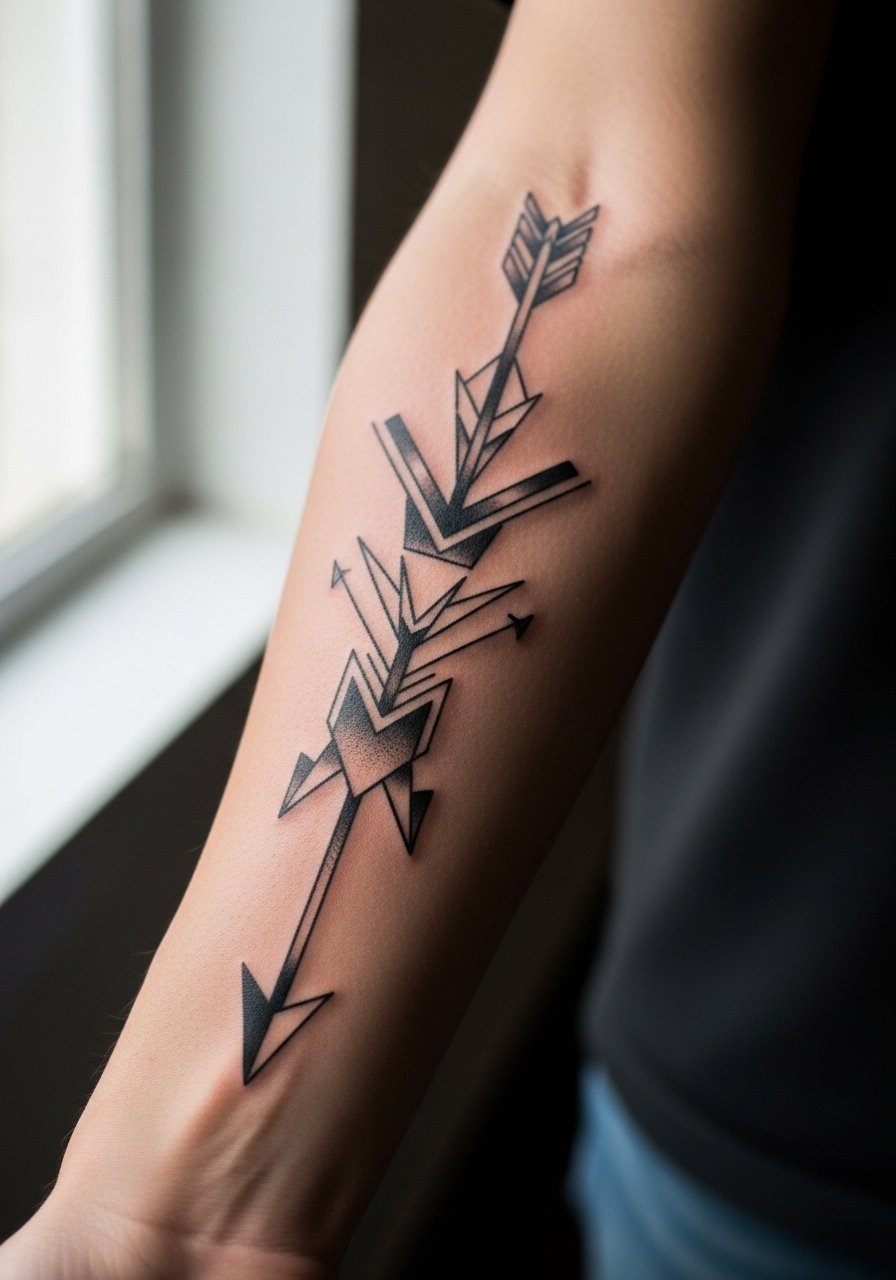
Personal observation lead. I tend to recommend arrows when someone wants directional flow in a sleeve. For this version, keep the arrowhead geometry bold and the shaft as a negative-space alignment to avoid clutter. Tell the artist you want the shaft tapered in proportion to wrist width so it does not look too heavy at the end. Mistake people make is over-detailing the shaft which muddies with movement. Pain is mild on the forearm. Touch-up needs are typically minimal if spacing and weight are correct.
14. Layered Concentric Hexes with Metallic Ink Accents
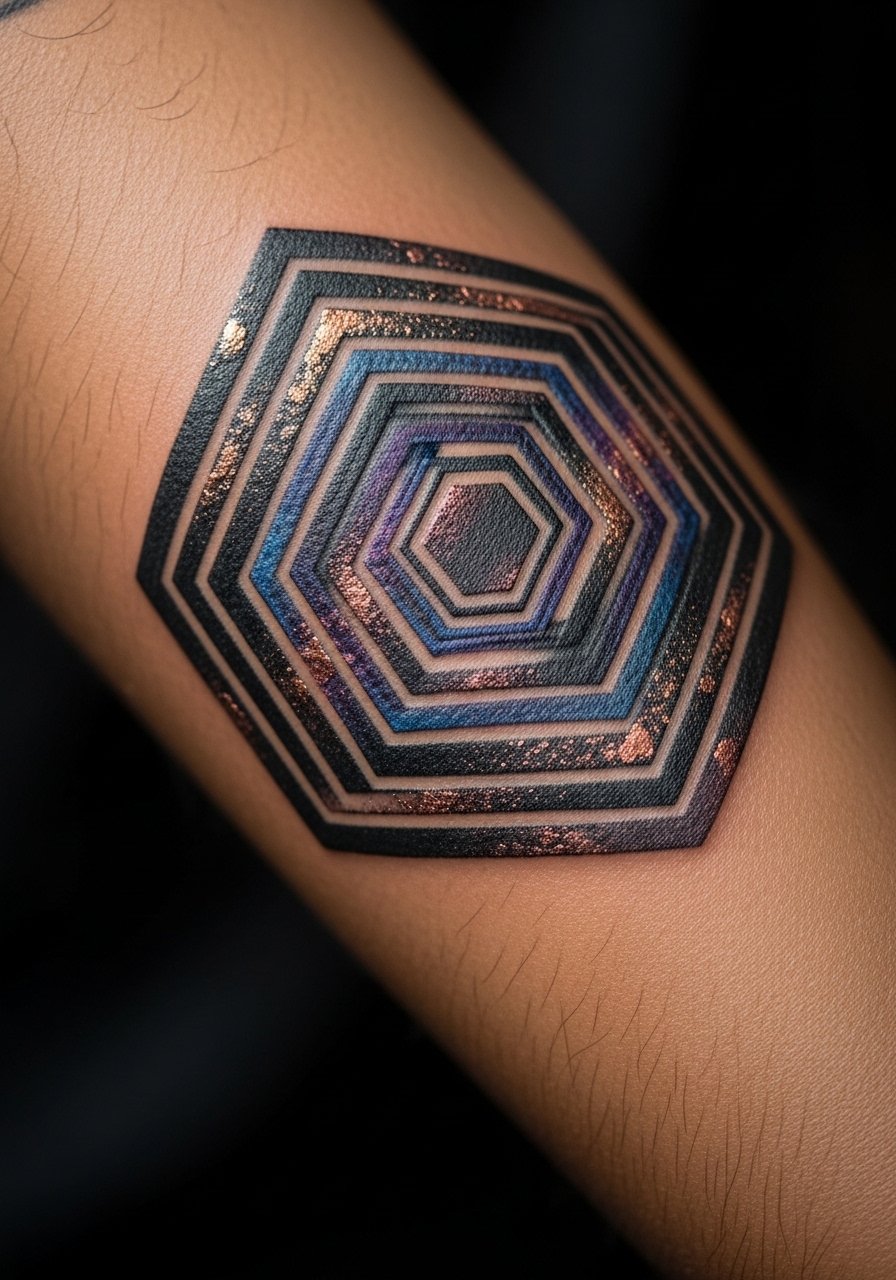
Consultation lead. When you want metallic or colored accents in geometric work, mention exact pigments and how they appear on your skin tone. Metallics can read differently across tones and often need careful saturation to stay visible. The common mistake is overusing reflective pigments which fade into dull spots. Sessions may require a color-focused touch-up after six months to a year. This style is best for collectors who are comfortable returning for maintenance.
15. Black and Grey Geometry Blended with Stippled Portrait Panels
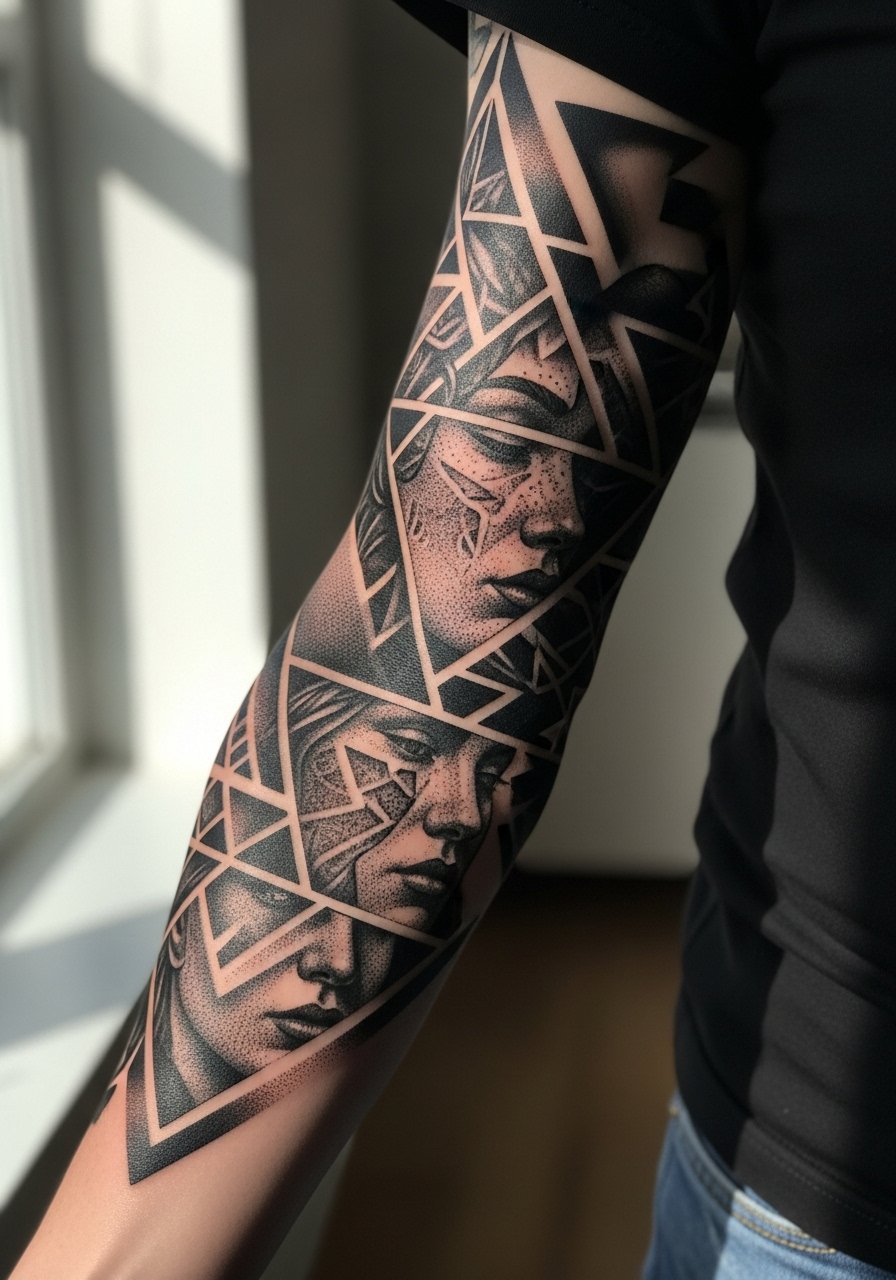
Controversy lead. Combining portraiture with geometric work sparks debate. One camp thinks portraits break the pattern flow of pure geometry. The other camp likes the contrast for storytelling. Decide if you want narrative interruption or cohesive pattern first. Tell the artist how to connect edges so the portrait does not float. Sessions combine portrait technique with stipple and take multiple appointments. Portrait portions will soften faster than solid geometry, so budget for targeted touch-ups.
16. Spiral Lattice That Follows Arm Contours
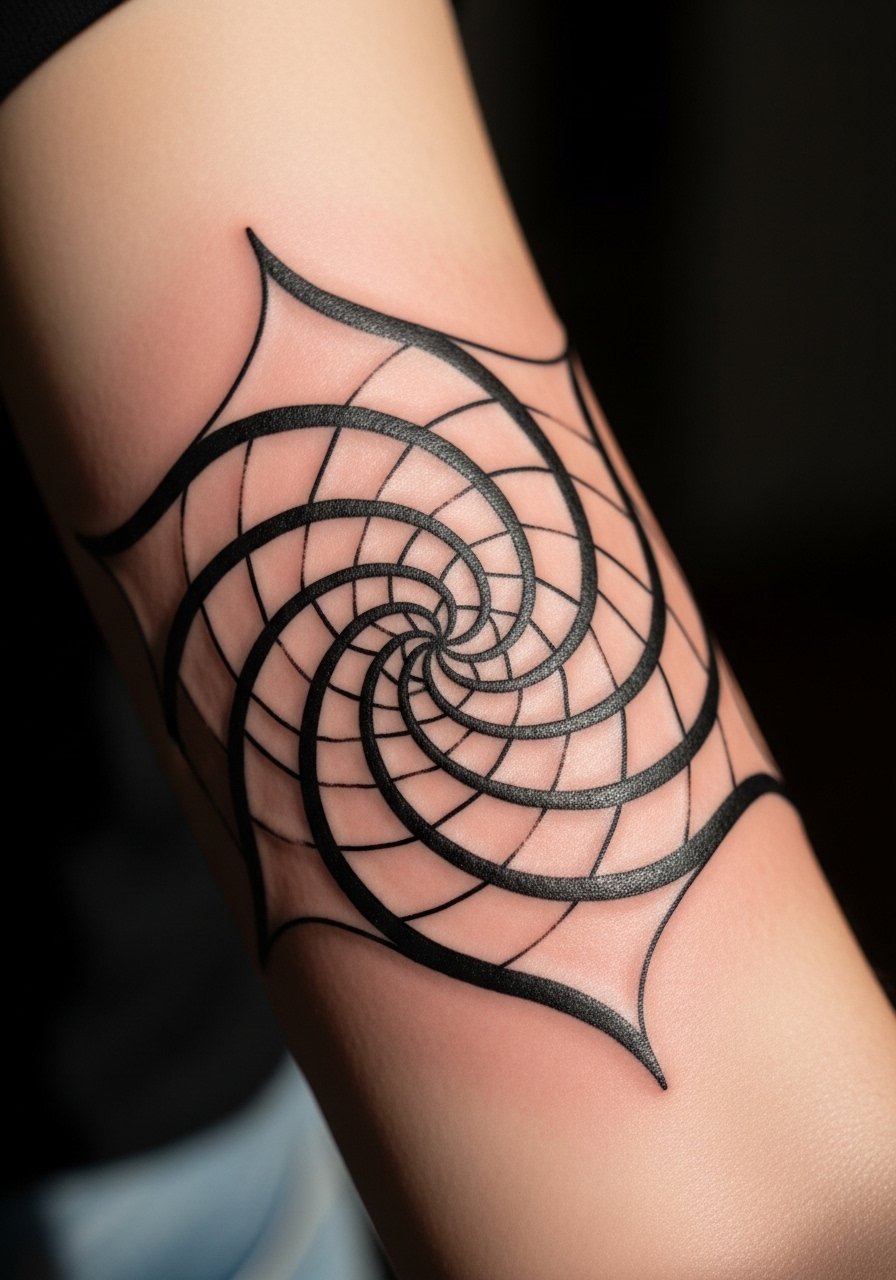
Visual impact lead. Spirals that respect arm contours avoid the flattened look when you bend. Tell your artist which direction you prefer for the spiral so the visual flow reads when your arm is relaxed. A common mistake is forcing symmetry that clashes with muscle lines. The session is mid-length. Over years the spiral may shift appearance slightly with muscle gain or loss, so keep that in mind if you plan major body changes.
17. Geometric Sleeve with Negative Space Portrait Silhouette
Mistake lead. The biggest error people make is not specifying how much contrast they want between tessellation and silhouette. Ask for a high-contrast border so the silhouette reads after healing. This placement often spans outer arm and bicep, so sessions will be multi-part. Expect touch-ups along the negative border lines after two to three years. For culturally inspired silhouettes, mention origin respect and get permission when applicable.
18. Chevron Cascade Ending at the Wrist with Micro-Dots
Pain warning lead. The wrist end of any cascade is prone to faster fade because of friction and sun exposure. When briefing your artist, ask for slightly bolder chevrons near the wrist to compensate. A common mistake is using very fine chevrons at the wrist which look ghosted after a year. Sessions are moderate and the tiny dots may require a touch-up after one to two years to preserve crispness.
19. Geometric Compass Rose with Radial Dot Shading on Upper Arm
Consultation lead. For radial dot shading, request a shading density test patch so you know how the dots appear on your tone. Some artists favor dense dot gradients, others prefer airy stipple. A common mistake is asking for too tight a gradient which becomes a mud patch after a couple years. The session is moderate and touch-ups usually target the radial gradient rather than the main compass lines.
20. Fractal Geometry That Flows Into the Elbow Crease
Aging and healing lead. Fractals look intricate but need breathing room near the crease so they do not blend into one another. Ask your artist to plan fractal elements that step back as they approach the elbow. The two camps here are those who place detail right on the crease and those who avoid it. Name both approaches and request healed examples. Pain is higher near the crease. Expect maintenance work focused on crease-adjacent lines at year two to three.
21. Micro-Realism Geometric Mix on Inner Wrist

Mistake lead. The inner wrist is a tight spot, and the biggest mistake is over-detailing a micro-realism element that cannot heal cleanly there. If you choose this, instruct the artist to simplify textures and make primary anchors slightly bolder. Pain is higher because the area is thin. For professional reasons consider placement visibility. Expect quicker fade rates and a likely touch-up within two years.
22. Layered Triangle Sleeve with Overlapping Transparency

Consultation lead. Overlapping transparency needs direction on which layers appear on top. Bring layered reference images so the artist knows your vision. A common mistake is failing to define foreground and background, which flattens the intended depth. Sessions are moderate to long depending on coverage. As layers soften with time, you may want a contrast refresh in three to five years.
23. Architectural Geometric Sleeve with Arch Motifs
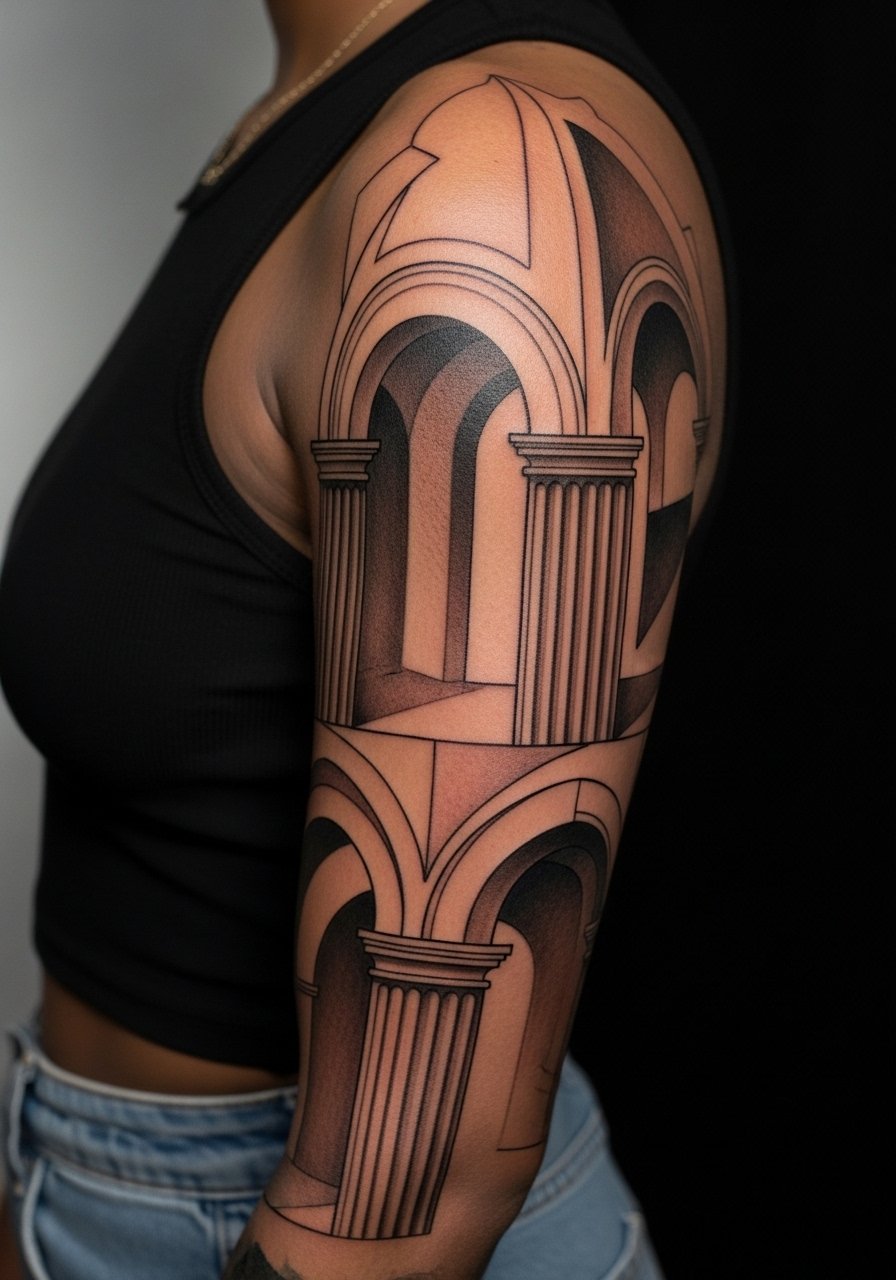
Personal observation lead. Architecture-inspired geometry works well for guys who prefer structured patterns with clear rhythm. Tell the artist you want consistent vanishing points so arch motifs feel intentional rather than scattered. A common mistake is mixing too many architectural vocabularies which confuses scale. Sessions will be methodical. Edges near the wrist and elbow need extra margin to hold well over time.
24. Constellation Map in Geometric Grid Across Forearm
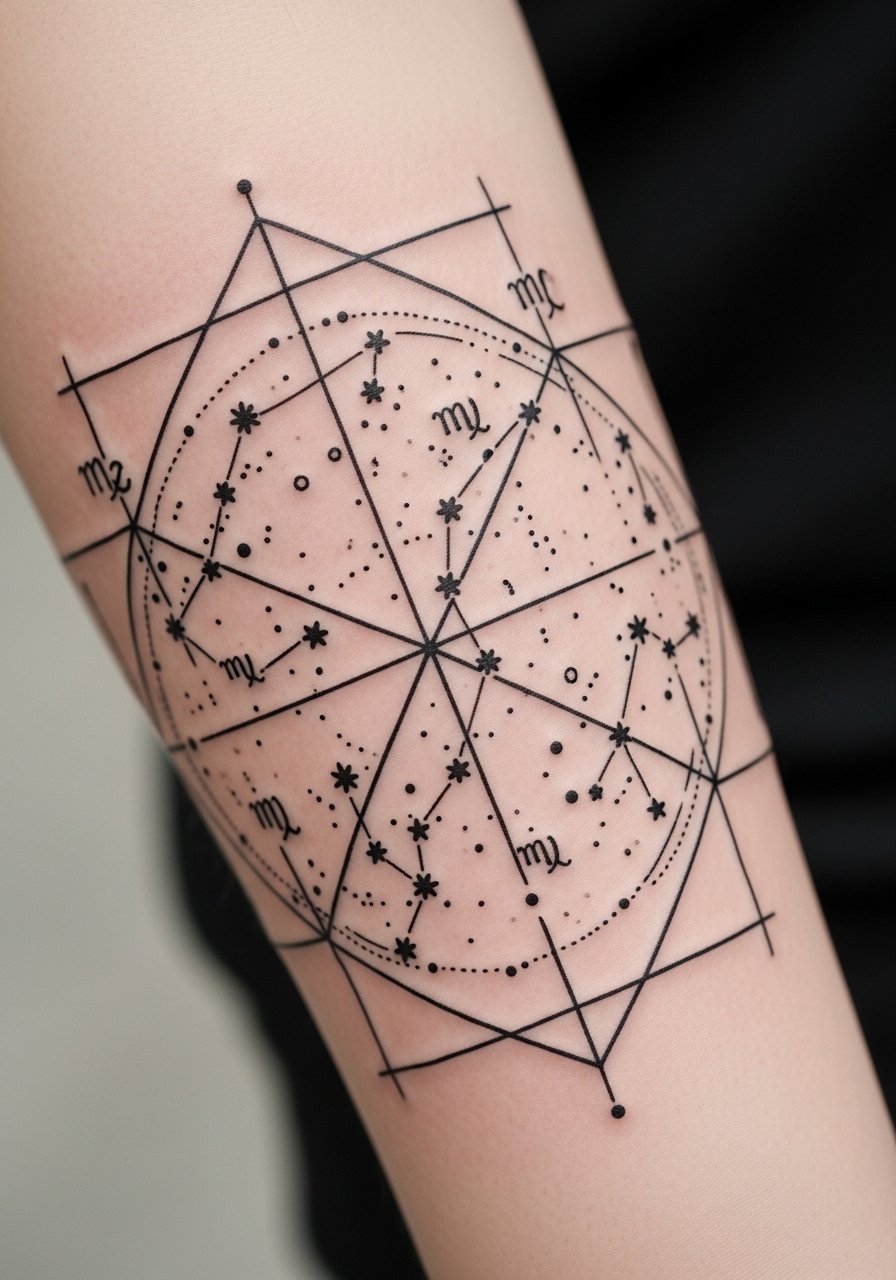
Mistake lead. When incorporating constellations, the real error is tiny stars without contrast. Ask for slightly larger star points or mild white highlights if your skin tone allows. The forearm is forgiving, but tiny connecting lines can blur if too faint. Sessions are relatively short. Over years the grid may need a touch-up to keep star points distinct.
25. Negative Space Geometric Sleeve with Bold Framing Lines
Consultation lead. Framing lines make negative space read as deliberate design, not missed areas, so ask your artist to draft the frames first. The common mistake is leaving uneven negative gaps that appear accidental. This sleeve comes together over multiple sessions. Expect touch-ups focused on frame crispness at years two to four. For culturally influenced motifs, mention origin respect and ask for subtle variation if needed.
Tattoo Prep and Aftercare Essentials
After Inked Tattoo Moisturizer, 2 oz. A lightweight, alcohol-free lotion many buyers use for daily moisturizing after the initial healing window. Use after scabs lift and skin stops oozing to keep saturation and prevent cracking.
H2Ocean Blue Green Foam Soap, 8 oz. Gentle foaming cleanser for the first week of cleaning a fresh tattoo. Helps remove excess plasma without stripping ink.
Tattoo Goo Aftercare Lotion, 4 oz. A balm-to-lotion option that many people use as they transition from occlusive ointment to regular moisturizer.
Dermalize Pro Transparent Film Dressing. Medical-grade second skin bandage useful for the first 24 to 72 hours on larger sleeve panels to protect from friction.
Woolzies Tattoo Butter, 2 oz. A plant-based balm some people prefer for ongoing moisturizing during the first few months of healing.
INK-EEZE Stencil Stuff. For anyone bringing custom stencils to a session this helps preserve crisp lines on the skin during layout and minimizes blurring when the artist begins.
Saniderm Tattoo Bandage, 4×6 Inch. A transparent occlusive bandage used by many artists for initial protection. Use this as your one mainstream product mention and follow your artist's guidance on wear time.
Every tattoo is different. Always follow your artist's specific aftercare instructions. Consult a dermatologist if you have skin concerns or unusual healing issues.
Frequently Asked Questions
Q: Will fine line geometric work blur if I get a full sleeve?
A: It depends on line weight and spacing. Fine line detail that hugs bone or joint areas tends to soften faster. If you are set on fine lines, ask for slightly heavier primary anchors and wider negative gaps. Plan to accept touch-ups at year two to three for sustained crispness.
Q: How do I brief an artist to avoid a geometric sleeve that looks flat when I move?
A: Mention arm contours and request flow studies in the consultation. Ask the artist to sketch the design on your arm in the position you use most, like relaxed and flexed. Also bring examples of healed work so you can see how movement affected similar pieces.
Q: Do certain placements need different aftercare or products?
A: Yes. High-friction spots like wrists and inner elbows need extra protection from clothing and sun. For the first 24 to 72 hours use a medical-grade film dressing like Dermalize Pro to limit rubbing. After scabs fall, switch to a fragrance-free moisturizer such as After Inked for daily care.
Q: Will mixing portrait elements with geometric panels make touch-ups harder?
A: It can. Portraits and stipple shading age differently than solid geometry. That means touch-ups may need separate sessions focusing on portrait tonal corrections and geometric outline refreshes. Discuss a staged maintenance plan with your artist before starting.
Q: How do I find artists who specialize in geometric sleeves without following specific Instagram handles?
A: Use local directories, tattoo convention guest lists, hashtag searches for healed work, and community threads on forums like r/tattoos. Look for portfolios that show healed photos and similar placements. Seeing a piece at a convention or in a studio walk-in gallery helps you verify how work looks months after healing.
