
Deer skull art looks everywhere online, but what people save and actually love five years later is rarely the same as the hottest Pinterest tile. Trendy tiny outlines and bright color pops photograph well the day they are done, yet they can blur, fade, or lose shape where antler tips meet thin skin. Read on for designs that work now and hold up, with placement and wardrobe notes so the piece reads the way you expect after healing.
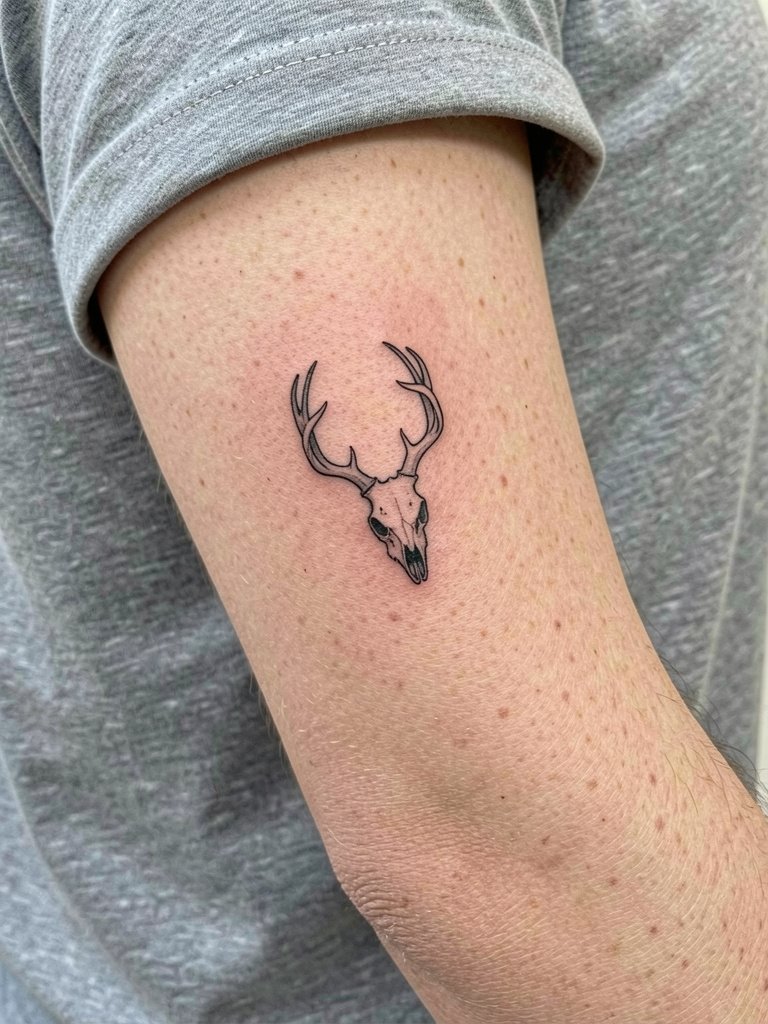
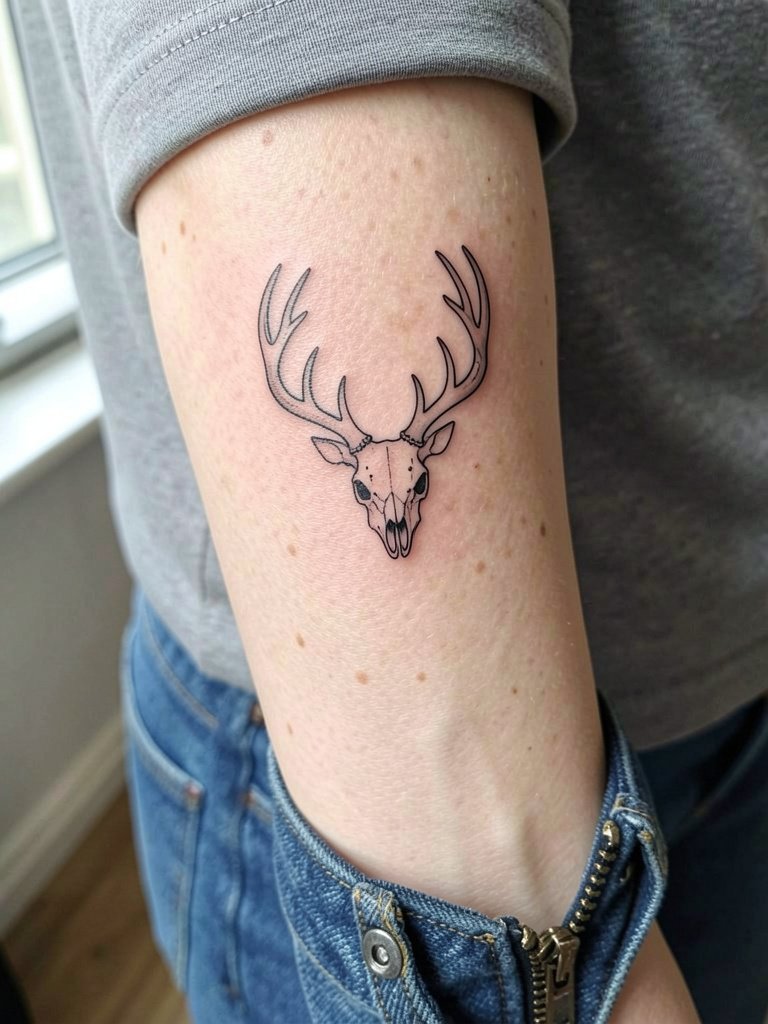
1. Fine-Line Deer Skull on Inner Forearm
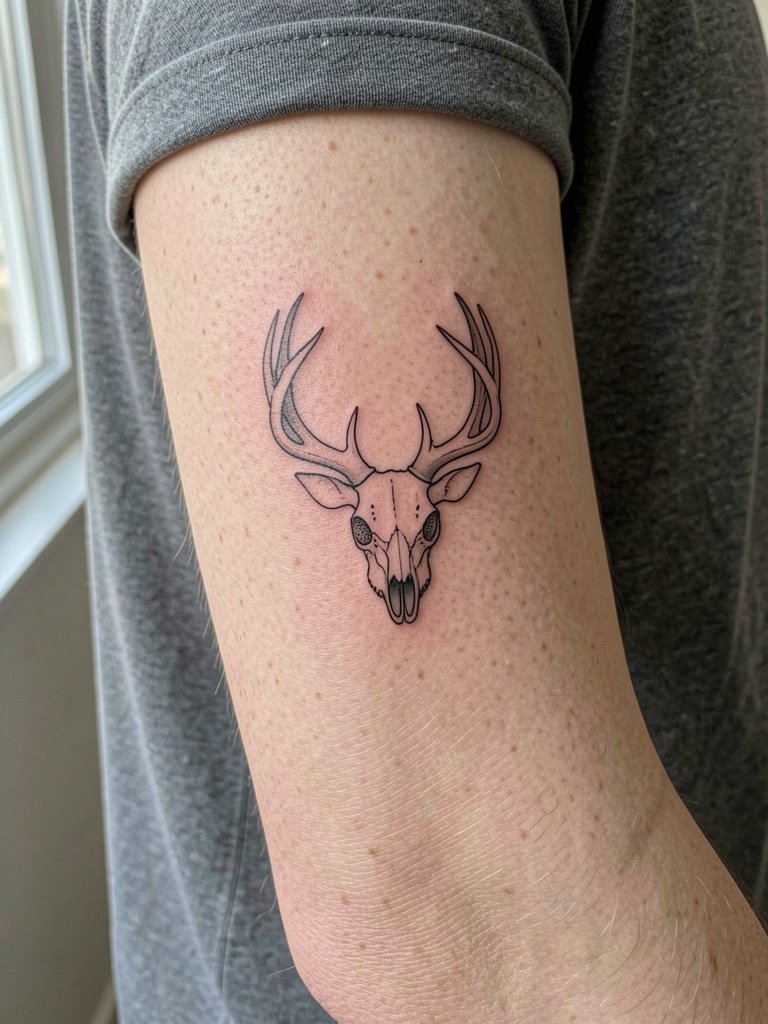
A tiny, fine-line deer skull on the inner forearm works if you accept shorter antler detail and heavier primary strokes. I recommend planning the antler tips wider than you think so they do not merge with skin texture by year two. Specify to your artist that the main silhouette stays a hair thicker than typical single-needle work, and ask for knotty intersections to be left as open space rather than packed lines. The inner forearm moves and stretches, so the common mistake is requesting wafer-thin filigree that disappears. For session wear, choose a linen button-down shirt you can roll above the elbow to give the artist clear access.
2. Realistic Deer Skull with Full Antlers on Outer Arm
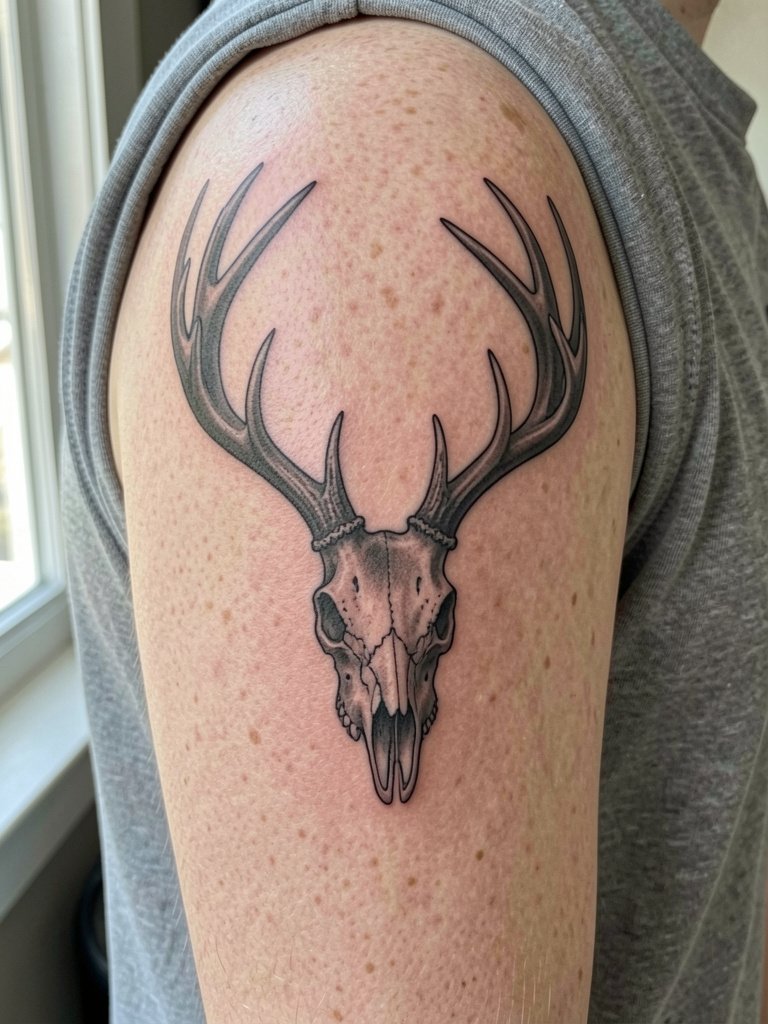
A medium-scale realism piece on the outer upper arm reads best because there is room for antler curvature and bone shading without the skin creasing that blurs detail. Tell the artist you want grainy stipple in the hollows and a slightly heavier contour line on the jawbone so the shape holds at a distance. The session feels like steady shading and small pauses for the antler curves, not a fast one-pass job. The common error is compressing antlers too narrow for the arm width. To show it off, pair the healed piece with an open overshirt layered over a tee so the antler tips peek out.
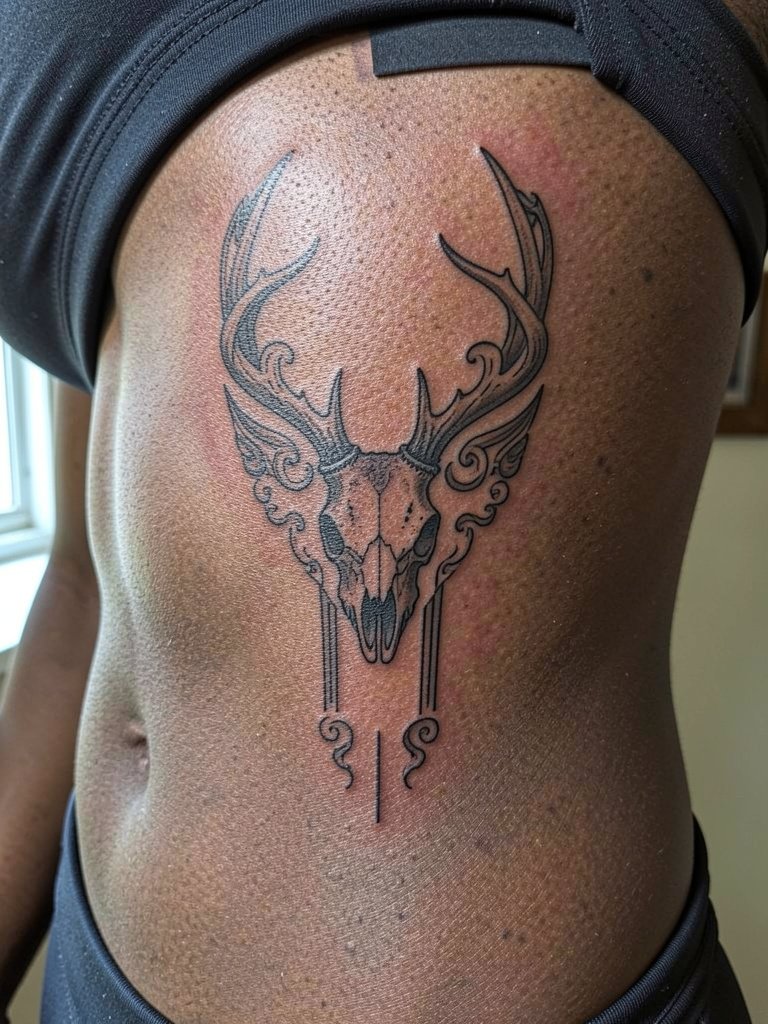
3. Deer Skull Woven with Wildflowers on Thigh
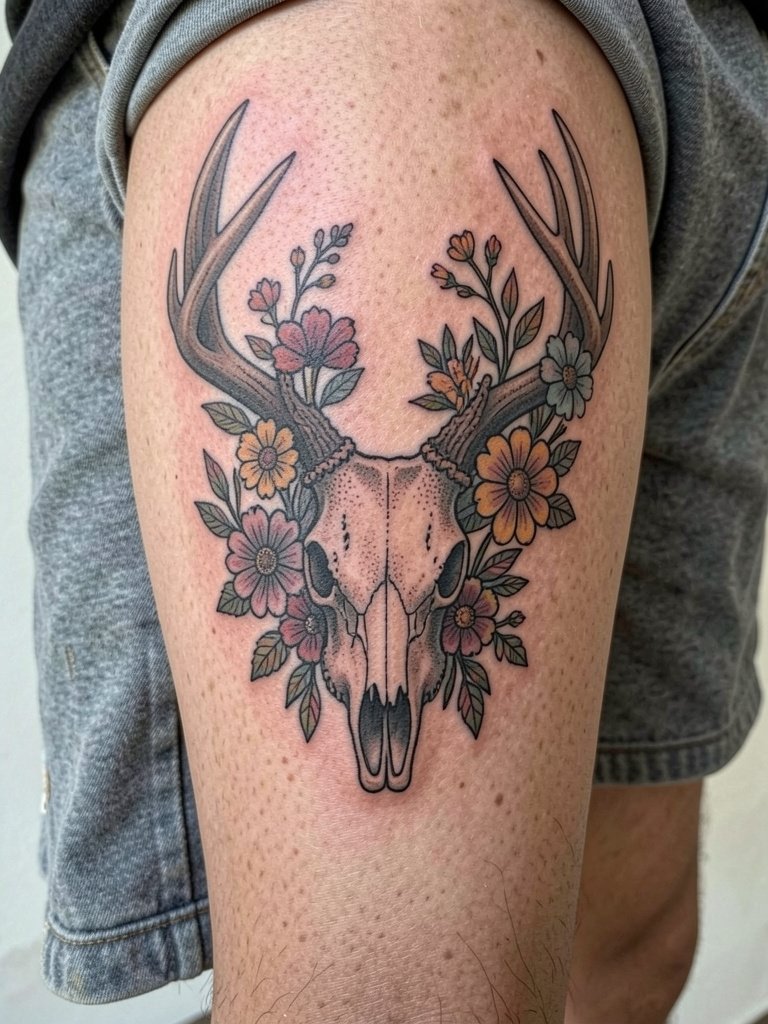
Combining flora with a skull softens the motif and makes the piece age more gracefully than a tiny outline. Be specific with the florist detail you want. For example, request that blooms are shaded with stipple rather than flat color so they do not fade into blobs. If you want color, limit accents to a few petals and ask the artist to use muted pigments to reduce rapid fading. The thigh tolerates dense detail and multiple sessions. For outfit pairing, this placement looks great with a high-slit skirt that reveals the skull and flowers when seated or walking.
4. Black and Gold Ornate Deer Skull on Calf
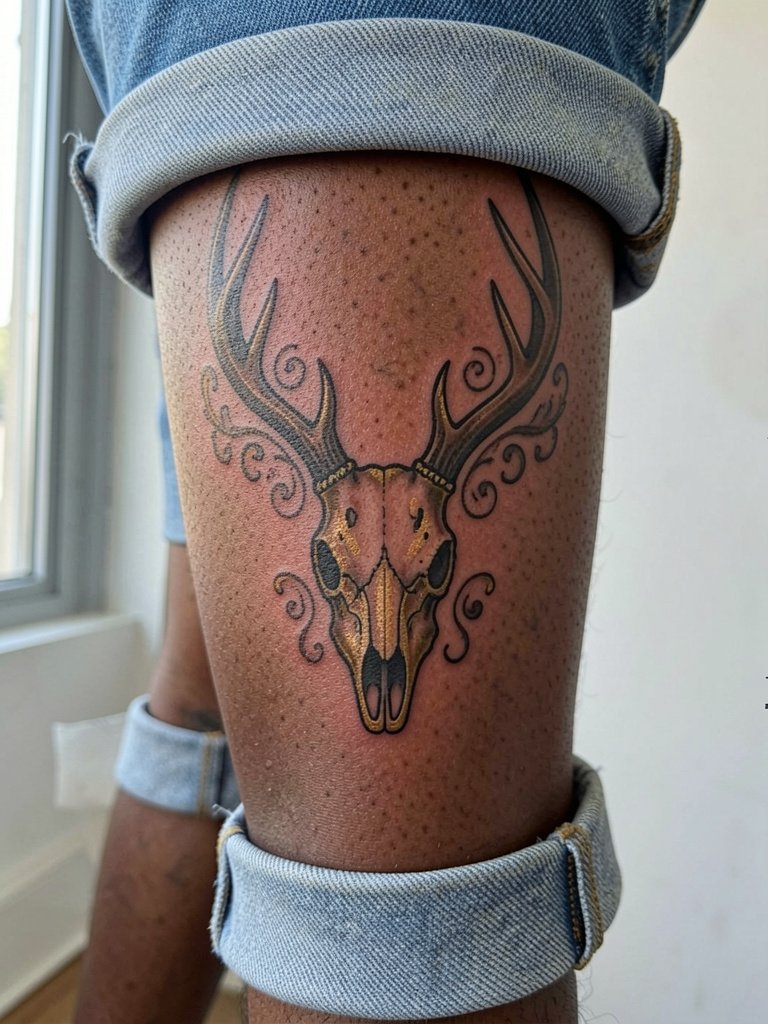
Color accents prompt a true debate. One camp argues black and gray ages more cleanly because bone structure and antler contrast remain legible even as lines soften. The other camp says restrained metallic or muted color highlights create a standout piece without harming long-term readability if the color is used sparingly. If you prefer gold, ask the artist to limit metallics to small panels and test the ink on similar skin to confirm saturation. The calf is forgiving for touch-ups, so a small color boost at year three is common. Pair the healed calf piece with cuffed straight jeans to show the antler sweep.
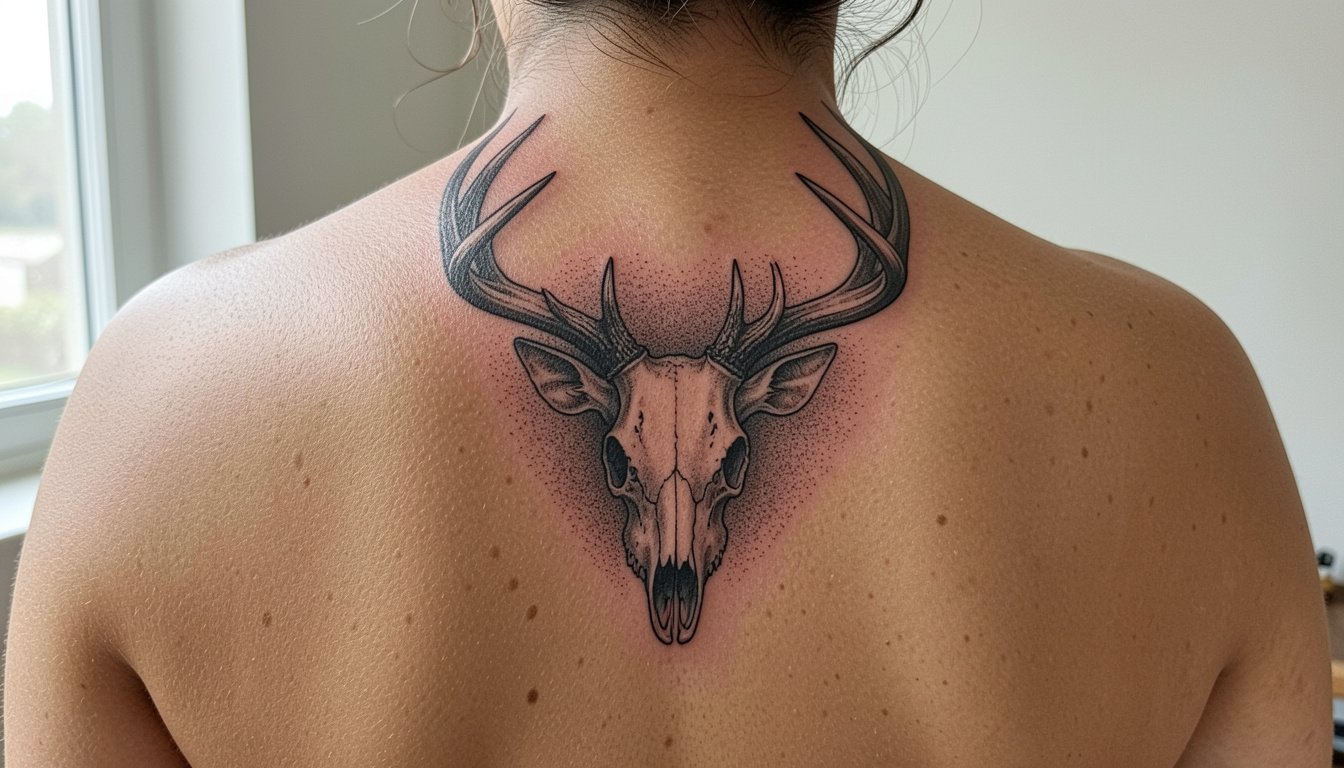
5. Blackwork Solid Deer Skull on Shoulder Blade
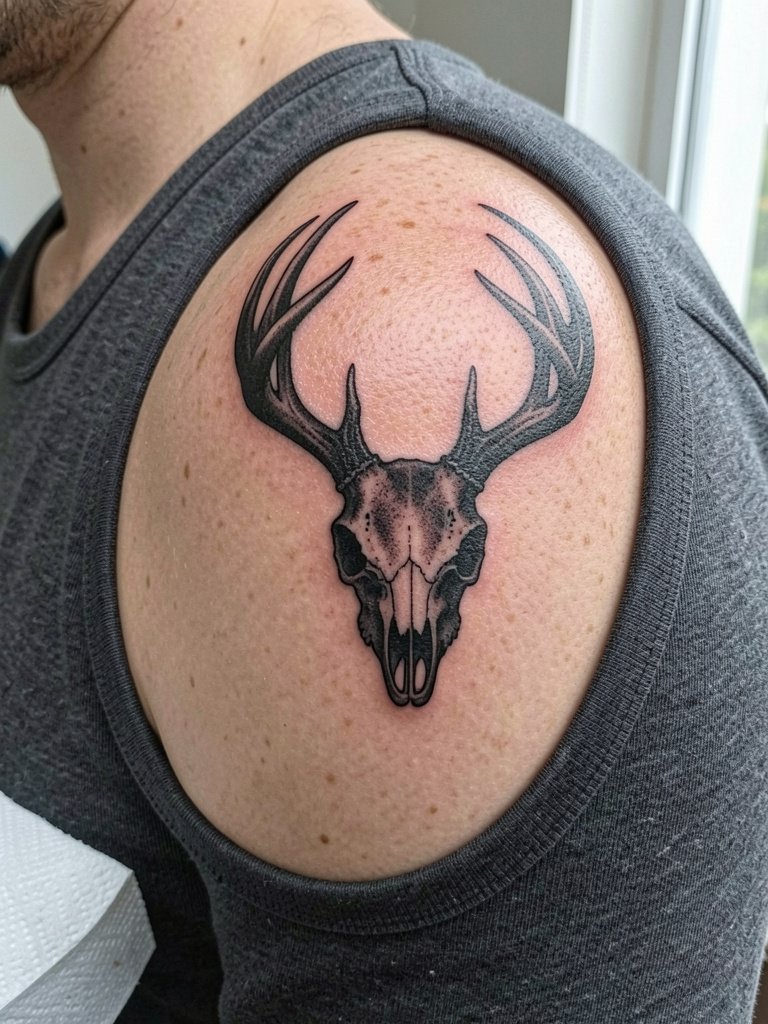
Blackwork is the safest visual bet if you want longevity from a deer skull design. Ask for consistent saturation and block fills rather than hairline hatching that can fade into texture. The typical mistake here is trying to force tiny internal bone detail inside a solid field. On the shoulder blade the skin slides under fabric occasionally, so expect a slightly longer touch-up window than on the outer arm. This placement looks sharp with a wide-neck tee that frames the shoulder blade without covering it.
6. Geometric Deer Skull with Sacred Geometry Halo on Chest
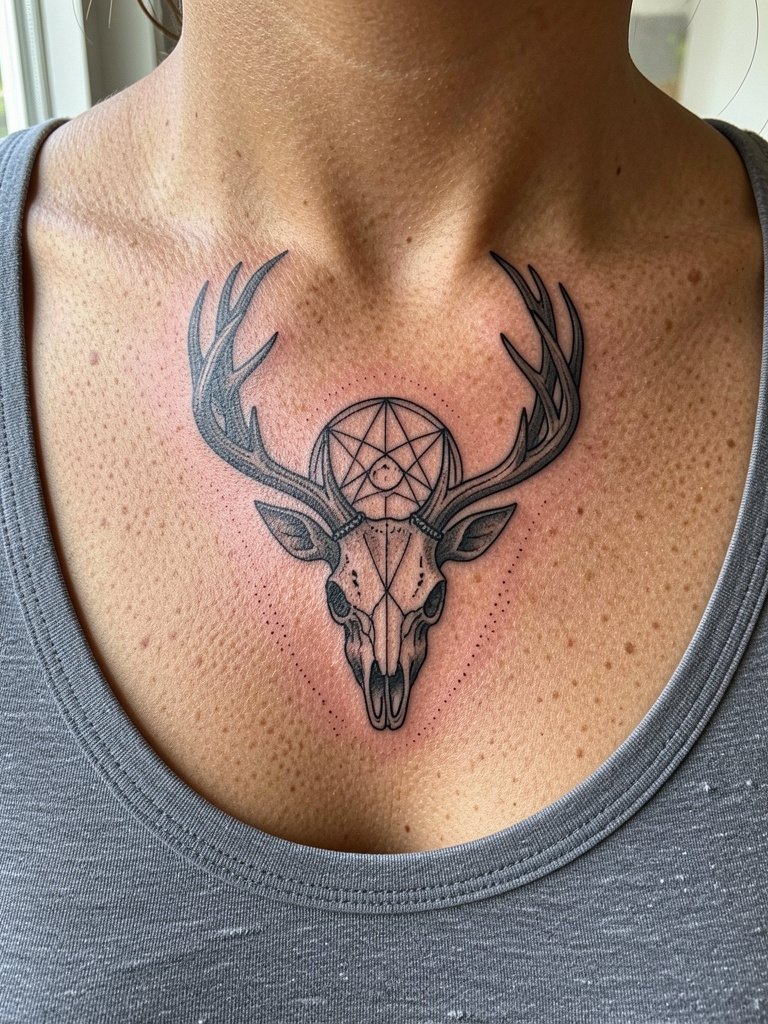
Geometric framing adds structure and modern contrast to organic skull shapes. Make sure line spacing in the halo gives each polygon at least 3 mm of visual breathing room so the geometry does not merge after healing. A clear consultation point is exact symmetry and whether you want the halo concentric or slightly offset. Chest skin moves with breathing and body shifts, so request slightly bolder anchor lines. For evenings out, an ensemble with delicate layered necklaces pairs cleanly with this collarbone placement.
Session Day Essentials
The first six designs above include delicate lines, color accents, and pieces that see friction. A few small items make the session and the first week of healing much easier.
-
Stencil transfer paper kit. Lets you preview the placement on skin so the antler spread and skull angle match the arm or thigh before the needle touches you.
-
Topical numbing cream. Applied per instructions before a sensitive forearm or rib session eases discomfort for clients who react strongly to long shading passes.
-
Thin protective film roll. A breathable film helps guard small wrist or finger tattoos from friction during the first 48 hours.
-
Fragrance-free gentle body wash. Use a mild cleanser during showers to avoid irritating fresh ink while still keeping the area clean.
-
Aquaphor healing ointment. A thin layer helps protect fine-line and stipple work during the initial healing window without suffocating the skin.
7. Deer-Human Hybrid Skull Back Piece
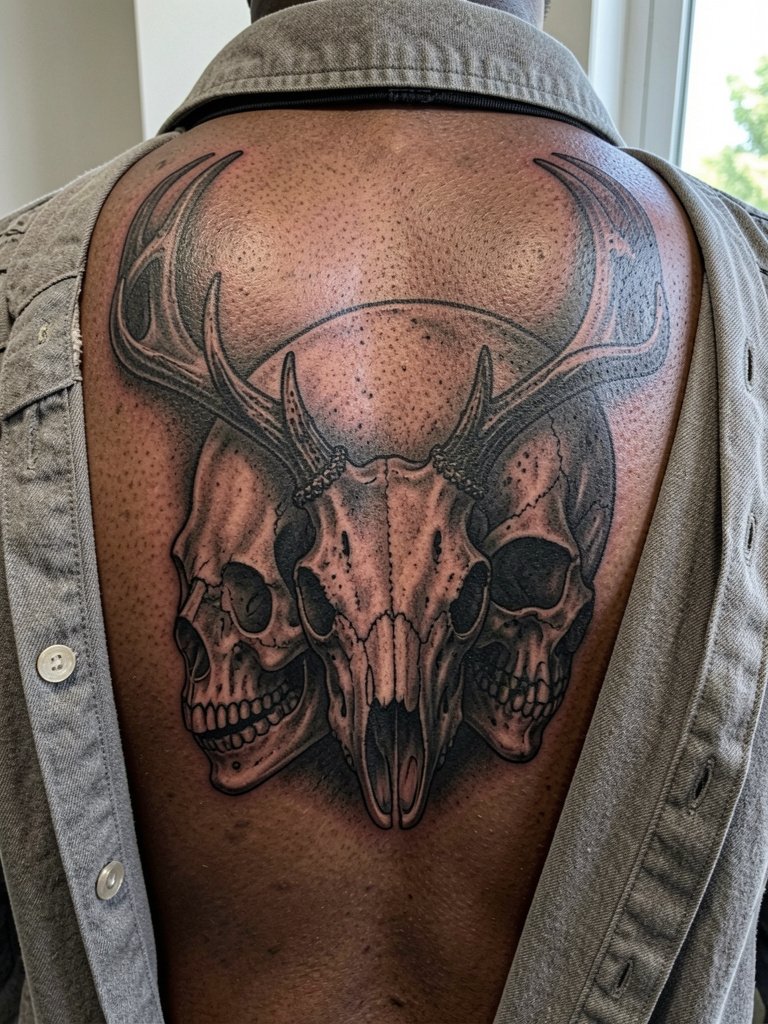
A hybrid skull composition carries narrative weight and needs space to breathe. Plan a multi-session approach and ask your artist how they will balance negative space to prevent a heavy black block across the back. A real mistake is crowding the jaw intersections where detail can become indistinguishable at distance. Back pieces take years to complete and benefit from a staged approach, so plan wardrobe that allows removal without rubbing the fresh work during sessions.
8. Minimal Micro Deer Skull at the Wrist
Micro tattoos on the wrist are popular, but they trade detail for subtlety. One group of artists recommends fine single-needle outlines for a discreet look. The other group warns that wrist skin and frequent washing cause tiny antler tips to blur within a few years. If you want micro detail to last, ask the artist to thicken the primary contours and to leave small open spaces in the antlers rather than packed hatching. For session comfort and display, wear a short sleeve tee and avoid watches on the tattooed wrist for the first two weeks.
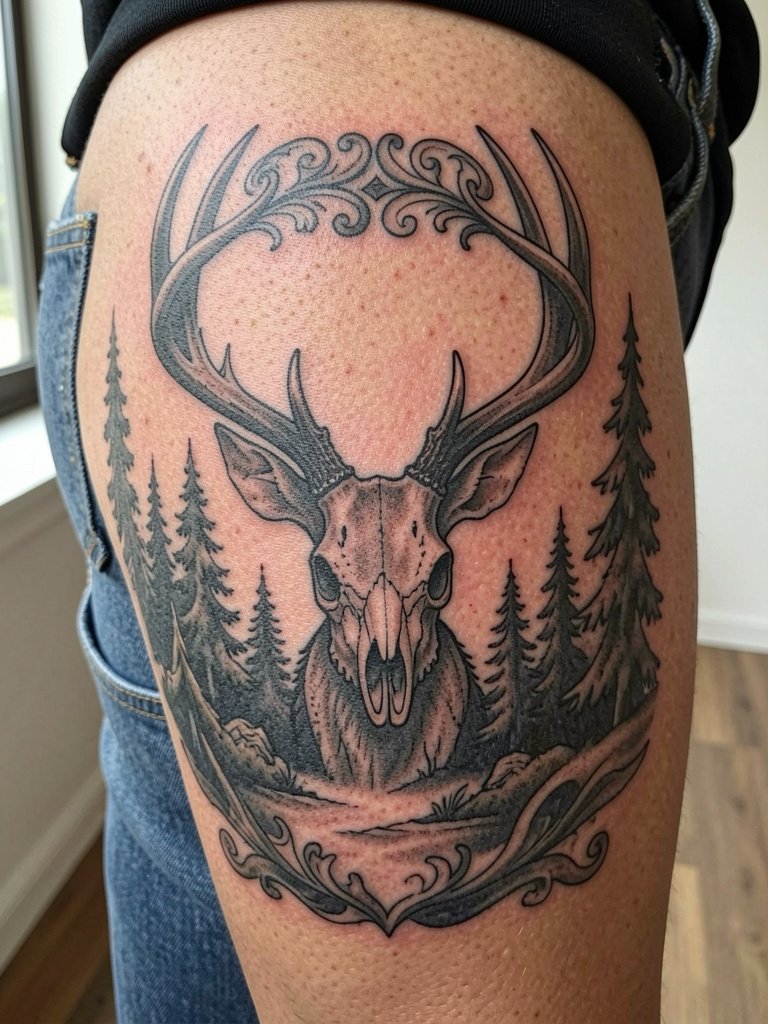
9. Deer Skull with Forest Background on Full Back
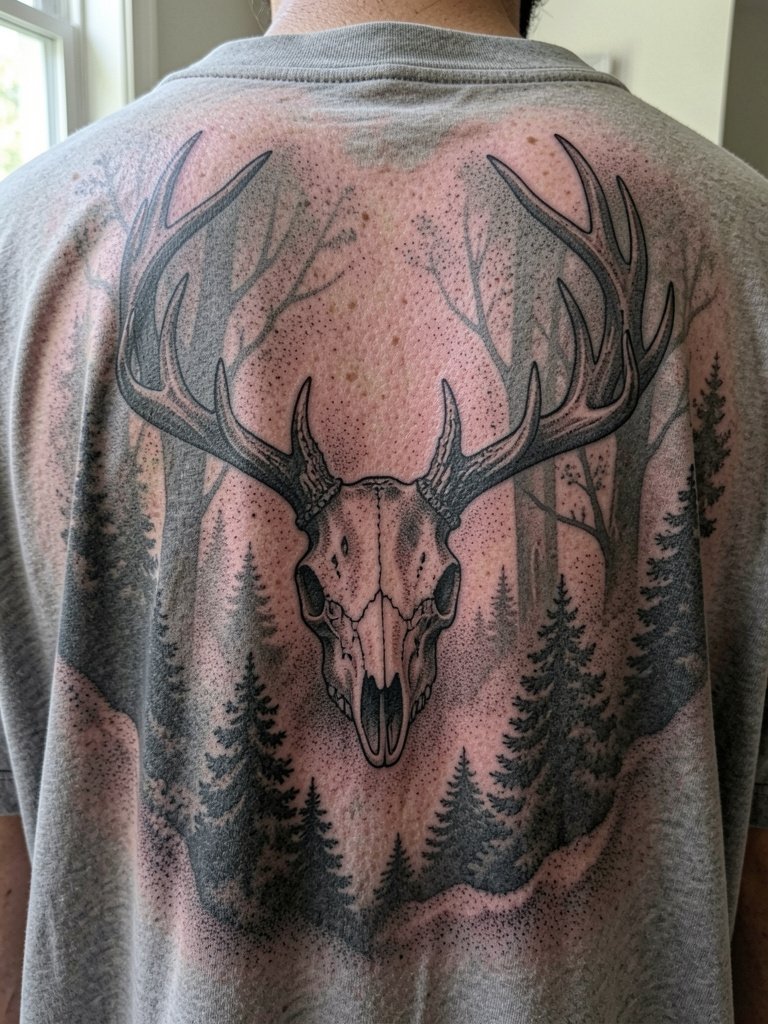
A forest backdrop turns a skull into a narrative scene and reduces the chance the piece reads like generic flash. Plan for scale and ask the artist to use layered values and stipple in the trees so the skull silhouette keeps its edges at distance. The main mistake is compressing too much detail into a small area; on the back you have the luxury of breathing room. For showing off the healed piece, select an open-back dress or racerback tank to reveal the art cleanly.
10. Ornate Deer Skull with Occult Symbols on Thigh
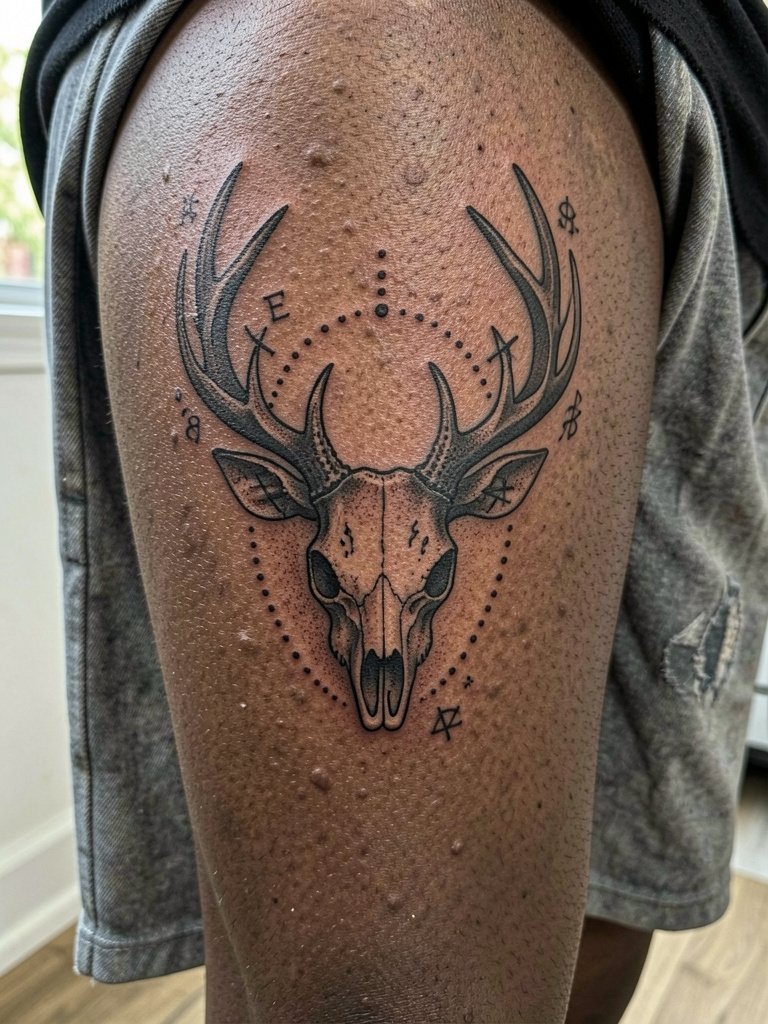
Mystical ornamentation adds a ritual feel but invites debate over symbolism. If you plan occult imagery, be explicit about the symbols and their arrangement so the artist can render them legibly at the chosen scale. The thigh is forgiving for dotwork and dense elements, and touch-ups are straightforward if a small symbol softens over time. For smart session wear, choose loose lounge shorts that allow the artist to roll the leg without pressure at the hem.
11. Sticker-Style Flash Deer Skull on Ankle

Flash-style stickers translate well into small, bold ankle pieces because the thick outline resists blowout. A common error is using too many interior details on a tiny patch of skin. Keep the design graphic and tell the artist you want a slight gap between the outline and any interior shading to preserve crispness. For day-to-day looks pick shoes and socks that do not rub directly on the fresh tattoo during the first two weeks.
12. Thigh Forest Scene with Hidden Deer Skull
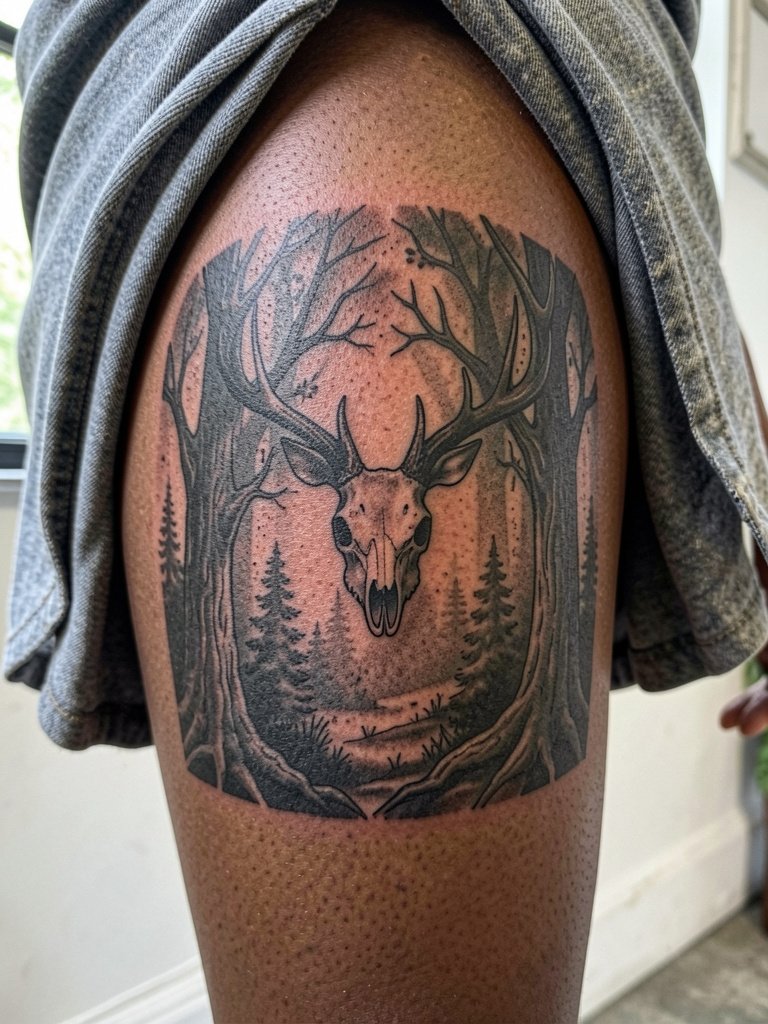
Subtlety can be powerful when the skull is tucked into a landscape. Ask the artist to map the silhouette at full size before filling trees so you can confirm the skull reads only at a glance. The typical mistake is over-contrasting the hidden shape so it looks forced. A hidden-silhouette approach tends to age well because the negative space does not rely on micro detail. Pair this healed thigh work with a relaxed shorts look that lets it peek out.
13. Deer Skull Ribcage Panel with Filigree
Ribcage work gives dramatic vertical canvas but comes with movement and pain considerations. Artists split on fine-line ribs. One group says the skin stretch and breathing blur thin lines in two years and avoid single-needle bands. The other group says careful depth, slightly wider spacing, and staged shading keep filigree readable, and they can show healed photos to support that. If you choose ribs, request a slightly bolder anchor line for the skull and lighter filigree inside so the main shape survives. Expect a tougher session and schedule breaks.
14. Minimalist Outline That Reads as Skull, Not Antlers
Minimal outlines are divisive. One camp favors them because they are discreet and photograph clean initially. The other camp warns that overly simple outlines can read as mere antler shapes rather than a skull unless you preserve defined negative spaces for the eye sockets and nasal cavity. To avoid that problem, ask for tiny anchor dots and slightly thicker junctions where the antlers meet the skull. For appointment day, keep the area uncovered with a slim watch on the opposite wrist so the tattoo wrist is free.
15. Full Thigh Black and Gray Scene with Antlers Extending Toward Hip
A full thigh piece allows max narrative scope and long antler runs that complement the hip line. The main consultation item is antler flow and how it meets the hip bone so nothing feels truncated. Avoid the common mistake of ending antlers at a seam or edge where future clothing will always crop them. For sessions, wear loose shorts or pants you can pull down slightly without forcing seams, and when healed show it in relaxed shorts or an oversized shirt over fitted bottoms to balance the silhouette.
Frequently Asked Questions
Q: How big does a deer skull tattoo need to be for antler detail to remain visible?
A: Antler tips and negative space need room. For fine detail plan for at least three to four inches of width for obvious antler separation. If you want tiny antlers, request bolder primary contours and less internal hatch so the silhouette reads even as lines soften.
Q: Should I go black and gray or add color accents for a deer skull?
A: Black and gray keeps bone structure readable as the tattoo ages and it is forgiving on most skin tones. A second approach uses selective muted color or metallic accents to highlight specific elements. If you pick color, ask for sparing placement and test patches when possible.
Q: Where can I find healed examples and artists who do deer skull work without naming creators?
A: Search hashtags like #deerskulltattoo, #skulltattoo, #blackandgreytattoo, and add your city name to narrow results on Instagram and TikTok. Use Pinterest for mood boards but cross-check against studio portfolios and booking pages to confirm healed photos and real client shots.
Q: How should I dress for a long session on the ribcage or thigh?
A: Wear loose garments that can be adjusted without pulling on the tattooed area. For ribs choose a fitted sports bra or bandeau in its normal worn position so the artist can access the side torso. For thigh wear loose shorts that pull down easily without riding or bunching at the hem.
Q: Will a small deer skull on my wrist need touch-ups more often than a back piece?
A: Yes, high-movement sites and areas with frequent washing typically need touch-ups sooner than larger, flatter canvases. Expect fine-line wrist work to be evaluated around year two, while back and thigh pieces often go longer before a refresh.
Q: What should I ask the artist about if I want an ornate deer skull with symbols?
A: Bring clear references at multiple scales and say exactly which symbols you want emphasized. Ask the artist how they plan to space those symbols to avoid visual clutter and whether they recommend staged sessions so shading and negative space can settle between visits.
