

Someone I know spent months scrolling for the right bird tattoo and then realized the problem was not finding art. It was knowing which style will still read clearly on skin after a few years. I spent time in five shops across Brooklyn and watched what healed best. These ten bird ideas focus on how they look now and how they age, plus what to say at your consultation to get the exact result you want.
1. Fine line hummingbird on inner forearm
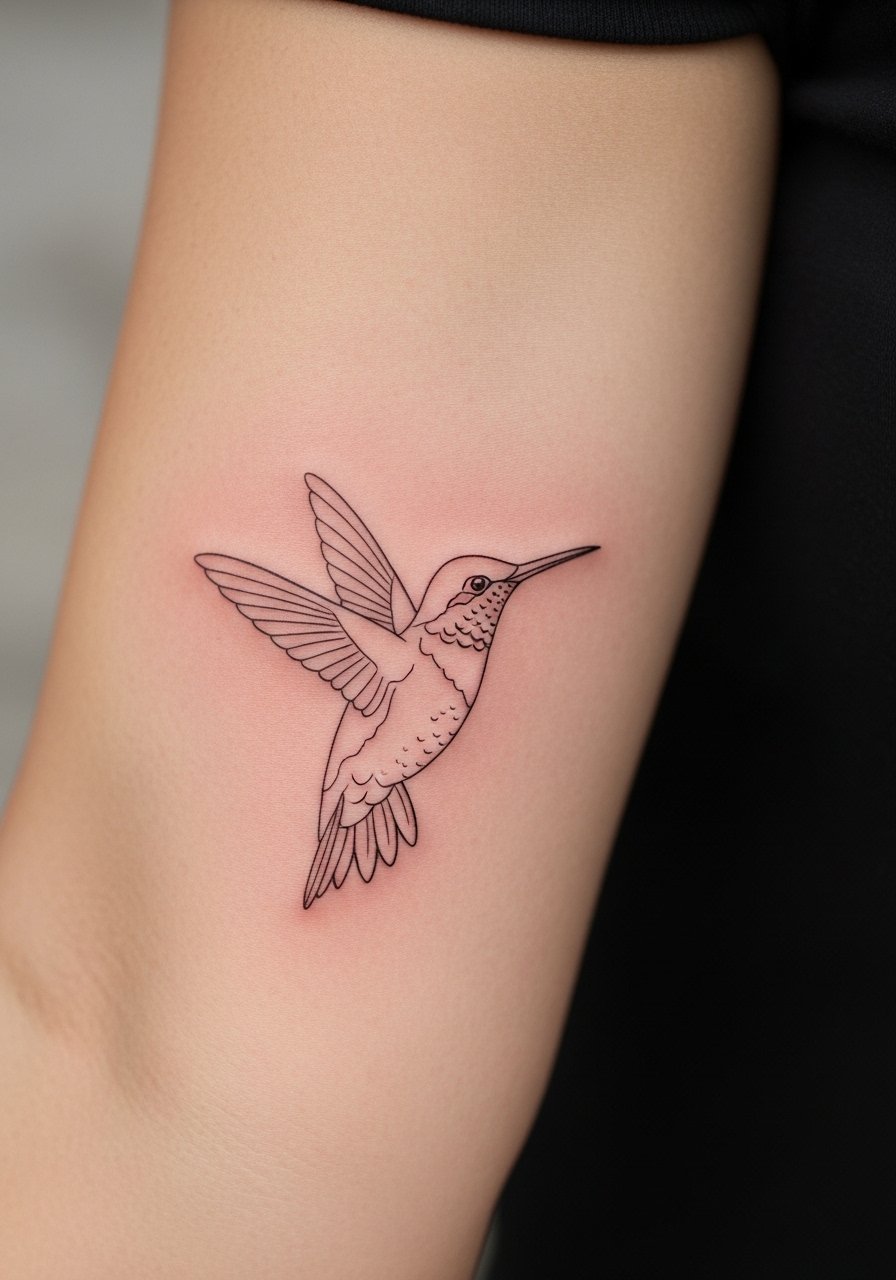
Someone I know first saw this style on a friend's forearm and could not stop staring at the delicate linework. Fine line hummingbirds read as motion with a tiny wash of color near the wing. Tell your artist you want single-needle feel but with slightly more spacing between strokes so lines do not merge as the skin ages. Fair warning, the inner forearm can show hair follicles and light blowout if the artist packs lines too tightly, so ask about spacing and needle depth during consult. Expect a one-hour session for a micro piece, light pain, and a likely touch-up window around year two for crispness.
2. Micro-realism blue jay on the ankle

The ankle is a great place for micro-realism when you want detail that fits a small canvas. In my experience, micro-realism holds up best where the skin is relatively stable and not stretched daily. Ask for photos of healed ankle work from the artist and request a tiny color key so the blues stay saturated without overworking the skin. People often ask for ultra-fine feathers and end up with muddy shading because the artist tried to force too much detail into too small an area. Session time is usually ninety minutes to two hours, pain is medium, and plan for a touch-up at around three years if you want the blues to pop again.
3. Blackwork swallow silhouette on the shoulder blade

There is something about bold black silhouettes that reads from across a room, especially on the shoulder blade. This placement gives the artist room to use solid saturation, which tends to age very well compared with thin outline work. Tell your artist you want saturated fill with crisp negative space around the wing tips so you can avoid early patchy fading. A common mistake is asking for an outline-only swallow at this size, which looks great early and then needs touch-ups sooner. Session time is often under two hours, pain is low to medium, and expect minimal blowout risk if the artist keeps the fill dense and consistent.
4. Minimalist sparrow behind the ear

A small behind-the-ear sparrow reads as a private symbol for many people. This spot has thin skin and sits near hair, so tell your artist you want slightly bolder linework than a pure single-needle sketch. The biggest mistake is asking for ultra-fine lines that vanish into the hairline after healing. Expect a quick fifteen to forty-five minute session, sharp but brief pain, and touch-up needs sooner than forearm pieces because of hair movement and frequent shampooing. If you work in a conservative field, remembervisibility near the ear can be noticeable depending on hairstyle.
5. Watercolor swallow on the upper arm
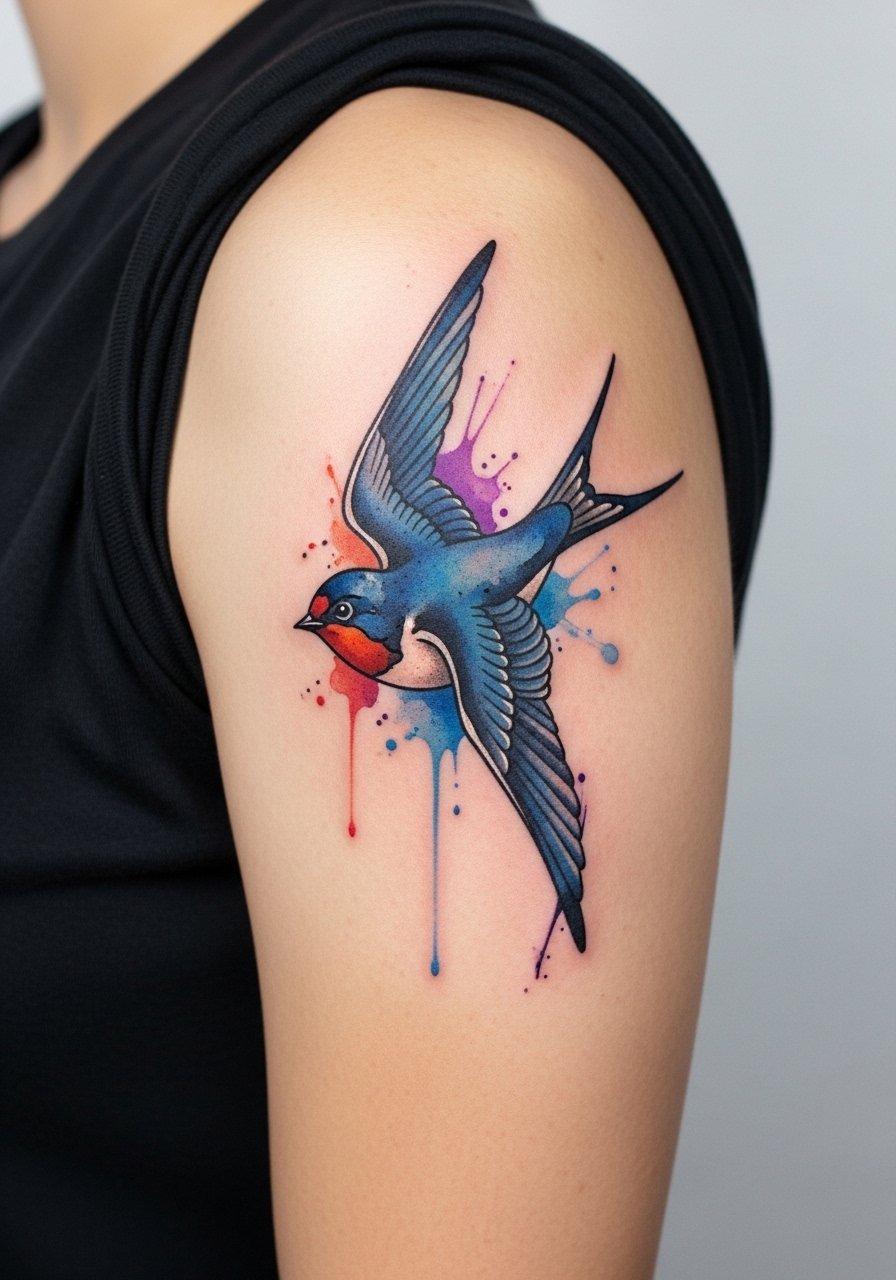
Watercolor style can look modern but it has a reputation for fading into ghostly smudges if done without structure. Most watercolor tattoos from a few years back look faded because artists skipped anchoring lines. This swallow version holds up because it pairs loose color with a fine contour to protect edges. In the consult, bring reference showing both the color wash and the contour you like. Session time is typically two hours, pain is low to medium, and you should plan on a color refresh at year two or three depending on sun exposure and aftercare. Ask the artist how they protect color edges when healing.
6. Phoenix in subtle color on the ribcage
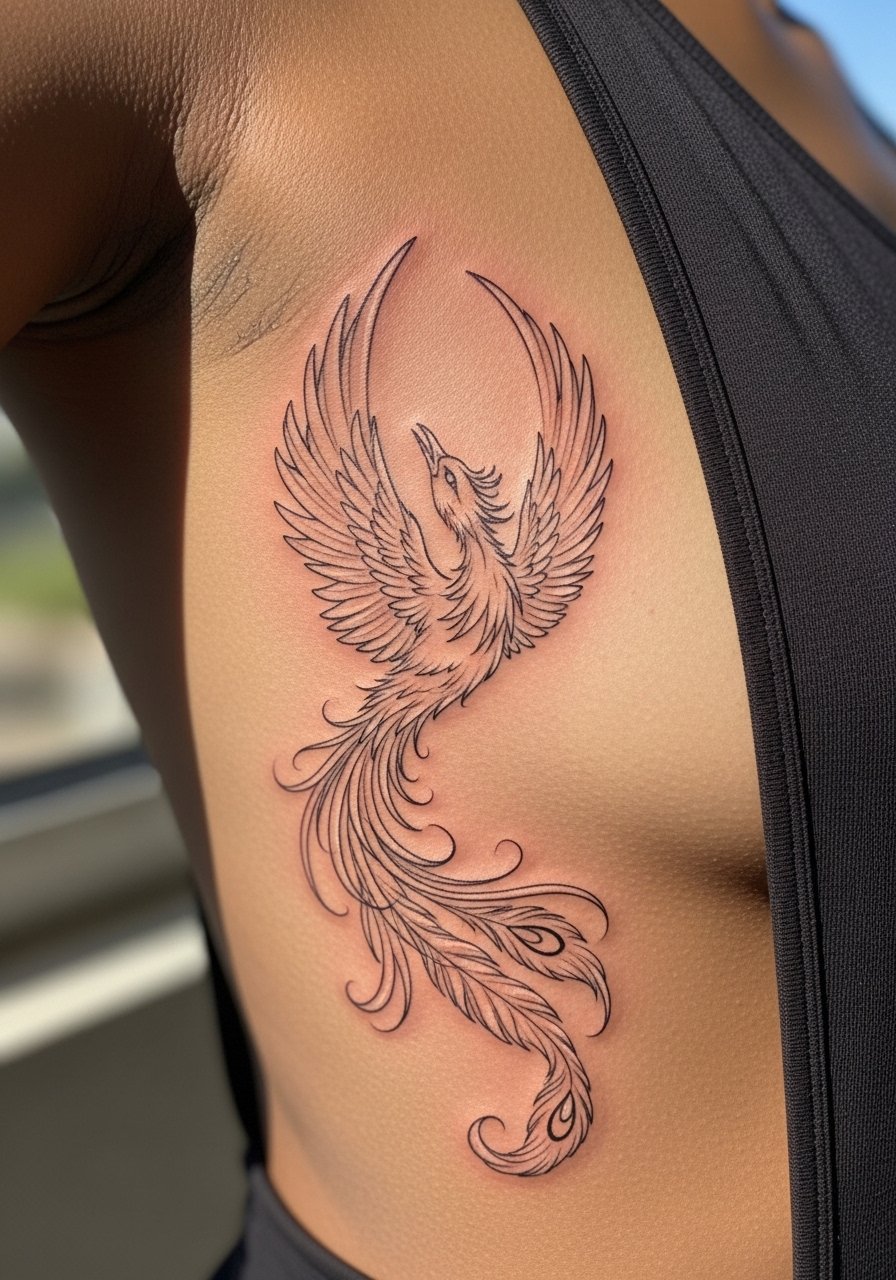
Fine line on ribs splits artists into two camps. One group says the skin stretch and constant movement blur thin lines within two years. The other group argues that with proper needle depth and spacing, fine line settles fine on ribs. I tell clients to pick a version between those extremes. If you want a phoenix with longevity, request slightly thicker contour lines and strategic color saturation, not tiny strokes all over. The ribcage is a 7 out of 10 on most pain scales, session time can run three hours or more, and touch-ups are common at year three for thin details.
7. Geometric origami crane on the calf
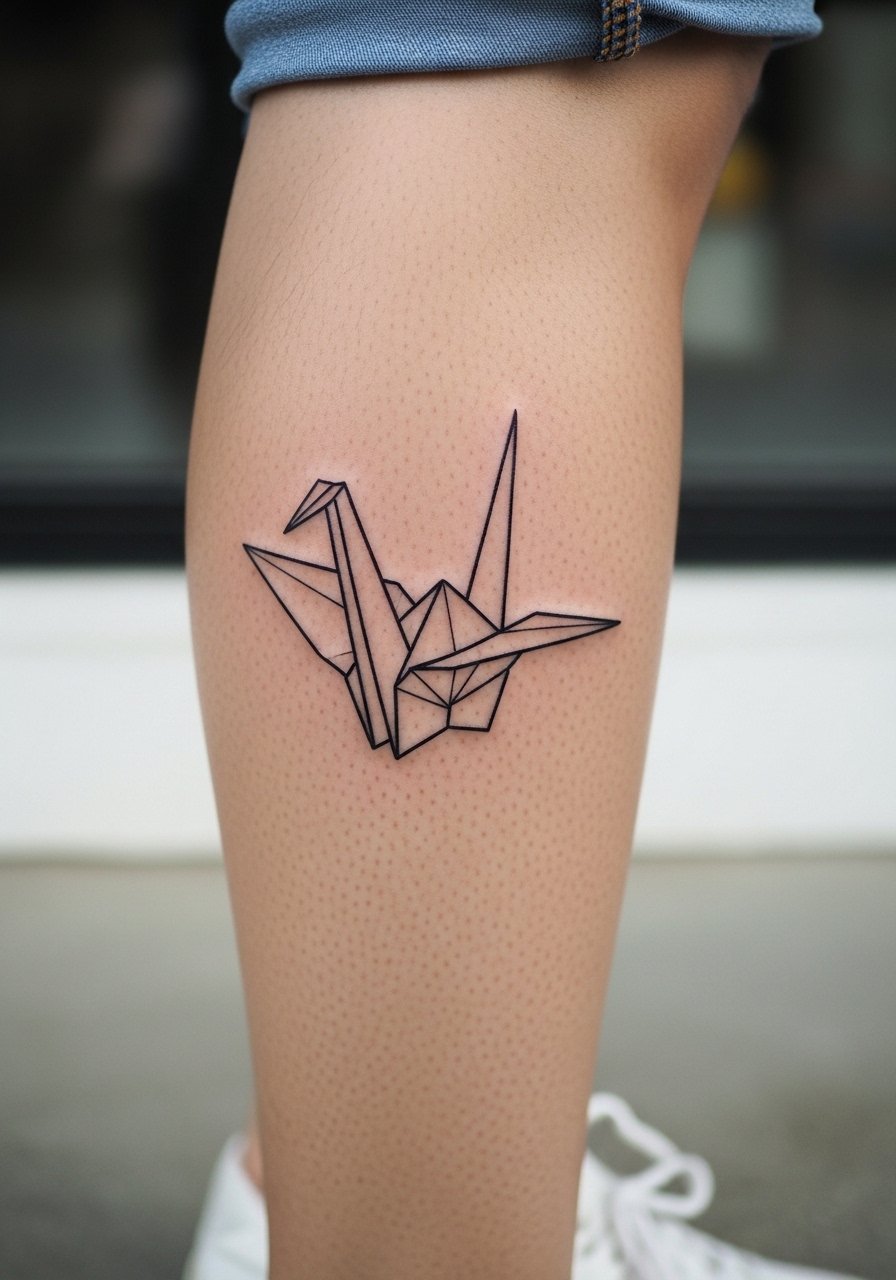
When you sit down with your artist for a geometric crane, bring grid-style references that show the exact angle and line weight you want. The biggest mistake is shrinking geometric designs too small. Tiny acute angles blur into indistinct shapes over time. The calf offers a forgiving surface with low blowout risk and a medium pain level during a one- to two-hour session. Ask about slightly bolded primary lines so the shape remains readable at two and five years. Geometric pieces also behave differently on rounded placements, so expect minor shape adjustments if you want a wraparound placement.
8. Traditional swallow on the collarbone

There is a long tradition of swallow motifs in classic tattooing and the collarbone is an ideal place for a bold, graphic swallow. Tell the artist you want American-inspired linework with strong saturation. A common error is requesting thin, delicate lines for a collarbone piece and then needing touch-ups as the area moves with breathing and clothing. Session time is under two hours usually, pain is medium because of proximity to bone, and the style tends to age well if the outlines are confident. If the collarbone area crosses into visible neckline territory at work, factor that visibility into your decision.
9. Stipple-shaded little owl on the upper thigh

There is a real advantage to stipple shading on the thigh because the skin there holds texture and tonal work nicely. A mistake I see is requesting full tonal realism in a very small owl. Stipple lets the piece read as texture rather than blurred gray. Tell your artist you want dot work density notes for the healed photos so you can preview how contrast will age. Pain level on the outer thigh is low, session time is usually around two hours, and touch-ups are less frequent thanks to consistent skin thickness. This placement also gives room for future expansion into a larger leg piece.
10. Minimal flock running down the spine
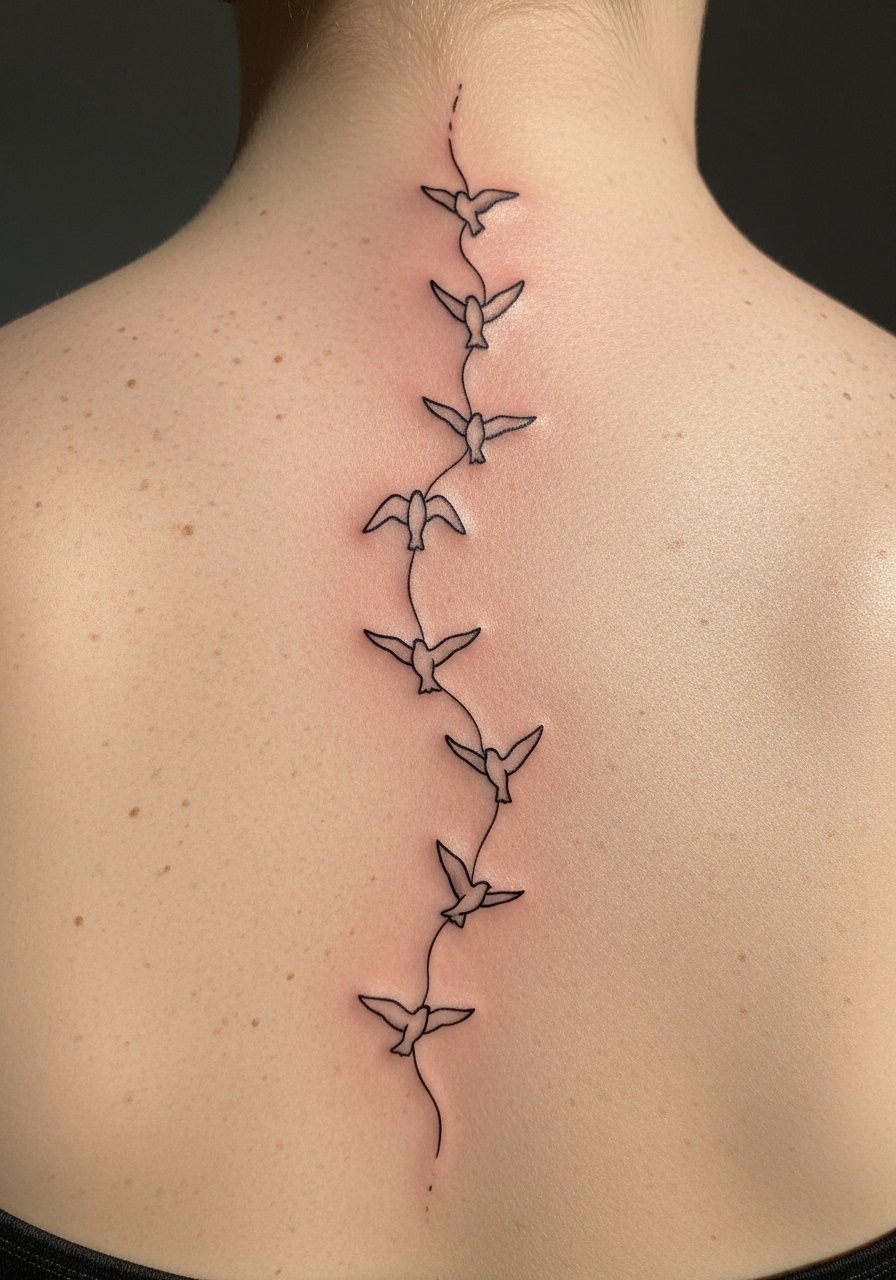
There is visual impact in a vertical flock on the spine because the line of birds follows the body axis. The biggest mistake is placing them too close together so the birds merge over time. Ask your artist to keep negative space between the silhouettes and to map the birds to vertebrae landmarks so the composition flows when you move. Spine pieces can be sensitive during the session, pain varies from medium to high depending on placement, and session time depends on count but expect multiple short sittings for larger flocks. If any of the birds sit high on the nape, note that neck visibility can affect workplace considerations.
Tattoo Prep and Aftercare Essentials
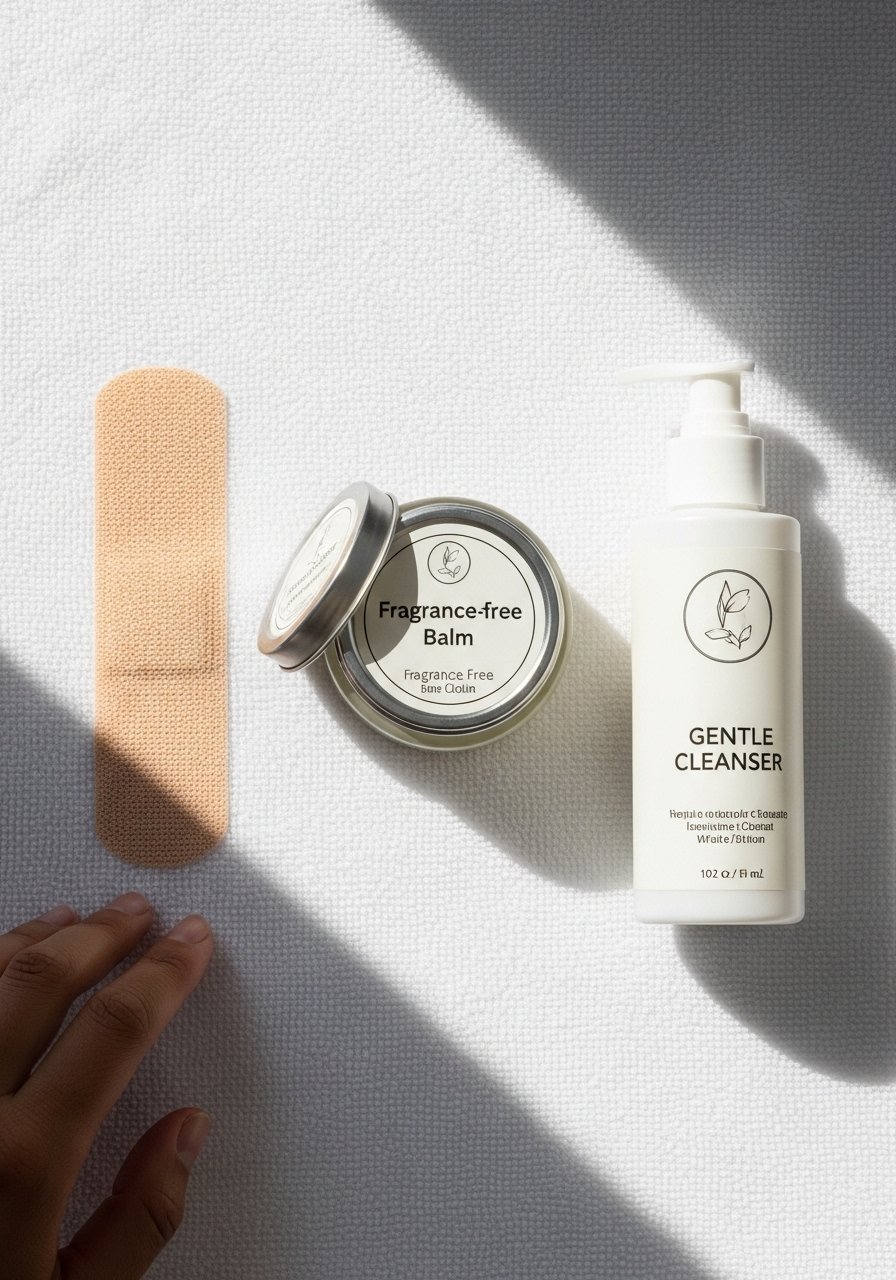
I include a short shopping list for prep and healing that I actually recommend to people who ask after a new piece. Use a fragrance-free gentle foaming cleanser right away to remove sweat and debris. A lightweight fragrance-free balm helps while the tattoo forms a scabless layer. A medical-grade occlusive bandage is useful for the first 24 to 48 hours on pieces that might rub against clothing. A reusable cold pack reduces swelling. A silicone-based long-term moisturizer keeps saturation even after the first six months. If you want an occlusive product, Saniderm works for many people as a single mainstream option, but check with your artist first.
Shopping list
Fragrance-free gentle foaming cleanser. Use twice daily during the first two weeks to keep the area clean without stripping ink. Good for removing ointment residue.
Lightweight fragrance-free balm for tattoo healing. Apply thin layers two to three times a day after cleansing to prevent dryness and itching.
Medical-grade occlusive bandage, single-use strips. Ideal for the initial 24 to 48 hours if your artist recommends bandaging. Protects against friction and contamination.
Silicone-based long-term moisturizer. Use after initial healing to preserve color and smooth texture. Particularly helpful on areas with frequent movement.
Hypoallergenic sunblock with high UVA protection. Apply daily to exposed tattoos to slow fading. Reapply regularly when exposed to sunlight.
Reusable cold pack for swelling and pain. Helpful right after a session to reduce inflammation and ease soreness.
Soft, breathable clothing cover for the tattooed area. Prevents rubbing and keeps new ink from sticking to fabric during the first week.
Antibacterial wound cleanser, fragrance-free. Use cautiously if advised by your artist for areas prone to infection or heavy sweating.
Every tattoo is different. Always follow your artist's specific aftercare instructions. Consult a dermatologist if you have skin concerns or unusual healing issues.
Frequently Asked Questions
Q: Will fine line bird tattoos blur into each other if I get a full sleeve of birds?
A: It depends on spacing and line weight. From what I've seen, fine line clusters need deliberate negative space and slightly bolder primary lines at larger scales. Ask your artist for a mock layout on your arm so you can preview how each bird sits next to the others and schedule a realistic touch-up plan.
Q: Do watercolor-style bird tattoos need different aftercare than traditional blackwork?
A: Yes. Watercolor pieces rely on color saturation staying soft, so avoid heavy scrubbing and use a gentle foaming cleanser plus a lightweight balm during the first two weeks. Long-term, prioritize sunscreen on exposed areas to slow color loss. If you want a product to protect color edges immediately after healing, the medical-grade occlusive bandage above is helpful.
Q: Why do ribs and sternum cause more touch-ups for detailed bird work?
A: Ribs and sternum move a lot and the skin there is thin. Artists split on technique because one approach favors thin line detail and the other favors thicker contour to protect the design. If you pick a highly detailed bird for ribs, expect touch-ups earlier than you would on the forearm.
Q: Can dot work or stipple shading look good on darker skin tones?
A: Absolutely. Stipple shading can create readable texture on darker skin when the artist adjusts dot density and contrast. Bring healed examples from the artist's portfolio that match your skin tone and ask how they plan to lay dots for long-term clarity.
Q: How visible are collarbone and neck bird tattoos in professional settings?
A: Visibility can vary by clothing and hairstyle. Collarbone pieces show with open necklines, and high nape placements can be noticeable with short hair. Think about your job requirements and whether you need a version that can be covered by a blouse or scarf.
