
I spent months staring at neck tattoos on Instagram before I realized the real fear wasn’t the design. It was whether a neck piece would still read confident after healing. These 27 neck tattoo ideas map styles that age well, expectations for pain and healing, and what to ask your artist in 2025.
Quick context: I focused on bold, minimalist, and ornamental neck work. These ideas suit the throat, nape, behind-ear, and clavicle. Neck tattoos are trending for visible statement pieces and subtle hidden marks—this list reflects 2025 trends and what actually holds up (30% of U.S. adults have at least one tattoo — Harris Poll, 2019; 47% of 18–29 year-olds report tattoos — Statista, 2021).
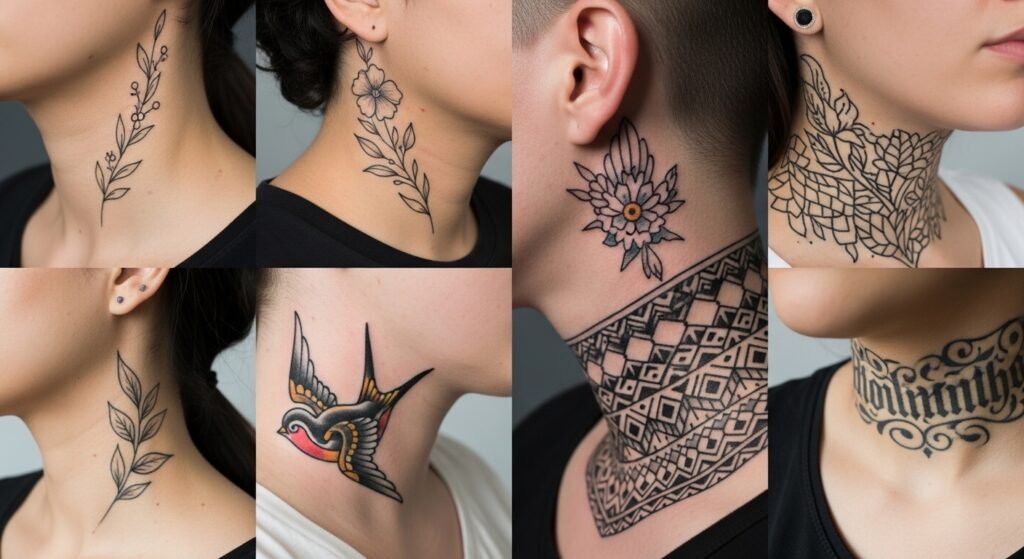
Fine Line Script on Side Of Neck
Style/Technique: Fine Line / Script
Pain Level: Medium-High (6/10)
Session Time: 1–2 hours
Best For: Meaningful words, visible but discrete

I like clean script for the side neck — it reads confident and personal. Expect sharp-looking lines fresh that soften slightly as the skin settles. Pain is real because the skin is thin; healing needs careful cleaning and moisturizer. Avoid tiny fonts that blur. Ask for steady single-needle work and healed examples from similar placements.
Micro-Realism Portrait On Nape
Style/Technique: Micro-Realism / Portrait
Pain Level: Medium (5/10)
Session Time: 2–4 hours
Best For: Pet or small portrait statements
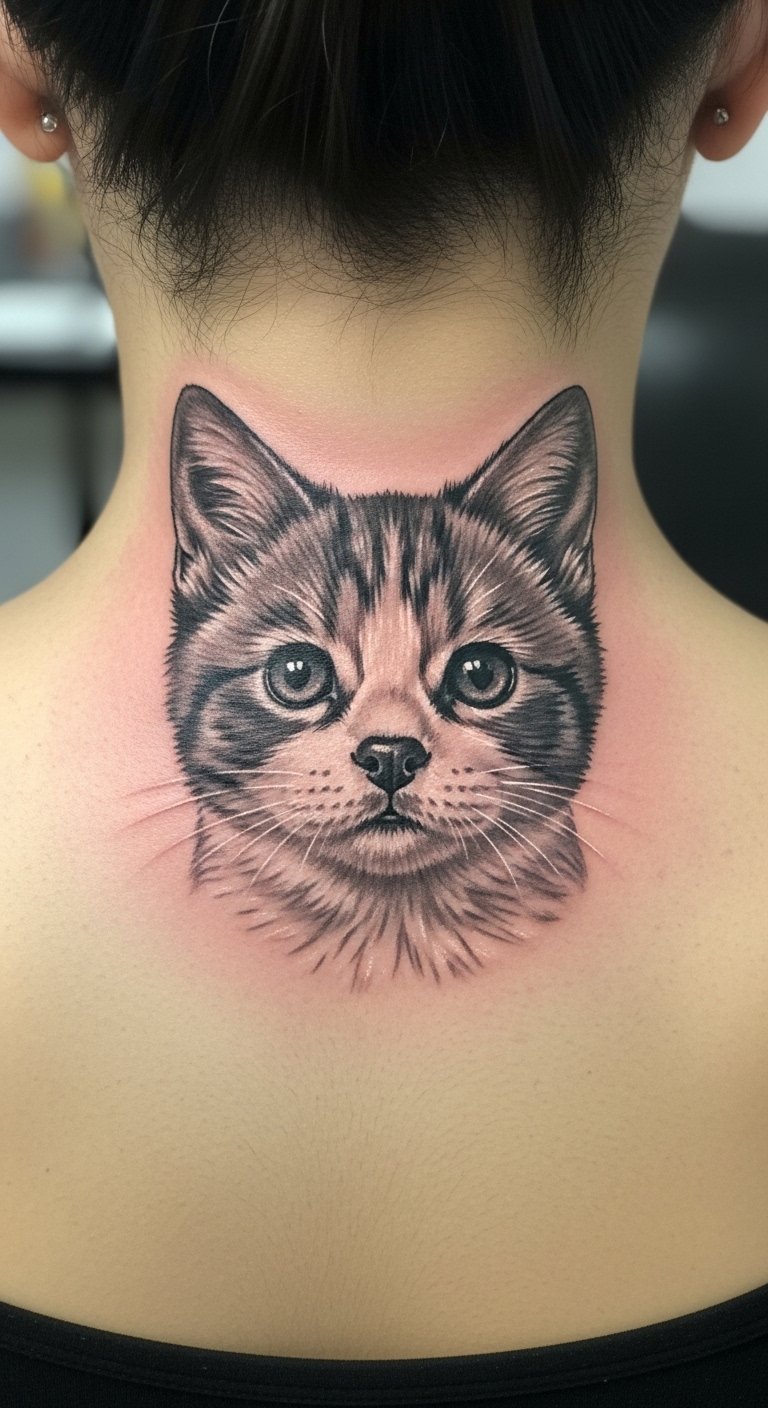
A tiny portrait on the nape is intimate and ages well when done by a micro-realism pro. Nape skin is forgiving for shading. Pain is moderate. Expect gradual softening of fine details; solid contrast prevents muddling. Common mistake: over-detailing for size—ask for slightly bolder values so the piece reads healed.
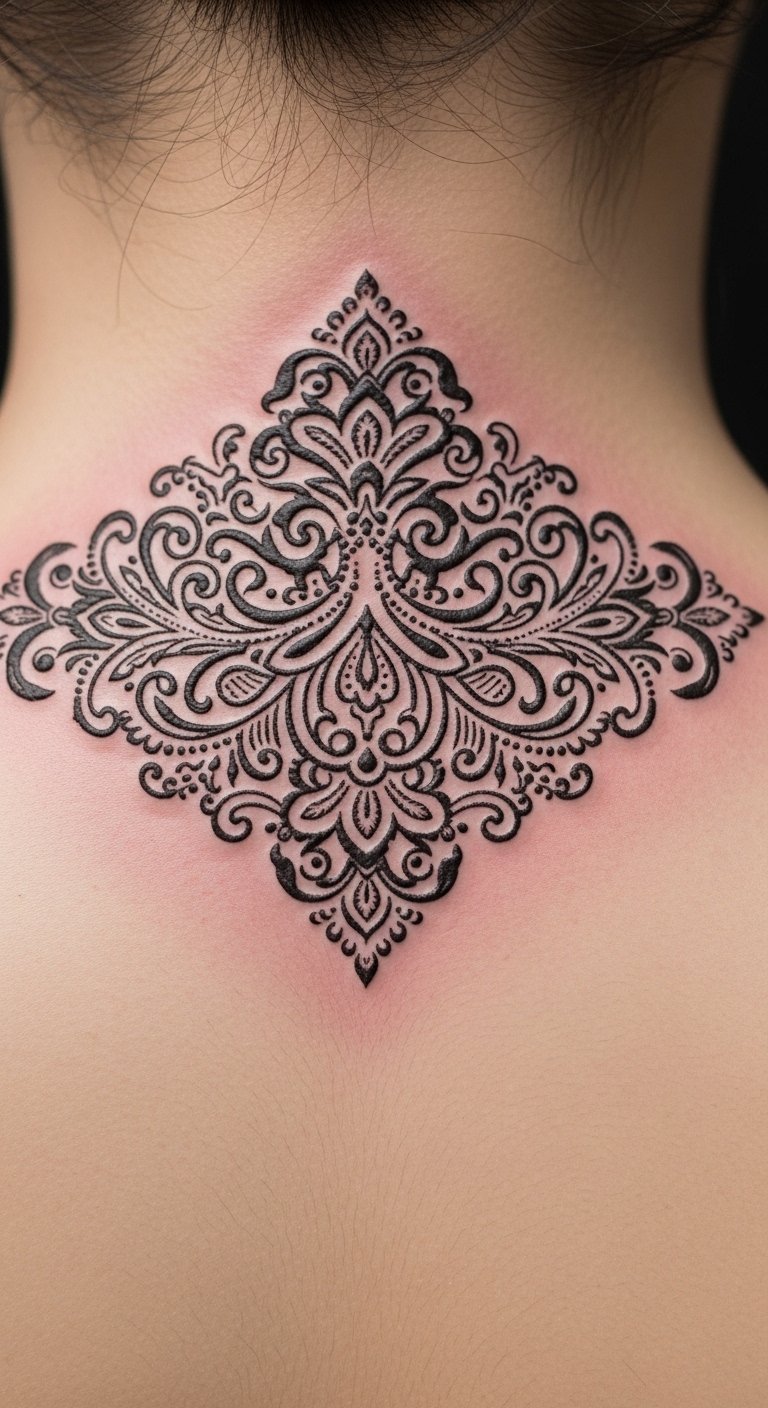
Blackwork Floral On Throat
Style/Technique: Blackwork / Botanical
Pain Level: High (7/10)
Session Time: 1–3 hours
Best For: Bold, high-visibility statement
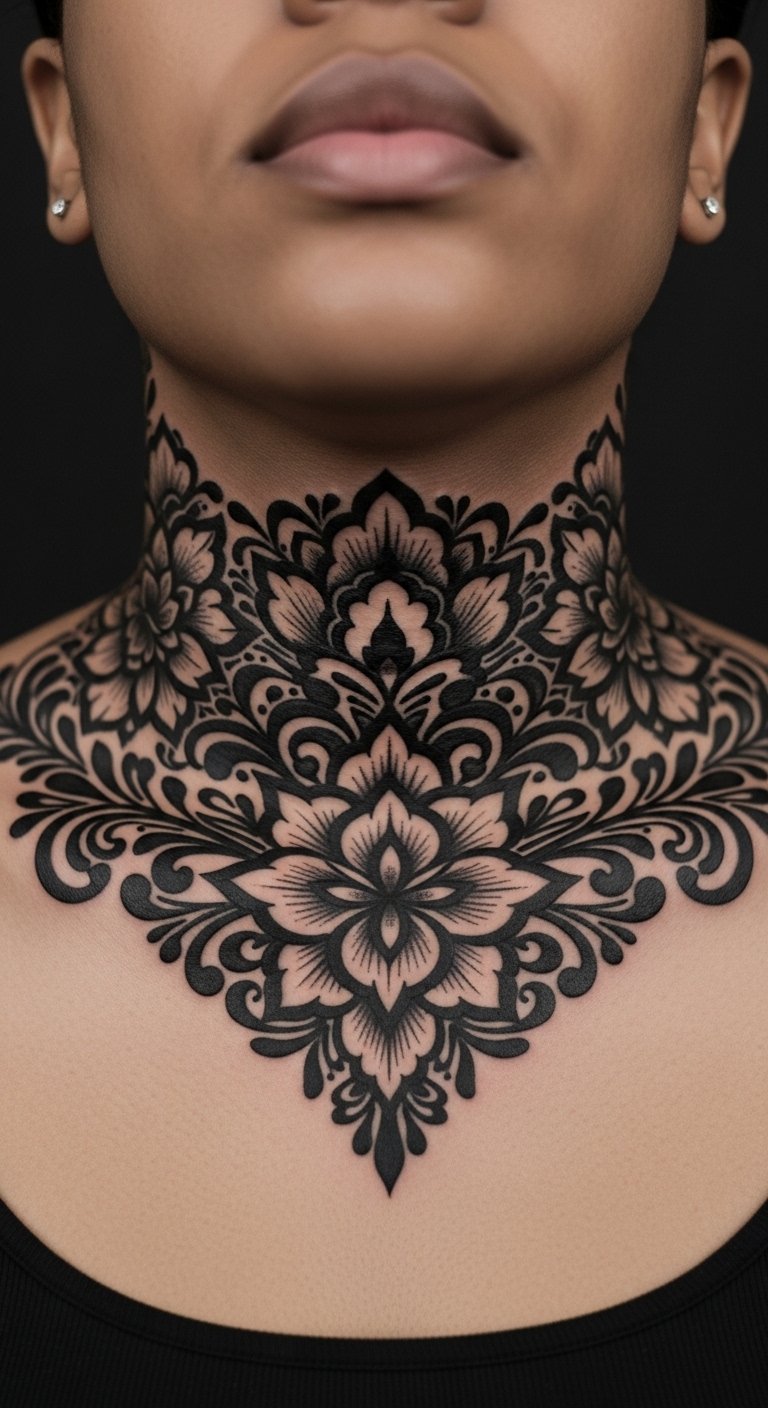
Blackwork flowers on the throat command attention and hold up well. Dense blacks resist fading; however, throat pain and movement make sessions intense. Healing time is delicate—keep it dry and avoid stretching. Avoid tiny gaps that trap ink. Request bold shapes and good negative-space planning from the artist.
Minimalist Line Necklace On Clavicle
Style/Technique: Minimalist / Single Line
Pain Level: Low-Medium (3–4/10)
Session Time: Under 1 hour
Best For: First visible neck tattoo, easy to hide with clothing

A necklace-style line along the clavicle looks like jewelry. It’s quick, less painful than throat work, and ages subtly. Expect lines to soften; a slightly bolder single line is smarter than ultra-fine hairlines. Common error: placing too low or too high—mark placement so it sits where you want with shirts.
Neo-Traditional Rose On Side Neck
Style/Technique: Neo-Traditional / Floral
Pain Level: Medium (5/10)
Session Time: 2–3 hours
Best For: Timeless, colorful statement

Neo-traditional roses balance bold outlines and color. On the neck, they read classic and confident. Color may fade faster than black; black outlines help maintain shape. Pain is moderate. Avoid tiny color gradients too close to the jawline—ask for solid values and healed examples on neck placements.
Dotwork Mandala At Nape
Style/Technique: Dotwork / Ornamental
Pain Level: Medium (5/10)
Session Time: 2–4 hours
Best For: Symmetrical, center-back neck piece

Mandala dotwork suits the nape’s flat canvas. It feels meditative and holds if dots are spaced correctly. Pain is manageable. Healing requires keeping the area clean to avoid dots blurring. A common mistake is over-compressing dots—ask the artist to map negative space intentionally.
Ornamental Filigree Along Hairline
Style/Technique: Ornamental / Filigree
Pain Level: Medium (4–6/10)
Session Time: 1–2 hours
Best For: Visible but elegant nape detail

Filigree along the hairline reads like delicate jewelry and is great for subtle confidence. Hairline placements need care during shaving/haircuts. Expect slight softening; solid blacks help longevity. Ask for healed examples and for the artist to test scale on skin before inking.
Single-Needle Crescent Behind Ear
Style/Technique: Single-Needle / Minimalist
Pain Level: High (6–7/10)
Session Time: Under 1 hour
Best For: Tiny, close-to-ear accents
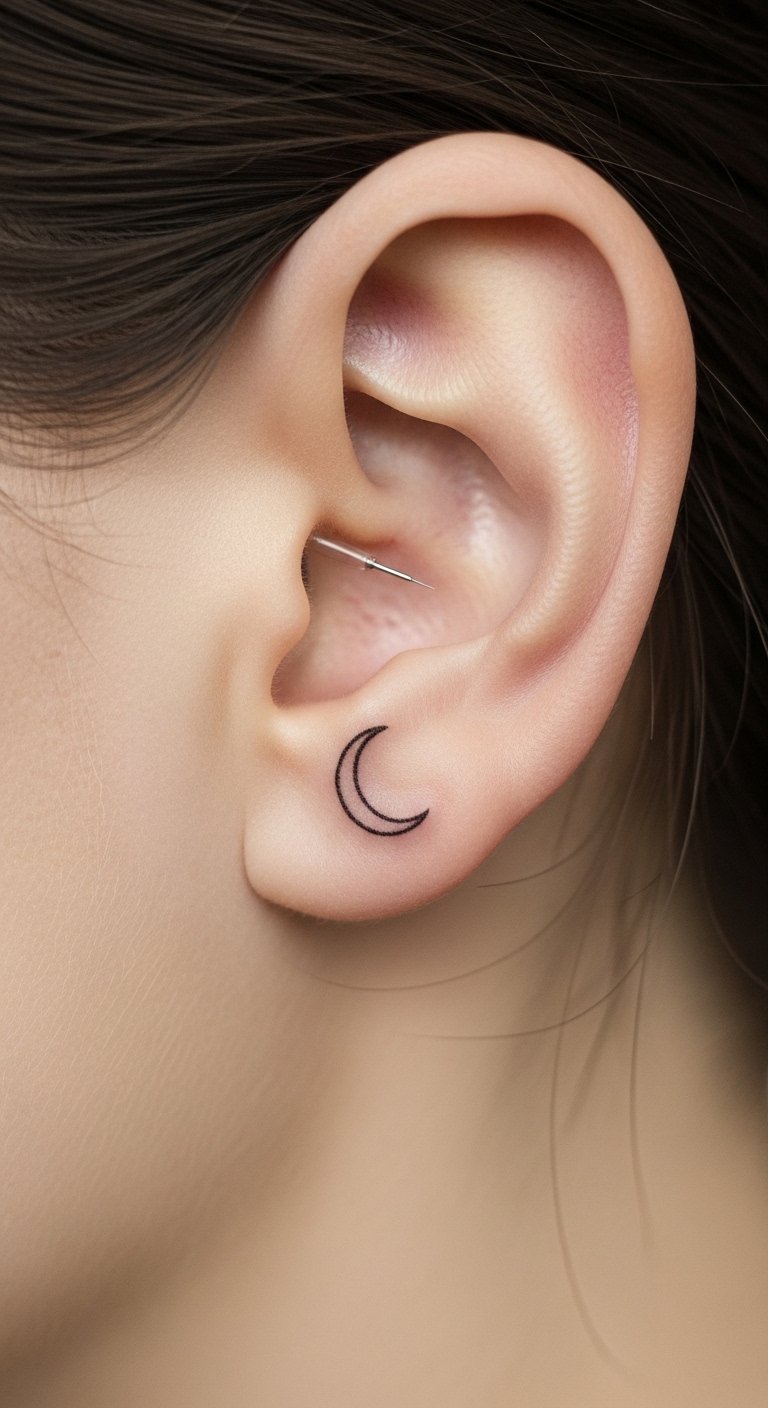
Behind-ear tattoos are tiny but painful. Single-needle crescents look refined and are discreet. Healing can be tricky—avoid sleeping on that side. The biggest mistake is choosing too small a motif; opt for slightly larger line weight so it reads after healing.
Barcode/Numbers At Center Throat
Style/Technique: Bold Line / Conceptual
Pain Level: High (7/10)
Session Time: 1–2 hours
Best For: Graphic, statement-oriented pieces
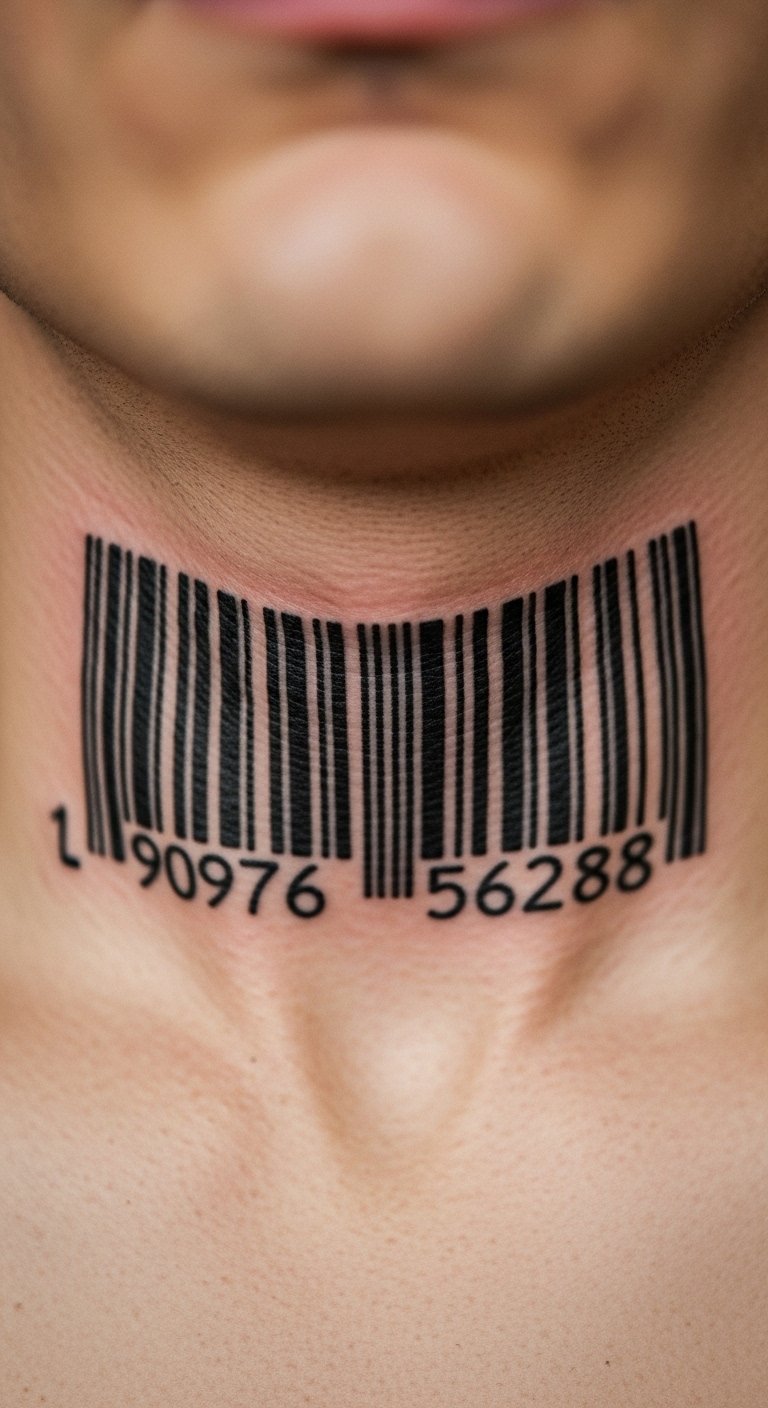
A barcode or numeric strip is graphic and modern. Throat placements carry high pain and require bold, consistent lines. Fine gaps can blur—ask for solid, even lines. Watch how it moves when swallowing; consult on exact placement to avoid distortion.
Micro-Lettering Under Jawline
Style/Technique: Fine Line / Micro-Lettering
Pain Level: High (6–7/10)
Session Time: Under 1 hour
Best For: Subtle phrases or names

Under-jaw micro-lettering reads intimate but can blur if too small. I recommend slightly bolder letters for long-term legibility. Pain spikes due to thin skin. Keep expectations: healed letters soften. Ask to see healed micro-lettering samples.
Geometric Triangle Cluster On Side Neck
Style/Technique: Geometric / Blackwork
Pain Level: Medium (5/10)
Session Time: 1–2 hours
Best For: Modern, masculine or gender-neutral pieces

Geometric clusters are crisp and graphically strong on the neck. They age well if shapes are bold. Thin lines can blur along curved neck areas—opt for solid fills or slightly thicker lines. Discuss alignment with the neck’s natural lines.
Watercolor Floral Splash On Lower Neck
Style/Technique: Watercolor / Painterly
Pain Level: Medium (5/10)
Session Time: 2–3 hours
Best For: Color-forward, feminine pieces

Watercolor looks dreamy but can fade faster on the neck. For longevity, combine color washes with some defined edges. Pain is moderate. Ask for color placement that avoids constant sun exposure. Common mistake: relying solely on delicate washes without anchor lines.
Small Anchor On Nape
Style/Technique: Traditional / Small Bold
Pain Level: Low-Medium (3–4/10)
Session Time: Under 1 hour
Best For: Classic, nautical nod
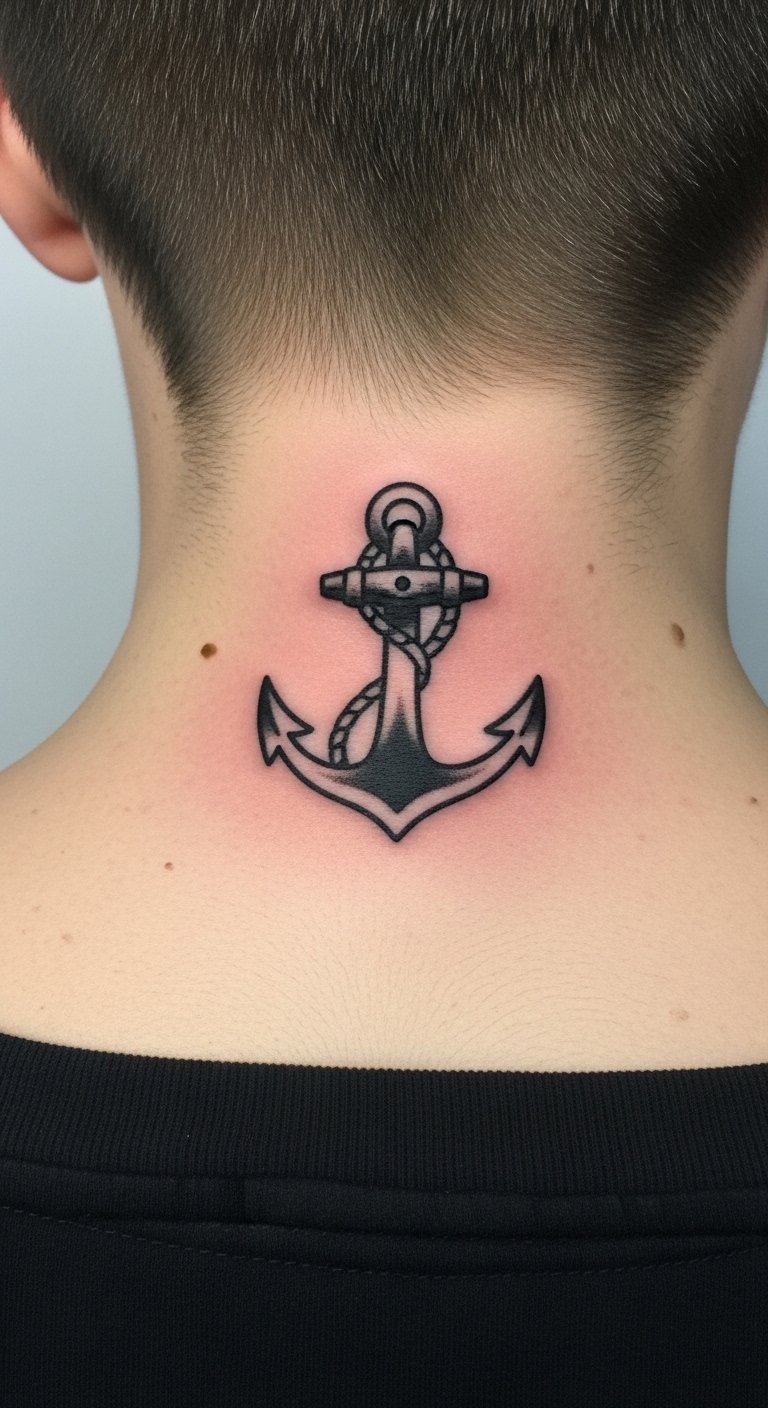
A tiny anchor is classic and ages predictably. Traditional bold lines resist blurring. Nape placement is less painful than throat. Keep the design simple. Ask for saturated black outlines to ensure shape longevity.
Neo-Tribal Neck Band Around Throat
Style/Technique: Neo-Tribal / Band
Pain Level: High (7/10)
Session Time: 2–3 hours
Best For: Strong, continuous statement

A tribal band across the throat is visually strong. Symmetry is crucial. Expect longer sessions and more pain. Healing needs attention to scabbing. Ask for mapping to ensure pattern sits evenly with movement.
Blacklight/UV Accent Dots On Nape
Style/Technique: UV Ink / Accents
Pain Level: Medium (4–5/10)
Session Time: Under 1 hour
Best For: Hidden surprise elements
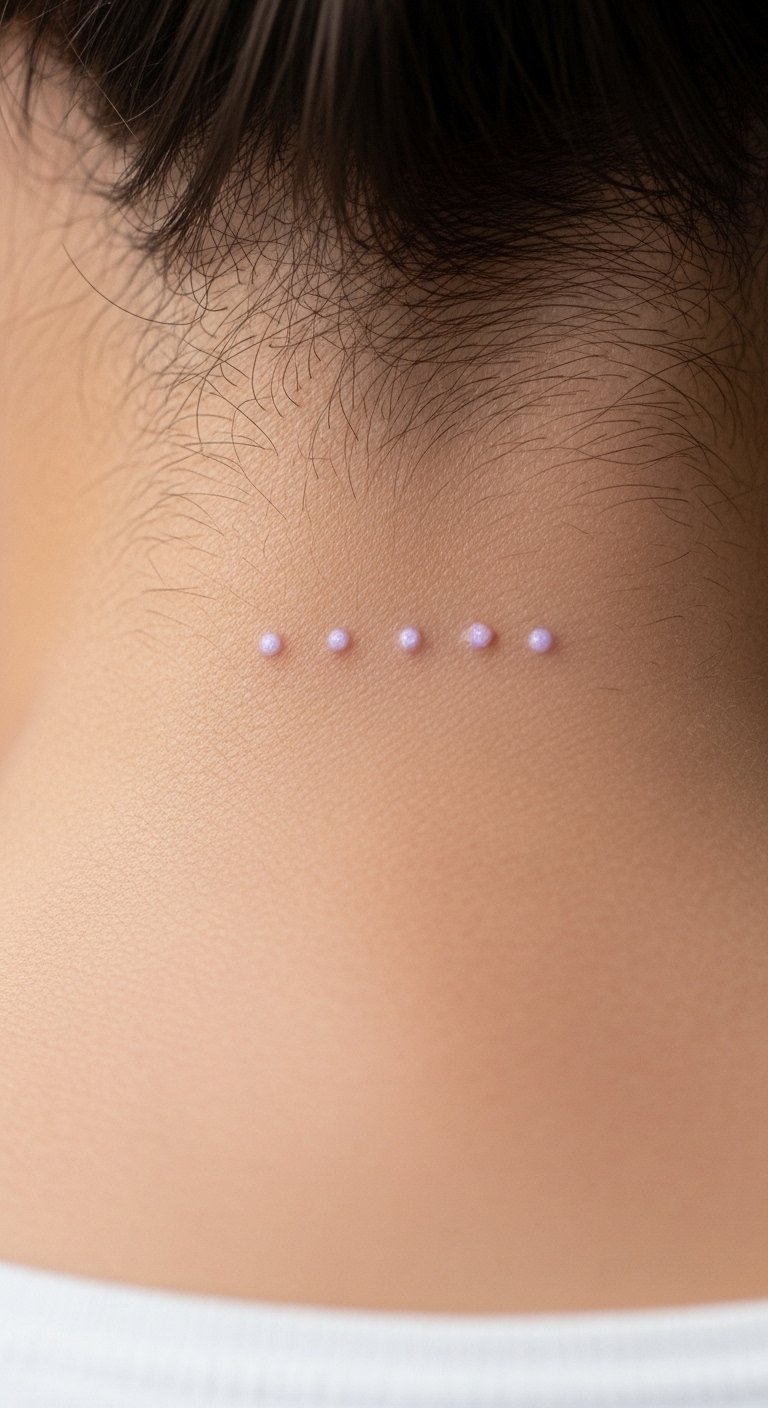
UV accents add a playful layer but rely on the right artist and inks. They’re subtle in daylight and pop under blacklight. Ask about ink safety and healed results, since UV may appear faint on some skin tones.
Micro-Skull On Side Neck
Style/Technique: Micro-Realism / Tiny Skull
Pain Level: High (6–7/10)
Session Time: Under 1 hour
Best For: Edgy, compact motifs

Tiny skulls read bold despite size. Fine shading can blur, so ask for slightly stronger contrast. Neck movement can soften detail; plan for minor touch-ups later. Expect focused pain and quick sessions.
Floral Collarbone Extensions
Style/Technique: Botanical / Realistic
Pain Level: Medium (4–5/10)
Session Time: 1–3 hours
Best For: Flowing pieces linking neck to chest

Extending florals across the collarbone connects neck work to chest pieces. It looks natural with clothing. Expect moderate pain and longer healing if it crosses mobile areas. Avoid overly fine petals near clavicle; choose readable shapes.
Small Compass At Base Of Neck
Style/Technique: Minimalist / Symbolic
Pain Level: Medium (4–5/10)
Session Time: Under 1 hour
Best For: Directional, travel-minded pieces
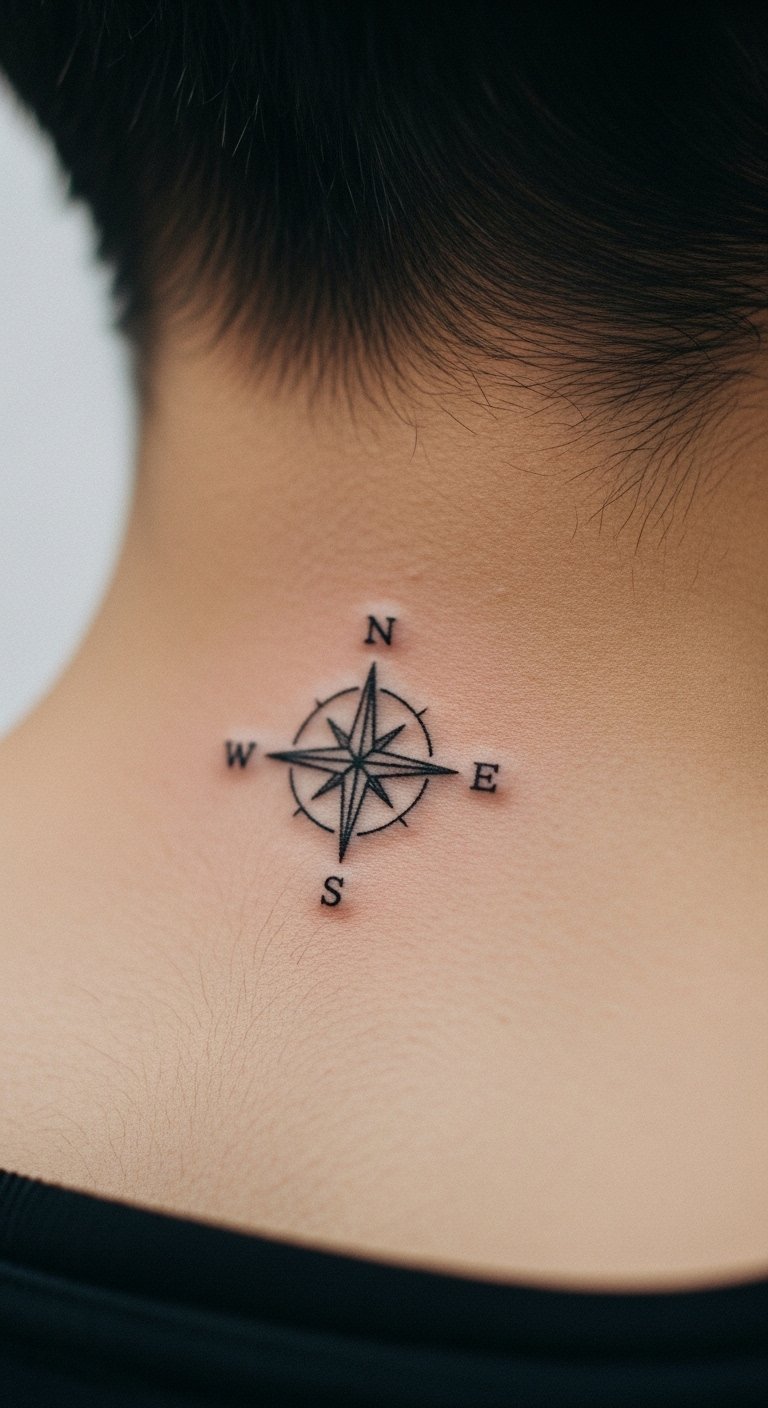
A compact compass is symbolic and practical for neck placement. Keep secondary details minimal so the piece ages clean. Ask for slightly thicker line weight for long-term clarity.
Gothic Script On Throat Center
Style/Technique: Bold Script / Gothic
Pain Level: High (7/10)
Session Time: 1–2 hours
Best For: Dramatic, visible lettering
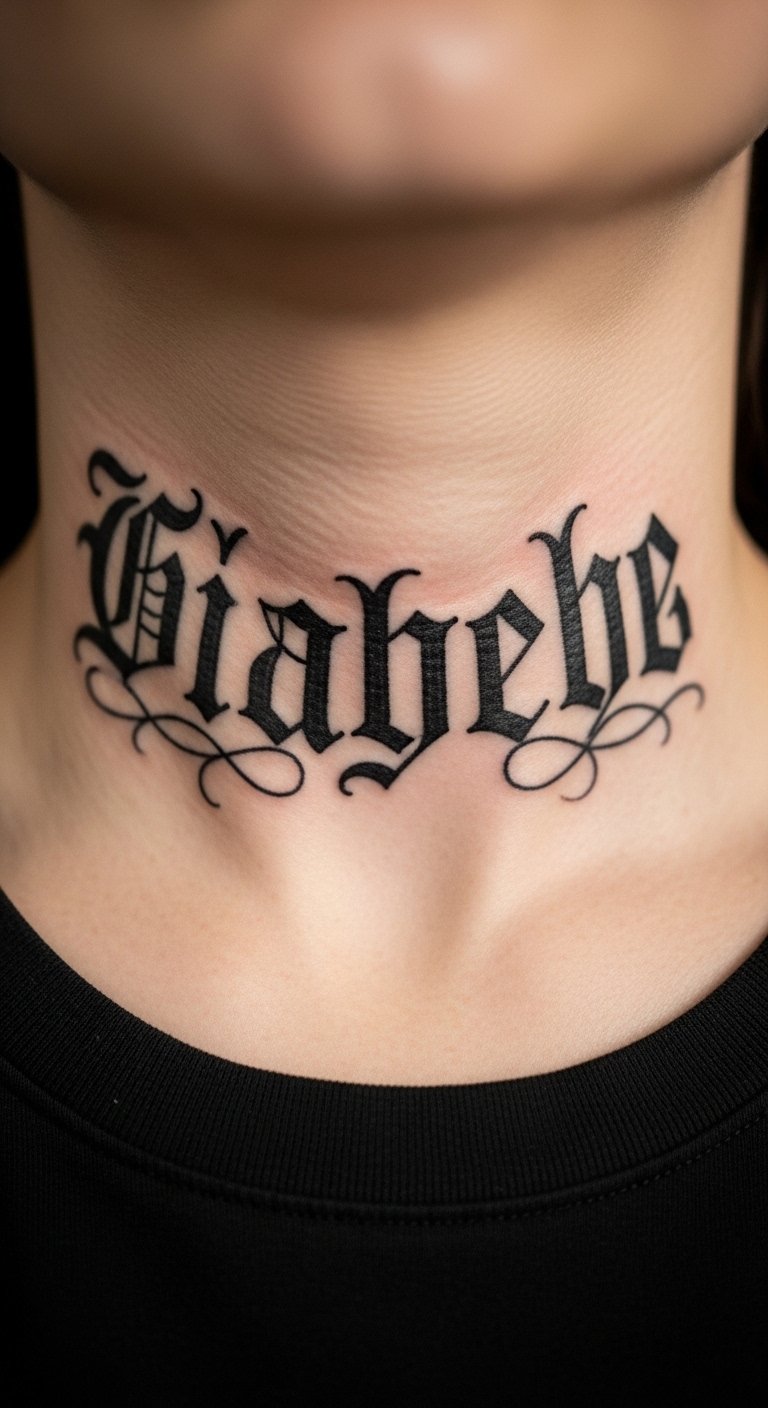
Gothic script looks powerful across the throat. Thin strokes lose clarity—opt for strong blacks. Pain and healing are intense; avoid small decorative flourishes that blur.
Ornate Cross Behind Ear And Neck
Style/Technique: Ornamental / Religious
Pain Level: Medium-High (6/10)
Session Time: 1–2 hours
Best For: Personal faith or symbolic motifs

Small crosses that curve from behind the ear onto the neck are intimate. Detail needs to be balanced for the scale. Avoid over-fussy decoration; bold anchors preserve shape.
Script Coordinates Along Side Neck
Style/Technique: Fine Line / Coordinates
Pain Level: Medium (5/10)
Session Time: Under 1 hour
Best For: Meaningful locations, discreet statements
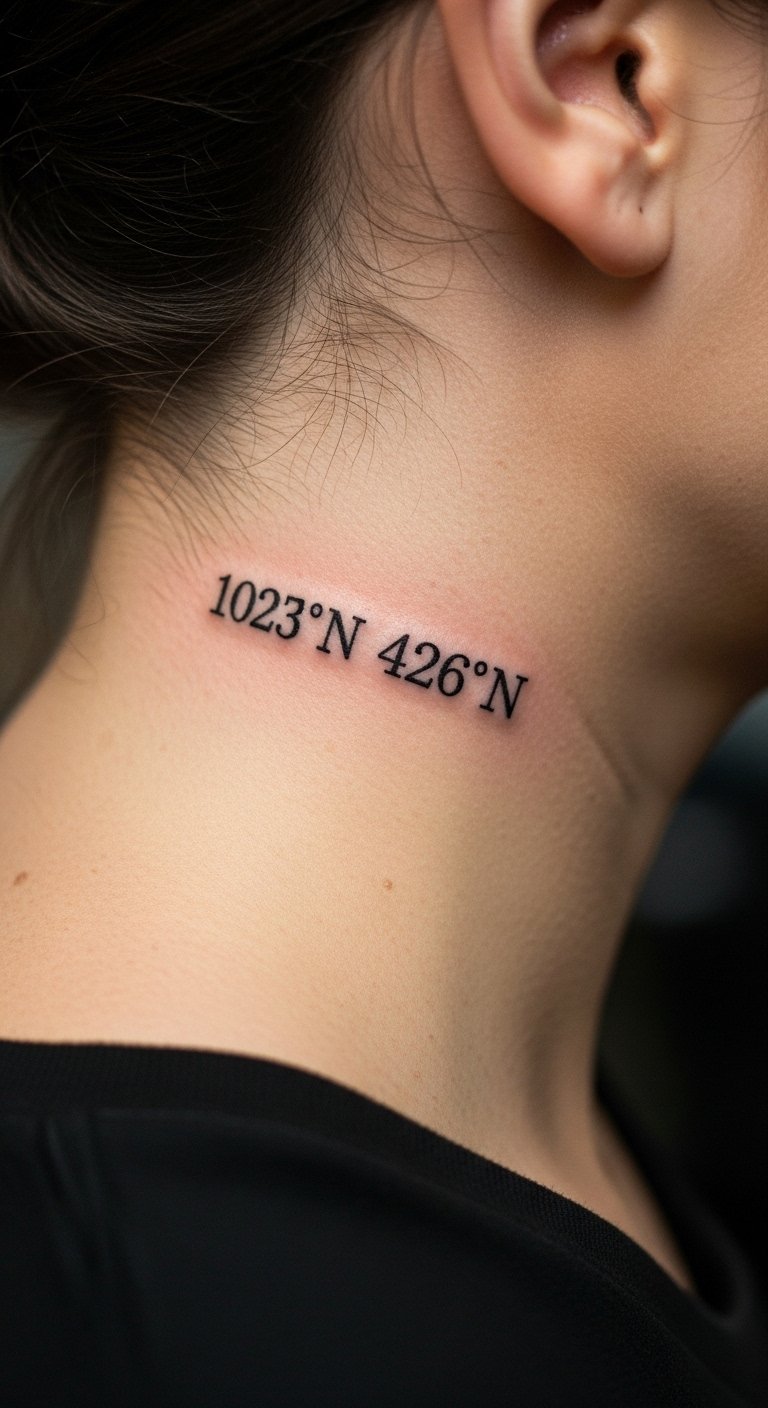
Coordinates are discreet and meaningful. Fine numbers can blur; pick thicker type or spacing. Pain moderate. Ask to preview sizing on skin to ensure legibility long-term.
Small Animal Silhouette On Nape
Style/Technique: Minimalist / Silhouette
Pain Level: Low-Medium (3–4/10)
Session Time: Under 1 hour
Best For: Personal symbols, pet tributes
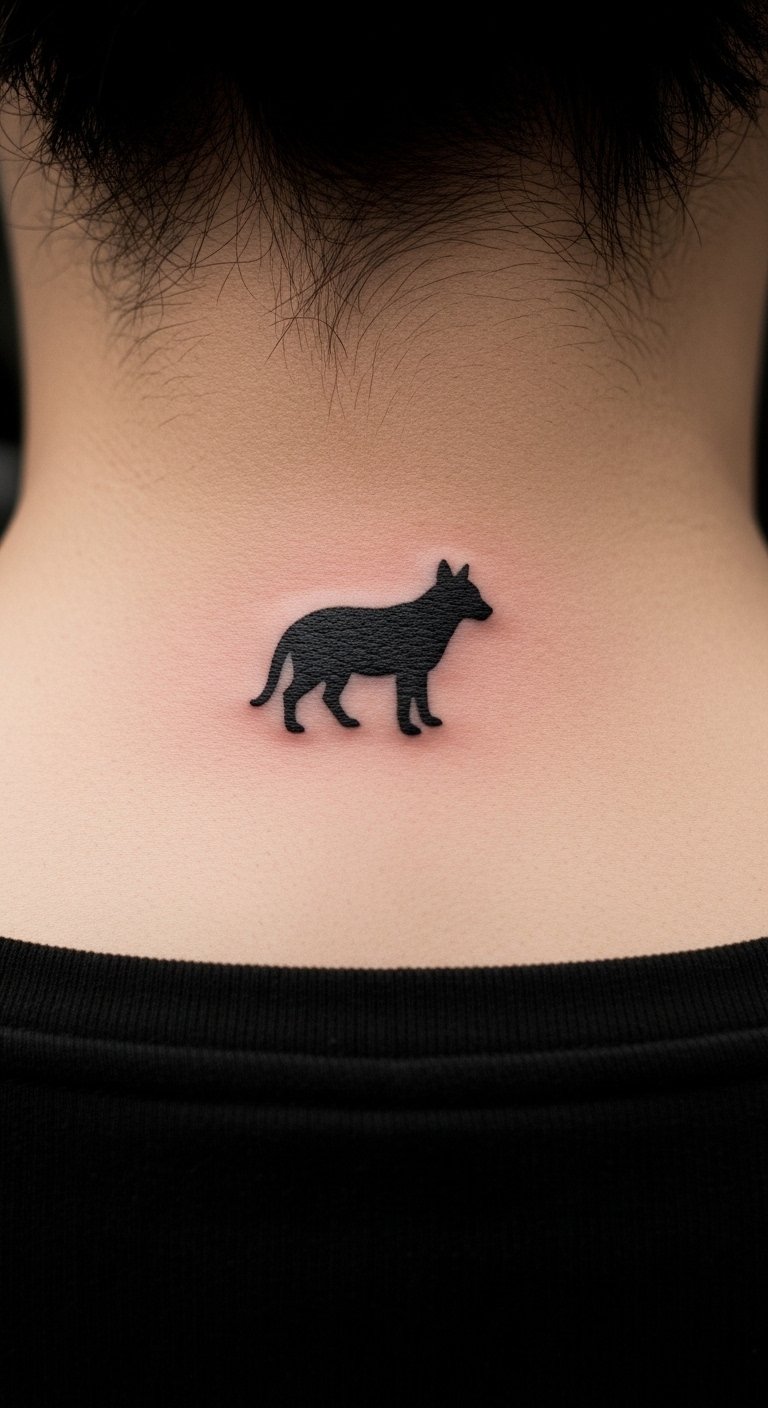
Silhouettes are readable and age well when kept simple. Nape placement is forgiving. Avoid tiny interior details that can disappear. Request reference photos of healed silhouettes.
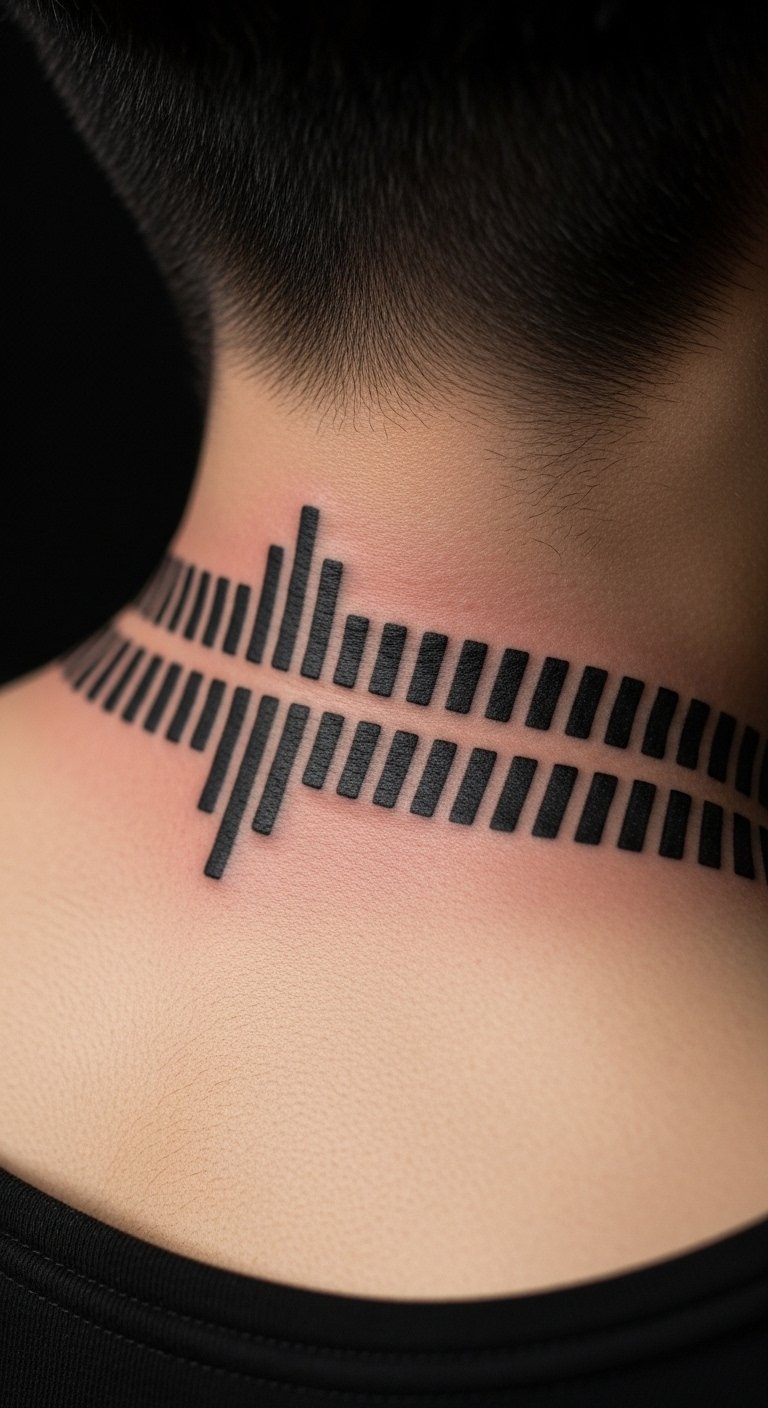
Barcode-Like Soundwave On Side Neck
Style/Technique: Graphic / Soundwave
Pain Level: High (6–7/10)
Session Time: 1–2 hours
Best For: Audio memory or song-based pieces
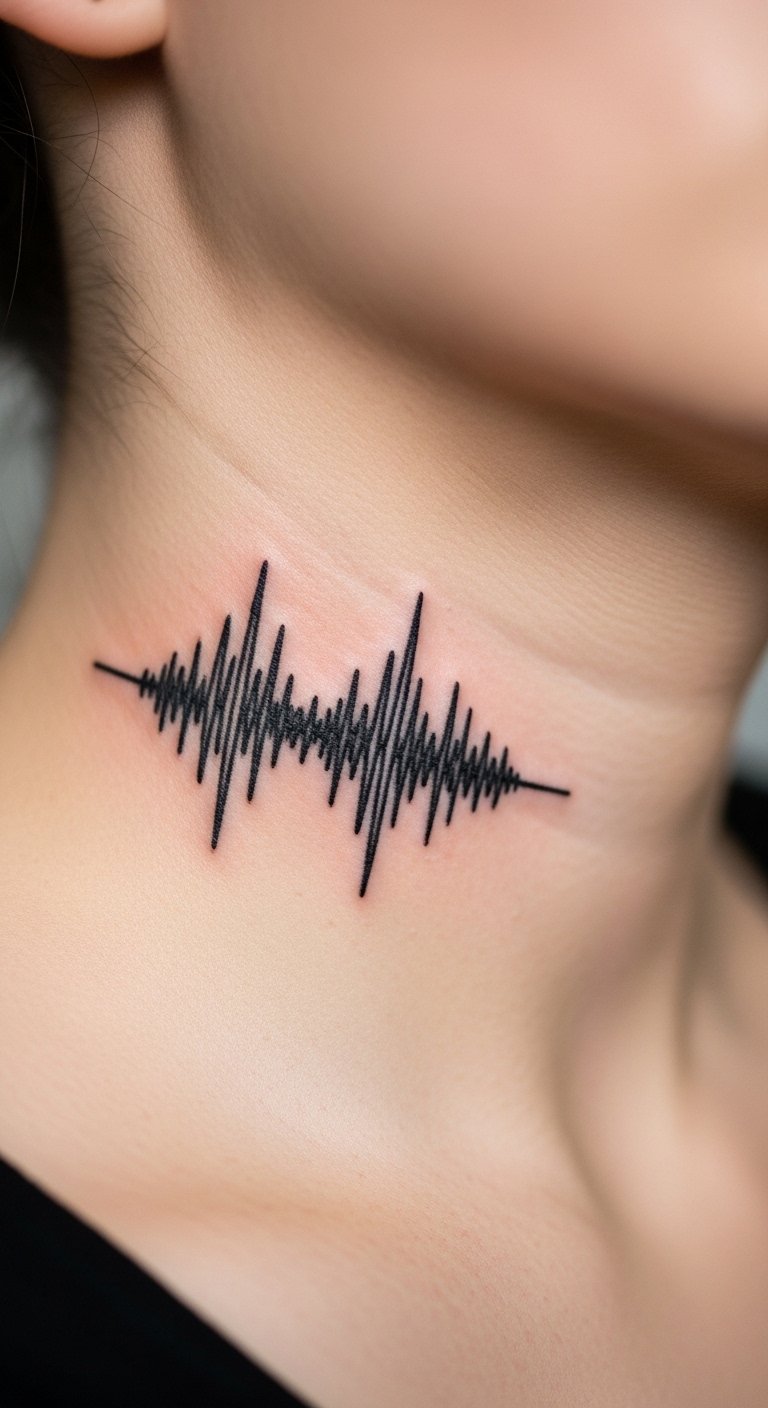
Soundwaves are personal and modern. Lines must be precise; movement can distort long waveforms, so plan for shorter segments. Ask the artist to test scale.
Scar-Camouflage Filigree On Nape
Style/Technique: Cover-Up / Filigree
Pain Level: Medium (5/10)
Session Time: Multiple sessions
Best For: Hiding scars or texture irregularities
Using ornamental filigree to mask scars is underrated. Ask for artists experienced with scar tissue; ink uptake differs. Healing is slower and may need multiple sessions. This is a practical, confident choice many overlook.
Tiny Crown On Lower Neck
Style/Technique: Minimalist / Icon
Pain Level: Medium (4–5/10)
Session Time: Under 1 hour
Best For: Regal, subtle statements

A small crown reads confident without shouting. Keep the lines bold enough to remain legible. Avoid micro-ornamentation that disappears.
Floral Vine Wrapping To Shoulder
Style/Technique: Botanical / Flowing
Pain Level: Medium (4–5/10)
Session Time: 2–4 hours
Best For: Integrated neck-to-shoulder pieces

Vines linking neck to shoulder look natural with clothing and movement. Plan for multiple sessions. Healing across joints needs careful aftercare to avoid stretching scars.
Tiny Heart Under Jaw
Style/Technique: Minimalist / Symbolic
Pain Level: High (6/10)
Session Time: Under 1 hour
Best For: Small personal marks

Tiny hearts are intimate but susceptible to blur. Slightly thicker lines prevent loss of shape. Expect short but sharp pain.
Barcode-Eyebrow Style Row On Nape
Style/Technique: Graphic / Repeating Row
Pain Level: Medium (5/10)
Session Time: 1–2 hours
Best For: Pattern-based neck accents
Repeating bars read modern and bold. Ensure the artist spaces lines for long-term clarity. Check healed samples of similar density.
Tattoo Prep and Aftercare Essentials
Aftercare Essentials:
- Aquaphor Healing Ointment, 14oz tube — For the first 3–5 days recommendation
- Saniderm Transparent Adhesive Bandage, 6-inch roll — Second-skin method recommended by many pros
- CeraVe Fragrance-Free Moisturizing Lotion, 12oz — Daily moisturizer for days 4–14
- Dr. Bronner's Unscented Castile Soap, 32oz — Gentle cleaning
Before Your Appointment:
- Tattoo Numbing Cream with 5% Lidocaine — Use only if your artist approves
- Tattoo Stencil Transfer Paper 8.5×11 — For at-home mockups
Long-Term Maintenance:
- SPF 50 Sunscreen Stick for Tattoos — Daily sun protection prevents fading
- Mad Rabbit Tattoo Balm, 2oz — Keeps healed ink vibrant
- Hustle Butter Deluxe, 4oz — Vegan aftercare option
Optional Comfort Items:
- Tattoo Numbing Spray — For touch-ups or sensitive areas
- Hydrocolloid Bandages Large — Alternative to plastic wrap for spot care
Frequently Asked Questions
Q: How bad does a neck tattoo actually hurt?
A: Neck pain varies by spot. Side throat and jawline hit 6–8/10 for many; nape and clavicle are often 4–6/10. Expect a burning-scratching sensation more than sharp stabbing. For sensitive areas, consider asking about a numbing cream with 5% lidocaine.
Q: Will a neck tattoo fade faster than other places?
A: Yes—sun exposure and friction (collars, scarves) speed fading. Daily use of an SPF 50 sunscreen stick and regular moisturizing keeps ink vibrant longer.
Q: What if I regret a neck tattoo?
A: Sit with the idea for months and consider a less-visible placement if unsure. Laser removal exists but is a long process. Cover-ups and smart design choices reduce regret risk.
Q: How long does a neck tattoo take to heal?
A: Surface healing: 2–3 weeks. Full healing: 2–3 months. The first week is critical—use Aquaphor or Saniderm as recommended and avoid sun and heavy sweating.
Q: Can I work out after getting a neck tattoo?
A: Wait at least 48–72 hours and avoid heavy sweating for a week—sweat can cause irritation and infection. Keep the area clean with gentle soap like Dr. Bronner's Unscented Castile Soap.
Q: Do tattoos look different on darker skin tones?
A: Yes. Black and bold designs read best across tones. Bright colors may appear muted; white ink often disappears on deeper skin. Always ask to see healed examples on similar skin tones.
Conclusion
I recommend researching styles, sitting with designs, then booking a consult to confirm placement. Proper aftercare—think Aquaphor and daily SPF—makes the biggest visual difference over years. Which neck style are you leaning toward?