

Japanese cloud motifs can read like lace at first glance, but the versions that still read crisp after five years are the ones that respect negative space and line weight from the start. A slightly bolder contour and deliberate gaps make clouds hold up on textured skin. Read on for designs that balance traditional Japanese movement with practical choices that age well and look intentional from session day onward.
1. Single Cloud Behind the Ear
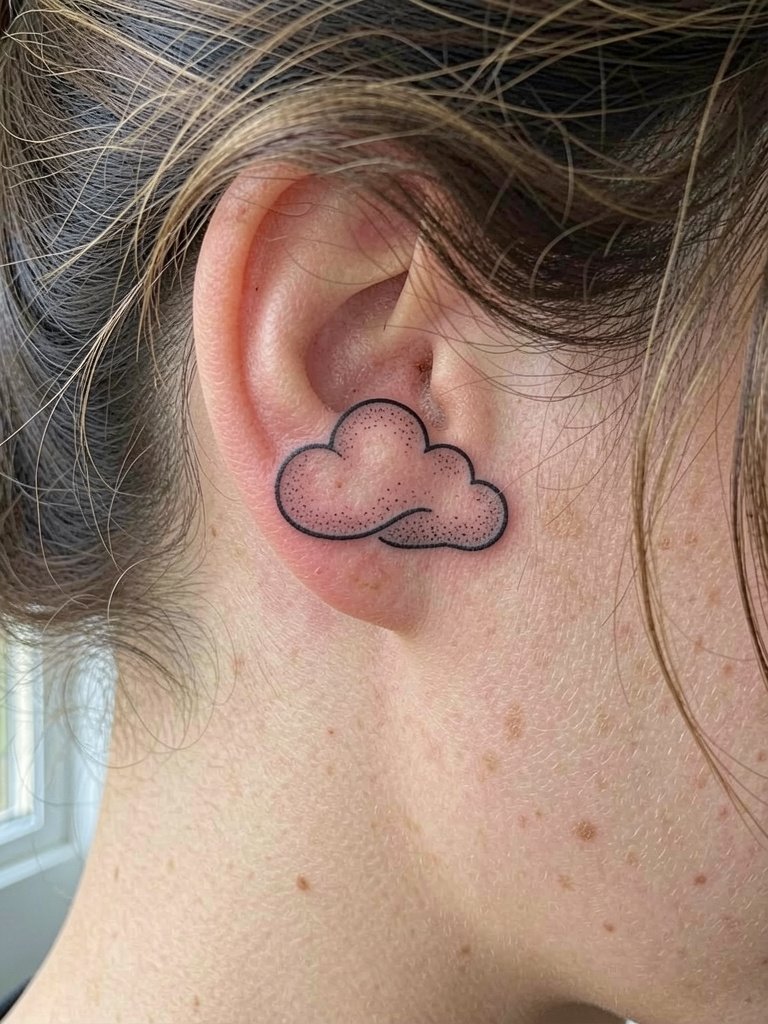
This is one of the easiest cloud motifs to hide or show. The session is short, typically 20 to 40 minutes, and pain sits low to moderate because the mastoid area has thin tissue. Ask for a slightly heavier outline than you think you need so the curve reads after the initial settling. A common mistake is requesting ultra-fine single-needle weight and then being surprised at early softening. At six months the line will still look sharp while at two years a delicate contour with a tiny buffer of negative space will keep the silhouette clear. For the appointment wear a hairstyle that stays up like a claw clip so the artist has full access.
2. Mini Cloud Band on Inner Forearm
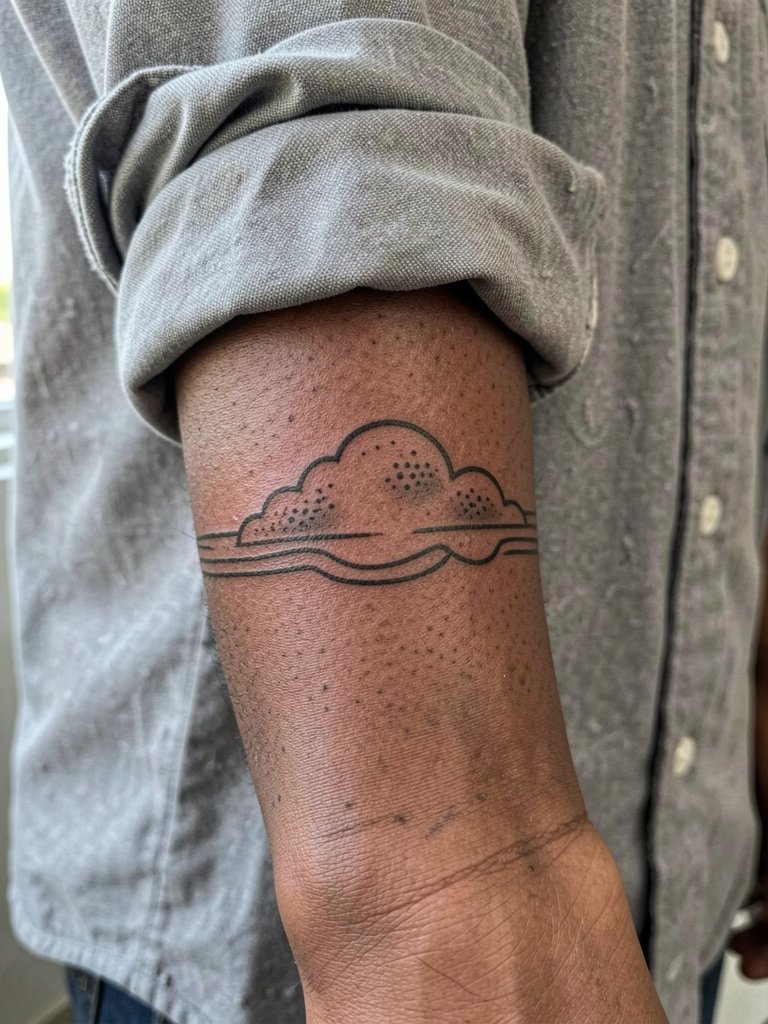
A cloud band on the inner forearm reads well across seasons and with sleeves. Expect a single session of 45 to 90 minutes depending on fill. Tell the artist you want the dot work and thin fillers done with light hand speed to avoid over-saturation in this thin-skinned area. Inner forearm flesh usually keeps detail for several years, but tiny cross-hatching placed too close will merge over time. Pair this visible strip with a rolled-sleeve linen button-up for casual show-off moments and link to a similar rolled-sleeve button-up shirt so the cuff frames the band.
3. Small Back-Of-Neck Cloud Panel
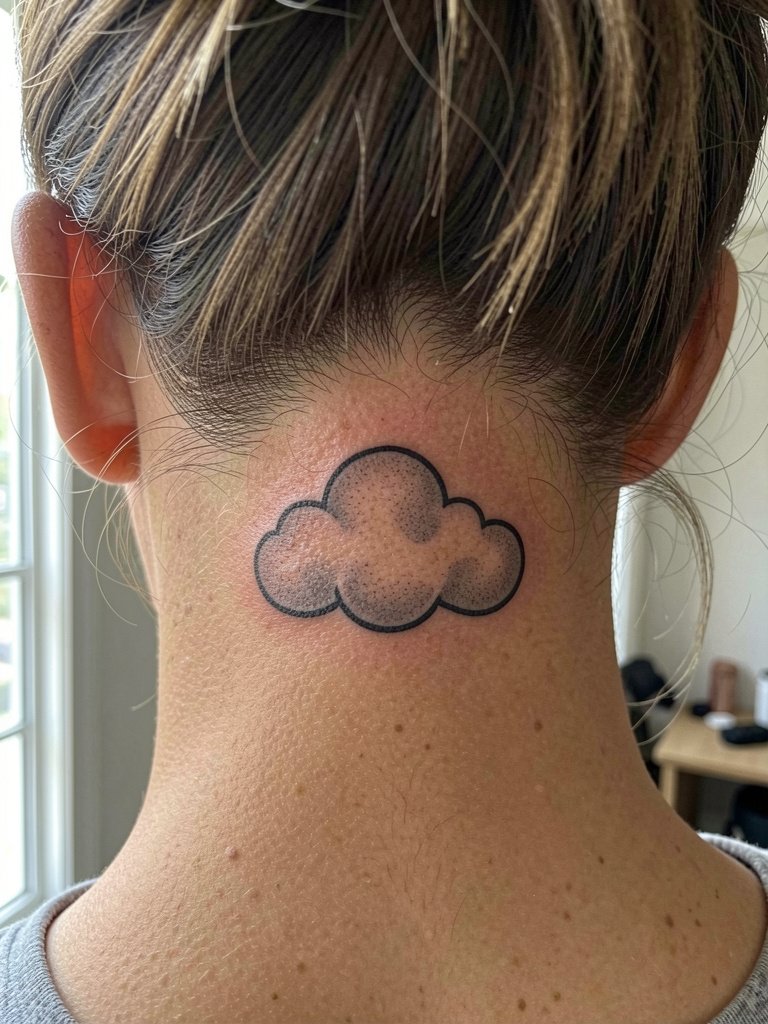
The nape is a tidy place for cloud clusters because the skin there stays relatively flat and experiences few friction points. Pain is moderate for most people and a single session of about an hour usually does it. Request slightly wider spacing between swirls so the grey shading has room to settle without muddying the lines. A frequent error is telling the artist the piece should be "very fine" which often comes out weaker after healing. When you want to show it off, a scoop-neck top keeps the hair and neckline clean, so consider a wide-neck tee for visits where you expect people to see the detail.
4. Floating Clouds on the Collarbone

Collarbone pieces work well as small clouds because the bone gives the silhouette definition. The session can be 45 to 75 minutes depending on the number of motifs and shading. Tell the artist to keep internal linework a touch heavier than on flat flesh so the pieces do not blur into the clavicle shadow. A common mistake is placing tiny interior strokes too close to the bone edges where movement and tension accelerate softening. When showing this placement, open-neck blouses or layered necklaces frame the shapes nicely and I like recommending a delicate chain necklace to sit just above the motifs.
5. Small Ankle Cloud Wrap
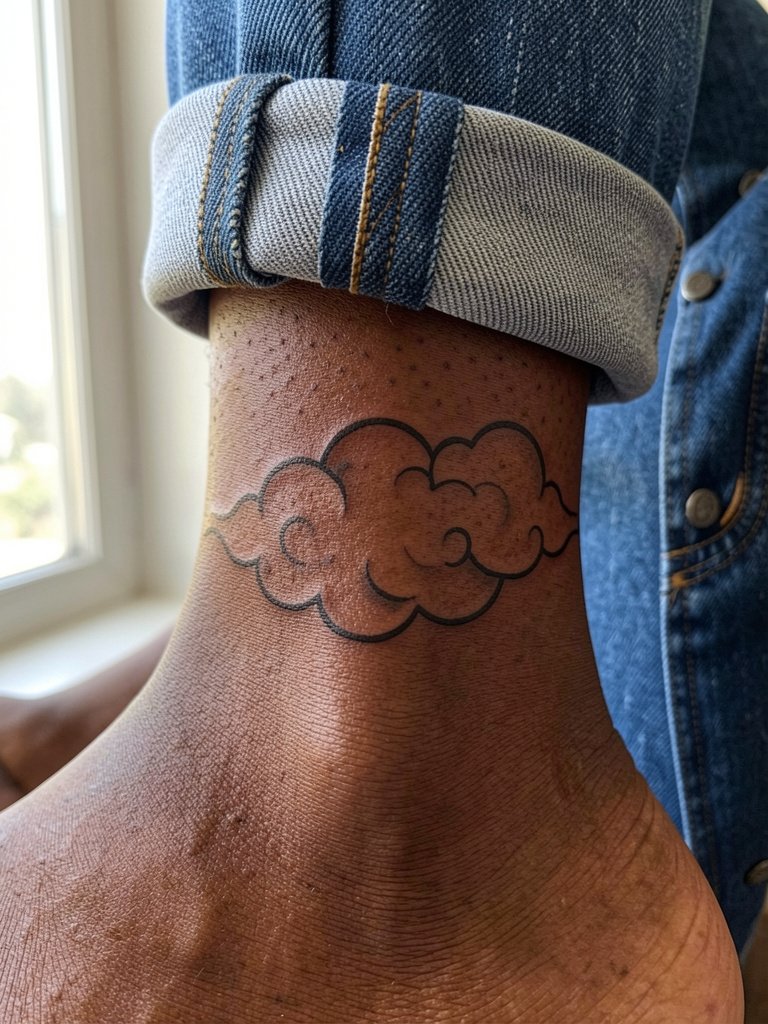
Ankle wraps face friction from socks and shoes during the first weeks so the outline needs intentional spacing. Expect 30 to 60 minutes in the chair and mild to moderate pain. The most common mistake is asking for extra-fine filigree that fades unevenly with shoe friction. For the session wear low-cut socks and shoes you can slip off easily. When you want to show the wrap, cropped denim or a midi skirt work well and I suggest pairing with a rolled-cuff denim jean so the tattoo peeks out.
6. Quarter-Sleeve Cloud Band with Wave Accent
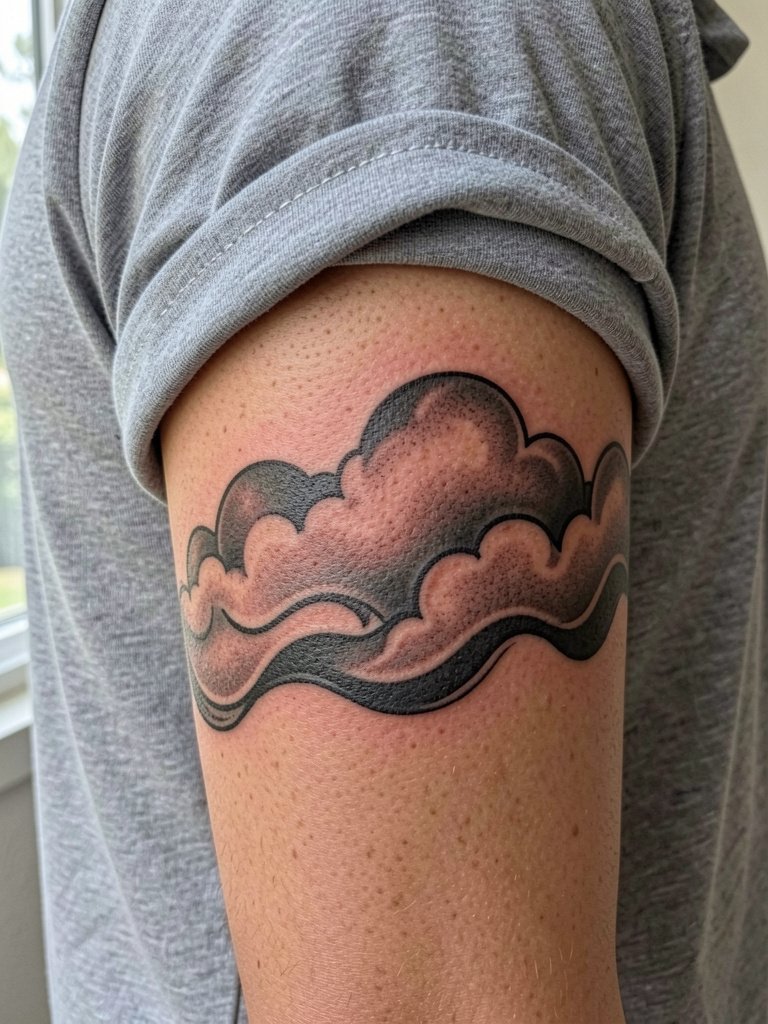
Quarter-sleeves let you combine cloud motifs with traditional wave motifs for motion. This takes two to four hours depending on complexity and fills. Request clear limits on saturation in the first pass so the artist does not overwork the skin. A mistake I see is overfilling on the first pass, which leads to heavy scabbing and inconsistent saturation. At six months the shape should look cohesive and at two years you want to see breathability between clouds. For show-off styling, short-sleeve tees and open shirts highlight the wrap and I suggest trying a lightweight linen shirt that hangs loose over the shoulder.
Studio Day Picks
These first six placements span tiny to medium pieces and share common session needs like stencil checks and breathable clothing. The small items above heal faster than full sleeves, so a few targeted supplies smooth the first week.
-
Stencil transfer paper kit. Lets you preview line placement directly on skin before any needlework, especially helpful for behind-the-ear and collarbone pieces.
-
Topical numbing cream. Apply 30 to 45 minutes before a sensitive area session to reduce surface discomfort during short bursts.
-
Thin protective film roll. Useful for ankle or wrist work that will face friction from socks and shoes in the first days.
-
Fragrance-free gentle body wash. Cleanses healing skin without added perfumes that often irritate fresh ink.
-
Aquaphor healing ointment. A mainstream balm that many artists recommend sparingly for the early sealing phase to keep fine line work hydrated.
7. Cloud Fragment on the Outer Hand
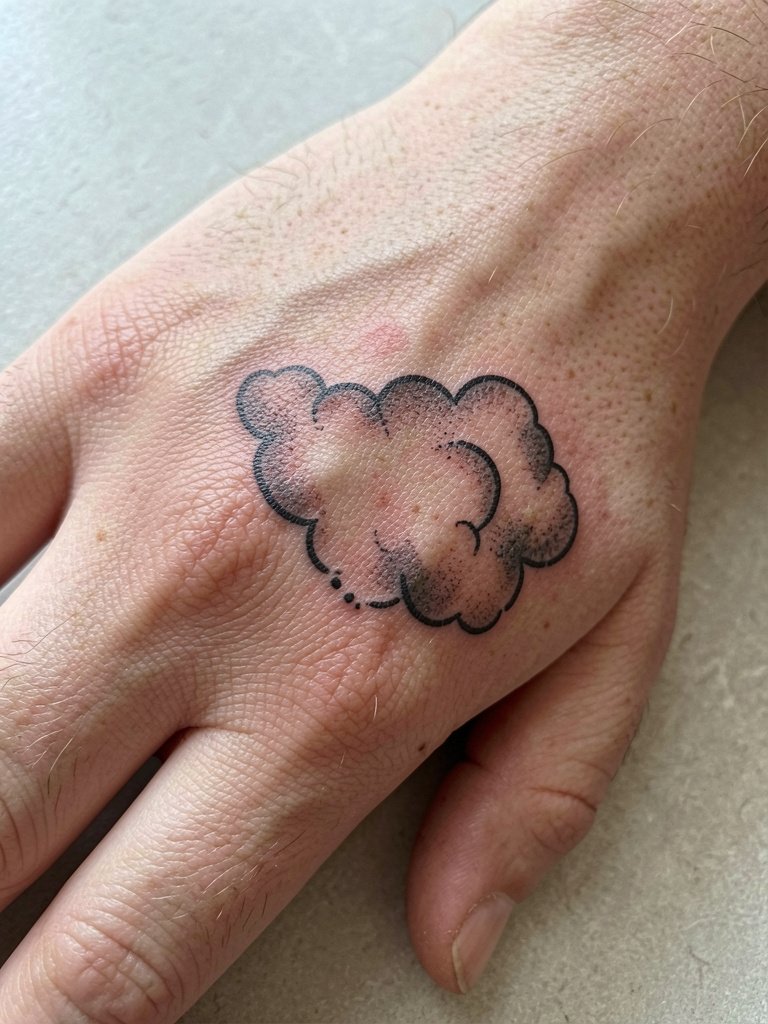
Hand and finger tattoos are visibly striking but they age faster because of constant washing and motion. Expect a short session for placement but plan on touch-up discussions. Tell the artist you want slightly heavier outline anchors so details stand after repeated abrasion. One camp argues hand detail must be bold from the start because the skin will eat fine lines within a year. The other camp argues microwork can last with very careful depth control and frequent touch-ups. If you plan to display this piece, pair it with thin stack rings that frame the cloud gaps and try a simple minimalist ring set to complement the space.
8. Negative Space Cloud Silhouette on the Ribcage
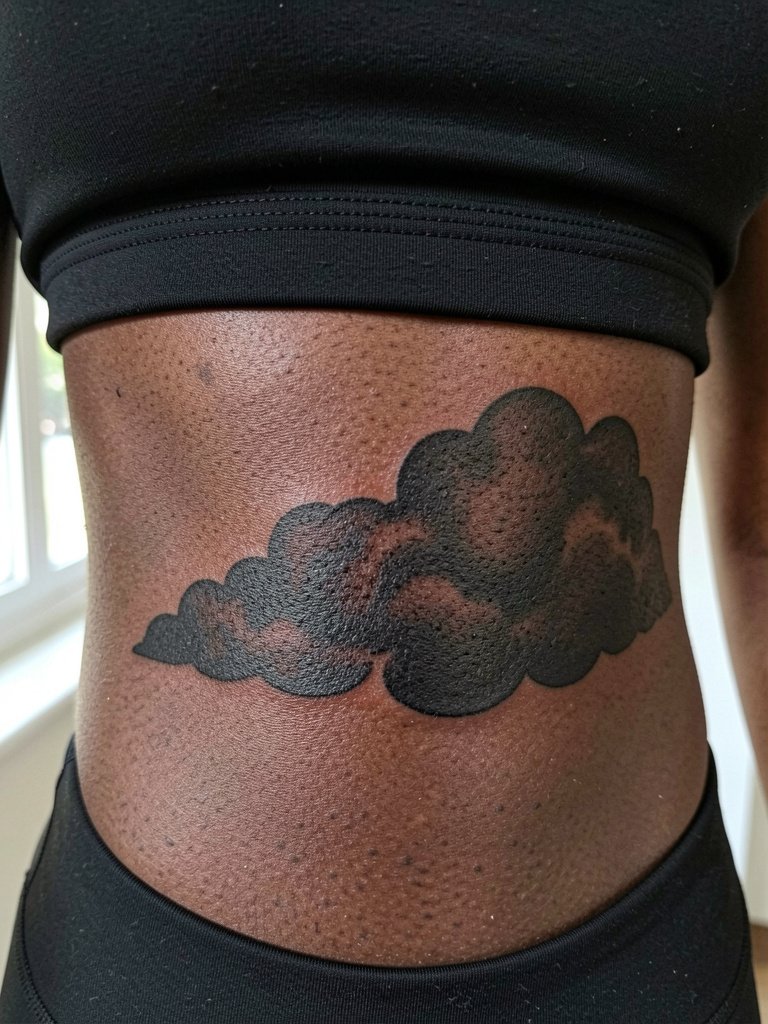
Ribcage is high on the pain scale for most people and also a place where fine lines struggle over time. This negative space approach uses saturated black fields so the uninked clouds remain crisp after healing. Some artists say fine line on ribs blurs within two years because of skin stretch. Other artists contend that with correct needle depth and slightly wider spacing fine line can settle fine and point to healed examples. If you choose this zone, plan a two-hour or longer session with breaks and wear a fitted sports bra so the artist can access the area without you adjusting clothing mid-session.
9. Cloud Outline Accent on the Calf

Calf placements let you scale cloud bands up without the contour issues of joints. Sessions run an hour to two depending on length. Ask for a slightly bolder outer contour because calves handle saturation well and it helps the silhouette stay readable. A usual error is making the internal filigree too tight which reduces clarity after yearly wear. Calves look great with mid-calf boots or cropped trousers and I recommend pairing the piece with a versatile ankle boot that ends just below the band.
10. Tiny Cloud on the Wrist
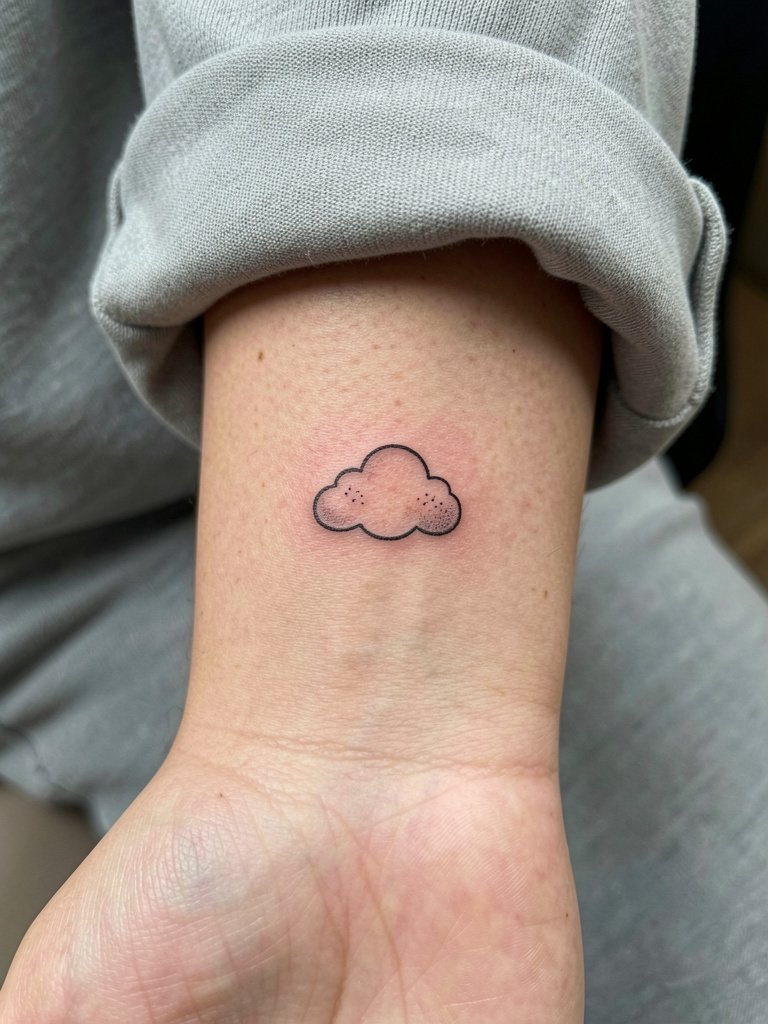
Wrist tattoos are visible and subject to sun and wash abrasion so sizing matters. The session is brief, twenty to forty minutes, and pain is usually low to moderate. A common mistake is packing tiny interior details that become indistinct after a year. Request slightly heavier anchor strokes and ask the artist to step back and show the design at the final working size so you can judge readability. For outfits, cuffed sleeves and bracelets frame the piece nicely and a thin leather bracelet complements the cloud without covering it.
11. Traditional Irezumi Cloud Panel on the Back
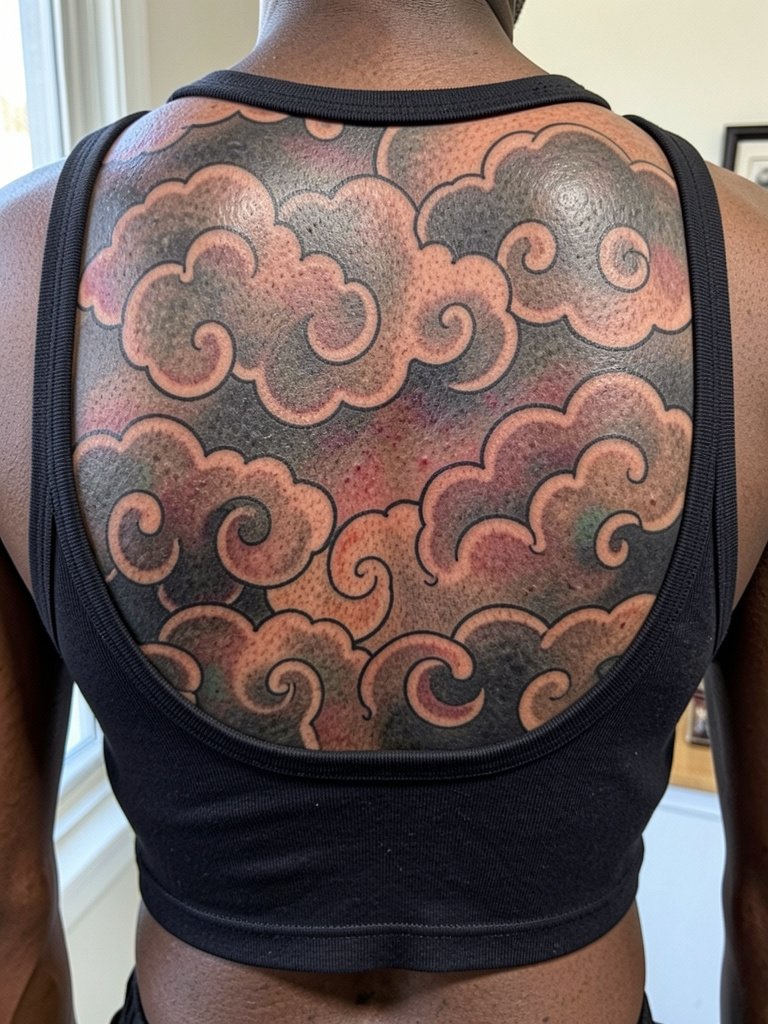
Full back cloud panels echo classic Japanese composition but carry cultural weight. One camp argues that using Irezumi motifs outside of their cultural context risks superficial borrowing. The other camp says learning about the motifs and crediting their origins while working with an artist who understands the lineage reduces that harm. If you choose this direction, include a sentence in your brief that acknowledges the inspiration and ask for references that show the traditional reading rather than a stylized copy. Sessions are long and staged over multiple days. Expect a heavier saturation strategy and a clear touch-up plan.
12. Micro-Clouds Along the Collar
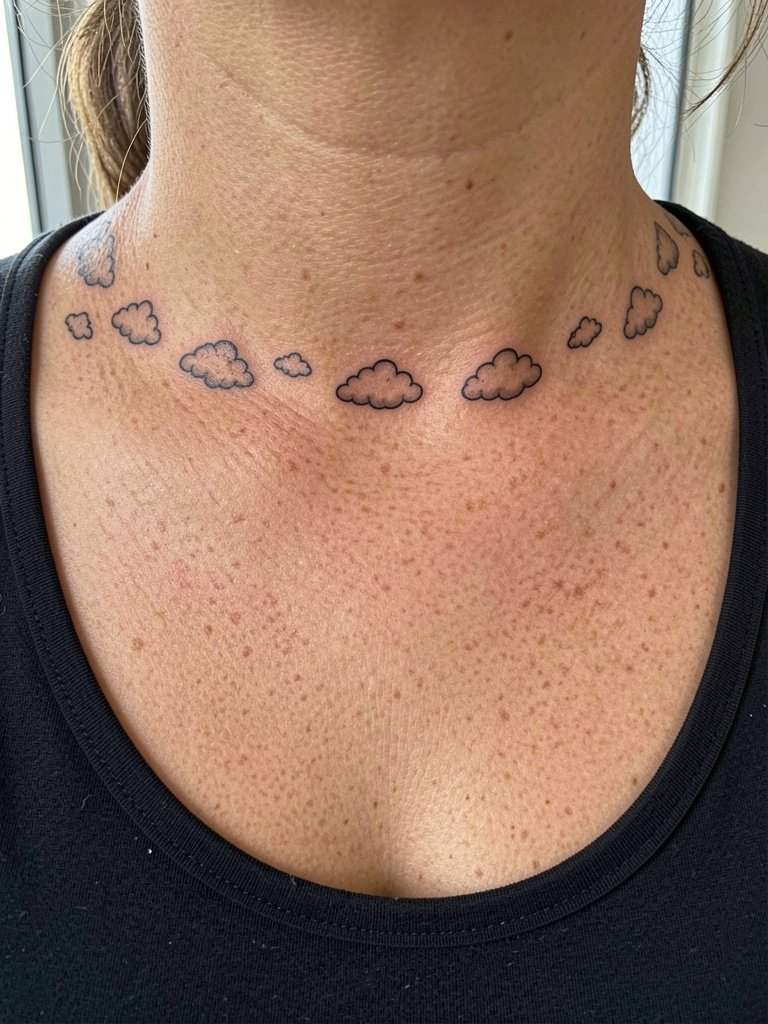
Micro-repeat patterns across the collar can read like jewelry if spaced correctly. These take 30 to 60 minutes and pain is usually low. The main mistake is placing motifs too tightly which causes merging after healing. Tell the artist you want consistent gaps of at least three millimeters between elements when scaled to the real size. For display, open-neck blouses and simple chokers work well and a thin velvet choker helps the motifs sit like a frame.
13. Sleeve Accent Clouds Interspersed with Flora
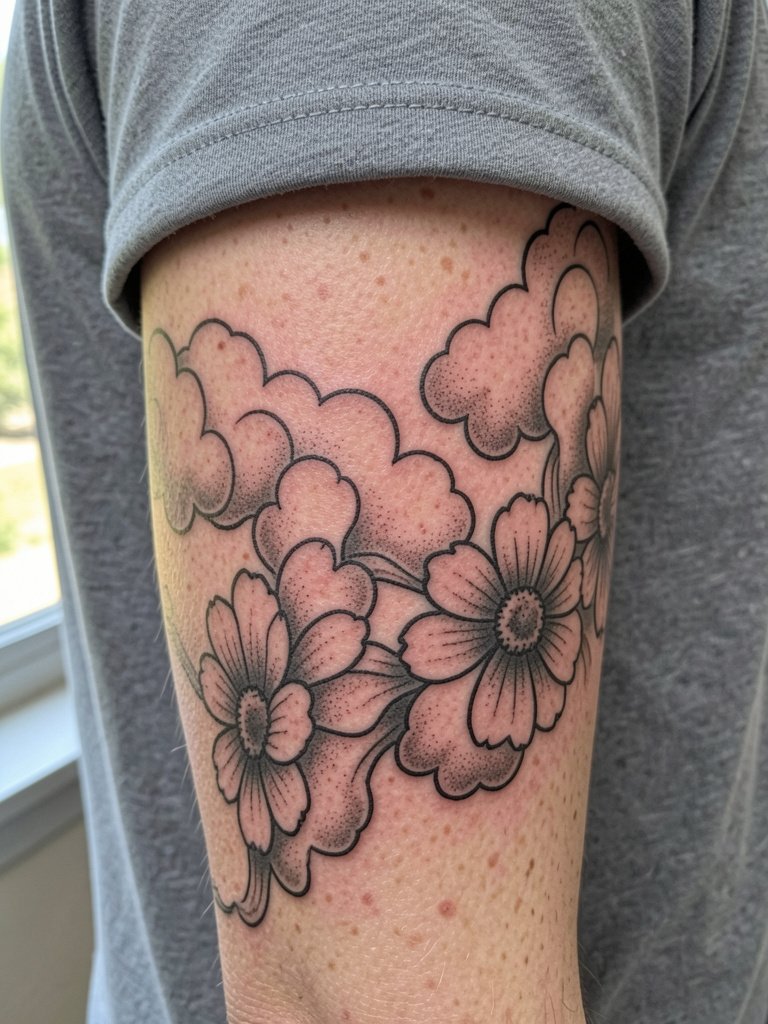
Combining clouds with flora lets movement carry around the arm. Sessions vary but plan for multiple hours if you want shading and flow. A typical error is mixing too many micro details in a small sleeve and then losing rhythm when healed. Ask the artist to map the negative spaces clearly so clouds breathe between petals. For outfits, rolled sleeves and sleeveless dresses make the pattern read as part of your everyday look and I recommend trying a sleeveless linen dress to showcase the arm flow.
14. Fine-Line Cloud Over the Hip
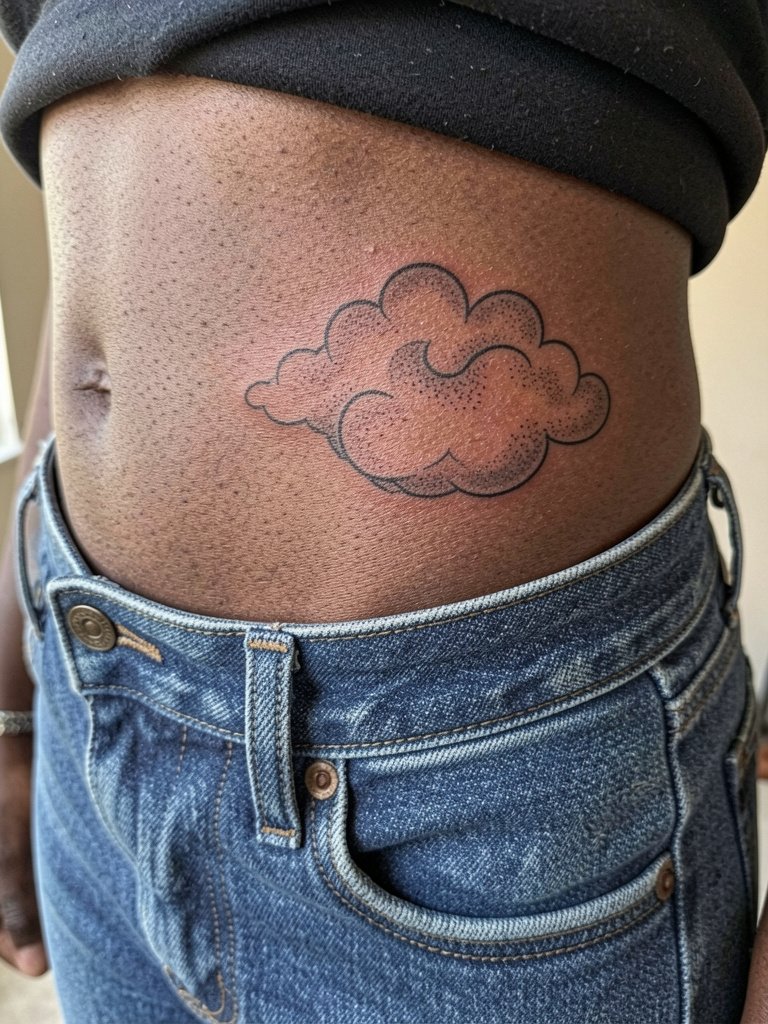
Hip placements are flattering but move with weight and clothing. Pain is moderate to high for some people and sessions are often kept short to manage comfort. A common mistake is asking for very tight filigree where waistband rubs nightly. Tell your artist to place the main curve a finger-width above where the waistband will rest so daily wear does not abrade the edge. For showing off, low-rise jeans or high-cut swimwear reveal this placement and a high-cut bikini bottom pairs well when you want the motif visible.
15. Full Sleeve Clouds with Layered Motion
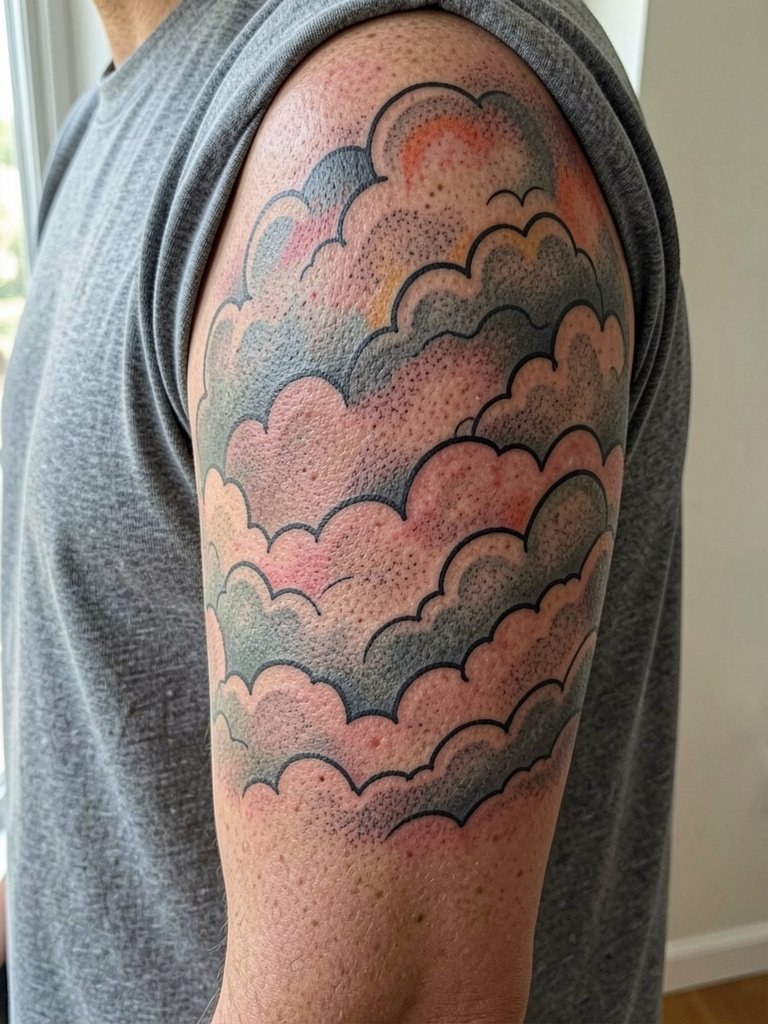
A full sleeve that uses layered clouds is a long-term project and needs staging. Expect multiple sessions and plan on a touch-up at year one for saturation checks. A mistake I see is not considering how sleeves look with different skin tones and wearing habits. Request a mapped progression from outline to shading so you can track how each pass will age. The session feel varies across the arm with the elbow and inner arm more sensitive than the outer bicep. For styling, three-quarter sleeves and lightweight cardigans let you reveal or conceal the flow and I suggest a open-front lightweight cardigan to frame the sleeve without covering key motifs.
Frequently Asked Questions
Q: How do Japanese cloud motifs differ from Western cloud tattoos?
A: Japanese cloud motifs often have stylized whorls and a sense of movement that links motifs across large surfaces. Western cloud tattoos tend to favor photorealism or softer edges. If you want the traditional rhythm, ask for references showing Japanese composition and discuss negative space so the motifs breathe across the body.
Q: Where can I find healed examples and portfolios without naming specific artists?
A: Search hashtags like #JapaneseCloudTattoo and #IrezumiCloud on image-forward platforms, filter by location on short video apps to see local healed work, and look for portfolio tags that include "healed" or "progression" so you view photos months or years after sessions. Reddit tattoo threads and community albums are also useful for seeing how similar placements age on different skin tones.
Q: Will fine-line cloud work on the ribcage long term?
A: Ribcage placements are notorious for both high pain and stretch-related softening. One camp believes fine-line blurs quickly on ribs because of the constant expansion and compression. The other camp argues the technique holds if you increase spacing and allow slightly heavier anchor lines. For longevity, choose design spacing and anchor weight intentionally and plan for a possible touch-up at year one.
Q: What should I wear to a session for a chest or collarbone cloud?
A: Wear something with a naturally low neckline so the artist can access the collarbone without you adjusting clothing mid-session. A fitted scoop-neck tank or a wide V-neck top is ideal and keeps the area clean. For example try a fitted scoop-neck tank so the artist can work without frequent wardrobe shifts.
Q: Are Irezumi-inspired clouds cultural appropriation?
A: People debate this and there are two clear perspectives. One side says using traditional Irezumi motifs without context risks reducing cultural symbols to fashion. The other side believes informed, respectful use that credits the origin and studies the motifs reduces harm and can honor the tradition. If you are using these motifs, include a note about your inspiration in the consultation and ask the artist how they approach lineage and respect.
Q: How often do cloud tattoos need touch-ups?
A: Touch-up frequency depends on placement and technique. High-friction areas like hands and ankles usually need touch-ups within one to three years. Larger saturated panels like back or sleeve work often hold color longer but still benefit from a touch-up at one year to even out saturation.
Q: Can clouds be combined with other Japanese elements like waves or peonies?
A: Yes, clouds pair naturally with waves, peonies, and cranes when the composition considers negative space and flow. Tell the artist how much contrast you want between elements and request mockups showing how clouds will sit around floral forms so nothing competes visually after healing.
