

Wearing a little ocean on your skin can quiet the day, but what looks perfect in a bright studio photo does not always read the same after a year of sun and sleeves. I see the same trade-offs in consultations: people want a hairline wave that feels airy yet they also want it to still read from across a room. Below are sea motifs and placement notes that favor lasting linework, sensible sizing, and clothes that actually show the design.
1. Fine Line Wave Wrap on the Wrist
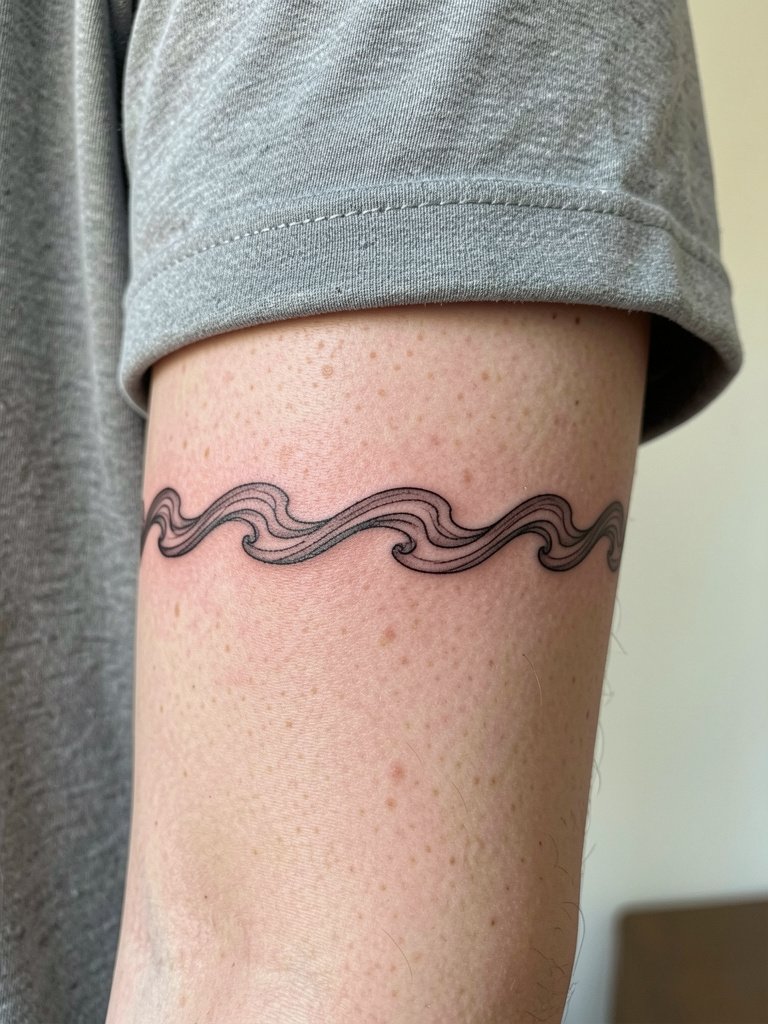
If you want a wrist wave, plan for slightly heavier linework than the Pinterest single-needle mockup. Fine line supporters argue the slim wave matches the delicate wrist aesthetic and reads like jewelry, and they prefer single-needle flow. The other camp says a bolder outline and a little spacing are safer because the wrist moves a lot and fine work can blur into a soft gray over time. Tell your artist you want the wave to keep its breaks and ask them to show a healed example at similar scale. Expect a thirty to forty minute session and a low blowout risk when the stencil sits flat. For showing off, pair the wrist wave with a thin cuff bracelet and short sleeves so the wrap reads against skin.
2. Micro Seashell on the Inner Forearm

Inner forearm micro shells work because the palm-up surface stays relatively flat and easy to photograph. The common mistake is shrinking the reference down too much. Ask for slightly thicker contour lines and a small solid anchor point so the silhouette survives two to five years. At six months most micro shells soften a touch, and by year two they can lose crisp breaks if done too faintly. Session time is usually under an hour and pain is low. For outing the piece, a rolled linen shirt or an linen button down frames the forearm without covering the shell.
3. Watercolor Seashell on the Calf
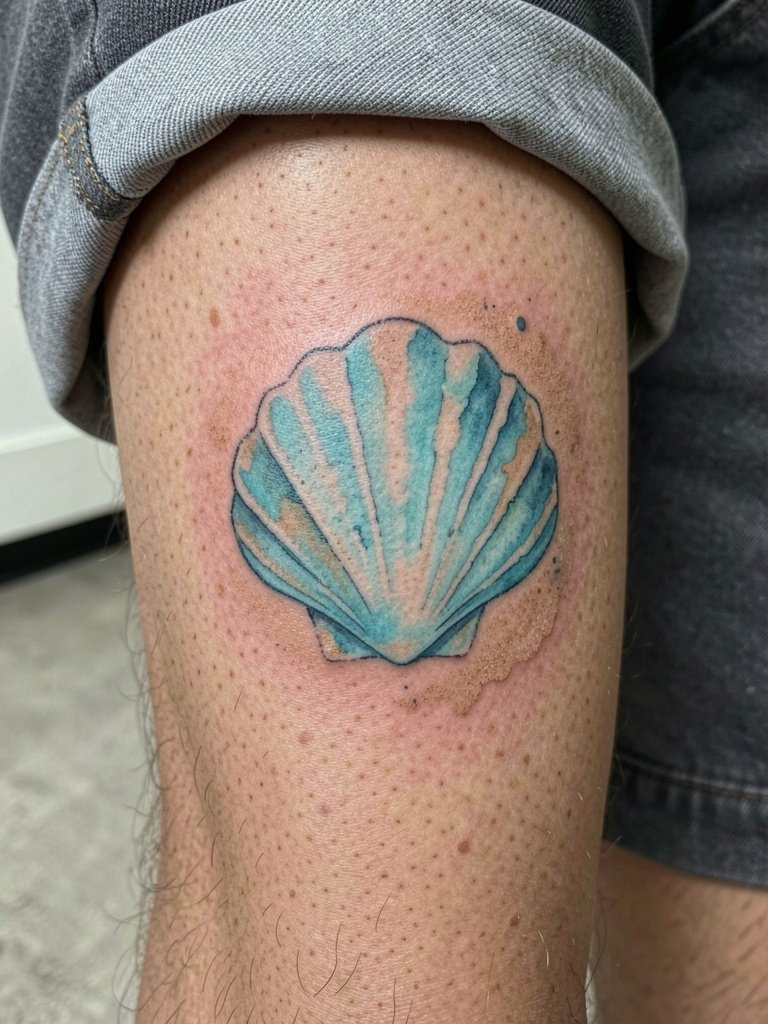
Watercolor fans love the beachy wash it gives shells. One camp says watercolor reproduces the ocean palette better than rigid black lines and gives the piece a painterly motion. The other camp warns watercolor can diffuse and soften faster, especially on high-sun areas like calves that see summer exposure. If you want color here, ask for pockets of concentrated pigment near the shell ridges to act like anchors, and plan for a touch-up at year two if you want those hues to pop long term. Calf sessions are comfortable for most people and typically take one session of forty to ninety minutes. Show-off tip, wear midi skirts or shorts that leave the calf open.
4. Octopus Ankle Tattoo
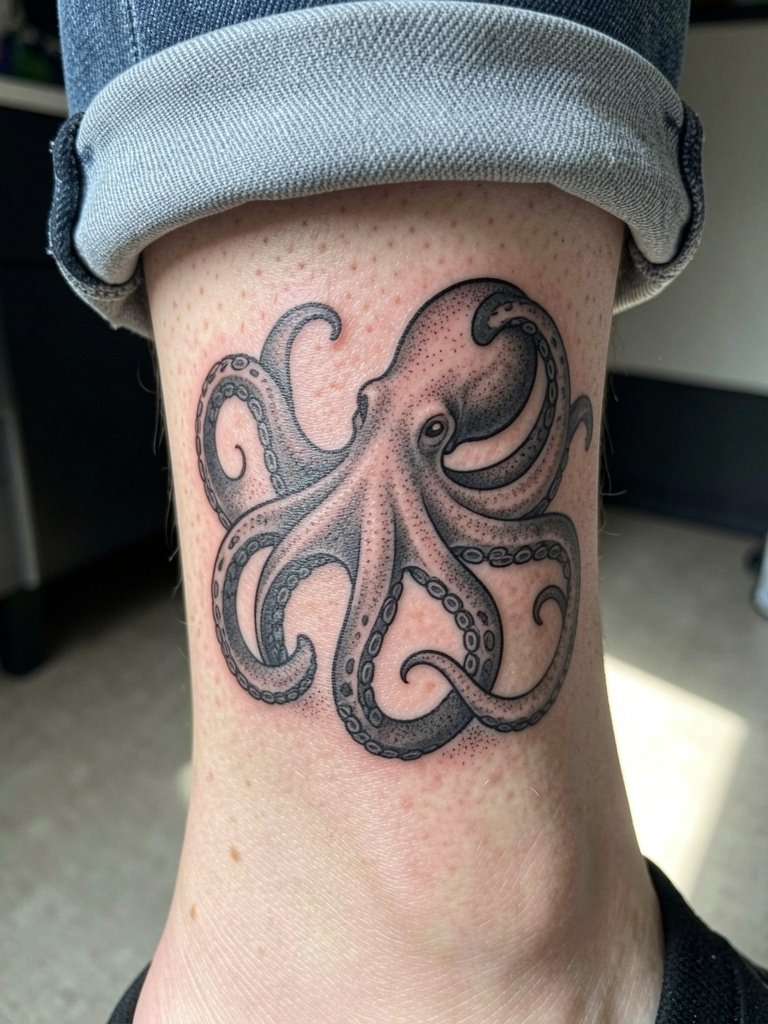
Ankle tattoos face high friction from socks and shoes, so silhouettes outperform fragile filigree here. Ask for tentacle ends to be blocky rather than feathered so they stay readable under wear. People underestimate ankle pain, it is sharper than the calf thanks to thin tissue near bone, but session time is short for a small octopus. Plan one session for a compact design and expect potential touch-up in the first year where the skin rubbed a lot. For seasonality, cropped pants or ankle strap sandals show the wrap without rubbing fabric across the design.
5. Whale on the Outer Upper Arm
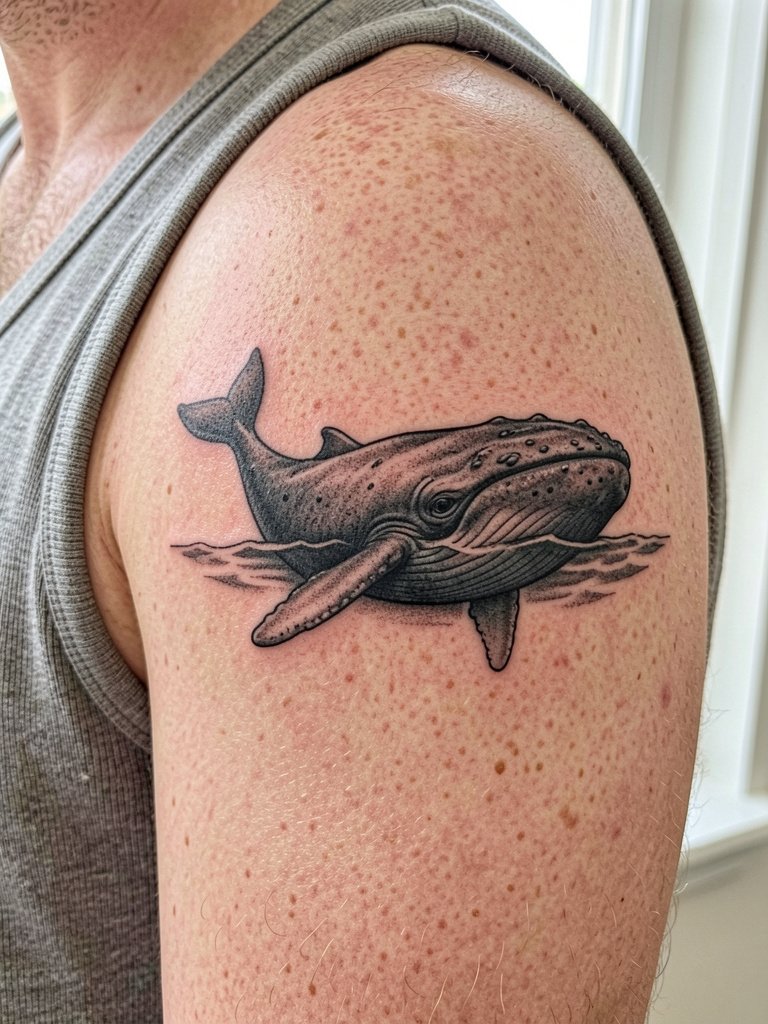
Whales scale well from medium to statement size. The outer upper arm is forgiving because the skin is thicker and movement is less extreme than on the wrist. Ask for reference photos at the size you want so the artist can show how the shading reads at three versus five inches. The common aging error is packing micro-realism into too small a space which turns to mush over years. Expect one to two sessions for realistic shading. For casual styling, a muscle tank top exposes the piece while keeping the shoulder line clean.
6. Sea Turtle on the Forearm
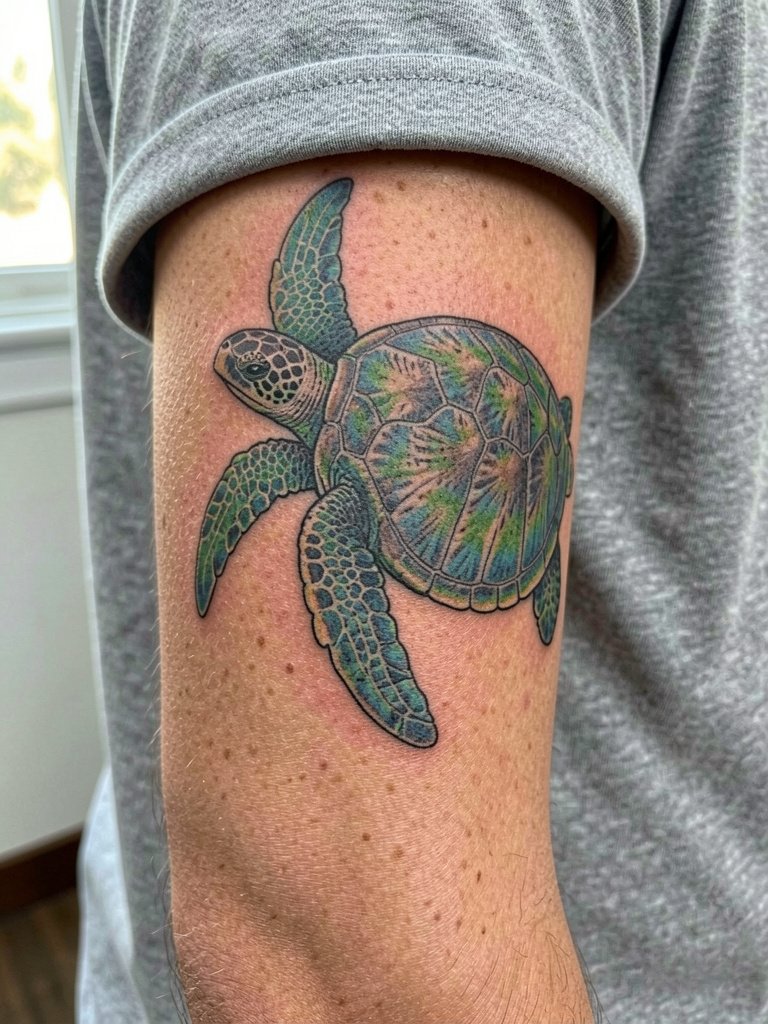
The forearm gives a turtle room to show shell detail and stipple shading without the crowding that ruins tiny animal tattoos. A mistake I see is asking for intricate shell patterns under two inches. Instead, increase the scale slightly and the pattern preserves texture. Session time for a medium turtle is one session under two hours. Forearm pain is low and touch-ups are only occasionally needed where the wrist or elbow flexes. For display, roll a linen shirt sleeve or choose sleeveless tanks so the turtle sits in clear view.
Pre-Session Essentials
The wrist wraps, forearm shells, and calf color above make the first week simpler with a few targeted items. These are practical picks artists often recommend for the earliest healing window.
-
Tattoo-specific cleansing foam. Gentle foam spreads easily over fine line work without dragging the skin, handy for small wave and shell pieces that need careful cleansing in the first week.
-
Medical-grade silicone scar gel. Useful later in healing if a raised patch appears, especially on friction zones like the ankle or rib line.
-
Adhesive remover wipes. Removes bandage adhesive cleanly if you use protective film on a wrist or hand piece without tugging at nearby hair or delicate skin.
-
Second-skin transparent bandage. Many artists favor this for small pieces on wrists and hands to keep friction down in the first 24 to 48 hours.
-
Aquaphor healing ointment. A thin layer for the first few days keeps fine line work moisturized and prevents crusting, but use sparingly on color washes so pigment does not pool.
7. Bracelet Wave Around the Ankle
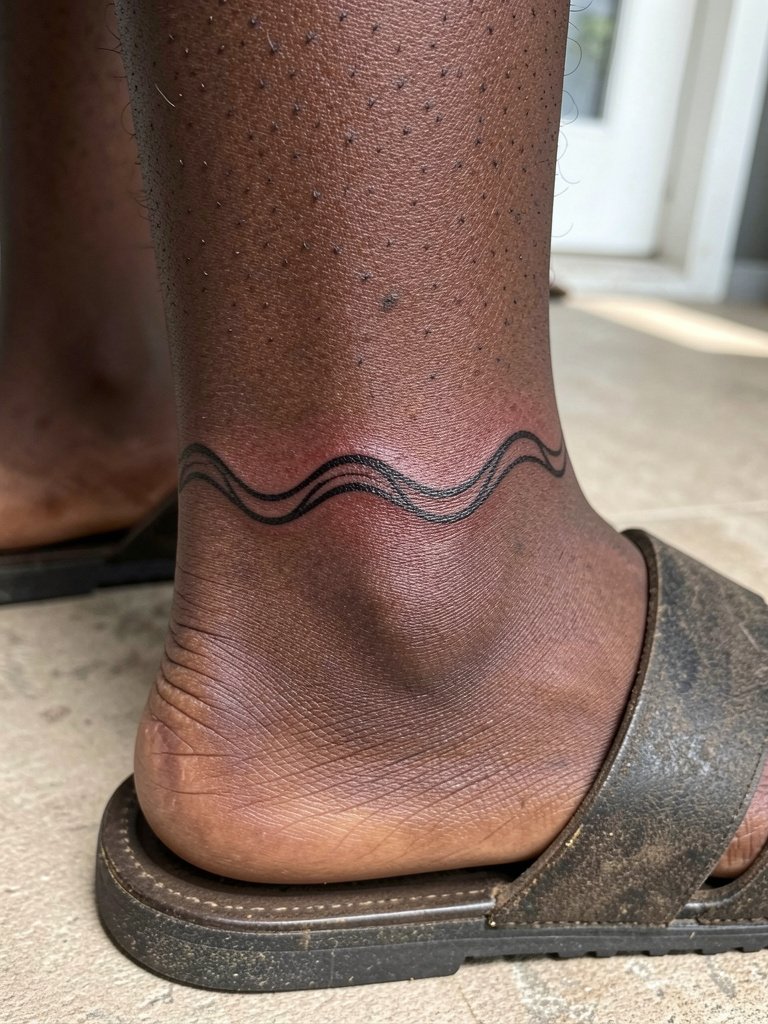
Bracelet waves read like jewelry but need a strong silhouette to resist sock and shoe abrasion. Ask for the wave to have defined tops and bottoms rather than a single hairline curve. Ankle sessions are short and more painful than the calf. Expect a touch-up if the line sits under heavy footwear. For showing the piece, cropped pants and no-show socks or sandals keep the design visible without rubbing.
8. Compass with Flowers on the Inner Forearm

A compass benefits from clear negative space in the needle and cardinal points. The inner forearm keeps the compass readable because the surface stays flat when the palm is up. The mistake is over-detailing tiny letters and floral filigree at small scales. For longevity, ask for bolder cardinal markers and open petals so the piece keeps contrast at two years. Session time varies from forty minutes to two hours depending on detail.
9. Boat on the Hand
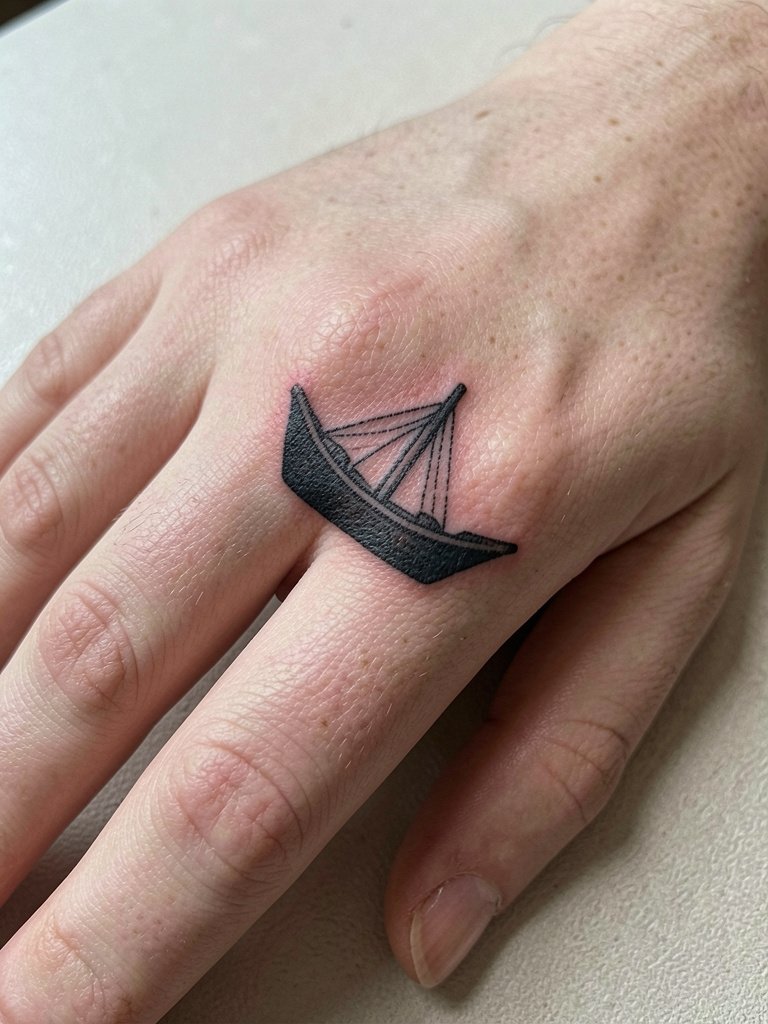
Hand tattoos need bold linework because the skin here moves and is washed frequently. A classic boat in strong black outlines holds up better than a micro-detailed sketch. Hands can need touch-ups sooner than forearms. For appointment wear, go jewelry-free and consider a clean manicure so the area reads clearly. Add a small minimalist ring set on the opposite hand to balance attention without rubbing the fresh ink.
10. Starfish on Forearm or Ankle

Starfish are flexible motifs that work small. The common error is packing stipple texture into a tiny space. Instead, pick one focal texture area and let the rest be simple contours. Forearm placement has lower blowout risk than the ankle. Color is optional but if you choose it, ask for concentrated spots of saturation rather than an all-over wash. Session time is typically under an hour.
11. Patchwork Marine Sleeve Fragments

If you plan a patchwork sleeve, think about consistent line weight and shared negative-space motifs so pieces glue together visually. A common mistake is adding one-off small creatures that fight the scale of neighboring fragments. Build around an anchor piece, then add smaller companions sized to complement it. Sleeves are multi-session projects and black and gray fragments usually age more cohesively over time than mixed watercolor pieces.
12. Shark on the Outer Calf
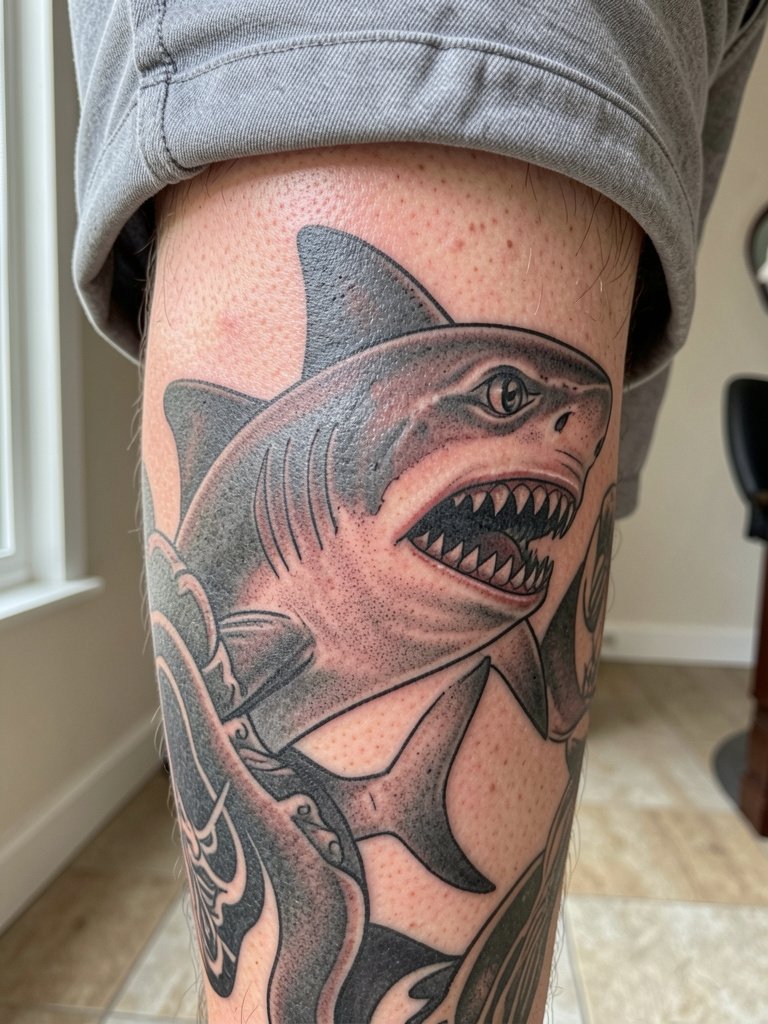
Sharks work well in bold traditional or blackwork styles because strong shapes read from a distance. The outer calf has enough flat surface for movement-friendly compositions. The common error is fine-line detailing that disappears against the calf's curvature. Expect one to two sessions depending on size. For evenings out, midi skirts or shorts keep the shark visible and let the saturated black hold loud against neutral clothing.
13. Coral Reef Scene on the Upper Arm
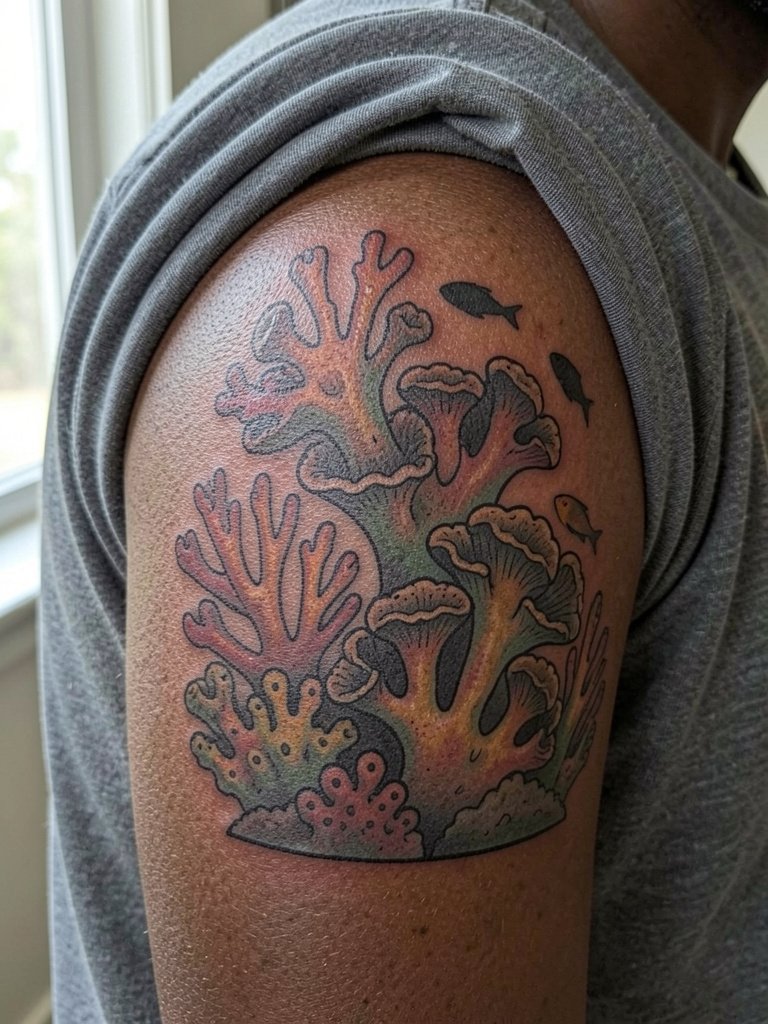
Large reef scenes are a great way to layer depth and shelter smaller motifs you might add later. The mistake is cramming too many tiny fish into small negative spaces. Give the artist blocks of color or black to separate organisms so the scene keeps breathing at six months and two years. Multiple sessions let you build saturation gradually and keep session length comfortable.
14. Medallion Compass with Nautical Florals

This ornamental medallion reads well where the forearm has room for circular designs. Discuss spacing between the compass points and floral petals so the petals do not close into the compass over time. A medium-sized medallion keeps the geometry crisp. Session time is usually one to two hours. Pair the finished piece with rolled cuff shirts to show the circle when you cross your arms.
15. Small Starfield and Wave on the Ribcage

Ribcage pieces are high on the pain scale and need careful spacing. Artists are split on fine line here. One group says rib skin stretch and breathing blur delicate lines within a few years. The other group says with slightly increased spacing and controlled needle depth, fine line holds. If you choose this area, request wider spacing between stars and a slightly heavier wave mainline. Plan for shorter sessions and consider numbing options ahead of time.
16. Tiny Jellyfish on the Hip Bone

Hip tattoos sit near clothing friction zones so keep thin tentacles and trailing dots minimal. Ask your artist to place the jellyfish where the waistband sits consistently below the design when you wear your usual pants. The hip is moderate in pain and often a quick session for a small jellyfish. For summer reveals, high-waisted bikini bottoms work to show or hide the piece as you prefer.
17. Minimalist Wave Line Along the Collarbone
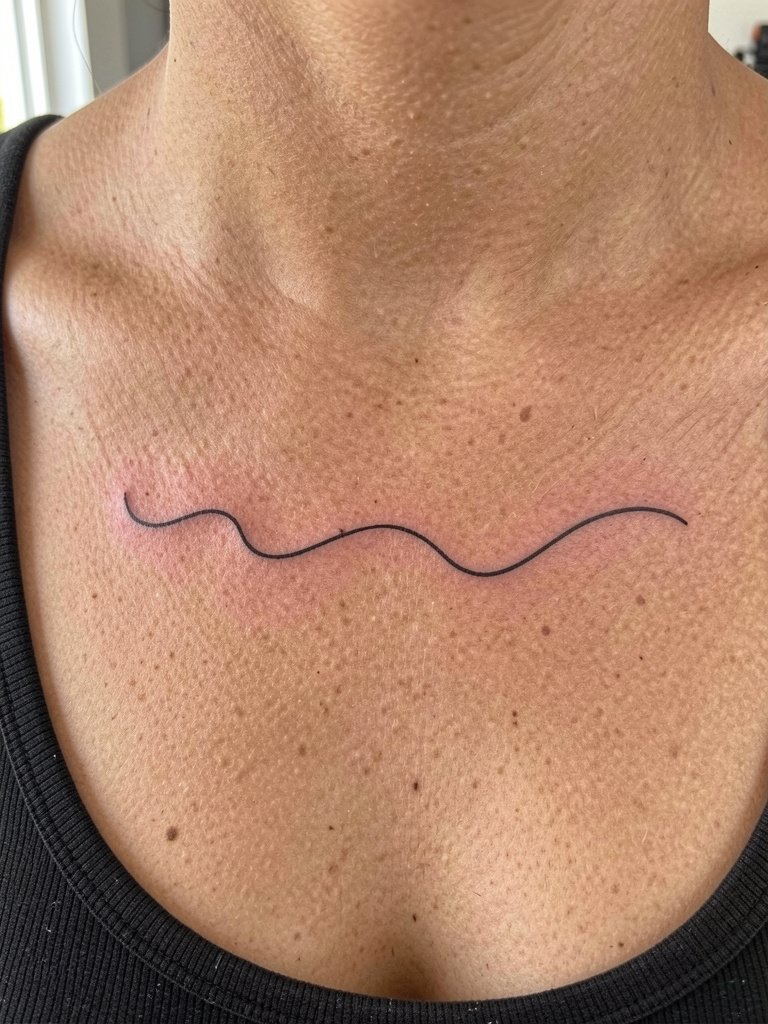
Collarbone waves are delicate and visible. The main mistake is putting single-needle tight curves too close to where clothing rubs the area. Ask for a clean continuous line but with slightly increased thickness so the curve keeps contrast as skin moves. Sessions are short but the collarbone can be sensitive. Choose tops with a natural scoop neckline to frame the line.
18. Nautical Star on the Hand or Forearm

Nautical stars need heavy contrast to survive frequent washing and sun. A bold outline with a solid negative center keeps the geometry crisp longer than fragile linework. Hands need more frequent touch-ups than forearms. For work that uses hands, expect visible lightening sooner. Session time is brief, and the tattoo reads clearly with simple rings on the opposite hand.
19. Medusa-Style Jellyfish on the Outer Thigh

The outer thigh is forgiving and ideal for larger, flowing jellyfish. A common mistake is over-detailing tentacles too thinly, which risks fading lines in a few years. Use stipple shading in the bell for texture and reserve tentacles for stronger strokes. Session lengths vary; larger pieces can be split into multiple appointments. For private reveals, lounge shorts or wrapped skirts work well.
20. Small Anchor Behind the Ear
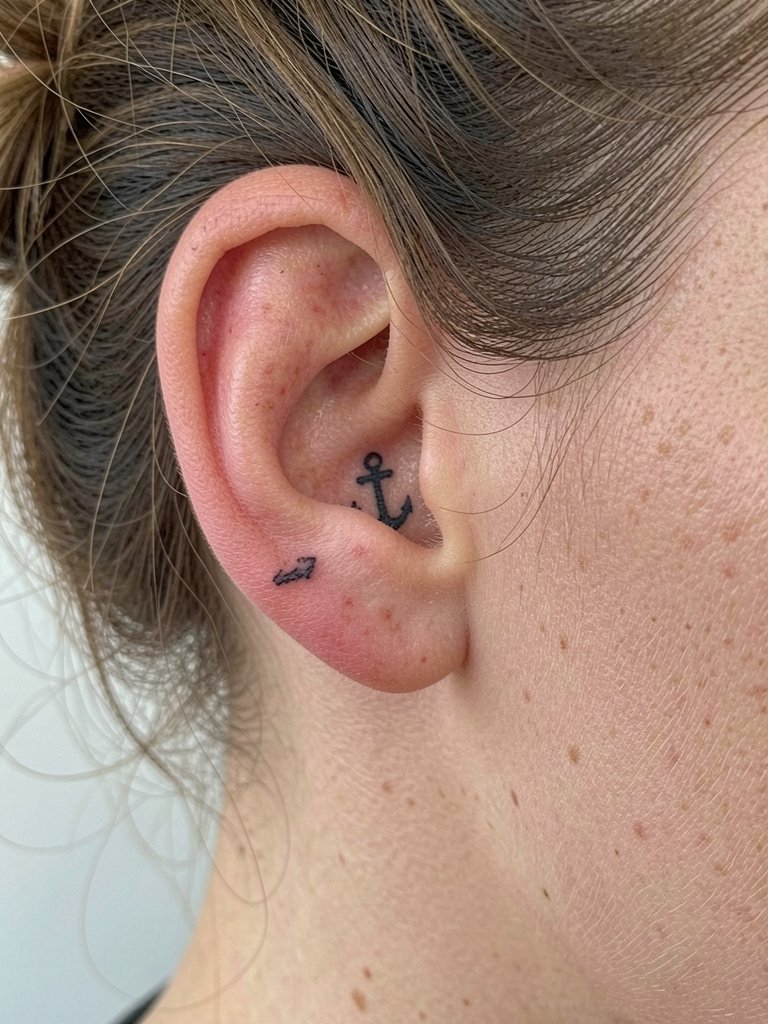
Behind-ear tattoos are intimate and need a simple silhouette. Keep the anchor compact but not hairline thin. This spot heals quickly but may feel sensitive due to proximity to bone. Hair pulled into a loose updo is the best session wear to expose the area without tugging skin.
21. Patchwork Sleeve Fragment: Jellyfish and Shell

When building a patchwork sleeve, size each fragment so it connects visually with neighboring pieces. A jellyfish paired with a shell reads like a small ecosystem when spacing and line weight match. Avoid mixing a single heavy black piece next to ultra-fine fragments unless you plan filler work to tie them together. For wearing, sleeveless tops and relaxed denim create a beach-adjacent look that complements the marine patchwork.
22. Small Boat on the Ribcage
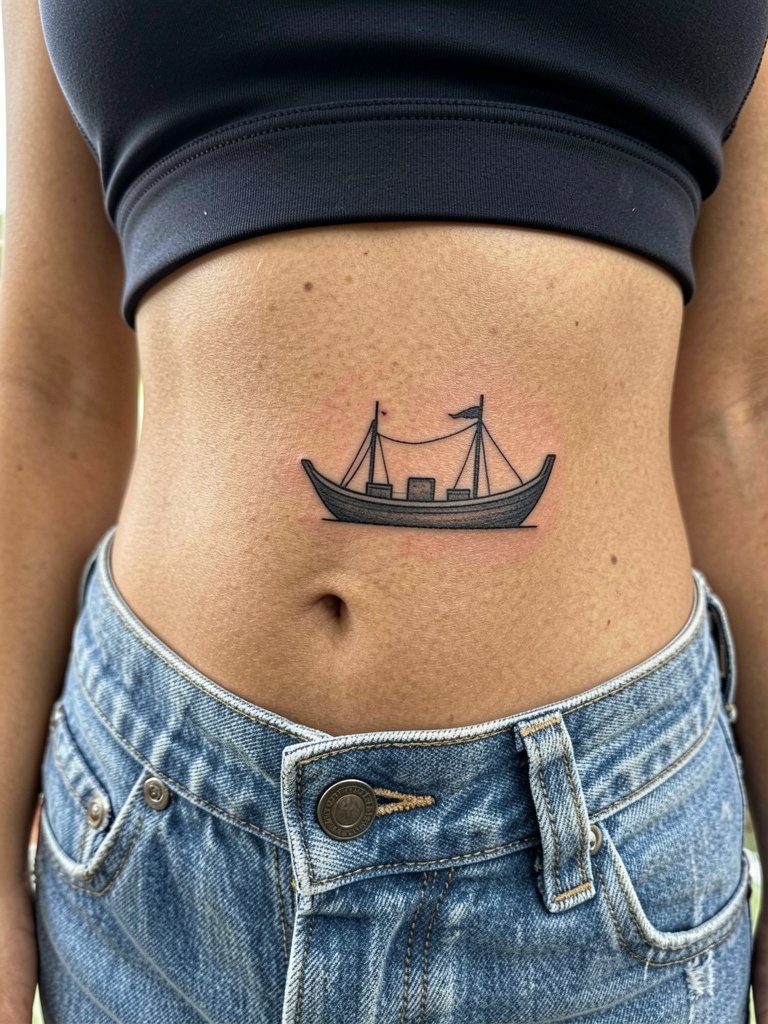
Ribcage boat icons read well as bold silhouettes. The common aging problem is requesting tiny internal detail that the rib skin cannot hold. Ask for a compact silhouette with clean interior spacing to avoid the lines merging later. Sessions are more intense on the ribs, so plan short breaks and consider numbing approaches if needed.
23. Large Coastal Scene Across the Back of the Calf

A larger calf scene lets you combine motifs—lighthouse, waves, and sky—without crowding. The key is to plan focal hierarchy so the eye travels naturally from lighthouse to shore. Mistakes happen when artists try to fit too many small elements into a single view. Calf skin tolerates longer sessions and color or black-and-gray both work well here. For display, resort wear and midi skirts showcase the whole scene.
Frequently Asked Questions
Q: How much should I expect to pay for a tiny ocean tattoo like a wave or shell?
A: Small pieces often hit shop minimums, so the headline price for a two-inch wave can feel high even if the needle time is short. Expect a shop minimum to cover prep, stencil work, and sterile setup, and factor in tip and potential touch-up time. If budget is tight, book during walk-in hours or pick a simpler flash design that cuts down on custom stenciling time.
Q: Will a fine line wave or shell still look good after a few years?
A: It depends on size, placement, and line weight. Fine line supporters like the airy look, but they risk softening on high-move areas. A practical approach is to increase line weight slightly and leave more negative space so the design keeps its breaks at two and five years.
Q: Where can I find healed examples and local artists who do sea inspired tattoo designs?
A: Start with subject and style hashtags on social platforms, then filter by location to find nearby portfolios. Search style-first hashtags like #finelinetattoo and then add subject tags such as #whaletattoo or #shelltattoo. Tattoodo-style directories are useful for browsing portfolios, and community threads on Reddit are good for seeing healed photos and real pricing experiences.
Q: What should I wear to a ribcage, hip, or inner thigh appointment?
A: Choose loose, comfortable clothing that exposes the area in its normal worn state. For ribcage work pick a fitted button-front shirt or soft bralette so the artist can access the side without you lifting fabric. For hip pieces wear low-rise jeans that are fully zipped and buttoned so the waistband naturally sits below the tattoo. For inner thigh choose very loose shorts or a wrap skirt so the artist can work without fabric bunching.
Q: Do darker skin tones need different sea tattoo choices?
A: Yes. On deeper skin tones high-contrast black-and-gray pieces and bolder outlines preserve silhouette and saturation better than ultra-fine single-needle work. Ask to see healed examples on similar skin and request stronger anchors in the design like filled black areas or solid shell ridges so the motif reads clearly as it heals.
