
A lot of first-timers pick the prettiest photo on their saved board and are surprised when the ink and placement look different after healing. Trends push tiny single-needle scripts and delicate botanicals, but what actually holds up on a man who works with his hands is often a little bolder or placed where skin moves less. Read the first entry for a low-commitment wrist option that still reads clean in year three.
1. Tiny Minimalist Symbol on the Wrist
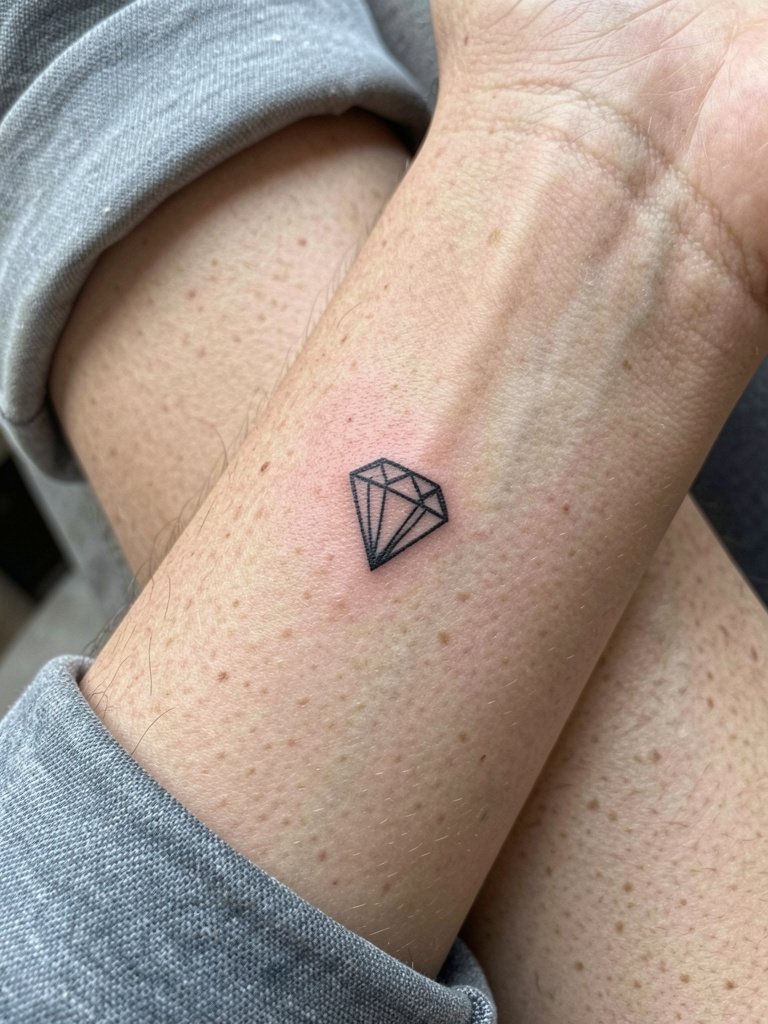
A tiny symbol on the inner wrist is the classic low-commitment first piece for men who still want daily visibility. Recommend this when you want something discreet that can be hidden under a watch or sleeve later. Linework should be slightly heavier than the Instagram reference so the symbol keeps shape after a year of washing and sun. Expect a short session of under 45 minutes, mild soreness, and a likely touch-up at 12 to 18 months for single-needle work on that surface. For the appointment, wear a rolled sleeve tee so the artist can lay the arm flat and work with a steady surface.
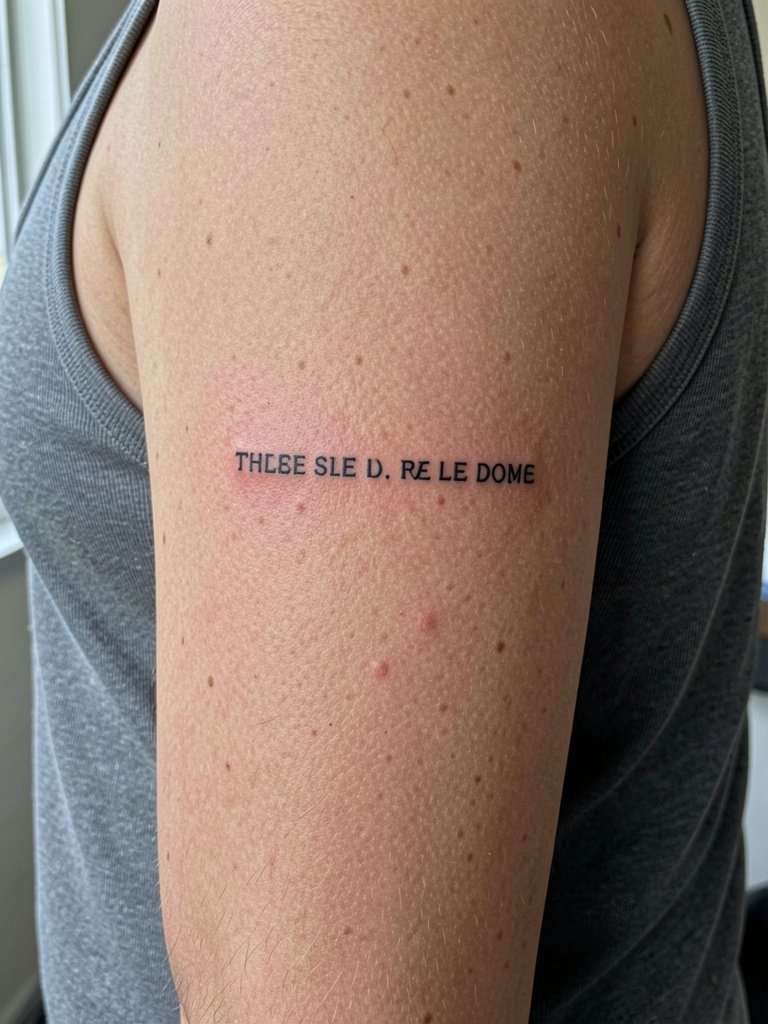
2. Fine Line Script Along the Inner Forearm
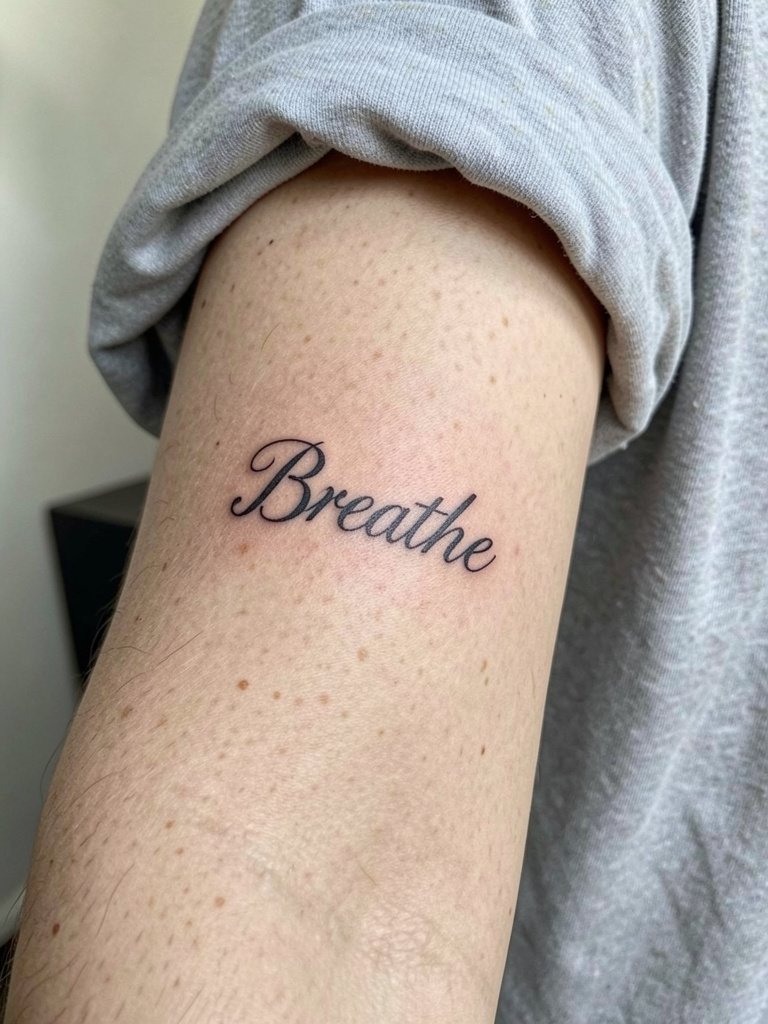
Fine line script reads elegant, but only when spacing and placement are planned. I recommend this for the palm-up inner forearm because the skin is flatter there and motion is predictable. A common mistake is to copy a tiny Instagram script and place it too near the wrist; the letters blur together after one to two years. Tell your artist you want slightly wider letter spacing and a modestly heavier line to preserve readability. Session time is typically 30 to 60 minutes, and sunscreen after healing keeps the black crisp. Pair the healed piece with a linen button-down when you want it to peek from a rolled sleeve.
3. Single-Line Animal Silhouette on the Outer Forearm
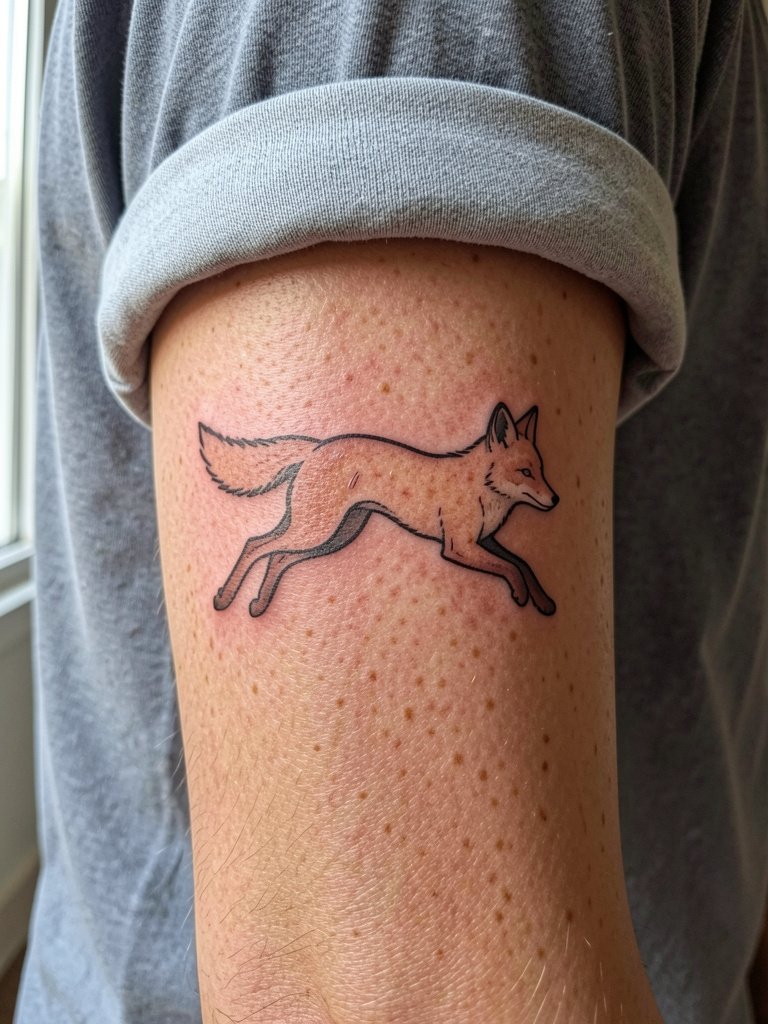
A single-line animal silhouette ages well because the composition reads from a distance and the lack of tiny interior details avoids early softening. Recommend this over micro-realism when you want symbolic meaning without a heavy contrast piece. Discuss scale and silhouette flow with your artist and bring two references at different sizes so they can show how the fox reads at three inches versus five. Outer forearm sessions feel like steady vibration with moderate pain and usually take 45 to 90 minutes. For showing it off, wear a short sleeve work shirt that keeps the arm visible without clutter.
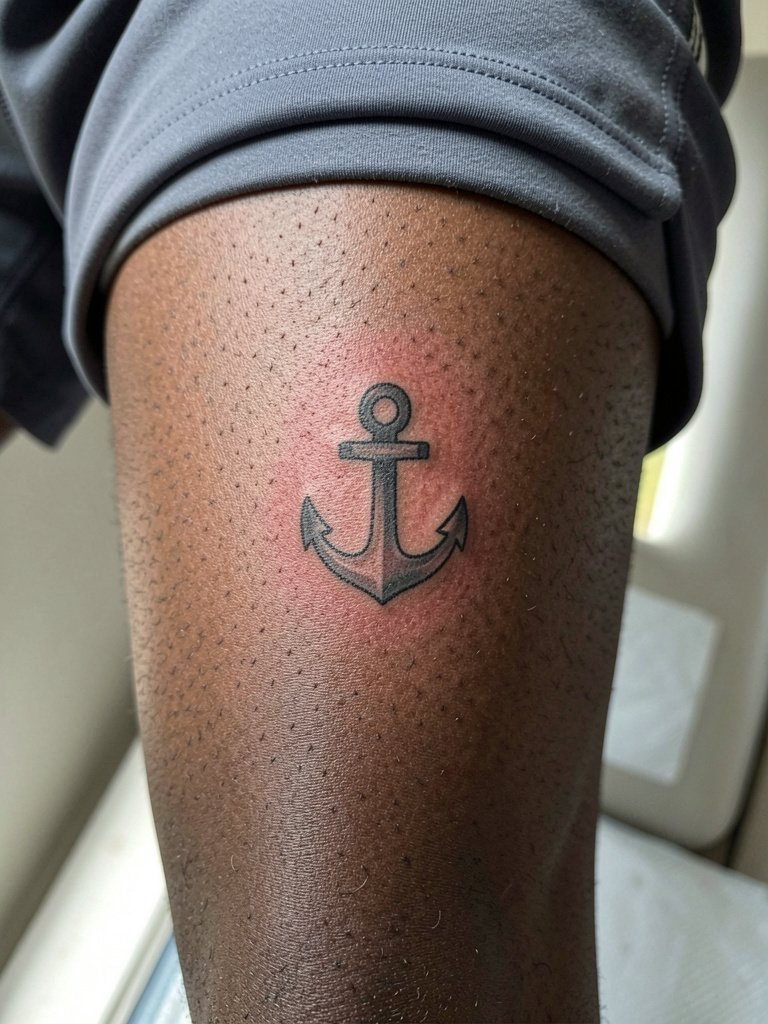
4. Classic Anchor Flash on the Upper Arm
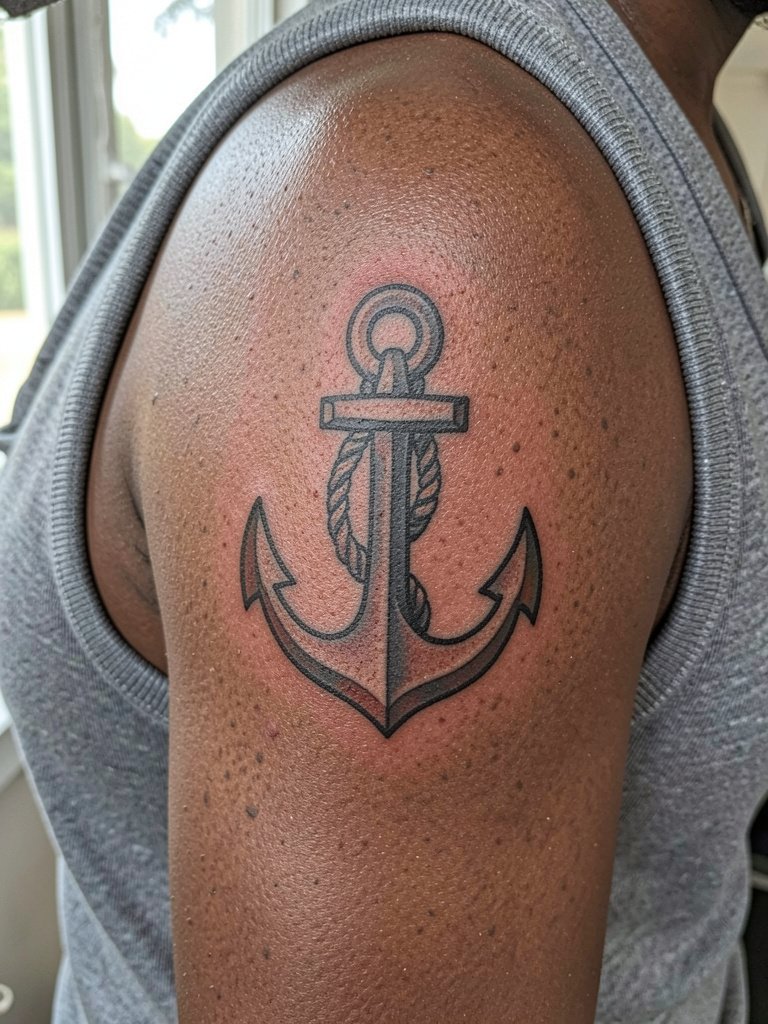
Traditional flash icons like anchors or daggers are forgiving for a first tattoo because bold outlines hold through normal fading. Choose flash when you want a quick session and predictable aging. A frequent error is asking for tiny interior shading inside the anchor that becomes patchy after a few years. Ask for classic flat fills and solid outlines, and plan for an hour-long session for a small upper arm flash. The outer upper arm is low on blowout risk and heals cleanly. This placement pairs well with sleeveless tanks and athletic cuts, so bring a muscle tank top to the appointment.
5. Small Botanical Sprig on the Inner Upper Arm
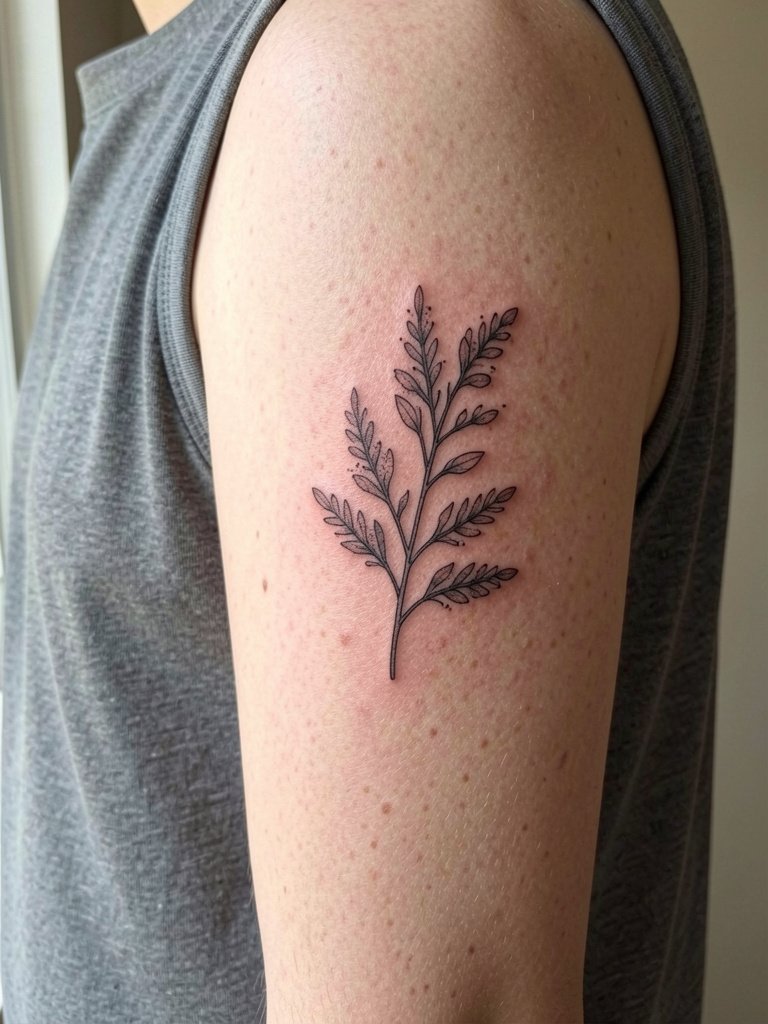
A delicate sprig on the inner upper arm reads refined and can scale up into a larger sleeve later. I suggest this over ultra-tiny botanicals when you want botanical detail but want to avoid early softening. The biggest mistake is placing too small a sprig against textured skin; increase size modestly. Inner bicep sessions are mild to moderate on the pain chart. In two years the stipple shading may need a light touch-up to keep the gradient crisp. For the session, wear a loose short-sleeve or a tank so the artist can work with the arm relaxed and flat.
6. Small Animal Portrait on the Shoulder Blade
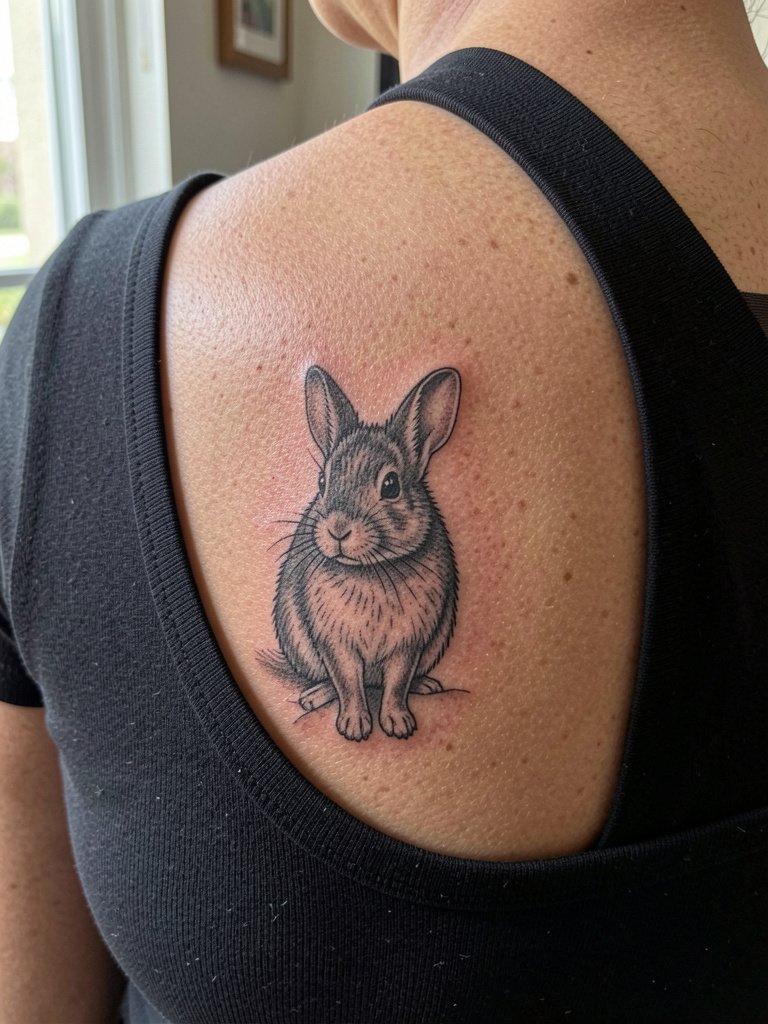
A small animal portrait on the shoulder blade makes use of skin that stretches little in normal movement, which helps small realism read better. Recommend this instead of a tiny face on the forearm when you want detail but not constant visibility. Discuss exact likeness landmarks with your artist and bring a high-contrast healed photo reference so they can plan shading density. The session is usually one to two hours with moderate discomfort when lying face-down. Expect a potential touch-up after twelve months if you want crisp contrast through the first few years.
Session Day Picks
The wrist-to-shoulder pieces above have different healing needs, so a few low-touch items smooth the first week and protect fine line work.
- Indie tattoo balm alternatives. Lighter balms from small brands can avoid the greasy feel and are good for people who dislike thick ointments after a wrist or forearm session.
- Fragrance-free sensitive-skin lotion. Gentle lotions with minimal ingredients reduce irritation risk on freshly inked inner-arm pieces.
- Petroleum-free moisturizer options. For those who react to occlusive products, these keep linework from sticking without trapping moisture.
- Unscented antibacterial body wash. Use during the first few showers to remove plasma and surface residue without perfumes that sting.
- Second-skin protective bandage kit. For people who want a low-touch healing window, a second-skin dressing reduces friction and keeps the area clean for the first couple of days.
7. Small Cross or Faith Symbol on the Upper Chest

A small cross below the clavicle is high-visibility but easy to scale and hide with shirts. Choose bold but simple linework to prevent early softening across the shallow collarbone skin. During consultation bring exact placement landmarks and necklace examples so the artist can center the piece under common chain lengths. Chest sessions can be more sensitive near bone, so plan for short breaks. Post-healing, the spot benefits from sunscreen to reduce fading when it is exposed.
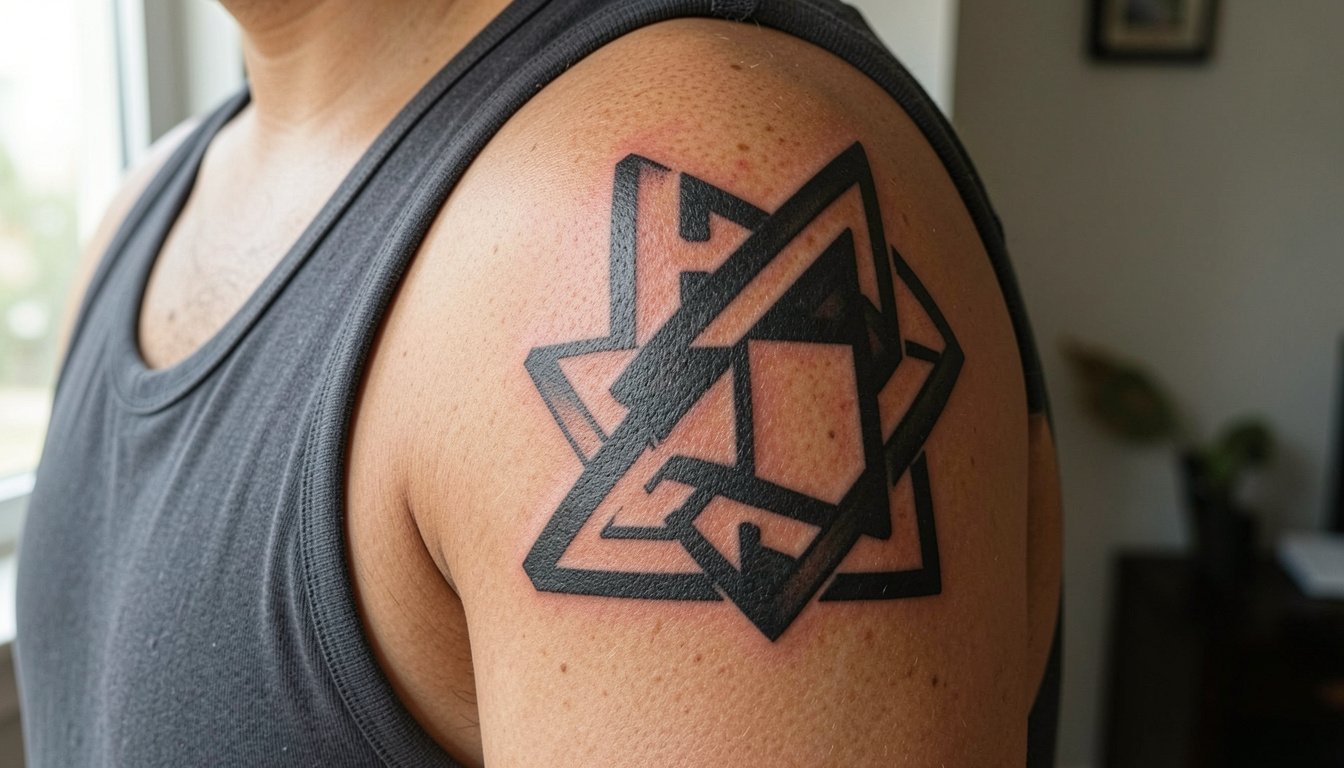
8. Blackwork Geometric Band on the Forearm
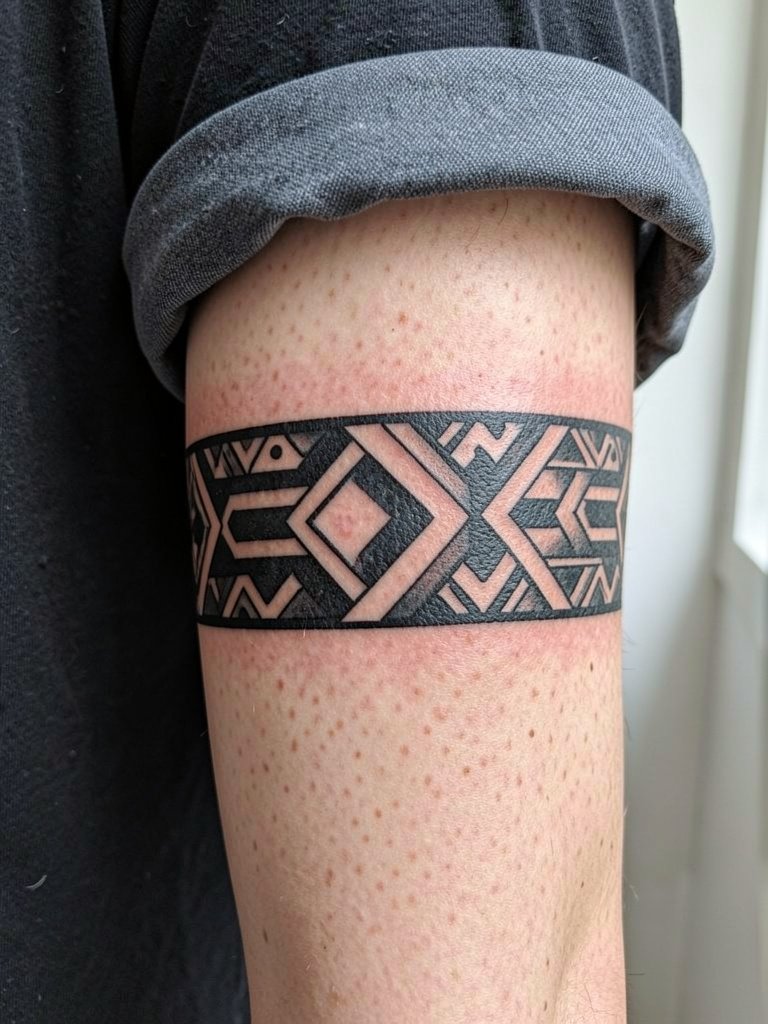
Blackwork geometry is a durability-first choice because high saturation ages into a clear silhouette. I recommend it over fine-line decorative bands if you work outdoors or expect heavy sun exposure. The biggest mistake is placing intricate micro-geometry too small; give shapes room to avoid merging. Forearm sessions are moderate and typically done in one to two hours depending on coverage. When healed, this piece pairs with solid color tees or a utility jacket that frames the arm without distracting from the bold shapes.
9. Micro-Realism Portrait on the Inner Forearm
Portraiture on the inner forearm reads intimate and is best if you want a recognizable face. Recommend larger scale than many Instagram samples because micro-detail needs space to age cleanly. Discuss healed reference shots with your artist and ask them to show healed examples at similar scale. Inner forearm portrait sessions can run multiple hours and may require a second visit. Because the forearm sees sun and friction, plan for a touch-up at 12 to 24 months if you want crisp facial details to remain.
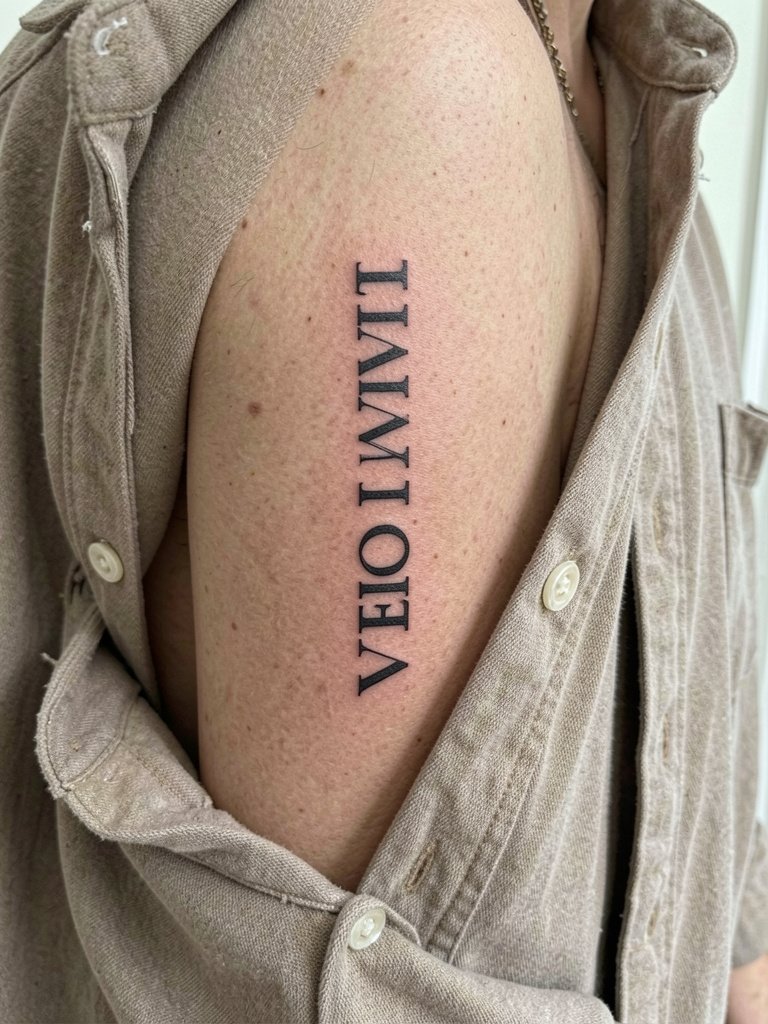
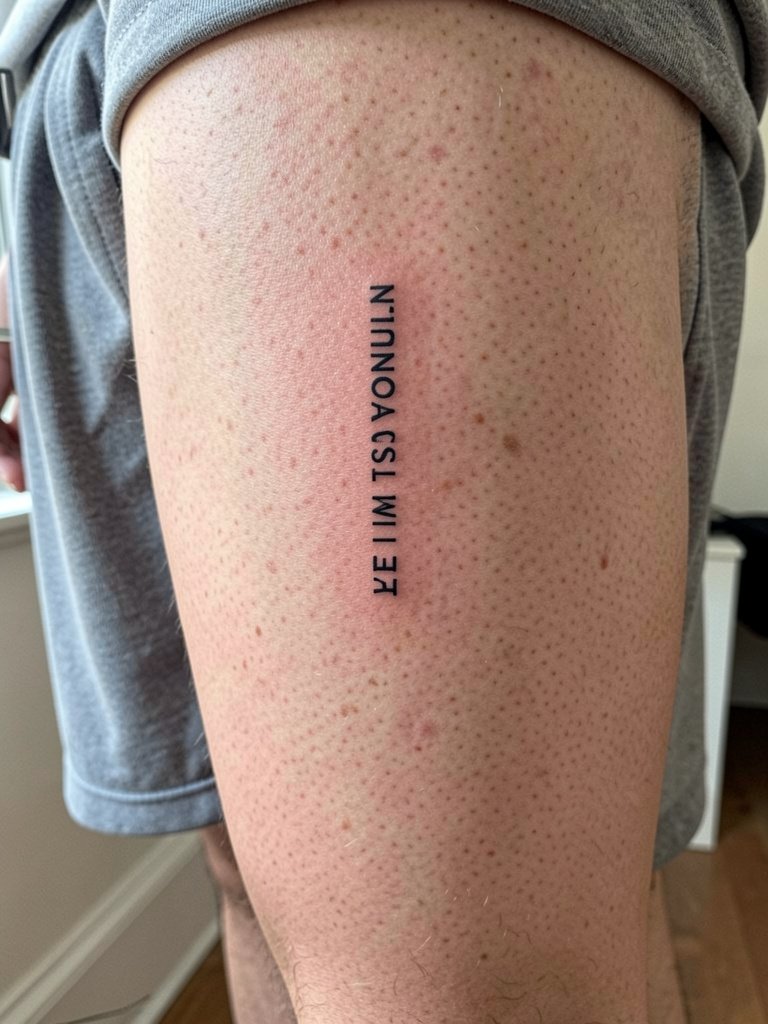
10. Vertical Script on the Calf
The calf is a forgiving first-tattoo placement because it avoids constant friction and sun exposure for many wearers. Vertical text looks clean there and scales well for future leg pieces. A common error is choosing ultra-thin lettering that disappears into skin texture on darker tones. Ask for a slightly heavier typeweight and a stitched up touch-up plan at year one. Calf sessions are low to moderate pain and usually take 45 to 90 minutes. For showing the healed vertical script, cuffed shorts or cropped joggers let the piece read without effort.
11. Small Traditional Rose on the Outer Forearm
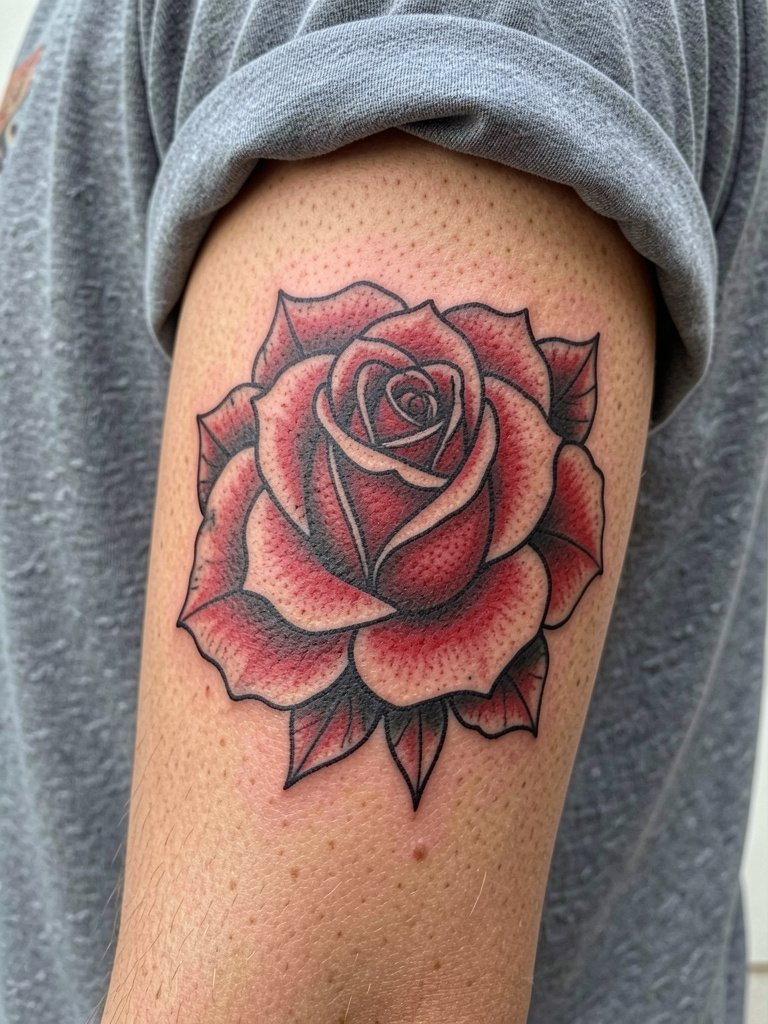
A small traditional rose is the textbook beginner piece because strong linework and flat color hold up. Choose this when you want an easy-to-maintain classic that integrates into future patchwork. The usual mistake is asking for soft watercolor shading inside a tiny flash rose; the washes can age patchy. Specify bold outlines and saturated fills, and expect one to two hours in the chair. This outer forearm placement is low on blowout risk and pairs with solid tees and a plain crew neck tee when you want the tattoo to be the focal point.
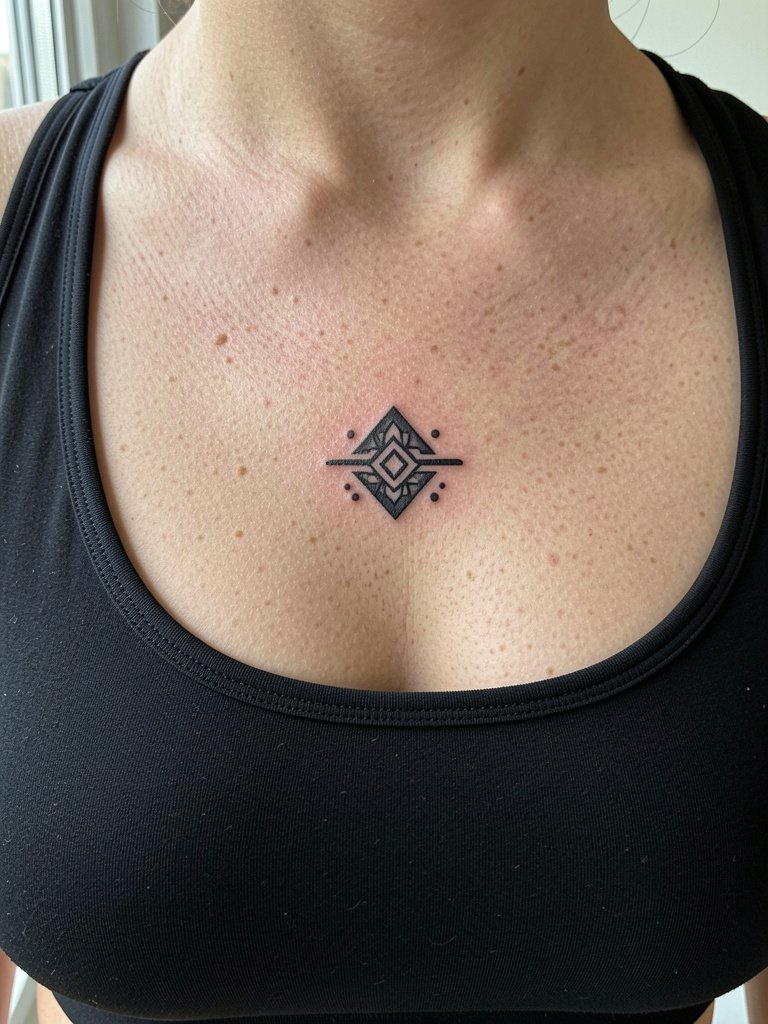
12. Ornamental Sacred-Geometry on the Sternum Edge
Sternum and underbust geometry require precision and patience. I recommend this for people who want a balanced ornamental piece that can be centered under necklaces. A common issue is picking microscopic dot work that looks gorgeous fresh and then loses definition with movement and skin texture. When you consult, request slightly larger spacing between lines and stipple elements so the pattern breathes. Sternum sessions can be more painful because of proximity to bone and thin skin; plan for breaks and a 1.5 to 3-hour window.
13. Patchwork Starter Piece on the Shoulder Cap
Patchwork-style starters are great for people who expect to add pieces over years. Pick a small, consistent scale so future additions sit comfortably. The mistake is mixing vastly different styles without a plan; commit to either bold flash or fine line cluster so the area reads cohesive. Shoulder cap pieces handle color and linework well and are moderate in pain. For the appointment, a loose open overshirt or tank top gives the artist access while keeping you comfortable.
14. Vertical Wildlife on the Calf or Thigh
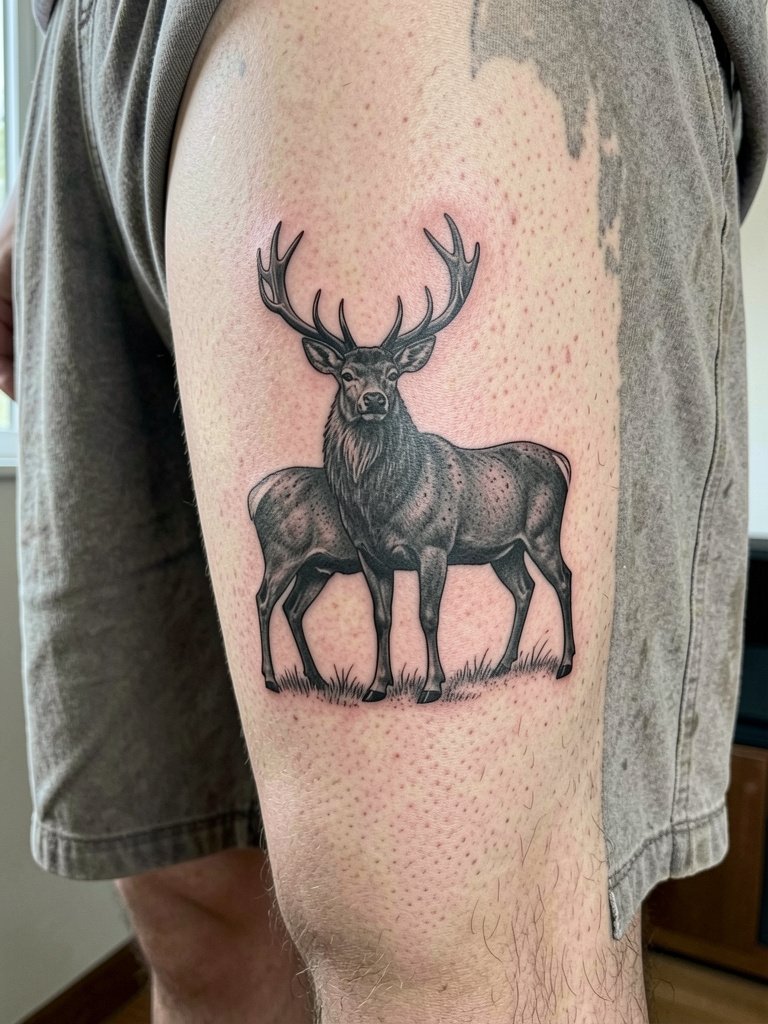
Large vertical wildlife uses the leg as a canvas without making it constantly visible. Choose the calf for public display or the outer thigh for privacy. The common error is over-detailing too small a leg piece; scale up to let fur textures and shading settle. Thigh sessions are lower on the pain scale than ribs, but expect longer sittings if the piece is detailed. For showing the healed motif, straight-leg shorts or cuffed joggers present the work well when weather allows.
15. Minimalist Coordinates under the Clavicle
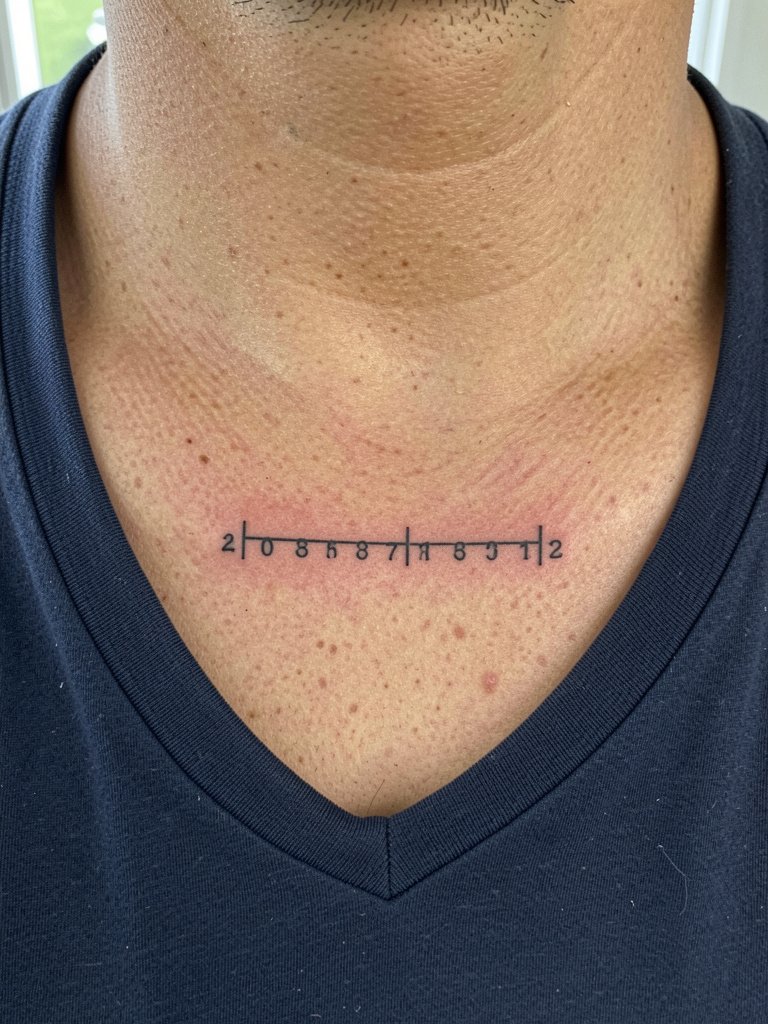
Coordinates are a compact way to mark a place that matters while keeping design minimal. I suggest a slightly bolder typeface than the thinnest single-needle font to keep numerals legible on chest skin that receives sun. Tell the artist the exact font size and spacing you want so they can mock up the placement in a mirror. Sessions are short and the site heals predictably, but sunscreen matters after healing because the upper chest sees direct sun in summer. Layer with open collars or a deep crew neck tee for clean display.
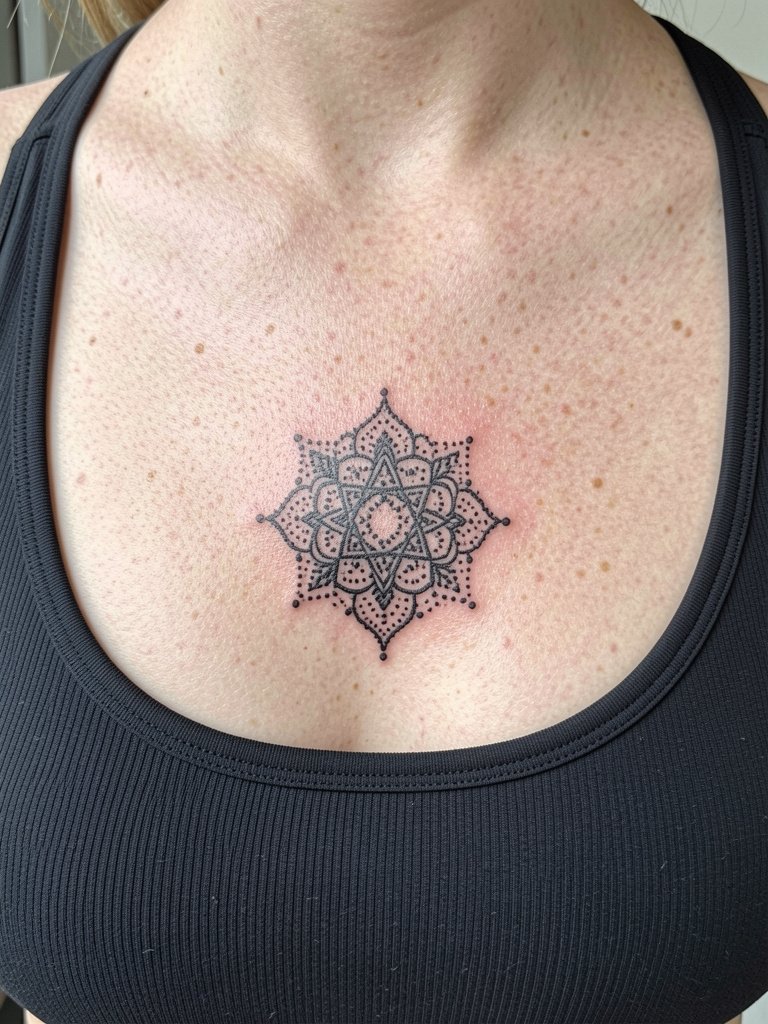
16. Dot-Work Mandala at the Sternum Edge
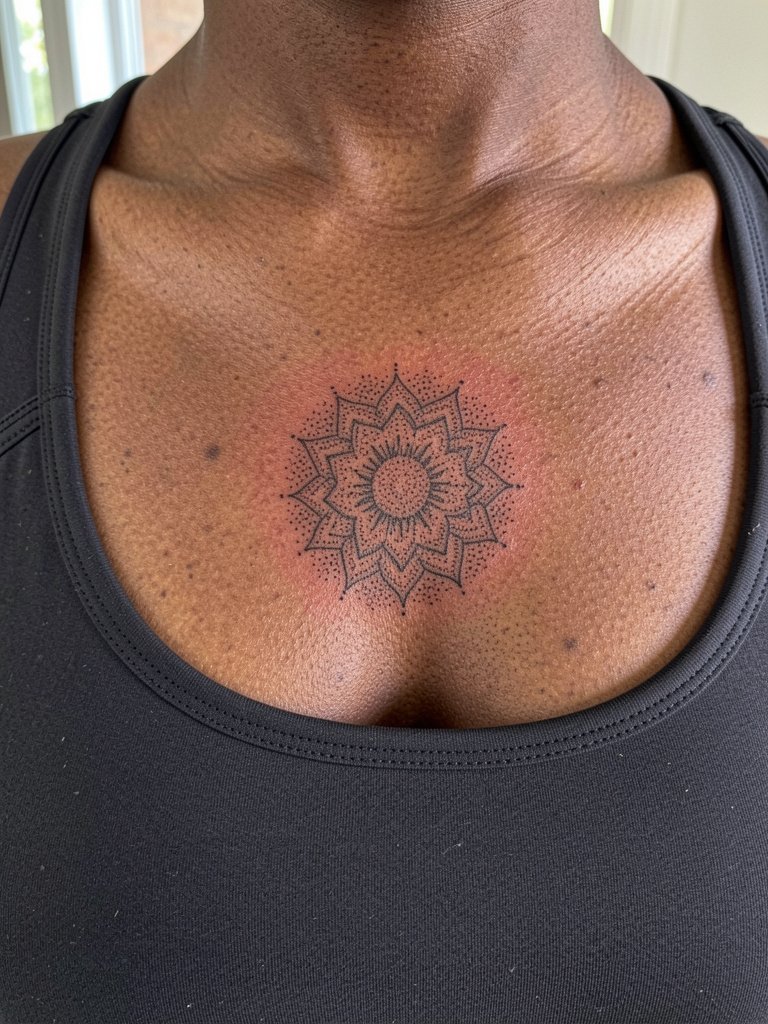
A mandala on the sternum benefits from symmetry and a bit of scale so the dots never blur into a gray patch. Request the artist show healed dot-work examples at the same scale because small stipple patterns need breathing room. This area is sensitive and sessions can be painful around bone. Because the piece relies on tight contrast, schedule a potential touch-up at the one-year mark rather than waiting longer. For the session, wear clothing the artist can lift without pulling fabric across the sternum.
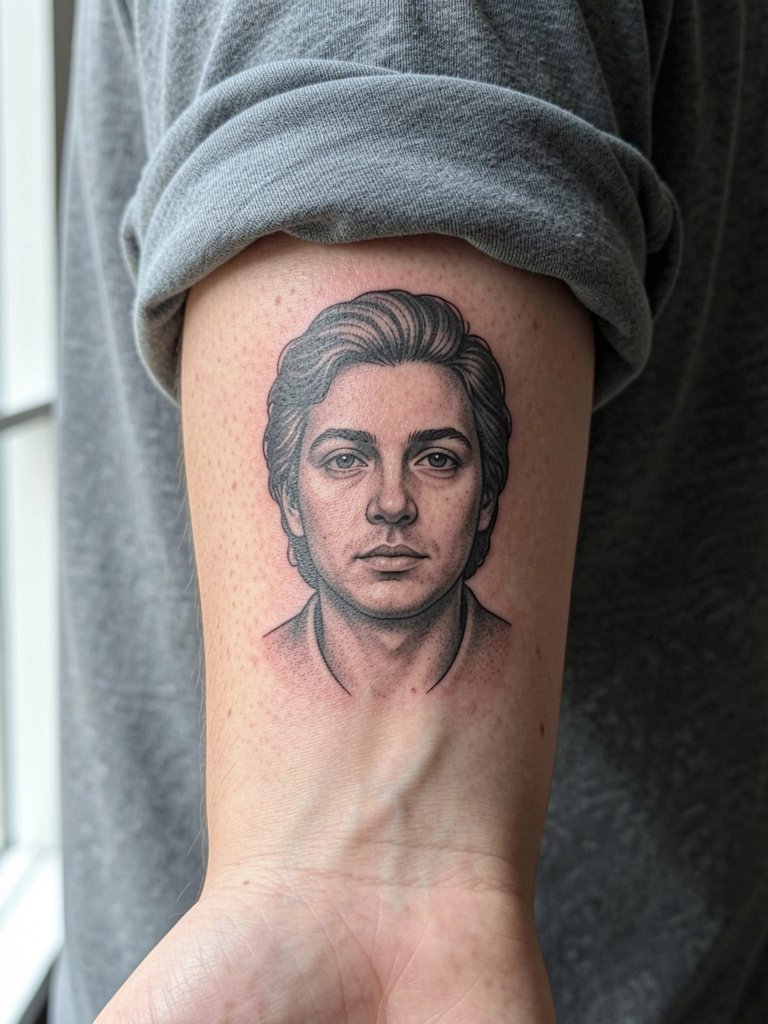
17. Small Commemorative Portrait on the Upper Arm
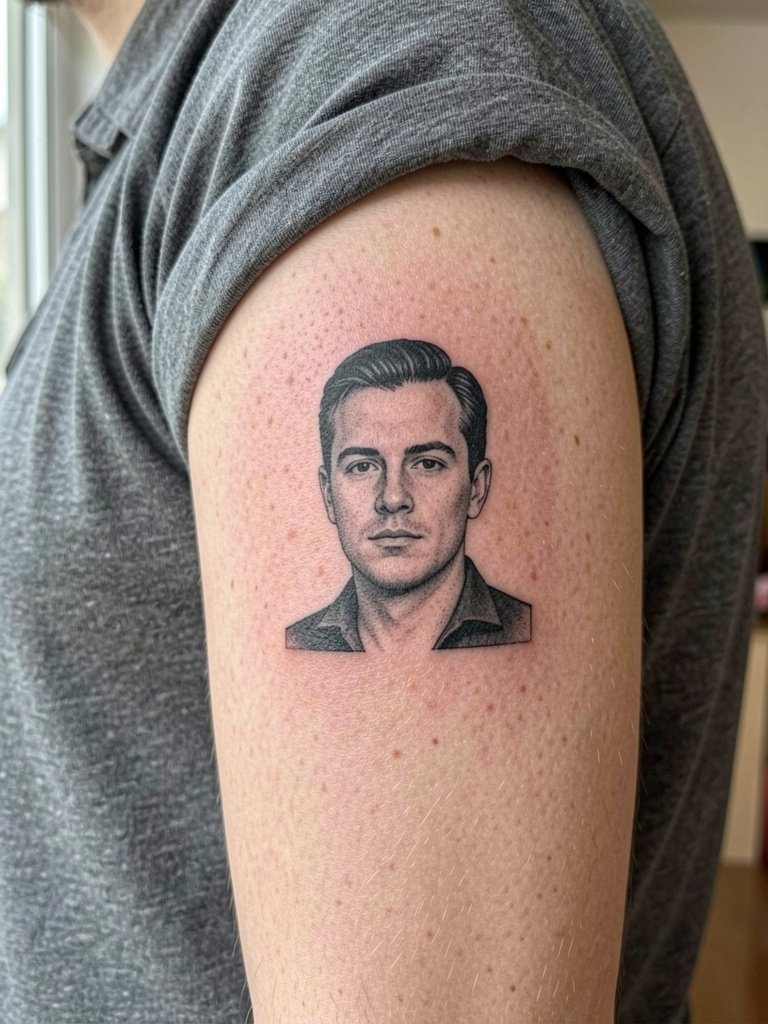
A commemorative portrait on the upper arm is visible without being front-and-center. Choose this over dense forearm portraits if you want privacy with recognition. Bring two clear photos and ask the artist to map facial landmarks at the stencil stage to ensure likeness at the chosen scale. Outer upper arm work tolerates heavier shading and usually heals with predictable saturation. Plan for a longer session depending on complexity, and budget for a touch-up to refine small highlights.
18. Small Geometric Palm-Side Wrist Band
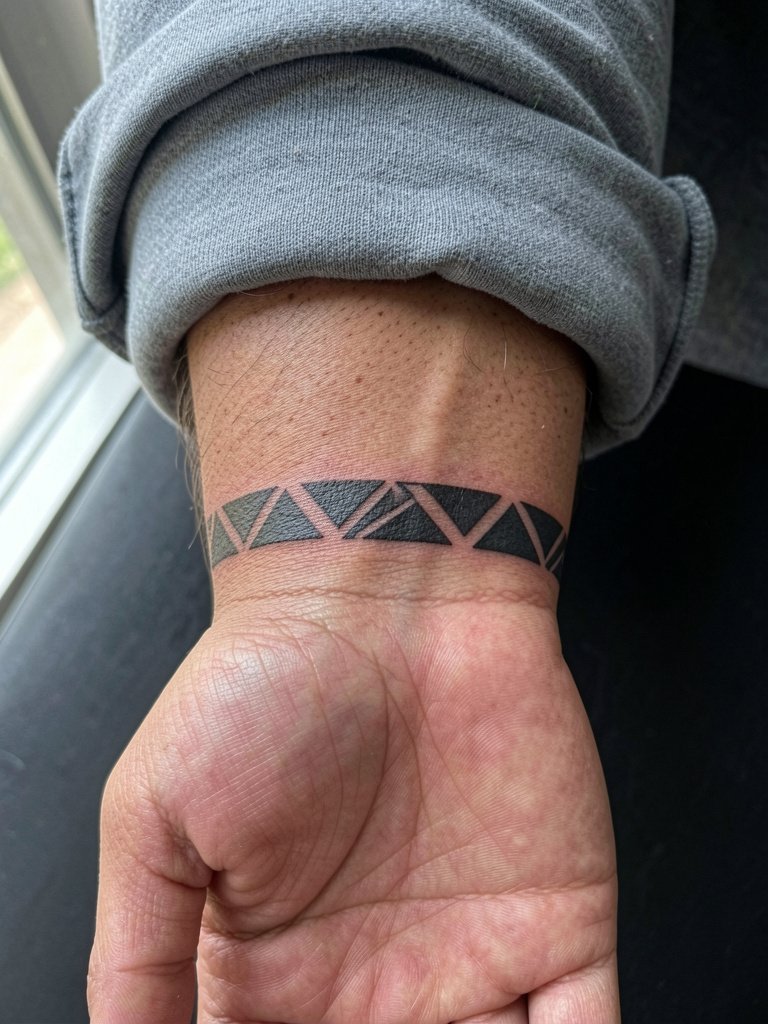
Wrist bands on the palm-side work well when the repeat pattern has generous spacing. Avoid ultra-thin lines that a wrist will quickly soften. Specify slightly heavier linework for the palm-up surface and ask the artist to show how the pattern flows when the wrist bends. Sensation is brief but sharp for many people. To show it off, pair the healed band with a thin chain bracelet on the opposite wrist so attention rests on the ink without clutter.
19. Simple Arrow on the Ankle
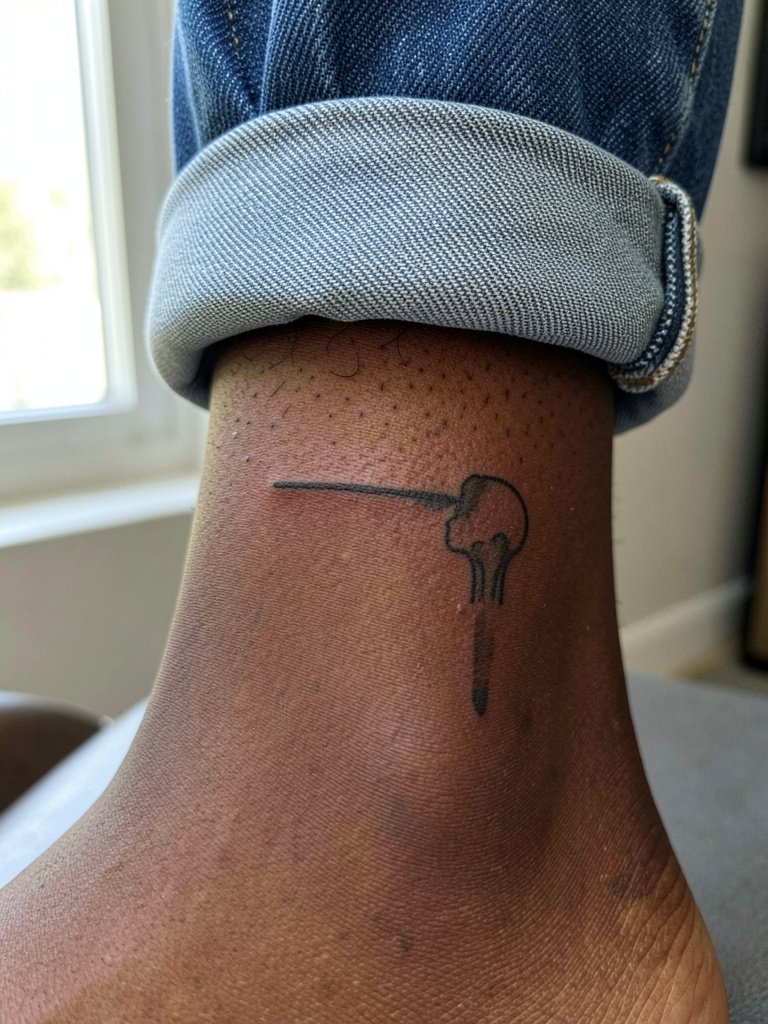
Ankle arrows are low-commitment and easy to hide when needed, but the ankle sees friction from shoes and socks that can dull fine tips. Ask for a slightly reinforced arrowhead and a clean shaft so the silhouette holds. Sessions are short, with localized soreness and occasional rubbing while shoes break in. For the appointment, wear jeans with cuffs rolled up or loose shorts so the artist has clear access to the area.
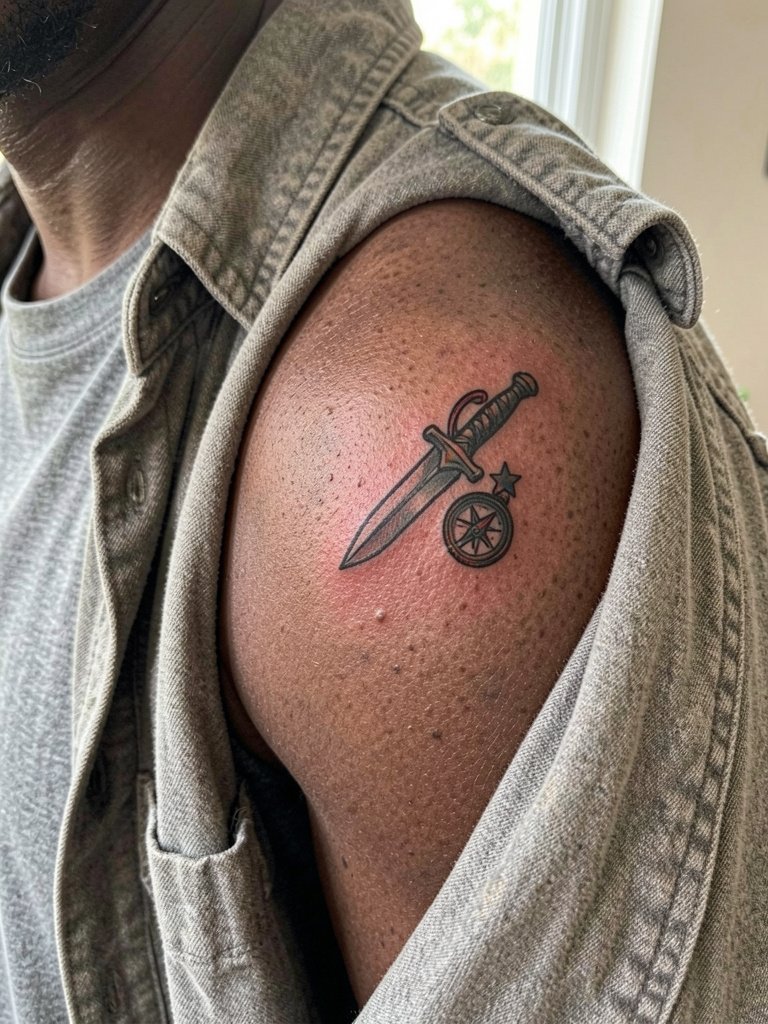
20. Small Blackwork Compass on the Outer Forearm
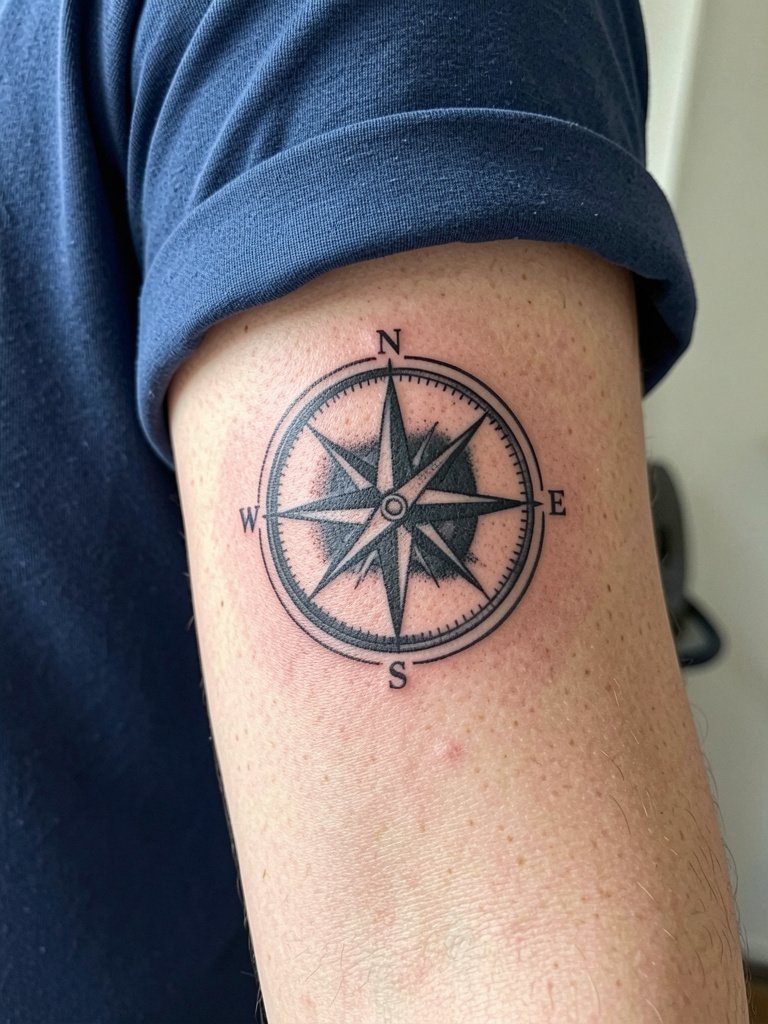
A blackwork compass gives you a strong silhouette that ages predictably. Choose it when you want a classic symbol with immediate readability. The common mistake is overcomplicating the interior points in a tiny space. Request bold cardinal points and simplified interior lines to keep contrast. Outer forearm placement makes sessions easy and healing straightforward. Pair the healed piece with solid color tees for maximum visual clarity.
21. Small Memorial Date in Roman Numerals on the Ribcage Side
Ribcage dates are intimate and sit well where coverage is easy. Be aware that fine-line numerals on ribs can blur faster because the skin flexes. One camp says ribs soften fine-line work quickly and prefer bolder marks. Another camp argues that careful needle depth and slightly wider spacing preserves fine line there. Name both camps during your consultation and decide which approach fits your priorities. Rib sessions are painful for many, so discuss breaks and numbing protocols with specifics for timing and placement.
22. Black and Gray Owl on the Upper Arm
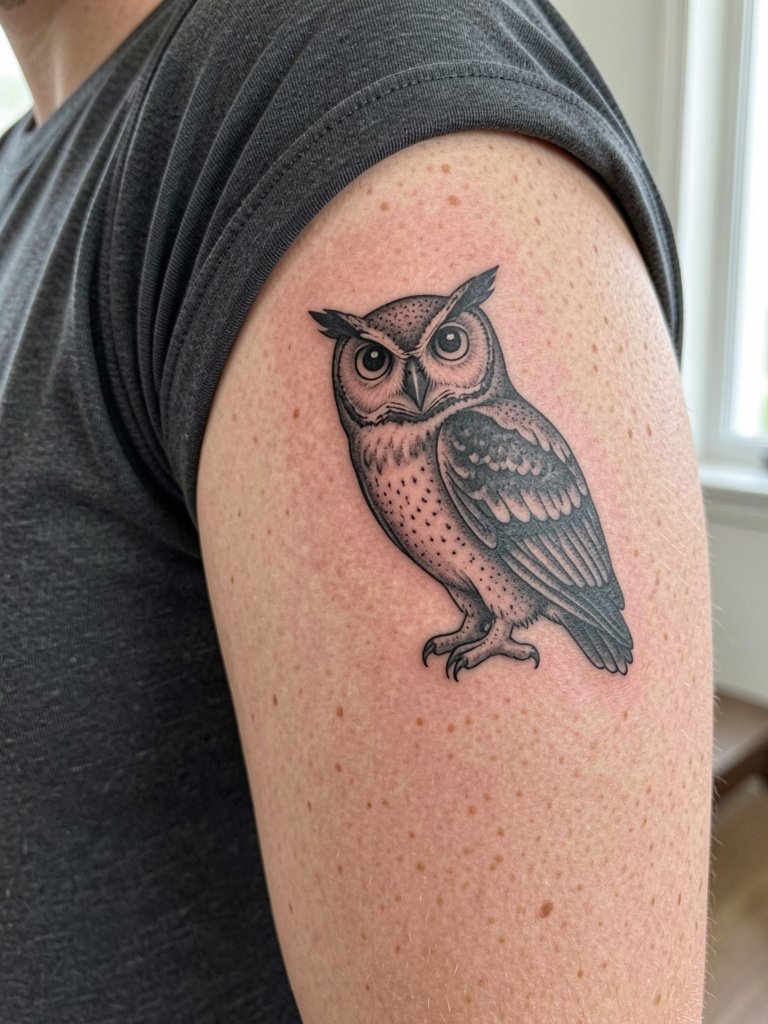
Owl imagery benefits from black and gray shading for mood and readability. Pick illustrative shading over tiny realism if you want detail that lasts under regular wear. Talk with the artist about feather contrast and stipple density so eyes remain crisp in healed photos. Upper arm sessions are moderate and heal well. To frame this piece, wear an open overshirt or fitted tee so the owl can peek from under sleeve lines.
23. Small Cross-Fade Anchor on the Calf
A shaded anchor on the calf gives you a bit of realism without a large commitment. The mistake is placing soft gradients too small; they can become muddy over time. Request clear highlight areas and slightly stronger edge contrast. Calf sessions are comfortable for most people and healing is straightforward. For seasonal showing, cuffed shorts or cropped trousers work well.
24. Small Geometric Sternum Accent That Can Be Hidden
Sternum accents can be shown or kept private depending on outfits. I recommend black geometry over pastel fills for first-timers who worry about longevity. Ask the artist for a centered mock-up using necklace lengths you commonly wear so the piece plays well under collars. Sessions are sensitive but short when the design is compact. For wardrobe, open-collar shirts or layered chains keep the area elegant when you want it visible; try a layered chain necklace to frame the piece.
25. Small Memorial Text on the Inner Bicep
Inner bicep text is subtle and private but readable when the arm is up. Because the inner bicep is close to friction zones, avoid ultra-thin fonts and request slightly heavier stroke widths. Discuss exact placement relative to the armpit crease so the text won't distort when the arm moves. Sessions here are mild to moderate and healing is straightforward when the arm rests. If the text is commemorative, plan for a small touch-up later rather than relying on the first pass to last unchanged.
26. Tiny Geometric Ring Behind the Ear
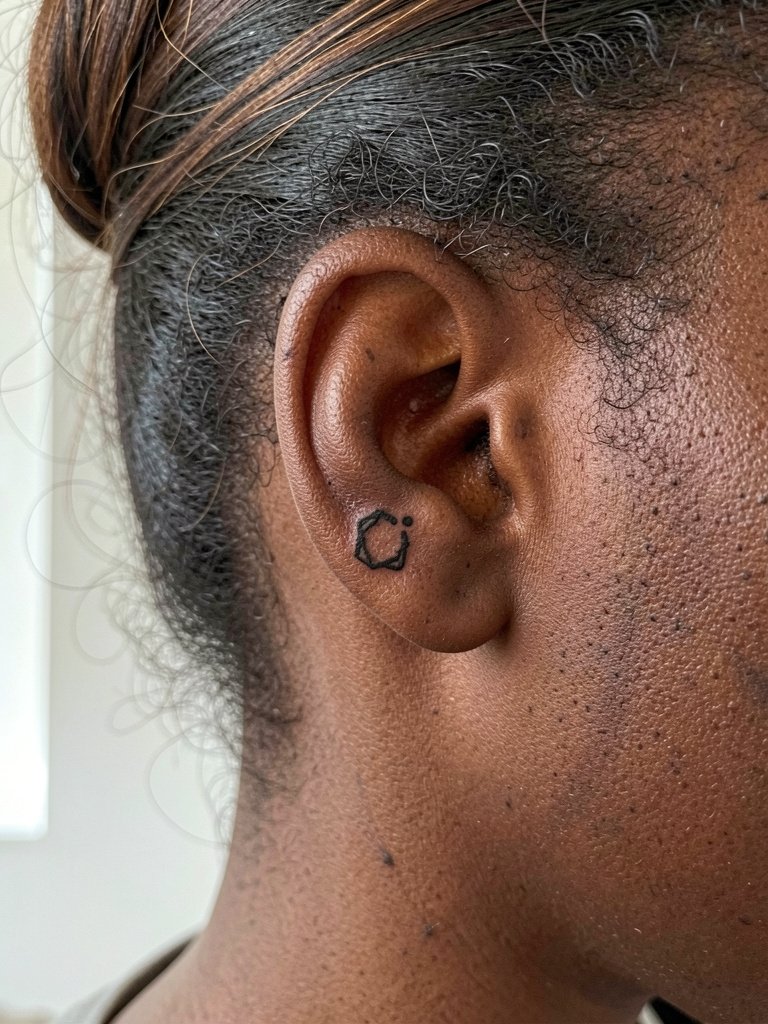
Behind-the-ear work is discrete and small in scale. Because the area is thin, fine line details can blur if cramped. Ask for a simple silhouette with a strong dot center and confirm placement with a mirror at the stencil stage. Sessions are quick and mildly sensitive. This area is best for accents rather than detailed subjects, and hair style choices affect how often others will see it.
27. Small Vertical Text on the Outer Upper Thigh
Outer upper thigh text is a private-first placement that still lets you wear longer shorts when you want it seen. The major error is choosing typography too thin for the thicker skin there; a modestly bold face prevents premature loss of contrast. Thigh sessions are generally tolerant and heal with minimal day-to-day irritation. For the appointment, wear loose shorts that the artist can roll without pinching or pressure on the area.
Frequently Asked Questions
Q: How do I find a reliable artist near me without relying on Instagram handles?
A: Start by searching healed-portfolio galleries on studio websites and booking platforms, then cross-check festival and guest-spot lineups for specialists in the style you want. Reddit communities are useful for candid accounts and healed photos, and searching "[your city] + fine line tattoo studio" or "[your city] + traditional tattoo shop" will surface local shops that post healed work.
Q: Will fine-line tattoos fade faster than bold outlines, and which camp is right?
A: Artists split into two camps on this. One camp warns that single-needle fine-line pieces can soften or blur sooner, especially in high-motion spots, and they recommend slightly heavier line weight for longevity. The other camp says fine-line tattoos settle well with correct depth, spacing, and placement, and they point to healed examples that have held up for years.
Q: What should I wear to my appointment for an upper chest, shoulder, or ribcage session?
A: For upper chest pick a button-down or a deep crew-neck tee you can pull down easily without tugging across the area. For shoulder bring a tank or muscle tank so the artist can work unobstructed. For ribcage choose a loose button-up or gym-style shorts so the artist can lift fabric without friction during the session. A simple linen button-down works for forearm and shoulder access.
Q: Are second-skin dressings better than dry healing for first-timers?
A: Opinions split into two camps here. One group favors second-skin dressings because they limit friction and keep the area protected during the critical first days. The other group prefers traditional wash-and-moisturize or dry healing for some skin types, noting adhesives can irritate or trap excess fluid. Consider your skin history and ask for a clear day-by-day care plan from the studio.
Q: How soon should I plan for a touch-up on fine-line or micro-realism pieces?
A: Expect that fine-line single-needle work often needs a gentle touch-up between 12 and 24 months if you want the original crispness maintained. Micro-realism portraits may need a touch-up sooner if they are in high-motion or high-sun areas. A scheduled check at one year helps you decide whether a touch-up will extend clarity.
Q: Do I need anything specific for showing off a forearm or wrist tattoo?
A: Solid colors and rolled sleeves help forearm and wrist tattoos read cleanly. For wrist pieces consider a slim watch on the opposite wrist or a thin chain bracelet to balance attention. A plain crew neck tee or a short sleeve work shirt complements bold linework without competing visually.
Q: Can darker skin tones get fine-line tattoos and which styles work best?
A: Darker skin tones can wear fine line, but high-contrast blackwork and slightly bolder outlines often translate more reliably across time. For very delicate detail choose slightly larger scale and ask the artist to show healed examples on similar skin. Many clients prefer black and gray for durability while keeping design clarity.
